1
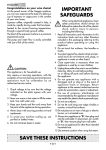
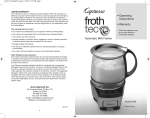
Stainless Steel Espresso &
Cappuccino Maker
User Manual
HPE20SS
Quality • Innovation • Style
English
IMPORTANT SAFEGUARDS
When using electrical appliances, basic safety precautions
should always be followed, including the following:
1. Read all instructions carefully.
2. Do not touch hot surfaces. Use handles or knobs.
3. To protect against fire, electric shock and injury to persons do not
immerse cord, plug or unit in water or other liquids.
4. Close supervision is necessary when any appliance is used by or
near children.
5. Unplug from outlet when not in use and before cleaning. Allow
cooling before putting on or taking off parts and before cleaning the
appliance.
6. Do not operate any appliance with a damaged cord or plug, or after
the appliance malfunctions or has been damaged in any manner.
Return appliance to the nearest authorized service facility for
examination, repair or adjustment.
7. The use of accessory attachments not recommended for use with
appliance may cause injuries.
8. Do not use outdoors.
9. Do not let cord hang over edge of table or counter, or touch hot
surfaces, including the stove.
10. Do not place on or near a hot gas or electric burner, or in a heated
oven.
11. To disconnect, turn all controls to “Off”, then remove plug from wall
outlet.
12. Use extreme caution when dispensing hot steam.
1
English
13. Scalding may occur if the filter holder is removed during the
brewing cycle.
14. Do not use the appliance for other than intended use.
15. Do not clean the espresso machine with scouring powders, steel
wool pads, or other abrasive materials.
SAVE THESE INSTRUCTIONS
HOUSEHOLD USE ONLY
Polarized Plug
This appliance is equipped with a polarized plug (one blade is wider than
the other). To reduce the risk of electric shock, this plug is intended to fit
into a polarized outlet only one way. This is a safety feature. If the plug
does not fit fully into the outlet, try reversing the plug. If it still does not fit,
contact a qualified electrician for assistance. Do not attempt to modify this
plug in any way. Do not attempt to defeat the safety purpose of this
polarized plug.
A s h o r t p o w e r - s u p p l y c o r d is provided to reduce the risk resulting
from becoming entangled in or tripping over a longer cord. Avoid the use
of an extension cord because it may overheat and cause a risk of fire.
However, if you must use an extension cord, the marked electrical rating
should be at least as great as the electrical rating of the appliance. The
longer cord should be arranged so that it will not drape over the countertop or tabletop where it can be pulled on by children or tripped over.
Thank you for using our Haier
product. This easy-to-use manual
will guide you in getting the best
use of your espresso machine.
Remember to record the model and
serial number. They are on a label
on the bottom of the product.
Model number
Date of purchase
Staple your receipt to your manual.
You will need it to obtain warranty service.
2
English
TABLE OF CONTENTS
PAGE
Important Safeguards ....................................................................1
Parts and Accessories......................................................................4
Before Using for the First Time ......................................................5
Operation ..............................................................................................6
Filling the Water Tank ................................................................................6
Preheating the Espresso Machine ................................................................6
How to Prepare Espresso Coffee ................................................................7
How to Make Cappuccino ..........................................................................8
Cleaning and Maintenance ............................................................9
Cleaning the Steam Nozzle ........................................................................9
Other Cleaning Operations........................................................................9
Descaling ................................................................................................10
Cleaning After Long Periods of Non-Use ..................................................10
Troubleshooting ............................................................................12
Limited Warranty ..........................................................................12
3
English
PARTS AND ACCESSORIES
6
1
2
7
3
8
4
5
9
10
11
1. Green Light
7. Steam Knob
2. Red Light
8. Water Tank
3. Upper Switch
9. Swing-out Steam Nozzle
4. Lower Switch
10. Removable Drip Tray
5. Filter Holder with Protective
Thumb Guard
11. 1 Cup Filter
12. 2 Cup Filter (not shown)
6. Clear Upper Cover
4
English
BEFORE USING FOR THE FIRST TIME
• When using the machine for the first time, wash the water tank and
all accessories (i.e. filter holder, steam nozzle, etc.) in hot soapy
water. Rinse thoroughly and wipe dry.
• Place the espresso machine on a dry, level surface at a safe distance
away from taps and sinks.
• Check that the voltage of the electrical power line corresponds to that
indicated on the appliance rating label.
• In the event of incompatibility between the plug on the appliance and
the outlet, contact a qualified professional for assistance. If the cord
is damaged or requires replacing, contact a service center authorized
by the manufacturer only.
• Never install the machine in an environment that can reach a
temperature less than or equal to 32˚F. If the water in the machine
freezes, the espresso machine may become damaged.
• To ensure the best tasting coffee, the internal circuits must also be
flushed thoroughly at least 5 five times. Follow the directions below in
the “How to Prepare Espresso Coffee” section using only water
instead of coffee and repeat five times. Then, follow the directions
below in the “How to Make Cappuccino” section using water instead
of milk and repeat five times.
5
English
OPERATION
Filling the Water Tank
Warning! Never operate the appliance without water in the tank.
Always remember to fill the tank when the water level is low
but be careful not to exceed the MAX level mark.
To remove the water tank, simply pull out the tank and fill it with water.
Do not exceed the MAX level indicated on the water tank. To fill the
tank without fully removing it, pull it out halfway and pour water directly
into it from a jug. Replace the tank, making sure the arrow and dots on
the tank are aligned with the arrow and dots on the housing, then push
into place.
Preheating the Espresso Machine
To ensure that your espresso coffee is dispensed at the correct
temperature, it is essential that the espresso machine be preheated.
• Turn on the upper switch by pressing down on the right side of the
button. The red light next to the “
“ symbol will turn on.
• Attach the empty filter holder to the machine by positioning it under
the boiler outlet with the arrow on the handle pointing towards the
left arrow (open) on the housing. Push upwards and at the same time
turn the handle to the right so that it points to the triangle marking at
the center of the housing (close).
• Position a cup under the filter holder. Use the same cup that the
coffee will be served in, so that it may be preheated.
• Turn on the lower switch for about 20 seconds, then turn off so as to
partially fill the boiler. Some water may drip out from the dispensing
holes on the filter holder.
• Wait until the green ”OK” light comes on, then turn on the lower
switch. Allow water to flow until the green “OK” light turns off, then
stop the flow of water by turning off the lower switch.
• Empty the cup, wait until the green “OK” light turns on again and
repeat the process.
6
English
How to Prepare Espresso Coffee
Hints and Tips
• Preheating the machine will ensure that your coffee is dispensed at
the correct temperature.
• It is important to use a high quality ground coffee with a fine grind in
order to avoid obstruction of the filter during brewing.
• Always make sure the filter is clean before filling with coffee grinds.
• Espresso is a strong dark coffee with a distinctive caramel colored
froth known as the “crema”. Tamping the grinds will give a better
quality espresso. If the grind is not pressed enough, it will come out
too quickly and the crema will be light in color.
• Espresso coffee is best served in small demitasse cups, with a halfcup being the ideal serving size (approx. 1-1/2 to 2 fl. oz.).
7
1. Preheat the espresso cups by placing them on top of the machine
under the clear upper cover.
2. After preheating of the machine as described in the preceding section, insert either the 1 or 2-cup filter depending on the number of
cups of espresso being made. Make sure that the filter is clean and
dry. To make just one cup of espresso, insert the 1-cup filter into the
filter holder and fill it with one level measuring spoon of ground coffee - about 0.25 oz. To make two cups of espresso, insert the 2-cup
filter into the filter holder and fill with two level measuring spoons of
ground coffee - about 0.50 oz.
3. Remove any excess coffee grind from the filter holder rim. Tamp
down the grinds in a slight twisting motion with the tamping tool (the
flat end of the measuring spoon) and attach the filter holder to the
machine by positioning it under the boiler outlet with the arrow on
the handle pointing towards the left arrow (open) on the housing.
Push upwards and turn the handle to the right so that it points to the
triangle marking at the center of the housing (close).
Note: To use a single-serve coffee pod, place the pod into the 1-cup
filter and attach the filter holder to the machine.
4. Place the cup or cups on the removable drip tray. Ensure that the cup
or cups line up with the dispensing holes on the filter holder.
5. Wait until the green “OK” light comes on, then turn the switch to the
espresso function
until the desired amount of espresso has been
brewed (approx. 1-1/2 to 2 fl. oz. or 1/2 “demitasse” cup). Then
turn the switch back to the original position.
6. Once the machine has stopped dispensing the espresso, turn the
handle of the filter holder from the right to left to detach it.
7. To remove the used coffee grinds, lock the filter in place with the
protective thumb guard that is built into the handle and knock the
coffee grounds out of the overturned filter holder. Wipe any leftover
grounds from the filter with a towel.
8. After removing the filter holder, place a cup on the removable drip
tray and press the
button for a couple seconds to clean out the
system.
9. To brew more espresso, repeat all the steps above. Otherwise, turn
off the espresso machine.
English
How to Make Cappuccino
1. Turn on the upper switch. The red light next to the “
“ symbol will
turn on. Then turn on the lower switch for about 20 seconds to let
the boiler fill partially, then turn off. Some water will drip out from
the dispensing holes on the filter holder. Wait until the green “OK”
light comes on, indicating that the boiler has reached the ideal
temperature for producing steam.
2. In the meantime, fill a container 1/4 full of milk (approx. 3 fl. oz. for
each cappuccino to be prepared). When choosing the container,
keep in mind that the volume of the milk will increase by 2 or 3
times. Cold low fat milk (not skim) will yield the best results.
3. Hold an empty container under the steam nozzle and open the
steam knob for a moment by turning counter-clockwise. Continue
until only steam comes out. This will purge any excess water from the
line. Close the steam knob by turning clockwise until it stops.
4. Position the container with milk under the steam nozzle and immerse
the tip of the steam nozzle about 3/4” into the milk and turn the
steam knob in a counter-clockwise direction. Hold the container at
an angle so that the steam creates a swirling motion in the froth.
Adjust the amount of steam that comes out from the steam nozzle by
turning the steam knob. The farther the steam knob is rotated, the
greater the volume of steam that will be released.
5. The milk will begin to increase in volume and will begin to appear
frothy. The container will need to be lowered as the froth increases in
volume. If there are large bubbles or if the milk begins to splatter,
lower the nozzle into the milk. When the froth has expanded to
about 3/4 the volume of the container, lower the steam nozzle into
the container to finish steaming the milk.
6. Once the milk has been frothed, keep the steam nozzle immersed in
the froth and turn off the steam by turning the steam dial in a
clockwise direction until it stops. Remove the steam nozzle from the
container of frothed milk.
7. It is very important to clean the steam nozzle immediately after each
use by wiping it with a damp cloth. Since milk residuals build up in
the tip of the steam nozzle after frothing the milk, this will prevent the
steam nozzle from clogging and will ensure perfect frothing results.
However, should the steam nozzle become clogged, follow the
directions in the section describing “Cleaning the Steam Nozzle”.
8. Follow the instructions above in the “How to Prepare Espresso
Coffee” section using a cup that is large enough for cappuccino to
brew a single shot of espresso. Pour the frothed and steamed milk
into the cup of espresso slowly and add sugar to taste. Put on the
finishing touch with a sprinkle of powdered chocolate, cinnamon or
nutmeg on top of the froth.
8
English
CLEANING AND MAINTENANCE
It is essential to keep the espresso machine clean in order to brew the
best tasting espresso. Stale coffee oils and leftover milk on the steam
nozzle will ruin the flavor of the espresso. Before cleaning, turn off the
machine, unplug it, and allow it to cool down. The machine can be
wiped clean with a damp cloth.
C a u t i o n ! Never immerse the body of the machine in water or any
other liquid. Clean the brewing head with a damp cloth and remove
any coffee grounds.
Cleaning the Steam Nozzle
Clean the steam nozzle after each use, otherwise the inside of the
nozzle will become clogged and the milk deposits on the outside will
harden and become difficult to remove.
• Remove the frothing sleeve from the steam nozzle by pulling
downwards.
• The frothing sleeve should be washed in warm, soapy water. Make
sure that all openings on the sleeve are free of milk residue. Wipe the
outside of the nozzle with a soft damp cloth.
• If clogging does occur, remove the milk residue using a sewing
needle, then rinse under the faucet and allow the nozzle to dry
thoroughly.
• Or turn the espresso machine on and wait until the “OK” light turns
on. Then point the steam nozzle into an empty cup and open the
steam valve for a few seconds by turning the steam knob counterclockwise. Then close the valve. Any milk residue will be flushed out.
Other Cleaning Operations
Caution! During cleaning, never immerse the unit in
water - it is an electrical appliance.
1. Do not use abrasive solvents or detergents and scouring pads to
clean the espresso machine and accessories. Use a soft, damp cloth
to wipe dry .
2. Remove the drip tray, filters, filter holder and wash them periodically.
3. Clean the water tank thoroughly.
9
English
Descaling
Calcium buildup (“scale”) should be cleaned from the machine every 4
months as this deposit could compromise the quality of the espresso as
well as the functioning of the machine components. The formation of
scale depends on the local hard-water conditions and on how much the
espresso machine is used. It is recommended that specific
(store-bought) products for descaling of espresso coffee machines be
used. If such products are not available, it is possible to proceed as
follows:
1. Fill the tank with 1 quart of water.
2. Dissolve 2 spoonfuls (about 1 ounce) of citric acid in the water
(available at pharmacies).
3. Turn on the upper switch and wait until the green “OK” light comes
on.
4. Check that the filter holder is not attached and place a container
under the outlet of the machine.
5. Turn on the lower switch and allow half of the solution in the tank to
flow out. Then stop the flow by turning off the lower switch.
6. Allow the solution to sit for about 15 minutes, then start up the flow
again and repeat until the tank is completely empty.
7. To eliminate the remaining solution and the calcium, rinse the tank
well, fill it with clean water and replace.
8. Turn on the lower switch and allow all of the remaining solution in
the tank to flow out.
9. Turn on the upper switch and repeat number 7 and 8 one more
time.
N o t e : Repairs for malfunctioning caused by problems of calcium
build-up are not covered by the warranty if the descaling
process described above is not carried out regularly.
Cleaning After Long Periods of Non-Use
Wipe the espresso machine and all accessories with a soft, damp cloth.
Follow instructions in the “Descaling” section and the “Before Using for
the First Time” section to prepare the machine for usage.
10
English
TROUBLESHOOTING
PROBLEM
Espresso coffee no longer
comes out.
POSSIBLE CAUSES
•Lack of water in the tank.
•Fill the water tank.
•The holes in the filter
holder spouts are blocked.
•Clean the holes in the spouts.
•The tube is not put in the tank or
is blocked.
Espresso coffee drips from
•The filter holder was improperly
the edges of the filter holder, inserted.
instead of from its holes.
The espresso coffee is cold.
•The holes in the filter
holder spouts are blocked.
•Clean the holes in the spouts.
•The “OK” pilot light was not on
when the coffee delivery switch
was pressed.
•Wait until the “OK” pilot light
comes on.
•Carry out the preheating as
indicated in the “Preheating the
Espresso Machine” section.
•The cups were not
preheated.
•Preheat the cups by rinsing
them in hot water or put the
cups on the top under the clear
upper cover.
•The water tank is empty.
•Fill the tank.
•The tube is not put in the tank or
is blocked.
•Put tube in the tank and
position correctly.
insufficient.
•The coffee is not ground finely
enough.
•The ground coffee is too tightly
pressed.
•Too much ground coffee has
been added.
•The coffee is too finely ground.
The coffee has an acidic
taste.
•Attach the filter holder correctly
and turn it all the way.
•Have the espresso boiler gasket
replaced at a service center.
The crema is light- colored
•The ground coffee has not been
(the coffee comes out quickly pressed enough.
from the spout).
•The quantity of ground coffee is
The crema is dark (the
coffee comes out slowly
from the spout).
•Put tube in the tank and
arrange correctly.
•The gasket of the espresso boiler
has lost elasticity.
•The preheating was not carried
out.
The pump is too noisy.
SOLUTIONS
•Tamp the ground coffee down
more.
•Increase the quantity of coffee
grinds.
•Only use coffee specifically
ground for espresso coffee
machines.
•Press the coffee less.
•Decrease the quantity of
ground coffee.
•Only use coffee specifically
ground for espresso coffee
machines.
•The unit was not sufficiently
rinsed after the descaling process
procedure.
•Rinse the unit as described in
the “Descaling” section.
•The milk is not cold enough.
•Always use milk at refrigerator
temperature.
The milk does not froth
when making a cappuccino. •The espresso machine is dirty.
•Carefully clean the pinholes in
the milk frother.
11
English
LIMITED WARRANTY
Full One Year
This warranty covers all defects in
workmanship or materials for a period
of 12 months from the date of
purchase, provided you are able to
present a valid proof-of-purchase (the
original receipt)
Exceptions: Commercial or Rental Use
Warranty is 90 days from date of
original purchase.
This warranty covers appliances within
the Continental United States, Puerto
Rico and Canada.
What is not covered by this
warranty:
Damage from other than normal use
or improper installation.
Damage from misuse, abuse, accident,
alteration, lack of proper care and
maintenance.
Failure caused by build-up of food
matter or water deposits.
Product, whose rating label has been
removed or altered.
Product serviced by other than
authorized service center.
Replacement or repair of household
fuses, circuit breakers or wiring.
Labor, shipping charges and
replacement of defective parts beyond
the initial 12-month period.
Do not return this product to the store.
If you need assistance with this
product, please contact Haier
Customer Satisfaction Service at
1-877-337-3639 between 9:00 AM
and 5:00 PM (EST) Monday to Friday.
Before calling, please have the
following information available:
Model number of your appliance. The
name and address of the store you
purchased the unit from and the date
of purchase. A clear description of the
problem.
Haier will repair or replace any part
free of charge including labor that fails
due to a defect in materials or
workmanship, or replace with a
comparable model.
THIS LIMITED WARRANTY IS
GIVEN IN LIEU OF ALL OTHER
WARRANTIES, EXPRESSED OR,
INCLUDING THE WARRANTIES OF
MERCHANTABILITY AND FITNESS
FOR A PARTICULAR PURPOSE.
The remedy provided in this warranty is
exclusive and is granted in lieu of all
other remedies.
This warranty does not cover incidental
or consequential damages, so the
above limitations may not apply to
you. Some states do not allow limitations on how long an implied warranty
lasts, so the above limitations may not
apply to you.
This warranty gives you specific legal
rights, and you may have other rights,
which vary, from state to state.
Haier America
New York, NY 10018
12
IMPORTANT
Do Not Return This Product To The Store
If you have a problem with this product, please contact the "Haier Customer Satisfaction
Center" at 1-877-337-3639.
DATED PROOF OF PURCHASE REQUIRED FOR WARRANTY SERVICE
115V, 60 Hz
Made in China
Haier America
New York, NY 10018
Printed in China
Issued: June - 06
Part # SE-8888-08