1
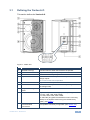
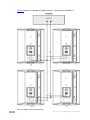
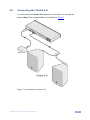
3. Pass the speaker wires through the round hole in the mounting bracket (see Section 4.3). 4. Adjust each speaker to the appropriate tap setting (see Figure 2). Set the tap according to the power requirements of the speaker based on its location in the room (for example, a speaker located in a remote corner may require additional power) Figure 2: Adjust Tap Selector 5. Connect one of the + and – terminal block pairs on the rear panel (see Figure 1) by connecting the wire from the: Negative terminal on the receiver into the negative terminal block of the speaker Positive terminal on the receiver into the positive terminal block of the speaker 6. Repeat step 5 for the other speaker (see Figure 7). 7. If required, connect the + and - terminal blocks to the + and - terminal blocks to an adjacent speaker (as illustrated in the example in Figure 6). 4.3 Installing the Mounting Bracket To install the mounting brackets, do the following: 1. Mark the location of the mounting holes on the wall. 2. Screw the mounting screws onto the wall at the location that you want to mount the speakers. If the location is backed by wall studs, you can use the wood screws provided. If the location is backed by a gypsum board, use wall anchors (not included in the package). Yarden 6-O - Installing the Yarden 6-O 7