1
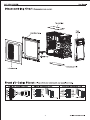
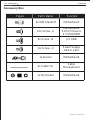
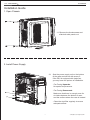
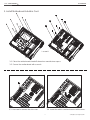
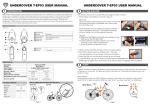
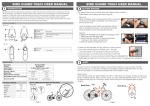
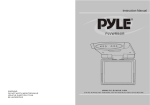
CASE CHALLENGER-
User Manual
Top I/O
Audio
HD AUDIO connector
HD AUDIO connector
to M/B (1 Audio Connection per M/B,
please check HD Audio)
USB 3.0
USB
USB 2.0
to M/B
to M/B
Power LED
Reset Button
POWER LED+
Reset SW
POWER LED-
to M/B
to M/B
Power Button
POWER SW
to M/B
3
© All rights reserved by Rosewill
CASE CHALLENGER-
User Manual
Accessory Box
Figure
Part’s Name
Function
9x M/B Standoff
Motherboard
12x Screw - A
Motherboard
5.25/3.5 Device
2.5 SSD/HDD
9x Screw - B
3.5 HDD
4x Screw - C
Power Supply
Add-in Card
1x Buzzer
Motherboard
3x Cable Tie
Cable
Management
1x Nut Setter
Motherboard
4
© All rights reserved by Rosewill
CASE CHALLENGER-
User Manual
Installation Guide
1. Open Chassis
1-1 Remove the thumbscrews and
slide both side panels out.
2. Install Power Supply
2-1 Seat the power supply unit on the bottom
of the case and secure with screw-C.
If the PSU is equipped with single fan,
you may have two options of installation:
- Fan Facing Upwards:
No special requirements.
- Fan Facing Downwards:
Make sure that there is enough room for
air-intake between the bottom of case
and the surface where the case is located.
- Clean the dust filter regularly to ensure
adequate airflow.
5
© All rights reserved by Rosewill
CASE CHALLENGER-
User Manual
3. Install Motherboard & Add-in Card
* screw A
3-1 Place the motherboard standoffs based on manufacturer specs.
3-2 Secure the motherboard with screw-A.
3-3 Unscrew to remove the slot cover.
3-4 Install the add-in card and secure with screws.
6
© All rights reserved by Rosewill
CASE CHALLENGER-
User Manual
5. Install 3.5”/2.5” HDD/SSD
5-1 Insert the 3.5” HDD into the cage
until the latch clicks.
5-2 Remove the thumbscrew to retrieve the 2.5” bay.
5-3 Secure the 2.5” SSD/HDD with screw-A.
5-4 Install back with the thumbscrews.
6. System Ready
6-1 Slide the side panels back and
secure with thumbscrews.
8
© All rights reserved by Rosewill
CASE CHALLENGER-
User Manual
7. Clean the dust filters
7.1 Clean the dust filter regularly to ensure adequate airflow for power supply unit.
(Unscrew to remove the top dust filter.)
9
© All rights reserved by Rosewill
CASE CHALLENGER-
User Manual
9. Optional: Additional Fan & Liquid Cooling Radiator
Challenger S has the capacity of installing additional fans :
a. 2x 120mm fans under top cover.
b. 2x 140mm fans on the side panel.
Insturction of installing 120mm water cooling radiator in the front :
a. Remove the front panel.
b. Unscrew to remove the 2.5” SSD/HDD tray on the bottom of the 5.25” cage.
c. Secure the radiator with screws and put the front panel back.
10
© All rights reserved by Rosewill