1
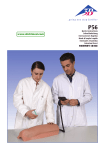
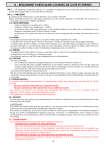
P56
Quick instructions
Schnellanleitung
Instrucciones Rapidas
Mode d’emploi rapide
Instruções resumidas
Istruzioni brevi
Intramuscular Injection Simulator-Upper Leg
English
Thank you for choosing a 3B Scientific product. Please read the user manual carefully before using the unit
to ensure a flawless operation and to enable you to work in a satisfactory way with this product.
Detailed instructions for usage are contained on the supplied CD ROM.
OFF
ON
1
2
C
Training
T
Control
4
5
3
6
7
1. Quick instructions
1
Status light (red LED) for battery
2
Start button
3
T button (training mode)
4
Status indicator (yellow LED) for T button
5
Status indicator (yellow LED��������������
) for
������������
C button
6
C button (control mode)
7
Result indicator (red or green LED)
®
1.1 Turning the unit ON
Before using the unit for the first time please insert the supplied batteries (2x AA) (see operating
instructions on CD ROM p. 4/ 2.4)
Info: Status light (battery) Status light (battery) Status light (battery) is off shows solid red
flashes red
battery is okay
battery is running low
please change battery
Press the Start button. All LEDs will now light up for the functional control phase.
When the Status indicator (for the T button) lights up this is a signal that the unit is ready for operation. (see operating instructions on CD ROM p. 6/ 3.1.2)
English
Intramuscular Injection Simulator-Upper Leg
Error message
Failing to connect the thigh to the control unit or to place the foam core correctly on the bone (e.g. because the thigh formation is dispersed), results in an error message in the form of a triple bleep. After this, the
result indicator flashes red and green alternately.
1.2 T button / C button
You can select either the training mode or the control mode. Please press the T button for the training
mode and the C button for the control mode.
T
In the training mode (T button), you will immediately receive feedback as follows while
administering the injection:
• positive feedback (result indicator (LED green) when you have performed the injection into the
muscle correctly,
• negative feedback (result indicator (LED red) + acoustic signal) when you hit the bone.
C
In the control mode (C button) you will receive no feedback while performing an injection into the
muscle. The result will be saved and you have to press the C button again to check whether you
have carried out the intramuscular injection correctly or incorrectly. You will receive
• positive feedback (result indicator (LED green)) when you have performed the intramuscular
injection correctly,
• negative feedback (result indicator (LED red)) when you have performed the injection incorrectly.
When you hit the bone while injecting, you will immediately receive negative feedback (result
indicator (LED red) + acoustic signal).
®
1.3 Matrix of the result indicator
Result indicator
(training mode)
Result indicator
(control mode)
Correct injection/site
green
green
Incorrect injection/site
no signal
red
Not deep enough
no signal
red
Injection into the bone
red
red
1.4 Turning the unit OFF
The unit automatically switches off when it has not been used for a period of two minutes, or can be
manually turned off by simultaneously pressing the T button and the C button.
Intramuskulärer Injektions-Simulator - Oberschenkel
Deutsch
Vielen Dank, dass Sie sich für ein 3B Scientific Produkt entschieden haben. Bitte lesen Sie sich vor
Inbetriebnahme des Gerätes die Bedienungsanleitung sorgfältig durch, damit ein störungsfreier Betrieb
gewährleistet ist und Sie mit diesem Produkt zufriedenstellend arbeiten können.
Eine ausführliche Betriebsanleitung finden Sie auf der beigefügten CD Rom.
OFF
ON
1
2
3
C
Training
T
Control
4
5
6
7
1. Schnellanleitung
1
Kontrollanzeige (LED rot) für Batterie
2
Starttaste
3
T-Taste (Trainingsprogramm)
4
Statusanzeige (LED gelb) für T-Taste
5
Statusanzeige (LED gelb) für C-Taste
6
C-Taste (Kontrollprogramm)
7
Ergebnisanzeige (LED rot oder grün)
®
1.1 Einschalten des Gerätes
Bei erster Inbetriebnahme setzen Sie die mitgelieferten Batterien (2x-AA) ein (siehe Bedienungsanleitung
auf CD-ROM S. 4/ 2.4)
Info: Kontrollanzeige (Batterie)
Kontrollanzeige (Batterie)
Kontrollanzeige (Batterie)
leuchtet nicht auf
leuchtet rot auf
blinkt rot auf
Batterie in Ordnung
Batterie schwach
Batterie auswechseln
Drücken Sie die Starttaste. Jetzt leuchten alle LED zur Funktionskontrolle auf.
Das Aufleuchten der Statusanzeige (für T-Taste) signalisiert, dass das Gerät betriebsbereit ist
(siehe Bedienungsanleitung auf CD-ROM S. 6/ 3.1.2)
Deutsch
Intramuskulärer Injektions-Simulator - Oberschenkel
Fehlermeldung
Ist der Oberschenkel nicht an das Bedienteil angeschossen, oder liegt der Schaumkern nicht richtig auf
dem Knochen auf (z.B. Weil der Oberschenkel auseinander gebaut ist) erfolgt als Fehlermeldung ein
dreimaliges Piepen. Danach blinkt die Ergebnisanzeige abwechselnd Rot-Grün.
1.2 T-Taste / C-Taste
Sie können zwischen dem Trainings- und Kontrollprogramm wählen. Drücken Sie bitte die T-Taste für
Trainingsprogramm bzw. die C-Taste für Kontrollprogramm.
T Im Trainingsprogramm (T-Taste) erhalten Sie unmittelbar während der Injektion
• eine positive Rückmeldung (Ergebnisanzeige (LED grün)), wenn Sie die Injektion in den Muskel richtig durchgeführt haben,
• eine negative Rückmeldung (Ergebnisanzeige (LED rot) + akustisches Signal), wenn Sie den
Knochen treffen.
C Im Kontrollprogramm (C-Taste) erhalten Sie während der Injektion in den Muskel keine
Rückmeldung. Das Ergebnis wird gespeichert und Sie erfahren erst durch erneutes Drücken der
C-Taste, ob Sie die intramuskuläre Injektion richtig bzw. falsch durchgeführt haben. Sie erhalten
• eine positive Rückmeldung (Ergebnisanzeige (LED grün)), wenn Sie die intramuskuläre
Injektion richtig durchgeführt haben,
• eine negative Rückmeldung (Ergebnisanzeige (LED rot)), wenn Sie die Injektion nicht richtig
durchgeführt haben.
Bei einer Injektion auf den Knochen erhalten Sie unmittelbar eine negative Rückmeldung
(Ergebnisanzeige (LED rot) + akustisches Signal).
®
1.3 Matrix der Ergebnisanzeige
Ergebnisanzeige
(Trainingsprogramm)
Ergebnisanzeige
(Kontrollprogramm)
Richtige Injektion/Stelle
grün
grün
Falsche Injektion/Stelle
keine Anzeige
rot
Unzureichende Tiefe
keine Anzeige
rot
Injektion in den Knochen
rot
rot
1.4 Ausschalten des Gerätes
Das Gerät schaltet sich nach zwei Minuten Inaktivität automatisch ab oder kann durch das gleichzeitige
Drücken von der T-Taste und C-Taste manuell ausgeschaltet werden.
Simulador de inyecciones intramusculares-muslo
Español
Muchas gracias por elegir un producto 3B Scientific. Por favor, antes de utilizar el aparato, lean
atentamente las instrucciones para su empleo a fin de conseguir que el funcionamiento de este producto
sea satisfactorio al máximo.
En el CD Rom adjunto, usted encontará un explicación detallada sobre el funcionamiento.
OFF
ON
1
2
3
C
Training
T
Control
4
5
6
7
1. Instrucciones Rapidas
1
Indicador de control (LED rojo) de la batería visión-display
2
Tecla de inicio
3
Tecla T (programa de entrenamiento)
4
Señal de situación (LED amarillo) para tecla T
5
Señal de situación (LED amarillo) para tecla C
6
Tecla C (programa de control)
7
Señal de resultado (LED rojo o verde)
®
1.1 Conexión de aparato
En la puesta en marcha por primera vez, usted debe colocar las baterías que ya vienen con el aparato
(2x-AA), (vea instrucciones para el manejo en CD-ROM 4/ 2.4).
Info: Señal de control (batería)
Señal de control (batería)
Señal de control (batería)
no se ilumina
se ilumina en rojo
parapadea en rojo
batería correcta
batería baja
batería agotada
Presione la tecla de inicio. Ahora se iluminan todos LED para controlar la función. El encendido de
la señal de situación (para la tecla T) indica que el aparato está preparado (vea instrucciones para el
manejo en CD-ROM 6/ 3.1.2).
Español
Simulador de inyecciones intramusculares-muslo
Aviso de error
Si el muslo no está unido al dispositivo de control, o si el núcleo de goma espuma no está bien colocado
sobre el hueso (vg. porque el muslo está separado) se emitirán tres pitidos para avisar del error. Después,
la pantalla de resultados parpadea de forma alterna rojo-verde.
1.2 Tecla-T / tecla - C
Usted puede elegir entre el programa de entrenamiento y el programa de control. Por favor, presione la
tecla T para el programa de entrenamiento y la tecla C para el programa de control.
T En el programa de entrenamiento (tecla- T), usted recibe inmediatamente durante la inyección
• un aviso positivo (señal de resultado (LED verde)), cuando usted ha puesto la inyección correctamente en el músculo,
• un aviso negativo (señal de resultado (LED rojo) + señal acústica), cuando usted ha pinchado el hueso.
C En el programa de control (tecla – C), usted no recibe señal alguna cuando da la inyección
en el músculo. El resultado se guarda y, al presionar de nuevo la tecla C, usted sabrá si la inyección intramuscular ha sido realizada correcta o incorrectamente. Usted obtiene
• un aviso positivo (señal de resultado (LED verde)), cuando usted ha puesto la inyección correctamente en el músculo,
• un aviso negativo (señal de resultado (LED rojo)), cuando usted ha puesto la inyección incorrectamente.
Cuando la inyección se pone en el hueso, usted recibe inmediatamente un aviso negativo (señal de resultado (LED rojo) + señal acústica).
®
1.3 Tabla de las señales de resultados
Señales de resultado
(Programa de entrenamiento)
Señales de resultado
(Programa de control)
Inyección/lugar correcto
verde
verde
Inyección/lugar incorrecto
sin señal
rojo
Profundidad insuficiente
sin señal
rojo
Inyección en el hueso
rojo
rojo
1.4 Desconexión del aparato
El aparato se desconecta automáticamente después de dos minutos de inactivaidad o manualmente
presionando a la vez las teclas T y C
Simulateur d’injection intramusculaire-cuisse
Français
Nous vous remercions d‘avoir acheté un produit 3B Scientific. Veuillez lire le mode d‘emploi de l‘appareil
attentivement avant de mettre l‘appareil en service afin d‘assurer un fonctionnement sans problème et
que vous puissiez utiliser ce produit à votre entière satisfaction.
Vous trouverez un mode d‘emploi détaillé sur le CR-DOM ci-joint.
OFF
ON
1
2
C
Training
T
Control
4
5
3
6
7
1. Mode d’emploi rapide
1
Affichage de contrôle (DEL rouge) pour pile
2
Touche de mise en service
3
Touche T (programme d’entraînement)
4
Affichage du statut (DEL jaune) pour touche T
5
Affichage du statut (DEL jaune) pour touche C
6
Touche C (programme de contrôle)
7
Affichage du résultat (DEL rouge ou verte)
®
1.1 Allumer l’appareil
Lors de la première utilisation, utilisez les piles fournies (2x-AA), (cf. mode d’emploi sur le CD-ROM p. 4/ 2.4)
Info : Affichage de contrôle (pile)
Affichage de contrôle (pile)
Affichage de contrôle (pile) pas allumé
rouge
clignotement rouge
la pile est en ordre
pile faible
remplacer la pile
Appuyez sur la touche de démarrage. Toutes les DEL de contrôle des fonctions sont allumées.
L’allumage de l’affichage du statut (pour la touche T) signale que l’appareil est prêt à fonctionner
(cf. mode d’emploi sur le CD-ROM p. 6/ 3.1.2).
Français
Simulateur d’injection intramusculaire-cuisse
Message d‘erreur
Si la cuisse n‘est pas reliée à l‘élément de commande ou si le noyau en mousse n‘est pas posé sur l‘os (par
ex. parce que la cuisse est écartée) un triple sifflement retentit en guise de signal d‘erreur. L‘affichage du
résultat clignote ensuite alternativement en rouge et en vert.
1.2 Touche T / Touche C
Vous pouvez choisir entre le programme d’entraînement et le programme de contrôle. Veuillez appuyer
sur la touche T pour le programme d’entraînement et sur la touche C pour le programme de contrôle.
T Le programme d’entraînement (touche T) vous donne directement pendant l’injection
• une confirmation positive (affichage du résultat (DEL verte)) lorsque vous avez effectué l’injection dans le muscle correctement ;
• une confirmation négative (affichage du résultat (DEL rouge) + signal acoustique) lorsque vous touchez l’os.
C
Le programme de contrôle (touche C) ne vous donne pas de confirmation pendant l’injection dans le
muscle. Le résultat est mémorisé et vous n’apprenez qu’en réappuyant sur la touche C si vous avez
effectué l’injection intramusculaire correctement ou non. Vous recevez
• une confirmation positive (affichage du résultat (DEL verte)) lorsque vous avez effectué l’injection
intramusculaire correctement ;
• une confirmation négative (affichage du résultat (DEL rouge)) lorsque vous n’avez pas effectué
l’injection correctement.
En cas d’injection au niveau de l’os, vous recevez directement une confirmation négative (affichage
du résultat (DEL rouge) + signal acoustique).
®
1.3 Matrice de l’affichage du réultat
Affichage du résultat
(programme d‘entraînement)
Affichage du résultat
(programme de contrôle)
Injection correcte/Site correct
vert
vert
Injection incorrecte/Site incorrect
pas d‘affichage
rouge
Profondeur insuffisante
pas d‘affichage
rouge
Injection au niveau de l‘os
rouge
rouge
1.4 Eteindre l’appareil
L’appareil s’éteint automatiquement au bout de deux minutes d’inactivité ou peut être éteint
manuellement en appuyant en même temps sur la touche T et la touche C.
Simulador de injeção intramuscular-coxa
Português
Muito obrigado por ter dado preferência a um produto da 3B Scientific. Por favor, leia o manual de
instruções com atenção antes de ativar o aparelho para garantir um funcionamento sem falhas e para
que assim possa trabalhar com este produto de modo satisfatório.
Encontrará um manual de instruções detalhado no CD-ROM anexo.
OFF
ON
1
2
C
Training
T
Control
4
5
3
6
7
1. Instruções resumidas
1
Indicador de controle (LED verm.) para a pilha
2
Tecla de início
3
Tecla T (programa de treinamento)
4
Indicador de status (LED amarelo) para a tecla T
5
Indicador de status (LED amarelo) para a tecla C
6
Tecla C (programa de controle)
7
Indicador de resultados (LED verm. e verde)
®
1.1 Ligar o aparelho
Insira as pilhas incluídas no fornecimento (2x-AA) ao ligar o aparelho pela primeira vez (veja o manual de
instruções no CD-ROM, pág. 4/ 2.4)
Informação: Indicador de controle (pilha)
Indicador de controle (pilha)
Indicador de controle (pilha)
não acende
brilha vermelho
pisc vermelho
pilha OK
pilha fraca
trocar a pilha
Pressione a tecla de início. Agora, todos os LED se acendem na função de controle.
O indicador de status aceso (para a tecla T) sinaliza que o aparelho está pronto para entrar em
função (veja o manual de instruções no CD-ROM, pág. 6/ 3.1.2).
Português
Simulador de injeção intramuscular-coxa
Informe de falha
Se a coxa não estiver conectada ao elemento de comando, ou se a espuma central não estiver bem colocada sobre o osso (p.ex., pelo fato da coxa estiver desmontada), sucede-se um sinal sonoro – um ‚bib‘ -- três
vezes. Em seguida, o indicador de resultado pisca vermelho e verde alternadamente.
1.2 Tecla T / Tecla C
Pode escolher entre o programa de treinamento e o programa de controle. Pressione por favor a tecla T
para o programa de treinamento ou a tecla C para o programa de controle.
T No programa de treinamento (tecla T) obterá imediatamente durante a injeção
• um aviso positivo (indicador de resultado (LED verde)) quando tenha realizado a injeção no músculo de maneira correta,
• um aviso negativo (indicador de resultado (LED vermelho)) + sinal acústico) quando tiver atingido o osso.
C
No programa de controle (tecla C) não receberá nenhum aviso durante a injeção no músculo. O
resultado será salvado e só saberá ao pressionar novamente a tecla C se a injeção intramuscular foi
feita de modo correto ou incorreto. Recebe então
• um aviso positivo (indicador de resultado (LED verde)) quando tenha realizado a injeção intramuscular de forma correta,
• um aviso negativo (indicador de resultado (LED vermelho)), quando tenha realizado a injeção de forma incorreta.
No caso de uma injeção no osso receberá imediatamente um aviso negativo (indicador de resultado
(LED vermelho) + sinal acústico).
®
1.3 Matriz do indicador de resultado
Indicador de resultado
(programa de treinamento)
Indicador de resultado
(programa de controle)
Injeção/localização correta
verde
verde
Injeção/localização incorreta
sem indicação
vermelho
Profundidade insuficiente
sem indicação
vermelho
Injeção no osso
vermelho
vermelho
1.4 Desligar o aparelho
O aparelho é desligado automaticamente após dois minutos de inatividade ou pode ser desligado
manualmente apertando-se simultaneamente a tecla T e a tecla C.
Simulatore per iniezioni intramuscolari-coscia
Italiano
Grazie di aver scelto questo prodotto 3B Scientific. Prima di mettere in funzione l’apparecchio vi preghiamo
di leggere con attenzione le istruzioni per l’uso, al fine di evitare possibili disturbi di funzionamento e
per poter usare questo apparecchio in modo soddisfacente.
Le istruzioni per l‘uso dettagliate sono contenute nell‘accluso CD-Rom.
OFF
ON
1
2
C
Training
T
Control
4
5
3
6
7
1. Istruzioni brevi
1
Spia di controllo (LED rosso) per batteria
2
Tasto di avviamento
3
Tasto T (programma di training)
4
Spia di stato (LED giallo) per tasto T
5
Spia di stato (LED giallo) per tasto C
6
Tasto C (programma di controllo)
7
Spia risultato (LED rosso e verde)
®
1.1 Accensione dell’apparecchio
Se mettete in funzione l’apparecchio per la prima volta, per prima cosa inserite le batterie in dotazione
(2x-AA), (vedi istruzioni per l’uso su CD-ROM pag. 4/ 2.4).
Info: spia di controllo (batterie)
spia di controllo (batterie)
spia di controllo (batterie)
non accesa
accesa in rosso
rosso lampeggiante
batteria ok
batteria quasi scarica
sostituire batteria
Premete il tasto di avviamento. Tutti i LED di controllo delle funzioni si accendono.
L’accensione della spia di stato (per il tasto T) segnala che l’apparecchio è pronto ad entrare in
funzione (vedi istruzioni per l’uso su CD-ROM pag. 6/ 3.1.2).
Italiano
Simulatore per iniezioni intramuscolari-coscia
Messaggio d‘errore
Se la coscia non è attaccata all‘interfaccia utente o se il nucleo di gommapiuma non è correttamente
appoggiato sull‘osso (p. es. perché la coscia è staccata), viene emesso un triplo segnale acustico per la
segnalazione dell‘errore. Successivamente l‘indicatore di risultato lampeggia alternativamente in rossoverde.
1.2 Tasto T / tasto C
Si può scegliere tra il programma di training e il programma di controllo. Premete il tasto T per il
programma di training e il tasto C per il programma di controllo.�
T Nel programma di training (tasto T) si riceve immediatamente durante l’iniezione
• un feedback positivo (spia del risultato (LED verde)), se l’iniezione nel muscolo è stata eseguita correttamente,
• un feedback negativo (spia del risultato (LED rosso) + segnale acustico), se si è centrato l’osso.
Nel programma di controllo (tasto C) non si riceve nessun feedback durante l’iniezione nel muscolo.
Il risultato viene memorizzato e solo premendo nuova-mente il tasto C si può sapere se l’iniezione
intramuscolare è stata eseguita correttamente o meno. Si riceve
• un feedback positivo (spia del risultato (LED verde)), se l’iniezione intramuscolare è stata eseguita correttamente,
• un feedback negativo (spia del risultato (LED rosso)) se l’iniezione non è stata eseguita correttamente.
Per l’iniezione sull’osso si riceve immediatamente un feedback negativo (spia del risultato
(LED rosso) + segnale acustico).
C
®
1.3 Matrice della spia risultato
Spia del risultato
(programma di training)
Spia del risultato
(programma di controllo)
Iniezione/punto corretto
verde
verde
Iniezione/punto scorretto
nessuna spia
rossa
Profondità insufficiente
nessuna spia
rossa
Iniezione dell’osso
rossa
rossa
1.4 Spegnimento dell’apparecchio
Dopo due minuti di inattività l’apparecchio si spegne automaticamente oppure si può spegnere
manualmente premendo contemporaneamente il tasto T e il tasto C.
大腿部筋肉注射トレーニング用モデル
日本語
このたびは 3B Scientific 製,P56:大腿部筋肉注射トレーニング用モデルをお買い上げいただきまして誠に
ありがとうございます。ユーザー様ご自身や周りの方々への危害および財産への損害を未然に防ぐため,本
取扱説明書をよくお読みになり,製品を正しくお使いください。より詳細な解説を収録しました,製品付属
のCD-ROM版取扱マニュアルもあわせてお使いください。
*パソコンでのCD-ROMの再生ができないお客様は当社までご連絡ください。印刷したものをお送りさせていただきます。
*CD-ROM版取扱マニュアルはパソコン再生専用です。その他の機器では使用なさらないでください。故障の原因となります。
OFF
ON
1
2
C
Training
T
Control
4
5
3
6
7
1. 各部の名称と基本操作
1
電池残量ランプ(赤)
2
スタートボタン
3
T ボタン(トレーニングモード)
4
トレーニングランプ(黄色)
5
コントロールランプ(黄色)
6
7
C ボタン(コントロールモード)
結果表示インジケーター(赤,緑)
1.1 電源を入れる
ご使用になる前に単 3 乾電池 2 本を本体にセットしてください。
(CD-ROM 版取扱マニュアル 4 ページ 図 2 〜 4 参照)
電池残量ランプが:
点灯しない場合
赤色に点灯している場合
赤色に点滅している場合
正常に動作しています
電池の残量が少なくなっています
電池を交換してください
スタートボタンを押すといったんすべてのランプとインジケーターが点灯します。トレーニングランプのみ
が点灯した状態になると使用可能となります。
(CD-ROM 版取扱マニュアル 6ページ 3.1.2電参照)
大腿部筋肉注射トレーニング用モデル
日本語
エラーメッセージ
コントロールユニットと大腿部の接続が適切になされていない場合や,シミュレーター内部のフォームが骨上
の正しい位置にセットされていない場合,警告音が3回鳴り,赤と緑のランプが交互に点滅します。
1.2 Tボタン / Cボタン
トレーニングモードとコントロールモードのいずれかを選択することができます。トレーニングモードを選択
する場合はTボタンを,コントーロールモードを選択する場合はCボタンを押してください。
T
トレーニングモード(Tボタン)で注射の練習を行うと,穿刺と同時に以下のようなフィードバックが得ら
れます。
• 筋肉に正しく穿刺された場合,インジケーターが緑に点灯します。
• 針先が骨に接触すると,インジケーターが赤く点灯すると同時にアラームが鳴ります。
C
コントロールモード(Cボタン)で注射の練習を行うと,穿刺中はインジケーターは点灯しません。代わり
に練習の結果が保存されます。保存されたデータはCボタンを押すことで確認できます。
• 筋肉に正しく穿刺された場合,インジケーターが緑に点灯します。
• 正しく穿刺がされていなかった場合,インジケーターが赤く点灯します。
(注)針先が骨に接触した場合はCボタンを押さなくても即座にインジケーターが赤く点灯するとともにアラ
ームが鳴ります。
1.3 インジケーターの見方
トレーニングモード
コントロールモード
注射が正しく行われたとき
緑に点灯
緑に点灯
注射場所が不適切
信号なし
赤く点灯
注射が浅すぎる
信号なし
赤く点灯
注射針が骨と接触
赤く点灯
赤く点灯
1.4 電源を切る
電源を切るにはTボタンとCボタンを同時に押します。また2分間使用されなかった場合は自動的に電源が切れ
ます。
P56-06/06-1
3B S C I E NT I F I C® P R O D U C T S
3B Scientific GmbH
Rudorffweg 8 • 21031 Hamburg • Germany
Tel.: + 49-40-73966-0 • Fax: + 49-40-73966-100
www.3bscientific.com • [email protected]
© Copyright 2006 for instruction manual and design of product:
3B Scientific GmbH, Germany