1
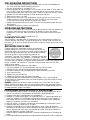
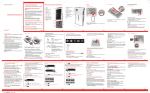
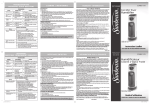
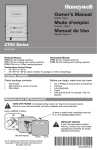
COOL MIST HUMIDIFIER
HUMECTADOR DE NIEBLA FRESCA
HUMIDIFICATEUR À VAPEUR FROIDE
Model/Modelo/Modèle 1124
www.sunbeam.ca
READ AND SAVE THESE INSTRUCTIONS
LEA Y GUARDE ESTAS INSTRUCCIONES
LISEZ ET GARDEZ CES INSTRUCTIONS
P.N. 117790-UL
P.N. 119428
9100030007741
READ AND SAVE THESE
INSTRUCTIONS
LEA Y GUARDE E
INSTRUCCIONES
1. Always have water in the water tank when operating unit.
2. Use only clean, distilled or filtered tap water. Using tap water with a high
mineral content (hard water) will result in the need for more
frequent cleanings.
3. Be sure the filling cap of the tank is firmly tightened.
4. Position the unit within the room so the air output from the top grill is
aimed away from children, walls and furniture.
5. When removing the Tank, use one hand on the Tank Handle and lift straight up.
DO NOT use if tank is cracked.
6. DO NOT place the appliance near heating devices. Keep the cord away
from heated surfaces and areas where it can be stepped on or tripped over.
7. Use only 120V AC outlet. Be sure unit is plugged in firmly and completely.
As with any electrical device, plug and unplug unit with dry hands only.
8. Turn the humidifier off and unplug the unit when: not in use, before moving or
before cleaning. Please refer to the CARE AND MAINTENANCE section in this manual.
9. To avoid the risk of fire, shock or personal injury, do not use an extension cord.
WARNING: Never operate unit with a damaged cord or plug.
10.Always place unit on a flat, level surface AWAY from direct sunlight or
computers or other sensitive electronic equipment.
11.This product does not offer a medicine cup feature. DO NOT add medication of
any type into the mist director, base or water tank. Do not cover or place
anything over any opening. Never drop or insert any object into any openings.
12.The unit should not be left unattended in closed rooms as air could become
saturated and leave condensation on walls or furniture. Always leave room door
partly open.
13.DANGER: To guard against electrical shock, NEVER immerse the humidifier
motor unit (base) in water or other liquids.
14.Regular cleaning of the unit is needed. Please refer to the CARE AND
MAINTENANCE section in this manual.
15.DO NOT use outdoors.
16.Turn the humidifier OFF if the relative humidity exceeds 60%, or if you notice
condensation on the inside of your windows. For proper humidity reading use a
hygrometer which is available in many retail stores.
17.Do not place the humidifier directly on wood furniture or other surfaces that can
be damaged by water. For best results, place on a level, waterproof surface.
18.The unit contains no consumer serviceable parts. To reduce the risk of
electrical shock, do not attempt to open the wiring cover.
1. Tenga siempre agua en el tanqu
2. Utilice solamente agua limpia, d
caño con un alto contenido min
limpiezas más frecuentes.
3. Asegúrese de que la tapa de lle
4. Coloque la unidad dentro del cu
tapa esté dirigido lejos de los ni
5. Al quitar el tanque, utilice una m
para arriba. No utilice si el tanqu
6. NO coloque el artefacto cerca d
cordón alejado de las superficie
pisado o causar tropiezos.
7. Utilice solamente enchufes de 1
enchufe firme y totalmente. Com
enchufe y desenchufe la unidad
8. Apague el humectador y desenc
moverla o antes de limpiarla. Re
MANTENIMIENTO en este manu
9. Para evitar el riesgo de incendio
cordón de extensión. ADVERTE
enchufe dañado.
10. Ponga siempre la unidad sobre
directa del sol o de las computa
11. Este producto no ofrece una car
medicación de ningún tipo dent
de agua. No cubra ni ponga nin
dejcaer o inserte ningún objeto
12. La unidad no se debe dejar des
saturarse y dejar condensación
la puerta del cuarto parcialment
13. PELIGRO: Para cuidarse de un
motor del humectador (base) en
14. Es necesario limpiar la unidad re
LIMPIEZA en este manual.
15. NO lo utilice al aire libre.
16. Apague el humectador si la hum
condensación en el interior de s
humedad use un higrómetro, qu
por menor.
17. No coloque el humectador direc
superficies que se puedan daña
colóquelo sobre una superficie n
18. La unidad no contiene ninguna
consumidor. Para reducir el ries
cubierta del cableado.
When using electrical appliances, basic safety precautions should
always be followed. Failure to follow these safety precautions may
result in personal injury or property damage, fire or shock.
FOR HOUSEHOLD USE ONLY
To reduce the risk of electrical shock, this product has a polarized plug (one blade is
wider than the other). As a safety feature, this plug will fit into the outlet only one way. If
the plug does not fit fully into the outlet, reverse the plug. If it still does not fit, contact a
qualified electrician. Do not attempt to defeat this safety feature.
Al usar artefactos eléctricos, s
de seguridad básicas. La falla
puede dar lugar a lesión perso
PARA USO EN EL
Para reducir el riesgo de choque eléctric
(una cuchilla es más ancha que la otra)
entrará en el tomacorriente en una direc
en el tomacorriente, invierta el enchufe.
electricista cualificado. No intente elimin
PRE-OPERATING INSTRUCTIONS
1. It is recommended that the water tray and humidifier tank be cleaned before first
use. (See CARE AND MAINTENANCE instructions)
2. Be sure the humidifier is switched OFF (O).
3. Select a location for your humidifier, on a flat level surface about 4” away from the
wall. DO NOT place the humidifier on a finished floor or near furniture, which can
be damaged by too much moisture or water. Place on a moisture resistant surface.
4. Remove the tank and the housing by lifting vertically off the base.
5. Make sure the wick is in place.
6. Bring the tank to the sink, turn upside down and twist off the tank cap by turning
counter clockwise. Fill tank with cool, tap water. DO NOT fill with warm water
as this may cause leaking. Replace the cap on tank FIRMLY.
7. Replace the humidifier housing and tank. The tank will immediately begin to empty
into the base.
8. Plug power cord into a 120V AC wall outlet only
OPERATING INSTRUCTIONS
1. To turn the humidifier on, switch the knob to desired setting. High will produce the
maximum moisture and Low will produce the longest run time and quieter
performance. It will take about 30 minutes for the humidifier to reach maximum
output.
2. To turn the unit OFF, switch the knob to Off (O).
Extended Run Time Setting:
Your humidifier is equipped with an extended run time setting which increases the
runtime between tank fillings. To take advantage of this setting, slide the switch on
the water tray all the way to right to Max Runtime. Slide the switch back to the left for
Max Output.
REPLACING THE FILTERS
Through normal use, waterborne minerals and sediment
become trapped in the wick filter. The harder your water, the
greater the amount of minerals in the water, and the more often
you will need to change your filter. You will be able to monitor
the life of the filter in your humidifier by checking the
FilterCheckTM Indicator. The FilterCheckTM Indicator will only read
the filter condition when the humidifier is in operation. After 60
minutes of use, FilterCheckTM Indicator will point to the current filter condition. A brand
new wick filter will register in the purple section reading GOOD filter. After frequent use
of your humidifier, the FilterCheckTM Indicator will let you know when the wick filter
needs to be changed.
To replace the wick filter, follow the steps below:
1. Turn the humidifier OFF (O) and disconnect from the electrical outlet.
2. Remove the tank and housing by lifting vertically off the base.
3. Discard the old wick filter and follow WEEKLY MAINTENANCE instructions.
4. Insert new wick filter.
5. Replace the tank and housing.
6. Repeat Pre-Operating and Operating Instructions.
It is recommended that a replacement wick filter (Model 1175) is purchased for
uninterrupted use. Replacement filter may be purchased at your local retailer or online
at: www.sunbeam.ca
DANGER: Improper use of electric cords and plugs can cause a burn, fire or other
electric shock hazard. Never “yank” on cord to remove from outlet, grip plug and pull
from outlet. Check the power cord and plug for damage. A damaged cord or plug must
be repaired before using the humidifier.
Figure 1:
A. Humidifier Tank
B. Humidifier Housing
C. Control Knob
D. Water Tray
E. Tank Handle
F. FilterCheckTM Indicator
G. Wick Filter
E
A
A. Tanque de humectador
B. Cubierta del
Humidificador
C. Perilla de control
D. Bandeja de agua
E. Manija del Depósito
F. Indicador del Filtro
G. Filtro de la mecha
A. Réservoir de ’humidificateur
B. Boîtier de l’humidificateur
C. Bouton de commande
D. Plateau à eau
E. Poignée du réservoir
F. Témoin de filtre
G. Filtre à mèche
D
Instrucciones de Funciona
1. Para encender la humidificador, gire
configuración Alta producirá la hume
proporcionará un mayor tiempo de e
El humidificador tardará aproximada
2. Para apagar de humidificador, gire la
Configuración de Tiempo de Ejecuc
Su humidificador está equipado con una
prolongado que aumenta el periodo de
aprovechar los beneficios que brinda es
bandeja de agua completamente hacia
deslice el interruptor nuevamente hacia
Sustitución de Filtros
Con el uso normal de la unidad, sedime
atrapados en el filtro. Cuánto más gorda
tiene y con mayor frecuencia necesitará
controlar la duración del filtro de su hum
Indicador FilterCheckTM. Al cabo de 60 m
cionamiento, el Indicador FilterCheckTM s
estado del filtro. Un filtro nuevo se regis
indica filtro BUENO. Tras el uso frecuent
Indicador FilterCheckTM indicará cuándo
ción de los filtros.
Instrucciones Antes de Utilizar el Humidificador
Para sustituir el filtro, siga los siguientes
1. Se recomienda limpiar la base y el tanque de agua del humectador antes de su
1. Apague (O) y desenchufe el humecta
primer uso. (Véase las instrucciones de CUIDADO Y MANTENIMIENTO).
2. Retire el tanque y la cubierta princip
2. Asegúrese de que el humidificador esté apagado (O).
3. Coloque su humidificador sobre una superficie plana a 4” aproximadamente de la 3. Tire el filtro viejo y siga las instruccio
4. Instale el filtro nuevo
pared. NO coloque el humidificador sobre pisos pulidos o cerca de muebles, ya
5. Retire la cubierta superior y el tanqu
que pueden dañarse a causa del exceso de calor, humedad o agua. Colóquelo
6. Repita las instrucciones del Pre-Fun
sobre una superficie resistente a la humedad.
4. Retire el tanque y la cubierta principal por levantándolo para sacarlo de la base.
Se recomienda adquirir un filtro de sust
5. Asegúrese de que el filtro esté en su lugar.
la unidad. Los filtros de sustitución (mod
6. Coloque el depósito en el sumidero, délo vuelta y retire la tapa del depósito
distribuidor local o en línea en www.sun
girándola en sentido horario. Llene el depósito con agua corriente fresca y fría. NO PELIGRO: El uso incorrecto de cordone
llene el depósito con agua tibia ya que puede ocasionar filtraciones. Coloque la
quemadura, incendios u otros peligros d
tapa del depósito y ajústela firmemente.
para quitarlo del tomacorriente, agarre e
7. Retire el tanque. El depósito comenzará a vaciarse inmediatamente en la Bandeja de
Compruebe el cordón y el enchufe de a
agua.
o un enchufe dañado debe ser reparado
8. Enchufe el cordón de alimentación en un tomacorriente de pared de 120V CA solamente.
.
r
Figure 1:
A. Humidifier Tank
B. Humidifier Housing
C. Control Knob
D. Water Tray
E. Tank Handle
F. FilterCheckTM Indicator
G. Wick Filter
E
C
F
A
B
A. Tanque de humectador
B. Cubierta del
Humidificador
C. Perilla de control
D. Bandeja de agua
E. Manija del Depósito
F. Indicador del Filtro
G. Filtro de la mecha
A. Réservoir de ’humidificateur
B. Boîtier de l’humidificateur
C. Bouton de commande
D. Plateau à eau
E. Poignée du réservoir
F. Témoin de filtre
G. Filtre à mèche
G
1. Il est conseillé de nettoyer la base de l'h
première utilisation. (Voir les instructions
2. Assurez-vous que l'humidificateur est é
3. Choisir un emplacement pour votre hum
mur par environ 4 po (10 cm). NE PAS p
près des meubles qui pourraient être en
déposer sur une surface résistante à l’h
4. Retirer le réservoir et boîtier principal so
5. Assurez-vous que la mèche est en plac
6. Amenez le réservoir à l’évier, tournez-le
bouchon dans le sens antihoraire. Remp
REMPLISSEZ PAS d’eau chaude ceci po
FERMEMENT le bouchon du réservoir.
7. Replacez le boîtier supérieur et le réserv
dans la base.
8. Ne brancher le cordon d’alimentation qu
CONSIGNES D’UTILISATION
1. Mettez le bouton à la position désiré pou
élevé (II) produit le plus de vapeur, tandi
offre la durée de fonctionnement la plus
L’humidificateur atteindra son rendemen
2. Mettez le bouton à la position « 0 » pou
D
Instrucciones de Funcionamiento
1. Para encender la humidificador, gire la perilla hacia la posición deseado. La
configuración Alta producirá la humedad máxima y la configuración Baja
proporcionará un mayor tiempo de ejecución y un funcionamiento más silencioso.
El humidificador tardará aproximadamente 30 minutos en alcanzar el punto máximo.
2. Para apagar de humidificador, gire la perilla a la posición Off (O).
Configuración de Tiempo de Ejecución Prolongado:
Su humidificador está equipado con una configuración de tiempo de ejecución
prolongado que aumenta el periodo de tiempo de rellenado del depósito. Para
aprovechar los beneficios que brinda esta configuración, deslice el interruptor sobre la
bandeja de agua completamente hacia la derecha. Para obtener un rendimiento óptimo,
deslice el interruptor nuevamente hacia la izquierda.
Sustitución de Filtros
CONSIGNES PRÉ-UTILISATIO
Con el uso normal de la unidad, sedimentos y minerales contenidos en el agua quedan
atrapados en el filtro. Cuánto más gorda sea el agua, mayor cantidad de minerales contiene y con mayor frecuencia necesitará cambiar el filtro. Podrá
controlar la duración del filtro de su humidificador revisando el
Indicador FilterCheckTM. Al cabo de 60 minutos de funcionamiento, el Indicador FilterCheckTM se moverá e indicará el
estado del filtro. Un filtro nuevo se registrará en la sección que
indica filtro BUENO. Tras el uso frecuente del humidificador, el
Indicador FilterCheckTM indicará cuándo es necesario la sustitución de los filtros.
Para sustituir el filtro, siga los siguientes pasos:
1. Apague (O) y desenchufe el humectador.
2. Retire el tanque y la cubierta principal por levantándolo para sacarlo de la base.
3. Tire el filtro viejo y siga las instrucciones de limpieza semanal
4. Instale el filtro nuevo
5. Retire la cubierta superior y el tanque.
6. Repita las instrucciones del Pre-Funcionamiento y de Funcionamiento.
Se recomienda adquirir un filtro de sustitución para no interrumpir el funcionamiento de
la unidad. Los filtros de sustitución (modelo 1174) pueden ser adquiridos a través de su
distribuidor local o en línea en www.sunbeam.com.
PELIGRO: El uso incorrecto de cordones y de enchufes eléctricos puede causar una
quemadura, incendios u otros peligros de descarga eléctrica. Nunca "tironee" el cordón
para quitarlo del tomacorriente, agarre el enchufe y sáquelo del tomacorriente.
Compruebe el cordón y el enchufe de alimentación para ver si tienen daños. Un cordón
o un enchufe dañado debe ser reparado antes de usar el humectador
Prolonger la durée de fonctionnement
Votre humidificateur est doté d’un réglage
augmente la durée entre les remplissages.
le bouton du plateau d'eau complètement v
remettez le bouton complètement à gauche
REMPLACEMENT DU FILTRE
Lors de l’utilisation normale, l’eau formera
dépôt qui seront emprisonnés dans le filtre
l’eau que vous utilisée est dure, plus elle co
Dans ce cas, vous devriez remplacer le filtr
Vous pouvez surveiller l’état du filtre de vot
vérifiant l’indicateur FilterCheckMC. L'indicat
lira seulement l'état de filtre quand l'humid
fonction. Il peut prendre à 60 minutes d'op
reflète l'état de filtre. Un filtre neuf indiquer
«GOOD», qui signifie un bon filtre. Si l’humi
FilterCheckMC vous indiquera quand le filtre
Pour remplacer le filtre, suivez les étapes c
1. Arrêter (O) l’humidificateur et le débranc
2. Retirer le réservoir et boîtier principal so
3. Retirez la mèche et jetez-la et suivez les
4. Insérez le nouveau filtre.
5. Remplacez le réservoir et le Boîtier.
6. Répétez les consignes Pre-Utilisation et
Nous vous recommandons d’acheter un filt
fonctionnement sans interruption. Vous pou
rechange en visitant www.sunbeam.ca
DANGER: Une mauvaise utilisation des co
provoquer des brûlures, un incendie ou d’a
jamais “tirer” sur le cordon pour débranche
S’assurer que le cordon d’alimentation et la
tout cordon ou prise endommagé avant d'u
CARE AND MAINTENANCE
The following maintenance procedures must be routinely followed in order to ensure proper, efficient operation of your humidifier. The unit WILL NOT WORK CORRECTLY if it is
not cleaned properly.
Daily Maintenance
1.
2.
3.
4.
Before cleaning, turn off and unplug the humidifier from the electrical outlet..
Remove the tank and housing by lifting vertically from the base of the humidifier and place in sink or tub.
Carry the water tray to the sink, remove the wick, drain any remaining water and rinse thoroughly to remove any
sediment or dirt. Wipe clean, and dry with a clean cloth or paper towel. The base is dishwasher safe (TOP RACK ONLY) for easy cleaning.
Put wick filter back in the base, replace the housing, then refill tank with cool tap water. Follow the PRE-OPERATING and OPERATING INSTRUCTIONS.
Weekly Maintenance
1.
2.
3.
Repeat steps 1-3 in the Daily Maintenance section.
Clean the water tray by partially filling the water tray with one 8-oz. cup of undiluted white vinegar. Let solution stand 20 minutes, cleaning all interior surfaces with a
soft brush. Dampen a cloth with undiluted white vinegar and wipe out entire base to remove scale.
Rinse the base with water tray with warm water to remove any remaining scale and white vinegar solution before beginning to disinfect the tank.
Disinfect tank
1.
2.
3.
4.
Fill humidifier tank 1/2 full with water and 1/2 tablespoon of chlorine bleach.
Let the solution stand for 20 minutes, swishing every few minutes. Wet all surfaces.
Carefully empty the tank after 20 minutes, and rinse well with warm water until you can not detect any bleach smell. Dry with a clean cloth or paper towel.
Place wick filter back into the base, replace the housing, then refill the tank with cool tap water. Follow the PRE-OPERATING and OPERATING INSTRUCTIONS.
STORAGE INSTRUCTIONS When not using your humidifier for an extended period of time:
1. Dispose of the wick filters. DO NOT leave in humidifier.
2. Clean, rinse and thoroughly dry the humidifier as directed in WEEKLY MAINTENANCE. DO NOT leave any water in the humidifier when storing.
Leaving water in the humidifier may render the humidifier inoperable for the following season.
3. Place the humidifier in the original carton and store in a cool, dry place.
CUIDADO Y MANTENIMIENTO
Deben respetarse los siguientes procedimientos de mantenimiento para asegurar un funcionamiento adecuado y efectivo de su humidificador. La unidad NO FUNCIONARÁ
CORRECTAMENTE si no se limpia de modo adecuado.
Mantenimiento Diario
1.
2.
3.
4.
Antes de limpiar, apague y desenchufe el humidificador de la toma eléctrica.
Retire la cubierta y el depósito del humidificador y colóquelo en el sumidero o bañera.
Lleve la base de la unidad al sumidero, retire el filtro, coloque la base en el sumidero, retire el agua remanente y lávela completamente para retirar sedimentos o
suciedad. Límpiela y séquela con un paño húmedo o toalla de papel. La base es apta para lavavajillas (SÓLO EN LA BANDEJA SUPERIOR) para facilitar la limpieza.
Coloque el filtro de mecha nuevamente en la base, coloque la cubierta y luego recargue el depósito con agua. Siga las INSTRUCCIONES PRELIMINARES y la
INSTRUCCIONES DE OPERACIÓN.
Mantenimiento Semanal
1.
2.
3.
Repita los pasos 1-3 detallados en la sección de Mantenimiento Diario.
Limpie la base llenándola parcialmente con una taza de 8 onzas de vinagre blanco sin diluir. Deje actuar la solución por 20 minutos y limpie simultáneamente las
superficies internas con un cepillo suave. Humedezca un paño con vinagre blanco sin diluir y limpie toda la base para retirar la cal.
Enjuague la base con agua tibia para retirar la cal restante y solución de vinagre blanco antes de comenzar a desinfectar el depósito.
Desinfectación de Depósito s
1.
2.
3.
Llene el depósito con 1⁄2 cucharadilla de blanqueador de cloro y 1/2 galón de agua.
Deje reposar la solución durante 20 minutos, moviéndola a intervalos de varios minutos. Moje las superficies.
Luego de 20 minutos, vacíe con cuidado el depósito y enjuague con agua hasta que no pueda percibirse el olor del blanqueador. Seque con un paño limpio o toalla
de papel.
4. Coloque el filtro de mecha nuevamente en la base, coloque la cubierta y luego recargue el depósito con agua. Siga las INSTRUCCIONES PRELIMINARES y la
INSTRUCCIONES DE OPERACIÓN.
Instrucciones de Almacenamiento Cuando no utilice su humidificador por un período de tiempo prolongado:
1. Descarte los filtros de mecha. NO los deje en el humidificador.
2. Limpie, enjuague y seque completamente el humidificador según se indica en el mantenimiento semanal. NO deje agua en la unidad cuando ésta vaya a ser
almacenada. El depósito de agua en el humidificador puede causar daños en la unidad.
3. Coloque el humidificador en su embalaje original y almacénelo en un sitio seco y frío.
ENTRETIEN ET MAINTENANCE
Les humidificateurs améliorent le niveau de confort en ajoutant de l’humidité à l’air sec d’intérieur. Pour mieux profiter de votre humidificateur et pour éviter un mauvais usage
du produit, suivez attentivement toutes les instructions.
ENTRETIEN QUOTIDIEN
1
2.
3.
4.
Avant le nettoyage, éteignez et débranchez l'humidificateur de la prise de secteur.
Retirez le boîtier et le réservoir de l’humidificateur et placez-les dans l’évier ou la baignoire.
Amenez la base de l’appareil à l’évier. Retirez la mèche, placez-la dans l’évier, égouttez toute l’eau qui y reste et rincez-la bien pour retirer toute saleté ou
sédiment. Essuyez-la et séchez-la à l’aide d’un linge propre ou d’un papier essuie-tout. La base va au lave-vaisselle (panier supérieur SEULEMENT).
Replacer le filtre à mèche à l’intérieur de la base et le boîtier par la suite,remplir le réservoir à l’eau fraîche. Suivre les instructions PRÉALABLES À LA MISE EN MARCHE
et DE MISE EN MARCHE.
ENTRETIEN HEBDOMADAIRE
1.
2.
3.
Répétez les étapes 1 à 3 ci-dessus.
Nettoyez le plateau en le remplissant partiellement d’une tasse de 8 onces de vinaigre blanc non dilué. Laissez la solution tremper pendant 20 minutes et
nettoyez toutes les surfaces intérieures avec une brosse douce. Humectez un chiffon avec du vinaigre blanc non dilué et essuyez le plateau complet pour
éliminer le tartre.
Rincez à l’eau propre et chaude pour enlever la solution de nettoyage avant de commencer la désinfection du réservoir.
Désinfection de la base de l’humidificateur et des réservoirs
1.
2.
Versez de l’eau dans chaque réservoir jusqu’à ce qu’il soit à moitié rempli et ajoutez 1 cuillère à thé d’eau de Javel.
Laissez la solution travailler pendant 20 minutes en la remuant toutes les quelques minutes. Assurez-vous
que toutes les surfaces sont mouillées.
3. Vidangez la base et les réservoirs après 20 minutes et rincez-les à l’eau jusqu’à ce que l’odeur d’eau de Javel ait disparu. Essuyez les surfaces avec un
chiffon propre ou un essuie-tout en papier.
4. Replacer le filtre à mèche à l’intérieur de la base et le boîtier par la suite,remplir le réservoir à l’eau fraîche. Suivre les instructions PRÉALABLES À LA MISE EN MARCHE
et DE MISE EN MARCHE.
INSTRUCTIONS D’ENTREPOSAGE Si vous n’avez pas l’intention d’utiliser l’humidificateur pour une période prolongée:
1. Jeter les filtres à mèche. NE PAS laisser à l’intérieur de l’humidificateur.
2. Nettoyez et séchez bien l’humidificateur selon les directives de la section « Entretien hebdomadaire ». NE laissez PAS de l’eau dans l’appareil lors de
l’entreposage. Le fait de laisser de l’eau dans l’appareil pourrait rendre l’appareil inutilisable pour la prochaine saison.
3. Placez l’humidificateur dans la boîte originale et rangez-la à un endroit frais et sec.
vant la
stancé du
er fini ou
Le
e.
ant le
diatement
120V.
églage
es.
ée qui
glisser
maximale,
eckMC
arquée
cateur
e.
aire.
de
. Ne
murale.
éparer
2 Years Limited Warranty
Sunbeam Products, Inc. doing business as Jarden Consumer Solutions or if in Canada,
Sunbeam Corporation (Canada) Limited doing business as Jarden Consumer Solutions
(collectively “JCS”) warrants that for a period of two years from the date of purchase,
this product will be free from defects in material and workmanship. JCS, at its option,
will repair or replace this product or any component of the product found to be defective
during the warranty period. Replacement will be made with a new or remanufactured
product or component. If the product is no longer available, replacement may be made
with a similar product of equal or greater value. This is your exclusive warranty. Do NOT
attempt to repair or adjust any electrical or mechanical functions on this product. Doing
so will void this warranty.
This warranty is valid for the original retail purchaser from the date of initial retail
purchase and is not transferable. Keep the original sales receipt. Proof of purchase is required to obtain warranty performance. JCS dealers, service centers, or
retail stores selling JCS products do not have the right to alter, modify or any way
change the terms and conditions of this warranty.
This warranty does not cover normal wear of parts or damage resulting from any
of the following: negligent use or misuse of the product, use on improper voltage
or current, use contrary to the operating instructions, disassembly, repair or alteration by anyone other than JCS or an authorized JCS service center. Further, the
warranty does not cover: Acts of God, such as fire, flood, hurricanes and tornadoes.
What are the limits on JCS’s Liability?
JCS shall not be liable for any incidental or consequential damages caused by the
breach of any express, implied or statutory warranty or condition.
Except to the extent prohibited by applicable law, any implied warranty or condition
of merchantability or fitness for a particular purpose is limited in duration to the
duration of the above warranty.
JCS disclaims all other warranties, conditions or representations, express, implied,
statutory or otherwise.
JCS shall not be liable for any damages of any kind resulting from the purchase, use or
misuse of, or inability to use the product including incidental, special, consequential or
similar damages or loss of profits, or for any breach of contract, fundamental or otherwise, or for any claim brought against purchaser by any other party.
Some provinces, states or jurisdictions do not allow the exclusion or limitation of
incidental or consequential damages or limitations on how long an implied warranty lasts, so the above limitations or exclusion may not apply to you.
This warranty gives you specific legal rights, and you may also have other rights
that vary from province to province, state to state or jurisdiction to jurisdiction.
How to Obtain Warranty Service
In the U.S.A.
If you have any question regarding this warranty or would like to obtain warranty
service, please call 1-888-264-9669 and a convenient service center address will
be provided to you.
In Canada
If you have any question regarding this warranty or would like to obtain warranty
service, please call 1-888-264-9669 and a convenient service center address will
be provided to you.
In the U.S.A., this warranty is offered by Sunbeam Products, Inc. doing business
Jarden Consumer Solutions located in Boca Raton, Florida 33431. In Canada, this
warranty is offered by Sunbeam Corporation (Canada) Limited doing business as
Jarden Consumer Solutions, located at 20 B Hereford Street, Brampton, Ontario
L6Y 0M1. If you have any other problem or claim in connection with this product,
please write our Consumer Service Department. PLEASE DO NOT RETURN THIS
PRODUCT TO ANY OF THESE ADDRESSES OR TO THE PLACE OF PURCHASE.
© 2011 Sunbeam Products, Inc. doing business as Jarden Consumer Solutions. All rights reserved.
Imported and distributed by Sunbeam Corporation (Canada) Limited doing business as Jarden
Consumer Solutions, 20 B Hereford Street, Brampton, Ontario L6Y 0M1.
Printed in China
Sunbeam Products
Sunbeam Corporat
forma conjunta, “J
este producto esta
reemplazará este p
período de garantía
producto ya no est
rior. Ésta es su gar
de este producto. A
La garantía es váli
misma no es trans
se requiere presen
minoristas que ven
otro modo los térm
Esta garantía no cu
tado de uso neglig
contrario a las inst
ajeno a JCS o a un
tuitos tales como i
¿Cuál es el lím
JCS no será respo
alguna garantía o c
Excepto en la med
comerciabilidad o
garantía antes men
JCS queda exenta
de cualquier otra n
JCS no será respo
ducto, o por la imp
gentes o similares
obligación esencia
tercero.
Algunas provincias
dentales o emerge
posible que la excl
Esta garantía le oto
que varían de un e
Cómo solicitar
En los Estados U
Si tiene alguna pre
1-888-264-96
En Canadá
Si tiene alguna pre
1-888-264-96
En los Estados Uni
bre de Jarden Con
por Sunbeam Corp
20 B Hereford Stre
ión con este produ
NO DEVUELVA ES
PRA.
©2011 Sunbeam P
Importado y distribu
Consumer Solutions
Impreso en China