1
Cluster OpenMP*
User Manual
Copyright © 2005–2006 Intel Corporation
All Rights Reserved
Document Number: 309076-003
Revision: 1.3
World Wide Web: http://www.intel.com
Document Number: 309076-003US
Cluster OpenMP*
Disclaimer and Legal Information
INFORMATION IN THIS DOCUMENT IS PROVIDED IN CONNECTION WITH INTEL® PRODUCTS. NO LICENSE, EXPRESS OR
IMPLIED, BY ESTOPPEL OR OTHERWISE, TO ANY INTELLECTUAL PROPERTY RIGHTS IS GRANTED BY THIS DOCUMENT. EXCEPT
AS PROVIDED IN INTEL'S TERMS AND CONDITIONS OF SALE FOR SUCH PRODUCTS, INTEL ASSUMES NO LIABILITY
WHATSOEVER, AND INTEL DISCLAIMS ANY EXPRESS OR IMPLIED WARRANTY, RELATING TO SALE AND/OR USE OF INTEL
PRODUCTS INCLUDING LIABILITY OR WARRANTIES RELATING TO FITNESS FOR A PARTICULAR PURPOSE, MERCHANTABILITY,
OR INFRINGEMENT OF ANY PATENT, COPYRIGHT OR OTHER INTELLECTUAL PROPERTY RIGHT. Intel products are not intended
for use in medical, life saving, life sustaining, critical control or safety systems, or in nuclear facility applications.
Intel may make changes to specifications and product descriptions at any time, without notice.
Designers must not rely on the absence or characteristics of any features or instructions marked "reserved" or "undefined." Intel
reserves these for future definition and shall have no responsibility whatsoever for conflicts or incompatibilities arising from
future changes to them.
MPEG is an international standard for video compression/decompression promoted by ISO. Implementations of MPEG CODECs, or
MPEG enabled platforms may require licenses from various entities, including Intel Corporation.
The software described in this document may contain software defects which may cause the product to deviate from published
specifications. Current characterized software defects are available on request.
This document as well as the software described in it is furnished under license and may only be used or copied in accordance
with the terms of the license. The information in this manual is furnished for informational use only, is subject to change without
notice, and should not be construed as a commitment by Intel Corporation. Intel Corporation assumes no responsibility or
liability for any errors or inaccuracies that may appear in this document or any software that may be provided in association with
this document.
Except as permitted by such license, no part of this document may be reproduced, stored in a retrieval system, or transmitted in
any form or by any means without the express written consent of Intel Corporation.
Developers must not rely on the absence or characteristics of any features or instructions marked "reserved" or "undefined."
Improper use of reserved or undefined features or instructions may cause unpredictable behavior or failure in developer’s
software code when running on an Intel processor. Intel reserves these features or instructions for future definition and shall
have no responsibility whatsoever for conflicts or incompatibilities arising from their unauthorized use.
BunnyPeople, Celeron, Celeron Inside, Centrino, Centrino logo, Chips, Core Inside, Dialogic, EtherExpress, ETOX, FlashFile, i386,
i486, i960, iCOMP, InstantIP, Intel, Intel logo, Intel386, Intel486, Intel740, IntelDX2, IntelDX4, IntelSX2, Intel Core, Intel
Inside, Intel Inside logo, Intel. Leap ahead., Intel. Leap ahead. logo, Intel NetBurst, Intel NetMerge, Intel NetStructure, Intel
SingleDriver, Intel SpeedStep, Intel StrataFlash, Intel Viiv, Intel vPro, Intel XScale, IPLink, Itanium, Itanium Inside, MCS, MMX,
MMX logo, Optimizer logo, OverDrive, Paragon, PDCharm, Pentium, Pentium II Xeon, Pentium III Xeon, Performance at Your
Command, Pentium Inside, skoool, Sound Mark, The Computer Inside., The Journey Inside, VTune, Xeon, Xeon Inside and
Xircom are trademarks or registered trademarks of Intel Corporation or its subsidiaries in the United States and other countries.
* Other names and brands may be claimed as the property of others.
Copyright © 2005-2006, Intel Corporation.
2
Document Number: 309076-003US
About this Document
Revision History
Document
Number
Revision Number
309076
309076
309076
Version 9.1, Rev 1.0
Version 9.1, Rev 2.0
Version 9.1, Rev 3.0
309076
309076
309076-003
Version 9.1, Rev 4.0
Version 9.1, Rev 4.1
1.3
User Manual
Description
First version.
Added new debugging information.
Revised debugging information, added information about
OpenMP* libraries supported by Cluster OpenMP*.
Added more specific download information.
Minor corrections.
Updates for 10.0 product.
Revision Date
August 2005
January 2006
February 2006
March 2006
May 2006
August 2006
3
Cluster OpenMP*
Contents
1
About this Document .........................................................................................8
1.1
1.2
1.3
1.4
2
Intended Audience .................................................................................8
Using This User Manual ...........................................................................8
Conventions and Symbols ........................................................................9
Related Information .............................................................................. 10
Using Cluster OpenMP* .................................................................................... 11
2.1
2.2
Getting Started .................................................................................... 11
Examples ............................................................................................ 12
2.2.1
Running a Hello World Program ................................................. 12
2.2.2
Sample Codes on the Web ........................................................ 13
3
When to Use Cluster OpenMP* .......................................................................... 14
4
Compiling a Cluster OpenMP* Program............................................................... 16
5
Running a Cluster OpenMP* Program ................................................................. 17
5.1
5.2
5.3
5.4
5.5
6
MPI Startup for a Cluster OpenMP* Program ....................................................... 25
6.1
6.2
6.3
7
Cluster OpenMP* Startup File ................................................................. 25
Network Interface Selection ................................................................... 26
Environment Variables .......................................................................... 26
6.3.1
KMP_MPI_LIBNAME ................................................................. 26
6.3.2
KMP_CLUSTER_DEBUGGER ....................................................... 27
6.3.3
KMP_CLUSTER_SETTINGS ........................................................ 27
Porting Your Code ........................................................................................... 28
7.1
7.2
7.3
4
Cluster OpenMP* Startup Process ........................................................... 17
Cluster OpenMP* Initialization File .......................................................... 19
5.2.1
Overall Format ........................................................................ 19
5.2.2
Options Line ........................................................................... 20
5.2.3
Environment Variable Section ................................................... 22
Input / Output in a Cluster OpenMP* Program .......................................... 22
5.3.1
Input Files .............................................................................. 22
5.3.2
Output Files ............................................................................ 23
5.3.3
Mapping Files into Memory ....................................................... 23
System Heartbeat ................................................................................ 23
Special Cases ...................................................................................... 24
5.5.1
Using ssh to Launch a Cluster OpenMP* Program ......................... 24
5.5.2
Using a Cluster Queuing System ................................................ 24
Memory Model and Sharable Variables..................................................... 28
Porting Steps ....................................................................................... 29
7.2.1
Initial Steps ............................................................................ 29
7.2.2
Additional Steps ...................................................................... 29
Identifying Sharable Variables with -clomp-sharable-propagation ................ 30
7.3.1
Using –clomp-sharable-propagation ........................................... 30
Document Number: 309076-003US
About this Document
7.4
7.5
7.6
7.7
7.8
8
Using KMP_DISJOINT_HEAPSIZE ............................................................ 32
7.4.1
How the Disjoint Heap Works .................................................... 33
Language-Specific Steps........................................................................ 35
7.5.1
Fortran Code .......................................................................... 36
7.5.2
C and C++ Code ..................................................................... 36
7.5.3
Using Default(none) to Find Sharable Variables ........................... 37
Promoting Variables to Sharable ............................................................. 37
7.6.1
Automatically Making Variables Sharable Using the Compiler ......... 37
7.6.2
Manually Promoting Variables ................................................... 38
7.6.3
Sharable Directive ................................................................... 38
7.6.4
Fortran Considerations ............................................................. 38
Declaring omp_lock_t Variables .............................................................. 40
Porting Tips ......................................................................................... 40
Debugging a Cluster OpenMP* Program ............................................................. 42
8.1
8.2
8.3
8.4
8.5
Before Debugging ................................................................................. 42
Using the Intel® Debugger .................................................................... 42
Using the gdb* Debugger ...................................................................... 43
Using the Etnus* TotalView* Debugger.................................................... 43
Redirecting I/O .................................................................................... 44
9
Evaluating Cluster OpenMP* Performance ........................................................... 45
10
OpenMP* Usage with Cluster OpenMP* .............................................................. 49
10.1
10.2
10.3
10.4
10.5
10.6
10.7
11
Related Tools ................................................................................................. 60
11.1
11.2
11.3
12
Intel® Compiler ................................................................................... 60
Intel® Thread Profiler ........................................................................... 60
Intel® Trace Analyzer and Collector ........................................................ 61
Technical Issues ............................................................................................. 62
12.1
12.2
User Manual
Program Development for Cluster OpenMP* ............................................. 49
10.1.1 Design the Program as a Parallel Program ................................... 49
10.1.2 Write the OpenMP* Program ..................................................... 49
Combining OpenMP* with Cluster OpenMP*.............................................. 50
OpenMP* Implementation-Defined Behaviors in Cluster OpenMP*................ 51
10.3.1 Number of Threads to Use for a Parallel Region ........................... 51
10.3.2 Number of Processors .............................................................. 51
10.3.3 Creating Teams of Threads ....................................................... 52
10.3.4 Schedule(RUNTIME) ................................................................ 52
10.3.5 Various Defaults ...................................................................... 52
10.3.6 Granularity of Data .................................................................. 53
10.3.7 volatile Keyword not Fully Implemented .................................. 53
10.3.8 Intel Extension Routines/Functions ............................................ 53
Cluster OpenMP* Macros ....................................................................... 54
Cluster OpenMP* Environment Variables .................................................. 54
Cluster OpenMP* API Routines ............................................................... 55
Allocating Sharable Memory at Run-Time ................................................. 56
10.7.1 C++ Sharable Allocation .......................................................... 57
How a Cluster OpenMP* Program Works .................................................. 62
The Threads in a Cluster OpenMP* Program ............................................. 63
5
Cluster OpenMP*
12.3
12.4
12.5
12.6
12.7
12.8
12.9
13
12.2.1 OpenMP* Threads ................................................................... 64
12.2.2 DVSM Support Threads ............................................................ 64
Granularity of a Sharable Memory Access ................................................ 64
Socket Connections Between Processes ................................................... 65
Hostname Resolution ............................................................................ 65
12.5.1 The Hostname Resolution Process .............................................. 65
12.5.2 A Hostname Resolution Issue .................................................... 66
Using X Window System* Technology with a Cluster OpenMP* Program ....... 66
Using System Calls with Cluster OpenMP ................................................. 67
Memory Mapping Files ........................................................................... 68
Tips and Tricks..................................................................................... 68
12.9.1 Making Assumed-shape Variables Private .................................... 69
12.9.2 Missing Space on Partition Where /tmp is Allocated ...................... 69
12.9.3 Randomize_va_space............................................................... 70
12.9.4 Linuxthreads not Supported ...................................................... 70
Configuring a Cluster ....................................................................................... 71
13.1
13.2
13.3
13.4
Preliminary Setup ................................................................................. 71
NIS Configuration ................................................................................. 72
13.2.1 Head Node NIS Configuration .................................................... 72
13.2.2 Compute Node NIS Configuration .............................................. 73
NFS Configuration ................................................................................ 74
13.3.1 Head Node NFS Configuration ................................................... 74
13.3.2 Compute Node NFS Configuration .............................................. 74
Gateway Configuration .......................................................................... 75
13.4.1 Head Node Gateway Configuration ............................................. 75
13.4.2 Compute Node Gateway Configuration........................................ 76
14
Configuring Infiniband ..................................................................................... 77
15
Reference ...................................................................................................... 80
15.1
15.2
Using Foreign Threads in a Cluster OpenMP Program ................................. 80
Cluster OpenMP* Options Reference ........................................................ 80
16
Glossary ........................................................................................................ 82
17
Index ............................................................................................................ 84
List of Figures
Figure
Figure
Figure
Figure
6
1
2
3
4
Normal Heap Address Space Layout....................................................... 34
Disjoint Heap Address Space Layout ...................................................... 35
Sample output .CSV file....................................................................... 47
Predicted scalability speedup using Cluster OpenMP* ............................... 48
Document Number: 309076-003US
About this Document
List of Tables
Table 1 Document Organization ........................................................................8
Table 2 Conventions and Symbols used in this Document .....................................9
Table 3 Options Line........................................................................................ 20
Table 4 MPI Replacements................................................................................ 25
Table 5 Assumptions about sharability of variables under OpenMP* and Cluster
OpenMP* ................................................................................................. 28
Table 6 Sample Fortran code with variables that should be made sharable .............. 30
Table 7 Sharable directives for C/C++ and Fortran .............................................. 38
Table 8 Fortran options that control defaults for making variables sharable ............. 39
Table 9 Options for clomp_forecaster ................................................................. 46
Table 10 OpenMP* and corresponding Cluster OpenMP* Options ............................ 50
Table 11 Defaults for various OpenMP* items...................................................... 52
Table 12 Cluster OpenMP* Environment Variables................................................ 54
Table 13 Cluster OpenMP* API Routines ............................................................. 55
Table 14 Cluster OpenMP* Options .................................................................... 80
User Manual
7
Cluster OpenMP*
1
About this Document
Cluster OpenMP* is a system that supports running an OpenMP program on a set of
nodes connected by a communication fabric, such as Ethernet. Such nodes do not
have the shared memory hardware that OpenMP is designed for, so Cluster OpenMP
simulates that hardware with a software mechanism. The software mechanism used
by Cluster OpenMP is commonly referred to as a distributed shared memory system.
This User’s Guide provides step-by-step instructions for using Cluster OpenMP*.
1.1
Intended Audience
This document is intended for users or potential users of Cluster OpenMP*. Users are
expected to be familiar with OpenMP* programming and ideally have some experience
using clusters and the Intel® compilers.
1.2
Using This User Manual
This User Manual contains the following sections:
Table 1
Document Organization
Chapter
8
Title
Description
2
Using Cluster OpenMP*
Includes a general usage model for using
Cluster OpenMP.
3
When to Use Cluster OpenMP*
Provides a test you can use to decide if Cluster
OpenMP is right for you.
4
Compiling a Cluster OpenMP* Program
Provides instructions and tips for compiling
your ported Cluster OpenMP program.
5
Running a Cluster OpenMP* Program
Provides instructions and tips for running your
compiled Cluster OpenMP program.
6
MPI Startup for a Cluster OpenMP*
Program
Describes how to use MPI as the mechanism to
start a Cluster OpenMP program.
7
Porting Your Code
Describes how to prepare your OpenMP* code
for use with Cluster OpenMP by making
variables sharable.
Document Number: 309076-003US
About this Document
Chapter
1.3
Title
Description
8
Debugging a Cluster OpenMP* Program
Provides suggestions for debugging your
Cluster OpenMP* program.
9
Evaluating Cluster OpenMP* Performance
Explains how to evaluate your program’s
performance using Cluster OpenMP and how to
determine the optimal number of nodes to use.
10
OpenMP* Usage with Cluster OpenMP*
Describes a recommended programming model
and provides a reference of OpenMP*
information that is specific to Cluster OpenMP.
11
Related Tools
Describes how to use the Intel® Threading
Tools to identify sharable variables and
improve performance.
12
Technical Issues
Includes advanced technical information,
including a description of how Cluster OpenMP*
works.
13
Configuring a Cluster
Includes both general instructions for
configuring a cluster as well as specific
information for configuring a cluster to work
with Cluster OpenMP.
14
Configuring Infiniband
Describes how to set up Inifiniband on a
cluster, for use with Cluster OpenMP.
15
Reference
Includes a command reference.
16
Glossary
Provides a guide to terminology used in this
document.
Conventions and Symbols
The following conventions are used in this document.
Table 2
Conventions and Symbols used in this Document
This type
style
User Manual
Indicates an element of syntax, reserved word, keyword, filename, computer
output, or part of a program example. The text appears in lowercase unless
uppercase is significant.
This type style
Indicates the exact characters you type as input. Also used to highlight the
elements of a graphical user interface such as buttons and menu names.
This type style
Indicates a placeholder for an identifier, an expression, a string, a symbol, or a
value. Substitute one of these items for the placeholder.
[ items ]
Indicates that the items enclosed in brackets are optional.
9
Cluster OpenMP*
{ item | item }
Indicates to select only one of the items listed between braces. A vertical bar ( | )
separates the items.
... (ellipses)
Indicates that you can repeat the preceding item.
NOTE:
All shell commands in this manual are given in the C shell (csh) syntax.
NOTE:
Any screen shots which appear in this manual are provided for illustration purposes
only. The actual program’s graphical user interface may differ slightly from the images
shown.
T
1.4
T
Related Information
For detailed instructions on using the Intel® compilers or Intel® Thread Profiler,
consult the documentation provided with the corresponding product.
For general information about Intel® Software Products, see the Intel® Software
website at http://www.intel.com/software/products/index.htm.
HTU
UTH
Support materials for Cluster OpenMP*, including sample code files are available. To
access them:
1.
You must register for an account at http://premier.intel.com and login to the
account.
2.
Select File Downloads, then select one of the following products:
HTU
3.
UTH
Intel C++ Compiler, Linux* Cluster OpenMP*
Intel Fortran Compiler, Linux* Cluster OpenMP*
Click Display File List. The extra support materials are found in the file
clomp_tools.tar.gz.
T
T
The support materials contain scripts that should be placed in a directory that is in
your path. In this User’s Guide, that directory will be referred to as <CLOMP tools
dir>. Some scripts must be used only on processors with Intel® 64 architecture and
compatible processors and can be found in the support materials in a directory named
/32e. Other scripts must be used only on an Intel® Itanium® processor, and can be
found in a directory named /64.
T
T
T
T
T
T
For more information on X Window System* technology and standards, visit the X.Org
Foundation at www.x.org.
HTU
10
UTH
Document Number: 309076-003US
Using Cluster OpenMP*
2
Using Cluster OpenMP*
This chapter presents a recommended model for using Cluster OpenMP* and includes
a simple example to illustrate how to use Cluster OpenMP*.
Before you begin, take a moment to consider whether your program can benefit from
Cluster OpenMP*. Your program is probably a good candidate for porting to Cluster
OpenMP* if one or more of the following conditions is met:
•
You need higher performance than can be achieved using a single node.
•
You want to use a cluster programming model that is easier to use and easier to
debug than message-passing (MPI).
•
Your program gets excellent speedup with ordinary OpenMP*.
•
Your program has reasonably good locality of reference and little synchronization.
If you are not sure whether Cluster OpenMP* is right for your needs, see Chapter 3,
When to Use Cluster OpenMP*, for more details including a step-by-step instructions
on how to evaluate the suitability of Cluster OpenMP* for your program.
TIP:
XRR
X
2.1
X
X
Getting Started
At a high level, using Cluster OpenMP* involves the following basic steps. Each step is
described in detail in the section noted:
1.
Make sure the appropriate Intel Compiler is installed on your system. See the
Release Notes for detailed requirements.
2.
Make sure your cluster is correctly configured for Cluster OpenMP*. See Chapter
13, Configuring a Cluster for complete details.
XRR
NOTE:
X
X
X
In most cases, you do not need to do anything special to configure your cluster. You
must make sure your program is accessible by the same path in all nodes and that the
appropriate compilers and their libraries are accessible with the same path on all
nodes. If you output to an X Window*, you must set up IP Forwarding for the cluster's
interior nodes. See Section 13.4 , Gateway Configuration for complete details.
RX
3.
XR
X
X
If you already have an existing parallel code using OpenMP*, skip to step 4.
If you are still planning your code development, see Section 10.1 , Program
Development for Cluster OpenMP*, for recommendations and considerations for
working with Cluster OpenMP*.
RR
RX
XR
X
X
User Manual
11
Cluster OpenMP*
2.2
4.
Port your code for use with Cluster OpenMP*. Porting involves making variables
sharable. You can use the compiler and the Cluster OpenMP run-time library to
help you port your code. See Chapter 7, Porting Your Code.
5.
Run your code using Cluster OpenMP* using a kmp_cluster.ini file. See Chapter 5 ,
Running a Cluster OpenMP* Program.
6.
Debug your code. See Chapter 8 , Debugging a Cluster OpenMP* Program.
7.
Cycle through steps 4 through 6 until your program runs correctly.
8.
Tune your code to improve its performance using Intel® Thread Profiler. See
Section 11.2, Intel® Thread Profiler.
Examples
This section includes simple examples to help you get started using Cluster OpenMP*.
2.2.1
Running a Hello World Program
Cluster OpenMP requires minimal changes to a conforming OpenMP program. The
following example illustrates at a high level how to compile and run a cluster hello
world program using Cluster OpenMP.
Consider the classic hello world program written in C:
#include <stdio.h>
main()
{
printf(“hello world\n”);
}
The equivalent parallel OpenMP program is:
#include <stdio.h>
main()
{
#pragma omp parallel
{
#pragma omp critical
printf(“hello world\n”);
}
}
To run this program on a cluster:
12
1.
Compile it with the Intel® C++ Compiler version 9.1 or higher using the
-cluster-openmp option.
2.
If the code does not compile correctly, debug your code.
Document Number: 309076-003US
Using Cluster OpenMP*
3.
Supply a kmp_cluster.ini file.
4.
Run the executable.
Compiling the program with –cluster-openmp inserts the proper code into the
executable file for calling the Cluster OpenMP run-time library and links to that library.
The kmp_cluster.ini file tells the Cluster OpenMP run-time system which nodes to
use to run the program and enables you to set up the proper execution environment
on all of them.
The following is a sample one-line kmp_cluster.ini file that runs the cluster hello
world program on two nodes, with node names home and remote. You type the
command on the node home. It uses two OpenMP threads on each node for a total of
four OpenMP threads:
--hostlist=home,remote –-process_threads=2
With this kmp_cluster.ini file in the current working directory, build the OpenMP
hello world program with the following commands:
$ icc
-cluster-openmp hello.c –o hello.exe
To run the program, run the resulting executable with:
$ ./hello.exe
This command produces the following output:
hello
hello
hello
hello
NOTE:
2.2.2
world
world
world
world
You can change the number of threads per process by changing the value of the
--process_threads option. You can change the number and identity of the nodes by
changing or adding/deleting names in the --hostlist option in the kmp_cluster.ini
file.
Sample Codes on the Web
You can download additional code samples from the Intel support website. See Section
1.4, Related Information for pointers.
User Manual
13
Cluster OpenMP*
3
When to Use Cluster OpenMP*
The major advantage of Cluster OpenMP* is that it facilitates parallel programming on
a distributed memory system since it uses the same fork-join, shared memory model
of parallelism that OpenMP* uses. This model is often easier to use than messagepassing paradigms like MPI* or PVM*.
OpenMP is a directive-based language that annotates an underlying serial program.
The underlying serial program runs serially when you turn off OpenMP directive
processing in the compiler. With planning, you can develop your program just as you
would develop a serial program then turn on parallelism with OpenMP. Since you can
parallelize your code incrementally, OpenMP usually helps you write a parallel
program more quickly and easily than you could with other techniques.
Not all programs are suitable for Cluster OpenMP. If your code meets the following
criteria, it is a good candidate for using Cluster OpenMP*:
Your code shows excellent speedup with ordinary OpenMP*.
If the scalability of your code is poor with ordinary OpenMP on a single node, then
porting it to Cluster OpenMP is not recommended. The scalability for Cluster OpenMP
is in most cases worse than for ordinary OpenMP because Cluster OpenMP has higher
overheads for almost all constructs, and sharable memory accesses can be costly.
Ensure that your code gets good speedup with “ordinary” OpenMP*.
To test for this condition, run the OpenMP* form of the program (a program compiled
with the –openmp option) on one node, once with one thread and once with n threads,
where n is the number of processors on one node.
For the most time-consuming parallel regions, if the speedup achieved for n threads is
not close to n, then the code is not suitable for Cluster OpenMP. In other words, the
following formula should be true: Speedup = Time(1 thread) / Time(n threads) = ~n
NOTE:
This measure of speedup is a scalability form of speedup. This measure is not the
same as the speedup that measures the quality of the parallelization. That type of
speedup is calculated as follows: Speedup = Time(serial) / Time(n threads).
Your code has good locality of reference and little synchronization.
An OpenMP program that gets excellent speedup may get good speedup with Cluster
OpenMP as well. However, the data access pattern of your code can make Cluster
OpenMP programs scale poorly even if it scales well with ordinary OpenMP. For
14
Document Number: 309076-003US
When to Use Cluster OpenMP*
example, if a thread typically accesses large amounts of data that were last written by
a different thread, or if there is excessive synchronization, Cluster OpenMP may spend
large amounts of time sending messages between nodes, which can prevent good
speedup.
If you are not sure whether your code meets these criteria, you can use the Cluster
OpenMP* Suitability Test described in the following section to verify that Cluster
OpenMP* is appropriate for your code.
User Manual
15
Cluster OpenMP*
4
Compiling a Cluster OpenMP* Program
To compile your ported program for use with Cluster OpenMP, use the
-cluster-openmp compiler option. This option produces a Cluster OpenMP executable.
Alternatively, you can use the –cluster-openmp-profile option to produce a
program that includes the gathering of detailed performance statistics. Use detailed
performance statistics to analyze your program’s performance using the Cluster
OpenMP* suitability script, or Intel® Thread Profiler (see Chapter 9 , Evaluating
Cluster OpenMP* Performance and Section 11.2, Intel® Thread Profiler).
You can use these options with both the Intel® C++ Compiler (icc) and the Intel®
Fortran Compiler (ifort). Use one of the following compiler options to generate code
for Cluster OpenMP:
For the Intel® C++ Compiler:
$ icc –cluster-openmp options source-file
$ icc –cluster-openmp-profile options source-file
For the Intel® Fortran Compiler:
$ ifort –cluster-openmp options source-file
$ ifort –cluster-openmp-profile options source-file
The –cluster-openmp and –cluster-openmp-profile options automatically link the
program with the proper run-time library. The –cluster-openmp-profile option also
performs extra checking during execution to make sure that the OpenMP constructs
are used properly.
16
Document Number: 309076-003US
Running a Cluster OpenMP* Program
5
Running a Cluster OpenMP* Program
To run your compiled Cluster OpenMP program, do the following:
1.
Verify that a kmp_cluster.ini file exists in the current working directory.
2.
Optionally, run the configuration checker script as follows:
T
a.
T
Locate the configuration checker script in the <CLOMP tools dir> directory.
See Section 1.4 Related Information for instructions on downloading this
script and other examples from the web.
T
XRR
b.
X
RRX
At the command prompt, type
$ clomp_configchecker.pl program-name
Where program-name is the name of your compiled executable.
The script does the following:
T
T
T
c.
3.
T
1.
Verifies that the supplied argument is a valid executable
2.
Checks for and parses the kmp_cluster.ini file.
3.
Pings each node to verify the connection to each node in the
configuration file.
4.
Tests a simple rsh (or ssh) command.
5.
Confirms the existence of the executable on each node.
6.
Verifies the OS and library compatibility of each machine.
7.
If an inconsistency is detected, the script writes a warning messagel. If
there is a configuration error, the script writes an error message and
exits.
8.
Creates a log file, clomp_configchecker.log, in the current working
directory.
T
T
T
T
T
T
T
T
Optionally, review the log file produced by the configuration checker script.
After correcting any errors reported by the script, type the name of the executable
file to execute the program, for example: $ ./hello.exe. Your executable should
run normally.
T
5.1
T
X
T
Cluster OpenMP* Startup Process
There are two ways to start a Cluster OpenMP program:
User Manual
•
Default startup. The default startup method is activated when you type the
name of the Cluster OpenMP executable file on the command line. It uses a
custom-built mechanism for spawning processes on remote nodes. This process is
described in this section.
•
MPI startup. The other method uses the MPI startup mechanism for spawning
remote processes. The MPI startup mechanism can make use of the MPI that is
17
Cluster OpenMP*
available on a given system. Cluster OpenMP-specific information about using the
MPI startup mechanism is given in Chapter 6, MPI Startup for a Cluster OpenMP*
Program. It is especially useful for running a Cluster Program with a cluster
queueing system.
NOTE:
The Cluster OpenMP startup mechanism does not change the communication
mechanism used after the program is started. In other words, a Cluster OpenMP
program started with the MPI startup mechanism does not communicate by MPI_Send
and MPI_recv.
Whichever startup mechanism you use, the general process is largely the same. It is
not necessary to understand it in order to use Cluster OpenMP. However, it is
described here in general terms to give you a sense of how it works.
First, the Cluster OpenMP runtime library queries your environment. The system
makes an effort to duplicate important parts of your environment in the home process
on each remote process. The system captures and stores the following key
environment variable values for later transmission to the remote processes:
PATH,
SHELL,
LD_LIBRARY_PATH.
The runtime library captures the following shell limits, then
transmits them to the remote processes:
core dump size,
cpu time,
file size,
locked-in memory addresses,
memory use,
number of file descriptors,
number of processes,
resident set size,
stack size, and
virtual memory use.
Next, the system establishes the Cluster OpenMP options to be used for the current
run. The following steps are used to find an initialization file in which the options are
specified. At the first point in these steps where an initialization file is found, the
process stops:
18
1.
Look for a kmp_cluster.ini file in the current working directory at the time the
program is run.
2.
If the environment variable KMP_CLUSTER_PATH has a value, use it as a path in
which to search for a .kmp_cluster file.
3.
Check your home directory for a .kmp_cluster file.
4.
Use the following built-in defaults:
hostlist=<current node>
processes=1,
process_threads=1, and
Document Number: 309076-003US
Running a Cluster OpenMP* Program
If an initialization file is found, it is read to establish values for the options. If not
found, default values are set, as described in step 4 above. Cluster OpenMP options
are processed and any environment variable definitions in the file are applied to the
home process and stored for transmission to the remote processes.
Then, the runtime library checks the KMP_CLUSTER_DEBUGGER environment variable
(that you can set). If it has a value, then the library checks the command that started
the program to see whether it matches that value (for example, gdb). If it matches,
then the system prepares to start up all remote processes in the same debugger. If
there is no match, the program starts normally.
T
T
T
T
The home process then opens sockets for each remote process in turn and constructs
a command string that is launched to remote processes through an appropriate
remote shell command (rsh or ssh). One socket is set up for communication in each
direction between each pair of processes for each thread.
T
T
T
T
Once communications are set up between the processes, the Cluster OpenMP runtime
system initializes itself. Threads are started to handle asynchronous communication
between the processes. The system-wide sharable memory is initialized and system
control information is allocated there. System-wide locks are allocated and initialized,
the OpenMP control structure is initialized, all OpenMP threads are started, and all
except the master thread on the home process wait at a barrier for the first parallel
region. The same number of OpenMP threads are started on each node, controlled by
the process_threads option.
T
T
Finally, control returns from the initialization and the master thread on the home node
starts running your program.
5.2
Cluster OpenMP* Initialization File
This section describes how to use and customize the Cluster OpenMP* initialization
file, kmp_cluster.ini for your use.
T
5.2.1
T
Overall Format
You put the Cluster OpenMP initialization file, kmp_cluster.ini, in the current
working directory that is active when you run your program. The initialization file
consists of the following parts:
T
•
The options line. The first non-blank, non-comment line in the file is considered
to be the options line. You can continue this line on as many lines as you want by
using \ as the last character in each continued line.
T
User Manual
T
T
19
Cluster OpenMP*
•
The environment variable section. All of the non-blank, non-comment lines
following the options line are considered to be in the environment variable section.
Each line in the environment variable part must be of the form: <environment
variable name> = <value>. Where <value> is evaluated in the context of your
shell. Any values that are permitted by the shell are acceptable as values. The
<value> is resolved on the home process, then the value is transmitted to each
remote process.
T
T
T
T
Comments. Optionally, comments are designated by the # character as the first
character on a line. # appearing in any other position in a line of the
kmp_cluster.ini file has no special meaning, and there are no end-of-line
comments.
•
T
T
T
T
T
•
T
Blank lines can appear in the file and are ignored.
The available options are described in the following section.
5.2.2
Options Line
The following table describes the options that may be specified in the options line of
the kmp_cluster.ini file, their arguments, and rules for their use:
T
T
Table 3 Options Line
Option
Default
Description
Notes
(preceded by --)
If a value for
omp_num_threads is
specified, the default value
is equal to
processes=integer
If the value set for ompnum-threads does not
equal (processes *
process_threads),
Number of processes to
use.
T
T
T
T
omp_num_threads /
process_threads
Cluster OpenMP* issues an
error message and exits.
T
Otherwise, the default is
equal to the number of hosts
in the host pool.
process_threads=
integer
omp_num_threads=
T
T
T
T
integer
hostlist=host,hos
t,…
T
processes *
process_threads
T
(home node)
T
20
T
Number of OpenMP*
threads.
List of host names in the
host pool.
Name of a hostname file.
The hostname file
consists of a list of
hostnames, one per line,
which defines the host
pool.
hostfile=filename
launch=keyword
Number of threads to use
per process.
1
rsh
These options are mutually
exclusive. They specify the
host pool, with the default
pool consisting of the home
node. Processes are started
on hosts in the host pool in a
round-robin fashion until the
appropriate number of
processes have been
started.
Keywords: {rsh, ssh}
The method for launching
the Cluster OpenMP*
program on remote
T
T
Document Number: 309076-003US
Running a Cluster OpenMP* Program
sharable_heap
256M
=integer[K|M|G]
transport=keyword
tcp
adapter=name
none
nodes.
The initial number of
bytes to allocate for
sharable memory. Valid
suffixes are K for
kilobytes, M for
megabytes, and G for
gigabytes.
Keywords: {tcp,
dapl}
The network transport to
use for communication
between Cluster
OpenMP processes.
Name of the DAPL
adapter to use.
For example,
You must specify a value if
transport=dapl is
specified.
--adapter=Openib
-ib0.
suffix=string
null
startup_timeout=
integer
30
IO=keyword
system
Hostname suffix to
append to host names in
the host pool. This is
useful when a cluster has
multiple interconnects
available.
Set the number of
seconds to wait for
remote processes to
startup. If any process
takes longer than this
time period to startup, the
program is aborted.
Keywords: {system,
debug, files}
system writes stderr
and stdout according
to the rules of the shell.
debug redirects stdout
and stderr on remote
nodes to stderr on home
node and prefixes each
remote line with Process
x:, where x is the number
of the remote process.
files redirects
stderr to a file named
clomp-<process
id>-stderr and
stdout to a file named
clomp-<processid>-stdout.
User Manual
[no-]heartbeat
heartbeat
backing_store
=string
/tmp
Turn on / off the
heartbeat mechanism for
ensuring that all
processes are alive.
Sets the directory where
swap space is allocated
on each process for the
sharable heap. This
option is useful if /tmp
21
Cluster OpenMP*
[no-]divert_twins
5.2.3
no-divert_twins
resides on a partition that
lacks sufficient space for
the sharable swap
requirements of an
application.
Tells the runtime to
reserve memory for twin
pages in the backing
store directory.
Ordinarily, twins are
allocated space in the
system swap file.
Use this option if your
system swap space is not
large enough to
accommodate your
application’s memory usage.
Environment Variable Section
The effect of the environment variable part is to assign the value to the variable in the
environment during program startup, but before any OpenMP constructs are executed.
This environment variable assignment is done in the context of the shell you are
currently using.
The following variables are not allowed in the kmp_cluster.ini file:
PATH
SHELL
LD_LIBRARY_PATH
5.3
Input / Output in a Cluster OpenMP* Program
This section describes the use of input and output files in a Cluster OpenMP* program.
5.3.1
Input Files
When reading input files with a Cluster OpenMP program, you must note that each
node is running a separate operating system. This means that there is a separate file
system for each node. Therefore, there are separate file descriptors and file position
pointers on each node. This can make a Cluster OpenMP program behave differently
than the equivalent OpenMP program. Reading a sequential file advances the file
pointer within each node independently because the file control structures are private
to a node.
As a result, the common practice of opening a file in the serial part of the program by
the master thread and then reading it in parallel within a parallel region does not work
for a Cluster OpenMP program. The file would have to be opened on each node for this
to work. Care must be taken to make sure that each file open specifies the proper
path for the file on that node. If the user launching the program is in a different group
22
Document Number: 309076-003US
Running a Cluster OpenMP* Program
on a remote node, then there could be permission problems accessing the file on that
node.
A program reading stdin within a parallel region will fail unless the read is inside a
master construct, since no attempt is made to propagate stdin to remote nodes. The
home process is the only process that has access to stdin.
Reading an input file from the serial part of the program should behave as expected
since that is done only on the home process by a single thread.
5.3.2
Output Files
When creating output files with a Cluster OpenMP program, you must note (just as
mentioned in the previous section) that each node is running a separate operating
system. If all nodes try to create a file with the same filename in the same shared
directory, there will be a conflict that will have to be handled by the file system.
Output should be written to separate files whenever possible, or should be written in
the serial part of the program to avoid these conflicts.
For information on the options regarding stdout and stderr, see Section 13.3, NFS
Configuration.
5.3.3
Mapping Files into Memory
Files may be mapped into memory with special Cluster OpenMP routines that mirror
the mmap and munmap system calls. There are read/write and read-only versions of
mmap and munmap available within the Cluster OpenMP run-time library. Mapping a file
into memory and then reading the memory has the effect of reading the file. If the
read/write version of mmap is used, unmapping the file has the effect of writing the
memory image back out to the file. See Section 12.8 , Memory Mapping Files, for
more information.
5.4
System Heartbeat
In a multi-process program, the Cluster OpenMP run-time system uses a heartbeat
mechanism to allow it to exit all processes cleanly in the event of a program crash.
The heartbeat mechanism is enabled by default, although it is possible to turn it off
with the --no-heartbeat option, if that is desired. The heartbeat adds very little
overhead in the common case because it merely has to keep track of whether it has
sent a message to a particular process during a given time period (called the
User Manual
23
Cluster OpenMP*
heartbeat period). If it has, it does nothing. If it has not, then a special heartbeat
message is sent to that process.
If process a has not heard from process b in a certain number of heartbeat periods,
then process a assumes that process b crashed and process a exits. Using this
mechanism, all processes will shut down if any process fails.
The heartbeat period is set at ten seconds. The number of heartbeat periods to wait
before the program is killed is based on the number of processes in the cluster:
Number-of-heartbeat-periods = ceiling(number-of-processes / 10) + 1
If the number-of-processes is equal to one, then the heartbeat is disabled.
If there is no heartbeat mechanism and one process fails, the rest of the processes
eventually attempt to synchronize with the failed process, and the program hangs as a
result. To remove these hanging processes, you must kill each one manually.
5.5
Special Cases
This section describes cases requiring special attention.
5.5.1
Using ssh to Launch a Cluster OpenMP* Program
The default behavior for Cluster OpenMP is to launch remote processes with the
remote shell rsh. If a more secure environment is required, you can use ssh to launch
remote processes by specifying the --launch=ssh option. It is your responsibility to
make sure that proper authentication is established between the home process and all
remote processes before the Cluster OpenMP program is run.
It is most convenient if you configure the system to not require a password for ssh.
5.5.2
Using a Cluster Queuing System
It is recommended that you use the MPI startup mechanism to run a Cluster OpenMP
program on a cluster managed by a queuing system such as PBS. There are usually
mechanisms in place in such an environment to help MPI programs mesh well with the
queuing system. See Chapter 6, MPI Startup for a Cluster OpenMP* Program for
details.
24
Document Number: 309076-003US
MPI Startup for a Cluster OpenMP* Program
6
MPI Startup for a Cluster OpenMP*
Program
You can start Cluster OpenMP* codes using the same mechanisms as Intel MPI codes.
For full details of the MPI startup mechanism see the Intel® MPI Reference Manual.
This chapter describes only Cluster OpenMP specific issues. It assumes you are
familiar with MPI.
NOTE:
Intel® MPI must be installed on your cluster to use the MPI startup mechanism for
Cluster OpenMP.
Consider the following example of using the MPI startup mechanism:
$ mpiexec
–n 2
hello.exe
The MPI startup mechanism makes it much easier to start a Cluster OpenMP program
in a queuing system environment, such as with the Portable Batch System (PBS*).
NOTE:
6.1
Even when a Cluster OpenMP program is started with the MPI startup mechanism, it
does not use MPI sends and receives internally. The startup mechanism does not
change how Cluster OpenMP communicates internally.
Cluster OpenMP* Startup File
When you start a Cluster OpenMP program by using mpirun or mpiexec, the Cluster
OpenMP startup file is still read by the first process in the Cluster OpenMP program.
However, since all of the Cluster OpenMP processes have already been started before
the startup file is read, the MPI startup mechanism ignores or overrides some items in
the startup file.
Table 4 MPI Replacements
Ignored Item
User Manual
MPI Replacement
--processes=count
-n count argument to MPI startup command
--hosts=hostlist
mpdboot configuration
--hostfile=hostfile
mpdboot configuration
--launch=launchmethod
mpdboot configuration
25
Cluster OpenMP*
--IO=
6.2
-l argument to MPI startup command is a partial replacement
Network Interface Selection
Cluster OpenMP does not understand the I_MPI_DEVICE environment variable. Use the
–transport and –adapter options in the Cluster OpenMP startup file to select the
network interface for a Cluster OpenMP program.
6.3
Environment Variables
By default, MPI startup propagates all of the environment variables to every process
in the job.
Environment variables set in the Cluster OpenMP startup file are propagated to all of
the processes. However it is possible that the behavior of the code may be different
when started by the MPI startup mechanism because in this case the environment
variables in the Cluster OpenMP startup file are propagated after the processes have
been started, whereas in the non-MPI startup mode, the environment variables are set
before the remote processes are started. Therefore, setting variables such as
LD_PRELOAD or LD_ASSUME_KERNEL in the Cluster OpenMP startup file will not have
the desired effect when the Cluster OpenMP code is started by MPI.
NOTE:
6.3.1
Setting certain environment variables in the Cluster OpenMP startup file is not
recommended practice, as even with normal Cluster OpenMP startup they will not
affect the initial process correctly if set only there (since the initial process must have
started to read the initialization file).
KMP_MPI_LIBNAME
To startup successfully under the MPI startup mechanism, a Cluster OpenMP code
needs to be able to dynamically open the MPI library. If you have already set up the
LD_LIBRARY_PATH necessary to run MPI codes, then that should be sufficient, and the
Cluster OpenMP code should be able to find libmpi.so. If you have not set up the
library path, or want explicitly to use a different MPI shared library, then you can set
the environment variable KMP_MPI_LIBNAME to the filename of the shared MPI library.
The Cluster OpenMP runtime will then attempt to open that file instead of libmpi.so.
26
Document Number: 309076-003US
MPI Startup for a Cluster OpenMP* Program
6.3.2
KMP_CLUSTER_DEBUGGER
Starting Cluster OpenMP processes under the control of a debugger specified by the
KMP_CLUSTER_DEBUGGER environment variable is not possible when the processes have
already been started by the MPI startup mechanism. Therefore this environment
variable has no effect when Cluster OpenMP processes are started by MPI. You can
use the normal MPI mechanisms for starting processes under the control of a
debugger.
6.3.3
KMP_CLUSTER_SETTINGS
As usual, setting KMP_CLUSTER_SETTINGS causes the Cluster OpenMP runtime to print
the values of the settings and Cluster OpenMP specific environment variables. If a
value is set as the result of the MPI startup mechanisms, then it is annotated as such.
For example:
(0) Cluster OMP Settings
(0)
(0)
Settings retrieved from
(0)
/localdisk/jhcownie/build/tmp/kmp_cluster.ini overridden by MPI
startup
(0)
(0)
processes (via mpiexec): 4
(0)
threads per process
: 2
(0)
total threads
: 8
(0)
hosts(via mpiexec)
: jhcownie-linux,jhcownie-linux,
(0)
jhcownie-linux,jhcownie-linux
(0)
network transport
: tcp
(0)
dapl adapter
: null
(0)
host suffix
: null
(0)
launch method
: mpiexec
(0)
sharable heap size
: 268435456
(0)
startup timeout
: 30
(0)
I/O handling method
: debug (ignored with MPI startup)
(0)
heartbeat
: off
(0)
backing store location : /tmp
(0)
twin swap directory
: system swap
User Manual
27
Cluster OpenMP*
7
Porting Your Code
This chapter describes the memory model used by Cluster OpenMP*and provides
instructions for porting your code for use with Cluster OpenMP with help from other
Intel tools.
7.1
Memory Model and Sharable Variables
The Cluster OpenMP* memory model is based on the OpenMP* memory model. One of
the keys to using this model is knowing whether a variable is used in a shared or
private way in a parallel region. If a variable is shared in a parallel region because the
variable name appears in a shared clause, or because of the defaults for a particular
parallel region, then the variable is used in a shared way. If a variable is used in a
shared way in at least one parallel region in a program, then it must be made
sharable in a Cluster OpenMP program. If a variable has the sharable attribute, then it
can be used in a shared way in any parallel region.
Specifying the difference between sharable and shared variables almost never arises
for OpenMP programs because they run on shared memory multiprocessors, where all
variables (except threadprivate variables) are automatically sharable.
The following table summarizes the assumptions made under OpenMP* versus the
assumptions made by Cluster OpenMP* concerning sharability.
Table 5 Assumptions about sharability of variables under OpenMP* and Cluster
OpenMP*
OpenMP*
All variables are sharable except
threadprivate variables.
Cluster OpenMP*
Sharable variables are variables that either:
Are used in a shared way in a parallel region
and allocated in an enclosing scope in the
same routine.
Appear in a sharable directive.
The compiler automatically applies these assumptions when –cluster-openmp or
-cluster-openmp-profile is specified. It automatically makes the indicated variables
sharable. All other variables are non-sharable by default.
28
Document Number: 309076-003US
Porting Your Code
Use the Intel compiler’s sharable directive to declare variables explicitly sharable, as
described in Section 7.6, Promoting Variables to Sharable.
XRR
7.2
X
X
X
Porting Steps
The process of porting an OpenMP code to Cluster OpenMP involves making sharable
all variables that are shared in a parallel region. The Intel® compiler automatically
does this for any stack-allocated variables in a routine that are shared in a parallel
region in the same routine, when you specify –cluster-openmp. Other variables that
are shared must be made sharable manually. Cluster OpenMP provides tools to help
you make variables sharable, including the following:
T
T
•
A Compiler pass. A special compiler pass that traces inter-procedurally to find
the allocation point of routine arguments that are shared in a parallel region.
•
Runtime check. A runtime check that finds shared usages of node-private heap
variables.
•
Language specific steps. For Fortran codes, there are compiler options that can
make whole classes of variables sharable. For C/C++, consider dynamic sharable
memory allocation.
Follow the steps in the sections below to port an OpenMP* program to Cluster
OpenMP.
7.2.1
Initial Steps
First, try the following:
1.
Verify that your code works correctly with OpenMP.
2.
If your code works correctly with OpenMP, try compiling it with the
-cluster-openmp option and then running it. If that also works correctly, then
you are done porting your code.
T
7.2.2
T
Additional Steps
If the initial steps do not work, try the following steps in order. These steps are
described in detail in the following sections.
1.
Try –clomp-sharable-propagation.
2.
Try KMP_DISJOINT_HEAPSIZE.
3.
For Fortran codes, use the options that make COMMONs, module variables, local
SAVE variables, and argument expressions sharable.
For C/C++, define the malloc family of routines to the kmp_sharable_malloc
family of routines.
For C++, use the appropriate sharable form for memory allocations.
T
T
T
T
T
User Manual
T
T
T
29
Cluster OpenMP*
Debug the program using ordinary techniques: Isolate the region causing the problem
and examine all the shared variables used to make sure they are all made sharable.
7.3
Identifying Sharable Variables with -clompsharable-propagation
The compiler contains an inter-procedural analysis pass that can identify some of the
variables that should be made sharable, but are not normally found by the compiler
because they are allocated in a different routine from the routine where they are
shared in parallel. To use this capability, use the -clomp-sharable-propagation and
–ipo compiler options as follows:
7.3.1
1.
Compile all the source files in your program using the –clomp-sharablepropagation and -ipo compiler options and link the resulting object modules to
produce an executable.
2.
Read the resulting compiler warnings and insert the indicated sharable directives
in your code.
3.
Rebuild and run the executable. If it runs correctly, you are done porting your
code.
Using –clomp-sharable-propagation
The -clomp-sharable-propagation option, used with the -ipo compiler option
causes the compiler to do an interprocedural analysis of data usage in the program. It
finds the allocation point for variables that are eventually shared in a parallel region in
the program. This process is useful for a variable in Fortran that is declared in one
routine, passed as an argument in a subroutine or function call, and then shared in a
parallel construct in some routine other than the one in which it was declared. It is
likewise useful for data in a C program that is declared in one routine, pointed at by a
pointer that is passed to a subroutine, then shared in a parallel construct by dereferencing the pointer. It can also be useful for C++ variables that are passed as
references to other routines and shared in a parallel construct. As an example of this
analysis, consider the following source files, pi.f and pi2.f:
Table 6 Sample Fortran code with variables that should be made sharable
Source File pi.f
double precision pi
integer nsteps
nsteps = 1000000
call compute(nsteps, pi)
print *, nsteps, pi
30
Source File pi2.f
subroutine compute(nsteps,
pi)
double precision pi, sum
integer nsteps
call calcpi(nsteps, pi, sum)
end
Document Number: 309076-003US
Porting Your Code
end
subroutine calcpi(nsteps, pi, sum)
double precision pi, sum, step
integer nsteps
double precision x
step = 1.0d0/nsteps
sum = 0.0d0
!$omp parallel private(x)
!$omp do reduction(+:sum)
do i=1, nsteps
x = (i - 0.5d0)*step
sum = sum + 4.0d0/(1.0d0 + x*x)
end do
!$omp end do
!$omp end parallel
pi = step * sum
End
To find the variables that must be declared sharable, use the following command:
$ ifort –cluster-openmp –clomp-sharable-propagation -ipo pi.f pi2.f
The resulting compiler warnings for this example are as follows:
IPO: performing multi-file optimizations
IPO: generating object file /tmp/ipo-ifortqKrZN4.o
fortcom: Warning: Sharable directive should be inserted by user as
'!dir$ omp sharable(nsteps)'
in file pi.f, line 2, column 16
fortcom: Warning: Sharable directive should be inserted by user as
'!dir$ omp sharable(sum)'
in file pi2.f, line 2, column 29
pi.f(18) : (col. 6) remark: OpenMP DEFINED LOOP WAS PARALLELIZED.
pi.f(17) : (col. 6) remark: OpenMP DEFINED REGION WAS PARALLELIZED.
The bold text indicates that the variables nsteps and sum should be made sharable by
inserting sharable directives in the source code at the specified lines in pi.f and
pi2.f. With the appropriate sharable directives, the corrected code is:
Source File pi.f
double precision pi
integer nsteps
!dir$ omp sharable(nsteps)
nsteps = 1000000
call compute(nsteps, pi)
print *, nsteps, pi
end
User Manual
Source File pi2.f
subroutine
compute(nsteps, pi)
double precision pi, sum
integer nsteps
!dir$ omp sharable(sum)
call calcpi(nsteps, pi,
sum)
end
31
Cluster OpenMP*
subroutine calcpi(nsteps,
pi, sum)
double precision pi, sum,
step
integer nsteps
double precision x
step = 1.0d0/nsteps
sum = 0.0d0
!$omp parallel private(x)
!$omp do reduction(+:sum)
do i=1, nsteps
x = (i - 0.5d0)*step
sum = sum + 4.0d0/(1.0d0
+ x*x)
end do
!$omp end do
!$omp end parallel
pi = step * sum
End
Compile and execute the two altered source files by typing:
$ ifort –cluster-openmp pi.f pi2.f –o pi.exe
$ ./pi.exe
In this example, the compiler can identify all the variables that need to be made
sharable for the program to function properly. This is not always true. For various
technical reasons, the compiler may not be able to find all such variables. In this case,
you must take additional steps to identify variables that should be made sharable.
7.4
Using KMP_DISJOINT_HEAPSIZE
To catch node-private heap variables that are shared in a parallel region, use the
environment variable KMP_DISJOINT_HEAPSIZE and then either run your code under a
debugger (see Chapter 8, Debugging a Cluster OpenMP* Program) or just run it
normally. If a heap block is misused, the program issues a SIGSEGV immediately. If
you are running under a debugger, it should show you the point of misuse.
You can use the disjoint heap with a program compiled with optimization, but you can
get much more information about the source of the problem if you compile with
debugging information (“-g”) before running the code using the disjoint heap and
debugger.
32
Document Number: 309076-003US
Porting Your Code
For example, if you use csh to run your code with the disjoint heap enabled with
128*1024*1024 bytes allocated for it in each process, your code could look as
follows:
% setenv KMP_DISJOINT_HEAP 128M
% ./a.out
Cluster OMP Fatal: Proc#1 Thread#3 (OMP): Segmentation fault
(ip=0x40000000000013a0 address=0x20000000216159c8)
To convert the instruction pointer (“ip”) to a source line you can use Linux’ addr2line
utility, as follows:
% addr2line -e a.out 0x40000000000013a0
/usr/anon/tmp/foo.c:9
This example shows that the access to the heap block which should have been
allocated with kmp_sharable_malloc happened at line 9 in the file foo.c. With that
information you can read the code to determine the point at which that block was
allocated, and change the allocation routine as appropriate.
7.4.1
How the Disjoint Heap Works
When porting a C or C++ code to Cluster OpenMP it is often difficult to find all of the
places where memory is allocated which need to be changed to use the routine
kmp_sharable_malloc, rather than malloc. As a result, while you port, you might
inadvertently pass pointers to blocks of store which are local to a particular process to
other processes which then attempt to read from them. Often such pointers are also
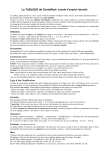
valid in the process to which they have been passed, as illustrated in Figure 1: Normal
Heap. In such a case, accessing these pointers does not cause a SIGSEGV signal.
However the data that is read corresponds to whatever data happens to be allocated
at that address in the process doing the reading, rather than the intended value.
User Manual
33
Cluster OpenMP*
Figure 1 Normal Heap Address Space Layout
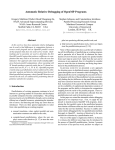
To help you find such problems, you can direct the heap code in Cluster OpenMP to
allocate the heap at a different address in each process which makes up the Cluster
OpenMP program, as shown in Figure 2 Disjoint Heap Address Space Layout. This
direction ensures that when the program attempts to access a pointer to an object in
the local heap from a processor other than the one which allocated it the process
immediately issues a SIGSEGV, rather than continuing to execute with wrong data
values, making the problem much easier to find.
34
Document Number: 309076-003US
Porting Your Code
Figure 2 Disjoint Heap Address Space Layout
To enable the disjoint heap, set the environment variable KMP_DISJOINT_HEAPSIZE to
a size. Use use ‘K’ for KiB (1KiB is 1024 bytes) or ‘M’, for MiB (1MiB is 1024*1024
bytes). This environment variable sets the size of the disjoint heap in each process.
The minimum value is 2MB. If you set a value lower than the minimum, it is forced to
2MB. For example, a recommended value is:
KMP_DISJOINT_HEAPSIZE = 2M
The total virtual address space consumed by the disjoint heap is the size you set for
KMP_DISJOINT_HEAPSIZE multiplied by the number of processes.
If any process in your program uses more heap space than is allocated for the disjoint
heap, a warning message appears. Allocation then continues from a heap expansion
area which is very likely not disjoint.
Since the disjoint heap consumes much more address space than the normal heap it is
recommended that you use KMP_DISJOINT_HEAPSIZE for debugging, but not for large
production runs.
7.5
Language-Specific Steps
If the previous two porting steps don’t produce a working program, the next step is to
try some language-specific fixes, as detailed in this section. For each language, it is
User Manual
35
Cluster OpenMP*
important to check for the shared use of dynamically allocated memory. If
dynamically-allocated variables are being shared in the parallel construct, or any of
the routines called from inside the parallel construct, then you must allocate them out
of sharable memory according to the demands of the language you use.
7.5.1
Fortran Code
In Fortran, try to isolate the offending variables by using the four Fortran-specific
options: -clomp-sharable-commons, -clomp-sharable-modvars, -clomp-sharablelocalsaves, and –clomp-sharable-argexprs. See Section 0,
Language
Syntax
C/C++
#pragma intel omp sharable( variable [, variable . . . ]
)
Fortran
!dir$ omp sharable( variable [, variable . . . ] )
Fortran Considerations for more information. You can use an ALLOCATABLE variable in
a parallel construct in a shared way. If you do so, put the variable name of such a
variable in a sharable directive.
7.5.2
C and C++ Code
In C, if memory is allocated with malloc or one of the other malloc-type routines and
then used in a shared way, allocate it using kmp_sharable_malloc instead. See
Section 10.6, Cluster OpenMP* API Routines for a list of the malloc-type routines
available.
Replace the malloc-type routine with its Cluster OpenMP analogue. Make sure to
replace free calls for this memory with kmp_sharable_free. It may be useful to use
code such as the following:
#define
#define
#define
#define
malloc kmp_sharable_malloc
free kmp_sharable_free
calloc kmp_sharable_calloc
realloc kmp_sharable_realloc
In C++, memory allocated with new and shared in a parallel region must be allocated
in sharable memory. See Section 10.7.1, C++ Sharable Allocation.
In C and C++, it is important to check whether a routine called from within a parallel
region is using some file-scope data in a shared way, without the file-scope data being
declared sharable.
36
Document Number: 309076-003US
Porting Your Code
7.5.3
Using Default(none) to Find Sharable Variables
If your program does not function correctly after the preceding steps, use the
default(none) clause to find variables that need to be made sharable. This final step
should find all the remaining variables that need to be made sharable. To do this:
7.6
1.
Place a default(none) clause on a parallel directive that seems to reference a nonsharable variable in a shared way. This clause causes the compiler to report all
variables that are not explicitly mentioned in a data sharing attribute clause on
the parallel directive, and it alerts you to all the variables that must be shared,
and as a consequence, sharable.
2.
Add variables mentioned in the messages to a private or shared clause for the
parallel region and recompile, until no compiler default(none)appear.
3.
Use the –clomp-sharable-info compiler option to report all variables
automatically promoted to sharable.
4.
Verify that all variables in the shared clause are either listed in a clomp
sharable-info message or in an explicit sharable directive.
5.
For a C/C++ program, verify that data shared by dereferencing a pointer is made
sharable, since it does not show up in a default(none) message
Promoting Variables to Sharable
This section describes how to promote variables to sharable. If the procedures
described in section 7.3, Identifying Sharable Variables with -clomp-sharablepropagation indicate that certain variables need to be made sharable, follow the
instructions in the following sections to make the variables sharable.
7.6.1
Automatically Making Variables Sharable Using the
Compiler
You do not need to specify sharable for all variables that must be allocated in sharable
memory. The appropriate Intel® compiler can automatically determine which
variables must be sharable and can automatically promote these variables to sharable.
If a variable is stack-allocated in a certain program scope, for example, local variables
in a Fortran program unit, or variables declared within a {} scope in C or C++), and
the variable is also used as a shared variable or in a firstprivate, lastprivate, or
reduction clause in any parallel region in that scope, then the compiler automatically
promotes the variable to be sharable.
User Manual
37
Cluster OpenMP*
7.6.2
Manually Promoting Variables
Manually promoting variables means specifying variables in a sharable directive.
In C/C++, variables you need to specify sharable include:
•
File-scope variables
•
Static variables and stack-allocated variables that are shared in a parallel region
outside the current lexical scope or are passed by-reference to a routine where it
is used in a shared way
•
Static variables and stack-allocated variables that are:
⎯ shared in a parallel region outside the current lexical scope, or
⎯ passed by-reference to a routine where it is used in a shared way
In Fortran, these are COMMON block names, module variables, variables with the SAVE
attribute and variables declared locally in a routine and are shared in a parallel region
outside the current routine.
T
7.6.3
T
T
T
Sharable Directive
Use the sharable directive to allocate a variable in sharable memory at compile time.
The syntax of the sharable directive is as follows:
T
T
Table 7 Sharable directives for C/C++ and Fortran
Language
7.6.4
Syntax
C/C++
#pragma intel omp sharable( variable [, variable . . . ]
)
Fortran
!dir$ omp sharable( variable [, variable . . . ] )
Fortran Considerations
In Fortran, the sharable directive must be placed in the declaration part of a routine,
such as a threadprivate directive.
T
T
Common block members can not appear in a sharable directive variable list, since
they could break storage association. A common block name (between slashes) can
appear in a sharable list, however. For example an acceptable version is:
!dir$ omp sharable(/cname/)
Variables appearing in an EQUIVALENCE statement should not appear in a sharable list
since this could break storage association. If variables that appear in an EQUIVALENCE
statement must be declared sharable, you must place them all together in a new
COMMON statement, and use the common block name in the sharable directive.
T
T
T
T
38
T
T
Document Number: 309076-003US
Porting Your Code
You can not use variables appearing in a Fortran EQUIVALENCE statement in a
SHARABLE directive.
T
T
T
T
The Intel® Fortran compiler provides several options that you can use to make each
of the following classes of variables sharable by default:
•
COMMONs
T
T
•
Module variables
•
Local SAVE variables
•
Temporary variables made for expressions in function and subroutine calls.
T
T
For Fortran, use the options in the following table to change how the defaults for
making sharable variables are interpreted by the compiler.
Table 8 Fortran options that control defaults for making variables sharable
Option
Description
[-no]-clomp-sharableargexprs
An argument to any subroutine or function call that is an
expression (rather than a simple variable) is assigned to a
temporary variable that is allocated in sharable memory.
Without this sub-option, such temporary variables are
allocated in non-sharable memory.
The default is –no-clomp-sharable-argexprs.
T
[-no]-clomp-sharablecommons
T
All common blocks are placed in sharable memory by
default. Without this sub-option, all common blocks are
placed in non-sharable memory, unless explicitly declared
sharable.
The default is –no-clomp-sharable-commons.
T
[-no]-clomp-sharablelocalsaves
T
All variables declared in subroutines or functions that are
not in common blocks, but have the Fortran SAVE
attribute are placed in sharable memory by default.
Without this sub-option, all such variables are placed in
non-sharable memory, unless explicitly declared sharable.
The default is –no-clomp-sharable-localsaves.
T
[-no]-clomp-sharablemodvars
T
All variables declared in modules are placed in sharable
memory by default. Without this sub-option, all module
variables are placed in non-sharable memory, unless
explicitly declared sharable.
The default is --no-clomp-sharable-modvars.
T
T
Each of these options makes all variables of a certain class sharable throughout the
program. See Chapter 15, Reference, for more information about these options.
XRR
X
X
X
You can turn all of these options on to help ensure that all the right data will be made
sharable. However, the fewer variables made sharable unnecessarily, the better. So it
User Manual
39
Cluster OpenMP*
is best to use these switches as part of an investigation, then only make the necessary
variables sharable with a sharable directive.
7.7
Declaring omp_lock_t Variables
The omp_lock_t variables are used for OpenMP locks and for the Cluster OpenMP
condition variable API routines such as kmp_lock_cond_wait(). You must allocate
these variables in sharable memory. Allocation is done automatically if they are
allocated on the stack and are shared in a parallel region in the same routine. They
may be mentioned in the list of a sharable directive, if necessary.
If you are using omp_lock_t variables, you must declare them sharable.
7.8
Porting Tips
The compiler does not automatically make sharable an expression that is passed as an
actual argument to a Fortran routine and then used directly in a parallel region. You
can create a new sharable variable and copy the value to it, then use that variable in
the parallel region as shown in the following example.
NOTE:
The actual argument is an expression: 2*size. To pass to the argument of the
subroutine foo, the compiler makes a temporary location to save the value of the
expression in before passing it to subroutine bound. The temporary location is then
passed to the subroutine.
integer size
!dir$ omp sharable(size)
size = 5
call foo(2*size)
end
subroutine foo(bound)
integer bound
!$omp parallel do
do i=1,bound
!$omp critical
print *,'hello i=',i
!$omp end critical
enddo
end
40
Document Number: 309076-003US
Porting Your Code
To automatically make the temporary variable passed to subroutine foo sharable,
specify the compiler option -clomp-sharable-argexprs on the compile line. This
option causes all such expressions used as arguments to function or subroutine calls
to be transformed as follows:
integer size, temp
!dir$ omp sharable(size, temp)
size = 5
temp = 2*size
call foo(temp)
end
subroutine foo(bound)
integer bound
!$omp parallel do
do i=1,bound
!$omp critical
print *,'hello i=',i
!$omp end critical
enddo
end
User Manual
41
Cluster OpenMP*
8
Debugging a Cluster OpenMP*
Program
This chapter describes some strategies for debugging Cluster OpenMP* applications
using the Intel® debugger (idb), and two common debuggers: the GNU* debugger
(gdb*) and the Etnus* debugger (TotalView*).
8.1
Before Debugging
Before you begin any debugging, turn off the heartbeat mechanism with the
–no-heartbeat option in the kmp_cluster.ini file. Turning off the heartbeat ensures
that the Cluster OpenMP library does not time-out and kill the processes. See section
5.4, System Heartbeat for more on heartbeats.
Debuggers normally handle various signals, including SIGSEGV. This can be a problem
when debugging a Cluster OpenMP program, which uses the SIGSEGV signal as part of
its normal operation. Cluster OpenMP installs its own handler for SIGSEGV and uses it
as part of its memory consistency protocol. Unless you instruct it to do otherwise,
every SIGSEGV signal that Cluster OpenMP causes is sent to the debugger. To prevent
this, you must tell each debugger not to intercept SIGSEGV. You do this differently in
each debugger, as described in the following sections.
To catch SIGSEGV signals that are caused by program errors, Cluster OpenMP causes
them to call a routine called __itmk_segv_break. You can be notified of a program
error causing a SIGSEGV by setting a breakpoint in that routine. The following sections
provide instructions for doing so for each debugger.
8.2
Using the Intel® Debugger
You must tell the Intel debugger (idb) not to intercept SIGSEGV signals by creating a
.dbxinit file in your home directory containing the line:
ignore segv
To set a breakpoint in the routine __itmk_segv_break to catch addressing errors, use
the following idb command:
stop in __itmk_segv_break
42
Document Number: 309076-003US
Debugging a Cluster OpenMP* Program
You can start remote processes in separate windows by using the
KMP_CLUSTER_DEBUGGER environment variable, setting its value to idb. Execute the
program as follows:
idb <executable>
The remote processes starts in idb. The DISPLAY environment variable in the
kmp_cluster.ini file determines where the remote idb sessions can be viewed.
8.3
Using the gdb* Debugger
To cause gdb to ignore SIGSEGV signals, the .gdbinit file must be located in your
home directory and must contain the following line:
handle SIGSEGV nostop noprint
You should set a break point in the routine __itmk_segv_break, to catch errors in
your code that cause SIGSEGVs. Use the following command:
break __itmk_segv_break
You can cause each remote process to enter the debugger in a separate window by
using the KMP_CLUSTER_DEBUGGER environment variable. If the
KMP_CLUSTER_DEBUGGER environment variable is set to gdb and you start the program
on the home process with:
gdb <executable>
The remote processes also start up in the gdb debugger. If the DISPLAY environment
variable is also set in the kmp_cluster.ini file, then each remote process starts in
the debugger and opens an X Window* for the debugger session to wherever the
DISPLAY is pointing to.
8.4
Using the Etnus* TotalView* Debugger
You can tell TotalView* to pass any SIGSEGV signals on to the program by creating a
.tvdrc file in your home directory, containing the line:
dset TV::signal_handling_mode {Resend=SIGSEGV}
You should set a breakpoint in __itmk_segv_break so that TotalView can catch
addressing errors.
Execute the program with TotalView* as follows:
totalview <executable>
User Manual
43
Cluster OpenMP*
TotalView automatically acquires the Cluster OpenMP processes. Follow the
instructions provided in the TotalView documentation as if you are debugging an MPI
program.
8.5
Redirecting I/O
A debugging method that is sometimes useful is to separate the I/O streams of the
various processes. The default option for Cluster OpenMP is to enable the system to
redirect the standard output and standard error streams. Therefore there is no way to
distinguish between outputs from two different processes without modifying your
program. Cluster OpenMP supplies the following three kmp_cluster.ini file options to
modify this behavior:
--IO=system // This is the default option.
--IO=debug //
The --IO=debug option redirects standard error and standard output for remote
processes to standard error on the home process. It prefixes remote output lines with:
Process <process-id>
Where process-id is a numerical identifier of the process. IDs are assigned starting
at 0 in the order that the hosts appear on the command line.
The --IO=files option takes standard error and standard output from remote
processes and redirects them to files named clomp-<process-id>-stderr and clomp<process-id>-stdout, respectively.
These options are for handling I/O of remote processes only. The system always
handles the I/O for the home process.
44
Document Number: 309076-003US
Evaluating Cluster OpenMP* Performance
9
Evaluating Cluster OpenMP*
Performance
This section describes a set of steps you can use to test the performance of Cluster
OpenMP* for your program. The process includes using a script packaged with the tool
that can help you determine whether a given OpenMP* program is suitable for running
on a cluster with Cluster OpenMP, and how many nodes are appropriate.
CAUTION: This section assumes that you have access to at least one multi-processor Itanium®based or processors with Intel® 64 architecture or compatible processors.
To evaluate your code’s performance with Cluster OpenMP, do the following in order:
1.
Ensure that your code gets good speedup with Cluster OpenMP* in one process.
To do this:
⎯ Port the code to Cluster OpenMP by adding sharable directives wherever they
are needed. See Chapter 7, Porting Your Code.
⎯ Run the one-process Cluster OpenMP form of the program (compiled with
-cluster-openmp) with one thread and record runtime.
⎯ Run the one-process Cluster OpenMP form of the program with n threads,
where n is the number of processors in one node.
⎯ If the speedup achieved for n threads is not close to n, then the code is not
suitable for Cluster OpenMP. Consider the formula:
Speedup = Time(1 thread) / Time(n threads)
Speedup should be approximately equal to n.
XRR
T
X
RRX
X
T
T
2.
T
Run the Cluster OpenMP code as multiple processes on one node.
Build the code with –cluster-openmp-profile and make at least two runs on one
or more nodes of the cluster, collecting the .gvs files produced from each run:
one process, one thread per process (options
process_threads=1
processes=1)
k processes, one thread per process (options
process_threads=1
processes=k)
T
T
T
T
The projections are most accurate for k nodes.
T
T
This step simulates a multi-node run by using multiple processes on one or more
nodes. Over-subscribing a node may cause the program to run much slower than
it would on k nodes, but in this step execution time is not being measured.
Rather, statistics are being gathered about how many messages are exchanged by
the processes and the volume of data being transmitted in those messages.
This step produces files with the suffix *.gvs.
T
User Manual
T
45
Cluster OpenMP*
It is recommended that you name these to identify the run they each represent,
for instance t1n1.gvs (for 1 thread and 1 node), and t1n2.gvs (for one thread
and two nodes). The files are the inputs to step 3.
3.
Run the suitability script.
Run the suitability program, giving the *.gvs files from the previous step as
input:
clomp_forecaster [ options ] t1n1.gvs t1nk.gvs . . .
where options is one of the options shown in the following table:
Table 9 Options for clomp_forecaster
Option
Description
-b bandwidth
Specifies the maximum bandwidth for the interconnect being used
(in Mb/s).
-l latency
Specifies the minimum round-trip latency for UDP on the
interconnect being used (in microseconds). Can be calculated with
the clomp_getlatency script in <CLOMP tools dir>. See 1.4, Related
Information for instructions on downloading this script and other
examples from the web.
-t target
Specifies that the output should project speedup up to target nodes.
-w
Eliminates all warnings.
The output of this step is a comma-separated-values (CSV) file written to stdout.
NOTE:
46
The forecast results are for the specific workload you ran. Results may vary with
different workloads.
Document Number: 309076-003US
Evaluating Cluster OpenMP* Performance
4.
Open the *.CSV file in a spreadsheet program such as Microsoft Excel*. The
following image shows the output of a sample *.CSV file in Microsoft Excel*:
Figure 3 Sample output .CSV file
The numbers in rows 12 and 18 represent the number of nodes. The values MIN
and MAX are estimates of execution time (in seconds) for executing the program
on the indicated number of nodes (1 through 8). The values BEST and WORST are
estimates of scalability speedup, which is the ratio of execution time on 1 node to
the execution time on the corresponding number of nodes.
5.
User Manual
Produce a chart using the data in the SCALABLITY section of the table. Select the
data in the SCALABILITY section of the table, typically rows 18-20 and select
Insert > Chart to produce a chart such as the following:
47
Cluster OpenMP*
18
16
14
Scalability
12
PERFECT
10
BEST
8
WORST
6
4
2
0
1 2 3 4 5 6 7 8 9 10 11 12 13 14 15 16
Nodes
Figure 4 Predicted scalability speedup using Cluster OpenMP*
In this example, the chart indicates that the application should scale extremely
well with Cluster OpenMP. Worst-case performance is shown as a speedup of
about 15 on 16 nodes.
6.
Determine the optimum number of nodes for your code.
At this point, you should decide based on cost/performance criteria how many
nodes are right for you. Choosing the most appropriate number of nodes to use is
probably workload dependent.
NOTE:
Actual performance is usually between BEST and WORST cases.
NOTE:
Actual time is usually close to the average of the HIGH and LOW scalability
predictions.
NOTE:
The predictions are for applications using the stats-enabled library,
libclusterguide_stats.so, typically installed in the <compiler install
directory>/lib. This library has up to 10% overhead relative to the non-statsenabled library.
NOTE:
To improve performance, use Intel® Thread Profiler to tune your code. See
Section 11.2, Intel® Thread Profiler for details.
48
Document Number: 309076-003US
OpenMP* Usage with Cluster OpenMP*
10
OpenMP* Usage with Cluster
OpenMP*
This chapter presents a program development model and describes OpenMP*
considerations for working with Cluster OpenMP*.
10.1
Program Development for Cluster OpenMP*
This section presents an idealized program development model for Cluster OpenMP*.
The steps described here are not required, but are recommended.
10.1.1
Design the Program as a Parallel Program
If you have the luxury of writing the program from scratch, it is important to design it
with OpenMP parallelism in mind. A planned OpenMP program may differ significantly
from a naïve serial program that is parallelized by adding OpenMP directives. Write
your program according to the following guidelines:
10.1.2
•
Make parallel regions as large as possible
•
Use private data as much as possible
•
Do as little synchronization as possible
Write the OpenMP* Program
To write the OpenMP* Program:
1.
User Manual
Design a parallel program.
Pay special attention to the tasks in your design that can be done in parallel. The
ideal parallel application is one that has no serial code at all. However, most
interesting codes require some synchronization and communication between
threads. For best performance, synchronization and communication should be kept
to a minimum. You can use various techniques to reduce synchronization and
communication. For instance, instead of making a calculation on one thread and
sending the result to the other threads, it may be faster to do the calculation
redundantly on each thread. Also, avoid making the program depend on using a
certain number of threads, or doing special things on certain threads other than
49
Cluster OpenMP*
the master thread. This strategy enables the program to run on any machine
configuration.
10.2
2.
Debug the code serially.
If you have an existing serial code, start by debugging it as you normally would.
Or, compile your OpenMP* Program without using –openmp or –cluster-openmp
options to produce a serial program. Debug this program using a serial debugger
until this serial version of the code is working.
3.
Debug the parallel form of the code.
Add code as appropriate to parallelize the code. As in step 1, avoid making the
program depend on using a certain number of threads, and avoid doing special
things on threads other than the master thread. Compile using the –openmp option
to produce the parallel form of the program. Debug until it works.
4.
Mark sharable variables.
Ensure that all variables that are in firstprivate, lastprivate, reduction, or
shared clauses in the program are sharable.
Also, all variables that are shared by default in any parallel region must be
sharable. Any of these that are declared in the same routine in which they are
used in a parallel region are made sharable automatically by the compiler. You
must mark others with sharable directives or by specifying an appropriate
compiler option (for Fortran).
Follow the procedures described in 7, Porting Your Code to mark all variables
sharable.
5.
Build and run as a Cluster OpenMP program.
Compile with the –cluster-openmp option. The program should execute correctly.
Combining OpenMP* with Cluster OpenMP*
Some libraries such as the Intel® Math Kernel Library and the Intel® Integrated
Performance Primitives use OpenMP* directives for parallelism. These libraries are not
designed to execute across a cluster. When using such libraries in a Cluster OpenMP*
program, you must link the program with the Cluster OpenMP* runtime library instead
of the OpenMP* runtime library.
The Cluster OpenMP* runtime library detects when a directive has not been compiled
with –cluster-openmp. It runs a parallel region with the number of threads specified
by the –-process_threads option if the region is encountered outside of any Cluster
OpenMP* parallel region. Otherwise, it serializes the parallel region.
When linking such a library with a Cluster OpenMP* program, replace the OpenMP*
option with the corresponding Cluster OpenMP* option as follows:
Table 10 OpenMP* and corresponding Cluster OpenMP* Options
OpenMP* Option
-openmp
50
Replace with Cluster OpenMP* Option
-cluster-openmp
Document Number: 309076-003US
OpenMP* Usage with Cluster OpenMP*
-lguide
-lclusterguide and -lclompc
To ensure that you linked with the correct library, use the KMP_VERSION environment
variable as outlined in 10.5, Cluster OpenMP* Environment Variables. If you linked
correctly with Cluster OpenMP*, the version output should show Intel(R) Cluster OMP.
If not, the OpenMP* runtime library could be statically linked into the library you are
trying to use. In this the case, compile the program to produce object files and link
explicitly as follows:
<intel compiler> <obj files> -o <exe> –lclusterguide –lclompc –
l<other library>
As long as –lclusterguide appears before the other library on the link line, the
OpenMP* runtime library symbols will be resolved from the Cluster OpenMP* runtime
library instead of from the other library you are trying to use. To verify, use
KMP_VERSION to make sure you linked with Cluster OpenMP*. If you linked correctly
with Cluster OpenMP*, the version output should show Intel(R) Cluster OMP.
10.3
OpenMP* Implementation-Defined Behaviors
in Cluster OpenMP*
The OpenMP* specification at www.openmp.org requires an implementation to
document its behavior in a certain set of cases. This section documents these
behaviors for Cluster OpenMP.
10.3.1
Number of Threads to Use for a Parallel Region
The number of OpenMP threads that are started at the beginning of a given program
is the value of the omp_num_threads option after proper defaults are applied. This is
the maximum number of threads that can be used by any parallel region in the
program.
A parallel region can use fewer than the maximum number of threads by specifying a
value for the OMP_NUM_THREADS environment variable, or by using the
omp_set_num_threads() routine.
10.3.2
Number of Processors
The number of processors reported by omp_get_num_procs() is the sum of the
number of processors on all nodes.
User Manual
51
Cluster OpenMP*
10.3.3
Creating Teams of Threads
Cluster OpenMP does not support nested parallelism. If an inner parallel region is
encountered by a thread while a parallel region is already active, then the inner
parallel region is serialized and executed by a team of one thread.
10.3.4
Schedule(RUNTIME)
If the OMP_SCHEDULE environment variable is not set, the default schedule is static.
10.3.5
Various Defaults
In the absence of the schedule clause, Cluster OpenMP uses static scheduling.
Table 11 Defaults for various OpenMP* items
Item
Description
(internal control variable)
ATOMIC
Cluster OpenMP* replaces all atomic constructs with
critical constructs with the same unique name.
omp_get_num_threads
(nthreads-var)
If the number of threads has not been set by you, Cluster
OpenMP sets it to the maximum number of threads (the
product of the number of processes and the number of
threads per process).
omp_set_dynamic
(dyn-var)
The default for dynamic thread adjustment is that it is
disabled.
omp_set_nested
(nest-var)
OMP_SCHEDULE
(run-sched-var)
OMP_NUM_THREADS
(nthreads-var)
Cluster OpenMP supports only one level of parallelism.
OMP_DYNAMIC
(dyn-var)
52
The default schedule if OMP_SCHEDULE is not defined is static.
If OMP_NUM_THREADS has not been defined by you, Cluster
OpenMP uses the maximum number of threads (the value of
the –omp_num_threads option after all defaults are
evaluated).
The default for dynamic thread adjustment is that it is
disabled.
Document Number: 309076-003US
OpenMP* Usage with Cluster OpenMP*
10.3.6
Granularity of Data
The smallest unit of data that Cluster OpenMP can operate on in sharable memory is
four bytes. This means that all sharable variables must be at least four bytes in
length. Therefore the following parallel loop may not execute as expected:
int i;
char achars[1000], bchars[1000];
#pragma omp parallel for
for (i=0; i<N; i++) {
achars[i] = bchars[i];
}
For a work-around to this limitation, see Section 12.3 , Granularity of a Sharable
Memory Access.
10.3.7
volatile Keyword not Fully Implemented
Cluster OpenMP does not completely implement section 1.4.2 on page 12 of the
OpenMP 2.5 specification which states:
The volatile keyword in the C and C++ languages specifies a consistency
mechanism that is related to the OpenMP memory consistency mechanism in the
following way: a reference that reads the value of an object with a volatilequalified type behaves as if there were a flush operation on that object at the
previous sequence point, while a reference that modifies the value of an object
with a volatile-qualified type behaves as if there were a flush operation on that
object at the next sequence point.
In Cluster OpenMP, a volatile keyword used for a sharable variable does not cause the
insertion of flush operations as described in specification. Instead, if you need extra
flushes for a sharable variable beyond what are inserted by default in all
synchronization constructs and lock routines, you must insert the appropriate flush
directives manually.
10.3.8
Intel Extension Routines/Functions
Intel’s support for OpenMP* includes additional functions which provide a fast perthread heap implementation. These functions are documented in the Intel® C++
Compiler documentation. They include kmp_malloc, kmp_calloc, kmp_realloc and
kmp_free. In Cluster OpenMP these functions continue to allocate store with the same
accessibility as malloc, providing a local, process-accessible store. They do not
allocate sharable store. As a result blocks allocated by these routines can only be
freed by threads which are running in the same process as the thread which allocated
the store.
User Manual
53
Cluster OpenMP*
If sharable store allocation is required you must replace these allocation calls with
calls to the corresponding kmp_sharable_* function.
10.4
Cluster OpenMP* Macros
A given program can check to determine whether it was compiled with the –clusteropenmp or cluster-openmp-profile options by checking whether the
_CLUSTER_OPENMP macro has a value. If it does, then one of the Cluster OpenMP*
options was used.
10.5
Cluster OpenMP* Environment Variables
The following table defines a set of environment variables you can set from the shell
to control the behavior of a Cluster OpenMP* program.
Table 12 Cluster OpenMP* Environment Variables
Variable name
KMP_STACKSIZE
size [K |
M ]
Default
Value
Description
1M
Stacksize for subordinate threads in each
Cluster OpenMP process, in kilobytes (K) or
megabytes (M). The stacksize of each principle
thread is determined by your original shell
stack size.
Size of stack to be used for allocation of stackallocated sharable data on each OpenMP
thread. The value for KMP_STACKSIZE is
independent of the value for
KMP_SHARABLE_STACKSIZE.
KMP_SHARABLE_STACKSIZE
size [K |
M ]
1M
KMP_STATSFILE
filename
guide.gvs
Filename to use for the statistics file (build with
-cluster-openmp-profile)
KMP_CLUSTER_DEBUGGER
Name
none
KMP_WARNINGS
KMP_CLUSTER_SETTINGS
0 or
1 or
0 or
1 or
None
Debugger executable name (must be in your
path).
0 turns off run-time warnings from the Cluster
OpenMP* run-time library.
KMP_CLUSTER_PATH
None
Nome
directory
KMP_CLUSTER_HELP
None
None
KMP_SHARABLE_WARNINGS
54
Value
off
on
off
on
on
off
1 turns on warnings for variables that may be
shared in parallel regions but are not sharable.
None
Causes system to output the current values of
all options specifiable in
kmp_cluster.ini and all environment
variable values.
In case there is no kmp_cluster.ini file
in the current working directory where you start
the Cluster OpenMP* program, specifies a
path along which to find the first instance of a
.kmp_cluster file.
Causes system to output text describing the
Document Number: 309076-003US
OpenMP* Usage with Cluster OpenMP*
KMP_VERSION
None
None
KMP_DISJOINT_HEAPSIZE
size [K |
M ]
None
KMP_ALIGN_THRESHOLD
size [K |
M ]
KMP_AFFINITY
See
compiler
documentat
ion
None
[ 0 | 1 ]
0
KMP_CLUSTER_VERBOSE_START
UP
10.6
use of the kmp_cluster.ini file options, then
exits.
Causes system to dump its version information
at run-time
Enable the disjoint heap porting mechanism.
See Section 7.4, Using
KMP_DISJOINT_HEAPSIZE. Causes
diagnostic information to appear at runtime.
Minimum assigned value is 2K.
All sharable memory allocations of this size
and larger will be aligned on a page boundary.
Aligning things in this way can help reduce
false sharing" that can occur when many
sharable variables are placed together on the
same page.
This variable causes threads to be pinned to
specific processors on the machine. Full
documentation about this environment variable
may be found in the Intel(R) C++ Compiler
Documentation and Intel(R) Fortran Compiler
Documentation found in <compiler-installdir>/doc/main_cls/index.html or <compilerinstall-dir>/doc/main_for/index.html.
This variable, when set to 1, causes the
Cluster OpenMP startup mechanism to output
messages about each step of starting the
Cluster OpenMP program. If you are having
problems getting a Cluster OpenMP program
running, these messages may help you locate
the problem.
Cluster OpenMP* API Routines
The following table defines a collection of API routines that you can call from inside
your code to control Cluster OpenMP* program behavior.
Table 13 Cluster OpenMP* API Routines
API Routine
void *kmp_sharable_malloc (size_t size)
void *kmp_aligned_sharable_malloc (size_t size)
void *kmp_sharable_calloc (size_t n, size_t size)
void *kmp_sharable_realloc (void *ptr, size_t size)
User Manual
Description
Allocate sharable
memory space.
Allocate sharable
memory space
aligned on a page
boundary.
Allocate sharable
memory space for
an array of n (each
of size size) and
zero it.
De-allocates
previously
allocated sharable
memory space
55
Cluster OpenMP*
void kmp_sharable_free (void *ptr)
int kmp_private_mmap(char *filename, size_t *len, void ** addr)
int kmp_sharable_mmap(char *filename, size_t *len, void **addr)
Read-only version
of munmap. See
also 12.8, Memory
Mapping Files.
Read/write version
of munmap.
int kmp_private_munmap (void *start);
int kmp_sharable_munmap (void * start);
Wait on a
condition.
Signal a condition.
void kmp_lock_cond_wait (omp_lock_t *lock)
void kmp_lock_cond_signal (omp_lock_t *lock)
void kmp_lock_cond_broadcast (omp_lock_t *lock)
void kmp_nest_lock_cond_wait (omp_nest_lock_t
*lock)
kmp_nest_lock_cond_signal (omp_nest_lock_t *lock)
kmp_nest_lock_cond_broadcast (omp_nest_lock_t *lock)
10.7
void
kmp_set_warnings_on ( void )
void
kmp_set_warnings_off ( void )
omp_int_t
kmp_get_process_num ( void )
omp_int_t
kmp_get_num_processes ( void )
omp_int_t
kmp_get_process_thread_num ( void )
(pointed to by ptr
and allocates a
new block of size
size.)
Free sharable
memory space.
Read-only version
of mmap.
See also Section
12.8, Memory
Mapping Files.
Read/write version
of mmap.
Broadcast a
condition.
Wait on a
condition with
nested lock.
Signal a condition
with a nested lock.
Broadcast a
condition with a
nested lock.
Enable run-time
warnings.
Disable run-time
warnings.
Return the
process number of
the current
process.
Return the number
of processes
involved in the
computation.
Return the thread
number of the
current thread with
respect to the
current process.
Allocating Sharable Memory at Run-Time
This section describes routines you can use that are specific to C, C++ or Fortran
programming to help allocate sharable memory at runtime.
56
Document Number: 309076-003US
OpenMP* Usage with Cluster OpenMP*
Allocating sharable memory at run-time is possible in C, C++ and Fortran. In C and
C++, you can call one of two malloc-like routines:
void * kmp_sharable_malloc( int size);
void * kmp_aligned_sharable_malloc( int size );
These routines both allocate the given number of bytes out of the sharable memory
and return the address. The _aligned_ version allocates memory that is
guaranteed to start at a page boundary, which may reduce false sharing at runtime.
Memory allocated by one of these routines must be deallocated with:
void kmp_sharable_free(void *ptr)
In Fortran, the
ALLOCATE statement allocates a variable declared with the sharable
directive in sharable memory. For example:
integer, allocatable :: x(:)
!dir$ omp sharable(x)
allocate(x(500))
! allocates x in sharable memory
10.7.1
C++ Sharable Allocation
This section describes sharable allocation requirements for C++ applications.
10.7.1.1
Header Files
All of the definitions required for using shared allocation in C++ are included in the file
kmp_sharable.h. Use:
#include <kmp_sharable.h>
10.7.1.2
Creating Sharable Dynamically Allocated Objects
If you determine that only some objects of a given class need to be sharably
allocated, then you must modify the allocation points of the objects which need to be
sharable.
Suppose you are allocating objects of class foo. If your initial code is:
foo * fp = new foo (10);
convert this to code which allocates a sharable foo, as follows:foo * fp = new kmp_sharable foo (10);
Adding the kmp_sharable macro ensures that your code continues to compile correctly
when it is not compiled with Cluster OpenMP enabled. When not compiling with
Cluster OpenMP*, the kmp_sharable macro expands to nothing . When compiling with
User Manual
57
Cluster OpenMP*
Cluster OpenMP*, this macro inserts a bracketed expression which invokes a different
operator new.
For example, if the initial code is:
foo * fp = new foo [20];
Change the code to include the kmp_sharable macro call as follows:
foo * fp = new kmp_sharable foo [20];
NOTE:
Implementing a new kmp_sharable requires the overloading of the global operator
new. If your code already replaces ::operator new then you need to resolve the
conflict.
10.7.1.3
Creating a Class of Sharable Allocated Objects
If you determine that all dynamically allocated objects of a particular class should be
allocated as sharable, you can modify the class declaration to apply to all objects
within it instead of modifying all of the points at which objects are allocated.
For example if the initial class declaration is:
class foo : public foo_base
{
// … contents of class foo
};
Change the declaration to allocate all objects as sharable as follows:
class foo : public foo_base, public kmp_sharable_base
{
// … contents of class foo
};
NOTE:
Implementing kmp_sharable_base provides the derived class with operator new and
operator delete methods which use kmp_sharable_malloc. If your class is already
providing its own operator new and operator delete then you need to reconsider how
to manage sharable store allocation for the class.
10.7.1.4
Sharable STL Containers
STL containers add another level of complication to programming since the container
has two separate store allocations to manage:
1.
58
The store allocated for the container object itself. To allocate sharably, add the
kmp_sharable macro after the new command.
Document Number: 309076-003US
OpenMP* Usage with Cluster OpenMP*
2.
The space dynamically allocated internally by the container class to hold its
contents. To cause that to be allocated sharably, pass in an allocator class to the
STL container instantiation.
If the initial allocation is: std::vector<int> * vp = new std::vector<int>;
Make it sharable as follows:
std::vector<int,kmp_sharable_allocator<int> > * vp = new kmp_sharable
std::vector<int, kmp_sharable_allocator<int> >;
The kmp_sharable_allocator cause the vector’s contents to be allocated in sharable
space, while the new kmp_sharable causes the vector object itself to be allocated in
sharable space.
Since the allocator is a part of the vector’s type, you must also modify any iterators
which iterate over the vector so that they are aware of the non-default allocator.
10.7.1.5
Complicated STL Containers
Some of the more complicated STL containers, such as std::map, use additional
template arguments before the allocator, as in the following example:
std::map<int,float> * ifm = new std::map<int, float>;
Change the container to dynamically allocate sharable variables as follows:
std::map<int,float,std::less<int>,kmp_sharable_allocator<float> > *
ifm = new kmp_sharable
std::map<int,float,std::less<int>,kmp_sharable_allocator<float> >;
User Manual
59
Cluster OpenMP*
11
Related Tools
This chapter describes additional tools that can help you get the most out of Cluster
OpenMP*. The following sections include specific suggestions for using these tools with
Cluster OpenMP*. The tools are available from
http://www.intel.com/cd/software/products/asmo-na/eng/index.htm.
For complete details, consult each product’s documentation.
11.1
Intel® Compiler
The Intel® Compiler version 9.1 or later must be installed in order to use Cluster
OpenMP*.
11.2
Intel® Thread Profiler
Intel® Thread Profiler locates performance issues in your threaded code.
Using Intel® Thread Profiler to find performance issues in Cluster OpenMP* programs
is very similar to using Thread Profiler on traditional multi-threaded codes.
To use Thread Profiler with your Cluster OpenMP program:
NOTE:
60
1.
Compile your Cluster OMP application with the cluster-openmp-profile option
to obtain a version of the run-time library that collects statistics.
2.
Run the application as usual, but using a reduced dataset or iteration space if
possible since statistics collection slow the application down.
By default, Thread Profiler produces a guide.gvs file in the current working
directory. You can change this default using the KMP_STATSFILE environment
variable.
3.
Open the guide.gvs file in Intel® Thread Profiler on your Windows* client to view
performance data.
For complete instructions on using Intel® Thread Profiler, see that product’s online
Help.
Document Number: 309076-003US
Related Tools
NOTE:
11.3
Thread Profiler does not report additional information about Cluster OpenMP statistics.
See Chapter 9, Evaluating Cluster OpenMP* Performance, for details about using the
*.gvs files for analyzing application communication overheads.
Intel® Trace Analyzer and Collector
If you have purchased the Intel® Trace Analyzer and Collector components of the
Intel Cluster Tools, you can use them to help analyze the performance of a Cluster
OpenMP code.
To use Trace Analyzer and Collector with Cluster OpenMP code:
1.
Ensure that the Trace Analyzer is installed on all nodes on which the Cluster
OpenMP code is to run.
2.
Ensure that your LD_LIBRARY_PATH includes the directory where the appropriate
Trace Analyzer dynamic libraries exist (normally /opt/intel/ict/<ict
version>/itc/<itc version>/slib).
3.
Set the environment variable KMP_TRACE to the value 1.
4.
Run your code.
As your code runs, it produces a set of trace files which record important events from
inside the Cluster OpenMP runtime library. You can analyze these records with Intel
Trace Analyzer to tune, analyze and improve the performance of your code.
For complete instructions on using Trace Analyzer, consult that product’s
documentation.
User Manual
61
Cluster OpenMP*
12
Technical Issues
This chapter provides technical details on Cluster OpenMP*.
12.1
How a Cluster OpenMP* Program Works
In the following description, the assumption is that the Cluster OpenMP program is
running on a cluster with one process per node.
Each sharable page is represented by a set of associated pages, one on each process.
Each such page is at the same virtual address within each process. The access
protection of each sharable page is managed according to a protocol within each
process, based on the accesses made to the page by that process, and the accesses
made to the associated pages on the other processes.
The basic idea of the protocol is that whenever a page is not fully up-to-date with
respect to the associated pages on other processes, the page is protected against
reading and writing. Then, whenever your program accesses the page in any way, the
protection is violated, the Cluster OpenMP library gets notified of the protection
failure, and it sends messages to the other processes to get the current up-to-date
version of the page. When the data is received from the other processes and the page
is brought up-to-date, the protection is removed, the instruction that accessed the
page in the first place is re-started and this time the access succeeds.
In order for each process to know which other processes modified which pages,
information about the modifications is exchanged between the processes. At crossthread synchronizations (barriers and lock synchronizations), information is
exchanged about which pages were modified since the last cross-thread
synchronization. This information is in the form of a set of write notices. A write notice
gives the page number that a process wrote to and the vector time stamp of the write.
The vector time stamp is an array of synchronization epoch values, one per process in
the system. A particular process increments its epoch value each time it synchronizes
with at least one other process. The epoch values on that process for all the other
processes in the system represent the epoch values of each at the last synchronization
point between that process and the current process. The vector time stamps are
associated with a sharable page to show the state of the information on that page with
respect to each process. This enables the process to check to see whether it needs
updated information from a given process for a given page.
62
Document Number: 309076-003US
Technical Issues
At each barrier synchronization point, as a barrier arrival message, each process
sends write notices about which sharable pages it or other processes have modified,
since the last synchronization point, to the master process. Then the master process
combines all the write notices, determines which write notices are covered by which
other write notices, and as a barrier departure message, sends the combined set of
write notices to each remote process.
When a page is protected from any access, and a read is done to an address on the
page, a SIGSEGV occurs and is caught by the SIGSEGV handler in the Cluster OpenMP
run-time library. The handler checks the write notices it has stored for that page and
then requests updated information from each process from whom it has a write notice.
In most cases, the updated information comes in the form of a diff. A diff requires a
comparison between the current information stored in a page and an old copy or twin
page that the process made at some point in the past. So, only the locations that have
changed since the twin was made are sent to the requesting process. The request for
this diff information is call a diff request.
Each process keeps a database of write notice and diff information, sorted by vector
time and organized by page. The diffs are stored so that the diff only has to be
calculated once. After the diff is stored, the associated twin can be deallocated. Any
future diff request for the current vector time and page are retrieved from the
database and transmitted.
While executing a barrier synchronization, if the write notice database gets too large
on any process, a repo is done. A repo is the mechanism where each process is able
to delete its write notice database, by bringing each page up-to-date on some
process. The processes agree on which process should be considered to be the owner
for each page. Each process brings the pages for which it is the owner up-to-date
during the repo, and marks those pages private. The pages for which a process is not
the owner are marked empty (and protected against reading and writing), but the
owner for the page is remembered. Then, immediately after the repo, on a process’s
first access to a particular empty page, the process sends a page-request to the
page’s owner to retrieve the fully up-to-date page.
12.2
The Threads in a Cluster OpenMP* Program
This section describes the different kinds of threads used in a Cluster OpenMP*
program.
User Manual
63
Cluster OpenMP*
12.2.1
OpenMP* Threads
The thread that starts the execution of a Cluster OpenMP program is called the master
thread. The rest of the threads started in a parallel region are called worker threads.
Nested parallel regions are serialized (at the present time) and the thread that
executes the serialized parallel region becomes the master thread of the team of one
that executes that serialized region.
The threads of each process are divided into two kinds of threads. The thread that
initiates processing on the process is called the principal thread for the process and
the other threads are the subordinate threads for the process. So, the OpenMP master
thread is the principal thread on the home process. The OpenMP worker threads are
all the subordinate threads on all the processes, plus the principal threads on all the
remote processes.
The OpenMP threads are also referred to as top-half threads on any given process.
12.2.2
DVSM Support Threads
Every process in a Cluster OpenMP program has a set of bottom-half threads (part of
the DVSM mechanism) that handles asynchronous communication chores for the
process. That is, the bottom-half threads are activated by messages that come to the
process from other processes. When a thread k on one process sends a message to a
second process, the message is handled on the second process by a bottom-half
thread.
Additional threads are used to handle mundane chores. If you use the --IO=debug
option (see Chapter 15, Reference), the home process uses an output listener thread
to handle text written to stdout by all remote processes. Also, the heartbeat
operation, if enabled, is handled by its own thread on each process.
12.3
Granularity of a Sharable Memory Access
The smallest size for a memory access operation that can be kept consistent
automatically is four bytes. However, consistency can be guaranteed for accesses of
less than four bytes if the access is placed inside a critical section. For example, the
following loop will not work for Cluster OpenMP:
char buffer[SIZE];
#pragma omp parallel for
for (i=0; i<SIZE; i++)
{
buffer[i] = …;
64
Document Number: 309076-003US
Technical Issues
}
The example must be modified as follows:
char buffer[SIZE];
#pragma omp parallel for
for (i=0; i<SIZE; i++)
{
#pragma omp critical
{
buffer[i] = …;
}
}
Note that such a parallel loop has poor performance with Cluster OpenMP.
12.4
Socket Connections Between Processes
At program startup, each bottom-half thread connects a socket to the same numbered
thread on each other process for sending requests. So,
Number-of-sockets-on-one-process = ((number-ofthreads/process)+1)*(number-of-processes – 1)
The total number of socket connections between all processes of the cluster is
Number-of-connections = (number-of-threads/process)*(number-ofprocesses – 1)*(number-of-processes)
12.5
Hostname Resolution
This section describes the mechanism for resolving a hostname at program start.
12.5.1
The Hostname Resolution Process
The Cluster OpenMP library hostname resolution process is made up of the following
stages:
1.
User Manual
The library reads an initialization file (kmp_cluster.ini) to determine the
machine configuration and options. It reads the list of hosts either from the file
itself or from the file specified in the --hostfile option. The first node in the host
list must be the node from which the program is executed. Also, the names of the
nodes in the kmp_cluster.ini file must be well-known to all the nodes in the
cluster such that the contents of /etc/hosts or the equivalent mechanism are
consistent across all nodes in the cluster. The master node uses each name in the
65
Cluster OpenMP*
host list in an ssh or rsh command to create the rest of the processes in the
program.
12.5.2
2.
Each process gets its own IP address by passing gethostbyname() the
corresponding hostname from the hostlist. The Cluster OpenMP library then
searches all of the attached interfaces of family AF_INET, to see if the IP address
matches one of the interfaces. If there is no match, then the Cluster OpenMP
library issues a warning.
3.
The master node creates a socket for accepting connections. When using the TCP
transport, gethostbyname() is used by every process to get the IP address of
every other process. When using the DAPL transport, gethostbyname() only
assigns the master's IP address. Sockets pass around the DAPL IP addresses and
then use DAPL connection establishment.
A Hostname Resolution Issue
Because of various inconsistencies in Linux* implementations, you might need to
modify /etc/hosts on the node from which a Cluster OpenMP program is launched.
A message such as the following indicates a situation requiring modification of
/etc/hosts:
Cluster OMP Warning: Proc#0 Thread#0 (UNKNOWN): It appears that this
host
isn't machine08. You may need to update /etc/hosts or fix your host
list.
This message indicates that either you are not running your program from the host
machine08, or the program cannot determine that the current node is machine08. To
fix the problem, try adding a line to your /etc/hosts file or move lines around. For
example, if /etc/hosts does not contain a line with the node's external IP address,
such as in the first line below, you must add it:
10.230.27.36
127.0.0.2
machine08.mycompany.com machine08
machine08.mycompany.com machine08
The real net address of 10.230.27.36 must come before the localhost address of
127.0.0.2, so that the name resolution algorithm finds that first.
12.6
Using X Window System* Technology with a
Cluster OpenMP* Program
If you want to use X Window System* calls within a Cluster OpenMP program, set the
DISPLAY environment variable appropriately in the kmp_cluster.ini file and run the
program. The DISPLAY environment variable is automatically propagated to the
66
Document Number: 309076-003US
Technical Issues
remote processes, so they will receive the same value. In this way, all processes are
capable of starting an X Window System* session on the same display.
12.7
Using System Calls with Cluster OpenMP
You must be careful when using system calls with Cluster OpenMP. Cluster OpenMP
depends on protecting memory pages when they are not up-to-date. When your
program reads or writes memory that is protected, this causes a segmentation fault,
which triggers the memory consistency mechanism. This methodology works well for
accesses done in user mode. However, since system calls execute in system mode,
segmentation faults that happen during the system call can cause the program to
abort. To avoid this problem, if you expect system calls to reference sharable data,
you must update the data before making the system call.
The Cluster OpenMP runtime library can do this transparently for some system calls,
but other system calls can cause program failures. Of the cases that cause program
failure, some produce messages explaining the situation, then exit, with the following
possible messages:
•
If the argument is part of a va_list, the failure message has the following form
(where xxxx represents the routine name):
Cluster OMP Fatal: Proc#0 Thread#3 (INITIAL): Variable argument to
system
routine "xxxx" was sharable. This is not allowed.
T
T
•
T
T
If the argument is not part of a va_list, the failure message has the following
form (where xxxx represents the argument name and yyyy represents the routine
name):
Cluster OMP Fatal: Proc#0 Thread#3 (INITIAL): Sharable argument
"xxxx" to
system routine "yyyy" is not allowed.
T
T
T
T
T
T
Some system calls are not intercepted, so their use in a Cluster OpenMP program is
not supported. If they are called with sharable arguments, they could fail with an
EFAULT error code. Use them at your own risk. The following system calls are not
supported:
T
T
sched_getaffinity
sched_setaffinity
sysfs
bdflush
semctl
vm86
vm86old
get_thread_area
arch_prctl
ptrace
User Manual
67
Cluster OpenMP*
12.8
Memory Mapping Files
The mmap system call maps a file into the address space of the program. Since Cluster
OpenMP employs mmap internally, it must be used with care. Cluster OpenMP supplies
replacement routines for mmap and munmap that are compatible with the underlying
DVSM mechanism. Two types of mmap are available: read/write and read-only.
The read/write version maps the entire file into the sharable memory on the home
process. The normal DVSM mechanism propagates the information to remote
processes as different parts of the file are read and written by different threads. When
the associated munmap routine is called, the current memory image of the file is
written back to the file.
The read-only version of mmap maps the entire file into process-private memory,
starting at the same virtual address on each process. Since process-private memory is
used, no attempt is made to keep the copies of the file consistent, and nothing is
written back to the file when the associated munmap routine is called. Nothing prevents
the program from writing to the mapped version of the data, but any changes will be
lost.
The memory mapping routines are:
Read/write version:
int kmp_sharable_mmap(char * filename, size_t * len,
int kmp_sharable_munmap(void * start);
void ** addr);
Read-only version:
int kmp_private_mmap(char * filename, size_t * len, void ** addr);
int kmp_private_munmap(void *start);
The return values of each of these routines are 0 for success and -1 for failure. If an
mmap routine returns success, then it also returns the length of the file in bytes in the
len parameter and the starting address in the addr parameter.
All of these calls must be made from the serial part of the program. Any use of these
routines from a parallel region is unsupported.
12.9
Tips and Tricks
This section contains suggestions for making the most of Cluster OpenMP*.
68
Document Number: 309076-003US
Technical Issues
12.9.1
Making Assumed-shape Variables Private
An assumed shape array may be used in a private clause in an OpenMP program. If it
is, however, the variable in the outer scope that the private variable is modeled on
must be declared sharable, because the information relating to the shape of the array
must be available across all nodes of the system. The array must be declared sharable
at its declaration point. For example, consider the following code:
interface
subroutine B ( A )
integer A(:)
end subroutine B
end interface
integer A(100000)
!dir$ omp sharable(A)
call B(A)
. . .
subroutine B( A )
integer A(:)
!$omp parallel private(A)
. . .
In this situation, if A were not declared to be sharable, then the information about its
shape would not be available to all nodes of the cluster. The sharable directive is
necessary to make this work. Without it, a variable of the proper shape could not be
made by all threads.
12.9.2
Missing Space on Partition Where /tmp is Allocated
If you notice that the partition where /tmp is allocated is running low on space and the
lack of space does not seem to be due to files residing on that partition, it is possible
that there are Cluster OpenMP programs that are either still running on the cluster, or
are halted in the debugger. If you kill all such programs, the space should reappear in
the partition.
This is due to the anonymous space used for swap space in the /tmp partition by
Cluster OpenMP.
User Manual
69
Cluster OpenMP*
12.9.3
Randomize_va_space
Some recent Linux* distributions, particularly SuSE* 10, have enabled a kernel
security feature known as randomize_va_space. This feature causes the virtual
addresses of memory mapped code and data to change at every process invocation.
This feature causes incompatibilities with Cluster OpenMP, since Cluster OpenMP
requires every process to map sharable data at the same virtual address.
To determine whether your system is affected by this feature, look at the file
/proc/sys/kernel/randomize_va_space. If it contains 1, then this feature is enabled
on your system. To make Cluster OpenMP work properly in this situation, you must
disable randomize_va_space by putting a "0" in that file.
To disable randomize_va_space:
12.9.4
1.
Login as root and edit the file /etc/sysctl.conf by adding the line:
kernel.randomize_va_space=0
2.
Reboot.
Linuxthreads not Supported
Cluster OpenMP does not support the version of POSIX* threads known as
linuxthreads. It does support the version of POSIX threads known as NPTL. You can
find out which version of POSIX threads your kernel supports by issuing the following
Linux command:
$ getconf GNU_LIBPTHREAD_VERSION
If the output looks something like this:
NPTL 0.60
then your system supports NPTL. If the output looks something like this:
linuxthreads-0.10
then your system supports linuxthreads. If your system supports linuxthreads,
contact your system administrator to get NPTL support enabled instead.
70
Document Number: 309076-003US
Configuring a Cluster
13
Configuring a Cluster
This section provides instructions for configuring a cluster that you can use with
Cluster OpenMP*. The instructions include both general steps and steps that are
specific to configuring a cluster for Cluster OpenMP*.
NOTE:
In most cases, you do not have to do anything special to prepare your cluster for use
with Cluster OpenMP*. Special configuration is required if you intend to work with X
Windows*. See 13.4, Gateway Configuration for details.
Configuring a cluster for the purpose of using Cluster OpenMP involves making a few
decisions about how the cluster will be administered and how it fits in with the
computing environment. One node of the cluster is distinguished as the head node.
The other nodes of the cluster are referred to as the compute nodes.
13.1
1.
Decide how the cluster will appear in the external environment.
Will all cluster nodes be visible to external machines, or will only the head node be
visible? If all nodes are visible to external machines, then the cluster becomes
much more accessible to external users and the cluster is more likely to be
disturbed during the run of a Cluster OpenMP program.
2.
Decide how to manage user accounts within the cluster.
Will all user accounts for the compute nodes be exported from outside, or will user
accounts on the compute nodes be exported from the head node? Note that the
user account that launches a Cluster OpenMP program must exist on all nodes.
3.
Decide how to organize the file systems on the compute nodes.
Will the head node export directories to the compute nodes, while accessing its
directories from the outer domain? Or will the compute nodes access directories
from the outer domain using a hub uplink or by using the head node as a
gateway? It is recommended that the head node export directories to the compute
nodes because the directory path to the executable and the Cluster OpenMP
library on the home node must exist on the remote nodes.
Preliminary Setup
The following are general instructions for setting up a cluster. If you already have a
cluster set up, you can skip to the next section.
These instructions assume that the outer domain in which the cluster is being setup is
called outerdomain.company.com and the yellow pages server for the outer domain is
called ypserver001.
1.
User Manual
Distribute a /etc/hosts file.
71
Cluster OpenMP*
⎯
Include cluster IP addresses and hostnames to all nodes in the cluster. Use
separate names for the IP address of the head node’s external ethernet port
and the name for the internal ethernet port. For example: headnode-external
and headnode.
⎯ If you decided not to resolve host names via DNS or NIS, include entries for
mounted file systems.
⎯ To prevent problems with rsh and X Windows, ensure that the 127.0.0.1 line
is filled out as follows on each host:
127.0.0.1 localhost.localdomain localhost
T
T
T
T
T
T
2.
T
T
Set up rsh, rlogin,and rexec. For the head node and each of the compute
nodes:
⎯ At the end of /etc/securetty add rsh, rexec, and rlogin.
⎯ Create /etc/hosts.equiv file containing hostnames of head node and
compute nodes.
⎯ Copy /etc/hosts.equiv to /root/.rhosts.
⎯ Set rsh to run in runlevel 3, then do the same for rexec and rlogin, that
is: /sbin/chkconfig --level 3 rsh on
⎯ To test, as root run rsh localhost and rsh hostname If these commands do
not work, verify that a correct 127.0.0.1 line is in the /etc/hosts file.
T
T
T
T
T
T
T
T
T
T
T
T
T
T
T
T
T
T
T
T
T
T
T
T
T
T
T
T
T
T
T
T
T
T
T
T
T
T
T
13.2
T
T
T
NIS Configuration
This section contains instructions for configuring user accounts for the cluster.
13.2.1
Head Node NIS Configuration
If compute nodes use outer domain logins and home directories, skip to Section
13.2.2 , Compute Node NIS Configuration and configure the head node the same way
as the other compute nodes.
RX
XR
X
X
To configure the head node:
1.
Make sure that ypserv rpm is installed.
2.
Configure the head node as a client of the outer NIS domain:
/bin/domainname outerdomain.company.com
T
T
T
3.
To survive a reboot, in the file /etc/sysconfig/network add the line:
NISDOMAIN=outerdomain.company.com
T
T
T
4.
Edit /etc/yp.conf and add the line:
ypserver ypserver001
T
T
T
5.
Start ypbind with:
/etc/rc.d/init.d/ypbind start
T
T
T
6.
Set ypbind to run in runlevel 3 after reboot:
/sbin/chkconfig --level 3 ypbind on
T
T
T
T
T
T
Configure the head node to export its local user accounts (not outer domain user
accounts) to the compute nodes, as follows:
72
Document Number: 309076-003US
Configuring a Cluster
7.
Switch to an internal domain name:
/bin/domainname your_cluster_nis_domain
8.
Start ypserv and yppasswdd:
/etc/rc.d/init.d/ypserv start
/etc/rc.d/init.d/yppasswdd start
9.
Run /usr/lib/yp/ypinit –m. Type the hostname of the head node when
prompted.
T
T
T
T
T
T
10. Change back to the outer NIS domain as in step 2.
11. Add ypserv and yppasswdd to runlevel 3 with chkconfig as in step 6.
T
T
T
T
T
T
T
T
12. Whenever a new user is created, update the NIS maps as follows:
cd /var/yp
/bin/domainname your_cluster_nis_domain
make
/bin/domainname outerdomain.company.com
13.2.2
Compute Node NIS Configuration
To configure compute nodes for NIS configuration, do the following:
1.
Edit /etc/yp.conf as follows:
⎯ If you configured the head node so that it exports its local user accounts via
NIS (that is, if you followed the steps in Head Node NIS Configuration), add
the line ypserver your-head-node-hostname.
⎯ If compute node accounts are all resolved from the outer domain NIS servers
(if you skipped the Head Node NIS Configuration section), add the line
ypserver ypserver001
T
T
T
T
T
T
T
2.
T
Start ypbind with:
/etc/rc.d/init.d/ypbind start
T
T
3. Set ypbind to run in runlevel 3 after reboot:
/sbin/chkconfig --level 3 ypbind on
T
T
T
T
4. Edit /etc/nsswitch.conf and make sure the following lines (or similar lines) are
present:
T
NOTE:
T
This must be nis. Using nisplus does not work.
passwd:
files nis
shadow:
files nis
group:
files nis
T
5.
T
T
T
To survive a reboot, in the file /etc/sysconfig/network add the appropriate line
as follows:
⎯ If you are using internal logins: NISDOMAIN=your-cluster-nis-domain
⎯ If you are using external logins: NISDOMAIN=outerdomain.company.com
T
T
T
T
T
User Manual
T
73
Cluster OpenMP*
13.3
NFS Configuration
This section contains instructions for configuring the file systems for the nodes of the
cluster.
13.3.1
Head Node NFS Configuration
To configure head nodes for NFS:
1.
Set up the node to receive outer domain user account home directories. Assuming
NIS configuration is already working, start the automounter:
/etc/rc.d/init.d/autofs start
2.
Set autofs to run in runlevel 3 after reboot:
/sbin/chkconfig --level 3 autofs on
3.
Setup /etc/exports to cause directories to be exported to compute nodes.
T
T
NOTE:
This step is essential for using Cluster OpenMP*: You need directories to be exported
from the head node to ensure that your program can find the Cluster OpenMP library
and your home directory.
TIP:
Using man exports may be helpful.
4.
Edit /etc/exports to contain the following line, modifying for the correct network,
netmask, and options:
/opt 10.0.1.0/255.255.255.0(ro)
T
T
•
If clients are using user accounts local to the head node rather than the outer
domain user accounts, export user home directories as follows:
/home
10.0.1.0/255.255.255.0(rw,no-root-squash)
•
Optionally, add the following lines if you want to share these directories. You
must ensure that these directories exist on the compute nodes and,
preferably, are empty:
/usr 10.0.1.0/255.255.255.0(rw,no-root-squash)
/shared
10.0.1.0/255.255.255.0(rw,no-root-squash)
13.3.2
5.
Start or restart nfs with:
/etc/rc.d/init.d/nfs restart
6.
Set nfs to run in runlevel 3 after reboot:
/sbin/chkconfig --level 3 nfs on
Compute Node NFS Configuration
To configure compute nodes for NFS:
74
Document Number: 309076-003US
Configuring a Cluster
1.
2.
13.4
Type :
mount your-head-node
/opt
/opt
Edit the /etc/fstab file, and add the following line:
your-head-node:/opt
/opt
nfs defaults
0 0
3.
If compute nodes receive user accounts and directories from the outer network do
the following:
/etc/rc.d/init.d/autofs start
/sbin/chkconfig --level 3 autofs on
4.
If compute nodes receive user accounts and directories from the head node, type:
mount your-head-node:/home /home
5.
Edit the /etc/fstab file to add the following line:
your-head-node:/home
/home
nfs defaults
0 0
Gateway Configuration
The configuration steps in this section are recommended for using Cluster OpenMP*
and are required if you want the head node of the cluster to act as a gateway. This
enables a Cluster OpenMP program to write to an external X Window.
13.4.1
Head Node Gateway Configuration
To configure the head node:
User Manual
1.
Turn on IP forwarding:
echo 1 > /proc/sys/net/ipv4/ip-forward
2.
To survive a reboot, add the following line to /etc/sysctl.conf:
net.ipv4.ip-forward = 1
3.
Save the iptables configuration. The following line writes the iptables rules to
the /etc/sysconfig/iptables file, which you must define prior to running
iptables:
/etc/rc.d/init.d/iptables save
4.
Turn off ipchains and turn on iptables:
/etc/rc.d/init.d/ipchains stop
/etc/rc.d/init.d/iptables start
5.
Do the same in runlevel 3 to survive a reboot:
/sbin/chkconfig --level 3 iptables on
/sbin/chkconfig --level 3 ipchains off
6.
Add a rule to forward packets from the internal nodes with a source IP of the head
node:
/sbin/iptables –t nat –A POSTROUTING –o external-ethernet-port -j
SNAT to-source external-ip-address
7.
Save this rule:
/etc/rc.d/init.d/iptables save
75
Cluster OpenMP*
13.4.2
Compute Node Gateway Configuration
To configure the compute nodes:
Add the following line to the /etc/sysconfig/network file:
GATEWAY=head-node-ip-address
76
Document Number: 309076-003US
Configuring Infiniband
14
Configuring Infiniband
Cluster OpenMP uses DAPL (Direct Access Programming Library) as its interface to
Infiniband. Cluster OpenMP supports the Open Fabrics Enterprise Distribution (OFED).
Versions 1.0 and 1.1 of the distribution are available from
http://www.openfabrics.org. OFED 1.1 is also available in RedHat Enterprise Linux 4
update 4.
The following systems have been tested with Cluster OpenMP:
•
Redhat EL4 and SLES 9.0 and some SLES 10.0 configurations have been
successfully tested with Cluster OpenMP.
•
Scientific Linux 4.3 passed preliminary testing with Cluster OpenMP.
•
Fedora Core 5 does not work with Cluster OpenMP.
•
Fedora Core 4 works but requires some extra effort. See the OFED documentation
for a list of supported systems.
The default OFED installation does not install all of the drivers required by Cluster
OpenMP. The following is the recommended method for building and installing OFED
1.0/1.1 to support Cluster OpenMP:
1.
Download the source package, for example from:
http://openfabrics.org/downloads/OFED-1.0.tgz
HTU
UTH
2.
Unpack the package.
3.
Edit the configuration file ofed.conf. Most options should be marked as y, for
example: libibverbs=y. Mark the following options n:
libipathverbs=n
libipathverbs_devel=n
T
T
T
T
T
T
T
T
If you want to build MPI you can change the following options to y:
mpi_osu=n
openmpi=n
T
User Manual
T
4.
On one system in your cluster, build the OFED software:
./build.sh -c `pwd`/ofed.conf
5.
If required, install the sysfsutils packages, for example:
[lfmeadow@stan ~]$ rpm -aq | egrep sysfsutils
sysfsutils-1.2.0-4.x86_64
sysfsutils-devel-1.2.0-4.x86_64
6.
On all the systems in your cluster, install the OFED software as root:
/install.sh -c `pwd`/ofed.conf
T
T
77
Cluster OpenMP*
7.
Edit the appropriate network configuration scripts to configure the interfaces for IP
over IB:For Redhat, edit /etc/sysconfig/ifcfg-ib0 and ifcfg-ib1. For
example:
[lfmeadow@stan ~]$ cat /etc/sysconfig/network-scripts/ifcfg-ib0
DEVICE=ib0
BOOTPROTO=static
ONBOOT=yes
IPADDR=192.168.1.1
For SLES, edit /etc/sysconfig/network/ifcfg-ib0/ib1 as follows:
fxidlin19> cat /etc/sysconfig/network/ifcfg-ib0
BOOTPROTO='static'
IPADDR='192.168.3.1'
NETMASK='255.255.255.0'
NETWORK='192.168.3.0'
BROADCAST='192.168.3.255'
REMOTE_IPADDR=''
STARTMODE='onboot'
WIRELESS='no'
NOTE:
It is important to have valid addresses for both interfaces. If valid addresses are
missing, the device drivers will not all load properly.
Advanced users can use DHCP and other types of configurations. Read the OFED
documentation for details.
CAUTION: Ensure that /etc/init.d/openibd runs to completion. Several drivers are loaded
after the IPoIB configuration, and the script exits if the configuration does not work
properly.
8.
If necessary, edit /etc/infiniband/openib.conf. Make sure the RDMA drivers
are loaded as follows:
# Load RDMA_CM module
RDMA_CM_LOAD=yes
# Load RDMA_UCM module
RDMA_UCM_LOAD=yes
9.
Modify /etc/security/limits.conf to increase the amount of memory that can
be pinned as is required by the Infiniband hardware:
* soft memlock 4000000
* hard memlock 4000000
10. Ensure that one of the machines connected to your Infiniband switch is running
OpenSM, or that the switch itself is running OpenSM. See the OFED
documentation for details. Only one instance of OpenSM should be running.
11. Pick your favorite application and create a Cluster OpenMP kmp_cluster.ini file
that includes a line such as:
--hostlist=node1,node2,node3 --transport=dapl --adapter=OpenIB-cma
12. Run your application. Ensure that it uses native DAPL transport with the OFED
DAPL drivers.
78
Document Number: 309076-003US
Configuring Infiniband
Only Redhat- and SLES- compatible platforms are supported. It is recommend not to
use any of the binary OFED RPM packages.
See http://premier.intel.com for recent news about Cluster OpenMP and OFED. and to
report any problems.
User Manual
79
Cluster OpenMP*
15
Reference
15.1
Using Foreign Threads in a Cluster OpenMP
Program
It is possible for a program to start its own POSIX* threads that access the sharable
memory provided by Cluster OpenMP. Threads started explicitly by your program are
called foreign threads.
Foreign threads can access sharable memory, call OpenMP and Cluster OpenMP API
routines, and execute OpenMP constructs. However, all OpenMP constructs executed
by foreign threads will be serialized, that is, executed by just one thread.
15.2
Cluster OpenMP* Options Reference
You can access brief descriptions of the following commands by typing the –help
command. The Cluster OpenMP* options are available if you have a separate license
for the Cluster OpenMP product.
You can use these options on Linux* systems running on Intel® Itanium® processors
or IA-32 processors with Intel® 64 Instruction Set Architecture (ISA).
Table 14 Cluster OpenMP* Options
Command
80
Description
-[no-]cluster-openmp
Enables you to run an OpenMP program on a
cluster.
-[no-]cluster-openmp-profile
Link a Cluster OpenMP program with profiling
information.
-[no-]clomp-sharablepropagation
Reports variables that need to be made sharable by
you with Cluster OpenMP.
-[no-]clomp-sharable-info
Reports variables that the compiler automatically
makes sharable for Cluster OpenMP.
-[no-]clomp-sharable-commons
(Fortran only) Makes all COMMONs sharable by
default for Cluster OpenMP.
Document Number: 309076-003US
Reference
User Manual
-[no-]clomp-sharable-modvars
(Fortran only) Makes all variables in modules
sharable by default for Cluster OpenMP.
-[no-]clomp-sharablelocalsaves
(Fortran only) Makes all SAVE variables sharable by
default for Cluster OpenMP.
-[no-]clomp-sharable-argexprs
(Fortran only) Makes all expressions in function and
subroutine call statements sharable by default for
Cluster OpenMP.
81
Cluster OpenMP*
16
Glossary
The following definitions of terms related to Cluster OpenMP* are used throughout this
document:
backing store – file space assigned to hold a backup copy of system memory.
Cluster OpenMP* – the Intel® implementation of OpenMP for a distributed memory
environment.
compute node – one of the nodes of a cluster that is not the head node.
DVSM – distributed virtual shared memory – the underlying mechanism that provides
the shared memory space required by OpenMP.
foreign thread – a thread started by you through an explicit thread creation call.
head node – the node of a cluster visible outside the cluster. Users usually login to a
cluster through its head node.
home node – the node of a cluster where a Cluster OpenMP program is originally
started by you.
home process – the process started on the home node to run the Cluster OpenMP
program.
host – see the definition for node.
host pool – the set of hosts that run a Cluster OpenMP program.
master thread – the thread that runs the serial code at the beginning of an OpenMP
program. The master thread forms each Cluster OpenMP parallel team.
multi-node program – a Cluster OpenMP program that runs on more than one node.
There is a minimum of one process per node, so a multi-node program is also a multiprocess program.
multi-process program – a Cluster OpenMP program that includes more than one
process.
82
Document Number: 309076-003US
Glossary
node – a computer with its own operating system. In a cluster, the nodes are
connected together by a communications fabric (i.e., a network).
OpenMP thread – a thread started on behalf of you, due to the semantics of the
OpenMP program that executes user-written code.
OpenMP* – a directive-based parallel programming language, for annotating Fortran,
C, and C++ programs. See http://www.openmp.org.
principal thread – the distinguished thread in a Cluster OpenMP process that begins
the execution in that process. The principal thread in the home process is called the
master thread for the Cluster OpenMP program.
process – an operating-system-schedulable unit of execution, including one or more
threads, a virtual memory and access to resources such as disk files. A Cluster
OpenMP program consists of one or more processes running on one or more nodes of
a cluster.
remote node – a node of a cluster, different from the home node that runs part of a
Cluster OpenMP program.
remote process – a process spawned from the home process, usually on a remote
node, for the purpose of executing a Cluster OpenMP program.
sharable memory – the memory space in a Cluster OpenMP program that is kept
consistent across all the Cluster OpenMP processes.
socket – a communication channel opened between processes, used for passing
messages.
subordinate threads – all OpenMP threads in a Cluster OpenMP process that are not
the principal thread.
thread – an entity of program execution, including register state and a stack. A
Cluster OpenMP program includes threads for executing your code and threads for
supporting the Cluster OpenMP mechanism.
twin – a read-only copy of a sharable memory page.
worker threads – all OpenMP threads that are not the master thread.
User Manual
83
Cluster OpenMP*
17
Index
ALLOCATE, 58
kmp_private_munmap, 57, 70
bottom-half threads, 66
kmp_set_warnings_off, 58
clomp_forecaster, 47
kmp_set_warnings_on, 58
configuration checker, 17
kmp_sharable_calloc, 37, 57
DISPLAY, 44, 69
kmp_sharable_free, 37, 57, 58
environment, 13, 18, 19, 20, 22, 25,
26, 27, 28, 33, 36, 44, 52, 53, 55,
56, 62, 69, 74, 85
kmp_sharable_malloc, 30, 34, 37, 57,
58, 60
environment variable, 18, 19, 20, 22,
27, 28, 33, 36, 44, 52, 53, 55, 56,
62, 69
foreign threads, 83
gdb, 19, 43, 44
heartbeat, 22, 24, 28, 43, 66
kmp_aligned_sharable_malloc, 57, 58
kmp_cluster.ini, 12, 13, 17, 18, 19,
20, 23, 28, 43, 44, 45, 56, 69
KMP_CLUSTER_DEBUGGER, 19, 28,
44, 55
kmp_get_num_processes, 58
kmp_get_process_num, 58
kmp_get_process_thread_num, 58
kmp_lock_cond_broadcast, 57
kmp_lock_cond_signal, 57
kmp_lock_cond_wait, 41, 57
kmp_nest_lock_cond_broadcast, 58
kmp_nest_lock_cond_signal, 57
kmp_nest_lock_cond_wait, 57
84
kmp_sharable_munmap, 57, 70
kmp_sharable_realloc, 37, 57
KMP_SHARABLE_STACKSIZE, 55
KMP_STACKSIZE, 55
KMP_STATSFILE, 55, 62
KMP_VERSION, 52, 56
master thread, 19, 23, 51, 66, 85, 86
mmap, 24, 57, 70, 71
munmap, 24, 57, 70
NFS Configuration, 24, 77, 78
NIS configuration, 76, 77
OMP_DYNAMIC, 54
omp_get_num_procs, 53
omp_get_num_threads, 53
omp_lock_t, 41, 57
OMP_NUM_THREADS, 52, 53
OMP_SCHEDULE, 53
omp_set_num_threads, 52
output listener thread, 66
Document Number: 309076-003US
Index
PBS, 25, 26
stderr, 22, 24, 45
principal thread, 66, 86
stdin, 23
queueing system, 18
stdout, 22, 24, 45, 47, 66
repo, 65
subordinate threads, 55, 66, 86
rsh, 17, 19, 21, 25, 75
top-half threads, 66
SIGSEGV, 33, 34, 35, 43, 44, 65
vector time stamp, 64
socket, 19, 67, 86
write notice, 64, 65
ssh, 17, 19, 21, 25
User Manual
85