1
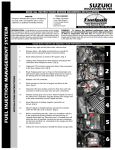
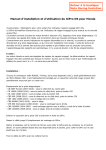
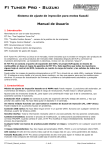
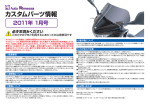
FI Tuner Pro
Install Guide for FIT-S01
For use with the following SUZUKI motorcycles:
AN400 (2003-2010), AN650 (2003-2010), B-King (2008-2010), DL1000 V-Strom (20022010), GSF650 Bandit (2007-2010), GSF1250 Bandit (2007-2010), GSR400 (2006-2010),
GSR600 (2006-2010), GSX650F (2008-2010), GSX1250FA (2010-2012), GSX-R600 (20012010), GSX-R750 (1998-2010), GSX-R1000 (2001-2010), GSX1300R Hayabusa (1999-2010),
RM-Z250 (2010), RM-Z450 (2008-2010), RMX450Z (2010), SV1000 (2003-2009),
TL1000R/S (1997-2003), TU250 (2009-2010), VL800 Intruder Volusia (2005-2010), VL1500
Intruder (2005-2010), VZ1500 (2009-2010), VZR1800 (2006-2010), Boulevard M109R
(2006-2010), M109R2 (2008-2010), C50 (2005-2010), C90 (2005-2010), M90 (2009-2010),
Intruder M1800R (2006-2010), M1800R2 (2008-2010), C800 (2005-2010), C1500 (20052010), M1500 (2009-2010)
Also fits Kawasaki KLV1000 (2004-2006)
Disclaimer: Do not attempt to install the product if you don’t have basic mechanical skills.
HealTech Electronics Ltd. and its distributors shall not be liable for any loss or damage
caused by improper installation.
1.
Check the supplied parts:
-
FIT module
Wiring harness with a 2-pole plug
Red wire tap connector, gel-filled (2 pcs)
USB cable with a 4-pole plug
Cable ties (2+1 pcs)
Velcro strips
HealTech stickers (2+2 pcs)
2.
Make sure the ignition key is in OFF position. Remove the seat.
3.
Locate the ECM (Engine Control Module, main computer) under the seat.
4.
The table below shows the models which are equipped with a Lambda (O2)
sensor on certain markets.
If your motorcycle is not in the list or not equipped with a Lambda sensor, or the
sensor has been by-passed already, skip section 4 and proceed to step 5.
4.1. The ECM usually has two multi-pin connectors. Disconnect the connector
listed for your bike model/year, then locate the wire based on the pin
number AND wire color shown. (The pin numbering can be seen at the back
side of the connector. There are more wires with this color, so make sure the
pin number and wire color match the description.
At the wire color description, the first color means the base color and the
second color the thin stripe on it. If you find a different wire color in the pin
number specified, please contact us. If you do not find any wire in the pin
number specified, or the wire here was cut already, proceed to step 5.)
FIT_S01_InstallGuide_en.pdf
http://www.fi-tuner.com
[rev. 006]
-1-
Model
AN650 (2003-2010)
B-King (2008-2010)
DL1000 (2002-2003)
KLV1000 (2004-2006)
DL1000 (2004-2010)
GSF650 (2007-2010)
GSX650F (2008-2010)
GSF1250 (2007-2010)
GSX1250 (2010-2012)
GSR600 (2006-2010)
GSX-R600
GSX-R750
GSX-R600
GSX-R750
(2006-2007)
(2006-2007)
(2008-2010)
(2008-2010)
GSX-R1000 (2007-2010)
GSX1300R (2002-2007)
GSX1300R (2008-2010)
SV1000 (2003-2004)
SV1000 (2005-2009)
VL800, Boulevard C50,
Intruder C800 (2005-2010)
VL1500, Boulevard C90
Intruder C1500 (2005-2010)
VZ1500, Boulevard M90
Intruder M1500 (2009-2010)
VZR1800, Boulevard M109R
Intruder M1800R (2006-2010)
Lambda control wire
Small connector
pin #19, Black/Brown
Black connector
pin #24, Black/White
Single connector
pin #23, Black/Brown
Small connector
pin #11, Black/White
Remark
EX
Small connector
pin #23, Black/White
Small connector
pin #23, Black/White
Black connector
pin #30, Black/Brown
Black connector
pin #5, Black/White
Black connector
pin #5, Black/White
Large connector
pin #11, Black/Brown
Black connector
pin #24, Black/White
Single connector
pin #23, Black/Brown
Small connector
pin #11, Black/Brown
Large connector
pin #23, Black/Brown
Large connector
pin #23, Black/Brown
Large connector
pin #23, Black/White
Grey connector
pin #28, Black/Brown
EX
EX
EX
EX
EX
4.2. After confirming that the correct wire is found, cut this wire about 3 cm (1”)
away from the ECM plug. (Alternatively, if you wish, you could remove the
terminal from the ECM connector slot without cutting.) Isolate both wire ends
with tape.
Cutting this wire will by-pass the Lambda (O2) sensor which is a required step
when you install an FI module (regardless of brand). It is a common
procedure and will not induce an “FI” error. If you decide to uninstall the FI
module, it is not necessary to reconnect the wire.
Note: it can happen that this wire has been cut or removed already on your
bike by a dealer, especially if you have an aftermarket exhaust.
4.3. If there’s an “EX” mark in the table shown for your bike, check and make sure
the Exhaust valve is in the fully open position.
Otherwise, disconnect the cable from the exhaust valve and the spring will
force it open. (Alternatively, if you have the Suzuki SDS tool or HealTech OBD
Tool, under “Active tests”, open the exhaust valve before you cut the wire
shown in the table above. This will ensure that the valve is open and stays
open at all times.) Note: it can happen that the Exhaust valve has been
removed or bypassed already on your bike by a dealer, especially if you have
an aftermarket exhaust.
5.
-2-
Locate the 8-pole black Expansion port, near the ECM module, usually under the
seat. It has a removable cap. Remove the cap and connect the 8-pole FIT module
connector. (The location of this special connector is not shown in the Suzuki Service
Manuals but it is there near the ECM box.)
6.
Connect the 2-pole plug (supplied) into the FIT module connector.
7.
Locate the TPS (Throttle Position Sensor signal) and RPM (tacho or crank signal)
wires at the ECM connector. The ECM usually has two multi-pin connectors.
Disconnect the connector listed for your bike model/year, then locate the wire
based on the pin number AND wire color shown. (The pin numbering can be seen at
the back side of the connector. At the wire color description, the first color means
the base color and the second color the thin stripe on it.)
Model
AN650 (2003-2010)
B-King (2008-2010)
DL1000 (2002-2003)
KLV1000 (2004-2006)
DL1000 (2004-2010)
GSF650 (2007-2010)
GSX650F (2008-2010)
GSF1250 (2007-2010)
GSX1250 (2010-2012)
GSR600 (2006-2010)
GSX-R750 (1998-1999)
GSX-R600
GSX-R750
GSX-R600
GSX-R750
GSX-R600
GSX-R750
GSX-R600
GSX-R750
(2001-2003)
(2000-2003)
(2004-2005)
(2004-2005)
(2006-2007)
(2006-2007)
(2008-2010)
(2008-2010)
GSX-R1000 (2001-2004)
GSX-R1000 (2005-2006)
GSX-R1000 (2007-2010)
GSX1300R (1999-2007)
GSX1300R (2008-2010)
SV1000 (2003-2004)
SV1000 (2005-2009)
TL1000R/S (1997-2003)
VL800, Boulevard C50,
Intruder C800 (2005-2010)
VL1500, Boulevard C90, Intruder
C1500 (2005-2010)
VZ1500, Boulevard M90,
Intruder M1500 (2009-2010)
VZR1800, Boulevard M109R,
Intruder M1800R (2006-2010)
TPS wire
Small connector
pin #15 Pink/Black
Black connector
pin #8, Pink/Black
Single connector
pin #19, Pink/White
Large connector
pin #17, Pink/White
RPM wire
Small connector
pin #21 Brown/White
Gray connector
pin #4, Yellow/Blue
Single connector
pin #4, Brown/Black
Small connector
pin #4, Brown/Black
Large connector
pin #8, Pink/Black
Large connector
pin #13, Yellow/Blue
Large connector
pin #8, Pink/Black
Large connector
pin #16, Blue
Small connector
pin #15, Pink/Black
Large connector
pin #8, Pink/Black
Black connector
pin #8, Pink/Black
Black connector
pin #6, Pink/Black
Small connector
pin #15, Pink/Black
Black connector
pin #8, Pink/Black
Black connector
pin #6, Pink/Black
Small connector
pin #15, Pink/Black
Black connector
pin #8, Pink/Black
Single connector
pin #19, Pink/White
Large connector
pin #8, Pink/White
Small connector
pin #5, Gray wire
Large connector
pin #21, Blue/Black
Large connector
pin #21, Blue/Black
Large connector
pin #21, Pink/Black
Black connector
pin #8, Pink/Black
Small connector
pin #3, Yellow/Blue
Small connector
pin #2, Black/Red
Small connector
pin #21, Yellow/Blue
Small connector
pin #3, Yellow/Blue
Gray connector
pin #4, Yellow/Blue
Black connector
pin #11, Yellow/Blue
Small connector
pin #21, Yellow/Blue
Gray connector
pin #3, Yellow/Blue
Black connector
pin #11, Yellow/Blue
Small connector
pin #21, Yellow/Blue
Gray connector
pin #4, Yellow/Blue
Single connector
pin #4, Brown/Black
Small connector
pin #3, Brown/Black
Large connector
pin #7, Black/Red wire
Large connector
pin #27, Green/Yellow
Large connector
pin #27, Green/Yellow
Large connector
pin #27, Green/White
Gray connector
pin #30, Black/Green
Note: if your motorcycle is not listed in the table, please either consult with your dealer or
contact us to find out the TPS and RPM wire colors.
-3-
8.
Connect the FIT module Pink/Black wire to the TPS wire (see table above). Use
the Red wire tap connector supplied.
Usage: Place unstripped run wire (TPS wire) inside run channel. Close side
cover until latched. Insert unstripped tap wire (FIT Pink/Black) completely and
check its position. Insert the blade (u-contact) and press down by finger
pressure. Then, depress the u-contact with pliers. Close hinged top cover until
latched. Remove the excess gel around the connector with dry cloth.
9.
Connect the FIT module Yellow/Blue wire to the RPM wire (see table above).
Use the second Red wire tap connector supplied.
10. Check whether everything is installed and working properly:
Æ
Have the engine stop switch in RUN position, turn the ignition key ON.
The LED should be flashing in Green color.
(If not, check the terminals in the 8-pole plug).
Æ
Slowly pull the throttle.
The LED should be flashing faster and stay lit at full throttle.
(If not, check the splice of the Pink/Black wire and make sure it is connected to
the TPS signal wire).
Æ
Release the throttle and start the engine.
The LED should stay lit.
(If not, check the splice of the Yellow/Blue wire and make sure it is connected
to the RPM signal wire).
11. Mount the FIT box under the seat by the supplied Velcro strips, and secure the
cables with cable ties. Do not bend the cable of the 2-pole plug near the module. If
possible, do not place the unit directly on the ECM. It is important to use the Velcro
strips to minimize vibrations.
12. Connect the USB cable (supplied) between a computer and the module. You may
use a USB 2.0 extension cord if needed (up to 3m / 10 feet). Note:
-
The USB connection will not work if the module is uninstalled.
-
After install and setup, you can either leave the USB cable connected to the
module or have it removed.
-
Never attempt to connect a different cable than supplied to the 4-pole USB
connector of the module. If you need a replacement cable, please contact us.
13. Download and Run the setup file (FIT-Suzuki_Setup.exe) from our website.
Î Type in your browser: www.fi-tuner.com/install and hit Enter.
Note: if you are installing an ATRE/XTRE at the same time, please configure the
TRE unit before doing a custom map for the FIT module.
14. Please read the User’s Manual which is installed by the software.
In case of questions or problems, please contact us:
Email:
[email protected]
www.fi-tuner.com
-4-