1
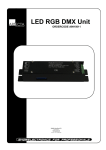
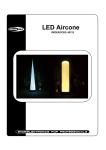
D-Pack 6 Classic
ORDERCODE 50315M
Congratulations!
You have bought a great, innovative product from Showtec.
The Showtec D-Pack 6 Classic brings excitement to any venue. Whether you want simple plug-&-play
action or a sophisticated DMX show, this product provides the effect you need.
You can rely on Showtec, for more excellent lighting products.
We design and manufacture professional light equipment for the entertainment industry.
New products are being launched regularly. We work hard to keep you, our customer, satisfied.
For more information: [email protected]
You can get some of the best quality, best priced products on the market from Showtec.
So next time, turn to Showtec for more great lighting equipment.
Always get the best -- with Showtec !
Thank you!
Showtec
Showtec D-Pack 6 Classic™ Product Guide
Warning..…...................................................................................…………………………………………....................
Safety-instructions…………………………………………………………………………………….…........................
Operating Determinations…………………………………………………………………………….........................
Return Procedure……………………………………………………………………………........................................
Claims……………………………………………………………………………...........................................................
2
2
3
4
4
Description..…..............................................................................……….……………………………….….................. 5
Features…….……………………………………………………………………………………….……....….................. 5
Overview………………………………………………………………………………………………………................... 5
Front....................................................................................................................................................................... 5
Backside................................................................................................................................................................ 6
Installation................................................................................…...……………………………………..…................... 7
Set Up and Operation.....................................................................……..…………………………….…....................
Connecting the unit to a single phase...…...……………………………………..…............................................
Connecting the outputs…………………….....................................................……….........................................
DMX control……………....................................................................................……….........................................
Analog control.....................................................................................................................................................
7
7
7
8
9
Maintenance.................................................................................………..………….…….……………..................... 10
Troubleshooting............................................................................………………….………………….…..................... 10
Product Specifications.................................................................……………….…….…………………..................... 10
1
WARNING
CAUTION!
Keep this device away from rain and moisture!
FOR YOUR OWN SAFETY, PLEASE READ THIS USER MANUAL CAREFULLY
BEFORE YOUR INITIAL START-UP!
SAFETY INSTRUCTIONS
Every person involved with the installation, operation and maintenance of this device has to:
be qualified
follow the instructions of this manual
CAUTION! Be careful with your operations.
With a dangerous voltage you can suffer
a dangerous electric shock when touching the wires!
Before your initial start-up, please make sure that there is no damage caused by transportation. Should
there be any, consult your dealer and do not use the device.
To maintain perfect condition and to ensure a safe operation, it is absolutely necessary for the user to
follow the safety instructions and warning notes written in this manual.
Please consider that damages caused by manual modifications to the device are not subject to
warranty.
This device contains no user-serviceable parts. Refer servicing to qualified technicians only.
IMPORTANT:
The manufacturer will not accept liability for any resulting damages caused by the nonobservance of this manual or any unauthorized modification to the device.
Never let the power-cord come into contact with other cables! Handle the power-cord and all
connections with the mains with particular caution!
Never remove warning or informative labels from the unit.
Do not open the device and do not modify the device.
Do not insert objects into air vents.
Do not connect this device to a dimmerpack.
Do not switch the device on and off in short intervals, as this would reduce the device’s life.
Only use device indoor, avoid contact with water or other liquids.
Avoid flames and do not put close to flammable liquids or gases.
Always disconnect power from the mains, when device is not used or before cleaning! Only
handle the power-cord by the plug. Never pull out the plug by tugging the power-cord.
Make sure that the device is not exposed to extreme heat, moisture or dust.
Make sure that the available voltage is not higher than stated on the rear panel.
Make sure that the power-cord is never crimped or damaged. Check the device and the powercord from time to time.
If device is dropped or struck, disconnect mains power supply immediately. Have a qualified
engineer inspect for safety before operating.
If the device has been exposed to drastic temperature fluctuation (e.g. after transportation), do
not switch it on immediately. The arising condensation water might damage your device. Leave
the device switched off until it has reached room temperature.
If your Showtec device fails to work properly, discontinue use immediately. Pack the unit securely
(preferably in the original packing material), and return it to your Showtec dealer for service.
2
Repairs, servicing and electric connection must be carried out only by Showtec.
For replacement use fuses of same type and rating only.
This device falls under protection class I. Therefore it is essential to connect the yellow/green
conductor to earth.
WARRANTY: Till one year after date of purchase.
OPERATING DETERMINATIONS
This device is not designed for permanent operation. Consistent operation breaks will ensure that the
device will serve you for a long time without defects.
If this device is operated in any other way, than the one described in this manual, the product may suffer
damages and the warranty becomes void.
Any other operation may lead to dangers like short-circuit, burns, electric shock, lamp explosion, crash
etc.
You endanger your own safety and the safety of others!
Improper installation can cause serious damage to people and property !
Connection with the mains
Connect the device to the mains with the power-plug.
Always pay attention, that the right color cable is connected to the right place.
International
EU Cable
UK Cable
US Cable
Pin
L
BROWN
RED
YELLOW/COPPER
FASE
N
BLUE
BLACK
SILVER
NUL
YELLOW/GREEN
GREEN
GREEN
EARTH
Make sure that the device is always connected properly to the earth!
3
Return Procedure
Returned merchandise must be sent prepaid and in the original packing, call tags will not be issued.
Package must be clearly labeled with a Return Authorization Number (RMA number). Products returned
without an RMA number will be refused. Highlite will not accept the returned goods or any responsibility.
Call Highlite 0031-455667723 or mail [email protected] and request an RMA prior to shipping the fixture.
Be prepared to provide the model number, serial number and a brief description of the cause for the
return. Be sure to properly pack fixture, any shipping damage resulting from inadequate packaging is the
customer’s responsibility. Highlite reserves the right to use its own discretion to repair or replace
product(s). As a suggestion, proper UPS packing or double-boxing is always a safe method to use.
Note: If you are given an RMA number, please include the following information on a piece of paper
inside the box:
1) Your name
2) Your address
3) Your phone number
4) A brief description of the symptoms
Claims
The client has the obligation to check the delivered goods immediately upon delivery for any shortcomings and/or visible defects, or perform this check after our announcement that the goods are at their
disposal. Damage incurred in shipping is the responsibility of the shipper; therefore the damage must be
reported to the carrier upon receipt of merchandise.
It is the customer's responsibility to notify and submit claims with the shipper in the event that a fixture is
damaged due to shipping. Transportation damage has to be reported to us within one day after receipt
of the delivery.
Any return shipment has to be made post-paid at all times. Return shipments must be accompanied with
a letter defining the reason for return shipment. Non-prepaid return shipments will be refused, unless
otherwise agreed in writing.
Complaints against us must be made known in writing or by fax within 10 working days after receipt of the
invoice. After this period complaints will not be handled anymore.
Complaints will only then be considered if the client has so far complied with all parts of the agreement,
regardless of the agreement of which the obligation is resulting.
4
Description of the device
Features
The D-Pack 6 Classic is a light controller from Showtec and features:
• LED indicator and dimmer-fader for each channel
• Preheat 0-50% adjustable
• 3 phase input and 20A per phase
• AC 230V, 50/ 60 Hz
• Power output: 10A per channel max. Total 60A max.
• Fuse: 20A circuit breaker
• Dimensions: 482 x 430 x 89mm
• Weight: 7.1 kg
Note:
Knowledge of DMX is required to fully utilize this unit.
Overview
Front
Fig. 1
1) Channel 1 indicator
This indicator lights if there is no load connected
2) Channel 3 indicator
This indicator lights if there is no load connected
3) Channel 1 circuit breaker
This circuit breaker will cut off the power supply if the load current exceeds 20A
4) Channel 3 circuit breaker
This circuit breaker will cut off the power supply if the load current exceeds 20A
5) Channel 2 indicator
This indicator lights if there is no load connected
6) Channel 4 indicator
This indicator lights if there is no load connected
7) Channel 2 circuit breaker
This circuit breaker will cut off the power supply if the load current exceeds 20A
8) Channel 4 circuit breaker
This circuit breaker will cut off the power supply if the load current exceeds 20A
9) Preheat control
This control is used to adjust the initial lightning point
10) Power LED
11) Channel 1-6 dimmer indicator
12) DMX indicator
13) Channel 5 indicator
This indicator lights if there is no load connected
5
14) Channel 5 circuit breaker
circuit breaker will cut off the power supply if the load current exceeds 20A
15) Channel 6 indicator
This indicator lights if there is no load connected
16) Channel 6 circuit breaker
circuit breaker will cut off the power supply if the load current exceeds 20A
17) DMX channel Dip switch
These switches are used to set the DMX start channel
18) Channel 1-6 dimmer control
Use to adjust the according dimmer level
19) Power switch
Backside
Fig. 2
20) 3-pin DMX output connector
21) ANALOG input port (8-pin DIN socket)
22) ANALOG output port (8-pin DIN socket)
23) 3-pin DMX input connector
24) Multipin output connectors
6
Installation
Remove all packing materials from the D-Pack 6 Classic. Check that all foam and plastic padding is
removed. Screw the equipment into a 19" rack. Connect all cables.
Always disconnect from electric mains power supply before cleaning or servicing.
Damages caused by non-observance are not subject to warranty.
Set Up and Operation
Connecting the unit single phase
Although the unit is factory setup for three phase connection, it is also possible rewire the unit for single
phase operation. Please remove the top-cover plate for rewiring the device. See figure 3 for the correct
wiring.
Unplug the unit from mains before making any connections
Fig. 3
Multipin outputs pin assignment
Both multipin sockets are wired in parallel.
Pin assignment
1
2
3
4
5
6
CH1
CH2
CH3
CH4
CH5
CH6
9~14
7,8,15,16
Chase
N
NC
GND
Fig. 4
7
DMX Control
When dipswitch #10 is turned OFF all dimmers are controlled by a separate DMX channel. If dipswitch
#10 is turned ON all dimmers are controlled by a single DMX channel (parallel).
Example: normal mode
DMX CH 1: dimmer channel 1 DMX CH 4: dimmer channel 4
DMX CH 2: dimmer channel 2 DMX CH 5: dimmer channel 5
DMX CH 3: dimmer channel 3 DMX CH 6: dimmer channel 6
Example: parallel mode
DMX CH 1: dimmer channel 1 DMX CH 1: dimmer channel 4
DMX CH 1: dimmer channel 2 DMX CH 1: dimmer channel 5
DMX CH 1: dimmer channel 3 DMX CH 1: dimmer channel 6
DMX Dipswitch Settings
DMX products must have their own "address" to receive DMX signals. Addresses on the controller are set
by flipping the appropriate DMX dipswitches.
You need to know that DMX address settings are the sum of the dip switch values where switch 1 = 20,
switch 2 = 21, switch 3 = 22,, switch 4 = 23 etc., finally switch 9 = 28.
Example
Switch
#1 (20)
#5 (24)
Total sum
Value
1
16 +
17
A much better approach is using the DMX Address Quick reference Chart as shown in figure 5 on the
following page.
Example:
1. If you want to give a DMX device DMX address133, you first have to find the number 133 in the DMX
Chart.
2. Then look at the left side (Dip Switches #1-#5) horizontally from 133.
In the Table you’ll see #1=ON, #2=OFF, #3=ON, #4=OFF, #5=OFF.
3. Finally look at the upper side of the table (Dip Switches #6-#9) vertically from 133.
DMX Address Quick Reference Chart
DMX DIP SWITCH SET
#9
0
0
0
0
0
0
0=OFF
#8
0
0
0
0
1
1
1=ON
#7
0
0
1
1
0
0
#6
0
1
0
1
0
1
32
64
96
128
160
#1
#2
#3
#4
#5
0
0
0
0
0
1
0
0
0
0
1
33
65
97
129
161
0
1
0
0
0
2
34
66
98
130
162
1
1
0
0
0
3
35
67
99
131
163
0
0
1
0
0
4
36
68
100
132
164
1
0
1
0
0
5
37
69
101
133
165
0
1
1
0
0
6
38
70
102
134
166
In the Table you’ll see #6=OFF, #7=OFF, #8=ON, #9=OFF.
8
DMX Address Quick Reference Chart
Dip Switch Position
DMX DI P SWITCH SET
#9
0
0
0
0
0
0
0
0
1
1
1
1
1
1
1
1
0=OFF
#8
0
0
0
0
1
1
1
1
0
0
0
0
1
1
1
1
1=ON
#7
0
0
1
1
0
0
1
1
0
0
1
1
0
0
1
1
#6
0
1
0
1
0
1
0
1
0
1
0
1
0
1
0
1
#1
#2
#3
#4
#5
0
0
0
0
0
32
64
96
128
160
192
224
256
288
320
352
384
416
448
480
1
0
0
0
0
1
33
65
97
129
161
193
225
257
289
321
353
385
417
449
481
0
1
0
0
0
2
34
66
98
130
162
194
226
258
290
322
354
386
418
450
482
1
1
0
0
0
3
35
67
99
131
163
195
227
259
291
323
355
387
419
451
483
0
0
1
0
0
4
36
68
100
132
164
196
228
260
292
324
356
388
420
452
484
1
0
1
0
0
5
37
69
101
133
165
197
229
261
293
325
357
389
421
453
485
0
1
1
0
0
6
38
70
102
134
166
198
230
262
294
326
358
390
422
454
486
1
1
1
0
0
7
39
71
103
135
167
199
231
263
295
327
359
391
423
455
487
0
0
0
1
0
8
40
72
104
136
168
200
232
264
296
328
360
392
424
456
488
1
0
0
1
0
9
41
73
105
137
169
201
233
265
297
329
361
393
425
457
489
0
1
0
1
0
10
42
74
106
138
170
202
234
266
298
330
362
394
426
458
490
1
1
0
1
0
11
43
75
107
139
171
203
235
267
299
331
363
395
427
459
491
0
0
1
1
0
12
44
76
108
140
172
204
236
268
300
332
364
396
428
460
492
1
0
1
1
0
13
45
77
109
141
173
205
237
269
301
333
365
397
429
461
493
0
1
1
1
0
14
46
78
110
142
174
206
238
270
302
334
366
398
430
462
494
1
1
1
1
0
15
47
79
111
143
175
207
239
271
303
335
367
399
431
463
495
0
0
0
0
1
16
48
80
112
144
176
208
240
272
304
336
368
400
432
464
496
1
0
0
0
1
17
49
81
113
145
177
209
241
273
305
337
369
401
433
465
497
0
1
0
0
1
18
50
82
114
146
178
210
242
274
306
338
370
402
434
466
498
1
1
0
0
1
19
51
83
115
147
179
211
243
275
307
339
371
403
435
467
499
0
0
1
0
1
20
52
84
116
148
180
212
244
276
308
340
372
404
436
468
500
1
0
1
0
1
21
53
85
117
149
181
213
245
277
309
341
373
405
437
469
501
0
1
1
0
1
22
54
86
118
150
182
214
246
278
310
342
374
406
438
470
502
1
1
1
0
1
23
55
87
119
151
183
215
247
279
311
343
375
407
439
471
503
0
0
0
1
1
24
56
88
120
152
184
216
248
280
312
344
376
408
440
472
504
1
0
0
1
1
25
57
89
121
153
185
217
249
281
313
345
377
409
441
473
505
0
1
0
1
1
26
58
90
122
154
186
218
250
282
314
346
378
410
442
474
506
1
1
0
1
1
27
59
91
123
155
187
219
251
283
315
347
379
411
443
475
507
0
0
1
1
1
28
60
92
124
156
188
220
252
284
316
348
380
412
444
476
508
1
0
1
1
1
29
61
93
125
157
189
221
253
285
317
349
381
413
445
477
509
0
1
1
1
1
30
62
94
126
158
190
222
254
286
318
350
382
414
446
478
510
1
1
1
1
1
31
63
95
127
159
191
223
255
287
319
351
383
415
447
479
511
Dip Sw itch Positio n
DMX Ad dress
Fig. 5
Analog Control
The D-pack classic uses 8-pole DIN connectors as shown in figure 6.
Fig. 6
9
Maintenance
The Showtec D-Pack 6 Classic requires almost no maintenance. However, you should keep the unit
clean. Disconnect the mains power supply, and then wipe the cover with a damp cloth. Do not immerse
in liquid. Do not use alcohol or solvents.
Keep connections clean. Disconnect electric power, and then wipe the DMX and audio connections
with a damp cloth. Make sure connections are thoroughly dry before linking equipment or supplying
electric power.
Troubleshooting
Showtec D-Pack 6 Classic
This troubleshooting guide is meant to help solve simple problems. If a problem occurs, carry out the steps
below in sequence until a solution is found. Once the unit operates properly, do not carry out following
steps.
1. If the device does not operate properly, unplug the device.
2. Check power from the wall, all cables, the fuse, the settings (return to default), etc.
3. If all of the above appears to be O.K., plug the unit in again.
4. If nothing happens after 30 seconds, unplug the device.
5. Return the device to your Showtec dealer.
Product Specification
Model: Showtec D-Pack 6 Classic
Power Input: AC 230V 50/60Hz 3-phase or single phase input
Power Output: 10A per channel max. Total 60A max.
Fuse: 20A circuit breaker per channel
Dimensions: 19” x 2U x 432mm (lxWxH)
Weight: 7,1kg
Design and product specifications are subject to change without prior notice.
Website: www.Showtec.info
Email: [email protected]
10