1
1
Volume
CREATIVE DATA TECHNOLOGIES, INC.
DATALAYER.NET™
Getting Started
Guide
T A B L E
O F
C O N T E N T S
Table of Contents
Table of Contents............................................................................................................................. 1
Chapter 1 - Installation .................................................................................................................... 2
1.1 Installation Steps.............................................................................................................. 2
1.1 Creating the OrderEntrySystem Database ............................................................... 2
Chapter 2 – DataLayer.NET Overview ............................................................................................ 3
2.1 Overview of DataLayer.NET Components................................................................ 3
2.2 Summary............................................................................................................................. 4
Chapter 3 – Quick Start Sample Aplication ................................................................................... 5
3.1 Project Source Code Organization ............................................................................. 5
3.2 SQL Server Northwind sample database required ................................................ 5
3.3 High level steps to create the Quick Start Application ...................................... 5
3.4 VB.NET Steps to create the Quick Start Application .......................................... 6
3.5 C# Steps to create the Quick Start Application .................................................. 16
3.6 Summary........................................................................................................................... 24
1
C H A P T E R
1
-
I N S T A L L A T I O N
1
Chapter
Chapter 1 – Installation
1.1 Installation Steps
1. Download the DataLayer.NET library files using the following hyperlink:
http://sourceforge.net/projects/datalayernet/files/DataLayer_2.1.zip/download
2. Create a Folder called "DataLayer" in your “C:\Program Files” folder (so it will be C:\Program
Files\DataLayer).
Note: A Setup program was not created, on purpose, so that you, as developers, would not have
to worry about malicious activity from a Setup.exe (or .msi) from an unknown or untrusted
party).
3. Unzip the contents of the Zip file to the new DataLayer folder you just created.
4. Create a desktop shortcut icon to the
C:\Program Files\DataLayer\DataLayerCodeGenerator.exe program.
5. That's it. The DataLayer.dll file is the one main assembly you will be adding as a reference in all
of your projects.
1.2 Creating the OrderEntrySystem Database
In order to follow along with the code examples in these manuals, you will need to create the
sample “OrderEntrySystem” database.
Please follow the steps in Appendix A of the DataLayer Users Guide to create the database.
2
C H A P T E R
2
–
D A T A L A Y E R . N E T
O V E R V I E W
2
Chapter
Chapter 2 – DataLayer.NET Overview
2.1 Overview of DataLayer.NET Components
The DataLayer.NET Library is broken into two main components. The first component is called the
DataConnection class. It is used to help you manage the database connection, manage
transactions (if needed) and it provides scalar database functions for your use. The second
component is called the DataHandler class. This is the main component that does most of the
database work for you in data retrieval and managed updates.
Here is the design philosophy we used when we built the DataLayer.NET Library:
§ Make the components intuitive and easily understood by most programmers.
§ Provide functionality that saves the programmer from having to work at such a low level with
the ADO.NET Framework (directly interacting with ADO.NET classes such as the
SqlConnection, SqlDataAdapter, SqlDataReader, SqlTransaction, SqlCommand,
SqlParameter, and all the equivalent classes for the ODBC and OLE-DB interfaces).
§ Provide a programming platform that minimizes the dependence of any particular back-end
database, where none of the interaction with the ADO.NET classes above will need to be
coded by the programmer, making it much easier to scale an application from SQL Server to
Oracle (OLE-DB driver), for example.
§ Make the library capable of accessing any of the following three types of databases:
* Microsoft SQL Server
* Any ODBC database
* Any OLE-DB database (Oracle, DB2 Connect, etc.)
§ Handle NULL values for the VB programmer. When reading or setting database values, VB
programmers do not have the ability to represent a NULL value with program variables. The
DataLayer.NET has a feature you can enable or disable that will automatically convert null
values to each data type’s MinValue constant. For example, a NULL integer will be read in
as Integer.MinValue, and a NULL datetime value will be read in as DateTime.MinValue.
§ Dramatically decrease the amount of coding that is required to create typical database
interactive programs.
§ Provide support for Parameterized SQL statements for best practices. The use of
parameterized SQL protects your applications from SQL Injection attacks, and the SQL also
3
C H A P T E R
§
§
§
§
§
§
§
2
–
D A T A L A Y E R . N E T
O V E R V I E W
runs much faster, as the back-end database (particularly SQL Server) can cache the SQL
command signatures on the cache and run the SQL much faster upon subsequent matching
SQL execution.
Fully support the use of the DataLayer.NET library for VB.NET programmers as well as
C#.NET programmers.
Provide a strongly typed interface to the column data, exposing the actual database column
types read from the database.
Leverage the IntelliSense feature of the Visual Studio.NET environment to save typing time
and avoid typing errors during programming. This is an additional benefit of the strongly
typed interface of the DataLayer.NET library.
Trust and empower the programmers, but do not tie their hands behind their backs. Provide
them with the data access objects to make their lives easier, but do not prevent them from
directly sending some custom SQL to the database should they see fit. Extend their SQL
Knowledge; do not try to replace it.
From the programmer’s perspective, the library must be flexible to changes in the database
structures (tables). The programmer will only have to update the schema information in a
single class (the inherited DataHandler class for the table).
Performance must be a key goal in the design, as programmers will not want to use the
library if they find out that there is a 10 – 20% reduction in performance by doing so. On the
contrary, our clients experience a significant increase in performance because they adopt the
parameterized SQL methodology as well as using the DataLayer.NET library.
Provide a record retrieval system that can either retrieve ALL of the rows of the result set into
a buffer (DataSet), or retrieve the rows one page at a time, where page size and which page
to retrieve can be specified by the user at runtime.
2.2 Summary
You can see from the above list of features above, the DataLayer.NET is going to save you a lot of
coding and make your applications a lot easier to create and maintain. Some developers have
stated that they saved as much as 60 to 70% code savings in the data access layers of their
programs.
In the next chapter for this Quick Start Guide, you will be led through the construction of a very
simplistic sample application to give you an idea how to start using the DataLayer.NET library.
4
C H A P T E R
3
–
Q U I C K
S T A R T
S A M P L E
A P P L I C A T I O N
3
Chapter
Chapter 3 – Quick Start Sample
Application
3.1 Project Source Code Organization
As you create new programs using Visual Studio.NET, the default location where projects are
stored is in a folder name under your “My Documents” folder called “Visual Studio Projects” (or
“Visual Studio 2010\Projects” if you are using the new Visual Studio 2010). The physical path to
these folders can get quite long, so we suggest simply creating a directory called “Projects” directly
at the root of your C: drive (i.e. C:\Projects), and creating a new folder under the C:\Projects folder
for each one of your new projects. Where you actually choose to keep the source code for your
new projects is completely up to you, of course. However, for the purposes of the samples
contained in the 3 DataLayer.NET Users’ Manuals, we will be assuming that you are saving the
projects under the folder C:\Projects.
3.2 SQL Server sample database “OrderEntrySystem” required
All of the sample programs provided with the DataLayer.NET library use the sample
OrderEntrySystem database that is provided. Follow the instructions in Appendix A of the
DataLayer.NET User’s Guide, if you haven’t already done so.
3.3 High level steps to create the Quick Start Application
Here is a high level view of the steps required to create the Quick Start Application. You will be
given specific instructions in the next section to perform these steps. This is presented here to give
you an overview of the steps that are required:
• Create the new project using Visual Studio.
• Add the Reference to the DataLayer.dll Assembly.
• Add a project level Imports declaration for the CDT.DATALAYER namespace (VB.NET only).
• Use the Code Generator to generate a new class file for the PRODUCT_TYPES table.
• Import the new PRODUCT_TYPES class file into your project.
• Decorate the new PRODUCT_TYPES class with the appropriate Attributes for each column.
5
C H A P T E R
•
•
•
•
•
•
3
–
Q U I C K
S T A R T
S A M P L E
A P P L I C A T I O N
Design a simple window with several controls for the user interface for the program.
Code the Connect button to connect to the Northwind database.
Code the Retrieve button to retrieve the rows into the DataGrid control.
Test the Connect and Retrieval portions of the application.
Add a Total button to demonstrate using the strongly typed interface.
Add an Update button to demonstrate sending updates to the database.
3.4 VB.NET Steps to create the Quick Start Application
Note: See section 3.5 if you prefer to create a C# Application.
Use the following steps to create your first DataLayer.NET database application:
1. Create the C:\Projects folder, as mentioned above in section 3.1.
2. Start Visual Studio.NET, and click on the New Project link.
3. Make sure the “Visual Basic” folder is selected on the top left box called “Installed
Templates”.
4. Make sure the “Windows Forms Application” template is selected.
5. Type in “QuickStart” for the project’s Name, and then click the OK button. You will get a
simple windows application with one main form called “Form1.vb”.
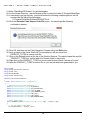
6. On the right side under “Solution Explorer”, click on the “Show All Files” button so that the
“References” folder is visible for the project.
7. Expand the “References” folder in the Solution Explorer for the QuickStart application, and
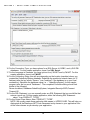
then right-click on the References and choose “Add Reference…” from the popup menu.
8. Click the Browse button and navigate to the C:\Program Files\DataLayer folder, and select
the DataLayer.dll file and click Open.
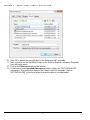
9. You will see the DataLayer.dll assembly selected in the bottom part of the window as follows:
6
C H A P T E R
3
–
Q U I C K
S T A R T
S A M P L E
A P P L I C A T I O N
10. Click OK to accept the new reference to the DataLayer.NET assembly.
11. Next, right-click on the QuickStart Project in the Solution Explorer, and select Properties
from the popup menu.
12. Click on the References item on the left side.
13. At the bottom under Imported Namespaces, select (check) the “CDT.DATALAYER”
namespace. This makes it so that you don’t have to add the statement “Imports
CDT.DATALAYER” to the top of every form and module in your application.
7
C H A P T E R
3
–
Q U I C K
S T A R T
S A M P L E
A P P L I C A T I O N
14. Click on the Save All button at the top of Visual Studio to save all the changes we have
made so far. Close the Application Properties Window.
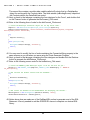
15. Next, we will be using the DataLayer.NET Code Generator to generate a new class file to
access the PRODUCT_TYPES table in the OrderEntrySystem database.
16. Right-click on the QuickStart Application in the Solution Explorer, and choose “Add New”,
and then choose “Folder”. Rename the folder to “Domain”. This is where all your
DataLayer.NET classes will reside.
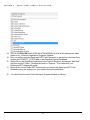
17. Minimize the Visual Studio.NET Environment, and launch the DataLayer.NET Code
Generator using the desktop icon you created during the installation.
18. You should see the main Code Generator Program Window as follows:
8
C H A P T E R
3
–
Q U I C K
S T A R T
S A M P L E
A P P L I C A T I O N
19. For the Connection Type, you have options for a) SQL Server, b) ODBC, and c) OLE-DB
databases. For this sample application, leave it as SQL Server.
20. For the Language to Generate, you have options for a) VB.NET and b) C#.NET. For this
sample application, leave it as VB.NET.
21. For the Connection String, this will vary depending on the location (machine) where you
created the OrderEntrySystem database. Substitute the machine’s network name (or IP
Address) after the key words “Server=” (use “localhost” if the database is on your local
workstation). Substitute the database name (i.e. – “OrderEntrySystem” for this sample
program) after the key word “Database=”. The completed ConnectionString should look
similar to the following:
Server=localhost; Database=OrderEntrySystem; Integrated Security=SSPI;Connect
Timeout=30
22. For the SQL Statement, you can normally enter any SQL Statement that you would like that
returns a result set. For this sample application, enter the following SQL Statement:
select * from PRODUCT_TYPES
23. For the Output Class Name, enter “PRODUCT_TYPES”.
NOTE: We usually create these particular class names in UPPER CASE. This will help you
distinguish all the DataLayer.NET Code Generated entity classes in your application from
all the other classes as you develop your application.
9
C H A P T E R
3
–
Q U I C K
S T A R T
S A M P L E
A P P L I C A T I O N
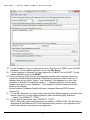
24. Leave the Namespace empty.
25. For the Output Directory, use the Browse button to select the folder C:\Projects\QuickStart.
26. If everything is set up correctly, you should notice the following complete path for the VB
source code file that will be generated:
C:\Projects\QuickStart\Domain\PRODUCTS.vb
27. Click the Generate Class Source Code File button. You should get the following
confirmation window:
28. Click OK, and then exit the Code Generator Program using the Exit button.
29. Next, go back to the Visual Studio.NET environment so we can import the
PRODUCT_TYPES.vb source code file.
30. Click on the Refresh button at the top of the Solution Explorer. This should make the new
file “PRODUCT_TYPES.vb” visible under the Domain folder in the project.
31. Right-click on the PRODUCT_TYPES.vb source code file and choose “Include in Project”.
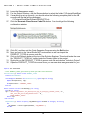
32. Open the PRODUCT_TYPES.vb source file so you can see what was generated for you:
Imports CDT.DATALAYER
' Class PRODUCT_TYPES generated by DataLayer.NET Code Generator.
<Serializable()> Public Class PRODUCT_TYPES
Inherits DataHandler
Sub New(ByVal DataConn As DataConnection, ByVal SQL As String)
MyBase.New(DataConn, SQL)
Me.UpdateTable = "PRODUCT_TYPES"
End Sub
Public Shared Function GetBaseSQL() As String
Dim SQL As String
SQL = "SELECT id_product,txt_description,qty_on_hand,qty_reorder_level," & _
"amt_cost,amt_price,nme_manufacturer " & _
"FROM PRODUCT_TYPES"
Return SQL
End Function
<Updateable()> Public Property ID_PRODUCT(ByVal RowNum As Integer) As String
Get
ID_PRODUCT = GetStringData(RowNum, "ID_PRODUCT")
End Get
10
C H A P T E R
3
–
Q U I C K
S T A R T
S A M P L E
A P P L I C A T I O N
Set
SetData(RowNum, "ID_PRODUCT", Value)
End Set
End Property
<Updateable()> Public Property TXT_DESCRIPTION(ByVal RowNum As Integer) As String
Get
TXT_DESCRIPTION = GetStringData(RowNum, "TXT_DESCRIPTION")
End Get
Set
SetData(RowNum, "TXT_DESCRIPTION", Value)
End Set
End Property
<Updateable()> Public Property QTY_ON_HAND(ByVal RowNum As Integer) As Integer
Get
QTY_ON_HAND = GetIntegerData(RowNum, "QTY_ON_HAND")
End Get
Set
SetData(RowNum, "QTY_ON_HAND", Value)
End Set
End Property
<Updateable()> Public Property QTY_REORDER_LEVEL(ByVal RowNum As Integer) As Integer
Get
QTY_REORDER_LEVEL = GetIntegerData(RowNum, "QTY_REORDER_LEVEL")
End Get
Set
SetData(RowNum, "QTY_REORDER_LEVEL", Value)
End Set
End Property
<Updateable()> Public Property AMT_COST(ByVal RowNum As Integer) As Decimal
Get
AMT_COST = GetDecimalData(RowNum, "AMT_COST")
End Get
Set
SetData(RowNum, "AMT_COST", Value)
End Set
End Property
<Updateable()> Public Property AMT_PRICE(ByVal RowNum As Integer) As Decimal
Get
AMT_PRICE = GetDecimalData(RowNum, "AMT_PRICE")
End Get
Set
SetData(RowNum, "AMT_PRICE", Value)
End Set
End Property
<Updateable()> Public Property NME_MANUFACTURER(ByVal RowNum As Integer) As String
Get
NME_MANUFACTURER = GetStringData(RowNum, "NME_MANUFACTURER")
End Get
Set
SetData(RowNum, "NME_MANUFACTURER", Value)
End Set
End Property
11
C H A P T E R
3
–
Q U I C K
S T A R T
S A M P L E
A P P L I C A T I O N
End Class
33. The general structure of these files is the Class name declaration at the top, followed by a
New constructor and then a function called GetBaseSQL. This function is useful for building
SQL statements in your descendant classes, as it provides all the columns in a bare SQL
statement. After that, you have Get / Set properties defined for each column in the table.
Notice that the data type and methods called by each property are particular to the datatype
of each column.
34. Next you need to modify this class to decorate each column with the appropriate attributes.
Here is a list of the available attributes:
Updateable() = The column is an updateable column (to be included in update statements
sent to the database.
PrimaryKey() = The column is part of the primary key for the table.
Identity() = The column is an IDENTITY column (automatically generated number) in the
database. When you use this attribute, the DataLayer.NET Library will read the new key
value assigned after an INSERT statement into the buffer object.
Sequencer() = The column is a child table sequencer (don’t worry about this for now, more
on this can be found in the User’s Manual).
DB2Timestamp() = The column is a DB2 timestamp. DB2 requires a very specific format for
sending updates and inserts based on these column types.
35. As you can see from looking at the generated source code, the “Updateable()” attribute is
added by default by the code generator for every column. Note that when you are adding the
attributes, you do not have to enter the parenthesis (they will automatically be added).
36. For the Products table in this example, the Primary Key is the ID_PRODUCT column. You
need to add the PrimaryKey() attribute, as follows:
<PrimaryKey(), Identity()> Public Property ID_PRODUCT(ByVal RowNum As Integer) As
_ Integer
Get
ID_PRODUCT = GetIntegerData(RowNum, "ID_PRODUCT")
End Get
Set
SetData(RowNum, "ID_PRODUCT", Value)
End Set
End Property
37. Click the “Save All” button to save your changes.
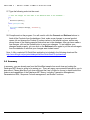
38. Next, let’s work on creating the user interface for this sample application.
39. Click on the tab page containing the Form1.vb with the blank form visible on the screen.
40. Drag the lower right corner of the form to make it about twice as tall and twice as wide as it
gets created originally.
41. Here is a print screen of the controls placed on the form, so you can see what it should look
like as you place the controls on the form:
12
C H A P T E R
3
–
Q U I C K
S T A R T
S A M P L E
A P P L I C A T I O N
42. Using the toolbox on the left, add all four buttons and the DataGridView in the middle.
43. Set the .Text property of each button to read Connect, Retrieve, Total, and Update as shown
above.
44. Set the .Name property to be btnConnect, btnRetrieve, btnTotal, and btnUpdate accordingly.
45. Leave the DataGridView control’s name as “DataGrid1”
46. Click on the View Code button at the top of the Solution Explorer.
47. In the source code editor, enter the following two lines just below the line “Public Class
Form1:
Private mSQLConn As DataConnection ' DataLayer connection object.
Private mProducts As PRODUCT_TYPES ' DataHandler object for Products table.
Private mBindingSource As BindingSource ' BindingSource for the Grid.
The first line creates a module-wide variable called mSQLConn for the database connection.
The second line creates a module-wide variable called mProducts that is a DataHandler
object for working with the Products table. The third variable (mBindingSource) helps bind
the Products data to the DataGridView control.
48. Next, go back to the tab page containing the form designer for the Form1, and double-click
on the Connect button to generate the btnConnect_Click event.
49. Enter in the following lines of code for the btnConnect_Click event:
' Create the DataLayer Connection object set for SQL Server mode...
mSQLConn = New DataConnection(DataLayer_ConnectionType.SQLServer)
13
C H A P T E R
3
–
Q U I C K
S T A R T
S A M P L E
A P P L I C A T I O N
mSQLConn.ConnectionString = "Server=localhost; Database=OrderEntrySystem; Integrated
Security=SSPI;Connect Timeout=30"
Try
mSQLConn.Connect()
Catch ex As Exception
MsgBox(ex.Message, MsgBoxStyle.Critical, "Problem:")
Exit Sub
End Try
50. You may need to modify the line of code containing the ConnectionString property in the
same manner as you did when you were using the Code Generator Program.
51. Next, go back to the tab page containing the form designer and double-click the Retrieve
button to generate the btnRetrieve_Click event.
52. Enter in the following source code for the btnRetrieve_Click event:
' Create the PRODUCT_TYPES DataLayer object to do all the work for you...
mProducts = New PRODUCT_TYPES(mSQLConn, PRODUCT_TYPES.GetBaseSQL & " ORDER BY
txt_description")
' Now retrieve the Product records from the database...
Try
mProducts.GetAllRows()
Catch ex As Exception
MsgBox(ex.Message, MsgBoxStyle.Critical, "Problem:")
Exit Sub
End Try
' Now connect the DataSet to the DataGridView for displaying the records...
mBindingSource = new BindingSource(mProducts.DataSet, "data")
DataGridView1.DataSource = mBindingSource
53. Notice above how we made use of the GetBaseSQL routine to generate most of the SQL
Statement. We only needed to add the ORDER BY clause to complete our desired SQL
Query.
54. Also notice in the 2nd to last line the mention of the DataSet table called “data”. All
DataHandler generated DataSet tables are called “data” by default. These DataHandler
DataSet buffers usually only contain a single table object, so this is the standard table name
that is used to access the row data.
55. Compile and run the sample application. When you run the program, first click on the
Connect button (wait a couple of seconds to see if any error appears). Next, click on the
Retrieve button to populate the Products row data into the DataGrid.
Note: This display is very raw, as none of the columns have been formatted or sized
accordingly, but it gives you an idea of the power the DataLayer.NET library puts into your
hands without a lot of programming.
56. Next, we will be coding the Total button to display the total price of all the products in the
database that have a price listed. This Total is not particularly useful information, but it will
serve its purpose demonstrating the strongly typed interface.
57. Double-click the Total button to generate the btnTotal_Click event skeleton.
14
C H A P T E R
3
–
Q U I C K
S T A R T
S A M P L E
A P P L I C A T I O N
58. Type the following code below into the event. Notice that when you are typing the mProducts
object name, the IntelliSense feature of Visual Studio automatically gives you the column
properties of the object in a list. All you have to do is type in the first letter or two of the
property you are looking for, then hit the tab key to accept the selected property name.
' Add up all the product prices and display the total...
Dim decTotal As Decimal = 0.0
Dim I As Integer
For I = 1 To mProducts.RowCount
If (mProducts.AMT_PRICE(I) <> Decimal.MinValue) Then
decTotal += mProducts.AMT_PRICE(I)
End If
Next
MsgBox("The Grand Total of all Unit Prices is " & Format(decTotal, "$#,###,##0.00"))
59. Go ahead and compile and run the program, and test out the Total button. Don’t forget that
you need to first Connect and Retrieve before clicking the Total button, or you will receive an
error. You should see a messagebox similar to the following (the exact total may vary):
60. Finally, let us code the Update button. You may be thinking that this will be the most
complex coding of all, but the DataLayer.NET library takes care of all the work for you. It is
essentially a single line of source code!
61. Double-click the Update button to generate the skeleton for the btnUpdate_Click event.
62. Type the following code into the event:
' Save the changes the user made in the DataGrid back to the database...
Try
mProducts.Update()
Catch ex As Exception
MsgBox(ex.Message, MsgBoxStyle.Critical, "Problem:")
Exit Sub
End Try
63. Compile and run the program. You will need to click the Connect and Retrieve buttons to
fetch all the Products from the database. Next, make some changes to several product
names (do not change the Product ID column values in the leftmost column, as this may
disrupt some of the existing sample Orders that are in the database. After you have made a
few changes, click on the Update button to save your changes. To test whether your
15
C H A P T E R
3
–
Q U I C K
S T A R T
S A M P L E
A P P L I C A T I O N
changes saved properly, you can click on the Retrieve button again to pull the records again
from the database to see that your changes were indeed saved.
Note: A fully completed VB.NET QuickStart application is included in the following download file:
http://sourceforge.net/projects/datalayernet/files/QuickStartVB.zip/download
3.5 C# Steps to create the Quick Start Application
1.
2.
3.
4.
5.
6.
7.
8.
9.
Create the C:\Projects folder, as mentioned above in section 3.1.
Start Visual Studio.NET, and click on the New Project link.
Make sure the “Visual C#” folder is selected on the top left under “Installed Templates”.
Make sure the “Windows Forms Application” template is selected.
Type in “QuickStartCS” for the project’s Name, and then click the OK button. You will get a
simple windows application with one main form called “Form1.cs”.
On the right side under “Solution Explorer”, click on the “Show All Files” button so that the
“References” folder is visible for the project.
Expand the “References” folder in the Solution Explorer for the QuickStart application, and
then right-click on the References and choose “Add Reference…” from the popup menu.
Click the Browse button and navigate to the C:\Program Files\DataLayer folder, and select
the DataLayer.dll file and click Open.
You will see the DataLayer.dll assembly selected in the bottom part of the window as follows:
16
C H A P T E R
3
–
Q U I C K
S T A R T
S A M P L E
A P P L I C A T I O N
10. Click OK to accept the new reference to the DataLayer.NET assembly.
11. Click on the Save All button at the top of Visual Studio to save all the changes we have
made so far. You will be prompted to save the Project files. Make sure the project folder is
created under C:\Projects.
12. Next, we will be using the DataLayer.NET Code Generator to generate a new class file to
access the PRODUCT_TYPES table in the OrderEntrySystem database.
13. Right-click on the QuickStart Application in the Solution Explorer, and choose “Add New”,
and then choose “Folder”. Rename the folder to “Domain”. This is where all your
DataLayer.NET classes will reside.
14. Minimize the Visual Studio.NET Environment, and launch the DataLayer.NET Code
Generator using the desktop icon you created during the installation.
15. You should see the main Code Generator Program Window as follows:
17
C H A P T E R
3
–
Q U I C K
S T A R T
S A M P L E
A P P L I C A T I O N
16. For the Connection Type, you have options for a) SQL Server, b) ODBC, and c) OLE-DB
databases. For this sample application, leave it as SQL Server.
17. For the Language to Generate, you have options for a) VB.NET and b) C#.NET. For this
sample application, leave it as C#.NET.
18. For the Connection String, this will vary depending on the location (machine) where you
created the OrderEntrySystem database. Substitute the machine’s network name (or IP
Address) after the key words “Server=” (use “localhost” if the database is on your local
workstation). Substitute the database name (i.e. – “OrderEntrySystem” for this sample
program) after the key word “Database=”. The completed ConnectionString should look
similar to the following:
Server=localhost; Database=OrderEntrySystem; Integrated Security=SSPI;Connect
Timeout=30
19. For the SQL Statement, you can normally enter any SQL Statement that you would like that
returns a result set. For this sample application, enter the following SQL Statement:
select * from PRODUCT_TYPES
20. For the Output Class Name, enter “PRODUCT_TYPES”.
NOTE: We usually create these particular class names in UPPER CASE. This will help you
distinguish all the DataLayer.NET Code Generated entity classes in your application from
all the other classes as you develop your application.
18
C H A P T E R
3
–
Q U I C K
S T A R T
S A M P L E
A P P L I C A T I O N
21. Enter “QuickStartCS.Domain” for the Namespace.
22. For the Output Directory, use the Browse button to select the folder C:\Projects\QuickStart.
23. If everything is set up correctly, you should notice the following complete path for the VB
source code file that will be generated:
C:\Projects\QuickStart\Domain\PRODUCTS.vb
24. Click the Generate Class Source Code File button. You should get the following
confirmation window:
25. Click OK, and then exit the Code Generator Program using the Exit button.
26. Next, go back to the Visual Studio.NET environment so we can import the
PRODUCT_TYPES.cs source code file.
27. Click on the Refresh button at the top of the Solution Explorer. This should make the new file
“PRODUCT_TYPES.cs” visible under the Domain folder in the project.
28. Right-click on the PRODUCT_TYPES.cs source code file and choose “Include in Project”.
29. Open the PRODUCT_TYPES.cs source file so you can see what was generated for you:
using
using
using
using
using
System;
System.Collections.Generic;
System.Text;
CDT.DATALAYER;
System.Collections;
namespace QuickStartCS.Domain
{
public class PRODUCT_TYPES : DataHandler
{
// Declare all the column properties...
public DataLayerIndexer_String ID_PRODUCT;
public DataLayerIndexer_String TXT_DESCRIPTION;
public DataLayerIndexer_Integer QTY_ON_HAND;
public DataLayerIndexer_Integer QTY_REORDER_LEVEL;
public DataLayerIndexer_Decimal AMT_COST;
public DataLayerIndexer_Decimal AMT_PRICE;
public DataLayerIndexer_String NME_MANUFACTURER;
// Class Constructor...
public PRODUCT_TYPES(DataConnection dc, String SQL) : base(dc, SQL)
{
// Set the Update Table Name...
this.UpdateTable = "PRODUCT_TYPES";
19
C H A P T E R
3
–
Q U I C K
S T A R T
S A M P L E
A P P L I C A T I O N
// Set the DataLayer object up for C# Mode...
this.CSharpMode = true;
// Name the Primary Key Columns...
ArrayList objPKList = new ArrayList();
objPKList.Add("ID_PRODUCT");
this.SetPrimaryKeyArrayList(objPKList);
// Name the Updateable columns...
ArrayList objUpdateColumns = new ArrayList();
objUpdateColumns.Add("ID_PRODUCT");
objUpdateColumns.Add("TXT_DESCRIPTION");
objUpdateColumns.Add("QTY_ON_HAND");
objUpdateColumns.Add("QTY_REORDER_LEVEL");
objUpdateColumns.Add("AMT_COST");
objUpdateColumns.Add("AMT_PRICE");
objUpdateColumns.Add("NME_MANUFACTURER");
this.SetUpdateColumnArrayList(objUpdateColumns);
// Initialize all the Property Indexers...
ID_PRODUCT = new DataLayerIndexer_String(this, "ID_PRODUCT");
TXT_DESCRIPTION = new DataLayerIndexer_String(this, "TXT_DESCRIPTION");
QTY_ON_HAND = new DataLayerIndexer_Integer(this, "QTY_ON_HAND");
QTY_REORDER_LEVEL = new DataLayerIndexer_Integer(this, "QTY_REORDER_LEVEL");
AMT_COST = new DataLayerIndexer_Decimal(this, "AMT_COST");
AMT_PRICE = new DataLayerIndexer_Decimal(this, "AMT_PRICE");
NME_MANUFACTURER = new DataLayerIndexer_String(this, "NME_MANUFACTURER");
}
public static String GetBaseSQL() {
String SQL;
SQL = "SELECT id_product,txt_description,qty_on_hand,qty_reorder_level," +
"amt_cost,amt_price,nme_manufacturer " +
"FROM PRODUCT_TYPES";
}
}
return SQL;
}
30. The general structure of these files is the Namespace declaration is at the top, followed by
the Class name declaration. Next is all of the public column properties (each column type
has a different kind of accessor type. Next is the constructor, which includes code to set the
Update Table’s name, CSharpMode flag, a list of the Primary Key Columns, and Update
Columns, and then the code that actually initializes all of the property indexers. Finally, there
is a function called GetBaseSQL. This function is useful for building SQL statements in your
descendant classes, as it provides all the columns in a bare SQL statement. Notice that the
C# form of these DataHandler class files do not use Attributes the way that the VB.NET
DataHandler classes do. The Primary Keys and Updateable columns are initialized in the
Constructor instead for C#.
31. Click the “Save All” button to save your changes.
20
C H A P T E R
3
–
Q U I C K
S T A R T
S A M P L E
A P P L I C A T I O N
32. Next, let’s work on creating the user interface for this sample application.
33. Click on the tab page containing the Form1.vb with the blank form visible on the screen.
34. Drag the lower right corner of the form to make it about twice as tall and twice as wide as it
gets created originally.
35. Here is a print screen of the controls placed on the form, so you can see what it should look
like as you place the controls on the form:
36. Using the toolbox on the left, add all four buttons and the DataGridView in the middle.
37. Set the .Text property of each button to read Connect, Retrieve, Total, and Update as shown
above.
38. Set the .Name property to be btnConnect, btnRetrieve, btnTotal, and btnUpdate accordingly.
39. Leave the DataGridView control’s name as “DataGrid1”
40. Click on the View Code button at the top of the Solution Explorer.
41. Add the following two lines of code to the list of using statements at the top of the file:
using CDT.DATALAYER;
using QuickStartCS.Domain;
42. Next, enter the following two lines just inside the class declaration:
Private DataConnection mSQLConn; // DataLayer connection object.
Private PRODUCT_TYPES mProducts; // DataHandler object for Products table.
Private BindingSource mBindingSource // BindingSource for the Grid.
The first line creates a module-wide variable called mSQLConn for the database connection.
21
C H A P T E R
3
–
Q U I C K
S T A R T
S A M P L E
A P P L I C A T I O N
The second line creates a module-wide variable called mProducts that is a DataHandler
object for working with the Products table. The third variable (mBindingSource) helps bind
the Products data to the DataGridView control.
43. Next, go back to the tab page containing the form designer for the Form1, and double-click
on the Connect button to generate the btnConnect_Click event.
44. Enter in the following lines of code for the btnConnect_Click event:
// Create the DataLayer Connection object set for SQL Server mode...
mSQLConn = new DataConnection(DataLayer_ConnectionType.SQLServer);
mSQLConn.ConnectionString = "Server=localhost; Database=OrderEntrySystem; Integrated
Security=SSPI;Connect Timeout=30";
try
{
mSQLConn.Connect();
}
catch (Exception ex)
{
MessageBox.Show(ex.Message, "Problem:");
return;
}
45. You may need to modify the line of code containing the ConnectionString property in the
same manner as you did when you were using the Code Generator Program.
46. Next, go back to the tab page containing the form designer and double-click the Retrieve
button to generate the btnRetrieve_Click event.
47. Enter in the following source code for the btnRetrieve_Click event:
// Create the PRODUCT_TYPES DataLayer object to do all the work for you...
mProducts = new PRODUCT_TYPES(mSQLConn, PRODUCT_TYPES.GetBaseSQL() + " ORDER BY
txt_description");
// Now retrieve the Product records from the database...
try
{
mProducts.GetAllRows();
}
catch(Exception ex)
{
MessageBox.Show(ex.Message, "Problem:");
return;
}
// Now connect the DataSet to the DataGridView for displaying the records...
mBindingSource = new BindingSource(mProducts.DataSet, "data");
dataGridView1.DataSource = mBindingSource;
48. Notice above how we made use of the GetBaseSQL routine to generate most of the SQL
Statement. We only needed to add the ORDER BY clause to complete our desired SQL
Query.
22
C H A P T E R
3
–
Q U I C K
S T A R T
S A M P L E
A P P L I C A T I O N
49. Also notice in the 2nd to last line the mention of the DataSet table called “data”. All
DataHandler generated DataSet tables are called “data” by default. These DataHandler
DataSet buffers usually only contain a single table object, so this is the standard table name
that is used to access the row data.
50. Compile and run the sample application. When you run the program, first click on the
Connect button (wait a couple of seconds to see if any error appears). Next, click on the
Retrieve button to populate the Products row data into the DataGrid.
Note: This display is very raw, as none of the columns have been formatted or sized
accordingly, but it gives you an idea of the power the DataLayer.NET library puts into your
hands without a lot of programming.
51. Next, we will be coding the Total button to display the total price of all the products in the
database that have a price listed. This Total is not particularly useful information, but it will
serve its purpose demonstrating the strongly typed interface.
52. Double-click the Total button to generate the btnTotal_Click event skeleton.
53. Type the following code below into the event. Notice that when you are typing the mProducts
object name, the IntelliSense feature of Visual Studio automatically gives you the column
properties of the object in a list. All you have to do is type in the first letter or two of the
property you are looking for, then hit the tab key to accept the selected property name:
// Add up all the product prices and display the total...
decimal decTotal = 0.0m;
for(int i = 1; i<= mProducts.RowCount(); i++)
{
if (mProducts.AMT_PRICE[i] != decimal.MinValue)
decTotal += mProducts.AMT_PRICE[i];
}
MessageBox.Show("The Grand Total of all Unit Prices is " + decTotal.ToString("$#,###,##0.00"));
54. Go ahead and compile and run the program, and test out the Total button. Don’t forget that
you need to first Connect and Retrieve before clicking the Total button, or you will receive an
error. You should see a message box similar to the following (the exact total may vary):
55. Finally, let us code the Update button. You may be thinking that this will be the most
complex coding of all, but the DataLayer.NET library takes care of all the work for you. It is
essentially a single line of source code!
56. Double-click the Update button to generate the skeleton for the btnUpdate_Click event.
23
C H A P T E R
3
–
Q U I C K
S T A R T
S A M P L E
A P P L I C A T I O N
57. Type the following code into the event:
// Save the changes the user made in the DataGrid back to the database...
try
{
mProducts.Update();
}
catch (Exception ex)
{
MessageBox.Show(ex.Message, "Problem:");
return;
}
58. Compile and run the program. You will need to click the Connect and Retrieve buttons to
fetch all the Products from the database. Next, make some changes to several product
names (do not change the Product ID column values in the leftmost column, as this may
disrupt some of the existing sample Orders that are in the database. After you have made a
few changes, click on the Update button to save your changes. To test whether your
changes saved properly, you can click on the Retrieve button again to pull the records again
from the database to see that your changes were indeed saved.
Note: A fully completed C# QuickStart application is included in the following download file:
http://sourceforge.net/projects/datalayernet/files/QuickStartCS.zip/download
3.6 Summary
In summary, you can already see from the QuickStart sample how much time and coding the
DataLayer.NET library is going to be saving you. There are many more powerful features for you to
learn about. Please take time to sit down and read the User’s Guide for a more in depth look at the
features and capabilities of the DataLayer.NET library, including Transaction Management,
Parameterized SQL, Sequence Column management, and Scalar Functions.
24