1
xx
ZZZ
Tektronix TekSmartLab™
TSL3000A
User Manual
*P077108300*
077-1083-00
xx
ZZZ
Tektronix TekSmartLab™
TSL3000A
User Manual
Register now!
Click the following link to protect your product.
► www.tektronix.com/register
www.tektronix.com
077-1083-00
Copyright © Tektronix. All rights reserved. Licensed software products are owned by Tektronix or its subsidiaries
or suppliers, and are protected by national copyright laws and international treaty provisions.
Tektronix products are covered by U.S. and foreign patents, issued and pending. Information in this publication
supersedes that in all previously published material. Specifications and price change privileges reserved.
TEKTRONIX and TEK are registered trademarks of Tektronix, Inc.
Contacting Tektronix
Tektronix, Inc.
14150 SW Karl Braun Drive
P.O. Box 500
Beaverton, OR 97077
USA
For product information, sales, service, and technical support:
In North America, call 1-800-833-9200.
Worldwide, visit www.tektronix.com to find contacts in your area.
TSL3000A Tektronix TekSmartLabTM User Manual
Table of Contents
Home Interfaces ................................................................................................................................................................... 1-3
Centralized Instrument Configuration ................................................................................................................................... 1-4
Configuring Courses......................................................................................................................................................... 1-4
Choosing and Editing Courses..................................................................................................................................... 1-4
Configuring Courses .................................................................................................................................................... 1-4
Choosing and Configuring Instruments ............................................................................................................................ 1-6
Home Interface based on Instruments ......................................................................................................................... 1-6
Configuring instruments ............................................................................................................................................... 1-6
Configuring Benches ............................................................................................................................................................ 1-8
Bench Monitoring Interface .............................................................................................................................................. 1-8
Bench Configuration Interface .......................................................................................................................................... 1-9
Monitoring and Controlling Instruments of a Bench ............................................................................................................ 1-11
Instrument Static Report ..................................................................................................................................................... 1-13
Example Cases................................................................................................................................................................... 1-14
Arranging the Benches ................................................................................................................................................... 1-14
Customizing Courses and Configuring Instruments ....................................................................................................... 1-16
Editing the Report Template and Inserting Test Result into a Report ............................................................................ 1-19
2
TSL3000A Tektronix TekSmartLabTM User Manual
Home Interfaces
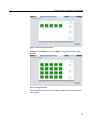
The TSL3000A has two home screens. The default screen (see below) is based on
courses that can be chosen to configure the parameters of instruments.
Figure 1: Default (courses) home screen
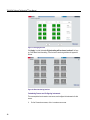
Click the arrow pointing right. You can see the other home interface (see below) based
on instruments that can be chosen to configure parameters also.
Figure 2: Second (instruments) home screen
3
TSL3000A Tektronix TekSmartLabTM User Manual
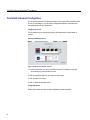
Centralized Instrument Configuration
You can set the instrument configurations based on the courses and then distribute them
to over 100 instruments, or you can set the configurations based on instruments and
then distribute them to up to 30 benches.
Configuring Courses
You can customize your courses and configure the instruments in a batch based on
courses.
Choosing and Editing Courses
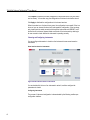
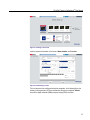
Figure 3: Home screen based on courses
1. On the Course screen, you can choose different courses. The left arrow and right
arrow allow you to move between courses.
2. Click the magnifying glass icon to to search for the courses.
3. Click + to add a new course.
4. Click - to delete the selected course.
Configuring Courses
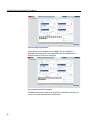
Double click a course to enter the course configuration interface as below:
4
TSL3000A Tektronix TekSmartLabTM User Manual
Figure 4: Course configuration interface
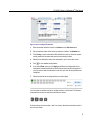
1.
Enter information about this course in the Name box and Overview boxes.
2.
Set the sequence order of this course by entering a number in the Number box.
3.
Click Library to check and save the files related to this course. All the test reports
and lab results will be saved under each course according to date.
4.
Select the box beside the name of the instrument to put in use for this course.
5.
Click
6.
If you select Reset, when you click Apply to distribute the configurations to the
instruments, the instruments will be reset to the previously saved configurations. If
you only want to reset the instruments, make sure you leave all the parameters unconfigured.
7.
Select the benches to be configured when you select Apply.
for more detailed configurations.
You can choose or deselect one bench, multiple benches, or all benches. The shadow
underneath the number icon means that the bench is chosen.
As shown above, benches number 1 and 2 are chosen, whereas the benches number 3
and 4 are not chosen.
5
TSL3000A Tektronix TekSmartLabTM User Manual
Click Capture to capture the current configuration of the chosen bench (only one bench
can be chosen). You can then copy the configuration of this bench onto another bench.
Click Apply to distribute the configurations to the chosen benches.
When the number icon of a bench turns green, the configuration is successful. If the icon
turns red, you can choose this bench only and repeat the configuration. If the icon stays
red, please check the cable connection and reset the instruments and USB WIFI hub. If
the fault is still not cleared, please initiate a self-check of the instruments by referring to
its user manual to check whether the instrument is operating correctly.
Choosing and Configuring Instruments
You can configure instruments in a batch on the Instruments home screen based on
instruments.
Home Interface based on Instruments
Figure 5: Home interface based on instruments
You can double-click the icon of an instrument to select it, and then configure the
parameters in a batch.
Configuring instruments
The process of instrument configuration is demonstrated by the following oscilloscope
configuration interface.
6
TSL3000A Tektronix TekSmartLabTM User Manual
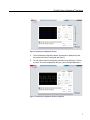
Figure 6: Oscilloscope configuration interface
1.
On the oscilloscope configuration interface, the waveform is displayed only after
the instrument of a bench is configured (see Figure 7).
2.
You can choose a bench to configure the instruments on by selecting it. If a bench
is chosen, its icon will be displayed as dark grey. (refer to Configuring Benches .)
Figure 7: Oscilloscope configuration interface (configured)
7
TSL3000A Tektronix TekSmartLabTM User Manual
Configuring Benches
Bench Monitoring Interface
You can enter the bench-monitoring interface from the Instruments home screen as
follows.
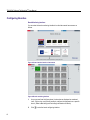
Figure 8: Home interface based on instruments
Figure 9: Bench monitoring interface
8
1.
As you can see from the figure above, the benches are displayed as numbered
icons. Click an icon, and you will be able to configure the instruments on a specific
bench. (Refer to Monitoring and Controlling Instruments of a Bench)
2.
Click
to enter the bench configuring interface
TSL3000A Tektronix TekSmartLabTM User Manual
3.
Every bench has four instruments as shown in Figure 9, and their status are
displayed in three colors:
a. Green indicates that the instrument is connected and functioning.
b. Grey indicates that the instrument is not connected. Please check whether the
instrument is turned on, properly connected, or whether the USB-WIFI HUB is
functioning.
c. Red indicates that the instrument is not communicating with the monitoring
computer. You may restart the instrument and USB-WIFI HUB. If the fault is still
not cleared, please run a self-check of the instruments. Refer to its user manual
to determine whether the instrument is malfunctioning.
Bench Configuration Interface
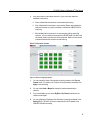
Figure 10: Bench configuring interface
1.
You can arrange the layout of the benches by entering numbers in the Row and
Column boxes. The number in the Total box will be automatically computed. Click
Apply to save the setting.
2.
You can choose Auto or Manual to arrange the numbers automatically or
manually.
3.
If you choose Auto, you can choose By Row or By Column to decide how the
numbers are arranged.
4.
You can configure the IP address of the first bench by entering the address in the
Starting IP box. TSL3000A will link the chosen bench to the IP address of the
USB-WIFI HUB after this setting.
9
TSL3000A Tektronix TekSmartLabTM User Manual
Figure 11: Editing benches
10
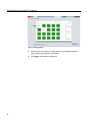
5.
Double-click the icon of a bench to delete abench; if you double-click the blank
again, the bench will reappear on the interface.
6.
Click Apply to save the bench configuration.
TSL3000A Tektronix TekSmartLabTM User Manual
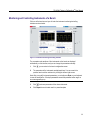
Monitoring and Controlling Instruments of a Bench
Click one of the benches, and you will enter the instrument monitoring/controlling
interface as shown below.
Figure 12: Instrument monitoring/controlling interface
The parameters and waveform of the instruments on the bench are displayed
automatically on this interface, and you can change the parameters manually.
1.
Click
2.
The parameters of the instruments are displayed here. You can move to the
previous bench and the next bench by clicking the left and right arrows.
, you can return to the bench configuration screen.
Note: After you modify instrument parameters, you should press Enter on your keyboard
to save the modification. If the input parameters exceed the predefined value range, an
error message will pop up.
3.
Click
4.
Click Report to save the test result in a preset template.
to set more parameters of the chosen instrument.
11
TSL3000A Tektronix TekSmartLabTM User Manual
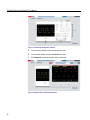
Figure 13: Oscilloscope configuration interface
5.
You can set the parameters of the oscilloscope in this area.
6.
You can enable, disable, and execute Autoset in this area.
7.
Click Snapshotto capture the waveform of the oscilloscope.
Figure 14: Snapshot of the oscilloscope waveform
12
TSL3000A Tektronix TekSmartLabTM User Manual
Instrument Static Report
Figure 15: Instrument status report
Click Static Report, an Excel report will pop up, which records the supplier, model
number, serial number, bench number, and time of use of the chosen instrument.
13
TSL3000A Tektronix TekSmartLabTM User Manual
Example Cases
A few example cases of using TSL3000A are show in this section.
Arranging the Benches
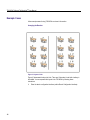
Figure 16: Layout of a lab
Figure 16 showcases the layout of a lab. There are 16 benches in total with a hallway in
the middle. You can represent this layout in the TSL3000A by following these
instructions:
1.
14
Enter the bench configuration interface (refer to Bench Configuration Interface)
TSL3000A Tektronix TekSmartLabTM User Manual
Figure 17: Bench configuration interface
Set Row as 4 and Column as 5. Then click Apply. The layout of 20 benches is shown
as follows.
Figure 18: Arranging benches
Choose and double-click the column in the middle to delete the column as shown in the
following figure.
15
TSL3000A Tektronix TekSmartLabTM User Manual
Figure 19: Arranging benches
Click Apply. An alert that reads Original setting will be cleaned, continue? will pop
up. Click Yes to finish the setting. Then the bench monitoring interface will appear as
follows.
Figure 20: Bench monitoring interface
Customizing Courses and Configuring Instruments
This case explains how to create a new course, and configure the instruments for this
course.
1.
16
On the Course home screen, click + to create a new course.
TSL3000A Tektronix TekSmartLabTM User Manual
Figure 21: Creating a new course
Input the respective information in the boxes of Name, Number, and Overview.
Figure 22: Customizing a course
Tick the instrument to be configured and set the parameters. In the following figure, the
arbitrary function generator (AFG) and oscilloscope (Scope) are configured. Autoset
boxes of the digital multimeter (DMM) and power supply (PWS) are ticked.
17
TSL3000A Tektronix TekSmartLabTM User Manual
Figure 23: Configuring instruments
Choose the bench to be configured, and click Apply. Then the configuration is
distributed to the chosen bench. If the configuration works, the configured bench is
displayed in green as shown in the below figure.
Figure 24: Bench successfully configured
Click Save, and the newly created course along with its configurations is saved as you
can see on the home interface based on courses below.
18
TSL3000A Tektronix TekSmartLabTM User Manual
Figure 25: Newly created course on the home interface
Editing the Report Template and Inserting Test Result into a Report
You can customize the report template of TSL3000A. All the test reports will be created
based on this template.
To edit the report template, find the document with the name Report.doc under the
directory where the TSL3000A is installed. You can edit anything, but you should always
keep the line following 6. Test Result blank because the test result will be imbedded
here.
Test result will be
imbedded here
Figure 26: Keeping the line for test report blank
To create a report, click Report on the instrument monitoring interface of a bench.
Figure 27: Instrument monitoring interface
19
TSL3000A Tektronix TekSmartLabTM User Manual
The test result will be imbedded in the report template automatically to create a new
report. The newly created report will be saved in the Library of its corresponding course.
20
TSL3000A Tektronix TekSmartLabTM User Manual
21