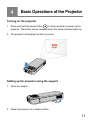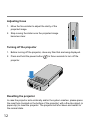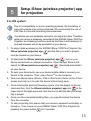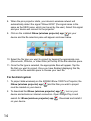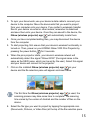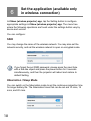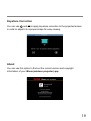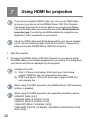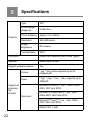
1
User Manual
CONTENTS
CONTENTS......................................................... 1
BEFORE YOU START......................................... 3
FCC Warning............................................................................3
For Customers in Europe..........................................................4
About this Manual.....................................................................5
SAFETY PRECAUTIONS.................................... 6
GETTING READY............................................... 7
Accessories Included................................................................7
Part Names...............................................................................8
Charging Battery.......................................................................9
Downloading and installing iShow (wireless projector) app... 10
Basic Operations of the Projector .....................11
Turning on the projector......................................................... 11
Setting up the projector using the support............................. 11
Adjusting focus...................................................................... 12
1
Turning off the projector......................................................... 12
Resetting the projector........................................................... 12
Setup iShow (wireless projector) app for
projection ..........................................................13
For iOS system...................................................................... 13
For Android system................................................................ 14
For Windows system............................................................. 16
Set the application (available only in wireless
connection)........................................................18
SSID...................................................................................... 18
Hibernation / Sleep Mode...................................................... 18
Keystone Correction.............................................................. 19
About..................................................................................... 19
Using HDMI for projection.................................20
Firmware Update...............................................21
Specifications....................................................22
2
1
BEFORE YOU START
FCC Warning
This equipment has been tested and found to comply with the limits
for a Class B digital device, pursuant to Part 15 of the FCC Rules.
These limits are designed to provide reasonable protection against
harmful interference in a residential installation. This equipment
generates uses and can radiate radio frequency energy and, if not
installed and used in accordance with the instructions, may cause
harmful interference to radio communications. However, there is no
guarantee that interference will not occur in a particular installation. If
this equipment does cause harmful interference to radio or television
reception, which can be determined by turning the equipment off and
on, the user is encouraged to try to correct the interference by one
or more of the following measures:
-- Reorient or relocate the receiving antenna.
-- Increase the separation between the equipment and receiver.
-- Connect the equipment into an outlet on a circuit different from
that to which the receiver is connected.
-- Consult the dealer or an experienced radio/TV technician for help.
This device complies with part 15 of the FCC Rules. Operation is
subject to the following two conditions:
(1) This device may not cause harmful interference, and (2) this
device must accept any interference received, including interference
that may cause undesired operation.
Changes or modifications not expressly approved by the party
responsible for compliance could void the user's authority to operate
the equipment.
3
For Customers in Europe
This symbol [crossed-out wheel bin WEEE Annex IV] indicates
separate collection of electrical waste and electronic equipment in
the European countries. Please do not throw the equipment into
domestic refuse. Please use the return and collection systems
available in your country for proper, safe disposal of this product.
“CE” mark indicates that this product complies with the European
requirements for safety, health, environment, and customer
protection. “CE” marked products are intended for sales in Europe.
Europe – EC Declaration of Conformity
This device complies with the essential requirements of the R&TTE
Directive 1999/5/EC.
Copy of the EC declaration can be obtained from JK Europe Ltd.
Packing: Please follow local regulations for the recycling of
packaging.
Batteries:Please dispose of used batteries at designated collection
centers.
4
About this Manual
Thank you for purchasing this KODAK iShow 1000 Pico Projector. Please
read this manual carefully and keep it in a safe place for future reference.
Windows is registered in the United States and other countries by
Microsoft Corporation, and its trademark use rights are reserved by
Microsoft Corporation.
Product names and trademarks involved in the Manual are for illustrative
and identification purposes only. All of them are the registered trademarks
or copyrights of their original companies.
This manual provides you with instructions on how to use your new
KODAK iShow 1000 Pico Projector. Every effort has been made to
ensure that the contents of this manual are accurate; however JK
Imaging Ltd. reserves the right to make changes without notice.
5
2
SAFETY PRECAUTIONS
When using a pico projector, please note the following safety precautions to
prevent damage to the product.
Do not dispose of improperly or expose to extreme heat.
Do not operate the pico projector in moist or wet environments. Exposure
to water may cause electrical shock or other injury.
Avoid exposure to extreme temperatures as this may damage the
pico projector.
Do not operate the pico projector if damaged. Disassembling the pico
projector will void the warranty.
Do not point the pico projector directly into your eyes or those of anyone
else while in use.
Do not place or store the pico projector on a wet surface or in places
where dripping water or sand may come in contact with the
pico projector; doing so may cause irreparable damage.
Keep the pico projector out of reach of babies, small children and
animals.
Avoid placing pico projector on a vibrating or an unstable surface.
If the projector lens is dirty, use a soft cleaning cloth to clean the lens.
Do not use pico projector in the following types of locations.
1. In rain, very humid or dusty environments.
2. In a place where pico projector can be exposed directly to sunlight or
subject to high temperatures, e.g. inside a closed car in summer.
3. In a place where the pico projector is subject to a high magnetic field,
e.g. near motors, transformers or magnets.
6
3
GETTING READY
Accessories Included
Your KODAK iShow 1000 Pico Projector box should contain the pico projector
you purchased along with the following accessories. If anything is missing or
appears to be damaged, please contact your retailer.
Quick S
tart Gui
de
Quick Start Guide
CD-ROM
STOP
Warranty Card
Service Card
AC Adapter
7
Part Names
Focus slider
Speaker
Power button
Status indicator
Earphone jack
HDMI port
Power inlet
Tripod receptacle
Support
Lens
8
Reset hole
Charging Battery
1. Ensure the projector is turned off and connect it to the power charger.
2. Insert the plug of the power charger into the wall outlet to charge the
battery.
3. Charging indicator:
Red: Charging
Green: Charging complete
4. To have maximum battery life, charge the battery for at least 4 hours the
first time.
9
Downloading and installing iShow (wireless projector) app
1. For iOS system users: Please search for the iShow (wireless projector)
app
in the App Store ® , download the app, and install it on your
device.
2. For Android system users: Please search for the iShow (wireless
projector) app
in Google Play ® , download the app, and install it on
your device.
3. For Windows 8/7 system users: Please use the installing software item
on the CD-ROM (included) to conduct the installation of the iShow
(wireless projector) app.
10
4
Basic Operations of the Projector
Turning on the projector
1. Press and hold the power button
for three seconds to power up the
projector. The button can be released when the status indicator lights up.
2. The projector will display the start up screen.
Pico Projector
Setting up the projector using the support
1. Open the support.
2. Place the projector on a stable surface.
11
Adjusting focus
1. Move the focus slider to adjust the clarity of the
projected image.
2. Stop moving the slider once the projected image
becomes clear.
Turning off the projector
1. Before turning off the projector, close any files that are being displayed.
2. Press and hold the power button
for three seconds to turn off the
projector.
Resetting the projector
In case the projector acts erratically and/or the system crashes, please press
the reset hole (located on the bottom of the projector) with a fine-like object (a
paper-clip) to reset the projector. The projector will shut down and restart to
the normal state.
12
5
Setup iShow (wireless projector) app
for projection
For iOS system
Due to incompatibility on some operating systems, the formatting of
some documents may not be preserved. We recommend the use of
PDF files to minimize formatting inconsistencies.
Your device can only wirelessly connect to one signal at a time. Therefore,
while your device is wirelessly connected to the KODAK iShow 1000 Pico
Projector, live streaming functions (such as YouTube ® and Facebook ®)
and web browsers will not be accessible on your device.
1. To project data wirelessly on the KODAK iShow 1000 Pico Projector, the
iShow (wireless projector) app
and the files you wish to project
must be loaded on your device.
2. To download the iShow (wireless projector) app
, turn on your
device and activate an internet connection. Open the App Store ® and
search for iShow (wireless projector) app
. Download and install it
on your device.
3. To sync your documents, use your device’s data cable to connect your
device to the computer. Then, open iTunes ® on the computer.
4. Find your device name (iPhone, iPad or iPod touch) shown in the iTunes
screen and click on it to enter the device's [Summary] pane.
5. Once entering the device’s [Summary] pane, click the [Apps] on the top
command line. Find the iShow (wireless projector) app icon
at the
lower side of the Apps pane and click the icon to add the files you would
like to project.
6. Once you have completed adding files, you may disconnect the device
from the computer.
7. To start projecting, first ensure that your device’s wireless functionality is
turned on. Then, power on your KODAK iShow 1000 Pico Projector by
pressing the power button
for 3 seconds.
13
8. When the pico projector starts, your device’s wireless network will
automatically detect the signal “iShow-XXXX” (the signal name is the
same as the SSID name, which can be set by the user). Select this signal
and your device will connect to the projector.
9. Click on the installed iShow (wireless projector) app
on your
device and the file selection pane will appear as shown below.
10.Select the file type you want to project by tapping the appropriate icon
(Documents, Pictures, or Video Files) at the top of the file selection pane.
11.Once the file type is selected, the appropriate files will appear. Tap the
file that you want to project. Once you have finished displaying this file,
return to the file selection pane to choose your next file.
For Android system
1. To project data wirelessly on the KODAK iShow 1000 Pico Projector, the
iShow (wireless projector) app
and the files you wish to project
must be loaded on your device.
2. To download the iShow (wireless projector) app
, turn on your
device and activate an internet connection. Open Google Play ® and
search for iShow (wireless projector) app
. Download and install it
on your device.
14
3. To sync your documents, use your device’s data cable to connect your
device to the computer. Move the documents that you want to project
from your computer onto your device. If you prefer to wirelessly transfer
files to your device via email or other means, remember to download
and save them onto your device. Once they are saved to the device, the
iShow (wireless projector) app
will automatically locate them.
4. Once you have completed adding files, you may disconnect the device
from the computer.
5. To start projecting, first ensure that your device’s wireless functionality is
turned on. Then, power on your KODAK iShow 1000 Pico Projector by
pressing the power button
for 3 seconds.
6. When the pico projector starts, your device’s wireless network will
automatically detect the signal “iShow-XXXX” (the signal name is the
same as the SSID name, which can be set by the user). Select this signal
and your device will connect to the projector.
7. Click on the installed iShow (wireless projector) app
on your
device and the file selection pane will appear as shown below.
The first time the iShow (wireless projector) app
is used, the
scanning process may take some time to complete. The scanning
time varies by the version of Android and the number of files on the
device.
8. Select the file type you want to project by tapping the appropriate icon
(Documents, Pictures, or Video Files) at the top of the file selection pane.
15
9. Once the file type is selected, the appropriate files will appear. Tap the
file that you want to project. Once you have finished displaying this file,
return to the file selection pane to choose your next file.
For Windows system
1. Use enclosed CD-ROM to install iShow (wireless projector) app on
your computer.
2. Power on your KODAK iShow 1000 Pico Projector by pressing the power
button
for 3 seconds.
3. When the pico projector starts, your computer’s wireless network will
automatically detect the signal “iShow-XXXX” (signal name is the same
as the SSID name, which can be set by the user). Select this signal and
your computer will be connected to the projector.
4. Click on the installed iShow (wireless projector) app
on your
computer and the file selection pane will appear as shown below.
5. Click the setting button
on the interface of iShow (wireless
projector) app. Select [Add File Folders] to add the folders you would
like to project. You can add up to 10 folders. You can also choose [Open
File] to select a single file in the file management system. Then click
[Send] to add it to the application.
16
6. Click the setting button
again to return to the previous interface.
Select the file type you want to project by clicking the appropriate icon
(Documents, Pictures, or Video Files) at the top of the file selection pane.
7. Once the file type is selected, the appropriate files will appear. Click the
file that you want to project. Once you have finished displaying this file,
return to the file selection pane to choose your next file.
Transmission speeds of wireless network differ due to different
hardware configurations.
During your use of iShow (wireless projector) app, please use
genuine operating system, in order to ensure the normal operation of
the program.
iShow (wireless projector) app supports the use of cloud data.
However, when downloading from the cloud, the cloud software may
modify the name of the file.
To project Office files in Windows operating system, the following two
plug-ins must be installed for Microsoft Office 2007 or earlier versions:
.netframework3.5 download address:
http://www.microsoft.com/en-us/download/details.aspx?id=21
Microsoft Office 2007 plug-in download address:
http://www.microsoft.com/en-us/download/details.aspx?id=7
17
6
Set the application (available only
in wireless connection)
In iShow (wireless projector) app, tap the Setting button to configure
appropriate settings in iShow (wireless projector) app. The menu tree
where the following operations are found under the settings button vary by
device and version.
You can configure:
SSID
You may change the name of the wireless network. You may also set the
network security, and set the wireless network to open or encrypted mode.
If you forget the set SSID password, please press the reset hole
with a fine-like object and press the power button for 3 seconds
simultaneously, and then the projector will reboot and restore to
default Setting.
Hibernation / Sleep Mode
You can switch on the hibernation mode to set the continuous projection time
for longer battery life. The hibernation times that can be set are 10 mins, 15
mins, and 20 mins.
18
Keystone Correction
You can use
and
to apply keystone correction to the projected screen
in order to adjust it to a proper shape for easy viewing.
About
You can use this option to find out the current version and copyright
information of your iShow (wireless projector) app.
19
7
Using HDMI for projection
If your device supports HDMI output, you can use an HDMI cable
to connect your device to the KODAK iShow 1000 Pico Projector.
This allows the projector to mirror what is on your devices display.
This functionality does not require the use of the iShow (wireless
projector) app. Connecting via HDMI enables the projection any
application that is supported on your device.
Using the HDMI cable specifically designed for your device enables
you to use live streaming apps (such as YouTube ® , Facebook ®)
while running the KODAK iShow 1000 Pico Projector.
1. Start the projector.
2. Connect the KODAK iShow 1000 Pico Projector to your device using
the HDMI cable (not included) designed for your device. The image from
your device will then be displayed by the projector.
Limitations for iOS:
(1) iPad 1, iPhone 4 and below, iPod touch gen 4 and below,
support HDMI but can only view photos and video.
(2) iPad 2 and above, iPhone 4S and newer, support HDMI and
can view any file.
When using the HDMI projection, the KODAK iShow 1000's wireless
function is disabled.
When using the HDMI projection, the supporting resolution will be:
640x480P [60Hz (4:3)],
720x480P [60Hz (4:3)/60Hz (16:9)],
720x576P [50Hz (4:3)/50Hz (16:9)],
1280x720P [50Hz (16:9)/60Hz (16:9)],
1920x1080P [23.97Hz (16:9)/24Hz (16:9)/25Hz (16:9)/29.97Hz (16:9)/
30Hz (16:9)]
20
8
Firmware Update
When there is a new version of firmware, follow the following steps to update
the firmware of the pico projector:
1. Download the new firmware to the computer's hard drive.
2. Turn on the KODAK iShow 1000 Pico Projector and connect to the power
charger.
3. Use the wireless network to connect the computer containing the
firmware upgrade to the projector. Open a web browser, and enter the
IP (192.168.203.1) to access to the firmware update interface.
4. Operate according to the instructions on the update interface to update
the firmware of the projector.
Only firmware update via a computer is supported.
The web browser used must have the Javascript support function.
You may use the following web browsers for firmware update:
Firefox 12 and above
IE 8 and above
Google Chrome 18 and above
Opera 12 and above
Safari 5.1 for Windows and above
Safari for MAC OS X 6.0 and above
21
9
Projector
Specifications
Type
DLP
Focus Range
(diagonal)
5-50inches
Throw Distance
Approx.16.5-165cm
Resolution
854×480 pixels
Image
Brightness
50 Lumens
Contrast Ratio
500:1
Connector
Power inlet, earphone jack, HDMI Type A
Speaker
Mixed stereo output
Support wireless network
Yes
Picture
*.jpg, *.png; photo supports up to 24
mega-pixels
Video
*.3gp, *.mp4, *.mov, *.m4v; supports up to
1080p30
Supported
projection
file
formats
Microsoft ® Word ® (*.doc, *.docx; Office
2003, 2007 and 2010)
Document
Microsoft ® PowerPoint ® (*.ppt, *.pptx;
Office 2003, 2007 and 2010)
Microsoft ® Excel ® (*.xls, *.xlsx; Office
2003, 2007 and 2010)
Adobe PDF (*.pdf)
22
Supported operating
systems
Android 2.3.0 or higher, iOS 4.3.1 or higher,
Windows 7, Windows 8
Focus Control
Manual
Power
Built-in rechargeable Li-polymer battery 3.7V
2800mAh
Capability
Approx. 90 mins
Operation Environment
Temperature: 0 ~ 35°C, Humidity: 10 ~ 80%
Storage Environment
Temperature: 0 ~ 45°C, Humidity: 0 ~ 60%
Product Dimension
Approx. 125.0×60.0×22.5mm
Product Weight
Approx. 165g
23
The Kodak trademark and trade dress are used under license from Kodak.
© 2013 by JK Imaging Ltd. All Rights Reserved.
JK Imaging Ltd., 17239 South Main Street, Gardena, CA 90248, USA
JK Imaging Europe, 71 Clarendon road, Watford, WD17 1DS, UK
www.kodakpixpro.com
Ver. 4