1
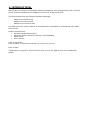
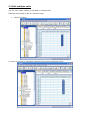
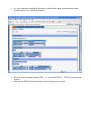
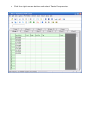
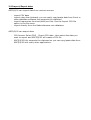
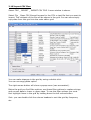
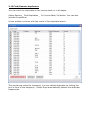
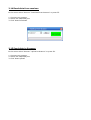
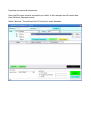
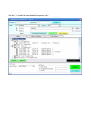
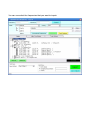
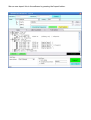
ARC5/6/20 for Icom
User Manual
Version 0.90 draft
<C> 2010 BuTel software The Netherlands – all rights reserved
www.butelsoftware.com
Contents:
1 Introduction and quick start reference
1.1 Software Installation
1.2 Enter registration information
1.3 Connecting the scanner to your PC
1.4 Model and RS232 port setup
2: Using the memory channel editor:
2.1 General editor options
2.2 Edit multiple cells
2.3 Using the FILL option
2.4 Using the FILL SERIES option for ALPHA tag columns
2.5 Using the clipboard
2.6 Keyboard shortcuts
2.7 EasyFill
2.8 Using Paste Frequencies for importing frequencies of the internet
2.9 Import/Export data
2.10 Import CSV files
2.11 Checking for software updates
2.12 Customizing the View
2.13 Default data
2.14 Read data from Scanner
2.15 Send data to Scanner
3 Radioreference Database import
3.1 Conventional Import
3.2 Trunk Systems
4 General information and troubleshooting
4.1 Revision history
4.2 Troubleshooting
1: INTRODUCTION:
ARC5/6/20 is a collection of Windows software package for easy programming Icom receivers.
At this moment packages are available for the IC-R5, IC-R6 and IC-R20.
This manual describes the following software packages:
-
ARC5 for the Icom IC-R5
ARC6 for the Icom IC-R6
ARC20 for the Icom IC-R20
Any differences are clearly marked. Screenshots may look different. Screenshots were taken
from ARC20.
System requirements:
• Windows XP/Win2000/Vista/7
• Minimum display resolution settings: VGA 1280x800
• Small Fonts
• Icom receiver
Icom IC-R5/IC-R6:
A PC interface is required to connect the receiver to your PC.
Icom IC-R20:
A USB cable is required to connect the receiver to your PC. USB drivers are included with
ARC20.
ARC Quick Start Reference:
-
Install the software (1.1)
Enter the registration information (1.2)
Connect the scanner to the PC (1.3)
Setup communication port number (1.4)
Software is ready for use
IMPORTANT: YOU MUST ENTER A VALID REGISTRATION CODE TO MAKE FULL USE OF THE
SOFTWARE. THE REGISTRATION CODE IS SEND TO YOU BY E-MAIL (IF YOU PURCHASED
ONLINE) OR CAN BE FOUND IN THE CD BOX.
DO NOT LOSE THIS INFORMATION; YOU NEED IT FOR FREE UPDATES!
1.1 Software installation:
The ARC5/6/20 software is available as Internet download or on CD-ROM.
Win2000/XP/Vista/7 users: You must be logged on as administrator to install
and use ARC5/6/20.
Internet download:
The downloaded file contains all the necessary files for installation. Run the
setup.exe file and the installer will automatically start. If you previously
installed the software the installer will automatically update the older version.
You do not need to uninstall any previous versions.
CD ROM:
Insert the CDROM; the CDROM has an auto start option that will automatically
start the installation process. If the installation process does not start, simply
run setup.exe
During the installation process you can set the installation directory. We
suggest using the default directory. You cannot install the software on a
network drive.
Software un installation:
ARC5/6/20 will automatically add an uninstall option. Use the Windows Control
Panel for uninstalling the software. Backup your work before using the uninstall
option.
1.2 Registration:
After installation of the software, the program runs in DEMO mode. You must
enter a valid registration code to activate the software. In DEMO mode the
software does not upload data to the receiver.
Internet download: customers that purchased using the Internet download
option, received a registration code by e-mail. It is VERY IMPORTANT that you
store the registration code in a safe place. If you loose the registration
information you must buy a new registration code.
CDROM: in the jewel case of the CDROM you find the registration information.
Store the case of the CDROM in a safe place.
Enter registration:
Start the software by selecting START _ PROGRAMS _ BUTEL _ ARC5/6/20 _
ARC5/6/20 Software. After the start screen, select HELP _ REGISTER in the
menu.
Enter the key1 and key2 information: the name is case sensitive!
No spaces are allowed. After entering the registration you must restart the
software to enable the upload option.
1.3 Connect your receiver:
Icom IC-R5 / Icom IC-R6:
You need to purchase an additional PC interface. There are many PC interface
cables available both for rs232 and usb ports.
Icom sells the OPC478 and OPC478U cables. Also cheap USB cable are
available on ebay. Search ebay.com for ‘icom programming cable R5’.
Icom IC-R20:
The IC-R20 is programmed using the built in USB port. Connect a USB cable
from the receiver to the PC and install the USB driver included with ARC20.
You can not program the receiver using the CIV connection. The CIV is used to
control the receiver. ARC20 does not include control software.
2: Using the memory channel editor:
ARC5/6/20 includes the most versatile memory editor available on the market.
This section describes most options available in the memory editor; in order to
use the full power of the editor it is important that you read this section
carefully. The editor does not require that a scanner is connected.
The memory editor has a clear layout:
The top section has a standard Windows menubar and a toolbar. Most options
found in the menu also have a ‘shortcut’ in the toolbar. If the mouse is moved
over a toolbar button a help text is shown giving a brief description of that
button.
Below the grid a dynamic help text is shown. This help text shows information
about the selected item, it also shows any shortcuts that can be used.
On the left there is a tree for easy browsing the software. The tree has
shortcuts to all the important section of the software.
2.1 General editor options:
You can edit data in the grid by typing in data. For example to enter a
frequency click on the frequency column and type in the frequency. The
software will automatically select edit mode when you type a character. Edit
mode is shown by a yellow or blue background of the selected field.
You can also use function button F2 or a double click to enable edit mode.
If the data in a field is limited to 2 or more ‘fixed’ selections the software will
automatically show a dropdown list to select the data. Most columns also
support keyboard shortcuts, for example 1= On, 0= Off, F= flash etc. The help
text dynamically shows the shortcuts. You will also see shortcuts to the
available selections above the grid.
To correct a mistake use the Escape button, this will restore the previous data.
2.2 Edit multiple cells:
You can very easily modify or edit data in multiple cells:
Example setting Skip to On for selected range:
1. select the range:
2: press ‘S’ on the PC keyboard, selected range will be filled with ‘Skip’:
2.3 Using the FILL option:
Another powerful option is the FILL option. Fill will copy the data from the first selected row to
the remaining selected rows:
1. Program data in one row:
2. Highlight the range:
3. Press the ‘FILL’ in the Toolbar:
2.4.1 Using the FILL SERIES option for ALPHA tag columns:
Another powerful option is the FILL SERIES option. Fill series will copy the data from the first
selected Alpha tag row to the remaining selected rows and automatically increase the number:
1. Program data in one row:
2. Highlight the range:
3. Select Options _ Fill Series:
2.4.2 Using the FILL SERIES option with step:
Another powerful option is the FILL SERIES option. Fill series will copy the data from the first
selected Alpha tag row to the remaining selected rows and automatically increase the number:
4. Program data in two rows:
5. Highlight the range:
6. Select Options _ Fill Series:
2.5 Using the clipboard
In the memory editor grid you can use the standard Windows clipboard
options. In the toolbar shortcuts are available for cut, copy and paste options.
You can also use the keyboard shortcuts CTRL C, CTRL X and CTRL V.
Use these options to paste data from other applications like Excel or within the
object grids.
An additional clipboard option is available that will automatically select entire
lines (Cut line, copy line and paste line).
To use these extra options, click any cell of a memory channel then select
cut/copy/paste line. To paste in a different memory channel, select any cell in
that memory channel, then select paste line, ARC5/6/20 will automatically
align the pasted text.
Important: while pasting data make sure the data is valid for the column you
want to paste data. Example: you cannot paste WFM in the step column.
2.6 Keyboard shortcuts:
Most columns also support keyboard shortcuts, for example:
0= Off
1= On
F= Off
N= On
S= Skip
F=Flash
A = AM
F = FM
See dynamic help text in the software for more information.
2.7 EasyFill
EasyFill is a simple but powerful option that lets you program data in a range
of channels with only a few mouse clicks.
Additionally you can use EasyFill for quickly program a range of frequencies in
a memory bank so you can use a memory as a search bank.
Select EasyFill from the Options menu or use the EasyFill toolbar button to
display the EasyFill window:
In the top frame the channel range is selected. DEFAULT will set the start and
end channel of the selected bank.
In the ‘Fill Range With’ frame you select the data you want to program in that
range. If you want to set the mode for all selected channels to WFM select the
MODE check box then select WFM and select APPLY, this will program WFM in
all selected channels. You can select more the one check box.
If the Frequency check box is selected you can set a start frequency and a
step. The software will automatically calculate the frequencies for the selected
channel range.
Example: Frequency is set to 88.000 MHz, step is set to 50 kHz and channel
range is 1-100. If you select APPLY the software will program 88.000 in
channel 1, 88.050 in channel 2, 88.100 in channel 3 etc.
Fill series: for the TAG option you can also set the fill series option. Fill series
will search for a number in the tag and use that number to ‘calculate’ the tags
in the selected channel range.
Example: in the tag box the tag is set to ‘Police 1’. The channel range is set to
1-100.
If fill series is selected, the software will automatically program ‘Police 1’ in
channel 1, ‘Police 2’ in channel 2, ‘Police 3’ in channel 3 etc. See also section
2.9.
The number of characters of the tag box is shown in blue.
2.8 Using Paste Frequencies for importing frequencies of the internet:
With ARC5/6/20 you can very easily import frequencies from any website.
•
•
Start the ARC5/6/20 software
Open you internet browser and open a website displaying frequencies
you want to import , for example:
•
In your browser highlight the area (hold down right mouse button and
move mouse) you want to import:
•
Now in your browser press CTRL – C (or select EDIT _ COPY from the top
menu)
Now go to ARC5/6/20 and click in the frequency column
•
•
Click the right mouse button and select ‘Paste Frequencies:
2.9 Import/Export data:
ARC5/6/20 can import data from various sources:
-
import CSV data
import using the clipboard: you can easily copy/paste data from Excel or
other database software that supports the clipboard
import frequencies from text/html/csv files. Use the Import CSV file
option in the file menu.
import directly from the Radioreference.com database.
ARC5/6/20 can export data:
-
CSV format: Select FILE _ Export CSV data , then select the data you
want to export and ARC5/6/20 will create a CSV file
ARC5/6/20 fully supports the clipboard so you can copy/paste data from
ARC5/6/20 into many other applications.
2.10 Import CSV files:
Select FILE _ IMPORT _ IMPORT CSV FILE. A new window is shown.
Select File _ Open CSV file and browse for the CSV or text file that you want to
import. The contents of the file will be shown in the grid. You can now simply
copy data from this grid into the main editor grid:
You can make changes in the grid by using a double click.
You can use copy/paste option.
The right mouse button will show a popup menu (see screenshot).
Below the grid you find filter options, use these filter options to replace strings
and convert data to lower or upper case. To use the filter options you must
first highlight items in the grid by holding down the left mouse button.
Sort: you can double click the column headers to sort the grid by frequency
etc.
2.11 Checking for software updates
For your convenience the software can check if a newer version of the
ARC5/6/20 software is available (internet connection required).
Select HELP _ CHECK FOR UPDATES.
The software will show a message if a newer version is available.
2.12 Sorting Data:
You can sort data by double clicking the header of the editor grid. Data will be
sorted by the selected column.
2.13 Find/Remove duplicates:
You can check for duplicates in the current bank or in all banks.
Select Options _ Find Duplicates _ In Current Bank/ All banks. You can also
include the subtone.
A new window is shown with the result of the duplicate search:
The results are sorted by frequency. You can delete duplicates by ticking the
box in front of the frequency. Select Dups automatically selects the duplicate
frequencies.
2.14 Read data from receiver:
In the menu select ‘Scanner’ ‘Download from Scanner’ or press F5.
1. Connect your scanner
2. Select the USB/COM port
3. Click ‘Start Download’
2.15 Send data to Scanner:
In the menu select ‘Scanner’ ‘Upload to Scanner’ or press F6.
1. Connect your scanner
2. Select the USB/COM port
3. Click ‘Start Upload’
3 RadioReference Database import
ARC can import frequencies directly from www.radioreference.com ,
RadioReference is the largest and most accurate scanner database in the
world.
For information about the database check out: http://www.radioreference.com
IMPORTANT: To use the Radioreference import option you must
subscribe to their services (only $7.50 / 90 days)
IMPORTANT: you must allow the ARC software to access the internet
through your firewall (port 80 only). Without access the import option
will not work.
The RR import may not work properly on satellite internet connections due to latency
problems. Use dialup or DSL/Cable/WAN instead.
The RadioReference subscription is not included with ARC.
Importing conventional frequencies:
Open the RR import window and select your State. In this example we will import data
from California, Alameda county:
Select California. This will load the CA County list, select Alameda:
Now press the blue ‘Conventional Frequencies’ button. The software will now load all the
frequencies from the selected county:
Use the ‘+’ symbol to see detailed frequency info:
You can now select the frequencies that you want to import:
We can now import this in the software by pressing the Import button.
3.2 Radioreference Options:
1: Use Tag Filters:
This option uses an external file to automatically filter/replace text tags. You
can edit the file in notepad and define your own ‘filter’ rules.
Locate ‘tagfilter.txt’ and open in notepad, here are some filter examples:
"East","E"
"West","W"
"North","N"
"South","S"
"Police","PD"
"Fire","FD"
"Tactical","Tac"
";",""
So ‘East’ will be replaced by ‘E” etc. The ; character will be removed. You can
define up to 1000 rules to filter text.
2: Remove spaces, tick this box if you want the software to automatically
remove spaces form group and channel names
3: Do not modify: if the tag is 16 characters or less the software will not
modify it since it fits the available space
4 General information and troubleshooting
4.1 Revision history:
ARC5/6/20 V0.90 –0.99: beta versions