1
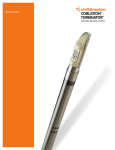
User Manual
MIS
Crest Widener
Designed by Dr. Zvi Laster
®
Introduction
The MIS Crest Widener is used to widen a narrow alveolar crest which has
sufficient height so as to prepare the ridge for implantation. With this technique,
bone augmentation is avoided, the implant is placed in the correct lateral position
and sufficient attached gingiva is obtained. The Crest Widener consists of 4 arms,
2 on each side, connected with guiding pins and an activating screw.
The Crest Widener is inserted after cutting 3 mucoperiosteal incisions (without
stripping the bone) as well as cutting and splitting the narrow alveolar crest. By
rotating the activating screw, each pair of arms moves away from the other 2 arms,
thus pushing the buccal cortical bone apart.
Activation starts 5 - 7 days (latency period) after the insertion of the device.
By separating the cortical plates, new bone is created in between (Distraction
Osteogenesis), and the attached gingiva is simultaneously distracted.
The procedure is conducted under local anesthesia in one or two stages.
Indications for MIS Crest Widener
Preparing the narrow alveolar crest for implantation as an alternative to bone augmentation.
Contra-indications
In cases where the alveolar ridge has insufficient vertical height (less than 10mm), or where
there is an absence of cancellous bone between the two crestal cortical bones.
Advantages
1.The transported bone is not stripped from periosteum, therefore, no post-operative bone
resorption.
2.Simple, short, minimally invasive procedure.
3.No morbidity or painful donor site.
4.Less technique-sensitive.
Advantages (continuation)
5. Implant placement is possible after extremely short post-operative period (4-8 weeks).
6. The procedure is easily performed in a dental office, under local anesthesia.
7. Minimally compromised aesthetics.
8. Enables ideal lateral implant positioning when needed.
Intraoperative approach
The MIS Crest Widener is inserted in one or two stages with local anesthesia via submucosal infiltration.
* Crest widening can be performed in all maxillary and mandibular areas.
Step-by-step procedure
The one-stage procedure
1.
2.
Three incisions are made along the
desired area under local anesthesia: 2
vertical, anteriorly and posteriorly, and 1
crestal incision (Fig. 1). These incisions
are made through the mucosa and the
periosteum.
The top of the crest is exposed lingually/palataly,
leaving the buccal side unstripped (Fig. 2) and a
trough is drilled along the lingual/palatal aspect using
a 1mm round burr (Fig. 3).
Fig. 1
Fig. 2
Fig. 3
3.
4.
A sagittal cut of crestal bone is made followed
by anterior and posterior cuts through the
mucoperiosteal incisions (Fig. 4/Fig. 5). No bone
stripping!
A vestibular bone cut (Fig. 6) is made with a
round small bur after tunneling at the vestibular
end of the anterior vertical incision. No bone
stripping! If the crest is narrow, but has a
triangular shape with a wide base, it is possible
to fracture the buccal plate without a vestibular
bone cut.
Either a Scalpel reciprocating saw, a thin long tungsten
fissure bur or a Piezo machine can be used.
Fig. 4
Fig. 5
Fig. 6
5.
6.
The buccal bone is fractured using
a thin osteotome (Fig. 7). It is
important to verify the fracture by
manipulating the osteotome.
Placement of the Crest Widener: For security reasons,
a titanium wire is threaded through the hole in the
arm prior to the insertion of the device (Fig. 8a). The
Crest Widener is gently tapped half-way into the
bony cut with the index finger (Fig. 8b). The crestal
Fig. 7
Fig. 8a
Fig. 8b
6. (continuation)
7.
and the vertical incisions are then sutured. After
final tapping of the device, the Crest Widener is
secured (Fig. 8c) with the fine titanium ligature to
an adjacent tooth, leaving 1mm above the crest for
cleaning (Fig. 8d).
Activating trial: In order to ensure
stabilization of the widener two
anti-clockwise turns are made (Fig. 9).
This step will engage the small sharp
spikes to the cortical bone and indicate
whether the buccal plate is freely
movable.
Fig. 8c
Fig. 8d
Fig. 9
The two-stage procedure
1st stage
1.
2.
Under local anesthesia, 3 incisions, which will define
the area for expansion, are made along the ridge. 2
vertical incisions anteriorly (Fig. 10a) and posteriorly
(Fig. 10b) and one horizontal incision at the
vestibulum. 10mm below the crestal peak (Fig. 10c).
These incisions are made through the mucosa and
the periosteum.
Anterior (Fig. 11 a) and posterior (Fig. 11 b) vertical
bone cuts are made through the mucoperiosteal
incisions without bone stripping. This is followed
by a bone cut of the cortical bone at the
vestibulum (Fig. 11c).To prevent jeopardizing the
blood supply to the bone, periosteal stripping
must always be from the bone cut downwards
in the mandible
and upwards in the
maxilla!
Either a Scalpel reciprocating
saw, a thin long tungsten
fissure bur or a Piezo
machine, can be used for
cutting the bone.
Fig. 10 a.b.c
Fig. 11 a.b.c
3.
All incisions are sutured
(Fig. 12).
The two-stage procedure
1st stage (3 weeks later)
Fig. 12
4.
A crestal incision is made along the desired area under local anesthesia. The
crest is minimally exposed (Fig. 13a) and by using a small (1mm) round burr (Fig.
13b) a trough is made along the crest on the lingual/palatal aspect. A bone cut is
then made through the prepared trough to a depth of at least 10mm by using a
reciprocating scalpel saw or tungsten burr (Fig. 13c).
Fig. 13a
Fig. 13b
Fig. 13c
5.
6.
The buccal bone is fractured using
a thin osteotome (Fig. 14). It is
important to verify the fracture by
manipulating the osteotome.
Placement of the Crest Widener: For security reasons
a titanium wire is threaded through the hole in the arm,
prior to the insertion of the device (Fig. 15a). The Crest
Widener is gently tapped half-way into the bony cut with
the index finger (Fig. 15b). The crestal incision is then
sutured.
Fig. 14
Fig. 15a
Fig. 15b
6. (continuation)
7.
After final tapping of the device, the Crest Widener
is secured (Fig. 15c) with the fine titanium ligature to
an adjacent tooth, leaving 1mm above the crest for
cleaning (Fig. 15d).
Activating trial: In order to ensure
stabilization of the widener, two anticlockwise turns are made (Fig. 16). This
step will engage the small sharp spikes
to the cortical bone and indicate whether
the buccal plate is freely movable.
Fig. 15c
Fig. 15d
Fig. 16
Activation of the MIS Crest Widener
1.The activation is achieved by anti-clockwise rotation of the key by patient or family member.
The recommended rate is 1/4 of a turn twice a day (0.45 mm each full turn), for 4 days of
activation and one day of rest, unless other instructions were given by your dentist. The
patient should be examined by the surgeon every 5-6 days.
2.It is recommended to perform slight over-distraction of 1mm to compensate future relapse.
3.Once the sufficient width is obtained (after 15-25 days), activation is ceased. The Crest
Widener is left for 1-2 weeks to consolidate the distracted area.
4.If the device loosens during the consolidation period, it must be removed under local
anesthesia and the implant should be placed in the area during the same session or 5-7
days later.
5.The minimum opening space to insert the crest widener is 2mm.
6.The maximum operational activation limit is 6mm.
7.Maximum working load required = 20Ncm. The Crest Widener can support a maximum
load of 60Ncm.
Removal of the MIS Crest Widener
The activating screw should be turned clockwise three full turns to disengage
the retentive spikes, then it can be withdrawn (under local anesthesia). No soft
tissue closure is necessary after the removal of the device.
Implantation
Implantation can be performed on the same day that the Crest Widener is removed,
and up to 5-7 days later. The transmucosal approach is the recommended technique to
minimize soft tissue exposure and avoid undue bone resorption. Since the callus is still
soft only 1mm depth of mucosal lining is removed, by using a tungsten fissure burr, which
is then followed by drilling through the opening for implantation. The implant should be
immersed into the callus 1-2mm and the healing cap put in place.
Recommendations for the surgeon
- Avoid unnecessary stripping of the periosteum in order to reduce bone resorption.
- Attempt to perform the crestal bony cut on the lingual/palatal cortical bone, since these are
thicker and more compact than the buccal bone.
- Either the scalpel reciprocating saw, the thin long tungsten fissure burr or the Piezo machine
can be used for the bony cuts.
- The Piezo machine is the recommended technique for this procedure under local anesthesia,
since it is the most comfortable for the patient.
- Impaired dental aesthetics in the anterior segments can be avoided by an Omnivac Vacuum
Egg Shell with denture teeth as a provisional bridge.
Recommendations for the surgeon (continuation)
- After tapping the Crest Widener, always ensure that the bone fragment is loosened
by activating the distractor 2 full anti-clockwise turns and 1 clockwise turn. The
stability of the device is increased when it is activated.
- If the bone fragment is not loosened, use a thin osteotome to free it.
- Always secure the distractor to an adjacent tooth with the titanium wire of
1/0 black silk or a nylon suture.
- If the distractor is loosened after the activation is stopped, remove the distractor
and insert the implants.
- Antibiotic cover is recommended.
Patient
instructions:
-
Cold soft food and drinks for 24 hours.
Avoid chewing on the distracted side.
Antiseptic mouth rinse and gentle brushing of distractor and widened region.
Self-activation of the device 1/4 of a turn twice a day, unless other instructions were given by your dentist.
One day rest after every 4 days of activation.
Make sure to be examined by your surgeon at least every 5-6 days.
Patient instructions:
Patient instructions (continuation)
- If the device is loosened after the activation is stopped, see
your surgeon as soon as possible.
- Slight pressure might be felt at the beginning of the
activation and towards completion.
Sterilization
- The device is not sterile.
- The device must be sterilized before use by autoclave, at a
temperature of 134°C (273°F) for 6 minutes.
- Do not exceed 134°C during sterilization.
- The device is for single use, for only one patient, do not reuse.
Manufacturer
By prescription only
Lot number
Catalog number
Single use, do not reuse, use only once
Attention, see Instructions For Use
Do Not Use if Package is Damaged
© MIS Corporation. All Rights Reserved
Non-Sterile
MP-UI017 Rev. 9
Manufactured by:
MIS Implants Technologies Ltd.
P.O. Box 7 Bar Lev Industrial Park, 2015600,
Website: www.mis-implants.com
MIS Implants Technologies GmbH
Simeonscarre 2, 32423 Minden, Germany
Tel: +49 571-972-7620
Email: [email protected]
MIS Corporation. All Rights Reserved.