1
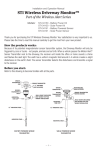
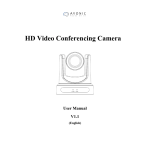
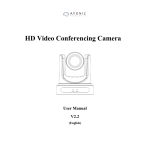
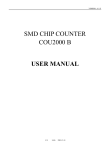
Quick Start Guide
1
Ge tting sta rte d
This Quick Start Guide has been designed to aid in quickly getting started with mounting and using the accessories obtained. If you require further help, or have
further questions on the detail in how to operate the projector unit or to see the selection of accessories available, please refer to the projector user guide or our web
site. You can also access FAQs, and download detailed white papers in order to get to know the more specific features and benefits.
3
I m po r t a nt t o k now
When installing the exhaust air kit please notice the following:
• Make sure that the individual parts enter their locations effortlessly and that the screws are not overtightened when fastened.
Packaging contents for full kit (exceptions in brackets):
• Do not block neither the air inlet nor the exhaust air outlet. Hot air is exhausted from the rear air outlet. Do not place any objects sensitive to heat
near to the exhaust vent. For instance do not curl up additional cable lengths inside the ceiling mount cover (section 1/part 3).
1 Air-inlet filter (not included in kit/sold separately)
3
2 Side cover/Air-inlet
• Minimum safety distance to the unit (with kit mounted) is 50 cm / 20” to the air inlet side: The distance to ceiling must be at least 15 cm / 6”.
For the other side of the projector (with no air inlet/outlet) and the top (facing down), no distance restrictions apply.
3 Ceiling mount cover/Air-outlet (included in kit/also sold separately)
• If air-inlet filter is installed, take care to remove and clean the filter removing dust and filth at regular intervals.
4 Exhaust air duct (including flexible hose with clamp)
• Do not mount this kit on a projector used in any other position than ceiling mounted!
4
2
• Make sure to mount the flexible hose correctly, as seen in section 4 below.
2/3/4 Exhaust air kit (combined)
2/3 Acoustic silencer kit (combined)
15cm
1
50cm
For further information on ceiling mounting of your projector please refer the user manual or our web page
User documentation
2
Air-inlet Filter
Ceiling Mount Cover
Exhaust Air Kit
Mo unting Air- inle t filt er / C eilin g m ou n t cov er / E x h au s t air kit
The Exhaust air kit is delivered without an Air-inlet filter (1 - illustration above), but the filter can be purchased separately and added either with or without
the rest of the kit. The Ceiling mount cover (3 - illustration above) is included in the Exhaust air kit, but can also be purchased separately.
4
M o unt i ng t he f l exi bl e ho se
When mounting the flexible hose on the exhaust air, please notice the following:
Air-inlet filter (1 - illustration above): To mount the Air-inlet filter, fit the filter onto the grille and make sure the extruding plastic guide enters the inlet grille properly.
Attach the Air-inlet filter to the grille using the 3 supplied screws, two long screws on the left hand side and one shorter screw on the right hand side. If part of a kit,
make sure to mount the filter first. For mounting of other parts, see description in the following sections below. Mounting a filter is registered by the projector and a
reminder to clean or replace the filter will appear when required.
Ceiling mount cover (no. 3 - illustration above): Attach the cover by entering the plastic guides into the fitting holes at the back of the projector (upper edge) . Snap
the cover onto the rear end of the projector, making sure that the 2 extensions with screw holes are positioned over the corresponding holes in the projector chassis.
Fasten by entering the supplies screws. Make sure that the screws enter correctly and do not overtighten. If you have a complete kit, see exhaust duct description
below first.
Exhaust duct (no. 4 - illustration above): If you have a kit, the exhaust duct needs to be mounted on the ceiling mount cover before attaching the cover to the
projector. First you need to loosen the chamber wall separating the padded exhaust chamber from the rest of the cover by removing 2 screws (Section 4 - right hand
side). Position the exhaust duct, angle pointing backwards, entering the slot on the cover side facing outwards. Make sure that the protruding retainer enters the
back cover rim correctly when pushed backwards into place. Place the chamber wall back in initial position and fasten the 2 wall screws. Finally fasten the 2 screws
connecting the wall to the exhaust duct.
Side cover (no. 2 - illustration above): In order to mount the side cover the ceiling mount cover has to be mounted first. Position the side cover so that the screw
holes at the rear end of the projector fits into the countersink in the ceiling mount cover and the holes at the front end of the side cover are positioned above the
corresponding holes in the projector. Enter the screws (short screws at rear end/long at front end of projector) and fasten.
Remove chamber
wall (1) in ceiling
mount cover before
attempting to mount
the exhaust air duct
(2) (two screws)
5-inch (125 mm) diameter flexible hose
Maximum length of flexible hose
200 cm
If exhaust is directed into a false ceiling,
this area should be well vented. Make
sure the ventilation does not override
the projector fans
Minimum 15 cm
clearance to any
object
Never sharper than 900 bend
2
Flexi-hose for exhaust duct (section 4 - right hand side): Thread the flexible hose for the exhaust air onto the exhaust duct and fasten it with the hose clamp.
A Exhaust air kit assembly without Air-inlet filter
C How the finished mounted kit should look
B Exhaust air kit assembly including Air-inlet filter
D Air flow directions for the Exhaust air kit (blue = inlet air / red = exhaust).
601-0326-00
601-0348-00
A
B
4
C
1
5
6
7
D
Please notice that the exhaust air kit is only intended for ceiling mounted projectors
P leas e v is it ou r web s it e t o dow nl o a d pr o duc t m a nua l s o r t o f i nd re l a t e d i nf o r m a t i o n
www.barco.com
english
WEEE INFORMATION
This product conforms to all requirements of the EU Directive on waste
electrical and electronic equipment (WEEE). This product shall be recycled
properly. It can be disassembled to facilitate proper recycling of it’s
individual parts.
Consult your dealer or relevant public authority regarding drop-off points for
collection of WEEE. For details, please visit the Barco website at: http://www.
barco.com/en/AboutBarco/weee.
francais
deutsch
WEEE-ANGABEN
Dieses Produkt erfüllt alle Auflagen aus der EU-Richtlinie für Elektro- und
Elektronik-Altgeräte (WEEE). Dieses Produkt kann sachgemäß recycelt
werden. Es kann zerlegt werden, um die Einzelteile ordnungsgemäß zu
recyceln.
Fragen Sie Ihren Händler oder die zuständigen Behörden nach Entsorgungsstellen
für Elektro- und Elektronik-Altgeräte. Für weitere Informationen, besuchen Sie
bitte die Website unter: http://www.barco.com/en/AboutBarco/weee.
INFORMATION WEEE
Cet appareil est conforme à la Directive EU relative au recyclage des
équipements électriques et électroniques (WEEE). Cet appareil doit être
recyclé correctement. Il peut être démonté pour faciliter le recyclage de
chaque pièce séparément.
Consultez votre revendeur ou les autorités publiques compétentes concernant les
points de collecte WEEE. Pour plus de détails, veuillez visiter le site web Barco à:
http://www.barco.com/en/AboutBarco/weee.
INFORMACIÓN WEEE
Este producto cumple todos los requisitos de la Directiva de la UE
sobre residuos de equipos eléctricos y electrónicos. Este producto debe
reciclarse adecuadamente. Puede desmontarse para facilitar el adecuado
reciclado de cada una de sus piezas.
Consulte a su distribuidor o al organismo público pertinente acerca de los puntos
limpios para la recogida de residuos de equipos eléctricos y electrónicos. Para
obtener más información, visite la página web de Barco: http://www.barco.com/
en/AboutBarco/weee.
norsk
italiano
español
INFORMAZIONI SU WEEE
Questo dispositivo è conforme a tutti i requisiti della direttiva UE (WEEE)
sullo smaltimento di apparecchiature elettriche ed elettroniche. Questo
prodotto deve essere riciclato correttamente e può essere smontato per
agevolare il riciclaggio dei singoli componenti.
Per informazioni sui punti di raccolta WEEE, consultare il rivenditore o l’autorità
preposta. Per ulteriori informazioni, visitare il sito web Barco: http://www.barco.
com/en/AboutBarco/weee.
WEEE INFORMATION
Dette produktet tilfredsstiller alle krav i EU direktivet 2002/96/EC
somgjelder brukt elektrisk og elektronisk utstyr. Dette produktet skal
resirkuleres forsvarlig. Det kan demonteres slik at de enkelte deler kan
resirkuleres forsvarlig.
Kontakt din forhandler eller relevant offentlig myndighet angående returpunkter for
innsamling
for
innsamling
av WEEE.
av WEEE. For mer informasjon, se Barco sin webside: http://www.
barco.com/en/AboutBarco/weee.