1
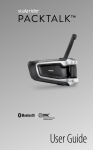
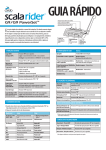
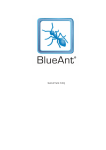
communication in motion
®
“V-” Volume Down / Rewind button
G9 / G9 PowerSet™
“MB”Mobile phone button
“V+”Volume Up / Forward button
T
his Quick Guide is not a substitute to the user manual and addresses only a
limited scope of features and functions of your scala rider G9. Assuming that
you have already completed the entire set-up of your G9, including pairing with
external devices (e.g. your mobile phone, MP3 player, GPS), this reference guide may
be useful to look up some basic functions and commands of your G9 while you are
on the road and have no access to the user manual.
This Quick Guide can be printed and folded for easy reference while on the road, or it
may be viewed directly on your smartphone.
1 | GENERAL
FUNCTIONS
Power ON / OFF
Press “MB” for 2 seconds
• ON: 3 short blue LED flashes + ascending tone
• OFF: 3 short red LED flashes + descending tone
scala rider G9 Unit
Channel A Button
(“A”)
• Connect to Rider A
• MP3 Button
Voice Command
Button (“VC”)
“One+8” Intercom
3 | LED
Status
None
scala rider G9 is OFF
1 BLUE flash every
3 seconds
Standby mode
No active audio sources
Channel B Button
(“B”)
• Connect to Rider B
• FM Radio Button
Volume
Tap “V+” or “V-” to adjust volume of current audio source
2 BLUE flashes every 3 Active mode – Call in progress / music or other audio source
seconds
is ON
Mute speakers
Tap “V+” and “V-” simultaneously
1 RED flash every
3 seconds
Standby mode – Battery is low
Battery level
indicator
Press “V+” for 2 seconds
• Blue LED = Full charge
• Purple LED = Half charge
• Red LED = Almost empty
2 RED flashes every 3
seconds
Active mode – Battery is low
Solid RED
Charging
4
Voice Menu
Press “A” and “B” simultaneously for 2 seconds and follow the
spoken instructions
Hear Your
Assigned Name
Tap “VC” and “B” simultaneously
Paired Device
Indication
| PHONE CALLS
Answer a call
Tap “MB” or speak any word loudly to answer by VOX
Reject a call
Remain silent for 15 seconds, or press and hold “MB” for 2
seconds
End a call
Tap “MB”
Press “VC” for 5 seconds
If “One+8” Buddies are within range, purple LEDs flash for
2 seconds
Voice Dial*
Tap “MB” and follow the prompt from the mobile
Redial*
Tap the “MB” twice
Hot Dial
Tap “A” and “B” simultaneously
Group Signal
Tap “VC” twice
INTERCOM CONFERENCE MODE
Enable / Disable
Vox (For Intercom
calls only)
Press “V+” and “V-” simultaneously for 2 seconds
• Enabled: Blue flash for 2 seconds
• Disabled: Red flash for 2 seconds
Enable/Disable
Click-to-Link (CTL)
(Disabled by default)
Via the Voice Menu
2
Tap “A” while on a phone call
Add/Remove Channel
“B” to/from a call
Tap “B” while on a phone call
*This feature is not available during intercom or mobile calls
5 | A2DP
| VOICE COMMANDS
1. In Standby, tap “VC” or speak any word loudly to activate VOX
2. Speak a Voice Command from the table below:
Current Mode
Add/Remove Channel
“A” to/from a call
Desired Action
Say this:
<<G9 Buddy Name>>
MUSIC PLAYER
Play
Press and hold “A” for 2 seconds
Pause/Stop
Press and hold “A” for 2 seconds
Forward
Press and hold “V+” for 2 seconds
Rewind*
Press and hold “V-” for 2 seconds
*With some phones you may need to repeat this action
| FM RADIO
Standby / FM / A2DP “One+8” Intercom Call
/ AUX
Intercom call with A or B
“Call Intercom”
Radio On / Off
Press “B” for 2 seconds
Standby
Start A2DP
“Music ON”
Turn on FM
“Radio ON”
FM
Turn off FM
“Radio OFF”
Configuring
radio stations
from your G9
device
A2DP
Stop / Pause A2DP
“Music OFF”
1. Turn on Radio.
2. Tap “B” to select a preset number (1 - 6 follow the number of
beeps to indicate preset number).
3. P ress “V+” or “V-” for 2 seconds (Search up/down) to find an FM
station to save:
4. Tap “B” within 20 seconds to save into current Preset.
6
7
Four-Way Calls
| INTERCOM CONFIGURATION
Manual Option:
Note: PowerSet units are already factory paired!
1. Rider #1 taps “A” to Passenger #2.
2. Rider #3 taps “A” to call Passenger #4.
3. Passenger #2 taps “B” to call Passenger #4.
CLIC
K!
Flash Pairing
Flash Pairing (Remove both G9 units from Audio Kits)
9
| CLICK TO LINK (“CTL”) CALLS
with a “One+8”
Intercom Buddy
Bump G9 units together and hold side by side.
Purple LED = success
Start a “CTL” call request
(search lasts up to 10 seconds)
with Channels
A/B
1. Tap either “A” or “B” on both G9 units.
2. Bump G9 units together and hold side by side.
Purple LED = success
End a “CTL” call / Cancel “CTL” Tap “A”
request
Accept a “CTL” call
When you hear the “CTL” ringtone:
• Tap “A” or
• Speak any word loudly to answer by VOX
Reject a “CTL” call
When you hear the “CTL” ringtone, remain silent until
the ring tone stops
Manual Pairing
with Channels
A/B
Press either “A” or “B” for 5 sec. on both G9 units until red (A) or
blue (B) LEDs begin flashing rapidly.
Solid Red/Blue LED = success
3-Way Intercom
• Rider #1 and Rider #2 pair via “A”
• Rider #1 and Rider #3 pair via “B”
4-Way Intercom
• Rider #1 and Passenger #2 pair via “A”.
• Rider #3 and Passenger #4 pair via “A”
• Passenger #2 and Passenger #4 pair via “B”
8 | USING
10
INTERCOM
Tap “A” twice
| TROUBLESHOOTING
Rebooting the G9
Reset Pairing
(Delete paired
devices – except
“One+8” pairings)
If your G9 stops responding to your commands, reset it by
turning it off and then on again (press “MB” for 2 seconds).
1. When in Standby mode, press “MB” for 6 seconds until G9
flashes red/blue.
2. Press “V+” for 2 seconds until G9 flashes 5 times in purple.
Two-Way Calls
“One+8” Intercom
Say the Name:
Choose the Name (from your Buddy List):
a. T ap “VC”
b. S peak the
name of the
“One+8”
Intercom
Buddy
a. Press “VC” for 2 seconds
b. Hear the names of all pre-paired “One+8” Intercom
Buddies.
c. Once you hear the name of the Buddy you wish to call, tap
“VC” or speak any word loudly into the microphone.
To cancel “One+8” Buddy List playback:
Press “VC” for 2 seconds.
OR
When receiving a “One+8” Intercom call from someone who is not in your Buddy
list, you will hear a ringtone, and not the name of the caller.
Tap “A” to accept Intercom calls or stay silent until ringtone stops to reject the call.
“V-” Volume Down / Rewind button
“MB”Mobile phone button
“V+”Volume Up / Forward button
Three-Way Calls
To start an Intercom Conference Call with Channels “A” and “B”:
Voice Connect
Option (VOX):
1. When in A2DP/FM/AUX/ Standby, speak any word loudly to
activate the Voice Command and wait for a brief tone.
2. Now say “Call Intercom” to call Riders A + B.
Manual Option:
1. To add Channel “A” into the conference, tap “A”.
2. To add Channel “B” into the conference, tap “B”.
Channel A Button
(“A”)
• Connect to Rider A
• MP3 Button
Voice Command
Button (“VC”)
“One+8” Intercom
Channel B Button
(“B”)
• Connect to Rider B
• FM Radio Button
To disconnect either, tap “A” or “B” respectively.
Ch a
nne
l “A”
Rider 2
C
Us e
han
nel “
B”
Rider 3
Rider 1
The contents of this User Guide, including all text, illustrations and drawings are the exclusive intellectual
property of Cardo Systems, Inc. (the “Company”) and are protected by copyright laws. Any partial or total
reproduction, translation and or dissemination, without the prior written authorization by the Company are
strictly prohibited. Any rights not expressly granted herein are reserved.
MAN01009 G9 QG EN J 203
Us e