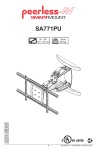
1
EM 41 D Gebrauchsanleitung Digital TENS/EMS .............................(3-15) G Instruction for Use Digital TENS/EMS unit .....................(16-29) FMode d’emploi Appareil TENS/EMS numérique .......(30-43) EInstrucciones para el uso Aparato digital TENS/EMS ...............(44-57) IInstruzioni per l’uso Apparecchio TENS/EMS digitale .....(58-71) TKullanma Talimatı Dijital TENS/EMS cihazı ..................(72-84) oИнструкция по применению Тренажер (TENS/EMS) для мышц ........(85-98) QInstrukcja obsługi Cyfrowe urządzenie do elektrycznej stymulacji mięśni i nerwów ............(99-111) RUS Beurer GmbH • Söflinger Str. 218 • D-89077 Ulm, Germany Tel.: +49 (0)731 / 39 89-144 • Fax: +49 (0)731 / 39 89-255 www.beurer.de • Mail: [email protected] 0483 CH1 CH2 1A-1B/2A-2B 1A-1B/2A-2B 1A-2A/1B-2B 1A-1B/2A-2B 1A-1B/2A-2B 1A-1B/2A-2B 1A-2A/1B-2B 1A-1B/2A-2B 1A-2A/1B-2B 1A-1B/2A-2B 1A-2A/1B-2B 1A-1B/2A-2B 1A-2B/2A-1B 1A-1B/2A-2B 1A-2B/2A-1B 1A-1B/2A-2B 1A-2A/1B-2B 1A-1B/2A-2B 1A-1B/2A-2B 1A-1B/2A-2B 1A-2A/1B-2B 1A-1B/2A-2B 1A-2A/1B-2B 1A-1B/2A-2B 1A-2A/1B-2B 1A-1B/2A-2B 1A-2B/2A-1B 1A-1B/2A-2B 1A-2A/1B-2B 1A-1B/2A-2B 1A-2B/2A-1B 1A-2A/1B-2B 1A-1B/2A-2B 1A-2B/2A-1B 1A-2A/1B-2B 1A-1B/2A-2B 1A-2A/1B-2B 1A-1B/2A-2B 1A-2A/1B-2B 1A-1B/2A-2B 1A-2A/1B-2B 1A-1B/2A-2B 1A-2A/1B-2B 1A-1B/2A-2B 1A-2B/2A-1B 1A-2A/1B-2B 1A-1B/2A-2B 1A-2B/2A-1B 1A-2A/1B-2B 1A-1B/2A-2B 2A-1B/1A-2B 1A-1B/2A-2B 1A-2B/2A-1B 1A-2A/1B-2B 1A-1B/2A-2B 2A-1B/1A-2B Sehr geehrte Kundin, sehr geehrter Kunde, Deutsch wir freuen uns, dass Sie sich für ein Produkt unseres Sortimentes entschieden aben. Unser Name steht für hochwertige und eingehend geprüfte Qualitätsh produkte aus den Bereichen Wärme, Gewicht, Blutdruck, Körpertemperatur, Puls, Sanfte Therapie, Massage und Luft. Bitte lesen Sie diese Gebrauchsanleitung aufmerksam durch, bewahren Sie sie für späteren Gebrauch auf, machen Sie sie anderen Benutzern zugänglich und beachten Sie die Hinweise. Inhaltsverzeichnis 1. Zum Kennenlernen..................................................................................3 1.1 Was ist und kann Digital TENS/EMS?.................................................3 1.2 Lieferumfang.......................................................................................4 2. Wichtige Hinweise...................................................................................5 3.Stromparameter......................................................................................7 3.1 Impulsform..........................................................................................7 3.2 Impulsfrequenz ....................................................................................7 3.3 Impulsbreite.........................................................................................7 3.4 Impulsintensität...................................................................................7 3.5 Zyklusgesteuerte Impulsparameter-Variation......................................7 4. Gerätebeschreibung...............................................................................7 4.1 Bezeichnung der Komponenten..........................................................7 4.2 Tastenfunktionen ................................................................................8 5. Inbetriebnahme ......................................................................................8 6. Programmübersicht................................................................................8 6.1 Grundsätzliches ..................................................................................8 6.2 TENS-Programme...............................................................................9 6.3 EMS-Programme ...............................................................................10 6.4 MASSAGE-Programme.....................................................................11 6.5 Hinweise zur Elektrodenplatzierung..................................................11 7. Anwendung............................................................................................12 7.1 Hinweise zur Anwendung..................................................................12 7.2 Ablauf für die Programme 01–10 TENS, EMS und MASSAGE.........12 7.3 Ablauf für die TENS/EMS-Programme 11– 20 (Ind.-Prog.) ................12 7.4 Änderungen der Einstellungen..........................................................13 7.5 Doctor’s Function..............................................................................13 18. Reinigung und Aufbewahrung .............................................................13 9.Entsorgung ............................................................................................14 10.Probleme/Problemlösungen................................................................14 11. Technische Angaben .............................................................................15 12.Garantie ..................................................................................................15 Mit freundlicher Empfehlung Ihr Beurer-Team 1. Zum Kennenlernen 1.1 Was ist und kann Digital TENS/EMS? Digital TENS/EMS gehört zur Gruppe der Elektrostimulationsgeräte. Es beinhaltet drei Basisfunktionen, die kombiniert betrieben werden können: 1. Die elektrische Stimulation von Nervenbahnen (TENS) 2. Die elektrische Stimulation von Muskelgewebe (EMS) 3. Eine durch elektrische Signale hervorgerufene Massagewirkung. Dazu besitzt das Gerät zwei unabhängige Stimulationskanäle und vier selbsthaftende Klebeelektroden. Es bietet vielseitig anwendbare Funktionen zur Erhöhung des allgemeinen Wohlempfindens, zur Schmerzlinderung, zur Erhaltung der körperlichen Fitness, Entspannung, Muskelrevitalisierung und Müdigkeitsbekämpfung. Sie können dazu entweder aus voreingestellten Programmen wählen oder diese selbst entsprechend Ihrer Bedürfnisse festlegen. Das Wirkungsprinzip von Elektro-Stimulationsgeräten basiert auf der Nachbildung körpereigener Impulse, welche mittels Elektroden über die Haut an die Nerven- bzw. Muskelfasern weitergeleitet werden. Die Elektroden können dabei an vielen Körperpartien angebracht werden, wobei die elektrischen Reize ungefährlich und praktisch schmerzfrei sind. Sie spüren in bestimmten Anwendungen lediglich ein sanftes Kribbeln oder Vibrieren. Die in das Gewebe gesandten elektrischen Impulse beeinflussen die Erregungsübertragung in Nervenleitungen sowie Nervenknoten und Muskelgruppen im Anwendungsgebiet. 3 Die Wirkung der Elektrostimulation wird in der Regel erst nach regelmäßig wiederholter Anwendung erkennbar. Am Muskel ersetzt die Elektrostimula tion regelmäßiges Training nicht, ergänzt die Wirkung desselben aber sinnvoll. Kräftigung der Muskulatur hervorgerufen werden (aktivierende Anwendung) und zum anderen kann auch eine entspannende, erholende Wirkung (relaxierende Anwendung) erzielt werden. Zur aktivierenden Anwendung gehören: • Muskeltraining zur Erhöhung der Ausdauerleistung und/oder • Muskeltraining zur Unterstützung der Kräftigung bestimmter Muskeln oder Muskelgruppen, um gewünschte Veränderungen der Körperproportionen zu erreichen. Zur relaxierenden Anwendung gehören: • Muskelrelaxation zur Lösung von muskulären Verspannungen • Verbesserung bei muskulären Müdigkeitserscheinungen • Beschleunigung der Muskelregeneration nach hoher muskulärer Leistung (z.B. nach einem Marathon). Digital TENS/EMS bietet durch die integrierte Massagetechnologie außerdem die Möglichkeit, mit einem in Empfindung und Wirkung an eine reale Massage angelehnten Programm Muskelverspannungen abzubauen und Müdigkeitserscheinungen zu bekämpfen. Anhand der Positionierungsvorschläge und Programmtabellen in dieser Anleitung können Sie für die jeweilige Anwendung (je nach betroffener Körperregion) und für die beabsichtigte Wirkung die Geräteeinstellung schnell und einfach ermitteln. Durch die beiden separat justierbaren Kanäle bietet das Digital TENS/EMS den Vorteil die Intensität der Impulse unabhängig voneinander auf zwei zu behandelnde Körperpartien anzupassen, zum Beispiel um am Körper beide Seiten abzudecken oder größere Gewebeareale gleichmäßig zu stimulieren. Die individuelle Intensitätseinstellung jedes Kanals ermöglicht es Ihnen außerdem gleichzeitig zwei verschiedene Körperpartien zu behandeln, wodurch eine Zeitersparnis gegenüber einer sequentiellen Einzelbehandlung erreicht werden kann. Unter TENS, der transkutane elektrische Nervenstimulation, versteht man die über die Haut wirkende elektrische Anregung von Nerven. TENS ist als klinisch erwiesene, wirksame, nicht-medikamentöse, bei richtiger Anwendung nebenwirkungsfreie Methode zur Behandlung von Schmerzen bestimmter Ursachen zugelassen – dabei auch zur einfachen Selbstbehandlung. Der schmerzlindernde bzw. -unterdrückende Effekt wird unter anderem erreicht durch die Unterdrückung der Weiterleitung des Schmerzes in Nervenfasern (hierbei vor allem durch hochfrequente Impulse) und Steigerung der Ausscheidung körpereigener Endorphine, die das Schmerzempfinden durch ihre Wirkung im Zentralen Nervensystem vermindern. Die Methode ist wissenschaftlich untermauert und medizinisch zugelassen. Jedes Krankheitsbild, das eine TENS Anwendung sinnvoll macht, muss von Ihrem behandelnden Arzt abgeklärt werden. Dieser wird Ihnen auch Hinweise zum jeweiligen Nutzen einer TENS-Selbstbehandlung geben. TENS ist bei folgenden Anwendungen klinisch geprüft und zugelassen: • Rückenschmerzen, insbesondere auch Lenden- und HalswirbelsäulenBeschwerden • Gelenkschmerzen (z.B. Kniegelenk, Hüftgelenk, Schulter) •Neuralgien •Kopfschmerzen • Regelbeschwerden bei Frauen • Schmerzen nach Verletzungen am Bewegungsapparat • Schmerzen bei Durchblutungsstörungen • Chronischen Schmerzzuständen verschiedener Ursachen. Die elektrische Muskelstimulation (EMS), ist eine weit verbreitete und allgemein anerkannte Methode und findet seit Jahren in der Sport- und Rehabilitationsmedizin Anwendung. Im Sport- und Fitnessbereich wird EMS unter anderem ergänzend zum konventionellen Muskeltraining eingesetzt, um die Leistungsfähigkeit von Muskelgruppen zu erhöhen und um die Körperproportionen den gewünschten ästhetischen Ergebnissen anzupassen. Die Anwendung der EMS geht in zwei Richtungen. Zum einen kann eine gezielte 1.2 Lieferumfang – 1x Digital TENS/EMS-Gerät (inkl. Gürtelclip) – 2x Anschlusskabel – 4x Klebeelektroden (45 x 45 mm) – 3x AAA-Batterien 4 – diese Gebrauchsanweisung – 1x Kurzanleitung (Vorschläge Elektrodenplatzierung und Anwendungsgebiete) – 1x Aufbewahrungstasche Nachkaufartikel Rückengürtel mit 4 verschleißfreien Wasserkontaktelektroden, Mat.-Nr. 162.825 8x Klebeelektroden (45 x 45 mm), Art.-Nr. 661.02 4x Klebeelektroden (50 x 100 mm), Art.-Nr. 661.01 • Im Bereich des Halses / Halsschlagader • Im Bereich der Genitalien • Auf akut oder chronisch erkrankter (verletzter oder entzündeter) Haut, (z.B. bei schmerzhaften und schmerzlosen Entzündungen, Rötungen, Hautausschlägen (z.B. Allergien), Verbrennungen, Prellungen, Schwellungen und offenen sowie sich im Heilungsprozess befindliche Wunden, an Operationsnarben die in der Heilung begriffen sind) • In Umgebungen mit hoher Feuchtigkeit wie z.B. im Badezimmer oder beim Baden oder Duschen • Nicht nach Alkoholkonsum verwenden • Bei einem gleichzeitigen Anschluss an ein Hochfrequenz-Chirurgiegerät 2. Wichtige Hinweise Eine Anwendung des Gerätes ersetzt keine ärztliche Konsultation und Behandlung. Befragen Sie bei jeder Art von Schmerz oder Krankheit deshalb immer zunächst Ihren Arzt! WARNUNG! Um gesundheitlichen Schäden vorzubeugen ist in folgenden Fällen von der Anwendung des Digital TENS/EMS dringend abzuraten: • Bei implantierten elektrischen Geräten (wie z.B. Herzschrittmachern) • Bei Vorhandensein von metallenen Implantaten • Bei Insulinpumpenträgern • Bei hohem Fieber (z.B. > 39 °C) • Bei bekannten oder akuten Herzrhythmusstörungen und anderen Erre gungsbildungs- und Leitungsstörungen am Herzen • Bei Anfallsleiden (z.B. Epilepsie) • Bei einer bestehenden Schwangerschaft • Bei vorliegenden Krebserkrankungen • Nach Operationen, bei denen verstärkte Muskelkontraktionen den Heilungsprozess stören könnten • Eine Anwendung in der Nähe des Herzens muss unterbleiben. Stimulationselektroden dürfen an keiner Stelle des vorderen Brustkorbs (durch Rippen und Brustbein gekennzeichnet) angewandt werden, insbesondere nicht an beiden großen Brustmuskeln. Hier kann es das Risiko von Herzkammerflimmern erhöhen und einen Herzstillstand herbeiführen • Am knöchernen Schädel, im Bereich des Mundes, des Rachenraumes oder des Kehlkopfes Halten Sie vor einer Anwendung des Geräts Rücksprache mit Ihrem behandelnden Arzt bei: • Akuten Erkrankungen, insbesondere bei Verdacht oder Vorliegen von Bluthochdruckerkrankungen, Blutgerinnungsstörungen, Neigung zu thrombo-embolischen Erkrankungen sowie bei bösartigen Neubildungen • Allen Hauterkrankungen • Nicht abgeklärten chronischen Schmerzzuständen unabhängig von der Körperregion •Diabetes • Allen Sensibilitätsstörungen mit reduziertem Schmerzempfinden (wie z.B. Stoffwechselstörungen) • Gleichzeitig durchgeführten medizinischen Behandlungen • Mit der Stimulationsbehandlung auftretenden Beschwerden • Beständigen Hautreizungen aufgrund von langzeitiger Stimulation an der gleichen Elektrodenstelle ACHTUNG! Verwenden Sie das Digital TENS/EMS ausschließlich: • Am Menschen • Für den Zweck, für den es entwickelt wurde und auf die in dieser Gebrauchsanleitung angegebene Art und Weise. Jeder unsachgemäße Gebrauch kann gefährlich sein • Zur äußerlich Anwendung • Mit den mitgelieferten und nachbestellbaren Original-Zubehörteilen, ansonsten erlischt der Garantieanspruch 5 VORSICHTSMASSNAHMEN: •Nicht anwenden in der Nähe leicht entzündlicher Stoffe, Gase oder Sprengstoffe. • Verwenden Sie keine Akkus und nur die gleichen Batterietypen. •Führen Sie die Anwendung in den ersten Minuten im Sitzen oder Liegen durch, um in den seltenen Fällen vagaler Reaktion (Schwächegefühl) nicht unnötiger Verletzungsgefahr ausgesetzt zu sein. Stellen Sie bei Eintreten eines Schwächegefühls sofort das Gerät ab und legen Sie die Beine hoch (ca. 5 –10 Min.). • Eine Vorbehandlung der Haut mit fettenden Cremes oder Salben wird nicht empfohlen, der Elektrodenverschleiß ist hierdurch stark erhöht bzw. kann es auch hier zu unangenehmen Stromspitzen kommen. Beschädigung • Benutzen Sie das Gerät bei Beschädigungen im Zweifelsfall nicht und wenden Sie sich an Ihren Händler oder an die angegebene Kundendienstadresse. • Überprüfen Sie das Gerät auf Anzeichen von Abnutzung oder Beschädigung. Falls Sie solche Anzeichen finden oder falls das Gerät unsachgemäß benutzt wurde, müssen Sie es vor erneuter Benutzung zum Hersteller oder Händler bringen. • Schalten Sie das Gerät sofort aus, wenn es defekt ist oder Betriebsstörungen vorliegen. • Versuchen Sie in keinem Fall, das Gerät selbständig zu öffnen und/oder zu reparieren. Lassen Sie Reparaturen nur vom Kundendienst oder autori sierten Händlern durchführen. Bei Nichtbeachten erlischt die Garantie. • Der Hersteller haftet nicht für Schäden, die durch unsachgemäßen oder falschen Gebrauch verursacht wurden. • Entfernen Sie die Elektroden stets mit mäßigem Zug von der Haut, um im seltenen Fall einer hochempfindlichen Haut Verletzungen zu vermeiden. • Halten Sie das Gerät von Wärmequellen fern und verwenden Sie es nicht in der Nähe (~1 m) von Kurz- oder Mikrowellengeräten (z.B. Handys), da dies zu unangenehmen Stromspitzen führen kann. • Setzen Sie das Gerät nicht direkter Sonne oder hohen Temperaturen aus. • Schützen Sie das Gerät vor Staub, Schmutz und Feuchtigkeit. Das Gerät niemals in Wasser oder andere Flüssigkeiten tauchen. • Das Gerät ist zur Eigenanwendung geeignet. • Die Elektroden dürfen aus hygienischen Gründen nur bei einer Person angewendet werden. • Sollte das Gerät nicht korrekt funktionieren, sich Unwohlsein oder Schmerzen einstellen, brechen Sie die Anwendung sofort ab. • Zum Entfernen oder Versetzen von Elektroden zuvor das Gerät bzw. den zugehörigen Kanal abschalten, um ungewollte Reize zu vermeiden. • Modifizieren Sie keine Elektroden (z.B. durch Beschnitt). Dies führt zu höherer Stromdichte und kann gefährlich sein (max. empfohlener Ausgangswert für die Elektroden 9 mA/cm2, eine effektive Stromdichte über 2 mA/cm2 bedarf der erhöhten Aufmerksamkeit). • Nicht im Schlaf, beim Führen eines Kraftfahrzeuges oder gleichzeitigem Bedienen von Maschinen anwenden. • Nicht anwenden bei allen Tätigkeiten, bei denen eine unvorhergesehene Reaktion (z.B. verstärkte Muskelkontraktion trotz niedriger Intensität) gefährlich werden kann. • Achten Sie darauf, dass während der Stimulation keine metallischen Objekte wie Gürtelschnallen oder Halsbänder in Kontakt mit den Elektroden gelangen können. Sollten Sie im Bereich der Anwendung Schmuck oder Piercings (z.B. Bauchnabelpiercing) tragen, müssen Sie diese vor dem Gebrauch des Gerätes entfernen, da es sonst zu punktuellen Verbrennungen kommen kann. • Halten Sie das Gerät von Kindern fern, um eventuellen Gefahren vorzubeugen. • Verwechseln sie die Elektrodenkabel mit den Kontakten nicht mit Ihren Kopfhörern oder anderen Geräten und verbinden Sie die Elektroden nicht mit anderen Geräten. • Benutzen Sie dieses Gerät nicht gleichzeitig mit anderen Geräten, die elektrische Impulse an Ihren Körper abgeben. Informationen zu ESD (Elektrostatische Entladung) Bitte beachten Sie, dass Buchsen, welche mit dem ESD-Warnschild versehen sind, nicht berührt werden dürfen. ESD Schutzmaßnahmen: –Stecker/Buchsen, die mit dem ESD-Warnschild versehen sind, nicht mit den Fingern berühren! –Stecker/Buchsen, die mit dem ESD-Warnschild versehen sind, nicht mit handgeführten Werkzeugen berühren! Weitere Erläuterungen zum ESD-Warnschild sowie mögliche Schulungen und deren Inhalte sind auf Anfrage beim Kundendienst erhältlich. 6 3. Stromparameter tung, der Hautdicke sowie der Güte des Elektrodenkontakts. Die praktische Einstellung soll zwar wirksam sein, darf aber niemals unangenehme Empfindungen, wie z.B. Schmerzen am Anwendungsort hervorrufen. Während ein leichtes Kribbeln eine ausreichende Stimulationsenergie anzeigt muss jede Einstellung die zu Schmerzen führt vermieden werden. Bei längerer Anwendung kann eine Nachjustierung auf Grund von zeitlichen Anpassungsvorgängen am Anwendungsort nötig sein. Elektrostimulations-Geräte arbeiten mit den folgenden Stromeinstellungen, die je nach Einstellung unterschiedliche Auswirkung auf die Stimulations wirkung haben: 3.1 Impulsform Impuls intensität Diese beschreibt die Zeitfunktion des Erregungsstroms. monophasische Pulse Dabei werden monophasische von biphasischen Puls Zeit strömen unterschieden. Bei monophasischen Pulsströmen fließt der Strom in eine Richtung, bei biphasischen Pulsen biphasische Pulse wechselt der Erregungsstrom seine Richtung ab. Im Digital TENS/EMS finden sich ausschließlich biphasi sche Pulsströme, da sie den Muskel entlasten und zu einer geringeren Muskelermüdung sowie zu einer sichereren Anwendung führen. 3.5 Zyklusgesteuerte Impulsparameter-Variation In vielen Fällen ist es erforderlich durch die Anwendung mehrerer Impuls parameter die Gesamtheit der Gewebestrukturen am Anwendungsort abzudecken. Beim Digital TENS/EMS erfolgt dies dadurch, dass die vorliegenden Programme automatisch eine zyklische Impulsparameter-Veränderung vornehmen. Dadurch wird auch der Ermüdung einzelner Muskelgruppen am Anwendungsort vorgebeugt. Beim Digital TENS/EMS gibt es sinnvolle Voreinstellungen der Stromparameter. Sie haben jedoch jederzeit die Möglichkeit während der Anwendung die Impulsintensität zu verändern und bei einzelnen Programmen können Sie zudem vorab die Impulsfrequenz ändern, um die für Sie angenehmste bzw. erfolgsversprechendste Anwendung durchzuführen. 3.2 Impulsfrequenz Die Frequenz gibt die Anzahl der Einzelimpulse pro SekunPeriodenzeit de an, ihre Angabe erfolgt in Hz (Hertz). Sie kann berechnet werden, indem man den Umkehrwert der Periodenzeit berechnet. Die jeweilige Frequenz bestimmt, welche Muskelfasertypen bevorzugt reagieren. Langsam reagierende Fasern reagieren eher auf niedrigere Impulsfrequenzen bis 15 Hz, schnell reagierende Fasern dagegen sprechen erst ab ca. 35 Hz aufwärts an. Bei Impulsen von ca. 45 – 70 Hz kommt es zur Daueranspannung im Muskel verbunden mit schneller Muskelermüdung. Höhere Impulsfrequenzen sind daher bevorzugt für Schnellkraft- und Maximalkrafttraining einsetzbar. 4.1 Bezeichnung der Komponenten Display (Hauptmenü): AImpulsintensität BProgramm-/Zyklusnummern C Frequenz (Hz) D Niedriger Batteriestand E Menüs TENS/EMS/MASSAGE F Timer-Funktion (Anzeige Restlaufzeit) G Anzeige des Operationsstatus Tasten: aAuswahltasten UP (auf) und DOWN (ab) b Bestätigungs-Taste ENTER c Taste EIN/AUS d Taste MENU e Intensitäts-Tasten CH1+, CH1-, CH2+, CH2- 3.3 Impulsbreite Mit ihr wird die Dauer eines Einzelimpulses in Mikrosekun den angegeben. Die Impulsbreite bestimmt dabei unter anderem die Eindringtiefe des Stromes, wobei allgemein gilt: Größere Muskelmasse bedarf größerer Impulsbreite. A 4. Gerätebeschreibung Impulsbreite 3.4 Impulsintensität Die Einstellung des Intensitätsgrades richtet sich individuell nach dem subjektiven Empfinden jedes einzelnen Anwenders und wird durch eine Vielzahl von Größen bestimmt, wie dem Anwendungsort, der Hautdurchblu7 B E F C D G e e a b c d 5. Inbetriebnahme Zubehör: • 2x Anschlusskabel • 4x Klebeelektroden (45 x 45 mm) • 1x Gürtelclip 1.Nehmen Sie den Gürtelclip, falls aufgesteckt, vom Gerät ab. 2.Drücken Sie auf die Batteriefachabdeckung auf der Rückseite des Gerätes und schieben Sie sie zur Seite. 3.Legen Sie die 3 Batterien vom Typ Alkaline AAA 1,5 V ein. Abb. 1 Achten Sie unbedingt darauf, dass die Batterien entsprechend der Kennzeichnung mit korrekter Polung eingelegt werden. 4.Schließen Sie den Batteriefachdeckel wieder sorgfältig. (Abb. 1) 5.Verbinden Sie die Anschlusskabel mit den Elektroden. Abb. 2 (Abb. 2) i Hinweis: Für eine besonders einfache Verbindung sind die Elektroden mit Clipverschluss ausgestattet. 4.2 Tastenfunktionen Jedes Betätigen einer Taste wird mit einem Signalton quittiert, um unbeabsichtigtes Drücken einer Taste erkennbar zu machen. Dieser Signalton lässt sich nicht ausschalten. EIN/AUS (1) Zum Einschalten des Geräts kurz drücken. Wird die Taste beim Einschalten 10 Sekunden lang gedrückt, schaltet sich das Gerät selbständig wieder ab. (2) Unterbrechung der Stimulationsbehandlung durch einfaches Drücken = Pausenmodus (3) Ausschalten des Gerätes durch langes Drücken (ca. 3 Sekunden) und (1) Wahl von (A) Behandlungsprogramm, (B) Frequenz und (C) Behandlungszeit (2) Mit der DOWN-Taste wird bei laufender Stimulation die Impulsintensität für beide Kanäle verringert. MENU (1) Navigation zwischen den Untermenüs TENS, EMS und MASSAGE (2) Rückkehr zum (A) Programmauswahlfenster oder zum (B) Hauptmenü ENTER (1)Menüauswahl (2) Bestätigung einer mit UP/DOWN getroffenen Auswahl, ausgenommen Kanalintensität CH1+, CH1-, CH2+, CH2Einstellung der Impulsintensität 6. Programmübersicht 6.1 Grundsätzliches Das Digital TENS/EMS verfügt insgesamt über 50 Programme: • 20 TENS-Programme • 20 EMS-Programme • 10 MASSAGE-Programme Bei allen Programmen haben Sie die Möglichkeit, die Anwendungsdauer und für jeden der beiden Kanäle die Impulsintensität separat einzustellen. Darüber hinaus können Sie bei den TENS- und EMS-Programmen 11 – 20 auch die Impulsfrequenz der einzelnen Zyklen verändern, um die Stimula tionswirkung dem Aufbau des Anwendungsortes anzupassen. Zyklen sind die verschiedenen Sequenzen, aus denen die Programme bestehen. Sie laufen automatisch nacheinander ab und vergrößern die Wirksamkeit der Stimulation auf verschiedene Muskelfasertypen und wirken einer schnellen Muskelermüdung entgegen. Die Standardeinstellungen der Stimulationsparameter und Hinweise zur Elektrodenplatzierung finden Sie in den folgenden Programmtabellen für TENS, EMS und MASSAGE. 8 6.2 TENS-Programme Progr.- Sinnvolle Anwendungs- Mögliche Nr. bereiche, ElektrodenIndikationen platzierung Zyklus 1 Zyklus 5 Breite Fre(µs) quenz (Hz) 250 4 250 6 250 6 250 10 250 2 Zyklus 2 Zyklus 6 On Off Breite FreTime Time (µs) quenz (Sec.) (Sec.) (Hz) 30 0 250 4 20 0 250 6 30 0 250 6 20 0 250 10 10 0 250 4 Zyklus 3 Zyklus 7 On Off Breite FreTime Time (µs) quenz (Sec.) (Sec.) (Hz) 30 0 250 5 20 0 250 8 30 0 250 8 20 0 8 0 250 6 Zyklus 4 Zyklus 8 On Off Breite FreTime Time (µs) quenz (Sec.) (Sec.) (Hz) 30 0 250 5 30 0 250 8 20 0 250 8 6 0 250 60 20 0 250 70 20 0 250 80 30 0 250 80 70 40 20 4 30 0 0 0 250 250 250 80 65 45 20 4 30 0 0 0 250 75 4 0 08 250 250 250 250 55 30 Siehe Hinweis 09, 10 250 250 250 4 8 40 30 30 5 0 0 0 250 250 250 4 8 6 20 20 10 0 0 0 250 250 250 6 10 50 30 30 5 250 75 0,25 0,25 250 2 0,5 0 250 100 0,25 0,25 1 + 11 Nackenschmerzen, 01, 02, 13 Spannungskopfschmerz 2 + 12 Rückenschmerzen 03, 04, 05, 06, 15, 23 3 + 13 Schulterschmerzen 07, 14 4 + 14 Schmerzen aufgrund rheumatoider Arthritis 5 + 15 Lumbale Beschwerden 6 + 16 Menstruations beschwerden 7 + 17 Schmerzprogramm I Siehe Hinweis 22 8 + 18 Kniebeschwerden, Sprunggelenksbeschwer den, Kapselverletzungen 9 + 19 Schmerzprogramm II Siehe (Burst) Hinweis 10 + 20 Schmerzprogramm III Siehe (Burst) Hinweis On Time (Sec.) 30 30 20 Off Time (Sec.) 0 0 0 80 30 0 250 10 20 0 0 250 60 30 0 0 0 0 250 250 6 10 20 20 0 0 On-Time (Sec.) = Zyklus-Einschaltzeit in Sekunden (Kontraktion) – Off-Time (Sec.) = Zyklus-Ausschaltzeit in Sekunden (Entspannung) Hinweis: Die Elektrodenposition soll das schmerzhafte Gebiet umschließen. Bei schmerzhaften Muskelgruppen werden die Elektroden um den betroffenen Muskel gruppiert. Bei Gelenkschmerzen soll das Gelenk an der Vorder-/Hinter-Seite des Gelenks sowie, wenn es die Elektrodenabstände zulassen, an der rechten und linken Gelenkseite mit Elektroden umgeben werden. Der minimale Elektrodenabstand soll 5 cm nicht unter- und 15 cm nicht überschreiten. Beachten Sie die Abbildungen 9 und 10, die für das Knie- und Sprunggelenk gelten. Burst-Programme sind für alle Anwendungsorte geeignet, die mit wechselndem Signalmuster behandelt werden sollten (für eine möglichst geringe Gewöhnung). 9 6.3 EMS-Programme Progr.- Sinnvolle Anwendungs Nr. bereiche, Indikationen Mögliche Elektrodenplatzierung Zyklus 1 Zyklus 5 Breite Fre- On (µs) quenz Time (Hz) (Sec.) 250 30 5 Zyklus 2 Zyklus 6 Off Breite Fre- On Time (µs) quenz Time (Sec.) (Hz) (Sec.) 1 250 10 15 Zyklus 3 Zyklus 7 Off Breite Fre- On Time (µs) quenz Time (Sec.) (Hz) (Sec.) 1 250 50 5 Zyklus 4 Zyklus 8 Off Breite Fre- On Off Time (µs) quenz Time Time (Sec.) (Hz) (Sec.) (Sec.) 1 1 + 11 Schultermuskulatur 07, 14 2 + 12 Mittlerer u. unterer Trapez muskel, Lattisimus dorsi Muskel, Nackenmuskulatur 3 + 13 Wirbelsäulennahe Rückenmuskulatur Progr. I 4 + 14 Vordere u. hintere OberarmMuskulatur (u.a. Bizeps), vordere und hintere Unterarm-Muskulatur 01, 02, 03, 04, 05, 12, 15 03, 06, 22, 23 16, 17, 18, 19 250 4 30 1 250 4 20 1 250 6 30 1 250 6 20 1 250 2 10 1 250 4 10 250 4 30 1 250 4 250 5 30 1 5 + 15 Gerade und schräge Bauchmuskulatur 6 + 16 Wirbelsäulennahe Rückenmuskulatur Progr. II 7 + 17 Wirbelsäulennahe Rückenmuskulatur Progr. III 8 + 18 Gesäßmuskulatur 11, 20, 21 250 6 15 1 250 03, 06, 22, 23 03, 06, 22, 23 24 250 2 20 1 250 250 250 4 8 20 30 30 5 9 + 19 Vordere und hintere Oberschenkelmuskulatur 10 + 20 Vordere und hintere Unterschenkelmuskulatur 25, 26 250 20 27, 28 250 25 250 5 30 1 250 5 20 1 1 250 6 10 1 30 1 250 4 30 1 250 5 30 1 8 15 1 250 10 15 1 250 2 20 1 250 1 30 1 250 1 30 1 1 1 1 250 250 250 4 8 6 20 20 5 1 1 1 250 6 30 1 250 6 20 1 250 30 5 1 5 1 250 6 8 1 250 25 5 1 5 1 250 6 8 1 250 35 5 1 On-Time (Sec.) = Zyklus-Einschaltzeit in Sekunden (Kontraktion) – Off-Time (Sec.) = Zyklus-Ausschaltzeit in Sekunden (Entspannung) 10 6.4 MASSAGE-Programme Progr.-Nr. 1 2 3 4 5 6 7 8 9 10 stimuliert wird. Um die Stimulation zu erhöhen muss dann die Impulsintensität erhöht werden. Es gilt als Richtlinie für die Wahl der Elektrodenabstände: • sinnvollster Abstand: ca. 5 –15 cm, • unter 5 cm werden primär oberflächliche Strukturen stark stimuliert, • über 15 cm werden großflächige und tiefe Strukturen sehr schwach stimuliert. Elektrodenbezug zum Muskelfaserverlauf Die Wahl der Stromflussrichtung ist entsprechend der gewünschten Muskel schicht dem Faserverlauf der Muskeln anzupassen. Sind oberflächliche Muskeln zu erreichen, so ist die Elektrodenplatzierung parallel zum Faserverlauf durchzuführen (S. 2, Abb. 16; 1A-1B/2A-2B), sollen tiefe Gewebsschichten erreicht werden, ist die Elektrodenplatzierung quer zum Faserverlauf durchzuführen (S. 2, Abb. 16; 1A-2A/1B-2B). Letzteres kann z.B. über die Kreuz (= Quer) Elektrodenanordnung erreicht werden, z.B. S. 2, Abb. 16; 1A-2B/2A-1B. Kanalzuordnung: Kanal 1 (CH1): Anschluß links, Intensitätsregler-Wipptaste links, Impulsintensitätsanzeige links (CH1). Kanal 2 (CH2): Anschluß rechts, Intensitätsregler-Wipptaste rechts, Impulsintensitätsanzeige rechts (CH2). i Bei der Schmerzbehandlung (TENS) mittels Digital TENS/EMS mit seinen 2 getrennt regelbaren Kanälen und je 2 Klebeelektroden ist es ratsam, entweder die Elektroden eines Kanals so anzulegen, dass der Schmerzpunkt zwischen den Elektroden liegt oder Sie legen eine Elektrode direkt auf den Schmerzpunkt und die andere legen Sie mindestens 2 – 3 cm entfernt an. Die Elektroden des zweiten Kanals können zur gleichzeitigen Behandlung weiterer Schmerzpunkte verwendet werden, oder aber auch gemeinsam mit den Elektroden des ersten Kanals zur Einkreisung des Schmerzbereiches (gegen überliegend) verwendet werden. Hier ist wieder eine Kreuzanordnung sinnvoll. i Tipp zur Massagefunktion: für eine optimale Behandlung verwenden Sie immer alle 4 Elektroden. i Um die Haltbarkeit der Elektroden zu verlängern, verwenden Sie diese auf sauberer, möglichst haar- und fettfreier Haut. Falls nötig die Haut vor der Anwendung mit Wasser reinigen und Haare entfernen. Massageform Klopf- und Greifmassage Knet- und Greifmassage Klopfmassage Handkanten-/Druckmassage Handkanten-/Druckmassage Schüttelmassage Klopfmassage (Wechsel zwischen Elektroden) Massagestrahl (Wechsel zwischen Elektroden) Druckmassagestrahl (Wechsel zwischen Elektroden) Kombiprogramm (Wechsel zwischen Elektroden) Die Platzierung der Elektroden ist so zu wählen, dass sie die betroffenen Muskelsegmente umschließt. Für eine optimale Wirkung ist der Abstand der Elektroden nicht größer als ca. 15 cm. Eine Anwendung der Elektroden an der vorderen Wand des Brustkorbs darf nicht durchgeführt werden, d.h. eine Massage am linken und rechten großen Brustmuskel muss unterbleiben. 6.5 Hinweise zur Elektrodenplatzierung Eine sinnvolle Platzierung der Elektroden ist für den beabsichtigten Erfolg einer Stimulations-Anwendung wichtig. Wir empfehlen Ihnen die optimalen Elektrodenpositionen an Ihrem beabsichtigten Anwendungsgebiet mit Ihrem Arzt abzustimmen. Als Leitschnur dienen die vorgeschlagenen Elektrodenplatzierungen auf der Umschlagsinnenseite (Abbildungen 1– 28). Es gelten folgende Hinweise bei der Wahl der Elektrodenplatzierung: Elektrodenabstand Je größer der Elektrodenabstand gewählt wird, desto größer wird das stimulierte Gewebsvolumen. Dies gilt für die Fläche und die Tiefe des Gewebsvolumens. Zugleich nimmt aber die Stimulationsstärke des Gewebes mit größerem Elektrodenabstand ab, dies bedeutet dass bei größerer Wahl des Elektrodenabstands zwar ein größeres Volumen, dies aber schwächer 11 • Wählen Sie die für Sie angenehmste Impulsintensität durch Drücken der Taste CH 1+/CH 2+. Die Anzeige der Impulsintensität passt sich entsprechend an. i Sollte sich eine Elektrode während der Anwendung lösen, so geht die Impulsintensität beider Kanäle auf die niedrigste Stufe. Drücken Sie die EIN/AUS-Taste um in den Pausenmodus zu gelangen, platzieren Sie die Elektrode neu und fahren Sie mit der Anwendung durch erneutes Drücken der Taste EIN/AUS fort und stellen Sie die gewünschte Impulsintensität ein. 7.3 Ablauf für die TENS/EMS-Programme 11 bis 20 (Individual-Programme) 7. Anwendung Abb. 5 Die Programme 11 bis 20 sind voreingestellte Programme, die Sie zusätzlich individualisieren können. Sie haben hier die Möglichkeit die Impulsfrequenz einzustellen. • Wählen Sie aus den Programmtabellen ein für Ihre Zwecke geeignetes Programm. • Platzieren Sie die Elektroden im Zielbereich und verbinden diese mit dem Gerät. Dabei können Ihnen die entsprechenden Platzierungsvorschläge helfen. • Drücken Sie die EIN/AUS-Taste, um das Gerät einzuschalten. • Navigieren Sie durch Drücken von MENU durch die Unter menüs (TENS/EMS/MASSAGE) und bestätigen Sie Ihre Wahl mit ENTER. (Abb. 1, Bsp. Display-Anzeige TENS) • Wählen Sie mit den UP/DOWN-Tasten Ihr gewünschtes Abb. 1 Programm aus, und bestätigen Sie mit ENTER (Abb. 2, Bsp. Display-Anzeige TENS-Programm Nr. 11). • Wählen Sie mit den UP/DOWN-Tasten die gewünschte Frequenz (Hz) für Zyklus 1 und bestätigen Sie sie mit Abb. 2 ENTER (Abb. 3). Wiederholen Sie diesen Vorgang für alle späteren Zyklen. • Um die Frequenzeinstellung zu beenden, setzen Sie die Frequenz (Hz) nach dem zuletzt benötigten Zyklus auf "--0" Abb. 3 und drücken Sie ENTER, alle Frequenzeinstellungen späterer Zyklen werden automatisch auf “0” gesetzt und somit nicht beachtet. i Tipp: Halten Sie die ENTER-Taste 2 Sekunden lang gedrückt, um die Frequenzeinstellungen zu überspringen und zur Behandlungszeiteinstellung zu gelangen. Für den Fall, dass Sie alle 8 Zyklen benötigen, beenden Sie die Auswahl der Frequenzeinstellung ebenfalls durch das 2-sekündige Drücken der ENTER-Taste. 7.1 Hinweise zur Anwendung • Wird das Gerät 3 Minuten lang nicht verwendet, schaltet es sich automatisch ab (Abschaltautomatik). Bei erneutem Einschalten erscheint der LCD-Bildschirm des Hauptmenüs, wobei das zuletzt verwendete Untermenü blinkt. • Wird eine zulässige Taste gedrückt, erklingt ein kurzer Signalton, beim Drücken einer unzulässigen Taste werden zwei kurze Signaltöne ausgegeben. 7.2 Ablauf für die Programme 01– 10 TENS, EMS und MASSAGE (Schnellstart) • Wählen Sie aus den Programmtabellen ein für Ihre Zwecke geeignetes Programm. • Platzieren Sie die Elektroden im Zielbereich und verbinden diese mit dem Gerät. Dabei können Ihnen die entsprechenden Platzierungsvorschläge helfen. • Drücken Sie die EIN/AUS-Taste, um das Gerät einzuschalten. • Navigieren Sie durch Drücken von MENU durch die Unter menüs (TENS/EMS/MASSAGE) und bestätigen Sie Ihre Abb. 1 Wahl mit ENTER. (Abb. 1, Bsp. Display-Anzeige TENS) • Wählen Sie mit den UP/DOWN-Tasten Ihr gewünschtes Programm aus, und bestätigen Sie mit ENTER (Abb. 2, Bsp. Display-Anzeige TENS-Programm Nr. 01). Abb. 2 • Wählen Sie dann mit den UP/DOWN-Tasten die Gesamt behandlungszeit und bestätigen mit ENTER (Abb. 3, Bsp. Behandlungsdauer 30 Minuten). Das Gerät befindet sich im Wartestatus (Abb. 4). • Drücken Sie EIN/AUS, um mit der Stimulationsbehandlung Abb. 3 zu beginnen. Die Anzeige des Operationsstatus beginnt zu wechseln (Abb. 5). Abb. 4 12 • Wählen Sie dann die gewünschte Behandlungszeit mit den UP/DOWN-Tasten, und bestätigen Sie mit ENTER (Abb. 4, Bsp. Behandlungsdauer 30 Minuten). • Das Gerät befindet sich im Wartestatus (Abb. 5). • Drücken Sie EIN/AUS, um die Stimulationsbehandlung zu starten. Die Anzeige des Operationsstatus beginnt zu blinken (Abb. 6). • Wählen Sie die für Sie angenehmste Impulsintensität durch Drücken der Taste CH 1+/CH 2+. Die Anzeige der Impulsintensität passt sich entsprechend an. i Hinweis: Ihre individualisierten Programmeinstellungen werden gespeichert und bei der nächsten Anwahl automatisch abgerufen. Die Einstellung dieses individuellen Programms kann dabei z.B. durch Ratschlag Ihres Arztes erfolgen. Bei der Doctor’s Function kann während der Stimulationsbehandlung lediglich die Impulsintensität verändert werden. Alle anderen Parameter und Programme des Digital TENS/EMS sind in diesem Fall gesperrt und können nicht verändert bzw. aufgerufen werden. Einstellen der Doctor‘s Function: • Wählen Sie Ihr Programm und die entsprechenden Einstellungen wie unter 7.2 bzw. 7.3 beschrieben aus. • Bevor Sie das Programm durch Drücken der EIN/AUS-Taste aktivieren, halten Sie die Tasten EIN/AUS und CH 2+ gleichzeitig ca. 5 Sekunden lang gedrückt. Die Speicherung in der Doctor’s Function wird durch einen langen Signalton bestätigt. Löschen der Doctor’s Function: Um das Gerät wieder freizugeben und wieder auf andere Programme zugreifen zu können, halten Sie die beiden Tasten EIN/AUS und CH 2+ abermals ca. 5 Sekunden lang gedrückt (nicht während der Stimulation möglich). Die Löschung der Doctor’s Function wird durch einen langen Signalton bestätigt. Abb. 4 Abb. 5 Abb. 6 7.4 Änderungen der Einstellungen Veränderung Intensität (während Anwendung) • CH1+/- und CH2+/-: Veränderung der Intensität je Kanal •DOWN-Taste : die Intensität beider Kanäle wird reduziert Unterbrechung der Stimulation EIN/AUS-Taste drücken. Bei erneutem Drücken wird die Anwendung wieder aufgenommen. Abschaltung eines kompletten Kanals Taste CH- drücken bis der Kanal die niedrigste Intensität erreicht, dann die Taste gedrückt halten bis dieser im Display nicht mehr angezeigt wird. Halten Sie die entsprechenden Taste CH+ gedrückt, so wird der Kanal reaktiviert. Anwendung ändern (komplett oder einzelne Parameter) • EIN/AUS: Unterbrechung der Stimulation • MENU: zurück zum Programmwahlfenster bzw. Hauptmenü • Einstellen der gewünschten Parameter. Bestätigen mit ENTER. EIN/AUS zum Fortsetzen der Anwendung. 8. Reinigung und Aufbewahrung Klebeelektroden: • Um eine möglichst langandauernde Haftung der Elektroden zu gewährleisten, sollten diese mit einem feuchten, fusselfreien Tuch vorsichtig gereinigt werden. • Kleben Sie die Elektroden nach der Anwendung wieder zurück auf die Trägerfolie. Reinigung des Gerätes: • Entfernen Sie vor jeder Reinigung die Batterien aus dem Gerät. •Reinigen Sie das Gerät nach Gebrauch mit einem weichen, leicht angefeuchteten Tuch. Bei stärkerer Verschmutzung können Sie das Tuch auch mit einer leichten Seifenlauge befeuchten. • Achten Sie darauf, dass kein Wasser in das Gerät eindringt. Falls dies doch einmal der Fall sein sollte, dann verwenden Sie das Gerät erst dann wieder, wenn es vollständig getrocknet ist. • Benutzen Sie zum Reinigen keine chemischen Reiniger oder Scheuermittel. 7.5 Doctor’s Function Die Doctor’s Function ist eine spezielle Einstellung mit der Sie noch einfacher und gezielter Ihr ganz persönliches Programm aufrufen können. Ihre individuelle Programmeinstellung wird sofort beim Einschalten im Warte status aufgerufen und durch simples Drücken der EIN/AUS-Taste aktiviert. 13 (2) Vor jeder Anwendung die Haut reinigen, auf Hautbalsam und Pflegeöle vor der Behandlung verzichten. Eine Rasur kann die Haltbarkeit der Elektroden erhöhen. Das Gerät gibt während der Behandlung anomale Signaltöne aus. Was tun? (1) Beobachten Sie das Display, blinkt ein Kanal? Programm durch Drücken der EIN/AUS-Taste unterbrechen. Korrekte Verbindung der Anschlussleitungen zu den Elektroden kontrollieren. Stellen Sie sicher, dass die Elektroden festen Kontakt zum Behandlungsbereich haben. (2) Vergewissern Sie sich, dass der Anschlussleitungsstecker fest mit dem Gerät verbunden ist. (3) Setzen die Signaltöne bei blinkendem Kanal nicht aus, Verbindungskabel auswechseln. (4) Das Display zeigt ein blinkendes Batteriesignal. Erneuern Sie alle Batterien. Es kommt zu keiner spürbaren Stimulation. Was tun? (1) Falls ein Warnsignal ertönt, die oben beschriebenen Arbeitsschritte durchführen. (2) EIN/AUS-Taste drücken, um das Programm erneut zu starten. (3) Überprüfen Sie die Elektrodenplatzierung bzw. achten Sie darauf, dass sich die Klebeelektroden nicht überlappen (4) Impulsintensität schrittweise erhöhen. (5) Die Batterien sind beinahe leer. Ersetzen Sie diese. Sie verspüren ein unangenehmes Gefühl an den Elektroden. Was tun? (1) Die Elektroden sind schlecht platziert. Prüfen Sie die Platzierung und nehmen Sie gegebenenfalls eine Neupositionierung vor. (2) Die Elektroden sind abgenutzt. Diese können auf Grund einer nicht mehr gewährleisteten gleichmäßigen, vollflächigen Stromverteilung zu Haut reizungen führen. Ersetzen Sie diese daher. Die Haut im Behandlungsbereich wird rot. Was tun? Behandlung sofort abbrechen und warten bis sich der Hautzustand normalisiert hat. Eine schnell abklingende Hautrötung unter der Elektrode ist ungefährlich und lässt sich durch die örtlich angeregte stärkere Durchblutung erklären. Bleibt die Hautreizung jedoch bestehen, und kommt es evtl. zu Juckreiz oder Entzündung ist vor weiterer Anwendung mit Ihrem Arzt Rücksprache zu halten. Evtl. ist die Ursache in einer Allergie auf die Klebeoberfläche zu suchen. Aufbewahrung: • Entnehmen Sie die Batterien aus dem Gerät, wenn Sie es längere Zeit nicht benutzen. Auslaufende Batterien können das Gerät beschädigen. • Knicken Sie die Anschlussleitungen und Elektroden nicht scharf ab. • Trennen Sie die Anschlussleitungen von den Elektroden ab. • Kleben Sie nach Gebrauch die Elektroden wieder zurück auf die Träger folie. • Lagern Sie das Gerät an einem kühlen, belüfteten Ort. • Stellen Sie keine schweren Gegenstände auf das Gerät. 9. Entsorgung Die verbrauchten, vollkommen entladenen Batterien sind über die speziell gekennzeichneten Sammelbehälter, die Sondermüllannahmestellen oder über den Elektrohändler zu entsorgen. Sie sind gesetzlich dazu verpflichtet, die Batterien zu entsorgen. Hinweis: Diese Zeichen finden Sie auf schadstoffhaltigen Batterien: Pb = Batterie enthält Blei, Cd = Batterie enthält Cadmium, Hg = Batterie enthält Quecksilber. Bitte entsorgen Sie das Gerät gemäß der Elektro- und Elektronik Altgeräte EG-Richtlinie 2002/96/EC – WEEE (Waste Electrical and Electronic Equipment). Bei Rückfragen wenden Sie sich bitte an die für die Entsorgung zuständige kommunale Behörde. 10. Probleme/Problemlösungen Das Gerät schaltet sich bei Drücken der EIN/AUS-Taste nicht ein. Was tun? (1) Sicherstellen, dass die Batterien korrekt eingelegt sind und Kontakt haben. (2) Gegebenenfalls Batterien auswechseln. (3) Mit dem Kundendienst in Verbindung setzen. Die Elektroden lösen sich vom Körper. Was tun? (1) Die klebrige Oberfläche der Elektroden mit einem feuchten, fusselfreien Tuch reinigen. Anschließend an der Luft trocknen lassen und wieder anbringen. Sollten die Elektroden nach wie vor keinen festen Halt haben, müssen diese ausgetauscht werden. 14 Der Gürtelclip sitzt nicht fest. Was tun? Ist der Clip am Gürtel befestigt und wird erst anschließend das Gerät angesetzt, so ist kein optimaler Halt gegeben. Nehmen Sie daher das Gerät in die Hand. Setzen Sie den Gürtelclip auf der Rückseite des Gerätes an. Sie bemerken den korrekten Sitz des Clips durch hör- und spürbares Einrasten. Befestigen Sie nun das Gerät inklusive Gürtelclip erneut am Gürtel. maßnahmen hinsichtlich der elektromagnetischen Verträglichkeit. Bitte beachten Sie dabei, dass tragbare und mobile HF-Kommunikationseinrichtungen dieses Gerät beeinflussen können. Genauere Angaben können Sie unter der angegebenen Kundenservice-Adresse anfordern. Das Gerät entspricht den Anforderungen der europäischen Richtlinie für Medizinprodukte 93/42/EC, dem Medizinproduktegesetz. Entsprechend der „Betreiberverordnung für Medizinprodukte“ sind regelmäßige messtechnische Kontrollen durchzuführen, wenn das Gerät zu gewerblichen oder wirtschaftlichen Zwecken eingesetzt wird. Auch bei privater Benutzung empfehlen wir Ihnen eine messtechnische Kontrolle in 2-Jahres-Abständen beim Hersteller. 11. Technische Angaben Name und Modell: EM 41 Ausgangs-Kurvenform: biphasische Rechteckimpulse Pulsdauer: 40 – 250 µs Pulsfrequenz: 1–120 Hz Ausgangsspannung: max. 90 Vpp (an 500 Ohm) Ausgangsstrom: max. 180 mApp (an 500 Ohm) Spannungsversorgung: 3x AAA-Batterien Behandlungszeit: von 5 bis 90 Minuten einstellbar Intensität: von 0 bis 15 einstellbar Betriebsbedingungen: 10 °C – 40 °C (50 °F – 104 °F) bei einer relativen Luftfeuchtigkeit von 30 – 85% Lagerbedingungen: -10 °C – 50 °C (14 °F – 122 °F) bei einer relativen Luftfeuchtigkeit von 10 – 95% Abmessungen: 122 x 59 x 23 mm Gewicht: 69 g (ohne Batterien), 108 g (inkl. Gürtelclip und Batterien) Zeichenerklärung: Anwendungsteil Typ BF Achtung! Gebrauchsanweisung lesen. 12. Garantie Sie erhalten 3 Jahre Garantie ab Kaufdatum auf Material- und Fabrikations fehler des Produktes. Die Garantie gilt nicht: • im Falle von Schäden, die auf unsachgemäßer Bedienung beruhen, • für Verschleißteile wie Elektroden, Batterien und Anschlusskabel, • für Mängel, die dem Kunden bereits bei Kauf bekannt waren, • bei Eigenverschulden des Kunden. Die gesetzlichen Gewährleistungen des Kunden bleiben durch die Garantie unberührt. Für Geltendmachung eines Garantiefalles innerhalb der Garantiezeit ist durch den Kunden der Nachweis des Kaufes zu führen. Die Garantie ist innerhalb eines Zeitraumes von 3 Jahren ab Kaufdatum gegenüber der Beurer GmbH, Söflinger Straße 218, 89077 Ulm (Germany), geltend zu machen. Der Kunde hat im Garantiefall das Recht zur Reparatur der Ware bei unseren eigenen oder bei von uns autorisierten Werkstätten. Weitergehende Rechte werden dem Kunden (aufgrund der Garantie) nicht eingeräumt. Hinweis: Bei Verwendung des Gerätes außerhalb der Spezifikation ist eine einwandfreie Funktion nicht gewährleistet! Technische Änderungen zur Verbesserung und Weiterentwicklung des Produktes behalten wir uns vor. Dieses Gerät entspricht den europäischen Normen EN60601-1 und EN60601-1-2 sowie EN60601-2-10 und unterliegt besonderen Vorsichts15 English Table of Contents 7. Application................................................................................................26 7.1 Advice on application.........................................................................26 7.2 Procedure for TENS, EMS and MASSAGE programmes 01–10........26 7.3 Procedure for TENS/EMS programmes 11– 20 (ind. prog.)................26 7.4 Changes to settings ...........................................................................27 7.5 Doctor’s Function ...............................................................................27 8.Cleaning and storage ............................................................................27 9.Disposal..................................................................................................27 10.Problems and solutions.........................................................................28 11. Technical details....................................................................................28 1.Getting to know your machine................................................................17 1.1 What is Digital TENS/EMS and what can it do?..................................17 1.2 Scope of supply...................................................................................18 2.Important information..............................................................................18 3.Current parameters.................................................................................20 3.1 Pulse shape..........................................................................................20 3.2 Pulse frequency....................................................................................20 3.3 Pulse width...........................................................................................20 3.4 Pulse intensity......................................................................................20 3.5 Cycle-controlled pulse parameter variation.........................................20 4.Unit description........................................................................................21 4.1 Description of components..................................................................21 4.2 Key functions.......................................................................................21 5.Start-up.....................................................................................................21 6.Programme overview...............................................................................22 6.1 Basic information.................................................................................22 6.2 TENS programmes...............................................................................23 6.3 EMS programmes................................................................................24 6.4 MASSAGE programmes.......................................................................25 6.5 Information on placing the electrodes .................................................25 16 Dear Customer, TENS, transcutaneous electrical nerve stimulation, means electrical stimulation of nerves through the skin. TENS is recognised as a clinically proven, effective, non-medication method of treating pain from certain causes. It is free from side-effects when used properly, and can also thereby be used as a simple means of self-treatment. The pain-alleviating or suppressing effect is also achieved by preventing pain from being passed on into nerve fibres (above all through high-frequency pulses) and increasing the secretion of the body’s own endorphines which reduce awareness of pain through their effect on the central nervous system. The method is scientifically underpinned and medically approved. Any symptoms indicating TENS application must be clarified with the doctor in charge of your treatment. The latter will also give you information on the respective benefits of TENS self-treatment. TENS is clinically tested and approved with the following applications: • Back pain, particularly also lumbar and cervical spine problems • Joint pain (e.g. knee joint, hip joint, shoulder) •Neuralgia •Headaches • Women’s period pains • Pain after injuries to musculoskeletal system • Pain with circulatory problems • Chronic pain through various causes Electrical muscle stimulation (EMS) is a widespread and generally recognised method and has been used for years in sports and rehabilitation medicine. In the sports and fitness field, one of the uses of EMS is as a supplement to conventional muscle training, in order to increase the efficiency of muscle groups and adapt physical proportions to the desired aesthetic results. EMS application goes in two directions. On the one hand, a targeted strengthening of musculature can be produced (activating application) and on the other hand a relaxing, resting effect can also be achieved (relaxing application). Active application includes the following: • Muscle training to improve endurance performance and/or •Muscle training to support the strengthening of certain muscles or muscle groups in order to achieve desired changes to body proportions. Thank you for choosing one of our products. Our name stands for high-quality, thoroughly tested products for the applications in the areas of heat, weight, blood pressure, body temperature, pulse, gentle therapy, massage and air. Please read these instructions for use carefully and keep them for later use, be sure to make them accessible to other users and observe the information they contain. Best regards, Your Beurer Team 1. Getting to know your machine 1.1 What is Digital TENS/EMS and what can it do? Digital TENS/EMS belongs to the group of electrical stimulation systems. It has three basic functions, which can be used in combination: 1. Electrical stimulation of nerve tracts (TENS). 2. Electrical stimulation of muscle tissue (EMS). 3. A massage effect generated by electrical signals. For this, the device has two independent stimulation channels and four selfadhesive electrodes. It has various versatile functions in order to increase general wellbeing, alleviate pain, maintain physical fitness, relaxation, revitalise muscles and combat fatigue. You can either select these functions from preset programmes or determine them yourself according to your requirements. The operating principle of electrical stimulation equipment is based on simulating the body’s own pulses which are transmitted transcutaneously to nerve or muscle fibres by means of electrodes. The electrodes can thereby be attached to many parts of the body, whereby the electrical stimuli are safe and practically painless. You merely feel a gentle prickling or vibrating in some applications. The electrical pulses transmitted to the tissue affect the transmission of stimulation in nerve conductions as well as neural nodes and muscle groups in the field of application. The effect of electrical stimulation is generally only recognisable after regularly repeated application. Electrical stimulation does not replace regular exercising of the muscle, but is able to reasonably supplement the effect thereof. 17 Relaxing application includes the following: • Muscle relaxation in order to loosen up muscular tension • Improving muscular fatigue symptoms •Accelerating muscle regeneration after high muscular performance (e.g. after a marathon). Through integrated massage technology, Digital TENS/EMS also offers the possibility of reducing muscular tension and combating fatigue symptoms using a programme based on real massage in terms of sensation and effect. Using the positioning suggestions and programme charts in this manual, you can determine the machine setting fast and easily for the respective application (depending on the region of the body affected) in order to ensure the desired effect. Through the two separately adjustable channels, the Digital TENS/EMS has the advantage of adapting the intensity of the pulses independently of each other to two parts of the body to be treated, for example in order to cover both sides of the body or ensure even stimulation of larger areas of tissue. The individual intensity setting of each channel also allows you to treat two different parts of the body at the same time, whereby it is possible to save time compared with individual sequential treatment. 2. Important Information Use of the machine does not replace medical consultation and treatment. In the event of any type of pain or illness, you must therefore always first ask your doctor. WARNING! In order to prevent any damage to health, we would urgently advise against using the Digital TENS/EMS in the following cases: • With any implanted electrical devices (such as pacemakers) • If there are any metal implants • When using an insulin pump • In case of high fever (e.g. > 39 °C) • In case of known or acute cardiac arrhythmias and other disorders in stimulus formation and conduction of the heart • If suffering from attacks (e.g. epilepsy) • If pregnant • In case of cancer • After operations where increased muscle contractions might impair the healing process • Never use near the heart. Stimulation electrodes should never be placed anywhere on the front of the thorax (marked by ribs and breastbone), but above all not on the two large pectoral muscles. Here it can increase the risk of ventricular fibrillation and lead to cardiac arrest • On the bony part of the cranium, near the mouth, throat or larynx • Near the throat / carotid artery • Near the genitals • On acutely or chronically diseased (injured or inflamed) skin (e.g. in the event of painful and painless inflammation, reddening, skin rashes (e.g. allergies), burns, bruises, swellings, open wounds and wounds in the process of healing, on operation scars in the process of healing) • In environments with high humidity such as in the bathroom or when having a bath or shower • Do not use after consuming alcohol • When a high frequency surgical device is connected at the same time 1.2 Scope of supply – – – – – – 1x Digital TENS/EMS machine (incl. belt clip) 2x connecting cable 4x adhesive electrodes (45 x 45 mm) 3x AAA batteries these instructions for use 1x brief instructions (suggestions on placing electrodes and fields of application) – 1x storage bag Subsequent purchase articles Back belt with 4 wear-free water contact electrodes, mat. no. 162.825 8x adhesive electrodes (45 x 45 mm), Art. no. 661.02 4x adhesive electrodes (50 x 100 mm), Art. no. 661.01 18 Before using the machine, you should consult with the doctor in charge of your treatment in the event of the following: • Acute diseases, especially if hypertension is suspected or actually exists, or blood-clotting disorders, tendency to thromboembolic diseases or in case of malignant new masses • All skin diseases • Chronic pain disorders which have not been clarified, regardless of the region of the body •Diabetes • All sensitivity disorders with reduced pain awareness (such as metabolic disturbances) • Medical treatments carried out simultaneously • Complaints arising as a result of the stimulation treatment • Constant skin irritation as a result of prolonged stimulation at the same electrode point. • To remove or move the electrodes, first switch off the machine or the appropriate channel in order to avoid unwanted irritation. • Never modify any electrodes (e.g. by cutting). This leads to a higher current density and can be dangerous (max. recommended output value for electrodes: 9 mA/cm2, an effective current density over 2 mA/cm² requires greater attention). • Do not use when asleep, when driving a vehicle or at the same time as operating machinery. • Never use with any activities where an unforeseen reaction (e.g. increased muscle contraction despite low intensity) may be dangerous. • Make sure that no metallic objects such as belt buckles or necklaces can come in contact with the electrodes during stimulation. If you wear any jewellery or piercings (e.g. belly piercing) near the application site, you must remove these before using the machine as burning may otherwise occur at some points. • Keep the device away from children to prevent any hazards. • Do not confuse the electrode cables and contacts with your headphones or other devices, and do not connect the electrodes to other devices. • Do not use this machine at the same time as other equipment which sends electrical pulses to your body. • Do not use it near any highly flammable substances, gases or explosives. • Never use accumulators, always use the same types of battery. • In the initial minutes, carry out the application sitting or lying down in order to avoid any unnecessary risk of injury in the rare event of a vagal reaction (feeling of weakness). If you start feeling weak, switch the machine off immediately and put your legs up (approx. 5–10 minutes). • It is not advisable to apply any enriching creams or ointments to the skin beforehand, as this greatly increases electrode wear or else unpleasant current spikes may occur here. Damage: • If the machine is damaged, do not use it if you are in any doubt but rather contact your dealer or the customer service address indicated. • Check the device at regular intervals for signs of wear or damage. If you find any such signs or if the device was used improperly, you must bring it to the manufacturer or dealer before it is used again. • Switch off the device immediately if it is defective or if is not working properly. IMPORTANT! Use the Digital TENS/EMS solely: • On humans • For the purpose for which it was developed and in the manner specified in these instructions for use. Any improper use can be hazardous. • For external application. • With the original accessory parts which are supplied and can be re-ordered, otherwise the warranty becomes null and void. PRECAUTIONARY MEASURES: • Always remove the electrodes from the skin with a moderate pull in order to avoid injury in the event of highly sensitive skin. • Keep the machine away from heat sources and never use it near (~1 m) short-wave or microwave equipment (e.g. mobile phones), as this may lead to unpleasant current spikes. • Do not expose the machine to direct sunlight or high temperatures. • Protect the machine from dust, dirt and humidity. Never submerge the device in water or other liquids. • The machine is suitable for private use. • For reasons of hygiene, the electrodes should only be used on one person. • If the machine is not functioning properly, or if you start feeling unwell or there is any pain, stop the application immediately. 19 while fast-response fibres only respond to frequencies over approx. 35 Hz. With pulses of approx. 45–70 Hz, there is permanent tension in the muscle combined with premature muscle fatigue. Higher pulse frequencies can therefore preferably be used for elasticity and maximum strength training. • Do not, under any circumstances, attempt to open or repair the machine yourself! Only have repairs carried out by the customer service department or an authorized dealer. If these instructions are not heeded, the warranty becomes null and void. • The manufacturer assumes no liability for damage caused through improper or wrong use. Information on ESD (Electrostatic Discharge) Please note that jacks marked with the ESD warning label must not be touched. ESD protective measures: –Do not touch plugs/jacks marked with the ESD warning label with fingers! –Do not touch plugs/jacks marked with the ESD warning label with handheld tools! Further explanations on the ESD warning label, as well as possible training courses and their contents, are available on request from the customer service department. 3.3 Pulse width Pulse width is used to indicate the duration of an individual pulse in microseconds. Pulse width also determines the penetration depth of the current whereby in general, the following applies: a greater muscle mass requires a greater pulse width. 3.4 Pulse intensity Setting the degree of intensity is individually dependent on the subjective feeling of each individual user and is determined by a number of parameters such as application site, skin circulation, skin thickness as well as quality of electrode contact. The actual setting should be effective but should never produce any unpleasant sensations such as pain at the site of application. While a slight tingling sensation indicates sufficient stimulation energy, any setting which leads to pain must be avoided. With prolonged application, readjustment may be necessary due to time adjustment processes at the site of application. 3. Current parameters Electrical stimulation machines operate with the following current settings, which will alter the stimulation effect depending on the setting. 3.1 Pulse shape 3.5 Cycle-controlled pulse parameter variation monophase pulses pulse intensity This describes the time function of the excitation current. whereby monophase pulse trains are differentiated from biphase. In monophase pulse trains the current flows in one direction, in biphase pulse trains the excitation current changes direction. In the Digital TENS/EMS unit, there are only biphase pulse trains, as they reduce the strain on the muscle, leading to less muscle fatigue as well as safer application. Pulse width In many cases it is necessary to cover the entirety of tissue structures at the site of application by using several pulse parameters. With the Digital TENS/ EMS unit, this is done by the existing programmes automatically making a cyclical pulse parameter change. This also prevents individual muscle groups at the site of application from getting tired. With the Digital TENS/EMS unit there are useful presettings for current parameters. During the application, however, you do have the possibility of changing pulse intensity at any time and, with individual programmes, you can also alter pulse frequency beforehand in order implement the application which is the most comfortable or promises the most success for you. time biphase pulses 3.2 Pulse frequency periodic Frequency indicates the number of individual pulses per time second, and is indicated in Hz (Hertz). It can be calculated by working out the inverse value of the periodic time. The respective frequency determines which types of muscle fibre preferably react. Slow-response fibres tend to react to lower pulse frequencies up to 15 Hz, 20 4. Unit description (2)The DOWN key is used to reduce pulse intensity for both channels during stimulation. MENU (1) Navigation between the submenus TENS, EMS and MASSAGE. (2) Return to (A) programme selection window or (B) main menu. ENTER (1) Menu selection. (2) To confirm a selection made with UP/DOWN, apart from channel intensity. CH1+, CH1-, CH2+, CH2Setting pulse intensity. A 4.1 Description of components Display (main menu): A Pulse intensity B Programme/cycle numbers C Frequency (Hz) D Low battery E TENS/EMS/MASSAGE menus F Timer function (residual time indicator) G Operating status display Keys: a UP and DOWN selection keys b ENTER confirmation key c ON/OFF key d MENU key e CH1+, CH1-, CH2+, CH2- intensity keys B E F C D G e e a b 5. Start-up c d 1.Remove the belt clip from the machine, if attached. 2.Press on the battery cover at the back of the machine and push it to the side. 3.Insert three AAA 1.5 V alkaline batteries. Make absolutely sure that you insert the batteries with the correct polarity as marked. 4.Replace the battery cover carefully (Fig. 1). 5.Attach the connecting cable to the electrodes (Fig. 2). i Note: The electrodes have a clip fastener to ensure easy connection. Accessories: • 2x connection cable • 4x adhesive electrodes (45 x 45 mm) • 1x belt clip 4.2 Key functions Every time a key is pressed, this is acknowledged by a signal tone in order to ensure that any unintentional pressing of a key is detected. This signal tone cannot be switched off. ON/OFF (1) Hit briefly to switch on the machine. If the key is held down for 10 seconds when switching on, the unit automatically switches off again. (2) Press once to interrupt stimulation treatment = pause mode. (3) Hold ON/OFF key down (approx. 3 seconds) to switch off the machine. and (1) Select between (A) treatment programme, (B) frequency and (C) treatment time. Fig. 1 Fig. 2 21 6. Programme overview 6.1 Basic information The Digital TENS/EMS unit has a total 50 programmes: • 20 TENS programmes • 20 EMS programmes • 10 MASSAGE programmes With all programmes, you can set the length of application and (for each of the two channels) pulse intensity separately. Besides this, with TENS and EMS programmes 11– 20, you can also change the pulse frequency of the individual cycles in order to adapt the stimulation effect to the structure of the site of application. Cycles are the different sequences making up the programmes. They automatically run one after the other and increase the efficacy of stimulation on different types of muscle fibre and combat premature muscle fatigue. You will find the standard stimulation parameter settings and information on placing the electrodes in the following programme charts for TENS, EMS and MASSAGE. 22 6.2 TENS programmes Prog. No. Reasonable areas of application Indications 03, 04, 05, 06, 15, 23 07, 14 Cycle 1 Cycle 5 Width Fre- On (µs) quen- Time cy (Hz) (sec.) 250 4 30 250 6 20 250 6 30 250 10 20 250 2 10 Cycle 2 Cycle 6 Off Width Fre- On Time (µs) quen- Time (sec.) cy (Hz) (sec.) 0 250 4 30 0 250 6 20 0 250 6 30 0 250 10 20 0 250 4 8 Cycle 3 Cycle 7 Off Width Fre- On Time (µs) quen- Time (sec.) cy (Hz) (sec.) 0 250 5 30 0 250 8 30 0 250 8 20 0 0 250 6 6 Cycle 4 Cycle 8 Off Width Fre- On Time (µs) quen- Time (sec.) cy (Hz) (sec.) 0 250 5 30 0 250 8 30 0 250 8 20 4 + 14 Pain as a result of rheumatoid arthritis 5 + 15 Lumbar pain See note 250 60 20 0 250 70 20 0 250 80 30 0 250 80 30 0 22 20 4 30 0 0 0 250 250 250 80 65 45 20 4 30 0 0 0 75 4 0 250 10 20 0 08 80 70 40 250 6 + 16 Menstrual pain 250 250 250 250 55 30 0 250 60 30 0 7 + 17 Pain programme I See note 30 30 5 0 0 0 250 250 250 4 8 6 20 20 10 0 0 0 250 250 250 6 10 50 30 30 5 0 0 0 6 10 20 20 0 0 09, 10 4 8 40 250 250 8 + 18 Knee pain Ankle joint pain, capsular injuries 9 + 19 Pain programme II (Burst) 10 + 20 Pain programme III (Burst) 250 250 250 See note 250 75 0,25 0,25 250 2 0,5 0 See note 250 100 0,25 0,25 1 + 11 Neck pain, tension headache 2 + 12 Back pain 3 + 13 Shoulder pain Possible electrode position 01, 02, 13 Off Time (sec.) 0 0 0 0 On-Time (sec.) = Cycle switch-on time in seconds (contraction) – Off-Time (sec.) = Cycle switch-off time in seconds (relaxation) Note: Electrode position is supposed to surround the painful area. With painful muscle groups, the electrodes are grouped round the muscle affected. In case of joint pain, the joint on the front/rear side of the joint and, if electrode distances permit, on the right and left sides of the joint, should be surrounded with electrodes. Minimal electrode distance should not be less than 5 cm and not exceed 15 cm. See figure no. 9 an 10 for knee and ankle joint. Burst programmes are suitable for all sites which should be treated with an alternating signal pattern (to ensure minimum habituation). 23 6.3 EMS programmes Prog. No. Reasonable areas of application Indications Possible electrode position Cycle 1 Cycle 5 Width Fre- On (µs) quen- Time cy (Hz) (sec.) 250 30 5 Cycle 2 Cycle 6 Off Width Fre- On Time (µs) quen- Time (sec.) cy (Hz) (sec.) 1 250 10 15 Cycle 3 Cycle 7 Off Width Fre- On Time (µs) quen- Time (sec.) cy (Hz) (sec.) 1 250 50 5 Cycle 4 Cycle 8 Off Width Fre- On Off Time (µs) quen- Time Time (sec.) cy (Hz) (sec.) (sec.) 1 250 4 30 1 250 4 20 1 250 6 30 1 250 6 20 1 250 2 10 1 250 4 10 250 4 30 1 250 4 250 5 30 1 1 + 11 Shoulder muscles 07, 14 2 + 12 Middle and lower trapezius muscle, lattisimus dorsi muscle, neck muscles 3 + 13 Back musculature near spinal column, Prog. I 4 + 14 Front and back upper arm musculature (including biceps), front and back lower arm musculature 01, 02, 03, 04, 05, 12, 15 03, 06, 22, 23 16, 17, 18, 19 5 + 15 Straight and transverse abdominal musculature 6 + 16 Back musculature near spinal column, Prog. II 7 + 17 Back musculature near spinal column, Prog. III 8 + 18 Posterior musculature 11, 20, 21 250 6 15 1 250 03, 06, 22, 23 03, 06, 22, 23 24 250 2 20 1 250 250 250 4 8 20 30 30 5 250 20 250 25 9 + 19 Front and back upper thigh 25, 26 musculature 10 + 20 Front and back lower thigh 27, 28 musculature 250 5 30 1 250 5 20 1 1 250 6 10 1 30 1 250 4 30 1 250 5 30 1 8 15 1 250 10 15 1 250 2 20 1 250 1 30 1 250 1 30 1 1 1 1 250 250 250 4 8 6 20 20 5 1 1 1 250 6 30 1 250 6 20 1 250 30 5 1 5 1 250 6 8 1 250 25 5 1 5 1 250 6 8 1 250 35 5 1 On-Time (sec.) = Cycle switch-on time in seconds (contraction) – Off-Time (sec.) = Cycle switch-off time in seconds (relaxation) 24 6.4 MASSAGE programmes Prog. no. 1 2 3 4 5 6 7 8 9 10 but stimulation is weaker. To increase stimulation, pulse intensity must then be increased. The following guideline holds when selecting electrode distances: • most reasonable distance: approx. 5 –15 cm • below 5 cm, it is mainly surface structures which are strongly stimulated • over 15 cm, large-area and deep structures are stimulated very weakly Electrode relationship to muscle fibre orientation Choice of current flow direction must be adapted to the muscle fibre orientation according to the desired muscle layer. If surface muscles are to be reached, the electrodes must be placed parallel to the fibre orientation (P. 2, Fig. 16; 1A-1B/2A-2B). If deep tissue layers are to be reached, the electrodes must be placed crosswise to the fibre orientation (P. 2, Fig. 16; 1A-2A/1B2B). The latter arrangement can, for example, be achieved via the cross electrode arrangement, such as P. 2, Fig. 16; 1A-2B/2A-1B. Channel allocation: Channel 1 (CH1): connection left, intensity controller rocker switch left, pulse intensity display left (CH1). Channel 2 (CH2): connection right, intensity controller rocker switch right, pulse intensity display right (CH2). i In the treatment of pain (TENS) using the Digital TENS/EMS machine with its 2 separately controllable channels and in each case 2 adhesive electrodes, it is advisable to either position the electrodes of one channel so that the pain spot lies between the electrodes or else you position one electrode directly on the pain spot and the other at least 2 – 3 cm away. The electrodes of the second channel can be used to treat other pain spots simultaneously or else, however, together with the electrodes of the first channel, to surround the pain area (opposite). A cross arrangement is again advisable here. i Massage function tip: always use all 4 electrodes to ensure optimal treatment. i In order to extend the durability of the electrodes, use them on clean skin which is as free as possible from hair and grease. If necessary, clean the skin with water before application and remove the hair. Massage form Tap and grasp massage Knead and grasp massage Tap massage Side of hand/pressing massage Side of hand/pressing massage Vibratory massage Tap massage (switch between electrodes) Massage jet (switch between electrodes) Pressure massage jet (switch between electrodes) Combination programme (switch between electrodes) Electrodes must be placed so that they surround the muscle segments in question. For optimal effect, electrode distance must not be greater than approx. 15 cm. The electrodes should not be applied to the anterior wall of the thorax, i.e. never massage the left or right large pectoral muscle. 6.5 Information on placing the electrodes For the desired success of any stimulation application, it is important that electrodes are placed sensibly. We advise you to coordinate with your doctor regarding the best electrode positions for your intended field of application. The electrode positions suggested inside the cover (Figs. 1– 28) serve as a guide. The following applies when choosing electrode positions: Electrode distance The greater the electrode distance which is selected, the greater will be the volume of tissue that is stimulated. This applies to the area and the depth of the tissue volume. At the same time, however, the strength of tissue stimulation decreases as the electrode distance becomes greater, which means that, if a greater electrode distance is chosen, a greater volume is stimulated, 25 7.3 Procedure for TENS/EMS programmes 11 to 20 (individual programmes) i If an electrode becomes detached during the application, the pulse intensity of both channels goes to the lowest setting. Press the ON/OFF key to enter pause mode, reposition the electrode and continue application by pressing the ON/OFF key again and setting the required pulse intensity. Programmes 11 to 20 are preset programmes which you can also individualise. Here you can set pulse frequency. • From the programme charts, select a programme that is suitable for your purpose. • Place the electrodes in the area selected and connect these to the machine. The corresponding positioning suggestions may help you here. • Press the ON/OFF key in order to switch on the machine. • Press MENU and navigate through the sub-menus (TENS/ EMS/MASSAGE) and confirm your selection with ENTER. (Fig. 1, example of TENS display) • Using the UP/DOWN keys, select the programme you want Fig. 1 and confirm with ENTER (Fig. 2, example of display for No. 11 TENS programme). • Using the UP/DOWN keys, select the frequency you want for Cycle 1 (Hz) and confirm with ENTER (Fig. 3). Repeat this Fig. 2 process for all subsequent cycles. • To terminate frequency setting, set the frequency (Hz) after the cycle last required “--0” and press ENTER. All frequency settings of subsequent cycles are then automatically set at Fig. 3 “0” and thus not taken into account. i Tip: Hold down the ENTER key for 2 seconds in order to skip frequency settings and access ‘treatment time setting’. In the event that you need all 8 cycles, you can also press ENTER for 2 seconds to terminate selection of frequency settings. • Using the UP/DOWN keys, select the desired treatment time and confirm with ENTER (Fig. 4, example of 30-minute treat- Fig. 4 ment duration). • The machine is in wait status (Fig. 5). • Press ON/OFF to start the stimulation treatment. The operation status display starts to flash (Fig. 6). Fig. 5 • Select the pulse intensity which is the most comfortable for you by pressing the key CH 1+/CH 2+. The pulse intensity display adapts accordingly. 7. Application 7.1 Advice on application • If the machine is not used within 3 minutes, it switches off automatically (automatic switch-off function). When it is switched on again, the LCD main menu screen appears, with the last used submenu flashing. • If an admissible key is pressed, there is one short beep. If an inadmissible key is pressed, there are two short beeps. 7.2 Procedure for TENS, EMS and MASSAGE programmes 01–10 (quick start) • From the programme charts, select a programme that is suitable for your purpose. • Place the electrodes in the area selected and connect these to the machine. The corresponding positioning suggestions may help you here. Fig. 1 • Press the ON/OFF key in order to switch on the machine. • Press MENU and navigate through the sub-menus (TENS/ EMS/MASSAGE) and confirm your selection with ENTER. (Fig. 1, example of TENS display) • Using the UP/DOWN keys, select the programme you want Fig. 2 and confirm with ENTER (Fig. 2, example of display for No. 1 TENS programme). • Using the UP/DOWN keys, select the total treatment time and confirm with ENTER (Fig. 3, example of 30-minute treat- Fig. 3 ment duration). The machine is in wait status (Fig. 4). • Press ON/OFF to start the stimulation treatment. The operaFig. 4 tion status display starts to change (Fig. 5). • Select the pulse intensity which is the most comfortable for you by pressing the key CH 1+/CH 2+. The pulse intensity display adapts accordingly. Fig. 6 Fig. 5 26 Cancelling Doctor’s Function: To clear the device again and access other programmes, hold down the two keys ON/OFF and CH 2+ once again for approximately 5 seconds (not possible during stimulation). Cancelling of the Doctor’s Function is confirmed by a long signal tone. i Note: Your individualised programme settings are stored and automatically retrieved when you select it next. 7.4 Changes to the settings Changing intensity (during application) • CH1+/- and CH2+/-: Changing the intensity for each channel. • DOWN key : the intensity of both channels is reduced. Interrupting stimulation Press the ON/OFF button. If you press it again, the application is resumed. Switching off a complete channel Press the CH- key until the channel reaches the lowest intensity, then hold the key depressed until the channel no longer appears in the display. Hold down the corresponding key CH+ to reactivate the channel. Changing application (completely or single parameters) • ON/OFF: to interrupt stimulation • MENU: back to program selection window or main menu • Set required parameters. Confirm with ENTER. Press ON/OFF to continue application. 8. Cleaning and storage Adhesive electrodes: • In order to ensure that the electrodes adhere for as long as possible, they should be cleaned carefully with a damp, lint-free cloth. • After use, stick the electrodes onto the backing film. Cleaning the unit: • Remove the batteries from the device every time you clean. • Clean the unit after use with a soft, slightly moistened cloth. In case of more extreme soiling you can also moisten the cloth with mild soapy water. • Ensure that no water penetrates into the machine. If this should ever happen, only use the machine again once it is completely dry. • Do not use any chemical cleaners or abrasive agents for cleaning. Storage: • Remove the batteries from the unit if you are not going to use it for a longer period. Leaking batteries can damage the unit. • Do not make any sharp kinks in the connecting leads or electrodes. • Detach the connecting cable from the electrodes. • After use, stick the electrodes onto the backing film. • Store the machine in a cool, well-ventilated place. • Never place any heavy objects on the machine. 7.5 Doctor’s Function Doctor’s Function is a specific setting to allow you to call up your specific personal programme even more easily. Your individual programme setting is immediately retrieved in wait status when you switch on and is activated by simply pressing the ON/OFF key. Settings for this individual programme may, for example, be on the advice of your doctor. With the Doctor’s Function, only pulse intensity can be changed during stimulation treatment. All other parameters and programmes of the Digital TENS/EMS are blocked in this case and cannot be modified or called up. Setting the Doctor’s Function: • Select your programme and appropriate settings as described under 7.2 or 7.3. • Before you activate the programme by pressing the ON/OFF key, hold ON/ OFF and CH 2+ keys down simultaneously for approximately 5 seconds. Storage in Doctor’s Function is confirmed by a long signal tone. 9. Disposal Used, fully discharged batteries must be disposed of in a specially labeled collection container, at toxic waste collection points or through an electrical retailer. You are under legal obligation to dispose of batteries correctly. Note: You will find these markings on batteries containing harmful substances: Pb = battery containing lead, Cd = battery containing cadmium, Hg = battery containing mercury. 27 You are aware that the electrodes feel uncomfortable. What should I do? (1) The electrodes are badly positioned. Check positioning and if necessary reposition the electrodes. (2) The electrodes are worn. Due to the fact that current distribution can no longer be guaranteed evenly over the entire surface, these may lead to skin irritation. You must therefore replace these. The skin in the treatment area becomes red. What should I do? Stop treatment immediately and wait until the skin has returned to normal. If any redness beneath the electrode soon disappears, this is not dangerous and is due to the increased circulation which has been stimulated locally. If, however, the skin irritation remains and there is possibly itching or inflammation, please consult your doctor before further use. It may possibly be caused by an allergy to the adhesive surface. The belt clip is not secure. What should I do? If the clip is fastened to the belt and only then connected to the machine, there is not optimal hold. You should therefore take the machine in your hand. Position the belt clip on the back of the machine. You will notice the correct position of the clip when you hear it click into position. Now secure the machine with belt clip on the belt again. Please dispose of the device in accordance with the directive 2002/96/EC – WEEE (Waste Electrical and Electronic Equipment). If you have any queries, please refer to the local authorities responsible for waste disposal. 10. Problems and solutions The machine does not switch on when the ON/OFF button is pressed. What should I do? (1) Make sure that the batteries have been inserted correctly and have contact. (2) Change the batteries if necessary. (3) Contact customer service. The electrodes are detaching themselves from the body. What should I do? (1) Clean the adhesive surface of the electrodes with a damp, lint-free cloth. Then let them dry in the air and attach them again. Should the electrodes still not adhere firmly, they must be replaced. (2) Before each application, clean the skin, avoiding using any skin cream or oils before treatment. Shaving can increase adhesion of the electrodes. The machine is giving out abnormal signal tones during treatment. What should I do? Interrupt the programme (1) Look at the display. Is any channel flashing? by pressing the ON/OFF button. Make sure that the connecting leads are properly connected to the electrodes. Make sure that there is a firm contact between the electrodes and the treatment area. (2) Make sure that the plug of the connecting lead is firmly connected to the machine. (3) If the signal tones do not stop and the channel is flashing, change the connecting cable. (4) The display shows a flashing battery signal. Renew the batteries. There is no noticeable stimulation. What should I do? (1) If a warning signal sounds, go through the steps described above. (2) Press the ON/OFF key to start the programme again. (3) Check that the electrodes are positioned properly and make sure that the adhesive electrodes are not overlapping. (4) Increase pulse intensity in stages. (5) The batteries are almost empty. Replace these. 11. Technical details Name and model: EM 41 Initial curve shape: biphase square-wave pulse Pulse duration: 40– 250 µs Pulse frequency: 1–120 Hz Output voltage: max. 90 Vpp (at 500 Ohm) Output current: max. 180 mApp (at 500 Ohm) Power supply: 3x AAA batteries Treatment time: adjustable from 5 to 90 minutes Intensity: adjustable from 0 to 15 Operating conditions:10 °C – 40 °C (50 °F – 104 °F) with a relative humidity of 30 – 85% Storage conditions:-10 °C – 50 °C (14 °F – 122 °F) with a relative humidity of 10 – 95% Dimensions: 122 x 59 x 23 mm 28 Weight: 69 g (without batteries) , 108 g (incl. belt clip and batteries) Explanation of symbols:Application part type BF Caution! Read the instructions for Use. Note: If the machine is not used according to these specifications, perfect functioning is not guaranteed. We reserve the right to make any technical alterations that are necessary in order to improve and develop the product further. This unit is in line with European Standards EN60601-1, EN60601-1-2 and EN60601-2-10 and is subject to particular precautions with regard to electromagnetic compatibility (EMC). Please note that portable and mobile HF communication systems may interfere with this unit. For more details, please contact customer service at the address indicated. The machine meets the requirements of the European Medical Products Directive 93/42/EC and the German Medical Products Act. In accordance with the Operators’ Ordinance on Medical Products, regular measurement precision controls must be carried out if the machine is used for commercial or economic purposes. Even in the case of private use, we recommend checking measurement precision at two-yearly intervals at the manufacturers. 29 Chère cliente, cher client, Français Nous sommes heureux que vous ayez choisi un produit de notre assortiment. Notre nom est synonyme de produits de qualité haut de gamme ayant subi des vérifications approfondies, ils trouvent leur application dans le domaine de la chaleur, du contrôle du poids, de la pression artérielle, de la mesure de température du corps et du pouls, des thérapies douces, des massages et de l’air. Lisez attentivement ce mode d’emploi, conservez-le pour un usage ultérieur, mettez-le à la disposition des autres utilisateurs et suivez les consignes. Sommaire 1.Premières expériences..........................................................................30 1.1 Qu’est-ce que le TENS/EMS numérique et à quoi sert-t-il ?.............30 1.2 Contenu de la livraison ......................................................................31 2.Remarques importantes........................................................................32 3.Paramètres de courant .........................................................................34 3.1 Forme d’impulsion .............................................................................34 3.2 Fréquence d’impulsion .......................................................................34 3.3 Largeur d’impulsion ...........................................................................34 3.4 Intensité des impulsions ....................................................................34 3.5 Variation des paramètres d’impulsion commandés par le cycle .......34 4.Description de l’appareil .......................................................................35 4.1 Désignation des éléments .................................................................35 4.2 Fonction des touches ........................................................................35 5.Mise en service ......................................................................................35 6.Aperçu des programmes ......................................................................35 6.1 Bases .................................................................................................36 6.2 Programmes TENS.............................................................................37 6.3 Programmes EMS ..............................................................................38 6.4 Programmes MASSAGE....................................................................39 6.5 Consignes de mise en place des électrodes .....................................39 7.Utilisation................................................................................................40 7.1 Remarques relatives à l’utilisation .....................................................40 7.2 Procédure pour les programmes 01 à 10 TENS, EMS et MASSAGE ....40 7.3 Procédure pour les programmes TENS/EMS 11 à 20 (prog. ind.) .....40 7.4 Modification des réglages ..................................................................41 7.5 Doctor’s Function ...............................................................................41 8.Nettoyage et stockage..........................................................................41 9.Elimination..............................................................................................42 10. Problèmes/remèdes..............................................................................42 11. Données techniques..............................................................................43 Avec nos sentiments dévoués Beurer et son équipe 1. Premières expériences 1.1 Qu’est-ce que le TENS/EMS numérique et à quoi sert-il ? Le TENS/EMS numérique fait partie du groupe des appareils d’électrostimulation. Il intègre trois fonctions de base pouvant être utilisées de manière combinée : 1.La stimulation électrique des voies nerveuses (TENS) 2.La stimulation électrique des tissus musculaires (EMS) 3.Un effet massant induit par des signaux électriques. Pour cela, l’appareil est doté de deux canaux de stimulation indépendants et de quatre électrodes auto-adhésives. Il propose de multiples fonctions permettant d’améliorer le bien-être général, d’atténuer la douleur, de vous maintenir en forme physique, de vous détendre, de revitaliser votre musculature et de lutter contre la fatigue. Vous pouvez pour cela soit faire votre choix à partir des programmes préréglés ou créer vos programmes vous-même en fonction de vos besoins. Le principe de fonctionnement des appareils d’électro-stimulation est fondé sur l’imitation des impulsions corporelles transmises par la peau aux fibres nerveuses et musculaires au moyen d’électrodes. Les électrodes peuvent être placées au niveau de nombreuses parties du corps. Leurs stimuli électriques sont inoffensifs et pratiquement indolores. Dans certains cas, vous sentirez uniquement un doux fourmillement ou de légères vibrations. Les impulsions électriques envoyées dans les tissus influencent la transmission de 30 l’excitation dans les transmissions de l’influx nerveux ainsi que dans les nœuds nerveux et les groupes musculaires présents dans la zone d’application. L’efficacité de l’électro-stimulation n’est généralement visible qu’en cas d’utilisation régulière. Sur les muscles, l’électro-stimulation ne remplace pas un entraînement régulier mais vient en complément de son efficacité. Par TENS, stimulation électrique transcutanée des nerfs, on entend l’excitation électrique des nerfs via la peau. Simple d’utilisation, le TENS est une méthode cliniquement prouvée, efficace, non médicamenteuse et sans effets secondaires en cas d’utilisation correcte pour le traitement des douleurs d’origine précise. L’effet analgésique ou apaisant est entre autres dû à la suppression de la transmission de la douleur dans les fibres nerveuses (notamment par des impulsions à haute fréquence) et par l’augmentation de l’excrétion des endorphines corporelles qui éliminent la sensation de douleur par leur action dans le système nerveux central. Cette méthode repose sur des faits scientifiques et est agréée par le corps médical. Tout tableau clinique pour lequel l’utilisation du TENS serait bénéfique doit être clarifié par votre médecin traitant. Celui-ci vous donnera également des indications pour que vous puissiez utiliser le TENS en parfaite autonomie. Le TENS a subi des tests cliniques et est autorisé pour les applications suivantes : • Douleurs dorsales, notamment douleurs lombaires et cervicales • Douleurs articulaires (par exemple genou, hanche, épaule) •Névralgies •Migraines • Douleurs menstruelles chez les femmes • Douleurs à la suite de blessures de l’appareil locomoteur • Douleurs liées à des troubles de l’irrigation sanguine • Douleurs chroniques d’origines diverses. La stimulation électrique des muscles (EMS) est une méthode largement répandue et généralement reconnue, utilisée depuis des années en médecine du sport et en rééducation. Dans le domaine du sport et du fitness, l’EMS est entre autres utilisée en complément de la musculation conventionnelle afin d’augmenter les performances de groupes musculaires et de modeler le corps en fonction des résultats esthétiques souhaités. L’EMS est utilisé pour deux choses. Il peut être utilisé pour affermir la musculature de manière ciblée (utilisation activante) mais aussi pour un effet relaxant et reposant (utilisation relaxante). L’utilisation activante inclut : • Entraînement musculaire pour accroître l’endurance et/ou. • Entraînement musculaire pour favoriser l’affermissement de certains muscles ou groupes de muscles afin de modeler le corps dans les proportions souhaitées. L’utilisation relaxante inclut : • Relaxation musculaire pour supprimer les tensions musculaires. • Amélioration en cas de signes de fatigue musculaire. • Accélération de la régénération musculaire après de hautes performances musculaires (par exemple après un marathon). Avec à sa technique de massage intégrée, le TENS/EMS numérique offre également la possibilité d’éliminer les tensions musculaires et de lutter contre les signes de fatigue au moyen d’un programme aux sensations et à l’efficacité proches de celles d’un massage réel. Grâce aux propositions de positionnement et aux tableaux de programmes figurant dans la présente notice, vous pourrez déterminer rapidement et aisément le réglage de l’appareil correspondant à l’utilisation que vous souhaitez en faire (en fonction de l’endroit du corps visé) et selon l’effet escompté. Equipé de canaux à réglage séparé, le TENS/EMS numérique a pour avantage de permettre le réglage indépendant de l’intensité des impulsions sur deux parties du corps à traiter, par exemple pour couvrir les deux faces du corps ou pour simuler des zones de tissus plus importantes, de manière uniforme. Le réglage individuel de l’intensité de chaque canal vous permet également de traiter simultanément deux parties différentes du corps et ainsi de gagner du temps par rapport à un traitement individuel séquentiel. 1.2 Contenu de la livraison – – – – – 31 1x appareil TENS/EMS numérique (avec agrafe de ceinture) 2x cordon d’alimentation 4x électrodes auto-adhésives (45 x 45 mm) 3x piles AAA le présent mode d’emploi – 1x mode d’emploi résumé (suggestions de mise en place des électrodes et domaines d’utilisation) – 1x sac de rangement Accessoires en option Ceinture dorsale avec 4 électrodes anti-usure à contact à eau, N° mat. 162.825 8x électrodes auto-adhésives (45 x 45 mm), réf. n° 661.02 4x électrodes auto-adhésives (50 x 100 mm), réf. n° 661.01 • Au niveau du cou / de la carotide • Dans la zone des parties génitales • Sur une peau présentant une maladie aiguë ou chronique (blessée ou irritée) (par exemple en cas d’irritations douloureuses et indolores, de rougeurs, d’éruptions cutanées (par exemple allergies), de brûlures, de contusions, de tuméfactions et de blessures ouvertes et en cours de guérison, sur des cicatrices en voie de guérison) • Dans les environnements très humides comme par exemple à la salle de bain, dans le bain ou la douche. • Ne pas utiliser après consommation d’alcool • Lorsqu’un appareil chirurgical à haute fréquence est branché simultanément Avant d’utiliser l’appareil, consultez votre médecin traitant dans les cas suivants : • Maladies aiguës, notamment en cas de suspicion ou en présence d’hypertension artérielle, de troubles de la coagulation sanguine, de tendance aux thromboses et aux embolies et en cas de tumeurs malignes • Toutes les maladies de peau • Douleurs chroniques inexpliquées, sur quelque partie du corps que ce soit •Diabète • Tous les troubles de la sensibilité avec sensibilité réduire à la douleur (par exemple troubles du métabolisme) • Pendant d’autres traitements médicaux • Douleurs liées au traitement par stimulation • Irritation permanente de la peau due à une stimulation prolongée au moyen d’une électrode placée au même endroit. 2. Remarques importantes L’utilisation de l’appareil ne saurait remplacer une consultation ou un traitement médical. Par conséquent, consultez toujours votre médecin au préalable en cas de douleur ou de maladie ! AVERTISSEMENT ! Pour éviter de nuire à votre santé, avant d’utiliser le TENS/EMS numérique, demandez impérativement l’avis médical dans les cas suivants : • En cas d’implant d’appareils électriques (par exemple pacemaker) • En présence d’implants métalliques • Chez les personnes porteuses d’une pompe à insuline • En cas de forte fièvre (par exemple > 39 °C) • En cas d’arythmie cardiaque connue ou aiguë et en cas d’autres dysfonctionnements de l’excitation et du rendement du cœur • En cas de crises (par exemple épilepsie) • En cas de grossesse avérée • En cas de cancer • Après des interventions chirurgicales, au cas où les contractions musculaires accrues pourraient empêcher la guérison • Il est interdit d’utiliser l’appareil à proximité du cœur. Les électrodes ne doivent pas être placées sur la cage thoracique (délimitée par les côtes et le sternum), notamment sur les deux gros pectoraux. Le risque de fibrillation ventriculaire est accru et peut provoquer un arrêt cardiaque • Sur la partie osseuse du crâne, dans la zone de la bouche, dans la zone du pharynx ou du larynx. ATTENTION ! Utilisez le TENS/EMS numérique exclusivement : • Sur l’homme • Dans le but pour lequel il a été conçu et de la manière indiquée dans le mode d’emploi. Toute utilisation incorrecte peut être dangereuse. • Pour un usage externe. • Avec les accessoires d’origine fournis et pouvant être commandés en option. (Lors de l’utilisation d’autres accessoires, la garantie sera annulée.) 32 MESURES DE PRECAUTION : • N’utilisez pas cet appareil en même temps que d’autres appareils envoyant des impulsions électriques dans votre corps. • N’utilisez pas l’appareil à proximité de matières facilement inflammables, de gaz ou d’explosifs. • N’utilisez pas de piles rechargeables. Utilisez uniquement des piles de même type. • Durant les premières minutes, utilisez l’appareil en position assise ou allongée afin de ne pas risquer de vous blesser inutilement en raison d’un malaise vagal (sensation de faiblesse), ce qui arrive rarement. En cas de sensation de faiblesse, arrêtez immédiatement l’appareil et surélevez vos jambes (pendant 5 à 10 minutes). • Il est déconseillé d’enduire votre peau de crèmes grasses ou d’onguents avant un traitement préalable car cela augmente fortement l’usure des électrodes ou peut provoquer des pointes de courant désagréables. Dommages • Si l’appareil est endommagé, en cas de doute, ne l’utilisez pas et adressezvous à votre revendeur ou à l‘adresse mentionnée du service après-vente. • Vérifiez l’appareil pour détecter des signes d’usure ou des dommages. Si l‘appareil présente de tels signes ou s‘il a été utilisé de manière non conforme, il doit être envoyé au fabricant ou rapporté au revendeur avant d‘être réutilisé. • Eteignez immédiatement l‘appareil s’il est défectueux ou s’il présente des dysfonctionnements. • N‘essayez en aucun cas d’ouvrir et/ou de réparer vous-même l’appareil ! Les réparations doivent être effectuées uniquement par le service après-vente ou des revendeurs agréés. Le non-respect de cette consigne annulera la garantie. • Le fabricant n‘est pas responsable des dommages causés par une utilisation incorrecte ou erronée. Informations sur les décharges électrostatiques (ESD) Attention, les prises portant le symbole de danger de décharge électrostatique ne doivent pas être touchées. Mesures de protection contre les décharges électrostatiques : –Ne pas toucher avec les doigts les prises ou fiches portant le symbole de danger de décharge électrostatique ! –Ne pas toucher avec des outils manuels les prises ou fiches portant le symbole de danger de décharge électrostatique ! • Afin d’éviter de blesser les peaux les plus sensibles (cas extrêmement rare), tirez toujours modérément sur les électrodes pour les enlever. • Eloignez l’appareil des sources de chaleur et ne l’utilisez pas à proximité (~1 m) d’appareils à ondes courtes ou à micro-ondes (par exemple téléphones portables) car cela pourrait provoquer des pointes de courant désagréables. • N’exposez pas l’appareil aux rayons directs du soleil ni à de hautes températures. • Protégez l’appareil de la poussière, de la saleté et de l’humidité. Ne plongez jamais l‘appareil dans l‘eau ou d‘autres liquides. • L’appareil est prévu pour un usage personnel. • Pour des raisons d’hygiène, les électrodes doivent être utilisées par une seule personne. • Si l’appareil ne fonctionne pas, en cas de malaise ou de douleurs, cessez immédiatement de l’utiliser. • Pour retirer ou déplacer les électrodes, débranchez tout d’abord l’appareil ou le canal correspondant afin d’éviter des stimuli involontaires. • Ne modifiez pas les électrodes (par exemple par découpage). Cela augmenterait la densité de courant, ce qui peut être dangereux (valeur de sortie max. recommandée pour les électrodes : 9 mA/cm2, une densité de courant effective supérieure à 2mA/cm² nécessite une attention accrue). • N’utilisez pas l’appareil pendant votre sommeil, en conduisant ou pendant l’utilisation simultanée de machines. • N’utilisez pas l’appareil lors de toutes les opérations lors desquelles une réaction imprévisible (par exemple contraction musculaire accrue malgré une faible intensité) peut se révéler dangereuse. • Veillez à ce qu’aucun objet métallique tel que les boucles de ceinture ou les colliers ne puisse entrer au contact des électrodes pendant la stimulation. Si vous portez des bijoux ou des piercings (par exemple au nombril) dans la zone d’application, retirez-les avant d’utiliser l’appareil car ils pourraient provoquer des brûlures locales. • Pour prévenir tout risque éventuel, gardez l‘appareil hors de portée des enfants. • Ne confondez pas les cordons électriques à fiches avec ceux de votre casque ou d’autres appareils et ne branchez jamais les électrodes sur d’autres appareils. 33 3.3 Largeur d’impulsion Des explications plus détaillées sur les symboles de danger de décharge électrostatique, ainsi que les formations possibles et leur contenu, sont disponibles sur demande auprès du service après-vente. Elle indique la durée d’une impulsion en microsecondes. La largeur d’impulsion détermine entre autres la profondeur de pénétration du courant. La règle suivante s’applique alors en général : plus la masse musculaire est importante, plus la largeur d’impulsion doit être élevée. 3. Paramètres de courant Les appareils de stimulation électrique fonctionnent avec les réglages suivants. Selon le réglage, ils ont un effet différent sur l’efficacité de la stimulation : 3.1 Forme d’impulsion Largeur d’impulsion 3.4 Intensité d’impulsion Impulsions monophasiques Elle décrit la fonction temps du courant d’excitation. On distingue les courants d’impulsion monophasiques Temps et biphasiques. En présence de courants d’impulsion monophasiques, le courant circule dans une direction, Impulsions biphasiques tandis que le courant d’excitation change de direction lors d’impulsions biphasiques. Le TENS/EMS numérique présente exclusivement des courants d’impulsion biphasiques car ils soulagent le muscle afin de réduire la fatigue musculaire et de garantir une utilisation sans danger. Intensité d’impulsion Le réglage du degré d’intensité dépend du ressenti subjectif de chaque utilisateur et est déterminé par de nombreux paramètres tels que l’endroit de l’application, l’irrigation cutanée, l’épaisseur de la peau et la qualité du contact des électrodes. Le réglage pratique doit être efficace mais ne doit jamais procurer de sensations désagréables telles que par exemple des douleurs au niveau du point d’application. Tandis qu’un léger picotement indique que l’énergie de stimulation est suffisante, tout réglage provoquant des douleurs doit être évité. En cas d’utilisation prolongée, un ajustage peut s’imposer en raison des processus d’adaptation dans le temps à l’endroit de l’application. 3.2 Fréquence d’impulsion La fréquence indique le nombre d’impulsions par seconde. Période Elle est indiquée en Hz (Hertz). Elle peut être calculée en déterminant la valeur d’inversion de la période. La fréquence détermine les types de fibres musculaires réagissant en priorité. Les fibres à réaction lente réagissent plutôt aux basses fréquences d’impulsion jusqu’à 15 Hz tandis que les fibres à réaction rapide ne réagissent qu’à partir d’env. 35 Hz. En présence d’impulsions comprises entre env. 45 et 70 Hz, le muscle se contracte en permanence et fatigue rapidement. Les fréquences d’impulsion supérieures peuvent par conséquent être utilisées en priorité pour l’entraînement en force rapide et l’entraînement en force maximale. 3.5 Variation des paramètres d’impulsion commandés par le cycle Dans de nombreux cas, l’ensemble des structures de tissu doit être couvert à l’endroit de l’application par l’utilisation de plusieurs paramètres d’impulsion. Sur le TENS/EMS numérique, les programmes existants procèdent auto matiquement à la modification cyclique des paramètres d’impulsion. Cela a aussi un effet préventif sur la fatigue des différents groupes musculaires à l’endroit de l’application. Le TENS/EMS numérique inclut des préréglages logiques des paramètres de courant. Vous avez cependant la possibilité de modifier l’intensité des impulsions à tout moment pendant l’utilisation et, en présence de programmes individuels, vous pouvez également modifier la fréquence d’impulsion à l’avance afin d’obtenir l’application la plus agréable et la mieux apte à répondre à vos attentes. 34 4. Description de l‘appareil et (1) Sélection du (A) programme de traitement, de la (B) fréquence et du (C) temps de traitement. (2) Appuyez sur la touche DOWN pour réduire l’intensité d’impulsion des deux canaux pendant la stimulation. MENU (1) Navigation entre les sous-menus TENS, EMS et MASSAGE. (2) Retour à la (A) fenêtre de sélection du programme et au (B) menu principal. ENTER (1) Choix du menu. (2) Validation de la sélection effectuée au moyen des touches UP/DOWN, hors intensité des canaux. CH1+, CH1-, CH2+, CH2Réglage de l’intensité d’impulsion. A 4.1 Désignation des éléments Affichage (menu principal) : A Intensité d’impulsion B Numéros de programme/cycle C Fréquence (Hz) D Niveau de batterie faible E Menus TENS/EMS/MASSAGE F Fonction Timer (affichage du temps de fonctionnement restant) G Affichage de l’état de fonctionnement Touches : A Touches de sélection UP (haut) et DOWN (bas) b Touche de validation ENTER c Touche MARCHE/ARRÊT d Touche MENU e Touches d’intensité CH1+, CH1-, CH2+, CH2Accessoires : • 2x cordon d’alimentation •4x électrodes autoadhésives (45 x 45 mm) • 1x agrafe de ceinture B E F C D G e e a b c d 5. Mise en service 1.Retirez l’agrafe de ceinture éventuellement fixée à l’appareil. 2.Appuyez sur le couvercle du compartiment des piles au dos de l’appareil et faites-le glisser sur le côté. 3.Installez les 3 piles alcalines AAA 1,5 V. Assurez-vous que les piles sont correctement installées, à l’aide des signes de polarité. 4.Refermez soigneusement le couvercle du compartiment des piles. (Fig. 1) 5.Reliez le cordon d’alimentation aux électrodes. (Fig. 2) i Remarque : Pour faciliter le branchement, les électrodes sont équipées d’un système de clip. 4.2 Fonctions des touches Un signal sonore retentit à chaque fois que vous appuyez sur une touche. Vous savez ainsi quand vous avez appuyé de manière involontaire sur une touche. Ce signal sonore ne peut pas être désactivé. MARCHE/ARRET (1) Pour mettre l’appareil en marche, appuyez brièvement. Si vous appuyez sur la touche pendant 10 secondes à la mise en marche, l’appareil s’éteint à nouveau automatiquement. (2) Interruption de la stimulation par simple pression = mode pause. (3) Arrêt de l’appareil par pression longue (env. 3 secondes). 35 Fig. 1 Fig. 2 6. Aperçu des programmes 6.1 Bases Le TENS/EMS numérique dispose au total de plus de 50 programmes : • 20 programmes TENS • 20 programmes EMS • 10 programmes MASSAGE Avec tous les programmes, vous pouvez régler la durée d’utilisation et vous avez la possibilité de régler l’intensité des impulsions séparément pour chacun des deux canaux. Pour les programmes TENS et EMS 11 à 20, vous pouvez en outre modifier la fréquence d’impulsion des différents cycles afin d’adapter l’action stimulante à la structure de l’endroit de l’application. Les cycles sont des séquences différentes composant les programmes. Ils sont exécutés automatiquement l’un après l’autre et augmentent l’efficacité de la stimulation sur différents types de fibres musculaires tout en agissant contre une fatigue rapide des muscles. Les réglages standard des paramètres de stimulation et les consignes de mise en place des électrodes sont indiqués dans les tableaux des programmes TENS, EMS et MASSAGE ci-après. 36 6.2 Programmes TENS Progr. Zones d’application n° judicieuses, indications 1 + 11 2 + 12 3 + 13 4 + 14 5 + 15 6 + 16 Emplacement Cycle 1 possible des Cycle 5 électrodes Lar- Frégeur quence (Hz) Douleurs dans la nuque, 01, 02, 13 250 4 céphalée de tension 250 6 Douleurs dorsales 03, 04, 05, 250 6 06, 15, 23 250 10 Douleurs dans les 07, 14 250 2 épaules Douleurs liées à Voir remar- 250 60 l’arthrite rhumatismale que Douleurs lombaires 22 250 80 250 70 Douleurs menstruelles 08 250 40 7 + 17 Programme douleur I Cycle 2 Cycle 6 Lar- FréOff On Time Time geur quence (Sec.) (Sec.) (Hz) 30 0 250 4 20 0 250 6 30 0 250 6 20 0 250 10 10 0 250 4 Cycle 3 Cycle 7 Lar- FréOff On Time Time geur quence (Sec.) (Sec.) (Hz) 30 0 250 5 20 0 250 8 30 0 250 8 20 0 8 0 250 6 Cycle 4 Cycle 8 Lar- FréOff On Time Time geur quence (Sec.) (Sec.) (Hz) 30 0 250 5 30 0 250 8 20 0 250 8 6 0 20 0 250 70 20 0 250 80 30 0 250 20 4 30 0 0 0 250 250 250 80 65 45 20 4 30 0 0 0 250 75 4 0 250 55 30 250 250 250 6 10 50 30 30 5 Voir remarque 09, 10 250 250 250 4 8 40 30 30 5 0 0 0 250 250 250 4 8 6 20 20 10 0 0 0 9 + 19 Programme douleur II Voir remarque 250 75 0,25 0,25 250 2 0,5 0 10 + 20 Programme douleur III Voir remarque (synchro- 250 100 0,25 0,25 8 + 18 Douleurs au genou, Douleurs de la cheville, blessures de la capsule (synchronisé) On Time (Sec.) 30 30 20 Off Time (Sec.) 0 0 0 80 30 0 250 10 20 0 0 250 60 30 0 0 0 0 250 250 6 10 20 20 0 0 nisé) On-Time (Sec.) = Durée d’activation du cycle en secondes (contraction) – Off-Time (Sec.) = Durée de désactivation du cycle en secondes (relâchement) Remarque : Les électrodes doivent encercler la zone douloureuse. En présence de groupes musculaires douloureux, les électrodes sont groupées autour du muscle concerné. En cas de douleurs articulaires, l’articulation doit être entourée d’électrodes, à l’avant et à l’arrière, à droite comme à gauche, à condition que la distance entre les électrodes le permette. La distance minimale entre les électrodes ne doit pas être inférieure à 5 cm ni être supérieure à 15 cm. Tenez compte des figures 9 et 10 applicables au genou et à la cheville. Les programmes synchronisés sont adaptés à tous les endroits à traiter avec un modèle de signaux variable (pour une accoutumance aussi réduite que possible). 37 6.3 Programmes EMS Progr. Zones d’application n° judicieuses, indications 1 + 11 Musculature de l’épaule 2 + 12 Trapèzes moyen et inférieur, muscle grand dorsal, musculature de la nuque 3 + 13 Musculature dorsale proche de la colonne vertébrale prog. I 4 + 14 Muscles de la face antérieure et postérieure du bras (entre autres biceps), muscles de la face antérieure et postérieure de l’avant-bras 5 + 15 Muscles abdominaux droits et obliques 6 + 16 Musculature dorsale proche de la colonne vertébrale prog. II 7 + 17 Musculature dorsale proche de la colonne vertébrale prog. III 8 + 18 Muscles fessiers Emplacement Cycle 1 possible des Cycle 5 électrodes Lar- Frégeur quence (Hz) 07, 14 250 30 Cycle 2 Cycle 6 On Off Lar- FréTime Time geur quence (Sec.) (Sec.) (Hz) 5 1 250 10 Cycle 3 Cycle 7 On Off Lar- FréTime Time geur quence (Sec.) (Sec.) (Hz) 15 1 250 50 Cycle 4 Cycle 8 On Off Lar- Fré- On Off Time Time geur quence Time Time (Sec.) (Sec.) (Hz) (Sec.) (Sec.) 5 1 01, 02, 03, 04, 05, 12, 15 03, 06, 22, 23 250 4 30 1 250 4 20 1 250 6 30 1 250 6 20 1 250 2 10 1 250 4 10 16, 17, 18, 19 250 4 30 1 250 4 250 5 30 1 11, 20, 21 250 6 15 1 250 03, 06, 22, 23 250 2 20 1 03, 06, 22, 23 250 4 30 250 8 30 24 250 20 250 250 9 + 19 Muscles avant et arrière de 25, 26 la cuisse 10 + 20 Muscles avant et arrière de 27, 28 la jambe 250 5 30 1 250 5 20 1 1 250 6 10 1 30 1 250 4 30 1 250 5 30 1 8 15 1 250 10 15 1 250 2 20 1 250 1 30 1 250 1 30 1 1 250 4 20 1 250 6 1 250 8 20 1 30 1 250 6 20 1 5 1 250 6 5 1 250 30 5 1 20 5 1 250 6 8 1 250 25 5 1 25 5 1 250 6 8 1 250 35 5 1 On-Time (Sec.) = Durée d’activation du cycle en secondes (contraction) – Off-Time (Sec.) = Durée de désactivation du cycle en secondes (relâchement) 38 6.4 Programmes MASSAGE Progr. n° 1 2 3 4 5 6 7 8 9 10 plus la force de stimulation des tissus diminue. Cela signifie que si vous optez pour une distance importante entre les électrodes, le volume sera plus grand mais la stimulation sera moins importante. Pour augmenter la stimulation, vous devrez alors augmenter l’intensité des impulsions. La directive suivante s’applique pour le choix de la distance entre les électrodes : • Distance la plus judicieuse : env. 5 à 15 cm • Au-dessous de 5 cm, les structures superficielles primaires sont fortement stimulées. • Au-dessus de 15 cm, les structures profondes et s’étendant sur des surfaces importantes sont très faiblement stimulées. Rapport des électrodes avec le cours des fibres musculaires Le choix du sens de circulation du courant doit être adapté à la disposition des fibres du muscle suivant la couche musculaire souhaitée. Pour atteindre les muscles superficiels, il convient de placer les électrodes parallèlement aux fibres musculaires (p. 2, fig. 16 ; 1A-1B/2A-2B). En revanche, si les tissus en profondeur sont visés, les électrodes doivent être placées perpendiculairement aux fibres (p. 2, fig. 16 ; 1A-2A/1B-2B). Dans le dernier cas, les électrodes peuvent par exemple être disposées en croix (= transversalement), par exemple p. 2, fig. 16 ; 1A2B/2A-1B. Affectation des canaux : Canal 1 (CH1) : connecteur gauche, touche de bascule du régulateur d‘intensité gauche, affichage d’intensité des impulsions gauche (CH1). Canal 2 (CH2) : connecteur droit, touche de bascule du régulateur d‘intensité droit, affichage d’intensité des impulsions droit (CH2). i Lors du traitement de la douleur (TENS) au moyen du TENS/EMS numérique et de ses 2 canaux à réglage séparé et de leurs 2 électrodes autoadhésives, il est conseillé de disposer les électrodes d’un canal de sorte que le point douloureux se situe entre les électrodes. Sinon, placez une électrode directement sur le point douloureux et les autres électrodes à au moins 2 ou 3 cm de ce point. Les électrodes du deuxième canal peuvent être utilisées pour le traitement simultané d’autres points douloureux mais aussi avec les électrodes du premier canal pour cerner la zone douloureuse (situées de l’autre côté). Une disposition en croix est alors à nouveau judicieuse. Forme de massage Massage par percussion et effleurage Massage par pétrissage et effleurage Massage par percussion Massage du tranchant de la main/par pression Massage du tranchant de la main/par pression Massage par vibration Massage par percussion (changement entre les électrodes) Jet de massage (changement entre les électrodes) Jet de massage par pression (changement entre les électrodes) Programme combiné (changement entre les électrodes) Placez les électrodes de sorte qu’elles encerclent les segments musculaires concernés. Pour une efficacité optimale, la distance entre les électrodes ne doit pas être supérieure à env. 15 cm. Les électrodes ne doivent pas être utilisées sur la paroi thoracique antérieure. Cela signifie qu’il ne faut pas utiliser l’appareil pour masser le grand pectoral gauche/droit. 6.5 Consignes de mise en place des électrodes Pour obtenir l’effet escompté de la stimulation, il est important de placer les électrodes de manière judicieuse. Nous vous recommandons de définir les positions optimales des électrodes dans la zone d’application souhaitée avec votre médecin. Les emplacements des électrodes proposés à l’intérieur de la jaquette sont indiqués à titre de référence (figures 1 à 28). Les remarques suivantes s’appliquent lors du choix de l’emplacement des électrodes : Distance entre les électrodes Plus la distance choisie entre les électrodes est grande, plus le volume de tissu stimulé sera grand. Cela s’applique à la surface et à la profondeur du volume de tissu. De même, plus la distance entre les électrodes est grande, 39 • A l’aide des touches UP/DOWN, choisissez ensuite le temps de traitement total et validez avec ENTER (Fig. 3, par exemple durée du traitement 30 minutes). L’appareil se trouve en veille (Fig. 4). • Pour commencer la stimulation, appuyez sur MARCHE/ ARRET. L’affichage de l’état de fonctionnement commence à changer (Fig. 5). • Choisissez l’intensité d’impulsion la plus agréable pour vous au moyen de la touche CH 1+/CH 2+. L’affichage de l’intensité d’impulsion varie en conséquence. i Conseil relatif à la fonction massage : pour un traitement optimal, utilisez toujours les 4 électrodes. i Pour prolonger la durée de vie des électrodes, utilisez-les sur une peau propre, si possible sans poils et non grasse. Si nécessaire, nettoyez la peau à l’eau et épilez-la avant l’application. i Si une électrode s’enlève pendant l’utilisation, l’intensité des impulsions des deux canaux passera au minimum. Appuyez sur la touche MARCHE/ ARRET pour passer en mode pause, remettez l’électrode en place, appuyez de nouveau sur la touche MARCHE/ARRET pour reprendre l’utilisation et réglez l’intensité d’impulsion souhaitée. 7.3 Procédure pour les programmes TENS/EMS 11 à 20 (programmes individuels) 7. Utilisation 7.1 Remarques relatives à l’utilisation Fig. 3 Fig. 4 Fig. 5 Les programmes 11 à 20 sont des programmes préréglés personnalisables. Vous pouvez ici régler la fréquence d’impulsion. • Dans les tableaux de programmes, choisissez un programme adapté à vos objectifs. • Placez les électrodes dans la zone visée et raccordez-les à l’appareil. Pour cela, aidez-vous des emplacements suggérés correspondants. • Pour mettre l’appareil en marche, appuyez sur la touche MARCHE/ARRET. • Pour naviguer parmi les sous-menus (TENS/EMS/MASSAGE), appuyez sur la touche MENU et validez votre choix avec ENTER (Fig. 1, par exemple écran TENS). • A l’aide des touches UP/DOWN, choisissez le programme Fig. 1 souhaité et validez avec ENTER (Fig. 2, par exemple écran TENS N°11). • A l’aide des touches UP/DOWN, choisissez la fréquence souhaitée (Hz) pour le cycle 1 et validez avec ENTER (Fig. 3). Fig. 2 Recommencez l’opération pour tous les autres cycles. • S’il n’est pas utilisé pendant 3 minutes, l’appareil s’arrête automatiquement (système de désactivation automatique). Lors de sa remise en marche, le menu principal s’affiche sur l’écran à cristaux liquides et le dernier sous-menu utilisé clignote. • Si vous appuyez sur une touche autorisée, un bref signal sonore retentit. Si vous appuyez sur une touche non autorisée, l’appareil émet deux signaux sonores brefs. 7.2 Déroulement des programmes 01 à 10 TENS, EMS et MASSAGE (démarrage rapide) • Dans les tableaux de programmes, choisissez un programme adapté à vos objectifs. • Placez les électrodes dans la zone visée et raccordez-les à l’appareil. Pour cela, aidez-vous des emplacements suggérés correspondants. • Pour mettre l’appareil en marche, appuyez sur la touche MARCHE/ARRET. • Pour naviguer parmi les sous-menus (TENS/EMS/ MASSAGE), appuyez sur la touche MENU et validez votre Fig. 1 choix avec ENTER (Fig. 1, par exemple écran TENS). • A l’aide des touches UP/DOWN, choisissez le programme souhaité et validez avec ENTER (Fig. 2, par exemple écran programme TENS N°01). • Pour terminer le réglage des fréquences, réglez la fréquence (Hz) du dernier cycle nécessaire sur « --0 » et appuyez Fig. 3 sur ENTER. Toutes les fréquences réglées pour les cycles ultérieurs seront automatiquement réglées sur « 0 » et ne seront pas prises en compte. i Bon à savoir : Maintenez la touche ENTER enfoncée pendant 2 secondes afin de sauter le réglage des fréquences et de passer directement Fig. 2 40 7.5 Doctor’s Function au réglage du temps de traitement. Si vous avez besoin des 8 cycles, appuyez également pendant 2 secondes sur la touche ENTER pour quitter la sélection du réglage des fréquences. • A l’aide des touches UP/DOWN, choisissez ensuite le temps de traitement souhaité et validez avec ENTER (Fig. 4, par exemple durée du traitement 30 minutes). Fig. 4 • L’appareil se trouve en veille (Fig. 5). • Pour commencer la stimulation, appuyez sur MARCHE/ ARRET. L’affichage de l’état de fonctionnement commence à clignoter (Fig. 6). • Choisissez l’intensité des impulsions la plus agréable pour Fig. 5 vous au moyen de la touche CH 1+/CH 2+. L’affichage de l’intensité des impulsions varie en conséquence. i Remarque : Tous vos réglages personnalisés sont enregis- Fig. 6 trés et seront appelés automatiquement lors de la sélection suivante. La Doctor’s Function est un réglage spécial permettant d’appeler votre programme personnel de manière encore plus simple et ciblée. Votre programme personnalisé est appelé en état de veille dès la mise en marche de l’appareil et il suffit d’appuyer sur la touche MARCHE/ARRET pour l’activer. Ce programme individuel peut par exemple être réglé sur les conseils de votre médecin. Avec la Doctor’s Function, seule l’intensité des impulsions peut être modifiée pendant le traitement par stimulation. Tous les autres paramètres et programmes du TENS/EMS numérique sont le cas échéant bloqués et ne peuvent pas être modifiés ni appelés. Réglage de la Doctor’s Function : • Choisissez votre programme et les réglages correspondants comme décrit au paragraphe 7.2 ou 7.3. • Avant d’activer le programme au moyen de la touche MARCHE/ARRET, appuyez simultanément sur les touches MARCHE/ARRET et CH 2+ et maintenez-les enfoncées pendant env. 5 secondes. L’enregistrement dans la Doctor’s Function est confirmé par un long signal sonore. Suppression de la Doctor’s Function : Pour débloquer l’appareil et pouvoir à nouveau accéder à d’autres programmes, appuyez simultanément sur les touches MARCHE/ARRET et CH 2+ et maintenez-les enfoncées pendant env. 5 secondes (impossible pendant la stimulation). La suppression de la Doctor’s Function est confirmée par un long signal sonore. 7.4 Modification des réglages Modification de l’intensité (pendant l’utilisation) • CH1+/- et CH2+/- : Modification de l’intensité par canal • Touche DOWN : réduction de l’intensité des deux canaux Interruption de la stimulation Appuyez sur la touche MARCHE/ARRET. Pour reprendre l’utilisation, appuyez une nouvelle fois sur cette touche. Désactivation de tout un canal Appuyez sur la touche CH- jusqu’à ce que le canal atteigne l’intensité minimale puis maintenez la touche enfoncée jusqu’à ce que le canal ne s’affiche plus à l’écran. Pour réactiver le canal, maintenez la touche CH+ correspondante enfoncée. 8. Nettoyage et conservation Electrodes auto-adhésives : • Pour que les électrodes conservent leur adhérence le plus longtemps possible, nettoyez-les soigneusement avec un chiffon non pelucheux humide. • Après utilisation, collez de nouveau les électrodes sur leur film de support. Nettoyage de l’appareil : • Avant tout nettoyage, retirez les piles de l’appareil. • Après chaque utilisation, nettoyez l’appareil avec un chiffon doux légèrement humide. S‘il est très sale, vous pouvez utiliser un chiffon humecté d‘une lessive de savon légère. Modification de l’utilisation (tous les paramètres ou quelques paramètres) • MARCHE/ARRET : Interruption de la stimulation • MENU : retour à la fenêtre de sélection du programme ou au menu principal • Réglage des paramètres souhaités. Validez avec ENTER. MARCHE/ARRET pour poursuivre l’utilisation. 41 10. Problèmes/remèdes • Veillez à ce que l‘eau ne pénètre pas dans l‘appareil. Si cela se produisait, ne réutilisez pas l‘appareil avant qu’il soit entièrement sec. • Pour le nettoyage, ne vous servez pas d‘agent de nettoyage chimique ni de produit abrasif. Conservation : • Si vous ne comptez pas l’utiliser avant longtemps, retirez les piles de l’appareil. Des piles qui fuient peuvent endommager l’appareil. • Ne pliez pas trop les cordons de raccordement ni les électrodes. • Débranchez les cordons de raccordement des électrodes. • Après utilisation, collez de nouveau les électrodes sur leur film de support. • Rangez l’appareil dans un lieu bien ventilé, à l’abri de la chaleur. • Ne posez pas d’objets lourds sur l’appareil. L’appareil ne se met pas en marche quand j’appuie sur la touche MARCHE/ARRET. Que faire ? (1) Vérifiez que les piles ont été mises en place correctement et font contact. (2) Si nécessaire, remplacez les piles. (3) Contactez le service après-vente. Les électrodes ne collent pas bien. Que faire ? (1) Nettoyez la surface adhésive des électrodes avec un chiffon non pelucheux humide. Ensuite, laissez-les sécher à l’air libre et remettez les électrodes en place. Si les électrodes n’adhèrent toujours pas, remplacez-les. (2) Avant chaque utilisation, nettoyez la peau. N’utilisez pas d’onguents ni d’huiles de soin avant le traitement. Le fait de se raser peut augmenter l’adhérence des électrodes. L’appareil émet des signaux sonores anormaux pendant le traitement. Que faire ? (1) Observez l’écran. Un canal clignote-t-il ? Appuyez sur la touche MARCHE/ARRET pour interrompre le programme. Vérifiez que les cordons d’alimentation sont bien raccordés aux électrodes. Vérifiez que les électrodes sont bien en contact avec la zone de traitement. (2) Assurez-vous que la fiche du cordon d’alimentation est bien raccordée à l’appareil. (3) Si les signaux sonores retentissent toujours alors que le canal clignote, remplacez le câble de raccordement. (4) Le symbole des piles clignote à l’écran. Remplacez toutes les piles. Aucune stimulation sensible n’est produite. Que faire ? (1) Si un signal d’avertissement retentit, exécutez les opérations décrites ci-dessus. (2) Appuyez sur la touche MARCHE/ARRET pour redémarrer le programme. (3) Vérifiez l’emplacement des électrodes et vérifiez que les électrodes autoadhésives ne se chevauchent pas. (4) Augmentez progressivement l’intensité des impulsions. (5) Les piles sont quasiment déchargées. Remplacez-les. 9. Elimination Les piles et les batteries usagées et complètement déchargées doivent être mises au rebut dans des conteneurs spéciaux ou aux points de collecte réservés à cet usage ou déposées chez un revendeur d‘appareils électriques. La législation vous oblige d‘éliminer les piles. Remarque: Ces marquages figurent sur les piles contenant des substances toxiques : Pb = pile contenant du plomb, Cd = pile contenant du cadmium, Hg = pile contenant du mercure. Veuillez éliminer l’appareil suivant la directive relative aux vieux appareils électriques et électroniques 2002/96/EC – WEEE (Waste Electrical and Electronical Equipment). Pour toute question, veuillez vous adresser aux autorités de la commune compétentes pour le traitement des déchets. 42 Vous avez une sensation désagréable au niveau des électrodes. Que faire ? (1) Les électrodes sont mal placées. Vérifiez leur position et remettez-les en place si nécessaire. (2) Les électrodes sont usées. Elles ne garantissent plus une répartition uniforme du courant sur toute la surface et peuvent provoquer des irritations cutanées. Remplacez-les. La peau est rouge dans la zone du traitement. Que faire ? Interrompez immédiatement le traitement et attendez que la peau ait retrouvé son état normal. Si la rougeur sous l’électrode disparaît rapidement, il n’y a aucun danger et cette rougeur est due à la circulation sanguine plus importante au niveau local. Si l’irritation persiste et provoque des démangeaisons ou une inflammation, consultez votre médecin avant toute nouvelle utilisation. Il se peut qu’il s’agisse d’une allergie à la surface adhésive. L’agrafe de ceinture ne tient pas en place. Que faire ? Si l’agrafe est fixée à la ceinture avant d’être appliquée sur l’appareil, elle ne peut pas tenir. Prenez l’appareil dans la main. Appliquez l’agrafe de ceinture au dos de l’appareil. L’enclenchement audible et sensible de l’agrafe indique que celle-ci est positionnée correctement. Fixez à présent de nouveau l’appareil avec l’agrafe à la ceinture. Dimensions : Poids : Explication des signes : 122 x 59 x 23 mm (avec agrafe de ceinture) 69 g (sans les piles), 108 g (avec l’agrafe de ceinture et les piles) Pièce d’application type BF Attention ! Lire le mode d’emploi. Remarque : S’il est utilisé d’une manière non conforme aux indications, l’appareil ne pourra pas fonctionner parfaitement ! Sous réserve de modifications à des fins d’amélioration et d’évolution du produit. Cet appareil est conforme aux normes européennes EN60601-1, EN60601-1–2 et EN60601-2-10 et est soumis aux mesures de précaution particulières en matière de compatibilité électromagnétique. Veuillez noter que les dispositifs de communication HF portables et mobiles sont susceptibles d’influer sur cet appareil. Pour des détails plus précis, veuillez contacter le service après-vente à l‘adresse ci-dessous. L’appareil correspond aux exigences de la directive européenne sur les produits médicaux 93/42/EC et à la loi sur les produits médicaux. Conformément à « l’ordonnance sur les produits médicaux 93/42/EC», des contrôles techniques réguliers doivent être effectués si l’appareil est utilisé à des fins professionnelles ou commerciales. Y compris en cas d’utilisation privée, nous vous recommandons de demander au fabricant de procéder à un contrôle technique tous les 2 ans. 11. Données techniques Nom et modèle : EM 41 Forme des courbes de départ : impulsions angulaires biphasiques Durée d’impulsion : 40-250 µs Fréquence d’impulsion : 1-120 Hz Tension de sortie : max. 90 Vpp (à 500 ohms) Courant de sortie : max. 180 mApp (à 500 ohms) Alimentation électrique : 3x piles AAA Temps de traitement : réglage possible entre 5 et 90 minutes Intensité : réglage possible entre 0 et 15 Conditions d’utilisation :10 °C à 40 °C (50 °F à 104 °F) à une humidité relative comprise entre 30 et 85% Conditions de stockage :-10 °C à 50 °C (14 °C à 122 °F) à une humidité relative comprise entre 10 et 95% 43 Estimados clientes: Español Es un placer para nosotros que usted haya decidido adquirir un producto de nuestra colección. Nuestro nombre es sinónimo de productos de alta y calidad estrictamente controlada en los campos de energía térmica, peso, presión sanguínea, temperatura del cuerpo, pulso, terapias suaves, masaje y aire. Sírvase leer las presentes instrucciones para el uso detenidamente; guarde el manual para usarlo ulteriormente; póngalo a disposición de otros usuarios y observe las instrucciones. Indice 1.Para conocer el producto .....................................................................44 1.1 ¿Qué es el Digital TENS/EMS y cuál es su función?.........................44 1.2 Volumen de suministro.......................................................................45 2.Indicaciones importantes......................................................................46 3.Parámetros de corriente.......................................................................48 3.1 Forma de impulso..............................................................................48 3.2 Frecuencia de impulso.......................................................................48 3.3 Anchura de impulso...........................................................................48 3.4 Intensidad de impulso........................................................................48 3.5 Variación de los parámetros de impulso con mando por ciclo ..........48 4.Descripción del aparato........................................................................49 4.1 Denominación de componentes........................................................49 4.2 Funciones de los botones..................................................................49 5.Puesta en operación..............................................................................49 6.Descripción de programas....................................................................50 6.1 Informaciones fundamentales ............................................................50 6.2 Programas TENS................................................................................51 6.3 Programas EMS.................................................................................52 6.4 Programas MASSAGE.......................................................................53 6.5 Indicaciones para posicionar los electrodos......................................53 7.Aplicación ...............................................................................................54 7.1 Indicaciones para la aplicación ..........................................................54 7.2 Secuencia de los programas 01-10 TENS, EMS y MASSAGE..........54 7.3 Secuencia de los programas TENS/EMS 11 hasta 20 (prog. ind.) ....54 7.4 Modificaciones de los ajustes ...........................................................55 7.5 Función Doctor ..................................................................................55 8.Limpieza y almacenamiento .................................................................55 9.Eliminación de desechos......................................................................56 10.Problemas y sus soluciones.................................................................56 11.Datos técnicos.......................................................................................57 Les saluda cordialmente Su equipo Beurer 1. Para conocer el producto 1.1 ¿Qué es el Digital TENS/EMS y cuál es su función? EL Digital TENS/EMS pertenece al grupo de electroestimuladores. El aparato ofrece tres funciones básicas que pueden utilizarse combinadas entre sí: 1. Electroestimulación de las vías nerviosas (TENS) 2. Electroestimulación de los tejidos musculares (EMS) 3. Un efecto de masaje generado por señales eléctricas. Para este efecto, el aparato está provisto de dos canales de estimulación independientes y de cuatro electrodos autoadhesivos. El aparato ofrece funciones de múltiple aplicación para aumentar el bienestar general, para aliviar dolores, para conservar la buena constitución física, para el relajamiento, para la revitalización de los músculos y para reducir la fatiga. Vd. puede seleccionarlas en programas preajustados o bien puede definirlas Vd. mismo según sus propias necesidades. El principio de acción de los electroestimuladores se basa en la imitación de los impulsos propios del cuerpo, los cuales se transmiten a través de la piel mediante electrodos hacia las fibras nerviosas, respectivamente fibras musculares. Para este efecto es posible colocar los electrodos en numerosas partes del cuerpo; los estímulos eléctricos son inofensivos y prácticamente no producen dolor. Durante determinadas aplicaciones siente Vd. solamente un suave hormigueo o una suave vibración. Los impulsos eléctricos que penetran al tejido influyen en la transmisión de la excitación a las vías nerviosas así como a los ganglios nerviosos y grupos de músculos en la región de aplicación. 44 El efecto de la electroestimulación se aprecia normalmente después de una repetida aplicación periódica del aparato. Si bien, la electroestimulación muscular no reemplaza el entrenamiento periódico del músculo, ella complementa prácticamente el efecto del entrenamiento. lado es posible activar un fortalecimiento directo de los músculos (aplicación activadora) y por otro lado es posible obtener un efecto de laxitud y de recuperación (aplicación relajadora). La aplicación activadora se compone de: • Un entrenamiento muscular para aumentar la capacidad de resistencia y/o • Un entrenamiento muscular para apoyar el fortalecimiento de determinados músculos o grupos de músculos a fin de realizar las modificaciones deseadas de las proporciones corporales. La aplicación relajadora se compone de: • Un relamiento de los músculos para aflojar las esclerosis musculares • Una reducción de la aparición de fatigas musculares • Una aceleración de la regeneración muscular después de grandes esfuerzos musculares (por ejemplo, después de carreras de maratón) El Digital TENS/EMS ofrece además, con la tecnología integrada de masajes, la posibilidad de eliminar las crispaciones musculares y de reducir la aparición de fatigas, mediante un programa cuyo resultado se basa en la percepción y efecto de un masaje real. Basándose en las posiciones propuestas y en las tablas de programas contenidas en las presentes instrucciones de uso, podrá Vd. determinar rápida y fácilmente la aplicación correspondiente (según la región afectada del cuerpo) y el ajuste respectivo del aparato, para el resultado pretendido. Gracias a sus dos canales de ajuste separado, el Digital TENS/EMS ofrece la ventaja de poder adaptar la intensidad de los impulsos independientemente uno del otro en dos partes del cuerpo a tratar, por ejemplo, para tratar ambos lados del cuerpo o bien para estimular grandes superficies de tejido simultáneamente. El ajuste individual de intensidad de cada canal permite a Vd. además tratar simultáneamente dos partes diferentes del cuerpo, redu ciendo así el tiempo de la aplicación respecto al tratamiento secuencial. Bajo TENS, la estimulación nerviosa transcutánea, se entiende la electroestimulación nerviosa a través de la piel. TENS constituye un eficiente método comprobado clínicamente, libre de medicamentos y exento de efectos secundarios, siempre que se aplique correctamente y está autorizado tanto para el tratamiento de dolores con una determinada causa como también para un simple tratamiento propio. El efecto analgésico, respectivamente supresivo, se obtiene, entre otros, mediante el bloqueo de la transmisión del dolor en las fibras nerviosas (se trata aquí sobre todo de impulsos de alta frecuencia) y el aumento de la secreción de las endorfinas propias del cuerpo, las cuales reducen la sensibilidad al dolor gracias a su efecto en el sistema nervioso central. Este método fue comprobado científicamente y autorizado medicinalmente. Todo cuadro clínico para el cual la aplicación de TENS sería razonable, debe ser aclarado por el médico que lleva a cabo su tratamiento. El médico dará a Vd. además las instrucciones necesarias para la aplicación de su propio tratamiento TENS. TENS fue comprobado y autorizado clínicamente para las siguientes aplicaciones: • Dorsalgias, especialmente para dolores en las vértebras lumbares y cervicales • Artralgias (por ejemplo, articulación de las rodillas, de las caderas, hombro) •Neuralgias • Dolores de cabeza • Trastornos menstruales de las mujeres • Dolores después de lesiones en el aparato locomotor • Dolores durante trastornos circulatorios • Dolores crónicos con diversas causas La electroestimulación muscular (EMS) es un método muy difundido y de aceptación general que es aplicado ya largos años en la medicina deportiva y en la medicina de rehabilitación. EMS se aplica en el sector de deportes y gimnasia entre otros, para complementar el entrenamiento convencional de los músculos permitiendo así aumentar la capacidad funcional de grupos musculares y adaptar las proporciones corporales a los resultados estéticos pretendidos. La aplicación de EMS está orientada en dos direcciones. Por un 1.2 Volumen de suministro – – – – – 45 1x aparato Digital TENS/EMS (incl. presilla para el cinturón) 2x cable de unión 4x electrodos autoadhesivos (45 x 45 mm) 3x pilas tipo AAA el presente manual de instrucciones – 1x instrucción breve (sugerencias para posicionar los electrodos y descripción de campos de aplicación) – 1x bolsa para guardar el aparato Artículos de repuesto Cinturón lumbar con 4 electrodos que no se estropean al contacto con el agua, n.º mat. 162.825 8x electrodos autoadhesivos (45 x 45 mm), N° de art. 661.02 4x electrodos autoadhesivos (50 x 100 mm), N° de art. 661.01 • En la zona del cuello / arteria carótida • En la zona genital • En regiones de la piel con afecciones agudas o crónicas (piel lesionada o inflamada) (por ejemplo inflamaciones dolorosas o no dolorosas, enrojecimientos, exantemas (por ejemplo, alergias), quemaduras, contusiones, hinchazones y heridas abiertas o heridas en proceso curativo, en cicatrices de operaciones que están en proceso curativo) • En entornos con humedad excesiva, como por ejemplo, en el baño, bañera o ducha • No utilizar después del consumo de alcohol • Si se está conectado al mismo tiempo a un equipo de cirugía de alta frecuencia. En los siguientes casos, sírvase consultar al médico que lleva a cabo el tratamiento, antes de aplicar el aparato: • Enfermedades agudas, especialmente si se sospechan o se presentan hipertensiones arteriales, coagulopatías, tendencia a trastornos trombo embólicos así como neogénesis malignas • Todo tipo de dermatopatías • Dolores crónicos no aclarados, independientemente de la región afectada del cuerpo •Diabetes • Todo tipo de disestesias con una sensibilidad reducida al dolor (por ejemplo, trastornos metabólicos) • Aplicación simultánea con otros tratamientos médicos • Afecciones causadas por el tratamiento de estimulación • Irritaciones persistentes de la piel debidas a una estimulación prolongada en el mismo lugar de colocación de electrodo 2. Indicaciones importantes La aplicación del aparato no sustituye la consulta ni el tratamiento médicos. Por esta razón, en caso de dolores o enfermedades consulte siempre en primer lugar a su médico. ADVERTENCIA Para prevenir daños a la salu,d recomendamos apremiantemente prescindir de la aplicación del Digital TENS/EMS en los siguientes casos: • Aparatos eléctricos implantados (por ejemplo, marcapasos cardíacos) • Implantes metálicos • En personas con bomba de insulina • Fiebre alta (por ejemplo > 39 °C) • Trastornos conocidos o agudos del ritmo cardíaco y otros trastornos del seno cardíaco y de la conducción de la excitación en el corazón • Padecimiento de ataques (por ejemplo, epilepsia) •Embarazos •Carcinosis • Después de operaciones en que el proceso de curación puede verse restringido por las contracciones musculares reforzadas • No debe llevarse a cabo una aplicación en las vecindades del corazón los electrodos de estimulación no deben posicionarse en lugares anteriores del pecho (regiones de las costillas y esternón), especialmente sobre ambos músculos pectorales mayores. aquí puede aumentar el riesgo de aleteo ventricular y puede llevar a un paro cardíaco • En el cráneo óseo, en la zona bucal, en la zona faríngea o laríngea ¡ATENCION! Utilizar el Digital TENS/EMS exclusivamente: • En personas • Para la finalidad definida en su desarrollo y en la forma especificada en el presente manual de instrucciones. Cualquier uso inadecuado/incorrecto puede significar peligro • Para aplicaciones exteriores • Con las piezas accesorias originales adjuntas y adquiribles ulteriormente, de los contrario caducará el derecho a garantía 46 PRECAUCIONES: • No confundir los contactos de los cables de los electrodos con los contactos de auriculares o de otros aparatos y no conectar los electrodos con otros aparatos. • No usar este aparato al mismo tiempo con otros aparatos que entregan impulsos eléctricos al cuerpo. • No usar el aparato cerca de substancias y gases fácilmente inflamables o de substancias explosivas. • No utilizar pilas recargables y utilizar siempre pilas del mismo tipo. • Llevar a cabo las primeras aplicaciones sentado o tendido a fin de evitar peligros innecesarios de lesiones en los raros casos de reacciones vagales (sensación de debilidad). Si se produce una sensación de debilidad, desconectar inmediatamente el aparato y elevar las piernas (más o menos 5-10 minutos). • No es recomendable untar la piel con cremas o ungüentos grasosos, porque aumentaría considerablemente el desgaste de los electrodos, además podrían producirse desagradables puntas de corriente. Daños • En casos de dudas, no utilice el aparato si está dañado y consulte a su distribuidor o bien a uno de los servicios postventa cuyas direcciones han sido indicadas. • Controle el aparato por si presenta señales de desgaste o daños. Si usted encuentra tales señales o bien si el aparato ha sido utilizado de forma inadecuada, deberá llevarlo al fabricante o al proveedor antes de utilizarlo nuevamente. • Desconecte inmediatamente el aparato, si está defectuoso o si presenta fallas de operación. • ¡Nunca trate usted mismo de abrir y/o reparar el aparato! Encargue las reparaciones del aparato exclusivamente al servicio postventa o a los comerciantes autorizados. Si se abre el aparato, caducará la garantía. • El fabricante rechazará toda responsabilidad por daños y perjuicios causados por un uso inadecuado o incorrecto. Informaciones sobre ESD (descarga electrostática) Sírvase observar que no deben tocarse los enchufes hembra pro vistos de un rótulo de advertencia ESD. • Retirar siempre los electrodos de la piel jalando moderadamente, para evitar lesiones en raros casos de una piel extremadamente sensible. • Mantener el aparato alejado de fuentes de calor y no usarlo en la cercanía (~1 m) de aparatos de onda corta o microondas (por ejemplo, teléfonos celulares), ya que de otra manera podrían causarse desgradables corrien tes de punta. • No exponer el aparato a la luz solar directa ni a temperaturas altas. • Proteger el aparato contra polvo, suciedad y humedad. Nunca sumergir el aparato en el agua ni en otros líquidos. • El aparato es apto para ser aplicado por el paciente mismo. • Por razones de higiene, los electrodos deben usarse solamente con una persona. • Si el aparato no funcionara correctamente o produjera malestares o dolores, interrumpa la aplicación inmediatamente. • Antes de retirar o cambiar la posición de los electrodos, desconectar el aparato, respectivamente el canal correspondiente, para evitar así estimulaciones no deseadas. • No alterar los electrodos (por ejemplo, cortándolos). Esto podría conducir a mayores densidades de corriente y podría ser peligroso No alterar los electrodos (por ejemplo, cortándolos). Esto podría conducir a mayores densidades de corriente y podría ser peligroso (valor de salida máximo recomendado para los electrodos: 9 mA/cm2, una densidad efectiva de corriente mayor que 2 mA/cm² requiere una mayor atención). • Nunca aplicar el aparato durante el sueño ni durante el manejo de vehículos o de máquinas. • No aplicar el aparato durante cualquier actividad en que una reacción imprevista (por ejemplo, una contracción muscular reforzada a pesar de una baja intensidad) pudiera llegar a ser peligrosa. • Durante la estimulación tomar cuidado que no haya objetos metálicos, tales como hebillas de cinturones o collares, que pudieran entrar en contacto con los electrodos. Si Vd. lleva joyas o piercings en la zona de aplicación (por ejemplo, un piercing en el ombligo), será necesario retirarlos antes de aplicar el aparato, ya que de lo contrario podrían producirse quemaduras puntuales. • Mantener el aparato alejado de los niños a fin de prevenir eventuales situaciones peligrosas. 47 3.3 Anchura de impulso Medidas de protección contra ESD: –¡No tocar con los dedos los enchufes macho/hembra que están provistos del rótulo de advertencia ESD! – ¡No tocar con las herramientas de manejo manual los enchufes macho/ hembra que están provistos del rótulo de advertencia ESD! Para recibir explicaciones más detalladas respecto al rótulo de advertencia ESD así como respecto a posibles cursos de adiestramiento y a sus contenidos, sírvase consultar a nuestro servicio postventa. La anchura de impulso define la duración de un impulso en microsegundos. La anchura de impulso es, entre otros, determinante para la profundidad de penetración de la corriente. En general puede decirse que: una mayor masa muscular requiere una mayor anchura de impulso. Anchura de impulso 3.4 Intensidad de impulso El ajuste del grado de intensidad se orienta individualmente según la sensibilidad subjetiva de cada usuario y está definida por numerosas magnitudes, tales como el lugar de aplicación, circulación cutánea, espesor de la piel así como la calidad del contacto de los electrodos. El ajuste práctico debe ser eficiente, sin embargo, nunca debe conducir a sensaciones desagradables, tales como dolores en el lugar de aplicación. Mientras que un leve hormigueo indica que la energía de estimulación es suficiente, deben evitarse todos los ajustes que conducen a dolores. Si se trata de una aplicación prolongada, puede ser necesario un reajuste debido a los procesos de adaptación de tiempos en el lugar de aplicación. 3. Parámetros de corriente Los electroestimuladores trabajan con los siguientes ajustes de corriente, los cuales tienen diferentes influjos sobre el efecto de la estimulación de acuerdo con el ajuste respectivo: 3.1 Forma del impulso Intensidad de impulso impulso monofásicas Describe la función de tiempo de la corriente de excitación. Aquí se diferencia entre corrientes de impulso Tiempo monofásicas y bifásicas. En las corrientes de impulso monofásicas la corriente fluye en una sola dirección, mientras impulso bifásicas que en las corrientes de impulso bifásicas la corriente de excitación cambia de dirección. El Digital TENS/EMS está provisto exclusivamente de corrientes de impulso bifásicas, porque estas descargan los músculos, reducen la fatiga muscular y la aplicación resulta más segura. 3.5 Variación de los parámetros de impulso con mando por ciclo En muchos casos es necesario cubrir mediante varios parámetros de impulso, la totalidad de la estructura de tejido en el lugar de aplicación. Esta cobertura se obtiene en el Digital TENS/EMS gracias a que los programas existentes llevan a cabo automáticamente una modificación cíclica de los parámetros de impulso. De esta manera se evita también la fatiga de grupos individuales de músculos en el lugar de aplicación. El Digital TENS/EMS ofrece pre-ajustes efectivos de los parámetros de corriente. Vd. tiene siempre la posibilidad de modificar la intensidad del impulso durante la aplicación y en determinados programas puede Vd. además modificar previamente la frecuencia de impulso a fin de adaptar la aplicación al modo más agradable y prometedor para Vd. 3.2 Frecuencia de impulso La frecuencia especifica la cantidad de impulsos por seTiempo de período gundo y la unidad es Hz (hertzio). La frecuencia se calcula a base del valor inverso del período. La frecuencia respectiva determina cuales tipos de fibras musculares reaccionan de preferencia. Las fibras de reacción lenta reaccionan más bien a las frecuencias de impulso bajas de hasta 15 Hz, las fibras de reacción rápida reaccionan a su vez a partir de 35 Hz más o menos. Si los impulsos son de 45-70 Hz, se produce una tensión permanente en el músculo y la fatiga muscular es más rápida. Por esta razón se prefiere aplicar frecuencias de impulso más altas para el entrenamiento rápido de fuerza y de fuerza máxima. 48 4. Descripción del aparato (3) Desconectar el aparato presionando prolongadamente (aprox. 3 segundos) y (1) Selección de (A) programa de tratamiento, (B) frecuencia y (C) tiempo de tratamiento (2) Con el botón DOWN se reduce la intensidad de impulso para ambos canales durante la estimulación. MENU (1) Navegación entre los submenús TENS, EMS y MASSAGE (2) Retorno a (A) ventana de selección de programa o a (B) menú principal ENTER (1) Selección del menú (2) Confirmación de una selección hecha con UP/DOWN, excepto la intensidad del canal CH1+, CH1-, CH2+, CH2Ajuste de la intensidad de impulso A 4.1 Denominación de componentes Pantalla (menú principal): B A Intensidad del impulso B Números de programa/ciclo C C Frecuencia (Hz) D D Nivel bajo de carga de pilas E Menús TENS/EMS/MASSAGE e F Función de temporizador (indicación del tiempo restante) G Indicación del estado operativo Botones: a a Botones de selección UP (arriba) y b DOWN (abajo) b Botón de confirmación ENTER c Botón ON/OFF d Botón MENU e Botones de intensidad CH1+, CH1-, CH2+, CH2Accesorios: • 2x cable de conexión • 4x electrodos auto adhesivos (45 x 45 mm) • 1x presilla para el cinturón E F G e c d 5. Puesta en operación 1. Quitar del aparato la presilla del cinturón, si está colocada. 2.Presionar la tapa del compartimento de las pilas en lado trasero del aparato y desplazarla hacia un lado. 3.Colocar 3 pilas de tipo alcalino AAA de 1,5 V. Es imprescindible observar que las pilas sean colocadas correctamente de acuerdo con la polaridad indicada en los aparatos. 4.Colocar cuidadosamente la tapa para cerrar el compartimento de pilas. (Fig. 1) 5.Conectar el cable de unión a los electrodos. (Fig. 2) i Indicación: Para facilitar efectivamente la conexión, los electrodos está provistos con cierres de clip. 4.2 Funciones de los botones Cada vez que se acciona un botón se escucha un tono que señaliza la confirmación, para evitar que se presione un botón por error. Este tono señalizador no puede desconectarse. ON/OFF (1) Para conectar el aparato presionar brevemente este botón. Si el botón se mantiene presionado 10 segundos, el aparato se desconectará automáticamente. (2) Interrupción del tratamiento de estimulación pulsando brevemente = modo de pausa 49 Fig. 1 Fig. 2 6. Descripción de programas 6.1. Informaciones fundamentales El Digital TENS/EMS está provisto en total de 50 programas: • 20 programas TENS • 20 programas EMS • 10 programas MASSAGE Todos los programas ofrecen la posibilidad de ajustar separadamente la intensidad de impulso para cada uno de ambos canales. Además, Vd. puede también modificar en ambos programas TENS y EMS 11-20 la frecuencia de impulso de cada ciclo, a fin de adaptar el efecto de la estimulación a la estructura del lugar de aplicación. Los ciclos constituyen las secuencias que forman un programa. Los ciclos son procesados automáticamente uno tras del otro aumentando la eficiencia de la estimulación en los diferentes tipos de fibras musculares y previniendo así una rápida fatiga de los músculos. Los ajustes standard de los parámetros de estimulación y las indicaciones para posicionar los electrodos se encuentran en las siguientes tablas de programas para TENS, EMS y MASSAGE. 50 6.2 Programas TENS N° de progr. Campos de aplicación e Posible indicaciones adecuados posicionamiento de electrodos Ciclo 1 Ciclo 2 Ciclo 3 Ciclo 4 Ciclo 5 Ciclo 6 Ciclo 7 Ciclo 8 An chura (µs) 1 + 11 Dolores de la nuca, 01, 02, 13 250 cefalea psíquica 250 2 + 12 Dorsalgias 03, 04, 05, 06, 250 15, 23 250 3 + 13 Dolores de los hombros 07, 14 250 Frecuencia (Hz) 4 6 6 10 2 On Time (seg.) 30 20 30 20 10 Off Time (seg.) 0 0 0 0 0 An chura (µs) 250 250 250 250 250 Frecuencia (Hz) 4 6 6 10 4 On Time (seg.) 30 20 30 20 8 Off Time (seg.) 0 0 0 0 0 An chura (µs) 250 250 250 Frecuencia (Hz) 5 8 8 On Time (seg.) 30 30 20 Off Time (seg.) 0 0 0 250 6 6 0 4 + 14 Doloresa causados por Véase nota la artritis reumatoidea 5 + 15 Afecciones lumbares 22 250 60 20 0 250 70 20 0 250 80 30 250 250 250 80 70 40 20 4 30 0 0 0 250 250 250 80 65 45 20 4 30 0 0 0 250 75 250 250 250 250 4 8 40 30 30 5 0 0 0 250 250 250 4 8 6 20 20 10 0 0 0 250 250 250 250 75 0,25 0,25 250 2 0,5 0 250 100 0,25 0,25 6 + 16 Afecciones menstruales 08 7 + 17 Programa paliativo I Véase nota 8 + 18 Afecciones de las rodi 09, 10 llas, tobillos, lesiones capsulares 9 + 19 Programa paliativo II Véase nota (Burst) 10 + 20 Programa paliativo III Véase nota (Burst) An chura (µs) 250 250 250 Frecuencia (Hz) 5 8 8 On Time (seg.) 30 30 20 Off Timae (seg.) 0 0 0 0 250 80 30 0 4 0 250 10 20 0 55 30 0 250 60 30 0 6 10 50 30 30 5 0 0 0 250 250 6 10 20 20 0 0 On-Time (seg.) = tiempo de ciclo de conexión en segundos (contracción) – Off-Time (seg.) = tiempo de ciclo de desconexión en segundos (relajación) Indicación: La posición de los electrodos debe encerrar la zona afectada por los dolores. Si los dolores afectan grupos de músculos, los electrodos deben posicionarse alrededor de los músculos respectivos. Tratándose de dolores que afectan articulaciones, los electrodos deben posicionarse alrededor de la parte anterior y posterior de la articulación y si las distancias de los electrodos lo permiten, deben posicionarse también en los lados izquierdo y derecho de la articulación. La distancia entre los electrodos no debe ser menor que 5 cm ni mayor que 15 cm. Observar las ilustraciones 9 y 10 que se refieren a las articulaciones de la rodilla y tobillo. Los programas Burst son apropiados para todas las regiones que deben ser tratadas con señales alternantes (para reducir a un mínimo posible la habituación). 51 6.3 Programas EMS N° de Campos de aplicación e Posible Ciclo 1 progr. indicaciones adecuados posiciona-miento Ciclo 5 de electrodos An Frecuchura encia (µs) (Hz) 1 + 11 Musculatura del hombro 07, 14 250 30 2 + 12 Musculatura trapezoide media e inferior, músculo dorsal ancho, musculatura cervical 3 + 13 Musculatura dorsal en la zona vertebral progr. I 4 + 14 Musculatura anterior y posterior del brazo (entre otros, los bíceps), musculatura anterior y posterior del antebrazo 5 + 15 Musculatura de pared abdominal recta y oblícua 6 + 16 Musculatura dorsal en la zona vertebral progr. II 7 + 17 Musculatura dorsal en la zona vertebral progr. III 8 + 18 Musculatura glútea 01, 02, 03, 04, 05, 12, 15 Ciclo 2 Ciclo 3 Ciclo 6 Ciclo 7 Ciclo 4 Ciclo 8 On Time (seg.) 5 Off Time (seg.) 1 An chura (µs) 250 Frecuencia (Hz) 10 On Time (seg.) 15 Off Time (seg.) 1 An chura (µs) 250 Frecuencia (Hz) 50 On Time (seg.) 5 Off An Frecu- On Off Time chura encia Time Time (seg.) (µs) (Hz) (seg.) (seg.) 1 250 5 30 1 250 4 30 1 250 4 20 1 250 6 30 1 250 6 20 1 03, 06, 22, 23 250 2 10 1 250 4 10 1 250 6 10 1 16, 17, 18, 19 250 4 30 1 250 4 30 1 250 4 30 1 250 5 30 1 11, 20, 21 250 6 15 1 250 8 15 1 250 10 15 1 03, 06, 22, 23 250 2 20 1 250 2 20 1 250 1 30 03, 06, 22, 23 250 250 250 4 8 20 30 30 5 1 1 1 250 250 250 4 8 6 20 20 5 1 1 1 250 6 250 250 20 5 1 250 6 8 1 250 25 5 1 250 6 8 1 24 9 + 19 Musculatura femoral 25, 26 anterior y posterior 10+20 Musculatura anterior y 27, 28 posterior de la pantorrilla 250 5 20 1 250 5 30 1 1 250 1 30 1 30 1 250 6 20 1 30 5 1 250 25 5 1 250 35 5 1 On-Time (seg.) = tiempo de ciclo de conexión en segundos (contracción) – Off-Time (seg.) = tiempo de ciclo de desconexión en segundos (relajación) 52 6.4 Programas MASSAGE N° de progr. 1 2 3 4 5 6 7 8 9 10 del tejido disminuye al aumentar la distancia de los electrodos; en otras palabras: si se selecciona una distancia mayor de electrodos, se estimula un volumen mayor, pero la estimulación del volumen es más débil. Para reforzar la estimulación es necesario entonces aumentar la intensidad de impulso. Como pauta para seleccionar la distancia de electrodos rige lo siguiente: • Distancia más conveniente: aproximadamente entre 5 y 15 cm • A distancias bajo 5 cm se estimulan en primer lugar fuertemente las estructuras superficiales • A distancias sobre 15 cm se estimulan muy débilmente estructuras profundas y de gran superfice Referencia de los electrodos respecto a la orientación de las fibras musculares La selección de la dirección del flujo de la corriente debe adaptarse al recorrido de las fibras musculares de la capa muscular que queremos trabajar. Si se desea estimular músculos superficiales, los electrodos deben colocarse paralelamente a las fibras (véase 2, fig. 16; 1A-1B/2A-2B), mientras que si se desea estimular capas de tejido profundas, los electrodos deben colocarse transversalmente a las fibras (véase 2, fig. 16; 1A-2A/1B-2B). Esto último puede realizarse p. ej., colocando los electrodos en cruz (= transversal), véase 2, fig.16; 1A-2B/2A-1B. Forma del masaje Masaje por golpeteo y prensión Masaje por amasamiento y prensión Masaje por golpeteo Masage con canto de mano y compresión Masage con canto de mano y compresión Masaje vibratorio Masaje por golpeteo (cambio entre electrodos) Chorro de masaje (cambio entre electrodos) Chorro de masaje por compresión (cambio entre electrodos) Programa combinado (cambio entre electrodos) El posicionamiento de los electrodos debe escogerse de manera tal que encierre los segmentos musculares afectados. Para obtener un efecto óptimo, la distancia de los electrodos no debe superar los 15 cm aproximadamente. No debe llevarse a cabo una aplicación de los electrodos en la pared torácica anterior; es decir, debe evitarse el masaje en los músculos pectorales mayores dereco e izquierdo. Asignación de los canales: Canal 1 (CH1): Conexión a la izquierda, regulador de intensidad-botón basculante a la izquierda, indicador de la intensidad del impulso a la izquierda (CH1). Canal 2 (CH2): Conexión a la derecha, regulador de intensidad-botón basculante a la derecha, indicador de la intensidad del impulso a la derecha (CH2). i Para el tratamiento del dolor (TENS) mediante Digital TENS/EMS con sus 2 canales de ajuste separado, cada uno con 2 electrodos autoadhesivos, se recomienda colocar los electrodos de un canal de manera tal que el punto doloroso quede entre los electrodos o bien se posiciona un electrodo directamente sobre el punto doloroso y el otro a una distancia de por lo menos 2-3 cm. Los electrodos del otro canal pueden usarse al mismo tiempo para tratar otros puntos dolorosos o bien en combinación con los electrodos del primer canal para encerrar la zona dolorosa (en posición opuesta). Aquí es razonable aplicar nuevamente la conexión en cruz. i Consejos para la aplicación de la función de masaje: Para un tratamiento óptimo usar siempre los cuatro electrodos. 6.5 Indicaciones para posicionar los electrodos Un posicionamiento favorable de los electrodos es importante para obtener el éxito pretendido de la aplicación de una estimulación. Recomendamos a Vd. consultar a su médico a fin de determinar las posiciones óptimas de los electrodos en la zona de aplicación pretendida. En el reverso de la tapa del presente manual se encuentran sugerencias para posicionar los electrodos (figuras 1-28). Para seleccionar la posición de los electrodos observar las siguientes indicaciones: Distancia de los electrodos Cuanto mayor es la distancia de los electrodos, tanto mayor es el volumen de tejido estimulado. Esto rige tanto para la superficie como para la profundidad del volumen del tejido. No obstante, la intensidad de la estimulación 53 • Presionar ON/OFF, para iniciar el tratamiento de estimulación. Ahora comienza a cambiar la indicación del status de operación (Fig. 5). • Seleccione la intensidad de impulso más agradable para Vd. presionando el botón CH 1+/CH 2+. La indicación de intensidad de impulso se adapta al valor actual correspondiente. i Para prolongar la vida útil de los electrodos, utilícelos sobre la piel libre de cabellos y grasa. En caso necesario, lavar la piel con agua y eliminar el cabello antes de iniciar la aplicación. i Si durante la aplicación se aflojara un electrodo, la intensidad de impulso se ajusta automáticamente al grado mínimo en ambos canales. Presionar el botón ON/OFF para acceder al modo de pausa, posicionar nuevamente los electrodos y reanudar la aplicación presionando nuevamente el botón ON/ OFF; ajustar ahora la intensidad de impulso deseada. Fig. 4 Fig. 5 7.3 Secuencia de los programas TENS/EMS 11 hasta 20 (programas individuales) 7. Aplicación 7.1 Indicaciones para la aplicación Los programas 11 hasta 20 son programas preajustados, que Vd. puede individualizar adicionalmente. Vd. tiene aquí la posibilidad de ajustar la frecuencia de impulso. • Seleccione Vd. en las tablas de programas un programa adecuado para sus aplicaciones. • Posicionar los electrodos en la zona de aplicación y conectarlos al aparato. Para este efecto puede Vd. tomar en cuenta las posiciones sugeridas correspondientes. • Presionar el botón ON/OFF, para conectar el aparato. • Presionar MENU para navegar entre los submenús (TENS/EMS/MASSAGE) y confirmar la selección mediante ENTER. (Fig. 1, ejemplo) indicación de pantalla TENS) Fig. 1 • Mediante los botones UP/DOWN seleccionar el programa deseado y luego confirmar con ENTER (Fig. 2, ejemplo indicación de pantalla programa TENS N° 11). • Seleccionar con los botones UP/DOWN la frecuencia deFig. 2 seada (Hz) para el ciclo 1 y confirmarla con ENTER (Fig. 3). Repetir este proceso para todos los ciclos ulteriores. • Para finalizar el ajuste de frecuencia, ajustar la frecuencia (Hz) del ciclo requerido en último lugar al valor »--0« y Fig. 3 presionar ENTER, todos los ajustes de frecuencia de los ciclos ulteriores se ajustan automáticamente al valor “0”, quedando así suprimidos. i Consejo: Mantener presionado el botón ENTER durante 2 segundos, para sobrepasar los ajustes de frecuencia y acceder al ajuste de tiempos de tratamiento. Si Vd. requiere los 8 ciclos completos, finalice la selección • Si el aparato no se usa durante 3 minutos, se desconectará automáticamente (desconexión automática). Al conectar nuevamente el aparato en la pantalla LCD se visualiza el menú principal y el submenú usado en último lugar parpadea. • Si se presiona un botón admisible, se escucha un breve tono, si el botón presionado no es admisible, se escuchan dos tonos breves. 7.2 Secuencia de los programas 01-10 TENS, EMS y MASSAGE (arranque rápido) • Seleccione Vd. en las tablas de programas un programa adecuado para sus aplicaciones. • Posicionar los electrodos en la zona de aplicación y conectarlos al aparato. Para este efecto puede Vd. tomar en cuenta las posiciones sugeridas correspondientes. • Presionar el botón ON/OFF, para conectar el aparato. • Presionar MENU para navegar entre los submenús (TENS/ EMS/MASSAGE) y confirmar la selección mediante ENTER. Fig. 1 (Fig. 1, ejemplo) indicación de pantalla TENS) • Mediante los botones UP/DOWN seleccionar el programa deseado y luego confirmar con ENTER (Fig. 2, ejemplo indicación de pantalla programa TENS N° 01). Fig. 2 • Mediante los botones UP/DOWN seleccionar el tiempo total de tratamiento y luego confirmar con ENTER (Fig. 3, ejemplo duración de tratamiento 30 minutos). El aparato se encuentra en estado de espera (Fig. 4). Fig. 3 54 7.5 Función de Doctor del ajuste de frecuencia también manteniendo presionado el botón ENTER durante 2 segundos. • Mediante los botones UP/DOWN seleccionar el tiempo de tratamiento deseado y luego confirmarlo con ENTER (Fig. 4, ejemplo duración de tratamiento 30 minutos). Fig. 4 • El aparato se encuentra en estado de espera (Fig. 5). • Presionar ON/OFF, para iniciar el tratamiento de estimulación. Ahora comienza a parpadear la indicación del status de operación (Fig. 6). • Seleccione la intensidad de impulso más agradable para Fig. 5 Vd. presionando el botón CH 1+/CH 2+. La indicación de intensidad de impulso se adapta al valor actual correspondiente. i Indicación: Ahora se almacenan los ajustes de programas Fig. 6 individualizados, para ser activados automáticamente al efectuarse la próxima selección. La función Doctor es un ajuste especial que Vd. puede usar para activar con mayor facilidad aún y directamente su programa de aplicación personal. El ajuste del programa individual se activa inmediatamente después de conmutarse el estado de espera y presionando brevemente el botón ON/OFF. El ajuste de este programa individual puede tener lugar, por ejemplo, según el consejo del médico. Con la función Doctor es posible modificar solamente la intensidad de impulso durante el tratamiento por estimulación. En este caso, está bloqueado el acceso a todos los otros parámetros y programas del Digital TENS/EMS, siendo imposible modificarlos o activarlos. Ajuste de la función Doctor: • Seleccione Vd. su programa y los ajustes correspondientes tal como se describe en los puntos 7.2 y 7.3. • Antes de activar el programa presionando el botón ON/OFF, mantener presionados simultáneamente ambos botones ON/OFF y CH 2+ durante 5 segundos. El almacenamiento en la función Doctor queda confirmado por el largo tono de señalización. Borrar la función Doctor: Para liberar nuevamente el aparato y poder acceder a los otros programas, mantener presionados ambos botones ON/OFF y CH 2+ otra vez durante 5 segundos aproximadamente (esto no es posible durante la estimulación). El borrado de la función Doctor queda confirmado por el largo tono de señalización. 7.4 Modificaciones de los ajustes Variazione dell’intensità (durante l’applicazione) • CH1+/- y CH2+/-: Modificación de la intensidad en cada canal • Botón DOWN : se reduce la intensidad en ambos canales Interrupción de la estimulación Pulsar el botón ON/OFF. Si se presiona nuevamente el botón, se reanudará la aplicación. Desconexión de un canal completo Presionar el botón CH- hasta que el canal llegue a la intensidad mínima, luego mantener presionado el botón hasta que el canal desaparezca de la pantalla. Mantener presionado el respectivo botón CH+ para reactivar el canal. Modificar la aplicación (completa o sólo algunos parámetros) • ON/OFF: Interrupción de la estimulación • MENU: retorno a la ventana de selección de programas, respectivamente al menú principal •Ajustar los parámetros deseados. Confirmar el ajuste con ENTER. Presionar ON/OFF para reanudar la aplicación. 8. Limpieza y almacenamiento Electrodos autoadhesivos: • Para asegurar una adherencia lo más duradera posible, es conveniente limpiar cuidadosamente los electrodos con un paño húmedo y sin pelusas. • Una vez finalizada la aplicación, pegar los electrodos nuevamente en la lámina de almacenamiento. Limpieza del aparato: • Retire usted las pilas del aparato antes de cada limpieza. • Después del uso, limpie el aparato con un paño suave, ligeramente humedecido. Si el aparato está demasiado sucio, puede usted también humedecer el paño en una ligera jabonadura. 55 Los electrodos se sueltan del cuerpo. ¿Qué se debe hacer? (1) Limpiar la superficie adherente de los electrodos con un paño húmedo y sin pelusas. A continuación dejar que se sequen al aire y colocarlos nuevamente. Si a pesar de todo los electrodos no se adhieren firmemente a la piel, deberán ser cambiados. (2) Antes de iniciar toda aplicación, limpiar la piel y no untarla con bálsamos ni aceites de limpieza antes del tratamiento. Un afeitado de la piel puede aumentar la vida útil de los electrodos. El aparato emite tonos de señalización anormales durante el trata miento. ¿Qué se debe hacer? (1) Observar la pantalla, ¿está parpadeando uno de los canales? En caso afirmativo, interrumpir el programa presionando el botón ON/ OFF. Controlar ahora la correcta conexión de los cables de unión de los electrodos. Asegurarse que los electrodos tengan un firme contacto con la zona de tratamiento. (2) Asegurarse que el enchufe de conexión de cables esté enchufado firmemente al aparato. (3) Si el aparato continúa emitiendo los tonos de señalización con el canal parpadeante, cambiar el cable de unión. (4) La pantalla visualiza una señal de pila parpadeante. Cambiar todas las pilas. La estimulación del aparato es imperceptible. ¿Qué se debe hacer? (1) Si se escucha un tono de señalización, llevar a cabo los pasos de trabajo descritos anteriormente. (2) Presionar el botón ON/OFF para iniciar nuevamente el programa. (3) Controlar el posicionamiento de los electrodos y observar que los electrodos autoadhesivos no estén traslapados. (4) Aumentar paso a paso la intensidad de impulso. (5) Las pilas están prácticamente agotadas. Cambiar las pilas. Vd. percibe una sensación desagradable en el lugar de los electrodos. ¿Qué se debe hacer? (1) Los electrodos están mal posicionados. Controlar el posicionamiento y en caso dado, llevar a cabo nuevamente el posicionamiento. (2) Los elecrodos están desgastados. Los electrodos pueden causar irritaciones de la piel debido a que ya no pueden garantizar una distribución • Tome cuidado que no penetre agua al aparato. Si a pesar de las precauciones hubiera penetrado agua al aparato, antes de usarlo esperar que se haya secado completamente. • Para la limpieza nunca utilice detergentes químicos ni polvos para fregar. Almacenamiento: • Sacar las pilas del aparato, si éste no se utilizará durante un espacio de tiempo prolongado. Si las pilas tienen fugas, se podría dañar el aparato. • No doblar demasiado los cables de conexión y los electrodos. • Separar los cables de conexión de los electrodos. • Una vez finalizada la aplicación, pegar los electrodos nuevamente sobre la lámina de almacenamiento. • Guardar el aparato en un lugar frío y ventilado. • No depositar objetos pesados sobre el aparato. 9. Eliminación de desechos Las pilas normales y las pilas recargables agotadas y completamente descargadas deben ser eliminadas en los depósitos especialmente marcados para este efecto, en los puntos de recepción de basura especial o bien en las tiendas de artículos eléctricos. Conforme a la ley, usted está obligado a desechar las pilas en una de las formas anteriormente descritas. Nota: Los siguientes símbolos se encuentran en las pilas que contienen substancias tóxicas: Pb = esta pila contiene plomo, Cd = esta pila contiene cadmio, Hg = esta pila contiene mercurio. Sírvase eliminar los desechos del aparato de acuerdo con la Prescripción para la Eliminación de Desechos de Aparatos Eléctricos y Electrónicos en Desuso 2002/96/EC – WEEE („Waste Electrical and Electronic Equipment“). En caso de dudas o consultas sírvase dirigirse a las autoridades competentes para la eliminación de desechos. 10. Problemas y sus soluciones El aparato no se conecta después de presionar el botón ON/OFF. ¿Qué se debe hacer? (1) Asegurarse que las pilas estén colocadas correctamente y que tengan contacto. (2) En caso necesario, cambiar las pilas. (3) Consultar al servicio postventa. 56 de la corriente uniforme y en toda la superficie. Por esta razón, cambiar los electrodos. La piel se enrojece en el lugar de tratamiento. ¿Qué se debe hacer? Interrumpir inmediatamente el tratamiento y esperar que se haya normalizado el estado de la piel. Un enrojecimiento bajo los electrodos que desaparece rápidamente de la piel es inofensivo y es causado por la circulación de sangre estimulada en ese lugar. Pero si la irritación de la piel permanece y produce además, eventualmente una comezón o inflamamiento, será necesario consultar al médico antes de reanudar la aplicación. La causa posible podría ser una alergia a la superficie de adhesión. La presilla para el cinturón se suelta. ¿Qué se debe hacer? Si se coloca la presilla en el cinturón antes de colocar el aparato, la sujeción de la presilla será insuficiente. Por esta razón, tomar el aparato en la mano. Colocar la presilla del cinturón en el lado trasero del aparato. La presilla queda colocada correctamente, si Vd. escucha y percibe el enclavamiento. Fijar ahora nuevamente el aparato junto con la presilla al cinturón. Explicación de los símbolos: Pieza de aplicación tipo BF ¡Atención! Leer las instrucciones de uso. Indicación: Si el aparato se usa fuera de las especificaciones mencionadas, será imposible garantizar un correcto funcionamiento. Reservados todos los derechos a modificaciones para mejorar y perfeccionar el producto. Este aparato cumple con lo estipulado en las normas europeas EN60601-1 y EN60601-1-2 así como EN60601-2-10 y cumple además con las medidas especialmente estipuladas respecto a la compatibilidad electromagnética. Para este efecto sírvase considerar que los equipos de comunicación HF portátiles y móviles pueden influir en la función de este aparato. Para requerir informaciones más detalladas puede Vd. dirigirse a la dirección de servicio postventa indicada más abajo El aparato cumple con los requerimientos estipulados en la directriz europea para productos médicos 93/42/EC, la así llamada Ley de Productos Médicos. Si se utiliza para fines comerciales o económicos, el aparato deberá ser sometido a controles periódicos de técnica de medición conforme al »Decreto de Gestión para Productos Médicos« Recomendamos someter el aparato también a controles de técnica de medición cada 2 años, si el aparato se usa en el sector privado. 11. Datos técnicos Nombre y tipo: EM 41 Forma de la curva de salida: Impulsos rectangulares bifásicos Duración de impulso: 40-250 µs Frecuencia de impulso: 1-120 Hz Tensión de salida: máx. 90 Vpp (a 500 ohmios) Corriente de salida: máx. 180 mA (a 500 ohmios) Alimentación de tensión: 3x pilas tipo AAA Duración del tratamiento: ajustable de 5 hasta 90 minutos Intensidad: ajustable de 0 hasta 15 Condiciones de operación: 10 °C-40 °C (50 °F-104 °F) a una humedad atmosférica relativa de 30-85% Condiciones de almacenamiento:-10 °C-50 °C (14 °F-122 °F) a una humedad atmosférica relativa de 10-95% Dimensiones: 122 x 59 x 23 mm (incl. presilla para el cinturón) Peso: 69 g (sin pilas) , 108 g (incl. presilla para el cinturón y pilas) 57 Gentile cliente, Italiano siamo lieti che abbia scelto un prodotto della nostra gamma. Il nostro nome è sinonimo di prodotti di alta qualità continuamente sottoposti a controlli nei settori del calore, del peso, della pressione sanguigna, della temperatura corporea, delle pulsazioni, della terapia dolce, del massaggio e dell’aria. La preghiamo di leggere attentamente le presenti istruzioni, di conservarle per un’eventuale consultazione successiva, di metterle a disposizione di altri utenti e di osservare le avvertenze ivi riportate. Sommario 1.Note introduttive....................................................................................58 1.1 Che cos’è e cosa può fare il Digital TENS/EMS?..............................58 1.2 Stato della fornitura ...........................................................................59 2.Avvertenze importanti ..........................................................................60 3.Parametri della corrente .......................................................................61 3.1 Forma dell’impulso .............................................................................62 3.2 Frequenza di stimolazione.................................................................62 3.3 Ampiezza di impulso..........................................................................62 3.4 Intensità di impulso/stimolazione ......................................................62 3.5 Variazione dei parametri di stimolazione guidata ciclicamente..........62 4.Descrizione dell’apparecchio...............................................................63 4.1 Designazione dei componenti ...........................................................63 4.2 Funzioni dei tasti................................................................................63 5.Messa in servizio....................................................................................63 6.Panoramica dei programmi ..................................................................64 6.1 Informazioni fondamentali .................................................................64 6.2 Programmi TENS...............................................................................65 6.3 Programmi EMS.................................................................................66 6.4 Programmi di MASSAGE...................................................................67 6.5 Indicazioni sulla collocazione degli elettrodi......................................67 7.Modalità d’uso........................................................................................68 7.1 Indicazioni sulla modalità d’uso.........................................................68 7.2 Svolgimento per i programmi 01-10 TENS, EMS e MASSAGE.........68 7.3 Svolgimento per i programmi TENS/EMS 11-20 (prog. pers.) ..........68 7.4 Modifica delle impostazioni...............................................................69 7.5 Doctor’s Function ..............................................................................69 8.Pulizia e custodia...................................................................................69 9.Smaltimento...........................................................................................70 10.Problemi/Rimedi ai problemi................................................................70 11.Specifiche tecniche ..............................................................................71 Cordiali saluti Il Suo team Beurer 1. Note introduttive 1.1 Che cos’è e cosa può fare il Digital TENS/EMS? Il Digital TENS/EMS appartiene al gruppo degli elettrostimolatori. Esso contiene tre funzioni fondamentali che possono essere combinate fra di loro. 1. L’elettrostimolazione transcutanea del nervo (TENS) 2. L’elettrostimolazione del tessuto muscolare (EMS) 3. Un effetto massaggiante provocato da segnali elettrici. Inoltre l’apparecchio dispone di due canali di stimolazione indipendenti e di quattro elettrodi autoadesivi. Esso offre molteplici funzioni applicabili per aumentare il senso di benessere generale, lenire i dolori, mantenere il fitness corporeo, rilassare, rivitalizzare i muscoli e combattere la stanchezza. La scelta dell’applicazione può essere effettuata da programmi preimpostati oppure definita in funzione delle proprie necessità personali. Il principio di azione degli elettrostimolatori è basato sulla riproduzione degli impulsi del proprio corpo che, con l’ausilio elettrodi, vengono trasmessi alle fibre nervose e muscolari attraverso la pelle. Gli elettrodi possono essere collocati in molte parti del corpo, gli stimoli elettrici sono innocui e praticamente indolori. In alcune applicazioni particolari si percepisce solo un dolce formicolio o una lieve vibrazione. Gli impulsi elettrici inviati al tessuto influenzano la trasmissione dello stimolo nei conduttori nervosi, nei nodi nervosi e nei gruppi muscolari nell’area di applicazione. L’effetto dell’elettrostimolazione è riconoscibile normalmente solo dopo applicazione ripetuta regolarmente. L’elettrostimolazione non sostituisce l’allenamento regolare dei muscoli, ma ne coadiuva l’effetto. 58 Quando si parla di TENS, (Stimolazione Elettrica Transcutanea del Nervo), si intende la stimolazione elettrica dei nervi attraverso la pelle. TENS è un metodo efficace, non-farmacologico, comprovato clinicamente e, se applicato correttamente, esente da effetti collaterali, approvato per la terapia di dolori indotti da determinate cause, e che può essere praticato anche come autotrattamento. L’effetto calmante e inibente sulla percezione del dolore viene realizzato, tra l’altro, grazie all’inibizione della trasmissione del dolore nelle fibre nervose (soprattutto tramite impulsi ad alta frequenza) e a ll’incremento del rilascio delle endorfine del proprio corpo che, grazie al loro effetto nel sistema nervoso centrale, riducono la sensibilità al dolore. Il metodo è comprovato scientificamente e accettato dai medici. Ogni quadro patologico laddove è consigliato il ricorso alla TENS deve essere chiarito e valutato dal medico curante. Egli potrà fornire anche informazioni fondate sui benefici specifici dell’autotrattamento TENS. La TENS è testata clinicamente e autorizzata per le seguenti applicazioni: •Dolori dorsali, in particolare lombalgie e disturbi della colonna vertebrale cervicale • Dolori articolari (ad es. articolazioni del ginocchio e dell’anca, spalle) •Neuralgie • Mal di testa/emicranie • Dolori mestruali nelle donne • Dolori causati da lesioni dell’apparato motorio • Dolori dovuti a disfunzioni dell’irrorazione sanguigna • Dolori cronici imputabili a svariati fattori. L’elettrostimolazione muscolare (EMS) è un metodo molto diffuso e generalmente riconosciuto che viene applicato ormai da anni nella medicina sportiva e riabilitativa. Nel settore sportivo e del fitness l’EMS viene utilizzata, tra l’altro, per coadiuvare efficacemente l’allenamento muscolare tradizionale con lo scopo di aumentare la performance di gruppi di muscoli e ottenere i risultati estetici desiderati adeguando le proporzioni corporee. L’applicazione dell’EMS si svolge in due direzioni. Da un lato essa può mirare al potenziamento della muscolatura (applicazione attivante) e, d’altro lato, produrre un effetto distensivo e decontratturante (applicazione rilassante). L’applicazione attivante comprende: • Allenamento dei muscoli per conferire una maggiore resistenza alla fatica e/o • Allenamento dei muscoli per coadiuvare il potenziamento di determinati muscoli o gruppi di muscoli e ottenere le modifiche desiderate delle proporzioni corporee. L’applicazione rilassante comprende: • Rilassamento dei muscoli per sciogliere le contrazioni muscolari • Miglioramento dei sintomi di stanchezza muscolare • Accelerazione della rigenerazione muscolare dopo grandi prestazioni muscolari (ad es. dopo una maratona). Il Digital TENS/EMS, grazie alla sua tecnologia di massaggio integrata e un programma adattato in sensazione ed effetto al massaggio reale, offre inoltre la possibilità di eliminare le contrazioni muscolari e combattere i sintomi di stanchezza muscolare. Le proposte di posizionamento e le tabelle dei programmi contenute in questo manuale di istruzioni consentono di determinare velocemente e facilmente l’impostazione dell’apparecchio in funzione dell’applicazione scelta (a seconda dell’area corporea interessata) e dell’effetto previsto. I due canali impostabili separatamente sull’elettrostimolatore Digital TENS/ EMS permettono di usufruire del vantaggio di poter adattare l’intensità degli impulsi in due diverse aree corporee da trattare, indipendentemente l’una dall’altra, ad esempio per coprire i due lati del corpo o stimolare uniformemente vaste aree tessutali. L’impostazione individuale dell’intensità di ogni canale consente inoltre di trattare contemporaneamente due parti diverse del corpo con conseguente risparmio di tempo rispetto ad un trattamento singolo sequenziale. 1.2 Stato di fornitura – – – – – – 1 elettrostimolatore Digital TENS/EMS (incl. clip da cintura) 2 cavo di connessione 4 elettrodi adesivi (45 x 45 mm) 3 batterie AAA il presente manuale tecnico di istruzione 1 guida rapida (proposte per la collocazione degli elettrodi e le aree di applicazione) – 1 astuccio di custodia 59 Articoli di acquisto garantito Cintura lombare con 4 elettrodi di contatto con acqua resistenti all‘usura, cod. art. 162.825 8 elettrodi adesivi (45 x 45 mm), art. n. 661.02 4 elettrodi adesivi (50 x 100 mm), art. n. 661.01 • In ambienti con elevata umidità come ad es. la stanza da bagno o durante il bagno o la doccia. • Non utilizzare dopo il consumo di bevande alcoliche • Con una contemporanea connessione ad un apparecchio chirurgico ad alta frequenza. Prima di utilizzare l’apparecchio consultare il proprio medico curante nei casi seguenti: • Malattie acute, in particolare in caso di sospetta ipertonia o in presenza di ipertensione, disfunzione della coagulazione del sangue, tendenza a malattie tromboemboliche e in presenza di neoformazioni maligne • Tutte le malattie cutanee • Dolori cronici non chiariti, indipendentemente dall’area corporea interessata •Diabete • Tutte le disfunzioni della sensibilità con ridotta sensibilità al dolore (ad es. disturbi del metabolismo) • Trattamenti medici in corso • Disturbi sorti con la terapia di stimolazione • Irritazioni persistenti della pelle causate da stimolazioni prolungate sullo stesso sito di collocazione dell’elettrodo. 2. Avvertenze importanti L’uso dell’apparecchio non sostituisce la consultazione medica e il trattamento medico. Per ogni tipo di dolore o malattia consultare quindi sempre in primo luogo il proprio medico! AVVERTENZA! Per prevenire eventuali danni alla salute, nei casi seguenti si sconsiglia vivamente l’applicazione del Digital TENS/EMS: • In portatori di dispositivi elettrici impiantati (come ad es. pacemaker) • In presenza di impianti metallici • Nei portatori di pompa per insulina • Con febbre alta (ad es. > 39 °C) • In presenza di aritmie cardiache acute e di altri disturbi cardiaci (eccitazione e disordine della conduzione) • In caso di attacchi (ad es. epilepsia) • In presenza di una gravidanza • In presenza di malattie tumorali • Dopo operazioni in cui contrazioni muscolari più vigorose possono disturbare il processo di guarigione • Non applicare nelle vicinanze del cuore. Gli elettrodi di stimolazione non devono essere applicati in nessuna zona del torace (caratterizzata da costole e sterno), in particolare non sui due grandi muscoli pettorali. Rischio accresciuto di fibrillazione ventricolare che può cagionare un arresto cardiaco • Sulle ossa del cranio, nella zona della bocca, della cavità orale o della laringe • Nella zona del collo / della carotide • Nella zona genitale • Sulla pelle affetta da malattie acute o croniche (cute lesa o infiammata), (ad es. in presenza di infiammazioni indolori, arrossamenti, esamtemi (ad es. allergie), ustioni, contusioni, gonfiori e ferite aperte o in via di guarigione, su cicatrici da operazione nel processo di guarigione. ATTENZIONE! Utilizzare il Digital TENS/EMS esclusivamente: • Su persone • Per lo scopo per cui è stato sviluppato e nel modo descritto nelle istruzioni per l’uso. Qualunque altro uso non appropriato può costituire un pericolo • Per l’uso esterno • Con gli accessori originali forniti in dotazione o che possono essere ordinati ulteriormente, altrimenti viene invalidata la garanzia. MISURE PRECAUZIONALI: • Rimuovere gli elettrodi dalla pelle esercitando sempre una forza moderata per evitare lesioni cutanee nei casi rari di pelle ultrasensibile. • Tener lontano l’elettrostimolatore da fonti di calore e non utilizzarlo nelle vicinanze (~1 m) di apparecchi a onde corte o a microonde (ad es. cellulari) poiché questi potrebbero causare sgradevoli picchi di corrente. • Non esporre l’elettrostimolatore ai raggi diretti del sole o ad alte temperature. • Proteggere l’elettrostimolatore dalla polvere, dalla sporcizia e dall’umidità. Non immergere mai l’apparecchio nell’acqua o in altri liquidi. 60 • L’elettrostimolatore è previsto esclusivamente per l’uso personale. • Per motivi igienici, gli elettrodi devono essere utilizzati da una sola persona. • Se l’elettrostimolatore non dovesse funzionare correttamente, o dovessero sorgere malessere o dolori durante il trattamento, interrompere immediatamente l’applicazione. • Per la rimozione o lo spostamento degli elettrodi, spegnere prima l’elettrostimolatore o il canale associato per evitare stimoli indesiderati. • No alterar los electrodos (por ejemplo, cortándolos). Esto podría conducir a mayores densidades de corriente y podría ser peligroso (valor de salida máximo recomendado para los electrodos: 9 mA/cm2, una densidad efectiva de corriente mayor que 2 mA/cm² requiere una mayor atención). • Non utilizzare l’apparecchio durante il sonno, guidando un veicolo o maneggiando contemporaneamente altre macchine. • Non applicare in tutte le attività nelle quali una reazione imprevista (ad es. contrazione muscolare più intensa malgrado un’intensità più bassa) può risultare pericolosa. • Durante la stimolazione prestare attenzione a non fare entrare in contatto gli elettrodi con oggetti metallici come fibbie della cintura o collane. Se sulle parti del corpo da sottoporre al trattamento sono applicati gioielli o piercing (ad es piercing ombelicale), essi devono essere rimossi prima di usare l’apparecchio altrimenti si corre il pericolo di ustioni localizzate. • Tenere i bambini lontani dall’apparecchio per prevenire eventuali pericoli. • Non confondere i cavi degli elettrodi dotati di contatti con quelli delle cuffie o di altri apparecchi e non collegare gli elettrodi ad altri apparecchi. • Non utilizzare questo apparecchio contemporaneamente ad altri apparecchi che trasmettono impulsi elettrici al corpo. • Non utilizzare nelle vicinanze di prodotti facilmente infiammabili, gas o esplosivi. • Non utilizzare accumulatori e usare soltanto batterie dello stesso tipo. • Eseguire l’applicazione nei primi minuti seduti o distesi per evitare inutili pericoli di lesioni nei rari casi di reazione vagale (senso di debolezza). Ai primi sentori di debolezza spegnere immediatamente l’apparecchio e sollevare le gambe (circa 5 -10 min.). • Si sconsiglia un trattamento preliminare della pelle con creme o pomate lubrificanti poiché ciò aumenta notevolmente l’usura degli elettrodi o può causare sgradevoli picchi di corrente. Danneggiamenti • In caso di dubbio non utilizzare l’apparecchio danneggiato e consultare il proprio rivenditore o contattare il servizio assistenza indicato. • Controllare se l’apparecchio presenta segni di usura o di danni. Se si riscontrano tali segni oppure se l’apparecchio è stato utilizzato in modo improprio, farlo esaminare dal produttore o da un rivenditore autorizzato prima di continuare ad utilizzarlo. • Spegnere immediatamente l’apparecchio quando è difettoso o presenta anomalie di funzionamento. • Non tentare in nessun caso di aprire e/o riparare sé stessi l’apparecchio. Le riparazioni devono essere eseguite esclusivamente dal servizio assistenza o da rivenditori autorizzati. La non osservanza di questa prescri zione invalida la garanzia. • Il produttore non risponde di danni causati da un uso improprio o errato dell’apparecchio. Informazioni sulle ESD (scariche elettrostatiche) Tener presente che le prese provviste di simbolo di avvertenza ESD non devono essere toccate. Misure protettive contro ESD: –non toccare con le dita le spine/prese provviste di simbolo di avvertenza ESD! – non toccare con utensili a mano le spine/prese provviste di simbolo di avvertenza ESD! Maggiori spiegazioni sul simbolo di avvertenza ESD, nonché su possibili addestramenti e i loro contenuti possono essere richiesti al Servizio Assistenza clienti. 3. Parametri della corrente Gli elettrostimolatori funzionano con le seguenti impostazioni di corrente, che hanno differenti ripercussioni sull’effetto della stimolazione a seconda dell’impostazione eseguita: 61 3.1 Forma dell’impulso spessore della cute nonché la qualità del contatto con l’elettrodo. L’impostazione pratica deve essere efficace ma mai provocare sensazioni sgradevoli come ad es. dolore sul sito di applicazione. Un leggero formicolio segnala un’energia di stimolazione sufficiente; evitare tutte le impostazioni che provocano dolori. In caso di lunghe applicazioni può essere necessaria una regolazione ulteriore a causa di operazioni di adattamento sul sito di applicazione effettuate nel corso del trattamento. Intensità di impulso o stimolazione Descrive la funzione temporale della corrente di eccitaziImpulsi monofasici one. Durata Si distinguono correnti ad impulso di tipo monofasico e bifasico. Nelle correnti ad impulso monofasico la corrente Impulsi bifasici scorre in una direzione, ad impulso bifasico invece la corrente di eccitazione alterna la sua direzione. Nel Digital TENS/EMS sono presenti unicamente correnti ad impulso di tipo bifasico poiché esse alleviano i muscoli e producono un minore affaticamento dei muscoli e consentono un’applicazione sicura. 3.5 Variazione dei parametri di stimolazione guidata ciclicamente In molti casi è necessario coprire la totalità delle strutture tessutali sul sito di applicazione utilizzando diversi parametri di stimolazione. Con il Digital TENS/EMS questa operazione viene effettuata tramite una variazione ciclica automatica dei parametri di stimolazione da parte dei programmi presenti. Ciò consente di prevenire anche l’affaticamento di singoli gruppi di muscoli sul sito di applicazione. Il Digital TENS/EMS contiene preimpostazioni utili dei parametri di corrente. L’utente ha comunque sempre la possibilità di variare l’intensità di stimolazione durante l’applicazione, e in singoli programmi è possibile inoltre modificare anzitutto la frequenza dell’impulso per eseguire il trattamento ritenuto dall’utente come il più piacevole e il più efficace. 3.2 Frequenza di stimolazione La frequenza di stimolazione indica il numero di singoli Periodo impulsi al secondo, ed il suo valore è espresso in Hz (Hertz). Questa frequenza può essere determinata calcolando il valore inverso del periodo. La singola frequenza stabilisce i tipi di fibre muscolari che reagiscono preferibilmente all’eccitazione. Le fibre che reagiscono lentamente rispondono piuttosto alle basse frequenze di eccitazione fino a 15 Hz, le fibre che reagiscono velocemente rispondono invece a partire da circa 35 Hz in poi. Con impulsi di circa 45 -70 Hz si ottiene una tensione permanente del muscolo, associata ad un rapido affaticamento del muscolo stesso. Frequenze di eccitazione più elevate sono quindi utilizzate preferibilmente per l’allenamento di forza veloce e di forza massima. 3.3 Ampiezza di impulso Questo parametro indica la durata di un singolo impulso in microsecondi. L’ampiezza di impulso determina tra l’altro la profondità di penetrazione della corrente in cui è valida la seguente regola: grandi masse muscolari necessitano di una maggiore ampiezza di impulso. Ampiezza di impulso 3.4 Intensità di impulso/stimolazione L’impostazione del grado di intensità si effettua in funzione della percezione soggettiva di ogni singolo utente e viene determinata da tutta una serie di parametri come il sito di applicazione, l’irrorazione sanguigna della pelle, lo 62 4. Descrizione dell’apparecchio e (1) Selezione di (A) Programma di trattamento, (B) Frequenza e (C) Durata del trattamento (2) Il tasto DOWN (Giù) consente di decrementare l’intensità dell’impulso nei due canali durante la stimolazione. MENU (1) Navigazione tra i sottomenu TENS, EMS e MASSAGE (2) Ritorno alla (A) Finestra di selezione del programma oppure al (B) Menu principale INVIO (1) Selezione del menu (2) Conferma di una selezione effettuata con UP/DOWN (SU/GIÙ), ad esclusione dell’intensità del canale CH1+, CH1-, CH2+, CH2Impostazione dell’intensità di impulso A 4.1 Designazione dei componenti Display (Menu principale): A Intensità di impulso/stimolazione B Numeri del programma/ciclo C Frequenza (Hz) D Basso livello di carica delle batterie E Menu TENS/EMS/MASSAGGIO F Funzione timer (indicazione del tempo rimanente) G Indicazione dello stato operativo Tasti: a Tasti di selezione UP (su) e DOWN (giù) b Tasto di conferma, INVIO c Tasto ON/OFF d Tasto MENU e Tasti di intensità CH1+, CH1-, CH2+, CH2Accessori: • 2 cavo di connessione • 4 elettrodi adesivi (45 x 45 mm) • 1 clip da cintura B E F C D G e e a b c d 5. Messa in servizio 1. Se già applicata, rimuovere dall’apparecchio la clip della cintura. 2.Esercitare una pressione sul coperchio del vano batterie sul retro dell’apparecchio e spostarlo lateralmente. 3.Inserire le 3 batterie di tipo alcalino AAA 1,5 V. Prestare la massima attenzione a inserire le batterie rispettando la polarità corretta. 4.Richiudere accuratamente il coperchio del vano batterie (fig. 1). 5. Collegare i cavi di connessione agli elettrodi (fig. 2). i Nota: per facilitare al massimo il collegamento, gli elettrodi sono dotati di un connettore a clip. 4.2 Funzioni dei tasti Ogni azionamento dei tasti viene confermato da un segnale sonoro per il riconoscimento di un’eventuale pressione involontaria dei tasti. Non è possibile sopprimere questo segnale sonoro. ON/OFF (1) Premere brevemente questo tasto per accendere l’apparecchio. Se durante l’accensione si mantiene premuto questo tasto per 10 secondi, l’apparecchio si spegne automaticamente. (2) Interruzione del trattamento di stimolazione premendo brevemente = Modalità di pausa (3) Spegnimento dell’apparecchio premendo a lungo (circa 3 secondi) fig. 1 fig. 2 63 6. Panoramica dei programmi 6.1 Informazioni fondamentali L’elettrostimolatore Digital TENS/EMS dispone complessivamente di 50 programmi: • 20 programmi TENS • 20 programmi EMS • 10 programmi di MASSAGE Tutti i programmi consentono di impostare a parte la durata di applicazione e l’intensità di impulso per ogni canale. Inoltre, i programmi TENS e EMS 11- 20 permettono anche di variare la frequenza di impulso dei singoli cicli per adattare l’effetto stimolante alla struttura specifica del sito di applicazione. I cicli sono le diverse sequenze che compongono i programmi. Essi vengono eseguiti automaticamente uno dopo l’altro, aumentano l’efficacia della stimolazione su diversi tipi di fibre muscolari e prevengono l’affaticamento precoce dei muscoli. Le seguenti tabelle dei programmi per TENS, EMS e MASSAGE contengono le impostazioni standard dei parametri di stimolazione e le indicazioni sulla collocazione degli elettrodi 64 6.2 Programmi TENS Progr. n. 1 + 11 2 + 12 3 + 13 Aree di applicazione sensate, indicazioni Collocazione Ciclo 1 possibile degli Ciclo 5 elettrodi Am- Frepiezza quenza (Hz) (µs) Dolori cervicali, cefalea da 01, 02 250 4 tensione 250 6 Dolori dorsali 03, 04, 05, 06, 250 6 15, 23 250 10 Dolori alle spalle 07, 14 250 2 On Time (sec.) 30 20 30 20 10 Off Time (sec.) 0 0 0 0 0 Ciclo 2 Ciclo 6 Ampiezza (µs) 250 250 250 250 250 Frequenza (Hz) 4 6 6 10 4 On Time (sec.) 30 20 30 20 8 Off Time (sec.) 0 0 0 0 0 Ciclo 3 Ciclo 7 Ampiezza (µs) 250 250 250 Frequenza (Hz) 5 8 8 On Time (sec.) 30 30 20 Off Time (sec.) 0 0 0 250 6 6 0 Ciclo 4 Ciclo 8 Ampiezza (µs) 250 250 250 Frequenza (Hz) 5 8 8 On Time (sec.) 30 30 20 Off Time (sec.) 0 0 0 4 + 14 Dolori causati da artrite reumatoide Vedi nota 250 60 20 0 250 70 20 0 250 80 30 0 250 80 30 0 5 + 15 Disturbi lombali 22 0 0 0 250 250 250 80 65 45 20 4 30 0 0 0 4 0 250 10 20 0 08 20 4 30 75 Disturbi mestruali 80 70 40 250 6 + 16 250 250 250 250 55 30 0 250 60 30 0 7 + 17 Programma dolori I Vedi nota 30 30 5 0 0 0 250 250 250 4 8 6 20 20 10 0 0 0 250 250 250 6 10 50 30 30 5 0 0 0 6 10 20 20 0 0 09, 10 Disturbi al ginocchio Disturbi dell’articolazione tibio-tarsale, lesioni della capsula Programma dolori II Vedi nota 4 8 40 250 250 8 + 18 250 250 250 250 75 0,25 0,25 250 2 0,5 0 250 100 0,25 0,25 9 + 19 (Burst) 10 + 20 Programma dolori III (Burst) Vedi nota On Time (sec.) = periodo d’inserzione del ciclo in secondi (contrazione) – Off Time (sec.) = periodo di disinserzione del ciclo in secondi (rilassamento) Nota: La posizione degli elettrodi deve richiudere l’area dolorante. Per i gruppi di muscoli doloranti gli elettrodi vengono raggruppati attorno al muscolo interessato. Per i dolori articolari, applicare gli elettrodi sui lati anteriore e posteriore dell’articolazione e, se la distanza interelettrodica lo consente, sui lati destro e sinistro dell’articolazione. La distanza minima tra gli elettrodi non deve essere inferiore a 5 cm e superiore a 15 cm. Prestare attenzione alle figure 9 e 10 valide per le articolazioni del ginocchio e tibio-tarsale. I programmi Burst sono adatti per tutti i siti che devono essere trattati con modelli di segnali variabili (per un’assuefazione più bassa possibile). 65 6.3 Programmi EMS Progr. n. Aree di applicazione sensate, indicazioni Ciclo 2 Ciclo 6 On Off Am- FreTime Time piezza quenza (sec.) (sec.) (µs) (Hz) 5 1 250 10 Ciclo 3 Ciclo 7 On Off Am- FreTime Time piezza quenza (sec.) (sec.) (µs) (Hz) 15 1 250 50 Ciclo 4 Ciclo 8 On Off Am- FreOn Off Time Time piezza quenza Time Time (sec.) (sec.) (µs) (Hz) (sec.) (sec.) 5 1 1 + 11 Muscolatura delle spalle 2 + 12 Muscolo trapezoidale medio e 01, 02, 03, 04, 250 inferiore, muscolo lattisimus 05, 12, 15 250 dorsi, muscolatura cervicale Muscolatura dorsale in prossi- 03, 06, 22, 23 250 mità della spina dorsale Progr. I 4 30 1 250 4 20 1 6 30 1 250 6 20 1 2 10 1 250 4 10 Muscolatura anteriore e poste- 16, 17, 18, 19 250 riore del braccio (tra gli altri: bicipite), Muscolatura anteriore 250 e posteriore dell’avambraccio Muscoli addominale ritti e 11, 20, 21 250 obliqui 4 30 1 250 4 5 30 1 6 15 1 250 6 + 16 Muscolatura dorsale in prossi- 03, 06, 22, 23 250 mità della spina dorsale Progr. II 2 20 1 7 + 17 Muscolatura dorsale in prossi- 03, 06, 22, 23 250 mità della spina dorsale Progr. III 250 4 30 8 8 + 18 Muscolatura dei glutei 24 250 20 9 + 19 Muscolatura anteriore e posteriore della coscia 25, 26 250 10 + 20 Muscolatura anteriore e posteriore della gamba 27, 28 250 3 + 13 4 + 14 5 + 15 Collocazione Ciclo 1 possibile degli Ciclo 5 elettrodi Am- Frepiezza quenza (Hz) (µs) 07, 14 250 30 250 5 30 1 250 5 20 1 1 250 6 10 1 30 1 250 4 30 1 250 5 30 1 8 15 1 250 10 15 1 250 2 20 1 250 1 30 1 250 1 30 1 1 250 4 20 1 250 6 30 1 250 6 20 1 30 1 250 8 20 1 5 1 250 6 5 1 250 30 5 1 20 5 1 250 6 8 1 250 25 5 1 25 5 1 250 6 8 1 250 35 5 1 On Time (sec.) = periodo d’inserzione del ciclo in secondi (contrazione) – Off Time (sec.) = periodo di disinserzione del ciclo in secondi (rilassamento) 66 6.4 Programmi di MASSAGE Progr. n. 1 2 3 4 5 6 7 8 9 10 scegliendo una distanza maggiore tra gli elettrodi viene stimolato un volume tissutale maggiore ma con minore intensità. Per incrementare la stimolazione è quindi necessario aumentare l’intensità di stimolazione. Per la scelta delle distanze interelettrodiche è valida la seguente regola: • distanza ottimale: circa 5 -15 cm • con una distanza inferiore a 5 cm vengono fortemente stimolate in primo luogo le strutture superficiali • con una distanza superiore a 15 cm la stimolazione delle strutture di grande estensione e profonde è molto leggera. Forma di massaggio picchiettio e pizzicottamento impastamento e pizzicottamento picchiettio con taglio della mano / pressione della mano con taglio della mano / pressione della mano scuotimento picchiettio (attivazione alternata degli elettrodi) a getto massaggiante (attivazione alternata degli elettrodi) a getto massaggiante a pressione (attivazione alternata degli elettrodi) programma combinato (attivazione alternata degli elettrodi) Rapporto tra elettrodi e direzione delle fibre muscolari La scelta della direzione del flusso di corrente deve essere adattata alla direzione delle fibre dello strato di muscoli che si desidera trattare. Se devono essere raggiunti muscoli superficiali, collocare gli elettrodi parallelamente alla direzione delle fibre (pag. 2, fig. 16; 1A-1B/2-2B); se invece si desidera raggiungere strati tessutali profondi, gli elettrodi devono essere collocati trasversalmente rispetto alla direzione delle fibre (pag. 2, fig. 16; 1A-2A/1B-2B). Quest’ultima costellazione può essere ottenuta ad es. tramite la disposizione trasversale (incrociata) degli elettrodi, ad es. pag. 2, fig. 16; 1A-2B/2A-1B. Assegnazione dei canali: Canale 1 (CH1): connessione a sinistra, pulsante basculante del regolatore intensità a sinistra, indicazione intensità impulso a sinistra (CH1). Canale 2 (CH2): connessione a destra, pulsante basculante del regolatore intensità a destra, indicazione intensità impulso a destra (CH2). i Nel trattamento del dolore (TENS) a mezzo dell’elettrostimolatore Digital TENS/EMS con i suoi 2 canali regolabili separatamente e 2 elettrodi adesivi per canale, è opportuno applicare gli elettrodi di un canale in modo che il punto doloroso si trovi tra gli elettrodi, oppure collocare un elettrodo direttamente sul punto dolorante e applicare l’altro elettrodo almeno 2-3 cm più lontano. Gli elettrodi del secondo canale possono essere utilizzati per il trattamento contemporaneo di altri punti dolorosi o anche, assieme agli elettrodi del primo canale, per circoscrivere l’area dolorante dirimpetto. In questo caso è nuovamente utile una disposizione incrociata. i Suggerimento per la funzione di massaggio: per un trattamento ottimale utilizzare sempre tutti e 4 gli elettrodi. La collocazione degli elettrodi deve essere fatta in modo da circondare i segmenti muscolari interessati. Per ottenere un effetto ottimale, la distanza fra gli elettrodi non deve superare il valore di circa 15 cm. L’applicazione degli elettrodi sulla parete toracica anteriore non è ammessa; ciò significa che non si deve eseguire il massaggio sui grandi muscoli toracici di sinistra e destra. 6.5 Indicazioni sulla collocazione degli elettrodi La collocazione sensata degli elettrodi è fondamentale per il successo della stimolazione. Consigliamo di accordare con il proprio medico la collocazione ottimale degli elettrodi sull’area di applicazione prevista. Le collocazioni degli elettrodi proposte sul lato interno della copertina (figure 1-28) servono da modello. Nella scelta della locazione degli elettrodi sono valide le seguenti avvertenze: Distanza tra gli elettrodi Quanto più grande è la distanza scelta tra gli elettrodi, tanto maggiore è il volume tissutale stimolato. Ciò è valido per l’area e la profondità del volume tissutale. Contemporaneamente, l’intensità di stimolazione del tessuto diminuisce con l’aumento della distanza interelettrodica; ciò significa che 67 • Premere ON/OFF per iniziare il trattamento di stimolazione. L’indicazione dello stato operativo inizia a cambiare (fig. 5). • Selezionare l’intensità di stimolazione ritenuta personalmente la più piacevole premendo il tasto CH 1+/CH 2+. L’indicazione dell’intensità di stimolazione si adatta alla nuova scelta. i Per prolungare la tenuta degli elettrodi applicarli sulla cute pulita e possibilmente esente da peli e grassi. Se necessario, lavare la pelle con acqua e rasare i peli prima dell’applicazione. i Se durante il trattamento si dovesse staccare un elettrodo, l’intensità di stimolazione dei due canali scende al livello inferiore. Premere il tasto ON/ OFF per attivare la modalità di pausa, ricollocare l’elettrodo e proseguire il trattamento premendo nuovamente il tasto ON/OFF e impostare l’intensità di stimolazione desiderata. 7.3 Svolgimento per i programmi TENS/EMS da 11 a 20 (programmi personalizzati) 7. Modalità d’uso 7.1 Indicazioni sulla modalità d’uso fig. 4 fig. 5 I programmi da 11 a 20 sono preimpostati e possono essere personalizzati. È possibile impostare la frequenza di stimolazione. • Dalle tabelle dei programmi scegliere un programma adatto ai propri scopi. • Collocare gli elettrodi nell’area bersaglio e collegarli all’elettrostimolatore. Le proposte di posizionamento servono come suggerimento per la collocazione. • Premere il tasto ON/OFF per accendere l’apparecchio. • Premere il tasto MENU per navigare fra i sottomenu (TENS/ EMS/MASSAGE) e confermare la scelta con INVIO. (fig. 1, esempio Display TENS). fig. 1 • Con i tasti UP/DOWN (Su/Giù) selezionare il programma desiderato e confermare con INVIO (fig. 2, esempio Display programma TENS n. 11). • Con i tasti UP/DOWN (Su/Giù) selezionare la frequenza fig. 2 desiderata (Hz) per il ciclo 1 e confermare con INVIO (fig. 3). Ripetere questa operazione per tutti i cicli successivi. • Per terminare l’impostazione della frequenza mettere la frequenza (Hz) dell’ultimo ciclo occorrente a »--0« e premere INVIO; tutte le impostazioni delle frequenze dei cicli successi- fig. 3 vi vengono messe automaticamente a »0« e quindi ignorate. i Suggerimento: tener premuto il tasto INVIO per 2 secondi per saltare le impostazioni delle frequenze e passare all’impostazione della durata del trattamento. Nel caso in cui siano necessari tutti gli 8 cicli, terminare la selezione dell’impostazione delle frequenze premendo ugualmente il tasto INVIO per 2 secondi. • Se l’apparecchio non viene utilizzato per oltre 3 minuti, esso si disinserisce automaticamente (spegnimento automatico). Alla riaccensione appare il display LCD del menu principale in cui lampeggia l’ultimo sottomenu utilizzato. • Se si preme un tasto consentito, risuona un breve segnale acustico (bip); se invece si preme un tasto non consentito vengono emessi due brevi bip. 7.2 Svolgimento per i programmi 01-10 TENS, EMS e MASSAGE (avvio veloce) • Dalle tabelle dei programmi scegliere un programma adatto ai propri scopi. • Collocare gli elettrodi nell’area bersaglio e collegarli all’elettrostimolatore. Le proposte di collocazione servono come suggerimento per una collocazione corretta. • Premere il tasto ON/OFF per accendere l’apparecchio. • Premere il tasto MENU per navigare fra i sottomenu (TENS/ EMS/MASSAGE) e confermare la scelta con INVIO. (fig. 1, esempio Display TENS) fig. 1 • Con i tasti UP/DOWN (Su/Giù) selezionare il programma desiderato e confermare con INVIO (fig. 2, esempio Display programma TENS n. 01). • Con i tasti UP/DOWN (Su/Giù) selezionare quindi la durata fig. 2 totale del trattamento e confermare con INVIO (fig. 3, esempio Durata di trattamento 30 minuti). L’apparecchio si trova in stato di attesa (fig. 4). fig. 3 68 • Con I tasti UP/DOWN (Su/Giù) selezionare quindi la durata del trattamento e confermare con INVIO (fig. 4, esempio Durata di trattamento 30 minuti). • L’apparecchio si trova in stato di attesa (fig. 5). • Premere ON/OFF per avviare il trattamento di stimolazione. L’indicazione dello stato operativo inizia a lampeggiare (fig. 6). • Selezionare l’intensità di stimolazione ritenuta personalmente la più piacevole premendo il tasto CH 1+ / CH 2+. L’indicazione dell’intensità di stimolazione si adatta alla nuova scelta. i Nota: le impostazioni personalizzate vengono memorizzate e richiamate automaticamente alla successiva selezione. L’impostazione di questo programma personalizzato può essere effettuata ad es. su consiglio del proprio medico. Con la Doctor’s Function è possibile variare solo l’intensità di impulso durante il trattamento di stimolazione. Tutti gli altri parametri e programmi di Digital TENS/EMS sono bloccati in questo caso e non possono essere modificati o richiamati. Impostazione della Doctor‘s Function: • Selezionare il proprio programma e le impostazioni corrispondenti come descritto ai punti 7.2 e 7.3. • Prima di attivare il programma premendo il tasto ON/ OFF, tener premuti contemporaneamente i tasti ON/OFF e CH 2+ per circa 5 secondi. La memorizzazione nella Doctor’s Function viene confermata da un lungo segnale sonoro. Soppressione della Doctor‘s Function: Per disinibire l’apparecchio e poter accedere ad altri programmi, tener premuti i due tasti ON/OFF e CH 2+ di nuovo per circa 5 secondi (questa operazione non è possibile durante la stimolazione). La soppressione della Doctor’s Function viene confermata da un lungo segnale sonoro. fig. 4 fig. 5 fig. 6 7.4 Modifica delle impostazioni Variazione dell’intensità (durante l’applicazione) • CH1+/- e CH2+/-: Variazione dell’intensità per canale • Tasto DOWN (Giù) : riduzione dell’intensità in entrambi i canali Interruzione della stimolazione Premere il tasto ON/OFF. Ripremendo il tasto si prosegue l’applicazione. Disattivazione di un canale completo Premere il tasto CH- finché non si raggiunge l’intensità minima del canale, tenere quindi premuto il tasto finché il canale non scompare dal display. Per riattivare il canale, tener premuto il corrispondente tasto CH+. Modifica dell’applicazione (completa o singoli parametri) • ON/OFF: Interruzione della stimolazione • MENU: ritorno alla finestra di selezione del programma o al menu principale • Impostazione dei parametri desiderati. Confermare con INVIO. ON/OFF per proseguire l’applicazione 8. Pulizia e custodia Elettrodi adesivi: • Per garantire il più a lungo possibile l’adesione degli elettrodi, pulirli con precauzione utilizzando un panno umido e senza peluzzi. • Rincollare gli elettrodi sul foglio di supporto una volta terminata l’applicazione. Pulizia dell’apparecchio: • Rimuovere le batterie dall’apparecchio prima di ogni intervento di pulizia. • Dopo l’uso pulire l’apparecchio con un panno morbido e leggermente inumidito. In caso di sporcizia elevata e consistente inumidire il panno con una leggera lisciva di sapone. • Prestare attenzione a non fare penetrare acqua nell’apparecchio. Se nonostante tutte le precauzioni dovesse essere penetrata acqua, utilizzare l’apparecchio solo in stato completamente asciutto. • Per la pulizia non utilizzare detergenti chimici o abrasivi. 7.5 Doctor’s Function La Doctor’s Function è un’impostazione speciale che consente di richiamare il proprio programma personalizzato ancora più facilmente e in modo mirato. L’impostazione personalizzata del programma viene richiamata in stato di attesa immediatamente dopo l’accensione e attivata premendo semplicemente il tasto ON/OFF. 69 (2) Prima di ogni applicazione pulire la pelle e rinunciare a balsami per la pelle e oli curativi. Una rasatura può aumentare la tenuta degli elettrodi. L’apparecchio emette segnali sonori anomali durante il trattamento. Che fare? (1) Osservare il display, lampeggia un canale? Interrompere il programma premendo il tasto ON/OFF. Controllare il collegamento corretto tra cavi di connessione e gli elettrodi. Assicurasi che gli elettrodi abbiano un buon contatto con l’area di trattamento. (2) Assicurarsi che il connettore dei cavi di connessione sia ben innestato nell’apparecchio. (3) Se i segnali sonori non scompaiono con il canale lampeggiante, sostituire il cavo di collegamento. (4) Il display visualizza un segnale di batteria lampeggiante. Sostituire tutte le batterie. Non viene eseguita nessuna stimolazione percettibile. Che fare? (1) Se risuona un segnale di avviso, eseguire le operazioni sopradescritte. (2) Premere il tasto ON/OFF per riavviare il programma. (3) Controllare la collocazione degli elettrodi e assicurarsi che gli elettrodi adesivi non si sovrappongano. (4) Incrementare progressivamente l’intensità dell’impulso. (5) Le batterie sono quasi scariche. Sostituirle. Si percepisce una sensazione sgradevole sugli elettrodi. Che fare? (1) Gli elettrodi sono mal collocati. Controllare la collocazione e, se necessario, eseguire un riposizionamento. (2) Gli elettrodi sono consumati. Essi non possono più eseguire stimolazioni della pelle a causa della mancanza di una distribuzione uniforme della corrente su tutta la superficie. È necessario quindi sostituirli. La pelle arrossisce nell’area di trattamento. Che fare? Interrompere immediatamente il trattamento e attendere finché lo stato della pelle non si sia normalizzato. Un arrossamento della pelle che scopare rapidamente sotto l’elettrodo non è pericoloso e si spiega con l’aumento dell’irrorazione sanguigna locale dovuto alla stimolazione. Se però l’irritazione cutanea persiste e provoca prurito e infiammazioni, consultare il proprio medico prima di continuare il trattamento. Eventualmen- Custodia: • Rimuovere le batterie quando l’apparecchio non viene usato per un lungo periodo. La fuoriuscita del liquido dalle batterie può danneggiare l’apparecchio. • Non piegare ad angolo vivo i cavi di connessione e gli elettrodi. • Scollegare i cavi di connessione dagli elettrodi. • Rincollare gli elettrodi sul foglio di supporto una volta terminata l’applicazione. • Custodire l’apparecchio in un luogo fresco e arieggiato. • Non appoggiare oggetti pesanti sull’apparecchio. 9. Smaltimento Le batterie e gli accumulatori usati, completamente scarichi, devono essere smaltiti nei contenitori di raccolta appositamente contrassegnati, tramite i centri di raccolta differenziata dei rifiuti speciali oppure tramite il rivenditore di prodotti elettrici. La legge impone all‘utente lo smaltimento ecologico delle batterie. Avvertenza: queste indicazioni sono riportate sulle batterie contenenti sostanze tossiche: Pb = la batteria contiene piombo, Cd = la batteria contiene cadmio, Hg = la batteria contiene mercurio. Smaltire l’apparecchio secondo la direttiva sui rifiuti di apparecchiature elettriche ed elettroniche 2002/96/EC, detta anche WEEE (Waste Electrical and Electronic Equipment). In caso di domande si prega di rivolgersi all’autorità locale competente in materia di smaltimento. 10. Problemi/Rimedi ai problemi L’apparecchio non si accende quando si preme il tasto ON/OFF. Che fare? (1) Assicurarsi che le batterie siano inserite correttamente e abbiano un buon contatto. (2) Se necessario, sostituire le batterie. (3) Contattare il servizio assistenza. Gli elettrodi si staccano dal loro corpo. Che fare? (1) Pulire la superficie appiccicosa degli elettrodi con un panno umido e privo di peluzzi. Lasciar quindi asciugare all’aria e riapplicarli Se gli elettrodi continuano a non aderire, è necessario sostituirli. 70 nicazione portatili e mobili ad alta frequenza possono influenzare questo apparecchio. Richiedere informazioni più dettagliate all’indirizzo indicato del servizio assistenza clienti. L’apparecchio è conforme alle esigenze della direttiva europea concernente i prodotti medicali 93/42/EC (Legge sui prodotti medicali). Conformemente a quanto prescritto nella »Direttiva per esercenti di prodotti medicali« si devono eseguire regolarmente controlli tecnici se l’apparecchio viene utilizzato per fini commerciali ed economici. Anche per l’uso privato consigliamo un controllo tecnico in intervalli di 2 anni da eseguire presso il produttore. te, la causa potrebbe essere un’allergia nei confronti della superficie adesiva degli elettrodi. La clip da cintura non si blocca correttamente. Che fare? Se la clip è già fissata alla cintura e si applica poi l’apparecchio, non si ottiene un arresto ottimale. Prendere in mano l’apparecchio. Applicare la clip da cintura sulla parte posteriore dell’apparecchio. Si nota il bloccaggio corretto della clip dallo scatto ben percettibile di innesto. Fissare di nuovo l’apparecchio, inclusa la clip, alla cintura. 11. Specifiche tecniche Nome e modello: EM 41 Forma d’onda all’uscita: impulsi rettangolari bifasici Durata dell’impulso: 40 - 250 µs Frequenza della pulsazione: 1-120 Hz Tensione di uscita: max. 90 Vpp (a 500 Ohm) Corrente di uscita: max. 180 mApp (a 500 Ohm) Alimentazione di tensione: 3 batterie AAA Durata del trattamento: impostabile da 5 a 90 minuti Intensità: impostabile da 0 a 15 Condizioni di esercizio:10 °C- 40 °C (50 °F-104 °F) con un’umidità relativa dell’aria di 30 - 85% Condizioni di conservazione:-10 °C-50 °C (14 °F-122 °F) con un’umidità relativa dell’aria di 10 - 95% Dimensioni: 122 x 59 x 23 mm Peso: 69 g (senza batterie) , 108 g (incl. clip da cintura e batterie) Legenda: Parte applicativa tipo BF Attenzione! Leggere le istruzioni per l’uso. Avvertenza: se l’apparecchio viene utilizzato al di fuori delle specifiche, non è più garantito il suo funzionamento corretto! Sotto riserva di modifiche tecniche per il miglioramento e lo sviluppo ulteriore del prodotto. Questo apparecchio è conforme alle norme europee EN60601-1, EN60601-1-2 e EN60601-2-10 ed è sottoposto a misure speciali concernenti la compatibilità elettromagnetica. Tener presente che dispositivi di comu71 Sayın Müşterimiz, TÜRKÇE İmalatımız olan bir ürünü tercih etmenizden dolayı memnuniyetimizi belirtmek isteriz. Adımız, Isı, Ağırlık, Kan Basıncı, Vücut Isısı, Nabız, Yumuşak Terapi, Masaj ve Hava alanlarında ayrıntılı olarak kontrolden geçirilmiş yüksek kaliteli ürünlerin simgesidir. Lütfen bu kullanma talimatını dikkatle okuyup sonrakı kullanımlar için saklayınız, diğer kullanıcıların da okumasına olanak tanıyınız ve belirtilen açıklamalara uyunuz. İçindekiler 1.Ünite ile tanışmak..................................................................................72 1.1 Dijital TENS/EMS nedir ve ne özelikleri vardır?..................................72 1.2 Teslimat kapsamı...............................................................................73 2.Önemli bilgiler........................................................................................74 3.Elektrik akım parametreleri...................................................................75 3.1 Empülsiyon şekli................................................................................75 3.2 Empülsiyon frekansı...........................................................................76 3.3 Empülsiyon genişliği..........................................................................76 3.4 Empülsiyon yoğunluğu......................................................................76 3.5 Periyodik kontrollü empülsiyon parametresi varyasyonu...................76 4.Cihazın tarifi.............................................................................................76 4.1 Bileşenlerin tanımı..............................................................................76 4.2 Tuş fonksiyonları................................................................................77 5.Devreye sokulması.................................................................................77 6.Programa genel bakış...........................................................................77 6.1 Esaslar...............................................................................................77 6.2 TENS programları..............................................................................78 6.3 EMS programları................................................................................79 6.4 MASSAGE programları.......................................................................80 6.5 Elektrotların yerleştirilmesi ile ilgili notlar...........................................80 7.Uygulama................................................................................................81 7.1 Uygulama ile ilgili notlar.....................................................................81 7.2 01-10 TENS, EMS ve MASSAGE programlarının akışı......................81 7.3 11 ile 20 arasındaki TENS/EMS programlarının akışı.........................81 7.4 Ayarların değiştirilmesi.......................................................................82 7.5 Doctor’s Function (Doktor fonksiyonu)..............................................82 8.Temizleme ve muhafaza........................................................................82 9.Cihazın giderilmesi................................................................................82 10.Problemler/Problem çözümleri............................................................83 11.Teknik bilgiler.........................................................................................83 Dostane tavsiyelerimizle Beurer Müessesesi 1. Ünite ile tanışmak 1.1 Dijital TENS/EMS nedir ve ne özelikleri vardır? Dijital TENS/EMS, elektronik uyarma (stimülasyon) cihazları grubuna aittir. Ünite, kombine edilerek çalıştırılabilen üç temel fonksiyona sahiptir: 1.Sinir hatlarının elektriksel uyarılması veya stimülasyonu (TENS) 2.Kas dokusunun elektriksel uyarılması veya stimülasyonu (EMS) 3.Elektriksel sinyaller üzerinden elde edilen bir masaj etkisi. Bu özellikler için cihazın birbirinden bağımsız iki uyarma (stimülasyon) kanalı ve dört kendiliğinden yapışan elektrodu vardır. Bu cihaz, kendinizi genel anlamda daha iyi hissetmeniz için, ağrı dindirmek için, bedensel zindeliğinizin korunması için, kasların yeniden canlanması için ve yorgunluğun giderilmesi için çok yönlü kullanılabilen fonksiyonlar sunmaktadır. Bunun için ya önceden ayarlanmış programları seçebilirsiniz, ya da bu programları kendi ihtiyaçlarınıza göre belirleyebilirsiniz. Elektronik stimülasyon cihazlarının etki prensibi, bedene özgü empülsiyonların taklit edilmesi temeline dayanır ki, bu empülsiyonlar elektrotların yardımıyla cilt üzerinden sinir ya da kas liflerine iletilir. Elektrotlar vücudun birçok bölgesine yerleştirilebilir; uygulanan elektrik uyarıları tehlikesizdir ve hemen hemen hiçbir ağrı veya sancıya sebep olmaz. Bazı uygulamalarda sadece hafif bir karıncalanma veya titreşim hissedersiniz. Vücut dokusuna gönderilen elektrik empülsiyonları, tedavinin uygulandığı bölgedeki sinir hatlarına, sinir düğümlerine ve kas gruplarına uyarım iletimini etkiler. Elektronik stimülasyonun etkisi normal olarak ancak muntazam aralıklarla tekrarlanan uygulama sonrasında tespit edilebilir. Kaslara uygulanan elektronik 72 stimülasyon, muntazam aralıklar ile yapılan antrenmanın yerine geçmez, fakat antrenmanın etkisini yararlı şekilde destekler. TENS, transkutan elektriksel sinir stimülasyonu, denildiğinde, cilt üzerinden etki gösteren, sinirlerin elektriksel uyarılması anlaşılır. TENS, klinik testleri sonucunda kanıtlanmış, etkili, ilaç kullanılmayan, doğru uygulama halinde hiçbir yan etkisi olmayan bir tedavi yöntemidir ve belli sebepleri olan ağrıların tedavi edilmesi için kullanımına izin verilmiştir – tabii ki basit bir şekilde kendi kendini tedavi etmek için de tasarlanmıştır. Ağrının sinir liflerine iletilmesi önlenerek (özellikle yüksek frekanslı empülsiyonlar sayesinde) ve merkezi sinir sisteminde ağrının algılanmasını etkileyen özelliğe sahip, vücudun kendi endorfinlerini salgılaması ile, ağrı azaltıcı ya da ağrı kesici etki elde edilir. Bu metot bilimsel olarak kanıtlanmıştır ve tıbbi açıdan uygulanmasına izin verilmiştir. Bir TENS uygulamasını gerekli kılabilecek her hastalık belirtisi, doktorunuz tarafından gözden geçirilmeli ve açıklanmalıdır. Doktorunuz, kendi kendinize uygulayacağınız bir TENS tedavisinin yararları hakkında da size bilgi verecektir. TENS, aşağıdaki uygulamalar için klinik ortamında test edilmiş ve kullanılmasına izin verilmiştir: • Sırt ağrıları, özellikle de bel ve boyun omurgalarındaki şikayetlerde • Eklem ağrıları (örn. diz eklemi, kalça eklemi, omuz) • Nörolojik ağrılar • Baş ağrıları • Kadınlarda adet görme ağrıları • Hareket sistemindeki yaralanmalardan sonraki ağrılar • Vücudun belli bölgelerindeki kan ile beslenme şikayetlerindeki ağrılar • Farklı sebeplerden kaynaklanan kronik ağrı durumları. Elektriksel kas stimülasyonu (EMS), çok yaygın ve genel anlamda kabul edilmiş bir yöntemdir ve yıllardır sporda ve tıbbi rehabilitasyonda uygulanmaktadır. Sporda ve sağlıklı spor (fitnes) alanında EMS yöntemi, geleneksel kas antrenmanına ek olarak uygulanır ve böylelikle kas gruplarının performansının artması ve vücudun genliştirilerek estetik açıdan istenilen sonuca varılması amaçlanır. EMS uygulaması iki yönde geliştirilir. Bir yandan kasların kuvvetlenmesi sağlanırken (aktifleştirme uygulaması), öte yandan da rahatlatıcı, dinlendirici bir etki (rahatlatıcı uygulama) elde edilebilir. Aktifleştirici uygulama kapsamı: • Uzun süreli performansın yükseltilmesi için kas antrenmanı ve/veya • Vücudun orantılarında istenilen değişikliklerin sağlanabilmesi için, belli kasların ve kas gruplarının kuvvetlendirilmesinin desteklenmesi için kas antrenmanı. Rahatlatıcı uygulama kapsamı: • Kaslardaki gerginlikleri çözmek için, kas relaksasyonu (rahatlaması/gevşemesi) • Kaslardaki yorulma belirtilerinin düzeltilmesi • Yüksek performans (örn. bir maraton koşusundan sonra) sonrasında, kas rejenerasyonunun hızlandırılması. Dijital TENS/EMS, entegre edilmiş masaj teknolojisi sayesinde ayrıca, algılama ve etki açısından gerçek masaj bazındaki bir program sayesinde, kas gerginliğini giderme ve yorulma belirtilerini yok etme olanağı sunar. Bu kılavuzdaki pozisyonlama önerilerinin ve program tablolarının yardımıyla, ilgili uygulama (tedavi edilecek vücut bölgesine göre) için ve amaçlanan etki için cihaz ayarlarını hızlı ve basit bir şekilde tespit edebilirsiniz. Ayrı bir şekilde ayarlanabilen iki kanal yardımıyla, Dijital TENS/EMS ünitesi empülsiyonların yoğunluğunu birbirinden bağımsız şekilde, tedavi edilecek iki vücut bölgesine uygun şekilde ayarlama avantajını sunar; örneğin vücudun her iki tarafını da uygulamaya dahil etmek için veya daha büyük bir doku alanını muntazam bir şekilde uyarmak (stimüle etmek) için. Her kanalın yoğunluk ayarının kişiye özel bir şekilde yapılabilmesi, size ayrıca iki farklı vücut kısmının aynı anda tedavi edilebilmesi olanağını sunar ve böylelikle kısmi bir tekil tedaviye kıyasla daha fazla zaman tasarrufu sağlanır. 1.2 Teslimat kapsamı – 1x Dijital TENS/EMS cihazı (kemer klipsi dahil) – 2x Bağlantı kablosu – 4x Yapışkan elektrot (45 x 45 mm) – 3x AAA pil – İşbu kullanma kılavuzu – 1x Kısa kılavuz (elektrot yerleşimi ve uygulama alanları önerileri) – 1x Muhafaza etme çantası Sonradan ek olarak satın alınan artikeller 4 adet aşınmaz su temaslı elektroda sahip sırt kemeri, Mat. No. 162.825 8x Yapışkan elektrot (45 x 45 mm), Art-Nr. 661.02 4x Yapışkan elektrot (50 x 100 mm), Art-Nr. 661.01 73 • Vücudun aynı zamanda yüksek frekanslı cerrahi bir cihaza bağlanması halinde. Cihazın kullanılmasından önce, sizi tedavi eden doktorunuza danışınız: • Akut hastalıklarda, özellikle yüksek tansiyon hastalıkları varsa veya ihtimali varsa, kann pıhtılaşması hastalıklarında, trombo-embolik hastalık eğiliminde ve kötü huylu yeni hastalıklar oluşması durumunda • Tüm cilt hastalıklarında • Vücut bölgesinden bağımsız, açıklanamayan kronik ağrı durumlarında • Diyabet durumunda (şeker hastalığı) • Ağrı hissetme özelliğinin azaldığı tüm algılama rahatsızlıklarında (örn. metabolizma rahatsızlıkları) • Aynı zamanda uygulanan tıbbi tedavilerde • Stimülasyon tedavisi ile ortaya çıkan rahatsızlıklar • Aynı elektrot tarafında uzun süre stimülasyon uygulanmasından dolayı sürekli cilt tahrişi durumunda. 2. Önemli bilgiler Cihazın kullanılması, bir doktor kontrolünün ve tedavisinin yerine geçmez. Bu nedenle, her türlü ağrı veya hastalık durumunda daima önce doktorunuza danışınız! UYARI! Sağlık açısından zarar oluşmasını önlemek için, aşağıdaki durumlarda Dijital TENS/EMS ünitesi kesinlikle kullanılmamalıdır: • Elektrikli cihazlar (örn. kalp pili) emplante edilmişse • Vücutta metal emplantatlar varsa • Ensülin pompası kullananlarda • Yüksek hararet (örn. > 39 °C) durumunda • Bilinen veya akut kalp ritmi rahatsızlıklarında ve kalpteki diğer heyecan oluşma ve performans rahatsızlıklarında • Nöbet tutma rahatsızlıklarında (örn. epilepsi) • Hamilelik durumu söz konusuysa • Kanser hastalıkları mevcutsa • Yoğun kas kontraksiyonlarının iyileşme sürecini kötü etkileyebileceği ameliyatlardan sonra • Kalp yakınlarında herhangi bir uygulama yapılmamalıdır. Stimülasyon elektrotları ön göğüs kafesinin (kaburgalar ve sternum, yani göğüs kemiği ile belirlenmiş) hiçbir yerinde uygulanmamalıdır; özellikle de her iki göğüs kasına uygulanmamlıdır. Alet bu bölgede yürek karıncığı titremesi riskini arttırabilir ve kalbin durmasına neden olabilir • Kemiksi kafatasında, ağız bölgesinde, boğaz bölgesinde veya gırtlak bölgesinde • Boyun / şah damarı bölgesinde • Cinsel organlar bölgesinde • Akut veya kronik hasta (yaralı veya iltihaplı) cilt üzerinde, (örn. ağrılı ve ağrısız iltihaplarda, kızarmalarda, cilt kızarıklıklarında (örn. alerji), yanmalarda, morarmalarda, şişmelerde ve açık veya iyileşmeye yüz tutmuş yaralarda, iyileşmekte olan ameliyat yara izlerinde) • Nem oranı yüksek olan ortamlarda (örn. banyoda veya yıkanmada veya duş almada) • Alkol içildikten sonra kullanılmamalıdır DİKKAT! Dijital TENS/EMS ünitesini sadece aşağıdaki durumlarda kullanınız: •İnsanlarda • Sadece cihazın geliştirilmesinde öngörülmüş amaca uygun olarak ve işbu kullanma kılavuzunda bildirildiği şekilde kullanılmalıdır. Gerektiği şekilde kullanılmaması halinde, tehlike söz konusu olabilir • Harici (dıştan) uygulanmalıdır • Cihaz ile birlikte teslim edilen ve sonradan ısmarlanabilen orijinal aksesuarlar ile birlikte kullanılmalıdır; aksi halde garanti hakkı kaybolur ÖNLEMLER: • Çok hassas ciltlerde yaralanma olmasını önlemek için, elektrotları daima fazla yüksek olmayan, uygun güç uygulayarak ciltten ayırınız. • Cihazı ısı kaynaklarından uzak tutunuz ve cihazı kısa dalga veya mikro dalga cihazlarının (örn. cep telefonu) yakınında (~1 m) kullanmayınız, çünkü bu tür cihazlar rahatsız edici kısa süreli aşırı akıma neden olabilir. • Cihazı doğrudan güneş ışınlarına veya yüksek ısı derecelerine maruz bırakmayınız. • Cihazı toza, pisliğe ve neme karşı koruyunuz. Aleti kesinlikle suya veya başka sıvı maddelerin içine sokmayınız. • Cihaz, kendi kendinizde kullanılmaya uygundur. 74 • Elektrotlar hijyenik sebeplerden dolayı sadece bir kişide kullanılmalıdır. • Cihaz düzgün çalışmazsa, rahatsız olma veya ağrı söz konusu olması halinde, uygulamayı derhal durdurunuz. • Elektrotları çıkarmak veya yerlerini değiştirmek için, önce cihazı ya da ilgili kanalı kapatarak, istenmeyen tahriş ve uyarmalar olması önlenmelidir. • Elektrotlarda herhangi bir değişiklik yapmayınız (örn. keserek). Böyle bir durum, akım yoğunluğunu yükseltebilir ve bu da tehlikeli olabilir (elektrotlar için azm. tavsiye edilen başlangıç değeri: 9 mA/cm2, efektif akım yoğunluğu 2 mA/cm2 değerinden fazla olması halinde, durumun daha fazla dikkate alınması gerekir). • Uykuda, araba kullanırken veya makinede çalışma esnasında uygulanmamalıdır. • Ani ve beklenmeyen bir reaksiyonun (örn. düşük etkenliğe rağmen, yoğun kas kontraksiyonu) tehlike yaratabileceği hiçbir çalışmada kullanılmamalıdır. • Stimülasyon esnasında elektrotlara kayış tokası veya kolye gibi metalik cisimlerin temas etmemesine dikkat ediniz. Aleti kullandığınız alanda takı veya piercing (örn. göbek piercingleri) kullanıyorsanız, aleti kullanmaya başlamadan önce ilgili takıyı çıkarmanız gerekir, çünkü aksi halde noktasal yanıklar oluşabilir. • Muhtemel tehlikeleri önlemek için, aleti çocukların erişemeyeceği şekilde muhafaza ediniz. • Kontakları olan elektrot kablosunu kulaklıklarınız veya başka cihazlar ile karıştırmayınız ve elektrotları başka cihazlara bağlamayınız. • Bu aleti, vücudunuza elektrik sinyalleri veya titreşimleri veren başka cihazlar ile aynı anda kullanmayınız. • Kolay alevlenen maddelerin, gazların veya patlayıcı maddelerin yakınında kullanmayınız. • Akü kullanmayınız ve sadece aynı tipten pil kullanınız. • Uygulamayı ilk dakikalarda oturarak veya yatarak yaparak, nadir durumlarda söz konusu olabilecek zayıf düşme reaksiyonundan (halsizlik) kaynaklanabilecek gereksiz yaralanma tehlikesine olanak tanımayınız. Bir halsiz kalma durumunda cihazı derhal durdurunuz ve bacaklarınızı yüksek bir pozisyona alınız (yakl. 5 -10 dak.). • Cilde önceden yağlayıcı kremler veya merhemler uygulanması tavsiye edilmez, çünkü bu durumda elektrotlar çok daha fazla aşınır ya da bu gibi durumlarda rahatsız edici ani yüksek elektrik akımları söz konusu olabilir. Cihazda hasar • Emin değilseniz, cihazda hasar olduğunda, cihazı kullanmayınız ve satıcınıza veya bildirilen yetkili servis adresine başvurunuz. • Cihazda aşınma, eskime veya hasar belirtileri olup olmadığını kontrol ediniz. Böylesi belirtilerin olması halinde veya cihaz amacına uygun kullanılmamışsa, cihazı tekrar kullanılmadan önce, üreticiye veya yetkili satıcıya götürüp göstermeniz gerekir. • Cihaz bozuksa veya herhangi bir işletme arızası söz konusu olursa, cihazı derhal kapatınız. • Cihazı kesinlikle kendiniz açmayı ve/veya onarmayı denemeyiniz. Onarımları sadece yetkili servise veya yetkili satıcılara yaptırınız. Verilen bilgi ve direktiflere uyulmaması halinde, garantie geçerliliğini yitirir. • Üretici, kuraldışı veya yanlış kullanmadan dolayı ortaya çıkan hasar ve arızalar için sorumluluk kabul etmez. ESD (elektrostatik boşalma veya deşarj) hakkında bilgiler ESD ikaz levhaları ile donatılmış kovanlara veya soketlere dokunulmasının yasak olduğuna lütfen dikkat ediniz. ESD koruyucu önlemler: _ ESD ikaz levhaları ile donatılmış fişlere / kovanlara veya soketlere parmaklarınız ile dokunmayınız! – ESD ikaz levhaları ile donatılmış fişlere / kovanlara veya soketlere, elden kullanılan aletler ile dokunmayınız! ESD ikaz levhaları ile ilgili daha fazla açıklama ve konu ile ilgili muhtemel eğitim hakkında bilgi almak için, yetkili servise başvurunuz. 3. Elektrik akımı parametreleri Elektronik stimülasyon cihazları, ayarlara bağlı olarak stimülasyon efektini farklı etkileyen, aşağıdaki elektrik akım ayarları ile çalışır: Uyarma akımının zaman fonksiyonunu tarif eder. Burada tek fazlı ve çift fazlı empülsiyon akımları olarak, iki farklı akım söz konusudur. Tek fazlı empülsiyon akımlarında akım tek yönde akar, çift fazlı empülsiyon akımlarında ise uyarma akımı yönünü değiştirir. Dijital TENS/EMS ünitesinde sadece çift fazlı empülsiyon 75 Empülsiyon yoğunluğu 3.1 Empülsiyon şekli Tek fazlı empülsiyonlar Süre Çift fazlı empülsiyonlar 3.5 Periyodik kontrollü empülsiyon parametresi varyasyonu akımları vardır, çünkü bu akımlar kaslardaki yükü azaltır, daha az kas yorulmasına neden olur ve daha güvenilir bir uygulama sağlar. Dijital TENS/EMS ünitesinde sadece çift fazlı empülsiyon akımları vardır, çünkü bu akımlar kaslardaki yükü azaltır, daha az kas yorulmasına neden olur ve daha güvenilir bir uygulama sağlar. Bir çok durumda, uygulama yerindeki tüm doku teşekkülüne erişilebilmesi için, birden fazla empülsiyon parametresi uygulanması gereklidir. Dijital TENS/EMS ünitesinde bu durum, mevcut programların otomatik olarak periyodik bir empülsiyon parametre değişikliği yapması sayesinde gerçekleşir. Böylelikle u ygulama yerindeki tekil kas gruplarının yorulmasına karşı da önlem alınmış olur. Dijital TENS/EMS ünitesinde elektrik akımı parametrelerinin mantıklı ön ayarları vardır. Fakat uygulama esnasında her zaman empülsiyon yoğunluğunu değiştirme olanağına sahipsiniz ve her bir programda ayrıca önceden empülsiyon frekansını değiştirerek, sizin için en rahat ya da en başarılı olma ihtimali olan uygulamayı gerçekleştirebilirsiniz. 3.2 Empülsiyon frekansı Frekans, bir saniyede uygulanan tekil empülsiyon adedini Periyot süresi Hz (Hertz) birim türünden bildirir. Periyot süresinin ters değeri (bir bölü değer) üzerinden hesaplanabilir. İlgili frekans, hangi kas lifi tiplerinin öncelikle reaksiyon göstereceğini belirler. Yavaş reaksiyon gösteren lifler, öncelikle 15 Hz frekansına kadar olan düşük empülsiyon frekanslarında reaksiyon gösterir, hızlı reaksiyon gösteren lifler ise, ancak yakl. 35 Hz frekanstan daha yüksek frekanslarda reaksiyon gösterir. Yakl. 45 -70 Hz empülsiyonda kas dahilinde sürekli gerilim ve buna bağlı olarak hızlı kas yorulması söz konusu olur. Bu nedenle, daha yüksek empülsiyon frekansları öncelikle hızlı kuvvet ve azami kuvvet antrenmanı için uygulanabilir. 4. Cihazın tarifi A 4.1 Bileşenlerin tanımı Ekran (ana menü): B A Empülsiyon şiddeti (yoğunluğu) B Program numaraları / Periyot numaraları C C Frekans (Hz) D D Düşük pil (akü) şarj seviyesi E TENS/EMS/MASAJ menüleri e F Timer fonksiyonu (bakiye çalışma süresi göstergesi) G İşlem durumu göstergesi a Tuşlar: a Seçme tuşları UP (yukarı) ve DOWN (aşağı) b b Tasdik tuşu ENTER c AÇIK / KAPALI tuşu d MENÜ tuşu e Şiddet (yoğunluk) tuşları CH1+, CH1-, CH2+, CH2Aksesuarlar: • 2x bağlantı kablosu • 4x yapışkanlı elektrot (45 x 45 mm) • 1x kayış klipsi 3.3 Empülsiyon genişliği Bu değer ile, mikrosaniye türünden tekil empülsiyon süresi Empülsiyon genişliği bildirilir. Empülsiyon genişliği, ek olarak akımın dokuya girme derinliğini de belirler ve bu durum için şu kural geçerlidir: Daha fazla kas kütlesi için daha yüksek empülsiyon genişliği gereklidir. 3.4 Empülsiyon yoğunluğu Yoğunluk derecesinin ayarı, her bir kullanıcının soyut algılamasına veya hissetmesine göre kişisel yapılır ve kullanma yeri, ciltteki kan besleme durumu, cilt kalınlığı ve elektrot temasının kalitesi gibi bir çok faktöre bağlıdır. Gerçi pratik ayarlama etkili olmalıdır fakat örn. uygulama bölgesinde ağrı gibi rahatsız edici algılamalara neden olmamalıdır. Hafif karıncalanma yeterli bir stimülasyon enerjisi belirtisi iken, ağrıya neden olan her ayar önlenmelidir. Uzun süreli uygulamada, uygulama yerindeki uyum süreci için gerekli zamandan dolayı, ek bir kalibrasyon gerekli olabilir. 76 E F G e c d 6. Programa genel bakış 4.2 Tuş fonksiyonları Her bir tuşa basılması, bir sinyal sesi ile tasdik edilir ve böylelikle bir tuşa istenmeden basılması belli edilir. Bu sinyal sesini kapatmak mümkün değildir. AÇIK/KAPALI (1) Cihazı açmak için kısaca basınız. Cihaz açılırken tuşa 10 saniye boyunca basılırsa, cihaz yine kendiliğinden kapanır. (2) Stimülasyon tedavisine basit bir şekilde basılarak ara verilmesi = Mola modu (3) Uzun süre basılarak cihazın kapatılması (yakl. 3 saniye) ve (1) (A) tedavi programının, (B) frekansın ve (C) tedavi süresinin seçilmesi (2) DOWN tuşu ile, çalışmakta olan stimülasyon uygulamasında her iki kanal için empülsiyon yoğunluğu düşürülür. MENÜ (1) TENS, EMS ve MASSAGE alt menüleri arasında navigasyon (2) (A) program seçme penceresine veya (B) ana menüsüne geri dönülmesi ENTER (1) Menü seçimi (2) UP/DOWN ile yapılmış bir seçimin tasdik edilmesi; kanal yoğunluğu hariç CH1+, CH1-, CH2+, CH2Empülsiyon yoğunluğunun ayarlanması 6.1 Esaslar Dijital TENS/EMS toplam 50 programa sahiptir: • 20 TENS-Programları • 20 EMS-Programları • 10 MASSAGE-Programları Bütün programlarda uygulama süresini ve her iki kanal için de impülsiyon yoğunluğunu ayrı ayrı ayarlama olanağına sahipsiniz. Bunun haricinde TENS ve EMS programları 11- 20 arasında, stimülasyon etkisinin uygulama yerinin yapısına uyarlanabilmesi için, her bir döngünün empülsiyon frekansını da değiştirebilirsiniz. Döngüler, programları oluşturan çeşitli sekanslardır. Bunlar peş peşe otomatik olarak çalışır ve çeşitli kas elyafı lifi üzerindeki stimülasyonun etkisini büyütür ve hızlı bir kas yorulmasına karşı etkide bulunur. Stimülasyon parametrelerinin standart ayarları ile elektrotların yerleştirilmesi ile ilgili bilgileri TENS, EMS ve MASSAGE için aşağıdaki program tablolarında bulabilirsiniz. 5. Devreye sokulması 1.Eğer takılmışsa, kemer klipsini cihazdan çıkarınız. 2.Cihazın arka yüzündeki pil yuvası kapağının üzerine basınız ve kapağı yan tarafa itiniz. 3.Alkalin AAA 1,5 V tipinde 3 adet pili yerleştiriniz. Pillerin işaretlenmiş olduğu gibi, doğru kutuplara dikkat edilerek yerleştirilmesine kesinlikle dikkat ediniz. 4.Pil yuvasının kapağını tekrar dikkatlice kapatınız. (Şek. 1) 5.Bağlantı kablolarını elektrotlara bağlayınız. (Şek. 2) i Bilgi: Bağlantının çok basit yapılabilmesi için, elektrotlar klips bağlantı düzenekleri ile donatılmıştır. Şek. 1 Şek. 2 77 6.2 TENS-Programları Progr. no. 1 + 11 2 + 12 3 + 13 Anlamlı uygulama alanları, Olası elektrot endikasyonlar konumları Periyot 1 Periyot 5 Geniş- Frelik (µs) kans (Hz) Ense aürilari, kasılmadan 01, 02, 13 250 4 kaynaklanan baş ağrısı 250 6 Sırt ağrıları 03, 04, 05, 06, 250 6 15, 23 250 10 Omuz ağrıları 07, 14 250 2 On Time (sn.) 30 20 30 20 10 Off Time (sn.) 0 0 0 0 0 Periyot 2 Periyot 6 Geniş- Frelik (µs) kans (Hz) 250 4 250 6 250 6 250 10 250 4 On Time (sn.) 30 20 30 20 8 Off Time (sn.) 0 0 0 0 0 Periyot 3 Periyot 7 Geniş- Frelik (µs) kans (Hz) 250 5 250 8 250 8 On Time (sn.) 30 30 20 Off Time (sn.) 0 0 0 250 6 6 0 Periyot 4 Periyot 8 Geniş- Frelik (µs) kans (Hz) 250 5 250 8 250 8 On Time (sn.) 30 30 20 Off Time (sn.) 0 0 0 4 + 14 Sebebi romatoid artrit olan ağrılar Bakınız bilgi/ not 250 60 20 0 250 70 20 0 250 80 30 0 250 80 30 0 5 + 15 Lumbal (bel) şikayetler 22 0 0 0 250 250 250 80 65 45 20 4 30 0 0 0 4 0 250 10 20 0 08 20 4 30 75 Adet göreme şikayetleri 80 70 40 250 6 + 16 250 250 250 250 55 30 0 250 60 30 0 7 + 17 Ağrı programı I Bakınız bilgi/ not 0 0 0 250 250 250 4 8 6 20 20 10 0 0 0 250 250 250 6 10 50 30 30 5 0 0 0 20 20 0 0 09, 10 30 30 5 6 10 Diz şikayetleri, ayak bileği şikayetleri, kapsül yaralanmaları Ağrı programı II 4 8 40 250 250 8 + 18 250 250 250 Bakınız bilgi/ not 250 75 0,25 0,25 250 2 0,5 0 Bakınız bilgi/ not 250 100 0,25 0,25 9 + 19 (Burst) 10 + 20 Ağrı programı III (Burst) On Time (sn.) = Saniye türünden periyot başlatma süresi (kontraksiyon) – Off Time (sn.) = Saniye türünden periyot sona erdirme süresi (gevşeme) Bilgi: Elektrot pozisyonu, ağrı olan bölgenin etrafını kapsamalıdır. Ağrıyan kas grupları söz konusuysa, elektrotlar ilgili kasların etrafına gruplandırılır. Eklem ağrılarında, eklemin ön ve arka tarafına ve eğer elektrot mesafeleri izin veriyorsa, eklemin sağ ve sol tarafına elektrotlar yerleştirilmelidir. Asgari elektrot mesafesi 5 cm altında ve 15 cm üstünde olmamalıdır. Diz ve ayak bileşi eklemleri için geçerli olan 9 ve 10 numaralı resimleri dikkate alınız. Burst programları, değiken sinyal modu ile tedavi edilecek (mümkün olduğu kadar az alışma durumu için) her yer için uygundur. 78 6.3 EMS-Programları Progr. no. Anlamlı uygulama alanları, endikasyonlar Olası elektrot konumları Periyot 1 Periyot 5 GeFrenişlik kans (µs) (Hz) 250 30 On Time (sn.) 5 Off Time (sn.) 1 Periyot 2 Periyot 6 GeFrenişlik kans (µs) (Hz) 250 10 On Time (sn.) 15 Off Time (sn.) 1 Periyot 3 Periyot 7 GeFrenişlik kans (µs) (Hz) 250 50 On Time (sn.) 5 Off Time (sn.) 1 Periyot 4 Periyot 8 GeFrenişlik kans (µs) (Hz) On Time (sn.) Off Time (sn.) 250 5 20 1 250 5 30 1 1 + 11 Omuz kasları 07, 14 2 + 12 Orta ve alt trapez kas, üst sırt kasları, boyun kasları 30 30 10 1 1 1 250 250 250 4 6 4 20 20 10 1 1 1 5 30 1 Omurga kemiğine yakın sırt kasları programı I 4 6 2 250 3 + 13 01, 02, 03, 04, 250 05, 12, 15 250 03, 06, 22, 23 250 250 6 10 1 4 + 14 Ön ve arka üst kol kasları 16, 17, 18, 19 250 (örn. pazular), ön ve arka alt kol 250 kasları Düz ve çapraz karın kasları 11, 20, 21 250 4 30 1 250 4 30 1 250 4 30 1 5 30 1 6 15 1 250 8 15 1 250 10 15 1 6 + 16 Omurga kemiğine yakın sırt kasları programı II 03, 06, 22, 23 250 2 20 1 250 2 20 1 250 1 30 1 250 1 30 1 7 + 17 Omurga kemiğine yakın sırt kasları programı III 30 30 5 1 1 1 250 250 250 4 8 6 20 20 5 1 1 1 6 30 1 250 6 20 1 Kaba et kasları 4 8 20 250 8 + 18 03, 06, 22, 23 250 250 24 250 250 30 5 1 9 + 19 Ön ve arka üst bacak kasları 25, 26 250 20 5 1 250 6 8 1 250 25 5 1 10 + 20 Ön ve arka alt bacak kasları 27, 28 250 25 5 1 250 6 8 1 250 35 5 1 5 + 15 On Time (sn.) = Saniye türünden periyot başlatma süresi (kontraksiyon) – Off Time (sn.) = Saniye türünden periyot sona erdirme süresi (gevşeme) 79 6.4 MASSAGE Programları Progr. no. 1 2 3 4 5 6 7 8 9 10 Elektrot mesafelerinin seçimi sırasında aşağıdaki notlar geçerlidir: •En mantıklı mesafe: yakl. 5 -15 cm • 5 cm altında birincil olarak yüzeysel yapılar daha çok stimüle edilir • 15 cm üzerinde büyük yüzeyli ve derin yapılar çok zayıf stimüle edilir Kas lifi akışına göre elektrot ilişkisi Akım akış yönünün seçilmesi, istenilen kas tabakasına uygun olarak, kasların lif akışına göre uyarlanmalıdır. Eğer yüzeysel kaslara ulaşılması hedefleniyorsa, elektrot yerleşimi lif akışına paralel yapılmalıdır (S. 2, Res. 16; 1A-1B/2A2B); eğer daha derindeki doku tabakalarına ulaşılacaksa, elektrot yerleşimi lif akışına göre çapraz konumda uygulanmalıdır (S. 2, Res. 16; 1A-2A/1B-2B). İkinci seçenek, çapraz (= enine) elektrot düzenlemesi ile sağlanabilir; örn. S. 2, Res. 16; 1A-2B/2A-1B. Masaj türü Darbeleme ve sıkıştırma masajı Yoğurma ve sıkıştırma masajı Darbeleme masajı Elin dış kenarı ile darbeleme masajı / Bastırma masajı Elin dış kenarı ile darbeleme masajı / Bastırma masajı Sallama masajı Darbeleme masajı (sırayla elektrotlar arasında değişme) Masaj jet tahriği (sırayla elektrotlar arasında değişme) Bastırma masaj jet tahriği (sırayla elektrotlar arasında değişme) Kombine program (sırayla elektrotlar arasında değişme) Kanal tertibi: Kanal 1 (CH1): Bağlantı sol, şiddet (yoğunluk) ayarı basma tuşu sol, empülsiyon şiddet (yoğunluk) göstergesi sol (CH1). Kanal 2 (CH2): Bağlantı sağ, şiddet (yoğunluk) ayarı basma tuşu sağ, empülsiyon şiddet (yoğunluk) göstergesi sağ (CH2). i 2 ayrı ayarlanabilir kanala ve her biri 2’şer yapıştırma elektroda sahip dijital TENS/EMS vasıtasıyla tedavide, ya bir kanalın elektrotlarını, ağrı noktası elektrotların arasında bulunacak şekilde yerleştirilmesi tavsiye edilir veya bir elektrotu doğrudan ağrı noktasının üzerine, diğerini ise bundan minimum 2-3 cm uzağa yerleştirin. İkinci kanalın elektrotları, başka ağrı noktalarının aynı anda tedavisinde kullanılabilir veya birinci kanalın elektrotlarıyla birlikte ağrı bölgesinin çevrelenmesinde (karşı taraf) kullanılabilir. Burada yine bir çapraz düzenleme mantıklıdır. i Masaj fonksiyonu ile ilgili öneriler: Optimum bir tedavi için daima tüm 4 elektrotu kullanın. i Elektrotların dayanıklılığını uzatmak için bunları temiz, mümkün olduğunca kılsız ve yağsız cilt üzerinde kullanın. Şayet gerekiyorsa cildi uygulama yapmadan önce suyla temizleyin ve kılları temizleyin. i Uygulama sırasında bir elektrot çözülecek olursa, o taktirde her iki kanalın empülsiyon yoğunluğu en düşük kademeye gider. Ara moduna ulaşmak için AÇMA/KAPATMA düğmesine basın, elektrotu yeniden yerleştirin ve AÇMA/ KAPATMA düğmesine tekrar basarak uygulamaya devam edin ve istediğiniz empülsiyon yoğunluğunu ayarlayın. Elektrotların konumlandırılması öyle seçilmelidir ki, ilgili kas bölümlerinin etrafı kapsanmalıdır. En iyi etkiyi elde edebilmek için, elektrotların mesafesi azami yakl. 15 cm olmalıdır. Elektrotlar, göğüs kafesinin ön yüzünde kullanılmamalıdır, yani sol ve sağ göğüs kasına masaj uygulanmamalıdır. 6.5 Elektrotların yerleştirilmesi ile ilgili notlar Elektrotların tutarlı bir şekilde yerleştirilmesi, bir stimülasyon uygulamasının hedeflenen başarısı açısından önem taşır. Hedeflenen uygulama bölgesinde optimum elektrot pozisyonlarını, doktorunuzla birlikte belirlemenizi önermekteyiz. Kapağın iç sayfasında bulunan önerilen elektrot yerleşimleri, kılavuz görevi yapmaktadır (Şekiller 1- 28). Elektrotların yerleşiminin seçilmesi sırasında aşağıdaki notlar geçerlidir: Elektrot mesafesi Elektrot mesafesi ne kadar büyük seçilirse, stimüle edilen doku hacmi o kadar büyür. Bu, doku hacminin yüzeyi ve derinliği için geçerlidir. Aynı anda elektrot mesafesinin yükselmesiyle birlikte, dokunun stimülasyon gücü artmaktadır, bu, elektrot mesafesinin daha büyük seçilmesi durumunda gerçi daha büyük hacim anlamına gelir ama bu daha zayıf stimüle edilir. Stimülasyonunun artırılması için empülsiyon yoğunluğu yükseltilmelidir. 80 7. Uygulama 7.3 11 ile 20 arasındaki TENS/EMS programlarının akışı (bireysel programlar) • Eğer cihaz 3 dakika boyunca kullanılmazsa, bu kendini otomatik olarak kapatır (kapatma otomatiği). Tekrar açıldığında ana menünün LCD ekranı görüntülenir, bu sırada son kullanılan alt menü yanıp-söner. • Eğer izin verilen bir tuşa basılırsa, kısa bir bip sesi duyulur, izin verilmeyen bir tuşa basıldığında ise, iki bip sesi duyulur. 11 ile 20 arasındaki programlar, ayrıca bireyselleştirebileceğiniz ön ayarlı programlardır. Burada empülsiyon frekansını ayarlama olanağına sahipsiniz. • Program tablolarının arasından, amaçlarınız için uygun bir program seçin. • Elektrotları hedef bölgesine yerleştirin ve bunları cihazla birleştirin. Bu sırada söz konusu yerleştirme önerilerinin size yardımı dokunabilir. • Cihazı açmak için AÇMA/KAPATMA düğmesine basın. • MENU’ye basarak alt menülerin arasında gezinebilir ve seçiminizi ENTER ile onaylayabilirsiniz. (Şek. 1, örnek ekran gösterimi TENS) Şek. 1 • UP/DOWN tuşlarıyla istediğiniz programı seçin ve ENTER ile onaylayın (Şek. 2, örn. ekran gösterimi TENS program no. 11). • UP/DOWN tuşlarıyla döngü 1 için istediğiniz frekansı (Hz) seçin ve ENTER ile onaylayın (Şek. 3). Bu işlemi tüm sonraki Şek. 2 döngüler için tekrarlayın. • Frekans ayarının sona erdirilmesi için son olarak kullanılan döngünün frekansını (Hz) “--0”a getirin ve ENTER’e basın, sonraki döngülerin tüm frekans ayarları otomatik olarak “0”a Şek. 3 getirilir ve böylelikle dikkate alınmaz. i Öneri: Frekans ayarlarını atlamak ve tedavi süresi ayarına ulaşabilmek için ENTER tuşuna 2 saniye boyunca basılı tutun. Tüm 8 döngüye ihtiyaç duymanız durumunda, frekans ayarı seçimini aynı şekilde ENTER tuşuna 2 saniye basarak bitirin. Şek. 4 • Daha sonra UP/DOWN tuşlarıyla istenen tedavi süresini seçin ve ENTER ile onaylayın (Şek. 4, örn. tedavi süresi 30 dakika). • Cihaz bekleme konumunda bulunuyor (Şek. 5). • Stimülasyon tedavisine başlamak için AÇMA/KAPATMA’ya Şek. 5 basın. Operasyon durumunun göstergesi yanıp-sönmeye başlar (Şek. 6). • CH 1+/CH 2+ tuşuna basarak sizin için en rahat empülsiyon yoğunluğunu seçin. Şek. 6 Empülsiyon yoğunluğunun göstergesi uygun şekilde değişir. i Not: Bireyselleştirilmiş program ayarlarınız kaydedilir ve sonraki seçimde otomatik olarak çağrılır. 7.1 Uygulama ile ilgili notlar 7.2 01-10 TENS, EMS ve MASSAGE programlarının akışı (hızlı çalıştırma) • Program tablolarının arasından, amaçlarınız için uygun bir program seçin. • Elektrotları hedef bölgesine yerleştirin ve bunları cihazla birleştirin. Bu sırada söz konusu yerleştirme önerilerinin size yardımı dokunabilir. • Cihazı açmak için AÇMA/KAPATMA düğmesine basın. • MENU’ye basarak alt menülerin arasında gezinebilir ve seçiminizi ENTER ile onaylayabilirsiniz. (Şek. 1, örnek ekran gösterimi TENS) Şek. 1 • UP/DOWN tuşlarıyla istediğiniz programı seçin ve ENTER ile onaylayın (Şek. 2, örn. ekran gösterimi TENS program no. 01). • UP/DOWN tuşlarıyla toplam tedavi süresini seçin ve ENTER ile onaylayın (Şek. 3, örn. tedavi süresi 30 dakika). Şek. 2 Cihaz bekleme konumunda bulunuyor (Şek. 4). • Stimülasyon tedavisine başlamak için AÇMA/KAPATMA’ya basın. Operasyon durumunun göstergesi değişmeye başlar (Şek. 5). • CH 1+/CH 2+ tuşuna basarak sizin için en rahat empülsiyon Şek. 3 yoğunluğunu seçin. Empülsiyon yoğunluğunun göstergesi uygun şekilde değişir. Şek. 4 Şek. 5 81 8. Temizleme ve muhafaza 7.4 Ayarların değiştirilmesi Yoğunluk değişimi (uygulama sırasında) • CH1+/- ve CH2+/-: Kanal başına yoğunluğun değişmesi •DOWN-Tuşu : Her iki kanalın yoğunluğu düşürülür Stimülasyonun kesilmesi AÇIK/KAPALI-Tuşuna basın. Tekrar basıldığında uygulama tekrar başlatılır. Komple bir kanalın kapatılması Kanal en düşük yoğunluğa ulaşana kadar CH- tuşuna basın, ardından tuş ekranda görülmeyene kadar buna basılı tutun. Söz konusu CH+ tuşuna basılı tutarsanız, o taktirde kanal yeniden aktifleştirilir. Uygulamanın değiştirilmesi (komple veya münferit parametreler) • AÇIK/KAPALI: Stimülasyonun kesilmesi • MENÜ: Program seçme penceresi veya ana menüye dönüş • Istenilen parametrelerin ayarlanması. ENTER ile onaylama. Uygulamaya devam etmek için AÇMA/KAPATMA. Yapıştırma elektrotları: • Elektrotların mümkün olduğunca uzun süreli yapışmasını sağlamak için, bunlar nemli, hav bırakmayan bir bezle dikkatli bir şekilde temizlenmelidir. • Uygulamadan sonra elektrotları tekrar taşıyıcı folyonun üzerine geri yapıştırın. Cihazın temizlenmesi: • Her temizlikten önce cihazın içinden pillerini çıkartın. • Cihazı, kullandıktan sonra yumuşak ve hafif nemli bir bezle temizleyiniz. Çok kirlenme durumunda bezi hafif bir sabun çözeltisi ile de nemlendirebilirsiniz. • Cihazın içine su girmemesine dikkat edin. Eğer böyle bir durum gerçekleşecek olursa, bu durumda cihazı ancak tamamen kuruduktan sonra kullanın. • Temizlik için kimyasal temizleyici veya aşındırıcı madde kullanmayın. Muhafaza: • Uzun süre kullanmadığınızda pilleri cihazın içinden çıkartın. Akan piller cihaza hasar verebilir. • Bağlantı tesisatları ile elektrotları keskin bir şekilde kırmayın. • Bağlantı tesisatlarını elektrotlardan ayırın. • Kullanımdan sonra elektrotları tekrar taşıyıcı folyonun üzerine geri yapıştırın. • Cihazı serin, havalandırılan bir yerde saklayın. • Cihazın üzerine ağır cisimler yerleştirmeyin. 7.5 Doctor’s Function Doctor’s Function özel bir ayarlama olup, bununla çok özel programınızı daha basit ve hedefli çağırabilirsiniz. Bireysel program ayarınız hemen açılma sırasında bekleme konumuna çağrılır ve AÇMA/KAPATMA düğmesine basitçe basarak aktifleştirilir. Bu bireysel programın ayarlanması, bu sırada örneğin doktorunuzun önerisi ile gerçekleştirilebilir. Doctor’s Function’da stimülasyon tedavisi sırasında sadece empülsiyon yoğunluğu değiştirilebilir. Dijital TENS/EMS‘nin tüm diğer parametreler ve programları bu durumda bloke olur ve değiştirilemez veya çağrılamaz. Doctor’s Function’un ayarlanması: • Programınızı ve söz konusu ayarları 7.2 veya 7.3 altında açıklandığı gibi seçin. • AÇMA/KAPATMA tuşuna basarak programı aktifleştirmeden önce, AÇMA/ KAPATMA ve CH 2+ tuşlarına aynı anda yaklaşık 5 saniye boyunca basılı tutun. Doctor’s Function’daki kaydetme, uzun bir sinyal sesiyle onaylanır. Doctor’s Function’un silinmesi: Cihazın tekrar serbestleştirilmesi ive başka programlara ulaşabilmek için, AÇMA/KAPATMA ve CH 2+ tuşlarına aynı anda yaklaşık 5 saniye boyunca basılı tutun (Stimülasyon sırasında mümkün değildir). Doctor’s Function’un silinmesi, uzun bir sinyal sesiyle onaylanır. 9. Atığın yok edilmesi Kullanılmış ve tamamen boşalmış piller ve aküler, özel olarak işaretlenmiş toplama kaplarına atılarak, özel çöp alım yerlerine veya Elektronik Eşya Saticilarina verilerek imha edilmelidir. Yasal olarak, pilleri imha etmekle yükümlüsünüz. Uyarı: Aşağıda belirtilen işaretleri zararlı madde içeren pillerde görürsünüz: Pb = Kurşun içeren pil, Cd = Kadmiyum içeren pil, Hg = Civa içeren pil. Lütfen aleti, 2002/96/EC – WEEE’nin (Waste Electrical and Electronic Equipment – Atık elektrikli ve elektronik donanım) elektro ve elektronik eski aletler yönetmeliği uyarınca ilgili toplama, ayırma veya geri dönüşüm tesislerine veriniz. K onuyla ilgili sorularınız olması halinde, yerel idarelerin ilgili birimlerine müracaat ediniz. 82 10. Problemler/problem çözümleri Tedavi bölgesindeki cilt kızarıyor. Ne yapmalı? Tedaviyi hemen yarıda kesin ve cilt durumunun normalleşmesini bekleyin. Elektrotun altında hemen kaybolan cilt kızarıklığı tehlikesizdir ve bölgesel olarak harekete geçirilen kan akışı ile açıklanır. Ancak cilt tahrişi devam ederse ve muhtemelen kaşıntı veya enflamasyon oluşursa, uygulamaya devam etmeden önce doktorla görüşülmelidir. Gerekiyorsa yapıştırma yüzeyi ile ilgili bir alerji araştırılmalıdır. Kemer klipsi sıkı oturmuyor. Ne yapmalı? Eğer klips kemere sabitlenmişse ve ancak bundan sonra cihaz harekete geçirilirse, bu durumda optimum duruş sağlanmaz. Bundan dolayı cihazı elinize alın. Kemer klipsini cihazın arka tarafına yerleştirin. Klipsin doğru oturmasını, duyulur ve hissedilir bir oturma ile anlarsınız. Şimdi kemer klipsiyle birlikte cihazı yeniden kemere sabitleyin. AÇIK/KAPALI tuşuna basıldığında cihaz açılmıyor. Ne yapmalı? (1) Pillerin doğru yerleştirildiğinden ve temas ettiğinden emin olun. (2) Gereken hallerde pilleri değiştirin. (3) Müşteri hizmetleri ile temasa geçin Elektrotlar vücuttan ayrılıyor. Ne yapmalı? (1) Elektrotların yapışkan yüzeyini nemli, hav bırakmayan bir bezle temizleyin. Ardından kurumaya bırakın ve tekrar yapıştırın. Eğer elektrotlar yine iyi tutunmuyorsa, bunlar değiştirilmelidir. (2) Her uygulamadan önce cildi temizleyin, tedaviden önce cilt balsamı ile bakım yağları kullanmayın. Traş, elektrotların tutunabilirliğini artırabilir. Cihaz, tedavi sırasında anormal sinyal sesleri çıkartıyor. Ne yapmalı? (1) Ekranı gözleyin, bir kanal yanıp-sönüyor mu? AÇIK/KAPALI tuşuna basarak programı yarıda kesin. Bağlantı tesisatlarının elektrotlara olan doğru bağlantısını kontrol edin. Elektrotların tedavi bölgesi ile sıkı teması olduğundan emin olun. (2) Bağlantı tesisatı soketlerinin cihaz ile sıkıca bağlantılı olduğundan emin olun. (3) Sinyal sesleri kanal yanıp-sönerken durmuyorsa, bağlantı kablosunu değiştirin. (4) Ekran yanıp-sönen bir pil sinyali gösteriyor. Tüm pilleri yenileyin. Hissedilir bir stimülasyon gerçekleşmiyor. Ne yapmalı? (1) Eğer bir ikaz sinyali duyulursa, yukarıda tanımlanan çalışma adımlarını uygulayın. (2) Programı yeniden başlatmak için AÇMA/KAPATMA düğmesine basın. (3) Elektrot yerleşimini kontrol edin veya yapıştırma elektrotların üst üste binmemesine dikkat edin. (4) Empülsiyon yoğunluğunu adım adım artırın. (5) Piller neredeyse boş. Bunları değiştirin. Elektrotlarda rahatsız edici bir his algılıyorsunuz. Ne yapmalı? (1) Elektrotlar kötü yerleştirilmiş. Yerleşimi kontrol edin ve gerekiyorsa yeniden pozisyonlandırın. (2) Elektrotlar aşınmış. Bunlar, artık akım dağılımının eşit ve tam yüzeyli olmamasından dolayı ciltte tahrişlere neden olabilir. Bundan dolayı bunları değiştirin. 11. Teknik bilgiler İsim ve model: EM 41 Çıkış eğrisi biçimi: Bifazlı dikdörtgen empülsiyonlar Empülsiyon süresi: 40 - 250 µs Empülsiyon frekansı: 1-120 Hz Çıkış gerilimi: maks. 90 Vpp (an 500 Ohm) Çıkış akımı: maks. 180 mApp (an 500 Ohm) Gerilim beslemesi: 3x AAA-Pil Tedavi süresi: 5 ile 90 dakika arasında ayarlanabilir Yoğunluk: 0 ile 15 arasında ayarlanabilir İşletme koşulları:10 °C - 40 °C (50 °F -104 °F) % 30-85’lik bir bağıl hava neminde Saklama koşulları:-10 °C - 50 °C (14 °F -122 °F) % 10-95’lik bir bağıl hava neminde Ölçüler: 122 x 59 x 23 mm 83 Ağırlık: İşaret açıklaması: 69 g (piller hariç), 108 g (kemer klipsi ve piller dahil) Uygulama parçası tip BF Dikkat! Kullanma kılavuzunu okuyunuz. Not: Cihazın spesifikasyonların dışında çalıştırılması durumunda, mükemmel bir fonksiyon sağlanmaz! Ürünün iyileştirilmesi ve geliştirilmesi ile ilgili teknik değişiklik hakkımızı saklı tutuyoruz. Bu cihaz EN60601-1, EN60601-1-2 ve EN60601-2-10 Avrupa normlarına uygundur ve elektromanyetik uyumluluk bakımından özel güvenlik önlemlerine tabidir. Lütfen bu sırada taşınabilir ve mobil HF iletişim düzeneklerinin bu cihazı etkileyebileceğini dikkate alın. Daha detaylı bilgileri bildirilen müşteri servisi adresinden talep edebilirsiniz. Cihaz, tıbbi ürünler, tıbbi ürün yasası için Avupa yönetmelikleri taleplerine uygundur. Eğer cihaz ticari veya ekonomik amaçlarla kullanılırsa, “Tıbbi ürünler için işletici yönetmeliği” uyarınca düzenli kontroller uygulamalıdır. Özel kullanımda da cihazın üreticide 2 yıllık aralıklarla ölçüm-tekniksel bir kontrole tabi tutulmasını öneriyoruz. 84 Многоуважаемый покупатель! Мы рады тому, что Вы выбрали товар из нашего ассортимента. .Изделия нашей компании высочайшего качества, используемых для Измерения веса, артериального давления, температуры тела, частоты пульса, в области мягкой терапии и массажа. Внимательно прочтите данную инструкцию по эксплуатации, сохраняйте ее для дальнейшего использования, дайте ее прочитать и другим пользователям и строго следуйте приведенным в ней указаниям РУССКИЙ Оглавление 1. Для знакомства.....................................................................................85 1.1 Что такое и что может цифровой прибор TENS/EMS?..................85 1.2 Объем поставки................................................................................86 2. Важные указания..................................................................................87 3. Параметры тока....................................................................................89 3.1 Форма импульсов..............................................................................89 3.2 Частота импульсов............................................................................89 3.3 Длительность импульса....................................................................89 3.4 Интенсивность импульсов...............................................................89 3.5 Цикличное изменение параметров импульсов...............................89 4. Описание приборов..............................................................................90 4.1 Обозначение компонентов...............................................................90 4.2 Функции кнопок.................................................................................90 5. Ввод в эксплуатацию............................................................................90 6. Перечень программ..............................................................................90 6.1 Общая информация..........................................................................91 6.2 Программы TENS..............................................................................92 6.3 Программы EMS...............................................................................93 6.4 Программы MASSAGE......................................................................94 6.5 Указания по расположению электродов.........................................94 7.Применение............................................................................................95 7.1 Указания по применению.................................................................95 7.2 Порядок действий для программ 01–10 TENS, EMS и MASSAGE.. 95 7.3 Порядок действий для программ TENS/EMS 11–20......................95 7.4 Изменения настроек.........................................................................96 7.5 Doctor’s Function...............................................................................96 8. Уход и хранение.....................................................................................96 9.Утилизация.............................................................................................97 10.Проблемы и их решение......................................................................97 11. Технические данные.............................................................................98 12. Гарантия..................................................................................................98 С дружескими пожеланиями фирма БОЙРЕР 1. Для знакомства 1.1 Что такое и что может цифровой прибор TENS/EMS? Цифровой прибор TENS/EMS относится к группе электростимуляторов. Он включает в себя три базовые функции, которыми можно пользоваться в комбинации: 1.Электрическая стимуляция нервных путей (TENS) 2.Электрическая стимуляция мышечных тканей (EMS) 3.Массажное действие, вызываемое электрическими сигналами. Для этого прибор имеет два независимых каналов стимуляции и четыре самоклеющихся электрода. Он предлагает универсальные функции для повышения общего самочувствия, для облегчения болей, для улучшения физического состояния, расслабления, регенерации мышц и борьбы с усталостью. Для этого Вы можете выбирать предварительно настроенные программы или создавать их самостоятельно в соответствии с Вашими требованиями. Принцип действия электростимуляторов базируется на имитации аутогенных импульсов, которые с помощью электродов передаются через кожу нервным и мышечным волокнам. Электроды могут быть размещены на различных частях тела, возникающее при этом электрическое раздражение безопасно и практически безболезненно. Вы чувствуете при определенных методах применения лишь небольшой зуд или вибрацию. Переданные в ткань электрические импульсы влияют на передачу возбуждения по нервам, а также на нервные узлы и группы мышц в области применения. Действие электростимуляции, как правило, становится видным только после 85 регулярного повторного применения. Электростимуляция не заменяет регулярную тренировку мышц, но в значительной степени дополняет ее действие. Под термином TENS – чрескожной электростимуляцией нервных окончаний – понимают действующее через кожу электрическое возбуждение нервов. TENS допущен в качестве клинически доказанного, эффективного, не медикаментозного, при правильном применении не имеющего побочных эффектов метода по лечению болей, вызываемых определенными причинами, – при этом в т. ч. и для простой самотерапии. Болеутоляющее и болеподавляющее действие достигается, кроме всего прочего, путем подавления передачи боли по нервам (при этом, прежде всего, благодаря высокочастотным импульсам) и роста выделения аутогенного эндорфина, который уменьшает чувствительность к боли благодаря своему действию на центральную нервную систему. Метод научно подтвержден и допущен к медицинскому применению. Каждая картина заболевания, позволяющая использовать TENS, должна быть обговорена с лечащим врачом. Он даст Вам также указания по самотерапии с применением TENS. TENS клинически испытан и допущен для следующих областей применения: • боли в спине, особенно жалобы в области поясничного и шейного отделов позвоночника • боли в суставах (например, коленных, тазобедренных, плечевых) • невралгии • головные боли • боли при менструациях у женщин • боли после травм опорно-двигательного аппарата • боли при нарушениях кровообращения • хронические боли, вызываемые различными причинами. Электростимуляция мышц (EMS) является широко распространенным и общепризнанным методом и уже многие годы применяется в спортивной и реабилитационной медицине. В области спорта и фитнеса EMS применяется как дополнение к обычным методам тренировки мышц, чтобы повысить функциональные способности мышц и достичь желаемых пропорций тела. EMS используется в двух направлениях. С одной стороны, можно вызывать целенаправленное укрепление мускулатуры (активирующее применение), а с другой – может достигаться расслабляющее, восстанавливающее действие (расслабляющее применение). К активирующему применению относятся: • тренировка мышц для повышения выносливости и/или • тренировка мышц для поддержки укрепления определенных мышц или групп мышц, чтобы достичь желаемых изменений в пропорциях тела. К расслабляющему применению относятся: • релаксация мышц для устранения растяжения и защемления мышц • улучшение при явлениях мышечной усталости • ускорение регенерации мышц после большой мышечной нагрузки (например, после марафонского бега). Кроме того, цифровой прибор TENS/EMS благодаря встроенной технологии массажа дает возможность с помощью приближенной по восприятию и действию к реальному массажу программы уменьшать растяжения и защемления мышц и бороться с явлениями усталости. На основании рекомендаций по позиционированию и таблиц программ, приведенных в данной инструкции, Вы можете быстро и просто определить настройку прибора для соответствующего применения (в зависимости от части тела) и для соответствующего действия. Благодаря двум раздельно регулируемым каналам, цифровой прибор TENS/ EMS обеспечивает возможность регулировки интенсивности импульсов независимо друг от друга на две части тела, например, чтобы охватить тело с обеих сторон или равномерно стимулировать большие участки тканей. Кроме того, индивидуальная регулировка интенсивности каждого канала дает Вам возможность одновременного применения прибора в двух различных частях тела, благодаря чему достигается экономия времени по сравнению с последовательным применением. 1.2 Объем поставки – 1 цифровой прибор TENS/EMS (включая защелку для ремня) – 2 соединительный кабель – 4 самоклеющихся электрода (45 x 45 мм) – 3 батарейки типа AAA – данная инструкция по применению – 1 краткая инструкция (рекомендации по расположению электродов и примеры применения) – 1 сумка для хранения 86 Дополнительно покупаемые части воспалениях, покраснениях, кожной сыпи (например, аллергии), ожогах, ударах, отеках, на открытых или заживающих ранах, на шрамах после операций, находящихся в процессе заживления) • при высокой влажности воздуха, например, в ванных комнатах или при приеме ванны или душа. • Не пользоваться после употребления алкоголя • При одновременном присоединении к высокочастотному хирургическому аппарату. Электростимулятор для спины с четырьмя специальными износостойкими контактными электродами, материал № 162.825 8 самоклеющихся электродов (45 x 45 мм), арт. № 661.02 4 самоклеющихся электрода (50 x 100 мм), арт. № 661.01 2. Важные указания Применение прибора не заменяет врачебных консультаций и лечения. Поэтому при любых типах болей или болезней всегда предварительно проконсультируйтесь с врачом! Перед применением прибора проконсультируйтесь с лечащим врачом при: ВНИМАНИЕ! • острых заболеваниях, в особенности при подозрении или наличии артериальной гипертонии, нарушениях свертывания крови, склонности к тромбоэмболии, а также при злокачественных новообразованиях • любых кожных заболеваниях • невыясненных хронических болезненных состояниях, независимо от части тела • диабете • любых нарушениях чувствительности с пониженной болевой чувствительностью (например, при нарушениях обмена веществ) • одновременно проводимых медицинских лечениях • возникающих при стимуляции жалобах • неисчезающих раздражениях кожи в связи с длительной стимуляции с расположением электродов в одном и том же месте Во избежание вреда здоровью настоятельно не рекомендуется применять цифровой прибор TENS/EMS в следующих случаях: • при имплантированных электроприборах (например, стимулятор ритма сердца) • при наличии металлических имплантатов • Для людей, использующих инсулиновые насосы • при высокой температуре (например, свыше 39 °C) • при известных или острых нарушениях ритма сердца и других нарушениях возбуждения и проведения импульсов в сердце • при припадках (например, эпилепсии) • во время беременности • при раковых заболеваниях • после операций, при которых усиленное сокращение мышц может мешать процессу выздоровления • Запрещается применение прибора вблизи сердца. Стимулирующие электроды запрещается устанавливать в каких-либо точках передней части грудной клетки (ограниченной ребрами и грудиной), в особенности на обоих больших грудных мышцах. Здесь он может повышать опасность мерцания желудочков сердца и вызвать остановку сердца • на костях черепа, в области рта, глотки или гортани • в области шеи / сонных артерий • в области половых органов • при острых или хронических заболеваниях кожи (повреждения или воспаления), (например, при болезненных или безболезненных ВНИМАНИЕ! Используйте цифровой прибор TENS/EMS исключительно: • Для людей • в целях, для которых он был разработан, и только способом, описанным в данной инструкции по применению. Любое неправильное использование может быть опасным • для наружного применения • с входящими в объем поставки и дополнительно купленными оригинальными принадлежностями, в противном случае теряют свою силу притязания по предоставление гарантии 87 МЕРЫ ПРЕДОСТОРОЖНОСТИ: • Не используйте этот прибор одновременно с другими приборами, которые передают телу электрические импульсы. • Не используйте прибор вблизи легко воспламеняющихся веществ, газов или взрывчатых веществ. • Не используйте аккумуляторы; всегда используйте батарейки одинакового типа. • Используйте прибор в первые минуты в положении лежа или сидя, чтобы в редких случаях вазовагальной реакции (чувство слабости) не подвергаться излишней опасности получения травм. При появлении чувства слабости незамедлительно отключите прибор и поднимите ноги (приблизительно на 5–10 минут). • Предварительная обработка кожи жирными кремами не рекомендуется, т. к. это ведет к повышенному износу электродов и может также приводить к неприятным скачкам тока. • Всегда снимайте электроды с кожи, не слишком сильно тяня за них, чтобы в редких случаях очень чувствительной кожи предотвратить ее повреждения. • Не приближайте прибор к источникам тепла и не используйте его вблизи (~1 м) коротко- и микроволновых приборов (например, мобильных телефонов), т. к. это может приводить к неприятным скачкам тока. • Не подвергайте прибор действию прямых солнечных лучей или высоких температур. • Защищайте прибор от пыли, грязи и влаги. Ни в коем случае не погружайте прибор в воду или другие жидкости. • Прибор подходит для персонального использования. • По гигиеническим причинам электродами может пользоваться только один человек. • Если прибор не функционирует должным образом, появляются недомогания или боли, незамедлительно прервите использование. • Для снятия или смещения электродов предварительно отключить прибор или соответствующий канал, чтобы предотвратить нежелательную стимуляцию. • Не видоизменяйте электроды (например, обрезая их). Это ведет к повышенной плотности тока и может быть опасным (макс. рекомендуемое выходное значение для электродов: 9 mA/cm2, эффективная плотность тока свыше 2 мА/см2 требуем повышенной внимательности). • Не применять во время сна, вождения автомобиля или при одновременном управлении машинами и оборудованием. • Не применять при любых работах, при которых непредсказуемая реакция (например, усиленное сокращение мышц, несмотря на низкую интенсивность) может быть опасной. • Следите за тем, чтобы во время стимуляции металлические объекты, например, пряжки ремней или цепочки, не могли войти в контакт с электродами. Если у Вас в зоне применения имеются украшения или пирсинг (например, в пупке), то перед использованием прибора их необходимо снять, т. к. в противном случае можно получить точечные ожоги. • Во избежание возможных опасностей храните прибор в недоступном для детей месте. • Не перепутывайте кабели электродов и контакты с наушниками или другими приборами и не соединяйте электроды с другими приборами. Повреждения • В случае сомнений при повреждениях прибора не используйте его и обратитесь в торговую организацию, продавшую прибор, либо по указанному адресу службы технического обеспечения. • Периодически проверяйте прибор на отсутствие признаков повреждения или износа. При обнаружении подобных признаков или в случае неправильного использования прибора перед повторным использованием его необходимо отправить изготовителю или в торговую организацию. • Незамедлительно выключите прибор, если он неисправен или имеются неполадки в работе. • Ни в коем случае не пытайтесь самостоятельно открыть и/или отремонтировать прибор. Доверяйте выполнять ремонт только службе технического обеспечения или авторизированным торговым организациям. Несоблюдение ведет к потере гарантии. • Изготовитель не несет ответственности за ущерб, вызванный неквалифицированным или неправильным использованием. Информация об ЭСР (электростатическом разряде) Учтите, что запрещается прикасаться к гнездам, которые обозначены предупреждающей табличкой «ЭСР». 88 3.3 Длительность импульса Меры по защите от ЭСР: –Не прикасаться пальцами к штекерам/гнездам, которые обозначены предупреждающей табличкой «ЭСР»! –Не прикасаться находящимися в руках инструментами к штекерам/ гнездам, которые обозначены предупреждающей табличкой «ЭСР»! Под ней понимают длительность единичного импульса в микросекундах. Среди прочего, длительность импульса определяет глубину проникновения тока, причем в общем случае действует следующее правило: большая мышечная масса требует большей длительности импульсов. Дальнейшие пояснения, касающиеся предупреждающей таблички «ЭСР», а также перечень возможных обучающих курсов и их содержание можно получить по запросу в службе технического обеспечения. Длительность импульса 3.4 Интенсивность импульсов Регулировка уровня интенсивности зависит от индивидуального субъективного ощущения каждого отдельного пользователя и определяется большим числом величин, как, например, область применения, кровообращение в коже, толщина кожи, а также качество контакта с электродами. На практике настройка должна быть эффективной, но ни в коем случае не должна вызывать неприятных ощущений, например, более в области применения. В то время, как легкий зуд указывает на достаточную энергию стимуляции, запрещается применять настройки, которые вызывают боль. При длительном использовании может потребоваться регулировка в связи с временными процессами адаптации к области применения. 3. Параметры тока Электростимуляторы работают со следующими настройками тока, которые, в зависимости от регулировки, отказывают различное действие на эффект стимуляции: 3.1 Форма импульсов Интенсивность импульсов Она описывает функцию времени тока возбуждения. Монофазные импульсы При этом различают моно- и двухфазные импульсные токи. При монофазных импульсах ток течет в одном Время направлении, Двухфазные импульсы при двухфазных – ток возбуждения меняет свое направление. В цифровых приборах TENS/EMS применяются только двухфазные импульсные токи, т. к. они разгружают мышцы, ведут к меньшему утомлению мышц и обеспечивают более надежное и безопасное применение. 3.5 Цикличное изменение параметров импульсов Во многих случаях требуется путем применения нескольких параметров импульсов охватить все совокупность структур ткани в области применения. В цифровом приборе TENS/EMS это осуществляется благодаря тому, что предлагаемые программы автоматически выполняют циклическое изменение параметров импульсов. Тем самым также предотвращается усталость отдельных групп мышц в области применения. В цифровом приборе TENS/EMS имеются рациональные предварительные настройки параметров тока. Но Вы можете в любой момент во время применения изменить интенсивность импульсов, а, кроме того, в отдельных программах Вы можете предварительно изменить частоту импульсов, чтобы провести более приятное или сулящее больший успех применение. 3.2 Частота импульсов Длительность Частота указывает число единичных импульсов в секунду, периода она измеряется в Гц (герцах). Ее можно рассчитать, взяв обратное от длительности периода. Соответствующая частота определяет, какие типы мышечных волокон реагируют. Медленно реагирующие мышечные волокна реагирует скорее на низкие частоты импульсов до 15 Гц, а быстро реагирующие волокна начинают реагировать только с частоты более 35 Гц. При импульсах с частотой 45–70 Гц происходит длительное напряжение мышц в сочетании с быстрой мышечной усталостью. Поэтому высокая частота импульсов преимущество применяется для тренировки скоростной и максимальной силы 89 4. Описание прибора 4.1 Обозначение компонентов Дисплей (главное меню): A Интенсивность импульсов B Номера программ/циклов C Частота (Гц) D Низкий уровень заряда батареек E Меню TENS/EMS/МАССАЖ F Функция таймера (индикация оставшегося времени) G Индикация режима работы Кнопки: ▲и▼ (1) Выбор (A) программы, (B) частоты и (C) длительности воздействия (2) Кнопкой DOWN во время стимуляции уменьшается интенсивность импульсов для обоих каналов. A B E МЕНЮ F C D (1) Навигация между подменю TENS, EMS и MASSAGE (2) Возврат в (А) окно выбора программ или в (В) главное меню G e e a a Кнопки выбора UP (вверх) и DOWN (вниз) b b Кнопка подтверждения ENTER c Кнопка ВКЛ/ВЫКЛ d Кнопка МЕНЮ e Кнопки интенсивности CH1+, CH1-, CH2+, CH2- ENTER (1) Выбор меню (2) Подтверждение сделанного кнопками UP/ DOWN выбора, за исключением интенсивности каналов CH1+, CH1-, CH2+, CH2- c d Регулировка интенсивности импульсов 5. Ввод в эксплуатацию 1.Снимите с прибора защелку для ремня, если она установлена. 2.Нажмите на крышку отсека для батареек, расположенную на задней стороне прибора, и сместите ее в сторону. 3.Вложите 3 батарейки типа Alkaline AAA 1,5 В. Вкладывайте батарейки только соответственно их полярности и маркировке. 4.Тщательно закройте крышку отсека для батареек. (Рис. 1) 5.Соедините соединительный кабель с электродами. (Рис. 2) i Указание: Для предельно простого соединения электроды оснащены зажимами. Принадлежности: • 2 соединительных кабеля • 4 самоклеющихся электрода (45 x 45 мм) • 1 защелка для ремня 4.2 Функции кнопок Каждое нажатие кнопки подтверждается звуковым сигналом, чтобы обратить внимание на случайное нажатие кнопок. Этот звуковой сигнал не может быть выключен. Рис. 1 Рис. 2 ВКЛ/ВЫКЛ (1) Коротко нажать для включения прибора. Если кнопка при включении остается нажатой 10 секунд, прибор автоматически отключается. (2) Прерывание стимуляции однократным нажатием = режим паузы (3) Выключение прибора длительным нажатием (ок. 3 секунд) 90 6. Перечень программ 6.1 Общая информация Цифровой прибор TENS/EMS имеет 50 программ: • 20 программ TENS • 20 программ EMS • 10 программ МАSSAGE Во всех программах Вы можете устанавливать длительность воздействия, а для каждого из двух каналов – раздельно интенсивность импульсов. Кроме того, в программах TENS и EMS 11–20 Вы можете также изменять частоту импульсов отдельных циклов, чтобы адаптировать действие стимуляции к строению области применения. Циклы – это различные последовательности, из которых состоят программы. Они автоматически выполняются один за другим и повышают эффективность стимуляции различных типов мышечных волокон и противодействуют быстрой усталости мышц. Стандартные настройки параметров стимуляции и указания по расположению электродов приведены в следующих таблицах программ TENS, EMS и MASSAGE. 91 6.2 Программы TENS № Рациональные Возможное Цикл 1 прогр. области применения, расположение Цикл 5 показания электродов Длительность (мкс) 1 + 11 Боль в шее, головная 01, 02, 13 250 боль вазомоторного 250 характера Цикл 2 Цикл 3 Цикл 4 Цикл 6 Цикл 7 Цикл 8 Частота On Off Длительность Частота On Off Длительность Частота On Off Длительность Частота On Off (Гц) Time (с) Time (с) (мкс) (Гц) Time (с) Time (с) (мкс) (Гц) Time (с) Time (с) (мкс) (Гц) Time (с) Time (с) 4 30 0 250 4 30 0 250 5 30 0 250 5 30 0 6 20 0 250 6 20 0 250 8 30 0 250 8 30 0 2 + 12 Боль в спине 03, 04, 05, 06, 250 15, 23 250 07, 14 250 6 10 2 30 20 10 0 0 0 250 250 250 6 10 4 30 20 8 0 0 0 250 8 20 0 250 8 20 0 250 6 6 0 См. указание 250 60 20 0 250 70 20 0 250 80 30 0 250 80 30 0 22 80 70 40 20 4 30 0 0 0 250 250 250 80 65 45 20 4 30 0 0 0 250 75 4 0 250 10 20 0 250 55 30 0 250 60 30 0 4 8 40 30 30 5 0 0 0 250 250 250 4 8 6 20 20 10 0 0 0 250 250 250 6 10 50 30 30 5 0 0 0 250 250 6 10 20 20 0 0 См. указание 250 75 0,25 0,25 250 2 0,5 0 См. указание 250 100 0,25 0,25 3 + 13 Боль в плече 4 + 14 Боль в связи с ревматическим артритом 5 + 15 Жалобы в пояснице 250 250 250 6 + 16 Жалобы при 08 менструации 7 + 17 Противоболевая См. указание 250 программа I 250 8 + 18 Травмы коленного 09, 10 250 сустава, травмы голеностопного сустава, повреждения капсулы 9 + 19 (Burst) 10 + 20 (Burst) Противоболевая программа II Противоболевая программа III On Time (с) = время включения цикла в секундах (сокращение) – Off Time (с) = время выключения цикла в секундах (расслабление) Указание: Положение электродов должно охватывать болезненную зону. При болезненных группах мышц электроды группируются вокруг соответствующих мышц. При болях в суставах сустав должен быть охвачен электродами с передней/задней стороны, а также, если это допускают расстояния между электродами, с правой и левой стороны. Расстояние между электродами не должно быть меньше 5 см и больше 15 см. Учитывайте рисунки 9 и 10, которые касаются коленного и голеностопного сустава. Программы Burst подходят для всех зон, которые должны стимулироваться с переменным рисунком сигналов (для как можно меньшего привыкания). 92 6.3 Программы EMS Цикл 2 Цикл 3 № Рациональные Возможное Цикл 1 прогр. области применения, расположение Цикл 5 Цикл 6 Цикл 7 электродов Длительность Частота On показания Off Off Off Длительность Частота On Длительность Частота On (Гц) Time (с) Time (с) (мкс) (Гц) Time (с) Time (с) (мкс) (Гц) Time (с) Time (с) (мкс) 1 + 11 Плечевая мускулатура 07, 14 250 30 5 1 250 10 15 1 250 50 5 1 Цикл 4 Цикл 8 Off Длительность Частота On (Гц) Time (с) Time (с) (мкс) 2 + 12 Средняя и нижняя трапецеидальная мышца, мышца Lattisimus dorsi, мускулатура шеи 250 5 20 1 250 5 30 1 01, 02, 03, 04, 250 05, 12, 15 4 30 1 250 4 20 1 250 6 30 1 250 6 20 1 3 + 13 Мускулатура спины 03, 06, 22, 23 250 вблизи позвоночника прогр. I 2 10 1 250 4 10 4 + 14 Передняя и задняя 16, 17, 18, 19 250 мускулатура плеча (в т. ч. бицепс), передняя 250 и задняя мускулатура предплечья 4 30 1 250 4 5 30 1 250 6 15 1 250 6 + 16 Мускулатура спины 03, 06, 22, 23 250 вблизи позвоночника прогр. II 2 20 1 250 5 + 15 Прямая и косая мускулатура живота 11, 20, 21 250 5 30 1 1 250 6 10 1 30 1 250 4 30 1 8 15 1 250 10 15 1 2 20 1 250 1 30 1 250 1 30 1 250 6 30 1 250 6 20 1 7 + 17 Мускулатура спины 03, 06, 22, 23 250 вблизи позвоночника 250 прогр. III 4 30 1 250 4 20 1 8 30 1 250 8 20 1 8 + 18 Мускулатура ягодиц 24 250 20 5 1 250 6 5 1 250 30 5 1 9 + 19 Передняя и задняя мускулатура бедра 25, 26 250 20 5 1 250 6 8 1 250 25 5 1 10 + 20 Передняя и задняя мускулатура голени 27, 28 250 25 5 1 250 6 8 1 250 35 5 1 On Time (с) = время включения цикла в секундах (сокращение) – Off Time (с) = время выключения цикла в секундах (расслабление) 93 6.4 Программы MASSAGE № прогр. 1 2 3 4 5 6 7 8 9 10 объема тканей. Вместе с тем, с увеличением расстояния между электродами уменьшается интенсивность стимуляции тканей, что означает, что при выборе большего расстояния хотя и стимулируется больший объем, но с меньшей интенсивностью. Для повышения стимуляции необходимо увеличить интенсивность импульсов. При выборе расстояния между электродами следует учитывать следующее: • наиболее рациональное расстояние: прибл. 5–15 см • менее 5 см: преимущественно сильно стимулируются поверхностные структуры • свыше 15 см: очень слабо стимулируются крупные и глубокие структуры Расположение электродов относительно направлению мышечных волокон Выбор направления течения тока следует согласовать с направлением мышечных волокон соответственно требуемому слою мышц. Если должны быть достигнуты поверхностные мышцы, то следует расположить электроды параллельно направлению волокон (стр. 2, рис. 16; 1A-1B/2A-2B); если должны быть достигнуты глубокие слои тканей, то электроды необходимо расположить поперек направления волокон (стр. 2, рис. 16; 1A-2A/1B-2B). Последнее можно, например, достичь крестообразным (= поперечным) расположением электродов, например, стр. 2, рис. 16; 1A-2B/2A-1B. Распределение каналов: Канал 1 (CH1): подключение слева, кнопка регулятора интенсивности слева, индикатор интенсивности импульсов слева (CH1). Канал 2 (CH2): подключение справа, кнопка регулятора интенсивности справа, индикатор интенсивности импульсов справа (CH2). i При болевой терапии (TENS) с помощью цифрового прибора TENS/EMS с его двумя раздельно регулируемыми каналами и двумя самоклеющимися электродами на каждом имеет смысл установить электроды одного канала таким образом, чтобы болевая точка располагалась между электродами, либо Вы располагаете один электрод непосредственно на болевой точке, а второй – на расстоянии не менее 2–3 см от первого. Электроды второго канала можно использовать для одновременной терапии других болевых точек либо совместно с электродами первого канала применять для блокирования болевой зоны (с противолежащей стороны). Здесь снова имеет смысл крестообразное расположение. i Совет по массажной функции: для оптимального действия всегда используйте все 4 электрода. Форма массажа Массаж похлопыванием и пощипыванием Разминание и массаж пощипыванием Массаж похлопыванием Массаж ребрами ладоней/массаж давлением Массаж ребрами ладоней/массаж давлением Массаж встряхиванием Массаж похлопыванием (смена между электродами) Массажная струя (смена между электродами) Упорная массажная струя (смена между электродами) Комбинированная программа (смена между электродами) Расположение электродов выбрать таким образом, чтобы они охватывали требуемые сегменты мышц. Для оптимального действия расстояние между электродами не должно быть больше 15 см. Запрещается располагать электроды на передней стенке грудной клетки, т. е. выполнять массаж левой и правой большой грудной мышцы. 6.5 Указания по расположению электродов Рациональное расположение электродов важно для оптимального успеха стимуляции. Мы рекомендуем согласовать оптимальные позиции электродов в предполагаемой области применения с Вашим врачом. В качестве основы служат рекомендуемые расположения электродов, приведенные на внутренней стороне обложки (рис. 1–28). При выборе расположения электродов следует соблюдать следующие указания: Расстояние между электродами Чем большим выбирается расстояние между электродами, тем больше будет стимулируемый объем тканей. Это касается площади и глубины 94 • Выберите наиболее приятную для Вас интенсивность импульсов нажатием кнопки CH 1+/CH 2+. Индикация интенсивности импульсов соответствующим образом изменяется. i Для улучшения фиксации электродов используйте их на чистой, по возможности, обезжиренной и побритой коже. При необходимости, перед использованием промыть кожу водой и удалить волосы. i Если во время работы один из электродов отсоединяется, то интенсивность импульсов обоих каналов устанавливается на наименьшую величину. Нажмите кнопку ВКЛ/ВЫКЛ, чтобы попасть в режим паузы, заново расположите электроды и продолжите использование повторным нажатием кнопки ВКЛ/ВЫКЛ и установите требуемую интенсивность импульсов. Рис. 4 Рис. 5 7. Применение 7.3 Порядок действий для программ TENS/EMS 11–20 (индивидуальные программы) 7.1 Указания по применению • Если прибор не используется 3 минуты, он автоматически отключается (автоматикой отключения). При повторном включении на ЖК-дисплее появляется главное меню, использовавшееся последним подменю мигает. • При нажатии допустимой кнопки звучит короткий звуковой сигнал, при нажатии недопустимой – два коротких сигнала. Программы 11–20 – это предварительно настроенные программы, которые Вы можете индивидуализировать. Вы можете настроить частоту импульсов. • Выберите из таблицы программ подходящую для Ваших целей программу. • Расположите электроды в требуемой области и соедините их с прибором. В этом Вам могут помочь рекомендации по расположению. • Для включения прибора нажмите кнопку ВКЛ/ВЫКЛ. • Нажатием кнопки МЕНЮ выполните навигацию между подменю (TENS/EMS/МАSSAGE) и подтвердите Ваш выбор нажатием кнопки ENTER. (Рис. 1, пример: индикация на дисплее TENS) Рис. 1 • Выберите кнопками UP/DOWN требуемую программу и подтвердите выбор кнопкой ENTER (Рис. 2, пример: индикация на дисплее, программа TENS № 11). • Выберите кнопками UP/DOWN требуемую частоту (Гц) Рис. 2 для цикла 1 и подтвердите выбор кнопкой ENTER (Pис. 3). Повторите эту процедуру для всех последующих циклов. • Для окончания настройки частоты установите частоту (Гц) последнего требуемого цикла на „--0“ и нажмите кнопку ENTER, все настройки частоты последующих циклов Рис. 3 автоматически устанавливаются на “0” и, таким образом, не учитываются. i Совет: удерживайте кнопку ENTER нажатой 2 секунды, чтобы пропустить настройку частоты и перейти к настройке времени воздействия. В случае, если Вам требуются все 8 циклов, также закончите выбор настройки частоты 2-секундным нажатием кнопки ENTER. 7.2 П орядок действий для программ 01–10 TENS, EMS и MASSAGE (быстрый пуск) • Выберите из таблицы программ подходящую для Ваших целей программу. • Расположите электроды в требуемой области и соедините их с прибором. В этом Вам могут помочь рекомендации по расположению. • Для включения прибора нажмите кнопку ВКЛ/ВЫКЛ. • Нажатием кнопки МЕНЮ выполните навигацию между подменю (TENS/EMS/MASSAGE) и подтвердите Ваш выбор нажатием кнопки ENTER. (Рис. 1, пример: индикация на Рис. 1 дисплее TENS) • Выберите кнопками UP/DOWN требуемую программу и подтвердите выбор кнопкой ENTER (Pис. 2, пример: индикация на дисплее, программа TENS № 01). • Затем выберите кнопками UP/DOWN общую длительность Рис. 2 воздействия и подтвердите выбор кнопкой ENTER (Pис. 3, пример: длительность воздействия 30 минут). Прибор находится в состоянии ожидания (Pис. 4). • Для того, чтобы начать стимуляцию, нажмите кнопку Рис. 3 ВКЛ/ВЫКЛ. Начинается сменяться индикация рабочего состояния (Pис. 5). 95 • Затем выберите кнопками UP/DOWN требуемую длительность воздействия и подтвердите выбор кнопкой ENTER (Рис. 4, пример: длительность воздействия 30 минут). • Прибор находится в состоянии ожидания (Pис. 5). • Для того, чтобы начать стимуляцию, нажмите кнопку ВКЛ/ ВЫКЛ. Начинается мигать индикация рабочего состояния (Pис. 6). • Выберите наиболее приятную для Вас интенсивность импульсов нажатием кнопки CH 1+/CH 2+. Индикация интенсивности импульсов соответствующим образом изменяется. i Примечание: Индивидуализированные Вами настройки программ сохраняются в памяти и автоматически вызываются при следующем выборе. 7.5 Doctor’s Function Doctor’s Function – это специальная настройка, с помощью которой Вы еще проще и целенаправленней можете вызвать абсолютно персональную программу. Ваша индивидуальная настройка программ вызывается сразу же при включении в состояние ожидания и активируется простым нажатием кнопки ВКЛ/ВЫКЛ. Настройка этой индивидуальной программы может выполняться, например, по совету Вашего врача. При активированной Doctor’s Function во время стимуляции можно изменить только интенсивность импульсов. Все другие параметры и программы цифрового прибора TENS/EMS в этом случае заблокированы и не могут быть изменены и вызваны. Рис. 4 Рис. 5 Рис. 6 Настройка Doctor‘s Function: • Выберите Вашу программу и соответствующие настройки, как описано в п. 7.2 и 7.3. • Прежде, чем активировать программу нажатием кнопки ВКЛ/ВЫКЛ, одновременно удерживайте нажатыми кнопки ВКЛ/ВЫКЛ и CH 2+ в течение 5 секунд. Сохранение в Doctor’s Function подтверждается длительным звуковым сигналом. 7.4 Изменения настроек Изменение интенсивности (во время использования) • CH1+/- и CH2+/-: Изменение интенсивности каждого канала • Кнопка DOWN : интенсивность обоих каналов уменьшается Прерывание стимуляции Удаление Doctor‘s Function: Нажать кнопку ВКЛ/ВЫКЛ. При повторном нажатии стимуляция начинается снова. Для того, чтобы снова разблокировать прибор и получить возможность обращения к другим программам, удерживайте обе кнопки ВКЛ/ВЫКЛ и CH 2+ нажатыми в течение 5 секунд (не возможно во время стимуляции). Удаление Doctor’s Function подтверждается длительным звуковым сигналом. Отключение всего канала Нажимать кнопку CH- до тех пор, пока канал не достигнет наименьшей интенсивности, затем удерживать кнопку нажатой до тех пор, пока он больше не будет показываться на дисплее. Если Вы удерживаете нажатой соответствующую кнопку CH+, то канал снова активируется. 8. Уход и хранение Самоклеющиеся электроды: • Для обеспечения как можно более длительного сцепления электродов, их следует очищать влажной, не волокнистой тряпкой. • После использования приклеивайте электроды снова к пленке. Изменение использования (полностью или отдельных параметров) Чистка прибора: • ВКЛ/ВЫКЛ: Прерывание стимуляции • МЕНЮ: Возврат в окно выбора программы или главное меню • Настройка требуемых параметров Подтвердите нажатием ENTER. ВКЛ/ ВЫКЛ для продолжения применения. • Перед каждой чисткой вытаскивайте батарейки из прибора. • Очищайте прибор мягкой, слегка смоченной тряпкой. При сильном загрязнении Вы можете смочить тряпку легким мыльным раствором. 96 • Следите за тем, чтобы вода не попала внутрь прибора. Если это случилось, используйте прибор повторно только после того, как он полностью высох. • Для чистки не применяйте химические или абразивные средства. (2) Перед каждым использованием очищать кожу, не пользоваться бальзамами и маслами для ухода за кожей. Бритье может улучшить фиксацию электродов. Во время использования прибор подает аномальные звуковые сигналы. Что делать? Хранение: • Вытащите батарейки, если Вы длительное время не пользуетесь прибором. Вытекший из батареек электролит может повредить прибор. • Не перегибайте соединительные провода и электроды. • Отсоедините соединительные провода от электродов. • После использования приклеивайте электроды снова к пленке. • Храните прибор в прохладном, проветриваемом месте. • НЕ ставьте на прибор тяжелые предметы. (1) Посмотрите на дисплей – мигает один канал? Прервать программу нажатием кнопки ВКЛ/ВЫКЛ. Проверить правильность соединения соединительных проводов с электродами. Убедитесь в том, что электроды имеют надежный контакт с областью стимуляции. (2) Убедитесь в том, что штекер соединительного провода прочно соединен с прибором. (3) Если звуковые сигналы при мигающем канале не прекращаются, заменить соединительный кабель. (4) Дисплей показывает мигающий сигнал батареек. Замените все батарейки. 9. Утилизация Использованные ,полностью разряженные батарейки и аккумуляторы должны утилизироваться помещением в специально обозначенные контейнеры, пункты сбора специальных отходов или через торговцев электротоварами. Вы обязаны по закону утилизировать батарейки. Информация: Эти обозначения ставятся на батарейках, содержащих вредные материалы: Pb = в батарейке содержится свинец, Cd = в батарейке содержится кадмий, Hg = в батарейке содержится ртуть. Никакой чувствительной стимуляции не происходит. Что делать? (1) Если звучит предупреждающий сигнал, выполнить описанные выше операции. (2) Для повторного запуска программы нажать кнопку ВКЛ/ВЫКЛ. (3) Проверьте расположение электродов и следите за тем, чтобы электроды не перекрывались. (4) Шаг за шагом повысить интенсивность импульсов. (5) Батарейки почти разряжены. Замените их. Утилизация прибора должна осуществляться в соответствии с требованиями Директивы 2002/96/EC „Старые электроприборы и электрооборудование“. (WEEE, Waste Electrical and Electronic Equipment). Для получения необходимых сведений обращайтесь в соответствующий орган местного самоуправления. Неприятные ощущения вокруг электродов. Что делать? (1) Электроды плохо расположены. Проверьте расположение и, при необходимости, заново расположите электроды. (2) Электроды изношены. Они больше не могут обеспечить стимуляцию изза невозможности равномерного поверхностного распределения тока. Поэтому замените их. 10. Проблемы и их решение Прибор не включается при нажатии кнопки ВКЛ/ВЫКЛ. Что делать? (1) Убедиться в том, что батарейки правильно вложены и имеют контакт. (2) При необходимости, заменить батарейки. (3) Связаться со службой технического обеспечения. В области применения краснеет кожа. Что делать? Электроды отваливаются с тела. Что делать? Незамедлительно прервать использование и подождать, пока не нормализуется состояние кожи. Быстро исчезающее покраснение кожи под электродами не опасно и может быть объяснено локальной интенсификацией кровообращения. (1) Клейкую поверхность электродов очистить влажной, не волокнистой тряпкой. Затем дать высохнуть на воздухе и установить повторно. Если электроды все равно не держатся, их необходимо заменить. 97 учитывайте, что переносные и мобильные средства ВЧ -связи могут влиять на данный прибор. Точную информацию Вы можете получить в сервисных центрах. Прибор соответствует требованиям европейского нормативного акта по медицинским изделиям 93/42/EC, Закону о медицинских изделиях. Согласно «Правил эксплуатации медицинских изделий» необходимо регулярно проводить метрологический контроль, если аппарат применяется для промышленных или хозяйственных целей. Даже при личном использовании мы рекомендуем каждые 2 года передавать аппарат в сервисную службу для метрологического контроля. Но если покраснение кожи не исчезает и возникает воспаление или зуд, перед дальнейшим применением проконсультироваться с врачом. Возможно, причина заключается в аллергии к клейкой поверхности. Защелка для ремня не держится. Что делать? Если вначале защелка крепится на ремне, а только затем устанавливается прибор, то оптимальное крепление не обеспечивается. Возьмите прибор в руку. Установите защелку на заднюю сторону прибора. Защелка должна зафиксироваться с характерным щелчком. Теперь повторно закрепите прибор вместе с защелкой на ремне. 12. Гарантия 11. Технические данные Мы предоставляем гарантию на дефекты материалов и изготовления на срок 12 месяцев со дня продажи через розничную сеть. Гарантия не распространяется: • на случаи ущерба, вызванного неправильным использованием • на быстроизнашивающиеся части (насадки, электроды, батарейки) AB 52 • на дефекты, о которых покупатель знал в момент покупки • на случаи собственной вины покупателя. Товар сертифицирован: бытовые массажеры – ОС ”Межрегиональная Сертификационная Компания“, №РОСС DE. AB52.B35744 срок действия с 18.03.2011 по 17.03.2014гг Срок эксплуатации изделия: мин 3 года Фирма изготовитель:Бойрер Гмбх, Софлингер штрассе 218 89077-УЛМ, Германия Фирма-импортер: 109451 г. Москва, ул.Перерва, 62, корп.2, офис 3 Сервисный центр: 109451 г. Москва, ул. Перерва, 62, корп.2 Тел(факс) 495—658 54 90 Наименование и модель: EM 41 Форма выходной кривой: двухфазные прямоугольные импульсы Длительность импульса: 40–250 мкс Частота импульсов: 1–120 Гц Выходное напряжение: макс. 90 Вpp (при 500 Ом) Выходной ток: макс. 180 мАpp (при 500 Ом) Электропитание: 3 батарейки типа AAA Длительность воздействия: регулируемая от 5 до 90 минут Интенсивность: регулируемая от 0 до 15 Условия эксплуатации:10 °C–40 °C (50 °F–104 °F) при относительной влажности воздуха 30–85% Условия хранения:-10 °C–50 °C (-10,00 °C–85,56 °C) при относительной влажности воздуха 10–95% Размеры: 122 x 59 x 23 мм Вес: 69 г (без батареек), 108 г (включая защелку для ремня и батарейки) Пояснение символов: Активный узел типа BF Внимание! Прочесть инструкцию по эксплуатации. Примечание: При использовании прибора вне пределов спецификации не гарантируется его безупречная работа! Мы оставляем за собой право на внесение технических изменений, служащих усовершенствованию прибора. Данный прибор соответствует европейским стандартам EN60601-1 и EN60601-1-2, а также EN60601-2-10 и является предметом особых мер предосторожности в отношении электромагнитной совместимости. При этом Дата продажи___________________________________________________________ Подпись продавца_______________________________________________________ Штамп магазина ________________________________________________________ Подпись покупателя_____________________________________________________ 98 Szanowni Klienci, Polski bardzo dziękujemy za wybór jednego z naszych wyrobów. Nazwa naszej firmy oznacza wysokiej jakości wyroby, dokładnie sprawdzone w zakresie zastosowań w obszarach nagrzewania, pomiarów masy ciała, ciśnienia krwi, temperatury ciała, tętna, łagodnej terapii, masażu i powietrza. Prosimy o dokładne przeczytanie niniejszej instrukcji obsługi oraz o zatrzymanie jej do późniejszego użytku, udostępniając ją innym użytkownikom oraz przestrzegając zawartych w niej informacji. Spis treści 1.Zapoznanie.............................................................................................99 1.1 Co to jest i co potrafi Digital TENS/EMS?..........................................99 1.2 Zakres dostawy................................................................................100 2.Ważne wskazówki................................................................................101 3.Parametry prądowe..............................................................................102 3.1 Forma impulsu.................................................................................102 3.2 Częstotliwość impulsu.....................................................................103 3.3 Szerokość impulsu...........................................................................103 3.4 Intensywność impulsu.....................................................................103 3.5 Sterowane cyklami przestawienia parametrów impulsów...............103 4.Opis urządzenia.....................................................................................103 4.1 Opis komponentów..........................................................................103 4.2 Funkcje przycisków..........................................................................103 5.Uruchomienie.......................................................................................104 6.Tabela programów...............................................................................104 6.1 Informacje zasadnicze.....................................................................104 6.2 Programy TENS................................................................................105 6.3 Programy EMS.................................................................................106 6.4 Programy MASSAGE.......................................................................107 6.5 Wskazówki do umiejscawiania elektrod..........................................107 7.Zastosowanie.......................................................................................108 7.1 Wskazówki do stosowania...............................................................108 7.2 Czynności dla programów 01-10 TENS, EMS i MASSAGE.............108 7.3 Czynności dla programów TENS/EMS 11-20 (prog. ind.)................108 7.4 Zmiany i ustawienia..........................................................................109 7.5 Funkcja „Doktor“..............................................................................109 8.Czyszczenie i przechowywanie..........................................................109 9.Utylizacja..............................................................................................109 10.Problemy i ich rozwiązywanie.............................................................110 11.Dane techniczne..................................................................................111 Z poważaniem, Zespół firmy Beurer 1. Zapoznanie 1.1 Co to jest i co potrafi Digital TENS/EMS? Digital TENS/EMS należy do grupy stymulatorów elektrycznych. Posiada trzy funkcje podstawowe, które mogą być ze sobą kombinowane: 1. Elektryczna stymulacja dróg nerwowych (TENS) 2. Elektryczna stymulacja tkanki mięśniowej (EMS) 3. Działanie masujące wywoływane przez sygnały elektryczne. W tym celu urządzenie posiada dwa niezależne kanały stymulacyjne i cztery samoprzylepne elektrody. Oferuje wielostronne funkcje do podniesienia samopoczucia, zmniejszenia bólu, utrzymania sprawności fizycznej, rozluźnienia, rewitalizacji mięśni i zwalczania poczucia zmęczenia. W tym celu można wybrać gotowy program lub stworzyć go dla własnych potrzeb. Zasada działania stymulatora opiera się na symulowaniu impulsów własnych organizmu, które przenoszone są za pomocą elektrod przez skórę do nerwów i włókien mięśniowych. Elektrody mogą być przy tym rozmieszczane na całym ciele, przy czym stymulacja elektryczna jest bezpieczna i praktycznie bezbolesna. Odczuwa się czasami jedynie lekkie łaskotanie lub wibracje. Przesłane przez tkankę impulsy wpływają na przenoszenie wzbudzeń w przewodnictwie nerwów, a także w zwojach nerwowych i grupach mięśni w obszarze stosowania. Oddziaływanie elektrostymulacji rozpoznawalne jest z reguły po regularnym stosowaniu. Elektrostymulacja nie zastępuje regularnego treningu mięśni, ale uzupełnia go sensownie. 99 Pod pojęciem TENS, przezskórna elektryczna stymulacja nerwów, rozumie się działające przez skórę elektryczne wzbudzanie nerwów. TENS jest metodą dowiedzioną klinicznie, skuteczną, nie lekową – bez działań ubocznych przy właściwym stosowaniu, dopuszczoną do leczenia bólu spowodowanego przez określone przyczyny, w tym także do samoleczenia. Efekt zmniejszania i eliminowania bólu osiąga się m.in. przez zmniejszenie przekazywania bólu we włóknach nerwowych (przede wszystkim przez impulsy o wysokiej częstotliwości) i podnoszenie wydzielania endorfin endogennych, które zmniejszają odczuwanie bólu poprzez ich działanie na ośrodkowy system nerwowy. Ta metoda posiada podbudowę naukową i jest medycznie uznana. Każdy obraz choroby, w którym TENS znajduje zastosowanie, należy uzgodnić z lekarzem. Pomoże on przy pomocy wskazówek w zastosowaniu TENS do celów samoleczenia. TENS jest sprawdzone klinicznie i dopuszczone w następujących przypadkach: • Bóle pleców, w szczególności dolegliwości lędźwi i kręgosłupa na odcinku szyjnym • Bóle stawów (np.: stawy kolanowe, biodrowe, barki) •nerwobóle • Bóle głowy • Dolegliwości miesiączkowe u kobiet • Bóle pourazowe układu ruchu • Bóle przy zaburzeniach krążenia krwi • Chroniczne stany bólowe o różnych przyczynach. Elektryczna stymulacja mięśni (EMS), jest szeroko rozpowszechnioną i ogólnie uznaną metodą i stosowana jest od lat w medycynie sportowej i rehabilitacji. W zakresie sportu i rekreacji EMS stosowana jest m. in. uzupełniająco do konwencjonalnego treningu mięśni, aby podnieść wydolność grup mięśniowych i dopasować proporcje ciała zgodnie z oczekiwaniami estetycznymi. Zastosowanie EMS idzie w dwóch kierunkach. Pierwszy to celowe wzmacnianie muskulatury (zastosowanie aktywujące), drugi to działanie wypoczynkowe, odprężające (zastosowanie relaksacyjne). Do zastosowania aktywującego należy: • Trening mięśni do zwiększenia wytrzymałości i/lub • Trening mięśni wzmacniający określone mięśnie lub grupy mięśni, aby osiągnąć oczekiwane zmiany proporcji ciała. Do zastosowania relaksacyjnego należy: • Relaksacja mięśni w celu rozluźnienia • Poprawa przy objawach zmęczenia mięśni • Przyspieszenie regeneracji mięśni po dużym wysiłku (np.: po maratonie). Digital TENS/EMS oferuje przez zintegrowaną technologię masażu poza tym i możliwość rzeczywistego rozluźnienia mięśni w oparciu o program realnego masażu oraz zwalczania objawów zmęczenia mięśni. Na podstawie propozycji miejsc i tabel programów możliwe jest w tej instrukcji szybkie i proste ustawienie urządzenia tak, aby w zależności od zastosowania (określone miejsca na ciele) uzyskać oczekiwany efekt. Dzięki obydwu niezależnie ustawianym kanałom Digital TENS/EMS oferuje zaletę w postaci dopasowania intensywności impulsów niezależnie od siebie w różnych partiach ciała, np.: równomiernej stymulacji po jego obydwu stronach lub większych obszarów tkanki. Indywidualne ustawienia intensywności każdego kanału umożliwiają poza tym jednoczesne leczenie dwóch różnych partii ciała, przez co oszczędza się czas w stosunku do leczenia pojedyńczego. 1.2 Zakres dostawy – – – – – – 1x urządzenie Digital TENS/EMS (włącznie z zapięciem na pasek) 2x kabel połączeniowy 4x elektrody samoprzylepne (45 x 45 mm) 3x baterie AAA ta instrukcja obsługi 1x instrukcja skrócona (propozycje umieszczenie elektrod i obszary zastosowań) – 1x opakowanie Artykuły, które można dokupić Pasek na plecy z 4 niezużywającymi się elektrodami zwilżanymi wodą, nr kat. 162.825 8x Elektrody samoprzylepne (45 x 45 mm), Art.-Nr. 661.02 4x Elektrody samoprzylepne (50 x 100 mm), Art.-Nr. 661.01 100 2. Ważne wskazówki Stosowanie urządzenia nie zastępuje konsultacji i leczenia lekarskiego. W przypadku wystąpienia bólu lub podejrzenia choroby należy skonsultować się najpierw z lekarzem! OSTRZEŻENIE! Aby uniknąć szkód zdecydowanie odradza się w poniższych przypadkach stosowania Digital TENS/EMS: • Przy implantach urządzeń elektrycznych (jak np.: rozruszniki serca) • Przy wszczepionych metalowych implantach • W przypadku użytkowników pompy insulinowej • Przy wysokiej gorączce (np.: > 39 °C) • Przy znanych i ostrych arytmiach serca i innych zaburzeniach krążenia i pracy serca • Przy atakach (np.: epilepsji) • W ciąży • Przy zachorowaniu na raka • Po operacjach, po których wzmożone skurcze mięśni mogą zaburzyć proces leczenia • Nie stosować w pobliżu serca. Elektrody stymulujące nie mogą być stosowane w żadnym miejscu przedniej klatki piersiowej (oznakowane przez żebra i mostek), w szczególności nie na obydwu dużych mięśniach piersiowych. Może to prowadzić do podwyższenia ryzyka migotania komór serca i prowadzić do zatrzymania akcji serca • Na czaszce, w okolicach ust, gardła lub krtani • W obszarze szyi/tętnicy szyjnej • W obszarze genitaliów • Na chorą w stadium ostrym lub chronicznym skórę (skaleczenia lub zapalenia), (np.: przy bolących i niebolących zapaleniach, zaczerwienieniach, wysypkach (np.: alergie), oparzeniach, stłuczeniach, obrzękach, a także ranach znajdujących się w procesie gojenia, bliznach pooperacyjnych, które zawierają się w leczeniu) • W otoczeniu o wysokiej wilgotności, jak np.: łazienka lub podczas kąpania w wannie lub pod prysznicem • Nie korzystać po spożyciu alkoholu • Przy jednoczesnym podłączeniu do wysokoczęstotliwościowych urządzeń chirurgicznych. Przed użyciem urządzenia zasięgnąć opinii lekarza przy: •Ostrych zachorowaniach, w szczególności przy podejrzeniu lub istnieniu nadciśnienia, zaburzeń krzepnięcia krwi, skłonności do schorzeń zakrzepowo-zatorowych, jak i złośiwych formacji • Wszystkich chorobach skóry • Nie wyjaśnionych, chronicznych stanach bólowych niezależnie od obszaru ciała •Cukrzycy • Wszystkich zaburzeniach czucia ze zredukowanym odczuwaniem bólu (np.: zaburzenia przemiany materii) • Jednoczesnym leczeniu medycznym • Dolegliwościach występujących w wyniku leczenia stymulacyjnego • Podrażnieniach skóry z powodu długiej stymulacji w tym samym miejscu gdzie elektroda. UWAGA! Digital TENS/EMS stosować wyłącznie: • U ludzi • W celu, do jakiego został zbudowany i w sposób, jaki podano w niniejszej instrukcji obsługi. Każde nieprawidłowe użycie może być niebezpieczne • Do zewnętrznych zastosowań • Z dostarczonymi i możliwymi do zamówienia częściami oryginalnymi, w innym przypadku gwarancja wygasa. ŚRODKI BEZPIECZEŃSTWA: • Usuwać elektrody ze skóry zawsze zdecydowanym ruchem, aby uniknąć skaleczeń przy skórze wrażliwej. • Nie zbliżać się z urządzeniem do źródeł ciepła i nie stosować w pobliżu (~1 m) urządzeń krótko i mikro falowych (np.: telefony komórkowe), bo to może prowadzić do nieprzyjemnego potęgowania się prądu. • Nie wystawiać urządzenia na działanie słońca lub wysokich temperatur. • Chronić urządzenie przed kurzem, brudem i wilgocią. Urzadzenia nigdy nie zanurzać w wodzie lub innych płynach. • Urządzenie stosuje się do użytku własnego. • Ze względów higienicznych elektrody mogą być używane tylko przez jedną osobę. 101 • Sprawdzać urządzenie pod kątem śladów zużycia lub uszkodzeń. Jeśli takie znaki pojawiłyby się lub jeśli urządzenie stosowane byłoby nieprawidłowo, należy je przed kolejnym uruchomieniem zanieść do producenta lub sprzedawcy. • Urządzenie natychmiast wyłączyć, jeśli jest popsute lub uległo usterce. • W żadnym przypadku nie należy otwierać i/lub naprawiać urządzenia samodzielnie! Naprawę powinien przeprowadzić wyspecjalizowany serwis producenta lub autoryzowanego sprzedawcy. W przypadku niestosowania się do wskazówek gwarancja wygaśnie. • Producent nie ponosi odpowiedzialności za szkody powstałe w wyniku nieprawidłowego lub niewłaściwego użycia. Informacje na temat wyładowania elektrostatycznego (ESD) Gniazd oznaczonych symbolem ostrzegawczym ESD nie wolno dotykać. Środki ostrożności przed wyładowaniami –Gniazd oznaczonych symbolem ostrzegawczym ESD nie wolno dotykać palcami! –Wtyczek/gniazd oznaczonych symbolem ostrzegawczym ESD nie wolno dotykać narzędziami ręcznymi! Dalsze informacje na temat symboli ostrzegawczych ESD oraz ewentualne szkolenia i ich zakres dostępne są na życzenie w punkcie obsługi klienta. 3. Parametry prądowe Stymulatory elektryczne pracują z następującymi ustawieniami prądowymi, które mają w zależności od ustawienia różne oddziaływanie na działanie stymulujące: 3.1 Forma impulsów Opisuje ona funkcję czasową prądu wzbudzania. Strumienie jednofazowe Rozróżnia się jedno- i dwufazowe prądy pulsowania. W przypadku jednofazowych prądów pulsowania, prąd Czas płynie w jednym kierunku, w przypadku dwufazowego Strumienie dwufazowe pulsowania, prąd wzbudzania zmienia swój kierunek. W urządzeniu Digital TENS/EMS obecne są wyłącznie dwufazowe prądy pulsowania, ponieważ odciążają one mięśnie i powodują ich mniejsze zmęczenie oraz sprawiają, że użytkowanie jest bezpieczniejsze. 102 Intensywność impulsu • Jeśli urządzenie nie funkcjonuje poprawnie, pojawiają się bóle lub niedyspozycja, należy przerwać natychmiast stosowanie. • Aby usunąć lub przesunąć elektrody należy najpierw urządzenie wzgl. właściwy kanał wyłączyć, aby uniknąć niechcianych podrażnień. • Nie modyfikować żadnych elektrod (np.: przez przycięcie). To prowadzi do podwyższonej gęstości prądu i może być niebezpieczne (maks. zalecana wartość wyjściowa dla elektrod: 9 mA/cm2, efektywna gęstość prądu ponad 2 mA/cm2 wymaga podwyższonej uwagi). • Nie stosować podczas snu, w czasie prowadzenia pojazdów mechanicznych lub podczas obsługi podobnych maszyn. • Nie stosować podczas czynności, przy których nieprzewidziane reakcje (np.: zwiększona kontrakcja pomimo niskiej intensywności) mogą być niebezpieczne. • Należy uważać, aby podczas stymulacji elektrody nie dotykały żadnych metalowych obiektów, jak spinka paska czy naszyjnik. Jeśli w obrębie stosowania znajduje się biżuteria lub piercing (np.: w pępku), należy ją przed użyciem usunąć, w innym przypadku może dojść do miejscowych poparzeń. • Urządzenie trzymać z dala od dzieci, aby zapobiec ew. zagrożeniom. • Nie pomylić kabla elektrody z kontaktami od słuchawek lub innymi urządzeniami i nie łączyć elektrod z innymi urządzeniami. • Nie używać tego urządzenia równocześnie z innymi urządzeniami, które przenoszą impulsy elektryczne do ciała. • Nie używać w pobliżu materiałów łatwopalnych, gazów lub materiałów wybuchowych. • Nie używać akumulatorków, lecz baterii tego samego typu. • Stosować w pierwszych minutach na siedząco lub leżąco, aby w rzadkich przypadkach reakcji nerwu błędnego (uczucia słabości) uniknąć niebezpieczeństwa skaleczenia. W przypadku wystąpienia słabości natychmiast wyłączyć urządzenie i położyć się z nogami w górze (ok. 5-10 min.). • Nie zaleca się pełnego smarowania skóry kremami i maściami natłuszczającymi, bowiem zużycie elektrod jest większe wzgl. może to prowadzić do nieprzyjemnego potęgowania się prądu. Uszkodzenie • W sytuacji niepewności, czy urządzenie jest uszkodzone, nie należy go używać i należy zwrócić się do sprzedawcy lub pod wskazany adres serwisu producenta. 3.2 Częstotliwość impulsów Przy Digital TENS/EMS są odpowiednio ustawione fabrycznie parametry prądowe. Istnieje w każdej chwili możliwość zmiany intensywności podczas używania, a w niektórych programach można zmienić z góry częstotliwość, aby użycie było możliwie najprzyjemniejsze i rokujące największy sukces. Liczba pojedynczych impulsów na sekundę wskazuje Czas cyklu częstotliwość, która jest wyświetlana w Hz (herc). Można ją obliczyć, wyliczając odwrotność czasu cykli. Dana częstotliwość określa, które typy włókien mięśniowych reagują lepiej. Wolno reagujące włókna reagują częściej na niższe częstotliwości impulsów do 15 Hz, szybciej reagujące zadziałają dopiero od 35 Hz. Przy impulsach 45-70 Hz dochodzi do trwałego napięcia mięśnia, połączonego z szybkim jego zmęczeniem. Wyższe częstotliwości są preferowane dla treningu szybkościowego i wysiłkowego. 4. Opis urządzenia Ustawienie stopnia intensywności kształtuje się indywidualnie wg subiektywnego odczucia każdego użytkownika i określane jest przez wiele czynników, jak np.: miejsce stosowania, ukrwienie skóry, grubość skóry, jak i jakość kontaktu elektrody. Praktyczne ustawienie ma być wprawdzie skuteczne, ale nigdy nie może powodować nieprzyjemnego odczucia, jak np.: ból w miejscu stosowania. Lekkie łaskotanie wskazuje na wystarczającą energię stymulującą, a unikać należy każdego ustawienia wywołującego ból. Przy dłuższym użytkowaniu może być niezbędne doregulowanie w celu dopasowania do miejsca stosowania. Wyświetlacz (menu główne): B A Intensywność impulsów B Numer programu/numer cyklu C C Częstotliwość (Hz) D D Niski poziom baterii E Menu TENS/EMS/MASAŻ F Funkcja timera (wskaźnik pozostałego e czasu działania) G Wskaźnik statusu operacji Przyciski: a a Przyciski wyboru UP (do góry) i DOWN b (na dół) b Przycisk zatwierdzenia ENTER c Przycisk WŁĄCZ/WYŁĄCZ d Przycisk MENU e Przyciski intensywności CH1+, CH1-, CH2+, CH2Wyposażenie dodatkowe: • 2x kabel połączeniowy • 4x elektrody samoprzylepne (45 x 45 mm) • 1x zapięcie na pasek 3.5 Sterowane cyklami przestawienia parametrów impulsów 4.2 Funkcje przycisków 3.3 Szerokość impulsów Przy jej pomocy podaje się trwanie impulsów pojedyńczeSzerokość impulsów go w mikrosekundach. Szerokość impulsów określa tutaj między innymi głębokość wnikania prądu, przy czym ogólnie obowiązuje zasada: większa masa mięśni wymaga większej szerokości impulsów. 3.4 Intensywność impulsów W wielu przypadkach jest konieczne użycie większej ilości parametrów impulsów dla całości struktury tkanki w miejscu stosowania. W urządzeniu Digital TENS/EMS następuje to przez to, że istniejące programy automatycznie podejmują cykliczne zmiany parametrów impulsów. Zapobiega się w ten sposób zmęczeniu poszczególnych grup mięśni w miejscu stosowania. A 4.1 Opis komponentów E F G e c d Każde użycie przycisku sygnalizowane jest tonowo, aby rozpoznać nieprawidłowe użycie przycisku. Sygnału nie można wyłączyć. 103 Włącz/wyłącz (1) Krótko nacisnąć, aby włączyć. Jeśli przycisk przytrzymany zostanie przez 10 sek., urządzenie wyłączy się samoczynnie. (2) Przerwanie stymulacji przez proste przyciśnięcie = tryb pauzy (3) Wyłączenie urządzenia przez dłuższe przytrzymanie (ok. 3 sekundy) i (1) Wybór (A) program leczenia, (B) frekwencja i (C) czas leczenia (2) Przyciskiem DOWN zmniejsza się przy bieżącej stymulacji intensywność obydwu kanałów. MENU (1) Nawigacja pomiędzy podmenu TENS, EMS i MASSAGE (2) Powrót do (A) okno wyboru programu lub do (B) menu główne ENTER (1) Wybór menu (2) Potwierdzenie wyboru przy pomocy UP/DOWN, z wyjątkiem intensywności kanału CH1+, CH1-, CH2+, CH2Ustawienie intensywności impulsów 6. Tabela programów 6.1 Informacje podstawowe Digital TENS/EMS dysponuje 50 programami: • 20 programów TENS • 20 programów EMS • 10 programów MASSAGE Przy wszystkich programach istnieje możliwość oddzielnego ustawienia czasu stosowania i dla każdego z obydwu kanałów intensywności impulsów. Stąd można zmieniać w programach TENS i EMS 11-20 także i częstotliwość impulsów poszczególnych cykli, aby dopasować działanie stymulacyjne do budowy miejsca stosowania. Cykle są różnymi sekwencjami, z których składają się programy. Biegną one automatycznie po sobie i zwiększają skuteczność stymulacji na różne typy tkanki mięśniowej i przeciwdziałają szybkiemu zmęczeniu mięśnia. Ustawienia standardowe parametrów stymulacji i wskazówki do umiejscowienia elektrod znajdują się w tabelach programów dla TENS, EMS i MASSAGE. 5. Uruchomienie 1.Zdjąć z urządzenia zapięcie na pasek, jeśli nałożony. 2.Nacisnąć pokrywę kieszeni baterii na tylnej stronie urządzenia i przesunąć w bok. 3.Włożyć 3 baterie typu Alkaline AAA 1,5 V. Zwrócić uwagę na to, aby baterie były prawidłowo spolaryzowane, odpowiednio do oznaczeń. 4.Zamknąć starannie kieszeń baterii. (Rys. 1) 5.Połączyć przewód z elektrodami. (Rys. 2) i Wskazówka: w w celu łatwiejszego połączenia elektrody są zaopatrzone w zamknięcie typu klips. Rys. 1 Rys. 2 104 6.2 Programy TENS Progr. Nr 1 + 11 2 + 12 3 + 13 4 + 14 5 + 15 6 + 16 7 + 17 8 + 18 Zalecane obszary zastosowań wskazania Możliwe Cykl 1 umiejscowienie Cykl 5 elektrod Szero- Częstokość tliwość (Hz) (µs) bóle karku, ból napięciowy 01, 02, 13 250 4 głowy 250 6 Bóle pleców 03, 04, 05, 06, 250 6 15, 23 250 10 Bóle barków 07, 14 250 2 Cykl 2 Cykl 6 On Off Sze Time Time rokość (Sek.) (Sek.) (µs) 30 0 250 20 0 250 30 0 250 20 0 250 10 0 250 Cykl 3 Cykl 7 Off SzeroCzęsto- On tliwość Time Time kość (Sek.) (Sek.) (µs) (Hz) 4 30 0 250 6 20 0 250 6 30 0 250 10 20 0 4 8 0 250 6 6 0 bóle na tle reumatoidalnego zapalenia stawów bóle lędźwiowe patrz: wskazówka 22 Dolegliwości 08 menstruacyjne Program przeciwbólowy I patrz: wskazówka dolegliwości kolan, 09, 10 dolegliwości stawu skokowego, urazy torebki stawowej Program przeciwbólowy II Patrz: wskazówka 9 + 19 (klatka piersiowa) 10 + 20 Program przeciwbólowy III Patrz: (klatka wskazówka piersiowa) Cykl 4 Cykl 8 Często- On Off Szerotliwość Time Time kość (Hz) (Sek.) (Sek.) (µs) 5 30 0 250 8 30 0 250 8 20 0 250 Częstotliwość (Hz) 5 8 8 On Time (Sek.) 30 30 20 Off Time (Sek.) 0 0 0 250 60 20 0 250 70 20 0 250 80 30 0 250 80 30 0 250 250 250 80 70 40 20 4 30 0 0 0 250 250 250 80 65 45 20 4 30 0 0 0 250 75 4 0 250 10 20 0 250 55 30 0 250 60 30 0 250 250 250 4 8 40 30 30 5 0 0 0 250 250 250 4 8 6 20 20 10 0 0 0 250 250 250 6 10 50 30 30 5 0 0 0 250 250 6 10 20 20 0 0 250 75 0,25 0,25 250 2 0,5 0 250 100 0,25 0,25 On-Time (Sek.) = Cykl – czas podłączenia w sekundach (skurcz) – Off-Time (Sek.) = Cykl – czas wyłączenia w sekundach (rozluźnienie) Wskazówka: Elektrody powinny obejmować bolesne miejsce. W przypadku bólu ze strony grup mięśni elektrody umiejscawiane są wokół bolącego mięśnia. W przypadku bólu stawów należy objąć staw elektrodami na przedniej/tylnej jego stronie oraz, jeżeli pozwalają na to odległości pomiędzy elektrodami, po jego prawej i lewej. Minimalny odstęp pomiędzy elektrodami nie powinien być mniejszy niż 5 cm i większy niż 15 cm. Proszę przestrzegać postępowania jak na rysunkach 9 i 10, odnoszących się do stawów kolanowych i skokowych. Programy dla klatki piersiowe są odpowiednie dla wszystkich miejsc, które leczone są wg schematu sygnału zmiennego (w celu jak najmniejszego przyzwyczajenia). 105 6.3 Programy EMS Progr. Zalecane obszary Nr zastosowań wskazania 1 + 11 mieśnie barków 2 + 12 Środkowa i dolna część mięśnia czworobocznego, mięsień najszerszy grzbietu, mięśnie karku 3 + 13 Mięśnie grzbietu okolic kręgosłupa progr. I 4 + 14 grupa przednia i tylna mięśni ramienia (m.in. biceps), grupa przednia i tylne mieśni przedramienia 5 + 15 proste i skośne mięśnie brzucha 6 + 16 Mięśnie grzbietu okolic kręgosłupa progr. II 7 + 17 Mięśnie grzbietu okolic kręgosłupa progr. III 8 + 18 Mięśnie pośladków 9 + 19 grupa przednia i tylna mięśni ud 10 + 20 grupa przednia i tylna mięśni łydek Możliwe Cykl 1 umiejscowienie Cykl 5 elektrod Sze Częstorokość tliwość (Hz) (µs) 07, 14 250 30 On Time (sek.) 5 Off Time (sek.) 1 Cykl 2 Cykl 6 Sze rokość (µs) 250 Cykl 3 Cykl 7 Często- On Off Sze tliwość Time Time rokość (Hz) (Sek.) (Sek.) (µs) 10 15 1 250 Cykl 4 Cykl 8 Off Często- On Off Sze Często- On tliwość Time Time rokość tliwość Time Time (Hz) (Sek.) (Sek.) (Hz) (Sek.) (Sek.) (µs) 50 5 1 250 5 30 1 01, 02, 03, 04, 250 05, 12, 15 250 4 30 1 250 4 20 1 6 30 1 250 6 20 1 03, 06, 22, 23 250 2 10 1 250 4 10 1 250 6 10 1 16, 17, 18, 19 250 4 30 1 250 4 30 1 250 4 30 1 250 5 30 1 250 6 15 1 250 8 15 1 250 10 15 1 03, 06, 22, 23 250 2 20 1 250 2 20 1 250 1 30 03, 06, 22, 23 250 250 24 250 4 8 20 30 30 5 1 1 1 250 250 250 4 8 6 20 20 5 1 1 1 250 6 250 25, 26 250 20 5 1 250 6 8 1 27, 28 250 25 5 1 250 6 8 1 11, 20, 21 250 5 20 1 250 5 30 1 1 250 1 30 1 30 1 250 6 20 1 30 5 1 250 25 5 1 250 35 5 1 On-Time (Sek.) = Cykl – czas podłączenia w sekundach (skurcz) – Off-Time (Sek.) = Cykl – czas wyłączenia w sekundach (rozluźnienie) 106 6.4 Programy MASSAGE Nr progr. 1 2 3 4 5 6 7 8 9 10 Technika masażu Oklepywanie i rozcieranie Ugniatanie i rozcieranie Oklepywanie Masaż brzegami dłoni/uciskanie Masaż brzegami dłoni/uciskanie Wstrząsanie Oklepywanie (zmiana elektrod) Strumień masujący (zmiana elektrod) Strumień masażu uciskowego (zmiana elektrod) Program łączony (zmiana elektrod) Umiejscowienie elektrod należy tak dobrać, aby obejmowały właściwe segmenty mięśni. Dla optymalnego działania odstęp pomiędzy elektrodami nie powinien być większy niż 15 cm. Nie wolno stosować elektrod na przedniej ścianie klatki piersiowej, tzn. należy zaniechać masażu po lewej i prawej stronie dużego mięśnia piersiowego. 6.5 Wskazówki do umiejscawiania elektrod Dobre umiejscowienie elektrod jest ważne dla spodziewanego sukcesu stymulacji. Zaleca się skonsultowanie optymalnego położenia elektrod w przewidywanym obszarze stosowania z lekarzem. Poglądowo przedstawiono umiejscowienie elektrod na stronie wewnątrz (rysunki 1-28). Przy wyborze miejsca dla elektrod należy pamiętać: Odstęp pomiędzy elektrodami Im większy odstęp pomiędzy elektrodami, tym większy obszar tkanki jest stymulowany. Dotyczy to także powierzchni i zagłębień obszaru tkanki. Jednocześnie siła stymulacji zmniejsza się z rosnącym odstępem elektrod, znacza to, że przy większym odstępie stymulowany jest większy obszar, o ale słabiej. Aby zwiększyć stymulację, należy zwiększyć intensywność impulsów. Oto wytyczne do wyboru odległości pomiędzy elektrodami: • sensowny odstęp: ok. 5-15 cm • poniżej 5 cm prymarne struktury powierzchniowe są silnie stymulowane • powyżej 15 cm struktury o dużej powierzchni i głębokie są słabo stymulowane Odniesienie elektrod do przebiegu włókien mięśniowych Wybór kierunku przepływu prądu należy dopasować do przebiegu włókien mięśniowych w danej warstwie mięśni. Jeśli konieczne jest dotarcie do mięśni powierzchniowych, wówczas elektrody należy umieścić równolegle do przebiegu włókien mięśniowych (str. 2, rys. 16; 1A-1B/2A-2B), jeśli chcemy dotrzeć do warstw tkankowych, wówczas elektrody należy rozłożyć poprzecznie do przebiegu włókien (str. 2, rys. 16; 1A-2A/1B-2B). Ostatni z opisanych efektów można uzyskać np. poprzez ułożenie elektrod na krzyż (= poprzecznie), np. str. 2, rys. 16; 1A-2B/2A-1B. Przyporządkowanie kanałów: Kanał 1 (CH1): Przyłączenie po lewej, regulator intensywności-przycisk uchylny po lewej, wskaźnik intensywności impulsu po lewej (CH1). Kanał 2 (CH2): Przyłączenie po prawej, regulator intensywności-przycisk uchylny po prawej, wskaźnik intensywności impulsu po prawej (CH2). i W terapii bólowej (TENS) za pomocą TENS/EMS z 2 oddzielnymi, regulowanymi kanałami po dwie elektrody zaleca się, aby albo elektrody jednego kanału tak umieścić, żeby punkt bólu leżał pomiędzy nimi lub umieścić jedną elektrodę na punkcie bólu, a drugą w oddaleniu min. 2-3 cm. Elektrody drugiego kanału mogą być używane jednocześnie do leczenia dalszych punktów bólu, ale także zastosowane z elektrodami pierwszego kanału do otoczenia obszaru bólowego (naprzeciwko siebie). Zaleca się tutaj umiejscowienie krzyżowe. i Wskazówka do funkcji masażu: w celu optymalnego leczenia używać zawsze wszystkich 4 elektrod. i Aby przedłużyć trwałość elektrod, należy ich używać na skórze czystej i możliwie bez tłuszczu i włosów. Jeśli konieczne przed użyciem umyć wodą i usunąć włosy. i 107 i Jeśli elektrody odpadłyby podczas używania, to intensywność impulsów obydwu kanałów przełącza się na najniższy poziom. Nacisnąć przycisk WŁ./WYŁ., aby włączyć pauzę, umieścić na nowo elektrodę i kontynuować proces przyciskiem WŁ./WYŁ., i ustawić oczekiwaną intensywność impulsów. 7. Zastosowanie 7.1 Wskazówki do zastosowania • Jeśli urządzenie przez 3 minuty nie jest używane, wyłączy się automatycznie (automatyka wyłączania). Przy ponownym włączeniu pojawi się na wyświetlaczu LCD menu główne, a używane uprzednio podmenu pulsuje. • Jeśli naciśnięty został przycisk dozwolony, rozbrzmieje jeden krótki sygnał dźwiękowy, przy przycisku niedozwolonym – dwa krótkie sygnały. 7.2 Czynności dla programów 01-10 TENS, EMS i MASSAGE (szybki start) • Wybrać z tabeli programów właściwy dla własnych celów. • Umieścić elektrody we właściwych miejscach i połączyć je z urządzeniem. Mogą w tym pomóc propozycje umiejscowienia. • Nacisnąć przycisk WŁ./WYŁ., aby włączyć urządzenie. • Przejść przyciskając MENU przez podmenu (TENS/EMS/ MASSAGE) i potwierdzić wybór przyciskiem ENTER. (Rys. 1) przykł. wskazanie na wyświetlaczu TENS) • Wybrać przy pomocy przycisków UP/DOWN właściwy program i potwierdzić przez ENTER (Rys. 2, przykł. wskazanie na wyświetlaczu programu TENS Nr. 01). • Wybrać przy pomocy przycisków UP/DOWN całkowity czas leczenia i potwierdzić przez ENTER (Rys. 3, przykł. całkowity czas leczenia 30 minut). Urządzenie znajduje się w trybie oczekiwania (Rys. 4). • Nacisnąć WŁ./WYŁ., aby rozpocząć leczenie. Wskazanie stanu operacji zaczyna się zmieniać (Rys. 5). • Wybrać najprzyjemniejszą intensywność impulsów poprzez naciśnięcie przycisków CH 1+/CH 2+. Wskazanie intensywności impulsów dopasuje się odpowiednio. Rys. 1 Rys. 2 Rys. 3 Rys. 4 Rys. 5 7.3 Czynności dla programów TENS/EMS 11 do 20 (programy indywidualne) Programy 11 do 20 są programami fabrycznymi, które można zindywidualizować. Istnieje możliwość ustawienia częstotliwości impulsów. • Wybrać z tabeli programów właściwy dla własnych celów. • Umieścić elektrody we właściwych miejscach i połączyć je z urządzeniem. Mogą w tym pomóc propozycje umiejscowienia. • Nacisnąć przycisk WŁ./WYŁ., aby włączyć urządzenie. • Przejść przyciskając MENU przez podmenu (TENS/EMS/ MASSAGE) i potwierdzić wybór przyciskiem ENTER. (Rys. 1) przykł. wskazanie na wyświetlaczu TENS) Rys. 1 • Wybrać przy pomocy przycisków UP/DOWN oczekiwany program i potwierdzić przez ENTER (Rys. 2, przykł. wskazanie na wyświetlaczu programu TENS Nr. 11). • Wybrać przy pomocy przycisków UP/DOWN oczekiwaną Rys. 2 częstotliwość (Hz) dla cyklu 1 i potwierdzić przez ENTER (Rys. 3). Powtórzyć dla wszystkich późniejszych cykli. • Aby zakończyć ustawianie częstotliwości, należy najpierw ustawić częstotliwość (Hz) ostatnio używanego cyklu na „--0” i nacisnąć ENTER, wszystkie ustawienia częstotliwości Rys. 3 późniejszych cykli zostaną ustawione automatycznie na „0” i tym samym nie stosowane. i Wskazówka: Przytrzymać ENTER przez 2 sekundy, aby przeskoczyć ustawianie częstotliwości i przejść do Rys. 4 ustawiania czasu leczenia. W przypadku, kiedy potrzebnych jest wszystkich 8 cykli, zakończyć wybór ustawiania częstotliwości także przez 2-sekundowe naciśnięcie ENTER. • Wybrać przy pomocy przycisków UP/DOWN oczekiwany Rys. 5 czas leczenia i potwierdzić przez ENTER (Rys. 4, przykł. całkowity czas leczenia 30 minut). • Urządzenie znajduje się w trybie oczekiwania (Rys. 5). • Nacisnąć WŁ./WYŁ., aby rozpocząć stymulację. Wskazanie Rys. 6 stanu operacji zaczyna pulsować (Rys. 6). • Wybrać najprzyjemniejszą intensywność impulsów poprzez naciśnięcie przycisków CH 1+/CH 2+. Wskazanie intensywności impulsów dopasuje się odpowiednio. 108 i Wskazówka: zindywidualizowane parametry programu zostały zapamiętane i przy ponownym wyborze zostaną automatycznie przywołane. 7.4 Zmiana ustawień Zmiana intensywności (w czasie używania) • CH1+/- i CH2+/-: zmiana intensywności na kanał • przycisk DOWN : redukcja intensywności obydwu kanałów Przerwanie stymulacji Nacisnąć przycisk WŁĄCZ/WYŁĄCZ. Przy ponownym naciśnięciu urządzenie ponownie rozpocznie pracę. Odłączenie całego kanału Nacisnać przycisk CH, aż kanał osiągnie najniższą intensywność, następnie przytrzymać wciśnięty, aż na wyświetlaczu nie będzie już nic pokazywane. Przytrzymac odpowiednio przycisk CH+, kanał zostanie aktywowany. Zmiana użycia (całkowicie lub poszczególne parametry) • Włącz/wyłącz: przerwanie stymulacji • MENU: powrót do okna programu wzgl. menu głównego • Ustawianie właściwego parametru. Potwierdzenie przez ENTER. WŁ./ WYŁ., aby kontynuować. 7.5 Funkcja „Doktor“ Funkcja Doktor jest specjalnym ustawieniem, przy pomocy którego jeszcze łatwiej i bardziej celowo można przywołać osobisty program. Indywidualne ustawienia programu są przywoływane natychmiast po włączeniu w trybie oczekiwania i aktywowane przez proste naciśnięcie przycisku WŁ./WYŁ. Ustawienie indywidualnego programu może nastąpić np.: z pomocą rad lekarza. W funkcji Doktor można zmieniać w czasie stymulacji intensywność impulsów. Pozostałe parametry i programy Digital TENS/EMS są w tym przypadku zablokowane i nie mogą być zmienione wzgl. przywołane. Ustawianie funkcji Doktor: • Wybrać program i przeprowadzić odpowiednie ustawienia, jak opisano w 7.2 wzgl. 7.3. • Zanim przez naciśnięcie przycisku WŁ./WYŁ. aktywowany zostanie program, przytrzymać przycisk WŁ./WYŁ. i CH 2+ jednocześnie przez 5 sekund. Zapisanie do pamięci funkcji Doktor potwierdzone zostanie długim sygnałem dźwiękowym. Kasowanie funkcji Doktor: Aby odblokować urządzenie z tej funkcji i móc ponownie sięgać do innych programów, należy przytrzymać obydwa przyciski WŁ./WYŁ. i CH 2+ tym razem przez ok. 5 sekund (nie jest możliwe w czasie stymulacji). Skasowanie z pamięci funkcji Doktor potwierdzone zostanie długim sygnałem dźwiękowym. 8. Czyszczenie i przechowywanie Elektrody samoprzylepne: • Aby zapewnić możliwie najdłuższą trwałość elektrod, należy je czyścić ostrożnie mokrą, niekłaczącą ściereczką. • Po użyciu ponownie nakleić elektrody na folię. Czyszczenie urządzenia: • Przed każdym czyszczeniem wyciągać baterie z urządzenia. • Po użyciu czyścić urządzenie miękką, lekko nawilżoną szmatką. Przy większym z abrudzeniu ścierkę można zamoczyć w ługu (mydło). • Uważać, aby nie wylać wody na urządzenie. Jeśli to się jednak zdarzy, urządzenie można stosować dopiero po całkowitym wyschnięciu. • Nie używać do czyszczenia żadnych środków chemicznych lub do szorowania. Przechowywanie: • Wyciągnąć baterie z urządzenia, jeśli nie będzie przez dłuższy czas używane. Baterie, które się rozlały, mogą uszkodzić urządzenie. • Nie zginać przewodów połączeniowych i elektrod. • Rozłączać przewody od elektrod. • Po użyciu naklejać elektrody na folię. • Przechowywać urządzenie w chłodnym, wentylowanym miejscu. • Nie stawiać żadnych ciężkich przedmiotów na urządzeniu. 9. Utylizacja Zużyte, całkowicie rozładowane baterie i akumulatory muszą być wyrzucane do specjalnie oznakowanych pojemników, oddawane do punktów przyjmowania odpadów specjalnych lub sprzedawcom sprzętu elektrycznego. 109 Są Państwo prawnie zobowiązani do usunięcia baterii. Wskazówka: Symbole te znajdują się na bateriach zawierających substancje szkodliwe: Pb = bateria zawiera ołów, Cd = bateria zawiera kadm, Hg = bateria zawiera rtęć. Urządzenie należy utylizować zgodnie z rozporządzeniem dotyczącym zużytych urządzeń elektronicznych i elektrycznych 2002/96/EC – WEEE (Waste Electrical and Electronic Equipment). Przy zapytaniach prosimy zwracać się do urzędów odpowiedzialnych za utylizację. 10. Problemy i ich rozwiązywanie Urządzenie się nie włącza po naciśnięciu przycisku WŁĄCZ/WYŁĄCZ. Co robić? (1) Upewnić się, że baterie są prawidłowo włożone i mają kontakt. (2) W razie potrzeby wymienić baterie. (3) Skontaktować się z serwisem klienta. Elektrody odpadają od ciała. Co robić? (1) Wyczyścić samoprzylepną powierzchnię elektrody mokrą, niekłaczącą ściereczką. Następnie wysuszyć elektrodę i ponownie przyczepić. Jeśli elektroda dalej się nie trzyma, należy ją wymienić. (2) Przed każdym użyciem umyć skórę, rezygnując z olejku bądź balsamu pielęgnacyjnego. Ogolonie może zwiększyć trwałość elektrod. Urządzenie w czasie używania wydaje dziwne sygnały dźwiękowe. Co robić? Przerwać program, (1) Obserwować wyświetlacz, czy pulsuje kanał? naciskając przycisk WŁĄCZ/WYŁĄCZ. Skontrolować prawidłowość przewodów łączących elektrody. Upewnić się, że elektrody mają dobry kontakt w obszarze stosowania. (2) Upewnić się, że wtyczka jest trwale połączona z urządzeniem. (3) Jeśli dźwięki nie zanikną przy pulsującym kanale, wymienić kabel połączeniowy. (4) Wyświetlacz wskazuje pulsujący sygnał baterii. Wymienić wszystkie baterie. Stymulacja jest bardzo wyczuwalna. Co robić? (1) Jeśli rozbrzmiewa sygnał ostrzegawczy, przeprowadzić powyżej opisane kroki zaradcze. (2) Nacisnąć przycisk WŁ./WYŁ., aby ponownie uruchomić program. (3) Sprawdzić umiejscowienie elektrod wzgl. uważać, aby elektrody nie nachodziły na siebie. (4) Podwyższyć stopniowo intensywność impulsów. (5) Baterie prawie wyczerpane. Wymienić baterie. Niemiłe odczucie pod elektrodami. Co robić? (1) Elektrody są źle umiejscowione. Sprawdzić umiejscowienie i zmienić w razie potrzeby. (2) Elektrody są zużyte. Mogą one nie gwarantować już równomiernego, pełnopowierzchniowego rozdzielania prądu, co może prowadzić do podrażnień skóry. Należy je więc wymienić. Skóra robi się czerwona w obszarze stosowania. Co robić? Natychmiast przerwać stosowanie i odczekać, aż skóra powróci do normy. Szybko zanikające zaczerwienienie skóry pod elektrodą nie jest niebezpieczne i można to wytłumaczyć miejscowo wzbudzonym, silniejszym ukrwieniem. Jeśli jednak podrażnienie pozostanie i dojdzie ew. do swędzenia lub zapalenia, należy przerwać stosowanie i skonsultować się z lekarzem. Ewentualna przyczyna to uczulenie na powierzchnię samoprzylepną elektrody. Zapięcie na pasek nie trzyma się mocno. Co robić? Jeśli zapięcie jest mocowane na pasku i potem osadzane jest na nim urządzenie, to nie ma tu optymalnego mocowania. Należy wziąć urządzenie do ręki. Osadzić zapięcie na tylnej stronie urządzenia. Słychać wtedy charakterystyczny klik i czuć, że zapięcie zaskoczyło. Umocować teraz ponownie urządzenie na pasku. 110 11. Dane techniczne Nazwa i model: EM 41 Forma krzywej wyjściowej: dwufazowy impuls prostokątny Czas trwania impulsów: 40-250 µs Częstotliwość pulsu: 1-120 Hz Napięcie wyjściowe: maks. 90 Vpp (przy 500 Ohm) Prąd wyjściowy: maks. 180 mApp (przy 500 Ohm) Zasilanie: 3x baterie AAA Czas leczenia: nastawiany w zakresie od 5 do 90 minut Intensywność: nastawiana w zakresie od 0 do 15 Warunki pracy:10 °C-40 °C (50 °F-104 °F) przy względnej wilgotności 30-85% Warunki składowania:-10 °C-50 °C (14 °F-122 °F) przy względnej wilgotności 10-95% Wymiary: 122 x 59 x 23 mm Ciężar: 69 g (bez baterii), 108 g (włącznie z zapięciem na pasek i bateriami) Wyjaśnienie oznaczeń: Część typu BF Uwaga! Należy przeczytać instrukcję obsługi! Niniejsze urządzenie odpowiada wymogom dyrektywy europejskiej dla produktów medycznych 93/42/EC, prawu o produktach medycznych. Odpowiednio do „Przepisów użytkownika dot. produktów medycznych” należy regularnie przeprowadzać kontrole pomiarowo – techniczne, jeśli urządzenie ma znaleźć zastsowanie w celach komercyjnych lub przemysłowych. Także stosując prywatnie zaleca się przeprowadzić u producenta kontrole pomiarowo – techniczne w odstępach 2 – letnich. Wskazówka: W przypadku stosowania urządzenia poza danymi zawartymi w specyfikacji technicznej nie gwarantuje się jego poprawnego działania! Zastrzega się prawo do zmian technicznych, rozwojowych oraz ulepszeń. Niniejsze urządzenie odpowiada normom europejskim EN60601-1 i EN60601-1–2 jak i EN60601-2-10 i podlega szczególnym środkom bezpieczeństwa w odniesieniu do kompatybilności elektromagnetycznej. Należy pamiętać, że urządzenia przenośne i telefony komórkowe mogą mieć wpływ na to urządzenie. Informacji szczegółowych udziela dział obsługi klienta pod wskazanym adresem. 111 112 753.207-0911 Irrtum und Änderungen vorbehalten