1
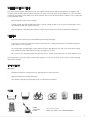
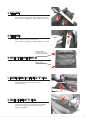
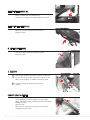
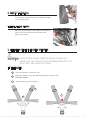
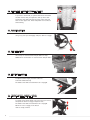
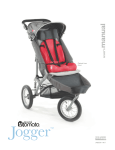
User’s manual
EIO Push Chair
WARNING: AVOID SERIOUS INJURY FROM FALLING OR SLIDING OUT.
ALWAYS USE THE SEAT HARNESS.
NEVER LEAVE CHILD UNATTENDED.
IMPORTANT: KEEP THESE INSTRUCTIONS FOR FUTURE REFERENCE.
A CHILD’S SAFETY IS YOUR RESPONSIBILITY. THIS VEHICLE IS
SUITABLE FOR ONE CHILD.
GENERAL INFORMATION & SAFETY
2
•
Follow all instructions carefully. Incorrect use will cause damage to stroller.
•
This product has been designed to take the maximum weight of 90lbs (40kg).
•
Children should be harnessed in at all times and should never be left unattended.
•
•
IMPORTANT - It is important for your child’s safety that the harness be correctly fitted and adjusted. If not adjusted
correctly in accordance with the instructions, the stability of the stroller will be compromised.
•
The harness and seat belt are not a substitute for proper adult supervision.
•
The child should be clear of moving parts while making adjustments.
•
•
IMPORTANT - DANGER: It is important that care is taken to ensure that children are kept clear of the stroller when
folding or unfolding. Pinch points and scissoring actions are unavoidable during these operations.
•
•
Do not carry additional children, goods or accessories in or on this stroller except as permitted in this manual.
They may cause the stroller to become unstable or place unneeded stress on the stroller that could lead to breakage.
•
•
Overloading, incorrect folding and the use of accessories, e.g. child seats, bag hooks, rain covers, buggy boards, etc.,
other than those approved by the manufacturer may damage or break this stroller.
•
•
Any damage caused by the use of accessories not supplied by manufacturer will not be covered by the terms of our
warranty.
•
•
Never leave child in the stroller when ascending or descending stairs or escalators or when travelling on other forms of
transport.
•
The stroller should always open and fold easily. Do not force it. It maybe necessary to re-read the instructions.
•
Negotiate curbs and rough ground carefully. Repeated impact will cause damage to the stroller.
•
Never allow children to stand on the footrest.
•
Do not leave the stroller exposed to heat, i.e., by a radiator or in direct sunlight.
•
Do not place items on the top of the hood as it may cause damage to the canopy.
MAINTENANCE AND REPAIR
This stroller requires regular maintenance by the user. Regularly check all rivets and connecting devices for tightness and
security. Inspect all brakes, wheels and tires and replace or repair if necessary. Check all safety devices for correct operation,
in particular the primary and secondary locks. These should be free to move at all times. Never continue to use a product that
is not structurally sound.
•
We recommend a service every 12 months.
•
If wheels squeak, lubricate sparingly with Teflon or silicone coating. Do NOT use oil or grease based products, as this
will attract dirt, which will clog the movement.
•
Only manufacturer replacement parts should be used. It may be unsafe to use parts not supplied by manufacturer.
CLEANING
•
Clean frame with a damp cloth and a mild detergent and dry thoroughly.
•
If the stroller chassis parts have been exposed to salt water, we recommend that they be rinsed down with fresh
(tap) water as soon as possible.
•
The canopy maybe sponged lightly using a damp cloth and a mild detergent. The seat cover, head cushion, lateral
pads and harness pads maybe washed. Line dry thoroughly before reuse.
•
Do not fold or store the product while wet and never store in a damp environment, This can cause mildew to form.
The manufacturer reserves the right to make design changes to any of their products as part of their continuous design
improvement program.
INSTRUCTIONS
IMPORTANT:
•
Read these instructions carefully before use and keep them for future reference.
•
Apply both brakes when parking the stroller.
•
Your childrin’s safety may be affected if you do not follow these instructions.
PARTS
REAR AXEL
SEAT FABRIC
FOOTWELL
FRONT WHEELS
FRAME
& SHOPPING
POCKET
REAR WHEELS
CANOPY
LATERAL PADS
NOTE: THIS PART IS JUST PACKING MATERIAL
3
HANDLE
1. FRAME
HANDLE TUBE
Open frame in the upright position.
When primary & secondary lock is engaged,
an audible CLICK will be heard.
SECONDARY
LOCK
REAR
2. REAR AXEL
Push rear frame legs into rear axel.
When lock is engaged, an audible CLICK will be heard.
3. REAR WHEELS
Push rear wheel onto left rear axel. Repeat for right.
When lock is engaged, an audible CLICK will be heard.
4. FRONT WHEELS
Push front left wheel up into front frame leg. Repeat for right.
Lubricate sparingly with Teflon or silicone coating.
When lock is engaged, audible CLICK will be heard.
5. FOOTREST
4
Orient footrest so that it is facing up. Push right and left footrest
tubes into the frame at the same time.
When lock is engaged, an audible CLICK will be heard.
PRIMARY LOCK
FOOTREST
CONNECTION
FRONT
6. SEAT FABRIC
Double button on the handle tube (right & left sides).
When button is engaged, an audible SNAP will be heard.
A. SEAT FABRIC
Button support straps to each rear leg.
When button is engaged, an audible SNAP will be heard.
FRONT STRAP
(above bolt, below
footwell adjustment)
B. UNDER SEAT FRAME STRAPS X2
REAR STRAP
C. IMPORTANT: UNDER SEAT STRAP “D” RINGS
Thread up through the bottom, then down
through the top.
D. UNDER SEAT STRAP “D” RINGS
Loose tail of under seat strap should be positioned
between the taught strap and the seat bottom.
DO NOT overtighten.
5
E. FOOTWELL SNAPS X2
Button footwell fabric to footwell snaps.
When button is engaged, an audible SNAP will be heard.
F. FOOTWELL VELCRO X2
Wrap velcro around footwell frame and fasten.
Repeat for right.
G. SIDE SADDLE BAGS
Fold over primary frame locks and velcro down.
Repeat for right.
7. CANOPY
A Slide canopy clip down into frame connector. Do Not force.
Be sure clip is clear of fabric obstruction. Repeat for left.
When lock is engaged, an audible CLICK will be heard.
B To remove canopy- press down clip then slide
upward.
CANOPY SNAP & ZIPPER
6
Fasten stabilization snaps and zipper the canopy sides.
Zipper and snap should be positioned just below the handle
adjustment button.
Repeat for left.
NOTE: You can remove the rear half of the canopy by
unzipping the center seam.
A
B
8. PADDED LATERALS X4
Feed both velcro straps through slots located at the edges
of seat & back surface.
LATERAL VELCRO STRAPS
Pull velcro straps through to the outside of the seating (or
back) surface. Then wrap around frame and fasten.
Repeat for all straps.
9. SEAT BELT/ SHOULDER HARNESS OPERATION
WARNING:
AVOID SERIOUS INJURY FROM FALLING OR SLIDING OUT.
ALWAYS USE THE CROTCH STRAP IN COMBINATION WITH THE WAIST BELT AND SHOULDER STRAPS.
TO FIT HARNESS
A
Insert both fasteners securely into clasp.
B
Adjust strap lengths. Crotch strap and shoulder harness should be snug.
TO RELEASE HARNESS
C
Squeeze fastener prongs and pull up.
B
C
A
B
7
10. SHOULDER HARNESS (SMALL CHILD)
If you have a small child, an optional method to thread the
shoulder harness may be required to take up more slack.
Thread the strap down through the front lower slots and
back out the upper slots. Place head pillow over buckles to
avoid chafing.
11. PARKING BREAK
Using foot, push up to disengage and press down to engage.
12. RECLINE STRAP
UP: Push up on recline buckle and pull down on strap.
DOWN: Pinch arrow button on recline buckle and pull down
13. FOOTWELL ANGLE
To adjust footwell angle, press the button on
both sides simultaneously.
An audible CLICK will be heard when lock is engaged.
14. FRONT WHEEL SWIVEL LOCKS
8
To engage front wheel swivel locks, press tab up to unlock
and press tab down to engage. Repeat for left.
An audible CLICK will be heard when lock is engaged.
NOTE: For lock to engage, front wheels
must be facing forward.
BACK REST SURFACE
15. FOLDING
A
Fully recline stroller
B
Disengage rear canopy hood from seat back
C
Place handle in upright position
D
Unlock front swivel wheels
(both sides facing forward)
E
Place footwell in down position
F
Standing behind the push chair, Lift up on primary locks (both sides) & secondary lock (right side).
C
F
B
E
A
D
A
FOLDING
B
A
Primary locks will disengage
B
Push down on handle of EIO
FOLDING
A
Engage closure clip
A
9
IMPORTANT- WARRANTY WILL BE VOID IF DEFACED OR REMOVED
Your stroller is guaranteed to be free from any manufacturing defects for a period of 2 years from the date of
purchase under normal use and provided it is used in compliance with the operating instructions. This warranty
extends only to the original retail purchaser and is only valid when supplied with proof of purchase. Please retain
proof of purchase with this Limited Warranty.
Should a repair be needed please contact the retailer from whom the product was purchased.
PLEASE NOTE THAT THE WARRANTY
WILL NOT BE APPLICABLE IF:
•
•
•
•
•
A fault is the cause of misuse or poor maintenance.
Repairs are carried out by a third party.
The stroller is faulty due to general wear and tear which is the result of everyday use.
A stroller is damaged as a result of an accident.
The manufacturer is not satisfied that the stated warranty terms and conditions have been met.
© 2009 Bergeron By Design
The information contained herein is subject to change without notice.
Bergeron By Design shall not be liable for technical errors or omissions herein.