1
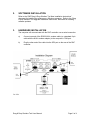
12843 Foothill Blvd, #D
Sylmar, CA 91342
Voice: 818 898-3380
Fax: 818 898-3360
Internet: http://dnfcontrols.com
Drag & Drop Shotbox Tool
for use with Grass Valley
Profile Media Manager
User Manual
Rev 112904
Table of Contents
1.
OVERVIEW ............................................................................................................... 1
2.
SOFTWARE INSTALLATION ................................................................................... 2
3.
HARDWARE INSTALLATION................................................................................... 2
4.
APPLICATION STARTUP......................................................................................... 3
5.
VIEW CLIP ASSIGNMENTS ..................................................................................... 3
6.
MODIFY CLIP ASSIGNMENTS ................................................................................ 4
1.
a)
Delete Clip Assignments ................................................................................. 4
b)
Add Clip Assignments ..................................................................................... 4
OVERVIEW
The Drag & Drop Shotbox Tool, in combination with the Grass Valley Profile
Media Manager application, provides a fast and easy means to assign clips to
the Shotbox keys. Quickly view existing assignments, clear assignments, and
add new assignments.
The Drag & Drop Shotbox Tool works in combination with the Shotbox and the
controller. Clips may be assigned using the Shotbox Tool, Shotbox, or controller.
Drag & Drop Shotbox Tool User Manual
Page 1 of 4
2.
SOFTWARE INSTALLATION
Refer to the “DNF Drag & Drop Shotbox Tool New Installation Instructions”
document for installing the software on a Windows computer. Refer to the “Drag
& Drop Shotbox Tool Upgrade Installation Instructions” document for installing
software updates.
3.
HARDWARE INSTALLATION
The computer will communicate with the DNF controller over a serial connection.
a)
Connect one end of the RS232 NULL-modem cable (or a standard 9-pin
cable with the NULL-modem adapter) to the computer’s COM port.
b)
Plug the other end of the cable into the SP2 port on the rear of the DNF
controller.
Drag & Drop Shotbox Tool User Manual
Page 2 of 4
4.
APPLICATION STARTUP
a)
Launch the Drag & Drop Shotbox Tool application on the computer.
The prompt “No COM PORT selected! Click on "LPT Port" to select com
port” will be displayed.
b)
Click on the LTP Port drop down menu to select the COM port connected
the DNF controller. The “No COM PORT selected!” prompt will be
removed.
When the computer can communicate with the controller the “Waiting to
Communicate with Controller” indicator, in the upper right hand corner will
turn green indicating “Communicating with Controller”.
c)
5.
Startup the Grass Valley Profile Media Manager application on the same
computer.
VIEW CLIP ASSIGNMENTS
a)
Click on a BANK SELECT key to select bank and view the clip
assignments in that bank.
b)
Click on the OVERVIEW button to toggle between OVERVIEW and
DETAIL view modes.
In OVERVIEW view mode, all 30 keys in the bank will be displayed with
their respective clip assignments.
In DETAIL view mode, one row of keys in the bank, 1-10, 11-20, or 21-30
will be displayed. The clips assignments for each key will be shown
including detail for all of the VTRs. Click on the “1-10”, “11-20”, or “21-30”
button at the bottom of the window to select a row of keys.
Changes to the clip assignments may only be made in the DETAIL mode.
Drag & Drop Shotbox Tool User Manual
Page 3 of 4
6.
MODIFY CLIP ASSIGNMENTS
a)
b)
Delete Clip Assignments
1)
Select DETAIL view mode by clicking on the OVERVIEW button.
2)
Click on the CLEAR button, below the drop box, to empty the drop
box.
3)
Click on a BANK SELECT key, at the top of the window, to select
bank ‘0’ through ‘9’.
4)
Click on the “1-10”, “11-20”, or “21-30” key to select a row of keys
in a bank.
5)
Double click on the KEY# column, in the desired key row, to clear
all VTRs in that row.
6)
Double click on a VTR column, in the desired key row, to clear a
specific VTR.
Add Clip Assignments
1)
Select DETAIL view mode by clicking on the OVERVIEW button.
2)
Click on the CLEAR button, below the drop box, to empty the drop
box.
3)
Drag a clip name from Grass Valley Profile Media Manager and
drop it in the drop box in the upper right hand corner of the
window.
4)
Click on a BANK SELECT key, at the top of the window, to select
bank ‘0’ through ‘9’.
5)
Click on the “1-10”, “11-20”, or “21-30” key to select a row of keys
in a bank.
6)
Double click on a VTR column, in the desired key row, to assign
the clip in the drop box to the specific key.
7)
Repeat steps 3, 4, & 5, to assign the clip to other keys.
8)
Click on the CLEAR button to clear the drop box.
Drag & Drop Shotbox Tool User Manual
Page 4 of 4