1
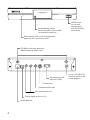
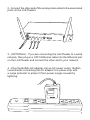
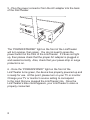
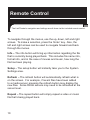
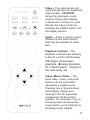
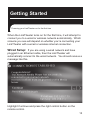
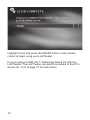
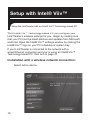
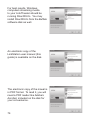
LinkTheater – Wireless A&G Media Player P4LWAG v1.2 Introduction Product Diagram Connect Your Cables Remote Control Initial Power-On Wired Setup Wireless Setup Intel® Viiv™ AOSS Manual Wireless Configuration Settings System Preferences Network Settings Display Settings Reset System Settings Choosing your Media Sources Installing and Configuring Buffalo PC Utility Configuring Windows Media Player Connecting to a Media Server Browsing Music Browsing Pictures Browsing Videos Connecting to and Using a USB Device Digital Audio / Surround Sound HDTV / 720p Information Software and Updates Contact Information Warranty Information FCC and Regulatory Information 3 4 5 10 13 13 15 16 24 25 28 30 32 46 48 49 52 60 64 66 68 69 70 72 72 72 76 77 78 Using LinkTheater Thank you for choosing LinkTheater! This manual should help you configure and use your new LinkTheater. Buffalo Technology’s LinkTheater P4LWAG Wireless-A&G Network Media Player is the missing link between your TV, home entertainment center, and computer network. Now, you can play the movies, music, and photos stored on your computers from the comfort of your living room, through your TV and home entertainment center. The LinkTheater can connect to wired or wireless networks. With 802.11g technology, your media files can move through your wireless network at up to 54 Mbps*, and the RJ-45 Ethernet port is good for 100 Mbps with wired connections. The LinkTheater has a wide variety of AV connections on the back, including High-Definition compatible video connectors as well as digital Dolby™ 5.1 and DTS compatible audio connectors. LinkTheater also supports Universal Plug & Play for easy installation. Most of the industry’s most popular video, image, and audio formats are supported by LinkTheater. LinkTheater includes support for the following file types: Video: MPEG1, MPEG2, MPEG4, XviD, WMV, H.264 (480i, 480p, and 720p) Audio: MP3, WAV, WMA, M4A (AAC), LPCM, AC3 Image: JPG, BMP, PNG Prepare to experience one of the highest quality, most versatile media players available! Buffalo Technology’s LinkTheater will provide seamless access to your multimedia archives. Please check our web site (http://www.buffalotech.com) for updates and additional support for this product. TM RESET USB 2.0 port for use with memory keys and FAT32 USB hard drives Power/Standby switch Hold 5 seconds to start AOSS; 10 seconds to reset unit. Reset button; hold in with a straightened paper clip for 5 seconds to reset. RP-SMA for wireless antennas (attach antennas before use) + D4/Component HD video out (720p) S-Video port Composite Video port RCA stereo audio out Toslink digital audio out (5.1) 10/100 Ethernet - 5 V dc (110-240V 5060Hz AC power to AC power adapter) Package Contents: • • • • • • • • LinkTheater Media Player (2) Wireless Antennas Remote Control with Batteries AC Power Adapter LinkTheater CD-ROM User Manual (this guide) Standard A/V Cable (Red, White, and Yellow RCAs) D4/Component Video Cable If any items are missing from your package, please contact Buffalo Technology’s Technical Support or contact the place you purchased your product from. Prepare for Hookup: The LinkTheater connects to a TV or video moniter with composite (RCA), S-Video, D4, or component style video connectors. Find an appropriate place to install the LinkTheater. We recommend that the install place is: • within visible site of the primary seating area. This device uses an IR remote control and requires line of sight. • where the the antennas can be pointed directly up in an unobstructed way if the built-in wireless radio is going to be used to connect to the network. • on a flat surface or cabinet. We do NOT recommend placing it on top of a warm-running audio/video component, due to potential overheating concerns. Hookup: The LinkTheater must be connected to a TV or monitor. Although the LinkTheater plays mp3s and other popular music formats, a TV or monitor is required to navigate and configure options on the LinkTheater. By default, the LinkTheater uses the standard 4:3 video mode over the yellow analog video connector, or an S-Video connector. Component video is supported for higher resolutions (480p and 720p); however, to initially access the configuration menu, the LinkTheater must be hooked up with the standard yellow analog video connector. For more information on component video, please see the component video section of this user’s manual. Please follow the procedure below: 1 - Hook up the included analog video cable to your TV or monitor: 2 - Connect the other end of the analog video cable to the associated ports on the LinkTheater: 3 - (OPTIONAL): If you are connecting the LinkTheater to a wired network, then plug in a CAT-5 Ethernet cable into the Ethernet port on the LinkTheater and connect the other end to your network. 4 - Plug the Buffalo AC adapter into an AC power outlet. Buffalo recommends connecting the AC adapter to a power-strip with a surge protector to protect it from power surges caused by lightning. 5 - Plug the power connector from the AC adapter into the back of the LinkTheater. The ‘POWER/STANDBY’ light on the front of the LinkTheater will turn orange, then green. You do not need to press the power button on the front of the LinkTheater. If it does not light up, then please check that the proper AC adapter is plugged in and seated correctly. Also, check that your power-strip or surge protector is on. 6 - Once the ‘POWER/STANDY’ light on the front of the LinkTheater turns green, the device has properly powered up and is ready for use. At this point, please turn on your TV or monitor. Change your TV or monitor’s source setting to correspond to the input that you plugged the LinkTheater into. Once the LinkTheater’s blue menu appears, your LinkTheater’s video is properly connected. Remote Control The LinkTheater's navigation and settings are all done via the included remote control. To navigate through the menus, use the up, down, left and right arrows. To make a selection, press the ‘Enter’ key. Also, the left and right arrows can be used to navigate forward and back through the menus. Info – The info button will bring up information regarding the file that is currently being played back. This includes file name info, format info, and in the case of movies and music, how long the file has been playing. Setup – The setup button will instantly take you to the System Settings area. Refresh – The refresh button will automatically refresh what is on the screen. For example, if recent files have been added to a media server, pressing the refresh button may display the new files. Some DLNA servers may need to be refreshed at the server level. Repeat – The repeat button will simply repeat a video or music file that’s being played back. 10 Video – The video button will cycle through the four supported video modes. CAUTION: Using this improperly could result in losing video display. In that event, continue to cycle through the video modes by pressing the VIDEO button until the display returns. Audio – Audio is used to select different sound track options that may be available in video files. Playback Controls – The playback controls work similarly to that of a VCR or DVD player. >/II begins and pauses playback, stops playback, >> is fast forward, >I goes to the next song, etc. Video, Music, Photo – The three video, music, and photo buttons can be used while navigating a media source. Pressing one of these buttons will instantly change your viewing to the file types that correspond with the button pushed. For example, if you’re browsing video and press the music button, you’ll instantly be browsing music instead. 11 Home – The home button will return you to the main navigation hub. Up and Down – The up and down buttons work like Page Up and Page Down does on a computer. This is a quick way to browse through folders that have a lot of media. Volume and Mute – The LinkTheater has its own independent volume control that can be used along with or as an alternative to your TV or sound system’s remote control. This allows you to quickly mute or raise/lower the volume without having to necessarily use the TV or sound system’s remote control. Stop – The stop key will temporarily pause a slideshow that’s in progress. Track – The track button will skip forward or back to the next video, music, or picture file. 12 Getting Started Powering your LinkTheater on for the first time When the LinkTheater turns on for the first time, it will attempt to connect you to a wired or wireless network automatically. Which screens you see will depend on whether you’re connecting your LinkTheater with a wired or wireless internet connection. Wired Setup: If you are using a wired network and have plugged in an Ethernet cable, then the LinkTheater will automatically connect to the wired network. You should receive a message like this. Highlight Continue and press the right control button on the remote control. 13 Highlight Finish and press the ENTER button on the remote control to begin using your LinkTheater. If you’re using a Intel® Viiv™ Technology-based PC with the LinkTheater, The LinkTheater will need to be added to the PC’s device list. Turn to page 21 for instructions. 14 Wireless Setup: If you are using a wireless network, then the LinkTheater will give you three options to initially connect your device. Intel® Viiv™ Setup – If you have an Intel® Viiv™ Technologybased PC on your network, it can instruct this device on how to set up. Turn to page 16 for wireless setup with a Intel® Viiv™ computer. AOSS – If your access point supports AOSS, then you can connect your LinkTheater to it wirelessly by just pushing a couple of buttons. Turn to page 24 for more information. Regular Setup – Regular setup lets you configure your LinkTheater manually. Turn to page 25 for instructions on configuring your LinkTheater manually. It’s time to make a decision! Turn to page 16, 24, or 25, depending on how you want to configure your LinkTheater’s wireless connection. 15 Setup with Intel® Viiv™ Setup the LinkTheater with an Intel® Viiv™ Technology-based PC. Your Intel® Viiv™ Technology-based PC can configure your LinkTheater’s wireless settings for you. Begin by making sure that your PC has the latest patches and updates from Microsoft and Intel. Open the Intel® Viiv™ settings window by clicking the Intel® Viiv™ logo on your PC’s desktop or system tray. If your LinkTheater is connected to the network with a wired Ethernet connection and you’re using an Intel® Viiv™ Technology-based PC, then turn to page 21. Installation with a wireless network connection: Select Add a device. 16 Select Start. Select Wirelessly, then next. When you see this screen, go to your LinkTheater. 17 Power on the LinkTheater and select Yes to have Intel® Viiv™ configure your wireless connection for you. Your LinkTheater will give you a passcode. Write this down. You have ten minutes to type this into your Intel® Viiv™ Technologybased PC. If time runs out on the timer, go back to the previous screen and select Yes again to get a new passcode. 18 Back at the PC, click next. Enter the passcode that you got from the LinkTheater. Click next. 19 Select media device and then next. Your LinkTheater is now connected to the network. Click next to begin building your media library. Turn to page 23. 20 If you’ve connected your LinkTheater to your network with a wired Ethernet connection, you can still add the LinkTheater to an Intel® Viiv™ Technology-based PC’s list of devices. Installation with a wired Ethernet connection: On the Intel® Viiv™ Technology-based PC, select add a device, Select connecting it to the router with an Ethernet network cable, then click next. 21 Select next. Select media device. When you see this screen, your device has been sucessfully added to the network. Select next to begin building your media library. 22 Build your media library: Select next. Read conditions. Select agree to continue. Select Standard Setup and then choose finish. Congratulations! Your LinkTheater is configured to work with your Intel® Viiv™ Technology-based PC. 23 AOSS Configuration AOSS can configure your wireless connections for you. To let AOSS configure your wireless network settings, select No, Use AOSS Instead from the Welcome to Setup page. Now, press the AOSS button on your access point or wireless router. When you see this screen about 40 seconds later, your LinkTheater is connected to your wireless network. 24 Manual Configuration You can enter your wireless network information manually. If you chose the regular setup method, the LinkTheater will automatically detect all available wireless networks. Highlight the wireless network you would like to connect to and then press the right control button on the remote control. 25 Unless the chosen network is open, you will need to enter the encryption key (password) for the wireless network. Input the WEP (hex) or WPA Personal (alphanumeric) key into the key field. Highlight the key field, press the remote’s ENTER key, type the key in, and press ENTER again when finished. Use the 0-9 keys in sequence to type numbers and letters into the field (similar to how a cell phone works). For capital letters, please cycle through the lower case and numbers first. The left arrow key is used for backspace, the right arrow key for space. Select Continue when done. 26 Press the right arrow to have DHCP automaticly configure your network settings (recommended). If you select ‘Enter the Settings (Static Address)’ then you will have to set your IP address and subnet mask manually. If all goes well, you should see this screen. You have connected the LinkTheater to your network! 27 Settings Configure your LinkTheater. The LinkTheater has various configurable settings that change how the device communicates with your network, when the screen saver turns on, what display mode you’re running, etc. This section will explain each feature in detail. To navigate to the Settings area, please use the control arrows on the remote control to highlight settings and then press the ‘Enter’ button or the right control. NOTE: Pressing the ‘Settings’ button on the remote control will accomplish the same task. 28 The System Options area allows you to change key settings of your LinkTheater. At a minimum, we recommend you configure your System Preferences and Network Settings. Specific instructions are included on the following pages. System Preferences – This area allows you to set the Screen Saver Delay, Slideshow Delay, Check the firmware version, and check for firmware updates. Network Settings – This area allows you to configure the LinkTheater to connect to a wired or wireless network as well as configure proxy server information. Display – This area allows you to change the video mode of your product. This is particularly useful when using the D4/ component video interface. Reset System Settings – This resets all of your settings to the factory default settings. 29 System Preferences: Using the remote’s control arrows, change the Screen Saver Delay and Slideshow Delay to your desired settings. To change a setting, please highlight the specific item and press the ENTER key on your remote control. You can then increase or decrease the value by using the up and down controls on the remote. Once the value has been changed, press the ENTER button again to lock in the setting. Screen Saver Delay – This is the time of inactive use required by the LinkTheater before it activates its internal screen saver. The screen saver is used to protect your TV or monitor from image burning. Some types of displays (specifically CRT tubes) are especially easy to burn images into. It is recommended that the screen saver be used when the LinkTheater is not being used. Slideshow Delay – This is the amount of time a picture or graphics file will be displayed before the next file is displayed. This amount of time is only pertinent when doing a slideshow of multiple images. 30 Mediaplayer - The Mediaplayer setup page tells you the name of the device and the version number of the firmware. It is not necessary to change the name unless you have multiple LinkTheaters and plan on using access control to prevent certain servers from working with certain LinkTheaters. Software - The Software setup page informs you of the software firmware version on the device as well as the serial number/MAC address. The Check for Updates Now option allows you to check for product updates. For more on this, please refer to the ‘Firmware Updates’ portion of this guide. 31 Network Settings: The Network Settings area is used to connect your LinkTheater to the network, manage how it connects, and change proxy server settings. Use the remote control to navigate to the appropriate areas: Current Network Status – Shows the LinkTheater’s current network information including IP address information. Create New Profile – Begins a wizard that allows you to create and connect to a new wired or wireless network. Modify Profile – Allows you to edit an existing network profile. Connect to Profile – Instructs the LinkTheater to immediately connect to an existing network profile. Remove Profile – Allows you to delete an existing network profile. Profile Startup Order – Allows you to the pick the network profile the LinkTheater should try connecting to first, second, third, etc. Proxy Settings – Allows you to configure proxy settings. Proxy servers are not commonly used, and are almost never used in homes. If you are installing the LinkTheater in a business environment, please ask your network administrator if there is any proxy server information that is needed. 32 Current Network Status: The Current Network Status will give you a quick snapshot regarding your network connection. It will inform you which IP address has been assigned to your LinkTheater and in the case of a wireless network connection, information regarding the wireless network. This is more of a diagnostic/information status screen. It is mainly used to verify whether you have properly connected to a network. 33 Create New Profile: If you are connecting to a new wired or wireless network for the first time, you will be required to add a profile for that network. First, select whether you want to connect via a wired or wireless connection. 34 Wired Profile: Select whether you wish to use DHCP (recommended) to automatically determine your network information from your router or whether you want to enter the settings manually. If you selected ‘Enter the Settings (Static Address)’ then the next setup page will ask your for network information. Please fill it out and navigate and click the ‘Continue’ button. If you selected ‘Connect Automatically (DHCP)’, then the above steps are not required. 35 After the device attempts to connect via DHCP or via the static address information you will be prompted that it successfuly connected to the network. You should now be able to use the device on the network. You can verify your connection information by checking the ‘Current Network Status’. 36 Wireless Profile: When connecting to a wireless network, the LinkTheater will scan for visible wireless networks. The LinkTheater supports connections on three different wireless technologies: 802.11a, 802.11b, and 802.11g. It will list all types of wireless networks together. It will also list if they’re using encryption and in certain cases what type. Once the wireless scan is complete, you will need to choose your wireless network. Press the remote’s ENTER or right arrow key to select a network. Alternatively, if you wish to manually enter SSID information, you may select ‘Manually Enter SSID’ and then fill out the appropriate network information on the following screen(s). 37 The next status page will prompt you for additional information including encryption key info. The Security type should automatically be set to the appropriate setting for that network: Open = Wireless networks without encryption or that use WEP encryption WPA Personal – Wireless networks that use WPA Personal authentication (WPA-PSK TKIP) Shared = Wireless networks with shared key authentication. If applicable, please input the WEP (hex) or WPA Personal (alphanumeric) key into the key field. Highlight the key field, press the remote’s ENTER key, type the key in, and press ENTER again when finished. Use the 0-9 keys in sequence to type numbers and letters into the field (similar to how a cell phone works). For capital letters, please cycle through the lower case and numbers first. The left arrow key is used for backspace, the right arrow key for space. Select ‘Continue’ when done. 38 Select whether you wish to use DHCP (recommended) to automatically determine your network information from your router or whether you want to enter the settings manually. If you selected ‘Enter the Settings (Static Address)’ then the next setup page will ask your for network information. Please fill it out and navigate and click the ‘Continue’ button. If you selected ‘Connect Automatically (DHCP)’, then the above steps are not required. 39 After the device attempts to connect via DHCP or via the static address information you will be prompted that it successful connected to the network. You should now be able to use the device on the network. You can verify your connection information by checking the ‘Current Network Status’. 40 Modify Profile: Modifying profiles allows you to edit specific portions of existing profiles without the need for recreating them entirely. This may be used if a wireless network’s encryption key has changed, or if IP addressing has changed. To modify a profile, use the remote control’s navigation keys to go through the wizard. Once modifying a profile, the wizard is identical to the wizard used to create a network. If you need further assistance, follow the instructions available under the ‘Create New Profile’. 41 Connect to Profile: Connecting to a profile just instructs the LinkTheater to connect to a specific, existing network profile. If you wish to connect to a different profile than the one you are currently connected to, then select the profile using the remote’s navigational arrows and press the right arrow. Once connected to the new profile, you will remain on the network until you connect to another profile, add a new profile, or restart the LinkTheater. If you wish to make a network profile the preferred or default profile, then please see the ‘Profile Startup Order’ section of this guide. 42 Remove Profile: You may want to remove older profiles that you are no longer using. To do this, select the profile you’d like to remove using the remote’s directional keys. Once selected, press the right arrow. NOTE: You cannot remove the profile that you are currently connected to. In this case, you will need to go back a page and use the ‘Connect to Profile’ and connect to a different profile. Additionally, you cannot delete the only profile that exists. You will receive another instruction wanting you to verify that you want to remove the profile. Select Continue to proceed or cancel to go back. 43 Profile Startup Order: The Profile Startup Order instructs the LinkTheater on how to connect to your network profiles. The network profile at the top of the screen is the first priority. This means that when the LinkTheater turns on, it will first attempt to connect to that network. If it cannot connect to the first profile, then it will try the second one, and so on. It’s important that your Profile Startup Order is correct. NOTE: Whenever you add a new network profile, it automatically becomes the top profile in the startup order. To move a profile, highlight a profile, press the remote’s ENTER key and then use the up and down arrows to move it in the list. Once you are done moving the profile, press the ENTER key again. Once complete, press the remote’s left arrow key to go back. 44 Network Proxy Settings (Advanced Feature): The LinkTheater allows you to configure proxy server information for use on networks that require proxy server use. Please check with your network administrator for this information if it is required. Once the fields have been entered correctly, select the ‘Commit Changes’ option and press the remote’s ENTER key. 45 Display Settings: The LinkTheater supports four display modes. Changing the display modes could result in your LinkTheater not operating properly so please make sure you know which modes your TV or monitor supports: Composite 480i 4x3 – This is the standard mode. It utilized the standard RCA (yellow) video cable or S-Video to transmit video data. 480i means the picture is displayed at the resolution 640x480 interlaced. Component 480i 4x3 – This mode uses the same resolution as above but transmits the image over the D4/component video connectors. Your TV or monitor must support D4 or component video to use this mode. Component 480p 4x3 – This is identical to the mode above, requiring a TV or monitor with D4 or component video, however, this mode uses 640x480 progressive resolution. This is the same resolution that a progressive scan DVD player would use. If your TV or monitor doesn’t support 480p/progressive than this mode will NOT work. Component 720p 16x9 – This mode utilizes HDTVs at HD resolutions over the D4/component video connectors. This is the highest and recommended setting if your TV or monitor supports it. Most widescreen HDTVs should support this mode. It uses 1280x720 progressive resolution. If your TV or monitor doesn’t support 480p/progressive than this mode will NOT work. Please check with your TV or monitor’s documentation and specifications to determine which mode you would like to use. NOTE: The LinkTheater can only transmit on video signal on RCA/composite and S-Video simultaneously. It cannot transmit on D4/component and composite or D4/component and S-Video simultaneously. 46 To select a mode, press the remote’s ENTER key and use the up and down arrows to select the proper mode. Pressing the ENTER key one more time will instantly switch the device to that mode. This may cause your screen to go completely black. In this case, you will need to switch your TV or monitors TV source or TV mode to component or composite connections (depending on which mode was just selected). Once the display is visible, you will need to press the 0 key on the remote to verify that you can properly see the display. NOTE: Pressing the VIDEO button on your remote control will cycle through the four supported display modes. 47 Reset System Settings: Resetting the system settings will return the product to default settings. This is the same configuration that the product was set in when it was brand new. All settings will be erased and you will need to reconfigure the product. Video modes will go back to Composite 480i 4x3 and network profiles will need to be reconfigured. You will be prompted twice to continue with the reset. Select Continue and Yes to reset your settings. 48 Choosing and Installing your Media Sources: Congratulations, at this point your LinkTheater is completely configured for your TV or monitor and your network. The default menu screen for the LinkTheater will be your hub for accessing multimedia content. The LinkTheater is one of the most versatile network media players available. It offers extensive playback support from many multimedia sources. There are three categories to choose from: Browse Media – This will access any of the following media devices: • DLNA Media Servers • The PC Utility that came with your LinkTheater • Buffalo’s DLNA Home Server NAS products (LinkStation Home Server and TeraStation Home Server) • 3rd party DLNA servers like TwonkyVision (www. twonkyvision.com) • Microsoft® Windows® Media Connect • Microsoft® Windows® Media Player 11 • 3rd party UPnP A/V Servers 49 Browse USB – Browse any USB Storage device that is formatted in FAT32. Devices include: • • • • USB Memory Sticks USB Hard Disk Drives Digital Cameras Card Readers Intel® Viiv™ Zone – Access any multimedia files that reside on an Intel® Viiv™ Technology-based PC. 50 Browse Media: The Browse Media area allows you to access a variety of sources discussed earlier in this section. This guide will give instructions on how to set up a media server using the included Buffalo utility as well as Microsoft’s Windows Media Connect. If you are using a 3rd party DLNA or UPnP A/V media server, then please consult the documentation for the server application or device. If you are using a Buffalo Home Server NAS device, then please consult the documentation for it, specifically the section about turning on PCast and DLNA. 51 Installing the Buffalo PC Utility: Please follow the install steps below if you wish to use the Buffalo PC Utility (recommended): 1. Insert the LinkTheater CD-ROM into your PC’s CD-ROM drive. The program should automatically launch, if it does not, browse for the CD and run Setup.exe. 2. Press the ‘Start’ button. 3. Agree to the End User License. 52 4. Press ‘Start’. 5. The installation will complete. You will need to reboot your machine. 53 6. After the reboot, please launch the ‘Configure MediaServer’ program from the start menu. Configuring the Buffalo PC Media Server: Now that the Buffalo PC Media Server is installed and running, you must point it to the media on your computer. 54 There are two options for adding media: Add - By pressing the Add button, you can specifically pick a directory on your computer to share with the LinkTheater. If you wish to add multiple directories, then you can add them one at a time by repeating the process. Auto Search – Auto search launches a wizard that will help you automatically find your media. Press the Next button to continue. 55 Select which drive or drives you’d like to include in the search. Press the Next button. Additional options are available. We recommend that you keep the options as is. Press the Next button when ready. After the search completes, you will be asked to confirm which folders you’d like to add to the media server. Checked folders will be shared, unchecked folders will not. Once you have analyzed the list, press the Confirm button. 56 The Options tab will let you turn on and off file sharing. It also includes other options, including the ability to control whether the media server starts when your computer starts. To disable file sharing, press the Turn OFF File Sharing button. You may want to turn on Access Control to prevent certain devices from accessing your media content. This is especially important if there are multiple LinkTheaters or other DLNA playback devices on your network. If you’d like to prevent some devices from accessing your date while permitting others, press the Turn ON Access Control button. Press Add to bring up the access control wizard. 57 Press Next. And then press Next again. 58 Select your preferred method for assigning access to drives. Once complete, press Next. You can continue to add more access grants by pressing the Add button again. The access rules will appear in the main application console. Congratulations, you’ve completed the install and configuration of the Buffalo PC Media Server. 59 Configuring Windows Media Player: With Windows Media Player 11, a PC can stream media files to the LinkTheater. If you’ve already installed the Buffalo PC Media Server utility, then using Windows Media Player 11 may not be necessary. Windows Media Player 11 replaces the Windows Media Connect 2.0 software that was available within previous versions of Windows XP. If you still have Windows Media Connect 2.0 software on your computer, it will continue to work with your LinkTheater, but upgrading to Windows Media Player 11 or later is recommended. Among other functions, Windows Media Player 11 streams multimedia content to devices like LinkTheater. Currently it and Intel® Viiv™ Zones are the only way to transmit DRM (Digital Rights Management) protected multimedia files from a Windows XP PC to a device like LinkTheater. If you do not own or use any DRM protected multimedia files then setting up Windows Media Player is not necessary. Windows Media Player supports playback of DRM protected files that use the WinDRM codec. Currently, the LinkTheater only supports playback of DRM protected files that use the WinDRM codec (this includes napster. com, walmart.com, rhapsody.com, movielink.com, cinemanow. com and other sources). You can get the latest version of Windows Media Player from Microsoft’s Window’s Update (http://windowsupdate.microsoft. com ). 60 In Windows Media Player, click Tools and choose Options. From the Library tab, choose Configure Sharing. 61 Make sure that you have a check next to “Share my media to:”. If your LinkStation is powered on and connected to the network, it will appear in the window as an “Unknown Device” with a yellow triangle and an explanation point. Highlight the new “Unknown Device” and click Allow. Note: If more then one device is listed then multiple media players are available on your network; in this case either add all of them or determine which one is your LinkTheater by turning it on and off and seeing how the list is affected. Click Settings to specify specify what media files to share with your LinkTheater. 62 Change settings as desired. Click OK when done. 63 Connecting to a Media Server using Browse Media: Browsing media from different media servers is virtually identical. The following steps will show you how to navigate and choose files for playback. Depending on which server you use, the steps may be slightly different. To begin accessing media, highlight Browse Media on the LinkTheater’s display and press the remote’s right control arrow. Depending on which servers are installed and running on your network, you will see them available. Select the server that contains the multimedia files that you wish to playback and press the remote’s right control arrow. 64 Media is broken down into three categories: Music, Pictures, and Video. This guide show navigation in each of these three categories. Turn to page 66 for more on navigating music, page 68 for more on navigating pictures, and 69 for more on navigating video. 65 Browsing Music: Media Servers will be default sort your music based on data found inside of the music files. It will attempt to sort it based on several pieces of information include artist, title, genre, album name, etc. Please select a method to sort your music by. If you wish to see all the files in their folders, then select the Folder option. Selecting All Tracks will put all of the pictures in one large list, disregarding any folder structure. Once you have selected a sort style, then press the remote’s right control button. NOTE: Sorting uses ID3 and other tags as available. Sometimes information in these tags is inaccurate or incomplete. In these cases your music may not appear to be sorted correctly. In this event, using the Folder navigation options allows you to see all your files and any folder based sorting you have. 66 Depending on how you sorted your music in the previous step, your navigation will differ. Select the folder, artist, genre, etc that you’re interested in hearing. NOTE: This screenshot shows ‘Artist’ based sorting. Depending on which navigation you use, you will ultimately find songs and/or playlists listed. To play a song or playlist, select it and press the ENTER key or right control arrow on the remote. Pressing the Play/Pause button will play all of the music, one file after another in alphabetical order. While music is playing, you can navigate to other areas of the LinkTheater, including viewing pictures and slideshows. 67 Browsing Pictures: Many media servers will have their own sorting options besides the ones shown below. To see all the files in their folders, elect the Folder option. Selecting All Pictures will put all pictures in one long list, disregarding any folder structure. Once you have selected a sort method, press the remote’s right control button. Thumbnails of the pictures in the folder will be displayed. You can browse through the pictures by using the remote control’s up and down buttons. Once you find a picture that you want to view, press the ENTER key or right control button on the remote control. Pressing the Play/Pause button will start a slideshow. In a slideshow, the pictures will change depending on the Slideshow Interval setting in System Preferences. 68 Browsing Videos: Media Servers will be default sort your videos based on what folder they’re in or what date they were created. NOTE: Some media servers may have other sort options. Please select a method to sort your videos by. If you wish to see all the files in their folders, then select the Folder option. Selecting All Pictures will put all of the pictures in one large list, disregarding any folder structure. Once you have selected a sort style, then press the remote’s right control button. To play a video, select it and press the ENTER key or right control arrow on the remote. Pressing the Play/Pause button will play all of the videos, one file after another in alphabetical order. 69 Connecting to a USB Device: Browsing media from USB Devices is simple. Start by plugging the USB device into the LinkTheater’s USB port. Highlight Browse USB and press the right control button on the remote control. NOTE: To use a USB device on the LinkTheater it must be a USB mass storage class device with a FAT32 file format. 70 Press the right control arrow once the USB device has been highlighted. Multimedia files on the USB devices are not sorted like they are on DLNA Media Servers and Intel® Viiv™ zone servers. Instead, they are just navigated using the folder structure that is on the USB device. Select a folder if one exists.. To play a file, select it and press the ENTER key or right control arrow on the remote. Pressing the Play/Pause button will play all of the files, one file after another in alphabetical order. 71 Digital Audio / Surround Sound: The LinkTheater supports surround sound (AC3, Dolby Digital, etc.) by utilizing the TOSLINK/Optical audio connector on the back of the LinkTheater. The LinkTheater does not ship with a TOSLINK cable, but they are readily available from almost any electronic’s store. The LinkTheater can natively pass AC3 and other digital formats to an audio receiver to decode. For maximum quality and compatibility, it only passes digital audio tracks through to the receiver and relies on the receiver to decode. When you’re using the regular, composite stereo connectors, the LinkTheater decodes any digital sound track to analog stereo. HDTV / 720p Support: The LinkTheater supports HD resolutions at 720p. Natively it will play Mpeg-4 and WMV 9 HD clips that are encoded up to 2.5 Mbps. For all other non-HD content, the LinkTheater will upconvert lower resolution content to 720p for improved visual quality. To change your display mode, please see the ‘Display Settings’ area of this user’s guide. Software and Updates: For best results with the LinkTheater, the PCs that will be streaming media should be kept up to date. Visit www. windowsupdate.com for updates to Microsoft Windows. Intel® Viiv™ Technology-based PCs should be kept up to date as well. The software CD supplied with your LinkTheater includes a copy of Intel’s® Viiv™ software version 1.5. If this is more recent than the version on your Intel® Viiv™ Technology-based PC, you should install it. 72 To install, insert your Buffalo software disk. This window will open. Select Intel® Viiv™ software update. The updates will install automatically. 73 For best results, Windows computers streaming media to your LinkTheater should be running DirectX9.0c. You may install DirectX9.0c from the Buffalo software disk as well. An electronic copy of the LinkStation user manual (this guide) is available on the disk. The electronic copy of the maual is in PDF format. To read it, you will need a PDF reader like Adobe’s Acrobat, included on the disk for your convenience. 74 Specifications PC-P4LWAG LinkTheater Supported Multimedia Formats Video Formats MPEG1, MPEG2, MPEG4, XviD, WMV, H.264 (MPEG4 AVC) Audio Formats MP3, WAV, WMA, M4A (AAC), LPCM, AC3 Image Formats JPG, BMP, PNG Video Modes 480i, 480p, and 720p Wired LAN Interface Interface Transmission Speed Connector Type Access Method IEEE 802.3 (10BASE-T), IEEE 802.3u (100BASE-TX) 10 / 100 Mbps RJ-45 CSMA/CD Wireless Network Interface Standards Frequency Access Method Protocol Security IEEE802.11a / IEEE 802.11g / IEEE 802.11b 802.11a: 5.180-5.240GHz (Channels 36, 40, 44, 48), 802.11g/b: 2.412 - 2.472 GHz (Channels 1-11) Infrastructure Mode OFDM / DSSS / CCK WPA-PSK (TKIP), 128/64-bit WEP USB Interface Interface Data Transfer Speed USB2.0/1.1 480 Mbps Other Supported OS Product Voltage Power Consumption Dimensions Windows® XP, Windows® 2000 5V Max. 8 W W 11.02 x H 1.85 x D 4.88 in (280×47×124 mm) Weight Approx. 1.54 lbs. 75 Contact Information for America and Europe North America: Buffalo Technology USA Inc. 4030 West Braker Lane, Suite 120 Austin, TX 78759-5319 General Inquiries: Monday through Friday 8:30am-5:30pm CST Direct: 512-794-8533 | Toll-free: 800-456-9799 | Fax: 512-794-8520 | Email: [email protected] Tecnical Support: North American Technical Support by phone is available 24 hours a day, 7 days a week. (USA and Canada). Toll-free: (866) 752-6210 | Email: [email protected] Europe: Buffalo Technology UK Ltd. 176 Buckingham Avenue, Slough, Berkshire, SL1 4RD United Kingdom General Inquiries: Email: [email protected] Tecnical Support: Phone (UK only): 08712 50 12 60* Phone: +353 61 70 80 50 Email: [email protected] *Calls cost 8.5p per minute Technical Support Operating Hours Monday - Friday (GMT) 9:00 AM - 6:00 PM Monday-Thursday 9:00 AM - 4:30 PM Friday 76 Multimedia Product Warranty Buffalo Technology (Buffalo Inc.) products come with a one-year limited warranty from the date of purchase. If the Buffalo product malfunctions during the warranty period, Buffalo Technology will replace the unit, provided the unit has not been subjected to misuse, abuse, or non-Buffalo technology authorized alteration, modifications or repair. All expressed and implied warranties for the Buffalo Technology product line including, but not limited to, the warranties of merchantability and fitness of a particular purpose are limited in duration to the above period. Under no circumstances shall Buffalo Technology be liable in any way to the user for damages, including any lost profits, lost savings or other incidental or consequential damages arising out of the use of, or inability to use the Buffalo products. In no event shall Buffalo Technology’s liability exceed the price paid for the product from direct, indirect, special, incidental, or consequential damages resulting from the use of the product, its accompanying software, or its documentation. Buffalo Technology/(Buffalo Inc.) does not offer refunds for any product. Technical Support and firmware upgrades for Buffalo Technology products are restricted to the country/region of purchase. Please have your proof of purchase receipt to get warranty support. All defective products shall be returned with a copy of proof of purchase. In no event shall Buffalo Technology’s liability exceed the price paid for the product from direct, indirect, special, incidental, or consequential damages resulting from the use of the product, its accompanying software, or its documentation. Buffalo Technology does not offer refunds for any product. All rights reserved. Buffalo devices are designed for home or office use. Buffalo cannot be made liable for any damages, loss of data or damage following thereof (including, without limitation, damages for loss of business profits, business interruption, loss of business information, or other pecuniary loss) arising out of the use of or inability to use this Buffalo product, even if Buffalo has been advised of the possibility of such damages. We reserve the right to upgrade our products in keeping with technological advances. To protect against power surges and power outages, we strongly recommend that you use power surge protection and UPS solutions suitable for your situation. This warranty is void if: • The product was operated/stored in abnormal use or maintenance conditions; • The product is repaired, modified or altered • The product was subjected to abuse, neglect, electrical fault, improper packaging, accident or acts of nature; • The product was installed improperly; • The serial number of the product is defaced or missing; • The tamper seal on the casing is broken. © 2003-2006 Buffalo Technology (USA), Inc. 77 Federal Communication Commission Interference Statement This equipment has been tested and found to comply with the limits for a Class B digital device, pursuant to Part 15 of the FCC Rules. These limits are designed to provide reasonable protection against harmful interference in a residential installation. This equipment generates, uses and can radiate radio frequency energy and, if not installed and used in accordance with the instructions, may cause harmful interference to radio communications. However, there is no guarantee that interference will not occur in a particular installation. If this equipment does cause harmful interference to radio or television reception, which can be determined by turning the equipment off and on, the user is encouraged to try to correct the interference by one of the following measures: • Reorient or relocate the receiving antenna. • Increase the separation between the equipment and receiver. • Connect the equipment into an outlet on a circuit different from that to which the receiver is connected. • Consult the dealer or an experienced radio/TV technician for help. FCC Caution: To assure continued compliance, (example - use only shielded interface cables when connecting to computer or peripheral devices). Any changes or modifications not expressly approved by the party responsible for compliance could void the user’s authority to operate this equipment. This device complies with Part 15 of the FCC Rules. Operation is subject to the following two conditions: (1) This device may not cause harmful interference, and (2) this device must accept any interference received, including interference that may cause undesired operation. FCC RF Radiation Exposure Statement: This equipment complies with FCC RF radiation exposure limits set forth for an uncontrolled environment. This equipment should be installed and operated with a minimum distance of 20 centimeters between the radiator and your body. This transmitter must not be co-located or operating in conjunction with any other antenna or transmitter. Europe – EU Declaration of Conformity This device complies with the essential requirements of the R&TTE Directive 1999/5/EC. The following test methods have been applied in order to prove presumption of compliance with the R&TTE Directive 1999/5/EC: 78 •EN 60950: 2000 Safety of Information Technology Equipment •EN 300 328-2 V1.2.1 (2001-12) Technical requirements for spread-spectrum radio equipment •EN 301 489-17 V1.1.1 (2000-09) EMC requirements for spread-spectrum radio equipment Taiwan: SAR compliance has been established in typical laptop computer(s) with CardBus slot, and product could be used in typical laptop computer with CardBus slot. Other application like handheld PC or similar device has not been verified, may not comply with related RF exposure rules, and such use shall be prohibited. Safety This equipment is designed with the utmost care for the safety of those who install and use it. However, special attention must be paid to the dangers of electric shock and static electricity when working with electrical equipment. All guidelines of this manual and of the computer manufacturer must therefore be allowed at all times to ensure the safe use of the equipment. Intended use This device is a 2.4 GHz wireless LAN transceiver, intended for indoor home and office use in USA, Canada, all EU and EFTA member states. EU Countries intended for use This device is intended for indoor home and office use in the following countries: Austria, Belgium, Germany, Denmark, Spain, Greece, France, Finland, Italy, Ireland, Luxembourg, The Netherlands, Portugal, Sweden, United Kingdom, Cyprus, Czech Republic, Estonia, Hungry, Latvia, Lithuania, Malta, Poland, Slovak Republic and Slovenia. The device is also authorised for use in all EFTA member states Iceland, Liechtenstein, Norway and Switzerland. EU countries not intended for use None 79 Potential restrictive use This device is a 2.4 and 5 GHz wireless LAN transceiver, intended for indoor home and office use in all EU and EFTA member states, except in France, Belgium and Italy where restrictive use applies. In Italy the end-user should apply for a license at the national spectrum authorities in order to obtain an authorization to use the device for setting up outdoor radio links. In Belgium there is a restriction in outdoor use. The frequency range in which outdoor operation in Belgium is permitted is 2460 – 2483.5 MHz. In France only channels 10,11,12 and 13 are available. This device may not be used for setting up outdoor radio links in France. For more information see http://www.anfr.fr/ and/or http:// www.art-telecom.fr 80 Notes: 81