1
Package Contents
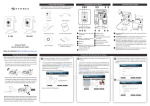
Camera Layout
Connecting the Cables
Please check the package contents on your hand. If anything is
missing, please don’t hesitate to contact your local distributor.
D-10H
Network Camera
RJ-45 LAN Cable
Power Adaptor (5V, 2A)
Quick Start Guide
DN-20H
Network Camera
Quick Installation Guide
Installation CD
Screw for Ceiling Mount x 3
Screw Anchor x 3
Light sensor (only on DN-20H)
Audio Output
Lens
Reset Button
PC connection: Please connect your PC to the LAN port of your
hub/router (xxx Box).
IR Lamp x 6 (only on DN-20H)
Microphone
microSD card slot (SDHC only
on DN-20H)
Camera connection: Use the bundled RJ-45 LAN cable to connect
the LAN port of the IP camera to the LAN port of your hub/router.
Speaker
Microphone Input
LED status indicator (dotted line
shows DN-20H LED indicator )
Power adaptor port
USB Wireless adaptor connector
I/O port (2 in/1 out)
Wireless adaptor (optional accessory): If you have purchased the
Storex USB wireless adaptor, plug it into the USB port of IP camera.
Please do not use other USB adaptors on your IP camera, than as
recommended by Storex (to avoid compatibility problems).
Ethernet Port
Power: Attach the cord power to the camera and connect the
power plug to a power outlet.
Video Installation: http://installipcam.storex.eu
Package Contents
Installing Camera Software
Follow the steps below to mount the camera on a flat surface. Then
adjust the camera to the desired viewing angle.
1.Detach the metal mounting plate from the bracket by inserting a flat
blade screwdriver into the rectangular hole on the wide end of the
bracket base and then pressing the screwdriver downward.
To begin setup, insert the installation CD into your CD-ROM
drive, and the iWizard will start automatically.
- If it doesn’t, browse the contents of the CD and run the ‘iWizard.exe’.
- If you have no CD-ROM drive, please use this link to download
software installation: http://ipcam.storex.eu
- Select your language [Next]. Then choose IP camera to set up [ok]
Shows how to connect cables [Next].
2.Place the side of the mounting plate that has protruding screw
holes against the mounting surface. Screw the mounting plate via
the holes on the mounting surface. And fasten the bracket to the
mounting plate by clicking the plate into position.
- Check the LED statut [Next].
1
Note: When dismounting the camera, follow step 1 to detach the
camera from the mounting plate. Do not pull the camera off the
mounting surface by force, as doing so may damage the bracket
base permanently and render future camera mounting impossible.
- Select a camera and wait until the live video appears on the
right. (You can check current settings with the camera’s bottom
sticker).
The default password is “admin”. If you need, you can change it
(please note down your new password).
- Click [Next] to skip this process.
-You can verify FW versions from: http://ipcam.storex.eu
Click [Next] when you’re ready. Meanwhile, if you see the
Windows Security Alert dialog box during the search, please
choose [Unblock].
- Check the camera name, date and time setting.
2
OK
iWizard scan for available cameras on your local network.
Choose whether to use Seedonk service to remotely access
your camera. You may also use a different Seedonk server by
clicking on [Advanced Settings].
(Skip this step if you are not using wireless connection).
For Seedonk Setup, choose between:
A - Select «I already have a Seedonk Account». Click [Next],
then enter your Seedonk User Name and Password
If you have purchased Storex wireless adaptor and connected
to your IP camera, you can choose wireless mode by default.
iWizard will search for available access points. Then select the
one you want to use.
B - Select «i need to create a new Seedonk Account». Click [Next],
then continue your account registration.
Enter the correct “passphrase” and choose the IP address
configuration (DHCP mode or Advanced settings).
(If you already have Seedonk Messenger installed on your
computer, this screen will not appear).
After logging to your new Seedonk account, you may click on
[Download and Install] to install Seedonk Messenger.
Or click on [Next] to install it later manually.
The iWizard starts programming your camera based on your
settings. Please wait patiently and DO NOT interrupt the
process. (If you chose not to use Seedonk service, you’ll get to
review your settings before saving them.)
Select “obtain IP address automatically” for DHCP mode.
Or configure manually your IP address with your connection port
and local power line frequency. (If you enabled Seedonk service,
you will not see connection port and power line frequency setting.)
The iWizard performs system diagnosis based on your
network settings and alerts you for inappropriate settings
(which are marked with a question mark icon).
Accessing the Camera via Internet Explorer
The iWizard indicates the setup has completed successfully.
You can click on the URL to view the live video now. Click [Yes]
if you wish you set up another camera from scratch.
Please follow the steps below to access your IP camera via the Web
Browser of your Internet Explorer:
1.Open the Internet Explorer.
2.Enter the camera’s IP address in the address bar. (e.g. 192.168.0.100)
3.A dialog box appears to enter a valid User Name and Password;
then press [OK].
6.A dialog box will appear again to reconfirm the installation of ActiveX.
- Click [Install] for each of the following dialogs:
A. StorexActiveX.cab
B. IPCamClientActivex.cab
Visit the STOREX website http://ipcam.storex.eu and then select you IP
camera model. You will be able to download the latest full version of the
user´s manual and the software updates.
For any technical support or repair requests, please fill out the Technical
Support contact at the following address: [email protected]
The guarantee from STOREX is valid for 1 year for the device, and 3 months
for any accessories (power supply, CPL...).
The default User Name and Password are both “admin”.
7.Meanwhile, the Windows Security Alert dialog may appear. Please
click [Unblock] to unblock it from firewall.
8.Now you can start using your Internet Explorer’s Web Browser to
watch the live video and manage IP camera.
STOREX guarantees your device against any manufacturing or assembly
faults. This guarantee only applies to the first purchase of the device by
an end user and it’s not transferable if the device is resold. This warranty
does not cover any incompatibilities found by end user apart from the
recommendations specified on the packaging, or any other incompatibility
generated by other hardware or software solution.
The guarantee does not cover failures or defects induced by non-compliance
to this manual’s instructions, including alteration, improper installation/
maintenance, reparation, inadequate tests, accident or external factor such as
– excessive heat or humidity or power failures.
The only contractual obligation endorsed by STOREX pertains to the
reparation or replacement of a defective product.
4.After logging in your Account, Internet Explorer will prompt the
installation of camera software from Storex.
5.Click on the warning message and choose to install the ActiveX.
This guarantee of your device is clearly defined and cannot be modified,
decreased or increased without written consent from STOREX.
This warranty covers only your device and is governed by French law.
Note: STOREX™ reserves the right to modify the user manual without prior
notice according to the product’s development and any updates.
is the registered logo of Storex.
and Seedonk Messenger are registered trademarks of Seedonk Inc.
All other company and product names mentioned in this document are
registered trademarks of the respective companies.
P/N: 3GA0310772