1
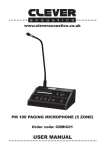
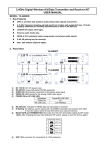
www.cleveracoustics.co.uk
www.cleveracoustics.co.uk
OUTPUT
POWER IN
PM 200 PAGING MIC
PM 200 DYNAMIC PAGING
MICROPHONE WITH CHIME
Order code: CRMIC02
9V DC
Battery: 9V Alkaline
WARNING
FOR YOUR OWN SAFETY, PLEASE READ THIS USER MANUAL CAREFULLY
BEFORE YOUR INITIAL START-UP!
CAUTION!
Keep this equipment away from rain,
moisture and liquids.
SAFETY INSTRUCTIONS
Every person involved with the installation, operation & maintenance of this
equipment should:
-
Be competent
-
Follow the instructions of this manual
Before your initial start-up, please make sure that there is no damage caused during
transportation. Should there be any, consult your dealer and do not use the equipment.
To maintain the equipment in good working condition and to ensure safe operation, it is
necessary for the user to follow the safety instructions and warning notes written in this
manual.
Please note that damages caused by user modifications to this equipment are not
subject to warranty.
1
IMPORTANT:
The manufacturer will not accept liability for any resulting damages caused
by the non-observance of this manual or any unauthorised modification to the
equipment.
• Never remove warning or informative labels from the equipment.
• Do not open the equipment and do not modify the equipment.
• Do not switch the equipment on and off in short intervals, as this will reduce the
system’s life.
• Only use the equipment indoors.
• Do not expose to flammable sources, liquids or gases.
• Always disconnect the power from the mains when equipment is not in use or before cleaning! Only handle the power-cable by the plug. Never pull out the plug
by pulling the power-cable.
• Make sure that the available voltage is DC 9V.
• Make sure that the power-cable is never crimped or damaged. Check the
equipment and the power-cable periodically.
• If the equipment is dropped or damaged, disconnect the mains power supply
immediately.
Have a qualified engineer inspect the equipment before operating again.
• If the equipment has been exposed to drastic temperature fluctuation (e.g. after
transportation), do not switch it on immediately. The arising condensation might damage the equipment. Leave the equipment switched off until it has reached room temperature.
• If your product fails to function correctly, discontinue use immediately. Pack the unit securely (preferably in the original packing material), and return it to your Prolight dealer for service.
• Only use fuses of same type and rating.
• Repairs, servicing and power connection must only be carried out by a qualified
technician. THIS UNIT CONTAINS NO USER SERVICEABLE PARTS.
• WARRANTY; One year from date of purchase.
• If this equipment is operated in any other way, than those described in this
manual, the product may suffer damage and the warranty becomes void.
• Incorrect operation may lead to danger e.g.: short-circuit, burns,
electric shock etc.
• Do not endanger your own safety and the safety of others!
Incorrect installation or use can cause serious damage to people and property.
2
The PM 200 Paging microphone is designed to be used with the MA Mixer Amplifier Series.
Features
• Remote paging microphone with built-in chime
• Dynamic microphone capsule
• Cardioid polar pattern
• Push to talk button
• Connection: 3-pin XLR
• Supplied with 3-pin XLR to 6.35mm mono jack cable
• Powered either by 9V PP3 battery or optional
• 9V DC input (PSU not supplied)
Specifications
PM 200
Sensitivity:
-63dB
Frequency response:
50Hz-12kHz
Polar pattern:
Cardioid
Output impedance:
600Ω
Power supply:
9V DC
Dimensions (H x W x D):
125 x 150 x 455mm
Weight:
1.3kg
Order code:
CRMIC02
3
Overview:
Identification:
1. PM 200 microphone - Connect the microphone to the PM 200 base stand uing the 3-pin
XLR socket.
2. XLR mic input - Use this socket to connect to the microphone.
3. Talk LED - When the talk button has been pressed the LED will light up.
4. Talk button - Use this button activate the talk function
5. 3-pin XLR output socket - Use this socket to connet to your mixer amplifier.
6. DC 9V input - Use the this socket to connect to a 9V DC adaptor (not supplied).
7. Optional 9V Alaline Battery power supply - Use this to power the mic via a 9V battery.
4
Panel connections:
9V DC (adaptor not supplied)
Back Panel
www.cleveracoustics.co.uk
OUTPUT
POWER IN
9V DC
PM 200 PAGING MIC
Battery: 9V Alkaline
TEMP PROT
MIC1
LEVEL
POWER
MA 260 MIXER AMPLIFIER
2
MIC2
MIC3
AUX2
AUX1
TEL
BASS
4
6
8
TREBLE
10
12
MASTER
MIC 1
ON
OFF
Mixer Amplifier
www.cleveracoustics.co.uk
~240V 50Hz 100W
T2AL 250V
DO NOT USE 4-16Ω, 70V AND 100V
AT THE SAME TIME
DC INPUT
12V 10A
OUTPUTS
COM 4-16Ω
70V
MUTE
MIC 1
XLR/6.35MM INPUT
MIC2
MIC3
TEL INPUT
100V
G
BAL/UNBAL
5
PHANTOM
AUX1
AUX2
LINE
OUT
Problem Chart
PROBLEM
CAUSE
REMEDY
No Power
The power supply is not connected
Check the power supply and any
extension cables.
Flat battery
Replace with new 9V DC PP3
Alkaline or remove battery and
operate using power supply.
The power supply of the respective
product is not connected properly or
not at all.
Check the power supply and if the
plugs are properly connected with
the sockets.
The connection socket or the plug
is dirty.
Clean the socket and/or the plug.
Noise
The input signal is too strong
Reduce the input signal via the
gain control.
Distorted Sound
Input is too strong
Ensure the user is not shouting into
the microphone or positioning the
microphone too close to the users
mouth.
No Sound
CAUTION - DANGER TO LIFE
DISCONNECT FROM THE MAINS BEFORE
STARTING MAINTENANCE OPERATION
Cleaning and Maintenance
We recommend a frequent cleaning of the product. Please use a soft lint free and moistened
cloth. Never use alcohol or solvents.
There are no serviceable parts inside the product except for the fuse. Maintenance and service
operations are only to be carried out by authorised dealers.
Should you need any spare parts, please use genuine parts.
Should you have any further questions, please contact your dealer.
6
www.cleveracoustics.co.uk