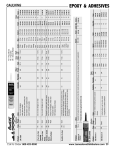
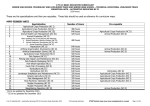
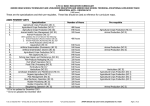
1
Easy Bead
Please print this document for future reference.
Copyright © 2012
2005 Fulford Software Solutions
Trademarks : All other product names mentioned are acknowledged to be the marks of their producing
companies.
LICENCE AGREEMENT
GRANT OF LICENCE
This agreement is between Fulford Software Solutions (“the Owner”) and the person or entity whose name appears on the registration card
(not required when purchased directly from the Owner) completed for this copy of the Software (“you”).
Under copyright law you are not permitted to install or run Easy Bead (“the Software”) or use the manual and other documentation (“the
Manual”) supplied to you without the permission of the Owner.
The Owner grants you a non-exclusive right (“the Licence”) to install and run the Software and use the Manual as permitted by this
Agreement.
You are permitted to install the Software and use the Software and Manuals in connection with a single computer at any one time which must
be under your control.
You are also permitted to:
• make a back-up copy of the Software in support of your permitted use of the Software
• transfer the Software and Manual and your Licence on a permanent basis to another person but only if that person agrees to accept the
terms of this Agreement and you inform the Owner of the transfer
You may not nor permit others to:
• use, copy or transfer the Software except as permitted by this Agreement
• distribute, rent, loan, lease, sub-licence or otherwise deal in the Software and the Manual
• copy the Manual in any manner
• alter, adapt, merge, modify or translate the Software or the Manual in any way for any purpose
• reverse-engineer, disassemble or decompile the Software only to the extent permissible by law
• remove, change or obscure any product identification or notices of proprietary rights and restrictions on or in the Software and Manual
TERM AND TERMINATION
The Licence will continue until terminated. You may terminate it at any time by destroying the Software and the Manual together with all copies
in any form.
Your licence to use the Software and the Manual will terminate automatically if you fail to comply with any term of this Agreement. The Licence
will also terminate without further action or notice by the Owner if you become insolvent.
Upon termination of the Licence for any reason you will destroy the Software and the Manual together with all copies in any form, including
copies on your hard and back-up disks. Any use of any copies of the Software or the Manual after termination of the Licence is unlawful.
LIMITED WARRANTY
The Owner warrants only to you, as the original licensee, that: the Software when used properly will provide the functions and facilities as
described in the user manual supplied for the Software; and the media on which the Software is recorded will be free from defects in material
and workmanship under normal use. The Owner’s entire liability and your exclusive remedy under the warranties given in this section (Limited
Warranty) will be, at the Owner’s option, to either: repair or replace the Software or media which does not conform with the warranty or refund
the price paid for the Software and terminate the Licence.
This remedy is subject to the return of the Software with a copy of your payment receipt to the Owner not later than 5 days after the end of a
period of 30 days from the date of your receipt of the Software.
EXCLUSION OF OTHER WARRANTIES
Except for the express warranties in the Limited Warranty section the Owner and its suppliers make you receive no other express
warranties, conditions or representations. The Owner does not warrant that the operation of the Software will be error free or
uninterrupted. It is your responsibility to ensure that the Software is suitable for your needs and the entire risk as to the
performance and results of the Software and the Manual is assumed by you. The Owner will provide you with a demonstration
version of the Software on request.
DISCLAIMER
In no event will either the Owner or its suppliers be liable for any direct, consequential, incidental or special damage or loss of
any kind (including without limitation loss of profits, loss of contracts, business interruptions, loss of or corruption to data)
however caused and whether arising under contract, tort, including negligence, or otherwise.
If any exclusion, disclaimer or other provision contained in this Agreement is held invalid for any reason and the Owner becomes
liable for loss or damage that could otherwise be limited, such liability, whether in contract, negligence or otherwise, will not
exceed the amount actually paid by you for the Software.
The Owner does not exclude or limit liability for death or personal injury resulting from an act of negligence of the Owner, or damage caused
by a defect in the Software within the meaning of the Consumer Protection Act 1987 Part I.
You acknowledge that the allocation of risk in this Agreement reflects the price paid for the Software and also the fact that it is not within the
Owner’s control how and for what purposes the Software is used by you.
GENERAL
This Agreement is the entire agreement between you and the Owner and supersedes any other oral or written communications, agreements
or representations with respect to the Software and the Manual.
Nothing in this Agreement will affect the statutory rights of a consumer in “consumer transactions” under any applicable statute.
If any part of this Agreement is held by a court of competent jurisdiction to be unenforceable the validity of the remainder of the Agreement will
not be affected.
This Agreement is governed by the laws of England and Wales, should you have any questions concerning this Agreement please contact
Fulford Software Solutions.
Quick Reference Guide
a
b
c
d
e
f
g
h
i
j
k
l
m
n
o
p
r
s
t
u
v
w
x
y
z
Pan
Save Motif
Copy
Draw Motif
Extend
Fill
Grid On/Off
Help
Show
Reflect Vertically (whilst placing areas)
Pick Colour
Open Design
Move
New Design
Crop
Print
Reflect Horizontally (whilst placing areas)
Save Design
Rotate (whilst placing areas)
Backdrop On/Off
Full View
Redraw
Design Stitch Display
Definable Outline (in Copy, Move, Cut and Edit Area)
Zoom
Zoom in
Zoom out
O
N
Cd
Ce
C%
E
Z
Y
Q
R
!
Easy Bead 2000
Enlarge the area (whilst placing areas)
Reduce the area (whilst placing areas)
Define Colour
Toggle Edit Area
Full Screen Display On/Off
Select Last Command
Select Next Colour Up
Select Next Colour Down
Select Previous Colour in List
Select Next Colour in List
Help
Quick Reference Guide • v
Bead Charts
Easy Bead contains numerous beads which have been approved for use by the manufacturers. The charts
appear as they would in the manufacturers shade card and any of these shades can be selected.
Available shade cards are:
Frosted Mist & Crayon Bead
General Needlecraft Bead
Metallic Bead
Nostalgia Bead
Beadesign
Seed Beads
Mill Hill
Antique Seed Beads
Frosted Beads
Large Bugle Beads
Medium Bugle Beads
Small Bugle Beads
Peeble Beads
Petite Glass Beads
Seed Beads
Seed Beads Crayon Colours
Magnifica Glass Beads
Size 6 Beads
Size 8 Beads
Easy Bead
Contents • i
Contents
Quick Reference Guide
v
Bead Charts
i
Installation
1
Requirements................................................................
Hardware Requirements.................................................................................................................................................
1
................................................................
Easy Bead Software Installation .....................................................................................................................................
1
Using Easy Bead
2
................................................................................................
Screen Layout ................................................................................................................................................................
2
................................................................................................
The Design Area ............................................................................................................................................................
2
Palette................................................................................................
Colour Palette.................................................................................................................................................................
3
................................................................................................
Selecting a Colour ..........................................................................................................................................................
3
................................................................................................
Toolbars .........................................................................................................................................................................
4
Rulers................................................................................................
Rulers.............................................................................................................................................................................
4
File Menu
5
................................................................................................
New ................................................................................................................................................................................
5
................................................................
Bead Design ..................................................................................................................................................
5
Open ................................................................................................
.............................................................................................................................................................................. 5
Browse ................................................................................................
........................................................................................................................................................................... 6
Close................................................................................................
Close.............................................................................................................................................................................. 6
Save ................................................................................................
............................................................................................................................................................................... 6
Save As ................................................................................................
.......................................................................................................................................................................... 7
Save All .......................................................................................................................................................................... 7
Print................................................................................................................................................................................ 7
Print Preview .................................................................................................................................................................. 8
Print Settings.................................................................................................................................................................. 8
Tiling............................................................................................................................................................ 10
Printout Colour............................................................................................................................................. 10
Margins........................................................................................................................................................ 10
Design Information....................................................................................................................................... 11
Font ............................................................................................................................................................. 11
Print Setup ................................................................................................................................................................... 11
Exit ............................................................................................................................................................................... 12
Most Recently Used Design File List............................................................................................................................ 12
Convert Menu
13
Convert Image .............................................................................................................................................................. 13
Adjust Image................................................................................................................................................ 13
Convert To................................................................................................................................................... 15
Colour Match ............................................................................................................................................... 16
Design Size ................................................................................................................................................. 17
Image Detail................................................................................................................................................. 17
Number of Colours ...................................................................................................................................... 18
Convert Area................................................................................................................................................ 18
Backdrop Also ............................................................................................................................................. 19
Select Important Colours ............................................................................................................................. 19
Dither Colours.............................................................................................................................................. 19
Hints and Tips for Converting Images ......................................................................................................... 20
Browse Convert Image ................................................................................................................................................. 20
Acquire......................................................................................................................................................................... 21
Select Source............................................................................................................................................................... 22
Position Backdrop ........................................................................................................................................................ 22
Rotate/Reflect Backdrop............................................................................................................................................... 23
Delete Backdrop ........................................................................................................................................................... 23
Backdrop Display ......................................................................................................................................................... 24
Backdrop Brightness .................................................................................................................................................... 24
Most Recently Used Image File List ............................................................................................................................. 24
Edit Menu
25
Copy............................................................................................................................................................................. 25
User Definable Outline Shape ..................................................................................................................... 26
Move............................................................................................................................................................................. 26
Cut................................................................................................................................................................................ 27
Paste ............................................................................................................................................................................ 27
Flip ............................................................................................................................................................................... 28
Mirror ............................................................................................................................................................................ 28
Scale Up....................................................................................................................................................................... 28
Scale Down .................................................................................................................................................................. 28
................................
Centre In Area ..............................................................................................................................................................
29
................................
Change Colour .............................................................................................................................................................
29
Colour................................
Delete Colour................................................................................................................................................................
29
Area................................................................
Area..............................................................................................................................................................................
29
Inside................................
Edit Inside....................................................................................................................................................
29
Outside................................
Edit Outside.................................................................................................................................................
30
Area................................
Clear Area....................................................................................................................................................
30
Area................................
Reset Area...................................................................................................................................................
30
Draw Menu
31
Shape................................
Draw Shape..................................................................................................................................................................
31
................................
Poly Line ......................................................................................................................................................
31
................................
Square .........................................................................................................................................................
31
Rectangle................................
Rectangle.....................................................................................................................................................
32
ii • Contents
Easy Bead
Diamond ...................................................................................................................................................... 32
Circle ........................................................................................................................................................... 32
Ellipse.......................................................................................................................................................... 33
Arc ............................................................................................................................................................... 33
Triangle........................................................................................................................................................ 33
Angled Square............................................................................................................................................. 34
Pentagon ..................................................................................................................................................... 34
Hexagon....................................................................................................................................................... 34
Octagon ....................................................................................................................................................... 35
Star .............................................................................................................................................................. 35
Curve ........................................................................................................................................................... 35
Draw Filled Shape ........................................................................................................................................................ 36
Fill................................
Flood Fill.......................................................................................................................................................................
36
................................
Insert Design ................................................................................................................................................................
37
................................
Browse Insert Design ...................................................................................................................................................
37
Motif Menu
38
Draw................................................................
Draw.............................................................................................................................................................................
38
................................
Edit Motif Library ..........................................................................................................................................................
39
Motif................................
Save Motif.....................................................................................................................................................................
41
Palette Menu
42
Colour................................
Select Colour................................................................................................................................................................
42
................................
Add Colours .................................................................................................................................................................
43
Colour................................
Remove Colour.............................................................................................................................................................
43
................................
Remove Unused Colours .............................................................................................................................................
43
................................................................
Palette ..........................................................................................................................................................................
43
................................
New .............................................................................................................................................................
43
Open................................
Open............................................................................................................................................................
44
Save................................
Save.............................................................................................................................................................
44
Default................................
Make Default................................................................................................................................................
44
................................
Sort ..............................................................................................................................................................
44
Colours................................
Refresh Colours...........................................................................................................................................
45
Beads................................
Symbols and Beads......................................................................................................................................................
45
................................
Define Colour ...............................................................................................................................................................
46
Setup................................................................
Setup............................................................................................................................................................................
47
................................
Edit Bead Charts .........................................................................................................................................
47
Preference
Set Chart Preference...................................................................................................................................
48
View Menu
49
................................................................
Redraw .........................................................................................................................................................................
49
Pan................................................................
Pan...............................................................................................................................................................................
49
................................................................
Zoom ............................................................................................................................................................................
49
................................................................
Zoom In ........................................................................................................................................................................
50
................................
Zoom Out .....................................................................................................................................................................
50
................................
Zoom Back ...................................................................................................................................................................
50
Zoom Forward .............................................................................................................................................................. 50
Full View....................................................................................................................................................................... 51
Normal View ................................................................................................................................................................. 51
Bead Display ................................................................................................................................................................ 51
Grid Colours ................................................................................................................................................................. 52
Grid .............................................................................................................................................................................. 52
Ruler Settings............................................................................................................................................................... 52
Motif Pad ...................................................................................................................................................................... 53
Toolbar List................................................................................................................................................................... 53
Tools Menu
54
Crop ............................................................................................................................................................................. 54
Extend .......................................................................................................................................................................... 54
Insert/Delete Rows/Columns ........................................................................................................................................ 54
Scale ............................................................................................................................................................................ 55
Rotate/Reflect Design .................................................................................................................................................. 55
Centre Design .............................................................................................................................................................. 56
Adjust Bead Grid .......................................................................................................................................................... 56
Show ............................................................................................................................................................................ 56
Options......................................................................................................................................................................... 57
Toolbar Buttons ............................................................................................................................................................ 59
Undo Menu
60
Undo............................................................................................................................................................................. 60
Undo Off....................................................................................................................................................................... 60
Undo On....................................................................................................................................................................... 60
Redo............................................................................................................................................................................. 60
List of Options that can be Undone .............................................................................................................................. 60
Window Menu
61
Cascade ....................................................................................................................................................................... 61
Tile ............................................................................................................................................................................... 61
View Designs ............................................................................................................................................................... 61
Close All ....................................................................................................................................................................... 61
Arrange Icons ............................................................................................................................................................... 61
List of Designs that can be selected............................................................................................................................. 61
Help
62
Help.............................................................................................................................................................................. 62
Contents ....................................................................................................................................................................... 62
Search for Help On ...................................................................................................................................................... 62
Easy Bead
Contents • iii
How to Use Help .......................................................................................................................................................... 62
Troubleshooting
63
Printing ......................................................................................................................................................................... 63
Scanning ...................................................................................................................................................................... 63
General......................................................................................................................................................................... 63
Glossary of Terms
65
Index
68
iv • Contents
Easy Bead
Installation
Hardware Requirements
The Easy Bead program requires an IBM compatible PC machine with a mouse, running Windows XP,
2000, NT, ME or 98, a minimum of 16MB of memory and 25MB of hard drive space.
Easy Bead Software Installation
Place the Easy Bead software CD into your CD-ROM drive. If your computer is AutoPlay capable, the
installation will automatically appear on screen.
Follow the on-screen instructions, after the software is successfully installed an Easy Bead shortcut is added
to your Start menu.
If your system is not AutoPlay capable, open the My Computer icon on your Desktop, then select the drive
letter that represents your CD-ROM drive. Double-click the SETUP.EXE program and follow the on-screen
instructions. After the software is successfully installed an Easy Bead shortcut is added to your Start menu.
During the installation you will be asked if you want to install the Adobe Acrobat Reader software. This
software is required to get access to the manual which is in PDF format.
Easy Bead
Installation • 1
Using Easy Bead
Screen Layout
Screen Layout
The display given when Easy Bead begins,
runs consists
consists
of a
of menu
a menu
across
across
thethe
top,top,
thethe
colour
colour
palette
palette
to the left,
toolbar and bead toolbar at the top and the design area in the centre with rulers to the top and left. The
designing is made by using the mouse, the position of which is shown by a small pointer. As the mouse
moves over the toolbars and colours, the option or colour name is given. Along the bottom are two status
lines. In the first are the Current Colour buttons, Current Colour name, the mouse’s grid reference and the
colour which is under the current mouse position along with its name. The second line is a prompt line that
details the number of colours used in the design, the current option and instructions on what to do along with
the Design/Palette Bead Display button,
When colours are deleted, the used colours may be temporarily inaccurate. Easy Bead will automatically
update these values when the program is idle.
The Current Colour button shows which colour in the palette is in use. By double clicking on the button, the
colour can be selected from the bead charts. When the Palette Bead Display button is set to symbols, then
the Current Colour will be given as a symbol. [See Select Colour in the Palette menu for details on altering
the colour and Bead Display in the View menu for details on changing how the beads are viewed].
The Design Area
The design area consists of a grid composed of ten by ten squares subdivided into five by five, this is where
the design is displayed. The edge of the design is shown by the black border. By moving the mouse pointer
to a small square and pressing the LEFT mouse button a block will appear. By moving the mouse whilst
holding down the mouse button, a line of blocks will appear in a similar way to using a spray option in a
paint box package. To remove a block, press the RIGHT mouse button over the unwanted block. By
changing the colours, [see Colour Palette for more details], a design can be built up quickly and easily.
2 • Using Easy Bead
Easy Bead
Colour Palette
The colour palette appears to the left of the grid and can have a maximum of 255 colours at one time. The
program is supplied with default DMC, Mill Hill and Bead design palettes, along with the ability to set up new
palettes for future use. [See Palette Menu for setting up palettes.]
Each colour has a number that refers to the manufacturers charts along with an approximate colour name.
Different names or numbers can be assigned by using Symbols and Beads in the Palette menu. The
assigned names are for reference only and are not official names.
If the colour is changed by using Define Colour in the Palette menu, then the name and number will be
cleared. If the colour is changed by using Select Colour in the Palette menu, then the corresponding colour
name and number will be given as well as clearing the other manufacturers numbers.
As the mouse moves over a colour in the palette, a tooltip will appear giving the colour description. To
change what appears as the colour description use the Show/Hide Charts option in the Symbols and
Beads option in the Palette menu.
It is possible to arrange the palette by moving individual palette colours, to do so click on the required colour
and hold down the button whilst moving to the new position in the palette then release the mouse button.
There will be only one colour active at any one time, the Current Colour, which is shown by a box
surrounding it. This is used when drawing or filling areas on the grid.
By doing a right click on a colour this will activate a popup menu giving access to the Select Colour, Add
Colours, Remove Colour, Remove Unused Colours, Sort Palette, Define Colour and Width options.
Width will affect the amount of screen taken up by the palette and design preview; choose from Narrow,
Normal and Wide.
Colours that are used within a design are shown by a small white square in the top-left corner of the colour
in the palette.
When colours are deleted, the used colours may be temporarily inaccurate. Easy Bead will automatically
update these values when the program is idle.
When using monitors with 16 or less colours Windows will reserve the colours for it's own use. So to
preserve compatibility with Windows, the colours may be produced by using mixtures of two or more
colours. This also results in the bead currently drawn not being changed immediately that the colour is
changed, but when the design is next drawn. This can be achieved by selecting Redraw in the View menu.
On monitors having 256 colours the first 220 displayed will be solid, the rest being mixed. On monitors
having a greater range of colours this should not happen.
Selecting a Colour
To select a colour, simply move the cursor to the required colour and press the LEFT mouse button. A box
will appear around the colour to show that it is the Current Colour. A quick way of selecting a colour from a
manufacturer chart is to double click the LEFT mouse button when the mouse is over the colour to be
changed. [See Select Colour in the Palette menu for more details on selecting a colour.]
Alternatively the arrow keys can be used:
Up arrow key
Down arrow key
Left arrow key
Right arrow key
Easy Bead
selects the colour above in the palette
selects the colour below in the palette
selects the previous colour to the left in the palette
selects the next colour to the right in the palette
Using Easy Bead • 3
Toolbars
Both the toolbar and the bead toolbar are dockable, so they can be positioned anywhere around the grid.
The toolbar gives quick access to the following options: New, Open, Save, Print, Print Preview, Cut,
Copy, Move, Paste, Undo, Redo, Select Colour, Draw Motif, Zoom, Zoom In, Zoom Out, Zoom Back,
Zoom Forward, Normal View and Help.
Toolbar
The Undo button will undo the last option, to go back further keep pressing the button until the required
undo has happened.
The toolbars can be customised to contain the options most frequently used, by using Toolbar Buttons in
the Tools menu. The toolbars can also be removed or reinstated by selecting or deselecting the relevant
toolbar at the bottom of the View menu.
To select the last option used, press the Enter button on the keyboard, this is useful when using the same
option repeatedly for example drawing a shape several times.
Rulers
Rulers are given to the top and left of the design area, they can be displayed in terms of inches, centimetres
or number of beads. The design centre is shown on the rulers as triangles. [See Ruler Settings in the View
menu for further information on rulers. ]
Guides can be added to the rulers to help placement of items. The guides are shown as red lines on the
design. To access these options right click on either of the rulers and select from the following options:
Set Ruler Guide: This will set a new guide at the selected position on the ruler.
Clear Ruler Guide: This will clear the nearest ruler guide to the selected position on the ruler.
Adjust Guide Position: This will allow a precise position in centimetres or inches (depending on the
current unit settings) to be entered for the nearest ruler guide to the selected position.
Settings: This allows different settings for the rulers to be altered. [See Ruler Settings in the View
menu for more details.]
Setting a New Ruler Guide
1. Right click on the ruler at the required position and select Set Ruler Guide in the given popup menu.
Clearing a Ruler Guide
1. Right click on the ruler at the required position and select Clear Ruler Guide in the given popup
menu. The nearest ruler guide will be removed.
Adjusting a Ruler Guide Position
1. Right click on the ruler at the required position and select Adjust Guide Position in the given popup
menu. A dialog will be given in which the new position of the nearest ruler guide can be entered.
Changing the Ruler Settings
1. Right click on one of the rulers and select Settings in the given popup menu. A dialog will be given
in which the settings can be altered. See Ruler Settings in the View menu for more details.
4 • Using Easy Bead
Easy Bead
File Menu
New
Bead Design
To create a new design select New in the File menu.
To create a New Design set the Design Height and Width in beads or inches/centimetres by using the
relevant spin buttons. Select the desired Style from the given drop down list, the available choice is Peyote,
Brick, Square, Two drop peyote, Two drop brick, Three drop peyote and Three drop brick. These
values are remembered and given the next time a new design is created. A new design can also be created
by pressing N, this will give a grid of these values without going to the dialog. To select a Palette for the
new design being created choose from the given drop down list of palettes in the Easy Bead folder.
Other options that are given are OK, to continue, Cancel, to leave the option without creating a new design
and Help.
Creating A New Design
1. Select New from the File menu - the New Bead Design dialog is given.
2. Set required Design Height and Width in terms of number of beads or in inches/centimetres.
3. Select the required Style.
4. Select a Palette if required.
5. Select OK.
Or
1. Press N, this gives a grid the same size as the last one used.
Or
1. Select the New button from the toolbar, this gives a grid the same size as the last one used.
Build up the design by selecting the required colours from the colour palette on the left of the screen.
Open
To load an existing design from disk, select Open in the File menu or press L. A list of existing designs on
the disk will be given from which one can be selected.
Opening An Existing Easy Bead File
1. Select Open from the File menu - the Open dialog is given.
2. Select the required file from the list.
3. If the file is not in the list, then use the File Selector to locate the file (See Using The File Selector
section below).
Or
1.
2.
3.
Press L - the Open dialog is given.
Select the required file from the list.
If the file is not in the list, then use the File Selector to locate the file (See Using The File Selector
section below).
1.
2.
3.
Select the Open button from the toolbar - the Open dialog is given.
Select the required file from the list.
If the file is not in the list, then use the File Selector to locate the file (See Using The File Selector
section below).
Or
Using The File Selector
1. Select Files of Type by using the drop down list to specify what type of file is being used.
2. Select Look in by using the drop down list to specify which drive the file is on.
3. Select the folder from the list, not all folders are necessarily listed (See Changing Folders section
below).
4. Select the Filename from the given list or by typing the filename in the edit box for a new file.
Easy Bead
File Menu • 5
Changing Folders
If your folder does not appear then select it in several steps. Each time a folder is selected its sub-folders
will be listed.
For example if you wish to use the folder C:\EASYB\CATS
1.
2.
3.
Select the C:\ folder.
Then the EASYB folder.
And finally the CATS folder.
Browse
This option allows a preview of files to be seen before they are selected. Select Browse in the File menu, a
screen is given showing previews for files in the current folder. More files can be viewed by using the scroll
bar or by selecting a new folder. By clicking on a preview and pressing Open, the selected file will be
opened.
The first time a preview of a design is drawn, a few moments can be taken due to the complexity of
designs.
To change the folder, select the folder from the list on the left. Should the folder be within another folder
click on the plus icon to show more folders.
More than one design file can be opened, press and hold down the Ctrl key on the keyboard and select the
required files as normal by using the mouse, then select OK and the files will be given on screen. To select
a group of files, select the first file, press and hold down the Shift key on the keyboard then select the last
file in the group.
To print the selected designs, select File from the Browse screen and then Print. The standard Windows
Print dialog will be given asking for the number of copies. The files will be printed using the Print Settings
within the file and all the pages of the files will be printed.
To print the selected designs using a pre-saved Print Settings file, select File from the Browse screen .
The Open Print Settings dialog is given, select the required Print Settings file and select Open. The
standard Windows Print dialog will be given asking for the number of copies. All the pages of the files will be
printed.
Design files can also be copied, moved, renamed and deleted by selecting the required files and then the
required option either Copy, Move, Rename or Delete by selecting the File button.
Browsing Design Files
1. Select Browse from the File menu - the Browse screen is given.
2. Click on the required file’s preview.
3. Select OK.
Close
To close the current design, select Close in the File menu, this will close the design. If changes have been
made then Easy Bead will allow the design to be saved.
Closing A Design
1. Select Close from the File menu.
Save
The option Save in the File menu allows the current design to be saved to disk. This will save the design
under whichever filename it was last loaded or saved as. Should the design not have a name, then the file
name will be requested as in the Save As option.
The option can also be selected by pressing the letter S.
6 • File Menu
Easy Bead
Saving An Easy Bead Design
1. Select Save from the File menu.
2. If the design has not been saved previously then the Save As dialog is given (See Saving A Design
Under A New Name Or Location in the Save As section of the manual).
Or
1.
2.
Press S.
If the design has not been saved previously then the Save As dialog is given (See Saving A Design
Under A New Name Or Location in the Save As section of the manual).
1.
2.
Select the Save button from the toolbar - a dialog is given.
If the design has not been saved previously then the Save As dialog is (See Saving A Design Under
A New Name Or Location in the Save As section of the manual).
Or
Rules For Naming Files When Saving
The filename must not contain full stops (periods) or any of the following * ? : [ ] + = \ / ; ` < >
If the new filename is the same as an existing design, the information contained in the older file will be lost.
Save As
This option allows the current design to be saved to disk and will request the name of the file before saving
the design. Other options that are given are Save, to continue and Cancel, to leave the option without
saving a design.
Saving A Design Under A New Name Or Location
1. Select Save As from the File menu - the Save As dialog is given.
2. Type in the new Filename, or select the new location (See Changing Folders and Rules For Naming
Files When Saving in the Open and Save sections of the manual).
3. Select OK.
Save All
This option will save all the designs in memory. It will save the designs under whichever filenames they
were last loaded or saved as. Should any designs not have a name, then the file name will be requested as
in the Save As option.
Saving All Designs In Memory
1.
2.
Select Save All from the File menu.
Select OK.
Print
This option allows a design to be printed to any graphics printer supported under Windows and is selected
by using Print in the File menu or pressing P. Once the option has been selected the Print Settings dialog
is given. As well as printing the current design, the Design Information, Margins and Font can be altered.
[See Print Settings in the File menu for further details.]
Other options that are given are OK, to continue, Cancel, to leave the option without printing and Help.
After the required options have been chosen, the final dialog given is the Windows Print dialog, in which the
number of copies and orientation of the page can be set.
Easy Bead
File Menu • 7
Printing A Design
1. Select Print from the File menu - the Print Settings dialog is given.
2. Select either Design Only, Design and Key or Key Only from the drop down list.
3. Select the given checkboxes to have Grid and Centre Arrows printed.
4. To print the Key and Design Information on a separate page and the Copyright By on the chart,
select the given checkboxes.
5. To add a Blank Border Around the Design select the checkbox and set the value required by using
the spin buttons.
6. To print a selected area, select Select Area button - the design is given from which the area should
be selected.
7. Select the Printout Bead Display by using the drop down list.
8. Set the Printout Size (default is zero, which fits the design onto one page).
9. Other options can be selected as required.
10. Select OK - the Windows Print Dialog is given in which the number of copies can be set.
Or
1.
Press P and follow instructions No. 2 to No. 10
Selecting A New Layout For A Printed Design
1. Select Print Layout from the File menu.
2. Choose the required Print Layout file.
3. Modify the layout or select Print as required.
Print Preview
Print Preview in the File menu allows you to see an approximation of how the printout should look when
printed. To change the appearance of the printout use Print Settings in the File menu. Use the given
buttons to Print, see Next Page, Prev Page or Two Pages, Zoom In, Zoom Out or Close and Settings
will give access to Print Settings options.
The Print Preview may give erroneous effects that will not appear on the printout. This is due to the
resolution of the monitor being lower than most printers.
Previewing A Printed Design
1. Select Print Preview from the File menu.
Or
1. Select the Print Preview button from the toolbar.
Print Settings
Print Settings in the File menu can be used for setting any of the print options; when this option is selected
a dialog will be given.
Use the mouse to select whether the Design Only, Design and Key or Key Only is printed from the drop
down list. The Key Order can be set to various orders by selecting the required order from the drop down
list. To have the Key and Information printed on a separate page, select the given checkbox. If this option
is chosen then the Copyright By or the Designed By from the Design Information option can appear on
the chart by selecting the relevant checkbox. This will be disabled unless the Key and Information on a
Separate Page option is selected.
Select the given buttons to have Grid and Centre Arrows printed. The design is normally printed to the
same size as the area used in the design. To add a Blank Border Around Design, select the given button
and then set the value required by using the spin button.
The design can be centred on the page both Across and Down by selecting the required checkboxes. If
tiling, the printout will be centred across all of the pages. Select the Centre Key checkbox to have the key
centred as well, otherwise the key will be printed to the left.
8 • File Menu
Easy Bead
Print Settings dialog
The Printout Bead Display can be set to Beads, Blocks, Colour Symbols, Bead Shapes, Black/White
Symbols, Blocks with Symbols or Blocks with B/W Symbols; to select the required printout use the drop
down list. Blocks with B/W Symbols will give white symbols on dark colours and black symbols on light
colours.
The Printout Size option allows the size of the grid squares to be set, thus enabling charts to be read more
clearly. The number below gives the minimum value for the design to fit onto one page. If the Printout Size
is set to zero then the grid will automatically size to fit onto one page. If the design goes over several pages,
it will automatically tile so that the chart is easier to read.
A fractional Printout Size (squares per inch) is allowed in this option.
Printing Design Only
1. Select Print or Print Settings from the File menu - the Print Settings dialog is given.
2. Select Design Only from the given drop down list.
3. Select OK.
Printing Key Only
1. Select Print or Print Settings from the File menu - the Print Settings dialog is given.
2. Select Key Only from the given drop down list.
3. Select OK.
Centring The Printout
1. Select Print or Print Settings from the File menu - the Print Settings dialog is given.
2. Select Centre Design Across checkbox to centre the design across the page.
3. Select Centre Design Down checkbox to centre the design down the page.
4. Select Centre Key checkbox to centre the key.
5. Select OK.
Printing The Grid Line Numbers
1. Select Print or Print Settings from the File menu - the Print Settings dialog is given.
2. Select Print Grid Line Numbers checkbox.
3. Select OK.
Easy Bead
File Menu • 9
Tiling
This can be selected only when the design is tiled, and gives the Overlap, Shading and Show Guide for
Page Order on design pages options. The Overlap can be set by using the given spin button. The Shading
can be set to None, Light, Medium or Heavy by using the drop down list. When the design is tiled then a
Show Guide for Page Order can be printed onto each page showing how the pages fit together, by
selecting the given button. The Show Page Numbers will add page numbers to each of the design pages.
The default settings when tiling is an overlap of 2 with light shading and to have the page order guides.
Other options that are given are OK, to continue, Cancel, to leave the option without making changes and
Help.
Setting The Tiling Information
1. Select Print or Print Settings from the File menu - the Print Settings dialog is given.
2. Select Tiling button.
3. Set the Overlap to the required value by using the spin buttons.
4. Set the Shading to the required value from the drop down list.
5. Select the given checkbox to have the Guide for Page Order on design page.
6. Select OK.
Printout Colour
This option allows the Print Colour and Font Colour to be changed. Select either Print or Font Colour
button and 48 basic colours will be given from which a choice can be made. If another colour is required
then select Define Custom Colors that allows a colour to be defined. [See Define Colour options for details
on defining a colour.] Print Colour will change the colour of the symbols and gridlines whereas Font
Colour will change the colour of any text on the printout and the colour of annotation arrows.
Some printers will match to the closest available colour, so the resulting colour on the printout may vary.
Other options that are given are OK, to continue, Cancel, to leave the option without making changes and
Help.
Changing The Printout Colour
1. Select Print or Print Settings from the File menu - the Print Settings dialog is given.
2. Select Printout Colour button - the Printout Colour dialog is given.
3. Select either the Print or Font Colour buttons - the Windows Color dialog is given.
4. Select one of the available colours or use Define Custom Colors to create your own.
5. Select OK.
6. Select OK.
Margins
This option allows Left, Right,
Right Top and Bottom margins of the paper to be set for printing, thus preventing
the chart being printed too close to the edge. Select the required value for the margins by using the spin
buttons.
Other options that are given are OK, to continue, Cancel, to leave the option without making changes and
Help.
Setting Print Margins
1. Select Print or Print Settings from the File menu - the Print Settings dialog is given.
2. Select Print Margins button.
3. Set the Left, Right, Top and Bottom margins by using the spin buttons.
4. Select OK.
10 • File Menu
Easy Bead
Design Information
This option allows information to be set that appears on the printout. Use the mouse to select the given
buttons to have the Title appear Above the Grid and/or Above the Key. Select the required edit boxes for
By, then type in the information as required.
Design Title, Notes, Design By and Copyright By
Design Default allows the default Designer, Copyright and Notes to be set, once the button is selected a
dialog is given. Type in the required text in the relevant edit box and then select OK. These values will be
used the next time a design is created.
Other options that are given are OK, to continue Cancel, to leave the option without making changes and
Help.
Setting The Design Information
1. Select Print or Print Settings from the File menu - the Print Settings dialog is given.
2. Select Design Information button.
3. Select the box for Design Title, Notes, Design By and Copyright By, then type in the required
information.
4. Set the given buttons to have the Title appear Above the Grid and/or Above the Key .
5. Select OK.
Setting The Default Design Information
1. Select Print or Print Settings from the File menu - the Print Settings dialog is given.
2. Select Design Information button.
3. Select Default Design button.
4. Select the box for Design Title, Notes, Design By and Copyright By, then type in the required
information.
5. Select OK.
Font
This option allows the font that is used on the printout to be changed, use the appropriate button to change
the Title Font or Printout Font.
Font A dialog is given, use the appropriate scroll bars to change the Font, Font
Style, Size and Color of the font.
Other options that are given are OK, to continue, Cancel, to leave the option without making changes and
Help.
Setting The Printout or Title Font
1. Select Print or Print Settings from the File menu - the Print Settings dialog is given.
2. Select Font button - the Fonts dialog is given.
3. Select either Printout Font or Title Font - the Font dialog is given.
4. Select the required Font, Font Style and Size by using the scroll bars.
5. Select OK.
6. Select OK.
This option will save the current settings and go to the Print Preview display.
Print Setup
This option allows printer settings such as page size and orientation to be defined without needing to print a
design.
Changing Which Printer Is Used Without Printing
1. Select Print Setup from the File menu - the Print Setup dialog is given.
2. Use the drop down list to select the required printer from the given list.
3. Select OK.
Easy Bead
File Menu • 11
Changing The Orientation Of The Page Without Printing
1. Select Print Setup from the File menu - the Print Setup dialog is given.
2. Select the required orientation either Portrait or Landscape by using the given radio buttons.
3. Select OK.
Exit
Select the Exit option in the File menu or press the letter Q, to leave the program. If any of the current
designs have been changed since the last time they were saved, then a warning message will appear and
you will be allowed to save the design if required.
Exiting The Program
1. To leave the program, select Exit from the File menu.
Most Recently Used Design File List
A list of the last five design files which have been used is given at the end of the File menu. Select the
required file by clicking on it or pressing the relevant number.
Selecting A File From The Recently Used File List
1. Select the File menu, then the required file from the list given at the bottom of the menu.
Or
1.
12 • File Menu
Select the File menu, then press the number corresponding to the required file.
Easy Bead
Convert Menu
Convert Image
Other file formats can be imported and converted into a bead design by Easy Bead, by selecting Convert
Image in the Convert menu.
Easy Bead supports the following file formats:
Windows Bitmap (BMP)
TIFF (Not LZW compression)
PCX
Windows Metafile (WMF)
JPEG (JPG)
Truevision TARGA (TGA)
Portable Network Graphics (PNG)
Kodak Photo CD (PCD)
LEAD compressed (CMP)
MPT
IOCA (ICA)
WinFax Group 3
WinFax Group 4
FAX Group 3
FAX Group 4
Photoshop 3.0 (PSD)
DCX
PostScript Raster (EPS)
OS/2 Bitmap (BMP)
CALS Raster
MacPaint (MAC)
GEM Image (IMG)
Microsoft Paint (MSP)
WordPerfect (WPG)
SUN Raster (RAS)
Macintosh Pict (PCT)
The TIFF (LZW compression) and GIF formats are not supported due to the patent being held by Unisys.
A number of additional minor file formats are supported. If in doubt select the file and Easy Bead will
attempt to auto detect the format.
When an image is loaded into Easy Bead, it will normally be converted into beads. Normally a design from
an imported image will contain a greater number of colours and be of a larger size than is practical in Easy
Bead. Decreasing the size and number of colours can result in a loss of quality.
To convert the file into Easy Bead, set the file type to the required format and a list of all files in the folder
with that extension will be given. Normally a file from a scanned image will contain a greater number of
colours than are available in Easy Bead. So a choice of the best colours is made from the imported file,
which can result in a loss of quality.
Once the file type and OK has been selected the Adjust Image dialog will be given, on which the image's
properties can be altered. Other options that are given are OK, to continue, Cancel, to leave the option
without converting an image and Help.
Adjust Image
The properties of the image can be altered by using the options on this dialog, also given are a preview of
the original and new image.
Auto Contrast will give a contrast which will spread the shades out evenly; select the Auto Contrast
checkbox to get a good range of bright and dark colours, recommended for most images. Trim can be used
to remove unwanted space around the image; useful if the scanning area was not cropped down to the
required size of the picture. Move the cross-hair to one corner of the area. Press and hold down the LEFT
mouse button and drag to the second corner then release and select the Trim checkbox. Once an area is
selected it is possible to use the other options for that area only, i.e. brighten a particular area. To do this
select an area then the required option and the changes will only happen within the area.
By deselecting the Trim checkbox the image will return to it's original size unless Apply has been
selected. It can be useful to select the area first then select the Trim checkbox.
Easy Bead
Convert Menu • 13
Adjust Image dialog
Sharpen will strengthen the edges in the image which can help to reduce any blurring. De-speckle will help
to remove odd spots of colour, this may help to reduce the Moiré effect to a limited extent. Both Sharpen
and De-speckle can be used by selecting the required value Off, Low, Medium or High from the given
drop down lists.
Change the Brightness, Contrast, Red, Green, Blue, Colour or Saturation values by using the given spin
buttons. Brightness will make the image darker or lighter, whilst Contrast will make the image stronger or
fainter and Saturation will make the colours stronger or fainter. Altering Red, Green and Blue values can
help to compensate for some scanners that may return a tinted image.
On monitors using 256 or fewer colours, the previews are not a true representation of the image, as it is only
working with approximate colours. The final image will not be affected.
Some scanners may return a slightly green image, so making the Green value negative (i.e. -5%) will
compensate for this.
To make the colours more vibrant, increase the Saturation value (i.e. 50%).
To improve the definition, increase the Contrast value.
To use the current settings when converting future designs select the Use For All New Images checkbox.
The Zoom Level can be altered to improve the view of the images by using the given spin button.
By selecting the Apply option the current chosen colours will be updated and the dialog will be redrawn
showing the design with the new colours. When OK is selected the Convert Image dialog will be given
listing the available conversion options.
14 • Convert Menu
Easy Bead
Changing The Properties Of An Image When Converting
1. Select Convert Image from the Convert menu - the Open dialog is given.
2. Select the file to convert - the Adjust Image dialog is given.
3. Select Auto Contrast checkbox to give an automatic adjustment of the contrast.
4. Select area to be trimmed and then Trim checkbox.
5. Set Sharpen to Off, Low, Medium or High as required.
6. Set De-speckle to Off, Low, Medium or High as required.
7. Adjust Brightness and Contrast values as required.
8. Adjust Red, Green and Blue values as required.
9. Adjust Colour and Saturation values as required.
10. Alter Zoom Level as required.
11. Select Apply to save the current changes and be ready to make more alterations.
12. Select OK - the Convert Image dialog is given.
13. Select required conversion settings.
14. Select OK.
Changing The Properties Of An Area Of An Image When Converting
1. Select Convert Image from the Convert menu - the Open dialog is given.
2. Select the file to convert - the Adjust Image dialog is given.
3. Move the cross-hair to one corner of the area.
4. Press and hold down the LEFT mouse button and drag to the second corner then release.
5. Select the required options.
6. Select Apply to save the current changes and be ready to make more alterations.
7. Select OK - the Convert Image dialog is given.
8. Select required conversion settings.
9. Select OK.
Convert Image dialog
Convert To
This will set what the image will be converted to from the choice of Peyote, Brick, Square, Two drop
peyote, Two drop brick, Three drop peyote, Three drop brick. Once the selection has been made any
inappropriate settings will be greyed.
A preview of the converted image is shown. To update the preview with the current settings select the
Refresh Preview button.
Easy Bead
Convert Menu • 15
Setting Conversion Type
1. Select Convert Image from the Convert menu - the Open dialog is given.
2. Select the file to convert - the Adjust Image dialog is given.
3. Set required settings and select OK - the Convert Image dialog is given.
4. Select required type from the Conversion To drop down list.
5. Select required conversion settings.
6. Select OK.
Colour Match
This sets what the image will be matched to when converting; choose from Chart, Palette or Palettes and
Charts from the given drop down list. If Chart is selected, then the required bead chart should be chosen
from available charts given in the drop down list. If Palette is selected, then the required palette should be
chosen from available palettes given in the drop down list. Palettes and Charts allows colours to be chosen
from more than one chart or a palette and chart.
Using Palette, which will match to a previously created palette, can be useful as it will match to specific
colours, such as the colours in your workbox.
If Palettes and Charts is selected, a dialog is given; click on the required charts and/or palettes then on
, this will give a list under Match to these Palettes & Charts. If the image is matched to a palette and
chart, the priority is given to the colours in the palette then the chart.
If matching to more than one chart then the charts will be combined and the image will be matched to the
amalgamated chart, so the result will match to the nearest colour regardless of the chart. So sometimes
only a few colours are selected from the remaining charts.
To specify certain colours to use from a chart, make a palette of those colours and then use Palettes and
Charts selecting that palette and relevant bead chart. When matching, the program will take colours from
the palette first then top up with colours from the beadchart.
Other options that are given are OK, to continue, Cancel, to leave the option without making any changes
and Help.
Converting A Design Matching To A Bead Chart
1. Select Convert Image from the Convert menu - the Open dialog is given.
2. Select the file to convert - the Adjust Image dialog is given.
3. Set required settings and select OK - the Convert Image dialog is given.
4. Select Charts from the Colour Match drop down list.
5. Select the required chart from the Using drop down list.
6. Set required conversion settings.
7. Select OK.
Converting A Design Matching To The Current Design Palette
1. Select Convert Image from the Convert menu - the Open dialog is given.
2. Select the file to convert - the Adjust Image dialog is given.
3. Set required settings and select OK - the Convert Image dialog is given.
4. Select Palette from the Colour Match drop down list.
5. Select <Current Design> from the Using drop down list.
6. Set required conversion settings.
7. Select OK.
16 • Convert Menu
Easy Bead
Converting A Design Matching To An Existing Palette
1. Select Convert Image from the Convert menu - the Open dialog is given.
2. Select the file to convert - the Adjust Image dialog is given.
3. Set required settings and select OK - the Convert Image dialog is given.
4. Select Palette from the Colour Match drop down list.
5. Select the required palette from the Using drop down list.
6. Set required conversion settings.
7. Select OK.
Converting A Design Matching To A Palette And Chart
1. Select Convert Image from the Convert menu - the Open dialog is given.
2. Select the file to convert - the Adjust Image dialog is given.
3. Set required settings and select OK - the Convert Image dialog is given.
4. Select Palettes and Charts from the Colour Match drop down list.
5. Select Palette and Chart Selection button - the Palette and Chart Selection dialog is given.
6. Select the required palettes and/or charts from the given list.
7. Click the arrow button showing the required direction towards Match to these Charts & Palettes list.
8. Set required conversion settings.
9. Select OK.
Design Size
The size of the Easy Bead design in squares is given along with the measurements at the stated fabric
count, also given is the Maximum Bead Size.
Size To change any of these values either type the new value or
use the given spin buttons. The units of measurements can be changed by using Options in the Tools
menu.
Setting the Size of a Converted Image
1. Select Convert Image from the Convert menu - the Open dialog is given.
2. Select the file to convert - the Adjust Image dialog is given.
3. Set required settings and select OK - the Convert Image dialog is given.
4. Type in the required values for height & width.
5. Set required conversion settings.
6. Select OK.
Image Detail
When converting an image Easy Bead will have to reduce the size. Normally the program will take a sample
value of a colour area, which is best for when converting line art. To use this option select Take Sample
from the Image Detail drop down list. But when using a photograph sometimes an average of the colour
area is better. To use this option select Take Average from the Image Detail drop down list.
When scaling an image the darker or lighter detail can be made more prominent by selecting either
Enhance Dark Detail or Enhance Light Detail from the Image Detail drop down list. Depending on the
background colour of an image, either dark or light detail may require selecting to give a clear design, i.e.
for an image with a white background, Enhance Dark Details would be selected.
Enhancing Detail In The Image
1. Select Convert Image from the Convert menu - the Open dialog is given.
2. Select the file to convert - the Adjust Image dialog is given.
3. Set required settings and select OK - the Convert Image dialog is given.
4. Select the required setting from the Image Detail drop down list.
5. Set required conversion settings.
6. Select OK.
Easy Bead
Convert Menu • 17
Number of Colours
Select the Sensible Number radio button and the program will choose an appropriate number of colours to
give a reasonable quality. Alternatively the Number of Colours used when converting an image can be set
to a specific number by selecting the Up To radio button and entering the required value using the spin
button. If an image is converted with a large number of colours, the quality of the design is better but it can
be impractical to thread.
The number of colours in the final design can be less than the value entered because unused colours are
removed automatically.
When using Colour Match set to Palettes and Charts, the Number of Colours cannot be set to less than
the number of colours in the chosen palettes.
Letting The Program Choose How Many Colours To Convert To
1. Select Convert Image from the Convert menu - the Open dialog is given.
2. Select the file to convert - the Adjust Image dialog is given.
3. Set required settings and select OK - the Convert Image dialog is given.
4. Select Sensible Number radio button.
5. Set required conversion settings.
6. Select OK.
Setting The Number Of Colours When Converting
1. Select Convert Image from the Convert menu - the Open dialog is given.
2. Select the file to convert - the Adjust Image dialog is given.
3. Set required settings and select OK - the Convert Image dialog is given.
4. Select Up To radio button.
5. Enter the required value using the given spin button.
6. Set required conversion settings.
7. Select OK.
Convert Area
To convert only part of the image select the Convert Area checkbox, the partial conversion dialog will be
given after the image has been converted but before it is displayed. On the dialog there is a preview of the
image and the following options. The Spray Size and Zoom Level can be altered by using the given spin
buttons. Spray over the areas to be converted by using the mouse. The unimportant areas will be shown as
Lighter or Darker ; use the Unimportant Colours drop down list to change the effect. The Clear All option
will make none of the image important and the Select All option will make the entire image important.
Selecting An Area Of An Image To Convert
1.
2.
3.
4.
5.
6.
7.
8.
9.
Select Convert Image from the Convert menu - the Open dialog is given.
Select the file to convert - the Adjust Image dialog is given.
Set required settings and select OK - the Convert Image dialog is given.
Select required conversion settings.
Select Convert Area checkbox.
Select OK - the Convert Area dialog is given.
Alter Spray Size and Zoom Level as required.
Select the area to convert by spraying with the mouse.
Select Close.
18 • Convert Menu
Easy Bead
Backdrop Also
As well as converting the image into beads it is possible to have the image as a backdrop in the design, to
do this select the Backdrop Also checkbox.
Converting An Image Into Beads And A Backdrop
1. Select Convert Image from the Convert menu - the Open dialog is given.
2. Select the file to convert - the Adjust Image dialog is given.
3. Set required settings and select OK - the Convert Image dialog is given.
4. Select required conversion settings.
5. Select Backdrop Also checkbox.
6. Select OK.
Select Important Colours
The Select Important Colours option allows an area to be selected, which indicates which colours are
more important. For example a face might be highlighted which will tend to give more flesh tones. This
option is most useful when fewer colours are being used as it gives more colours in the most important
areas.
Select the Select Important Colours checkbox and after the image has been imported but before it is
displayed, a dialog will be displayed giving a preview of the image and the following options. The Spray
Size option will change the spray size by using the spin buttons. Spray over the areas of the image that are
important by using the mouse. The unimportant areas will be shown as Lighter or Darker; use the
Unimportant Colours drop down list to change the effect. The Clear All option will make none of the
image important and the Select All option will make the entire image important.
The Select Important Colours option makes the areas chosen more important. It does not totally
disregard the other areas, so colours from those areas may still be chosen.
Selecting Important Colours Of An Image When Importing
1. Select Convert Image from the Convert menu - the Open dialog is given.
2. Select the file to convert - the Adjust Image dialog is given.
3. Set required settings and select OK - the Convert Image dialog is given.
4. Select required conversion settings.
5. Select Select Important Colours checkbox.
6. Select OK - the Select Important Colours dialog is given.
7. Select the important colours, by spraying with the mouse.
8. Select Close.
Dither Colours
The Dither Colours option will give a converted image a dithered effect; it uses a similar process to a
newspaper picture where an image is made up of black and white dots to show the shading. An advantage
to dithering an image is that less colours can be used, often less than half.
Dithering is normally best used on larger designs, greater than 100 x 100 and where small detail is not
always required.
Dithering an image will give a lot more lone beads and could increase the difficulty of beading.
Dithering When Importing
1. Select Convert Image from the Convert menu - the Open dialog is given.
2. Select the file to convert - the Adjust Image dialog is given.
3. Set required settings and select OK - the Convert Image dialog is given.
4. Select Dither Colours checkbox.
5. Select required conversion settings.
6. Select OK.
Easy Bead
Convert Menu • 19
Hints and Tips for Converting Images
There are several factors which will affect the final design, these include the quality of the scanner and that
of the original image.
To achieve the best results, the original image should be a photograph. A printed picture can give poor
results due to the printing method. If you would like to use a magazine picture or similar material, then try
scanning at a higher resolution. This gives a better image for Easy Bead to use, but it will increase the
processing time and the memory required. Before using material other than your own, permission should be
obtained from the holder of the copyright to prevent infringement of the copyright laws.
Generally, scan images at a low resolution i.e. 75 - 100 dots per inch at most, this will keep the processing
time down and use less memory. If enlarging the image, then use a higher resolution i.e. 200 - 300 dots per
inch. Using a 24 bit image will give the best result, but can produce files that are very large and thus
increase the processing time.
When converting an image into a bead design, some manual editing is normally required to make the chart
suitable for beading.
By decreasing the Intensity value in the Adjust Image option, it is possible to reduce glare on the image.
If the image is too dark or light, use the Brightness control in the Adjust Image option to correct the image.
Some scanners may give an image a tint of colour, for example green, which is not on the original. To
correct this use the Adjust Image option.
When the image is imported there may be some areas which do not have many colours, whilst another area
has too many colours. By using the Select Important Colours option, areas where the colour matching
should be concentrated can be selected.
To convert a photograph with less than 10 colours, use the Dither option to improve the colour matching.
If the final design contains a number of colours which only have a few beads each then use the Decrease
Colours option to quickly remove them.
Browse Convert Image
This option allows previews of non Easy Bead files to be seen before they are imported. Select Browse
Convert Image in the Convert menu, a dialog is given showing up to six previews. More files can be
viewed by using the scroll bar. By clicking on a preview and pressing OK, the selected file will be imported.
The first time a preview of a design is drawn a few moments can be taken due to the complexity of
imported pictures.
The file type can be set by selecting the required type from the File Type drop down list. The number of
files can be reduced by entering the start of the filename in the box provided, i.e. b*.bmp, would list only
Bitmap files beginning with the letter b.
To change the folder, select the Select Folder button, a list of folders will be given from which a new one
can be selected.
More than one file can be opened, press and hold down the Ctrl key on the keyboard and select the
required files as normal by using the mouse, then select OK and the files will be given on screen. To select
a group of files, select the first file, press and hold down the Shift key on the keyboard then select the last
file in the group.
Browsing Convert Image Files
1. Select Browse Convert Image from the Convert menu - the Browse Convert Image dialog is given.
2. Use Select Folder button to change folder if required.
3. Click on the required file’s preview.
4. Select OK.
20 • Convert Menu
Easy Bead
Acquire
The Acquire option is used to directly scan an image into Easy Bead. Once this option has been selected, a
dialog is given on which various selections can be made. Set the Scan Mode to match the type of image
you are scanning by using the drop down list; LineArt is best for line drawings and Color is best for
photographs.
Use the slider bar to set the Resolution value. Generally, scan images at a low resolution i.e. 75 - 100 dots
per inch at most, this will keep the processing time down and use less memory. If enlarging the image then
use a higher resolution i.e. 200 - 300 dots per inch. Using a 24 bit image will give the best result, but can
produce data that is very large and thus increase the processing time.
Selecting the Tonal Adjustment will allow the brightness, contrast and colour to be changed. To see the
effect of these changes click the preview button.
The size of the scan area can be adjusted by resizing the crop frame. The Prescan option allows the image
to be seen as it would be when scanned. Once the required settings have been changed select Scan to
scan the image. For further information on scanning, see the on-line help within the scanning option.
Acquire dialog
The Acquire dialog may vary depending on which scanner driver is used. The dialog above is from a
flatbed scanner driver.
Scanning A Photograph
1. Select Acquire from the Convert menu - a dialog is given.
2. Set the Scan Mode to the required type by using the drop down list.
3. Set the Resolution value to 100 dots per inch by using the slider.
4. Select Tonal Adjustment for brightness and contrast, if required.
5. Select Prescan to see how the image would look when scanned.
6. Select Scan to scan the image.
Or
1. Select the Acquire button from the toolbar and follow instructions No.2 to No.6.
Easy Bead
Convert Menu • 21
Select Source
The Select Source option in the Convert menu allows you to select which scanner is to be used by Easy
Bead. Once this option is selected then the required scanner can be chosen from the given list.
Selecting The Scanner To Be Used
1. Select Select Source from the Convert menu - a list is given.
2. Select the required scanner from the list.
3. Select the Select button.
Position Backdrop
By using this option, the position of the backdrop can be changed, which is useful when it is being used in
an existing design. Once this option is selected, a dialog will appear giving the original placement and size.
Also given are spin buttons that allow changes to be made to the position of the Top and Left of the
backdrop, along with its Height and Width.
Please ensure that you have permission from the owner of the copyright for the chart before using it.
If the backdrop doesn't line up with the grid, fine adjustments can be made by using Adjust Top Left and
Adjust Bottom Right. Select Adjust Top Left, the dialog disappears and a cross-hair is given. On a
position on the backdrop in the top left, press and hold the LEFT mouse button and drag the cursor to where
the point should match up to on the grid. The backdrop will be offset and the Position Backdrop will return.
Select Adjust Bottom Right, the dialog disappears and a cross-hair is given. On a position on the backdrop
in the bottom right, press and hold the LEFT mouse button and drag the cursor to where the point should
match up to on the grid. The backdrop will be rotated/scaled and the Position Backdrop will return, select
Reset Adjustments to clear any changes that have been made.
When the Auto Adjust option is chosen the program will attempt to automatically recognise the grid lines.
Once the option has been selected a cross-hair is given. On the backdrop select the middle of an empty grid
square. It is best to choose a square that has empty squares across and below to the one chosen.
Other options that are given are OK, to continue, Cancel, to leave the option without changing the position
of the backdrop and Help.
Position Backdrop dialog
The quality of the backdrop is important. Without well defined grid lines the program will not be able to
automatically identify the grid. Scan at a resolution of 200dpi or higher in greyscale or full colour.
Try to ensure that the chart is of even brightness - if there are dark and light areas to the scan the program
may not be able to identify the lines correctly.
Choose an area of the grid that is empty. The program works by analysing grid squares across and down to
the chosen square. The greater the number of empty squares it can locate the better the accuracy.
22 • Convert Menu
Easy Bead
If the chart does not line up correctly try choosing a different start point for the auto adjust position. If the
chart is lined up in one area but not another try working on the area that is lined up - once this is completed
use the auto adjust option to choose another area of the chart.
If the chart does not line up correctly, try using the Auto Contrast and Sharpen features in the Adjust Image
dialog when scanning.
Manually Positioning A Converted Backdrop
1. Select Position Backdrop from the Convert menu - the Position Backdrop dialog is given.
2. Use the spin buttons to set the Top, Left, Height and Width values.
3. Press the Adjust Top Left button – the dialog will disappear and a cross hair cursor will be given.
4. Move the cursor to a point on the backdrop, press and hold the LEFT mouse button.
5. Drag the cursor to the required position on the grid and release the mouse button - the Position
Backdrop dialog will appear.
6. Press the Adjust Bottom Right button – the dialog will disappear and a cross hair cursor will be
given.
7. Move the cursor to a point on the backdrop, press and hold the LEFT mouse button.
8. Drag the cursor to the required position on the grid and release the mouse button - the Position
Backdrop dialog will appear.
9. Select OK.
Automatically Positioning A Converted Backdrop
1. Select Position Backdrop from the Convert menu - the Position Backdrop dialog is given.
2. Press the Auto Adjust button – the dialog will disappear and a cross hair cursor will be given.
3. Move the cursor to an empty grid square on the backdrop and press the LEFT mouse button.
Rotate/Reflect Backdrop
Rotate/Reflect Backdrop allows the backdrop to be rotated by multiples of 90º and/or reflected
horizontally. When the option is selected by using Rotate/Reflect Backdrop in the Convert menu, a dialog
is given. Select the required radio button to have the design rotated by 90, 180 or 270 degrees, to reflect a
design select the given checkbox.
Other options that are given are OK, to continue, Cancel, to leave the option without rotating or reflecting
the backdrop and Help.
Rotating The Backdrop
1. Select Rotate/Reflect Backdrop from the Convert menu - the Rotate/Reflect Backdrop dialog is
given.
2. Select the 90º, 180º or 270º radio button.
3. Select OK.
Reflecting The Backdrop
1. Select Rotate/Reflect Backdrop from the Convert menu - the Rotate/Reflect Backdrop dialog is
given.
2. Select the Reflect checkbox.
3. Select OK.
Delete Backdrop
This option allows you to delete the current backdrop; it will always ask if this is what you require, to prevent
losing the backdrop by accident.
Deleting The Imported Backdrop
1. Select Delete Backdrop from the Convert menu.
Easy Bead
Convert Menu • 23
Backdrop Display
The backdrop can be turned on or off by selecting Backdrop On and Backdrop Off on Backdrop Display
in the Convert menu. By pressing the letter U, the display of the backdrop will toggle on and off. This can
be used to make the design clearer and for checking what the design will look like when threaded.
Turning The Converted Backdrop On
1. Select Backdrop Display from the Convert menu - a sub-menu is given.
2. Select Backdrop On from the Backdrop Display sub-menu.
Or
1. Press U will toggle between Backdrop On and Backdrop Off.
Turning The Converted Backdrop Off
1. Select Backdrop Display from the Convert menu - a sub-menu is given.
2. Select Backdrop Off from the Backdrop Display sub-menu.
Or
1. Pressing U will toggle between Backdrop On and Backdrop Off.
Backdrop Brightness
The Backdrop Brightness option allows the intensity of the backdrop to be changed to make the display
clearer. The options are Very Light, Light, Normal, Dark and Very Dark, just click on the required one.
Setting The Backdrop Brightness
1. Select Backdrop Brightness from the Convert menu - a sub-menu is given.
2. Select the required brightness from the Backdrop Brightness sub-menu.
Most Recently Used Image File List
A list of the last five image files that have been used is given at the end of the Convert menu. Select the
required file by clicking on it or pressing the relevant number.
Selecting A File From The Recently Used Image File List
1. Select the Convert menu, then the required file from the list given at the bottom of the menu.
Or
1.
Select the Convert menu, then press the number corresponding to the required file.
24 • Convert Menu
Easy Bead
Edit Menu
Copy
To copy a section of the design, select the option Copy in the Edit menu and a cross-hair cursor will be
given. Press and hold down the LEFT mouse button at one corner of the area, then drag to the second
corner and release, a box will be given showing the area. Once the new position has been selected, press
the LEFT mouse button again and the area will be copied. The area can be copied several times by
repeatedly selecting new positions.
Should you not require to see the actual area that is being copied then by pressing the Space Bar only the
outline of the box is shown.
The area which has been selected for copying will also be copied to the Windows Clipboard, so it can be
used in other Windows programs.
When a design is copied to the Windows Clipboard only blocks will be available to other programs.
The area may also be rotated, reflected and scaled whilst being copied. Should you wish to do this, press
the following keys after selecting the area to be copied:
T
R
J
Page Up
Page Down
To rotate the area anti-clockwise by 90 degrees
To mirror the area
To flip the area
To enlarge the area
To reduce the area
When enlarging/reducing an area, the scale is in integer amounts only.
The option will continue until the RIGHT mouse button is pressed.
This option can also be used without selecting the menu option by moving the mouse to the first corner of
the area to be copied and pressing the letter C.
Copying An Area Of Design
1. Select Copy from the Edit menu - a cross-hair cursor is given.
2. Move the cross-hair to one corner of the area to be copied, press and hold down the LEFT mouse
button whilst dragging to the second corner - a box is given.
3. Release the button when the box is the correct size.
4. Move the area to where you wish it to be copied and press the LEFT mouse button.
5. To place another copy repeat No. 4.
6. To finish the option, press the RIGHT mouse button.
Or
1.
2.
3.
4.
5.
6.
Move the cursor to one corner of the area to be copied and press C - a box is given.
Set the size of the box by moving the mouse.
Press the LEFT mouse button.
Move the area to where you wish it to be copied and press the LEFT mouse button.
To place another copy repeat No. 4.
To finish the option, press the RIGHT mouse button.
1.
2.
Select the Copy button from the toolbar - a cross-hair is given.
Move cross-hair to one corner of the area to be copied, press and hold down the LEFT mouse
button whilst dragging to the second corner - a box is given.
Release the button when the box is the correct size.
Move the area to where you wish it to be copied and press the LEFT mouse button.
To place another copy repeat No. 4.
To finish the option, press the RIGHT mouse button.
Or
3.
4.
5.
6.
Easy Bead
Edit Menu • 25
User Definable Outline Shape
This option will allow a precise area to be copied. Select the Copy option in the Edit menu and after the
cross-hair appears, press Y. Move the cursor to the starting point of the required area and press the LEFT
mouse button. Follow the outline of the shape, pressing the LEFT mouse button at every corner. Once the
shape is finished, press the RIGHT mouse button and the area can be copied.
Copying An Area Of Design By Using The User Defined Outline
1. Select Copy from the Edit menu - a cross-hair cursor is given.
2. Press Y, move the cross-hair to the starting point of the area to be copied and press the LEFT
mouse button.
3. Follow the outline of the shape, pressing the LEFT mouse button at every corner.
4. When the shape is finished press the RIGHT mouse button.
5. Move the area to where you wish it to be copied and press the LEFT mouse button.
6. To place another copy repeat No. 5.
7. To finish the option, press the RIGHT mouse button.
Move
This option works in the same way as Copy, but will remove the original area when it is copied. Also the
area can only be moved once and then the option finishes, so it must be reselected to move a second area.
To finish the option at any point press the RIGHT mouse button.
This option can also be used without selecting the menu option by moving the mouse to the first corner of
the area to be moved and pressing the letter M.
Moving An Area Of Design
1. Select Move from the Edit menu - a cross-hair cursor is given.
2. Move the cross-hair to one corner of the area to be moved, press and hold down the LEFT mouse
button whilst dragging to the second corner - a box is given.
3. Release the button when the box is the correct size.
4. Move the area to where you wish it to be moved and press the LEFT mouse button.
Or
1.
2.
3.
4.
Move the cursor to one corner of the area to be copied and press M - a box is given.
Set the size of the box by moving the mouse.
Press the LEFT mouse button.
Move the area to where you wish it to be moved and press the LEFT mouse button.
1.
2.
Select the Move button from the toolbar - a cross-hair cursor is given.
Move the cross-hair to one corner of the area to be moved, press and hold down the LEFT mouse
button whilst dragging to the second corner - a box is given.
Release the button when the box is the correct size.
Move the area to where you wish it to be moved and press the LEFT mouse button.
Or
3.
4.
Moving An Area Of Design By Using The User Defined Outline
1.
2.
3.
4.
5.
26 • Edit Menu
Select Move from the Edit menu - a cross-hair cursor is given.
Press Y, move cross-hair to the starting point of the area to be moved and press the LEFT mouse
button.
Follow the outline of the shape, pressing the LEFT mouse button at every corner.
When the shape is finished press the RIGHT mouse button.
Move the area to where you wish it to be moved and press the LEFT mouse button.
Easy Bead
Cut
The Cut option allows an area to removed from the Easy Bead design and placed into the Windows
Clipboard. This option works in the same way as Move, but without placing the area in a new position.
To finish the option at any point press the RIGHT mouse button.
Cutting An Area Of Design And Adding It To The Windows Clipboard
1. Select Cut from the Edit menu - a cross-hair cursor is given.
2. Move the cross-hair to one corner of the area to be cut, press and hold down the LEFT mouse
button whilst dragging to the second corner - a box is given.
3. Release the button when the box is the correct size.
Or
1.
2.
3.
Move the cursor to one corner of the area to be copied and press Ctrl X - a cross-hair is given.
Move the cross-hair to one corner of the area to be cut, press and hold down the LEFT mouse
button whilst dragging to the second corner - a box is given.
Release the button when the box is the correct size.
Or
1.
2.
3.
Select the Cut button from the toolbar - a cross-hair cursor is given.
Move the cross-hair to one corner of the area to be cut, press and hold down the LEFT mouse
button whilst dragging to the second corner - a box is given.
Release the button when the box is the correct size.
Paste
When this option is selected, the contents of the Windows Clipboard will be copied into the current Easy
Bead design. Position the area to be pasted by using the mouse. Once this has been done, press the LEFT
mouse button to paste the area.
Should you not require to see the actual area that is being copied then by pressing the Space Bar only the
outline of the box is shown.
The area may also be rotated, reflected and scaled before it is pasted, this is done by pressing the following
keys:
T
R
J
Page Up
Page Down
To rotate the area anti-clockwise by 90 degrees
To mirror the area
To flip the area
To enlarge the area
To reduce the area
To finish the option at any point, press the RIGHT mouse button.
When enlarging/reducing an area, the scale is in integer amounts only.
Different programs store information in the Windows Clipboard in different formats, some of which will not
be able to be pasted into Easy Bead.
Pasting The Contents Of The Windows Clipboard Into A Design
1. Select Paste from the Edit menu - a box is given.
2. Place the area at the required position and press the LEFT mouse button.
Or
1.
2.
Press Ctrl V - a box is given.
Place the area at the required position and press the LEFT mouse button.
1.
2.
Select the Paste button from the toolbar - a box is given.
Place the area at the required position and press the LEFT mouse button.
Or
Easy Bead
Edit Menu • 27
Flip
When placing areas in the Insert Design, Copy, Move, Paste and Draw Motif options, they can be
reflected vertically by selecting Flip in the Edit menu.
Reflecting An Area Of Design Vertically When Placing
1. After selecting the area by using one of the following options Insert Design, Copy, Move, Paste and
Draw Motif.
2. Select Flip from the Edit menu.
3. Move the area to where you wish it to be placed and press the LEFT mouse button.
Or
1.
2.
After selecting the area by using the one of the following options Insert Design, Copy, Move, Paste
and Draw Motif.
Press J, move the area to where you wish it to be placed and press the LEFT mouse button.
Mirror
When placing areas in the Insert Design, Copy, Move, Paste and Draw Motif options, they can be
reflected horizontally by selecting Mirror in the Edit menu.
Reflecting An Area Of Design Horizontally When Placing
1. After selecting the area by using one of the following options Insert Design, Copy, Move, Paste and
Draw Motif.
2. Select Mirror from the Edit menu.
3. Move the area to where you wish it to be placed and press the LEFT mouse button.
Or
1.
2.
After selecting the area by using one of the following options Insert Design, Copy, Move, Paste and
Draw Motif.
Press R, move the area to where you wish it to be placed and press the LEFT mouse button.
Scale Up
When placing areas in the Insert Design, Copy, Move, Paste and Draw Motif options, they can be
enlarged by selecting Scale Up in the Edit menu.
Scaling Up An Area Of Design When Placing
1. After selecting the area by using one of the following options Insert Design, Copy, Move, Paste and
Draw Motif.
2. Select Scale Up from the Edit menu the required number of times.
3. Move the area to where you wish it to be placed and press the LEFT mouse button.
Or
1.
2.
After selecting the area by using one of the following options Insert Design, Copy, Move, Paste and
Draw Motif.
Press Page Up, move the area to where you wish it to be placed and press the LEFT mouse button.
Scale Down
When placing areas in the Insert Design, Copy, Move, Paste, Draw Motif options, they can be reduced by
selecting Scale Down in the Edit menu.
Scaling Down An Area Of Design When Placing
1. After selecting the area by using one of the following options Insert Design, Copy, Move, Paste and
Draw Motif.
2. Select Scale Down from the Edit menu the required number of times.
3. Move the area to where you wish it to be placed and press the LEFT mouse button.
28 • Edit Menu
Easy Bead
Or
1.
2.
After selecting the area by using the one of the following options Insert Design, Copy, Move, Paste,
Draw Motif and Text.
Press Page Down, move the area to where you wish it to be placed and press the LEFT mouse
button.
Centre In Area
When placing an area when using options like Copy, Move and Draw Motif it is possible to centre it within
a specified area. Once the area to be placed is given on screen, select Centre in Area from the Edit menu,
a cross-hair will be given. Move the cursor to one corner of the area to be centred within then press and hold
the LEFT mouse button. Drag the cursor to the opposite corner and release the mouse button, the area will
be placed centrally.
Centring Within A Designated Area
1. After selecting the area by using one of the following options Insert Design, Copy, Move, Paste, and
Draw Motif.
2. Select Centre in Area from the Edit menu - a cross-hair cursor is given.
3. Move the mouse to one corner of the area to be centred within and press and hold the LEFT mouse
button.
4. Drag the cursor to the opposite corner and release the mouse button.
Change Colour
This option allows a colour in the design to be changed to another, quickly and simply. Once the option has
been selected, a cross-hair cursor will be given. Select the new colour from the palette, then move the
cross-hair over the colour to be changed. Press the LEFT mouse button and the colour will change including
any bead in the same colour. The option will continue until the RIGHT mouse button is pressed.
Changing A Colour Used In The Design
1. Select Change Colour from the Edit menu - a cross-hair cursor is given.
2. Select the new colour from the palette.
3. Move the cross-hair over the colour to be changed in the design.
4. Press the LEFT mouse button.
5. Press the RIGHT mouse button to leave the option.
Delete Colour
Delete Colour will allow an entire colour to be removed from the design. Once the option has been
selected, a cross-hair cursor will be given. Move the cross-hair over the colour to be deleted and press the
LEFT mouse button. This colour will be removed and the option will continue until the RIGHT mouse button
is pressed.
Deleting An Entire Colour From The Design
1. Select Delete Colour from the Edit menu - a cross-hair cursor is given.
2. Move the cross-hair over the colour in the design to be removed.
3. Press the LEFT mouse button.
4. Press the RIGHT mouse button to leave the option.
Area
Edit Inside
This option allows an area to be set in which edits can only occur inside. To set an area of the design, select
the option and a cross-hair cursor will be given. Move the cross-hair to one corner then press and hold down
the LEFT mouse button. Then drag to the second corner and this will set the area.
The option will continue until the RIGHT mouse button is pressed.
Easy Bead
Edit Menu • 29
Setting The Edit Area For Edits To Occur Inside
1. Select Area from the Edit menu - a sub-menu is given.
2. Select Edit Inside - a cross-hair cursor is given.
3. Move the cross-hair to one corner of the area and press and hold the LEFT mouse button - a box is
given.
4. Set the size of the box by moving the mouse and release the button.
5. To finish the option, press the RIGHT mouse button.
Edit Outside
This option allows an area to be set in which edits can only occur outside. To set an area of the design,
select the option and a cross-hair cursor will be given. Move the cross-hair to one corner then press and
hold down the LEFT mouse button. Then drag to the second corner and this will set the area.
The option will continue until the RIGHT mouse button is pressed.
Setting The Edit Area For Edits To Occur Outside
1. Select Area from the Edit menu - a sub-menu is given.
2. Select Edit Outside - a cross-hair cursor is given.
3. Move the cross-hair to one corner of the area and press the LEFT mouse button - a box is given.
4. Set the size of the box by moving the mouse.
5. Press the LEFT mouse button.
6. To finish the option, press the RIGHT mouse button.
Clear Area
The Clear Area option when selected will clear the edit area that has been set by either the Edit Inside or
Outside options. By pressing Ctrl and E the current edit area will toggle on and off.
Clearing The Edit Area
1. Select Area from the Edit menu - a sub-menu is given.
2. Select Clear Area.
Or
1. Ctrl E will toggle Edit Area on and off.
Reset Area
The Reset Area option when selected will turn on the last used edit area which has been set by either the
Edit Inside or Outside options. By pressing Ctrl and E the current edit area will toggle on and off.
Turning On The Last Used Edit Area
1. Select Area from the Edit menu - a sub-menu is given.
2. Select Reset Area.
Or
1.
30 • Edit Menu
Ctrl E will toggle Edit Area on and off.
Easy Bead
Draw Menu
Draw Shape
Poly Line
The Poly Line option allows lines to be drawn in the design; when it is selected a cross-hair cursor will be
given. Move the cross-hair to the start of the required line and press the LEFT mouse button. A line will be
shown which can be positioned by moving the mouse. Once the line is in the required position, press the
LEFT mouse button again and the line will be drawn. Continuous lines can be drawn by repeatedly moving
to the end of each line and pressing the LEFT mouse button.
To finish drawing a section of lines press the RIGHT mouse button, which will allow a new section to be
started. Pressing the RIGHT mouse button a second time will end the option.
Adding Lines To A Design
1. Select Draw Shape from the Draw menu - a sub-menu is given.
2. Select Poly Line - a cross-hair cursor is given.
3. Move the cross-hair to one end of the required line.
4. Press the LEFT mouse button - a line is given.
5. Position the line by using the mouse.
6. Press the LEFT mouse button.
7. To place another line repeat Nos. 5 & 6.
8. To finish a section, press the RIGHT mouse button.
9. To finish the option, press the RIGHT mouse button.
10. The line will be drawn in the current colour.
Square
The Square option allows squares to be drawn in the design; when it is selected a cross-hair cursor will be
given. Move the cross-hair to one corner of the required square and press and hold the LEFT mouse button.
A square will be shown which can be sized by moving the mouse. Once the square is the required size,
release the LEFT mouse button and the square will be drawn. The option will continue until the RIGHT
mouse button is pressed.
Adding A Square To A Design
1. Select Draw Shape from the Draw menu - a sub-menu is given.
2. Select Square - a cross-hair cursor is given.
3. Move the cross-hair to one corner of the required square.
4. Press and hold the LEFT mouse button - a square is given.
5. Size the square by dragging the mouse.
6. Release the button when the square is the correct size.
7. To finish the option, press the RIGHT mouse button.
8. The square will be drawn in the current colour.
Easy Bead
Draw Menu • 31
Rectangle
The Rectangle option allows rectangles to be drawn in the design; when it is selected a cross-hair cursor
will be given. Move the cross-hair to one corner of the required rectangle and press and hold the LEFT
mouse button. A rectangle will be shown which can be sized by moving the mouse. Once the rectangle is
the required size, release the LEFT mouse button and the rectangle will be drawn. The option will continue
until the RIGHT mouse button is pressed.
Adding A Rectangle To A Design
1. Select Draw Shape from the Draw menu - a sub-menu is given.
2. Select Rectangle - a cross-hair cursor is given.
3. Move the cross-hair to one corner of the required rectangle.
4. Press and hold the LEFT mouse button - a rectangle is given.
5. Size the rectangle by dragging the mouse.
6. Release the button when the rectangle is the correct size.
7. To finish the option, press the RIGHT mouse button.
8. The rectangle will be drawn in the current colour.
Diamond
The Diamond option allows diamonds to be drawn in the design; when it is selected a cross-hair cursor will
be given. Move the cross-hair to one corner of the required diamond and press and hold the LEFT mouse
button. A diamond will be shown which can be sized by moving the mouse. Once the diamond is the
required size, release the LEFT mouse button and the diamond will be drawn. The option will continue until
the RIGHT mouse button is pressed.
Adding A Diamond To A Design
1. Select Draw Shape from the Draw menu - a sub-menu is given.
2. Select Diamond - a cross-hair cursor is given.
3. Move the cross-hair to one corner of the required diamond.
4. Press and hold the LEFT mouse button - a diamond is given.
5. Size the diamond by dragging the mouse.
6. Release the button when the diamond is the correct size.
7. To finish the option, press the RIGHT mouse button.
8. The diamond will be drawn in the current colour.
Circle
The Circle option allows circles to be drawn in the design; when it is selected a cross-hair cursor will be
given. Move the cross-hair to the centre of the required circle and press and hold the LEFT mouse button. A
circle will be shown which can be sized by moving the mouse. Once the circle is the required size, release
the LEFT mouse button and the circle will be drawn. The option will continue until the RIGHT mouse button
is pressed.
Adding A Circle To A Design
1. Select Draw Shape from the Draw menu - a sub-menu is given.
2. Select Circle - a cross-hair cursor is given.
3. Move the cross-hair to the centre of the required circle.
4. Press and hold the LEFT mouse button - a circle is given.
5. Size the circle by dragging the mouse.
6. Release the button when the circle is the correct size.
7. To finish the option, press the RIGHT mouse button.
8. The circle will be drawn in the current colour.
32 • Draw Menu
Easy Bead
Ellipse
The Ellipse option allows ellipses to be drawn in the design; when it is selected a cross-hair cursor will be
given. Move the cross-hair to one corner of a box for which the ellipse is to be fitted to and press and hold
the LEFT mouse button. An ellipse will be shown which can be sized by moving the mouse. Once the ellipse
is the required size, release the LEFT mouse button and the ellipse will be drawn. The option will continue
until the RIGHT mouse button is pressed.
Adding An Ellipse To A Design
1. Select Draw Shape from the Draw menu - a sub-menu is given.
2. Select Ellipse - a cross-hair cursor is given.
3. Move the cross-hair to one corner of the required ellipse.
4. Press and hold the LEFT mouse button - an ellipse is given.
5. Size the ellipse by dragging the mouse.
6. Release the button when the ellipse is the correct size.
7. To finish the option, press the RIGHT mouse button.
8. The ellipse will be drawn in the current colour.
Arc
The Arc option allows arcs to be drawn in the design; when it is selected a cross-hair cursor will be given.
Move the cross-hair to the start of the arc to be drawn and press and hold the LEFT mouse button. A line
will be shown and the end of the arc can be positioned by moving the mouse and releasing the LEFT mouse
button. An arc will then be shown which can be sized and then fixed by pressing the LEFT mouse button a
second time. The option will continue until the RIGHT mouse button is pressed.
Adding An Arc To A Design
1. Select Draw Shape from the Draw menu - a sub-menu is given.
2. Select Arc - a cross-hair cursor is given.
3. Move the cross-hair to the start of the required arc.
4. Press and hold the LEFT mouse button - a line is given.
5. Size the end of the arc by dragging the mouse.
6. Release the button when the line is the correct size - an arc is given.
7. Size the arc by dragging the mouse.
8. Press the LEFT mouse button.
9. To finish the option, press the RIGHT mouse button.
10. The arc will be drawn in the current colour.
Triangle
The Triangle option allows equilateral triangles to be drawn in the design; when it is selected a cross-hair
cursor will be given. Move the cross-hair to one corner of the required triangle to be drawn and press and
hold the LEFT mouse button. A triangle will be shown which can be sized by moving the mouse. Once the
triangle is the required size, release the LEFT mouse button and the triangle will be drawn. The option will
continue until the RIGHT mouse button is pressed.
Adding A Triangle To A Design
1. Select Draw Shape from the Draw menu - a sub-menu is given.
2. Select Triangle - a cross-hair cursor is given.
3. Move the cross-hair to one corner of the required triangle.
4. Press and hold the LEFT mouse button - a triangle is given.
5. Size the triangle by dragging the mouse.
6. Release the button when the triangle is the correct size.
7. To finish the option, press the RIGHT mouse button.
8. The triangle will be drawn in the current colour.
Easy Bead
Draw Menu • 33
Angled Square
The Angled Square option allows angled squares to be drawn in the design; when it is selected a cross-hair
cursor will be given. Move the cross-hair to one corner of the required angled square to be drawn and press
and hold the LEFT mouse button. An angled square will be shown which can be sized by moving the
mouse. Once the angled square is the required size, release the LEFT mouse button and the angled square
will be drawn. The option will continue until the RIGHT mouse button is pressed.
Adding An Angled Square To A Design
1. Select Draw Shape from the Draw menu - a sub-menu is given.
2. Select Angled Square - a cross-hair cursor is given.
3. Move the cross-hair to one corner of the required angled square.
4. Press and hold the LEFT mouse button - an angled square is given.
5. Size the angled square by dragging the mouse.
6. Release the button when the angled square is the correct size.
7. To finish the option, press the RIGHT mouse button.
8. The angled square will be drawn in the current colour.
Pentagon
The Pentagon option allows pentagons to be drawn in the design; when it is selected a cross-hair cursor will
be given. Move the cross-hair to one corner of the required pentagon to be drawn and press and hold the
LEFT mouse button. A pentagon will be shown which can be sized by moving the mouse. Once the
pentagon is the required size, release the LEFT mouse button and the pentagon will be drawn. The option
will continue until the RIGHT mouse button is pressed.
Adding A Pentagon To A Design
1. Select Draw Shape from the Draw menu - a sub-menu is given.
2. Select Pentagon - a cross-hair cursor is given.
3. Move the cross-hair to one corner of the required pentagon.
4. Press and hold the LEFT mouse button - a pentagon is given.
5. Size the pentagon by dragging the mouse.
6. Release the button when the pentagon is the correct size.
7. To finish the option, press the RIGHT mouse button.
8. The pentagon will be drawn in the current colour.
Hexagon
The Hexagon option allows hexagons to be drawn in the design; when it is selected a cross-hair cursor will
be given. Move the cross-hair to one corner of the required hexagon to be drawn and press and hold the
LEFT mouse button. A hexagon will be shown which can be sized by moving the mouse. Once the hexagon
is the required size, release the LEFT mouse button and the hexagon will be drawn. The option will continue
until the RIGHT mouse button is pressed.
Adding A Hexagon To A Design
1.
2.
3.
4.
5.
6.
7.
8.
Select Draw Shape from the Draw menu - a sub-menu is given.
Select Hexagon - a cross-hair cursor is given.
Move the cross-hair to one corner of the required hexagon.
Press and hold the LEFT mouse button - a hexagon is given.
Size the hexagon by dragging the mouse.
Release the button when the hexagon is the correct size.
To finish the option, press the RIGHT mouse button.
The hexagon will be drawn in the current colour.
34 • Draw Menu
Easy Bead
Octagon
The Octagon option allows octagons to be drawn in the design; when it is selected a cross-hair cursor will
be given. Move the cross-hair to one corner of the required octagon to be drawn and press and hold the
LEFT mouse button. An octagon will be shown which can be sized by moving the mouse. Once the octagon
is the required size, release the LEFT mouse button and the octagon will be drawn. The option will continue
until the RIGHT mouse button is pressed.
Adding An Octagon To A Design
1. Select Draw Shape from the Draw menu - a sub-menu is given.
2. Select Octagon - a cross-hair cursor is given.
3. Move the cross-hair to one corner of the required octagon.
4. Press and hold the LEFT mouse button - an octagon is given.
5. Size the octagon by dragging the mouse.
6. Release the button when the octagon is the correct size.
7. To finish the option, press the RIGHT mouse button.
8. The octagon will be drawn in the current colour.
Star
The Star option allows five pointed stars to be drawn in the design; when it is selected a cross-hair cursor
will be given. Move the cross-hair to one corner of the required star to be drawn and press and hold the
LEFT mouse button. A star will be shown which can be sized by moving the mouse. Once the star is the
required size, release the LEFT mouse button and the star will be drawn. The option will continue until the
RIGHT mouse button is pressed.
Adding A Star To A Design
1. Select Draw Shape from the Draw menu - a sub-menu is given.
2. Select Star - a cross-hair cursor is given.
3. Move the cross-hair to one corner of the required star.
4. Press and hold the LEFT mouse button - a star is given.
5. Size the star by dragging the mouse.
6. Release the button when the star is the correct size.
7. To finish the option, press the RIGHT mouse button.
8. The star will be drawn in the current colour.
Curve
The Curve option allows curves to be drawn in the design. A curve is specified by entering a series of
points, then the program will draw a line which passes smoothly through the points. When the option is
selected, move the cursor to where the curve should start and press the LEFT mouse button. A small filled
square will be drawn to show the start of the curve, then move the cursor to the next point and press the
LEFT mouse button. A small hollow square will be drawn showing the line the curve will follow. Continue
until all the points have been placed then press the RIGHT mouse button to finish the option and the curve
will be drawn.
By double clicking the LEFT mouse button on a small hollow square, it will change to a filled square that
represents the start or end of a curve. By placing two consecutive filled in squares a line will be drawn, so
a mixture of straight lines and curves can be used.
Easy Bead
Draw Menu • 35
Adding Curves To A Design
1. Select Draw Shape from the Draw menu - a sub-menu is given.
2. Select Curves - a cross-hair cursor is given.
3. Move the cross-hair to the start of the required line.
4. Press the LEFT mouse button - a small filled square is placed.
5. Move the cursor to the next point in the curve.
6. Press the LEFT mouse button - a small hollow square is placed.
7. Repeat Nos. 5 & 6 to extend the curve.
8. To finish the option, press the RIGHT mouse button.
9. The curve will be drawn in the current colour.
Draw Filled Shape
This gives a menu containing the options Poly Line, Square, Rectangle, Diamond, Circle, Ellipse, Arc,
Triangle, Angled Square, Pentagon, Hexagon, Octagon, Star, Curve and User Definable Shapes. [See
the relevant option in the sub-menu Draw Shape in the Draw Menu for more details on drawing the shape].
These shapes can be filled with a solid colour or pattern.
Adding Filled Shapes To A Design
1. Select Draw Filled Shape from the Draw menu - a sub-menu is given.
2. Select the required shape - a cross-hair cursor is given.
3. Position the shape in the required position.
4. To finish the option, press the RIGHT mouse button.
Flood Fill
Flood Fill allows areas of the design to be filled quickly and simply by just selecting a point within the area
to fill from. When the option is selected a cross-hair cursor will be given. Move the cross-hair to a point
within the area to be filled and press the LEFT mouse button. Once this has been done the area will be filled
starting from that point. If the DELETE key is pressed instead then the area pointed to by the cursor will be
removed. The option will continue until the RIGHT mouse button is pressed.
Flood Fill will only fill connecting areas to the point chosen, if there is an area that doesn't require filling
then disconnect them by adding a barrier of another colour.
When filling areas in this way, it is important that the area required must be entirely contained within a
shape, otherwise the flood fill will wander outside of the region required.
Flood Filling An Area Of The Design
1. Select Flood Fill from the Draw menu - a cross-hair cursor is given.
2. Select the colour in the palette to fill with.
3. Move the cursor to within the required area to be filled.
4. Press the LEFT mouse button.
5. To finish the option, press the RIGHT mouse button.
Or
1. Select the colour in the palette to fill with.
2. Select the Flood Fill button from the toolbar - a cross-hair cursor is given.
3. Move the cursor to within the required area to be filled.
4. Press the LEFT mouse button.
5. To finish the option, press the RIGHT mouse button.
36 • Draw Menu
Easy Bead
Insert Design
This option will allow a file to be inserted into the current design. After selecting Insert Design in the Draw
menu, a dialog is given from which the chosen file can be selected. A list of the file formats supported is
given in Convert Image in the Convert menu, as well as Easy Bead files. Once the file has been selected a
box is given, use this to place the design, the colours will be matched to the current palette.
Should you not require to see the actual area that is being inserted then by pressing the Space Bar only the
outline of the box is shown. The area may also be rotated, reflected and scaled before it is pasted, this is
done by pressing the following keys:
T
R
J
Page Up
Page Down
To rotate the area anti-clockwise by 90 degrees
To mirror the area
To flip the area
To enlarge the area
To reduce the area
The option will continue until the RIGHT mouse button is pressed.
When enlarging/reducing an area, the scale is in integer amounts only.
Inserting A Design
1. Select Insert Design from the Draw menu - the Open dialog is given.
2. Select the required file from the list - a box is given.
3. If the file is not in the list, then use the File Selector to locate the file (See Using The File Selector
section in the Open section of the manual).
4. Use the box to place the design.
5. Press the LEFT mouse button.
6. To finish the option, press the RIGHT mouse button.
Browse Insert Design
This option allow previews of files to be seen before they are selected. Select Browse Insert Design in the
Draw menu, a dialog is given showing up to six previews. More files can be viewed by using the scroll bar.
By clicking on a preview and pressing OK, the selected file will be inserted.
The first time a preview of a design is drawn, a few moments can be taken due to the complexity of bead
designs.
The file type can be set by selecting the required type from the File Type drop down list. The number of
files can be reduced by entering the start of the filename in the box provided, i.e. b*.bmp, would list only
Bitmap files beginning with the letter b.
To change the folder, select the required folder from the list given on the left hand side.
Browsing Insert Design Files
1. Select Browse Insert Design from the Draw menu - the Open dialog is given.
2. Use Select Folder button to change folder if required.
3. Click on the required file's preview.
4. Select OK.
Easy Bead
Draw Menu • 37
Motif Menu
Draw
To use a motif from a library, select the Draw option from the Motif menu. This will give the Motif Browser
showing all the motifs, use the scroll bar to view more. When the pointer moves over a motif, tooltips will
appear giving the motif size and title. Set the Library and/or Category to view different libraries or
categories. Once the required motif has been selected then select OK to place it in the design.
The motif will then be drawn, continue placing copies as required. Should you not require to see the actual
area that is being placed then by pressing the Space Bar only the outline of the box is shown.
The area may also be rotated, reflected and scaled whilst being positioned by pressing the following keys:
T
R
J
Page Up
Page Down
To rotate the area anti-clockwise by 90 degrees
To mirror the area
To flip the area
To enlarge the area
To reduce the area
When enlarging/reducing an area, the scale is in integer amounts only.
To finish the option at any point, press the RIGHT mouse button.
The standard wildcard rules can be used to list all motifs containing specific words.
Typing Heart* in the Title drop down list will give all motifs beginning with Heart.
Typing *Heart in the Title drop down list will give all motifs ending with Heart.
Typing *Heart* in the Title drop down list will give all motifs which contain Heart.
Similarly these can be used within the Library or Category drop down lists to locate specific ones.
Add To Motif Pad allows motifs to be added to the motif pad that sits to the right of the design, use Motif
Pad in the View menu to have the pad visible. To place a motif from the pad into a design, select the
required motif and move the cursor to the position in the design and press the LEFT mouse button.
When a motif is drawn, it is automatically added to the Motif Pad, if the Automatically Add Used Motifs
is selected in the Motif Pad option from the View menu.
To use the selected motif to create a motif border, select the Shape button and then the required border
shape from the pop-up menu given. A cross-hair will be given, use this to place the shape; the position of
the motifs will be shown by boxes [see Draw menu for further information on drawing shapes]. In the case of
circles and ellipses Easy Bead will try to make them as symmetrical as possible, but for small shapes
though this will not always occur.
Selecting A Motif From The Motif Library
1. Select Draw from the Motif menu - the Draw dialog is given.
2. Set the Library and/or Category to the required values.
3. Select required motif.
4. Select OK.
5. Position the box by using the mouse.
6. Press the LEFT mouse button.
7. To place another copy repeat Nos. 4 and 5.
8. To finish the option, press the RIGHT mouse button.
38 • Motif Menu
Easy Bead
Adding Motifs To The Motif Pad
1. Select Draw from the Motif menu - the Draw dialog is given.
2. Alter the Library, Category, and Title settings to show the required motifs.
3. Select the Add To Motif button.
4. Repeat steps 2, 3 as required.
5. Select OK.
Placing A Motif Selected From The Motif Pad
1. Move the cursor to the required motif and press the LEFT mouse button.
2. Move the cursor to the position on the design for the motif and press the LEFT mouse button.
3. To finish the option, press the RIGHT mouse button.
Creating A Motif Border
1. Select Draw from the Motif menu - the Draw dialog is given.
2. Set the Library and/or Category to the required values.
3. Select required motif.
4. Select Shape - a pop-up menu is given.
5. Select the required shape - a cross-hair is given.
6. Place the shape.
7. To finish the option, press the RIGHT mouse button.
Edit Motif Library
The Edit Motif Library option allows motifs to be added or deleted and to edit their name/location. When
this option has been selected the Motif Browser dialog is given with the Add, Add Folder, Edit, Edit All,
Delete and Delete All options.
To Add a motif, it needs to exist as a motif file (.WSY). First select Add and the name from the list of motif
files from the Open dialog; the Add Motif to Library dialog is given, set the Library, Category and Title as
required and select OK.
To add multiple motifs, select Add Folder and the required folder, set the required Library and Category
and select OK. The program will then scan the selected folder for motifs and add them to the library using
the given Library and Category. The title for the motif will be the same as the motif’s filename.
To edit the Library, Category and Title entries for a motif, select the required motif and then the Edit
option, which will give a dialog where the changes can be made. When the required changes have been
made by typing in the new details, select OK. This can be used to change the location of a motif to a new or
different library/category.
To edit multiple motifs, alter Library, Category and Title to show the required motifs and select Edit All.
Enter the new Library and/or Category name as required and select OK.
To delete a motif from the library, select the required motif and then the Delete option, confirmation will be
requested before the motif is deleted to prevent accidental losses.
To delete multiple motifs, alter Library, Category and Title to show the required motifs and select Delete
All, confirmation will be requested before the motifs are deleted to prevent accidental losses.
Other options that are given are Close, to leave when finished making changes and Help.
The option to enter any new motif into a library will be offered when saving a motif by using the Save Motif
option from the Motif menu. Once the motif has been saved using the Save Motif option, the Add Motif to
Library dialog is given with the motif filename given as the Title.
Easy Bead
Motif Menu • 39
Adding A Motif To The Motif Library
1. Select Edit Motif Library from the Motif menu - the Edit Motif Library dialog is given.
2. Select Add button - the Open dialog is given.
3. Select the required motif file - the Add Motif To Library dialog is given.
4. Type in the required information.
5. Select OK.
6. Select Close to return to the design.
Adding Multiple Motifs To A Library
1. Select Edit Motif Library from the Motif menu - the Edit Motif Library dialog is given.
2. Select the Add Folder button - the Add Folder Of Motifs To Library dialog is given.
3. Select the required folder.
4. Enter the Library name for the motifs by typing or using the drop down list.
5. Enter the Category name for the motifs by typing or using the drop down list.
6. Select OK.
7. Select Close to return to the design.
Editing The Information About A Motif From The Motif Library
1. Select Edit Motif Library from the Motif menu - the Edit Motif Library dialog is given.
2. Select the required motif.
3. Select Edit button - the Edit Motif dialog is given.
4. Type in the new information as required.
5. Select OK.
6. Select Close to return to the design.
Editing The Information About Multiple Motifs From The Motif Library
1. Select Edit Motif Library from the Motif menu - the Edit Motif Library dialog is given.
2. Select the required motifs using the Library, Category and Title settings.
3. Select Edit All button - the Edit Multiple Motifs dialog is given.
4. Enter new Library name for the motifs by typing or using the drop down list as required.
5. Enter new Category name for the motifs by typing or using the drop down list as required.
6. Select OK.
7. Select Close to return to the design.
Deleting A Motif From The Motif Library
1.
2.
3.
4.
5.
Select Edit Motif Library from the Motif menu - the Edit Motif Library dialog is given.
Select the required motif.
Select Delete button - the Delete Motif dialog is given.
Select Yes.
Select Close to return to the design.
Deleting Multiple Motifs From The Motif Library
1. Select Edit Motif Library from the Motif menu - the Edit Motif Library dialog is given.
2. Select the required motifs using the Library, Category and Title settings.
3. Select Delete All button - the Delete Motif dialog is given.
4. Select Yes.
5. Select Close to return to the design.
40 • Motif Menu
Easy Bead
Save Motif
To save an area of the design as a motif, select Save Motif in the Motif menu, a cross-hair cursor will be
given. Move the cross-hair to one corner of the area to be saved. Then press and hold down the LEFT
mouse button and drag to the second corner. The name of the motif can be entered. Motif files are saved
with the extension WSY. Another dialog is then given where the Library, Category and Title information for
the motif's entry in the library should be entered.
This option can also be used without selecting the menu option, by moving the mouse to the first corner of
the area to be saved and pressing B.
To finish the option without saving the motif, press the RIGHT mouse button.
Saving A Motif
1. Select Save Motif from the Motif menu - a cross-hair cursor is given.
2. Press and hold down the LEFT mouse button whilst dragging to the second corner - a box is given.
3. Release the button when the box is the correct size - the Save As dialog is given.
4. Type in the Filename (See Rules For Naming Files When Saving).
5. Select OK - the Add Motif to Library dialog is given.
6. Enter the Library, Category and Title information as required.
7. Select OK.
8. To finish the option, press the RIGHT mouse button.
Or
1. Move the cursor to one corner of the area to be copied and press B - a box is given.
2. Set the size of the box by moving the mouse.
3. Press the LEFT mouse button - the Save As dialog is given.
4. Type in the Filename (See Rules For Naming Files When Saving).
5. Select OK.
6. Enter the Library, Category and Title information as required.
7. Select OK.
8. To finish the option, press the RIGHT mouse button.
Easy Bead
Motif Menu • 41
Palette Menu
Select Colour
Select Colour in the Palette menu allows a colour in the palette to be changed to one from the bead charts
or your own [see Setup Bead Charts for details on creating your own bead charts]. Choose the colour to be
changed and then the option. A dialog is given showing the charts and the current palette, use the tabs to
select the required chart - the top row of tabs select the manufacturer and the second row the chart. Select
the required colour from the chart by using the mouse or by typing the number in the edit box at the bottom.
To view more of the chart use the slider at the bottom. A small white box is displayed in the top left corner
of any colour that is in the current palette, if the colour is in the palette more than once it will be a red box.
The chart can be displayed in either Chart or Number Order, select the Sort Chart option and then the
required order.
To print the chart select the Print Chart option - the Print Chart dialog is given. Select the number of
Columns required. Select the required checkboxes for the items to print from Print Colour Boxes, Print
Colour Numbers, Print Colour Names, Print RGB Values, Print CSI Values. RGB are Red, Green and
Blue values; CSI are Colour, Saturation and Intensity values.
Other options that are given are OK, to continue, Cancel, to leave the option without selecting a colour and
Help.
If the colour is changed by using this option, then the corresponding name and number will be given, as well
as clearing the other manufacturers numbers.
If the chart is being displayed in a manufacturers approximations using the Colour Schemes option then
the other numbers will not be cleared.
Select Colour dialog
Changing A Colour In The Palette For Another Colour From The Bead Charts
1. Select the colour in the palette you wish to change.
2. Select Select Colour from the Palette menu - the Select Colour dialog is given.
3. Use the tabs to select the required bead chart.
4. Select the required colour by using the mouse or typing the manufacturers number in the edit box.
5. To view more of the chart, use the slider.
6. Select OK.
42 • Palette Menu
Easy Bead
Or
1.
2.
3.
4.
5.
6.
Select the colour in the palette you wish to change.
Select Select Colour button from the toolbar - the Select Colour dialog is given.
Use the tabs to select the required bead chart.
Select the required colour by using the mouse or typing the manufacturers number in the edit box.
To view more of the chart, use the slider.
Select OK.
Add Colours
This option will allow colours to be added from the bead charts to the current palette, thus increasing the
number of colours available. The maximum number of colours in a palette is 255. Once this option has been
selected in the Palette menu, select the required bead chart by using the tabs. Colours can be selected
from any of the bead charts and will be added to the same palette.
Colours can be selected by using the mouse or typing the required colour numbers in the edit box at the
bottom. Several colours can be selected by either method at one time. To view more of the chart use the
slider at the bottom. As the colours are selected they are shown at the bottom of the dialog.
Other options that are given are OK, to continue, Cancel, to leave the option without adding a colour and
Help.
Adding Colours To The Current Palette
1. Select Add Colours from the Palette menu - the Add Colours dialog is given.
2. Use the tabs to select the required bead chart.
3. Select the required colours by using the mouse or typing the manufacturers number in the edit box.
4. Colours can be selected from more than one chart by using the tabs.
5. To view more of a chart, use the slider.
6. Select OK.
Remove Colour
The Remove Colour option in the Palette menu will allow a single colour to be removed from the palette,
even if it is being used. Select the colour to be removed from the palette, then the option and the colour will
be removed from the palette. If the colour is used in the design a warning is given.
Removing A Colour From The Current Palette
1. Select the colour in the palette to be removed.
2. Select Remove Colour from the Palette menu.
Remove Unused Colours
By selecting this option any unused colours will be removed from the palette. Easy Bead will always leave at
least one colour in the palette even if no colours are in the design.
Removing Unused Colours From A Design
1. Select Remove Unused Colours from the Palette menu.
Palette
New
The New option allows you to create your own palette from any of the bead charts. To make your selection
see the Add Colours option above. If no colours are selected then the program will automatically put a
colour in the palette.
Easy Bead
Palette Menu • 43
Creating A New Palette
1. Select Palette from the Palette menu - a sub-menu is given.
2. Select New - the New Palette dialog is given.
3. Use the tabs to select the required bead chart.
4. Select the required colours by using the mouse or typing the manufacturers number in the edit box.
5. Colours can be selected from more than one chart by using the tabs.
6. To view more of a chart use the slider.
7. Select OK.
OK
Open
This option allows an existing palette to be loaded from disk. Select the Open option in the Palette submenu. Once this has been done, a list of existing palettes on the disk will be given from which one can be
selected.
Opening An Existing Palette
1. Select Palette from the Palette menu - a sub-menu is given.
2. Select Open - the Open dialog is given.
3. Select the required palette from the list.
4. If the file is not in the list, then use the File Selector to locate the file (See Using The File Selector in
the Open section of manual).
Save
The option Save in the Palette sub-menu allows the current palette to be saved to disk and will request the
name of the file before saving the palette.
Saving A Palette
1. Select Palette from the Palette menu - a sub-menu is given.
2. Select Save - the Save As dialog is given.
3. Type in the new Filename, or select the new (See Changing Folders and Rules For Naming Files
When Saving in the Open and Save sections of the manual).
manual
4. Select OK.
Make Default
This option saves the current palette as bead.dpl and uses this as the default palette for new designs.
Making The Current Palette The Default Palette
1. Select Palette from the Palette menu - a sub-menu is given.
2. Select Make Default.
Sort
Sort Palette in the Palette sub-menu will allow the palette to be sorted by the amount used, name,
manufacturer number or manufacturer chart order. When the option is selected the required sort order can
be chosen from the drop down list. If Number or Chart Order is selected and more than one bead range is
used, then a further dialog is given so the different ranges can be sorted.
Other options that are given are OK, to continue, Cancel, to leave the option without sorting the palette and
Help.
Changing Order Of The Palette
1. Select Palette from the Palette menu - a sub-menu is given.
2. Select Sort - the Sort dialog is given.
3. Select the required sort from the down list.
4. Select OK.
44 • Palette Menu
Easy Bead
Sorting A Palette With Colours From More Than One Range
1. Select Palette from the Palette menu - a sub-menu is given.
2. Select Sort - the Sort dialog is given.
3. Set the sort to either Number or Chart Order from the down list - the Sort Order dialog is given.
4. Change the range order by using Move Up or Down as required.
5. Select OK.
6. Select OK.
Refresh Colours
This option will adjust the colours in the palette to match the colours in a bead chart. This is useful if either
the bead chart has been updated or the colours in the design have been changed and need to be reset.
Once Refresh Colours has been selected from the Palette sub-menu select the required chart from the
drop down list.
Refreshing The Colours In A Palette
1.
2.
3.
4.
Select Palette from the Palette menu - a sub-menu is given.
Select Refresh Colours - the Refresh Colours dialog is given.
Select the required chart from the drop down list.
Select OK.
Symbols and Beads
The symbols and bead names that have been assigned by Easy Bead can be altered by using Symbols
and Beads in the Palette menu. This will bring up the list of colours, names and symbols used within the
current design for the beads. If the information does not fit on one screen then use the slider to see the rest.
To have the information for Current Colour or All Colours displayed select the required radio buttons.
To modify the names of the colours, select the required name by using the mouse and then its contents can
be changed. To modify the symbols being used, use the mouse to select the symbol you wish to change and
then the new symbol from the list of available symbols. The symbols that are highlighted in yellow are the
symbols that are currently in use, if a symbol is duplicated then it will be highlighted in red. The program will
assign symbols according to the brightness of the colour, the darker the colour a more solid symbol is used.
When Reassign Symbols is selected then a dialog is given, select the required checkboxes to have the
colour of the symbols changed automatically.
The program will avoid the use of very light symbols, which will stop very similar looking symbols for light
colours when they are printed in a small grid.
Other options that are given are OK, to save the changes, Cancel, to leave the option without saving the
changes and Help.
Changing All Colour Names And Symbols Used In The Design
1. Select Symbols and Beads from the Palette menu - the Symbols and Beads dialog is given.
2. Select which colours will be listed by using the radio buttons.
3. Select the required name's edit box and then it can be changed.
4. Select the symbol to be changed and then the new symbol from the given list.
5. Select Close when finished.
Reassigning Symbols
1. Select Symbols and Beads from the Palette menu - the Symbols and Beads dialog is given.
2. Select the Reassign Symbols button - the Reassign dialog is given.
Easy Bead
Palette Menu • 45
Symbols and Beads dialog
Define Colour
The Define Colour option allows a colour from the palette to be defined to any colour or shade required.
Select the colour to be defined from the palette and then select the option in the Palette menu or by
pressing Ctrl D.
When the option has been selected, the define colour screen is given. To the left are the basic colours
which helps when you start to define a colour. Next to that are the Hue (colour) range and the Luminosity
(intensity) range. Below that are the colour which is being defined and the Hue, Saturation and Luminosity
along with the Red, Green and Blue values. The colour which is being defined appears dithered and as a
solid colour, it will always appear dithered regardless of the type of monitor being used.
Define Colour dialog
The position of the colour in the Hue and Luminosity range is marked by a cross. Each colour has a Hue,
Saturation and Luminosity value. These values can be typed in, select the required box by using the
mouse. Once this has been done a cursor will appear inside the box and it’s contents can be changed.
46 • Palette Menu
Easy Bead
Colours can also be defined by moving the cross around the two ranges. The colour range gives the Hue
values starting from left to right (0-239) and the Saturation values from top to bottom (0-240). The
Saturation value is a measure of the strength, a higher value gives a stronger colour and a lower value
gives paler colour. The Luminosity value is a measure of the brightness, the range is shown from top to
bottom (0-240), a higher value gives a brighter colour and a lower value gives a darker colour.
The Custom Colours are supplied by Windows and not Easy Bead, so ignore these.
Once the colour has been defined, press OK to end the option. This will keep the new colour in the palette
while the program is still running, but will be lost when the program has been quit, unless the palette is
saved.
If the colour is changed by using this option, then the name and numbers will be cleared.
Defining A Colour
1. Select Define Colour from the Palette menu - the Windows Color dialog is given.
2. Choose a colour which is approximately correct from the Basic Colours given.
3. Set the colours by any of the following methods.
4. Move the cross within the "rainbow" area of colour and the Luminosity arrow by using the mouse.
5. Set the Hue, Saturation and Luminosity numerical values by typing in the new values in the edit box.
6. Set the Red, Green and Blue values by typing in the new values in the edit box.
7. Select OK.
Or
1.
2.
3.
4.
5.
6.
7.
Press Ctrl D - the Windows Color dialog is given.
Choose a colour which is approximately correct from the Basic Colours given.
Set the colours by any of the following methods.
Move the cross within the "rainbow" area of colour and the Luminosity arrow by using the mouse.
Set the Hue, Saturation and Luminosity numerical values by typing in the new values in the edit box.
Set the Red, Green and Blue values by typing in the new values in the edit box.
Select OK.
Setup
Edit Bead Charts
The Edit Bead Charts option allows the colours within a bead chart to be altered. After selecting the option
a dialog is given showing the charts, use the tabs to select the required chart. Select the required colour
from the chart by using the mouse, to view more of the chart use the slider at the bottom.
When the colour has been selected, values will appear in the Red, Blue, Green and Colour, Saturation,
Intensity boxes. Use the given spin buttons to change the required values. The Colour value indicates the
colour base; red is 0, green is 80 and blue is 160. The Saturation value is a measure of the colours
strength, a higher value gives a stronger colour and a lower value gives a paler colour. The Intensity value
is a measure of the colours brightness, a higher value gives a brighter colour and a lower value gives a
darker colour.
By doing a right click on a colour, this will activate a popup menu giving access to Cut, Copy, Paste and
Delete, and the following options.
Edit Names option will allow the number and description to be changed. Select the required edit box and
type in the new values. Also given are OK, to continue, Cancel, to leave the option without changing the
names and Help.
Add Colour will add a space below the current colour. Once the space has been added then the appropriate
colour can be obtained by using Define Colour.
Insert Colour will add a space above the current colour. Once the space has been added then the
appropriate colour can be obtained by using Define Colour.
Easy Bead
Palette Menu • 47
Define Colour option allows the colour to be defined, [see Define Colour in the Palette menu for more
details on defining colours].
Add Column Break option will add a column break below the current colour.
Insert Column Break option will add a column break above the current colour.
Remove Column Break option will delete the column break at the beginning of the current column.
Other options that are given in the Edit Bead Charts dialog are OK, to continue, Cancel, to leave the
option without editing a colour, Help, Save, to save edits on the current chart and Save All, to save all edits
on all charts.
Editing A Bead Chart
1.
2.
3.
4.
5.
6.
7.
8.
Also
1.
Select Edit Bead Charts from the Palette menu - the Bead Charts dialog is given.
Use the tabs to select the required bead chart.
Select the required colours by using the mouse.
Change the Colour, Saturation and Intensity values by using the spin buttons.
To view more of a chart, use the slider.
Colours can be edited from other charts by using the tabs to select the required chart.
Select Save to save changes in the current chart and Save All to save all changes made.
Select OK.
Do a right click on a colour to activate a popup menu giving access to various other options that can
be used to edit a bead chart.
Set Chart Preference
The Set Chart Preference option will allow your preference for which manufacturer ranges will be shown
first in the Bead Chart dialog. The default palette can also be selected from the given list of available
palettes.
Other options that are given are OK, to continue, Cancel, to leave the option without making any changes
and Help.
Setting The Manufacturer Preference
1. Select Set Chart Preference from the Palette menu - the Set Chart Preference dialog is given.
2. Select the required bead manufacturer from the list.
3. Select a palette to become the Default Palette if required.
4. Select OK.
48 • Palette Menu
Easy Bead
View Menu
Redraw
To redraw the current design, use the Redraw option in the View menu or by pressing W.
Redrawing The Design
1. Select Redraw from the View menu.
Or
1.
Press W.
Pan
This option allows you to move easily around the image, without changing the amount of grid displayed. If
selected by using Pan in the View menu, then a cross-hair cursor will appear. Move this to the required
centre of view and press the LEFT mouse button. The grid will be re-drawn with the selected position in the
centre of the screen. This can be repeated to move across the entire design; the Pan option will work whilst
carrying out other options.
Should the grid not re-display itself, or the selected position is not in the centre of the screen, then it means
the limits of the grid have been reached and no more panning can be made in that direction. To finish the
option press the RIGHT mouse button.
Panning can also be achieved by moving the cursor to the required centre of view and pressing A.
Moving Around A Design
1. Select Pan from the View menu - a cross-hair cursor is given.
2. Move the cross-hair to the required centre of view.
3. Press the LEFT mouse button.
4. Press the RIGHT mouse button to leave the option.
Or
1.
Move the cursor to the required centre of view and press A.
1.
Click and hold down the pointer on the current view rectangle on the design preview and drag to the
new position.
Or
Zoom
The grid can be enlarged as required to make viewing easier by selecting the Zoom option in the View
menu. A cross-hair cursor will appear, move this to one corner of the area to be enlarged. Then press and
hold down the LEFT mouse button and drag to the second corner. When this has been done the grid will be
redrawn to show this new area enlarged.
Alternatively the cursor can be moved to the first corner of the new area and the letter Z pressed.
To keep as much of the design on the screen as possible, the area shown may be slightly larger than
selected to use up empty display space.
To finish the option press the RIGHT mouse button.
Zooming Into An Area Of Design
1. Select Zoom from the View menu - a cross-hair cursor is given.
2. Move the cross-hair to one corner of the area to be enlarged, press and drag the LEFT mouse
button - a box is given.
3. Release the button when the box is the correct size.
Or
1.
2.
3.
Easy Bead
Move the cursor to the required position on the design and press Z - a box is given.
Set the size of the box by moving the mouse.
Press the LEFT mouse button.
View Menu • 49
Or
1.
2.
3.
Select the Zoom button from the toolbar - a cross-hair is given.
Move the cross-hair to one corner of the area to be enlarged, press and drag the LEFT mouse
button - a box is given.
Release the button when the box is the correct size.
Zoom In
A simpler method of zooming in on the grid is to use the + key or to select the Zoom In option in the View
menu. This will have the effect of zooming in by a small factor. The Zoom In option will work whilst carrying
out other options.
Zooming In By Small Amounts
1. Select Zoom In from the View menu.
Or
1.
Press the + key.
1.
Select the Zoom In button from the toolbar.
Or
Zoom Out
A simpler method of zooming out of the grid is to use the - key or to select the Zoom Out option in the View
menu. This will have the effect of zooming out by a small factor. The Zoom Out option will work whilst
carrying out other options.
If this results in the squares becoming too small then symbols will be drawn as solid blocks. If the squares
become very small then the grid will not be displayed.
Zooming Out By Small Amounts
1. Select Zoom Out from the View menu.
Or
1.
Press the - key.
1.
Select the Zoom Out button from the toolbar.
Or
Zoom Back
The Zoom Back option in the View menu will select the previous view area, also the < key can be used.
The Zoom Back option will work whilst carrying out other options.
If this results in the squares becoming too small then symbols will be drawn as solid blocks. If the squares
become very small then the grid will not be displayed.
Going To The Previous View Area
1. Select Zoom Back from the View menu.
Or
1.
Press the < key.
1.
Select the Zoom Back button from the toolbar.
Or
Zoom Forward
The Zoom Forward option in the View menu will select the next view area (if the Zoom Back option has
been performed), also the > key can be used. The Zoom Forward option will work whilst carrying out other
options.
50 • View Menu
Easy Bead
Going To The Next View Area
1. Select Zoom Forward from the View menu.
Or
1.
Press the > key.
1.
Select the Zoom Forward button from the toolbar.
Or
Full View
To re-display the grid at a size such that the entire grid can be seen, select the Full View option in the View
menu or by pressing the V key. Full View will work whilst carrying out other options.
If this results in the squares becoming too small then symbols will be drawn as solid blocks. If the squares
become very small then the grid will not be displayed.
Viewing All Of A Design
1. Select Full View from the View menu.
Or
1.
Press V.
Normal View
This option will set the zoom level so that the size of squares on screen is as similar as possible to that of
the actual size of the beads.
The size on screen can depend on resolution settings within Windows for the monitor and graphics card.
Viewing The Design At The Size It Will Be Threaded
1. Select Normal View from the View menu.
Or
1.
Select the Normal View button from the toolbar.
Bead Display
After selecting Bead Display in the View menu, the display type of the palette and design can be selected
from the appropriate drop down list. The choice of display types can be made from Beads, Blocks, Colour
Symbols, Black/White Symbols or Blocks with Symbols.
When the Palette Bead Display is set to symbols, then the Current Colour will be given as symbols.
If the colours are being dithered, it is not recommended to set the bead display to colour symbols or
symbols in colour blocks as they may be of poor quality.
The design bead display can also be changed by pressing X until the required type is shown.
Other options that are given are OK, to continue, Cancel, to leave the option without changing the bead
display and Help.
Changing The Bead Display
1. Select Bead Display from the View menu - the Bead Display dialog is given.
2. Select the type of bead display for the design and/or palette from the drop down list.
3. Select OK.
Or
1. Pressing X will toggle between the various bead displays for the design.
Easy Bead
View Menu • 51
Grid Colours
To change the Grid and Background colours select Grid Colours in the View menu. Grid Colours can be
selected from the appropriate drop down list. The choice of colours can be made from User defined, White,
Light Grey, Medium Grey, Dark Grey and Black. Background Colours can be selected from the
appropriate drop down list. The choice of colours can be made from User defined, White, Cream or Black.
By selecting the colour square a full range of colours is given to choose from.
Other options that are given are OK, to continue, Cancel, to leave the option without changing the colours
and Help.
Setting The Grid Colours
1. Select Grid Colours from the View menu.
2. Select the Grid colours from the drop down lists.
3. Select OK.
Setting The Background Colours
1. Select Grid Colours from the View menu.
2. Select the Background Colours from the drop down lists.
3. Select OK.
Grid
The grid can be turned on or off by selecting Grid On and Grid Off in the Grid sub-menu in the View menu.
By pressing the letter G, the display of the grid will toggle on and off. This can make the design clearer
when looking at a large area, or to see more clearly what the design will look like when sewn.
Turning The Grid On
1. Select Grid from the View menu - a sub-menu is given.
2. Select Grid On from the Grid sub-menu.
Or
1.
Pressing G will toggle between Grid On and Grid Off.
Turning The Grid Off
1. Select Grid from the View menu - a sub-menu is given.
2. Select Grid Off from the Grid sub-menu.
Or
1.
Pressing G will toggle between Grid On and Grid Off.
Ruler Settings
When Ruler Settings in the View menu is selected, a dialog is given with which changes can be made to
how the rulers are displayed. Use the given checkboxes to have the Rulers, Design Centre marks and/or
Guides shown on screen. The Measurements of the rulers can be set to Beads, Centimetres or Inches by
using the drop down list.
Other options that are given are OK, to continue, Cancel, to leave the option without making any changes
and Help.
Altering The Display Of The Rulers
1. Select Ruler Settings from the View menu - the Ruler Settings dialog is given.
2. Select the Show Rulers checkbox to cause the rulers to appear.
3. Select the Show Design Centre checkbox to cause the centre arrows to appear.
4. Select the Show Guides checkbox to cause any set guide lines to appear.
5. Select the Measurements drop down list to change the units of measurements displayed on the
rulers.
52 • View Menu
Easy Bead
Ruler Settings dialog
Motif Pad
Motif Pad in the View menu allows the settings for the Motif Pad to be altered. Select the given
checkboxes to Show Motif Pad or Automatically Add Used Motifs and use the given spin button to set
the Maximum Number of Motifs. The maximum number of motifs allowed is 100 but the default limit is 15,
when the limit is reached the oldest ones will be removed. If Automatically Add Used motifs is selected then
motifs selected from the library will automatically be added to the pad.
Showing The Motif Pad
1. Select Motif Pad from the View menu - the Motif Pad dialog is given.
2. Select Show Motif Toolbar checkbox.
3. Select Automatically Add Used Motifs checkbox.
4. Alter the Maximum Number of Motifs by using the spin button.
5. Select OK.
Toolbar List
To remove or reinstate a toolbar, select or deselect the required toolbar from the bottom of the View menu.
[See Toolbar Buttons in the Tools menu for details on selecting which buttons are displayed.]
Displaying A Toolbar
1. Select General Toolbar from the View menu. This will turn the display of the toolbar on or off.
Easy Bead
View Menu • 53
Tools Menu
Crop
Crop allows the grid to be reduced by removing unwanted areas from around the actual design. When the
option is selected by using Crop in the Tools menu, a cross-hair cursor will appear. Move the cursor to the
first corner of the area to be kept and press and hold the LEFT mouse button. A box will appear which can
be sized to cover the area to be kept, then release the LEFT mouse button.
This option can also be used without selecting the menu option, by moving the mouse to the first corner of
the area required and pressing O.
To leave the option at any point without making any changes, press the RIGHT mouse button.
Decreasing The Size Of The Design
1. Select Crop from the Tools menu - a cross-hair cursor is given.
2. Move the cross-hair to the first corner of the area to be kept.
3. Press and hold down the LEFT mouse button whilst dragging to the second corner - a box is given.
4. Release the button when the box is the correct size.
Or
1.
2.
3.
4.
Move the cross-hair to the first corner of the area to be kept.
Press O - a box is given.
Set the size of the box by moving the mouse.
Press the LEFT mouse button.
Extend
Extend allows the size of the grid to be increased to give additional space for the design. To use this option,
select Extend in the Tools menu or press the letter E. The number of squares to increase the grid size in
the given directions should then be set.
If a negative value is entered the design size will be reduced.
Other options that are given are OK, to continue, Cancel, to leave the option without extending the design
and Help.
Increasing The Size Of The Design
1.
2.
3.
Select Extend from the Tools menu.
Set the number of squares to increase the grid size in the given direction.
Select OK.
1.
2.
3.
Press E.
Set the number of squares to increase the grid size in the given direction.
Select OK.
Or
Insert/Delete Rows/Columns
Insert/Delete Rows/Columns option will allow extra space to be added or removed from within a design.
Once the option has been selected a cross-hair will be given, move the cursor to where the columns/rows
are to be inserted/deleted and press the LEFT mouse button. A dialog is given, on which select how many
rows or columns are to be Inserted or Deleted, by using the given radio buttons and spin buttons.
Inserted rows will appear above the selected square and columns will appear to the left of the selected
square. Deleted rows will start from the selected square and work down, and columns will start from the
selected square and work to the right.
Other options that are given are OK, to continue, Cancel, to leave the option and Help.
54 • Tools Menu
Easy Bead
Adding/Deleting Rows From The Design
1. Select Insert/Delete Rows/Columns from the Tools menu - a cross-hair cursor is given.
2. Move the cursor to where rows are to be added/deleted and press the LEFT mouse button - the
Insert/Delete Rows/Columns dialog is given.
3. Select Insert or Delete as appropriate.
4. Set the number of rows by using the spin button.
5. Select OK.
Adding/Deleting Columns From The Design
1. Select Insert/Delete Rows/Columns from the Tools menu - a cross-hair cursor is given.
2. Move the cursor to where columns are to be added/deleted and press the LEFT mouse button - the
Insert/Delete Rows/Columns dialog is given.
3. Select Insert or Delete as appropriate.
4. Set the number of columns by using the spin button.
5. Select OK.
Scale
The Scale option allows the design to be scaled to a different size. When the option is selected from the
Tools menu, the original design size is given. The scale factors can be set by using the spin buttons i.e. 1.5
means enlarge by 50%, then the new Height and Width values will be given, or the required Height and
Width values can be set by using the spin buttons. Select Keep the same aspect ratio to ensure that the
proportions of the design are preserved - this option ensures that the Width and Height scales are kept the
same.
Other options that are given are OK, to continue, Cancel, to leave the option without scaling the design and
Help.
Scaling A Design Up Or Down
1. Select Scale from the Tools menu.
2. Select Keep the same aspect ratio to ensure that the proportions of the design are preserved.
3. Set the Scale Factor by using the spin buttons or the new Height and Width.
4. Select OK.
Rotate/Reflect Design
Rotate/Reflect Design allows the whole design to be rotated by multiples of 90º and/or reflected
horizontally. When the option is selected by using Rotate/Reflect Design in the Tools menu, a dialog is
given. Select the required radio button to have the design rotated by 90, 180 or 270 degrees, to reflect a
design select the given checkbox.
Other options that are given are OK, to continue, Cancel, to leave the option without rotating or reflecting a
design and Help.
Rotating A Design
1. Select Rotate/Reflect Design from the Tools menu - the Rotate/Reflect Design dialog is given.
2. Select the 90º, 180º or 270º radio button.
3. Select OK.
Reflecting A Design
1. Select Rotate/Reflect Design from the Tools menu - the Rotate/Reflect Design dialog is given.
2. Select the Reflect checkbox.
3. Select OK.
Easy Bead
Tools Menu • 55
Centre Design
Centre Design in the Tools menu will centre the design within the grid area.
Centring The Design Within The Grid Area
1. Select Centre Design from the Tools menu.
2. Answer Yes when asked for confirmation.
Adjust Bead Grid
The Adjust Bead Grid option will allow the Width and Height of the beads to be changed independently.
Set the Width and Height of the beads by using the given spin buttons.
Other options that are given are OK, to continue, Cancel, to leave the option without changing the width
and height of the beads and Help.
Changing the Bead Width and Height Values
1. Select Adjust Bead Grid from the Tools menu.
2. Set the new Width and Height of the Bead size.
3. Select OK.
Show
The Show option will give details of the amount of each colour used in the design. Information is given on
the Design Size and Beads. This option is selected by Show in the Tools menu or by pressing the letter I.
Show dialog
Font will allow the font used in the Show option to be changed, this font change is independent of others.
To leave Show, select the Close button on any page and to print the information on a specific page, press
the Print button. The information can also be Copy to Clipboard by selecting the relevant button. The
Order of which the information appears can be sorted by selecting the required order from the drop down
list.
56 • Tools Menu
Easy Bead
Viewing The Design Statistics
1. Select Show from the Tools menu.
2. Use the tabs to select other pages.
3. Select Print to print a specific page.
4. Select Copy to Clipboard to copy a specific page to the Windows Clipboard.
5. Select OK to leave the option.
Or
1. Press I.
2. Use the tabs to select other pages.
3. Select Print to print a specific page.
4. Select Copy to Clipboard to copy a specific page to the Windows Clipboard.
5. Select OK to leave the option.
Altering The Font Used In The Show Option
1.
2.
3.
4.
5.
Select Show from the Tools menu - the Show dialog is given.
Select Font button - the standard Windows Font dialog is given.
Select the required font.
Select OK.
Select Close.
Options
The Easy Bead program can be configured to give your personal choice for some of the option settings in
the design. When Options in the Tools menu is selected, a list of options will be given. These options can
be selected by using the given buttons.
The Units of Measurements used within the program can be altered by using the drop down list. .
Show Area to Place will display the area being placed in the Insert Design, Copy, Move, Paste and Draw
Motif options. Use the checkbox to turn the option on and off, this option can also be used without selecting
the menu option by pressing the Space Bar when placing an area.
Undo will be turned on every time Easy Bead is run if the Undo On button is selected.
Undo Memory sets the maximum amount of memory in KB which the Undo option can use. When working
on large designs this will prevent the program from using too much memory. The normal setting is 4096KB,
for machines with low memory this value should be reduced to approximately half your memory. The
program will only use the memory as it is required.
If your computer has low memory, then the speed of the options may be reduced if the Undo option is on.
So by turning the Undo off, the time taken can be reduced.
When Remind to Save Design Every is selected then the program will popup a reminder to save the given
design. Use the given spin button to set the length of time between each reminder.
When Auto Backup is selected, the program will generate backup files of modified designs roughly every
five minutes, the default setting is on. If a crash occurs, then the next time Easy Bead is used it will ask if
the backup files should be loaded. Select Yes to do so, if No is selected the files are lost and cannot be
retrieved.
If there are a lot of designs in memory the program will save them in stages to prevent the program
slowing down.
The Working Folder gives the default folder for design files when the program is first run.
Easy Bead
Tools Menu • 57
The Alternate Printing uses a different method of sending information to the printer which can help if the
printer driver runs out of memory - although it can take more memory within the program - this should only
be used if problems occur during printing. The program scrolls in a smoother fashion (less screen redrawing)
when using the scroll bars. Due to the way this is implemented, to make it work at a reasonable speed, there
may be the occasional graphics card/driver which does not handle this properly, so the features can be
disabled by removing the tick from the Enable Smooth Scrolling checkbox.
The Scanning Method should only be changed if you are experiencing failures when scanning, select
Method 1 or Method 2 from the drop down list.
The Bead Size can be altered by using the given spin button to change the size, this can make the grid
standout and so create an easier chart to follow.
Other options are OK, to save the values given to file, this will have the result of giving these values
whenever the Easy Bead program is run. If the Cancel option is selected then no changes will be made and
the original values will still be used and Help.
Options dialog
Changing The Program Settings
1. Select Options from the Tools menu - the Options dialog is given.
2. Set the Units of Measurement by using the drop down list.
3. To have the Show Area to Place on, then select the given checkbox.
4. To have the Undo option working, then select the given checkbox.
5. To set the Undo Memory use the spin button.
6. To have the Remind to Save Design on, then select the given checkbox and set the time.
7. To have the Auto Backup on, then select the given checkbox.
8. To change the Working Folder, select the Working Folder edit box and type the required folder.
9. To have the Smooth Scrolling on, then select the given checkbox.
10. To change the Scanning Method, use the given drop down list.
11. To change the Bead Size, use the spin button.
12. Select OK.
58 • Tools Menu
Easy Bead
Toolbar Buttons
Once Toolbar Buttons in the Tools menu is selected, a dialog is given. Select the required toolbar by
selecting the given tab, then select or deselect the required options by using the given checkboxes.
Other options that are given are OK, to continue, Cancel, to leave the option without saving the changes
and Help.
Changing Which Options Appear On The Toolbars
1. Select Toolbar Buttons from the Tools menu - the Toolbar Buttons dialog is given.
2. Select the tab for the toolbar you wish to alter.
3. Select or de-select the checkboxes for the buttons you wish altering.
4. Select OK.
Easy Bead
Tools Menu • 59
Undo Menu
Undo
The Undo facility allows up to 100 options to be undone, this allows the edits made to the design to be
undone if a mistake has been made.
Undo Off
The Undo Off option will disable the Undo facility and prevent any more copies of the design from being
saved. This may be required due to the limits of memory when running the program from floppy disk.
Should you wish to make this the default option then the configuration for Easy Bead can be changed to
allow this.[See Options in the Tools menu for further information.]
Turning Undo Off
1. Select Undo Off from the Undo menu.
Undo On
The Undo On option will turn the Undo facility on. This is the default option for Easy Bead unless set
otherwise in the Options option. Up to a maximum of 100 options can be undone.
Turning Undo On
1. Select Undo On from the Undo menu.
Redo
The Redo option will undo the last undo. Up to 100 redoes can be made according to how many options
have been undone.
If any edits are made to the design, the Redo option will not be available.
If several options are undone in one go the Redo option will only go back one option each time it is
selected.
Redoing An Undone Option
1. Select Redo from the menu.
Or
1.
Select the Redo button from the toolbar.
List of Options that can be Undone
A list of options which can be undone is given at the end of the Undo menu. If more than 10 options have
been used then only the last 10 can be selected at any one time.
Selecting An Option To Be Undone
1.
Select the Undo menu, then the required option from the list given at the bottom of the menu.
1.
Select the Undo menu, then press the number corresponding to the required option.
1.
Select the Undo button from the toolbar and the last option will be undone.
Or
Or
60 • Undo Menu
Easy Bead
Window Menu
Cascade
This option will cascade all of the active designs.
Cascading Active Designs
1. Select Cascade from the Window menu.
Tile
This option will tile all of the active designs.
Tiling Active Designs
1. Select Tile from the Window menu.
View Designs
View Designs in the Windows menu allows the designs that are currently loaded and not minimised to be
compared side by side. When the option is selected a dialog is given, select how to display the designs by
using the Tile Vertically or Tile Horizontally radio buttons. The default settings is to have the designs
displayed in Full View mode, should you wish to change the Zoom of the design remove the tick from the
Full View checkbox. Select either Hide Rulers or Show Rulers radio button as required to have rulers
there or not.
Other options that are given are OK, to continue, Cancel, to leave the option without viewing the designs
and Help.
Viewing The Designs Which Are Currently Loaded
1. Select View Designs from the Windows menu - the View Designs dialog is given.
2. Select either Tile Vertically or Tile Horizontally radio button.
3. Select the required settings for rulers
4. Select OK.
Close All
This option will close all active designs, if changes have been made then Easy Bead will allow the design to
be saved.
Closing All Designs
1.
Select Close All from the Window menu.
Arrange Icons
This option can be used to arrange minimised designs.
List of Designs that can be selected
This lists the designs which are currently open, which can be used to switch between designs.
Switching Between Opened Designs
1. Select the Window menu, then the required file from the list given at the bottom of the menu.
Or
1.
Easy Bead
Select the Window menu, then press the number corresponding to the required file.
Window Menu • 61
Help
Help
The on-line help facility gives access to the manual on screen. Help can be selected either by selecting one
of the options below or alternatively if F1 is pressed, help will be given about the current option.
Getting Help
1. Select Help menu.
Or
1.
Press F1.
1.
Selecting the Help button on the dialogs.
Or
Contents
This option gives the contents page of the Easy Bead on-line help. From this page information on other
options can be found. This option can be selected by pressing F1.
Search for Help On
This option gives a list of the various pages within Easy Bead on-line help. Select the required page for
more details on that option.
How to Use Help
This option gives details on how to use the Windows on-line help facilities.
62 • Help
Easy Bead
Troubleshooting
Printing
Most printing problems that users have experienced with Easy Bead are related to incompatibility with older
printer drivers. These problems can be corrected by obtaining the latest driver from the printers
manufacturer. There should be no charge for this service. If there is then you should object as it is not the
common practice. The problems have manifested themselves in the following ways.
The program appears to be printing, but there is no printout produced, why?
An application error occurs while printing, why?
Why does the program takes a long time to print?
Check the printer driver, most problems occur when using drivers supplied with the printer. Try either
obtaining an update from the manufacturer or selecting a driver from the original Windows disks.
Why does the program takes a long time to print, especially an imported image?
Easy Bead needs to print a small bitmap or “picture” for every bead when printing symbols. This can take a
long while for large designs, graphics printing takes a lot longer than text printing. If the design is from an
imported image, then every square will initially have a bead. If the background colour is deleted then
printing and other functions may speed up.
When printing a design to my laser printer, only half of it appears, why?
This is normally a result of the amount of memory available in your printer. Laser printers use their memory
for a variety of tasks including fonts, buffers and the actual page being printed. If the printer does not have
enough memory to store all this then only part of a page may be printed. There are several things which
may help to solve this:
Print at a lower resolution
Print True Type fonts as graphics (normally set in the Print Setup option)
Print the design at a larger size and over several pages - this can simplify the information held in the printer
at any one time
Set the Print Margins so that less of the paper is used
Add more memory to your printer
Scanning
Many scanning problems can be corrected by obtaining an updated driver from the manufacturer. Some of
the common problems are:
When I select Acquire nothing happens, why?
Try the Select Source option to select which TWAIN driver to use.
When I select the Select Source option nothing happens, why?
This is normally caused by no 32 bit TWAIN driver being installed. Check the disks supplied with the
scanner for the appropriate driver or contact the manufacturer.
The program crashes when I try to scan, why?
A number of drivers appear to cause problems during scanning. Try obtaining the latest driver from the
manufacturer.
Failure to scan, why?
Set the Scanning Method in Options from the Tools menu to another method.
General
Colours in the palette and design area appear grainy, why?
Easy Bead
Troubleshooting • 63
If the monitor display is set to 16 colours then Windows will attempt to create additional colours by
combining its 16 basic colours. This results in a pattern of dots being displayed. If your graphics card and
monitor can support more colours, such as 256, then Easy Bead will automatically generate most, if not all,
of its colours as solid.
My images appear dark or “muddy” looking after importing, why?
Adjust the brightness and/or contrast levels when importing it into Easy Bead.
No grid appears when importing a design, why?
When Easy Bead first displays a design, it tries to show as much as possible. Many imported designs are
large, this means there is no room for the grid so it is automatically turned off. To see the grid, zoom into
the design by using either the Zoom or Zoom In options.
Matching to one thread chart when importing, does not give the other charts approximations?
Because colour matching can be subjective, Easy Bead does not assign numbers for charts it does not
directly match to. See Colour Conversions in the Symbols and Threads option in the Palette menu to
generate the other charts approximations.
Why does the program take a long time whilst editing an imported image?
When an image is imported into Easy Bead all of the squares are converted including the background. By
deleting the background colour, the program can speed up.
Usually the imported image is larger than the finished size. So by reducing the File Size when importing, the
program can speed up.
The program runs slowly and the hard disk light flashes a lot, why?
This is caused by low memory. Turning the Undo option off or changing the amount of memory used in the
Options option, will reduce the amount used.
Also having several designs open at once will use a lot of memory, so close any designs that you have
finished with.
64 • Troubleshooting
Easy Bead
Glossary of Terms
Backdrop
When an image is imported as a backdrop, the image is loaded at the back of the grid instead of being
converting into a design. Design work can be carried out on top of the image, which remains untouched.
BMP Files
BMP is a file format used by other Windows programs. It is identified by the file extension .BMP.
Box
The box is used in the editing options to show the program in which area of the design you wish the edit to
occur.
Button
The button allows commands to be performed, such as OK to finish a dialog or Cancel to finish without
saving any changes made.
Checkbox
This allows an option to be toggled on or off by clicking on the button. When on the box contains a tick when
off the box is empty.
Cross-Hair Cursor
Cross-hair is the large cross which appears on screen and is used to select the starting position of the box in
editing options. Place the intersect of the cross over the position you wish a corner of the box to appear.
Current Colour
This is the colour which will be used when adding stitches to the design. It is shown in the bottom left hand
corner of the screen.
Cursor
Cursor or mouse pointer is shown by the arrow on screen it is used to select the various options on screen.
Default
The default settings are the ones given and will be used unless you select another.
Define Colour
This will allow you to alter the colour, make it a bit darker, lighter or create a new colour should you wish.
Design Area
Design area refers to the grid on screen on which the design is made.
Dialog
Once an option is selected, a form may appear asking for information. It can contain spin buttons, drop
down lists, edit boxes and other items.
Drive
The drive specifies which disk is being used.
Drop Down List
By clicking on the arrow, a list of available choices will be given in the form of a list.
Edit Box
This is a box on screen where information is typed.
File Extension
The three letters that appear after the full stop in filenames is the file extension. This shows the format of
the file, which is set by the original program. For example WBD are Easy Bead designs, BMP are Windows
bitmaps.
File Format
The file format gives the information and how it is stored when the file is saved. Each format gives unique
information, for example Easy Bead design files store stitch, colour, name and symbol information.
Easy Bead
Glossary of Terms • 65
File Selector
The file selector is used to save or load files from various folders.
Folder
A folder is a location on the hard or floppy disk.
Flood Fill
Flood Fill fills a given area with the current colour. This option will fill an area until it reaches the boundary.
If the boundary has a gap then the flood fill will continue outside.
Function Key
Function keys are the F1, F2, F3 etc. keys which are on the keyboard, normally at the top.
Hue
The hue value of a colour shows it's position in the colour range (i.e. if it is a red or blue etc.). Permissible
values for this are between 0 and 239.
Import
To load a file created in another program is to import the file. A common use is to import images from a
scanner package or clipart. Example files are TIFF and BMP.
Intensity
The intensity value of a colour shows how bright the colour is. Permissible values for this are between 0 and
240. 0 is the lowest value which gives a dark colour and 240 is the highest value which gives a light colour.
JPEG Files
These files are normally used for scanned pictures and give a very high compression ratio. The
disadvantage is that some of the quality may be lost when it is saved, although this is not normally
noticeable.
Kodak Photo CD
This is a method developed by Kodak for storing photographs onto CD ROMS.
Luminosity
The luminosity value of a colour shows how intense the colour is (i.e. how bright). Permissible values for this
are between 0 and 240. 0 is the lowest value which gives a dark colour and 240 is the highest value which
gives a light colour.
Menu
The menus are given at the top of the screen and list all the options available in the program.
Mouse Grid Reference
The position of the cursor or mouse pointer is given by X-Y co-ordinates in the bottom right corner of the
screen. The co-ordinates start at the bottom left of the grid. The X is how many squares across and the Y is
how many up.
PCX Files
PCX is a file format used by other programs for example PC Paintbrush. It is identified by the file extension
.PCX.
PNG Files
this file format is intended to be a successor to GIF due to the licensing agreements imposed by UNISYS for
the use of the GIF method of compressing data.
Prompt Line
This is a line at the bottom of the screen which gives tips on the current option.
Radio Button
A radio button is the circle next to the choices and when it is selected a small black circle appears inside.
Only one radio button in a group can be selected at a time.
Redraw
Refreshes the screen so that changes made can be displayed correctly.
66 • Glossary of Terms
Easy Bead
Resolution
The resolution is a measure of the quality of the image. For cross stitch designs the resolution should be set
at 100 dots per inch. Any higher gives a better image but is wasted when converting to cross stitch.
Saturation
The saturation value of a colour shows how strong the colour is. Permissible values for this are between 0
and 240. 0 is the lowest value which gives a pale colour and 240 is the highest value which gives a deep
colour.
Slider
This can be either a horizontal or vertical bar with a button representing a position. The button can be
dragged to scroll through lists or other information.
Spin Button
A spin button when clicked up or down will increase or decrease the value given.
Status Line
This is a line at the bottom of the screen which gives information on the status of the program, for example
the current colour and mouse position.
Sub-Folder
A sub-folder is a folder inside a folder.
Sub-Menu
A sub-menu is a menu inside a menu.
Tab
Tabs allow the choice between several pages of information.
Targa Files
This file format is a common method of storing full colour scanned images.
TIFF Files
TIFF is a file format used by other programs for example scanning packages. It is identified by the file
extension .TIF. The LZW compression is not supported by Easy Bead.
User Definable Outline Shape
This allows an outline to be drawn around the area to be copied or moved, which is useful when copying or
moving intricate areas.
Windows Clipboard
The Windows Clipboard is a storage area where images and other information can be kept for use in other
programs. When Windows is shut down the clipboard is cleared.
Windows Print Dialog
This is the standard dialog given which allows you to specify which pages, how many copies and change
printer settings.
WMF Files
Windows Meta Files are vector based pictures and so can be scaled very easily without losing quality.
Working Folder
This is the current folder for loading and saving designs.
Easy Bead
Glossary of Terms • 67
Index
A
Acquire 21, 63
Add
Blend Colour 3
Colour 3, 43, 48
Adjust Image 13, 16–20, 16–20, 23
Angled Square 34, 36
Annotations
Copy/Move Settings 29
Arc 33, 36
Area
Centring 29
Clear Editing 30
Copying 25–26
Cutting 27
Edit Inside 29–30
Edit Outside 30
Moving 26
Reflecting Horizontally 28
Reflecting Vertically 28
Restore Editting 30
Showing To Place 57
Automatic
Backup 57
B
Backdrop
Brightness 24
Convert Also 19
Delete 23
Display 24
Positioning 22
Rotating/Reflecting 23
Backstitch
Copy/Move Settings 29
Backup Files 57
BMP
Exporting 7
Border 2, 8, 38
Use Motif To Draw Shape 38
Brightness
Backdrop 24
Browse
Design 6
C
Centre
Arrows 8, 52
Design 9, 56
In Area 29
Showing Design 52
Changing
Printers Used 11
Circle 32, 36
Clear Area 30
Close
All Designs 61
Design 6
Colour
Changing 29
Changing Printout 10
Deleting 29
Dithering When Converting 19
Important Colours When Converting 19, 20
Palette Error! Not a valid bookmark in entry on page 2
Removing Unused 43
Selecting 3, 42–43
Selecting Blend 3
Setting Template 52
Colour Schemes 42
Conversion Settings 15, 16–19
Convert
Image 13, 20, 37
Convert Image
Backdrop Also 19
Brightness 14, 20–21, 22, 24, 45, 47–48, 64
Convert An Area 18
Convert To 15
Design Size 17
De-speckle 14
Dithering Colours 19
Hints and Tips 20
68 • Index
Number Of Colours 18
Select Important Colours 19, 20
Sharpen 14, 23
Copy/Move Settings 29
Copying
Area 25–26
Copyright By 8, 11
Creating
New Palette 44
Crop 54
Cross Stitch
Copy/Move Settings 29
Curve 35
Cutting
Areas 27
D
Decreasing
Size Of Design 54
Default
Design Information 11
Palette 44
Define Colour 46, 47
Delete
Backdrop 23
Colour 29
Deleting
Motif From Motif Library 40
Design
Browsing 6
Closing 6
Closing All 61
Copying Areas 25–26
Cutting Areas 27
Decreasing Size 54
Default Information 11
Increasing Size 54
Information 7, 8, 11
Inserting Into Current Design 37
Moving Areas 26
Moving Around 49
New 5
Opening 5
Preview 3, 49
Previewing Printing 8
Reflecting/Rotating 55
Saving 7
Saving All 7
Saving As 6–7, 6–7
Showing Centre 52
Switching Between 61
Viewing All 61
Viewing Statistics 57
Diamond 32, 36
Dither Colours 19
Draw
Filled Shape 36
Motif 38
E
Edit
Inside 29–30
Motif Library 39
Outside 30
Ellipse 33, 36
Enhance
Dark Detail 17
Light Detail 17
Exit 12
Extend 54
F
Fill Style 36
Filled, Draw Shapes 36
Flip 25, 27–28, 37, 38
Flood Fill 36
Font
Changing Printout 11
Full View 51
G
Getting Help 62
Grid
Turning Off 52
Turning On 52
Easy Bead
Help 62
Hexagon 34, 36
Hints and Tips for Converting Images 20
Print Settings 8
Printout
Colour 10
Font 11
Setting Square Size 9
Tiling Over Several Pages 10
Printout Stitch Display 8, 9
Program Settings 58
I
R
Increasing Size Of Design 54
Information, Design 7, 8, 11
Insert
Design 37
Installation 1
Rectangle 32, 36, 49
Redo 60
Redraw 49
Reflecting
Area Horizontally 28
Area Vertically 28
Remove
Unused Colours 43
Resolution 8, 20–21, 22, 51, 63
Restore Area 30
Rotate/Reflect
Backdrop 23
Design 55
Ruler 2, 4, 52, 61
Settings 4, 52
Showing 52, 61
Guide For Page Order 10
H
K
Key
Order 8
Print Only 8
L
Leaving The Program 12
Line 31, 36
S
M
Margins, Printing 10
Mirror 25, 27, 28, 37, 38
Motif
Borders 38
Deleting Motif From Library 40
Draw 38
Edit Library 39
Editing Library 39
Pad 38, 53
Saving 39–41
Moving
Area Of Design 26
Around Design 49
N
New
Design 5
Normal View 4, 51
O
Octagon 35, 36
Open
Design 5
Palette 44
Options 58
Orientation Of The Page 7, 12
Overlap, When Tiling 10
P
Palette
Colour Error! Not a valid bookmark in entry on page 2
Creating New 44
Default 44
Opening 44
Saving 44
Selecting 16, 44–45
Sorting 44
Width 3
Pan 49
Pasting
Contents Of Windows Clipboard 27
PCX
Exporting 7
Pentagon 34, 36
Photograph 17, 20, 21
Preview
Design 3, 49
Printed Design 8
Print 4, 6–8, 7, 8, 11, 42, 56, 63–64
Key Only 8
Margins 10
Preview 8
Select Charts 16
Setup 11
Easy Bead
Saturation 14, 42, 46, 47–48
Save
All Designs 7
Design 7
Motif 39–41
Palette 44
Save As
Design 6–7, 6–7
Scale 55
Down 28
Factor 55
Up 28
Scanner, Selecting To Use 22
Screen Layout 2
Select
Blend Colour 3
Charts When Printing 16
Colour 3, 42–43
Palette 16, 44–45
Source 22
Selecting
Scanner To Be Used 22
Setting
Ruler 4, 52
Settings
Conversion 15, 16–19
Copy/Move 29
Program 58
Shading, When Tiling 10
Shape
Drawing Filled 36
Show 56
Area to Place 57
Design Centre 52
Rulers 52, 61
Sort Palette 44
Spray Size 18–19
Square 2–3, 22, 31, 33–35, 36, 54, 63
Star 35, 36
Stitch
Display 51
Stitched View 51
Tent 15
Toolbar 2, 4
Switching Between Opened Designs 61
Symbols and Threads 3, 64
T
Template
Colour 52
Tent Stitch 15
TIFF
Exporting 7
Tiling 10
Toolbar 4
Buttons 4, 53, 59
Stitch 2, 4
Triangle 33, 36
Index • 69
True Type Text 4
Turning
Grid Off 52
Grid On 52
U
Undo 4, 57, 60, 64
Selecting Option 60
Units of Measurements 17, 52, 57
User Definable
Outline Shape 26
Shapes 36
V
View
Design Statistics 57
Full 51
Normal 51
Redraw 49
Stitched View 51
View Designs 61
Z
Zoom 4, 8, 14, 18, 49–51, 61, 64
70 • Index
Easy Bead