1
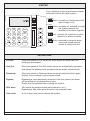
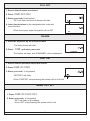
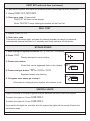
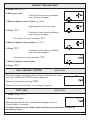
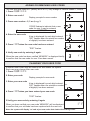
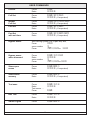
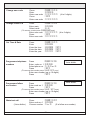
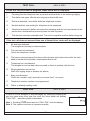
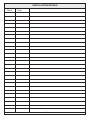
astec
Integrated Alarm System
USER GUIDE
020008599
CONTENTS
Full Set, Part Set and Disarm
Instant Full Set
3
3
Part Set with exit time
Bell Test
Bypassing zones
Switch Lights on/off
4
4
4
4
Bypass (24 hour) zones when system is unset
Testing zones / chime
5
5
Change time and date
6
'Call Central Station'
Test Call (for digital communicators:49D & 63D)
6
6
Adding or removing user codes
Changing your user code
7
7
Smoke Detector Operation
Mains failure
Alarm memory
8
8
8
User Commands
9
Changing telephone numbers (for voice diallers)
Test call (for voice diallers)
11
12
Installation Details
14
Copyright © 1997 ASTEC LTD. All rights reserved.
No part of this publication may be reproduced or transmitted in any form or by any means,
electronic or mechanical, for any purpose without the express written permission of ASTEC LTD.
ASTEC LTD. reserves the right to change the contents of this document, and the products
mentioned herein, without notice.
ASTEC LTD. makes no representations or warranties with respect to the contents hereof and
specifically disclaim any implied warranties of merchantability or fitness for any particular purpose.
There are patents pending to protect the design of the ASTEC system.
1
KEYPAD
Four indicators on the keypad communicate
information about the alarm system
POWER
POWER
Green: normally on, flashes when the
mains supply is off.
FAULT
ALARM
FAULT
CLEAR
INFRA
RED
1
2
3
PART
4
5
6
FULL
CONTACT
7
8
9
SET
SENSOR
VIEW
0
Fn
CLEAR
BYPASS
Yellow: normally off, switched on when
the system requires the
attention of an alarm engineer
ALARM
Red: normally off, switched on when
system is in alarm condition.
CLEAR
Green: switched on when all alarm
zones are closed and the
system is ready to be set.
DEFINITIONS
Full Set:
When the system is Full Set all the alarm zones are armed and the
building is unoccupied.
Part Set:
When the system is Part Set certain zones are automatically bypassed
(this allows the building to be occupied with perimeter zones armed).
Disarmed:
When the system is Disarmed alarm zones are switched off but panic
buttons, fire and tamper zones remain armed.
Bypass:
Bypassing a zone temporarily removes it from the system, the alarm
will not activate if a bypassed zone trips.
Zones may be bypassed when arming the system.
24hr zone:
24hr zones are always armed (safe protection, etc.).
Bypassing a 24hr zone gives access to the protected area.
User code:
A 4 to 6 digit code used to disarm the system.
2
FULL SET
1. Ensure that all zones are closed.
2. Press csf
3. Enter your code (if requested)
'SET' will flash and the exit buzzer will start.
SET
4. Leave the premises by the designated exit route and
close the door.
When the buzzer stops the system will be SET.
SET
DISARM
1. Enter the premises by the entry/exit route
The entry buzzer will start.
2. Press c and enter your code
DISARMED
The buzzer will stop, and 'DISARMED' will be displayed.
PART SET
1. Ensure that all perimeter zones are closed.
2. Press csp
3. Enter your code (if requested)
'PARTSET' will flash.
PARTSET
When 'PARTSET' stops flashing the system will be Part Set.
Instant FULL SET
To set the system silently and without exit time
1. Press csff
2. Enter your code (if requested)
'SET' will flash on the display
When 'SET' stops flashing the system will be Set.
3
PART SET with exit time (no buzzer)
To part set the system and leave the premises without disturbing the other occupants
1. Press cspp
2. Enter your code (if requested)
'PARTSET' will flash on the display
When 'PARTSET' stops flashing the system will be Part Set.
BELL TEST
1. Press cn9
2. Enter your code
This turns on the strobe light, activates the internal sounder for about five seconds,
activates the external sounder for 5 seconds and finally switches off the strobe.
BYPASS ZONES
1. Start arming the system and when SET or PARTSET is flashing.
2. Press b
BYPASS
ZONE
Display prompts for zone number
3. Press zone number
Zones that can be bypassed flash on the display
BYPASS
ZONE
INFRA RED
CONTACT
SENSOR
4. Press zone type button ior oor e
Bypassed zones stop flashing
5. To bypass more zones go to step 2
BYPASS
ZONE
INFRA RED
CONTACT
SENSOR
Otherwise do nothing and the system will continue to set.
SWITCH LIGHTS
Lights connected to the alarm system may be switched on and off from the keypad
To switch the lights on: Press cv3
To switch the lights off: Press cv3
If you switch the lights on and then arm the system the lights will be turned off when the
exit buzzer stops.
4
BYPASS (24 hour) ZONES WHEN SYSTEM IS UNSET
1. Press cnb
BYPASS
ZONE
2. Enter your code
Display prompts for zone number
3. Press zone number
Display flashes zones that can be
bypassed.
Zones that are already bypassed
appear steady.
BYPASS
ZONE
INFRA RED
CONTACT
SENSOR
4. Press ior o or e
Bypassed zones stop flashing
5. To bypass more zones press b and go to step 3.
BYPASS
'BYPASS' will flash as a reminder that zones are bypassed.
To "unbypass" zones repeat steps 1 to 4,
(zones that are not bypassed will flash on the display)
TESTING ZONES (CHIME)
1. Press cn6
2. Enter your code
ZONE
All alarm zones are in test
INFRA RED
CONTACT
SENSOR
TEST
3. Press zone number e.g. 2.
Zone 2 Contacts
Zone 2 Sensors and
Zone 2 Infrared are now in test
4. Press zone type button to focus test on a
particular zone e.g. o
5. Test zone
ZONE
ZONE
TEST
Buzzer will sound when contacts
on zone 2 are opened and closed.
6. Press c to terminate the test
5
INFRA RED
CONTACT
SENSOR
TEST
CONTACT
CHANGE TIME AND DATE
1. Press cn1
2. Enter your code
First digit of time flashes indicating
that it may be changed.
SET
3. Enter all digits of correct time e.g. 09 22
Digits appear as they are typed
4. Press s
SET
First digit of date flashes indicating
that it may be changed
If the date is correct just press s
DAT E
5. Enter all digits of correct date e.g. 25 12
SET
6. Press s
First digit of year flashes indicating
that it may be changed
If the year is correct just press s
DAT E
7. Enter all digits of correct year
SET
8. Press s
CALL CENTRAL STATION
(49D & 63D)
When the system is disarmed after an alarm the buzzer will sound
and 'CALL CENTRAL STATION' will be displayed.
CALL
CENTRAL STATION
Silence the buzzer by pressing c
Telephone your central station or monitoring company.
TEST CALL
(49D & 63D)
1. Press cn7
CENTRAL STATION
CONTACTED
2. Enter your code
When the test call has been completed the display will show
'Central Station Contacted'
Test calls should only be made on the instructions of your alarm installer or
monitoring centre.
6
ADDING OR REMOVING USER CODES
The user who has code no.1 (factory set to 4711) may change or remove codes 2, 3 and 4.
1. Press cn4
2. Enter user code 1
Display prompts for user number
3. Press user number - 2, 3 or 4, e.g. 3
'CODE' flashes to indicate that a new
code for user 3 may be entered
To remove a code press cc
CODE
now
4. Enter the new code
A bar is displayed for each digit entered.
'SET' flashes when the minimum number
of digits(4) has been entered.
CODE
SET
5. Press swhen the new code has been entered.
CODE
TEST
'TEST' flashes
MEMORY
6. Verify new code by entering it again.
When the new code has been verified 'MEMORY' is displayed briefly
to confirm that the new code for user 3 has been saved.
CHANGING YOUR USER CODE
4 different user codes may be used to set and disarm the system.
Each user may change their own code.
1. Press cn3
2. Enter your code
CODE
Display prompts for new code.
3. Enter your new code
A bar is displayed for each digit entered.
CODE
'SET' flashes when the minimum number
SET
of digits(4) has been entered.
4. Press swhen you have entered your new code
CODE
TEST
'TEST' flashes
5.Verify your new code by entering it again
MEMORY
When you have verified your new code 'MEMORY' will be displayed
to confirm that your old code has been replaced with the new one.
Note: the system will display 'no' and reject new codes that clash with existing codes.
7
SMOKE DETECTOR OPERATION
If a smoke detector alarm activation occurs when the system is disarmed the alarm keypad
will display the smoke detector's zone number and generate a warning tone.
ALARM
FIRE
If the CLEAR key is pressed within 30 seconds the buzzer will
stop and the system will not activate the alarm sounders.
ZONE
If the CLEAR key is NOT pressed within 30 seconds the alarm sounders will be switched
on and off at approximately 2 second intervals.
This feature is intended to reduce the incidence of nuisance alarms caused by cooking
fumes.
Smoke alarms occurring when the system is full set or part set will generate an immediate
full alarm.
MAINS FAILURE
Your system may be programmed to sound a warning buzzer if its
mains supply is disconnected.
Silence the buzzer by pressing
c
MAINS
ALARM MEMORY
The alarm memory is a 16 event log used to record alarm events and the time and date at
which they occurred.
The alarm memory is displayed automatically when the system is disarmed after an
activation.
Events are shown in the order in which they occurred.
To review the alarm memory when the panel is unset press cv2
panel requests it) enter your code.
and (if the
The first event in memory.
This example display shows that the
alarm was triggered by a door or
window contact on zone 2 at 23:57.
ALARM
MEMORY
ZONE
CONTACT
SET
The system was SET.
8
Time and date
are displayed here.
USER COMMANDS
Disarm
Press
Enter
c
CODE
Full Set
Press
Enter
csf
CODE (if requested)
Instant
Full Set
Press
Enter
csff
CODE (if requested)
Part Set
Press
Enter
csp
CODE (if requested)
Part Set
with exit time
Press
Enter
cspp
CODE (if requested)
Bypass zones
Start arming system (full or part set) and,
Press
b
zone number
?
Press
i,oor e
Bypass zones
when disarmed
Press
Enter
zone number
Press
cnb
CODE
?
i,oor e
Show open
zones
Press
Enter
cv1
CODE (if requested)
Show alarm
memory
Press
Enter
cv2
CODE (if requested)
Test zone
Press
Enter
Test zones .....
Press
cn6
CODE
c
Bell Test
Press
Enter
cn9
CODE
Switch Lights
Press
cv3
9
Change own code
Change Codes 2-4
Press
Enter
Enter new code
Press
Enter new code
cn3
CODE
??????
s
??????
Press
Enter main
Select code
cn4
CODE
2-4
(4 to 6 digits)
(To remove a code press cc now)
Enter new code
Press
Enter new code
??????
s
??????
Set Time & Date
Press
Enter
Enter the time
Enter the date
Enter the year
cn1
CODE
HHMM s
DDMM s
YYYY s
Programme telephone
numbers
Press
Enter code no. 1
Select phone no.
Press
cn8
CODE
1,2,3or 4
s
(4 to 6 digits)
Voice dialler
(To remove the number press bs now)
Enter new number (up to 16 digits)
Press
s
Programme follow
me number
Press
cn2
Enter code no. 1 CODE
Press
s
Voice dialler
(To remove the number press b s now)
Enter new number (up to 16 digits)
Press
s
Make test call
(Voice dialler)
Press
cn7
Enter code no. 1 CODE
Choose number 1 to 5
(5 is follow me number)
10
CHANGING TELEPHONE NUMBERS
49DV & 63DV
The 49DV and 63DV have four main telephone numbers which may be changed as shown
below.
If the dialler has to make a call it will try telephone number 1 first and then numbers 2, 3
and 4 until the call is acknowledged, or six attempts have been made to each number.
1. Press cn8
2. Enter operator code 1
Display flashes centre bar to ask which
telephone number you want to change
3. Select the telephone number that you wish
to programme 1,2,3 or 4
If the telephone number has been
programmed it will be displayed.
4. Press s to enter a new telephone number
'SET' flashes on display indicating that
the new number may be entered.
SET
5. Enter the new number
Digits appear on display as they are
pressed
6. Press s
To save the number
SET
The telephone number will be displayed
Press v to display the number again
Press c to leave this
Remember to make a test call to a new telephone number
To delete a telephone number press sbs at step 4.
PROGRAMMING THE FOLLOW ME NUMBER
The follow me number is a temporary number which is cleared the next time the system is
disarmed.
When the follow me number is programmed the dialler will try it first.
To programme the follow me number:
Press cn2, enter your user code and continue from step 4 above.
11
PABX
If you have a PABX system, it may require a pause between the access number and the
telephone number.
A three second pause may be inserted in the number with the p button
Example: To programme 9 <pause> 6704202: press s9p6704202
The programmed telephone number will be displayed as: 9-P-6-7-0-4-2-0-2.
Note: If the 3 second pause is entered as the first digit of the telephone number the dialler
will dial without waiting for a dial tone which may be necessary on some PABX systems.
TEST CALL
If you do change a telephone number you should make a test call to it to check that the
number is correct and to familiarise the keyholder with the message and the procedure for
accepting a call.
Description of call for keyholder
When you answer the phone you may hear one or two beeps before the message.
The message will be followed by a tone.
When the tone stops press the star key on your phone twice.
The dialler will give a double beep to indicate that it heard the star keys, and hang up.
Note: If your system has been set up with two messages the test call will play the second
message after the first one has been acknowledged.
To make a test call:
1. Press cn7
2. Enter user code 1
The centre bar will flash requesting
which number to call
TEST
4. Type a number from 1 to 5 (5 is the 'follow me' number)
The number will be displayed and
the dialler will make the call
TEST
The progress and result codes that the dialler displays during and after a test call are
listed overleaf.
12
TEST CALL
49DV & 63DV
As the test call proceeds the progress codes below will be displayed.
c-
Checking that the telephone line is present and that there is no incoming ringing.
c1
The dialler has gone offhook and is trying to detect dial tone.
c2
Dial tone detected, now dialler dials the telephone number.
c3
Number dialled, now waiting for telephone to be answered.
c4
Telephone answered, dialler now plays the message and the tone and waits for the
person who answered the phone to press the star key twice.
c5
The star key has been pressed twice. The call is complete and the dialler hangs up.
If the test call does not succeed then one of these failure codes will be displayed.
f1
No dial tone detected
The telephone line may be disconnected.
f2
The call was not answered
Check the telephone number
f3
The person who answered the phone did not press star button twice after the tone.
Make sure that the keyholder understands what to do.
f4
Telephone line not detected
The telephone line has been disconnected or there is problem with the line.
f5
Ringing detected on the line
Wait until ringing stops or answer the phone.
f6
Busy tone detected
Check the number, ring it manually to ensure that it is correct
f7
Telephone number number not programmed
f8
Dialler is already making a call.
CALL FAIL
49DV & 63DV
If none of its call attempts is acknowledged (by someone pressing the
star key twice when they hear the tone) the voice dialler will display
"CALL FAIL" when the system is disarmed.
Note 1. Pressing c twice removes "CALL FAIL" from the display.
Note 2. The system continues to operate normally.
13
CALL
INSTALLATION DETAILS
Zone
Type
14
Installation
company:
Telephone: