1
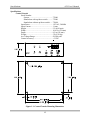
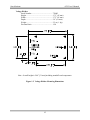
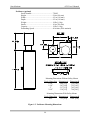
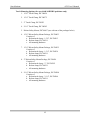
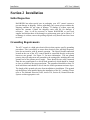
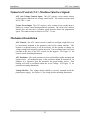
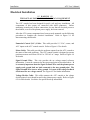
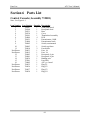
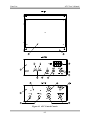
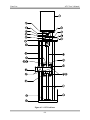
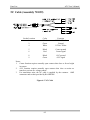
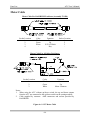
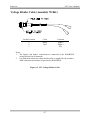
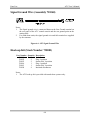
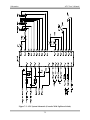
ATC User’s Manual
ATC
Automatic Torch Height Control System
Revision 7
5/16/07
Manual Part Number 718006
455 Fleming Road
Charleston, SC 29412 USA
(800) 252-2850 – Toll free
(843) 795-4286 – Phone
(843) 795-8931 – Fax
www.kaliburn.net
This page intentionally left blank
ATC User’s Manual
Limited Warranty
KALIBURN expressly warrants that this product shall be free from defects in
materials and workmanship, under proper and normal use for the intended
function of such equipment, for a period of one (1) year. This product is intended
for commercial use and is not intended for personal, family, or household
purposes. There are no warranties which extend beyond the description on the
face hereof. All other warranties, either expressed or implied, including any
implied warranty of merchantability or fitness for any particular purpose,
are expressly excluded.
If this product or any component thereof is determined to be defective in
manufacture, KALIBURN will repair or replace the defective component or
product. The buyer’s remedies are limited to the return of the product for repair
or replacement of any non-conforming product or part at the sole discretion of
KALIBURN. No freight charges of any kind are covered under this warranty.
All returned goods shall be at the buyer’s risk and expense. Beyond this remedy,
KALIBURN will not be responsible for any special, incidental or consequential
damages or injury to the person or property of anyone by reason of any defect in
any equipment sold hereunder.
Returned Goods Procedure
KALIBURN utilizes a returned goods procedure which must be followed before
returning any items for repair, replacement, or restocking. This means that a
returned goods authorization number must be obtained prior to shipment to
KALIBURN. It will be necessary for the customer to provide a description, along
with the stock number and serial number, if applicable, of the item to be returned.
In no case will a returned shipment be accepted by KALIBURN without the
proper returned goods authorization number.
ATC User’s Manual
TABLE OF CONTENTS
Section 1 Specifications .........…........................................................................... 1-1
System Description ............................................................................................................... 1-1
Safety .................................................................................................................................... 1-1
System Components ............................................................................................................. 1-1
Specifications ........................................................................................................................ 1-2
Features ................................................................................................................................. 1-6
Section 2 Installation ............................................................................................. 2-1
Initial Inspection ................................................................................................................... 2-1
Grounding Requirements ...................................................................................................... 2-1
System Interconnection ......................................................................................................... 2-2
Numerical Control (N.C.) Machine Interface Signals .......................................................... 2-3
Mechanical Installation ......................................................................................................... 2-3
Electrical Installation ............................................................................................................ 2-4
Voltage Divider Installation - General .................................................................................. 2-5
KALIBURN SR-45i Voltage Divider Installation ................................................................2-6
KALIBURN SR-100i Voltage Divider Installation .............................................................. 2-7
Preliminary Test .................................................................................................................... 2-8
Section 3 Operation ................................................................................................ 3-1
Operating Controls ................................................................................................................ 3-1
LED Functions ...................................................................................................................... 3-1
Pre-Cut Setup ........................................................................................................................ 3-2
Cut Quality ............................................................................................................................ 3-3
Section 4 Troubleshooting ..................................................................................4-1
Voltage Divider Check-Out .................................................................................................. 4-3
Section 5 Maintenance ..........................................................................................5-1
General .................................................................................................................................. 5-1
ATC Control Console ........................................................................................................... 5-1
ATC Positioner ..................................................................................................................... 5-2
Section 6 Parts List ................................................................................................. 6-1
Control Console .................................................................................................................... 6-1
Positioner (Optional) ............................................................................................................. 6-3
NC Cable ............................................................................................................................... 6-5
Motor Cable .......................................................................................................................... 6-6
Voltage Divider Cable .......................................................................................................... 6-7
Signal Ground Wire .............................................................................................................. 6-8
Hook-up Kit .......................................................................................................................... 6-8
ATC User’s Manual
Section 7 Schematics ............................................................................................. 7-1
Illustrations
Figure 1-1
Figure 1-2
Figure 1-3
Figure 2-1
Figure 3-1
Figure 6-1
Figure 6-2
Figure 6-3
Figure 6-4
Figure 6-5
Figure 6-6
Figure 7-1
Figure 7-2
Figure 7-3
Figure 7-4
Control Console Mounting Dimensions ....................................................... 1-2
Voltage Divider Mounting Dimensions ........................................................ 1-3
Positioner Mounting Dimensions ................................................................. 1-4
System Interconnection Diagram .................................................................. 2-2
ATC Control Console ................................................................................... 3-2
ATC Control Console ................................................................................... 6-2
ATC Positioner ............................................................................................. 6-4
NC Cable ....................................................................................................... 6-5
ATC Motor Cable ......................................................................................... 6-6
ATC Voltage Divider Cable ......................................................................... 6-7
ATC Signal Ground Wire ............................................................................. 6-8
ATC I/O Schematic (Consoles With Up/Down Switch) .............................. 7-1
ATC System Schematic (Consoles With Up/Down Switch) ........................ 7-2
ATC I/O Schematic (Consoles Without Up/Down Switch) ......................... 7-3
ATC System Schematic (Consoles Without Up/Down Switch) ................... 7-4
This page intentionally left blank
Specifications
ATC User’s Manual
Section 1 Specifications
System Description
The ATC torch height control system has been designed to provide arc voltage
control capabilities to any plasma system. The ATC is available in three
configurations; 1) as a complete system including torch positioner, 2) as a standalone arc voltage control excluding torch positioner and up/down switch, and 3) as a
stand-alone arc voltage control with up/down switch and excluding torch positioner.
When a torch positioner not manufactured by KALIBURN is used, it is imperative
that the positioner has good braking action to eliminate any potential oscillation
problem since a full speed up or down output is generated when the designed arc
voltage deadband is exceeded.
Safety
Installation, as well as repairs, made to the ATC System should only be performed by
qualified personnel. The ATC System makes use of both A.C. and D.C. circuitry for
operation. Remember, 115VAC can be fatal if not handled in a safe manner. In
addition, it will be necessary to make connections to the D.C. output of the plasma
power supply. These voltages can be in excess of 300 volts. Fatal shock hazard
does exist. Exercise extreme caution while working in these areas. Please refer to
the plasma power supply manufacturer’s operating manual for additional
information.
Various other safety hazards exist while operating a plasma arc cutting system.
Please see the plasma power supply manufacturer’s operating manual for information
on eye, skin, and hearing protection, as well as other information required to safely
operate the equipment.
ATC System Components
The ATC System consists of the following components:
•
•
•
•
•
•
•
•
ATC Control Console
ATC Voltage Divider
System Manual
ATC Torch Positioner (complete systems only)
Torch Clamp (complete systems only)
Interface Cables (complete system only)
Hook-up Kit (stand-alone systems only – see Section 6 for details)
Torch Safety Mount (optional)
1-1
Specifications
ATC User’s Manual
Specifications
Control Console
Stock Number
System ..................................................... 732001
Stand-alone with up/down switch ........... 732001
Stand-alone without up/down switch ...... 730010
Input Power ................................................... 115VAC, 50/60Hz
Input Current ................................................. 1 Amp
Height ............................................................ 3.5 in (89 mm)
Width ............................................................ 10.63 in (270 mm)
Depth ............................................................. 8.5 in (216 mm)
Weight ........................................................... 5 lb (2.26 kg)
Arc Voltage Range ........................................ 50-200 volts
Control Accuracy .......................................... + 3VDC
ATC
Figure 1-1 Control Console Mounting Dimensions
1-2
Specifications
ATC User’s Manual
Voltage Divider
Stock Number ............................................... 730003
Height ............................................................ 1.75” (45 mm)
Width ............................................................ 3.75” (95 mm)
Depth ............................................................. 2.4” (61 mm)
Weight ........................................................... 2.5 oz (.1 kg)
Division Ratio ............................................... 1:20
Note: Overall height is 2.00” [51 mm] including standoffs and components.
Figure 1-2 Voltage Divider Mounting Dimensions
1-3
Specifications
ATC User’s Manual
Positioner (optional)
Stock Number ............................................... 730015
Height ............................................................24 in (610 mm)
Width ............................................................ 4.5 in (114 mm)
Depth ............................................................. 4.5 in (114 mm)
Weight ........................................................... 18 lb (8.1 kg)
Stroke ............................................................ 10 in (254 mm)
Capacity ........................................................ 18 lb (8.1 kg)
Positioning Speed ......................................... 40 in/min (1016 mm/min)
Mounting Dimensions Without Safety Mount
Torch Clamp Size Dimension A Dimension B
1-3/8”
4.86 [123]
7.39 [188]
1-3/4”
5.07 [129]
7.55 [192]
2”
5.17 [131]
7.65 [194]
2-1/4”
5.30 [135]
7.90 [201]
Mounting Dimensions With Safety Mount
Torch Clamp Size Dimension A Dimension B
ALL
7.53 [191]
10.01 [254]
Figure 1-3 Positioner Mounting Dimensions
1-4
Specifications
ATC User’s Manual
Torch Mounting Options (for use with KALIBURN positioner only)
1. 1-3/8” Torch Clamp, PN 700024
2. 1-3/4” Torch Clamp, PN 700275
3. 2” Torch Clamp, PN 700223
4. 2-1/4” Torch Clamp, PN 700285
5. Relcon Safety Mount, PN 700017 (use with one of the packages below)
6. 1-3/8” Relcon Safety Mount Package, PN 700033
Consists of:
a. Relcon/torch clamp – 1-3/8”, PN 700213
b. Relcon clamp, PN 700211
c. All mounting hardware
7. 1-3/4” Relcon Safety Mount Package, PN 700235
Consists of:
a. Relcon/torch clamp – 1-3/4”, PN 700234
b. Relcon clamp, PN 700211
c. All mounting hardware
8. 2” Relcon Safety Mount Package, PN 700034
Consists of:
a. Relcon/torch clamp – 2”, PN 700212
b. Relcon clamp, PN 700211
c. All mounting hardware
9. 2-1/4” Relcon Safety Mount Package, PN 700290
Consists of:
a. Relcon/torch clamp – 2-1/4”, PN 700266
b. Relcon clamp, PN 700211
c. All mounting hardware
1-5
Specifications
ATC User’s Manual
Features
Arc Voltage Control (AVC): During the plasma cutting process, the ATC provides
arc voltage control to maintain the proper torch height. The desired arc voltage may
be adjusted with the thumbwheel switch during the cut if necessary, as well as prior
to starting the cut. The arc voltage can be adjusted in 5 volt increments.
Corner Height Freeze: This feature allows the arc voltage control to be disabled
while cutting. It is used to prevent the torch from diving into the workpiece during
corners or to deactivate the control at any given time during cutting.
AVC Delay: An adjustable 0-6 second AVC delay (pierce delay) potentiometer has
been provided on the front panel of the ATC control. This allows the operator to vary
the time at which the arc voltage control activates after arc transfer and is normally
used when initially piercing thick plates that requires the torch to be stationary for a
given length of time.
Limit: This feature automatically terminates arc voltage control when the actual arc
voltage exceeds the set voltage by 12 volts. This prevents the torch from hitting the
workpiece when crossing a kerf or running off the edge of a plate.
1-6
Installation
ATC User’s Manual
Section 2 Installation
Initial Inspection
KALIBURN has taken special care in packaging your ATC control system to
prevent damage in shipping. Before unpacking your system, please examine the
shipping container for any signs of damage. If damage is evident, open and
inspect the contents. Contact the shipping carrier and file for damages if
necessary. Next, it will be necessary to contact KALIBURN or your local
supplier and inform them of the damage so replacement parts can be ordered. If
no damage is evident, remove the packing slip and verify that all items have been
received.
Grounding Requirements
The ATC console is a high gain electrical device that requires specific grounding
procedures. This is necessary to ensure that electrical noise and high frequency
noise do not interfere with its normal operation. The Signal Ground connection
located on the rear of the ATC control should be connected directly to the point
known as star ground. See Figure 3-1 for more information. The star ground
point is where all subsystems are grounded to the cutting table, including the work
ground lead of the plasma power supply. There should be one cable connected
from the star ground point to a driven earth ground rod, which should be located
as close as possible to the star ground point. The ground rod should be at least 3/4
inch in diameter and should be driven into the earth's permanent moisture layer.
The length of this ground rod varies from installation to installation. This ground
rod should have been installed during the installation of the N.C. machine. Please
refer to The National Electrical Code, Article 250, Section H, Ground Electrode
System or other appropriate code.
2-1
Installation
ATC User’s Manual
System Interconnection
The ATC system interconnection diagram, Figure 2-1, will assist you in
identifying components and cables upon receipt of your system.
ATC
Figure 2-1 System Interconnection Diagram
2-2
Installation
ATC User’s Manual
Numerical Control (N.C.) Machine Interface Signals
AVC (Arc Voltage Control) Input: The ATC requires a relay contact closure
on this input to enable the arc voltage control mode. The contacts must be rated
for 18 VDC, 1.5 mA.
Corner Freeze Input: The ATC requires a relay contact closure on this input to
disable arc voltage control during automatic operation. The corner relay contacts
should close any time the x/y machine speed decreases below the programmed
speed. The contacts must be rated for 18 VDC, 1.5 mA.
Mechanical Installation
ATC Console: The ATC control console’s small size and light weight allow it to
be conveniently mounted at the operator's panel of the cutting machine. This
location is required because it will be necessary for the operator to change arc
voltage settings and manually position the torch. Four mounting holes have been
provided in the base of the ATC console for this purpose. See Figure 1-1 for
control console mounting dimensions.
ATC Positioner: The torch positioner to be used should be rigidly mounted and
operate freely. All mechanical play of the positioner should be minimized. In
addition, it is imperative that the positioner has good braking action. Poor
braking will result in oscillation about the set arc voltage. See Figure 1-3 for
positioner mounting dimensions.
Voltage Divider: The voltage divider should be securely mounted inside the
plasma power supply. See Figure 1-2 for voltage divider mounting dimensions.
2-3
Installation
ATC User’s Manual
Electrical Installation
!!!! WARNING !!!!
TURN OFF ALL POWER BEFORE WORKING ON EQUIPMENT
The ATC console has been designed for quick, safe and easy installation. All
components of this system are connected with AMP connectors. Before
attempting to make any of these connections, be sure that all electrical power to
the machine, as well as the plasma power supply, has been removed.
After the ATC system components have been securely mounted, use the following
procedures to complete the electrical installation. Refer to Figure 2-1 for
interconnecting cable details.
Numerical Control (N.C.) Cable: This cable provides 115 VAC, corner, and
AVC inputs to the ATC control console. Refer to Figure 6-3 for details.
Motor Cable: This cable provides the up/down outputs from the ATC console to
the motor of the torch positioner. The ATC control console is designed to operate
positioner motors rated from 24VAC to 230VAC at 3 amps. Refer to Figure 6-4
for details.
Signal Ground Wire: This wire provides the arc voltage control reference
information. It must be connected to the star ground point as described above. It
is extremely important that the Signal Ground Wire and the plasma power
supply work ground lead are both connected to the star ground point. The
Signal Ground Wire is not a safety ground. It is part of the voltage feedback
circuit used for arc voltage control. See Figure 6-6 for further information.
Voltage Divider Cable: This cable connects the ATC console to the voltage
divider printed circuit board located in the plasma power supply. Refer to Figure
6-5 for cable details. See below for specific hook-up information.
2-4
Installation
ATC User’s Manual
Voltage Divider Installation - General
!!!! WARNING !!!!
TURN OFF ALL POWER BEFORE WORKING ON EQUIPMENT
The voltage divider connections to the plasma power supply are important. The
proper connection reduces high frequency noise picked up by the voltage divider.
The voltage divider provides a feedback signal that is derived from the actual
cutting arc voltage of the plasma power supply. The ATC control uses this
feedback signal to control the cutting height of the torch. The voltage divider
used in the ATC supplies a 20:1 signal. This simply means that a cutting voltage
of 100 volts results in a signal of 5 volts provided to the control.
The power supply positive (P.S.+) and power supply negative (P.S.-) connections
on the voltage divider should be connected to the proper output points of the
plasma power supply. In general, if the power supply used has a “chopper”
control, the connections will be made at the output of the power supply. If the
power supply used is a “drooping” type power supply and only has a diode
bridge, then the connections will be made directly to the diode bridge. The ATC
voltage divider cable connects to the signal positive (Sig.+) and signal negative
(Sig.-) connections on the voltage divider. The 20:1 feedback signal is sent to the
ATC control console via these two connection points.
Refer to the appropriate section for specific voltage divider installation for the
plasma system you are using. Voltage divider installation instructions are given
for the following plasma cutting systems:
•
•
KALIBURN SR-45i
KALIBURN SR-100i
2-5
Installation
ATC User’s Manual
KALIBURN SR-45i Voltage Divider Installation
!!! WARNING !!!!
TURN OFF ALL POWER BEFORE WORKING ON EQUIPMENT
1.
Remove the back panel of the SR-45i and drill four holes in the upper left
corner of the inside back panel for voltage divider installation. See Figure 12 for voltage divider mounting dimensions.
2.
Remove the paint around the lower left-hand voltage divider mounting hole.
This will provide a chassis ground point for the white ground wire on the
voltage divider.
3.
Install the voltage divider with the (4) 6-32 X 3/8” screws provided. Orient
the board so the white ground wire is on the left. Mount the white ground
wire under the stand-off leg where the paint was removed.
4.
Connect the black wire of the voltage divider cable marked Signal- to the
Signal- terminal on the voltage divider.
5.
Connect the red wire of the voltage divider cable marked Signal+ to the
Signal+ terminal on the voltage divider.
6.
Using the single conductor red wire provided, connect the voltage divider
terminal labeled P.S.+ (power supply positive) to the green connection plug
on the I/O board, position #1 (far right-hand side).
7.
Using the single conductor black wire provided, connect the voltage divider
terminal labeled P.S.- (power supply negative) to the green connection plug
on the I/O board, position #6 (This is counted from right to left, #1 being on
the far right).
8.
If the voltage divider cable supplied with the ATC has fast-on terminals on
the power supply end, it will have to be modified with a plug and strain
relief (part numbers 709022 & 709023) and four sockets (part number
709018). Cut off the four fast-on connectors and wire the plug as follows:
Signal- Pin 1
Signal+ Pin 4
Now connect the cable to the outside of the SR-45i at the P7 plug.
2-6
Installation
ATC User’s Manual
KALIBURN SR-100i Voltage Divider Installation
!!! WARNING !!!!
TURN OFF ALL POWER BEFORE WORKING ON EQUIPMENT
1.
Remove the back panel of the SR-100i and drill four holes in the upper left
corner of the inside back panel for voltage divider installation. See Figure 12 for voltage divider mounting dimensions.
2.
Remove the paint around the lower left-hand voltage divider mounting hole.
This will provide a chassis ground point for the white ground wire on the
voltage divider.
3.
Install the voltage divider with the (4) 6-32 X 3/8” screws provided. Orient
the board so the white ground wire is on the left. Mount the white ground
wire under the stand-off leg where the paint was removed.
4.
The SR-100i has a built-in wiring harness for a voltage divider. Each of the
wires has a label indicating where it is to be connected. Note that all of the
wires will not be used with the ATC height control. Connect the Signal+,
Signal-, P.S.+ and P.S.- wires to their respective terminals on the voltage
divider.
5.
If the voltage divider cable supplied with the ATC has fast-on terminals on
the power supply end, it will have to be modified with a plug and strain
relief (part numbers 709022 & 709023) and four sockets (part number
709018). Cut off the four fast-on connectors and wire the plug as follows:
Signal- Pin 1
Signal+ Pin 4
Now connect the cable to the outside of the SR-100i at the P7 plug.
2-7
Installation
ATC User’s Manual
Preliminary Test
After all of the wiring and interconnecting cables have been installed, the system
may be checked for proper operation. Please use the following procedure.
1. Make sure that all power to the plasma power supply is off.
2. Apply 115 VAC to the ATC console and verify that the front panel power
LED is illuminated.
3. Using the inch up/down switch, check the positioner for proper operation.
4. Place the auto/manual switch in auto.
5. Set the AVC delay potentiometer to minimum.
6. Set the voltage thumbwheel to 150.
7. Simulate an arc transfer by connecting pin 8 to pin 9 of the N.C. connector.
The torch should immediately begin to move up.
8. The system is now ready for operation.
2-8
Operation
ATC User’s Manual
Section 3 Operation
Operating Controls
AVC Delay Potentiometer: This potentiometer is used to delay arc voltage
control after the cutting arc has transferred to the workpiece. The delay time
begins when the plasma cutting arc is established and is adjustable from 0 to 6
seconds. See Figure 3-1.
AVC Auto/Manual Switch: When this switch is in the auto position, arc voltage
control is enabled, provided that no other function has the arc voltage control
mode disabled. When the switch is in the manual position, arc voltage control is
disabled. See Figure 3-1.
Arc Voltage Thumbwheel: This switch is used to set the desired arc voltage. It
is capable of adjusting the voltage from 50 to 200 volts in 5 volt increments. See
Figure 3-1.
Inch Up/Down Switch (optional): This switch provides manual control of the
torch positioner. See Figure 3-1.
LED Functions
Power (PWR): This LED is located on the front panel of the ATC console.
When illuminated, it is a visual indication the 115 VAC has been applied to the
console. See Figure 3-1.
Arc Voltage Control (AVC): The ATC system has two AVC LED’s. One is
located on the p.c. board inside the control console and is designated LED1. This
LED illuminates to indicate that the AVC input to the ATC system has been
activated. The other AVC LED is located on the front panel of the control
console. The front panel LED illuminates to indicate that the AVC delay timer
has elapsed and arc voltage control has been initiated. See Figure 3-1.
Up/Down: These LED’s are located on the front panel of the control console and
illuminate whenever there is an AVC output to move the torch up or down. See
Figure 3-1.
Corner: This LED is located on the p.c. board inside the control console and is
designated LED2. This LED illuminates to indicate that the corner height freeze
input to the ATC system has been activated. When illuminated, arc voltage
control mode is disabled. See Figure 3-1.
3-1
Operation
ATC User’s Manual
ATC
Figure 3-1 ATC Control Console
Pre-Cut Setup
Before making a cut with the ATC system, perform the following setup sequence
to ensure proper operation.
1.
Program the correct arc voltage for the material being cut. Refer to the
plasma power supply operation manual for cutting parameters.
2.
Place the Auto/Manual switch in the Auto position.
3.
Manually lower the torch to the correct pierce height.
4.
Set the AVC Delay potentiometer to minimum. If necessary, this can be
changed at a later time.
5.
Place the Auto/Manual switch in the Auto position.
6.
Manually lower the torch to the correct pierce height.
7.
Initiate a cycle start on the cnc machine.
8.
After the main arc transfers to the workpiece, the AVC LED on the front
panel should illuminate, indicating that the arc voltage control mode has
been activated.
9.
The AVC LED should remain illuminated throughout the cut, but should
momentarily extinguish in the corners indicating that the corner height
freeze input has been activated.
3-2
Operation
ATC User’s Manual
Cut Quality
Before the optimum cutting condition can be achieved on a particular material
type and thickness, the machine operator must have a thorough understanding of
the cutting characteristics of the plasma system. When the cut quality is not
satisfactory, the cutting current, speed, or torch height may need to be adjusted
until the proper cutting condition is obtained. The following guidelines should be
useful in determining which cutting parameter to adjust.
1. A positive cut angle (top dimension of piece smaller than the bottom
dimension) usually occurs when the torch standoff distance is too high, when
cutting too fast, or when excessive power is used to cut a given plate
thickness.
2. A negative cut angle (top dimension of piece larger than the bottom
dimension) usually occurs when the torch standoff distance is too low or when
the cutting speed is too slow.
3. Top dross usually occurs when the torch standoff distance is too high.
4. Bottom dross usually occurs when the cutting speed is either too slow (slowspeed dross) or too fast (high-speed dross). Low-speed dross is easily
removed, while high-speed dross usually requires grinding or chipping off.
5. Note that different material compositions have an effect on dross formation.
3-3
This page intentionally left blank
Troubleshooting
ATC User’s Manual
Section 4 Troubleshooting
The following chart lists general troubleshooting guidelines for the ATC system.
Please contact KALIBURN technical support for any issues not covered in this
section. Before any tests are performed, make sure the two system fuses are
good. Both fuses are located on the rear panel of the control console. Also check
the power (PWR) LED on the front panel of the control console.
Problem
No automatic voltage control (AVC)
while cutting
Possible Cause / Solution
1.
2.
3.
4.
5.
6.
No auto torch up, front panel AVC and
Up LED’s illuminated
1.
2.
3.
No auto torch down, front panel AVC
and Down LED’s illuminated
1.
2.
3.
3A motor fuse blown.
Manually raise and lower the torch with the
inch up/down switch on the control console to
verify that the positioner is operational.
Auto/manual switch is in the manual position.
Remove the top cover of the ATC control
console and apply 115 VAC to the system.
Lower the torch toward the workpiece,
activate the plasma, and verify that the AVC
LED (LED1) on the p.c. board illuminates. If
the LED does not illuminate, check the relay
that activates the AVC input. If the p.c. board
AVC LED does illuminate, verify that the
AVC LED on the front panel illuminates after
the AVC delay times out. If the Up or Down
LED’s illuminate but the positioner does not
move, replace relays Opto 1 and Opto 2 on the
p.c. board. If there is still no arc voltage
control, replace the p.c. board.
Verify that the corner LED (LED2) on the p.c.
board is illuminated only during a part’s
corner. If the corner LED is illuminated
continuously, check the corner output relay
from the numerical control. The contacts
should only be closed in corners. If the relay
contacts are working properly and the LED
remains on, disconnect the N.C. cable. If the
LED goes out, check the cable for shorts. If
the LED remains on, replace the p.c. board.
Faulty voltage divider. Perform the voltage
divider check-out found at the end of this
section.
Verify that the torch moves up with the ATC
inch up/down switch.
Remove the top cover of the ATC control
console and replace Opto 2 on the p.c. board.
Replace the ATC p.c. board.
Verify that the torch moves down with the
ATC inch up/down switch.
Remove the top cover of the ATC control
console and replace Opto 1 on the p.c. board.
Replace the ATC p.c. board.
4-1
Troubleshooting
ATC User’s Manual
Torch dipping in corners while cutting
1.
Remove the top cover of the ATC control
console. Program a 6” X 6” square. While
looking at the corner LED (LED2) on the p.c.
board, make a cut. In each of the corners, the
LED should momentarily illuminate. If the
LED does not illuminate, check the corner
height freeze relay in the numerical control.
The contacts should be normally open and
should close in the corners. If the relay is
working properly, check the N.C. cable for
open wires. If the cable is good, replace the
p.c. board. If the LED remains illuminated
during the cut and turns off in the corners, the
normally closed contacts in the numerical
control are being used and should be changed
to the normally open set of contacts.
Torch moves upward on main arc
transfer
1.
Check the Signal Ground connection to the
ATC control console. The Signal Ground
wire must be connected to the star ground on
the cutting table.
Faulty voltage divider. Perform the voltage
divider check-out found at the end of this
section.
Check the wiring between the voltage divider
and the ATC control console.
2.
3.
2.
3.
The relay contacts that activate the AVC input
are closed.
Replace Opto 2 on the p.c. board.
Replace the ATC p.c. board.
Torch moves downward when 115
VAC is applied
1.
2.
Replace Opto 1 on the p.c. board.
Replace the ATC p.c. board.
Arc voltage control is operational, but
the torch stand off distance is
extremely high
1.
2.
3.
4.
Thumbwheel voltage set too high.
Faulty voltage divider. Perform the voltage
divider check-out found at the end of this
section.
Replace the thumbwheel assembly.
Replace the ATC p.c. board.
1.
2.
Replace the AVC Delay potentiometer.
Replace the p.c. board.
Torch moves upward when 115 VAC is
applied
No arc voltage control delay
1.
4-2
Troubleshooting
ATC User’s Manual
Voltage Divider Check-Out
Perform the following steps to test the voltage divider for proper operation. Do
not connect a voltmeter to the power supply output until after the cutting arc
has transferred to the workpiece and the high frequency circuit has
deenergized. The high frequency arc starting circuit will destroy digital
voltmeters.
1.
Apply power to the ATC, cutting machine, and plasma power supply.
2.
Place the ATC Auto/Manual switch in the Manual position and manually
lower the torch to the proper cutting height.
3.
Program a 6” X 6” square and depress cycle start on the N.C. machine.
4.
After the cutting arc transfers to the workpiece, measure the d.c. voltage
between P.S.+ and P.S.- on the voltage divider p.c. board inside the plasma
power supply.
5.
Now verify that the d.c. voltage between Signal+ and Signal- is 1/20 of the
voltage measured between P.S.+ and P.S.-. For example, if you measured
150 VDC between P.S.+ and P.S.-, you should measure 7.5 VDC between
Signal+ and Signal-.
6.
If the voltage between P.S.+ and P.S.- was 0 VDC, check the connections
between the voltage divider and the power supply output. If the voltage
between P.S.+ and P.S.- was correct, but the voltage divider output is
incorrect, replace the voltage divider.
4-3
This page intentionally left blank
Maintenance
ATC User’s Manual
Section 5 Maintenance
General
The purpose of this section is to provide vital information concerning routine
maintenance and preventive maintenance procedures for the ATC console.
Because this system is solid state, the amount of care and required maintenance is
minimal. Remember, preventive maintenance procedures, as well as routine
maintenance, will never totally eliminate emergency service calls, but can and
will reduce the number of these calls. By beginning to use the procedures now
you will ensure that the equipment is always operating at its optimum.
ATC Control Console
1.
A visual check of the AMP connectors should be performed weekly. Ensure
that the connectors are properly installed and that none of the cables have
pulled out of the strain reliefs.
2.
A visual check of the Signal Ground should be made at the ATC control
console as well as at the star ground connection point on the cutting table.
Pay careful attention that the table connection is not corroded, which can
result in poor contact. If the connection is corroded, clean with a wire brush.
3.
While the torch is cutting, increase the thumbwheel setting by 5 volts. The
up LED should illuminate and the torch should move up.
4.
While the torch is cutting, decrease the thumbwheel setting by 5 volts. The
down LED should illuminate and the torch should move down.
5.
Set the AVC Delay potentiometer to mid-range and initiate a cycle start.
Approximately 3 seconds after arc transfer, the arc voltage control should
activate. Return the potentiometer to the previous setting.
5-1
Maintenance
ATC User’s Manual
ATC Positioner (optional)
1.
Use the inch up/down switch to move the positioner to the full up position.
2.
Disconnect 115 VAC from the ATC.
3.
Remove the positioner cover and blow out the inside of the positioner with
clean, dry compressed air.
4.
Lubricate all four track rods where the carriage bearings ride with a light
coat of WD-40, or equivalent.
5.
Lubricate the ball screw with a light coat of WD-40, or equivalent.
6.
Apply 115 VAC power to the ATC.
7.
Use the inch up/down switch to raise and lower the torch through several
cycles. While moving the torch up and down, verify that the movement is
smooth. If the positioner movement is not smooth, locate the cause and
make the necessary adjustments.
5-2
Parts List
ATC User’s Manual
Section 6 Parts List
Control Console (Assembly 732001)
Note: See Figure 6-1.
Item Number Part Number Quantity Description
1
700307
1
Front panel decal
2
700308
1
Rear panel decal
3
700331
1
Base
4
700330
1
Cover
5
708101
1
Thumbwheel assembly
6
704009
4
LED
7
701051
1
Potentiometer, 100K
8
710004
1
Potentiometer knob
9
708002
1
Switch, auto/manual
10
708003
1
Switch, up/down
11
709010
2
Fuse holder
Not Shown
709033
1
Fuse, 1A
Not Shown
709012
1
Fuse, 3A
12
709003
1
Receptacle, 9 pin
13
709001
2
Receptacle, 4 pin
14
709034
1
Binding post
15
707001
1
Line filter
16
730002
1
ATC p.c. board
Not Shown
709035
1
Plug, P1
Not Shown
709036
1
Plug, P2
Not Shown
709037
1
Plug, P3
Not Shown
709038
1
Plug, P4
6-1
Parts List
ATC User’s Manual
ATC
Figure 6-1 ATC Control Console
6-2
Parts List
ATC User’s Manual
Positioner (Assembly 730015) - Optional
Note: See Figure 6-2.
Item Number Part Number Quantity Description
1
700036
1
ATC motor
2
700022
1
Spring cap
3
710005
1
Brake washer
4
710008
1
Retaining ring
5
700012
1
Bearing housing
6
900332
1
Ball screw/bearing assembly
7
900319
4
Track bearing
8
900302
1
Carriage plate
9
900318
2
Eccentric journal
10
900320
2
3/8-24 lock nut
11
900314
4
Track rod
12
700207
1
Positioner cover
13
700305
1
Motor plate
14
710003
1
Spring
16
700306
1
Motor coupling
17
700011
1
Brake plate
18
710009
1
Bearing
19
900309
1
Top plate
20
900327
1
Bearing screw coupling
21
900317
1
Extrusion
22
900336
1
Screw shaft bushing
23
900321
2
1/4-28 lock nut
24
900323
2
Precision bolt
25
900313
1
Carriage adaptor
26
710023
2
3/8-16 X 1/2” set screw
27
700018
1
Ball screw nut
28
900310
2
Bearing clamp
29
900308
1
Bottom plate
Not Shown
700024
1
Torch clamp – 1-3/8”
Not Shown
700275
1
Torch clamp – 1-3/4”
Not Shown
700223
1
Torch clamp – 2”
Not Shown
700285
1
Torch clamp – 2-1/4”
Not Shown
700017
1
Relcon safety mount (optional)
Not Shown
700033
1
Relcon mounting package – 1-3/8”
Not Shown
700235
1
Relcon mounting package – 1-3/4”
Not Shown
700034
1
Relcon mounting package – 2”
Not Shown
700290
1
Relcon mounting package – 2-1/4”
6-3
Parts List
ATC User’s Manual
Figure 6-2 ATC Positioner
6-4
Parts List
ATC User’s Manual
NC Cable (Assembly 711059)
Socket Location
1
2
4
Color
Black
Green
White
Function
115VAC Black
Ground
115VAC White
5
6
Black
Red
Corner ground
Corner signal
8
9
Black
Green
AVC ground
AVC signal
Notes:
1. Corner function requires normally open contacts that close to freeze height
in corners.
2. AVC function requires normally open contacts that close on main arc
transfer to activate arc voltage control.
3. For stand-alone units, the NC cable is supplied by the customer. AMP
connectors and sockets provided by KALIBURN.
Figure 6-3 NC Cable
6-5
Parts List
ATC User’s Manual
Motor Cable
Motor Cable For KALIBURN Positioner (Assembly 711058)
Socket Location
1
2
3
4
Color
Black
Green
White
-
Function
Down
Up
115VAC Black
Key
Socket Location
1
2
3
-
Motor Cable For All Other Positioners
Socket Location
1
2
3
Color
Black
Green
White
Function
Down
Up
Motor Common
Notes:
1. When using the ATC without up/down switch, the up and down outputs
from the ATC are connected to the up/down switch on the cutting machine.
2. Cable supplied by customer. AMP connectors and sockets provided by
KALIBURN.
Figure 6-4 ATC Motor Cable
6-6
Parts List
ATC User’s Manual
Voltage Divider Cable (Assembly 711061)
Socket Location
1
4
3
Color
Black
Red
-
Function
Signal Signal +
Key
Notes:
1. The Signal+ and Signal- connections are connected to the KALIBURN
voltage divider fast-on terminals.
2. For stand-alone units, the voltage divider cable is supplied by the customer.
AMP connectors and sockets are provided by KALIBURN.
Figure 6-5 ATC Voltage Divider Cable
6-7
Parts List
ATC User’s Manual
Signal Ground Wire (Assembly 711060)
Notes:
1. The Signal ground wire is connected between the Star Ground terminal on
the rear panel of the ATC control console and the star ground point on the
cutting table.
2. For stand-alone units, the signal ground wire and fork terminal are supplied
by the customer.
Figure 6-6 ATC Signal Ground Wire
Hook-up Kit (Stock Number 730001)
Part Number Quantity Description
709018
15
Socket
709022
2
Plug, 4 position
709023
2
Strain relief, 4 position
709016
1
Plug, 9 position
709015
1
Strain relief, 9 position
709028
4
Insulated disconnects
Notes:
1. The ATC hook-up kit is provided with stand-alone systems only.
6-8
Schematics
ATC User’s Manual
Section 7 Schematics
Figure 7-1 ATC I/O Schematic (Consoles With Up/Down Switch)
7-1
Schematics
ATC User’s Manual
Figure 7-2 ATC System Schematic (Consoles With Up/Down Switch)
7-2
Schematics
ATC User’s Manual
Figure 7-3 ATC I/O Schematic (Consoles Without Up/Down Switch)
7-3
Schematics
ATC User’s Manual
Figure 7-4 ATC System Schematic (Consoles Without Up/Down Switch)
7-4