1
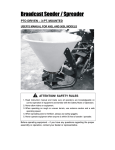
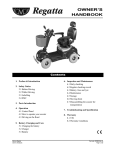
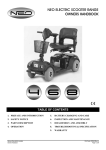
WIND TURBINE TOWER KIT
User’s Manual
Congratulations on your purchase of the XUNZEL Products Wind Turbine Tower Kit, Designed specifically for your
XUNZEL Products Wind Turbine. This guy-wire supported tower utilizes lightweight tubing while providing safety and
strength. Two people can easily erect this tower in about an hour. Because the wind generator and tower are
lightweight, no winches or vehicles are required for installation.
The tower includes a simple yet effective tower base and anchoring system, which eliminates the need for a concrete
base-pad. Depending on your soil conditions, cement may be necessary for proper anchoring. It is important to read
this manual first and understand your soil conditions before you begin construction.
Read this manual thoroughly before beginning assembly. XUNZEL Products Inc. assumes no responsibility for
inaccuracies or omissions. The user of this information and product assumes full responsibility and risk. All
specifications are subject to change without notice. If you have any questions on siting, proper installation or
operation, please contact XUNZEL Products Inc., or your dealer before installation.
Important Safety Instructions
Read these instructions in their entirety before installing your tower.
1) This manual contains important instructions that must be followed during installation and maintenance.
2) Read, understand and respect all warnings.
3) Obtain all required permits and engineering certifications for your tower and tower location.
4) Soil and wind conditions vary. Towers and tower foundations must be designed for your specific location.
5) Locate tower so as not to fall on occupied buildings, neighbors’ property or power lines.
6) Do not attempt to climb the tower. Tower climbing is very dangerous.
7) Locate the tower mounting mast well away from occupied buildings and power lines. A minimum of 300 ft (100 m)
is recommended.
8) If the wind generator sounds or appears loose, or if the tower is making an unusual sound, correct the condition
immediately. A loose wind generator or component will incur further damage and/or may fall from the tower.
9) Never stand in line with operating blades.
10) High voltage systems represent a dangerous shock hazard. All high voltage systems should be wired and
maintained by a qualified and licensed electrician.
11) Use protective gloves when handling guy wires.
12) Use protective gloves and safety glasses when working around batteries.
Safe Installation
It is very important to remember that any wind generator has high speed spinning parts and can be very dangerous!
Be sure that all bolted connections are tight and guy wire anchors are suitable for your soil conditions.
1) Two people must be present when the tower is raised. Have at least two people available during assembly and
erection of tower.
2) Always wear closed-toe shoes.
3) Always wear safety glasses.
4) Always wear protective gloves when handling cable.
5) Choose a calm day to install your tower.
XUNZEL Wind Turbine Tower Kit components (Images Not Shown to Scale)
Tower Base
Lower Guy Cable Wire: 21 ft (6.4 m)
Upper Guy Cable Wire: 30 ft (9.1 m)
Cable Clamps (16)
Guy Wire Attachment Plates
Cable Thimbles (8)
Arrowhead Earth Anchor
Tower Base Earth Spikes
Earth Anchor Driving Rod
Tower Tubes: (1) 42 in (1.0 m); (1) 48 in (1.2 m); (4) 72 in (1.8 m)
Selecting your site
The information in this section gives specifics about the ideal sitting of the Wind Turbine Tower, if your area does not
have an ideal location, find the best location possible. Remember correct sitting will increase both efficiency and
safety.
Small increases in average wind speeds result in dramatic increases in energy output of the wind generator. For
example, an increase in wind speed of 10% (9 mph - 10 mph; 4 m/s - 4.5 m/s) results in approximately a 30%
increase in the power available from the wind. Therefore, the better the location the better the performance. As a rule,
the wind generator should be mounted as high and as far away from obstructions as possible. This will create a clear
wind channel.
Two basic requirements for a good wind generator site:
• Good average wind speed
• Low wind turbulence
The lower the turbulence, the less stress your wind generator will sustain, the longer it will last and the more energy it
will produce. Turbulence is created by obstructions.
Keep the following in mind when considering siting:
• A tower immediately downwind of a building should be at least 20 ft (6.0 m) above the height of the building.
• The tower should be 20 ft (6.0 m) higher than any barrier within a 500 ft (152.4 m) radius.
Wind Speed
Your wind generator will produce energy when there is wind. A Photovoltaic (PV) solar panel will produce energy
when the solar is plentiful. This is typical of seasonal changes. When it is sunny it is calm; when it is cloudy it is windy.
For your wind generator to produce energy, average wind speed at your site should be at least 6mph:
6 miles/hour =2.68 meters/second.
If winds in your area are less than 6 mph, you might look to install a Photovoltaic (PV) system next to your wind
generator creating a hybrid renewable energy system.
Topography
If your location is basically flat, topography is not in issue when deciding where to place your wind generator.
There are circumstances where the highest land available may not be the best place for your wind generator. Highest
land nearby may be awkward to get to, may be too far away from where you need the power, or may expose
your wind generator to potentially damaging turbulent conditions. Time spent considering topography is vital prior to
installation.
Barriers
Barriers (buildings, trees, etc. that impede flow of wind) produce wakes that may extend far downwind of the barrier
and to a height considerably above the barrier. These wakes are areas of decreased wind speed and can
cause potentially damaging turbulence. Barriers near the wind generator will affect its performance.
Tower Base & Earth Anchor Layout
Remember your Wind Turbine Tower Kit should be installed by two people.
Tower Layout
The tower is assembled on the ground, then and only then, tilted into position. The tower base supports the tower on
the ground, and serves as the pivot point to raise and lower the tower. Two sets of guy wires (an upper and lower set
with four wires per set) secure the tower vertically:
• The upper set of guy wires secure the tower at a height of approximately 26 ft (8.0 m).
• The lower set of guy wires secure the tower at a height of approximately 15 ft (4.6 m).
Four arrowhead earth anchors (located approximately 15 ft (4.6 m) from the tower base at 90° intervals) secure the
guy wires to the ground. One upper guy wire and one lower guy wire attach to each earth anchor.
Tower Assembly – Hillside
If possible, position the tower to tilt along the incline of the hill, with the top of the tower uphill from the tower base.
This will add to the stability of the tower.
Tower Base
1. Locate the area where you will install the tower. Place the tower base on the ground and orientate in the direction
the tower will be tilted towards.
2. Have one person stand at the tower base holding a measuring tape.
3. The second person takes the measuring tape end and walks out 15 ft (4.6 m) and in a circle around the tower base.
• Make sure there are no obstructions along the circumference.
• Make sure there is sufficient room to tilt the tower into position and install the wind generator.
4. Drive the four tower base earth spikes into the ground toward the center of the base, as illustrated below.
Arrowhead earth anchors
1. Position the first earth anchor on the ground along the tower tilt axis, 15 ft (4.6 m) from the tower base.
2. Place the second earth anchor along the tower tilt axis, 15’ ft (4.6m) from the tower base in the opposite direction.
• With the tower base in the center, (4 places) 21.2 ft (6.6 m) the first and second earth anchors should form a straight
line 30 ft (9.2 m) along the tower tilt axis.
3. Place the third earth anchor 15 ft (4.6) from the tower base.
4. Place the fourth earth anchor 15 ft (4.6 m) from the tower base.
• With the tower base in the center, the third and fourth earth anchors should form a line perpendicular to the line
formed by the first two earth anchors
5. Check the position of the earth anchors to ensure that they are within approximately 6 in (15 cm) of their ideal
position.
• Each earth anchor should be 15 ft (4.6 m) from the tower base.
6. Insert the beveled end of the earth anchor driving rod into the arrowhead earth anchor, as illustrated below.
7. Drive the earth anchor up with force. You will notice the earth anchor pulling out of the ground into the ground using
the slightly. This will lock the earth anchor in the ground. earth anchor driving rod and a 10 kg hammer.
Note: No more than 12” inches (30 cm) of earth anchor cable should be out of the ground once it has been locked
into place.
• Notice the angle at which the earth anchor is being driven. This angle is important for maximum pull strength. The
angle should be in line with the angle of the guy wire (i.e. the angle should be pointing towards the tower base).
Important:
Earth anchors must be installed in soil that has been undisturbed.
8. Drive the earth anchor into the ground until 6” inches (15 cm) of cable remains above ground.
9. Then, insert the earth anchor driving rod through the cable eye and pull.
10. Finish installing the remaining three earth anchors as described above.
Important:
Although the earth anchor is designed to break through small rocks, if there is a rock or obstruction that is too large,
remove and relocate the anchor. The depth of the anchor is critical to its effectiveness.
Tower Assembly
The tower is assembled in several easy steps. If this is a permanent installation, first dig a trench from the base of the
tower, to where the battery is housed. This will assist in the laying of wire from your turbine to battery bank.
Tower Tube Layout
1. Lay out the six tower tubes on the ground as shown. Leave approximately 6” inches (15 cm) between each tube.
2. With the tubes laid out as shown on the preceding page, slide the guy wire attachment plates over the
corresponding tower tubes.
• Slide the 30 ft (9.1 m) guy wire attachment plate over the top tower tube.
• Slide the 21 ft (6.4 m) guy wire attachment plate over the fourth tower tube from the bottom.
3. Align the guy wire attachment plate so that each guy wire is in line with the anchors.
4. With all guy wire attachment plates in position, electrical wire can be run through the tower tubes. Leave sufficient
wire protruding at the top of the tower to connect the wind generator.
• Electrical wire can also be pulled through with a wire snake, after the tower tubes are assembled.
5. Join the tower tubes together using a soft-faced mallet or hammer. Use a piece of wood between the tube and the
mallet to protect the end of the tube.
• The expanded end of the tube prevents the guy wire attachment plate from sliding down the tube, and positions the
guy wire attachment plate at the correct height.
6. Secure the lower tube to the tower base with the M10 bolt and nyloc nut. Tighten the nut until it just contacts the
tower base.
Attaching the Guy Wires
1. Orientate guy wire attachment plates with their corners pointing towards the anchor. If they are not pointing towards
the anchor, adjust them before continuing.
2. Uncoil each guy wire bundle and extend them to their respective anchoring point. The fourth anchor point is directly
under the tower.
3. Begin attaching the guy wires to the earth anchors at the sides of the tower.
• Insert two cable thimbles in each earth anchor eyelet.
• Thread an upper guy wire and lower guy wire around its own cable thimble.
• Loosely attach two cable clamps to each guy wire.
4. Leave about 6” inches (15 cm) of slack in the guy wires, and tighten the cable clamps.
Note: The guy wire to the tower should contact the ‘saddle’ side of the cable clamp. On level ground, there will be
approximately 5 ft (1.5 m) of extra cable.
5. Attach two cable thimbles to the third earth anchor located directly below the tower.
6. Measure the length of the upper and lower guy wires on the side earth anchors. Use the same length for the guy
wires on the third earth anchor.
7. Secure the cable clamps to the third guy wire.
8. Place two cable thimbles on the fourth earth anchor. DO NOT connect the guy wires at this time.
9. The fourth set of guy wires are used to help tilt the tower into position. Secure these guy wires only after the tower
is upright.
It is important to remember during installation that guy wires must not become twisted, please take time to
ensure all wires are as straight as possible.
Raising the Tower
XUNZEL Products Inc. highly recommends first tilting the tower into position without the wind generator attached, to
verify proper installation and operation of the tower.
1. Before raising the tower, have another person ready to assist with installation.
2. One person should push the tower up into position. The other person should pull by the unattached upper guy wire.
With the tower off the ground a few feet, make sure that all the wires are coming up cleanly.
Adjusting the Guy Wires
If the guy wires are too tight they may cause the tower to bow as it is raised. If this happens, lower the tower to the
ground and reduce the tension on the guy wires.
• Check to see which wire(s) are too tight (the wires act in pairs).
• Release the tension on one of the wires by loosening the 2 cable clamps until the cable can be slid through them
• Let out some cable until there is no tension in the wire.
3. Retighten the cable clamps before raising the tower.
4. Once the tower is raised to vertical, attach the last guy wires to their anchor.
5. Walk a short distance from the tower and look to see that it is straight. A visual check is vital throughout the
installation process and can often speed up the process, by adjusting as you go.
6. Focus on the angle of the tower. Adjust the cables until the tower is straight up and down. Use a carpenter’s level
held against the tower for this check.
7. To adjust the angle of the tower, relax one guy wire and tighten the guy wire opposite to it. Repeat this process until
the tower is straight.
8. When the tower is straight, make sure that all cable clamps are tight.
9. After all the adjustments have been made, lower the tower.
Important: When the tower is lowered to install the wind generator, undo only the pull-side cables. When adjusting
the cables, NEVER loosen both sets of guy wires at the same time. When the tower is re-erected, only those pullside
cables will need to be readjusted.
Installing your XUNZEL Products Wind Turbine
Please refer to your XUNZEL Products Wind Turbine manual for assembly instructions.
Maintenance
There are no moving parts in the tower, so maintenance is minimal. However, as part of your annual maintenance,
XUNZEL Products, Inc. recommends that several areas are inspected to ensure long term integrity of your Wind
Turbine Tower Kit.
• Check guy wire condition. Inspect for wear and fraying at the guy wire to earth anchor connection points.
• Check guy wire tension. Guy wires should have uniform tension. Wires should be free of slack, but not overly taut.
• Check all bolts for tightness.
• Check cable clamps and pivot bolt.
• Check any unusual noises or vibrations. Investigate and correct as necessary.
Warranty:
This product is covered under a one year limited warranty. XUNZEL Products Inc. Warrants to the original purchaser that this product is free from
defects in materials and workmanship for the period of one year from date of purchase. To obtain warranty service please contact XUNZEL
Products for further instructions, at email [email protected] please note that proof of purchase including date, and expiration of complaint is
required for warranty service.
For more information or technical support
Pour plus d’information ou support technique
Para más información o soporte técnico
www.XUNZEL.com
[email protected]
MADE IN CHINA
FABRIQUÉ EN CHINE
HECHO EN CHINA
Tower2140121