1
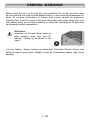
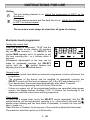
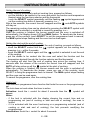
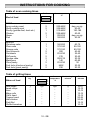
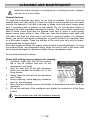
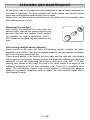
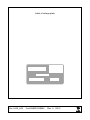
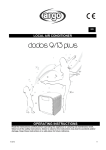
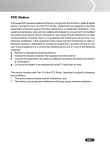
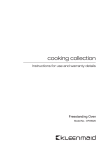
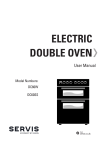
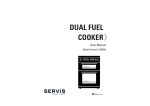
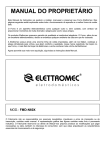
MULTIFUNCTIONAL OVEN
Instruction booklet for Installation - Use - Maintenance
Models: FBO-68
FBO-78
ENGLISH
Before leaving the factory, this appliance was tested and regulated by expert and
skilled personnel to give the best operating results. Any repair or regulation that
may subsequently be necessary must be carried out with the greatest care and
attention. For this reason, we recommend you always contact the Dealer you
bought the appliance from or our nearest Service Centre, specifying the type of
problem and the model of your appliance. Please remember as well that the
original spare parts are available only from our Technical Service Centres. Do not
leave the packaging unguarded, both for the safety of children and for the
protection of the environment, but dispose of it in a centre for differentiated waste.
The
symbol on the product or on the packaging means that the product must
not be considered as normal household refuse, but must be taken to the
appropriate collection point for the recycling of electric and electronic equipment.
The appropriate disposal of this product helps avoid potential negative
consequences on the environment and for health, which could be caused by
inappropriate disposal of the product. For more detailed information on the
recycling of this product, please contact your municipal offices, the local waste
disposal service or the store where the product was purchased.
This appliance complies with the following Directives:
-
2006/95/EC (low voltage equipment)
2004/108/EC (electromagnetic compatibility)
89/109/EC (articles intended to come into contact with foodstuffs)
2002/96/EC (WEEE).
2005/32/CE (EuP).
TABLE OF CONTENTS
General warnings
Instructions for use
Instructions for cooking
Cleaning and maintenance
Instructions for installation
Technical characteristic
Page
Page
Page
Page
Page
Page
1 - GB
2-3
4-7
8 - 10
11 - 13
14 - 15
16
GENERAL WARNINGS
Dear Customer,
Thank you for having chosen our product. This appliance is easy to use; before
installing it and using it however, you must read this booklet carefully. You will find
all the correct indications for the optimal installation, use and maintenance of the
product.
This product is intended for cooking and heating up food. Do not use it for any
other purposes.
!
It is very important to keep this instruction booklet together with the
appliance in the case that it is transferred to another person.
!
This appliance has been designed for non-professional domestic use. It
must be used by competent adults and therefore children must be kept
away from it and not play with it. During use, the accessible front parts
may become very hot. Watch over children and non-self-sufficient people
throughout use so that they do not touch the hot parts and are not near
the appliance when it is operating.
!
The product must be installed by competent and trained fitters, who are
familiar with the rules and regulations on installation currently in force.
The power supply cable of the appliance must not be replaced by the user. For
replacement, contact exclusively qualified personnel.
Never line the oven with sheets of aluminium foil, both not to close the holes and
not to alter the regular heat exchange, with consequent damage to the enamel.
!
IMPORTANT: the accessible parts can become very hot during use.
Children should be kept away from the appliance. Take care not to touch
the heating elements in the oven.
!
IMPORTANT: take care with the front part of the oven: hot air and steam
may come out of it.
2 - GB
GENERAL WARNINGS
Before using the oven for the first time, any protective film on the oven door must
be removed and the oven must be heated, empty, to the maximum temperature for
about 45 minutes (elimination of odours and smoke caused by production
residue).Then clean the inside of the oven thoroughly with soapy water and rinse
well without using an excessive quantity of water that otherwise could penetrate
and damage internal components.
!
Grill racks
Important: for the anti-tilting system to
work properly, insert first part “A”
holding it facing up as shown in the
figure.
For any repairs, always contact an authorized Technical Service Centre and
demand original spare parts. Repairs made by incompetent people may cause
damage.
3 - GB
INSTRUCTIONS FOR USE
The knobs of switch A and of thermostat B allow selecting the different functions of
the oven and choosing the different cooking temperatures most suitable for the
food to be cooked. In some models, the knobs are recessed; before making the
selection, you must press to make them appear and then press them again to
recess them.
When the oven is functioning, the light stays on.
B
A
Oven light
The oven light is on without any heating element (electrical resistance)
being activated.
Thawing
The back fan is on and, by moving the air in the oven, it helps rapidly thaw
out frozen food. No heating element is activated.
Traditional cooking
The upper and lower heating elements are on. The temperature can be
adjusted on the whole scale of the thermostat.
Convection cooking
The upper and lower heating elements and the back fan are on. The
temperature can be adjusted on the whole scale of the thermostat.
The lower heating element and the back fan are on. The temperature can
be adjusted on the whole scale of the thermostat.
The back heating element and the back fan are on. The temperature can
be adjusted on the whole scale of the thermostat.
4 - GB
INSTRUCTIONS FOR USE
Grilling
The grill heating element is on. Adjust the temperature to 200°C on the
thermostat.
The grill heating element and the back fan are on. Adjust the temperature
to 200°C on the thermostat.
The oven door must always be closed for all types of cooking.
Electronic touch programmer
Setting the current time
When the power is connected, “12:00” and the
symbol
flash on the display. By touching
any one of the controls (+, - or SELECT), the
symbol MAN appears and it is possible to set
the time, pressing the - or + buttons within 5
seconds.
Subsequent adjustments of the time can be
made by repeatedly touching the SELECT
symbol flashes and
control until the
adjusting the time as described above.
SELECT
General notes
− Setting the current time whilst an automatic programme is active will cancel the
programme.
− The loudness of the buzzer can be modified by repeatedly touching the
SELECT control until the level set appears (L1, L2 or L3) and pressing + or -.
− If not deactivated, the buzzer stops automatically after about 7 minutes.
− The maximum programming time is 23 hours 59 minutes.
− If there is a power cut, all the programmed settings are cancelled; when power
returns, the display flashes, showing 12:00. To restore the functioning of the
appliance, reset the current time and any programme.
Timer buzzer
To use it as a simple timer, touch the SELECT control repeatedly until the
symbol flashes, set the time desired, pressing + or -, after about 5 seconds the
symbol stops flashing and the time starts to decrease; to modify the time set or
zero it, press + or -.
When the time is finished, touch any one of the controls to deactivate the buzzer.
The maximum time that can be set is 99 minutes.
5 - GB
INSTRUCTIONS FOR USE
Setting the end of cooking
To start cooking immediately and set cooking time, proceed as follows:
− put the dishes to be cooked in the oven and select the function and temperature
desired using the functions selector and the thermostat
symbol appears and
− touch the SELECT symbol repeatedly until the flashing
set the cooking time within 5 seconds, pressing + or -.
and AUTO symbols
After a few seconds, the current time will reappear and the
will stay on.
The remaining cooking time can be checked by pressing the SELECT symbol until
symbol is selected, or modified or zeroed by pressing + or -.
the
When the cooking is finished, the buzzer sounds and the oven is switched off
automatically, the display shows 0.00 and MAN flashes. To deactivate the buzzer,
press any of the controls; touch SELECT to put the programmer back to manual,
the MAN symbol stops flashing and the oven can be used again.
Setting the start and the end of cooking
To programme both the starting time and the end of cooking, proceed as follows:
symbol appears, set the cooking time
− touch the SELECT control until the
pressing + or – within 5 seconds;
symbol is selected to set the end
− touch the SELECT control again until the
of the cooking.
− put the dishes to be cooked into the oven and select the function and the
temperature desired through the function selector and the thermostat.
The cooking will start from the end of cooking time minus the cooking time. 5
seconds after the release of the controls the current time will reappear and the
symbol at the start of cooking.
AUTO will stay active as will the
When the cooking is finished, the buzzer sounds and the oven is switched off
automatically. To deactivate the buzzer, press any one of the controls; touch
SELECT to bring the programmer back to manual. The MAN symbol stops flashing
and the oven can be used again.
To cancel the programme, zero the cooking time.
Safety lock
This electronic programmer has a function that locks the oven or the programmings
set.
The lock does not work when the timer is active.
symbol will
Activation: touch the + control for about 5 seconds then the
appear.
Notes:
− if the lock is activated with the display showing the current time and no
programming set (end of cooking or start and end of cooking), the oven is
locked
− if it is activated with the oven functioning or a programming selected (end of
cooking or start and end of cooking), the lock prevents modifying the
programmings.
Deactivation: touch the + control for about 5 seconds.
6 - GB
INSTRUCTIONS FOR USE
NOTE : in the case of a power cut, when the power returns, the lock will still be
active.
Thermostat light
This goes on every time the thermostat acts to stabilize the cooking temperature in
the oven and it goes off when the oven reaches the pre-set time.
Safety thermostat
This interrupts the power supply to avoid excessive overheating due to incorrect
use of the appliance or a possible defect of the components. If this device comes
into action due to incorrect use, you only have to wait for the oven to cool down
before you can use it again. However, if it is due to a defect of the components,
you must contact the Technical Assistance Service.
Cooling motor
Some ovens have a motor to cool the internal components. This device goes on
automatically however the oven is used.
7 - GB
INSTRUCTIONS FOR COOKING
ROASTING
For perfect roasting, the oven has to be pre-heated to the pre-set cooking
temperature. Only very fatty meat can be cooked with the oven starting from cold.
Never use shallow pans or the drip-tray as pans for roasts, to dirty the walls of the
oven as little as possible, avoid the fat splattering, the juices burning quickly and
smoke being produced.
Use deep pans, preferably made from terracotta, placed on the shelf about halfway up the oven.
The table shows you some examples of
thermostat settings and cooking times. The
cooking times can vary depending on the
nature of the foods, its evenness and
volume. We are certain that your experience
will soon suggest possible variations to the
values shown in the cooking times table.
Some practical advice to save energy
The oven can be switched off a few minutes before the end of cooking; the
remaining temperature will be sufficient to finish cooking. Open the door of the
oven as infrequently as possible; to check the degree of cooking, look through the
window (the oven light is always on).
General advice
The oven offers various types of heating
• traditional heating for roasting
• ventilated heating for baking cakes, biscuits etc.
If you choose ventilated heating, the best possible use should be made of its
advantage: to cook roasts and bake cakes on different shelves or to prepare
complete menus saving time and energy.
Ventilated heating
This function creates a continuous circulation of hot air that allows simultaneous
cooking on two shelves. The temperatures are below traditional ones.
Traditional heating
This is particularly suitable for roasting game and baking bread and sponge cakes.
It is a good rule to put the food to be cooked in the oven when it has reached the
cooking temperature, i.e. when the thermostat light goes off.
GRILLING
For grilling, the oven should be pre-heated for about 5 minutes. When grilling, the
heat comes from above and is based on the irradiation of infrared rays. It is
suitable for meat which is not very thick and toast. Meat and fish to be grilled
should be lightly brushed with oil and always placed on the shelf, which then slides
into the position nearer or further from the grilling element, in proportion to the
8 - GB
INSTRUCTIONS FOR COOKING
thickness of the meat; the table shown below gives some examples of cooking
times and the position of the food. The cooking times can vary according to the
nature of the food, its evenness and volume.
BAKING
The circulation of air in the oven ensures instantaneous and even distribution of the
heat. Pre-heating the oven is no longer necessary.
However, for more delicate baked goods, the oven can be pre-heated.
Several trays for baking can be placed in the oven, taking care not to use the first
shelf starting from the top. Other kinds of food (fish, meat etc.) can also be cooked
at the same time, without there being any transmission of flavour and smells.
This multiple cooking is possible because, although having different cooking times,
the cooking temperature of the different foods is the same.
COOKING AU GRATIN
This term refers to the change of the surface of food which is generally pre-cooked
and when placed in the oven, it becomes crisp and golden in appearance.
“Gnocchi alla romana”, “polenta pasticciata”, rice, lasagne, pasta and vegetables in
béchamel sauce are the typical dishes for this type of cooking.
THAWING
Thawing takes place as at room temperature with the advantage of being quicker.
The ten hours needed in the fridge are reduced to one hour for every kilo of meat.
Place the meat in its packaging on a plate. Put it into the oven.
COOKING TIMES
The table shows some examples of the thermostat setting and cooking time. The
cooking times can vary depending on the nature of the food, its evenness and its
volume. We are sure that your experience will soon suggest possible variations to
the values shown in the table.
Notes:
• For roasts of beef, veal, pork and turkey with bones or rolled roasts, increase
the times in the table by about 20 minutes.
• The indication in the table for the use of the shelves is the best one in the case
of cooking on several levels.
• The times described in the table refer to the cooking of one food only; for more
dishes, the cooking times have to be increased by 5-10 minutes.
9 - GB
INSTRUCTIONS FOR COOKING
Table of oven cooking times
Shelf no.
4
3
2
1
Kind of food
Oven temperature
°C
Time in minutes
FOOD
Long cooking roast
Short cooking roast
Poultry (guinea-fowl, duck etc.)
Chicken
Game
Fish
2
2
1
2
1
1
220-MAX
225-MAX
210-MAX
225-MAX
200-225
180-200
dep. on qty.
50-60
150-180
50-60
dep. on qty.
20-25
BAKING
Christmas cake
Plum-cake
Orange cake
Savoy biscuits
Croissants
Puff pastry
Sponge cake
Meringues
Chou pastry
Fruit tarts (shortcrust pastry)
Fruit tarts (yeast pastry)
1
1
1
2
2
2
2
1
2
2
2
160-200
170-180
170-180
200
215-230
215
200-215
140
215-230
MAX
230
60-70
90-100
80-100
40-45
35-40
30-40
30-35
60-80
30
30-35
20-30
Table of grilling times
Nature of food
Veal chops
Lamb chops
Liver
Mince rolls
Calf’s heart
Trussed roast
Half-chicken
Fish fillet
Stuffed tomatoes
Quantity
Kg
Shelf no.
1
“
“
“
“
“
-
3-4
“
“
“
“
“
“
“
“
4
3
2
1
10 - GB
Oven
temperature
°C
Pre-heating in
minutes
200
“
“
“
“
“
“
“
“
5
“
“
“
“
“
“
“
“
Time in
minutes
8-10
12-15
10-12
12-15
12-15
20-25
20-25
12-15
10-12
CLEANING AND MAINTENANCE
!
Important: before carrying out maintenance or cleaning the oven, unplug it
and wait for it to cool down.
General cleaning
To keep the enamelled part shiny for as long as possible, the oven must be
cleaned each time after using it. Leave the oven to cool down and you can easily
remove the deposits of fat with a sponge or damp cloth and warm soapy water
and, if necessary with a product on the market. Do not use abrasive cloths or
sponges that could irreparably damage the enamel. The control panel, handle and
knob of white ovens must also be cleaned each time in order to avoid greasy
steam turning them yellow in time. After use, rinse the stainless steel parts well
with water and then dry them with a soft cloth or chamois leather. For stubborn
stains, use normal non-abrasive detergents or specific products for stainless steel
or a little warm vinegar. Clean the window of the oven door only with hot water,
avoiding the use of rough cloths.
Oven with copper surfaces: the copper surfaces have a special protection. To keep
the surfaces intact, we recommend using, when the oven is cold, a soft clean cloth
and a neutral detergent for delicate surfaces. Never use abrasive tools.
Do not clean with a jet of steam.
Ovens with a tilting upper resistance for cleaning
1 Important: make sure that all the controls
are in the off position and wait for the
resistance to cool down
2 Hold the front part of the grill resistance
whilst you unscrew the knurled nut of the
fixing screws
3 Gently lower the front part of the resistance
until it stops.
4 During cleaning, avoid applying excessive
strain on the resistance.
5 After cleaning, carefully remove all residue to detergents and water from the
resistance.
6 Lift up the front part of the resistance and tighten the knurled nut of the fixing
screws.
!
Do not use the oven with the resistance lowered.
11 - GB
CLEANING AND MAINTENANCE
Cleaning the oven door
Dismounting the door
1. Open the oven door completely
2. Raise the U-bolts of the hinges, turning them completely as far as they go
towards the outside (fig. A).
3. Rotate the door towards the closed position until it leans on the U-bolts: this way
the spring of the hinge is blocked. Continuing in the closing movement of the
door, the hinges can be unhooked from the slots of the fittings, integrally with
the front of the muffle of the oven (sequence 1, 2, 3 of fig. B).
To remount the door, proceed with the operations described in the reverse order.
A
B
Dismounting the glass panes of the door
!
IMPORTANT: for your safety, before dismounting the glass panes,
remove the door from the oven.
For easier cleaning, after having removed the door from the oven, the glass panes
can be dismounted. You only have to remove the two upper blocks (fig. C) to be
able to slide out the windows (fig. D). After cleaning, remount the glass panes by
replacing the blocks and checking that all the parts are correctly fixed. Only then
remount the door on the oven.
Please keep the OK symbol below on the right.
OK
D
C
12 - GB
CLEANING AND MAINTENANCE
All the glass used in this appliance has undergone a special safety treatment. In
the case of breakage, the glass shatters into small square and smooth pieces
which are not dangerous because they are not sharp.
Please take care and avoid thermal shocks for the glass pane, for example, never
start cleaning when it is hot.
Replacing the oven light
After having disconnected the oven from the
power supply, unscrew the glass protection cap
and then the bulb and replace it with another
one suitable for high temperatures (300°C /
E14). Remount the glass cap and reconnect the
oven.
Self-cleaning catalytic panels (optional)
Some models of the oven can have self-cleaning panels, covering the walls,
mounted in the muffle. If they are not already supplied, you can contact your dealer
or Service Centre to purchase them.
These special panels, to be fixed to the side walls and the rear wall, are covered
with a special micro-porous catalytic enamel that gradually oxidises and vaporises
splattered oil and fat, eliminating them during cooking at over 200° C. If after
cooking very greasy or fatty food, the oven is not clean, switch it on empty at the
maximum temperature for the time necessary (max. 1 hour) for it to become clean
again. The self-cleaning panels must not be washed or cleaned with abrasive
products or products containing acids or alkalis, but only regularly wiped with a
cloth soaked in water.
13 - GB
INSTRUCTIONS FOR INSTALLATION
Electrical connection
!
Disconnect the power supply before every operation
The appliances have a three-pole power supply cable and are ready to work with
alternating current, at the voltage shown on the “ratings plate” at the end of the
booklet and on the product. The earth conductor of the cable is yellow/green.
Connecting the power supply cable to the mains
Connect a plug suitable for the load shown on the ratings plate of the product to
the oven power supply cable. In the case of direct connection to the mains (cable
without a plug), an omnipolar switch with an appropriate load must be inserted
upstream of the appliance, with a minimum opening of contacts of 3 mm. (the earth
connecting cable must not be interrupted by the switch).
Before proceeding with the connection to the mains, make sure that:
•
the electricity meter, the protection valve, the power line and the socket are
sufficient to support the maximum load required (see ratings plate)
•
the electricity system is earthed, compliant
with current regulations
•
the socket or omnipolar switch can easily
be reached after the oven has been
installed
•
after making the electrical connection,
check that the power supply cable does not
come into contact with parts subject to
heating up
•
do not use adaptors or shunts as they can
heat up or burn.
In the cases in which a hob is also installed, the hob and the oven must be
connected separately, both for electrical safety reasons and to make extracting the
oven easier.
After connection, put the power back on only after the oven has been put into the
unit.
The manufacturer is not responsible for direct or indirect damage caused by
incorrect installation or connection. All the operations relative to installation
and electrical connection must therefore be carried out by trained personnel
working according to local and general regulations in force.
14 - GB
INSTRUCTIONS FOR INSTALLATION
Recessing and fixing to unit:
575
558
573
594
0
56
9
49
598
575
560
24
20
0
56
560
Put the oven into the recess laying it on the
base and pushing it until the lateral jambs touch
the sides of the unit.
Open the door and fix the oven with four wood
screws which must be screwed through the
holes in the lateral jambs of the oven.
Ensure that the oven is fixed in a perfectly stable fashion, as shown, and that the
electrical parts are isolated so that they do not come into contact with the metal
parts. In addition, the adhesive that bonds the laminate to the unit must be
resistant to temperatures of not below 90°C to avoid deformation and ungluing of
the surface.
15 - GB
TECHNICAL CHARACTERISTIC
Power of possible heating elements:
(Upper+Grill) 800+1800W
(Back) 2100W
(Lower) 1000W
Light bulb:
25W (max)
Working capacity of the oven:
58lt
56lt
16 - GB
53lt
Label of ratings plate
Dis. L506_442
Cod.099221009962
Rev. 0 05/12