1
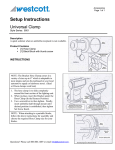
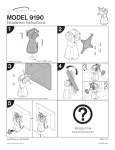
Lighting
Page 1 of 2
Setup Instructions
Strobelite™ PLUS 2-Light Kit
Style Series: 230
Description:
Strobelite PLUS pairs the highest quality engineered components with a lightweight outer shell, offering
power, precision and portability.
Product Contains:
(2) Strobelite PLUS Light Heads
(2) 24”x32” Strobelite Softboxes
(2) Strobelite Adapter Rings
(2) 8.5’ Light Stands
(1) Wheeled Carry Case
(1) Educational DVD
Instructions:
Set up the included light stands in your kit by using the tightening knobs found on the base and
telescoping pole of your stand. Loosen the tightening knob(s) and raise each telescoping pole to your
desired height and then ensure all knobs are securely tightened.
To set up your softboxes start by unfolding one Softbox. Locate your (4) black rods with silver tips.
Take one black rod and with the silver tip facing toward the rod pocket slide through the elastic loop
and into the pocket located on the inside of your Softbox. Repeat this step until the silver tips of all four
rods are securely placed in the rod pockets. You will then be able to place your soft box on a flat
surface with the flaps pointing upward. At this point you do not want your diffusion panel in place as it
could get dirty in the set-up process.
Place your Softbox on a flat surface so that your four flaps are facing up. When inserting the adapter
ring you want to make sure the smaller opening of the ring is facing towards you (this part of the ring
will attach to your light head). Take one black rod and insert into the hole on the ring labeled ‘B1’. Next
take the rod directly diagonal from the rod you just entered and insert into the hole on the ring labeled
‘B3’. Grab the next available rod and insert into the hole on the ring labeled ‘B2’ – you can place
pressure with the palm of your hand on the flat portion of the ring to gain a better angle to insert the rod.
Then take the last rod and with placing pressure with your hand insert the rod into the hole on the ring
labeled ‘B4’.
Take a minute to ensure all rods are securely seated in the holes on the adapter ring.
With your Softbox still on a flat surface and your adapter ring secured, take your Strobelite head and
place it onto the adapter ring lining up the 3 tabs on your adapter ring with the 3 notches found on the
front of your light head, turning clockwise until you hear the tabs firmly click in place. To remove the
light head from the ring simply locate the silver release tab on the top of the light head and pull towards
Questions? Please call 800.886.1689 or email [email protected].
©F.J. Westcott Company
Lighting
Page 2 of 2
the back of the light head while turning the head counter clockwise to lift it from the ring. (To remove
the protective cap placed on your light head locate the silver release tab on the top of the light head
and pull towards the back of the light head while turning the cap to release.)
Next locate the tilter bracket of your light head and ensure the locking knob is entirely backed out. Put
the tilter bracket on the stud of your light stand and with the locking knob secure in place. You should
only see a small silver ring at the base of the tilter bracket. If you see the silver stud or the light does
not feel secure make sure the locking knob is all the way backed out from the tilter bracket and re
attach to the stud of the light stand.
The last step in this process is to attach the inner baffle and front diffusion panel. To attach the inner
baffle start by placing each silver clip around the elastic hoops located on the inside of the soft box.
Lastly, take the diffusion panel and place all four corners over the corners of the soft box and run your
hands along the edge of the soft box to ensure the Velcro is secured keeping the diffusion panel in
place.
To start using your lights locate the power cords provided in your kit. There will be one power cord for
each light in your kit. Attach the power cord to the back of light head.
Please note you will also receive one sync cord for every light in your kit. You only need to use one
sync cord while taking pictures as each light has built in slaves.
Before using your kit enjoy the FREE Educational DVD provided that will walk you through numerous
lighting techniques including portrait lighting, fashion photography, product photography, posing,
camera techniques and more.
Questions? Please call 800.886.1689 or email [email protected].
©F.J. Westcott Company