1
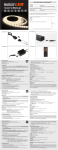
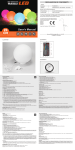
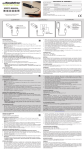
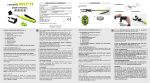
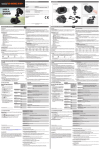
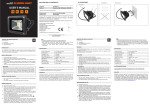
FOLDABLE LIGHT LED ILLUSTRATION 1 ILLUSTRATION 2 User’s Manual GB NL FR 1 D 2 3 PACKAGE CONTENTS The Foldable LED light packaging includes: • Foldable LED Light • USB charging cable • Mount with 3M VHB tape GB 5 4 VERPAKKINGSINHOUD De verpakking van de Foldable LED Light bevat: • Foldable LED Light • USB-oplaadkabel • Onderdeel met 3M VHB tape voor wandmontage NL PARTS See illustration I ONDERDELEN Zie illustratie I CHARGING See illustration II OPLADEN Zie illustratie II Connect one end of the USB charging cable to the lamp’s power port. Plug the other side of the cable into your computer’s USB port, a USB adapter (f.e. smartphone), portable power charger, etc. Sluit het ene uiteinde van de USB-oplaadkabel aan op de lamp. Steek de andere kant van de kabel in de USB-poort van uw computer, een USB-reislader (bv smartphone), draagbare power charger, etc. Note: • Charging time when using USB cable + PC/laptop is up to 20 hours. Charging time using USB cable + USB travel charger (not included, optionally available at www.quintezz.com) is 8~10 hours. • When charging, the red LED indicator will light up. When the battery is fully charged the LED indicator will turn off. Opmerking: • Bij gebruik van de USB-kabel + PC / laptop duurt het opladen ongeveer 20 uren. Oplaadtijd via USB-kabel + USB reislader (niet meegeleverd, optioneel verkrijgbaar bij www.quintezz.com) is 8 ~ 10 uur. • Tijdens het opladen, zal de rode LED indicator oplichten. Wanneer de batterij volledig is opgeladen, gaat de LED-indicator uit. OPERATION Turning the lamp ON/OFF Press the ON/OFF button (1): • 1x to turn the lamp ON. First level of brightness is shown. • 2x to activate the 2nd brightness level (DIM). • 3x to turn the lamp OFF. WERKING Lamp AAN-/UITschakelen Druk op de AAN/UIT toets (1): • 1x om de lamp AAN te schakelen. Eerste helderheidsniveau wordt getoond. • 2x om het tweede helderheidsniveau te activeren (DIM). • 3x om de lamp UIT te schakelen. Setting the date and time 1. Press the SET button (3) in normal mode. The “Hour” digit will flash. Press the UP (4) or DOWN (5) button to adjust, and press SET (3) to confirm. 2. The “Minute” digit will flash. Repeat the same procedure to complete the time & date setting: Hour-minute-year-month-day. The day of the week will be set automatically. 3. During the setting mode, press the MODE button (2) to return to normal time display. 4. If no buttons are pressed for 60 seconds, the clock will return to normal time display. 5. Press the UP button (4) in normal mode to switch between 12 hour and 24 hour time format. Instellen van de datum en tijd 1. Druk op de SET toets (3) in de normale modus. De “uren” zullen knipperen. Druk op de UP (4) of DOWN (5) toets om het uur aan te passen en druk op SET (3) om te bevestigen. 2. De “minuten” zullen knipperen. Herhaal dezelfde procedure om de instelling van tijd en datum te voltooien in deze volgorde: Uur-minuut-jaar-maand-dag. De dag van de week wordt automatisch ingesteld. 3. Tijdens het instellen, kunt u op de MODE toets (2) drukken om terug te keren naar de normale tijdweergave. 4. Als er gedurende 60 seconden geen toetsen worden ingedrukt, keert de klok terug naar de normale tijdweergave. 5. Druk op de UP toets (4) in de normale modus om te schakelen tussen 12 uur en 24 uur weergave. Temperature Press the DOWN button (5) in normal mode to switch between Celsius and Fahrenheit for the temperature setting. Alarm & Snooze function 1. In normal mode, press MODE (2) to enter the alarm mode. The alarm icon will be shown in the display. 2. Press the SET button (3) to enter alarm setting. Follow the same procedure to set the alarm time as described above for the time settings. 3. After you have set the “Minutes”, the “Snooze” digit will flash. Set the desired snooze time in minutes (01=1 min., 02=2 min. etc.), and press SET (3). 4. The alarm sound options (1-8) will flash. Choose an alarm sound and press SET (3) to confirm. 5. In ALARM mode, press the UP (4) or DOWN (5) button to turn the alarm and snooze functions On or Off. o Press UP or DOWN 1x to activate the alarm. The icon will be shown. o Press UP or DOWN again to turn the snooze function on. The icon will be shown. 6. Press MODE (2) to return to the normal time mode. If the alarm and snooze functions are both on, the display will show both icons. When the alarm time is reached the alarm will sound. Press MODE (2) or DOWN (5) button to activate the snooze and the icon will start flashing. The alarm will ring again at the snooze interval. The snooze function will only work 3 times before shutting off. Press the SET (3) or UP (4) button to stop the (snooze) alarm completely. Temperatuur Druk op de DOWN toets (5) in de normale modus om te schakelen tussen Celsius en Fahrenheit voor de temperatuurweergave. Alarm & Snooze function 1. In de normale modus, drukt u op MODE (2) om het alarm te activeren. Het alarmsymbool zal worden getoond op het display. 2. Druk op de SET toets (3) om het alarm in te stellen. Voor het in stellen van het alarm volgt u dezelfde procedure als hierboven beschreven voor het instellen van de tijd. 3. Nadat u de minuten heeft ingesteld, zal de “Snooze” instelling knipperen. Stel de gewenste snooze-tijd in, in minuten (01=1 min, 02=2 min. etc), en druk op SET (3). 4. Op het scherm knippert nu een cijfer. Dit cijfer geeft de instelling voor het alarmsignaal weer (1-8). Kies een alarmsignaal en druk op SET (3) om te bevestigen. 5. In alarmmodus, drukt u op de UP (4) of DOWN (5) toets om het alarm en de snooze-functie aan of uit te schakelen. • Druk 1x op de UP of DOWN toets om het alarm te activeren. Het symbool zal worden getoond. • Druk nogmaals op de UP of DOWN toets om de snooze-functie te activeren. Het symbool zal worden getoond. 6. Druk op MODE (2) om terug te keren naar de normale modus. Als het alarm en de snooze-functie beide geactiveerd zijn, zal het display beide iconen tonen. Note: The alarm will last for 1 minute and then stop automatically if no button is pressed. Als het ingestelde tijdstip is bereikt, zal het alarm afgaan. Druk op MODE (2) of DOWN (5) om de “snooze” te activeren. Het symbool begint te knipperen. De wekker zal opnieuw afgaan na de snooze-interval. De snooze-functie zal slechts 3 keer werken voordat deze wordt uitgeschakeld. Druk op SET (3) of UP (4) om het snooze-alarm volledig te stoppen. To deactivate the alarm, press the MODE button (2) to enter alarm setting mode, and press the UP or DOWN button until the alarm/snooze icons disappear. Opmerking: Het alarm zal gedurende 1 minuut afgaan en dan automatisch stoppen als er geen toets wordt ingedrukt. Note: If the alarm is not deactivated, it will be automatically set as an alarm at the same time the next day. Om het alarm uit te schakelen, drukt u op de MODE toets (2) om naar alarmmodus te gaan en drukt u op UP of DOWN tot de alarm/snooze symbolen verdwijnen. SAFETY INSTRUCTIONS • Never touch the plug contacts with sharp or metal objects. • Use only the original power supply and original accessories. • Never place the device in the vicinity of heat sources. • Never place the unit on surfaces that are heat sensitive. • Protect the device from special liquids and vapors. • Do not use any solvent based cleaning agents, only a soft, dry anti-static cloth. • Do not attempt repairs yourself. • If the unit is not properly installed or operated Quintezz® cannot accept liability. Opmerking: Als het alarm niet wordt uitgeschakeld, zal dit automatisch worden ingesteld als een alarm op hetzelfde tijdstip de volgende dag. SUPPORT For more information, technical questions and return requests concerning this product, you should contact: [email protected]. GUARANTEE Copyright © Quintezz®. Quintezz® is a registered trademark of TE-Group NV. The Quintezz® brand stands for superior product quality and outstanding customer service. That is why Quintezz® warrants this product against all defects in material and workmanship for a period of two (2) years from the date of original purchase of the product. The terms of this guarantee and the extent of responsibility of Quintezz® under this warranty can be downloaded from the website: www.quintezz.com VEILIGHEIDSINSTRUCTIES • Raak nooit de stekkercontacten met scherpe en metalen voorwerpen aan. • Zorg ervoor dat kabels dusdanig gelegd worden dat niemand erover kan struikelen of erop kan trappen. • Gebruik enkel origineel toebehoren. • Zet het apparaat nooit in de nabijheid van warmtebronnen. • Zet het apparaat nooit op oppervlakken die gevoelig voor warmte zijn. • Bescherm het apparaat tegen speciale vloeistoffen en wasems. • Gebruik voor het reinigen geen schoonmaakmiddelen met oplosmiddel, maar uitsluitend een zachte, droge en antistatische doek. • Een reparatie mag enkel door geschoold, geautoriseerd personeel uitgevoerd worden. • Bij ongeëigend gebruik aanvaardt Quintezz® geen enkele aansprakelijkheid. KLANTENONDERSTEUNING Voor meer informatie, technische vragen of retouraanvragen met betrekking tot dit product dient u rechtstreeks contact op te nemen met [email protected]. GARANTIE Copyright © Quintezz®. Quintezz® is een gedeponeerd handelsmerk van TE-Group NV. Het merk Quintezz® staat voor producten van superieure kwaliteit en een uitstekende klantenservice. Daarom garandeert Quintezz® dat dit product vrij is van materiaal- en fabricagefouten gedurende een periode van twee (2) jaar na de oorspronkelijke aankoopdatum van het product. De voorwaarden van deze garantie en de omvang van de verantwoordelijkheid van Quintezz® onder deze garantie kunt u downloaden vanaf de website: www.quintezz.com FOLDABLE LIGHT LED ILLUSTRATION 1 ILLUSTRATION 2 User’s Manual GB NL FR 1 D 2 3 PACKAGE CONTENTS The Foldable LED light packaging includes: • Foldable LED Light • USB charging cable • Mount with 3M VHB tape GB 5 4 VERPAKKINGSINHOUD De verpakking van de Foldable LED Light bevat: • Foldable LED Light • USB-oplaadkabel • Onderdeel met 3M VHB tape voor wandmontage NL PARTS See illustration I ONDERDELEN Zie illustratie I CHARGING See illustration II OPLADEN Zie illustratie II Connect one end of the USB charging cable to the lamp’s power port. Plug the other side of the cable into your computer’s USB port, a USB adapter (f.e. smartphone), portable power charger, etc. Sluit het ene uiteinde van de USB-oplaadkabel aan op de lamp. Steek de andere kant van de kabel in de USB-poort van uw computer, een USB-reislader (bv smartphone), draagbare power charger, etc. Note: • Charging time when using USB cable + PC/laptop is up to 20 hours. Charging time using USB cable + USB travel charger (not included, optionally available at www.quintezz.com) is 8~10 hours. • When charging, the red LED indicator will light up. When the battery is fully charged the LED indicator will turn off. Opmerking: • Bij gebruik van de USB-kabel + PC / laptop duurt het opladen ongeveer 20 uren. Oplaadtijd via USB-kabel + USB reislader (niet meegeleverd, optioneel verkrijgbaar bij www.quintezz.com) is 8 ~ 10 uur. • Tijdens het opladen, zal de rode LED indicator oplichten. Wanneer de batterij volledig is opgeladen, gaat de LED-indicator uit. OPERATION Turning the lamp ON/OFF Press the ON/OFF button (1): • 1x to turn the lamp ON. First level of brightness is shown. • 2x to activate the 2nd brightness level (DIM). • 3x to turn the lamp OFF. WERKING Lamp AAN-/UITschakelen Druk op de AAN/UIT toets (1): • 1x om de lamp AAN te schakelen. Eerste helderheidsniveau wordt getoond. • 2x om het tweede helderheidsniveau te activeren (DIM). • 3x om de lamp UIT te schakelen. Setting the date and time 1. Press the SET button (3) in normal mode. The “Hour” digit will flash. Press the UP (4) or DOWN (5) button to adjust, and press SET (3) to confirm. 2. The “Minute” digit will flash. Repeat the same procedure to complete the time & date setting: Hour-minute-year-month-day. The day of the week will be set automatically. 3. During the setting mode, press the MODE button (2) to return to normal time display. 4. If no buttons are pressed for 60 seconds, the clock will return to normal time display. 5. Press the UP button (4) in normal mode to switch between 12 hour and 24 hour time format. Instellen van de datum en tijd 1. Druk op de SET toets (3) in de normale modus. De “uren” zullen knipperen. Druk op de UP (4) of DOWN (5) toets om het uur aan te passen en druk op SET (3) om te bevestigen. 2. De “minuten” zullen knipperen. Herhaal dezelfde procedure om de instelling van tijd en datum te voltooien in deze volgorde: Uur-minuut-jaar-maand-dag. De dag van de week wordt automatisch ingesteld. 3. Tijdens het instellen, kunt u op de MODE toets (2) drukken om terug te keren naar de normale tijdweergave. 4. Als er gedurende 60 seconden geen toetsen worden ingedrukt, keert de klok terug naar de normale tijdweergave. 5. Druk op de UP toets (4) in de normale modus om te schakelen tussen 12 uur en 24 uur weergave. Temperature Press the DOWN button (5) in normal mode to switch between Celsius and Fahrenheit for the temperature setting. Alarm & Snooze function 1. In normal mode, press MODE (2) to enter the alarm mode. The alarm icon will be shown in the display. 2. Press the SET button (3) to enter alarm setting. Follow the same procedure to set the alarm time as described above for the time settings. 3. After you have set the “Minutes”, the “Snooze” digit will flash. Set the desired snooze time in minutes (01=1 min., 02=2 min. etc.), and press SET (3). 4. The alarm sound options (1-8) will flash. Choose an alarm sound and press SET (3) to confirm. 5. In ALARM mode, press the UP (4) or DOWN (5) button to turn the alarm and snooze functions On or Off. o Press UP or DOWN 1x to activate the alarm. The icon will be shown. o Press UP or DOWN again to turn the snooze function on. The icon will be shown. 6. Press MODE (2) to return to the normal time mode. If the alarm and snooze functions are both on, the display will show both icons. When the alarm time is reached the alarm will sound. Press MODE (2) or DOWN (5) button to activate the snooze and the icon will start flashing. The alarm will ring again at the snooze interval. The snooze function will only work 3 times before shutting off. Press the SET (3) or UP (4) button to stop the (snooze) alarm completely. Temperatuur Druk op de DOWN toets (5) in de normale modus om te schakelen tussen Celsius en Fahrenheit voor de temperatuurweergave. Alarm & Snooze function 1. In de normale modus, drukt u op MODE (2) om het alarm te activeren. Het alarmsymbool zal worden getoond op het display. 2. Druk op de SET toets (3) om het alarm in te stellen. Voor het in stellen van het alarm volgt u dezelfde procedure als hierboven beschreven voor het instellen van de tijd. 3. Nadat u de minuten heeft ingesteld, zal de “Snooze” instelling knipperen. Stel de gewenste snooze-tijd in, in minuten (01=1 min, 02=2 min. etc), en druk op SET (3). 4. Op het scherm knippert nu een cijfer. Dit cijfer geeft de instelling voor het alarmsignaal weer (1-8). Kies een alarmsignaal en druk op SET (3) om te bevestigen. 5. In alarmmodus, drukt u op de UP (4) of DOWN (5) toets om het alarm en de snooze-functie aan of uit te schakelen. • Druk 1x op de UP of DOWN toets om het alarm te activeren. Het symbool zal worden getoond. • Druk nogmaals op de UP of DOWN toets om de snooze-functie te activeren. Het symbool zal worden getoond. 6. Druk op MODE (2) om terug te keren naar de normale modus. Als het alarm en de snooze-functie beide geactiveerd zijn, zal het display beide iconen tonen. Note: The alarm will last for 1 minute and then stop automatically if no button is pressed. Als het ingestelde tijdstip is bereikt, zal het alarm afgaan. Druk op MODE (2) of DOWN (5) om de “snooze” te activeren. Het symbool begint te knipperen. De wekker zal opnieuw afgaan na de snooze-interval. De snooze-functie zal slechts 3 keer werken voordat deze wordt uitgeschakeld. Druk op SET (3) of UP (4) om het snooze-alarm volledig te stoppen. To deactivate the alarm, press the MODE button (2) to enter alarm setting mode, and press the UP or DOWN button until the alarm/snooze icons disappear. Opmerking: Het alarm zal gedurende 1 minuut afgaan en dan automatisch stoppen als er geen toets wordt ingedrukt. Note: If the alarm is not deactivated, it will be automatically set as an alarm at the same time the next day. Om het alarm uit te schakelen, drukt u op de MODE toets (2) om naar alarmmodus te gaan en drukt u op UP of DOWN tot de alarm/snooze symbolen verdwijnen. SAFETY INSTRUCTIONS • Never touch the plug contacts with sharp or metal objects. • Use only the original power supply and original accessories. • Never place the device in the vicinity of heat sources. • Never place the unit on surfaces that are heat sensitive. • Protect the device from special liquids and vapors. • Do not use any solvent based cleaning agents, only a soft, dry anti-static cloth. • Do not attempt repairs yourself. • If the unit is not properly installed or operated Quintezz® cannot accept liability. Opmerking: Als het alarm niet wordt uitgeschakeld, zal dit automatisch worden ingesteld als een alarm op hetzelfde tijdstip de volgende dag. SUPPORT For more information, technical questions and return requests concerning this product, you should contact: [email protected]. GUARANTEE Copyright © Quintezz®. Quintezz® is a registered trademark of TE-Group NV. The Quintezz® brand stands for superior product quality and outstanding customer service. That is why Quintezz® warrants this product against all defects in material and workmanship for a period of two (2) years from the date of original purchase of the product. The terms of this guarantee and the extent of responsibility of Quintezz® under this warranty can be downloaded from the website: www.quintezz.com VEILIGHEIDSINSTRUCTIES • Raak nooit de stekkercontacten met scherpe en metalen voorwerpen aan. • Zorg ervoor dat kabels dusdanig gelegd worden dat niemand erover kan struikelen of erop kan trappen. • Gebruik enkel origineel toebehoren. • Zet het apparaat nooit in de nabijheid van warmtebronnen. • Zet het apparaat nooit op oppervlakken die gevoelig voor warmte zijn. • Bescherm het apparaat tegen speciale vloeistoffen en wasems. • Gebruik voor het reinigen geen schoonmaakmiddelen met oplosmiddel, maar uitsluitend een zachte, droge en antistatische doek. • Een reparatie mag enkel door geschoold, geautoriseerd personeel uitgevoerd worden. • Bij ongeëigend gebruik aanvaardt Quintezz® geen enkele aansprakelijkheid. KLANTENONDERSTEUNING Voor meer informatie, technische vragen of retouraanvragen met betrekking tot dit product dient u rechtstreeks contact op te nemen met [email protected]. GARANTIE Copyright © Quintezz®. Quintezz® is een gedeponeerd handelsmerk van TE-Group NV. Het merk Quintezz® staat voor producten van superieure kwaliteit en een uitstekende klantenservice. Daarom garandeert Quintezz® dat dit product vrij is van materiaal- en fabricagefouten gedurende een periode van twee (2) jaar na de oorspronkelijke aankoopdatum van het product. De voorwaarden van deze garantie en de omvang van de verantwoordelijkheid van Quintezz® onder deze garantie kunt u downloaden vanaf de website: www.quintezz.com