1
HDX
PROFESSIONAL HD/CD/MP3 PLAYER
Quick Start Owner’s Manual
BOX CONTENTS
•
HD/CD Player
•
Platter Assembly
•
Wrench
•
Power Cable
•
Audio Cable
•
Fader Start Cable
•
USB Cable
•
Keyboard
QUICK SETUP (ENGLISH)
1.
2.
3.
4.
5.
6.
7.
8.
9.
10.
11.
12.
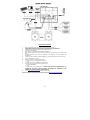
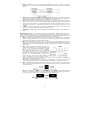
Make sure all items listed on the front of this guide were in the box.
READ SAFETY INSTRUCTION BOOKLET BEFORE USING THE PRODUCT.
Assemble unit following the Quick Assembly Instructions.
Study this setup diagram.
Place the unit in an appropriate position for operation.
Make sure all devices are turned off and all faders and gain knobs are set to their lowest
level.
Connect all stereo input sources as indicated in the diagram, your microphone, and
headphones
Connect the stereo outputs to power amplifier(s), tape decks, and/or other audio sources.
Plug all devices into AC power.
Switch everything on in the following order.
• audio sources (i.e. turntables or CD players)
• mixer
• finally, turn on any amplifiers or output devices
When turning off, always reverse this operation by,
• turning off amplifiers
• mixer
• Finally, turn off any audio sources. ALWAYS USE THE HDX’S POWER SWITCH TO
POWER OFF THE UNIT. DO NOT SWITCH THE POWER OFF EXTERNALLY (FOR
EXAMPLE, BY USING A POWER STRIP SWITCH).
Go to http://www.numark.com for product registration.
More information about this product may be found at http://www.numark.com
2
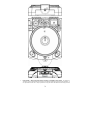
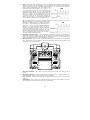
1.
Power Switch - Always shut down before removing or installing a drive caddy. The HDX has a
“soft power down” which will allow the hard drive to spin down before the power turns off completely, so
it is important that the unit is always powered off using this button first before disconnecting the main
3
power lead or turning off a surge suppressor. Typically, it is recommended that the HDX is powered on
before amplifiers and off after amplifiers to avoid an audio spike to be sent through your equipment.
2.
Slot Load CD Drive – Designed to play commercially available CD and properly burned CDR and CDRW
discs. Insert the CDs you wish to play here. Do not insert mini CDs (CD3”/80mm CDs) or CDs of
an unusual shape as they may be damaged or damage the slot load mechanism.
3.
Eject Button - Used to eject CDs from the player. The CD will only eject when it is not playing.
4.
Track/Menu Select Knob
Track – Rotate to select tracks.
Menu Select – Press “Menu” then rotate to move through menu options. Pressing selects menu options.
5.
High Torque Direct Drive Platter - Utilizes a 4.7 Kgf cm motor to turn the vinyl record. The platter
should not be held in position for sustained periods.
6.
Vinyl Record – Controls the playback of the music, including scratching, pitch bend and cueing.
7.
Play/Pause Button – Starts and stops playback and the platter. Pressing toggles between play and
pause of the platter. Each time PLAY is pressed after pausing, a new Cue Point is set.
8.
Startup Adjust – Changes the amount of time it takes for the platter to stop when the PAUSE button is
pressed. As the wheel is moved right the braking time increases. For fast braking move the wheel all
the way to the left. As you turn the wheel, the display will indicate the braking time.
9.
Brake Adjust - Changes the amount of time it takes for the platter to start when the PLAY button is
activated. As the wheel is moved to the right the startup time decreases. For fast startup move the
wheel all the way left. As you turn the wheel, the current startup time is shown on the display.
10.
Cue Button - Returns and pauses the music at the last set Cue Point. The Cue Point is the last place at
which the unit was paused and then PLAY or STUTTER was pressed. Pressing and holding the CUE button
will temporarily play starting from the cue point until you release the button. You can easily edit the cue
point by turning the record while paused. As you rotate the record the music will sound. By stopping
the wheel and pressing Play, a new cue point will be set.
11.
Stutter Button – When pressed, the music will play from the current cue point or the last point of
pause. If you start from the last pause point while the unit is paused, a new Cue Point is set.
Repeatedly pressing this button while the unit is playing will restart the unit from the last Cue Point,
creating a “stutter” effect. This also works from “RELOOP”.
12.
Position Marker – Used as a visual reference of platter position.
13.
Target Light – Illuminates the platter surface.
14.
Record Button / Record Light – When recording from the audio inputs this button will blink to indicate
you are recording. Pressing this button will take you to the record screen and arm the HDX for
recording. See the section on recording for more information.
15.
33/45 RPM Button - changes the rotation speed of the platter and the music. The default mode is 33
RPM, so when 45 RPM is selected the speed and pitch increase 35%. The default platter speed can be
set from the “Playback Options” menu.
4
16.
Reverse/Bleep Switch
Audio Reverse – Changes the direction of the platter and the music until it is returned to the upright
center position.
Bleep – Temporarily reverses the music from buffer while the unit continues forward motion. When the
toggle is released the unit resumes playing from the point where the song would be normally if it had not
been reversed. This is useful for “bleeping” out certain lyrics without interrupting the flow of the song.
17.
Scratch Mode Button – Changes the way the music reacts to movement of the record.
Scratch – Allows the record to act just like a typical record on a turntable.
Scratch+FWD - Allows the record to act just like a typical record on turntable but only plays
forward actions. Hold “Scratch” for 1 second to get in the FWD mode.
Scratch+CUE – Moves the to the last set cue point each time the record is moved, allowing you to
scratch from the same point every time you move the record.
Scratch+CUE+FWD – Moves the to the last set cue point each time the record is moved, allowing
you to scratch from the same point every time you move the record, and only plays audio when
the record is moved in a forward direction.
18.
Pitch Button - Adjusts the range of the pitch fader. Pressing this button will cycle through pitch ranges
of 6, 12, 25, and -100/+50%. Holding this button for 2 seconds will deactivate the pitch fader. Pressing
PITCH again will reactivate the pitch fader.
19.
Pitch Fader - Controls the overall speed of the music and platter. At pitch settings of -80% to -100%,
the platter will deactivate and the music will be controlled by the slider. By moving the slider toward
“+”, the music speeds up. By moving toward “-”, the music plays more slowly.
To match the speeds of two units, you can either monitor the music of both units by ear, or use the
automatic BPM readout and adjust the speed to match. When the tempo of the music of the song you
wish to match is slow compared to the tempo of the other song, move the slider toward the (+) end and
match the BPM. When faster, move the pitch slider toward the (-) end. By making this adjustment the
speeds can be matched, though the beats may not yet be aligned.
20.
Key Lock – Holds the music at the current key. If the pitch slider is moved, the speed will change, but
the key will remain the same. By adjusting the pitch to -100% you can actually slow the music to a
complete stop while playing the last heard tones of the music. This works very well on vocals and can be
a very cool effect. If the unit has Key Lock active after the track has been changed and before Play is
hit, the unit will lock to a key based on the current pitch fader position. If “Key” is deactivated during
Pause, the unit will reset to match the current pitch position. If “Key” is deactivated during Play, the key
will remain at the new position until the track is changed.
To change the key of the music press and hold “Key Lock” while moving the “Track/Menu Select Knob”.
The key can increase to 1 octave above normal, or up to 2 octaves above normal when the Slide effect is
used. The key can decrease up to 5 octaves below normal. The display will limit to 19 half steps above
or below the normal key.
21.
Jog Wheel - This wheel is used for searching, adjusting the parameters of effects, trim, and key. When
the motor is off, this wheel is used to control pitch.
22.
Search - Changes the mode of the “Jog Wheel” search mode. Search will remain active while the wheel
is being moved and for 8 seconds after. Moving the wheel clockwise rapidly moves forward through the
music. Counterclockwise moves backwards through the music. Search will automatically turn off after 8
seconds of non-use.
23.
The Beatkeeper™ - Utilizes the latest patented Beatkeeper™ technology.
The Beatkeeper™
automatically tracks beats based upon a combination of frequencies and rhythm patterns in the music.
It shows BPM in the display and outputs 4-count (a.k.a. one measure) information about the music in a
marching bar graph.
The Bar Graph: Most dance music and rock is set up in 4 beat increments called measures. Many
of the features within the unit use this information for incredible results. It’s important to
understand the basics of how the Beatkeeper™ works to effectively take advantage of other
advanced features in the unit. The bottom LED is for the 1st beat or “Down Beat”. Typically, most
music starts on the downbeat so the unit sets the first beat to where the music begins.
Occasionally this may not be correct or you may wish to reset it. To reset the downbeat simply tap
the “TAP” button at the new downbeat location as the music is playing or while in Pause.
TAP: This button is used for resetting the downbeat and also re-calibrating the BPM. The
Beatkeeper™ is considered by many to be the most accurate automatic beat counter on the market
today; however, it occasionally may have trouble determining the correct BPM. This can happen
when the music contains complex rhythms, or if it starts without a beat at all. If you know the
BPM showing in the display is incorrect, or if the beat LEDs are not flashing with the beat, you have
2 options to reset the Beatkeeper™.
1.
Press the Tap button on the downbeat and hold for a second. This will tell the unit to
re-calculate and display the next BPM it finds.
2.
If holding the “TAP” button doesn’t work, you can manually hit the “TAP” button on
the beat and the display will indicate the new BPM. The BPM will be based upon the
average of your last 8 taps. The Beatkeeper™ will then know which beats in the
music it should be using to determine the correct BPM and it will track them through
the song.
5
Occasionally, the unit will be tracking the wrong beat but have the correct BPM.
downbeat, simply hit the “TAP” button once on the downbeat.
To reset the
Storing BPM Information: BPM information can be stored for each track, which allows the
Beatkeeper to quickly lock onto the correct tempo when playing the track. The stored track BPM
can be updated manually by editing the BPM field on the track info page, or semi-automatically as
follows:
1.
The BPM will be stored every time the beat is tapped in using the TAP button.
2.
The BPM will be stored automatically when the track plays through its entirety under
the following conditions:
A.
If no BPM has been stored for the track previously.
B.
If the user tapped in the beat during playback of the track using the TAP button.
C.
If the user pressed and held the TAP button to resynchronize the BeatKeeper.
Please note that this stored BPM value, if present, is used to speed the convergence of the
BeatKeeper algorithm.
If a grossly inaccurate BPM is stored (via TAP or manually),
the
BeatKeeper may not converge to an accurate result. This situation can be corrected by entering a
better estimate of the BPM by any of the methods mentioned above.
24.
VFD Display - This is the main display, which shows all menu options and the current play status.
25.
Display/Back Button - When navigating through the menu system this button is used to step back to
the previous menu level or it is used like a backspace when entering text. During play, press this button
to toggle between elapsed time, track remaining time and remaining time on the entire playlist or
running order.
26.
Store/Recall Button - Holding this button for one second will store all cue points for the current track.
Pressing and releasing this button will recall the cue points for the current track.
27.
Menu – Pressing this button will allow you to use the track knob to navigate through the various menu
options on the HDX. Pressing the track select knob like a button will choose the selected menu item.
Many options will be stored and retained on unit power off. See the section “Navigating the Menu” later
in this manual for an in depth description of the menu options. When selecting a track holding the track
select knob for 2 seconds will let you view information about the song without selecting it. On the track
display screen holding the track select knob for 2 seconds will show and allow you to edit the track’s
information.
28.
Single - Toggles the unit to play back just one track at a time (Single) or play continuously through all
tracks and then start over repeating the running order infinitely (Continuous).
29.
Loop In - This is the point where you would like a loop to start. By default, a “loop in” point is
automatically set at the beginning of the song. To define a new “loop in” point, just press the LOOP IN
button when the song reaches the desired point where you would like a loop to begin. The LOOP IN
button will light, indicating a new loop in point has been set. The RELOOP button will also illuminate
indicating that you can now press RELOOP to immediately go back to the loop in point and begin playing.
Note: Changing tracks will always clear the current loop settings.
If you wish to change the loop-in point, just press “Loop In” again.
30.
Loop Out - Sets the end point of the loop. The first time you press LOOP OUT while a song is playing,
the LOOP OUT button will blink, and the song will begin playing in a seamless loop, starting from the
“loop in” point and ending at the “loop out” point. To release, or end the loop, press LOOP OUT a second
time and play will continue forward when the song passes the previously set “loop out” point. The LOOP
OUT button will then be continuously lit, indicating that the loop is now in memory for “reloop” purposes.
6
31.
Reloop - Repeats play or “stutters” (if repeatedly tapped) from the “loop in” point. If a loop has
previously been set, it plays and repeats that loop, until the loop is released by pressing the LOOP OUT
button.
32.
Smart Loop – Allows the Beatkeeper™ and loop buttons to work together to create loops that are
synchronized to the beat. First, properly align the Beatkeeper™ to the beat. After this has been done,
all loop points and stuttering will be synchronized perfectly to the beat of the music.
33.
Trim – Allows the loop-in and loop-out points to be adjusted. To adjust a point, press TRIM followed by
the button of the point you wish to adjust (LOOP IN, LOOP OUT, RELOOP), then rotate the small jog
wheel. When used with “Reloop” the unit will shift the entire loop by moving both the loop-in and loopout points at the same time. When used with “Smart Loop”, the unit will adjust all points in 1-beat
increments.
34.
< shift > – Adjusts the loop length by half length or double length increments. If the “Smart Loop”
feature is on, this will be limited to a minimum loop length of 1 beat.
35.
Length LEDs – Shows the length of the loop based upon the Beatkeeper™ setting. The middle LED is 4
beats.
Effect Buttons 36-40 are used to activate and deactivate a desired Effect. Holding an Effect button for 1
second will place the effect into a “hold” or alternate effect mode depending on which button you press. Once
an effect is active, rotate the jog wheel to get the desired effect sound. The parameter value will be shown on
the display. You can preset a desired value by holding the button and rotating the wheel.
36.
Sonar – Creates a metallic hollow effect to the audio. Pressing and holding this button will keep the
sound from automatically returning to normal when movement of the jog wheel stops. Tapping the
button will turn the effect on and off at the desired setting.
37.
Slide - Smoothly changes the key of the music. In the key display you will see the key change as the
jog wheel is moved. Pressing and holding this button will keep the sound from automatically returning to
normal when movement of the jog wheel stops. Tapping the button will turn the effect on and off at the
desired setting.
38.
Echo - Adds echo to the music also based upon tempo
reading of the Beatkeeper™. The start parameter is no
echo “0”. If you move the wheel clockwise, the numbers
will go 1-64, 1-32, 1-16, 1-8, 1-4, 1-2, and 1-1 indicating
the amount of echo added to the audio. If you move the
wheel counter-clockwise you will create negative or
preceding echo. This essentially plays an echo ahead of
the music. At 1-1 the music will echo 1 full measure or 4
beats of music. If you turn off the effect then back on
again it remembers the last set parameter. (Note: a
preceding echo requires the unit to play from buffer memory.
effect will stop until buffer playback is restored.)
If the buffer becomes unavailable the
A.D. (hold the Echo button to activate) - stands for “Auto Decimation”. It reduces the bit rate of the
music, creating increasing distortion. To activate this effect, hold the “Echo” button for 2 seconds.
39.
Filter – An isolation (band pass) filter that lets you play only a specific frequency of the music. Rotation
of the wheel moves the filter frequency. If you turn off the effect, then on again, it remembers the last
set parameter value.
Kill (hold the Filter button to activate) - This elimination (band stop) filter lets you play all but a specified
frequency. To activate, hold “Filter” for 2 seconds. Rotation of the wheel moves the filter frequency. If
you turn off the effect, then on again, it remembers the last set parameter value.
7
40.
Chop – breaks up the music by turning the volume on and off based upon the BPM of the Beatkeeper™.
This effect works best when the Beatkeeper™ is properly aligned. First activation of this effect plays
1/8th note or half of every beat. The BPM display will indicate “1-8”, which means one measure (4
beats) of music has been broken into 8 parts. Rotation of the
wheel to the left decreases the parts to 1-4, 1-2, and 1-1. At
1-1 the music plays for 4 beats then is silent. Rotating to the
right breaks up the music into 1-16, 1-32, 1-64, then smaller
increments, creating another interesting effect. When the
effect is first activated, the music will play the section then
turn off for a section. This is important because you can
reverse the sections that are on and off by activating the
effect in the other section. If you deactivate the effect, then
turn it on again, it remembers the last set parameter value.
Pan (hold the Chop button to activate) - Alternates playing the right and left channel based upon the
BPM of the Beatkeeper™. This effect works best when the
Beatkeeper™ is properly aligned. To activate, hold “Chop”
for 2 seconds. First activation of the effect alternates on
1/8th notes or half of every beat. The BPM display will
indicate a “1-8”, which means one measure (4 beats) of
music has been broken into 8 parts. Rotation of the wheel
to the left decreases the parts to 1-4, 1-2, and 1-1.
Rotating to the right makes faster changes of 1-16, 1-32,
1-64, then smaller increments, creating another interesting
effect. If you deactivate the effect then turn it on again, it
remembers the last set parameter value.
41.
Removable Hard Drive Caddy. - This is where the HDX hard drive is stored. It should never be
removed until the power has been turned off. By default, the hard drive caddy is locked in place with a
single screw to prevent the drive from being removed. To take out the screw, you must first remove the
platter. You should then see the screw located above the hard drive.
42.
Slot Load CD Drive - Designed to play commercially available CD and properly burned CDR and CDRW
discs. Insert the CDs you wish to play here. Do not insert small CDs or CDs of an unusual shape as they
may be damaged or damage the HDX.
1.
RCA Input Connectors - This is where you would connect your line level source that you wish to
record.
2.
RCA Output Connectors - These are the main analogue outputs of the HDX. Typically this is where you
would connect RCA cables to connect the HDX to a mixer or amplifier.
3.
PS/2 Connector - Connect the included PS/2 compatible keyboard here for text entry and menu
navigation.
4.
USB Connector - Plug one end of your USB cable here and the other into your computer to allow your
HDX and computer to communicate with each other to transfer files.
8
5.
Relay Connector - If you wish to use the relay function, plug in your 3.5mm stereo control cables into
here and then into your other CD player. The cable must have a stereo-style plug for the units to work
properly
Remote Start Connector – Use this connector to plug into your fader-start compatible mixer or remote
switch. This function is always active.
a.
To use this connector for fader-start, connect the supplied fader-start cable to a fader-start
compatible mixer. Every time you move the crossfader on the mixer to the side that the unit
is on, it will start playing. When you move the fader away from that side, the unit will stop.
Moving the fader back will start playback again.
b.
Foot switches can also be attached to this jack for creative mixing techniques and can be
found in most music shops. Connector plugs are often ¼”, so a 1/8” adapter will be needed
for connection. There are also two types of footswitches that will work with this connector.
The first is a typical, on/off pushbutton switch and is generally used for switching channels on
guitar amps. The second type is a momentary footswitch, which is typically used for
keyboard sustain pedals.
6.
IEC Power Plug Connector - Plug your supplied power cord in here. Above the power connector there
is a small red switch that is used to set the voltage of the unit to correspond with either 115v/60Hz or
230v/50Hz electrical systems. Make absolutely sure that this switch is set properly before plugging in
the unit or you will damage the internal components. This damage would not be covered under
warranty.
7.
HDX Link - This option port is unused as of the writing of this manual but may be used for future
expansion.
8.
MIDI IN Connector – This port is for receiving MIDI (Musical Instrument Digital Interface) signals from
other MIDI devices such as CD players, keyboards, or drum machines.
MIDI OUT Connector – The port is for sending MIDI signals to other MIDI devices.
9.
Digital Output - The format is Type 2, Form 1, also known as S/PDIF (Sony/Phillips Digital Interface
Format). This allows digital audio information to be sent to a device equipped with a S/PDIF input.
9
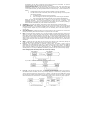
BASIC OPERATION
Playback from CD
To play back material from the HDX you must first select the source you would like to play. Begin by pressing
down on the track select knob to go to the SOURCE SELECT menu as shown below.
Source Select
X CD
HD by Artist
HD by Track
Items that are currently available will be indicated with a check mark while unavailable items will show an X
next to them. In the image above, no CD was loaded into the HDX, so the CD option is shown with an X next
to it. After loading an audio CD this display will appear as shown below.
Source Select
Audio CD
HD by Artist
HD by Track
To play an inserted CD, highlight “Audio CD” or “Data CD” and press the track knob to select it. At that point
you will be shown a list of tracks on the CD. To cue a particular song, just highlight it in the list and press the
track knob. The song will then be cued and ready to play by pressing PLAY or STUTTER. Pressing the track
knob again at this point will take you back to the main playback screen.
If the CD is found by the onboard Gracenote® Music Recognition database, the appropriate artist and song
information will be shown on the display.
Playback from the hard drive
Go to the SOURCE SELECT menu as shown above. You then have the option of displaying the contents of the
hard drive organized by Artist, Track, BPM, Album, Genre, or Playlist. The process for selecting a track based
on artist, track title, album or genre are essentially the same, so we’ll just cover it based on the assumption
that you want to select a song by the artist’s name.
If you choose “Artist” you will see a screen that looks something like this:
*| 2Pac
#| 50 Cent
A| 7 Seconds
B| AC/DC
To locate the desired artist, choose the first letter of the artist you’re looking for in the left column and press
the track selection knob, or select the asterisk to display a list of all artists in alphabetic order. If the artist’s
name begins with a number, select the pound sign. Once you press the track select knob you will then be
shown a list of all of the artists starting with the letter you selected. Highlight the desired artist and press the
track knob and you will be able to choose which track by that artist you wish to play.
To select songs based on tempo (BPM) choose “HD by BPM”, then select the BPM range you’re looking for. To
play songs in a certain playlist, select “HD Playlists”, then choose the playlist you want to play.
Tip: You can always get back to the main playback screen by repeatedly pressing the DSPLY/BACK
button.
Tip: To make sure your audio files are organized properly in the HDX it is important that your mp3
files contain proper ID3 tag information. Use your favorite mp3 organization software to enter in
the correct file characteristics (artist, title, album, genre, track number and year)
10
Adding Content to the Hard Drive
In addition to being a full featured CD player, the HDX also has a removable 80 gigabyte hard drive for storage
and playback of thousands of audio files.
ALWAYS USE THE POWER SWITCH ON THE HDX TO TURN THE UNIT OFF!
Never turn off the HDX by unplugging it or by using an external power switch (such as on a
power strip). If power is interrupted while it is performing a write operation to the hard disk,
the hard disk’s file system directory could become corrupted, making it unplayable. Using the
HDX’s power switch will allow it to power down gracefully so this does not happen.
NEVER INSERT OR REMOVE THE HARD DISK WHILE THE UNIT IS ON!
This could result in corrupted data on the drive or damage to the drive. Always power down
the unit before inserting or removing the hard drive caddy.
There are four ways to add songs to your hard drive:
1.
Connect the unit to your computer via USB to use the high speed USB 2.0 connection to transfer
songs. This is the fastest method.
2.
Insert an audio CD or CDR and rip the files to the hard drive. If the CD is a store-bought,
prerecorded audio CD, then there is a good chance it will be recognized by the onboard Gracenote®
Music Recognition database, allowing the artist and song information to be loaded automatically.
The music files will be compressed in the background allowing you to continue to use the unit
normally.
3.
Insert a data CD with MP3 or WMA files and rip the files to the hard drive.
4.
Record using the LINE IN connectors on the underside of the unit.
Music recognition technology and related data are provided by Gracenote. Gracenote is the industry
standard in music recognition technology and related content delivery. For more information visit
www.gracenote.com.
1.
USB 2.0 File Transfer
To connect your HDX to a computer, first power off the HDX, then connect a USB cable from the HDX to
your computer, then power the HDX on.
When connected via USB to a computer, your HDX will behave as a Mass Storage Class device, which
means it will appear as a normal hard drive to your computer and can be found either in the “My
Computer” window (on Microsoft Windows operating systems) or on the desktop (on the Apple Macintosh
operating system).
To transfer songs to the HDX, simply open the HDX drive icon and drag your audio files from your
computer to the HDX and drop them in the “Audio” folder. You can also perform the normal file
management functions (renaming, deleting etc.) right from this window.
Note: Do not unplug the USB cable while transferring files or the file system directory on the
HDX could be damaged.
2.
Copying An Audio CD From The Internal CD Drive
If you want to rip a CD to store on the hard drive for playback after the CD has been removed, press the
MENU button and choose “Rip/Rec Options” then select “Rip CD” to display the current compression
settings. To begin recording the CD, press the track select knob, or press the DSPLY/BACK button to
back out of the menu.
Note: You can change the compression settings by going to MENU > Rip/Rec Options >
Encoding Options.
Once the recording process has begun, you can continue to play other tracks from the CD or hard drive
while the CD is being ripped. If you play a CD while it is being ripped, the time to rip the CD will increase
dramatically. When ripping is complete the CD will be ejected.
Note: At any time during the ripping process you can check the rip status by pressing MENU,
selecting UTILITY, then STATUS.
11
Copying A Data CD From The Internal CD Drive
This process is the same as step 2 above. If the files have already been compressed when written to CD,
the ripping process will be much faster than with a standard audio CD.
Important information about WMA and VBR (Variable Bit Rate) Files
MP3 VBR (Variable Bit Rate) and WMA (Windows Media Player) files require special
timing information to be generated in the form of a TOC (Table of Contents). The
HDX does this generation on files on the hard drive as a background process, so you
don’t need to do anything. However, it takes some processing time for this to
happen. If you see a filename with (NOTOC) at the end, it means the HDX has not
yet generated a TOC for that song. If you play a song with no TOC, cue point settings
may not be as accurate as usual, and reverse playback may not occur smoothly.
Furthermore, if you jump to a cue point, there could be a glitch in the audio playback
some time after the cue point. For these reasons, we recommend that you wait until
the HDX has finished generating TOCs for all files before playing them live.
The HDX does not generate TOCs for VBR MP3 and WMA files on CD. You must rip
these files to the hard drive in order to scratch, play in reverse, or set cue points
accurately. Therefore, we highly recommend that you rip these files to your hard
drive and allow a TOC to be generated before playing these files in a performance
situation.
3.
Recording Audio From The LINE IN Jacks
To record audio from the LINE IN jacks on the underside of unit, just connect your line level audio device
to the connectors marked “LINE IN”. Then press MENU, select RIP/REC options, and then choose START
RECORDING. At this point you should adjust the level of your output device to achieve the proper
recording level as indicated on the meter shown on the HDX display. Ideally, the meter should reach the
word MAX without actually touching it. If MAX lights up, the signal is too loud and could cause distortion
in the final recording.
Once you have set the proper level on your output device, press the select knob to continue. You will
then be able to name your recording by using either the select knob or an attached keyboard. By
default, the name will be “Recording” followed by a number. If you want to enter your own name
instead, use the back button to erase the word “Recording” and enter your own title using either the
select knob or an attached keyboard. After entering the title of the recording, press down on the select
knob to begin recording.
Once recording has begun, you can press the select knob to split display the meter and elapsed time.
You can also tap the blinking RECORD button once to split the recording into multiple tracks. When you
want to stop recording, just hold the blinking RECORD button until the display indicates that recording
has stopped. The recording will be encoded to the format you selected from the compression settings
menu. Your recorded file will then be available for playback under the name that you previously
assigned it.
12
Navigating the Menu
Pressing the MENU button will display the main menu as shown below:
MAIN MENU
Playlists
Playback Options
Rip/Rec Options
Navigating the menu system of the HDX is done by turning the track knob to scroll up and down, and by
pressing down on the knob to choose a menu option or to enter a sub-menu. In addition to using the track
knob to navigate, you can also use an attached keyboard to navigate the menu system and to enter text.
Currently the following keyboard commands are available:
Esc = Back
Enter = Select
Cursor Up/Left = Rotary Encoder Counter-Clockwise
Cursor Down/Right = Rotary Encoder Clockwise
I = View Track Info
F1 = Search Cd
F2 = HD by Artist
F3 = HD by Track
F4 = HD by Bpm
F5 = HD by Album
F6 = HD by Genre
F10 = Go to Source Select Page, Set Search mode to “Contains”
F11 = Go to Source Select Page, Set Search mode to “Begins With”
Prtsc = Control the master HDX
Pause = Control the slave HDX
In this section we’ll break down the menu items and explain each menu option to help you get the most out of
your unit!
Playlists
Highlighting and selecting the PLAYLISTS menu option will bring you to the playlists sub-menu, which has 4
options.
Add Cur. Track to List
Add Tracks to Playlist
Choosing this menu item will bring you to a list of
playlists on the unit, allowing you to add the
current track to a previously created playlist.
Use the track knob to choose which playlist you
would like to add the track to, and then press the
track knob to select it. If no playlists have been
created, the message “This Folder Is Empty” will
b displayed.
Choose this to add multiple tracks to a playlist.
Selecting this option will bring you to a list of
playlists on the unit. Selecting a playlist will then
allow you to add multiple tracks to that playlist.
Remove Playlist Element
This will allow you to remove a song from any
playlist on the hard drive. Selecting this option
will bring you to a list of playlists on the unit.
Selecting a playlist will then allow you to remove
a song from that playlist.
Create A Playlist
This allows you to create and name a new
playlist. Once the playlist has been named, you
will have the option to add tracks to the playlist
immediately by navigating the contents of the
hard drive, or you can add tracks later through
the playlist menu.
Note: You can remove a playlist completely by connecting the HDX to a computer, navigating to the Playlists
folder and deleting the playlist you want to remove.
13
Playback Options
Motor On/Off
Remote Start Mode
Determines whether or not the platter will spin
while playing a song.
The HDX is equipped with a remote start jack
that allows you to remotely start and stop the
unit by connecting it to either a compatible fader
start mixer or switch.
Motor Speed
Allows you to choose the speed that the platter
spins; either 33 1/3 RPM or 45 RPM.
There are three remote start mode settings:
Fader Start Use this mode if your HDX is
connected to a fader start compatible mixer.
Remote On-On Use this mode if you want to
use a momentary footswitch (like a
keyboard sustain pedal) to start and stop
the HDX.
Remote On-Off Use this mode if you want
to start and stop the HDX with an on/off
button commonly used for switching
channels on a guitar amp.
Reverse Mode
This changes the behavior of the reverse switch.
If “Platter & Sound” is selected, and you activate
the reverse switch, the sound will play backwards
and the platter will spin backwards too. If “Sound
Only” is selected, only the sound will play
backwards, but the platter will continue to spin
clockwise.
Relay On/Off
Turns the relay feature on or off. Relay allows
you to automatically alternate play between two
units that are connected via relay cable.
Remote Start Action
This setting controls what will happen when the
HDX receives a “stop” command via the remote
start connector. Setting the remote start action
to “Cue” will cause the track to go back to the
current cue point, while “Pause” will cause the
track to pause.
Relay Timing
When the relay feature is active, and you have 2
units connected via relay cable, you can use relay
timing to adjust the overlap or delay between
songs. Use an “overlap” to have one song flow
into another. Use a “gap” if you want a space
between songs.
Interlock
Interlock allows you to automatically synchronize
the tempo of 2 HDX units connected together with
MIDI cables.
For more information see the
dedicated interlock section later in the manual.
Rip/Rec Options
o No Compression - This option will allow you
to record information to the hard drive in a
lossless, uncompressed “.wav” format. Use
this option if you need to make sure you get
the most accurate recording possible, but
keep in mind that although this option will
produce the best audio quality, it also will
create very large audio files, which will
ultimately reduce the total amount of songs
that will fit on the hard drive.
Start Recording
Selecting this menu option will allow you to use
the HDX to record line level audio via the rear
panel audio inputs. Keep in mind that if you
want to record audio from a turntable or
microphone, you will need to use a preamp or DJ
mixer to boost the signal to line level. For more
information on recording audio, please see the
section “Adding Content to the Hard Drive”.
Rip CD
In addition to an uncompressed format, you can
also choose between two types of mp3 files.
Use this option to record a CD to the HDX
internal hard drive.
You can record both
Redbook audio CDs as well as data CDs. For
more information please see the section “Adding
Content to the Hard Drive”.
o CD Quality - This option will save your
recorded and ripped information as 192 kHz
mp3 files.
o Pro Quality - This option will save your audio
data as 320 kHz mp3 files. This is a nearly
lossless compression and as with the
“uncompressed format” will give you audio of
a higher quality that the 192 kHz option, but
at the cost of larger files.
Encoding Options
Choosing this menu option will allow you to
specify the type of compression used for
information recorded to the internal hard drive.
There are 3 options:
14
Utility
Processing Status
Delete Protect
If you want to check the status of the information
the HDX is processing, select this option and you
will see three progress indicators.
Enabling delete protect will allow you to place the
HDX into a protected mode so that no files may
be deleted without first entering in a password.
You will be prompted to enter a 4 character
password.
This password will be needed to
delete or rename tracks or to disable Delete
Protect.
CDA - When a CD is inserted, the contents are
duplicated on the hard drive. This shows the
duplication or “mirroring” process.
ENC - Shows you the encoding process. If a CD is
being ripped to the hard drive this bar will be
active.
TOC - This graph indicates that the HDX is
generating table of contents information for files
on the hard drive.
Reset Factory Defaults
Choosing this will allow you to reset all of the
HDX settings to their factory default “fresh out of
the box” settings.
Calibration
This will allow you to recalibrate the platter, pitch
wheel and pitch slider. This may be necessary
after an operating system update.
HD Status
This screen will show you the amount of used
and available space on the hard drive.
Cleanup
The cleanup menu is where you go to delete or
rename songs. If “Delete Protect” is enabled in
the Utility menu, you will be prompted to enter
our password before you can delete or rename
any files.
15
Utility Features
Updating Firmware
To update your unit’s firmware, hold down the EJECT button, then power on the unit until it prompts you to
insert a firmware update CD. Then, follow the on-screen instructions. After you update the firmware, be sure
to recalibrate your unit through the utility menu.
Calibrating the Unit
To calibrate the unit, press MENU, select UTILITY and choose CALIBRATION. Follow the instructions as shown
on the display.
Updating the Gracenote® Database
To make sure your HDX will display the correct track and title information for new CDs, you should periodically
update the Gracenote Music Recognition Database, stored on the hard drive of the HDX.
To update the database:
1.
Download the updated Gracenote Database .zip file from the support section of www.numark.com,
and store it on your computer.
2.
Connect the HDX to the computer via USB and power up the HDX.
3.
Unzip the Gracenote .zip file to the root directory of the drive assigned to your HDX ("E:\" for
example). If asked to overwrite the existing Gracenote files, choose yes.
4.
Once the file transfer is complete, disconnect your HDX from the computer.
Formatting Your Hard Drive
To format your hard drive, first obtain the newest firmware update, available in the support section of
Numark.com. Because the firmware update is in “disc image” format, you must make sure you burn the
firmware update CD by choosing the option in your burning software that allows you to create a CD from an
image file. Since every burning program is different, you may need to refer to your CD burning software
instructions to find out how to burn a CD from an image file.
Once you have created the firmware update CD, power up your HDX while holding the EJECT button. Insert
the firmware update CD when the HDX prompts you to do so. Once the HDX recognizes the disc as a firmware
update CD, select the “Install with Format” option. This will erase the entire contents of the hard drive,
inclding all of your audio files, playlists and the Gracenote database.
Installing a New Hard Drive
You may want to use a different hard drive with your HDX, or have the ability to swap drives in and out of the
unit. When inserting a new hard drive for the first time, follow this procedure:
1.
Get the latest firmware update CD from the Numark website at www.numark.com.
2.
With the HDX powered off, remove the platter, record, and record cap by unscrewing the spindle
clockwise (note, it is reverse-threaded!)
3.
Unscrew the hard drive locking screw which is directly above the hard drive caddy.
4.
Remove the old hard drive caddy from the unit by pulling it out gently.
5.
Insert the new hard drive caddy.
6.
Replace the hard drive locking screw.
7.
Replace the platter, record, and cap by screwing the spindle on counterclockwise.
8.
Power the HDX on.
9.
Insert the update CD and wait for the upgrade to complete.
10. Turn off the HDX using the power button. When it is completely off, turn it back on again.
11. At this point you may want to follow the instructions above to install the Gracenote Music
Recognition Database.
Note: Never remove the drive from the unit while it is on!
removing the drive.
Always power off the unit before
Recovering From a Corrupted File System or Damaged Hard Drive
In the unlikely event that information on your hard drive becomes corrupted, the unit might not complete the
boot-up process, or might appear to “hang” when you try to select a song. If this happens, try the following:
Connect the HDX to a computer via USB and run “checkdisk” on it. In Windows XP, you can do this by
right-clicking on the HDX drive and selecting Properties. Then click on the Tools tab and click the “Check
Now” button. This will attempt to fix the errors on your disc.
If that does not work:
Connect the HDX to a computer via USB and try to back up your music to your computer by copying the
contents of the audio folder from the HDX to your computer. Keep in mind that this folder may be very
large, so make sure you have enough free hard drive space on your computer.
After you have backed up your audio files to your computer, download the latest operating system from
the Numark website and burn an operating system disk.
16
Power on the HDX while holding the eject button. The HDX will prompt you to insert a firmware update
CD. Insert the firmware update disc and choose the “update with format” option. This will update or
reinstall the operating system and format the hard drive, erasing all files from the hard drive.
After doing this, turn the HDX off, reconnect it to your computer via USB and try to copy the audio data
back to the HDX from your computer.
17
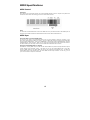
MIDI Specifications
MIDI Control
Description
Some controls can be accessed remotely via an external MIDI controller such as a computer or keyboard. The
chart below shows which notes will trigger control of various HDX functions.
Setup
You will need a standard MIDI cable. Connect the MIDI OUT from your MIDI controller to the MIDI IN port of
the HDX. Set the MIDI controller to transmit MIDI commands to the HDX on MIDI channel 6.
MIDI Sync
Syncing the HDX to an External MIDI Device
You can sync your HDX to an external MIDI device such as a drum machine, sequencer, computer, or any
other device that transmits a MIDI clock signal. Connect a MIDI cable from the external device’s MIDI OUT
jack to the HDX’s MIDI IN jack. Then turn on INTERLOCK on the HDX by pressing the MENU button, selecting
“Playback Options”, then “Interlock”. Make sure you select “On” and press down on the track knob to select it.
The HDX will then sync the tempo of the music to the MIDI clock information that it receives.
Syncing an External MIDI Device to the HDX
In addition to receiving MIDI clock, the HDX will also transmit MIDI clock, with the tempo determined by the
current reading of the HDX beat counter. This allows you to sync an external MIDI device to your HDX.
Connect a MIDI cable from the HDX’s MIDI OUT jack to the external device’s MIDI IN jack. The HDX will
transmit MIDI clock to the external device, as well as MIDI start and stop commands. In this way, you can
sync a drum machine or sequencer to the HDX.
18
Interlock
Interlock allows you to automatically synchronize the tempo of music playing on two HDX. You will need two
standard MIDI cables. Connect the MIDI OUT from the first HDX to the MIDI IN of the second. Connect the
MIDI IN of the first HDX to the MIDI OUT of the second HDX.
1.
2.
3.
4.
5.
6.
7.
8.
9.
10.
11.
Tips:
•
Turn on both HDX units.
Start one of the HDX playing. This will initially be the Master.
Start the other HDX playing. This will initially be the Slave.
On each HDX make sure the Beatkeeper™ is properly synced with the music. Use the Tap button if
necessary.
On either HDX, you can toggle Interlock mode on and off by pressing the MENU button, selecting
PLAYBACK OPTIONS, then INTERLOCK.
The slave HDX will sync its tempo to the Beatkeeper™ of the master by automatically shifting its
playback speed.
Both HDX will flash their status (“Master” or “Slave”) at the bottom of the display to indicate their
current role.
As you make adjustments to the master unit’s pitch, the slave unit will follow and attempt to
match. Adjustments you make to the Slave’s pitch slider will have no effect. The Slave’s platter
also will not affect playback, since playback speed is now controlled by the Master.
When you pause playback on the master while both units are playing, the master and slave will
exchange roles.
If the position of the pitch slider on the new Master does not match the pitch it had been playing
at, the screen will flash “Increase Pitch” or “Decrease Pitch” instead of “Master”. This means you
must move the pitch slider through the point corresponding to the pitch at which the HDX is
currently playing before you will be able to use the pitch slider to adjust the pitch. The pitch
display will show the direction and amount of adjustment needed to return the slider to the
appropriate position. This is to prevent abrupt changes in pitch when you move the slider.
On the Master HDX, the Beatkeeper will show the beat of the slave as a flashing LED if the two
HDX are not in sync. If the two HDX are in sync, the Beatkeeper LED will march normally with the
beat.
If you select a new track using the track select knob, Interlock will be turned off on the HDX you
selected the new track on. If that HDX was the Master, the other HDX will become the Master.
•
If you press the Tap button once to correct the downbeat, Interlock will remain on. However, if you
press the Tap button multiple times or hold the Tap button to correct the beat, Interlock will turn off
on that HDX.
•
As a result of the previous two notes, it is possible to end up with one HDX in Interlock mode while
the other is not. If you use the “Single” and “Menu” key combination described above you must do it
on the HDX that is not in Interlock mode. If you use the menu to turn Interlock on, it does not matter
which HDX you do this on but you must press Select once you’ve turned on Interlock, even if “ON” is
already displayed in the Interlock menu.
•
The pitch slider, 33/45 button, Reverse and Bleep do not work on a HDX when it is in Slave mode.
•
Moving the platter on a HDX that is in Slave mode has no effect.
•
You can not enable Interlock if either HDX Beatkeeper has not yet synced.
•
Brake time should work properly at all times but Start time will not work on a HDX that is in Slave
mode. If the HDX is in a mode where the playback is not controlled by the pitch slider then there may
be a noticeable jump in pitch when Pause is pressed. This is more noticeable for longer brake times.
•
When Interlock is turned on, Key Lock will automatically be enabled. You can turn Key Lock off
normally.
•
When Interlock is turned on, Smart Loop will automatically be enabled. You cannot turn Smart Loop
off while Interlock is on, because it would then be impossible to sync the music.
•
If the two HDX are out of sync by a constant amount for an extended period of time, reset the
Beatkeeper by pressing the tap button once on the downbeat of the music
19
Troubleshooting
Unit will not power up
Make sure the power cable is connected and power is being supplied to the unit. Make sure there is a hard
drive in the unit.
“HD Not Detected” message appear on power up
Make sure there is a drive in the unit. If there is a drive in the unit, shut the unti down, remove and re-insert
the drive to make sure it is connected properly.
Unit gets stuck in the “Importing” or “Checking Filesystem” stage of bootup
Please note that it can take significant time to import huge amounts of music into the HDX’s database. As a
reference, importing 5,000 tracks may take up to 15 minutes to complete. Additionally, if the HDX is shut
down by means other than the HDX power switch (i.e. an outlet strip), the entire filesystem must be checked
for corruption. On a full 80G disk, this may take up to 15 minutes. Assuming you have waited a reasonable
amount of time, here are a few possibilities to consider:
The HDX operating system requires that there is at least 100MB free on the harddisk. The HDX can hang if this
requirement is not met. If this situation occurs, remove some music from the harddisk via USB and reboot.
Another possibility is that the system directory on your disk could be damaged due to abrupt poweroff during
disk activity. See “Recovering From a Corrupted File System Directory” for more information.
Unit gets “hung” when a song is selected and displays the “rotating HDX” logo forever
The file system directory on your disk could be damaged due to abrupt poweroff during disk activity.
“Recovering From a Corrupted File System Directory”.
See
There are gaps or glitches in the audio playback
Some commercially-available CD’s are copy-protected. This means the manufacturer has intentionally inserted
a large number of errors on the disc, which makes it hard to play back on a computer, while fine to play back
on a regular CD player. This could interfere with the HDX’s ability to play or rip these files.
If the TOC (Table of Contents) has not yet been generated for the WMA or VBR MP3 file that you are playing,
glitches may occur during playback. Rip these songs onto your hard drive and wait for the unit to generate
TOCs for these as a background process before playing them.
Error messages or crashes during ripping or encoding
If you see a high number of error messages or the unit crashes frequently, the files or database on the hard
drive may be damaged or corrupted. This could be caused by errors due to improper shutdown of the HDX. It
is very important that you always use the power button on the HDX to shut down the unit.
Do not pull the plug out of of the wall or use any external outlet strips to turn the unit off.
If the information on the hard drive appears to be corrupted, the best way to try to fix it is to connect the HDX
to a computer, back up the audio files to your computer and reformat the HDX drive using the process
described on the “Utility Features” page of this manual.
A CD is stuck in the unit
If a CD is stuck and will not eject when you press the EJECT button, power off the unit, and unplug the power
cable. You’ll need a special tool which looks like flat-head a screwdriver with two prongs (Philips ECG part
number CR1833T, transport adjustment tool). On the bottom of the unit there is an access hole under the CD
player (next to the bar code label). Insert the tool and turn it clockwise. It will take a few dozen turns to fully
eject a disc.
20
Gracenote Music Recognition Service
Music recognition technology and related data are provided by Gracenote®. Gracenote is the industry standard
in music recognition technology and related content delivery. For more information visit www.gracenote.com.
CD and music-related data from Gracenote, Inc., copyright © 2000-2005 Gracenote. Gracenote CDDB® Client
Software, copyright 2000-2005 Gracenote. This product and service may practice one or more of the following
U.S. Patents: #5,987,525; #6,061,680; #6,154,773, #6,161,132, #6,230,192, #6,230,207, #6,240,459,
#6,330,593, and other patents issued or pending. Services supplied and/or device manufactured under license
for following Open Globe, Inc. United States Patent 6,304,523.
Gracenote and CDDB are registered trademarks of Gracenote. The Gracenote logo and logotype and the
"Powered by Gracenote" logo are trademarks of Gracenote.
End-User License Agreement
USE OF THIS PRODUCT IMPLIES ACCEPTANCE OF THE TERMS BELOW.
This product contains technology and data from Gracenote of Emeryville, California (“Gracenote”). The
technology from Gracenote (the “Gracenote Embedded Software”) enables this product to do disc identification
and obtain music-related information, including name, artist, track, and title information (“Gracenote Data”),
which is included on the Gracenote Database (the “Gracenote Database”).
You agree that you will use Gracenote Data, the Gracenote Database, and Embedded Software for your own
personal non-commercial use only. You agree that you will access Gracenote Data only by means of the
standard end user functions and features of this product. You agree not to assign, copy, transfer or transmit
the Embedded Software or any Gracenote Data to any third party. YOU AGREE NOT TO USE OR EXPLOIT
GRACENOTE DATA, THE GRACENOTE DATABASE, OR GRACENOTE COMPONENT, EXCEPT AS EXPRESSLY
PERMITTED HEREIN.
You agree that your non-exclusive license to use the Gracenote Data, the Gracenote Database, and Embedded
Software will terminate if you violate these restrictions. If your license terminates, you agree to cease any and
all use of the Gracenote Data, the Gracenote Database, and Gracenote Embedded Software. Gracenote
reserves all rights in the Gracenote Data, Gracenote Database, and Gracenote Embedded Software, including
all ownership rights. You agree that Gracenote may enforce its rights under this Agreement against you directly
in its own name.
The Embedded Software and each item of Gracenote Data are licensed to you “AS IS.” Gracenote makes no
representations or warranties, express or implied, regarding the accuracy of any Gracenote Data. Gracenote
reserves the right to delete data or to change data categories in any Data updates and for any cause that
Gracenote deems sufficient. No warranty is made that the Embedded Software is error-free or that functioning
of the Embedded Software will be uninterrupted. Gracenote is not obligated to provide you with any new
enhanced or additional data types or categories that Gracenote may choose to provide in the future.
GRACENOTE DISCLAIMS ALL WARRANTIES EXPRESS OR IMPLIED, INCLUDING, BUT NOT LIMITED TO, IMPLIED
WARRANTIES OF MERCHANTABILITY, FITNESS FOR A PARTICULAR PURPOSE, TITLE, AND NONINFRINGEMENT. GRACENOTE DOES NOT WARRANT THE RESULTS THAT WILL BE OBTAINED BY YOUR USE OF
THE GRACENOTE COMPONENT OR ANY GRACENOTE SERVER. IN NO CASE WILL GRACENOTE BE LIABLE FOR
ANY CONSEQUENTIAL OR INCIDENTAL DAMAGES OR FOR ANY LOST PROFITS OR LOST REVENUES.
General Public License
Parts of the software provided with the Numark HDX are covered by the GNU (http://www.gnu.org) General
Public License and the Lesser General Public License. Under the terms of the license we are required to
provide the source code for these components. These can be found included CD and on our website
(http://www.numark.com).
21
SPECIFICATIONS
MOTOR
TYPE: Heavy duty turntable motor with 12” aluminum platter
WOW/FLUTTER: 0.15% max
SPEEDS: 33, 45 RPM
BRAKE TIME: 0.25 to 8 sec
START TIME: 0.25 to 6 sec
INSTANTANEOUS TORQUE: 4.7 kgf cm
POWER SUPPLY
TYPE: Internal transformer with voltage selector switch, internal switching power supply
CONNECTOR: Standard IEC
VOLTAGE: AC 115V/230V ~ 50-60Hz
CONSUMPTION: 40W
CD PLAYER
TYPE: IDE slot-load, 8X minimum speed
MEDIA: CD, CD-R, CD-RW, MP3 CD
HARD DRIVE
TYPE: 2.5-inch x 9.5mm IDE laptop hard drive, ATA-6, 8192kB data buffer, 4200RPM minimum
MOUNTING: M3 screws
AUDIO
ANALOG OUTPUT: 1.3V RMS+/- 0.2V
HARMONIC DISTORTION: Less than 0.02%
SNR: More than 85dB
SEPARATION: More than 85dB
DYNAMIC RANGE: More than 80dB
OUTPUT LEVEL: 1.3V+/0.2V (1KHz 0dB)
CHANNEL BALANCE: +/-1dB
FREQUENCY RESPONSE: 20-20kHz
DIGITAL OUTPUT: Type 2, form 1, S/PDIF
PHYSICAL
DIMENSIONS: 14.5” by 17.75” by 5.25” (368mm by 450mm by 130mm)
WEIGHT: 22.0 lbs (10kg)
Specifications are subject to change due to ongoing improvements.
User Manual Revision 3.0
22