1
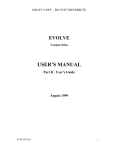
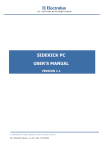
Aspdnsf Sitemap Pro User Manual Revision 1.01 (BETA) Simrun Technologies www.simrun.com Copyright © 2003 - 2012 Simrun Technologies L.L.C 7902 Wrenwood Blvd Suite B ∙ Baton Rouge, LA 70809 ∙ 1-877-SIMRUN1 ∙ www.simrun.com E-commerce Solutions About Aspdnsf Sitemap Pro Thank you for choosing Aspdnsf Sitemap Pro, we hope using Aspdnsf Sitemap Pro will make managing sitemaps for your Aspdotnetstorefront Site easier to manage for both single store and multi-store installs. Aspdnsf Sitemap Pro is designed as a windows based program and installs on its own database to maintain sitemap information so that you can submit sitemap information to various online search engines. Sitemaps are important in that they provide site crawlers a clear path to all of your products, entities, topics and website information. Aspdnsf Sitemap Pro is designed to handle large sites which millions of URL’s and doesn’t have issues such as time out errors and hang-ups that are all-to-common on pure web based sitemap generators. Aspdnsf Sitemap pro runs on its own database and code, hence its upgrade proof so you won’t need to carry it over when you upgrade your Aspdotnetstorefront site. Please note, this manual in its current form is considered a beta manual, meaning some information, spelling, and grammatical errors may exist; we are working on fixing these issues for you and should have a final version released shortly. If you have questions regarding something that is not explained correctly, please feel free to send us an email at [email protected] and we’ll be glad to help you (note assistance is available to registered customers). Be sure to visit our site for any updates and information regarding Aspdnsf Sitemap Pro: http://www.simrun.com/AspDotNetStoreFront/AspdnsfSitemapPro.aspx Copyright © 2003 - 2013 Simrun Technologies L.L.C. 7902 Wrenwood Blvd Suite B ∙ Baton Rouge, LA 70809 ∙ 1-877-SIMRUN1 ∙ www.simrun.com 2 E-commerce Solutions Table of Contents CHAPTER 1: REQUIREMENTS & INSTALATION ASPDOTNETSTOREFRONT MINIMUM REQUIREMENTS INSTALLING WSI FILES UPDATING WEB.CONFIG ASPDNSF SITEMAP PRO MINIMUM REQUIREMENTS INSTALLING ASPDNSF SITEMAP PRO TESTING CONNECTION & CONFIGURATION DATABASE CONFIGURATION CHAPTER 2: SETTING UP ACCOUNTS SETUP YAHOO & BING SITEMAP 12 POPULATE DATABASE DOWNLOAD SITEMAP INFORMATION CHAPTER 4: SUBMITTING SITEMAPS 11 SETUP GOOGLE SITEMAP CHAPTER 3: USING ASPDNSF SITEMAP PRO 4 14 CONFIGURE YOUR SITEMAP SUBMITTING SITEMAP FILES Copyright © 2003 - 2013 Simrun Technologies L.L.C. 7902 Wrenwood Blvd Suite B ∙ Baton Rouge, LA 70809 ∙ 1-877-SIMRUN1 ∙ www.simrun.com 3 E-commerce Solutions Chapter 1: REQUIREMENTS & INSTALATION ASPDOTNETSTOREFRONT WSI IPX MINIMUM REQUIREMENTS Aspdnsf Sitemap Pro requires the WSI Interface which was introduced for AspDotNetStorefront in version 7.23, hence the minimum requirements to run Aspdnsf Sitemap Pro is the ML 7.23 version of AspDotNetStorefront. Note some features may not be available in versions below the Multi-Store version of 9.X MSX and as such the minimum version officially supported by Aspdnsf Sitemap Pro is 9.X MSX starting with the R3 generation of Aspdnsf Sitemap Pro. While Aspdnsf Sitemap Pro will work on any version above 7.23 product support from Simrun Technologies is only offered on 9.X MSX and higher due to changes in the WSI system and on-going security patches released by Aspdotnetstorefront. If you are running a version of Aspdotnetstorefront older than 9.X MSX, please consider upgrading as the newer 9.X MSX provides new functionality and greater stability over previous releases and ensures that the latest third party integrations work properly with your cart. Aside from the minimum version of AspDotNetStorefront you will need the following to install the WSI component to your site: FTP Root Access to the directory that hosts your site (contact your web host for more details) A Super User Admin and password to your site Access to the web.config file and the ability to edit the file to enable the WSI component Access to the IPX and WSI files for your particular version so that you can install the files needed to run the WSI component. Ensure that the WSE 3.0 Add-on is installed on your Server (Windows 200 and Windows 2003 ONLY, windows 2008 already has this installed) OPTIONAL: Access to your IIS Server, or a way to restart you website after you have made the changes. If this is not available then you’ll need to contact your host to restart your website after you have installed the WSI interface. Once you have all the above you are ready to install the WSI component so Aspdnsf Sitemap Pro can connect to your website. INSTALLING WSI IPX FILES The first step in installing the WSI interface is to install the WSI files in your Aspdotnetstorefront site so that you have an interface from which the Aspdnsf Sitemap Pro can “Talk” to your site. This is fairly straight forward process and only requires you copy files that were included in your installation Copyright © 2003 - 2013 Simrun Technologies L.L.C. 7902 Wrenwood Blvd Suite B ∙ Baton Rouge, LA 70809 ∙ 1-877-SIMRUN1 ∙ www.simrun.com 4 E-commerce Solutions zip/folder over to your production site. Begin by looking in your install directory (the place you extracted your aspdotnetstorfront files) and look for a folder called WSI from this folder you’ll need to do the following: 1. Copy the ASPDNSFUserNameTokenManager.cs and ipx.cs files into the {root}/App_Code folder on your site. 2. Copy the ipx.asmx and ipx.xml files from the WSI folder to the root of your site. At this point you can rename the IPX.asmx file to something else If you want (for security purposes) or you can leave it as is, do not rename the extension, this should remain .asmx. Once you have done this you have installed the WSI Interface files, now all that remains is to update the web.config and ensure that the WSI URL is working properly. UPDATING WEB.CONFIG The WSI Interface requires that you modify the web.config to enable the WSI component, this step is a bit tricky but is required to enable the WSI Interface. To begin download the web.config from your root folder via ftp and save a copy of it as a backup. Now open your web.config with visual studio if you have it, or using NOTEPAD. Look for the commented lines related to the WSI they should say something along the lines: <!-- WSI Web Service Interface --> <!-- There are four separate sections within this file that need to be un commented. This is section 1 of 4. --> <!-- WSI Web Service Interface (Section 1 of 4) Uncomment the following line to enable WSI Web Service Interface--> <!-<section name="microsoft.web.services3" type="Microsoft.Web.Ser vices3.Configuration.WebServicesConfiguration, Microsoft.Web.Services3, Version=3.0.0.0, Culture=neutral, PublicKeyToken=31bf3856ad364e35"/> --> You’ll need to remove the “<!—“and the “-->” to uncomment the line the, area that needs to be uncommented has been bolded and enlarged for you. There are 4 areas where you have to uncomment WSI Interface items to enable the WSI Interface. PLEASE NOTE: Not all installs will work with all 4 areas of the WSI commented out. You may need to uncomment 1 of 4, 2 of 4 and 3 of 4 but leave 4 of 4 commented on some installs to get the Aspdnsf Sitemap Pro to connect properly. If this still does not work you try commenting step 3 of 4. If that still does not work, contact Simrun Support (For registered and active support holding customers only). Copyright © 2003 - 2013 Simrun Technologies L.L.C. 7902 Wrenwood Blvd Suite B ∙ Baton Rouge, LA 70809 ∙ 1-877-SIMRUN1 ∙ www.simrun.com 5 E-commerce Solutions Once you have done this, ftp the updated web.config file back to your root folder and go to your website and navigate to your IPX URL (WSI Interface) e.g. www.yourdomain.com/ipx.asmx (Note if you renamed your .asmx page than you’ll need to go to that file). Upon arriving to the page you should see something like this: If you see this page, then your WSI component is installed (the files at least) NOTE: Even though the page displays it may not mean your web.config is setup correctly as you may still not be able to connect, we’ll verify this when we try to have Aspdnsf Sitemap Pro connect to your site’s WSI interface. Once you have completed this step your website now has a functioning interface from which Aspdnsf Sitemap Pro can talk to, now the fun begins as we can install Aspdnsf Sitemap Pro and make you site managing a whole lot easier. ASPDNSF SITEMAP PRO MINIMUM REQUIREMENTS Aspdnsf Sitemap Pro now is a windows only program. Aspdnsf Sitemap Pro, while it will probably work on other O.S. using emulators and other programs that allow you to run windows programs on other O.S. such as Mac/Linux, our supported minimum requirements are as follows: Windows XP w/Sp3 or higher (windows 7 professional recommended) Windows 8 support is only available if you turn off smart screen filter. Asp.net 2.0 and higher Copyright © 2003 - 2013 Simrun Technologies L.L.C. 7902 Wrenwood Blvd Suite B ∙ Baton Rouge, LA 70809 ∙ 1-877-SIMRUN1 ∙ www.simrun.com 6 E-commerce Solutions 2.5 Ghz CPU or higher (Any Dual Core 2.0 ghz or higher is recommended) 2 GB ram or higher (4GB ram or higher recommended A broadband internet connection (512 Kbs) or higher 200 Mb install space (more will be needed to store log files and image resizing, 2-4 Gigabytes of free space recommended) If using professional version of any windows OS you will need administrator rights and the ability to run programs as an Administrator (i.e. right click and select run as Administrator on windows vista and windows 7). TESTING CONNECTION & CONFIGURATION To download Aspdnsf Sitemap Pro visit the Simrun Website: http://www.simrun.com/AspDotNetStoreFront/AspdnsfSitemapPro.aspx and download the latest release. The installer is fairly straight forward, chose your destination, decide who has access to the program and you will have the program installed with your selected options. You’ll need to agree to the legal disclaimer and waiver of liability before you can proceed, make sure you understand this; for 99.999% of the folks that will be using Aspdnsf Sitemap Pro, this is known as “The Legal Mumbo Jumbo”, and is the same as the countless disclaimers on various software, but never the less it’s there and must be agreed upon before you can install it on to your machine. NOTE: Aspdnsf Sitemap Pro may install new stored procedures and database fields on to your sites database. This is needed to ensure proper functionality and does not hamper the stock AspDotNetStorefront’s functions in anyway. If you need details on what changes are made to the database please contact Simrun Support at [email protected]. WSI CONFIGURATION After you have installed Sitemap Pro, its now time to setup the Database and the WSI configuration, to begin we’ll first setup the WSI. On the configuration tab, click on the WSI Configuration sub tab, this will bring up the WSI Configuration options: Copyright © 2003 - 2013 Simrun Technologies L.L.C. 7902 Wrenwood Blvd Suite B ∙ Baton Rouge, LA 70809 ∙ 1-877-SIMRUN1 ∙ www.simrun.com 7 E-commerce Solutions Here you’ll need to enter the following information: WSE3 Service URL: This is your IPX url (NOT YOUR WEBSITE ADMIN) e.g. http://www.yourdomain.com/ipx.asmx make sure you include the HTTP:// prefix, without it Aspdnsf Sitemap Pro won’t connect RETAIL VERSION: The retail version of Aspdnsf Sitemap Pro will not ask you for a registration key, instead you will provided with a .licx license file that you will need to place into the root folder where you installed Aspdnsf Sitemap Pro. After you place the file in the root, restart Aspdnsf Sitemap Pro and your license information will be displayed inside the ABOUT tab. Admin Email: Your SUPER ADMIN login email address (this is the same login that you use to log into your site’s admin) Admin Password: Your SUPER ADMIN password (the same password you use to log into your site’s admin) Log Folder Path: This is the directory where Aspdnsf Sitemap Pro will store its logs of activities, you can change this to any directory that you have write access to. NOTE this folder can get fairly big so make sure you enough space, you can also delete old log files that you no longer need. Copyright © 2003 - 2013 Simrun Technologies L.L.C. 7902 Wrenwood Blvd Suite B ∙ Baton Rouge, LA 70809 ∙ 1-877-SIMRUN1 ∙ www.simrun.com 8 E-commerce Solutions Processed Folder Path: This is the folder where Aspdnsf Sitemap Pro will move processed files such as completed import files, or resized images, NOTE this folder can get fairly big so make sure you enough space, you If you get an error saying Connection Failed then you need to ensure that your WSI is installed properly (see Installing WSI in this manual), other reasons could be: Can’t Connect/Failed: If you are sure that the WSI is installed properly; Make sure you are using a SUEPR ADMIN LOGIN as regular Admin Logins do not work. Also verify your password hasn’t expired by trying to log into your website admin. If you have followed the directions and STILL CAN NOT CONNECT, Please Leave Step 4 in the webconfig COMMENTED, this is because on some version of ML 8 and MSX v9 the Aspdnsf Sitemap Pro has issues with the tokenmanager.cs, this issue is further explained here: http://manual.aspdotnetstorefront.com/p-1213-wsi-sample-test-program-not-working-withdownloadable-demo.aspx WSI Page Not displaying/Working: Make sure you have WS3 Web Services Enhancements installed on your machine and you also have installed the WSI component properly. Check the manual for more help: http://manual.aspdotnetstorefront.com/wsi/ and view the installing WSI in this manual. If your connection is successful, click the Save Configuration button, upon doing this you have successfully setup the WSI portion of Aspdnsf Sitemap Pro and now it’s time to setup the database. DATABASE CONFIGURATION Aspdnsf Sitemap Pro has 2 options for database: 1. Setup Database locally on your local machine. 2. Use the same database that runs your Aspdotnetstorefront Store. Option 2 (local) should be available to most users, as it doesn’t require remote sql server access, however, if you would like to use the same database as the one that is used to run your site, you may use Option 2 (NOTE: if you are on a dedicated server and are running Aspdnsf Sitemap Pro on the same server you run your site, its recommended you use option 2 for the best performance). In this manual we will keep database installation procedures to a minimum as there are various online tutorials explaining how to install SQL SERVER. For Aspdnsf Site Map Pro we recommend you use any version of SQL SERVER 2012 (express works well and is free), here are some tutorials on how to install SQL Server: http://www.soheib.com/technical-knowledge/sql-server-2012-express-installation-tutorial/ http://databases.about.com/od/sqlserver/ss/Installing-Sql-Server-2012-Express-Edition.htm Copyright © 2003 - 2013 Simrun Technologies L.L.C. 7902 Wrenwood Blvd Suite B ∙ Baton Rouge, LA 70809 ∙ 1-877-SIMRUN1 ∙ www.simrun.com 9 E-commerce Solutions http://www.orcsweb.com/blog/mark-newnam/how-to-install-sql-server-2012-express-edition/ After you installed your database software and created a database, you will need to enter your database and login information into Aspdnsf Sitemap Pro. Begin by clicking on the configuration tab and then clicking on the Database Configuration Sub-Tab: Most of the fields should be self-explanatory; however, one of the fields is of particular note: Backup Database, this will allow you to create a database backup. NOTE: This will only be available if you have access to the database (i.e. Option 1) and will allow you to restore the database if you create changes that you did not intend to. After entering in your information and testing the connections, you will now need to create your initial database; click the Create Database button and this will begin the process to update your local or remote database with the table information needed by Aspdnsf Sitemap Pro. Once the database is created you can begin creating the sitemap files. After completing the WSI and Database configuration and setup, you are now ready to use Aspdnsf Sitemap Pro to generate your sitemaps. Copyright © 2003 - 2013 Simrun Technologies L.L.C. 7902 Wrenwood Blvd Suite B ∙ Baton Rouge, LA 70809 ∙ 1-877-SIMRUN1 ∙ www.simrun.com 10 E-commerce Solutions Chapter 2: Setting Up Accounts SETUP GOOGLE SITEMAP Aspdnsf Sitemap Pro requires that you have account setup with major search engines so that your URLS can be indexed. Aspdnsf Sitemap Pro initially supports: Google, Yahoo & Bing, more crawlers will be added as they gain market share. For our first Sitemap we shall look at Google which as of June 2013 accounts for about 65% of all search engine traffic, to setup Google Sitemaps, please follow this link: https://support.google.com/sites/answer/100283?hl=en Aspdnsf Sitemap pro supports multiple stores so you’ll want to make sure you have setup sitemaps for all of your stores setup in your accounts. Once you have setup and verified your site you can now setup accounts with Yahoo & Bing. SETUP YAHOO & BING SITEMAPS Similar to Google, Bing & Yahoo use their webmaster tools to allow you submit sitemap information to them. Since 2010 Microsoft & Yahoo have joined forces so the file format for both Yahoo & Bing are the same, however, you may need to setup both Yahoo & Bing accounts separately should Yahoo & Bing split up. For BING/Yahoo, follow these instructions: http://www.bing.com/webmaster/help/how-to-submit-sitemaps-82a15bd4 After you Have setup both accounts, please test your account settings and perform all verification as needed by the search engines, once this is done you will be ready to submit sitemap information to them via Aspdnsf Sitemap Pro. Copyright © 2003 - 2013 Simrun Technologies L.L.C. 7902 Wrenwood Blvd Suite B ∙ Baton Rouge, LA 70809 ∙ 1-877-SIMRUN1 ∙ www.simrun.com 11 E-commerce Solutions Chapter 3: Using Aspdnsf Sitemap Pro POPULATE DATABASE Once you have installed your database and setup your accounts with search engines, you can now start using Aspdnsf Sitemap Pro. Aspdnsf Sitemap Pro is essentially a 3 part process: 1. Setting up your sitemap criteria 2. Download URL information into Sitemap Pro’s database table 3. Generate your sitemap file and upload it to your live site sitemap directory Begin by clicking on the Sitemap tab on Aspdnsf Sitemap Pro; there you will see a screen showing you various options regarding the URLs that can be downloaded into the Sitemap Pro’s database: If you are using a Multi-store install, the Store drop down will allow you to generate sitemaps/store; if only 1 store is detected the Store dropdown will be disabled. You will notice various Checkboxes such as Add Product Url, Add Category, Add Section URL, these are options that allow you to decide what type of URLs will be added to your database, you can decide if you want to restrict certain types of urls from being downloaded into your database (e.g. you may not want Copyright © 2003 - 2013 Simrun Technologies L.L.C. 7902 Wrenwood Blvd Suite B ∙ Baton Rouge, LA 70809 ∙ 1-877-SIMRUN1 ∙ www.simrun.com 12 E-commerce Solutions to download Distributor URLs to a search engine) information if you don’t have that available. After you select the fields you will notice an Add Page Number in Entity URL followed by a text box option, this allow you to submit individual pages inside your entities to search engines; so if you have a category with 100 products inside 5 different pages (20/page) the Add Page Number in Entity Url will allow you to submit all 5 pages individually in the sitemap to ensure all content inside the category can be indexed. NOTE: Aspdnsf Sitemap Pro does not have support for unsupported entities such as Vectors, Genres, and Libraries; these may be added in a future version of Aspdnsf Sitemap pro if they are officially supported by Aspdotnetstorefront. DOWNLOAD SITEMAP INFORMATION Once you have selected the criteria that you would like to select, you can now download information from your website onto the Aspdnsf Sitemap Pro database. This process connects to your website’s wsi interface and downloads sitemap information into the Aspdnsf Sitemap Pro database tables. Click on the Populate Database to begin the download, after the download is complete you will then be able to create sitemaps. NOTE: you’ll need to re-update your database after you make changes to your product mix or if you add new entities/topics, this is needed to ensure that Aspdnsf Sitemap Pro has the latest version of your urls. Once your information is downloaded, you can now manually update each URL record with sitemap specific information if desired, you’ll notice on the right hand side each URL entry has options for setting up the frequency and last time the URL was changed as well as the priority each URL this is Meta Data that is used by search engines to help them index your sitemap; you can choose to leave this empty if you wish as it is not required to get your URL listed on sitemaps. NOTE: You can select which store to create sitemaps for; by default it will create sitemaps/store so you’ll need to run the process for each store. Copyright © 2003 - 2013 Simrun Technologies L.L.C. 7902 Wrenwood Blvd Suite B ∙ Baton Rouge, LA 70809 ∙ 1-877-SIMRUN1 ∙ www.simrun.com 13 E-commerce Solutions Chapter 4: Submitting Sitemaps CONFIGURE YOUR SITEMAP After you have downloaded your sitemap information from your website, you are now ready to generate and FTP your sitemap files to your site. This process is fairly straight forward but before you begin you will need to make sure you have your sitemap accounts set up with Google, Yahoo/Bing (see chapter 2 for more information). Begin by clicking on the Generate Sitemap Files & Upload sub tab, here you’ll see options first showing the search engine Request Urls, these are essentials “calls” to the search engine so that they can download and crawl your sitemaps. The default as of June 2013 are as follows: Google: http://www.google.com/webmasters/tools/ping?sitemap= Yahoo/Bing: http://www.bing.com/webmaster/ping.aspx?siteMap= After this you can select if you want to upload sitemap information for just 1 store, or if you would like to upload information for all available stores (for multi-store installs). Copyright © 2003 - 2013 Simrun Technologies L.L.C. 7902 Wrenwood Blvd Suite B ∙ Baton Rouge, LA 70809 ∙ 1-877-SIMRUN1 ∙ www.simrun.com 14 E-commerce Solutions UPLOAD SITEMAP FILES You’ll need to provide your FTP information; this is where the sitemap files will be uploaded, for best compatibility, make sure the FTP path/connection is to the path that you have specified in your Search engine webmaster tools, as this is where they crawlers will be looking for the sitemap file(s). Finally be sure to click the Verify FTP Settings button to ensure your info is correct. After you have verified your FTP Settings you can now select the criteria you wish to include in your sitemap, these options are very similar to the Populate Sitemap Database tab, however, the difference is that in this tab you are deciding what entries are going to be included in the sitemap file itself whereas the Populate Sitemap Database selects what information will be downloaded to the Aspdnsf Sitemap Pro database. NOTE: You can also setup a default frequency and priority for each of the records during the file creation process. You will notice on the right there are options for splitting up the sitemap file, this is extremely important if you have sitemaps that will exceed 50,000 records. Aspdnsf Sitemap pro allows you to split up sitemap files so that they can meet the requirements most search engines have (e.g. Google has a 50,000 record/sitemap limit). Aspdnsf Sitemap Pro does this by creating a sitemap index file and then uploading separate sitemap files, you will need to make sure you have this index file setup as the main file in your webmaster tool accounts on Google, Yahoo/Bing as this is the file that tells the search engine crawler where all of your sitemap files are. After you have selected your criteria and information for your sitemap file, you can now generate and upload your sitemap file(s), click on the Start Process to begin the sitemap file(s) creation process. After the sitemap file(s) have been crated, Aspdnsf Sitemap Pro will upload these files to the directory/path you have specified in the FTP settings. After the upload is complete, log onto your webmaster tool accounts on Google, Yahoo/Bing and make sure that the search engine has received your sitemap and is currently crawling it. NOTE: it’s not uncommon for search engines to take a couple of hours before they update the webmaster tools area, so if the status isn’t updated check back in an hour or two. Copyright © 2003 - 2013 Simrun Technologies L.L.C. 7902 Wrenwood Blvd Suite B ∙ Baton Rouge, LA 70809 ∙ 1-877-SIMRUN1 ∙ www.simrun.com 15