1
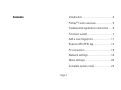
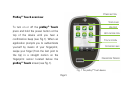
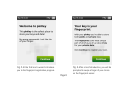
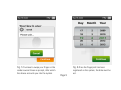
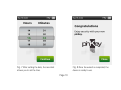
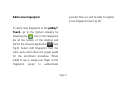
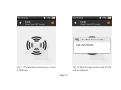
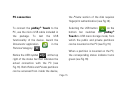
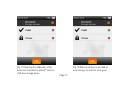
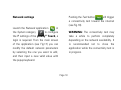
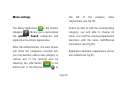
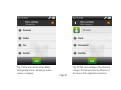
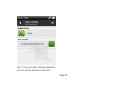
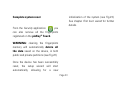
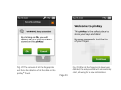
PINKEY® TOUCH
USER MANUAL
Page 2
Introduction ..............................................4
Contents
PinKey® Touch overview ..........................5
Fundamental application interaction ......6
First boot wizard .......................................7
Add a new fingerprint ............................11
Read an NFC/RFID tag ...........................13
PC connection .........................................15
Network settings ....................................18
Menu settings ........................................20
Complete system reset ..........................23
Page 3
Introduction
PinKey® Touch is a compact lightweight handheld device built for security,
access control and micropayment
purposes. It features a fingerprint sensor
for fingerprint reading, NFC hardware
with read/write capabilities and a 2.8”
touch screen for intuitive interaction and
ease of use.
Page 4
POWER BUTTON
PinKey® Touch overview
STATUS BAR
®
To turn on or off the pinKey Touch
press and hold the power button at the
top of the device until you hear a
confirmation beep (see Fig.1). When an
application prompts you to authenticate
yourself by means of your fingerprint,
swipe your finger (from the last joint to
the tip) in a straight motion on the
fingerprint sensor located below the
pinKey® Touch screen (see Fig.1).
USB PORT
APPLICATION ICON
TOUCH SCREEN
CATEGORIES BAR
FINGERPRINT SENSOR
Fig. 1 The pinKey® Touch device.
Page 5
Fundamental application interaction
To launch an application, click the
corresponding icon on the pinKey®
Touch desktop. To close the application,
select the close button
always
visible on the right of the title bar. The
application interaction experience may
vary depending on the user interface
implemented by the developers, although
the user should always be allowed to
return to the previous screen by pressing
the back button
on the left side of
the title bar (see Fig.2).
SUBTITLE
TITLE BAR
BACK BUTTON
CLOSE BUTTON
APPLICATION
TITLE
Fig. 2 An example of a pinKey® Touch
application user interface.
Page 6
WARNING: please notice that this
Tech Preview of ODIN OS™ does not
implement the plausible deniability
feature yet, thus, when asked for its
activation, select Skip. Pressing Continue
will ask for a new fingerprint enrollment,
but will not result in any actual
activation of the plausible deniability
option.
First boot wizard
The first time you turn on your pinKey®
Touch, you will be prompted to register
at least one fingerprint. Follow the steps
of the wizard to successfully complete
the registration. Please refer from Fig.3
to Fig.8. During the wizard you will be
asked to set the time and date of the
device; for later adjustments, use the
Date Time application
in the System
category
.
During the regular use of the device,
when asked by an application, swipe the
previously registered finger.
Page 7
Fig. 4 After a brief introduction, you will be
Fig. 3 At the first boot a wizard introduces
you to the fingerprint registration progress.
Page 8
prompted to swipe a finger of your choice
on the fingerprint sensor.
Fig. 5 You have to swipe your finger on the
Fig. 6 Once the fingerprint has been
reader several times as prompt, after which
the device accounts you into the system.
registered on the system, the date must be
set.
Page 9
Fig. 7 After setting the date, the assistant
Fig. 8 Once the wizard is completed, the
allows you to set the time.
device is ready to use.
Page 10
yourself, then you will be able to register
a new fingerprint (see Fig.10).
Add a new fingerprint
To add a new fingerprint to the pinKey®
Touch, go to the System category by
selecting the
icon in the categories
bar at the bottom of the desktop and
launch the Security application
(see
Fig.9). Select Add fingerprint from the
main menu and follow the popup guide
for the enrollment procedure. When
asked to log in, swipe your finger on the
fingerprint sensor to authenticate
Page 11
Fig. 9 The System category of the pinKey®
Fig. 10 The Security application allows you
Touch.
to register new fingerprints.
Page 12
After an RFID target has been acquired,
its UID will be read and displayed on the
screen (see Fig.12).
Read an NFC/RFID tag
In the Wallet category
launch the
Cards application
. Select Read tag: a
sights image will start to blink on the
screen, inviting you to aim at the RFID
card to read (see Fig.11).
Please notice the
symbol at the top
right of the status bar, indicating that the
NFC hardware of the pinKey® Touch is
on.
Page 13
Fig. 11 The animation prompts you to touch
Fig. 12 After the tag has been read, its UID
an RFID tag.
will be displayed.
Page 14
PC connection
the Private section of the disk requires
fingerprint authentication (see Fig.14).
To connect the pinKey® Touch to the
PC, use the micro USB cable included in
the package. To test the USB
functionality of the device, launch the
Documents application
in the
Personal category
.
Selecting the USB button
on the
bottom bar switches the pinKey®
Touch to USB mass storage mode, from
which the public and private partitions
can be mounted on the PC (see Fig.15).
When a partition is mounted on the PC,
the corresponding status indicator turns
green (see Fig.16)
Notice the USB symbol
at the top
right of the status bar that indicates the
actual connection with the PC (see
Fig.13). Both Public and Private partitions
can be accessed from inside the device,
Page 15
Fig. 13 The Documents applications lets
Fig. 14 The private partition allows you to
you select between the public and the
private partitions of the disk.
store important and sensitive files.
Page 16
Fig. 15 Selecting the USB button of the
bottom bar switches the pinKey® Touch to
USB mass storage device.
Fig. 16 When a partition is mounted as
mass storage, its indicator turns green.
Page 17
Pushing the Test button
will trigger
a connectivity test toward the internet
(see Fig.18).
Network settings
Launch the Network application
in
the System category
to configure
the IP settings of the pinKey® Touch, a
login is required. From the main screen
of the application (see Fig.17) you can
modify the default network parameters
by selecting the one you want to edit,
and then input a new valid value with
the popup keyboard.
WARNING: The connectivity test may
take a while to perform completely
depending on the network availability. It
is recommended not to close the
application while the connectivity test is
in progress.
Page 18
Fig. 17 The Network application allows you
to edit the network interface parameters.
Page 19
Fig. 18 By pushing the Test button the
device will perform a test of connectivity
toward the internet.
Menu settings
the left of the category
respectively (see Fig.19).
The Menu application
in the System
category
allows you to personalize
the pinKey® Touch categories and
application launchers appearance.
Select an item to edit the corresponding
category, you will able to change its
name, icon and the contained application
launchers with the same Add/Remove
mechanism (see Fig.20).
After the authentication, the main screen
will show the categories currently set;
you may decide to add a new category or
remove any of the existing ones by
selecting the Add button
on the
bottom bar or the Remove button
at
name
Application launchers appearance can be
also edited (see Fig.21).
Page 20
Fig. 19 The main screen of the Menu
Settings application, allowing to add or
remove a category.
Page 21
Fig. 20 The menu settings of the Personal
category that allows basic modification of
the layout of the application launchers.
Fig. 21 From the Menu Settings application
you can edit the application launchers.
Page 22
initialization of the system (see Fig.23).
See chapter First boot wizard for further
details.
Complete system reset
From the Security application
you
can also remove all the fingerprints
registered on the pinKey® Touch.
WARNING: clearing the fingerprints
memory will automatically delete all
the data saved on the device, in both
public and private partitions (see Fig.22).
Once the device has been successfully
reset, the setup wizard will start
automatically, allowing for a new
Page 23
Fig. 23 After all the fingerprints have been
deleted, the setup wizard will automatically
start, allowing for a new initialization.
Fig. 22 The removal of all the fingerprints
will force the deletion of all the data on the
pinKey® Touch.
Page 24
starting from the delivery date of the goods and
certified by an official and fiscally valid document.
Consumers lose their rights under this warranty if
the lack of conformity is not notified to the seller
within two months from the date on which the
defect was discovered.
In order to activate the warranty, it is necessary to
keep the warranty certificate along with a fiscally
valid delivery document (transportation document,
invoice, receipt, other) stating the name of the
seller, delivery date, product identification and sale
price; in case of a claim, both documents must be
submitted.
In order to make this Standard Warranty valid in
full, it is necessary that:
- the equipment is used in careful compliance with
the instructions detailed in the Instruction Manual
supplied with the equipment;
- any repair is performed by the Manufacturer and
spare parts used are exclusively original spare
Warranty certificate
This Warranty Certificate details the terms and
conditions of the Standard Warranty granted to the
Consumer; such terms and conditions do not
compromise – and they abide in full to – the rights
granted to Consumers by Legislative Decree No. 24
dated February 02/2002, issued as the
implementation of the European Parliament
Directive 1999/44/CE and Legislative Decree No.
206 dated September 2005.
Terms and Conditions of Validity
In case of lack of conformity at the time of
equipment delivery attributable to faults or
omissions of the manufacturer, Card Tech warrants
its products, under the terms and conditions of this
warranty, and according to the aforementioned
regulations, for a period of 24 months (12 months
for entities with a VAT number and that have
purchased the goods for professional purposes)
Page 25
the warranty, it is the obligation of the consumer
wishing to take advantage of the remedies granted
by the warranty, to prove the lack of conformity of
the goods from the date of delivery; thus, if the
consumer is unable to provide such evidence, the
expected warranty conditions would not apply.
Any repair or replacement will not extend beyond
the original warranty period, which always starts
from the delivery date.
parts, the same goes for any accessory which use
may affect the performance of the product.
Warranty Purpose
If, during the warranty period, it is established and
acknowledged that there is a lack of conformity on
the goods caused by faults or omissions of the
manufacturer, Consumers shall be entitled to the
recovery of conformity of the goods, at no charge if
suitable conditions apply, by repair or replacement,
unless the remedy requested is impossible or
unreasonably expensive and without prejudice to
other provisions in favor of Consumers, established
by the aforementioned regulations. It is understood
that, unless proven otherwise, lack of conformity
that occurs within six months from delivery of the
goods is assumed to be already existing on such
date, unless this assumption is incompatible with
the nature of the goods or the nature of the lack of
conformity. For the subsequent period of validity of
Territorial Extension
This warranty certificate is valid only if the defect
is found on a product purchased within Italy,
including the Republic of San Marino, Vatican City
and in all the states of the EU.
Consumers can contact Card Tech directly by
dialing +390240047473 or visit the website
www.card-tech.it. For buyers of Card Tech products
residing in other countries, the warranty will be
Page 26
regulated according to conditions in force in the
individual countries.
Limitation of Manufacturer’s Liability
Card Tech is not responsible for any damages that
may be caused directly or indirectly to people or
properties for failure to comply with all the
requirements specified in the Instruction Manual.
Once the warranty is expired, the cost of any
repairs will be paid by the Consumer.
Exclusion clauses
This warranty does not apply to all the components
showing lack of conformity caused by wear and
tear, negligence, carelessness of use and poor
maintenance by the consumer due to failure to
respect the instructions and recommendations
included in the product Instruction Manual, and in
any case it does not apply in all the circumstances
that are not attributable to faults or omissions of
the manufacturer.
All the accessories are covered by warranty only if
manufacturing defects are proven.
If at the request of the Consumer, Card Tech
performs a technical assistance in relation to the
above, all costs of the technical intervention as
well as any spare parts will be paid by the
Consumer.
Court of Jurisdiction
The Court of Udine (UD), Italy, shall have
jurisdiction in case of any dispute.
Notes
This manual refers to the 0.9.8 Tech Preview
version of ODIN OS™. Any subsequent release of
the operative system may vary in contents and
functionality.
Check the version of the operative system of your
pinKey® Touch by running the System Info
application in the System category.
Page 27
Page 28
REPAIR REQUEST FORM
Fill in this document in all of its parts and attach it to the product in need of assistance.
Always include a copy of a valid proof of purchase.
Defect report:
Model:
Surname:
Street:
ZIP:
VAT number/SSN:
Date:
Serial number:
The repaired/replaced product will be shipped to the following address:
Name:
N°:
Tel:
City:
Country:
Sign:
Dear Customer, Please note that Card Tech srl, pursuant to Legislative Decree No. 196/2003, will process the data you provide in accordance
with the regulations related to the treatment of personal data. Data contribution is optional, although any omission may result into the inability
to fulfill the obligations related to the repair service (article 13, paragraph 1, letter C, Legislative Decree No. 196 dated 2003). All personal data
you provide will be collected and processed with the help of electronic instruments also, directly and/or through appointed third parties (repair
and delivery companies).
In any case, your data will not be disclosed (with the exception of repair and delivery companies), or sold to third parties. Within Card Tech srl
all data can be acquired solely by those people specifically appointed for that purpose and operating at the Information Systems,
Administration, Accounting, and Customer Service Departments.
Under the Article 7 of the Legislative Decree No. 196/2003 you have the right, at any time, to obtain from the person in charge of the
processing of the information related to your personal data, its methods of collection, purpose of collection and logic applied to it. The manager
of the process is the legal representative of Card Tech srl, located in via Croazia 14, 33100 Udine (UD), Italy, www.card-tech.it.
card tech s.r.l. via croazia 14_33100_udine_italy [email protected]