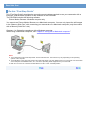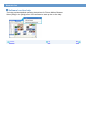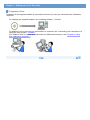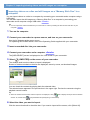
1
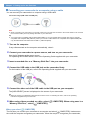
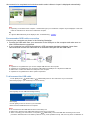
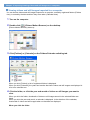
Read this first
On this “First Step Guide”
Software's on-line help
Picture Motion Browser features
Chapter 1: Setting up for the first time
Preparation flow
Installing software
Connecting your camcorder to a computer using a cable
Chapter 2: Importing/viewing videos and still images on a computer
Importing videos on a disc and still images on a “Memory Stick Duo” to a computer
Viewing videos and still images imported to a computer
Chapter 3: Editing the imported videos and still images
Editing videos
Editing still images
Chapter 4: Creating and copying a disc
Creating a disc
Copying a disc
Types of discs you can use
Chapter 5: Manipulating still images
Manipulating still images
Chapter 6: Using with a Macintosh computer
Connecting your camcorder and a Macintosh computer with a USB cable
Copying still images from a “Memory Stick Duo”
Troubleshooting
Symptoms
Cause and/or corrective actions
Additional information
System requirements
Trademarks and regulations
(C) 2007 Sony Corporation
Read this first
On this “First Step Guide”
This “First Step Guide” describes the connections and settings required to use your camcorder with a
computer, and the basic operation of the software on the CD-ROM.
The CD-ROM includes the following software.
Picture Motion Browser: Windows computer only
You cannot use Picture Motion Browser on a Macintosh computer. You can only import the still images
in the “Memory Stick Duo” with connecting your camcorder on a Macintosh computer (only the models
with a “Memory Stick Duo” slot).
Chapters 1 to 5 describe operations with a Windows computer.
When using a Macintosh computer, see “Chapter 6: Using with a Macintosh computer.”
Notes
z The screenshots in this “First Step Guide” are from Windows XP. The screens may vary depending on the operating
system of the computer.
z The illustrations of the camcorder used in this "First Step Guide" may look different from your camcorder. For the location
of the USB jack and POWER switch, etc., refer to the Operating Guide supplied with your camcorder.
z Both an 8 cm and a 12 cm DVDs are described as a “disc” in this “First Step Guide.”
Top
Next
Read this first
Software's on-line help
The help provides detailed operating instructions for Picture Motion Browser.
Select [Help] in the [Help] menu of the software to start up the on-line help.
Previous
Top
Next
Read this first
Picture Motion Browser features
Picture Motion Browser is a set of Windows applications with the following features.
If you double-click the [
] (Picture Motion Browser) icon on the desktop, [Picture Motion Browser]
starts up.
Notes
z The picture may not play back smoothly, depending on specifications of your computer. For details about the
recommended specifications, see “System requirements.”
z You cannot use Picture Motion Browser on a Macintosh computer.
Importing videos recorded on a disc to a computer <Details>
You can import videos recorded on a disc with a simple operation.
Viewing videos and still images imported to a computer <Details>
You can manage videos and still images recorded on a disc or on a “Memory Stick Duo” by date,
and select videos or still images you want to view from thumbnails of those videos or still images.
These thumbnails can be enlarged and played in a slide show.
Editing videos and still images <Details>
You can edit videos and still images imported to a computer.
Creating a disc <Details>
You can create an original DVD Video by putting together videos and still images taken with your
camcorder.
Copying a disc
Video Disc Copier <Details>
You can copy all the images on a disc taken with your camcorder.
Previous
Top
Chapter 1: Setting up for the first time
Preparation flow
Installation of the supplied software is required the first time you use your camcorder with a Windows
computer.
For installing the supplied software, see “Installing software.” <Details>
For details on how to connect your camcorder to a computer, see “Connecting your camcorder to a
computer using a cable.” <Details>
(For details on how to connect your camcorder to a Macintosh computer, click “Chapter 6: Using
with a Macintosh computer.”)
Top
Next
Chapter 1: Setting up for the first time
Installing software
You need to install the software to your Windows computer to enjoy editing your recorded videos and
still images. The installation is required only for the first time.
Before installation, prepare your camcorder and a USB cable.
1
Confirm that your camcorder is not connected to the computer.
2
Turn on the computer.
Log on as Administrators for installation.
Close all applications running on the computer before installing the software.
3
Place the CD-ROM in the disc drive of your computer.
The installation screen appears.
If the screen does not appear
1 Click [Start], then click [My Computer]. (For Windows 2000, double-click [My Computer]. )
2 Double-click [SONYPICTUTIL (E:)] (disc drive)*.
* Drive names (such as (E:)) may vary depending on the computer.
4
Click [Install].
5
Confirm the language for the application to be installed, then click [Next].
6
Confirm the area and country/region you live in, then click [Next].
The software to be installed will be configured according to your country/region.
7
Read [License Agreement], check [I accept the terms of the license agreement] if you
agree, then click [Next].
8
When [Confirm camera connection] is displayed, connect your camcorder to the
computer using a USB cable, then click [Next]. <Details>
Even if a screen prompting you to restart your computer appears, you do not need to restart it at this
time. Restart your computer after completing the installation.
9
Follow the instructions on the screen to install the software.
The following installation screens may be displayed, depending on your operating environment. In
this case, follow the instructions on the screen to install the software.
z Sonic UDF Reader --- Software required to recognize VR mode discs
z Windows Media Format 9 Series Runtime (Windows 2000 only) --- Software required to create
DVD video discs
z Microsoft DirectX 9.0c --- Software required for handling video
10
Make sure [Yes, I want to restart my computer now.] is selected, then click [Finish].
The computer restarts automatically.
11
Remove the CD-ROM from the disc drive of your computer.
The short-cut icons, such as [
z
] (Picture Motion Browser), appear on the desktop.
The short-cut icon used for Product Registration [
] appears on the desktop. By registering your Sony product, you can
access a range of convenient support and services.
http://www.sony.net/registration/di/
For the information about Picture Motion Browser, visit the following URL:
http://www.sony.net/support-disoft/
Previous
Top
Next
Chapter 1: Setting up for the first time
Connecting your camcorder to a computer using a cable
You can connect your camcorder to a computer using a USB cable.
Connection image (USB cable and USB jack)
Note
z When connecting your camcorder to a computer, make sure you insert the connector in the correct direction. Do not insert
the connector forcibly as it may damage the cable or your camcorder.
Tip
z Your camcorder is compatible with Hi-Speed USB (USB 2.0). You can transfer data at a faster rate using a computer
compatible with Hi-Speed USB (USB 2.0). When you connect a USB interface not compatible with Hi-Speed USB (USB
2.0), the data transfer ratio will be that of USB 1.1 (USB Full-Speed).
1
Turn on the computer.
If any software starts on the computer automatically, close it.
2
Connect your camcorder to a power source, and turn on your camcorder.
Use the AC Adaptor as the power source.
For operating the POWER switch, refer to the Operating Guide supplied with your camcorder.
3
Insert a recorded disc or a “Memory Stick Duo” into your camcorder.
4
Connect the USB cable to the USB jack on the camcorder firmly.
For the location of the USB jack, refer to the Operating Guide supplied with your camcorder.
5
Connect the other end of the USB cable to the USB port on your computer.
The [USB SELECT] screen is displayed on the screen of your camcorder.
Tip
z When the screen is not displayed, select the item from the menu. For selecting the menu, refer to the operating
instructions supplied with your camcorder.
6
When using videos recorded on a disc, select [
“Memory Stick Duo,” select [ COMPUTER].
When you select [
COMPUTER]. When using ones in a
COMPUTER]
The first time you connect your camcorder to a computer and select [ COMPUTER], it takes some
time until the computer recognizes your camcorder. When the computer recognizes your camcorder,
the connection is completed and a window used to select videos to import is displayed automatically.
Note
z Depending on the status of the computer, a window that urges you to restart the computer may be displayed. In this case,
follow the instructions on the screen to restart the computer.
Tip
z If [Picture Motion Browser] is not displayed, see “Troubleshooting.” <Details>
Recommended USB cable connection
Connect your camcorder as shown in the following illustration.
z Connect the USB cable from your camcorder to the USB port on the computer and make sure no
other USB devices are connected.
z If your computer has a USB keyboard and a USB mouse as standard equipment, leave them
connected and connect the camcorder to an available USB jack with the USB cable.
Notes
z Operation is not guaranteed if you connect multiple USB devices to the computer.
z Operation is not guaranteed if you connect the USB cable to the USB port on a keyboard or USB hub.
z Make sure to connect the cable to the USB port on the computer.
z Operation is not guaranteed on all the system requirement.
To disconnect the USB cable
1 Touch [END] on the [
COMPUTER] or [
COMPUTER] screen on the LCD screen of your camcorder.
2 Click the [Unplug or eject hardware] icon on the task tray.
3 Click [Safely remove USB Mass Storage Device].
4 Click [OK].
5 Touch [YES] on the LCD screen of your camcorder.
6 Disconnect the USB cable from the computer.
Notes
z Do not disconnect the USB cable while the access lamp is lit.
z Make sure to disconnect the USB cable before turning off your camcorder.
z When connecting your camcorder to a computer in [
COMPUTER], remove the USB cable according to the correct
procedure. Otherwise, files in the “Memory Stick Duo” may not be updated correctly. Also, this may cause a malfunction of
the “Memory Stick Duo.”
To switch the media (disc/“Memory Stick Duo”)
Touch the button of media you want to switch to ([ COMPUTER] or [ COMPUTER]) in step 5 of “To
disconnect the USB cable.” Your camcorder switch to the selected media.
Previous
Top
Chapter 2: Importing/viewing videos and still images on a computer
Importing videos on a disc and still images on a “Memory Stick Duo” to a
computer
You can import videos on a disc to a computer by connecting your camcorder and a computer using a
USB cable.
You can also import the still images on a “Memory Stick Duo” to a computer by connecting your
camcorder and a computer using a USB cable. <Details>
Tip
z You can import the videos recorded with your camcorder on a disc by inserting the disc into the DVD drive of your
computer. <Details>
1
Turn on the computer.
2
Connect your camcorder to a power source, and turn on your camcorder.
Use the AC Adaptor as the power source.
For operating the POWER switch, refer to the Operating Guide supplied with your camcorder.
3
Insert a recorded disc into your camcorder.
4
Connect your camcorder and a computer. <Details>
The [USB SELECT] screen is displayed on the LCD screen of your camcorder.
5
Select [
COMPUTER] on the screen of your camcorder.
The window used to select videos to import is displayed.
Scenes of videos recorded on the disc are displayed, scene by scene, as thumbnail images.
You can check the contents by playing back the selected video.
The selected scene appears in the preview box in the upper right. Preview the contents using the
playback control buttons.
Tip
z
When the window used to select videos to import is not displayed, click [
window. Or, double-click [
6
] first to display the import source selection
] (Import Media Files (Handycam)) on the desktop.
Select the video you want to import.
Click the scene thumbnail to check the box. If you want to import all the scenes, click [Select All].
7
Click [Next].
The window used to select the destination folder is displayed.
You can change the destination folder for imported videos in this window.
Tip
z The default location for the destination folder is set as [My Pictures]. You can specify a folder to be imported into by
clicking [Change], registering one of the Viewed folders in the displayed window.
8
Click [Import].
The import of the selected videos starts.
To import still images on a “Memory Stick Duo” to a computer
You can import the still images on a “Memory Stick Duo” to a computer with connecting your camcorder
and a computer using a USB cable.
Insert the “Memory Stick Duo” into the Memory Stick Duo Adaptor, then insert it into the Memory Stick
slot on your computer.
Tip
z You can import the still images recorded with your camcorder on a “Memory Stick Duo” by inserting the “Memory Stick
Duo” into the Memory Stick slot of your computer. <Details>
1 Turn on the computer.
2 Connect your camcorder to a power source, and turn on your camcorder.
Use the AC Adaptor as the power source.
For operating the POWER switch, refer to the Operating Guide supplied with your camcorder.
3 Connect your camcorder and a computer.<Details>
The [USB SELECT] screen is displayed on the LCD screen.
4 Select [ COMPUTER] on the screen of your camcorder.
The Import Media Files window is displayed.
5 Select the drive for the images to be imported from.
6 Select the folder for the images to be imported to.
7 Click [Import].
The import of selected images to the selected folder starts.
Tip
If the Import Media Files window is not displayed in step 4, click [Start] - [All Programs] ([Programs] for Windows 2000) [Sony Picture Utility] - [Import from]- [Digital Still Camera/Memory Stick (DCF Format)].
Calendar functions
With Picture Motion Browser, videos and still images imported from your camcorder are sorted by the
date and time they were taken, and are displayed as thumbnails in calendar format.
You can also select and view images from any folder or memory device.
On destination folders
The images are imported to the date folders (named with the date imported) created in the [My Pictures]
folder in the default setting.
To import the images from the DVD drive/Memory Stick slot of your computer
You can import the videos and still images recorded with your camcorder on a disc or a “Memory Stick
Duo” by inserting the disc/“Memory Stick Duo” into the DVD drive/Memory Stick slot of your computer.
Notes
z You must also finalize a DVD+RW disc before playing it with the DVD drive of your computer.
z To import images from 8 cm discs, the DVD drive of your computer must be able to read 8 cm DVD discs.
1 Turn on the computer.
2 Insert a recorded disc/“Memory Stick Duo” into the DVD drive/Memory Stick slot of the computer.
3 Double-click [
] (Picture Motion Browser) on the desktop.
[Picture Motion Browser] starts up.
4 Click [
].
The Import Media Files window is displayed.
The same screen can be displayed by selecting [Import Media Files] in the [File] menu.
5 Select [Handycam] or [Digital Still Camera/Memory Stick (DCF format)], and then click [OK].
If you select [Handycam], the window used to select the video to be imported is displayed.
6 Follow steps 6 to 8 in “Importing videos on a disc and still images on a “Memory Stick Duo” to a computer” to import
images.
Top
Next
Chapter 2: Importing/viewing videos and still images on a computer
Viewing videos and still images imported to a computer
You can browse videos and still images imported to a computer, sorted by registered folders (Folders
view), or sorted by the date and time they were taken (Calendar view).
1
Turn on the computer.
2
Double-click [
] (Picture Motion Browser) on the desktop.
[Picture Motion Browser] starts up.
3
Click [Folders] or [Calendar] on the Folders/Calendar switching tab.
When you click [Folders], a list of registered folders is displayed.
When you click [Calendar], the years and months that have videos and still images are displayed in
a list on a calendar tree.
4
Click the folder, or click the year and month of videos or still images you want to
view.
When you click the folder, thumbnails of videos or still images stored in the selected folder are
listed.
When you click the year and month, a calendar is displayed. In the date box of the calendar,
thumbnails of videos and still images taken on that date are displayed.
When you click the folder
When you click the month icon
Tips
z When you click a month on the yearly calendar, the calendar switches to the calendar of the selected month.
z When you click the date on a monthly calendar, the calendar switches to a time calendar for the selected date.
Thumbnails of the videos and still images taken that day are displayed, arranged according to the hour they were taken.
To enlarge a video or still image
Double-click the thumbnail.
The view image window starts up and the selected video or still image is enlarged.
When you select a video, the slider and the playback control buttons appear and playback starts.
When you select a still image
When you select a video
To play images consecutively
You can select videos and still images and play them as a slide show. Here we explain the procedure
for starting a slide show by selecting videos and still images in the Calendar view.
1 Turn on the computer.
2 Double-click [
] (Picture Motion Browser) on the desktop.
[Picture Motion Browser] starts up.
3 Click [Calendar] on the Folders/Calendar switching tab.
4 Click the date when the video or still image you want to view in the slide show is taken.
A list of videos and still images taken on the selected date is displayed.
5 Select the videos or still images.
The selected videos or still images are marked with a blue frame.
].
6 Click [
The selected video or still image is displayed full screen, and a slide show starts.
If you move the mouse while the slide show is playing, a setting bar for controlling the playback is displayed and you can
control playback and adjust the volume.
Tip
z To select consecutive videos and still images in the image display area in the main window, click the first thumbnail, then
press and hold down [Shift] key while you click the last thumbnail. To select two or more non-consecutive videos and still
images, press and hold down [Ctrl] key while clicking thumbnails.
Previous
Top
Chapter 3: Editing the imported videos and still images
Editing videos
You can cut out only required video parts to save.
1
Turn on the computer.
2
Double-click [
] (Picture Motion Browser) on the desktop.
[Picture Motion Browser] starts up.
3
Select the video you want to edit in the Folders view or Calendar view. <Details>
4
Click [
] and select [Video Trimming].
The Video Trimming window is displayed.
Tip
z You can display the Video Trimming window by selecting [Video Trimming] from the [Manipulate] menu in the Main
window, or clicking [
] in the view image window and selecting [Video Trimming].
5 Select the scene you want to set as an IN point (the beginning of the required part)
using the [ ], [
[Set IN point].
] buttons in the right side of the window, or the slider, and click
The selected scene is displayed in the thumbnail of [IN point].
6
Select the scene you want to set as an OUT point (the end of the required part) in the
same way, and click [Set OUT point].
The selected scene is displayed in the thumbnail of [OUT point].
7
After setting the points, click [Save Edited Video].
The Save Video window is displayed. The edited video file will be saved with a file name different
from that of the original file name.
8
Click [Save] to save the edited video.
Saving takes some time. When the saving is completed, a message is displayed. Click [OK].
To capture still images from a video
Click [Save Frame] in the Video Trimming window to save the current frame as a still image. The file of
the still image is saved in the same folder as the original video.
Tip
z Still images are saved in high resolution. By clicking [Settings] on the window displayed after you click [Save Frame], you
can adjust the settings for noise reduction and color correction.
Top
Next
Chapter 3: Editing the imported videos and still images
Editing still images
You can edit imported still images as follows. (only the models with a “Memory Stick Duo” slot)
For details about the operation, refer to the Picture Motion Browser Help.
Automatic Correction
Automatically corrects the brightness and contrast to the most suitable levels for that image.
Correcting brightness and contrast
The brightness and contrast of still images can be corrected. You can also correct only dark or light
areas.
Correcting saturation
Adjusts the saturation of pictures.
Adjusting sharpness
Emphasizes the outline of pictures.
Adjusting with the tone curve
The histogram and tone curve for the channel being displayed in the drop-down list are shown. You
can adjust the tone curve for each channel.
Red-eye Reduction
The use of a flash when photographing people can cause a red reflection in the eyes of subjects.
You can correct and remove the red-eye portion of still images.
Trimming
You can edit still images and use only the parts of the image you want.
Resizing
You can resize still images and save them to the desired folder.
Changing the date and time stamp
You can change the date and time stamp of still images in a batch.
Inserting date
You can insert a date stamp into still images.
Previous
Top
Chapter 4: Creating and copying a disc
Creating a disc
You can create a DVD video with a DVD menu by putting together videos and still images imported to
your computer.
Tip
z The selected videos are written to the disc as they are. If there are unnecessary scenes in the video, edit it beforehand.
<Details>
1
Turn on the computer.
2
Double-click [
] (Picture Motion Browser) on the desktop.
[Picture Motion Browser] starts up.
3
Select the videos and still images you want to write to the disc in the Folders view or
Calendar view. <Details>
You can select two or more videos and still images, or select videos and still images by folder or
date.
4
Select [DVD-Video Creation] in the [Manipulate] menu.
The window used to select videos and still images is displayed.
5
Confirm the videos and still images to write to the disc.
Tip
z Double-click a thumbnail to playback the video if it is a video file, or display the single image if it is a still image.
z To add videos and still images to the previously selected ones, select the videos or still images you want to add in the
image display area on the main window and drag and drop onto this window.
z Videos and still images are written to the disc in the order displayed. To change the order in which videos or still images
are written, click [Forward] or [Back].
6
Click [Next].
Menu selection window of the disc is displayed.
7
Select menu design and a title creation method, and enter the disc name.
Image of DVD video menu to create is displayed.
Tips
z Selecting [Menu Sorted by Date Taken] in the Menu structure drop-down list automatically changes the order of videos
and still images into the order of date on which they were taken.
z Clicking [Font] lets you select the text color of the disc name and title, etc.
z Clicking [Preview] lets you check the completion image of the DVD video to create.
z Clicking [Settings] lets you set the various operations that take place upon the first play of a disc, video quality, and
display time for each still image in slide show.
8
Click [Start].
The videos and still images are written to the disc.
Note
z You cannot use an 8 cm disc with the DVD drive of a computer. To write videos and still images to an 8cm disc, use your
camcorder.
Tip
z You can choose to create more copies of the same disc after writing to the disc is completed.
Top
Next
Chapter 4: Creating and copying a disc
Copying a disc
You can copy the images recorded on a disc to another 8 cm or 12 cm disc.
This procedure describes how to copy the images recorded on a -RW (8 cm) disc in your camcorder to
a -R (12 cm) disc in the DVD drive of your computer.
1
Turn on the computer.
2
Connect your camcorder to a power source, then turn on your camcorder.
Use the AC Adaptor as the power source.
For operating the POWER switch, refer to the Operating Guide supplied with your camcorder.
3
Insert a recorded disc into your camcorder.
4
Connect your camcorder and a computer.<Details>
The [USB SELECT] screen is displayed on the LCD screen.
5
Select [
6
Insert a blank DVD disc into the DVD drive of your computer.
7
Double-click [
COMPUTER] on the screen of your camcorder.
] (Video Disc Copier) on the desktop.
Disc copy window is displayed.
8
Select your camcorder for [Source:] and the DVD drive of your computer for [Copy
to:].
The status of the drive and disc is displayed. Depending on the status, copying cannot start. Follow
the instruction to change the disc or check the drive or your camcorder.
Obtaining information from a disc in your camcorder takes time. Wait until the disc information is
displayed in the window.
9
When preparations for copying are completed, click [Start].
Disc copy starts.
Tip
z You can choose to create one more same disc after writing.
To change the location for temporary files and the writing speed
On the Disc copy window, click [Settings].
Select [Manually select a writing speed before writing to the disc] and click [OK] to specify the writing
speed each time, before writing starts.
Tip
z When you copy a -RW (8 cm) disc to a -R (12 cm) disc, approximately 1.5 GB of free space is needed on your hard disk
for temporary files. Depending on the capacity of the source disc, the free space required varies.
Previous
Top
Next
Chapter 4: Creating and copying a disc
Types of discs you can use
This section explains about discs you can use for backing up a disc or creating a disc playable on other
DVD players.
The types of discs you can use ( ) for copying vary by the disc type recorded with your camcorder
and the disc type used to create the disc you want to copy. For details, refer to the charts below.
Destination
-R
-RW
+R
+R DL
+RW
(8 cm/12 cm) (8 cm/12 cm) (12 cm) (8 cm/12 cm) (8 cm/12 cm)
-R
(8 cm)
/
/
/
/
/
/
/
/
+R DL
(8 cm)
/
/
/
/
-RW VR mode
(8 cm)
/
/
/
/
+RW
(8 cm)
/
/
/
/
-RW VIDEO mode
(8 cm)
Source
Notes
z You cannot copy from 12 cm disc to 8 cm disc.
z When a 12 cm disc is copied to a 12 cm disc, a +R DL 12 cm disc can be the destination only for a +R DL 12 cm original
disc.
z You cannot use an 8 cm disc with the DVD drive of a computer. To write videos and still images to an 8cm disc, use your
camcorder.
z DVD-R DL is not supported.
z To copy a disc recorded using other than a DVD+RW disc, the disc must be finalized.
Previous
Top
Chapter 5: Manipulating still images
Manipulating still images
You can manipulate imported still images as follows.
For details about the operation, refer to the Picture Motion Browser Help.
Printing still images
You can print imported still images.
You can also print still images with the date information.
Tip
z You can save a scene you select from the video as a still image and print it. <Details>
Sending still images by e-mail
You can start your e-mail software, attach still images to e-mail and send them via e-mail.
Notes
z MAPI must be enabled in your e-mail software for this feature to work. Refer to the user manual or help files of your e-mail
software for more information about MAPI.
z Video data files cannot be sent by e-mail.
Opening with external program
You can start a commercially available software from Picture Motion Browser and view images with
these programs.
Top
Chapter 6: Using with a Macintosh computer
This “First Step Guide” describes how to connect your camcorder to a Macintosh computer and how to
import images from the inserted “Memory Stick Duo.” (Picture Motion Browser is not used on a
Macintosh computer.)
Connecting your camcorder and a Macintosh computer with a USB cable
Note
z The computer may not recognize your camcorder if you connect them with the USB cable before turning on your
camcorder.
1
Insert a “Memory Stick Duo” into your camcorder.
2
Connect your camcorder to a power source, then turn on your camcorder.
Use the AC Adaptor as the power source.
For operating the POWER switch, refer to the Operating Guide supplied with your camcorder.
3
Connect the USB cable to the USB jack on the camcorder firmly.
For the location of the USB jack, refer to the Operating Guide supplied with your camcorder.
4
Connect the other end of the USB cable to the USB port on your computer.
The [USB SELECT] screen is displayed on the screen of your camcorder.
Tip
z When the screen is not displayed, select the item from the menu. For selecting the menu, refer to the operating
instructions supplied with your camcorder.
Note
z When connecting your camcorder to a computer, make sure you insert the connector in the correct direction. Do not insert
the connector forcibly as it may damage the cable or the camcorder.
5
Select [
COMPUTER] on the LCD of your camcorder.
A drive icon appears on the desktop.
To disconnect the USB cable / To turn off the camcorder / To eject the “Memory Stick
Duo”
1 Touch [END] on the [
COMPUTER] screen on the LCD screen of your camcorder.
2 Quit all applications running on the computer.
3 Drag and drop the drive icon on the desktop onto the [Trash] icon.
4 Touch [YES] on the LCD screen of your camcorder.
5 Disconnect the USB cable from your camcorder and computer.
Notes
z Make sure to disconnect the USB cable before turning off your camcorder.
z If you are using Mac OS X, turn off the computer before disconnecting the USB cable and ejecting the “Memory Stick
Duo.”
Top
Next
Chapter 6: Using with a Macintosh computer
Copying still images from a “Memory Stick Duo”
1
Connect your camcorder to a computer via a USB cable. <Details>
2
Double-click the drive icon.
3
Drag and drop the desired still image file onto the hard disk icon.
Note
z For details on the “Memory Stick Duo” that you can use with the camcorder, refer to the operating instructions supplied
with your camcorder.
Previous
Top
Troubleshooting
Symptoms
When using the videos on a disc, a computer does not recognize your camcorder.
Cannot use the supplied software, Picture Motion Browser on the Macintosh computer.
Cannot view the videos on a disc in your camcorder with a computer.
You cannot view the still images recorded on a “Memory Stick Duo” on the computer.
The “Memory Stick” icon ([Removable Disk]) does not appear on the computer screen.
Picture Motion Browser does not function correctly.
The video or still image or sound of your camcorder is not played on your computer correctly.
Cannot write from your computer to a disc in your camcorder.
The file transferred from the computer is not written to the “Memory Stick Duo” in your camcorder.
The playback screen is paused or distorted.
The actual displayed screen or message is different from that shown in this “First Step Guide.”
Top
Next
Troubleshooting
Cause and/or corrective actions
When using the videos on a disc, a computer does not recognize your camcorder.
Install Picture Motion Browser. <Details>
Disconnect the USB device other than the keyboard, the mouse, and the camcorder from the computer.
Disconnect the cable from the computer and camcorder, restart the computer, then connect them again correctly. <Details>
Cannot use the supplied software, Picture Motion Browser on the Macintosh computer.
z
You cannot use Picture Motion Browser on a Macintosh. <Details>
Cannot view the videos on a disc in your camcorder with a computer.
Make sure you insert the connector in the correct direction, then connect the USB cable to the USB jack on your camcorder
firmly.
Select [COMPUTER], then [ COMPUTER] in the menu settings of your camcorder. For selecting the menu, refer to the
operating instructions supplied with your camcorder.
Disconnect the USB device other than the keyboard, the mouse, and the camcorder from the computer. <Details>
You cannot view the still images recorded on a “Memory Stick Duo” on the computer.
z
Insert the “Memory Stick Duo” firmly.
Select [COMPUTER], then [ COMPUTER] in the menu settings of your camcorder. For selecting the menu, refer to the
operating instructions supplied with your camcorder.
The computer does not recognize the “Memory Stick Duo” during camcorder operation such as disc playback or editing.
Finish camcorder operation before connecting the camcorder to the computer.
The “Memory Stick” icon ([Removable Disk]) does not appear on the computer screen.
z
Insert a “Memory Stick Duo” into your camcorder.
Disconnect the USB device other than the keyboard, the mouse, and the camcorder from the computer. <Details>
Select [COMPUTER], then [ COMPUTER] in the menu settings of your camcorder. For selecting the menu, refer to the
operating instructions supplied with your camcorder.
The computer does not recognize the “Memory Stick Duo” during camcorder operation such as disc playback or editing.
Finish camcorder operation before connecting the camcorder to the computer.
Picture Motion Browser does not function correctly.
Close Picture Motion Browser, then restart the Windows computer.
The video or still image or sound of your camcorder is not played on your computer correctly.
z
z
If your camcorder is connect to a computer that does not support Hi-speed USB (USB2.0), the video, still image or sound may
not be played back correctly. The video, still image or sound copied to your computer is not affected.
Video playback or sound may stop temporarily depending on your computer. The video or sound copied to your computer is
not affected.
Cannot write from your computer to a disc in your camcorder.
z
z
Use recommended discs. For details, refer to the Operating Guide supplied with your camcorder.
You cannot write to the DVD drive of your camcorder from software other than Picture Motion Browser.
The file transferred from the computer is not written to the “Memory Stick Duo” in your
camcorder.
The USB cable (supplied) is not removed with the right procedure. Connect your camcorder to the computer again and
transfer the data. <Details>
The playback screen is paused or distorted.
If the recorded disc is played back in your camcorder connected to a computer, the picture may not play back smoothly,
depending on the transfer speed. Insert the disc into the DVD drive of your computer for smooth playback.
The actual displayed screen or message is different from that shown in this “First Step Guide.”
The screen or message may be different.
Previous
Top
Additional information
System requirements
For Windows users
When using Picture Motion Browser
z OS: Microsoft Windows 2000 Professional, Windows XP Home Edition, Windows XP Professional
or Windows XP Media Center Edition
Standard installation is required.
Operation is not assured if the above OS has been upgraded or in a multi-boot environment.
z CPU: Intel Pentium III 1 GHz or faster
z Application: DirectX 9.0c or later (This product is based on DirectX technology. It is necessary to
have DirectX installed.)
z Sound system: Direct Sound compatible sound card
z Memory: 256MB or more
z Hard disk: Disc volume required for installation: Approximately 600 MB (5 GB or more may be
necessary when creating DVD videos.)
z Display: DirectX 7 or later-compatible video card, Minimum 1,024 X 768 dots, High Color (16 bit
color)
z Others: USB port (this must be provided as standard), DVD burner (CD-ROM drive is necessary for
installation)
Notes
z Even in a computer environment where the operations are guaranteed, frames may be dropped from movies, resulting in
uneven playback. However, imported images and images on discs created subsequently will not be affected.
z Operations are not guaranteed on all the recommended environments. For example,other open or background
applications running on currently may limit product performance.
z Picture Motion Browser does not support 5.1ch surround sound reproduction. The sound is reproduced in 2ch sound.
z Some computers do not support 8cm discs (such as DVD+R DL (double-layered)).
z If you use a Notebook PC, connect it to the AC Adaptor as the power source.
Otherwise, the software will not work properly due to the power saving function of the PC.
When playing still images recorded on a “Memory Stick Duo” on a computer
z OS: Microsoft Windows 2000 Professional, Windows XP Home Edition, Windows XP Professional
or Windows XP Media Center Edition
Standard installation is required.
Operation is not assured if the above OS has been upgraded.
z CPU: MMX Pentium 200 MHz or faster
z Others: USB port (this must be provided as standard)
z If your computer has a Memory Stick slot, insert the “Memory Stick Duo” on which pictures are
recorded into the Memory Stick Duo Adaptor, then insert it into the Memory Stick slot on your
computer to copy still images to the computer.
z When using a “Memory Stick PRO Duo” and your computer is not compatible with it, connect your
camcorder with the USB cable instead of using the Memory Stick slot on the computer.
For Macintosh users
When only copying pictures recorded on a “Memory Stick Duo” on a computer
z OS: Mac OS 9.1/9.2 or Mac OS X (v 10.1/v 10.2/v 10.3/v 10.4)
z Other: USB port (this must be provided as standard)
Top
Next
Additional information
Trademarks and regulations
On trademarks
z
z
z
z
z
z
“Handycam” and
are registered trademarks of Sony Corporation.
“Memory Stick,”
, “Memory Stick PRO,”
, “Memory Stick Duo,”
,
“Memory Stick PRO Duo,”
, “MagicGate” and
are trademarks or
registered trademarks of Sony Corporation.
Manufactured under license from Dolby Laboratories. “Dolby” and the double-D symbol are
trademarks of Dolby Laboratories.
Confidential unpublished works. Copyright 1992-1997 Dolby Laboratories. All rights reserved.
Microsoft, Windows and Windows Media are either registered trademarks or trademarks of Microsoft
Corporation in the United States and/or other countries.
Macintosh is a trademark of Apple Computer, Inc. in the U.S. and other countries.
Intel, Intel Core and Pentium are either registered trademarks or trademarks of Intel Corporation and
its subsidiaries in the United States and/or other countries.
All other product names mentioned herein may be the trademarks or registered trademarks of their
respective companies. Furthermore, “TM” and “(R)” are not mentioned in each case in this manual.
On copyrights
Music works, sound recording or other third party musical contents you may acquire from CDs, the
Internet or other sources (the “Music Contents”) are the copyrighted work of the respective owners
thereof and are protected by copyright laws and other applicable laws of each country/region. Except to
the extent expressly permitted by applicable laws, you are not permitted to use (including, without
limitation, copying, modifying, reproducing, uploading, transmitting or placing to the external network
accessible to the public, transferring, distributing, lending, licensing, selling and publishing) any of the
Music Contents without obtaining authorization or approval of the respective owners thereof. License of
Picture Motion Browser by Sony Corporation would not be construed as conferring to you by
implication, estoppel or otherwise any license or right to use the Music Contents.
Previous
Top
A
Automatic Correction
B
Brightness Correction
C
Calendar view
Capturing still images
Changing the date and time stamp
D
DirectX 9.0c
E
E-mail
External program
F
Folders view
H
Hi-Speed USB (USB 2.0)
I
Inserting date
Install
M
Macintosh
P
Picture Motion Browser
Printing
R
Red-eye Reduction
Resizing
S
Saturation
Sharpness
Slide show
T
Tone Curve
Trimming
U
USB cable
USB connection
V
Video Disc Copier
W
Windows