1
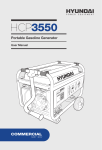
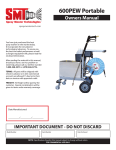
Gasoline-Powered Trash Pump
User Manual
1
©2011 Hyundai Power Equipment. All Rights Reserved.
Licensed by Hyundai Corporation, Korea.
hcp653-0711-02
2
3
4
Thank you for purchasing this Hyundai Power Equipment
Trash Pump.
Please register this product in order to ensure warranty
service in the future.
This manual covers the safety, operation and maintenance
procedures for the HCP653.
All information in this publication is based on the latest
product information available at the time of print.
Visit www.powerbyhyundai.com for manual updates and
operation notices.
No part of this publication may be reproduced without
written permission. Please keep this manual together with
the Owners Card. Contact Hyundai Power Equipment at
the numbers listed on the Owners Card if warranty service
is required.
It is important that anyone operating this product read and
understand the manual prior to use.
5
Warranty Information
Warranty service, operation assistance and product support is provided by
Midland International Inc., a licensed manufacturer of Hyundai Power Equipment.
www.powerbyhyundai.com
TECHNICAL ASSISTANCE
1-855-706-8475
CUSTOMER SERVICE
1-877-528-3772 (toll-free)
SALES
1-503-534-3684
Component Certifications
This product contains components certified by the following agency:
6
TABLE OF CONTENTS
1.0 - OPERATION SAFETY
1.1 - Operation Safety
8
2.0 - COMPONENTS
2.1 - Identification
9
3.0 - PRE-OPERATION INSPECTION
3.1 - Engine Oil Check
11
3.2 - Fuel Level Check
12
3.3 - Air Filter Check
13
3.4 - Hose Connections
14
4.0 - OPERATION
4.1 - Pump Placement
15
4.2 - Priming Water
16
4.3 - Starting Trash Pump
16
4.4 - Stopping the Engine
17
5.0 - MAINTENANCE
5.1 - Importance of Maintenance
18
5.2 - Maintenance Schedule
18
5.3 - Oil Maintenance
19
5.4 - Air Filter Service
20
5.5 - Spark Plug Service
21
5.6 - Fuel Sediment Cup
22
5.7 - Fuel Drainage
23
5.8 - Impeller Cleaning
23
5.9 - Transportation
24
5.10 - Storage
24
5.11 - External Parts Cleaning
25
6.0 - TROUBLESHOOTING
26
7.0 - SPECIFICATIONS
27
WARRANTY
28
7
1.0 - SAFETY PRECAUTIONS
1.1 - Operation Safety
•
Always perform a pre-operation check before starting the engine.
•
Properly clean and maintain the equipment.
•
Operate the Trash Pump according to instructions for safe and
dependable service.
•
Read user manual carefully before operating this product! Failure to do
so may result in serious harm to the user and to the equipment.
•
This product emits poisonous carbon monoxode gas. Do not operate in
an enclosed area.
•
Be careful not to touch the exhaust system during operation due to risk
of burns.
•
Pay attention to the warning labels. The engine exhaust system will
become heated during operation and remains hot immediately after the
engine is stopped.
•
Gasoline is a highly flammable and explosive liquid. Refuel in a well
ventilated area with the engine stopped.
•
When refueling the Trash Pump, keep it away from cigarettes, open
flames, smoke and/or sparks.
•
Place at least 5ft away from buildings or other equipment during
operation.
•
Run on a level surface to avoid fuel spills
•
Know how to stop the engine quickly and understand operation of all
the controls. Never permit anyone to operate this equipment without
proper training.
•
Keep children, pets and machinery with rotating parts away during
operation.
•
Do not touch the spark plug while the engine is operating or shortly after
the engine has been shut down.
•
Do not use this product to work with caustic liquids.
8
2.0 IDENTIFICATION OF COMPONENTS
Primer Cap
Outlet Port
Pump
Casing Bolts (x6)
Inlet Port
Engine Block
Trash Pump
Pump Drain Plug
9
10
3.0 - PRE-OPERATING PROCEDURE
Inspect all components for damage and to ensure that none are missing. If
you require a replacement, do not operate this tool until all parts are present
and in proper working order.
Do not modify or create accessories for this equipment. Using modified
components may result in damage and may void the warranty. Contact
customer service if you suspect that this equipment has been tampered with.
3.1 - Engine Oil Check
1. Ensure the Trash Pump is on a level surface.
2. Inspect engine oil:
•
Take out the dipstick and clean it with a dry towel.
•
Check the oil level by reinserting the oil filler cap without rotating it.
Remove the oil filler cap and examine the oil level. If the oil level is at
or below the lower level, refill the oil to the upper limit mark. (10W30)
Reinsert the oil filler cap and tighten securely.
11
3. If necessary, add engine oil - Open oil inlet located opposite the recoil
starter handle. Remove the dipstick and pour in the supplied oil with a
funnel. Do not operate without oil.
Reservoir can hold maximum 20 fl.oz of 10W30 oil - do not over fill.
Engine oil is a major factor affecting engine performance and service life. Nondetergent or vegetable oils are not recommended.
3.2 - Fuel Level Check
1. Check the fuel level by opening the tank and visually inspecting
2. Refuel if level is too low. Tighten the fuel tank cap securely after refilling
12
Gasoline is highly flammable and explosive under certain conditions. Refuel in
a well-ventilated area with the engine stopped. Do not smoke or allow open
flames or sparks in the area where the Trash Pump is being refueled or where
gasoline is stored. Do not overfill the tank. Be careful not to spill fuel when
refueling. Wipe up any spilled gasoline and let the area dry before starting the
engine. Gasoline substitutes such as gasohol are not recommended. They
may be harmful to the fuel system components
3.3 - Check the Air Filter
1. Loosen the knob and remove the air filter cover. Remove the air filter
element and inspect for cleanliness.
2. Clean the air filter element with soap and water or solvent. Squeeze dry
and then soak in clean engine oil.
3. Squeeze out all excess oil and reinstall. Replace the element if it is
damaged.
Check the air filter according to the maintenance schedule. Always inspect
the air filter before using the Trash Pump. Clean Air Filter every 3 months or
after 50hrs of operation according Section 5.4: Air Filter Service procedure.
13
3.4 - Hose Connections
1. Insert adapters into each end of the suction and discharge hoses.
2. Attach O-Rings to the adaptors.
3. Tighten the hose clamp around the discharge hose.
4. Insert strainer into the suction hose and tighten the hose clamp around
the hose.
5. Insert adapters into the appropriate pump fittings. Avoid sharp bends in
the hoses and do not place heavy objects on top.
14
4.0 - OPERATION
4.1 - Pump Placement
Placement is an important step in safely operating this product.
1. Refer to diagram for proper placement instructions.
2. Ensure that the suction head is less than the discharge head.
3. Increasing the discharge head will decrease output.
4. Ensure pump is primed to minimize the suction head.
Suction head is the height to which a pump can raise water on the suction
side, measured from the water level in the sump. Discharge head is the vertical
distance between the intake level of the water pump and the level at which
it discharges water freely. Total head is the sum of the suction and discharge
head.
15
4.2 - Priming Water
Make sure to prime the pump with water prior to operating it. Priming creates
a vacuum that helps to start the flow of water.
1. Unscrew the primer cap and insert the neck of the water container into
the opening. Gradually tilt until the reservoir is full.
2. Tighten the cap back on.
3. In case of dry operation (running the pump without priming), stop the
engine immediately and allow it to cool before following the priming
procedure.
Do not operate without priming. Doing so will overheat the engine and result
in damage to the system. Ensure that the priming water does not contain
debris.
4.3 - Starting the Trash Pump
RECOIL START METHOD
1. Rotate the fuel valve lever to ON position.
2. If the engine is cold: Push the choke lever to the CLOSE position out to
close the choke.
16
3. Grasp the recoil starter handle and pull it until the engine starts.
Do not allow the recoil starter to snap back. Return it slowly by hand
4. Push the choke lever to the OPEN position as the engine warms up. The
choke is used to provide the proper mixture when the engine is cold. It
can be opened and closed manually by moving the choke lever to the
closed position to enrich the mixture for cold starting.
5. After 5 minutes, slowly push the throttle lever to the OPEN position.
Engine RPMs will increase until engine reaches its stable running speed.
If the engine backfires or does not start repeated attempts, contact customer
support and do not attempt to use the Trash Pump.
4.4 - Stopping the Engine
1. Return the throttle lever to the IDLE position (towards the right)
2. Turn the engine switch to the OFF position
3. Turn the fuel valve to the OFF position
In an emergency, the engine can be quickly stopped by turning the engine
switch to the OFF position.
17
5.0 - MAINTENANCE
5.1 - Importance of Maintenance
Proper maintenance ensures safe, economical and trouble-free operation. Improper
maintenance may cause the Trash Pump to malfunction and can lead to serious
injuries. Contact Hyundai Power Customer Support if you have any maintenance
questions.
5.2 - Maintenance Schedule
ITEM
TASK
Spark
Plug
Check condition,
adjust gap and clean.
Replace if necessary.
Check oil level
Engine Oil
DAILY
EVERY
20
HOURS
•
Air Filter
Fuel Filter
Clean fuel valve and
tank filter. Replace if
necessary.
Valve Clearance
Check and adjust
when engine is cold.
Fuel Line
Check fuel hose for
cracks and other
damage. Replace if
necessary.
•
Check for leakage.
Tighten or replace
gasket if necessary.
•
Cooling
System
Check for water damage.
Starting
System
Check recoil starter
assembly.
•
•
•
•
Check muffler screen.
Clean or replace if
necessary.
Check choke operation
EVERY
300
HOURS
•
Clean, replace if
necessary
Carburetor
EVERY
100
HOURS
•
Replace
Exhaust
System
EVERY
50
HOURS
•
•
•
•
•
18
5.3 - Oil Change and Oil Drainage
Used motor oil can cause skin irritations if left in long-tern contact with skin.
Wash hands thoroughly with soap and water after handling oil.
Do not dispose of used oil in drains or on soil. Local service shops provide
environmentally-friendly disposal methods.
1. Stop the engine and remove oil filler cap.
2. Place a pan under the engine.
3. Remove the oil drain screw and allow the oil to completely drain into the
pan.
4. Reinstall drain screw before filling the engine with fresh oil. Do not
overfill oil reservoir. Use a funnel to prevent spillage.
5. Reinstall the filler cap and tightly fasten it.
19
5.4 - Air Filter Service
Using gasoline or other flammable solvents can cause a fire or explosion. Do
not use these to clean the air filter.
Do not operate this product without an air filter.
1. Unscrew the air filter cover.
2. Remove the filter element and wash with soap and water.
3. Pour a small amount of oil on filter element and squeeze out any excess.
Do not wring the filter element or apply excessive pressure. Smoke may
appear if too much oil is left in the air filter.
4. Reinstall the filter element and cover, ensuring a complete seal around
the filter.
20
5.5 - Spark Plug Service
Do not rinse spark plug in water. Follow guidelines and be careful not to
overtighten the spark plug.
Tighten ½ turn when installing a new spark plug.
Tighten ¼ turn when re-installing an old spark plug.
1. Disconnect and remove the spark plug using a wrench.
2. Inspect the spark plug and clean any dirt from the electrodes with a wire
brush. If electrodes are worn or show signs of wear, replace spark plug.
3. Measure the electrode gap with a spark plug gauge and adjust as
necessary by bending the side electrodes. Ensure that the gap is
between 0.7 and 0.9mm
4. Reinsert the plug carefully. Tighten with a spark plug wrench.
21
5.6 - Fuel Sediment Cup Service
1. Switch fuel valve to the OFF position.
2. Unscrew the sediment cup using a wrench and remove the O-ring.
3. Wash the cup and O-ring in a non-flammable solvent and dry
thoroughly.
4. Place the O-ring in the fuel valve, then attach sediment cup. Tighten
securely.
5. Switch the fuel valve to the ON position and check for leaks. Replace
O-ring if leakage occurs.
22
5.7 - Fuel Drainage
Gasoline should not be stored in containers that are not safe for fuel transport.
1. Place container underneath the while removing the drain screw from the
carburetor.
2. Turn the fuel valve to ON and slowly remove the fuel drain screw.
3. Allow fuel to drain fully and reinsert the screw.
5.8 - Impeller Cleaning
Impeller cleaning is important when storing pump for long periods of time. It is also
advisable as part of regular maintenance checks.
QUICK METHOD
1. Fill pump with fresh water through primer opening.
2. Start pump and allow it to run for up to 8 minutes or until water
evaporates upon contact with engine block.
3. Drain water through pump drain outlet.
4. Flush pump with clean water (puring it through primer opening).
5. Reinsert drain screw.
23
INTENSIVE CLEANING
1. Remove / unscrew all 6 pump casing bolts from the pump.
2. Carefully remove the outside casing, exposing the impeller.
3. Clean impeller using regular soap and water, if necessary use a light
scrubbing tool to remove debris.
4. Reinstall casing on trash pump and fasten all bolts.
When reinstalling the casing, ensure that the rubber seal is properly secure all
around the perimeter of the opening.
5.9 - Transportation
Engine and exhaust can become hot. Avoid contact due to risk of burns and
fires. Allow engine to cool before transporting unit.
Do not drop or strike the pump during transport. Avoid placing heavy objects
on the frame or gas tank.
•
Make sure engine and fuel valve are in the OFF positions
•
Keep the unit level to prevent spillage.
•
Place pump on a solid, level surface and secure it to prevent movement
during transport
5.10 - Storage
Do not store close to sources of heat, flames or sparks
Do not store in extremely humid or dusty areas
Do not store with gasoline still inside carburator or gas tank
1. Clean the impeller and drain water out
2. Drain gasoline from tank and carburator
3. Change engine oil
24
4. Slide fuel valve to OFF position
5. Place pump in an appropriate storage area at temperatures above 32°F
6. Cover inlet and outlet ports
7. Cover unit to protect it from dust
5.11 - External Parts Cleaning
Keeping the external parts clean can prevent debris build-up and ensure easy
access during maintenance.
Do not use a pressure washer to clean this product. Delicate electrical
components may be damaged.
1. Place unit in a well-lit area
2. Use a grease-removing solvent (non-flammable) and a cloth to clean
areas around the gas tank and oil ports.
3. Use a soft, damp cloth to clean off remaining residue and debris.
4. Allow unit to dry before using it.
25
6.0 - TROUBLESHOOTING
Common issues can be fixed by following the instructions in this guide. If the unit will not function after
following these instructions, contact technical support before attempting to use or repair the product.
ISSUE
Engine will not
start
Power is low
Water output
is low
No water
output
CAUSE
ACTION
Faulty spark plug
Use a wrench to remove the spark
plug and follow procedure for
cleaning or replacing
Clogged fuel line
Check fuel line for leaks. Unclog if
necessary
Wrong fuel type
Drain fuel and clean fuel line. Refill
with appropriate fuel
Carburator not getting air or fuel
Take to service dealer
Dirty air filter
Clean air filter
Starter not functioning
Take to service dealer
Dirty air filter
Clean air filter
Throttle lever unadjusted
Slide throttle lever to increase
power output
Clogged strainer
Remove debris and rinse with water
Suction hose blocked with debris
Remove obstruction
Damaged hoses
Replace hoses
Clogged impeller
Remove obstruction
Lose hose clamps
Tighten or replace hose clamps
Leaking seals
Take to service dealer
Incorrect pump placement
Reposition pump (see placement
section of manual)
Pump is not primed
Prime pump
Pump mechanism is damaged
Take to service dealer
26
7.0 - SPECIFICATIONS
TRASH PUMP
HCP9100
Discharge Port Diameter
3"
Suction Port Diameter
3"
Maximum Discharge
15,850 gal/hr
Maximum Lift
98'
Maximum Suction
26'
Operating Temperature Range
Type
32°- 104°F (0°-40°C)
7 HP, Single Cylinder, forced air cooling, 4-stroke,
OHV 25 deg tilt
ENGINE
Displacement (cm3)
208cc
Ignition mode
Non-contact transistor
Starting mode
Recoil Start
Fuel tank capacity (Gal)
1
Oil capacity
20 fl.oz. (10W30)
Fuel Type
Unleaded gasoline, propane
Running Volume
67dB (at 7m)
BOX
Running Time Per Tank (hours)
6
LxWxH
23x18x18.5"
Dry Weight
90lbs
27
Warranty
Midland International Inc.
26 Huddersfield Rd. Unit #2
Etobicoke, Ontario Canada
M9W 5Z6
This warranty is limited to the listed Hyundai Power Equipment products when distributed by
Cobalt Power Inc.
These products are warranted to be free of defects in materials and workmanship from the original date of
purchase according to the schedules defined in this warranty document. This limited warranty guarantees
that any defective parts will be repaired or replaced, at the warrantor’s discretion, at no cost, including
diagnosis and replacement parts.
3 YEAR LIMITED WARRANTY:
The limited warranty coverage is continual from the initial date of purchase and does not restart at any
time under any circumstances. This limited warranty is valid only when the equipment receives all necessary preventative maintenance, as described in the Hyundai User Manual. The repair or replacement will
take place within a reasonable period of time during normal business hours.
LABOR WARRANTY CLAIM PROCEDURE:
The product must be purchased in the United States or Canada from Cobalt Power Inc., via an authorized
channel of distribution. This limited warranty applies to the first purchaser and each subsequent registered owner during the applicable warranty time period.
What MIDLAND INTERNATIONAL INC. will Repair or Replace Under Limited Warranty:
MIDLAND INTERNATIONAL INC. will repair or replace, at its opinion, any part that is proven to be
defective in material or workmanship under the normal use during the applicable warranty time period.
Warranty repairs and replacements will be made without charge for parts, accessories, or labor during
the first 12 months after original purchase. The remaining 24 months of warranty are parts only. Anything
replaced under warranty becomes the property of MIDLAND INTERNATIONAL INC. All parts replaced
under warranty will be considered as part of the original product, and any warranty on those parts will
expire coincident with the original product warranty.
Warranty service must be performed by a Hyundai-authorized service dealer. If you feel your equipment is
malfunctioning due to a defect, simply contact our customer support center for technical advice, to file a
warranty claim or for general information.
28
BEFORE WARRANTY WORK CAN BEGIN
To obtain warranty service, contact our customer support center:
Toll Free: 1-877-528-3772
Email: [email protected]
Online: www.powerbyhyundai.com or www.hyundaipower.ca
LIMITATIONS OF REMEDIES AND DISCLAIMERS
THE FOREGOING LIMITED WARRANTY IS EXCLUSIVE OF AND IN LIEU OF ALL OTHER WARRANTIES
OF MERCHANTABILITY, FITNESS FOR A PARTICULAR PURPOSE, AND OF ANY OTHER WARRANTY,
WHETHER EXPRESSED OR IMPLIED.
Midland International Inc. disclaims any responsibility for any indirect, incidental or consequential loss or
damage caused by any defects in material or workmanship.
All expenses incurred in maintaining parts shall be incurred by the purchaser This warranty coverage does
not include parts affected by accident and/or collision, corrosion or rust, normal wear, use in an application for which the product was not intended, service from an unauthorized service dealer, or any other
misuse, neglect, incorporation or use of unsuitable attachments and/or parts. Under this warranty, the
warrantor is not obligated to bear any transportation fees of any product to/from an authorized service
dealer. Unauthorized alteration, installation, or any cause other than defects in material or workmanship of
the product will not be covered under this warranty.
Some states do not allow limitations on how long an implied warranty lasts and/or do not allow the exclusion or limitation of incidental or consequential damages, so the above exclusions and limitations may not
apply to you. This warranty gives you specific legal rights, and you may also have other rights which vary
from state to state.
NOT COVERED BY THIS LIMITED WARRANTY:
1.
Normal wear and tear, such as but not limited to fading of painted or plated surfaces, sheet
peeling and other natural deterioration.
2.
Damage caused by a lack of maintenance as described in the Hyundai User Manual.
3.
Consumable parts: Hyundai does not warrant deterioration of the following unless needed as
a part for another warranted repair: Spark plugs, fuel filters, air cleaner elements, clutch discs,
tires, wheel bearings, starter ropes, cables, belts, oil and grease.
4.
Damage caused by accidental or improper installation or storage.
5.
Exposure of the product to chemical agents, bird droppings, sea water, sea breeze or salt.
6.
Improper repair or maintenance.
7.
Damage caused by water ingestion, submersion, or external water damage except for HCP653
(Trash Pump) and HCP3000 (Pressure Washer).
8.
Damage or non-performance caused by operation of the generators set in a marine application.
9.
Operating methods other than those indicated in the owners manual.
10. Damage caused by operation with improper pressure, conditions, or modifications contrary to
published specifications.
29
11. Items not supplied by Hyundai, such as, but not limited to, external wiring, filters, etc.
12. The use of non-genuine Hyundai parts and accessories.
13. Repairs made during the warranty period without first obtaining a case number form Hyundai.
PRODUCT REGISTRATIONS
Product registration is required for all product support and warranty coverage. The purchaser must also
provide the original proof of purchase. The owner’s registration, found with the user manual, must be
completed and mailed. You can also register online at www.powerbyhyundai.com or
www.hyundaipower.ca. You should keep your receipt or invoice as proof of purchase.
Length of warranty from date of
original purchase
Product covered by warranty
LABOR
PARTS
12 Months
36 Months
Model No: HCP9000, Dual-Fuel Generator
12 Months
36 Months
Model No: HCP9100, Gas-Powered Air Compressor
12 Months
36 Months
Model No: HCP3000, Gas-Powered Pressure Washer
12 Months
36 Months
Model No: HCP653, Gas-Powered Water Trash
12 Months
36 Months
Pro Power Series Generators:
Model No: HCP6500D, Diesel Power Generator
ACCESSORIES AND REPLACEMENT PARTS
3 YEAR LIMITED PARTS AND ACCESSORIES WARRANTY
This limited warranty defines the accessories and replacement parts warranty and is limited to Hyundai
Power Equipment products when distributed by Cobalt Power Inc.
The accessories and replacement parts must be purchased from COBALT POWER INC. in the United
States or Canada. Parts and Accessories must be purchased for installation on original Hyundai equipment or engines to be eligible for warranty coverage. Installing parts and accessories on non-Hyundai
products or engines voids the warranty.
Midland International Inc. will repair or replace, at its option, any Hyundai Power Equipment accessories
or replacement parts that are proven to be defective in material or workmanship under normal use during
the applicable warranty time period. Anything replaced under warranty becomes the property of Midland
International Inc. All parts replaced under warranty will be considered as part of the original product, and
any warranty on those parts will expire coincident with the original product warranty.
PARTS AND ACCESSORIES WARRANTY CLAIM PROCEDURE
Original accessories and replacement parts that are proven to be defective in material or workmanship
under the normal use will be repaired or replaced under warranty without charge if determined to be defective within the first thirty-six months form the original date of purchase. After one year from the original
date of purchase, labor costs will be the responsibility of the purchaser. If installed by anyone else, acces30
sories and replacement parts will be repaired or replaced under warranty without charge for parts, but any
labor charges will be the responsibility of the purchaser.
EXCLUSIONS
The same exclusions listed above for labor apply to this warranty. This warranty does not extend to accessories, or parts, affected or damaged by collision, normal wear, use in an application for which the
product was not designed or any other misuse, neglect, incorporation or use of unsuitable attachments
or parts, unauthorized alteration, improper installation, or any causes other than defects in material or
workmanship of the product. Installing non-Hyundai Parts and Accessories voids this warranty.
DISCLAIMER OF CONSEQUENTIAL DAMAGE AND LIMITATION OF IMPLIED WARRANTIES:
MIDLAND INTERNATIONAL INC. disclaims any responsibility for loss of time or use of the product, or the
power equipment on which the product is installed, transportation, commercial loss, or any other incidental or consequential damage. Any implied warranties are limited to the duration of this written warranty.
Some states do not allow limitations on how long an implied warranty lasts and/or do not allow the exclusion or limitation of incidental or consequential damages, so the above exclusions and limitations may not
apply to you. This warranty gives you specific legal rights, and you may also have other rights, which vary
from state to state.
TO OBTAIN WARRANTY SERVICE FOR PARTS OR ACCESSORIES:
You must, at your expense, take the Hyundai Power Equipment accessory, or replacement part, or the
Hyundai Power Equipment product on which the accessory or replacement part is installed, and proof
of purchase to any authorized Hyundai Power Equipment dealer, distributor or distributor’s dealer in the
United States or Canada during the dealer’s or distributor’s normal business hours. If you are unable to
obtain warranty service or are dissatisfied with the warranty service you receive, take the following steps:
First, contact the owner of the service location involved; normally this will resolve the problem. Second, if
the issue is not resolved, contact:
Hyundai Power Equipment Customer Support Center
Toll Free: 1-877-528-3772
E-mail: [email protected]
Online: www.powerbyhyundai.com or www.hyundaipower.ca
31