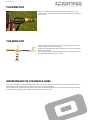
1
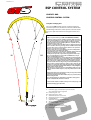
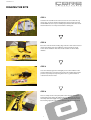
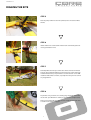
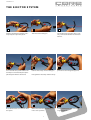
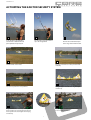
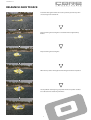
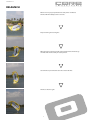
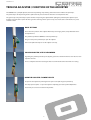
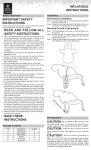
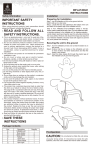
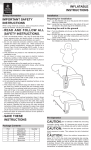
User Manual v1.0
User Manual
1
User Manual v1.0
Warning:
KITEBOARDING IS DANGEROUS
1. Warning:
•
Get professional Instructions before you go kite surfing!
•
Always be extremely careful when using this product
•
Due to safety precautions the kite should only be used on open and unobstructed water.
•
While using the product you´re responsible for your own as well as others well being
•
Always use the size of kite suiting your skills and the wind conditions. Always keep in mind that gusts
can be deadly. Eventually stated wind ranges are without commitment and refer to experts
•
Never go kite surfing when there are obstacles in Lee
•
Never go kiteboarding when the wind is directly on- or offshore
•
Fly this Kite only if you are a strong swimmer and are wearing an approved PFD
•
Only use the product if you are in good mental and physical shape
Assumption of Risk
Use of the CORE Kiteboarding Product and any of its components involve certain inherent risks, dangers and hazards that
can result in serious personal injury and death to both the user and to nonuser third parties. By using the CORE Kiteboarding Product, you freely agree to assume and accept any and all known and unknown and uncertain risks of injury to you
and to third parties while using the equipment. The risks inherent in this sport can be greatly reduced by abiding by the
warning guidelines listed in this owner manual and by common sense.
2. Release and waiver of claims
Hereby you agree that you have read and understood the whole CORE Kiteboarding user’s manual (manual below and
complete instructions on www.corekites.com ) including all Instructions and Warning notices. Furthermore you agree to
undertake to make sure that any third party ( who gets the product from you for a certain or unlimited period of time) has
read and understood all instructions and warning notices contained in this user’s manual before you permit the use of the
CORE Kiteboarding Product.
In consideration of the sale of the CORE Kiteboarding product to you, you hereby agree to the fullest extent permitted by
law, as follows:
To waive any and all claims that you have or may in the future have against CORE Kiteboarding and all related parties resulting from use of the CORE Kiteboarding Product and any of its components.
To release CORE Kiteboarding and all related parties from any and all liability for any loss, damage, injury, or expense that
you or any users of your CORE kiteboarding product may suffer, or that your next of kin may suffer, as a result of the use of
the CORE Kiteboarding product, due to any cause whatsoever, including negligence or breach of contract on the part of
CORE Kiteboarding and all related parties in the design or manufacture of the CORE Kiteboarding product and any of its
components. In the event of your death or incapacity, all provisions contained herein shall be effective and binding upon
your heirs, next of kin, executors, administrators, assigns, and representatives. CORE Kiteboarding related parties have not
made and expressly deny any oral or written representations other than what is set forth herein and the CORE Kiteboarding product User´s Manual.
2
User Manual v1.0
ESP CONTROL SYSTEM
CORE GTS AND
CORE ESP CONTROL SYSTEM
Setup Bar and flying lines
The new Core ESP Control System is ready for plug & play.
Just unwind your lines, attach them to the kite and have fun!
The following instructions and the picture on the left should
give you a quick overview how to setup your new kite and
bar.
K
PREFLIGHT CHECKLIST
D
C
C
A
A
B1
D
B2
1. Make sure your launch is open, FREE OF DOWNWIND BYSTANDERS,
hard objects, nearby power lines, buildings and walls, within at least 200
ft. (60 m), and preferably more. Some riders have needed in excess of 500
ft. (170 m), to regain control in violent dragging or loftings. Avoid kiteboarding near airports and in low flight path areas, complaints have led
to restricted access in some areas.
2. Check to see what size kite other kiteboarders are rigging and get their
input on conditions. Do not rig too large a kite for conditions and carefully consider advice of more experienced riders. Failure to act on prudent
advice has cost some riders severe injury.
3. Check your kite for tears or leaky bladders. If you have leaky bladders
or tears in your kite, repair them before flying.
4. Check ALL kite, harness, control bar lines, webbing, pigtails, bridles, the
chicken loop and leaders for knots, wear or abrasions. If the line
sheathing shows any breaks, replace them. The pigtails should be replaced no less frequently than every 6 months on inflatable kites. Inspect
and test your EJECTOR quick release.
5. Make sure your flying lines are equal as they will stretch unevenly with
use. If they have knots that can´t be easily untied, replace your flight lines.
6. Walk down your lines and examine them carefully. Just before launch
pick your bar up and carefully look down the lines for twists and tangles
that could cause the kite to be dangerously uncontrollable. While you are
holding your bar up look down the lines, shake your bar to make sure the
center lines are connected to the leading edge of the kite. Be particularly
careful, slow and methodical in high winds. Multiple, careful preflighting
in higher winds is strongly advised.
Inflate the kite to a max of 6psi and close the FastPump-Clamps properly.
To depower the kite with the adjuster , always keep a little tension on the
backlines.
With the minihook the rider can fix the bar in the powered position. This is
usefull in jumps and in low wind cruising.
Beginners should allways take off the minihook rope to prevent hooking
in when starting the kite.
G
Before starting the kite you should allways check all bar safety systems
and feel comfortable with all features on the bar.
Double-check the weather conditions and if you´re in doubt, don´t go out!
Have fun and enjoy your safe ride!
A:
Powerlines (grey), red attachment point for left side,
grey attachment point for right side
B1: Left steering line - red
B2: Right steering line - white
C: Attachment points for power lines
D: Attachment points for steering lines
E: Pull-Pull Adjuster
F: Adjustable steering lines (inside floater)
G: 5th line with stopperball (red)
H: Variable bar widths
I:
EJECTOR safety release system
J: Safetyleash with safety leash release
K: Exchangable pulley lines B1
E
F
F
H
H
I
J
3
User Manual v1.0
RIGGING THE KITE
STEP 1
Check the wind conditions in order to choose the correct kite size. Lay
out the kite. Secure the upwind wingtip with sand and make sure that
all FASTPUMP cleats are open to allow proper inflation of the kite. Check
that all bridle lines are evenly laid out and free off tangles.
STEP 2
Go to the centre of the kite leading edge and take a look at the inlet and
outlet valves. Both valves have different air lock systems. The larger
valve is for the deflation of the kite and the smaller one for the kites
inflation.
STEP 3
Close the outlet (larger) valve thoroughly and secure it with the velcro
and the rubber band as shown in the picture. This double safety closure
prevents any unsuspected opening of the valve e.g. when the kite is
crashed hard onto the water.
STEP 4
There is a Pump-leash on the pump that secures the kite and stops it
from blowing away during the inflation process. Make sure to connect
the Pump-leash thoroughly onto the specifically designed loop on the
kites leading edge (the same loop to which the 5th line is connected).
4
User Manual v1.0
RIGGING THE KITE
STEP 5
Push the pump nozzle into the inlet (smaller) valve and start to inflate
the kite.
STEP 6
Inflate until the kite is almost full and then turn around until your back
is facing towards the wind.
STEP 7
Now fully inflate the kite up to 6-7PSI. Check that all struts are inflated
properly. The maximum inflation pressure for the kite is 7PSI. If the kite
is under inflated it has poor performance and the relaunch can be difficult. Over inflated kites can burst, especially when they sit in the sun for
any length of time.
STEP 8
Flip the kite over, position it on its leading edge and weigh down with
lots of sand. A pre-filled linen sandbag is ideal for none sandy beaches.
Now you can unwind the lines from the bar and attach them to the kite
as shown in the graphic on page 3.
5
User Manual v1.0
T H E E J E C TO R S YS T E M
1
Push the yellow Ejector upwards and away from you to open the system.
4
To re-assemble the system hold the Chickenloop in one hand and push up the
yellow Ejector with the other hand.
7
Be careful that there is no sand or dirt in
the system.
3
2
This releases the Safety-pin.
5
The Chickenloop opens. The rider is now
only connected to the kite via the virtual
5th Line.
6
Push the metal loop over the Safety-pin.
pin back into their designated grooves.
Now guide the metal loop and the Safety-
8
10
When the Chickenloop and Safety-pin are
in the correct position,
6
let the yellow Ejector slide back into its
original position.
User Manual v1.0
ACTIVATING THE EJECTOR SECURITY SYSTEM
1
In an emergency grab the Ejector with one or both hands and
push upwards away from you.
2
3
The bar slides along the 5th line
up to the Stopperball.
4
The kite descends without pull
at the edge of the wind window.
5
The kite lands on the water.
Kite goes into the face to face position automatically.
6
7
Face to face position is 100% pull free.
It might happen that one steering line lays
over the tip.
8
9
To get the kite into relaunch position, you
have to pull in one steering line for 2m. You
have to pull in the steering line that is lying
over the tip.
Keep tension on the line until the kite is
back in relaunch position.
7
User Manual v1.0
RELAUNCH: FACE TO FACE
To start the kite again from the face to face position you have to pull in
one steering line for around 2m.
Keep tensioning the steering-line to enable the kite to right itself up
further.
Keep tensioning the steering-line.
When the tip catches wind again the kite will get into relaunch position.
Let the pulled in steering line go, depower the kite and pull on one floater to direct the kite out of the powerzone.
8
User Manual v1.0
RELAUNCH
Relaunch is very easy. Depower the kite and pull on one floater.
The kite will immediately travel to one side.
Keep tensioning the steering-line.
When the kite reaches the border of the powerzone let the floater go
and wait until the kite is fully in restart position.
Steer the kite up and sheet the bar out to restart the kite.
The kite is airborne again.
9
User Manual v1.0
TRIM VIA ADJUSTER / FUNCTION OF THE ADJUSTER
The CORE Bar has a pull-pull adjuster, that means depowering and powering of the kites is done with the two pull straps.
The yellow strap is for depowering the kite: pull it towards you to shorten the front lines and depower the kite.
The green strap is the powerstrap to power the kite and opening the adjuster. When pulling the powerstrap the adjuster opens
stepwise and you‘re able to power the kite again. The advantage of this system is very clear: You‘re able to trim the kite very exact
and with control.
BASIC SETTINGS
This is the home position of the adjuster. Both straps are hanging down, easily obtainable above
the depower line.
The yellow strap with the CORE label is the depowerstrap.
The green strap is the powerstrap to open the adjuster.
You need to pull both straps to use the adjuster correctly.
PULLED ADJUSTER / KITE IS DEPOWERED
By pulling the yellow depowerstrap the adjuster gets shorter and the front lines are shortened - this
depowers the kite.
This is a safety function when starting the kite or to trimm the kite when the wind is increasing.
OPEN THE ADJUSTER / POWER THE KITE
To open the the adjuster or powering the kite you need to pull the green powerstrap.
The strap opens stepwise - to open the adjuster completely you need to pull multiple times.
That‘s how you can reach an ideal trim of your kite.
10
User Manual v1.0
1.
CHICKENSTICK
The picture shows the assembly of the Chickenstick. It has to be on the
right side of the chickenloop (riders point of view) and then attached to the
harness hook.
THE MINILOOP
With the minihook the rider can fix the bar in the powered position. This is
useful in jumps and in low wind cruising.
Beginners should allways take off the minihook rope to prevent hooking in
when starting the kite.
Before starting the kite you should allways check all bar safety systems and
feel comfortable with all features on the bar.
MAINTENANCE OF THE BRIDLE LINES
The bridle lines must be controlled and maintained before every usage of the kite. After using the kite, the lines should be washed
with fresh-water and checked for wear and tear. Sand must be removed completely.
We recommend to attach the front bridle attachment point to the back bridle attachment to avoid accidently twisting and knotting
of the bridle while packing the kite. Always check the pulleys for free movement!
11
User Manual v1.0
CORE INTELLIGENT TRIM SYSTEM
Each CORE kite is delivered with the optimum all round trim settings. You are however able to trim your CORE kite
to suit your personal preferences and requirements.
TRIMMING THE TURNING SPEED
You are able to change the turning speed of the kite at the kite tip. The closer the flying lines are attached to the
kite tip, the faster your kite will turn.
Unhooked Wakestylers and Beginners select the front position for medium turning speed.
For free riders we would recommend the middle setting for quick turning speed.
The Wave riding mode – the back position – with the quickest turning speed is reserved for experts.
12
User Manual v1.0
CORE INTELLIGENT TRIM SYSTEM
CORE kites always give very good bar feedback. Kite feedback through the bar is a very important factor; both for
the professional and the beginner.
The amount of bar pressure is however a personal preference. Good kite feedback means that you can feel the kite
perfectly and always know exactly where the kite is. This allows you to concentrate on the board or the trick without having to constantly check on the kite.
The right amount of bar pressure is different for each kiter; some kiters prefer medium to high bar pressure whilst
others want as little bar pressure as possible.
It is for this reason that CORE kites gives you the trim options to tune your kite to your personal preferences.
TRIMMING THE BAR PRESSURE, TRIMMING THE KITE FEEDBACK
With these trim options you can determine the kite’s feedback through the Bar. The standard setting is the middle
knot. This setting allows for the perfect compromise between medium bar pressure and good kite feedback.
If you attach the bridle closer to the middle of the kite, the bar pressure increases slightly and the kite feedback is
increased.
If you attach the bridle closer to the tip of the kite, the bar pressure decreases and the kite feedback is slightly
reduced.
This feature is unique to CORE kites. Experiment with all the different trim options .
Enjoy!
more backline tension
more backline tension
standard
standard
less backline tension
less backline tension
13
User Manual v1.0
Hiss-Tec Fehmarn WARRANTY POLICY
Hiss-Tec Fehmarn warrants this product to be free of major defects in material or workmanship to the original purchaser for a period
of six months from the date of purchase. This warranty is subject to the following limitations: The warranty is valid only when the
product is used for kiteboarding on water and does not cover products used in rental or teaching operations.
Hiss-Tec Fehmarn will make the final warranty determination, which may require inspection and/or photos of the equipment, which
clearly show the defect(s). If necessary, this information must be sent to the Core Kiteboarding distributor in your
country, postage prepaid.
If a product is deemed to be defective by Hiss-Tec Fehmarn, the warranty covers the repair or replacement of the defective product
only. Hiss-Tec Fehmarn will not be responsible for any costs, losses or damages incurred as a result of loss of
use of this product. The warranty does not cover damage caused by misuse, abuse, neglect or normal wear and tear including but
not limited to, rigging with other than Hiss-Tec Fehmarn components, damage due to excessive sun exposure, damage caused by improper handling or storage, damage caused by use in the waves or shore break and damage caused by anything
other than defects in material and workmanship.
This warranty is voided if any unauthorized repair, change or modification has been made to any part of the equipment.
The warranty for any repaired or replaced equipment is good from the date of the original purchase only. The original purchase receipt must accompany all warranty claims. The name of the retailer and date of purchase must be clear and legible. There are no warranties that extend beyond the warranty specified herein.
Warranty Claims
Warranty claims must be processed and be issued a return authorization prior to shipping to Hiss-Tec Fehmarn.
PLEASE CALL OR WRITE FOR CLAIMS PROCESSING TO THE NATIONAL CORE KITEBOARDING DISTRIBUTOR.
CONTACT, SERVICE AND ADVICE
Get all CORE products and further advice at your national distributor,
on www.corekites.com/en or directly at CORE Kiteboarding in Germany:
Hiss-Tec Fehmarn
Am Steinkamp 28
23769 Burg auf Fehmarn
GERMANY
T: +49 4371 3950
F: +49 4371 879334
[email protected]
14