1
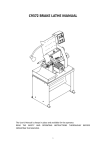
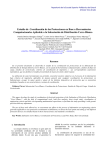
600+ Light Duty Single Shaft Shredder Models Covered: ALS, CLS, EBS, SLS, MLS Part Number: MAN-EBS-0011 Bulletin Number: GRN4-600 Effective: August 1, 2012 Write Down Your Serial Numbers Here For Future Reference: _________________________ _________________________ _________________________ _________________________ _________________________ _________________________ We are committed to a continuing program of product improvement. Specifications, appearance, and dimensions described in this manual are subject to change without notice. DCN No. ____________ © Copyright 2013 All rights reserved. CG5-630 ii Shipping Info Unpacking and Inspection You should inspect your granulator for possible shipping damage. Thoroughly check the equipment for any damage that might have occurred in transit, such as broken or loose wiring and components, loose hardware and mounting screws, etc. In the Event of Shipping Damage According to the contract terms and conditions of the Carrier, the responsibility of the Shipper ends at the time and place of shipment. Notify the transportation company’s local agent if you discover damage. Hold the damaged goods and packing material for the examining agent’s inspection. Do not return any goods before the transportation company’s inspection and authorization. File a claim with the transportation company. Substantiate the claim by referring to the agent’s report. A certified copy of our invoice is available upon request. The original Bill of Lading is attached to our original invoice. If the shipment was prepaid, write us for a receipted transportation bill. Advise customer service regarding your wish for assistance and to obtain an RMA (return material authorization) number. If the Shipment is Not Complete Check the packing list as back-ordered items are noted on the packing list. You should have: þ Bill of lading þ Packing list þ Operating and Installation packet þ Electrical schematic and panel layout drawings þ Component instruction manuals Re-inspect the container and packing material to see if you missed any smaller items during unpacking. If the Shipment is Not Correct If the shipment is not what you ordered, contact the shipping department immediately. For immediate assistance, please contact the correct facility located in the technical assistance section of this manual. Have the order number and item number available. Hold the items until you receive shipping instructions. CG5-630 iii Returns Do not return any damaged or incorrect items until you receive shipping instructions from the shipping department. Credit Returns Prior to the return of any material, authorization must be given by the manufacturer. A RMA number will be assigned for the equipment to be returned. Reason for requesting the return must be given. ALL returned material purchased from the manufacturer returned is subject to 15% ($75.00 minimum) restocking charge. ALL returns are to be shipped prepaid. The invoice number and date or purchase order number and date must be supplied. No credit will be issued for material that is not within the manufacturer’s warranty period and/or in new and unused condition, suitable for resale. Warranty Returns Prior to the return of any material, authorization must be given by the manufacturer. A RMA number will be assigned for the equipment to be returned. Reason for requesting the return must be given. All returns are to be shipped prepaid. The invoice number and date or purchase order number and date must be supplied. After inspecting the material, a replacement or credit will be given at the manufacturer’s discretion. If the item is found to be defective in materials or workmanship, and it was manufactured by our company, purchased components are covered under their specific warranty terms. CG5-630 iv Table of Contents CHAPTER 1: SAFETY ................................................................ 6 1-1 1-2 1-3 1-4 How to Use This Manual ............................................................................................. 6 Safety Symbols Used in this Manual ..................................................................... 6 General Safety Regulations ........................................................................................ 9 Responsibility .............................................................................................................. 9 Warnings and Precautions ........................................................................................ 10 CHAPTER 2: FUNCTIONAL DESCRIPTION ........................... 13 2-1 2-2 2-3 Models Covered in This Manual................................................................................ 13 General Description & Typical Features ................................................................... 13 Safety Features ......................................................................................................... 17 CHAPTER 3: INSTALLATION.................................................. 21 3-1 3-2 3-3 Uncrating the Equipment........................................................................................... 21 Electrical Connections ............................................................................................... 22 Initial Start-up ............................................................................................................ 23 CHAPTER 4: OPERATION....................................................... 24 4-1 4-2 4-3 Start-up ..................................................................................................................... 24 Operation Procedures ............................................................................................... 24 Shut-down ................................................................................................................. 24 CHAPTER 5: MAINTENANCE ................................................. 25 5-1 5-2 Preventative Maintenance Schedule ......................................................................... 25 Preventative & Corrective Maintenance .................................................................... 26 CHAPTER 6: TROUBLESHOOTING ....................................... 38 6-1 Introduction ............................................................................................................... 38 CHAPTER 7: APPENDIX.......................................................... 41 7-1 7-2 7-3 7-4 CG5-630 Technical Specifications ............................................................................................ 41 Drawings and Diagrams ............................................................................................ 42 Spare Parts List ......................................................................................................... 47 Technical Assistance ................................................................................................ 49 Parts and Service Department ............................................................................ 49 Sales and Contracting Department ..................................................................... 49 v Chapter 1: Safety 1-1 How to Use This Manual Use this manual as a guide and reference for installing, operating, and maintaining your granulator. The purpose is to assist you in applying efficient, proven techniques that enhance equipment productivity. This manual covers only light corrective maintenance. No other maintenance should be undertaken without first contacting a service engineer. The Functional Description section outlines models covered, standard features, and safety features. Additional sections within the manual provide instructions for installation, preoperational procedures, operation, preventive maintenance, and corrective maintenance. The Installation chapter includes required data for receiving, unpacking, inspecting, and setup of the granulator. We can also provide the assistance of a factory-trained technician to help train your operator(s) for a nominal charge. This section includes instructions, checks, and adjustments that should be followed before commencing with operation of the granulator. These instructions are intended to supplement standard shop procedures performed at shift, daily, and weekly intervals. The Operation chapter includes a description of electrical and mechanical controls, in addition to information for operating the granulator safely and efficiently. The Maintenance chapter is intended to serve as a source of detailed assembly and disassembly instructions for those areas of the equipment requiring service. Preventive maintenance sections are included to ensure that your granulator provides excellent, long service. The Troubleshooting chapter serves as a guide for identification of most common problems. Potential problems are listed, along with possible causes and related solutions. The Appendix contains technical specifications, drawings, schematics, parts lists, and available options. A spare parts list with part numbers specific to your machine is provided with your shipping paperwork package. Refer to this section for a listing of spare parts for purchase. Have your serial number and model number ready when ordering. Safety Symbols Used in this Manual The following safety alert symbols are used to alert you to potential personal injury hazards. Obey all safety messages that follow these symbols to avoid possible injury or death. DANGER indicates an imminently hazardous situation that, if not avoided, will result in death or serious injury. WARNING indicates a potentially hazardous situation or practice that, if not avoided, could result in death or serious injury. CAUTION indicates a potentially hazardous situation or practice that, if not avoided, may result in minor or moderate injury or in property damage. GRN4-600 Chapter 1: Safety 6 of 50 Figure 1: Safety Tags and warning features Hazard Alert Symbol GRN4-600 Description/Explanation Preventative Maintenance High Voltage Hazard. The electrical enclosure is supplied with 3-phase electrical power. Use caution when using or maintaining this product. Every six months inspect all electrical connections for secure attachment. For further information see the Maintenance Chapter in this manual Hands could be exposed to a crushing movement. Every month inspect the shears/blades for any type of wear. For further information see the Maintenance Chapter in this manual. When equipped with belts and sheaves, hands could become entangled. Every month inspect the belt(s) for any type of wear. For further information see the Maintenance Chapter in this manual. Hands can become entangled or cut if they enter the danger zone of gears or cutting shears. Every month inspect the shears/blades for any type of wear. For further information see the Maintenance Chapter in this manual. The unit can produce continuous noise above 85 dBA and/or produce projectiles under normal operating conditions. Always wear eye and ear protection when the machine is in operation or performing maintenance. Chapter 1: Safety 7 of 50 Mandatory Symbol Description/Explanation Read Operators Manual. This equipment must be operated and maintained by properly trained personnel. The information contained within this manual must be read and understood prior to operating this equipment. Lock Out. This equipment is operated with 3-phase electrical power. Therefore, when performing any maintenance operations we recommend following the local standards for performing a lock-out/tag-out procedure. Wear Safety Gloves. This equipment operates with sharp blades and rotors. We recommend that technicians use safety gloves while performing maintenance to protect hands from being exposed to these sharp surfaces. Wear ear and eye protection. This unit may produce loud and continuous noise and may produce projectiles. Pneumatic or hydraulic equipment. Pneumatic or hydraulic equipment must be kept at a safe pressure. Do not reach into unit. Reaching into a unit is prohibited while the unit is in operation and may cause serious injury. GRN4-600 Chapter 1: Safety 8 of 50 1-2 General Safety Regulations This machine uses knives for the performance of its intended use. Consequently, it can be a dangerous machine to operate and maintain unless these safety regulations are followed. These regulations should be read, understood and periodically reviewed by all personnel involved in any way with this machine. Never operate or remove any machine components that are secured by wrench-type fasteners unless the motor is electrically locked out and the rotor is motionless. Never operate the machine or jog the rotor unless the cutting chamber covers, discharge chute, or any guards or covers are in place and secure. Do not circumvent the safety interlocks. Prior to clearing a jam or performing any maintenance, the motor should be turned off and electrically locked out. Be sure that the rotor has come to a stop. Hands must not be inserted into the machine to clear the jam. Do not extend any part of the body into feed roll openings or discharge area unless the motors are electrically locked out and the rotor and feed rolls are motionless. Never extend fingers through holes in screen. Be sure that the v-belts are properly aligned and that tension is at its maximum. Extreme care should be taken to see that all bolts are properly tightened at all times. During the operation of the machine, rotor knife bolts may come loose. Although fine threads are used on the rotor knife bolts because vibration does not easily loosen them, you should inspect the tightness of the bolts frequently. This machine is designed for the granulation of plastic materials. Do not feed any other materials into the machine. 1-3 Responsibility These machines are constructed for maximum operator safety when used under standard operating conditions and when recommended instructions are followed in the maintenance and operation of the machine. All personnel engaged in the use of the machine should become familiar with its operation as described in this manual. Proper operation of the machine promotes safety for the operator and all workers in its vicinity. Becoming familiar with materials, inspection, speed limitations, screens, and guard maintenance and total user responsibility will assist you in learning potential areas in need of observation for danger. Each individual must take responsibility for observing the prescribed safety rules as outlined. All caution, warning and danger signs must be observed and obeyed. All actual or potential danger areas must be reported to your immediate supervisor. GRN4-600 Chapter 1: Safety 9 of 50 1-4 Warnings and Precautions Our granulators are designed to provide safe and reliable operation when installed and operated within design specifications, following national and local safety codes. To avoid possible personal injury or equipment damage when installing, operating, or maintaining this granulator, use good judgment and follow these safe practices: þ LEARN AND OBEY your company’s safety policy regarding granulating equipment. þ MOVING OR LIFTING THE GRANULATOR: Although our equipment is built and engineered for great ruggedness in operation, care must be taken when moving the machine along the floor or lifting it. Damage may occur to sheet metal covers, electrical cabinets, or small brackets if pressure is applied to them when moving the granulator. When lifting the granulator, be certain of total machine weight and the capability of the lifting equipment. (See the Granulator Specification Sheets for machine weights and dimensions.) þ GRANULATOR LOCATION: Adequate area for routine maintenance should be provided in order to open the machine for knife, screen, or cleanout service. Proper service area clearances also should allow people who are working on the machine to be clearly visible to others, thereby reducing the potential safety hazards. þ SAFE HOUSEKEEPING: The work area must be kept clean and uncluttered during periods of operation or maintenance. No hand tools or other metal objects should be left on or around the machine. Any tools or other metal objects that mistakenly fall into the hopper feed opening can cause severe damage to internal cutting chamber, rotor and screen components. þ SAFETY GLASSES OR A FACE SHIELD MUST ALWAYS BE WORN when servicing or operating the machine. Although our machines are designed for the maximum in flyback control, caution must be used when operating near the hopper feed opening in order to guard against unexpected material flyback. þ EAR PROTECTION may be required when operating the machine during granulation of very hard or noisy materials. The Occupational Safety and Health Act of 1970 have established guidelines for Permissible Noise Exposures (OSHA 1910.95) that should be followed. þ NEVER attempt to operate the granulator unless it is fully assembled with all guards and interlocks in place and functional. þ OBSERVE all danger, warning, caution and safety labels on the equipment. þ Upon completion of any machine maintenance, be certain ALL SAFETY GUARDS AND COVERS are securely and properly fastened prior to resuming machine operation. All fasteners must be in place and properly tightened. ANY SHORTCUTS MAY RESULT IN INJURY TO PERSONNEL OR DAMAGE TO EQUIPMENT. þ NEVER wear any loose fitting clothes, neckties, or dangling items such as earrings, belts, or shoestrings. Jewelry, such as wristwatches, bracelets, or rings should NEVER be worn. Long hair must be tied back or placed in a tight fitting hairnet. NEVER lean against or rest hands or feet on the granulator when it is in operation or open for maintenance. NEVER stand on the granulator when it is in operation. GRN4-600 Chapter 1: Safety 10 of 50 þ ROTATION OF MOTORS: The correct rotating direction for the granulator motor is clearly marked on the machine. Always check for proper rotation of motors. Incorrect rotation direction can cause severe damage. þ ELECTRICAL GROUNDING: All electrical equipment on the granulator must be grounded in accordance to all local codes and Article 250 of the National Electric Code. þ ALWAYS DISCONNECT AND LOCKOUT the main electrical power to the granulator before performing any service. þ SAFETY INTERLOCKS MUST NOT BE BYPASSED. The mechanical and electrical safety interlocks ensure the safety of personnel. They should never be tampered with or removed for ANY reason. They should be checked frequently by a qualified mechanic for proper operation. þ NEVER modify the machine configuration or any individual component without written notice from the factory. Remaining Risks The machine is constructed so that you are able to operate it safely. Non-avoidable dangers are prevented as greatly as possible by the protective devices. Remaining risks always exist. Please be aware of the risks described below, as this will help operators/staff avoid accidents. To further avoid danger, please adhere to all advice provided in the operational manual. Mechanical Dangers Type of Danger Activity Possible Consequences Preventative Measures Crushing due to heavy parts falling down or over. Unloading/transporting the machine and/or components. Serious injury. • Wear personal protective gear and follow the instructions provided in the operational manual. Cutting caused by sharp knives—even when the rotor is stationary. Knife replacement, knife setting, knife sharpening, and other maintenance. Serious injury— particularly to the hands and fingers. • Wear personal protective gear and follow the instructions provided in the operational manual. Crushing when opening/closing the doors on front side of machine. Maintenance. Serious injury. • Ensure no persons are in the danger area while closing the door. Tripping over cables and other surrounding objects. All activities. Serious injury. • Lay cables in accordance with regulations. • Keep work station clean and tidy. Crushing, cutting, amputation caused by rundown of the rotor. Maintenance. Serious injury or death. • The maintenance doors must always be tightly locked during operation. • DO NOT make the run-down safety devices ineffective by using technical aids or other manipulations. • NEVER use hands to check if the rotor has stopped. GRN4-600 Chapter 1: Safety 11 of 50 Type of Danger Activity Possible Consequences Preventative Measures Failure of the Emergency Stop Function. All activities. Serious injury or death. • There must be a guarantee that the machine will be stopped immediately upon failure of an Emergency Stop button. Fire/explosion caused by throwing dangerous objects (i.e. spray cans) into the shredder. Grinding. Serious injury or death. • Only grind material that corresponds to the agreed customer-specific specifications. Damage to hearing. All activities. Diminished hearing, headaches, impaired balance, and deterioration of concentration. • Reduce noise levels by taking suitable measures and wear ear protection. Instable machine due to vibration. All activities. Serious injury. • Install the machine according to the instructions in the operational manual. Loose cutter/bed knife mountings due to vibration. All activities. Serious injury. • Check the cutter/bed knife mountings regularly. Inhalation of grinding dust. All activities. Respirator disease, etc. • Mount a suitable air suction device. DO NOT blow out grinding dust when cleaning the machine. Crushing, cutting, amputation caused by manipulation of protective devices. All activities. Serous injury or death. • Never make the protective devices ineffective; check the devices regularly for proper function. For further information on granulator safety, installation and operation, see the American National Standard for Plastics Machinery⎯Granulators, Pelletizers, and Dicers Used for Size Reduction of Plastics⎯Construction, Care, and Use. ANSI B151.11-1982. We have long recognized the importance of safety and have designed and manufactured our equipment with operator safety as a prime consideration. We expect you, as a user, to abide by the foregoing recommendations in order to make operator safety a reality. GRN4-600 Chapter 1: Safety 12 of 50 Chapter 2: Functional Description 2-1 Models Covered in This Manual This manual covers the 600+ Series shredder containing models: ALS, CLS, EBS, SLS and MLS. The 600+ Shredder is designed for processing injection and extrusion mold startup purge. The shredder reduces material to approximately 1 to 4 inches (25 to 100 mm) when combined with a granulator (stacked 2-stage or in-line with conveyors), and output material sizes can range from 1/8 to 1/2 inches (3 to 13 mm). The shredder can average 150% of its stated throughputs without heavy power consumption loads (typically seen when using a granulator alone). 2-2 General Description & Typical Features Grinding Material In-feed The grinding material can be fed into the shredder using the following methods: • Manual in-feed of the grinding material directly into the hopper. • Manual in-feed of the grinding material with the help of an additional in-feed device (i.e. hydraulic feeding unit). • Automatic in-feed of the grinding material with an additional in-feed device (i.e. conveyor belt). In-feed Hopper The grinding material in-feed moves through an in-feed hopper so the material is delivered correctly and safely. Standard hopper GRN4-600 Chapter 2: Functional Description 13 of 50 Machine—standard execution 6 (1) (2) (3) (4) (5) (6) (7) Base frame Housing panel Gearbox motor Control panel Hand winch Hopper Discharge area 3 5 4 2 1 GRN4-600 7 Chapter 2: Functional Description 14 of 50 Drive The drive of the rotor runs using an electric helical gear motor. The motor is flanged on the rotor and fixed on the base frame. Please observe the operation manual from the manufacturer! Drive motor Rotor and Cutters The material is ground between the cutters assembled on the rotor and the bed knives, which are mounted in a fixed position on the machine’s lower section. All rotors are equipped with square cutters; these cutters make light work of the heaviest pieces. The cutters have four corners so they can be easily turned once a corner has worn out. The design of the rotor has a significant influence on the quality of the grinding process and its results. The rotor construction, the type of knife mounting, and the number of cutters have all been exactly matched to the allocated tasks of the machine. 1 (1) Cutter (2) Bed knife GRN4-600 2 Chapter 2: Functional Description 15 of 50 The rotor is accessible after opening the lower housing panel. The rotor is arranged on roller bearings, which are located outside the housing. Gearbox motor is attached to the rotor axis. The rotor is dynamically counter-balanced and has vibration-free concentricity. 1 (1) Cutter (2) Material outlet 2 Discharge of Grinding Material The ground material is usually discharged using a box. An available option is discharge with a conveyor. Control Panel (1) (2) (3) (4) (5) (6) (7) 3 Main switch Emergency stop Ampere meter Control lights Start button Stop button Reset button 4 6 7 5 GRN4-600 Chapter 2: Functional Description 16 of 50 1 2-3 2 Safety Features Protective Devices The machine must never be operated without the following protective devices or with faulty or manipulated protective devices. Housing panel safety device The shredder must only be operated if the housing flap is fixed and the screws are tightened—otherwise, the safety switch will be activated. If the housing panel is open during operation, the safety switch will be activated, and the machine will shut off. Safety device for housing panel GRN4-600 Chapter 2: Functional Description 17 of 50 Hopper safety device The hopper can be opened or pivoted upwards for maintenance and cleaning. It is connected with the cutting chamber with a joint. The hopper can be opened manually with a mounted hand winch; therefore, the hopper is safeguarded against opening while running. If the hopper is opened during operation, the safety switch will activate and the machine will stop. Safety device for hopper GRN4-600 Chapter 2: Functional Description 18 of 50 Splash guard The input opening of the machine is provided with a splash guard to prevent fly-out in case the grinded material is introduced directly in the feed hopper. Splash guard Safety Markings Safety markings are attached to the machine. If one of these markings becomes detached or is no longer recognizable, the marking must be replaced. New markings can be ordered from the manufacturer; please contact customer service. Personal Protective Gear The following protective gear must be worn when carrying out the outlined tasks. Use breathing equipment before inhaling substances that may be harmful to your health if necessary. Task Unloading machine Connecting machine Operation. Cleaning. Maintenance of bearings Maintenance of gearbox motor Maintenance of cutters/bed knives Knife sharpening GRN4-600 Safety Helmet X Safety Boots X X X X X Safety Gloves X Safety Goggles X X X X X X X Ear Muffs X X X X X Chapter 2: Functional Description 19 of 50 Emergency Stop Button The machine must only be operated with the installed Emergency Stop buttons. One Emergency Stop button must be mounted onto the control cabinet and a second onto the grinding material in-feed. In case of an emergency, immediately press one of the Emergency Stop buttons. The Emergency Stop button must be activated in all situations in which injury or damage could result! Re-operation 1. 2. 3. 4. GRN4-600 Eliminate the cause of the emergency stop. Unlock the Emergency Stop button. Acknowledge fault. The machine ready for re-operation. Chapter 2: Functional Description 20 of 50 Chapter 3: Installation 3-1 Uncrating the Equipment Choosing Application Site The location of the machine and site of application must exhibit the characteristics listed below. • Enclosed space. • Sufficient load-bearing capacity. (Find the machine weight in Chapter 7: Technical Specifications.) • Machine must be freely accessible from all sides. • Sufficient available room for operating and service personnel. • Spatial requirements—refer to the assembly drawing. All hinged parts must be able to be completely opened. • Vibration-free surroundings. • Sufficient lighting. • Machine may not be exposed to direct radiation of any kind. • Room temperature must range from 40°F (5°C) to 104°F (40°C). • Relative atmospheric humidity according to DIN 40040: 15 to 70% (indoor). (In humidity levels of higher than 70%, apply an anti-corrosive agent to the metallicfinished machine parts. Insulation for the tropics is also necessary.) • The machine may not be operated within range of static discharges or strong magnetic fields—this could lead to faults in the machine’s control system. Unloading and Installing the Machine The machine and/or components are packed so they will arrive safely. Use a suitable crane or forklift for unloading the packaged machine and/or components. GRN4-600 • After unloading the equipment, remove the packaging material and all transportation safety devices. • In the case that the shredder and its accessory components have been delivered as individual items, mount these at the site of application in accordance with the assembly drawing. • Align the machine horizontally using a suitable spirit level. • Do not use blocks to place underneath the machine; use metal strips in order to prevent buckling of the base frame. Make sure that an even distribution of weight is achieved on all the points of support. Chapter 3: Installation 21 of 50 Suspended load! Falling loads can cause serious injury or death! Only use a crane or forklift appropriate for the weight and dimensions of the load. Use suitable means to stop and pay attention to the center of gravity. Do NOT step under the suspended load. Wear a safety helmet in addition to the basic protective gear. Overturning or falling machine! Serious injury or death can result! In case that the granulation will be placed erect over a pit, on a frame, or on a platform, the machine MUST be secured by placing mounting screws though the holes on the mounting pads (see assembly drawing). 3-2 Electrical Connections Electrical connections should only be made by qualified electricians! Voltage, current, frequency, and protection are marked on the type plate. The voltage tolerance is +/- 10%. For machines that are not pre-wired, the electrical connection is to be carried out in accordance with the enclosed wiring diagram in the terminal box. When performing this task, it is important to follow the regulations of the local electricity authority. The required cable cross-section is determined according to the rated capacity of the units. The wiring schematics are located in the control panel. NOTE: Alterations to the wiring diagrams require the approval of the manufacturer. Failure to obtain approval will result in the termination of all guaranteed claims. DANGEROUS VOLTAGE. Touching live parts can lead to serious injury or death! Trained electricians may only carry out all work relating to the electricity of the machine. Observe the currently effective EMC regulations. Caution must be taken to prevent electrical shock when operating certain equipment. Installation, service, alterations, and/or modifications must only be done by qualified personnel and with a high regard for safety. Failing to conform to the requirements could result in bodily injury, costly damage, or death! Connection of Emergency Stop Button The machine must only be operated with installed Emergency Stop buttons. If the Emergency Stop buttons are not installed prior to delivery, one Emergency Stop button must be installed at the control cabinet and a second one at the grinding material in-feed. NOTE: GRN4-600 The control panel with the switches and Emergency Stop button should be installed near the machine; the distance should not exceed 16 ft (5 m). The connecting cables between the control panel and machine must be protected against damage. If the control panel cannot be installed according to these rules, an additional Emergency Stop button must be installed on the machine Chapter 3: Installation 22 of 50 3-3 Initial Start-up General Advice All work related to the start-up of the machine must be carried out by trained and specialized personnel. Check the oil level of the gearbox before operating the machine! Fill hydraulic tank with oil. Please observe the instructions in the operational manual! Checking the Rotational Direction Rotational direction of the motors must be checked before initial start-up. The following steps must be completed. NOTE: • Switch the machine on and immediately off again. • Observe whether the discharge air fan in the drive motor is rotating in the direction of the directional arrow. If running in the wrong direction, re-connect the motor connection immediately. Damage to the machine will result from operating in the wrong direction. Start-up Checklist þ When the housing panel is opened, check the cutter mounting screws using a torque wrench. þ Search the grinding chamber for foreign matter. þ Check oil level of the gearbox motor. þ Examine in-feed device for foreign matter. þ Check that they Emergency Stop buttons are unlocked. þ Check all safety devices for proper function. þ Switch ON the machine for a short time to check the rotational direction—can be seen at the discharge air fan of the drive motor—observe the running direction arrow. þ Allow machine to run approximately 10 minutes without grinding material. þ Connect material discharge and in-feed device; check rotational direction drives. þ Feed grinding material uniformly; too much material can cause the machine to overload. þ Check the temperature of ground material if necessary. þ Monitor the ammeter. This displays the present current consumption and provides information on the load of the machine. GRN4-600 Chapter 3: Installation 23 of 50 Chapter 4: Operation 4-1 Start-up Machine Checks Prior to Start-up þ The cutters are properly set and the screws are tightened with the specified torque. þ The grinding chamber is free of foreign matter. þ The housing panel is closed. þ All safety devices, including devices for the grinding material in-feed and discharge devices, are checked for proper function. Switching Machine ON 1. Switch ON the grinding material discharge device. 2. Switch ON the shredder (main switch to 1). Wait until the rotor has reached full speed. 3. Switch ON the grinding material in-feed device. 4-2 Operation Procedures Manual In-feed of Material • Throw the grinding material into the in-feed hopper. • The material should be fed into the front of the machine. • If the machine has an additional in-feed device installed, please observe additional information in the appropriate operational manual. Rotating knives can cause serious injuries and death! Do NOT reach into the in-feed hopper or lean in while the rotor is operating. Use only approved grinding material! DO NOT climb into the in-feed hopper while operating the machine. Death will result! 4-3 Shut-down Switching Machine OFF 1. Switch OFF the grinding material in-feed device. 2. Wait until the remaining grinding material has been processed, and then switch OFF the shredder, (main switch to 0). 3. Switch OFF the grinding material discharge device. GRN4-600 Chapter 4: Operation 24 of 50 Chapter 5: Maintenance 5-1 Preventative Maintenance Schedule Only trained personnel may perform maintenance on the machine. The maintenance must be performed within the specified time and also documented for records. Regular maintenance is important to the continued effectiveness and efficiency of the machine. Electrical voltage causes danger while starting the machine for maintenance—the main switch MUST be turned to 0, the machine must be safeguarded with a padlock, and a warning sign must be attached. Maintenance Plan The following maintenance must be completed after every 8 operation hours: • Check protective devices for proper function. • Check mountings of cutters and bed knives. • Check the condition of the cutters and bed knives. The following maintenance must be completed after every 40 operation hours: • Check that all screws are tightened. • Check all wearing parts. • Check hydraulic oil level and consistence. The following maintenance must be completed after every 2000 operation hours: • Check the oil level in the gearbox motor. The following maintenance must be completed when necessary: • Clean the machine. • Check the main bearings (bearing clearance, lubricant renewal). Yearly Maintenance: • GRN4-600 The purpose of yearly maintenance is to check the general condition of the machine and to arrange for the arrival of any necessary replacement parts in good time. A service engineer can assist in performing this task. Chapter 5: Maintenance 25 of 50 5-2 Preventative & Corrective Maintenance Checking the Protective Devices Check all safety devices for stipulated condition, location, and function; verify they have safe mountings. Danger results from non-functioning protective devices! Serious injury or death can result. Eliminate all defects before you put the machine into operation! If defects occur during operation, stop the machine immediately and eliminate the defect! Do NOT change or remove any protective devices. Do NOT modify the protective devices Cleaning the Machine To clean the machine, follow the steps below. 1. Switch OFF the shredder at main switch. 2. Safeguard main switch with a padlock. 3. Open the housing panel. 4. Safeguard the housing panel. 5. Remove the screen. 6. Empty the screen. 7. Pre-clean the grinding chamber with a hand brush. 8. Evacuate the remaining grinding material residue with a suitable suction device. 9. Remove any clinging residue with a wooden scraper. 10. Put the screen back into its working position and fasten with mounting screws. 11. Close the housing panel. 12. Machine can be started again. Danger of cutting caused by sharp knives even while the rotor is stationary. Serious injury may result—especially to the hands and fingers—wear protective gloves. Inhalation of dust can be hazardous and can result in respiratory injury—never blow out the residue and use breathing protection if necessary. Replacing the Gearbox Motor The gearbox motor’s dimensions make replacing the gearbox necessary only in exceptional cases. Dismounting and mounting the gearbox requires specialized knowledge. Please observe the installation requirements of the gearbox manufacturer. GRN4-600 Chapter 5: Maintenance 26 of 50 Replacing the Rotor The rotor has a heavy-duty design, which makes replacement necessary only after a crash, i.e. a hammer falls inside the machine. Dismounting and mounting the rotor requires specialized knowledge. Dismounting the rotor Follow the steps below to dismount the rotor. 1. Dismount the gearbox motor. 2. Remove the rotor mounting slot cover plates from the housing. 3. Screw in hooks on both shaft ends. 4. Remove the bearing housing mounting bolt. 5. Carefully lift the rotor out of the housing using suitable lifting equipment. 6. Place the rotor in a safe location (appropriately-sized timber beams are suitable for this). Mounting the rotor Clean the bearing seat surfaces and check the key before proceeding as follows to mount the rotor. 1. Lift the rotor using suitable lifting/stopping equipment and place the rotor carefully into the bearing seats. 2. Attach the bearing housing (Pos) to the bearing seats with screws. 3. Place the gearbox motor onto the rotor axis. 4. Return the rotor mounting slot cover plates. 5. Carry out a test run. Replacing the Main Bearings The dimensions of the main bearings make a replacement necessary only in exceptional cases. Dismounting and mounting the bearings requires specialized knowledge; therefore, please observe all instructions provided by the manufacturer or call customer service for assistance. The bearings mounting in this machine are indicated in the spare parts list. A requirement for dismounting and mounting the bearings is a suitable pulling-off device. GRN4-600 Chapter 5: Maintenance 27 of 50 Dismounting the main bearings Follow the steps below to dismount the main bearings. 1. Dismount the gearbox motor. 2. Pull the distance sleeve from the rotor axis. 3. Remove the rotor cover plates from the housing. 4. Screw in hooks/eye bolts on both shaft ends. 5. Hang the rotor from hooks/eye bolts on both shaft ends. 6. Remove the bearing housing mounting bolt. 7. Carefully lift out the complete rotor using suitable lifting equipment. 8. Place the rotor in a safe location (timber beams are recommended). 9. Loosen the bearings cover mounting screws and take off the bearing cover. 10. Pull the bearing housing off using a pulling-off device. 11. Pull the bearing off the rotor axis using a pulling-off device. Mounting the main bearings Thoroughly clean the bearing surfaces and the shaft surfaces and grease them lightly before following the steps below to mount the main bearings. 1. Mount the bearing in bearing housing. 2. Attach the bearing with the bearing housing to the rotor axis. 3. Lift the rotor using suitable equipment; carefully place the rotor into the bearing seats. 4. Attach the bearing housing to the bearing seats with screws. 5. Return the distance sleeve to the rotor axis. 6. Return the gearbox motor to the rotor axis. 7. Return the rotor cover plates. 8. Carry out a test run. NOTE: The mounting forces must always engage the inner-ring or roller body damage will result. The hardened bearing rings are sensitive to stressed impact; never hit the rings directly with a hammer. It is recommended to use a brass arbor or piping piece made from soft material. The bearing should be put onto the shaft using light blows. When performing this task, the force of pressure must be evenly distributed on the circumference of the bearing ring. Lubricating the Main Bearings A correct lubricant supply is an important requirement for operational safety and long service life of bearings. Every machine is greased and test runs are performed before delivery. GRN4-600 Chapter 5: Maintenance 28 of 50 NOTE: Unsuitable lubricant, lubricant deficiency, excessive lubricant, or impurities in the lubricant lead to overheating and extreme wear of the bearings. Lubrication intervals Use the following table to determine when to check and replace the lubricant. Shift Operation When to Replace When to Check One shift operation. Every 18 months. Monthly. Two shift operation. Every 9 months. Monthly. Three shift operation. Every 6 months. Monthly. Checking lubricant quality When determining whether a lubricant needs to be replaced, check for the following: • Change in consistency. • Discoloration. • Degree of soiling. Replacing or refilling lubricant • Fill the bearings uniformly with grease until all operating surfaces are well greased. • A lubricant quantity of 1/3 to 1/2 of the bearing volume per bearing is required. If too much grease is used, the lubricant will become unusable due to excessive temperature. • Only one type of grease must be used. Mixing different types of grease together is prohibited. The bearings are filled at the factory with lithium base saponification roller bearing grease F3. • Use the “List of lubricants” to determine which lubricants from which manufacturers to use. Refilling lubricant The grease travels through the circulating grooves and bores via lubrication nipples into the interior of the bearing. The greasing quantity is 2 oz. (60g) to 3.5 oz. (100g) roller bearing grease F3 per bearing. Grease nipple GRN4-600 Chapter 5: Maintenance 29 of 50 Replacing lubricant Renewing the lubricant between the specified intervals is only necessary when unusual bearing noises or overheating occurs. Mounting and dismounting the bearings must be performed according to the instruction in the operation manual. Follow the steps below to replace the lubricant. 1. Open the bearing. 2. Remove the bearing housing and the bearing cover. 3. Carefully clean the bearing with petroleum ether. (Petroleum ether, petroleum, spirit, aqueous neutral, or alkaline cleaning agents may be used to clean the bearings.) The bearing must be immediately preserved with the lubricant after cleaning in order to avoid corrosion. 4. Fill the bearing with an approved lubricant (see “list of lubricants”). List of lubricants Name/ Country of Manufacturer Roller Bearing Grease ARAL ARAL Grease HL 3 BP BP ENERGREASE LS 3 CASTROL CASTROL SPHEEROL AP 3 ESSO Beacon 3 FUCHS FUCHS Grease 1200; FUCHS Grease FWA 220 SHELL SHELL Alvania Grease 3 MOBIL-OIL MOBILUX 3 WISURA WISURA Liba L 3 Zeller & Gmelin ZET GE Grease M 50 FAG FAG L 71 ANTAR Petroles de l’Antantique ROLEXA Holland, Beverol Beverol Multi-Purpose Grease Italy, Agip AGIP Grease 33 FD Sweden, NYNAS Nynas FI 3-42 GRN4-600 Chapter 5: Maintenance 30 of 50 Working on the Cutters The correct grinding properties, the correct setting, and the correct mounting of the cutters are all-important factures to ensure proper function and economic operation of the shredder. Replacing and checking the cutter mountings • Certain machine parts are subject to stress while operating due to vibrations, which can lead to the loosening of screw connections. It is very important to check the cutter mounting screws according to the intervals in the maintenance plan. • Tighten the mounting screws on the cutters using a torque wrench set to the required torque for the screw size. The required torque for the cutter mounting bolts is 120 Nm. • Use the table below to determine torque values. The tightening capacity decreases on screws that have been loosened and tightened several times. New screws of the same material must replace the cutter mounting screws after they have been loosened and tightened several times. Torque Value Table Bolt Type Grade 8.8 Grade 10.9 Grade 12.9 Nm lbf ft Nm lbf ft Nm lbf ft M8 25 18.4 35 25.8 41 30.2 M10 49 36 69 60 83 61.2 M12 86 63.4 120 88.5 145 106 M16 210 154 295 271 355 261 M20 410 302 580 428 690 508 M24 710 523 1000 737 1200 885 Checking the condition of the cutters The cutters become blunt after a certain number of operation hours. They need to be checked regularly. Using blunt knives has several consequences including decreased grinding capacity, increased current consumption of the drive motor, inexact cuts, and overheating of the material. Sharp knives are dangerous when while the rotor is at standstill. Serious injury can result—especially to the hands and fingers—wear protective gloves! GRN4-600 Chapter 5: Maintenance 31 of 50 Dismounting the cutters Follow the steps below to dismount the cutters. (See image below.) 1. Switch OFF the shredder at the main switch. 2. Safeguard the main switch with a padlock. 3. Open the lower housing panel. 4. Safeguard the housing panel. 5. Remove the screen. 6. Clean the hexagon head socket of the cutter mounting bolt (2). 7. Loosen the bolt using a high quality Allen key (.4 in. /10 mm). Lightly knock the Allen key with a hammer to loosen if necessary. 8. Take out the cutter mounting bolt, the washer, and the cutter. 1 4 (1) (2) (3) (4) Cutter Cutter mounting screw Cutter holder Cutter mounting screws 3 2 NOTE: It is possible to reach the cutting shaft by climbing into the feeding chamber; however, it is strongly recommended that the cutters are accessed through the front size door. The shaft can be rotated manually by turning the motor V-belt pulley. Sharp knives are dangerous when while the rotor is at standstill. Serious injury can result—especially to the hands and fingers—wear protective gloves! GRN4-600 Chapter 5: Maintenance 32 of 50 Dismounting the cutter holders Follow the steps below to dismount the cutter holders. (See previous image.) 1. Switch OFF the shredder at main switch. 2. Safeguard the main switch with a padlock. 3. Open the lower housing panel. 4. Safeguard the housing panel. 5. Remove screen. 6. Clean the hexagon head socket of the cutter mounting (2). 7. Loosen the bolt using a high quality Allen key (.4 in. /10 mm). Light knock the Allen key with a hammer to loosen if necessary. 8. Take out the cutter holder mounting bolts. 9. Remove the cutter holder with the delivered Extractor. NOTE: It is possible to reach the cutting shaft by climbing into the feeding chamber; however, it is strongly recommended that the cutters are accessed through the front size door. The shaft can be rotated manually by turning the motor V-belt pulley. Sharp knives are dangerous when while the rotor is at standstill. Serious injury can result—especially to the hands and fingers—wear protective gloves! Dismounting the bed knives Follow the steps below to dismount the bed knives. (See image below.) 1. Switch OFF the shredder at the main switch. 2. Safeguard main switch with padlock. 3. Open the upper housing panel. 4. Safeguard the housing panel. 5. Clean the hexagon head socket of the knife mounting bolts (2) and the cover plates mounting bolts. 6. Loosen the cover plate mounting bolts with Allen key; lightly knock with a hammer if necessary. GRN4-600 Chapter 5: Maintenance 33 of 50 7. Take out the bolts and cover plates. 8. Loosen the knife adjusting screws for pulling and take them out. Loosen the knife mounting bolts using an Allen key; knock lightly with a hammer if necessary. 9. Take out the knife mounting bolt and the knife. 6 1 (1) Bed knife (2) Bed knife mounting screws (3) Bed knife holder (4) Cover plates (5) Bed knife adjusting screw (6) Cover plate holder (7) Cover plate mounting screws 5 3 4 7 6 Mounting the cutter holders Follow the steps below to mount the cutter holders. 1. Clean the knife pocket and the cutter holder. 2. Insert the cutter holder into the pocket. NOTE: Cutter holder must slide in easily. Do NOT damage the cutter holder surfaces with a hammer. 3. Attach the cutter holder mounting bolts (DIN912 – M8x25 – 12.9) and add some Loctite. 4. Make sure that the cutter holder fits properly. 5. Tight the cutter mounting bolts using a torque wrench. The required torque for the cutter holder mounting bolts is 39 Nm. (Refer to torque values table.) GRN4-600 Chapter 5: Maintenance 34 of 50 Mounting the cutters NOTE: The cutters and bed knives—especially the cutters—should only be sharpened or replaced in sets. There is a danger of balance error if a combination of cutters from different sets is used. Follow the steps below to mount the cutters. 1. Clean the knife support surface and the hole on the cutter holder. 2. Insert sharp cutter or turn old cutter and push against the cutter holder surface. 3. Attach the cutter mounting bolt (DIN912 – M12x40 – 12.9), and the washer (DIN433 – 13 – 300HV). 4. Screw in the mounting screws and tighten lightly first. Make sure the cutter fits planar in the seat! 5. Tighten the cutter mounting bolts using a torque wrench. The required torque for all cutter mounting bolts is 120 Nm (refer to the torque values table). 6. Make sure the cutting gap is correct and also that the cutters and bed knives do not collide as the rotor turns. 7. Remove tools and other objects from the cutter chamber. 8. Replace and mount screen. 9. Switch ON the shredder for a brief time without grinding material; listen for noises. If unusual noises are present, determine the cause and eliminate it. NOTE: Cutters are reversible and have four symmetrical cutting edges, which makes it possible to turn the cutters and only to sharpen after every fourth cutter change. Sharp knives are dangerous when while the rotor is at standstill. Serious injury can result—especially to the hands and fingers—wear protective gloves! Mounting the bed knives Follow the steps below to mount the bed knives. 1. Clean the knife supporting surface and the holes on the knife holder. 2. Insert sharp knife or turn old knife. 3. Attach the knife adjusting bolts. 4. Attach the knife mounting bolts (DIN912 – M12x55 – 12.9) and tighten lightly at first. 5. Adjust the gap between the cutters and bed knives to 0.03 in. to 0.04 in. (.8 – 1mm). 6. Tighten the knife mounting bolts using a torque wrench. The required torque for all knife mounting bolts is 120 Nm (refer to the torque values table). 7. Turn the rotor by hand. GRN4-600 Chapter 5: Maintenance 35 of 50 8. Make sure the cutting gap is correct and that the cutters and bed knives do not collide as the rotor turns. 9. Return the cover plates and mount them with the bolts. 10. Remove tools and other objects from the cutting chamber. 11. Replace and mount screen. 12. Switch ON the shredder for a brief time without grinding material; listen for noises. If unusual noises are present, determine the cause and eliminate it. Sharpening cutters and bed knives Shredder cutters have four cutting edges, which means they can be turned three times. After the third turn, they should be replaced with new ones. Bed knives can be turned two times and can be re-sharpened for as long as they can be mounted with the long hole. NOTE: Specialist sharpening of the cutters and bed knives is available through customer service. NOTE: The cutters and bed knives—especially the cutters—should only be sharpened or replaced in sets. There is danger of balance error if a combination of cutters from different sets is used. Follow the steps below to sharpen the cutters and bed knives. 1. Dismount the cutters. 2. Sharpen the cutters. A specialist should use the sharpening plan to uniformly sharpen the cutting knives mechanically. It is important to make sure that sharpening takes places with small grinding allowance and sufficient coolant supply. The sharpening process is finished when the cutting edge is sharply cut. Not all indentations must be worked out, or the number of possibilities for sharpening is reduced. For the sharpening process, use soft grinding wheels (40H or 46K). Knives with grinding cracks should not be re-used due to danger or breakage during operation. 3. Whet the cutting edges of the cutters and bed knives with a whetstone. 4. Set the cutters and bed knives. 5. Mount the cutters and bed knives. Sharp knives are dangerous when while the rotor is at standstill. Serious injury can result—especially to the hands and fingers—wear protective gloves! GRN4-600 Chapter 5: Maintenance 36 of 50 Setting the cutters and bed knives Rotor knives used in this machine don’t have to be adjusted. All adjustments have to be done with the bed knives. To simplify knife setting and shorten the standstill, the bed knives have four adjusting screws—two for pulling and two for pushing the knife. Standstill needs to be avoided/reduced if there are multiple cutter sets. Setting the gap between the cutters and bed knives carefully and correctly is an important requirement for the productivity of the shredder. Factors for the size of the gap include the size and design of the rotor and the material to be ground. Follow the steps below to set the cutters and bed knives. (See image on page 31.) 1. Remove old knives. 2. Insert sharp knife or turn old knife. 3. Attach the knife adjusting bolts and adjust them roughly. Attach the knife mounting bolts (DIN912 – M12x55 – 12.9) and tighten lightly first. 4. Adjust the gap between the cutter and bed knife to 0.3 in. to 0.4 in. (0.8 to 1 mm). 5. Tighten the knife mounting bolts using a torque wrench. The required torque for all knife mounting bolts is 120 Nm (refer to torque values table). 6. Turn the rotor by hand. 7. Make sure the cutting gap is correct and also that the cutters and bed knives do not collide as the rotor turns. 8. Mount the knife cover plates. Transporting and storing the cutters and bed knives Sharp knives present danger of cutting! Serious injury can result— especially to the hands and fingers—wear protective gloves! GRN4-600 • Only transport and store the packaged cutters and bed knives. • Grease the cutters and bed knives to avoid rust. • Protect the cutting edges with doubled cardboard, and use adhesive tape to safeguard the cutters and bed knives from slipping out of the sides. • After unpacking, the cutters and bed knives MUST be de-greased in order to promote a safe grip! Chapter 5: Maintenance 37 of 50 Chapter 6: Troubleshooting 6-1 Introduction The utmost in safety precautions should be observed at all times when working on or around the machine and the electrical components. All normal trouble-shooting must be accomplished with the power off, line fuses removed, and with the machine tagged as out of service. The use of good quality test equipment cannot be over-emphasized when troubleshooting is indicated. Use a good ammeter that can measure at least twice the AC and DC current that can be encountered for the machine. Be sure that the voltmeter has at least minimum impedance of 5,000 OHMS-per-volt on AC and 20,000 OHMS-per-volt on DC scales. Popular combination meters, VOM and VTVM can be selected to provide the necessary functions. Before making haphazard substitutions and repairs when defective electrical components are malfunctioning, we recommend that you check the associated circuitry and assemblies for other defective devices. It is common to replace the obviously damaged component without actually locating the real cause of the trouble. Such hasty substitutions will only destroy the new component. Refer to wiring diagrams and schematics. Locating mechanical problems, should they occur, is relatively straightforward. When necessary, refer to the parts catalog section. Problem Possible Cause Too much feed material. Knife condition. Cutting gap. Discharge blocked. Machine blocks or switches itself off Possible Remedy • Reduce grinding material. • Check knives and re-sharpen if needed. • Check cutting gap and set according to this manual. • Check if discharge conveyor belt is running. • Check limit switch for defective contact. Current failure. • Check electrical connection. • Tighten limit switch if needed. Fuse too small. • Fit larger fuse—only after consulting customer service. Rotational direction of rotor. • Check motor and reverse polarity if necessary. Rotor speed. GRN4-600 Chapter 6: Troubleshooting • Change rotor speed—only after consulting customer service. 38 of 50 Problem Possible Cause Rotor does not grip bulky material. Overheating grinding material. Knife condition • Check and sharpen in needed, according to the instructions in this manual. Protruding bed knife. • Consult customer service. Knives not aggressive enough. • Fit underlay plates below the knife holders. See first five causes for “Machine blocks or switches itself off” • See first five remedies to “Machine blocks or switches itself off” Knives sharpened wrongly. • Modify knife finish after consulting customer service. Material rubs against the housing wall. • Fit anti-winding device. Insufficient cooling. Unusual vibrations. • Weight knives, balance rotor. Bearing damage. • Check bearings and replace if needed. Bearing damage. • Check bearings and replace if needed. • Check knife and sharpen/replace if needed. Wrong cutting gap. • Check cutting gap and set according the instructions in this manual. Foreign matter. • Fit feed device with metal detector. Too much grease. • Reduce amount of grease. Rubbing on housing sealing ring. • Check sealing ring, oil, or replace. Bearing damage. No grease in bearing. Knife mounting screws not tight. Screw fatigue. GRN4-600 • Check mounting pads and renew if needed. Knife finish. Extreme cutter wear. Cutting gap alters during operation. • Fit rotor cooling. Rotor out of balance. Anti-vibration pads defective Bearings too hot. Possible Remedy • Check bearings and replace if needed. • Lubricate bearing. • Re-tighten using torque wrench in accordance with this manual. • Fit new screws. Washers are deformed. • Insert new washers. Knife holder surface is deformed. • Insert new knife holders. Support surfaces are dirty. • Clean and re-dust surfaces. Threads in housing are worn. • Fit new brushes in housing. Chapter 6: Troubleshooting 39 of 50 Problem Possible Cause Main and control fuses. Shredder does not start. Possible Remedy • Replace fuse. Feed device not connected. • Switch ON in sequence. Material jam. • Empty shredder before switching ON. Motor protection switches are off. Feed starts too early. • Check motor relay for correct setting and increase if needed. • Start feed only after switch over from star to delta. • Replace fuse Shredder blocks when under load. Fuse is defective. • Fit larger fuse—only after consulting customer service. • Reduce feed quantity. Motor fuse switches off – red indicator. • Correct setting. • Replace fuse. Frequent switching OFF of grinding material in-feed device. GRN4-600 Current relay switches off. Chapter 6: Troubleshooting • Correct setting. 40 of 50 Chapter 7: Appendix 7-1 Technical Specifications Standard Shredder Specifications Hopper Feed Opening (inches / mm) Usable Area of Cutting Chamber (inches / mm) Machine Size - W x L x H (inches / mm) Feed Height (inches / mm) Rotor Speed (rpm @ 60Hz) Rotor Diameter (inches / mm) Rotor Width (inches / mm) Standard Rotor Type # of D2 Rotor Cutters (34mm x 34mm) # of D2 Bed Knives (4 edge) Base Style Standard Motor (hp / kW) Machine Weight (lbs / kg) Opening Mechanism 600+ 21.7 x 19.3 (550 x 490) 22.8 x 22.0 (580 x 560) 53.1 x 39.2 x 91.7 (1350 x 995 x 2330) 69.9 (1775) 72 rpm 12 (310) 24 (600) Staggered Cutters 26 1 seat, 2 knives Gravity Drop 15 (11) 5,513 (2500) Mechanical Jack *The 600+ Shredder can ingest lumps with diameters up to 15.5" (400mm) and weight of 3 to 5 lbs (1.4 to 2.3 kg). GRN4-600 Chapter 7: Appendix 41 of 50 7-2 Drawings and Diagrams (See corresponding spare parts lists) Machine Drawing GRN4-600 Chapter 7: Appendix 42 of 50 Rotor Knife Mounting GRN4-600 Chapter 7: Appendix 43 of 50 Bed Knife Mounting GRN4-600 Chapter 7: Appendix 44 of 50 Rotor Assembly GRN4-600 Chapter 7: Appendix 45 of 50 Drive GRN4-600 Chapter 7: Appendix 46 of 50 7-3 Spare Parts List 600+ Shredder Pos. 100 101 102 103 104 105 106 107 108 109 Pc 1 1 1 1 1 1 1 4 4 Description/Standard Machine complete Standard hopper PVC curtain Hopper frame Cutting chamber Manual jack Door Base frame Stand Absorber 200 201 202 203 204 205 206 207 208 209 210 211 212 212 213 2 3 3 1 3 2 1 18 6 2 1 4 4 4 Bearing Bearing housing Bearing Bearing Cover A Bearing Cover B Sealing Grease nipple GB1152-89/M10x1 Bush Øxxx Mounting bolt cover plate A DIN912-M8x25-12.9 Mounting bolt cover plate B DIN912-M8x40-12.9 Mounting bolt DIN912-M8x30-12.9 Cover plate Mounting plate bolt DIN933-M20x70-12.9 Spring Washer DIN433 21 Washer DIN 125 – A 24 80051295 80040482 20322900 21252900 80040229 80012470 21252900 80011090 80011101 80011091 21252800 80010180 80040440 80010780 300 301 302 303 304 305 306 307 308 309 310 311 312 313 314 315 316 317 318 319 320 321 322 323 324 1 1 3 3 3 1 2 1 1 4 8 4 4 4 8 4 4 1 2 1 1 1 1 1 Drive Gearbox motor (Lenze) Cover for Gearbox motor Mounting bolt DIN933 M20x40-8.8 Spring washer DIN 127 –20 Washer DIN 125 –21 A Cover plate Mounting bolt DIN912 M8x50-12.9 Torque arm plate Torque arm Mounting bolt DIN931 M24x125-12.9 Washer DIN433-24 Spring washer DIN127-24 Mounting nut DIN934 M24-10 Mounting bolt DIN933 M16x60-12.9 Washer DIN433-16 Spring washer DIN127-16 Mounting nut DIN934 M16-10 Rubber bush Copper bush Torque arm bolt Mounting bolt DIN933 M8x20-8.8 Washer DIN125-8 Spring washer DIN127-8 Key GB1096/79 A20x12x230 80020437 21257700 80010080 80010880 80010770 21253200 80011121 21256700 21257100 80040363 80040442 80040441 80040366 80010010 80010760 80010870 80040367 80051584 80040575 21257600 80009590 80010720 80010840 80003370 GRN4-600 Part number/SAP 21254400 21255400 21255100 21250100 80004010 21253300 21256600 21254000 80051547 Chapter 7: Appendix 47 of 50 400 401 402 403 404 405 26 26 52 26 26 E-knife rotor ø387x850 Rotor knife 34x34x20 Rotor knife holder Knife holder mounting bolt DIN912 – M8x20–12.9 Washer D=13 Rotor knife mounting Bolt DIN912–M12x40–12.9 80001003 21702216 80040542 80040029 80011210 500 501 502 503 504 505 506 507 508 2 2 8 4 2 2 4 4 Stator knife complete Stator knife /Cr12Mo1V1 Mounting plate for stator knife Mounting Bolt DIN912 M16x50 – 12.9 Stator knife adjusting bolt DIN912 M16x30 – 12.9 Stator knife cover plate Mounting plate for cover plate Mounting Bolt DIN912 M12x65 – 12.9 Mounting Bolt DIN912 M16x50 – 12.9 80050037 22973500 80011291 80040249 21252000 21257800 80011270 80011291 600 601 602 1 2 Electrical parts Control panel Safety switch AZ15ZVRK-1476-1 GRN4-600 Chapter 7: Appendix 48 of 50 7-4 Technical Assistance Parts and Service Department The ACS Customer Service Group will provide your company with genuine OEM quality parts manufactured to engineering design specifications, which will maximize your equipment’s performance and efficiency. To assist in expediting your phone or fax order, please have the model and serial number of your unit when you contact us. A customer replacement parts list is included in this manual for your convenience. ACS welcomes inquiries on all your parts needs and is dedicated to providing excellent customer service. For immediate assistance, please contact: • North, Central and South America, 8am – 5pm CST +1 (800) 483-3919 for drying, conveying, heating and cooling and automation. For size reduction: +1 (800) 229-2919. North America, emergencies after 5pm CST (847) 439-5855 North America email: [email protected] • Mexico, Central & South America Email: [email protected] • Europe, Middle East & Africa +48 22 390 9720 Email: [email protected] • India +91 21 35329112 Email: [email protected] • Asia/Australia +86 512 8717 1919 Email: [email protected] Sales and Contracting Department Our products are sold by a worldwide network of independent sales representatives. Contact our Sales Department for the name of the sales representative nearest you. Let us install your system. The Contract Department offers any or all of these services: project planning; system packages including drawings; equipment, labor, and construction materials; and union or non-union installations. For assistance with your sales or system contracting needs please Call: North, Central and South America +1 (262) 641-8600 or +1 (847) 273-7700 Monday–Friday, 8am–5pm CST • Europe/Middle East/Africa +48 22 390 9720 • India +91 21 35329112 • Asia/Australia +86 512 8717 1919 Facilities: ACS offers facilities around the world to service you no matter where you are located. For more information, please visit us at www.acscorporate.com United States: ACS Schaumburg- Corporate Facility 1100 E. Woodfield Road Suite 588 Schaumburg, IL 60173 Phone: + 1 847 273 7700 Fax: + 1 847 273 7804 ACS New Berlin- Manufacturing Facility th 2900 S. 160 Street GRN4-600 New Berlin, WI 53151 Phone : +1 262 641 8600 Fax: + 1 262 641 8653 Asia/Australia: ACS Suzhou 109 Xingpu Road SIP Suzhou, China 215126 Phone: + 86 8717 1919 Fax: +86 512 8717 1916 Europe/Middle East/Africa: ACS Warsaw Ul. Działkowa 115 Chapter 7: Appendix 02-234 Warszawa Phone: + 48 22 390 9720 Fax: +48 22 390 9724 India ACS India Gat No. 191/1, Sandbhor Complex Mhalunge, Chakan, Tal Khed, Dist. Pune 410501, India Phone: +91 21 35329112 Fax: + 91 20 40147576 49 of 50 GRN4-600 Chapter 7: Appendix 50 of 50