1
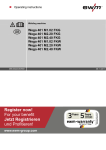
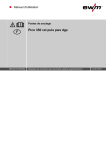
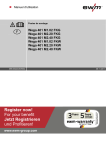
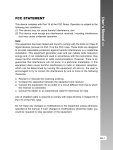
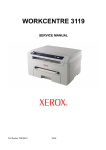
Operating instructions
Xbutton Tool
Observe additional system documents!
Register now!
For your benefit
Jetzt Registrieren
und Profitieren!
www.ewm-group.com
30.01.2015
*
*Details for ewm-warranty
www.ewm-group.com
099-L08742-EW501
General instructions
CAUTION
Read the operating instructions!
The operating instructions provide an introduction to the safe use of the products.
• Read the operating instructions for all system components!
• Observe accident prevention regulations!
• Observe all local regulations!
• Confirm with a signature where appropriate.
NOTE
In the event of queries on installation, commissioning, operation or special conditions at the
installation site, or on usage, please contact your sales partner or our
customer service department on +49 2680 181-0.
A list of authorised sales partners can be found at www.ewm-group.com.
Liability relating to the operation of this equipment is restricted solely to the function of the equipment. No other
form of liability, regardless of type, shall be accepted. This exclusion of liability shall be deemed accepted by the
user on commissioning the equipment.
The manufacturer is unable to monitor whether or not these instructions or the conditions and methods are
observed during installation, operation, usage and maintenance of the equipment.
An incorrectly performed installation can result in material damage and injure persons as a result. For this reason,
we do not accept any responsibility or liability for losses, damages or costs arising from incorrect installation,
improper operation or incorrect usage and maintenance or any actions connected to this in any way.
© EWM AG · Dr. Günter-Henle-Str. 8 · D-56271 Mündersbach, Germany
The copyright to this document remains the property of the manufacturer.
Reprinting, including extracts, only permitted with written approval.
Subject to technical amendments.
Contents
Brief description
1
Contents
1 Contents .................................................................................................................................................. 3
2 Overview ................................................................................................................................................. 4
2.1 Brief description ............................................................................................................................. 4
2.2 Audience ........................................................................................................................................ 4
2.2.1
IT administrator ............................................................................................................... 4
2.2.2
Welding supervisor ......................................................................................................... 4
2.3 System requirements ..................................................................................................................... 4
2.3.1
Client system requirements ............................................................................................ 4
2.4 Scope of supply ............................................................................................................................. 4
2.4.1
Standard scope of supply ............................................................................................... 4
2.4.2
Required accessories and licenses ................................................................................ 4
3 Administrator manual ............................................................................................................................ 5
3.1 Installation ...................................................................................................................................... 5
3.2 Wibu Runtime installation .............................................................................................................. 8
3.3 FTDI USB driver installation .......................................................................................................... 9
3.4 Update ......................................................................................................................................... 11
4 User manual .......................................................................................................................................... 12
4.1 Xbutton Tool screen layout .......................................................................................................... 12
4.2 System role administration .......................................................................................................... 13
4.2.1
Create system roles...................................................................................................... 13
4.2.2
Clean system roles ....................................................................................................... 13
4.3 Template administration............................................................................................................... 14
4.3.1
Create template ............................................................................................................ 14
4.4 User administration ...................................................................................................................... 16
4.4.1
Create user ................................................................................................................... 16
4.4.2
Edit user ....................................................................................................................... 16
4.4.2.1 Edit user name .............................................................................................. 16
4.4.2.2 User/system role allocation ........................................................................... 17
4.5 Xbutton administration ................................................................................................................. 18
4.5.1
Create Xbutton ............................................................................................................. 18
4.5.2
Edit Xbutton .................................................................................................................. 19
4.5.3
Inactivate Xbutton ......................................................................................................... 20
4.5.4
Overview of unallocated Xbuttons ................................................................................ 20
5 Appendix A ........................................................................................................................................... 21
5.1 Overview of EWM branches ........................................................................................................ 21
099-L08742-EW501
30.01.2015
3
Overview
Brief description
2
2.1
Overview
Brief description
Xbutton is a system to intelligently control access rights for EWM welding machines equipped with an
Expert 2.0 control. By programming small and handy storage chips for recognition, users can be assigned
different usage rights.
The Xbutton Tool is used to manage the storage chips and users.
2.2
Audience
2.2.1
IT administrator
Based on their training and experience, the IT administrators are able to provide for the system
requirements and work environment, including the technical equipment, required for operating the
software. They are also able to provide sufficient server capacity and ensure data backup.
2.2.2
Welding supervisor
Based on their relevant vocational or further training, expertise, experience and knowledge of the different
welding processes, the welding machine operator, welding engineer or welding supervisor is able to
perform the task of monitoring and analysing the welding process data as assigned to them.
They are also able to operate the computers and access the operating panel.
2.3
System requirements
2.3.1
Client system requirements
Compatibility
Hard disk
Connections
Operating system
Software
2.4
Scope of supply
2.4.1
Standard scope of supply
IBM compatible
500 MB hard disk space or more
2 USB 2.0 ports or more
Windows 7 or later
.NET 4.0 (part of the installation if required)
The standard scope of supply includes:
• USB interface with Xbutton adapter
• Software
• Licensing dongle
• 10 Xbuttons
2.4.2
Required accessories and licenses
Xbutton is supplied with a dongle with an activated license to operate the Xbutton Tool.
If you intend to operate Xnet and Xbutton at the same time, please contact EWM AG to transfer the
license to the existing Xnet dongle.
4
099-L08742-EW501
30.01.2015
Administrator manual
Installation
3
3.1
Administrator manual
Installation
Initial situation: The dongle is connected to the computer.
• On the dongle, open the directory XbuttonTool\Release\.
• Start the "Setup.bat" installation file by double-clicking it.
−
A prompt opens to check whether .NET4.0 is installed on the system.
Figure 3-1
•
Press any key to close the prompt.
−
The installation welcome page opens.
Figure 3-2
•
Select the "User-defined" installation mode.
099-L08742-EW501
30.01.2015
5
Administrator manual
Installation
•
Click the "Install" button.
−
The selection dialog with the available components opens.
Figure 3-3
Component
Xbutton Tool software
Database initialisation
Microsoft .NET Framework
Wibu Runtime
USB Serial Driver by FTDI
• Click "Next".
−
The parameter editor opens.
6
Explanation
The Xbutton Tool software
New creation of the database. Any existing database
including its data will be overwritten.
Microsoft .NET Framework
Driver for the dongle and software-based activation
Driver for the Xbutton USB interface
099-L08742-EW501
30.01.2015
Administrator manual
Wibu Runtime installation
Figure 3-4
•
Click "Next".
−
The software will be installed.
Figure 3-5
•
Click "Close".
099-L08742-EW501
30.01.2015
7
Administrator manual
Wibu Runtime installation
3.2
Wibu Runtime installation
To start Xbutton Tool, Wibu Runtime has to be installed. If not installed yet, the installation will start
automatically.
Figure 3-6
•
Click "Next".
Figure 3-7
•
•
Select the "Install for all users of this computer" installation mode.
Click "Next".
Figure 3-8
•
8
Click "Next".
099-L08742-EW501
30.01.2015
Administrator manual
FTDI USB driver installation
Figure 3-9
•
Click the "Install" button.
−
The software will be installed.
Figure 3-10
•
3.3
Click "Finish".
−
The installation is complete.
FTDI USB driver installation
The FTDI USB driver is a required component to control the Xbutton USB interface. If not installed yet,
the installation will start automatically.
Figure 3-11
•
Click "Extract".
099-L08742-EW501
30.01.2015
9
Administrator manual
FTDI USB driver installation
Figure 3-12
•
Click "Next".
Figure 3-13
•
10
Click "Finish".
−
The software will be installed.
099-L08742-EW501
30.01.2015
Administrator manual
Update
3.4
Update
The update procedure is similar to the installation, with the exception that you have to deselect the
"Database initialisation" option in the available components list.
Figure 3-14
NOTE
If you fail to deselect "Database initialisation" and the installation starts, the existing
database will be deleted and all data will be permanently lost.
099-L08742-EW501
30.01.2015
11
User manual
Xbutton Tool screen layout
4
4.1
User manual
Xbutton Tool screen layout
For a clearer overview the screen display is divided into three main sections in this manual: navigation
bar, dialog and button bar.
Figure 4-1
Item Description 0
Navigation bar
1
12
2
Dialog
3
Button bar
099-L08742-EW501
30.01.2015
User manual
System role administration
4.2
System role administration
System roles are used to define groups of users. A system role represents an assigned function or
access right.
When logging on to an Expert 2.0 control, the system role will be displayed as well.
4.2.1
Create system roles
Initial situation: Program has been started.
• Click the "Settings" button in the navigation bar.
−
The Settings dialog opens.
Figure 4-2
Clicking the arrow on to the "System roles" selection field will open the system roles that have already
been created.
• In the "System roles" selection field, enter the name of the new system role.
• Save your changes by pressing "Enter".
4.2.2
Clean system roles
Xbutton is supplied with a number of predefined system roles. Their colour correlates to the available
Xbuttons.
As long as no data records have been created, these system roles can be deleted if they do not match
your needs. For this reason it is recommended to set the system roles before you start programming the
Xbuttons.
Initial situation: Program has been started and the user has opened the "Settings" menu.
• Click the "Clean system roles" button on the button bar.
−
All system roles not currently used will be deleted from the database.
099-L08742-EW501
30.01.2015
13
User manual
Template administration
4.3
Template administration
Templates are used to define frequently used groups of user rights to facilitate the assignment of those
rights to the users.
4.3.1
Create template
Initial situation: Program has been started.
• Connect a new Xbutton to the programming device.
NOTE
If the Xbutton is not yet known to the system the following dialog opens: "Unknown
Xbutton. Do you want to add it to the database?
Confirm by clicking "Yes".
−
The Xbutton data will be displayed.
Figure 4-3
•
Click the "Permissions" tab.
−
The Xbutton permissions will be displayed.
Permission
Activate correction mode
Block change of wire feed speed
Block change of voltage correction
Block change of arc dynamics
Block change of operating mode
Block change of welding type
Block change of superPuls
Block JOB switching
Block JOB reset
Restrict program selection
Restrict program sequence
14
Explanation
By selecting this option, the correction mode is
activated for the user.
Selecting this option will prohibit the user from
changing the wire feed speed.
Selecting this option will prohibit the user from
changing the voltage correction.
Selecting this option will prohibit the user from
changing the arc dynamics.
Selecting this option will prohibit the user from
changing the operating mode.
Selecting this option will prohibit the user from
changing the welding type.
Selecting this option will prohibit the user from
activating superPuls.
Selecting this option will prohibit the user from
changing the welding JOB.
Selecting this option will prohibit the user from
resetting the welding JOB.
Selecting this option will prohibit the user from
selecting certain welding programs.
Selecting this option will prohibit the user from
accessing certain welding program sequences and
changing their parameters.
099-L08742-EW501
30.01.2015
User manual
Template administration
Permission
Block change of configuration parameters
Block program "0"
Block welding start
Explanation
Selecting this option will prohibit the user from
changing the configuration parameters.
Selecting this option will prohibit the user from
accessing program "0".
Selecting this option will prohibit the user from
starting the welding JOB.
NOTE
By selecting the „Show reserves“ option further permissions are shown which are
currently not activated in the software. They can be used as reserves for software
updates.
•
•
Activate/inactivate the required rights.
Click the "Save as template" button on the button bar.
−
The new template is saved in the system and is immediately available by clicking the
"Templates folder" button.
099-L08742-EW501
30.01.2015
15
User manual
User administration
4.4
User administration
In the user administration you can create all the users who are to be assigned Xbuttons.
4.4.1
Create user
Initial situation: Program has been started.
Figure 4-4
•
Click the "Create user" button on the button bar.
−
At the end of the user table a new user is inserted with the first name "NewFirstname" and
name "NewName" default values. To change these default values click the corresponding field.
Figure 4-5
4.4.2
Edit user
4.4.2.1
Edit user name
NOTE
A user name can be edited only as long as no Xbutton has been created for this user.
Initial situation: Program has been started and the user has been created.
• In the user table click the "First name" or "Name" field.
−
The data record selected will be highlighted in blue.
• Activate the edit mode by pressing F2.
• Change the data record as required.
• Save your changes by pressing "Enter".
• Dismiss your changes by pressing "Esc".
16
099-L08742-EW501
30.01.2015
User manual
User administration
4.4.2.2
User/system role allocation
NOTE
A system role can be allocated to a user only as long as no Xbutton has been created
for this user.
Initial situation: Program has been started and the user has been created.
• In the "System role" column, click the arrow next to the user you want to edit.
−
The system roles created will be displayed.
• Select the required system role.
• Save your changes by pressing "Enter".
• Dismiss your changes by pressing "Esc".
099-L08742-EW501
30.01.2015
17
User manual
Xbutton administration
4.5
Xbutton administration
The Xbutton is used to identify the user to the end device. The user-specific rights are stored on the
Xbutton. One user can have multiple Xbuttons with different rights. A Xbutton, however, can only be
assigned to one user.
4.5.1
Create Xbutton
Initial situation: Program has been started.
• Connect a new Xbutton to the programming device.
NOTE
If the Xbutton is not yet known to the system the following dialog opens: "Unknown
Xbutton. Do you want to add it to the database?
Confirm by clicking "Yes".
−
The Permissions dialog opens.
Permission
Activate correction mode
Block change of wire feed speed
Block change of voltage correction
Block change of arc dynamics
Block change of operating mode
Block change of welding type
Block change of superPuls
Block JOB switching
Block JOB reset
Restrict program selection
Restrict program sequence
Block change of configuration parameters
Block program "0"
Block welding start
Explanation
By selecting this option, the correction mode is
activated for the user.
Selecting this option will prohibit the user from
changing the wire feed speed.
Selecting this option will prohibit the user from
changing the voltage correction.
Selecting this option will prohibit the user from
changing the arc dynamics.
Selecting this option will prohibit the user from
changing the operating mode.
Selecting this option will prohibit the user from
changing the welding type.
Selecting this option will prohibit the user from
activating superPuls.
Selecting this option will prohibit the user from
changing the welding JOB.
Selecting this option will prohibit the user from
resetting the welding JOB.
Selecting this option will prohibit the user from
selecting certain welding programs.
Selecting this option will prohibit the user from
accessing certain welding program sequences and
changing their parameters.
Selecting this option will prohibit the user from
changing the configuration parameters.
Selecting this option will prohibit the user from
accessing program "0".
Selecting this option will prohibit the user from
starting the welding JOB.
NOTE
By selecting the „Show reserves“ option further permissions are shown which are
currently not activated in the software. They can be used as reserves for software
updates.
•
•
18
Activate/inactivate the required permissions for the Xbutton or select a template from the "Use
template" selection box.
Assign a name to the Xbutton using the „New Xbutton name“ input field.
099-L08742-EW501
30.01.2015
User manual
Xbutton administration
•
•
•
4.5.2
Select the user to be assigned to the Xbutton from the "Name" selection box.
Click the "Write permission" button on the button bar to save the changes.
Click the "Home page" button on the button bar to dismiss the changes.
Edit Xbutton
Initial situation: Program has been started.
• Connect a Xbutton which has already been assigned rights to the programming device.
−
The Permissions dialog opens.
Permission
Activate correction mode
Block change of wire feed speed
Block change of voltage correction
Block change of arc dynamics
Block change of operating mode
Block change of welding type
Block change of superPuls
Block JOB switching
Block JOB reset
Restrict program selection
Restrict program sequence
Block change of configuration parameters
Block program "0"
Block welding start
Explanation
By selecting this option, the correction mode is
activated for the user.
Selecting this option will prohibit the user from
changing the wire feed speed.
Selecting this option will prohibit the user from
changing the voltage correction.
Selecting this option will prohibit the user from
changing the arc dynamics.
Selecting this option will prohibit the user from
changing the operating mode.
Selecting this option will prohibit the user from
changing the welding type.
Selecting this option will prohibit the user from
activating superPuls.
Selecting this option will prohibit the user from
changing the welding JOB.
Selecting this option will prohibit the user from
resetting the welding JOB.
Selecting this option will prohibit the user from
selecting certain welding programs.
Selecting this option will prohibit the user from
accessing certain welding program sequences and
changing their parameters.
Selecting this option will prohibit the user from
changing the configuration parameters.
Selecting this option will prohibit the user from
accessing program "0".
Selecting this option will prohibit the user from
starting the welding JOB.
NOTE
By selecting the „Show reserves“ option further permissions are shown which are
currently not activated in the software. They can be used as reserves for software
updates.
•
•
•
•
•
Activate/inactivate the required permissions for the Xbutton or select a template from the "Use
template" selection box.
Assign a name to the Xbutton using the „New Xbutton name“ input field.
Select the user to be assigned to the Xbutton from the "Name" selection box.
Click the "Write permission" button on the button bar to save the changes.
Click the "Home page" button on the button bar to dismiss the changes.
099-L08742-EW501
30.01.2015
19
User manual
Xbutton administration
4.5.3
Inactivate Xbutton
This function is used to temporarily neutralise a Xbutton. All permissions are reset to "not authorised" and
the user entry on the Xbutton is deleted.
Initial situation: Program has been started.
• Connect a Xbutton which has already been assigned rights to the programming device.
−
The Permissions dialog opens.
• Select the user with the name "unallocated user" from the "Name" selection box.
• Click the "Write permission" button on the button bar to save the changes.
• Click the "Home page" button on the button bar to dismiss the changes.
NOTE
The inactivated Xbutton is stored in the "Unallocated" folder until it is allocated again to
a user.
4.5.4
Overview of unallocated Xbuttons
Initial situation: Program has been started.
• Click the "Unallocated Xbuttons" button on the button bar.
−
The dialog opens the list of all inactivated Xbuttons which are assigned to the "unallocated user"
in the system.
20
099-L08742-EW501
30.01.2015
Appendix A
Overview of EWM branches
5
Appendix A
5.1
Overview of EWM branches
099-L08742-EW501
30.01.2015
21