1
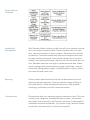
CHAMBER NATION
ADMINISTRATOR
GETTING STARTED GUIDE
EDUCATIONAL SERVICES MANUAL
VERSION 3.0
1
SYSTEM TRAINING
SUPPORT LEVELS
1. Administrative Technical Support for our membership / advertiser management systems. This support is accessed by logging into your Chamber Nation or Advertiser Support System and
clicking on the HELP or SUBMIT A TICKET link located on the top
of your dashboard.
2. Sales Support Team from R and S Consulting is provided as
part of your subscription to help in the training and providing
sales support materials for your organization. You can contact
this support team by visiting www.RandSTools.com.
3. Member and Advertiser Support is provided to all premium
plan participants at no additional cost to them, or to the organization that we serve. Our team is on-deck to provide your members
with incredible USA-BASED SETUP AND SUPPORT intelligence.
We mention intelligence because we realize that your member
advertisers are looking for intelligent support and setup, not
someone asking them what they want. Obviously we care about
them receiving a terrific deliverable, but we also realize that most
do not know how to direct our efforts to help them. This support
is accessible by visiting www.PremiumMemberSupport.com,
2
Setup Services
Once a member advertiser joins at the premium level we are automatically notified “when
also using Chamber Nation System,” and then
contact that business to begin the setup process. We often introduce ourselves as working
for your organization and appreciate their premium level subscription.
During our setup we activate an instance on your network for their business, assign a sub-domain, texting keyword, 3-D storyboard, Local
Golden Ticket, one-time use wireless access account, and mobile application.
During the configuration we will accommodate the look using their own
photography, or license graphics from Fotolia.com on their behalf at no
charge.
Artwork for their Local Golden Ticket is handled by our graphics team
and implemented in the community network, 3-D Storyboard, and
within both the subscriber’s and community mobile applications. This
automated process is started and confirmed by our team.
The window displays, otherwise known as “Ad Displays,” are created
by our team and then automatically posted out to the community mobile app, Chamber or Newspaper website directory, the business mobile web app, 3-D Storyboard, Catalog, Facebook, and Twitter for exhaustive promotion.
Ongoing professional support is maintained at all times with members
and organizations.
Support and Set Up
Support is included for you, staff and your members. We know that
most business owners are too busy or just don’t have the technological
ability to get them where they need to be. That’s where our support center takes control. Our support center will contact the business and do
all of the set up. They will even add the first 8 items to the display center. If the business does not have their own photography, our team will
provide licensed stock photography at no additional cost.
3
What ends up happening is that all the participating businesses
will have beautiful presentations of their goods and services. Their
business will be part of a local network where all of the businesses
are presented beautifully and with rich content.
• Technical Support for Chamber Administrators: (855)-233-6362
• Premium Edition Member Support: (844)-487-3663
• Sales System and Training Support: (530) 539-4259
4
CHAMBER
NATION
Chamber Nation is a collaboration of chamber executives. We
continue to hold (open mic) national customer meetings on a
monthly basis. We do this so Chamber Nation is always able to
deliver the best possible solution for Chamber of Commerce leaders.
• A complete membership development system
• A complete membership management system
• A sophisticated platform delivering Chamber Relevance to improve membership sales and retention
• A complete broadcasting system so that the Chamber can become the Official Area Network
• A syndicated calendar and event management system for central community event promotion
• A local networking system providing area search engine services to the local business community
5
• A program that’s similar to having your own information technology
team onsite for you and members
• A award winning program backed with hundreds of references
Chamber Relevance
We have invested heavily as a company to develop a membership surround. In other words, incredible member services that are exclusive to
Chamber of Commerce membership. So when you implement Chamber Nation, you are implementing a system that not only makes it much
easier to run a Chamber, but also to sell memberships while also improving Chamber of Commerce value for improved retention rates.
CHAMBER NATION’S COMMITMENT TO YOU
We are working every day to make your experience one that is far
above your expectations. We continue to reach out to our chamber executives for input and develop the latest technologies in the industry.
Support and training is included throughout the lifetime of our relationship. Our goal is that the chamber will be the communities’ most important point for information and that the chamber will retain and grow
membership.
System Features
6
System Features
Continued
Membership
Management
With Chamber Nation in place you will have all of your member information in one easy to access location. Record contacts with your members, even set reminders for future contacts. Send electronic referrals
to members. Customize membership plans and categories with easy
one step member activations. View member billing history, events attended, cross referenced listings, directory hits, and more with just one
click. Members have their own login to update personal data, submit
events, manage their personal directory page, mobile app, coupons,
online store, going green program, and participate in surveys, view reports and files and much more.
Reporting
Create custom reports based on the various data elements carried
within the member data base. View the extensive range of billing reports and options. Create membership directories, mailing labels,
name tags, certificates, and other useful documents.
Communication
Communicate with your members based on selection criteria. This criteria may be by categories, membership plans, projects, committees,
start dates, level of activity in the Chamber and more. Create beautiful
newsletters and email broadcasts. If you prefer using Constant Contact
we do offer a full connection, but that is not required.
7
Event Management
Mobile Applications
Members Area
Functions
Set up multiple calendars; i.e. a calendar for chamber events, a calendar for community events and even provide calendars to other organizations they use in their own websites so an “official area calendar” can
be created for the entire community. Delivered through websites and
mobile devices. There is no limit on the number of calendars you may
distribute for joint use. Calendars will display on your web site and offer
different views and printable PDF versions. Send out invitations to calendar items. Create events that people can register for and pay for online.
Add packages to your events. Create name tags and sign in sheets for
events. Send out a survey after the event. Even access this are of the
system via your mobile app.
Move your chamber to the mobile world with your own official mobile
app. Let the public download the chamber app (chamberapp.com)
from iPhones, iPads, Android Phones, Tablets and HTML5 devices.
They will discover directories, events, community information and much
more right on their phones. Members and chamber staff can also perform functions using the app just as if they were on the web site.
Manage files in the media and file center. Create message boards. Use
the online learning center to create training material for members. Create surveys for members that will store all of the responses in a data
base. Set up and manage projects and committees. Use the proposal
submission function to request RFPs for speakers.
Banner Ad Advertising
Use the banner ad program to generate income for the chamber. There
are even category specific banner ad spots for your directory. View reports on banner click through’s and directory hits. Take a look at a
search report that will let you know what people are looking for in your
directory and either finding it or not. View a report on member optimization status.
Website Management
Use the back office to manage many things that will automatically show
on your website. Manage news items, press releases, classified ads,
8
and relocation guide, even a donation/wish list for non-profits. Searchable directories are automatically updated on the website every time you
make a change in the database, calendar and event items are updated
in real time. Search engine optimization is built into the program. Online
member applications and member logins are connected to the website.
The Chamber has an online store connected to sell items like advertising packages. Manage your coupon programs like the chamber daily
deals program, member to member coupons, and directories of your
member special offer.
Social Networking
Manage your Facebook, Twitter, and your own Member Business Network from one dash board. Send calendar items, events, and regular
posts to your social media all at one time. Even set dates for future postings.
Billing Management
Create invoices for dues and non-dues items. Record payments, view
reports on aging and historical billing data, forecasting reports and
much more. Print or email invoices in one quick batch. Connect with
PayPal or a merchant account and allow payment for events and member dues with a credit card online. Create recurring non dues invoices
and event invoices and payment reports. Access this information while
in the field via your mobile phone to check on member payment status
while you visit them. Optional full integration with QuickBooks is available.
News and Press
Releases
Create news items and press releases that will automatically be added
to your web site and mobile apps. There is even a legislative action center to get your members involved with communicating the chamber’s
concerns to their representatives.
Connect with Members
Provide your members with many marketing and search tools. These
include beautiful directory pages and tie-ins with the members’ social
media. Premium members can open a large on line store (or “services
catalog” if not a retailer and no price entered) where they can display
9
up to 100 items (or services) through their own website or via the supplied member catalog and mobile website. There is a Going Green program for members to show what they are doing to go green. Members
can participate in various coupon programs. Members can submit
events and participate in the many online activities the chamber is providing by using their unique login information.
It Works for Members
We provide your members with incredible support so that we can assure our customers that the economic development tools inherent
within our system (your system) work to increase commerce. We help
you put the “Commerce” back into the Chamber of Commerce!
It’s Expandable, It’s Supported, and
It’s Appreciated by Tens-ofThousands of Users.
10
2
HELP CENTER
INDEX
VIDEO TRAINING
CHAMBERCLASSROOM.COM
The video training center is
your place for on-demand
video training on many of
our Chamber Nation Modules. We have created
these videos in-house so
that what you are looking at
on the video is the same
thing you will find in the administrative center of Chamber Nation. However, please
note that as our system
grows, there are times
where minor changes are
made after these videos
have been completed. The
basics of the functions and
the majority of the material
will still all be identical, but small pieces may vary.
12
We encourage you to utilize these training videos for training new
Chamber employees, or even for refreshing yourself on how something
is done. These videos are available to you at your convenience and
were broken down into bite-sized pieces to make it easier for you to
find exactly what you are looking for without having to sit through an
hour long video just to find the 2-minute segment you are looking for.
While these videos do not cover all of the Chamber Nation modules, we
are working to add more videos all of the time – so keep checking out
the Video Training Center.
I. Beginning Videos
ο
Opening Two Browser Windows Video
ο
How to Log In Video
ο
Membership Plans Video
ο
Member Categories Video
ο
Member Database Video
ο
Sending Welcome Emails Video
II. Intermediate Videos
ο
The CRM System Video
ο
Adding a Referred By Drop Down Option Video
ο
Creating an Overnight Event Registration Video
ο
Creating a Form Letter to Send to Your Members Video
ο
Send Leads to Members Video
ο
Leads Trading Game with Points Video
ο
Request Proposal Module for Public from Website Video
ο
Syndicated Calendar System Video
13
ο
Multi-post to Social Networks Video
III. Broadcast Messaging Videos
ο
Accessing Broadcast Messaging Video
ο
Understanding the First Screen of Broadcast Messaging Video
ο
Setting up a Broadcast Message Video
ο
Selecting Recipients of a Broadcast Message Video
ο
Resending a Broadcast Message Video
ο
Confirm Message Details and SPAM Score for Broadcast Messages Video
IV. Calendar of Events Videos
ο
Understanding the Calendar of Events Admin Video
ο
Adding a New Calendar Event Video
ο
Calendar Invitations Video
ο
Viewing Invitations and Tracking Attendance Video
V. Event Registration Videos
ο
Accessing Event Registration Video
ο
Understanding the Event Functions Video
ο
Adding Event Details Video
ο
Adding Event Confirmation Verbiage Video
ο
Adding Event Packages Video
ο
Editing Event Packages Video
ο
Adding Event Custom Fields Video
14
ο
Adding Event Administrative Fields Video
ο
Preview New Event Registration Video
VI. Newsletter Manager Videos
ο
Accessing the Newsletter Manager Video
ο
Understanding the First Screen of the Newsletter Manager Video
ο
Overview of Newsletter Template Selections Video
ο
How to Create a New Newsletter Template Video
ο
How to Create and Send a Newsletter Video
VII. Tiodew Website Editor Training Videos
ο
Tiodew Website Editor Login Video
ο
Tiodew Website Editor Overview of Left Access Panel Video
ο
Tiodew Website Editor Pages Overview Video
ο
Tiodew Website Editor Editing Page Video
ο
Tiodew Website Editor Understanding Text Video
ο
Tiodew Website Editor Photo App Video
ο
Tiodew Website Editor Add Multimedia Video
ο
Tiodew Website Editor Embedded Code Video
ο
Tiodew Website Editor Blog Video
ο
Tiodew Website Editor Files Video
ο
Tiodew Website Editor Design Video
ο
Tiodew Website Editor Publish Video
15
VIII. Snappages Website Editor Videos
ο
Logging in to the SP Editor Video
ο
Understanding the SP Dashboard Video
ο
Understanding the SP Page Editor Modules Video
ο
Editing a SP Page and Changing Settings Video
ο
Understanding the SP Text Module Area Video
ο
Tour the SP Media Module Area Video
ο
Tour the SP Elements Module Video
ο
Understanding the SP Widgets Module Video
ο
Understanding the Plugins Module Video
ο
Saving and Publishing Your SP Pages Video
ο
How to Use the SP Blog Feature Video
ο
How to Use the SP Photo Publishing System Video
ο
Using the SP Files/Download App Video
ο
Using the SP Themes Editor (Advanced Users) Video
ο
Using the SP Mobile Themes Editor (Advanced users) Video
IX. DisplayedRight Training Videos
ο
DisplayedRight Logging In Video
ο
DisplayedRight Preferences Area Overview Video
ο
DisplayedRight Ad Displays Dashboard Overview Video
ο
DisplayedRight Add or Edit Ad Displays Video
ο
DisplayedRight Add Displays Right from Phone or Tablet Video
ο
DisplayedRight Multi Post to Facebook, Twitter and More Video
16
ο
DisplayedRight Overview Stats Video
X. Strategy With Our Founder Videos
ο
Building Membership With Commerce Control Panel Video
ο
Explaining the Integrated Community Tools Video
ο
U.R. The Network and Why Video
ο
What is Chamber Squad Video
ο
What is Tiodew Video
XI. Chamber Sales Support
ο
Membership Sales Plan
ο
Chamber Economics Concept (Expired Program)
XII. What is Chamber Nation Video
ο
Interview with Chamber Nation Founder, Richard Scully Video
17
MEMBER
DATABASE
The Member Database is the heart of the MMS system. It allows
an organization to track member information, report on it, grant/
deny access to the members' area, and send broadcast emails
to the members and more.
Members (and other
contacts such as prospects) are assigned a
"Member Type". These
are edited from the
Member Plans section.
From the Member Database Admin area,
administrative-level users can alter all information for all members. Admins can add, change, and delete members. They also
have the capability to change their member status.
The Officers List (Board of Directors) list is also controlled from
the Member Database.
18
I. Tiered Membership Plans
ο
How can I create a tiered membership graph that shows the member benefits at each level of membership?
II. CRM System
ο
CRM System Intro
ο
Ticklers
ο
Referral Tool
III. Member Database
ο
Can I limit members to 2 categories only?
ο
Member-level Features
ο
Member Database Intro
ο
Member Database Admin
ο
Membership Plans
ο
Member Database Fields
ο
Granting Access to Members
ο
Officers/Board Members
ο
Multi-Member Accounts
ο
Match Merge
ο
Mass Entry of Data
19
MEMBERSHIP
BILLING
The Membership Billing System is an
extension of the member database
that allows you to create membership
invoices and track dues payments.
This part of the MMS is designed to
be flexible, offering a variety of features that an organization can pick-and-choose to meet their particular needs.
In this portion of the user manual, there is a section with a general explanation of how to handle member renewals, followed by
various sections explaining the features of the billing system• Creating Invoice Records
• Documents/Notifications
• Recording Payments
• Processing Drops
• Viewing Transactions
• Reporting/Data Export
20
I. Quickbooks Integration
ο
Quickbooks Integration Services
II. Membership Billing
ο
Red Door Plan Calculations – Convert Regular Member to Premium Membership Plan
ο
Member Billing System
ο
MMS Member Billing System Training Video
ο
Member Billing Intro Video
ο
Member Billing Reports Video
ο
Member Renewals Video
ο
Handling Member Renewals
ο
Member Renewals and Duplicates
ο
Creating Invoice Records
ο
Invoice Documents
ο
Email Renewal Notifications
ο
Recording Payments
ο
Receipt Documents
ο
Refunds
ο
Dropping Members
ο
Reinstating Members
ο
Viewing Transactions
ο
Reporting/Data Export
ο
Non-Dues Invoices
21
ο
Membership Add Ons
ο
Corrections/Voids
ο
Monthly Payments with CIM
ο
Full Automation – Nightly Jobs
ο
QuickBooks Interface
ο
Sync Operation
22
REPORTING
There are variety of reporting features included in the MMS system. Many organizations have specific reporting needs, so if you
don't see a report or label that will work for your group, feel free
to ask for an accommodation. Often, a customization can be accomplished at low cost or at no cost.
Quick Reports - these are some basic, ready-made reports that are
available to all members. The Quick
Reports are available under the
Members Area Features subsection
of the main menu.
Member Name Search - under the Members Area Features on
the main menu, this is a feature that allows all members to search
for a particular member based on name (first name, last name,
business name).
Member Directory - largely used by organizations in Business
mode, the MMS offers a facility that can be linked to outside of
the members area. This present the public with a way to search
for members based on business name, keyword, category. There
is also an option to allow the user to view all members.
23
Reporting/Lists/Labels - this feature allows a quick method for an admin to create a report, mailing labels, or to extract data to a commadelimited file (.csv).
Custom Reports - this is a more powerful, but more complex method for
setting up reports that can be re-used again and again. These reports
can also be included in the quick reports section, making them available to the general member (member-level) users.
I. Miscellaneous Reporting Topics
ο
Reporting Intro
ο
Member Search/Directory
ο
Google Maps
II. Lists and Labels
ο
Reporting, Lists, Labels Info
ο
Mailing Labels and Avery Forms
III. Quick Reports
ο
Creating a list of members that have not optimized their TCS page
ο
Quick Reports Info
IV. Custom Reports
ο
Custom Reporting Info
ο
Exporting to Excel
24
COMMUNICATIONS
I. Multiposting
In several locations in the MMS, you
will see links labeled 'multipost' or
'mpost'. This is a link to the Multipost
feature. Multipost allows to you create a single post, and then post it to
multiple social networks in one step.
Multipost currently allows posting to
the following social networks: Facebook, Twitter, and the MMS' internal
member social network. We are working on adding other social networks
to this list.
To use this feature, click on the link. You will then be presented
with a page where you can enter text for your post. It will often be
pre-populated with info based on where you clicked the mpost
link (if in the calendar, it would pre-populate with that event's info,
so you can post about your event).
25
Before sending a multipost, you will first want to link your Facebook
and/or Twitter accounts. What this means is that the Facebook or Twitter account will be linked to your member record, so that anytime you
want to multipost, you will be able to post to the social networks you
have access to. (When other users use multipost, they will have to link
their Facebook and Twitter accounts to their own member record.) To
link your Facebook and/or Twitter accounts, click on the button at the
top - My Accounts. Then click on the Facebook or Twitter tab, and click
ont he button to connect. From there, follow the instructions.
There is an optional date and time field available. This will allow you to
schedule when the multipost is made (this is so you can set up a reminder for an event to be posted at a later date/time). Connections to
social networks (aside from the MMS social network) are only valid for
60 days. Be sure to reconnect your account every 60 days if you're
scheduling posts. (as of this writing, 11/4/13, it's not clear that scheduled multiposts will not refresh the validity of your MMS-to-FB and
MMS-to-Twitter linkage)
I. Multipost
II. Drip Marketing
ο
Multipost/Social Networking Intro
ο
Linking to Facebook Pages
The Drip Marketing System is a way to set up drip programs. Each program is tied to one or more trigger events (joining, signing up as prospect, etc); and then multiple email messages are set up for the program. Each message is set up with a timeframe (# of days past the trigger event that a message is sent). When the trigger event occurs, the
series of messages are queued to be sent to the person that triggered
it.
One a program is set up, the messages are scheduled automatically.
But, if you want to manually schedule a program for a given person, or
to remove scheduled messages... go to the contact database, look up
the member, and then click on the link at the bottom for Drip Marketing
26
Messages for this Member. This shows the messages scheduled with
links to remove them. There is also an add button at the top, where you
can select a program, and add it to this member/prospect.
II. Drip Marketing
ο
III. Social Networking
Drip Marketing Intro
In several locations in the MMS, you will see links labeled 'multipost' or
'mpost'. This is a link to the Multipost feature. Multipost allows to you
create a single post, and then post it to multiple social networks in one
step. Multipost currently allows posting to the following social networks:
Facebook, Twitter, and the MMS' internal member social network. We
are working on adding other social networks to this list.
To use this feature, click on the link. You will then be presented with a
page where you can enter text for your post. It will often be prepopulated with info based on where you clicked the mpost link (if in the
calendar, it would pre-populate with that event's info, so you can post
about your event).
Before sending a multipost, you will first want to link your Facebook
and/or Twitter accounts. What this means is that the Facebook or Twitter account will be linked to your member record, so that anytime you
want to multipost, you will be able to post to the social networks you
have access to. (When other users use multipost, they will have to link
their Facebook and Twitter accounts to their own member record.) To
link your Facebook and/or Twitter accounts, click on the button at the
top - My Accounts. Then click on the Facebook or Twitter tab, and click
ont he button to connect. From there, follow the instructions.
There is an optional date and time field available. This will allow you to
schedule when the multipost is made (this is so you can set up a reminder for an event to be posted at a later date/time).
Connections to social networks (aside from the MMS social network)
are only valid for 60 days. Be sure to reconnect your account every 60
days if you're scheduling posts. (as of this writing, it's not clear that
27
scheduled multiposts will not refresh the validity of your MMS-to-FB and
MMS-to-Twitter linkage).
III. Social Network
IV. Newsletter Editor
ο
Networking Tools
ο
Multipost/Social Networking Intro
The MMS offers a newsletter editor that allows an organization to edit
and publish an electronic newsletter. This means a newsletter that is
published via HTML-formatted email.
The newsletter editor works by first setting up 'templates' for the publications
you want to create. The template allows to you set up the common attributes for the publication such as the
header image, masthead, colors and
more.
Once a template is created, you can add a newsletter (issue) and add/
edit articles within the newsletter. As months go by, you can copy a
prior month's newsletter to make it easier to create a new issue.
NOTE: HTML-formatted emails can be tricky at times, given that there
are so many email clients out there (Outlook, Thunderbird, Gmail, etc).
They don't all render HTML in the same way. As a rule-of-thumb, keep
things simple. If you keep the formatting simple, you increase the odds
that your newsletter will be look good in all email clients
IV. Newsletter Editor
ο
How do I upload images in the body of my newsletter article?
ο
Newsletter Editor Intro
28
V. Broadcast Messages
ο
Newsletter Template
ο
Editing a Newsletter
ο
Sending Out the Newsletter
ο
Newsletter Configuration
The Broadcast Message feature of the MMS allows an admin-level user
to send a simple email to the members, or a portion of the members, or
to a selected few members.
After selecting Broadcast Messages from the Administrative Functions section of the main menu, the
user is presented with a menu to
"send new message" or to "re-send/
add recipients" to a message already sent.
To send a new message, click on
"Send New Message", you are then guided through a series of pages1. Message Details
On this page, enter your name for Sender, enter your email for Sender
(Reply) Email, enter a subject and your message.
2. Attachments
On this page, you can add files that you would like attached to your
message. Use the Browse button to find the file on your local drive,
Click on Attach to upload and attach the document to your message
3. Recipients
Here you can designate who receives your message. Members (or
non-member contacts) can be added one-at-a-time using "Add Selected Members to List". Recipients can be added in groups using the
"Add Recipients by Membership Plan" or similar functions- add by
Project/Committee, Join Date, Business Category, etc. See the section
on Managing Lists for best practices.
29
4. Message Details
This is a confirmation page. Review the details of the message here before sending. When ready, click on the Send the Message button.
V. Broadcast Messages
ο
How do I send a Broadcast Message to only people in certain
categories?
ο
How do I edit a saved broadcast message?
ο
Broadcast Messages Intro
ο
Bounced Emails
ο
Broadcast Message Configuration
ο
Managing Lists
ο
Email Unsubscribe Requests
ο
Formatting Tips
ο
Avoiding Spam Filters
30
EVENT
MANAGEMENT
I. Event Registration
The Event Registration System allows
an organization's members (or nonmembers) to sign-up for conferences,
conventions, and other complex events.
The event registration system is designed to allow an admin to set up an
event, offer a link to the public and/or the members, then wait for
attendees to register for the event.
The admin can also manually enter attendees into the system (for
example, if an attendee sends in a check with a paper registration) so that the system can be used not just to allow for online
registration, but to use the various reports available to produce
attendee reports, name tags, and more.
31
Quick Set-Up Procedures (for more detail, look at the other help info in
this section)
To set up an Event Registration, go to the Event Registration Admin
menu (Event Registration Admin, under the Administrative Functions
subheading on the main menu) and follow these steps:
1. Click on "Add New Event"
2. Enter the event name, description, dates, payment options, cutoff
dates, and any other applicable fields available on this page. It's important to enter a notification email address. When people sign-up for the
event, a notification will be sent to this address.
3. Click on Continue. You will be taken to the Event Packages.
4. Click on "Add New Package" (You need to add at least one package.
If no cost is associated with the event, create a package with $0.00 as
the cost). Remember that registrants can only select 1 package.
5. Enter the package name, description, and cost.
6. Click on submit.
7. Repeat steps 4-6 to add additional packages
8. Click on Continue. You will be taken to the Custom Fields.
9. If you need to add additional fields (for session selection, meal selection, or other information that you need to collect) this is where you can
add these fields. If not, your set-up is complete at this point.
10. Click on "Add New Field"
11. Select the field type and click on Submit.
12. Enter the information related to the particular field and click on submit.
13. Repeat steps 11-12 to add additional custom fields.
14. When you are done entering fields, click on Continue to finish setting up your event!
32
I. Event Registration
ο
Event Registration Intro
ο
Setting Up a Registration
ο
Packages
ο
Members –v- Non-Members
ο
Custom Fields
ο
Admin Fields
ο
Editing Attendees/Payments
ο
Refunds
ο
Event Reporting
ο
Discount Codes
ο
Event Registration Messages
ο
Event Registration Configuration
ο
Event Billing: Separate from Dues Billing
II. Calendar Invites
II. Calendar Invites
ο
III. Calendar of Events
Invitations
The Calendar of Events feature is one of the most frequently used features in the MMS. It falls under the category of Content Management
Tools as it allows an organization to keep a calendar updated on their
website. It also fits into the category of Member Communication Tools
because it is integrated with an event invitation system. Beyond that,
there is a Member Tracking component as well. The Attendance module allows an organization to track member attendance at various
events.
33
The format of the calendar is very flexible and customizable, allowing
for multiple list-type formats and a flexible grid (calendar style) format.
If you have special needs for your calendar, feel free to contact us.
III. Calendar of Events
ο
How do I print the Chamber Calendar from the Website?
ο
Calendar of Events Intro
ο
Calendar of Events Usage
ο
Calendar of Events Fields
ο
Attendance Tracking
IV. Calendar
Automation
IV. Calendar Automation
ο
Broadcasting Member Events
ο
Member Calendar Network
Learn More: www.OfficialCalendarNetwork.com
34
MEMBERS AREA
FUNCTIONS
I. Resource Reservations
The resource reservations modules can be used to allow members to reserve a resource that the association has. This could be
a conference room, a party room, an LCD projector, or anything
that you allow members to use for a limited time.
Setting it up
To use this feature, go to Resource Reservations under administrative functions. From there, click on add to add a new resource.
Enter the name and description and click on submit. Repeat for
additional items/resources.
How members use it
Now that you've set up a resource, any member who logs in can
reserve the resource for a block of time. To do this, they can click
35
on Resource Reservations under members area features (at the bottom
of the members area menu).
Clicking on a block of time, they will be prompted to enter in the details,
start time, end time, etc. After they enter this, then that block of time will
be reserved for the member.
I. Resource Reservations
ο
Resource Reservations Intro
II. Proposal Submissions
III. Elections
II. Proposal Submissions
ο
Request for Proposal System
ο
RFP – Setup
ο
RFP – Edit Request – Pg 1
ο
RFP – Edit Request – Pg 2, 3, 4, & 5
ο
RFP – Topics/Committees
ο
RFP – Topics/Committees – Setup
ο
RFP – Message Function
ο
Screen Proposals and Assign Reviewer by Type
The Elections feature allows an admin-level user to create an election
with a variety of different questions, and send out emails to the membership to prompt members to complete the election. Within the emails,
there is a link to follow, which allows the member to complete the survey. The election is also posted within the member's area, so those who
are granted access to the member's area can log-in and complete the
election there.
36
NOTE:
the election system is designed to allow only one vote per person. The
emails sent to members will provide a link that will require them to login
to complete the election.
Members must login to complete an election.
III. Elections
ο
Elections Intro
ο
Creating Elections
ο
Election Reports
ο
Election Emails
IV. Online Learning
V. Message Boards
IV. Online Learning
ο
Online Learning Module
ο
Designing Your Courses
Message Boards are a useful tool allowing members to communicate
with one another. The Message Boards operate on a hierarchy organized by "Board" -> "Topic" -> "Post". Boards can only be created by admin users and are used as primary categories for organizing topics.
Topics can be created by any member and are used as primary discussion points. Posts (also known as "Replies") can be created by any
member and are directly related to the topic. There are a number of different settings and options for the message board module and those
will be discussed in sub-sections of this help file.
NOTE: The rest of the documentation on the Message Boards is for the
"New" Message Boards, implemented in 2012-2013. If you are not us-
37
ing the new message boards, you may switch over to it via MMS Configuration, Message Board configuration.
V. Message Boards
VI. Surveys
ο
Message Boards Intro
ο
Creating Message Boards
ο
Creating Topics
ο
Email List Enabled Message Boards
The Surveys feature allows an admin-level user to create a survey with
a variety of different questions, and send out emails to the membership
to prompt members to complete the survey. Within the emails, there is a
link to follow, which allows the member to complete the survey. The survey is also posted within the member's area, so those who are granted
access to the member's area can log-in and complete the survey there.
NOTE: the survey system is designed to allow only one vote per person. The emails sent to members are encoded for that particular member, so sharing a link to the survey will not work.
It's possible to allow non-members to participate in surveys. If if you
send the survey email to a non-member (prospect/list-only/other), or
grant member's area access to a non-member; these individuals can
then participate in surveys.
VI. Surveys
ο
Survey Intro
ο
Creating Surveys
ο
Survey Emails
ο
Survey Reports
38
VII. Projects/
Committees
The Projects/Committees feature offers a way for members to sign-up
for projects/committees online, present a list of current projects or committees, as well as for an admin to organize people who are serving on
a committee or interested in a project.
The Projects/Committees information can be used to create reports using the reporting module. It also has a few handy features for communication and reporting within it.
VII. Projects/Committees
ο
Project/Committees Intro
ο
Edit Projects/Committees
VIII. Media and File Center
VIII. Media and File
Finder
ο
File Archive
ο
File Management
ο
File Archive Video
ο
Mass Upload File Archive Video
39
BANNERS AND
SYSTEM STATS
I. Banner Ad Manager
ο
Banner Ad Manager
40
WEBSITE
MODULE
MANAGEMENT
I. Tiodew Website Editor
Training
I. Tiodew Website Editor Training
ο
Tiodew Website Editor Training
II. Snappages Website Editor
Training
II. Snappages Website Editor Training
ο
Snappages Website Editor Training
41
III. Library
The Library module allows you to manage a list of documents/media in
your organization's library. This can be used to track which member
has which materials in their possession.
Managing the library
When the module is turned on, the list of documents can be edited.
Click on Library under administrative functions, you will see an add/
change/delete environment where you can manage the list of documents.
Checking out / Checking in
Members, after logging into the members area, have the opportunity to
reserve (checkout) materials. This is avaialble under Members Area
Features on the main menu. Later, when the material is returned, the assigned librarian can check-in the materials.
When it is returned, the librarian can then use the editor (mentioned
above) to check-in the book. Look for the book in the list, and click on
the 'out' link. this will toggle the in/out indicator back to 'in'.
III. Library
ο
IV. Legislative Action
Center
Library Intro
This module is not enabled by
default, let us know if you want
to use this.
Once enabled, you will need to
edit/maintain a list of legislators. This is done from within
Member Database Admin,
house members and senate
members are two special record types that you will see in the view
drop-down.
42
To set up an legislative item, log-in, then look for Legislative Action in
the right column under admin functions.
Enter the name of the Action Item (the issue at hand), begin and end
dates, the details about the requests (why people should contact their
legislator) then the suggested subject and message text, house/
senate/both, multiple selection (whether you want people to be able to
send to multiple legislators), limited members (if it’s just a few legislators that need to be lobbied, select them).
When you’re done entering the action item, click on Submit. It will show
up in the list, along with a URL you can use to promote the action item.
You can post this URL on your website or sent out in an email to your
contacts.
As people respond, the system will track who has contacted which legislator.
IV. Legislative Action Center
ο
Legislative Action Center Intro
The online store feature allows you to manage a catalog of items and sponsorships,
and allow members and/or the public to
purchase them. If you have a credit
card merchant account or PayPal account integrated with your MMS account, it will automatically will be configured with the store.
V. Online Store
To start using the store, the first thing you will have to do is enter items
into your catalog to make them available for sale.
Catalog
To manage products listed in your catalog, click on Online Store under
Administrative functions.
43
All items in the catalog must be assigned to a category. So, your first
step may be creating categories. Click on 'Manage Categories' to manage your categories. From this page, you can add/change/delete categories. If you have few items, create a single category named 'general'
or 'products'.
Once you've created a category or two, click on Manage Products to
return to the product management page. From here you can add/
change/delete products. To add a product, click on Add New Item. You
can then enter the name, select a category, and enter a description
and price for the product. You can also browse for a picture of your
product on your local drive, which will then be uploaded and sized for
display in the catalog.
There is also a checkbox for 'sold out / not available'. If checked, users
will not be able to add this item to their cart.
In the 2nd page when editing a product, you can edit a list of attributes,
such as colors or sizes. this feature allows you to add up 5 different attributes for each product, and many options for each attribute.
Shipping Options, Taxes
In MMS Configuration, under Online Store Configuration, you can specify some options for taxes and shipping.
For taxes, you can specify whether to apply sales tax, and choose the
state you operate in. You will also want to indicate whether shipping is
taxable in your state. If you use the tax option, you can edit your products and identify which ones are taxable with a checkbox.
For shipping, you can select a simple shipping computation based on
a flat rate per item.
Publishing/Promoting
To promote your store on the public side of your website, use the link
that is presented at the bottom of the Online Store admin page (where
you edit products).
V. Online Store
ο
Online Store Intro
44
VI. Classified Ads
The Classified Ads system is a powerful system that can allow an organization to offer their members a valuable service. For homeowners
associations, neighbors can have an ongoing, electronic garage sale.
For academic and trade associations, the classified ads system can be
used to create job postings. To get to the classified ad editor, go to the
Content Manager Menu.
VI. Classified Ads
ο
Classified Ads Intro
ο
Classified Ads Submission
ο
Classified Ads Editor
VII. Job Board
VII. Job Board
ο
VIII. Photo/Mobile
Albums
Job Board Module
The Photo Album is a fun system allowing your organization to upload
photos of events and people. Once uploaded by an admin-level user,
these photos are arranged as part of a multi-page photo album that
can be integrated within the public side of your website.
Alternatively, photos can be kept private... presented within the members area only. This can be configured via the MMS Configuration
page, using the "include album in members area" option.
VIII. Photo/Mobile Albums
ο
Photo Album Intro
ο
Managing Photos
45
IX. Relocation Guide
Manager
The Relocation Guide and the Links Page editors provided by EcTown
are a unique form of editor. They allow an admin user to build the content of a page by assembling a variety of elements vertically, stacking
them into a neat presentation.
These elements includeTitle, Heading, Subheading - a variety bolded text one-lines of varying
size font
Text - a multiline text section
Table - a two-column table with multiple rows
Link - link to a website
IX. Relocation Guide Manager
ο
Relocation Guide Intro
ο
Editing Relocation Guide Elements
X. Daily Deal Approval
X. Daily Deal Approval
XI. Donations/Wish List
ο
Coupon System
ο
Daily Deal Administration
Donations
Provided your MMS account has been integrated with a payment gateway, you can use the donations module to provide a way for the public
to donate to your organization.
46
Wish List
A little more complicated than the donations module, the wish list module allows for monetary donations. But in addition, you can set up an
array of items you may need donated. Then donors, can choose to donate the item or the monetary equivalent of that item
XI. Donations/Wish List
ο
XII. Forms Builder
Donations/Wish List Intro
The forms builder is a handy tool allowing an organization to build a
simple web form that can be used by members or the general public.
This is useful for scholarship applications, public polls, and anything
that you can imagine. Each time a user fills out the form and clicks on
Submit, the contents of the form are sent to an assigned email address.
After selecting Form Builder from the Administrative Functions section
of the main menu, the user is presented with a menu to add/change/
delete forms.
To add a new form, click on "Add New Form", you are then guided
through a series of pagesGeneral InfoHere you can enter the name of the form, a description, an email address where the contents of the form will be sent upon submission.
Also, there is a checkbox to prompt for Name/Email. If checked, the
form will include a first name, last name, and email field.
QuestionsThis is where the form questions are composed. To add a question,
click on "Add New Question". You are then given the option of selecting
a type of question- Multiple Choice, Yes/No, Text Field, Multiline Text.
After selecting the type of question, you then are prompted to enter the
Question verbiage. If you selected Multiple Choice, you have the option
47
of allowing only 1 selection, x-number of selections, or unlimited selections.
After entering the question, if you selected Multiple Choice, you will
then be presented with a page where you can edit the choices.
To delete a question, click on delete to the right of the question.
To change a question, click on change to the right of the question.
To re-order the presentation of questions, use the "move up" and "move
down" links to move questions up or down the list.
Publishing
After your form has been created, a URL for this form will be listed in
the Forms Builder admin area. You can copy and paste the URL into
email, into a web page, or otherwise publish as you see fit.
XII. Forms Builder
ο
XIII. News Manager
Forms Builder Info
XIII. News Manager
ο
News Manager vs. Press Releases
ο
News Manager/Press Releases
ο
Entering Content Into the News Manager
XIV. Press Releases
XIV. Press Releases
ο
How do I add photos to my press release?
ο
My press release is showing before the date it is supposed to
ο
Press Releases vs. News Manager
ο
News Manager/Press Releases
48
WEB EDITOR
I. Webmaster Code and Ideas
ο
Making the Background of Images Transparent
ο
Adding Rollover Images to Websites (Sample Code)
II. Snap Pages Editor
ο
How do I change my password?
ο
How do I create a link page?
ο
How do I create a clickable ad in another website?
49
ADMIN
COMMUNITY
AND POSTS
I. Various
ο
Add a Custom Field (Like a business anniversary)
ο
Approving Pending Events
ο
Banner Ad “Impressions” Now Available
ο
Billing Q&A
ο
Broadcast Message Details
ο
Can I put an alternate billing address in my member database?
ο
Category List – Suggested Starter List
ο
Chamber Nation Web Mail
50
ο
Chamber Recreation System
ο
Connecting 1and1 Webmail to Outlook
ο
Daily Deals
ο
Drip Marketing System
ο
Google Apps Migration for Microsoft Outlook®
ο
Grid/Touch Screen Directories
ο
Keeping Member Categories Under Admin Control
ο
Limited Address Information on MAPPING
ο
Member Keyword Guide for Search Optimization
ο
Member Not Showing Correctly on Street View Mapping System
ο
MMS Banner Ad Manager
ο
MMS Broadcast Messaging
ο
MMS Calendar of Events
ο
MMS Classified Ads
ο
MMS Configuration Area
ο
MMS Contact Database/Member Referrals
ο
MMS Coupon System and Daily Deals
ο
MMS Drip Marketing
ο
MMS Event Registration System
ο
MMS Forms Builder and Forums
ο
MMS Legislative Action Center and Library
ο
MMS Media and File Center
ο
MMS Member Database Fields
ο
MMS Membership Billing System
51
ο
MMS Membership Plans
ο
MMS Mobile Photo Album – Shared with Members
ο
MMS Multi Post and Social Networking
ο
MMS New Manager/Press Releases
ο
MMS Newsletter Creator
ο
MMS Online Learning
ο
MMS Online Store and Donation System
ο
MMS Projects and Committees
ο
MMS Reporting
ο
MMS Resource Reservation
ο
MMS Survey System
ο
MMS System Introduction
ο
Mobile App Users Guide
ο
Monthly Newsletters and Customer Meetings
ο
New Photo Grid Membership Directory
ο
New Prospect List vs. Lead List Trigger
ο
NEW: Graphics Dashboard
ο
Newsletter Editing Solution Shown
ο
Newsletter Open-Rate Detection
ο
Outlook or Google Apps?
ο
Press Releases
ο
Real Value of Joining a Chamber Study
ο
Recreation Assets – GPS Override
ο
Recreation Site Mapping, Multi Chamber, Street View
52
ο
Red Indicators in Member Email Lists
ο
Setting Up Your Own Google Analytics Account
ο
Survey Report – How do I get the survey results after it is sent?
ο
Translating Your Website
ο
Understanding Google Analytics
ο
Using CRM Tool – Drip Marketing
ο
Way to Create Ambassador Page using Projects and Committees
ο
What is a Membership Card?
53
MOBILE APP
Mobile App Manager
The Mobile App Manager Module of the MMS allows an adminlevel user to order and manage mobile apps and content. If an
app has already been ordered (and/or created), the app will be
visible on the main page for this module. See below:
A new app can be ordered by clicking the "Add New Association
App" button. To edit the content for a mobile app: click the "App
Builder" link. To edit the description, promo text, or keywords:
click the "App Info" link. To view the launch page for the app:
click the "App Launch Page" link.
54
Chamber Onboarding
I.
Mobile App Manager
ο
Mobile App Manager Intro
ο
Ordering a New Mobile App
ο
Updating Mobile App Info
ο
Managing Mobile App Content
ο
Managing Mobile App Pages
ο
Managing Mobile App Features
ο
Managing Mobile App Categories
ο
Managing Mobile App Links
ο
Managing Mobile App Spacers
I.
Verification Services
ο
Verified Chamber Member
II.
Admin Cheat Sheet
ο
Administrative Cheat Sheet – Great Tips to Remember
III.
Merchant Account
ο
Fair Commerce Merchant Account Options
ο
Merchant Account Privacy, System Policies and Copyright
ο
Merchant Account Setup Information
IV.
Data Conversion
ο
Data Conversion Process – QuickBooks Integration
55
Optimal Upgrades
General
I.
Promotional Toolbox by CommunityLink (Free)
ο
Incredible Promotional Tools for Chambers of Commerce
II.
Chamber Texting Services
ο
Chamber Texting Consulting Services
III.
Chamber Website Makovers
ο
$499.95 Website Makeover
I.
Miscellaneous
ο
Members and Admins
ο
Application Time-Out
ο
MMS Configuration
ο
How to Limit Grid View Code to One Category with DisplayedRight System
II.
Chamber Advertising
ο
Chamber Advertising Live Network Feed
ο
Understanding the Value of Chamber Advertising
56
MOBILE APP
USER GUIDE
Mobile Application Support
The Mobile App Manager Module of the Chamber Nation Membership Development System (“MDS”) allows an admin-level user
to order and manage mobile apps and content.
If an app has already been ordered (and/or created), the app will
be visible on the main page for this module. See below: (If Not
There Contact Support for Access).
57
A new app can be ordered by contacting support at Chamber Nation.
After you submit your order, a new ticket will be created on the MDS
User Support
-- Client Care Center and the development process will begin as soon
as possible (unless otherwise noted in the comments of the form you
submitted).
Support will be contacting you for your logo so that your mobile artwork
can be generated. You will receive artwork proofs from the artist you
can view and approve.
When a Mobile App is published to Android or Apple/iOS, we enter
some information about the app that will inform the public about your
app and your organization.
During the ordering process you had an opportunity to provide this information.
For best results you may update this information as necessary. Note
that while you are able to modify this information, we still have to manually make those changes on Android and Apple/iOS markets/stores due
to restrictions by those companies.
To edit your app info, click on the "App Info" link on the main Mobile
App Manager Page:
This will take you to the edit page. Here you can edit the Title, Description, Promo Text, and Keywords related to your app. Please note that
Android restricts the app title to 30 characters and also each app title
must be 100% unique among all of the Android and Apple app markets.
58
Once you are satisfied with your changes, click the "Submit Changes"
button. One of our mobile developers will be notified of the change via
email and will update the app info on Android and Apple/iOS markets
as time allows.
When you order a mobile app it will be populated with a set of default
features and content. This set of content is just a sample of what is available for your use.
Managing Mobile
Application
Generally it is advisable to allow the support center to handle app content until after the app has been published by Apple as Apple is notorious for being picky and restrictive about approving apps.
After your app has been published and is in "Active" status, you can
edit your content by going to the Mobile App Manager main page and
clicking on "App Builder".
This page lists all the content in your mobile app as well as links to
add/change/remove content.
59
The Mobile App Content labels are displayed as buttons on the App's
Menu and once touched/clicked will display the content in the app's
main page.
There are 5 types of content:
1. Pages
2. Features
3. Categories
4. Links
5. Spacers
To add new content: click the appropriate link on the top of the page to
the right of "Add New:"
● To edit existing content: click the "Pencil" icon
● To delete existing content: click the red "X" icon
● To move the content up or down in the menu order: click the up or
down arrow
60
Pages
Pages for the Mobile App are just simple content pages (similar to what
you might add using the Website Content Editor for your website).
From the Mobile App Menu Builder page (see below):
To add a new page: Click the "Page" Link.
To edit an existing page: Click the "Pencil" Icon next to a page in the
menu list.
61
The add/edit page for "Page" content looks like this:
Simply enter a page name and some content and then click "Click here
to publish to mobile". Note you can specify a "Category" to place it under and also control the security level required to view the page.
62
Feautures
Features for the Mobile App are advanced content pages that have special properties allowing them to interact with the MDS database and provide dynamic content for the end user.
From the Mobile App Menu Builder page (see below):
To add a new feature: Click the "Feature" Link.
To edit an existing feature: Click the "Pencil" Icon next to a feature in the
menu list.
The add/edit page for "Feature" content looks like this:
63
Simply select the desired feature from the drop-down menu, enter the
menu text/name, determine which category (if any) to place it under, select a permission level, and click the "continue >>" button. Note you
can specify a "Category" to place it under and also control the security
level required to view the page.
Some features have additional pages where you will be asked to select
and/or enter other information, but most are just one step like the one
indicated above.
Categories
Categories for the Mobile App are simple menu items that allow you to
nest multiple items under them. The Mobile App Content Menu is limited to 12 top-level items so Categories are very handy in keeping everything organized and allowing for more content to be added.
To add a new category: Click the "Category" Link.
To edit an existing category: Click the "Pencil" Icon next to a category in
the menu list.
64
The add/edit page for "Category" content looks like this:
Simply enter the category name, select a permission level, and click
the "continue >>" button.
Once added, the category will appear on other add/edit screens in the
"Parent" drop-down box.
Links
Links for the Mobile App are simple menu items that when clicked will
open a new URL.
From the Mobile App Menu Builder page (see below):
To add a new link: Click the "Link" Link.
65
To edit an existing link: Click the "Pencil" Icon next to a Link in the menu
list.
The add/edit page for "Link" content looks like this:
Simply enter the link name, paste in the URL, and click the "continue>>" button. Note you can specify a "Category" to place it under
and also control the security level required to view the page.
Spacers
Spacers for the Mobile App are simple menu items that have no action
or purpose other than to insert a blank space (or a gap) in the menu of
the mobile app to help separate menu items.
From the Mobile App Menu Builder page (see below):
66
To add a new spacer: Click the "Spacer" Link.
To remove a spacer: Click the red "X" icon next to the spacer in the
menu item list.
See below:
Unique Member Access
and Network Tools
Overview
Once your new mobile application goes live it becomes another important module in the Chamber of Commerce program to become to most
powerful broadcasting system in the community.
Your members can now login through this mobile application to do the
following functions designed to enhance their advertising reach and improve business. To read all about these services for members please
visit: www.ChamberAPP.com
Member Mobile
Functions
Once members download the iPhone, Android or HTML5 mobile application for your own community, members are able to manage various
areas of their local advertising system. These updates are immediately
67
sent to the community / organization website, member directory profiles, area search engine and other community mobile applications.
• Locate Other Members
• View Leads Delivered Through Chamber
• Locate Event Information
• Update Member Profile
• View / Present Live Membership Card for Local Discounts, Etc.
• Opt in, Read and Post to Private Member Forums
• Post to Member Business Network / Public Stream
• View Special Offers from Other Members
• View Member-to-Member only Offers
• Add/Edit Business Services
• Add/Edit Business Hours
• Add/Edit Traffic Catcher Site and Mobile App Information
• Add/Edit Special Offers and Coupons
• Add/Edit Coupon Photos from Mobile Device
• Add/Edit Classifieds or Job Board Postings
• Add/Edit Press Releases
• Add/Edit Scrolling Photo Tour Images
• System will also update member's own mobile web app
• More on the way!
Unique Staff Access
and Mobile
Management Tools*
*Only available when logged in as a system admin level user through
your mobile device. Public/members do not have access to the following information.
68
• View Member Count Trends
• View Member Payment History
• View Member Ad Stats
• View Member Profile
• View/Edit Member Database
• View/Upload Member Photo
• View/Edit Calendar/Events
• View/Edit Membership Card and When it Can Be Used
• View/Edit Classifieds or Job Board Postings
• Rapid Checkin of Members at Events (App syncs between admins).
• View Custom Reports
• Send Prospect to Office (Business Card Photo Supported)
• Suspend Members for NonPayment
• Update Member Profile Photos with Phone/Tablet
• Post to Member Business Network updating all apps and community
information stream.
• ORDER THIS APP BY VISITING: www.ChamberAPP.com
69
BROADCAST TEXT
MESSAGES
Optional Add-On Services
The broadcast text message module allows an association to
send out text messages to a group of members. A minimum
monthly charge of $19.95 applies. (if you use less than 500 individual texts in a given month, you would still have to pay $19.95
in that month). This is a premium service. Additional texts above
the 500 allowed per month cost $0.02 cents per membermessage (if you were to send an additional 100 text messages to
members, the cost would be $0.50 extra). (Pricing current as of
August 2015).
To turn on this feature, please contact technical support - we will
turn on the module for you.
It will be necessary to turn on a special mobile-phone field within
the member database, such that you would load your members
70
mobile number's into that field. This is the field that is used to determine the phone numbers to use when sending out broadcasts.
When the module is enabled, to send a message, click on “send new
message.” You'll be prompted to enter a subject and message (note:
the subject is not sent, this is just used as a way to track which message was which). In the next screen, you'll be prompted to select recipients. Only member records with something entered in the mobile
phone field will be available to you. Once you've made your selection,
verified your message, you then can send it.
After the message, there is a “status page” available for that message.
It will show the progress of the message (which ones have been sent,
or which ones had difficulty). Also, if the recipients choose to reply to
your text, their replies will show up on the status page.
71
CHAMBER NATION SYSTEM REMINDERS
THIS IS THE ULTIMATE CHEAT SHEET
(POST NEAR YOUR COMPUTER)
• RUN BATCH RENEWALS AND APPLY PAYMENTS. (Batch Renewals should be run once a month
even for annual memberships.)
• BE SURE TO CREATE EVENT IN CALENDAR ADMIN FIRST. That way you won’t have to enter it
twice when creating an Event Registration.
• BE SURE TO SELECT THE PROPER MAILING LISTS when sending out Broadcast Messages
and Newsletter emails. That way people can opt out of those particular types of communication,
saving you from being marked as a spammer.
• CHECK YOUR BOUNCED EMAIL LIST as this will help keep you off the spammer lists.
• RUN THE MONTHLY BOARD REPORT once a month to stay in sync to how you are doing.
• BE SURE TO USE THE SEND LEADS TO MEMBERS MODULE. Members will be impressed with
the new service and will append to member statements too.
• PROMOTE AND UPDATE YOUR MOBILE APP. Tremendous potential in mobile publishing – try it your members and public will be impressed.
• REVIEW AND DELETE LIST ONLY RECORDS in your database that are not useful to you.
• REVIEW AND UPDATE YOUR CHAMBER WEBSITE this will often help your search rankings too.
• REVIEW YOUR MEMBERS OPTIMIZATION LEVELS When members engage and get valuable advanced member services, there are more reasons to renew their membership.
• BE SURE TO UPDATE CHAMBER NATION with your contact changes and contact us through the
“Help Desk” if you need our assistance.
72
3
ADDITIONAL
RESOURCES
OVERVIEW
www.ChamberStaff.com
For technical support for system administrators please call:
(855) 233-6362
For member and advertiser subscriber support have them call:
(844) 487-3663
For sales training and updated program material please call:
(530) 539-4259
The Purpose of this Program
• Add significant relevancy to the value of Chamber of Commerce membership.
• Provide members with a program designed to dramatically improve their promotion.
• Offer a program that delivers “REAL” prospects to members.
• Remove the concern about how the Chamber is delivering relevancy to their members.
74
• You continue to offer all of your existing membership plans.
• All of your existing Chamber Nation member services continue as
they are today.
• The Premium Membership Plans are OPTIONAL for new and renewing members.
• All costs associated with the Premium Plans are included in your premium edition plans and paid by the member at signup and renewal.
Important Program
Facts
This program was developed from the ground up by our team here at
Chamber Nation. After years of knowhow and direct experience in working with tens-of-thousands of Chamber of Commerce members, we
have learned what was needed to answer the “relevancy” question at
Chambers of Commerce.
We present the Premium Membership Plan – a first-of-its-kind solution
to bring back the purpose and value in joining the Chamber of Commerce. The market has changed significantly, so the response needed
to change too.
75
E15: THE REAL VALUE OF JOINING A LOCAL CHAMBER OF
COMMERCE
76
77
78
79
80
81
82
83
84