1
Owner’s Manual
for advanced features
Digital Camera
Model No.
DMC-TS5
Please read these instructions carefully before using this product,
and save this manual for future use.
Register online at
www.panasonic.com/register
(U.S. customers only)
until
2013/04/15
VQT4U19
F0113MG0
Contents
Before Use
Care of the camera ...................................................................................................... 7
(Important) About the Waterproof/Dustproof and
Anti-shock Performance of the Camera.................................................................. 10
Standard Accessories............................................................................................... 15
Names and Functions of Main Parts........................................................................ 16
Preparation
Charging the Battery................................................................................................. 18
• Charging ............................................................................................................. 18
• Approximate operating time and number of recordable pictures ........................ 20
Inserting and Removing the Card (optional)/the Battery....................................... 22
About the Built-in Memory/the Card ........................................................................ 24
• Approximate number of recordable pictures and available recording time......... 26
Setting Date/Time (Clock Set) .................................................................................. 28
• Changing the clock setting.................................................................................. 29
Tips for taking good pictures ................................................................................... 30
• Fit the strap and hold the camera carefully......................................................... 30
• Preventing jitter (camera shake)......................................................................... 30
Basic
Selecting the Recording Mode................................................................................. 31
Taking Pictures using the Automatic Function
(Intelligent Auto Mode) ............................................................................................. 32
• Changing the settings ......................................................................................... 34
Taking Pictures with Your Favorite Settings
(Program AE Mode)................................................................................................... 36
Focusing .................................................................................................................... 37
Recording Motion Pictures....................................................................................... 39
Playing Back .............................................................................................................. 42
• Displaying Multiple Screens (Multi Playback) ..................................................... 43
• Using the Playback Zoom................................................................................... 43
• Creating Still Pictures from a Motion Picture ...................................................... 44
• Playing Back Group Pictures .............................................................................. 44
Deleting Pictures ....................................................................................................... 46
• To delete a single picture .................................................................................... 46
• To delete multiple pictures (up to 100) or all the pictures ................................... 47
Setting the Menu ....................................................................................................... 48
• Setting menu items ............................................................................................. 48
• Using the Quick Menu ........................................................................................ 49
About the Setup Menu .............................................................................................. 50
-2-
Recording
About the LCD Monitor ............................................................................................. 62
Using the Zoom ......................................................................................................... 64
• Optical Zoom ...................................................................................................... 64
• Extended Optical Zoom (EZ) .............................................................................. 65
• Intelligent Zoom .................................................................................................. 65
• Digital Zoom........................................................................................................ 65
Taking Pictures Using the Built-in Flash................................................................. 66
• Switching to the appropriate flash setting ........................................................... 66
Taking Close-up Pictures ([AF Macro]/[Macro Zoom])........................................... 69
Taking Pictures with the Self-timer.......................................................................... 70
Compensating the Exposure.................................................................................... 71
Taking Pictures Using Auto Bracket ....................................................................... 72
Taking picture by setting the exposure manually
(Manual Exposure Mode).......................................................................................... 73
Taking Pictures with different image effects
(Creative Control Mode)............................................................................................ 75
• [Expressive] ........................................................................................................ 76
• [Retro] ................................................................................................................. 76
• [High Key] ........................................................................................................... 76
• [Low Key] ............................................................................................................ 76
• [Sepia]................................................................................................................. 77
• [Dynamic Monochrome]...................................................................................... 77
• [Impressive Art]................................................................................................... 77
• [High Dynamic] ................................................................................................... 77
• [Cross Process] .................................................................................................. 78
• [Toy Effect] .......................................................................................................... 78
• [Miniature Effect]................................................................................................. 78
• [Soft Focus]......................................................................................................... 79
• [Star Filter] .......................................................................................................... 79
• [One Point Color] ................................................................................................ 79
Take the Outdoors Scene Expressively .................................................................. 80
• Sports Mode........................................................................................................ 80
• Snow Mode......................................................................................................... 80
• Beach & Snorkeling Mode .................................................................................. 81
• Advanced Underwater Mode .............................................................................. 83
Taking panorama pictures (Panorama Shot Mode)................................................ 84
Taking pictures that match the scene being recorded (Scene Mode) .................. 87
• [Portrait] .............................................................................................................. 88
• [Soft Skin] ........................................................................................................... 88
• [Scenery]............................................................................................................. 88
• [Night Portrait]..................................................................................................... 89
• [Night Scenery] ................................................................................................... 89
• [Handheld Night Shot]......................................................................................... 89
• [HDR] .................................................................................................................. 90
• [Food].................................................................................................................. 90
• [Baby1]/[Baby2] .................................................................................................. 91
-3-
• [Pet] .................................................................................................................... 91
• [Sunset]............................................................................................................... 92
• [High Sens.] ........................................................................................................ 92
• [Starry Sky] ......................................................................................................... 92
• [Glass Through] .................................................................................................. 92
• [3D Photo Mode]................................................................................................. 93
Entering Text.............................................................................................................. 94
Using the [Rec] Menu................................................................................................ 95
• [Aspect Ratio] ..................................................................................................... 95
• [Picture Size]....................................................................................................... 96
• [Quality]............................................................................................................... 97
• [Sensitivity].......................................................................................................... 98
• [White Balance]................................................................................................... 99
• [AF Mode] ......................................................................................................... 102
• [Quick AF] ......................................................................................................... 104
• [Face Recog.] ................................................................................................... 105
• [i.Exposure]....................................................................................................... 109
• [Min. Shtr Speed] .............................................................................................. 109
• [i.Resolution] ......................................................................................................110
• [Digital Zoom].....................................................................................................110
• [Burst] ................................................................................................................ 111
• [Time Lapse Shot]..............................................................................................113
• [Color Mode] ......................................................................................................115
• [Color Reproduction]..........................................................................................115
• [AF Assist Lamp]................................................................................................115
• [Red-Eye Removal]............................................................................................116
• [Stabilizer] ..........................................................................................................116
• [Date Stamp] ......................................................................................................117
• [Clock Set] .........................................................................................................117
Using the [Motion Picture] Menu ............................................................................118
• [Rec Format] ......................................................................................................118
• [Rec Quality] ......................................................................................................119
• [Continuous AF] ................................................................................................ 120
• [Wind Cut] ......................................................................................................... 120
GPS/Sensor
Recording using the GPS function ........................................................................ 121
• Acquiring of the GPS information ..................................................................... 122
• Update the GPS information............................................................................. 125
• Change the recorded location name information.............................................. 126
• Switch between displaying and hiding the location name information.............. 127
• Register additional landmarks .......................................................................... 127
Reducing the Time Required for Positioning ....................................................... 128
• Update using the “GPS Assist Tool” ................................................................. 128
• Update using the Wi-Fi Function ...................................................................... 131
• Check the validity period of the GPS assist data.............................................. 131
GPS Logs ................................................................................................................. 132
• Record GPS Logs............................................................................................. 132
-4-
• Output GPS logs to files ................................................................................... 133
• Delete GPS Logs .............................................................................................. 134
Sensors (compass/altimeter/barometer) are operated ........................................ 135
Using the altimeter .................................................................................................. 136
• Adjusting the Altimeter...................................................................................... 137
• Adding an altimeter log ..................................................................................... 139
• Viewing the altimeter log................................................................................... 140
• Deleting the altimeter log .................................................................................. 141
Using the barometer ............................................................................................... 142
Using the compass ................................................................................................. 144
• Adjusting the compass...................................................................................... 145
Playback/Editing
Various methods of playback................................................................................. 146
• [Slide Show]...................................................................................................... 147
• [Filtering Play] ................................................................................................... 149
• [Calendar] ......................................................................................................... 152
Having Fun with Recorded Pictures (Retouch) .................................................... 153
• [Auto Retouch] .................................................................................................. 153
• [Creative Retouch] ............................................................................................ 154
• [Color Reproduction]......................................................................................... 155
Using the [Playback] Menu..................................................................................... 156
• [Location Logging] ............................................................................................ 156
• [Title Edit] .......................................................................................................... 158
• [Place-Name Edit]............................................................................................. 159
• [Text Stamp] ...................................................................................................... 160
• [Retouch] .......................................................................................................... 162
• [Video Divide].................................................................................................... 163
• [Time Lapse Video] ........................................................................................... 164
• [Resize]............................................................................................................. 165
• [Cropping] ......................................................................................................... 166
• [Favorite]........................................................................................................... 167
• [Print Set] .......................................................................................................... 168
• [Protect] ............................................................................................................ 170
• [Face Rec Edit] ................................................................................................. 171
• [Copy] ............................................................................................................... 172
Wi-Fi
Wi-FiR function ........................................................................................................ 173
What you can do with the Wi-Fi function .............................................................. 175
Remote Shooting..................................................................................................... 176
• Installing the smartphone/tablet app “Image App” ........................................... 176
• Connecting to a smartphone/tablet................................................................... 177
• Taking pictures via a smartphone/tablet (remote recording)............................. 178
• Playing back pictures in the camera ................................................................. 178
• Sending location information to the camera from a smartphone/tablet ............ 178
• History Connection ........................................................................................... 179
• Favorite Connection.......................................................................................... 180
-5-
Connecting Easily to a Smartphone/tablet (NFC)................................................. 182
• Controlling this camera remotely with a smartphone/tablet
by using the NFC function ................................................................................ 182
• Transferring images in this camera to a smartphone/tablet one at a time
by using the NFC function ................................................................................ 183
• About NFC ........................................................................................................ 184
Selecting the connection method .......................................................................... 185
• Connecting via a wireless access point ............................................................ 185
• Connecting directly ........................................................................................... 187
Playback on TV........................................................................................................ 188
• Displaying the picture on TV right after taking it/
Displaying the picture on TV by playing it back on the camera........................ 188
Send Images While Recording............................................................................... 190
• When sending images to smartphone/tablet .................................................... 190
• When sending images to PC ............................................................................ 193
• When sending images to [Cloud Sync. Service]............................................... 195
• When sending images to WEB Service ............................................................ 196
• When sending images to AV device ................................................................. 197
Send Images Stored in the Camera ....................................................................... 198
• When sending images to smartphone/tablet .................................................... 198
• When sending images to PC ............................................................................ 201
• When sending images to [Cloud Sync. Service]............................................... 202
• When sending images to WEB Service ............................................................ 203
• When sending images to AV device ................................................................. 204
• When sending images to Printer....................................................................... 205
Using “LUMIX CLUB”.............................................................................................. 206
• About the [LUMIX CLUB].................................................................................. 206
• Using WEB services ......................................................................................... 209
• Configuring the external AV device settings ..................................................... 210
How to Use the [Wi-Fi Setup] Menu ........................................................................211
Connecting to other equipment
Playing Back Pictures on a TV Screen.................................................................. 213
• Using VIERA Link (HDMI)................................................................................. 215
Playing back 3D pictures........................................................................................ 217
Saving still pictures and motion pictures on your PC......................................... 219
• About the supplied software ............................................................................. 220
Saving still pictures and motion pictures on a Recorder.................................... 225
Printing the Pictures ............................................................................................... 226
• Selecting a single picture and printing it ........................................................... 227
• Selecting multiple pictures and printing them ................................................... 227
• Print Settings .................................................................................................... 228
Others
Screen Display......................................................................................................... 231
Cautions for Use...................................................................................................... 233
Message Display ..................................................................................................... 247
Troubleshooting ...................................................................................................... 251
-6-
Before Use
Please be sure to read “(Important) About the Waterproof/Dustproof and Anti-shock
Performance of the Camera” (P10) before using this unit underwater to prevent the unit from
being mishandled, which may cause water to seep in.
Care of the camera
∫ Handling of the camera (to prevent water leakage and malfunction)
• Foreign objects may adhere to the inner side of the side door (around the
rubber seal or connecting terminals) when the side door is opened or
closed in places with sand or dust, etc. This may result in the impairment
of the waterproof performance if the side door is closed with foreign
objects adhered. Be extremely careful since it may result in malfunction,
etc.
• In case foreign objects adhere to the inner side of the side door, wipe
them off with a dry, lint-free cloth.
• If any liquid such as water droplets is adhered to the camera or inner
side of the side door, wipe off with a soft, dry cloth. Do not open or close
the side door near the water, when underwater, using wet hands, or when
the camera is wet. It may cause water leakage.
Do not apply strong shock or vibration by dropping or knocking the
camera. Also, do not apply strong pressure to the camera.
e.g.:
– Sit down with the camera in your trousers pocket or forcefully insert it into a
full or tight bag, etc.
– Attach any items such as accessories to the strap attached to the camera.
– When strong pressure is applied using the camera at a depth exceeding 13 m (43 feet).
• Waterproof performance may be impaired.
• Lens or LCD monitor may be damaged.
• It may cause malfunction in the performance or the function.
-7-
Before Use
∫ When inner side of the lens is fogged (condensation)
This unit has been designed to prevent condensation by
Anti-fog glass, however it may be caused by the environment
in which the camera is used. It is not a malfunction or failure of
the camera.
What to do when inner side of the lens is fogged
• Turn this unit off and open the side door in a place with constant
ambient temperature, away from high temperatures, humidity, sand
and dust. The fog will disappear naturally in 10 minutes to 2 hours with
the side door open when the temperature of the camera gets close to
the ambient temperature.
• Contact Panasonic if the fogging does not disappear.
Conditions in which inner side of the lens may be fogged
Condensation may occur and the inner side of the lens may be fogged when the camera is
used in areas that undergo a significant change in temperature or in high humidity, such as the
following:
• When the camera is used underwater suddenly after being on a hot beach, etc.
• When the camera is moved to a warm area from a cold area, such as at a ski resort or at high
altitude
• When the side door is opened in a high-humidity environment
-8-
Before Use
About the GPS
Your Panasonic Lumix digital still camera is GPS-equipped which can automatically record the
precise location coordinates of where the photo was taken. The specific physical address of
this location can easily be derived from this information.
If you upload such “geotagged” photos to the Internet, a social networking site or any other
electronic media, the precise location of where the photo was taken will remain embedded in
the photo and can be viewed by others.
Therefore, when taking digital still photos, care should be taken in determining whether you
wish to have the GPS feature enabled or disabled.
About the location name information of this unit
Be sure to read the “User License Agreement for Location Name data” on P241 before using.
When [GPS Setting] is set to [ON], GPS function will operate even when this unit is
turned off.
• When you bring the camera on an airplane or to a hospital, etc., set [Airplane Mode] to [ON], and turn off
the camera because electromagnetic waves, etc. emitted by the camera may interfere with gauges. (P53)
• Battery power is consumed even if this unit is turned off when [GPS Setting] is set to [ON].
About the information of recording location
• Location names of the recording locations or landmarks (such as name of the building, etc.) are as
of October 2012. Information will not be updated.
• Depending on the country or the region, there may be less information for location names and
landmark names.
About the positioning
• It will take longer for positioning in an environment where it is harder to receive the radio waves from
the GPS satellites. (P121)
• Even if the receiving condition of the radio waves is excellent, it may take approx. 2 to
3 minutes to complete the positioning when performing positioning for the first time or when
you perform positioning after turning this unit on again after turning the unit off with the
[GPS Setting] set to [OFF] or [Airplane Mode] set to [ON].
Using GPS assist data can reduce the time required for positioning. (P128, 131)
• The positions of the GPS satellites are changing constantly, so positioning may not be performed or
the information may have errors depending on the recording location or conditions.
• For details on how to perform positioning smoothly, read “Receiving signals from GPS satellites” on P121.
When used during overseas travel etc.
• The GPS may not operate in China or close to the Chinese border in neighbouring countries. (As of
January 2013)
• The usage of GPS etc., may be restricted depending on the country or the region. This camera has
a GPS function, so check with the embassies or travel agencies etc. prior to your overseas travel
regarding any restrictions on cameras with a built-in GPS function.
About the compass, altimeter, depth meter, and barometer
• Information measured on this unit is only a rough indication. Do not use it for technical purposes.
• When using this unit for full-scale mountain climbing, trekking, or underwater, use the
measured information (direction, altitude, depth, atmospheric pressure) only as a rough
indication, and always carry a map and purpose-built measurement tools.
-9-
Before Use
(Important) About the Waterproof/Dustproof and
Anti-shock Performance of the Camera
Waterproof/Dustproof Performance
This camera’s waterproof/dustproof rating complies with the “IPX8” and “IP6X”
ratings. Provided the care and maintenance guidelines described in this document
are strictly followed, this camera can operate underwater, to a depth not exceeding
13 m (43 feet) for a time not exceeding 60 minutes. (¢1)
Anti-shock Performance
This camera also complies with “MIL-STD 810F Method 516.5-Shock”. The camera
has cleared a drop test from a height of 2 m (6.6 feet) onto 3 cm (0.1 feet) thick
plywood. In most cases this camera should not sustain any damage if dropped from
a height not exceeding 2 m (6.6 feet). (¢2)
Withstand Load Performance
This camera complies with 100 kgf/220.5 lbf load tests. (¢3)
This does not guarantee no destruction, no malfunction, or waterproofing in all
conditions.
¢1 This means that the camera can be used underwater for specified time in specified pressure in
accordance with the handling method established by Panasonic.
¢2 “MIL-STD 810F Method 516.5-Shock” is the test method standard of the U.S. Defense
Department, which specifies performing drop tests from a height of 122 cm (4 feet), at
26 orientations (8 corners, 12 ridges, 6 faces) using 5 sets of devices, and passing the
26 orientation drops within 5 devices. (If failure occurs during the test, a new set is used to pass
the drop orientation test within a total of 5 devices)
Panasonic’s test method is based on the above “MIL-STD 810F Method 516.5-Shock”. However,
the drop height was changed from 122 cm (4 feet) to 200 cm (6.6 feet) dropping onto 3 cm
(0.1 feet) thick plyboard. This drop test was passed.
(Disregarding appearance change such as loss of paint or distortion of the part where drop impact
is applied.)
¢3 According to the test conditions specified by Panasonic.
- 10 -
Before Use
∫ Handling of the camera
• Waterproofing is not guaranteed if the unit is subject to an impact as a result of being hit or dropped
etc. If an impact to the camera occurs, it should be inspected (subject to a fee) by Panasonic to
verify that the waterproofing is still effective.
• When the camera is splashed with detergent, soap, hot spring, bath additive, sun oil, sun screen,
chemical, etc., wipe it off immediately.
• Waterproof function of the camera is for sea water and fresh water only.
• Any malfunction caused by customer misuse, or mishandling will not be covered by the warranty.
• The inside of this unit is not waterproof. Water leakage will cause malfunction.
• Supplied accessories are not waterproof.
• Card and battery are not waterproof. Do not handle with a wet hand. Also, do not insert wet card or
battery into the camera.
• Do not leave the camera for a long period of time in places where the temperature is very low (such
as at ski resorts or high altitudes) or where the temperature may exceed 40 oC (104 oF) (such as
inside cars in strong sunlight, close to a heater, on boats, or on the beach). (Waterproof performance
may become degraded.)
∫ About the [Precautions] demonstration display ([Requirements for Underwater use])
• [Precautions] is displayed when this unit is turned on for the first time after purchase, with the side
door completely closed.
• Please check beforehand to maintain the waterproof performance.
1
Press 2 to select [Yes], and press [MENU/SET].
• It will automatically skip to the clock setting screen if [No] is selected before it starts.
2
Press 2/1 to change the picture.
2: Return to the previous screen
1: View the next screen
• It can be forcefully ended by pressing [MENU/SET].
• When it is forcefully ended while checking by turning the unit off or pressing [MENU/SET],
[Precautions] is displayed every time this unit is turned on.
3
After the final screen (12/12), press [MENU/SET] to finish.
• When [MENU/SET] is pressed after the final screen (12/12), [Precautions] is not displayed from
the next time this unit is turned on.
• This can also be viewed from [Precautions] (P50) in the [Setup] menu.
- 11 -
Before Use
Check before using underwater
Always wipe the rubber seal on the side door and the area where rubber seal sits with a
dry, lint-free cloth.
1
Check that there are no foreign objects on the inner side of the side door.
• If there is any foreign object, such as lint, hair, sand, etc., on the surrounding area, water will
leak within a few seconds causing malfunction.
• Wipe it off with a soft, dry cloth if there is any liquid.
It may cause water leaks and malfunction if you use the camera with liquid adhered.
• If foreign objects are present, wipe them off with a dry, lint-free cloth.
• Be extremely careful to remove any sand, etc. that may adhere to the sides and corners of the
rubber seal.
2
Check for cracks and deformation of the rubber seal on the side door.
• The integrity of the rubber seals may decrease after about 1 year, with use and age. To avoid
permanently damaging the camera the seals should be replaced once each year. Please
contact Panasonic for related costs and other information.
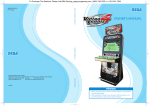
3
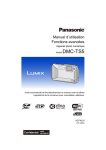
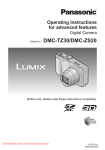
Close the side door securely.
• Lock the [LOCK] switch securely until the red part is no longer visible.
• To prevent water intrusion, be careful not to catch foreign objects such as liquids, sand, hair,
dust, or the strap cord.
A
B
C
D
Red part
[LOCK] switch (gray part)
Released state
Locked state
Do not open or close the side door in places with sand and dust, close to water, or with
wet hands. Sand or dust adhering may cause water leaks.
- 12 -
Before Use
Using the camera underwater
• Use the camera underwater to 13 m (43 feet) with the water temperature between 0 oC and 40 oC
(32 oF and 104 oF).
• Do not use for scuba diving (Aqualung).
• Do not use the camera at a depth of over 13 m (43 feet).
• Do not use it in hot water over 40 oC (104 oF) (in the bath or hot spring).
• Do not use the camera underwater for longer than 60 minutes continuously.
• Do not open or close the side door underwater.
• Do not apply shock to the camera underwater. (Waterproof performance may not be maintained, and
there is a chance of water leak.)
• Do not dive into the water holding the camera. Do not use the camera in a location where the water
will splash strongly, such as rapid flow or waterfall. (Strong water pressure may be applied, and it
may cause malfunction.)
• The camera will sink in the water. Take care not to drop the camera and lose it underwater by
securely placing the strap around your wrist or similar measure.
Caring of the camera after using it underwater
Do not open or close the side door until the sand and dust is removed by rinsing the
camera with water.
Make sure to clean the camera after using it.
• Thoroughly wipe off any water droplets, sand, and saline matter on your hands, body, hair, etc.
• It is recommended to clean the camera indoors, avoiding places where water spray or sand may
fall.
After using it underwater, always clean the camera rather than leaving it in a dirty
state.
• Leaving the camera with foreign objects or saline matter on it may cause damage, discoloration,
corrosion, unusual odour, or deterioration of the waterproof performance.
1
Rinse with water with the side door closed.
• After use at the seaside or underwater, soak the unit in fresh
water pooled in a shallow container for about 10 minutes.
• If the zoom button or camera [ON/OFF] button do not move
smoothly, it may be caused by an adhesion of foreign objects.
Using in such a state may cause malfunctions, such as locking
up, so wash off any foreign objects by shaking the camera in
fresh water.
• Bubbles may come out of the drainage hole when you
immerse the camera in water, but this is not a malfunction.
- 13 -
Before Use
2
Drain water by holding the camera upside
down and shaking it lightly a few times.
• Make sure to put your hand through the strap to
prevent the camera from falling.
3
Wipe off water drops on the camera with a
soft, dry cloth and dry the camera in a shaded
area that is well ventilated.
• Dry the camera by standing it on a dry cloth. This
unit incorporates drain design, draining water in
gaps in the camera [ON/OFF] button and zoom
button, etc.
• Do not dry the camera with hot air from dryer or
similar. Waterproof performance will deteriorate due to deformation.
• Do not use chemicals such as benzine, thinner, alcohol or cleanser, soap or detergents.
4
Confirm that there are no water droplets, open the side door, and wipe off any water
droplets or sand left inside using a soft, dry cloth.
• Water droplets may adhere to the card or battery when the side door is opened without
thoroughly drying. Also, water may accumulate in the gap around the card/battery slot or the
terminal connector. Be sure to wipe any water off with a soft, dry cloth.
• The water droplets may seep into the camera when the side door is closed while it is still wet,
causing condensation or failure.
- 14 -
Before Use
Standard Accessories
Check that all the accessories are supplied before using the camera.
• Supplied accessories are not waterproof.
• The accessories and their shape will differ depending on the country or area where the camera was
purchased.
For details on the accessories, refer to “Basic Owner’s Manual”.
• Battery Pack is indicated as battery pack or battery in the text.
• Battery Charger is indicated as battery charger or charger in the text.
• SD Memory Card, SDHC Memory Card and SDXC Memory Card are indicated as card in the text.
• The card is optional.
You can record or play back pictures on the built-in memory when you are not using a card.
• If any accessories are lost, customers in the USA and Puerto Rico should contact Panasonic’s parts
department at 1-800-833-9626 and customers in Canada should contact 1-800-99-LUMIX
(1-800-995-8649) for further information about obtaining replacement parts.
- 15 -
Before Use
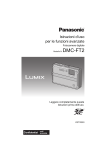
Names and Functions of Main Parts
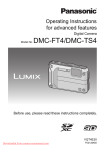
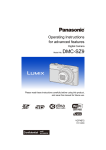
1
2
3
4
5
6
7
8
9
10
Flash (P66)
Self-timer indicator (P70)/
AF Assist Lamp (P115)/
LED light (P56)
Lens (P8, 237, 255)
Speaker (P53)
1
LCD monitor (P62, 231, 236)
[Wi-Fi] button (P177)
Wi-Fi® connection lamp (P174)
Zoom button (P64)
[(] (Playback) button (P42)
Strap eyelet (P30)
• Be sure to attach the strap when using the
5
2
3
6 7
4
8 9 10
camera to ensure that you will not drop it.
• Be sure to attach the strap to the strap
eyelet.
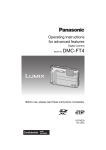
11
12
13
14
15
Decorative hole
[MODE] button (P31, 146)
[Q.MENU/ ] button (P49)/[
[DISP.] button (P62)
[MENU/SET] button (P48)
16 15 1413 12 11
] (Delete) button (P46)
16 Cursor buttons
A: 3/Exposure compensation (P71)
Auto Bracket (P72)
B: 4/Macro Mode (P69)
AF Tracking (P104)
C: 2/Self-timer (P70)
D: 1/Flash setting (P66)
MENU
/SET
In this owner's manual, the cursor buttons are described as shown in the figure below or
described with 3/4/2/1.
e.g.: When you press the 4 (down) button
or
Press 4
- 16 -
Before Use
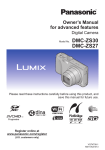
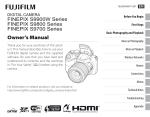
17
18
19
20
21
22
Microphone
GPS antenna (P121)
Camera [ON/OFF] button (P28)
GPS status indicator (P122)
Shutter button (P32, 36)
Motion picture button (P39)
17 18 19 20 21 22
23 Tripod mount
• A tripod with a screw length of 5.5 mm (0.22 inch) or more may
23
24
damage this unit if attached.
24 NFC antenna [
] (P182)
25 [HDMI] socket (P213, 215)
• Do not connect with any cable other than an HDMI micro
cable (RP-CHEU15: optional). Doing so may cause
malfunction.
26 Card slot (P22)
27 Battery slot (P22)
• When using an AC adaptor, ensure that the Panasonic DC
coupler (optional) and AC adaptor (optional) are used. For
connection details, refer to P23.
28
29
30
31
[AV OUT/DIGITAL] socket (P213, 222, 225, 226)
Release lever (P22)
[LOCK] switch (P12, 22)
Side door (P12, 22, 23)
- 17 -
25
26
27
28
29
30
31
Preparation
Charging the Battery
∫ About batteries that you can use with this unit
It has been found that counterfeit battery packs which look very similar to the
genuine product are made available to purchase in some markets. Some of these
battery packs are not adequately protected with internal protection to meet the
requirements of appropriate safety standards. There is a possibility that these battery
packs may lead to fire or explosion. Please be advised that we are not liable for any
accident or failure occurring as a result of use of a counterfeit battery pack. To
ensure that safe products are used, we would recommend that a genuine Panasonic
battery pack is used.
• Use the dedicated charger and battery.
Charging
• The battery is not charged when the camera is shipped. Charge the battery before use.
• Charge the battery with the charger indoors.
• Charge the battery in areas with an ambient temperature between 10 oC and 30 oC (50 oF and
86 oF) (same as the battery temperature) is recommended.
1
Connect the AC cable.
2
Attach the battery paying attention to the direction of
the battery.
• The [CHARGE] indicator A lights up and charging begins.
- 18 -
Preparation
∫ About the [CHARGE] indicator
On:
Charging.
Off:
Charging has completed. (Disconnect the charger from the electrical socket and
detach the battery after charging is completed.)
• When the [CHARGE] indicator flashes
– The battery temperature is too high or too low. It is recommended to charge the battery again in an
ambient temperature between 10 oC and 30 oC (50 oF and 86 oF).
– The terminals of the charger or the battery are dirty. In this case, wipe off the dirt with a dry cloth.
∫ Charging time
Charging time
Approx. 165 min
• The indicated charging time is for when the battery has been discharged completely. The
charging time may vary depending on how the battery has been used. The charging time for
the battery in hot/cold environments or a battery that has not been used for long time may be
longer than normal.
∫ Battery indication
The battery indication is displayed on the LCD monitor.
• The indication turns red and blinks if the remaining battery power is exhausted. Recharge the battery
or replace it with a fully charged battery.
• Do not leave any metal items (such as clips) near the contact areas of the power plug.
Otherwise, a fire and/or electric shocks may be caused by short-circuiting or the resulting
heat generated.
• The battery becomes warm after using it and during and after charging. The camera also becomes
warm during use. This is not a malfunction.
• The battery can be recharged even when it still has some charge left, but it is not recommended that
the battery charge be frequently topped up while the battery is fully charged. (Since characteristic
swelling may occur.)
- 19 -
Preparation
Approximate operating time and number of recordable pictures
∫ Recording still pictures
Number of recordable
pictures
Approx. 370 pictures
Recording time
Approx. 185 min
(By CIPA standard in Program AE
Mode)
Recording conditions by CIPA standard
• CIPA is an abbreviation of [Camera & Imaging Products Association].
• Temperature: 23 oC (73.4 oF)/Humidity: 50%RH when LCD monitor is on.
• Using a Panasonic SD Memory Card (32 MB).
• Using the supplied battery.
• Starting recording 30 seconds after the camera is turned on. (When the Optical Image Stabilizer
function is set to [ON].)
• Recording once every 30 seconds with full flash every second recording.
• Changing the zoom magnification from Tele to Wide or vice versa in every recording.
• Turning the camera off every 10 recordings and leaving it until the temperature of the battery
decreases.
• Not using the GPS function.
The number of recordable pictures varies depending on the recording interval time. If
the recording interval time becomes longer, the number of recordable pictures
decreases. [For example, if you were to take one picture every two minutes, then the
number of pictures would be reduced to approximately one-quarter of the number of
pictures given above (based upon one picture taken every 30 seconds).]
- 20 -
Preparation
∫ Recording motion pictures
[AVCHD]
[MP4]
(Recording with picture quality set (Recording with picture quality set
to [FHD/60p])
to [FHD/30p])
Recordable time
Approx. 80 min
Approx. 95 min
Actual recordable time
Approx. 35 min
Approx. 45 min
• These times are for an ambient temperature of 23 oC (73.4 oF) and a humidity of 50%RH. Please be
aware that these times are approximate.
• Time of recording without using the GPS function.
• Actual recordable time is the time available for recording when repeating actions such as turning this
unit on and off, starting/stopping recording, zoom operation, etc.
• Maximum time to record motion pictures continuously with [FHD/60p/
]/[FHD/60p]/[FHD/60i/ ]/
[FHD/60i] in [AVCHD] is 29 minutes 59 seconds.
• Maximum time to record motion pictures continuously with [MP4] is 29 minutes 59 seconds or up to
4 GB. (For [FHD/30p] in [MP4] format, the file size is large and so the recordable time will drop below
29 minutes 59 seconds.)
∫ Playback
Playback time
Approx. 210 min
• The operating times and number of recordable pictures will differ according to the
environment and the operating conditions.
For example, in the following cases, the operating times shorten and the number of recordable
pictures is reduced.
– At low temperature or in cold locations such as ski resorts or at high altitude¢
¢ Residual image may show on the LCD display when in use. The battery performance will
decrease, so keep the camera and spare batteries warm by placing them in a warm place
such as inside your cold protection gear or clothing. Performance of batteries and LCD
monitor will restore to normal when the temperature returns to normal.
– When using [Monitor Luminance].
– When operations such as flash and zoom are used repeatedly.
– When the GPS function is operating.
• When the operating time of the camera becomes extremely short even after properly charging the
battery, the life of the battery may have expired. Buy a new battery.
- 21 -
Preparation
Inserting and Removing the Card (optional)/the
Battery
• Check that this unit is turned off.
• Confirm that there is no foreign object. (P12)
• We recommend using a Panasonic card.
1
1: Slide the [LOCK] switch A, and release
the lock.
2: Slide the release lever B and open the
side door.
• Always use genuine Panasonic batteries.
• If you use other batteries, we cannot guarantee the
quality of this product.
2
Battery: Being careful about the battery
orientation, insert all the way until you hear
a locking sound and then check that it is
locked by lever C. Pull the lever C in the
direction of the arrow to remove the battery.
Card: Push it securely all the way until you
hear a “click” while being careful about the
direction in which you insert it. To remove
the card, push the card until it clicks, then
pull the card out upright.
D: Do not touch the connection terminals of the card.
3
Close the side door until it clicks, and then
lock the [LOCK] switch by sliding it toward
[2].
• Confirm that the red part on the [LOCK] switch is not
showing.
- 22 -
Preparation
• Remove the battery after use. (The battery will be exhausted if left for a long period of time after
being charged.)
• Turn the camera off and wait for the “LUMIX” display on the LCD monitor to clear before removing
the card or battery. (Otherwise, this unit may no longer operate normally and the card itself may be
damaged or the recorded pictures may be lost.)
∫ About the water leakage warning message
To maintain the waterproof performance of this unit, a message prompting to check for any
foreign material inside the side door or to perform maintenance is displayed along with a
warning sound when the following are performed. (P249)
• When this unit is turned on after opening the side door and replacing the card.
• When this unit is turned on after opening the side door and replacing the battery.
• After opening the side door, close it securely taking care not to get any foreign objects caught.
• If foreign objects are present, wipe them off with a dry, lint-free cloth.
• Warning message display can be turned off by pressing any button.
Using an AC adaptor (optional) and a DC coupler (optional) instead of the battery
The AC adaptor (optional) can only be used with the designated
Panasonic DC coupler (optional). The AC adaptor (optional)
cannot be used by itself.
1
2
3
4
Open the side door A.
Insert the DC coupler, being careful of the direction.
Plug the AC adaptor B into an electrical outlet.
Connect the AC adaptor B to the [DC IN] socket C of the DC
coupler.
• Ensure that only the AC adaptor and DC coupler for this camera are used.
Using any other equipment may cause damage.
• Always use a genuine Panasonic AC adaptor (optional).
• When using an AC adaptor, use the AC cable supplied with the AC adaptor.
• Side door cannot be closed while the AC adaptor is connected.
• Some tripods cannot be attached when the DC coupler is connected.
• Do not apply any force to the side door with the weight of the cable or your hand when the AC
adaptor is connected. It may cause damage.
• The DC coupler may get disconnected from this unit if a cable is pulled when connecting the
AC adaptor, so take caution.
• Before removing the DC coupler, turn the camera off and disconnect the AC adaptor.
• Also read the operating instructions for the AC adaptor and DC coupler.
• Waterproof/dustproof function does not operate when the AC adaptor is connected.
- 23 -
Preparation
About the Built-in Memory/the Card
The following operations can be performed using this unit:
When a card has not been inserted
Pictures can be recorded on the built-in memory
and played back.
When a card has been inserted
Pictures can be recorded on the card and
played back.
• When using the built-in memory:
k>ð (access indication¢)
1
• When using the card:
(access indication¢)
¢ The access indication is displayed in red
when pictures are being recorded on the
built-in memory (or the card).
Built-in Memory
• You can copy the recorded pictures to a card. (P172)
• Memory size: Approx. 10 MB
• The access time for the built-in memory may be longer than the access time for a card.
Card
The following cards which conform to the SD video standard can be used with this unit.
(These cards are indicated as card in the text.)
Remarks
SD Memory Card
(8 MB to 2 GB)
SDHC Memory Card
(4 GB to 32 GB)
• Use a card with SD Speed Class¢ with “Class 4” or higher
when recording motion pictures.
• SDHC Memory Cards and SDXC Memory Cards can be used only
with their compatible devices.
• Check that the PC and other equipment are compatible when
SDXC Memory Card
(48 GB, 64 GB)
using the SDXC Memory Cards.
http://panasonic.net/avc/sdcard/information/SDXC.html
• Only the cards with capacity listed left can be used.
¢ SD Speed Class is the speed standard regarding continuous writing. Check via the label on the
card, etc.
e.g.:
• Please confirm the latest information on the following website.
http://panasonic.jp/support/global/cs/dsc/
(This Site is English only.)
- 24 -
Preparation
• Do not turn this unit off, remove its battery or card, or disconnect the AC adaptor (optional)
during access (when pictures are being written, read or deleted, or the built-in memory or the
card is being formatted). Furthermore, do not subject the camera to vibration, impact or static
electricity.
The card or the data on the card may be damaged, and this unit may no longer operate
normally.
If operation fails due to vibration, impact or static electricity, perform the operation again.
• Write-Protect switch A provided (When this switch is set to the [LOCK] position, no
further data writing, deletion or formatting is possible. The ability to write, delete and
format data is restored when the switch is returned to its original position.)
• The data on the built-in memory or the card may be damaged or lost due to
2
electromagnetic waves, static electricity or breakdown of the camera or the card. We
recommend storing important data on a PC, etc.
• Do not format the card on your PC or other equipment. Format it on the camera only to ensure
proper operation. (P61)
• Keep the Memory Card out of reach of children to prevent swallowing.
- 25 -
Preparation
Approximate number of recordable pictures and available recording time
∫ About the display of the number of recordable pictures and available recording time
• Switch the display (number of recordable pictures, available recording time, etc.) by pressing
[DISP.]. (P62)
A Number of recordable pictures
B Available recording time
30p
30p
5
R1m10s
A
B
• The number of recordable pictures and the available recording time are an approximation. (These
vary depending on the recording conditions and the type of card.)
• The number of recordable pictures and the available recording time varies depending on the
subjects.
∫ Number of recordable pictures
• [i99999] is displayed if there are more than 100,000 pictures remaining.
• Aspect ratio [X], Quality [A]
[Picture Size]
Built-in Memory
(Approx. 10 MB)
2 GB
32 GB
64 GB
16M
5M (EZ)
1
3
300
650
4910
10620
9880
21490
0.3M (EZ)
67
10050
162960
247150
- 26 -
Preparation
∫ Available recording time (when recording motion pictures)
• “h” is an abbreviation for hour, “m” for minute and “s” for second.
• [AVCHD]
[Rec Quality]
[FHD/60p/
2 GB
32 GB
64 GB
]
9m00s
2h32m00s
5h08m00s
9m00s
2h32m00s
5h08m00s
]
15m00s
4h10m00s
8h27m00s
15m00s
4h10m00s
8h27m00s
15m00s
4h10m00s
8h27m00s
15m00s
4h10m00s
8h27m00s
[FHD/60p]
[FHD/60i/
[FHD/60i]
[HD/60p/
]
[HD/60p]
• [MP4]
[Rec Quality]
2 GB
32 GB
64 GB
[FHD/30p]
12m26s
3h23m22s
6h51m21s
[HD/30p]
23m45s
6h28m15s
13h05m20s
[VGA/30p]
52m17s
14h14m28s
28h48m24s
• The recordable time is the total time of all the motion pictures which have been recorded.
• Maximum time to record motion pictures continuously with [FHD/60p/ ]/[FHD/60p]/[FHD/60i/ ]/
[FHD/60i] in [AVCHD] is 29 minutes 59 seconds.
• Maximum time to record motion pictures continuously with [MP4] is 29 minutes 59 seconds or up to
4 GB. (For [FHD/30p] in [MP4] format, the file size is large and so the recordable time will drop below
29 minutes 59 seconds.)
• The maximum available continuous recording time is displayed on the screen.
- 27 -
Preparation
Setting Date/Time (Clock Set)
• The clock is not set when the camera is shipped.
1
Press camera [ON/OFF] button.
• If the language select screen is not displayed, proceed
to [Requirements for Underwater use] below.
2
Press [MENU/SET].
3
Press 3/4 to select the language, and press [MENU/SET].
[Requirements for Underwater use]
Be sure to check this so that you can maintain the waterproof performance.
[Please set the clock] is displayed after viewing the last screen.
For details, refer to P11.
4
Press [MENU/SET].
5
Press 2/1 to select the items (year, month,
day, hour, minute, display sequence or time
display format), and press 3/4 to set.
A: Time at the home area
B: Time at the travel destination
• You can cancel without setting the clock by pressing
[Q.MENU/
].
- 28 -
Preparation
6
Press [MENU/SET].
• Confirmation screen is displayed. Press [MENU/SET].
7
Select [Yes] to automatically correct the clock, and then press [MENU/
SET].
• Message screen is displayed. Press [MENU/SET].
8
Press 2/1 to select the home area, and then
press [MENU/SET].
• Confirmation screen to operate the altimeter, barometer
and compass is displayed. Select [Yes] to operate them.
Changing the clock setting
Select [Clock Set] in the [Rec] or [Setup] menu, and press [MENU/SET]. (P48)
• The clock can be reset as shown in steps 5 and 6.
• The clock setting is maintained for 3 months using the built-in clock battery even without the
battery. (Leave the charged battery in the unit for 24 hours to charge the built-in battery.)
• If the clock is not set, the correct date cannot be printed when you order a photo studio to print the
picture, or when you stamp the date on the pictures with [Date Stamp] (P117) or [Text Stamp]
(P160).
• If the clock is set, the correct date can be printed even if the date is not displayed on the screen of
the camera.
• When [GPS Setting] is set to [ON], the GPS function will operate even when this unit is turned
off. When you bring the camera on an airplane or to a hospital, etc., set [Airplane Mode] to
[ON], and turn off the camera because electromagnetic waves, etc. emitted by the camera
may interfere with gauges. (P53)
- 29 -
Preparation
Tips for taking good pictures
Fit the strap and hold the camera carefully
Hold the camera gently with both hands, keep your arms still at your side and
stand with your feet slightly apart.
• To prevent dropping, be sure to attach the supplied strap and fit it to your wrist. (P16)
• Do not swing around or pull forcefully on the unit with the strap attached. The strap may break.
• Be careful not to move the camera when you press the shutter button.
• Be careful not to put your fingers on the flash, AF assist lamp/LED light, microphone, speaker or lens
etc.
A
B
C
D
E
Strap
Flash
AF Assist Lamp/LED light
Microphone
Speaker
∫ Direction Detection Function ([Rotate Disp.])
Pictures recorded with the camera held vertically are played back vertically (rotated). (Only
when [Rotate Disp.] (P60) is set)
• When the camera is held vertically and tilted up and down to record pictures, the Direction Detection
function may not work correctly.
• Motion pictures taken with the camera held vertically are not displayed vertically.
Preventing jitter (camera shake)
When the Jitter alert [
] appears, use [Stabilizer] (P116), a tripod or the Self-timer (P70).
• Shutter speed will be slower particularly in the following cases. Keep the camera still from the
moment the shutter button is pressed until the picture appears on the screen. We recommend using
a tripod.
– Slow sync./Red-Eye Reduction
– [Night Portrait]/[Night Scenery]/[Starry Sky] (Scene Mode)
– When the shutter speed is slowed in [Min. Shtr Speed]
- 30 -
Basic
Selecting the Recording Mode
1
Press [MODE].
2
Press 3/4/2/1 to select the Recording Mode.
3
Press [MENU/SET].
∫ List of Recording Modes
Intelligent Auto Mode (P32)
The subjects are recorded using settings
automatically selected by the camera.
Snow Mode (P80)
This allows you to take pictures that show
the snow as white as possible at a ski resort
or a snow-covered mountain.
Program AE Mode (P36)
The subjects are recorded using your own
settings.
Beach & Snorkeling Mode (P81)
This mode is optimal for taking pictures
underwater and at the beach.
Manual Exposure Mode (P73)
The exposure is adjusted by the aperture
value and the shutter speed which are
manually adjusted.
Advanced Underwater Mode (P83)
This is optimal for taking pictures underwater
deeper than 13 m (43 feet) by the use of the
marine case (DMW-MCFT5: optional).
Creative Control Mode (P75)
Record while checking the image effect.
Panorama Shot Mode (P84)
This mode allows you to take panorama
pictures.
Sports Mode (P80)
Use this mode to take pictures of sporting
events, etc.
Scene Mode (P87)
This allows you to take pictures that match
the scene being recorded.
• When the mode has been switched from Playback Mode to Recording Mode, the previously set
Recording Mode will be set.
- 31 -
Basic
Taking Pictures using the Automatic Function
(Intelligent Auto Mode)
Recording Mode:
The camera will set the most appropriate settings to match the subject and the recording
conditions so we recommend this mode for beginners or those who want to leave the settings
to the camera and take pictures easily.
• The following functions are activated automatically.
– Scene Detection/Backlight Compensation/Intelligent ISO sensitivity control/Auto White Balance/
Face Detection/[Quick AF]/[i.Exposure]/[i.Resolution]/[i.ZOOM]/[AF Assist Lamp]/
[Red-Eye Removal]/[Stabilizer]/[Continuous AF]/[Wind Cut]
• Image quality is fixed to [A].
1
Press [MODE].
1 Shutter button
2
Press 3/4/2/1 to select [Intelligent Auto], and
then press [MENU/SET].
3
Press the shutter button halfway to focus.
• The focus indication A (green) lights when the subject is
focused.
• The AF area B is displayed around the subject’s face by the
Face Detection function. In other cases, it is displayed at the
point on the subject which is in focus.
• The minimal distance (how close you can be to the subject)
will change depending on the zoom factor. Please check
with the recordable range display on the screen. (P37)
• If you press 3 while [AF Tracking] is displayed, you can set
AF tracking. For details, refer to P104. (AF tracking is
canceled by pressing 3 again)
4
Press the shutter button fully (push it in
further), and take the picture.
- 32 -
A B
Basic
Scene Detection
When the camera identifies the optimum scene, the icon of the scene concerned is displayed in
blue for 2 seconds, after which its color changes to the usual red.
When taking pictures
¦
>
[i-Portrait]
[i-Scenery]
[i-Macro]
[i-Night Portrait]¢1
[i-Night Scenery]
[iHandheld Nite Shot]¢2
[i-Sunset]
[i-Baby]¢3
¢1 Only displayed when the flash is set to [
].
¢2 Only displayed when [iHandheld Nite Shot] is set to [ON].
¢3 When [Face Recog.] is set to [ON], [ ] will be displayed for birthdays of registered
faces already set only when the face of a person 3 years old or younger is detected.
When recording motion pictures
¦
>
[i-Portrait]
[i-Scenery]
[i-Low Light]
[i-Macro]
• [¦] is set if none of the scenes are applicable, and the standard settings are set.
• When [ ], [ ] or [ ] is selected, the camera automatically detects a person’s face, and it will
adjust the focus and exposure. (Face Detection)
• If a tripod is used, for instance, and the camera has judged that camera shake is minimal when the
Scene Mode has been identified as [ ], the shutter speed will be set to a maximum of 4 seconds.
Take care not to move the camera while taking pictures.
• When [Face Recog.] is set to [ON], and the face similar to the registered face is detected, [R] is
displayed in the top right of [ ], [ ] and [ ].
• Due to conditions such as the ones below, a different scene may be identified for the same subject.
– Subject conditions: When the face is bright or dark, the size of the subject, the color of the subject,
the distance to the subject, the contrast of the subject, when the subject is moving
– Recording conditions: Sunset, sunrise, under low brightness conditions, underwater, when the
camera is shaken, when zoom is used
• For the best results, it is recommended that you take pictures in the appropriate Recording Mode.
• Face Detection may become slower or it may not detect underwater.
The Backlight Compensation
When there is a backlight, the subject appears darker and the camera will automatically
attempt to correct it by increasing the brightness of the picture.
In Intelligent Auto Mode, backlight compensation works automatically. The [ ] is displayed on
the screen when backlighting is detected. (Depending on the backlighting conditions,
backlighting may not be detected correctly.)
- 33 -
Basic
Changing the settings
Following menus can be set.
Menu
Item
[Rec]
[Picture Size]¢/[Burst]¢/[Time Lapse Shot]/[Color Mode]¢/
[Motion Deblur]/[iHandheld Nite Shot]/[iHDR]/[Face Recog.]
[Motion Picture]
[Rec Format]/[Rec Quality]
[GPS/Sensor]
[GPS Setting]/[Repositioning]/[Sensor Settings]/[GPS Log]/
[GPS Area Select]/[Assist Data]/[Area Info. Set]/[My Landmark]/
[Altimeter]/[Calibrate compass]
[Setup]
[Clock Set]/[World Time]/[Airplane Mode]/[Beep]¢/[LED Light]/
[Language]/[Stabilizer Demo.]
• Menu items other than those listed above are not displayed, but you
can set them in other Recording Modes.
[Wi-Fi]
[New Connection]/[History Connection]/[Favorite Connection]/
[Wi-Fi Setup]
• For the setting method of the menu, refer to P48.
¢ Settings may be different from other Recording Modes.
Menus specific to Intelligent Auto Mode
∫ [Burst] (P111)
[
] can be set in [Burst]. In this setting, the burst speed is automatically adjusted based on
the movement of the subject.
∫ [Color Mode]
Color setting of [Happy] is available in [Color Mode]. It is possible to automatically take a
picture with a higher level of brilliance for the color brightness and vividness.
∫ [Motion Deblur]
When [Motion Deblur] is set to [ON], [ ] is displayed on the recording screen. The camera
automatically sets an optimal shutter speed according to the motion of the subject to reduce
blur on the subject. (In such a case, the number of pixels may be reduced.)
• It is initially set to [ON] on the camera.
∫ [iHandheld Nite Shot]
When [iHandheld Nite Shot] is set to [ON] and [ ] is detected while taking handheld night
shots, pictures of the night scenery will be taken at a high burst speed and composed into a
single picture. This mode is useful if you want to take stunning night shots with minimal jitter
and noise, without using a tripod. If the camera is mounted on a tripod or other type of stand,
[ ] will not be detected.
• It is initially set to [ON] on the camera.
- 34 -
Basic
∫ [iHDR]
When [iHDR] is set to [ON] and there is, for example, strong contrast between the background
and the subject, multiple still pictures are recorded with differing exposures and combined to
create a single still picture rich in gradation.
• It is initially set to [ON] on the camera.
• When [ ] is displayed on the screen but not otherwise, the iHDR function will work automatically as
required.
• In the case that a single picture is going to be composed from a burst, a message indicating that
multiple pictures are to be recorded appears on the screen and burst recording is carried out. Note
that burst recording will not take place if the camera determines that it can compensate for the
difference in contrast without composing the picture from a burst.
• In the case of composition from a burst, ghost images may appear if the subject was moving.
• In the following cases, a combined picture is not created.
– When the zoom factor exceeds 4.6k.
– When recording in [Burst].
– When the flash is activated
About the flash (P66)
• When [
] is selected, [
], [
], [
] or [
] is set depending on the type of subject and
brightness.
• When [
], [
] is set, [Red-Eye Removal] is enabled.
• Shutter speed will be slower during [
] or [
].
- 35 -
Basic
Taking Pictures with Your Favorite Settings
(Program AE Mode)
Recording Mode:
The camera automatically sets the shutter speed and the aperture value according to the
brightness of the subject.
You can take pictures with greater freedom by changing various settings in the [Rec] menu.
1
Press [MODE].
1 Shutter button
2
Press 3/4/2/1 to select [Program AE], and
then press [MENU/SET].
3
Aim the AF area at the point you want to focus on.
4
Press the shutter button halfway to focus and
then press it fully to take the picture.
A ISO sensitivity
B Aperture value
C Shutter speed
ISO
100
• Aperture value and shutter speed is displayed in red when
correct exposure is not achieved. (Except when using a
flash)
- 36 -
F3.3
1/60
AB C
Basic
Focusing
A
Aim the AF area at the subject, and then press the
shutter button halfway.
ISO
100
When the subject is focused
Focus
F3.3
B
1/60
When the subject is not
focused
Focus indication A
On
Blinks
AF area B
White>Green
White>Red
Sound
Beeps 2 times
Beeps 4 times
• The AF area may be displayed larger for certain zoom magnifications and in dark places.
∫ About focus range
The focus range is displayed when operating the zoom.
• The focus range is displayed in red when it is not focused after pressing the
shutter button halfway.
The focus range may change gradually depending on the zoom position.
e.g.: Range of focus during the Intelligent Auto Mode
30 cm (0.98 feet)
T
W
5 cm (0.16 feet)
- 37 -
0.16ft. W
∞
T 1X
Basic
∫ When the subject is not in focus (such as when it is not in the center of the
composition of the picture you want to take)
1
2
Aim the AF area at the subject, and press the
shutter button halfway to fix the focus and
exposure.
Press and hold the shutter button halfway
while moving the camera as you compose the
picture.
• You can repeatedly retry the actions in step 1 before pressing the shutter button fully.
∫ Subject and recording conditions which are difficult to focus in
• Fast-moving subjects, extremely bright subjects or subjects without contrast
• When recording subjects through windows or near shiny objects
• When it is dark or when jitter occurs
• When the camera is too close to the subject or when taking a picture of both distant and near
subjects
- 38 -
Basic
Recording Motion Pictures
Applicable modes:
This can record full high definition motion pictures compatible with the AVCHD format or motion
pictures recorded in MP4.
Audio will be recorded in stereo.
1
Start recording by pressing the motion
picture button.
A Available recording time
B Elapsed recording time
• You can record motion pictures fitting each Recording
A
Mode.
• Release the motion picture button right after you press
it.
R1m07s
• The recording state indicator (red) C will flash while
recording motion pictures.
• For the setting of the [Rec Format] and [Rec Quality],
refer to P118.
2
3s
B C
Stop the recording by pressing the motion
picture button again.
- 39 -
Basic
∫ About the recording format for recording motion pictures
This unit can record motion pictures in either AVCHD or MP4 formats.
AVCHD:
You can record high definition quality images with this format. It is suitable for viewing on a
large format TV or for saving to disc.
AVCHD Progressive:
The [FHD/60p/ ]/[FHD/60p] in [AVCHD] is a mode that allows motion pictures to be recorded
at 1920k1080/60p, the highest quality¢ that complies with the AVCHD standard.
Recorded motion pictures can be saved and played back using this unit or
“PHOTOfunSTUDIO”.
¢ This means the highest quality for this unit.
MP4:
This recording format saves a motion picture as a single file which is suitable for editing on a
PC or uploading to WEB services.
∫ About the compatibility of the recorded motion pictures
Motion pictures recorded in [AVCHD] or [MP4] may be played back with poor picture or sound
quality or playback may not be possible even when played back with equipment compatible
with these formats. Also, the recording information may not be displayed properly. In this case,
use this unit.
• For details on AVCHD Progressive and MP4 compatible devices, refer to the support sites below.
http://panasonic.jp/support/global/cs/dsc/
(This Site is English only.)
• When a motion picture is recorded in a high temperature environment or is recorded continuously,
the recording may stop after [
] is displayed to protect this unit.
• The available recording time displayed on the screen may not decrease regularly.
• Depending on the type of the card, the card access indication may appear for a while after recording
motion pictures. This is not a malfunction.
• The screen may be blacked out momentarily, or the unit may record noise due to static electricity or
electromagnetic waves, etc. depending on the environment of the Motion Picture Recording.
• Even if the aspect ratio setting is the same in still pictures and motion pictures, the angle of view may
change at the start of the motion picture recording.
When [Video Rec Area] (P55) is set to [ON], angle of view during motion picture recording is
displayed.
• About zooming while recording motion pictures
– If the Extended Optical Zoom was used before pressing the motion picture button, settings will be
canceled, and the recordable range will change drastically.
– If you operate the zoom etc. while recording motion pictures, the sound of the operation may be
recorded.
– The zoom speed will be slower than usual when recording motion pictures.
– Operating the zoom while recording motion pictures can take time for the image to come into
focus.
- 40 -
Basic
• If you end motion picture recording after a short time when using [Miniature Effect] of the Creative
Control Mode, the camera may go on recording for a certain period. Please continue to hold the
camera until the recording finishes.
• Stereo effects may not be obtained underwater.
• Noise may be recorded underwater.
• It is recommended to use a fully charged battery or AC adaptor (optional) when recording motion
pictures.
• If while recording motion pictures using the AC adaptor (optional) and the power supply is cut off due
to a power outage or if the AC adaptor (optional) is disconnected, etc., the motion picture being
recorded will not be recorded.
• Motion pictures cannot be recorded in the following cases.
– Built-in Memory
– [Soft Focus]/[Star Filter] (Creative Control Mode)
– [3D Photo Mode] (Scene Mode)
– When using [Time Lapse Shot]
• A sound might be muffed or warped when there is water on the microphone or the speaker. Wipe the
residue after letting the water drip out from the microphone and speaker by tipping it down, and use
it only after letting it dry for a while. (P237)
• It will be recorded in following categories for certain Recording Modes. A motion picture recording
matching each Recording Mode will be performed for the ones not listed below.
Selected Recording Mode
Recording Mode while recording motion picture
• Program AE Mode
• Manual Exposure Mode
• Sports Mode
• [HDR]/[Pet] (Scene Mode)
Normal Motion Picture
• [Baby1]/[Baby2] (Scene Mode)
Portrait Mode
• [Night Portrait]/[Night Scenery]/[Handheld
Low Light Mode
Night Shot]/[Starry Sky] (Scene Mode)
- 41 -
Basic
Playing Back
1
Press [(].
2
Press 2/1 to select pictures.
A
A File number
B Picture number
• If you press and hold 2/1, you can play back the pictures in
succession.
• Speed of picture Forwarding/Rewinding changes depending
on the playback status.
100-0001
B
1/5
∫ Playing Back Motion Pictures
Select a picture with a Motion Picture icon (such as [
and then press 3 to play back.
C Motion picture icon
D Motion picture recording time
]),
D
C
30p
3s
• If you have filtered images for playback by using [Slide Show]
(P147) or [Filtering Play] (P149), the selection screen appears.
Press 3/4 to select [Play Video], and then press [MENU/SET].
• After playback starts, the elapsed playback time is displayed on
the screen.
For example, 8 minutes and 30 seconds is displayed as [8m30s].
• Some information (recording information, etc.) is not displayed for motion pictures recorded in
[AVCHD].
• Operations performed during Motion Picture Playback
3
Play/Pause
4
Stop
2
Fast rewind¢/
Frame-by-frame rewind (while pausing)
1
Fast forward¢/
Frame-by-frame forward (while pausing)
¢ The fast forward/rewind speed increases if you press 1/2 again.
– You can adjust the volume with the zoom button.
- 42 -
Basic
• When the camera is turned off, press and hold [(]. If you turn it on this way, the playback screen
will be displayed automatically.
• This camera complies with the DCF standard “Design rule for Camera File system” established by
JEITA “Japan Electronics and Information Technology Industries Association” and with Exif
“Exchangeable Image File Format”. Files that do not comply with the DCF standard cannot be
played back.
• Images recorded with other camera may not be able to play back on this unit.
• This unit was designed to play motion pictures using the AVCHD, MP4 and QuickTime Motion JPEG
formats.
• When using a high capacity card, it is possible that fast rewinding may be slower than usual.
• To play back the motion pictures recorded by this unit on a PC, use the “PHOTOfunSTUDIO”
software on the CD-ROM (supplied).
• Be careful not to block the speaker of the camera during playback.
Displaying Multiple Screens (Multi Playback)
Press [L] (W) on the zoom button.
1/26
1 screen>12 screens>30 screens>Calendar screen
display
A Number of the selected picture and the total number of
recorded pictures
• Press [Z] (T) on the zoom button to return to the previous screen.
• Pictures displayed using [ ] cannot be played back.
∫ To return to Normal Playback
Press 3/4/2/1 to select a picture and then press [MENU/SET].
Using the Playback Zoom
Press [Z] (T) on the zoom button.
1k>2k>4k>8k>16k
• When you press [L] (W) on the zoom button after enlarging the
2X
picture, the magnification becomes lower.
• When you change the magnification, the zoom position indication
B appears for about 2 seconds, and the position of the enlarged
section can be moved by pressing 3/4/2/1.
• The more a picture is enlarged, the more its quality deteriorates.
- 43 -
B
A
Basic
Creating Still Pictures from a Motion Picture
You can create a single still picture from a recorded motion picture.
1
Press 3 to pause motion picture playback.
2
Press [MENU/SET].
• Confirmation screen is displayed. It is executed when [Yes] is selected.
Exit the menu after it is executed.
• The picture is saved with the following recording sizes.
Recording format
[AVCHD]
Picture size
2 M (16:9)
[FHD/30p]/[HD/30p]
2 M (16:9)
[VGA/30p]
0.3 M (4:3)
[MP4]
• You may not be able to save still pictures from a motion picture taken on other equipment.
• Still pictures created from a motion picture may be coarser than with normal picture quality.
Playing Back Group Pictures
The following pictures can be saved as a single Picture Group consisting of multiple pictures.
The Picture Group can be played back continuously or one picture at a time.
[˜]:
[ ]:
A picture group
A picture group
consisting of pictures
consisting of pictures
taken in a single Time
taken in the Burst Mode
Lapse Shot. (P113)
with the burst speed
[ 40 ], [ 60 ]. (P111)
• You can edit or delete all pictures in a group at once. (For example, if you delete a picture group, all
pictures in the group are deleted.)
• Pictures recorded after the number of pictures has exceeded 50000 will not be grouped.
• Pictures recorded on other cameras may not be recognized as a Picture Group.
• Pictures will not be grouped if recorded without setting the clock.
- 44 -
Basic
Continuously playing back Group Pictures
Select a picture with the group picture icon ([˜], [
]), and then press 3.
• If you have filtered images for playback by using [Slide Show] (P147) or [Filtering Play] (P149), the
selection screen appears. Press 3/4 to select [Burst Play]/[Sequential Play], and then press
[MENU/SET].
∫ Operations during Group Pictures playback
3
Continuous playback/Pause
4
Stop
2
Fast rewind, Rewind (while pausing)
1
Fast forward, Forward (while pausing)
Playing back each Group Pictures
1
Select a picture with the group picture icon ([˜], [
then press 4.
2
Press 2/1 to select the picture.
• Press 4 again to return to the normal playback screen.
• Operations similar to those for Normal Play can be used on the
]), and
pictures in the group. (Multi playback, playback zoom, deleting the
pictures, etc.)
• If you delete all pictures except one in the group, that picture will be saved as a single picture.
- 45 -
Basic
Deleting Pictures
Once deleted, pictures cannot be recovered.
• Pictures on the built-in memory or the card that are being played back will be deleted.
• Pictures that are not in the DCF standard or those that are protected cannot be deleted.
To delete a single picture
Select the picture to be deleted, and then press
[ ].
• Confirmation screen is displayed.
Picture is deleted by selecting [Yes].
- 46 -
Basic
To delete multiple pictures (up to 100) or all the pictures
1
Press [
2
Press 3/4 to select [Delete Multi] or
[Delete All] and then press [MENU/SET].
].
• [Delete All] > Confirmation screen is displayed.
Pictures are deleted by selecting [Yes].
• It is possible to delete all pictures except the ones set
as favorite when [All Delete Except Favorite] is
selected with the [Delete All] set.
3
(When [Delete Multi] is selected) Press 3/
4/2/1 to select the picture, and then
press [DISP.] to set. (Repeat this step.)
1
2
3
4
5
6
•[
] appears on the selected pictures. If [DISP.] is
pressed again, the setting is canceled.
4
(When [Delete Multi] is selected) Press [MENU/SET].
• Confirmation screen is displayed.
Pictures are deleted by selecting [Yes].
• Picture groups are treated as a single picture. (All the pictures in the selected picture group will be
deleted.) (P44)
• Do not turn the camera off while deleting. Use a battery with sufficient battery power or the AC
adaptor (optional).
• Depending on the number of pictures to be deleted, it may take some time to delete them.
- 47 -
Basic
Setting the Menu
The camera comes with menus that allow you to choose the settings for taking pictures and
playing them back just as you like and menus that enable you to have more fun with the
camera and use it more easily.
In particular, the [Setup] menu contains some important settings relating to the camera’s clock
and power. Check the settings of this menu before proceeding to use the camera.
Setting menu items
Example:
In the [Rec] menu, change [AF Mode] from [Ø] ([1-Area]) to [š] ([Face Detection])
1
Press [MENU/SET].
2
Press 3/4/2/1 to select menu and then press
[MENU/SET].
Menu
Description of settings
[Rec] (P95 to 117)
(Recording Mode only)
This menu lets you set the Coloring, Sensitivity, Aspect
Ratio, Number of pixels and other aspects of the
pictures you are recording.
[Motion Picture] (P118 to 120)
(Recording Mode only)
This menu lets you set the [Rec Format],
[Rec Quality], and other aspects for motion picture
recording.
[Playback] (P156 to 172)
(Playback Mode only)
This menu lets you set the Protection, Cropping or
Print Settings, etc. of recorded pictures.
[GPS/Sensor] (P121 to 145)
This menu lets you adjust the altimeter and depth
meter or display the current location information using
the GPS function.
[Setup] (P50 to 61)
This menu lets you perform the clock settings, beep
tone settings and other settings which make it easier
for you to operate the camera.
[Wi-Fi] (P175 to 212)
This menu lets you make the settings necessary to
connect to Wi-Fi or use the Wi-Fi function.
- 48 -
Basic
3
Press 3/4 to select the menu item and then
press [MENU/SET].
A
A Menu screen page
• It will switch to next page when you reach the bottom. (It will
also switch by pressing the zoom button)
4
Press 3/4 to select the setting and then press
[MENU/SET].
• Depending on the menu item, its setting may not appear or it
may be displayed in a different way.
∫ Close the menu
Press [Q.MENU/ ] until the screen returns to the
recording/playback screen or press the shutter button
half-way.
• There are functions that cannot be set or used depending on the modes or menu settings being
used on the camera due to the specifications.
Using the Quick Menu
By using the Quick Menu, some of the menu settings can be easily found.
• The features that can be adjusted using Quick Menu are determined by the mode or a display style
the camera is in.
1
Press [Q.MENU/
2
Press 3/4/2/1 to select the menu item and
the setting and then press [MENU/SET] to close
the menu.
] when recording.
- 49 -
Basic
About the Setup Menu
For details on how to select the [Setup] menu settings, refer to P48.
• [Clock Set], [Economy] and [Auto Review] are important items. Check their settings before using
them.
• In Intelligent Auto Mode, only [Clock Set], [World Time], [Airplane Mode], [Beep]¢, [LED Light],
[Language], [Stabilizer Demo.] can be set.
¢ Available settings may be different from other Recording Modes.
[Precautions]
To maintain waterproof performance, display the things you need to
check before use.
• Refer to P11 for details.
U [Clock Set]
Setting Date/Time.
• Refer to P28 for details.
The clock is updated automatically using the GPS function.
[Auto Clock Set]
[ON]:
This unit receives the date and time information from the GPS
satellites and automatically corrects the time for the current location.
[OFF]
• If [ON] is selected, the settings screen will be displayed. Press [MENU/SET], and perform the
operation of step 8 in “Setting Date/Time (Clock Set)” (P28). (first time only)
• When [Auto Clock Set] is set to [ON], [World Time] (P51) is set to [Destination] automatically.
• It is fixed to [OFF] when [GPS Setting] is set to [OFF].
• The date and time corrected with [Auto Clock Set] are not as accurate as the radio clock. If it cannot
correct accurately, reset the clock using [Clock Set].
- 50 -
Basic
Set the time in your home area and travel destination.
You can display the local times at the travel destinations and record
them on the pictures you take.
After selecting [Destination] or [Home], press 2/1 to select an
area, and press [MENU/SET] to set.
• Set [Home] first thing after purchasing. [Destination] can be set after
setting up [Home].
[World Time]
“ [Destination]:
Travel destination area
A Current time of the destination area
B Time difference from home area
– [Home]:
Your home area
A
B
C
C Current time
D Time difference from GMT (Greenwich
Mean Time)
• Press 3 if you are using Summer Time [
D
]. (The time will move forward by 1 hour.) Press 3
once more to return to the normal time.
• If you cannot find the travel destination in the areas displayed on the screen, set by the time
difference from the home area.
• When the [Auto Clock Set] is set to [ON], you can change Summer Time setting in [Destination] only.
- 51 -
Basic
Departure date and return date of the travel as well as the name of the
travel destination can be set.
You can display the number of days that have passed when playing
back the pictures and stamp it on the recorded pictures with [Text
Stamp] (P160).
[Travel Setup]:
[SET]:
Departure date and return date are set. Elapsed days (how many
days after) of the travel are recorded.
— [Travel Date]
[OFF]
• The travel date is automatically canceled if the current date is after the
return date. If the [Travel Setup] is set to [OFF], [Location] will also be set
to [OFF].
[Location]:
[SET]:
Travel destination is recorded at the time of recording.
[OFF]
• For details on how to enter characters, refer to “Entering Text” on P94.
• The number of days that have passed since the departure date can be printed out using the
“PHOTOfunSTUDIO” bundled software on the CD-ROM (supplied).
• The travel date is calculated using the date in the clock setting and the departure date you set. If you
set [World Time] to the travel destination, the travel date is calculated using the date in the clock
setting and the travel destination setting.
• The travel date setting is memorized even if the camera is turned off.
• The number of days that have passed since the departure date is not recorded before the departure
date.
• [Location] is stored separately from the location name information stored in pictures with the GPS
function.
• For motion pictures recorded using [FHD/60p]/[FHD/60i]/[HD/60p] in [AVCHD], [Travel Date] cannot
be set.
• [Travel Date] cannot be set in the Intelligent Auto Mode. Setting of other Recording Mode will be
reflected.
- 52 -
Basic
Restricts GPS/Sensor/Wi-Fi/NFC settings.
[Airplane Mode]
[ON]:
Wi-Fi and NFC functions cannot be used.
Furthermore, when this unit is turned off, GPS positioning and
compass/altimeter/barometer do not work.
[OFF]
• When you bring the camera on an airplane or to a hospital, etc., set
[Airplane Mode] to [ON], and turn off the camera because electromagnetic
waves, etc. emitted by the camera may interfere with gauges.
This allows you to set the beep and shutter sound.
r [Beep Level]:
[t]
r [Beep]
[Shutter Vol.]:
([Low])
[
[u] ([High])
[
] ([High])
[s]
[
] ([OFF])
([OFF])
[Beep Tone]:
[
1
]/[
2
]/[
3
] ([Low])
[Shutter Tone]:
]
[
1
]/[
2
]/[
3
]
u [Speaker Volume] Adjust the volume of the speaker to any of 7 levels.
• When you connect the camera to a TV, the volume of the TV speakers does not change. Also, when
connected, no sound is output from the camera speakers.
Brightness, color, or red or blue tint of the LCD monitor is adjusted.
[Brightness]:
Adjust the brightness.
[Contrast · Saturation]:
Adjust the contrast or clarity of colors.
[Monitor Display]
[Red Tint]:
Adjust the red tint.
[Blue Tint]:
Adjust the blue tint.
1
2
Select the settings by pressing 3/4, and adjust with 2/1.
Press [MENU/SET] to set.
• Some subjects may appear differently from actuality on the LCD monitor. However, this does not
affect the recorded pictures.
- 53 -
Basic
These menu settings make it easier to see the LCD monitor when you
are in bright places.
[„] ([Auto Power Monitor])¢:
The brightness is adjusted automatically depending on how bright it is
around the camera.
[Monitor Luminance]
[…] ([Power Monitor]):
The LCD monitor becomes brighter and easier to see even when
taking pictures outdoors.
[OFF]
¢ Can be set only when Recording Mode is set.
• The brightness of the pictures displayed on the LCD monitor is increased so some subjects may
appear different from real life on the LCD monitor. However, this does not affect the recorded
pictures.
• The LCD monitor automatically returns to normal brightness if no operations are preformed for
30 seconds when recording in [Power Monitor]. Press any button to make the LCD monitor bright
again.
• When [Monitor Luminance] is set, the usage time is reduced.
[Guide Line]
Set the pattern of the guidelines displayed when taking pictures. You
can also set whether or not to have the recording information
displayed when the guidelines are displayed. (P62)
[Rec. Info.]:
[ON]/[OFF]
[Pattern]:
[ ]/[
]
• When you align the subject on the horizontal and vertical guidelines or the cross point of these lines,
you can take pictures with well-designed composition by viewing the size, the slope and the balance
of the subject.
• The guideline is not displayed in the Panorama Shot Mode.
- 54 -
Basic
This allows you to set either to display or not display the histogram.
[ON]/[OFF]
[Histogram]
A Histogram is a graph that displays brightness along
the horizontal axis (black to white) and the number of
pixels at each brightness level on the vertical axis.
It allows you to easily check a picture’s exposure.
A dark
B optimal
C bright
• When the recorded picture and the histogram do not match each other under the following
conditions, the histogram is displayed in orange.
– When the Manual Exposure Assistance is other than [n0 EV] during exposure compensation or in
the Manual Exposure Mode
– When the flash is activated
– When the brightness of the screen is not correctly displayed in dark places
– When the exposure is not adequately adjusted
• The Histogram is an approximation in Recording Mode.
• The Histogram of a picture may not match in the Recording Mode and the Playback Mode.
• The Histogram displayed in this camera does not match Histograms displayed by picture editing
software used in PCs, etc.
• Histograms are not displayed in the following cases.
– Intelligent Auto Mode
– Multi Playback
– Recording motion pictures
– Playback Zoom
– Calendar
– When HDMI micro cable is connected
Angle of view for Motion Picture Recording can be checked.
[Video Rec Area]
[ON]/[OFF]
• Motion picture recording area display is only an approximation.
• Recording area display may disappear when zooming to Tele depending on the picture size setting.
• It will be fixed to [OFF] during the Intelligent Auto Mode.
- 55 -
Basic
This will illuminate the subject with a lamp when taking motion pictures
in dark surrounding.
Also, the LED can also be used as a simple light when necessary.
[
] ([On]):
LED light A is turned on continuously while
recording motion pictures.
[LED Light]
To use a simple light
If you set to [
], and press and hold down 1 (‰)
on the recording standby screen, the LED light will come on for
60 seconds. The LED light can be conveniently used as a simple light
when you wish to illuminate your immediate surroundings in a dark
location.
To turn off the light at any time, press [Q.MENU/ ].
[
] ([Off])
• Maximum illuminating range of the LED light is 50 cm (1.6 feet).
• The life of battery will decrease when the LED light is turned on constantly.
• In locations where the use of light is prohibited, set to [
].
• It is fixed to [
] in the following cases.
– Advanced Underwater Mode
– Panorama Shot Mode
– [Baby1]/[Baby2]/[3D Photo Mode] (Scene Mode)
• It is not available in Playback Mode.
- 56 -
Basic
The camera is automatically turned off if the camera has not been
used for the time selected on the setting.
Also, the battery life is conserved by dimming the LCD monitor.
p [Auto Power Off]:
The camera is automatically turned off if the camera has not been
used for the time selected on the setting.
q [Economy]
[2MIN.]/[5MIN.]/[10MIN.]/[OFF]
ECO
[Monitor Power Save]:
The brightness of the LCD monitor is lowered.
Battery life will be conserved by lowering the image quality of the LCD
monitor even further during recording (excludes the digital zoom
range). Note that this does not affect the quality of the recorded
images.
[ON]/[OFF]
• [Auto Power Off] is set to [5MIN.] in the Intelligent Auto Mode.
• [Auto Power Off] does not work in the following cases.
– When using the AC adaptor
– When connecting to a PC or a printer
– When recording or playing back motion pictures
– During a Slide Show
– When using [Time Lapse Shot]
• The effect of the [Monitor Power Save] is lower in the Digital Zoom range compared to the Optical
Zoom range.
• [Monitor Luminance] settings take priority, even if [Monitor Power Save] has been set.
- 57 -
Basic
Set the length of time that the picture is displayed after taking the still
picture.
[1 SEC]
o [Auto Review]
[2 SEC]
[HOLD]:
The pictures are displayed until one of the buttons is pressed.
[OFF]
• [Auto Review] is activated regardless of its setting in the following cases.
– When using Auto Bracket
– When using [Burst]
• The Auto Review function is fixed to [2 SEC] in the following case.
– Intelligent Auto Mode
• [Auto Review] does not work in the following cases.
– When using [Time Lapse Shot]
– When recording motion pictures.
v [No.Reset]
Reset the file number of the next recording to 0001.
• The folder number is updated and the file number starts from 0001.
• A folder number between 100 and 999 can be assigned.
When the folder number reaches 999, the number cannot be reset. We recommend formatting the
card (P61) after saving the data on a PC or elsewhere.
• To reset the folder number to 100, format the built-in memory or the card first and then use this
function to reset the file number.
A reset screen for the folder number will then appear. Select [Yes] to reset the folder number.
w [Reset]
The [Rec] or [Setup] menu settings are reset to the initial settings.
• When the [Rec] menu settings are reset during recording, the operation that resets the lens is also
performed at the same time. You will hear the sound of the lens operating but this is normal and not
indicative of malfunctioning.
• When the [Rec] menu settings are reset, data registered with [Face Recog.] will be also reset.
• When [Setup] menu settings are reset, the following settings are also reset.
– The birthday and name settings for [Baby1]/[Baby2] and [Pet] in Scene Mode
– [GPS/Sensor] menu
– The settings of [Travel Date] (departure date, return date, location)
– The [World Time] setting
• The folder number and the clock setting are not changed.
- 58 -
Basic
Reset all settings in the [Wi-Fi] menu to factory default settings.¢
[Reset Wi-Fi Settings]
• Always reset the camera when disposing or selling it to prevent personal information saved within
the camera from being misused.
• Always reset the camera after making a copy of personal information when sending the camera in to
be repaired.
¢ (Excluding [LUMIX CLUB]) (P209)
Select the USB communication system after or before connecting the
camera to your PC or your printer with the USB connection cable
(supplied).
Updates GPS assist data when connected to a PC.
x [USB Mode]
[y] ([Select on connection]):
Select either [PC] or [PictBridge(PTP)] if you connected the camera to
a PC or a printer supporting PictBridge.
[{] ([PictBridge(PTP)]):
Set after or before connecting to a printer supporting PictBridge.
[z] ([PC]):
Set after or before connecting to a PC.
[
] ([GPS assist data]):
Set this when connecting to a PC and updating GPS assist data.
Set to match the type of TV.
[
| [Output]
] ([TV Aspect]):
[W]:
When connecting to a 16:9 screen TV.
[X]:
When connecting to a 4:3 screen TV.
• This will work when the AV cable (optional) is connected.
- 59 -
Basic
Setup so this unit can be controlled by the remote control of the VIERA
by automatically coupling this unit with the VIERA Link compatible
equipment using HDMI micro cable (optional).
[VIERA Link]
[ON]:
Remote control operation of the VIERA Link compatible equipment is
enabled. (Not all operations are possible)
Button operation of the main unit will be limited.
[OFF]:
Operation is performed with the buttons on this unit.
• This will work when the HDMI micro cable (optional) is connected.
• Refer to P215 for details.
Setup the output method for 3D pictures.
[
]:
Set when connecting to a 3D compatible television.
[3D Playback]
[
]:
Set when connecting to a television not compatible with 3D.
Set this when you would like to view pictures in 2D (conventional
image) on a 3D compatible television.
• This will work when the HDMI micro cable (optional) is connected.
• Refer to P217 for the method to play back 3D pictures in 3D.
This mode allows you to display pictures vertically if they were
recorded holding the camera vertically.
[
M [Rotate Disp.]
] ([On]):
Rotate pictures on a TV and the LCD monitor so that they are
displayed vertically.
[
] ([External Only]):
Pictures are displayed vertically by rotating when played back on TV.
[OFF]
• Refer to P42 for information about how to play back pictures.
• When you play back pictures on a PC, they cannot be displayed in the rotated direction unless the
OS or software is compatible with Exif. Exif is a file format for still pictures which allows recording
information, etc. to be added. It was established by “JEITA (Japan Electronics and Information
Technology Industries Association)”.
• It may not be possible to rotate pictures that have been recorded with other equipment.
• Pictures are not rotated during Multi Playback.
- 60 -
Basic
[Version Disp.]
It is possible to check which version of firmware is on the camera.
• Press [MENU/SET] on the version display screen to display information about the software on the
unit.
[Format]
The built-in memory or card is formatted. Formatting irretrievably
deletes all the data so check the data carefully before formatting.
• Use a battery with sufficient battery power or the AC adaptor (optional) when formatting. Do not turn
the camera off during formatting.
• If a card has been inserted, only the card is formatted. To format the built-in memory, remove the
card.
• If the card has been formatted on a PC or other equipment, format it on the camera again.
• It may take longer to format the built-in memory than the card.
• If the built-in memory or the card cannot be formatted, consult Panasonic.
For USA and Puerto Rico assistance, please call:
1-800-211-PANA(7262) or, contact us via the web at:
http://www.panasonic.com/contactinfo
~ [Language]
For Canadian assistance, please call:
1-800-99-LUMIX (1-800-995-8649)
Set the language displayed on the screen.
• If you set a different language by mistake, select [~] from the menu icons to set the desired
language.
Displays the amount of jitter the camera has detected.
A Amount of jitter
B Amount of jitter after correction
[Stabilizer Demo.]
A
B
• The Stabilizer function is switched between [On] and [Off] every time [MENU/SET] is pressed.
• [Stabilizer Demo.] is an approximation.
- 61 -
Recording
About the LCD Monitor
Press [DISP.] to change.
1 LCD monitor
• When the menu screen appears, the [DISP.] button is not activated.
During Playback Zoom, motion picture playback, sequential
playback, panorama playback or a slide show, you can only select
“Normal display G” or “No display K”.
In Recording Mode
A
B
C
10
30p
30p
5
R1m10s
0ft
N
N
5
0
-5
-10
2
N
00' 00' 00.00
E
000' 00' 00.00
GPS
10:00 DEC.1
10:00 DEC.1.2013
1013hPa
-24H
0H
3
F
E
D
6000ft
0ft
-12H
A Normal display
0H
¢1
B Normal display¢1
C Environment information¢2
D Altimeter log¢3
E No display
F No display (Recording guide line)¢1
2 Number of recordable pictures
3 Available recording time
¢1 If the [Histogram] in [Setup] menu is set to [ON], histogram will be displayed.
¢2 If the [Sensor Settings] in [GPS/Sensor] menu is set to [ON], the environment information
measured by the compass, altimeter, and barometer is displayed. Also if the [GPS Setting] is set
to [ON], the latitude/longitude is displayed.
¢3 If the [Logging] of [Altimeter] in [GPS/Sensor] menu is set to [ON], a graph displaying an altimeter
log is displayed.
- 62 -
Recording
In Playback Mode
G
H
I
10
100-0001
100-0001
1/2
0ft
N
1/2
5
0
-5
AWB
'(&
5HWRXFK
ISO
100
F3.3
1/60
5HWRXFK
-10
N
E
10:00
K
00' 00' 00.00
000' 00' 00.00
DEC.1.2013
J
6000ft
0ft
G Normal display
H Display with recording information¢1
I Environment information
J Altimeter log
K No display¢2
¢1 If the [Histogram] in [Setup] menu is set to [ON], histogram will be displayed.
¢2 Name of the registered person in [Face Recog.] is displayed when [DISP.] is pressed.
- 63 -
1013hPa
Recording
Using the Zoom
Applicable modes:
You can zoom in to make people and objects appear closer or zoom out to record landscapes
in wide angle.
To make subjects appear further away use (Wide)
Press [W] on the zoom button.
To make subjects appear closer use (Tele)
Press [T] on the zoom button.
∫ Screen display
Example of display when Extended Optical Zoom (EZ), Intelligent Zoom and Digital Zoom are
used together.
A
B
C
D
E
Extended Optical Zoom indication
Optical Zoom range
Intelligent Zoom range
Digital Zoom range
Zoom magnification (approximation)
• When using the Zoom function, an estimate of the focus range will appear in conjunction
with the zoom display bar. [Example: 0.3 m (0.98 ft.) –¶]
Optical Zoom
Zooms in without deteriorating the image quality.
Maximum magnification: 4.6k
- 64 -
Recording
Extended Optical Zoom (EZ)
This function works when any of the picture sizes (P96) indicated with
is selected. You can
zoom in further than you can with the Optical Zoom without deteriorating the image quality.
Maximum magnification: 10.5k
(This includes the optical zoom magnification. The magnification level differs depending
on [Picture Size] setting.)
• “EZ” is an abbreviation of “Extended Optical Zoom”.
• This function is not available in the following cases:
– In Macro Zoom Mode
– [Toy Effect] (Creative Control Mode)
– [HDR]/[High Sens.]/[3D Photo Mode] (Scene Mode)
– When [Burst] in the [Rec] menu is set to [ 40 ], [ 60 ] or [
– When recording motion pictures
]
Intelligent Zoom
This function works when [i.Resolution] (P110) in the [Rec] menu is set to [i.ZOOM]. You can
zoom in up to twice the original zoom magnification while minimizing the deterioration of the
image quality.
• This will work automatically in Intelligent Auto Mode.
• This function is not available in the following cases:
– In Macro Zoom Mode
– [Toy Effect] (Creative Control Mode)
– [Handheld Night Shot]/[HDR]/[High Sens.]/[3D Photo Mode] (Scene Mode)
– When [Burst] in the [Rec] menu is set to [ 40 ], [ 60 ] or [ ]
Digital Zoom
This function works when [Digital Zoom] (P110) in the [Rec] menu is set to [ON]. Although the
image quality deteriorates every time you zoom in further, you can zoom in up to four times the
original zoom magnification.
• When using the [i.ZOOM], the maximum magnification of the Digital Zoom is set to 2k.
• We recommend using a tripod and the Self-timer (P70) for taking pictures.
• This function is not available in the following cases:
– Intelligent Auto Mode
– [Toy Effect]/[Miniature Effect] (Creative Control Mode)
– [Handheld Night Shot]/[HDR]/[High Sens.]/[3D Photo Mode] (Scene Mode)
– When [Burst] in the [Rec] menu is set to [ 40 ], [ 60 ] or [ ]
- 65 -
Recording
Taking Pictures Using the Built-in Flash
Applicable modes:
A Photo flash
Do not cover the flash with your fingers or other objects.
Switching to the appropriate flash setting
Set the flash to match the recording.
1
2
Press 1 [‰].
Press 3/4 to select the item and then press
[MENU/SET].
Item
([Auto])
([iAuto])¢1
[‡]
[
]
[
]
([Auto/Red-Eye])¢2
[‰]
([Forced Flash On])
[
]
([Slow Sync./
Red-Eye])¢2
[Œ]
([Forced Flash Off])
Description of settings
The flash is automatically activated when the recording conditions make it
necessary.
The flash is automatically activated when the recording conditions make it
necessary.
It is activated once before the actual recording to reduce the red-eye
phenomenon (eyes of the subject appearing red in the picture) and then
activated again for the actual recording.
• Use this when you take pictures of people in low lighting conditions.
The flash is activated every time regardless of the recording conditions.
• Use this when your subject is back-lit or under fluorescent light.
If you take a picture with a dark background landscape, this feature will
slow the shutter speed when the flash is activated so that the dark
background landscape will become bright. Simultaneously it reduces the
red-eye phenomenon.
• Use this when you take pictures of people in front of a dark
background.
The flash is not activated in any recording conditions.
• Use this when you take pictures in places where the use of the flash
is not permitted.
¢1 This can be set only when Intelligent Auto Mode is set. The icon changes depending on the type
of subject and brightness. (P35)
¢2 The flash is activated twice. The subject should not move until the second flash is
activated. Interval until the second flash depends on the brightness of the subject.
[Red-Eye Removal] (P116) on the [Rec] menu is set to [ON], [ ] appears on the flash icon.
- 66 -
Recording
∫ Available flash settings by Recording Mode
The available flash settings depend on the Recording Mode.
(±: Available, —: Not available, ¥: Scene Mode initial setting)
‡
±
¢
±
*+:;
,/
ï5
.
1í9
‰
Œ
—
—
—
±
±
±
±
±
±
±
±
—
±
±
—
±
—
±
±
¥
±
—
±
¥
—
—
—
—
—
—
—
¥
±
±
—
±
—
¥
¢ [
] is displayed.
• The flash setting may change if the Recording Mode is changed. Set the flash setting again if
necessary.
• The flash setting is memorized even if the camera is turned off. However, the Scene Mode flash
setting is reset to the initial setting when the Scene Mode is changed.
• Flash will not be activated when recording motion picture.
∫ The available flash range
• The available flash range is an approximation.
Wide
[AUTO] in
[Sensitivity]
Tele
30 cm (0.98 feet) to 5.6 m (18 feet)
- 67 -
30 cm (0.98 feet) to 3.1 m (10 feet)
Recording
∫ Shutter speed for each flash setting
Flash setting
Shutter speed (Sec.)
Flash setting
‡
Shutter speed (Sec.)
1 to 1/1300¢1
1 or 1/4 to 1/1300¢2
1/60 to 1/1300¢1
‰
Œ
¢1 Varies according to the settings of [Min. Shtr Speed] and [Sensitivity].
¢2 When [Min. Shtr Speed] is set to [AUTO]. Varies according to the [Sensitivity] setting.
• ¢2: The shutter speed becomes a maximum of 1 second in the following cases.
– When the Optical Image Stabilizer is set to [OFF].
– When the camera has determined that there is very little jitter when the Optical Image Stabilizer is
set to [ON].
• In Intelligent Auto Mode, shutter speed changes depending on the identified scene.
• The shutter speed for Manual Exposure Mode, Sports Mode, Snow Mode, Beach & Snorkeling
Mode, Advanced Underwater Mode and Scene Modes will be different from above table.
• If you bring the flash too close to an object, the object may be distorted or discolored by the heat or
lighting from the flash.
• Recording a subject from too close, or without sufficient flash will not provide the appropriate level of
exposure, and may result in a picture that is too white or dark.
• When the flash is being charged, the flash icon blinks red, and you cannot take a picture even when
you press the shutter button fully.
• If recording a subject without sufficient flash, the White Balance may not be properly adjusted.
• The effects of the flash may not be adequately achieved under the following conditions.
– When [Burst] in the [Rec] menu is set to [ ]
– When the shutter speed is too fast
• It may take time to charge the Flash if you repeat taking a picture. Take a picture after the access
indication disappears.
• The Red-Eye Reduction effect differs between people. Also, if the subject is far away from the
camera or was not looking at the first flash, the effect may not be as evident.
- 68 -
Recording
Taking Close-up Pictures ([AF Macro]/[Macro Zoom])
Applicable modes:
This mode allows you to take close-up pictures of a subject, e.g. when taking pictures of
flowers.
1
Press 4 [#].
2
Press 3/4 to select the item and then press [MENU/SET].
Item
[
]
([AF Macro])
[
]
([Macro Zoom])
[OFF]
Description of settings
You can take pictures of a subject as close as 5 cm (0.16 feet)
from the lens by pressing the zoom button upmost to Wide (1k).
Use this setting to get close to the subject and then further
enlarge when taking the picture.
You can take a picture with the Digital Zoom up to 3k while
maintaining the distance to the subject for the extreme Wide
position [5 cm (0.16 feet)].
• The image quality is poorer than during normal recording.
• Zoom range will be displayed in blue. (Digital zoom range)
j
• We recommend using a tripod and the Self-timer.
• We recommend setting the flash to [Œ] when you take pictures at close range.
• If the distance between the camera and the subject is beyond the focus range of the camera, the
picture may not be properly focused even if the focus indication lights up.
• When a subject is close to the camera, the effective focus range is significantly narrowed. Therefore,
if the distance between the camera and the subject is changed after focusing on the subject, it may
become difficult to focus on it again.
• Macro Mode gives priority to a subject close to the camera. Therefore, if the distance between the
camera and the subject is far, it takes longer to focus on it.
• When you take pictures at close range, the resolution of the periphery of the picture may decrease
slightly. This is not a malfunction.
• It is not possible to set [AF#] in the following cases.
– In all Scene Modes except [3D Photo Mode]
•[
] cannot be set in the following cases.
– [Toy Effect]/[Miniature Effect] (Creative Control Mode)
– Scene Mode
– When [ ] in [AF Mode] is set
– When [Burst] in the [Rec] menu is set to [ 40 ], [ 60 ] or [ ]
- 69 -
Recording
Taking Pictures with the Self-timer
Applicable modes:
1
Press 2 [ë].
2
Press 3/4 to select the item and then press [MENU/SET].
Item
[
]
([10sec.])
[
]
([2sec.])
Description of settings
Picture is taken 10 seconds after shutter is pressed.
Picture is taken 2 seconds after shutter is pressed.
• When using a tripod etc., this setting is a convenient way to avoid
the jitter caused by pressing the shutter button.
j
[OFF]
3
Press the shutter button halfway to focus and
then press it fully to take the picture.
• The Self-timer indicator A blinks and the shutter is activated
after 10 seconds (or 2 seconds).
• When you press the shutter button once fully, the subject is automatically focused just before
recording. In dark places, the Self-timer indicator will blink and then may turn on brightly operating as
an AF Assist Lamp to allow the camera to focus on the subject.
• We recommend using a tripod when recording with the Self-timer.
• The Self-timer cannot be set in the following cases.
– When using [Time Lapse Shot]
– When recording motion pictures.
- 70 -
Recording
Compensating the Exposure
Applicable modes:
Use this function when you cannot achieve appropriate exposure due to the difference in
brightness between the subject and the background.
Underexposed
Properly exposed
Compensate the exposure
towards positive.
Overexposed
Compensate the exposure
towards negative.
1
Press 3 [È] until [Exposure] appears.
2
Press 2/1 to compensate the exposure and
then press [MENU/SET].
• The exposure compensation value appears on the screen.
• Select [0 EV] to return to the original exposure.
• EV is an abbreviation of [Exposure Value], a unit indicating the amount of exposure. The EV
changes with the aperture value or the shutter speed.
• The set exposure value is memorized even if the camera is turned off.
• The compensation range of the exposure will be limited depending on the brightness of the subject.
• You cannot use the Exposure Compensation in following condition.
– [Starry Sky] (Scene Mode)
- 71 -
Recording
Taking Pictures Using Auto Bracket
Applicable modes:
In this mode, 3 pictures are automatically recorded in the selected exposure compensation
range each time the shutter button is pressed.
With Auto Bracket d1 EV
1st picture
2nd picture
3rd picture
d0 EV
j1 EV
i1 EV
1
Press 3 [È] until [Auto Bracket] appears.
2
Press 2/1 to set the compensation range of
the exposure and then press [MENU/SET].
• When you do not use Auto Bracket, select [OFF] (d0).
• When setting Auto Bracket, [ ] appears on the screen.
• When taking pictures using Auto Bracket after setting the Exposure Compensation range, the
pictures taken are based on the selected Exposure Compensation range.
• In Manual Exposure Mode, if the shutter speed is set to more than 1 second, Auto Bracket is
canceled.
• The exposure may not be compensated with Auto Bracket depending on the brightness of the
subject.
• [Œ] is set for the flash when Auto Bracket is set.
• You cannot use the Auto Bracket in following conditions.
– [Toy Effect]/[Miniature Effect]/[Soft Focus]/[Star Filter] (Creative Control Mode)
– [Handheld Night Shot]/[HDR]/[Starry Sky]/[3D Photo Mode] (Scene Mode)
– When using [Time Lapse Shot]
– When recording motion pictures
- 72 -
Recording
Taking picture by setting the exposure manually
(Manual Exposure Mode)
Recording Mode:
Determine the exposure by manually setting the aperture value and the shutter speed.
The Manual Exposure Assistance appears on the lower portion of the screen to indicate the
exposure.
1
Press [MODE].
2
Press 3/4/2/1 to select [Manual Exposure], and then press [MENU/
SET].
3
Press 3.
• Press [DISP.] to select between the aperture value setting and the shutter speed setting.
4
Press 2/1 to adjust, and then press [MENU/SET].
• The Manual Exposure Assistance is displayed, when the shutter
button is pressed halfway.
A Aperture Value
B Shutter Speed
C Manual Exposure Assistance
F3.3
1/60
A B C
Available Aperture Value (Wide)
Available Shutter Speed (Sec)
(Per 1/3 EV)
F3.3
F10
4¢ to 1/1300
¢ The shutter speed varies depending on the [Sensitivity] setting. (P98)
• Depending on the zoom magnification, available aperture values change.
- 73 -
Recording
∫ Manual Exposure Assistance
The exposure is adequate.
Set to faster shutter speed or larger aperture value.
Set to slower shutter speed or smaller aperture value.
• The Manual Exposure Assistance is an approximation. We recommend checking the pictures on the
playback screen.
• The brightness of the LCD monitor and the recorded pictures may differ. Check the pictures on the
playback screen.
• The aperture value and the shutter speed displayed on the screen turn red when the shutter button
is pressed halfway, if the exposure is not adequate.
• Display of the shutter speed will count down when the shutter speed is set slow and the shutter
button is pressed all the way.
• We recommend using a tripod when the shutter speed is slow.
• The [Sensitivity] is automatically set to [100] when you change the Recording Mode to Manual
Exposure Mode while the [Sensitivity] is set to [AUTO] or [
- 74 -
].
Recording
Taking Pictures with different image effects
(Creative Control Mode)
Recording Mode:
This mode records with additional image effects. You can set the effects to add by selecting
example images and checking them on the screen.
1
Press [MODE].
2
Press 3/4/2/1 to select [Creative Control], and then press [MENU/
SET].
3
Press 3/4 to select image effects and then press
[MENU/SET].
A
• The image effect of the selected example image will be applied in a
preview display A.
• A brief description of selected image effect appears when you press
[DISP.].
• To change the Creative Control Mode, press [MENU/SET], select [Creative Control] using 3/4/2/
1, and then press [MENU/SET].
• The displayed image on the recording screen and the preview of the selected image effect may differ
from the actual recorded image.
• The Creative Control Mode setting is stored even after turning off this unit.
• White Balance will be fixed to [AWB].
• [Sensitivity] cannot be set in Creative Control Mode because the camera adjusts its settings
automatically.
- 75 -
Recording
¢ These pictures are examples to show the effect.
[Expressive]
This effect emphasizes the color to make a pop art picture.
[Retro]
This effect gives a faded image.
[High Key]
This effect adds a bright, airy and soft feel to the overall image.
• If you select this effect with Panorama Shot Mode, the effect may not be
apparent in places with insufficient brightness.
[Low Key]
This effect adds a dark and relaxing feel to the overall image and
enhances bright parts.
- 76 -
Recording
[Sepia]
This effect creates a sepia image.
[Dynamic Monochrome]
This effect gives a higher contrast to create an impressive black and
white picture.
[Impressive Art]
This effect gives your photo a dramatic contrast look.
• If you select this effect with Panorama Shot Mode, seams between
pictures may become noticeable.
[High Dynamic]
This effect produces the optimum brightness for both dark and bright
parts.
- 77 -
Recording
[Cross Process]
This effect gives your photo a dramatic color look.
Items that can be set
Color
Green tone/Blue tone/Yellow tone/Red tone
• Press 2/1 to select the color to enhance, and
press [MENU/SET].
[Toy Effect]
This effect reduces peripheral brightness to give the impression of a toy
camera.
Items that can be set
Color
Orange emphasized
Blue emphasized
• Press 2/1 to select the color tone, and
press [MENU/SET].
[Miniature Effect]
This effect blurs peripheral areas to give the impression of a diorama.
• Display of the recording screen will be delayed more than usual and the
screen will look as if frames are being dropped.
• No sound is recorded in motion pictures.
• Approximately 1/10 of the time period is recorded. (If you record for
10 minutes, the resulting motion picture recording will be approximately
1 minute long.)
The displayed available recording time is approximately 10 times. When
switching to Recording Mode, please check the available recording time.
• When taking pictures of a large size, the screen may turn black after taking
the picture because of signal processing. This is not a malfunction.
- 78 -
Recording
[Soft Focus]
This effect blurs the overall image to produce a soft feel.
• Display of the recording screen will be delayed more than usual and the
screen will look as if frames are dropping.
[Star Filter]
This effect transforms pin-points of light into a star effect.
• Display of the recording screen will be delayed more than usual and the
screen will look as if frames are dropping.
[One Point Color]
This effect leaves one selected color to emphasize impressiveness.
∫ Set the color to leave in
1
2
Fit the color you want to leave in the
frame at the center of the screen, and
then press [MENU/SET].
• If you press [DISP.], you will return to step 1.
Check the color you have set, and then
press [MENU/SET].
• The set color is memorized even if the
camera is turned off. In that case, the
operation starts from step 2.
• Depending on the subject, the set color may not be left in.
- 79 -
Recording
Take the Outdoors Scene Expressively
Recording Mode:
By setting the Recording Mode to [ ], [ ], [ ] or [ ] pictures can be taken more
effectively matching the conditions such as sports, snow, beach & snorkeling.
• Tone of the color of the image may change when picture is taken with unmatched usage.
• The following cannot be set as the camera adjusts automatically.
– [Sensitivity]/[i.Exposure]/[Min. Shtr Speed]/[i.Resolution]/[Color Mode]/[Red-Eye Removal]
Sports Mode
Set here when you want to take pictures of sports scenes or other fast-moving events.
1
Press [MODE].
2
Press 3/4/2/1 to select [Sports], and then press [MENU/SET].
• Shutter speed may slow down up to 1 second.
• This mode is suitable for taking pictures of subjects at distances of 5 m (16 feet) or more.
Snow Mode
This allows you to take pictures that show the snow as white as possible at a ski resort or a
snow-covered mountain.
1
Press [MODE].
2
Press 3/4/2/1 to select [Snow], and then press [MENU/SET].
• White Balance is fixed to [AWB].
• To prevent water leakage, make sure that there are no foreign objects, such as sand, hair, dust, etc.,
clamped and close the side door all the way until it clicks. Also, read “(Important) About the
Waterproof/Dustproof and Anti-shock Performance of the Camera” (P10) before using the camera.
- 80 -
Recording
Beach & Snorkeling Mode
This is optimal for taking pictures underwater and at the beach. Depth meter will automatically
operate. It can be a rough indication of how deep you have gone underwater. You can use
[Color Reproduction] (P115) in the [Rec] menu and take pictures underwater without losing the
red tinge.
1
Press [MODE].
2
Press 3/4/2/1 to select [Beach & Snorkeling], and then press [MENU/
SET].
∫ About the [Depth indicator]
Make sure to perform [Depth indicator] in [GPS/Sensor] menu to set the depth meter before
you dive underwater.
1
2
3
Press [MENU/SET].
Press 3/4/2/1 to select [GPS/Sensor] menu, and then press [MENU/SET].
Press 3/4 to select [Depth indicator], and then press [MENU/SET].
• Confirmation screen is displayed. Depth meter will be set to 0 m (0 feet) when [Yes] is selected.
Exit the menu once completed.
∫ About the underwater screen display
When [DISP.] is pressed several times, the environment information
screen for the depthmeter, etc. is displayed.
0ft
A
A Depth meter
43ft
• Depth meter will display the depth to 13 m (43 feet) in 3 levels.
When the third level is flashing
You are approaching a depth of 13 m (43 feet), which is the
diving limit of this unit. Please be aware.
Entire depth meter is flashing
There is risk that depth has exceeded 13 m (43 feet).
• Camera will automatically set to the optimal picture quality for underwater from the depth
information. Icons showing the picture quality will switch in such a case.
[
]
It is adjusted to optimal picture quality for underwater up to a depth of 3 m (10 feet) when
[
] is displayed.
[
]
It is adjusted to optimal picture quality for underwater for a depth of 3 m (10 feet) to 13 m
(43 feet) when [
] is displayed.
- 81 -
GPS
Recording
∫ About the white balance
You can adjust the hue to your preferred setting using [WB Adjust.] (P101).
∫ To beautifully record the underwater red tinge (Underwater color reproduction)
Subjects appear blue in pictures taken underwater. Using [Color Reproduction] in the [Rec]
menu will allow pictures to be taken without the subjects losing their red tone.
1 Select [Color Reproduction] in the [Rec] menu.
2 Press 3/4 to select the effect, and then press [MENU/SET].
• You can select the effect of [HIGH], [MEDIUM], [LOW], or [OFF].
• Ichikawa Soft Laboratory has studied color loss in water based on the results of measurements of a
large number of color samples actually conducted in the ocean, and has developed “Natural Light
Technology” to reproduce vivid, accurate colors based on ongoing research into color reproduction
of pictures taken underwater.¢
[Color Reproduction] in the [Rec] menu and [Color Reproduction] under [Retouch] in the [Playback]
menu make use of this technology.
¢ “Natural Light Technology” is the technology behind “SILKYPIX Marine Photography”, Ichikawa
Soft Laboratory’s digital reproduction software designed for underwater pictures.
http://www.isl.co.jp/SILKYPIX/marine/p/
• Measured depth may not be accurate when pressure is applied to front or rear of this unit by
pressing with your hands, etc. In such a case, it is recommended to perform [Depth indicator] again
when you get back to the surface.
• The display may differ significantly depending on the weather conditions (atmospheric pressure, air
temperature), or seawater temperature.
• For more accurate depth measurements, we recommend that you perform [Depth indicator] before
you dive underwater.
• When the unit is wet immediately after coming out of the water, etc., it may not be able to measure
atmospheric pressure accurately. For details, read “About the measured altitude and atmospheric
pressure” (P143).
• To prevent water leakage, make sure that there are no foreign objects, such as sand, hair, dust, etc.,
clamped and close the side door all the way until it clicks. Also, read “(Important) About the
Waterproof/Dustproof and Anti-shock Performance of the Camera” (P10) before using the camera.
• Dip the camera in fresh water in a shallow container for 10 minutes or less after using it, then wipe
the water off with a soft, dry cloth. (P13)
• [Color Reproduction] is initially set to [LOW] on the camera.
• Depending on the recording conditions or environment, the way the effect of [Color Reproduction] is
applied may vary.
- 82 -
Recording
Advanced Underwater Mode
This is optimal for taking pictures underwater deeper than 13 m (43 feet) by the use of the
marine case (DMW-MCFT5: optional). You can use [Color Reproduction] (P115) in the [Rec]
menu and take pictures underwater without losing the red tinge.
¢ This camera has a waterproof/dustproof function equivalent to “IP68”. It is possible to take
pictures in 13 m (43 feet) depth for 60 minutes.
1
Press [MODE].
2
Press 3/4/2/1 to select [Advanced Underwater], and then press
[MENU/SET].
∫ Fixing the focus underwater (AF Lock)
You can fix the focus before taking a picture with AF lock. This is useful if you want to take
pictures of a fast moving subject, etc.
1
2
Aim the AF area at the subject.
Press 2 to fix the focus.
• The AF lock icon appears when the subject is focused.
• Press 2 again to cancel AF lock.
• When you press the zoom button, the AF lock is canceled. In this case, focus on the subject
and fix the focus again.
• You cannot set to AF lock when [AF Mode] is set to [
].
∫ About the white balance
You can adjust the hue to your preferred setting using [WB Adjust.] (P101).
∫ To beautifully record the underwater red tinge (Underwater color reproduction)
Subjects appear blue in pictures taken underwater. Using [Color Reproduction] in the [Rec]
menu will allow pictures to be taken without the subjects losing their red tone.
1 Select [Color Reproduction] in the [Rec] menu.
2 Press 3/4 to select the effect, and then press [MENU/SET].
• You can select the effect of [HIGH], [MEDIUM], [LOW], or [OFF].
• To prevent water leakage, make sure that there are no foreign objects, such as sand, hair, dust, etc.,
clamped and close the side door all the way until it clicks. Also, read “(Important) About the
Waterproof/Dustproof and Anti-shock Performance of the Camera” (P10) before using the camera.
• Dip the camera in fresh water in a shallow container for 10 minutes or less after using it, then wipe
the water off with a soft, dry cloth. (P13)
• Positioning is not possible underwater, because the GPS signals cannot reach the camera.
• When there is a significant amount of matter floating in the water, set the flash to [Œ].
• [Color Reproduction] is initially set to [LOW] on the camera.
• Depending on the recording conditions or environment, the way the effect of [Color Reproduction] is
applied may vary.
- 83 -
Recording
Taking panorama pictures (Panorama Shot Mode)
Recording Mode:
Pictures are recorded continuously while moving the camera horizontally or vertically, and are
combined to make a single panorama picture.
1
Press [MODE].
2
Press 3/4/2/1 to select [Panorama Shot], and then press [MENU/SET].
3
Press 3/4 to select the recording direction and then
press [MENU/SET].
4
Press 3/4 to select image effects and then press [MENU/SET].
• You can add the same image effect as the Creative Control Mode with the same operation as
the mode. (except for [Toy Effect] and [Miniature Effect])
• Read P76–79 for details on the respective effects.
• During panorama picture recording, the following image effects of the Creative Control Mode
are not visible on the screen:
– [Soft Focus]/[Star Filter]
• If you are not going to add an image effect, select [OFF].
5
After confirming the recording direction, press [MENU/SET].
• A horizontal/vertical guide is displayed.
If you press 1, you will return to step 3.
6
Press the shutter button halfway to focus.
- 84 -
Recording
7
Press the shutter button fully and record a picture while moving the
camera in a small circle in the direction selected in Step 3.
Recording from left to right
E
Move the camera in a single panning motion for about 8 seconds.
• Move the camera at a constant speed.
Pictures may not be able to be recorded properly if the camera is moved too fast or slow.
A 1 second
D 4 seconds
B 2 seconds
E Recording direction and panning (Guide)
C 3 seconds
8
Press the shutter button once again to end the still picture recording.
• Recording can also be ended by keeping the camera still while recording.
∫ Technique for Panorama Shot Mode
A Move the camera in the recording direction
without shaking it. If the camera shakes too
much, pictures may not be able to be
recorded, or the recorded panorama picture
may become narrower (smaller).
B Move the camera towards the edge of the
range you wish to record. (The edge of the
range will not be recorded in the last frame)
- 85 -
Recording
• The zoom position is fixed to Wide.
• [Stabilizer] is fixed to [OFF].
• The focus, white balance, and exposure are fixed at the optimum values for the first picture. As a
result, if the focus or brightness changes substantially during recording, the entire panorama picture
may not be recorded at the suitable focus or brightness.
• White Balance is fixed to [AWB] while an image effect is applied.
• When multiple pictures are combined to create a single panorama picture, the subject may appear
distorted or the connection points may be noticeable in some cases.
• The number of recording pixels in the horizontal and vertical directions of the panorama picture
varies depending on the recording direction and the number of combined pictures. The maximum
number of pixels is shown below.
Recording direction
Horizontal Resolution
Vertical Resolution
Horizontal
8000 pixels
1080 pixels
Vertical
1440 pixels
8000 pixels
• A panorama picture may not be able to be created, or the pictures may not be combined properly
when recording the following subjects or under the recording conditions below.
– Subjects with a single, uniform color or repetitive pattern (such as the sky or a beach)
– Moving subjects (person, pet, car, waves, flowers blowing in the breeze, etc.)
– Subjects where the color or patterns change in a short time (such as an image appearing on a
display)
– Dark places
– Locations with flickering light sources such as fluorescent lights or candles
∫ About playback
3
Start panorama playback¢1/Pause¢2
4
Stop
¢1 If you have filtered images for playback by using [Slide Show] (P147) or [Filtering Play] (P149),
the selection screen appears. Press 3/4 to select [Play Panorama], and then press [MENU/
SET].
¢2 You can perform frame-by-frame forward/rewind by pressing 1/2 during a pause.
- 86 -
Recording
Taking pictures that match the scene being
recorded (Scene Mode)
Recording Mode:
When you select a Scene Mode to match the subject and recording situation, the camera sets
the optimal exposure and hue to obtain the desired picture.
1
Press [MODE].
2
Press 3/4/2/1 to select [Scene Mode], and then press [MENU/SET].
3
Press 3/4/2/1 to select the Scene Mode and then
press [MENU/SET].
• To change the Scene Mode, press [MENU/SET], select [Scene Mode] using 3/4/2/1, and then
press [MENU/SET].
• The following cannot be set in Scene Mode as the camera adjusts automatically.
– [Sensitivity]/[i.Exposure]/[Min. Shtr Speed]/[i.Resolution]/[Color Mode]
- 87 -
Recording
[Portrait]
When taking pictures of people outdoors during the day, this mode allows you to improve the
appearance of the persons and make their skin tones look healthier.
∫ Technique for Portrait Mode
To make this mode more effective:
1 Press and hold down the zoom button as far as possible to Tele.
2 Move close to the subject to make this mode more effective.
[Soft Skin]
When taking pictures of people outdoors during the day, this mode enables the texture of their
skin to appear even softer than with [Portrait]. (It is effective when taking pictures of people
from the chest up.)
∫ Technique for Soft Skin Mode
To make this mode more effective:
1 Press and hold down the zoom button as far as possible to Tele.
2 Move close to the subject to make this mode more effective.
• If a part of the background etc. is a color close to skin color, this part is also smoothed.
• This mode may not be effective when there is insufficient brightness.
[Scenery]
This allows you to take pictures of a wide landscape.
- 88 -
Recording
[Night Portrait]
This allows you to take pictures of a person and the background with near real-life brightness.
∫ Technique for Night Portrait Mode
• Use the flash. (You can set to [‹].)
• Ask the subject not to move while taking a picture.
• We recommend using a tripod and the Self-timer for taking pictures.
• Shutter speed may slow down for up to 4 seconds.
• The shutter may remain closed (max. about 4 sec.) after taking the picture because of signal
processing. This is not a malfunction.
• Noise may become visible when you take pictures in dark places.
[Night Scenery]
This allows you to take vivid pictures of the nightscape.
• We recommend using a tripod and the self-timer for taking pictures.
• Shutter speed may slow down for up to 4 seconds.
• The shutter may remain closed (max. about 4 sec.) after taking the picture because of signal
processing. This is not a malfunction.
• Noise may become visible when you take pictures in dark places.
[Handheld Night Shot]
This mode allows you to record multiple pictures of night scenes at high speed, which are all
combined to make a single picture. It will reduce the jitter and noise from the picture even when
recording with the camera in your hand.
• Do not move the camera while recording pictures continuously.
• Noise may become visible when you take pictures in dark places or take pictures of moving subjects.
- 89 -
Recording
[HDR]
You can combine several pictures with different levels of exposure into a single picture with rich
gradation. You can minimize the loss of gradations in bright areas and dark areas when, for
example, the contrast between the background and the subject is large.
∫ What Is HDR?
HDR stands for High Dynamic Range and refers to a technique for expressing a wide contrast
range.
• Do not move the camera during the continuous shooting after pressing the shutter button.
• You cannot take the next picture until the combination of pictures is complete.
• A moving subject may be recorded with unnatural blurs.
• The continuous shooting may not work under certain recording conditions. In that case, a single
picture is recorded.
[Food]
This mode allows you to take pictures of food with a natural hue without being affected by the
ambient light in restaurants etc.
- 90 -
Recording
[Baby1]/[Baby2]
This takes pictures of a baby with a healthy complexion. When you use the flash, the light from
it is weaker than usual.
It is possible to set different birthdays and names for [Baby1] and [Baby2]. You can select to
have these appear at the time of playback, or have them stamped on the recorded image using
[Text Stamp] (P160).
∫ Birthday/Name setting
1 Press 3/4 to select [Age] or [Name] and then press [MENU/SET].
2 Press 3/4 to select [SET] and then press [MENU/SET].
3 Enter the birthday or name.
Birthday:
2/1: Select the items (year/month/day)
3/4: Setting
[MENU/SET]: Set
For details on how to enter characters, refer to “Entering Text” on P94.
Name:
• When the birthday or name is set, [Age] or [Name] is automatically set to [ON].
• If [ON] is selected when the birthday or name has not been registered, the setting screen
appears automatically.
4
Press 4 to select [Exit] and then press [MENU/SET] to finish.
∫ To cancel [Age] and [Name]
Select the [OFF] setting in step 2.
• The age and name can be printed out using the “PHOTOfunSTUDIO” bundled software on the
CD-ROM (supplied).
• If [Age] or [Name] is set to [OFF] even when the birthday or name has been set, the age or name will
not be displayed.
• Shutter speed may slow down for up to 1 second.
[Pet]
Select this when you want to take pictures of a pet such as a dog or a cat.
You can set your pet’s birthday and name.
For information about [Age] or [Name], refer to [Baby1]/[Baby2] on P91.
- 91 -
Recording
[Sunset]
Select this when you want to take pictures of a sunset view. This allows you to take vivid
pictures of the red color of the sun.
[High Sens.]
This mode minimizes the jitter of the subjects, and enables you to take pictures of these
subjects in dimly lit rooms.
∫ Picture size and aspect ratio
Select the picture size of 3M (4:3), 2.5M (3:2), 2M (16:9) or 2.5M (1:1).
[Starry Sky]
This mode allows you to take vivid pictures of a starry sky or a dark subject.
∫ Setting the shutter speed
Select a shutter speed of [15 sec.], [30 sec.].
• Press the shutter button fully to display the countdown screen. Do not move the camera after this
screen is displayed. When countdown finishes, [Please wait...] is displayed for the same length of
time as the set shutter speed for signal processing.
∫ Technique for Starry Sky Mode
• The shutter opens for 15, 30 seconds. Be sure to use a tripod. We also recommend taking pictures
with the self-timer.
[Glass Through]
Objects in the distance are prioritized for focus.
This mode is ideal for taking pictures of scenery and other landscapes through clear glass,
such as in vehicles or buildings.
• The camera may focus on the glass if it is dirty or has dust on it.
• The pictures taken may not look natural if the glass is colored. When this happens, change the white
balance settings. (P99)
- 92 -
Recording
[3D Photo Mode]
Pictures are recorded continuously while moving the camera horizontally, and two pictures
selected automatically are combined to make a single 3D picture.
To view 3D pictures, a television that supports 3D is required. (This unit will play back in 2D)
Refer to P217 for details about the playback method.
∫ Technique for 3D Photo Mode
Start the recording and then slide the camera horizontally
straight from left to right.
• A guide is displayed while recording.
• Move the camera approximately 10 cm (0.33 feet) within
approximately 4 seconds using the guide.
∫ To avoid mistakes in 3D recording
• Take a picture of a subject that is not moving.
• Take a picture in a well-lit place, such as outdoors, etc.
• Fix the focus and exposure by pressing the shutter button halfway, then press the shutter button fully
and move the camera.
• When you start recording with the subject slightly to the right of the center, the subject will be close
to the center in the final picture.
• You cannot record 3D pictures in vertical orientation.
• The 3D pictures are saved in MPO format (3D).
• Zoom position is fixed to Wide.
• The picture size is fixed to 2M (16:9).
• The ISO sensitivity is automatically adjusted. However, the ISO sensitivity is increased to make the
shutter speed become high-speed.
• Motion pictures cannot be recorded during 3D Photo Mode.
• Recording may not be possible depending on the recording conditions for the following cases. You
may not get a 3D effect or the picture may be warped even if it was possible to record.
– When the subject is too dark/bright
– When the brightness of the subject changes
– When the subject is moving
– Not enough contrast
- 93 -
Recording
Entering Text
It is possible to enter babies’ and pets’ names and the locations when
recording. When a screen that looks like the one on the right is displayed,
you can enter characters. (Only alphabetical characters and symbols can
be entered.)
1
Press 3/4/2/1 to select text and then press [MENU/SET] to register.
• Move the cursor to [
] and then press [MENU/SET] to switch text between [A] (capitals), [a]
(lower case), [1] (numbers) and [&] (special characters).
• To continuously enter the same character, move the cursor by pressing [T] on the zoom
button.
• The following operations can be performed by moving the cursor to the item and pressing
[MENU/SET]:
– []]:
– [Delete]:
– [ ]:
– [ ]:
Enter a blank
Delete a character
Move the entry position cursor to the left
Move the entry position cursor to the right
• The following characters and numbers can be entered.
– A maximum of 30 characters can be entered (Maximum of 9 characters when setting
names in [Face Recog.]).
A maximum of 15 characters can be entered for [ ], [ ], [ ], [ ] and [ ] (Maximum of
6 characters when setting names in [Face Recog.]).
2
Press 3/4/2/1 to move the cursor to [Set] and then press [MENU/SET]
to end text input.
• Text can be scrolled if all of the entered text does not fit on the screen.
• It is displayed in order of location name information, [Title], [Location], [Name] ([Baby1]/[Baby2],
[Pet]), [Name] ([Face Recog.]).
- 94 -
Recording
Using the [Rec] Menu
For details on [Rec] menu settings, refer to P48.
[Aspect Ratio]
Applicable modes:
This allows you to select the aspect ratio of the pictures to suit printing or the playback method.
Settings
Description of settings
[X]
[Aspect Ratio] of a 4:3 TV
[Y]
[Aspect Ratio] of a 35 mm film camera
[W]
[Aspect Ratio] of a high-definition TV, etc.
[
Square aspect ratio
]
• The ends of the recorded pictures may be cut at printing so check before printing. (P264)
- 95 -
Recording
[Picture Size]
Applicable modes:
Set the number of pixels. The higher the numbers of pixels, the finer the detail of the pictures
will appear even when they are printed onto large sheets.
[Aspect Ratio]: [X]
Settings
[16M]
]¢
[10M
[Aspect Ratio]: [Y]
Picture Size
Settings
4608k3456
[14M]
3648k2736
[9M
Picture Size
4608k3072
]¢
3648k2432
¢
2560k1712
[5M
]
2560k1920
[4.5M
]
[3M
]¢
2048k1536
[2.5M
]¢
2048k1360
[1M
]¢
1280k960
[0.3M
]¢
640k424
[0.3M
]
640k480
[Aspect Ratio]: [W]
Settings
[12M]
[7.5M
]¢
[3.5M
¢
[2M
[0.2M
]
]¢
]
¢
[Aspect Ratio]: [
Picture Size
Settings
]
Picture Size
4608k2592
[12M]
3648k2056
[7.5M
]¢
2736k2736
2560k1440
[3.5M
]
¢
1920k1920
1920k1080
[2.5M
]¢
1536k1536
[0.2M
¢
480k480
640k360
3456k3456
]
¢ This item cannot be set in the Intelligent Auto Mode.
• If you change the aspect ratio, set the picture size again.
• In specific modes, Extended Optical Zoom cannot be used, and the picture size for [
] is not
displayed. For details regarding modes in which Extended Optical Zoom cannot be used, refer to
P65.
• Pictures may appear mosaic depending on the subject and the recording conditions.
- 96 -
Recording
[Quality]
Applicable modes:
Set the compression rate at which the pictures are to be stored.
Settings
[A]
([Fine])
[›]
([Standard])
Description of settings
When giving priority to the picture quality
When using the standard picture quality and increasing the number of
pictures to be recorded without changing the number of pixels
• [Quality] is fixed to [›] in the following case.
– [High Sens.] (Scene Mode)
• The following icons are displayed during the 3D recording.
[
] ([3D+Fine]):
Both MPO images and fine JPEG images are recorded
simultaneously.
[
] ([3D+Standard]):
Both MPO images and standard JPEG images are recorded
simultaneously.
- 97 -
Recording
[Sensitivity]
Applicable modes:
This allows the sensitivity to light (ISO sensitivity) to be set. Setting to a higher number enables
pictures to be taken even in dark places without the resulting pictures coming out dark.
Settings
Description of settings
The ISO sensitivity is automatically adjusted according to the brightness.
• Maximum [1600]
[AUTO]
[
The ISO sensitivity is adjusted according to the movement of the subject and the
brightness.
• Maximum [1600]
• The shutter speed is not fixed when the shutter button is pressed halfway. It is
continuously changing to match the movement of the subject until the shutter
button is pressed fully.
]
([i.ISO])
[100]/[200]/
[400]/[800]/
[1600]/[3200]
The ISO sensitivity is fixed to various settings.
[100]
Recording location
(recommended)
[3200]
When it is light (outdoors)
When it is dark
Shutter speed
Slow
Fast
Noise
Less
Increased
Increased
Less
Jitter of the subject
• For the focus range of flash when [AUTO] is set, refer to P67.
• You cannot select [AUTO] or [
] in Manual Exposure Mode.
• The ISO sensitivity is automatically set under the following conditions.
– When [Burst] in the [Rec] menu is set to [ ]
– When recording motion pictures
• The shutter speed is determined by the [Sensitivity] setting as shown in the table below.
[Sensitivity]
Shutter speed (Sec.)
AUTO/
The shutter speed changes automatically according
to ISO sensitivity setting.
100/200/400
4 to 1/1300
800/1600
1 to 1/1300
3200
1/4 to 1/1300
- 98 -
Recording
[White Balance]
Applicable modes:
In sunlight, under incandescent lights or in other such conditions where the color of white takes
on a reddish or bluish tinge, this item adjusts to the color of white which is closest to what is
seen by the eye in accordance with the light source.
Settings
[AWB]
([Auto White Balance])
[V]
([Daylight])
[Ð]
([Cloudy])
[î]
([Shade])
[Ñ]
([Incandescent])
[Ò]
([White Set])
[Ó]
([White Set Setting])
Description of settings
Automatic adjustment
When taking pictures outdoors under a clear sky
When taking pictures outdoors under a cloudy sky
When taking pictures outdoors in the shade
When taking pictures under incandescent lights
Value set by using [Ó]
Set manually
• Under fluorescent lighting, LED lighting fixture etc., the appropriate White Balance will vary
depending on the lighting type, so use [AWB] or [Ó].
• The White Balance setting is memorized even if the camera is turned off. (However, the White
Balance setting for a Scene Mode returns to [AWB] when the Scene Mode is changed.)
• White Balance is fixed to [AWB] in following conditions.
– Beach & Snorkeling Mode
– Advanced Underwater Mode
– [Scenery]/[Night Portrait]/[Night Scenery]/[Handheld Night Shot]/[Food]/[Sunset]/[Starry Sky]
(Scene Mode)
- 99 -
Recording
∫ Auto White Balance
Depending on the conditions prevailing when pictures are taken, the pictures may take on a
reddish or bluish tinge. Furthermore, when a multiple number of light sources are being used or
there is nothing with a color close to white, Auto White Balance may not function properly. In
this case, set the White Balance to a mode other than [AWB].
1 Auto White Balance will work within this range.
2 Blue sky
3 Cloudy sky (Rain)
4 Shade
5 Sunlight
6 White fluorescent light
7 Incandescent light bulb
8 Sunrise and sunset
9 Candlelight
KlKelvin color temperature
Setting the White Balance manually
Set the White Balance value. Use to match the condition when taking photographs.
1
2
Select [Ó] and then press [MENU/SET].
Aim the camera at a sheet of white paper etc. so that the frame
in the center is filled by the white object only and then press
[MENU/SET].
• White Balance may not be set when the subject is too bright or too dark.
Set the White Balance again after adjusting to appropriate brightness.
• Exit the menu after it is set.
- 100 -
Recording
Finely adjusting the White Balance
You can finely adjust the White Balance when you cannot acquire the desired hue by setting
the White Balance.
• Fine adjustment is possible only when the White Balance is set to [V]/[Ð]/[î]/[Ñ]/[Ò].
1
Select the White Balance to finely adjust and then press [DISP.] to display
[WB Adjust.].
2
Press 2/1 to adjust the White Balance.
2 [Red]:
Press when the hue is bluish.
1 [Blue]:
Press when the hue is reddish.
• Select [0] to return to the original White Balance.
3
Press [MENU/SET] to finish.
• The White Balance icon on the screen turns red or blue.
• The White Balance fine adjustment setting is reflected in the picture when using the flash.
• You can finely adjust the White Balance independently for each White Balance item.
• The White Balance fine adjustment setting is memorized even if the camera is turned off.
• The White Balance fine adjustment level in [Ò] returns to [0] when you reset the White Balance
using [Ó].
• In the Beach & Snorkeling Mode or Advanced Underwater Mode, the White Balance is fixed at
[AWB], but it can be finely adjusted.
• White Balance fine adjustment cannot be set for [B&W] and [SEPIA] in [Color Mode].
- 101 -
Recording
[AF Mode]
Applicable modes:
This allows the focusing method that suits the positions and number of the subjects to be
selected.
Settings
[š]
([Face Detection])
[
]
([AF Tracking])¢1
[
]
([23-Area])
[Ø]
¢2
Description of settings
The camera automatically detects the person’s face. (max.
15 areas)
The focus and exposure can then be adjusted to fit that face no
matter what portion of the picture it is in.
Focus can be adjusted to a specified subject. Focus will keep on
following the subject even if it moves. (Dynamic Tracking)
Up to 23 points for each AF area can be focused. This is effective
when the subject is not in the center of the screen.
(AF area frame will be same as image aspect ratio setting.)
([1-Area])
The camera focuses on the subject in the AF area on the center
of the screen.
[Ù]
The camera focuses on a limited narrow area in the screen.
([Spot])¢2
¢1 [Ø] will be used during recording motion pictures or using [Time Lapse Shot].
¢2 [Ø] will be used during recording motion pictures.
• [AF Mode] is fixed to [Ø] in the following cases.
– [Miniature Effect] (Creative Control Mode)
– [Starry Sky] (Scene Mode)
• It will be fixed to [š] when the [Face Recog.] is set to [ON].
• It is not possible to set [š] in the following cases.
– [Soft Focus] (Creative Control Mode)
– Advanced Underwater Mode
– Panorama Shot Mode
– [Night Scenery]/[Handheld Night Shot]/[Food] (Scene Mode)
• It is not possible to set [ ] in the following cases.
– [Sepia]/[Dynamic Monochrome]/[High Dynamic]/[Toy Effect]/[Soft Focus] (Creative Control Mode)
– Panorama Shot Mode
– [B&W]/[SEPIA] ([Color Mode])
- 102 -
Recording
∫ About [š] ([Face Detection])
The following AF area frames are displayed when the camera detects the
faces.
Yellow:
When the shutter button is pressed halfway, the frame turns green when
the camera is focused.
White:
Displayed when more than one face is detected. Other faces that are the same distance away
as faces within the yellow AF areas are also focused.
• Under certain picture-taking conditions, including the following cases, the face detection function
may fail to work, making it impossible to detect faces. [AF Mode] is switched to [ ] ([Ø] while
motion pictures are taken).
– When the face is not facing the camera
– When the face is at an angle
– When the face is extremely bright or dark
– When there is little contrast on the faces
– When the facial features are hidden behind sunglasses, etc.
– When the face appears small on the screen
– When there is rapid movement
– When the subject is other than a human being
– When the camera is shaking
– When Digital Zoom is used
– Taking pictures underwater
• If the camera is registering something other than someone’s face, change the settings to something
other than [š].
- 103 -
Recording
∫ Setting up [
] ([AF Tracking])
Align the subject with the AF tracking frame, and then press 4 to
lock onto the subject.
A AF tracking frame
• AF area will be displayed in yellow when a subject is recognized, and focus
will automatically adjust continuously following the subject’s movement
(Dynamic tracking).
• AF tracking is canceled when 4 is pressed again.
A
• Dynamic tracking function may not work in the following cases:
– When the subject is too small
– When the recording location is too dark or bright
– When the subject is moving too fast
– When the background has the same or similar color to the subject
– When jitter is occurring
– When using the zoom
– Taking picture underwater
• When the lock fails, the AF tracking frame will turn red and then disappear. Press 4 again.
• The camera records pictures with [AF Mode] as [Ø] when locked or Dynamic Tracking is not
working.
[Quick AF]
Applicable modes:
As long as the camera is held steady, the camera will automatically adjust the focus and focus
adjustment will then be quicker when the shutter is pressed. This is useful when you do not
want to miss a picture-taking opportunity.
Settings: [ON]/[OFF]
• The battery will be consumed faster than usual.
• Press the shutter button halfway again when it is difficult to focus on the subject.
• It does not operate during AF tracking.
• [Quick AF] cannot be set in the following cases.
– [Night Portrait]/[Night Scenery]/[Handheld Night Shot]/[Starry Sky] (Scene Mode)
- 104 -
Recording
[Face Recog.]
Applicable modes:
Face Recognition is a function which finds a face resembling a registered face and prioritizes
focus and exposure automatically. Even if the person is located towards the back or on the end
of a line in a group photo, the camera can still take a clear picture.
Settings: [ON]/[OFF]/[MEMORY]
[Face Recog.] is initially set to [OFF] on the camera.
[Face Recog.] will turn [ON] automatically when the face image is registered.
• The following functions will also work with the Face Recognition
function.
In Recording Mode
– Display of corresponding name when camera detects a registered face¢
KEN
(if name has been set for the registered face)
In Playback Mode
– Display of name and age (if information has been registered)
– Selective playback of pictures chosen from pictures registered with Face Recognition ([Category
Selection] in [Filtering Play]).
¢ Names of up to 3 people are displayed. Precedence for the names displayed when taking
pictures is determined according to the order of registration.
• During the Burst Mode, [Face Recog.] picture information can be attached to only the first picture.
• [Face Recog.] does not guarantee secure recognition of a person.
• Face Recognition may take more time to select and recognize distinctive facial features than regular
face detection.
• Even when Face Recognition information has been registered, pictures taken with [Name] set to
[OFF] will not be categorized by Face Recognition in [Category Selection] ([Filtering Play]).
• Even when Face Recognition information is changed (P108), Face Recognition information
for the pictures already taken will not be changed.
For instance, if the name is changed, pictures recorded before the change will not be categorized by
Face Recognition in [Category Selection] ([Filtering Play])
• To change the name information of the pictures taken, perform the [REPLACE] in [Face Rec Edit]
(P171).
• [Face Recog.] cannot be used in the following cases.
– Recording Modes which do not allow setting to [š] of [AF Mode]
– [3D Photo Mode] (Scene Mode)
– When recording motion pictures
- 105 -
Recording
Face Settings
You can register information such as names and birthdays for face images of up to 6 people.
Registration can be facilitated by taking multiple face images of each person.
(up to 3 pictures/registration)
1
2
Select [Face Recog.] on the [Rec] menu and then press [MENU/SET].
3
Press 3/4/2/1 to select the Face Recognition frame that is
not registered, and then press [MENU/SET].
4
Press 3/4 to select [MEMORY] and then press [MENU/SET].
Take the picture adjusting the face with the guide.
• Confirmation screen is displayed. It is executed when [Yes] is selected.
• The faces of subjects other than people (pets, etc.) cannot be
registered.
• When [DISP.] is pressed, an explanation appears for taking face
images.
- 106 -
1HZ
Recording
5
Select item to edit with 3/4, and then press [MENU/SET].
Item
[Name]
Description of settings
1 Press 4 to select [SET] and then press [MENU/SET].
2 Enter the name.
• For details on how to enter characters, refer to “Entering Text”
section on P94.
[Age]
1 Press 4 to select [SET] and then press [MENU/SET].
2 Press 2/1 to select the items (Year/Month/Day), and then
press 3/4 to set and then press [MENU/SET].
[Focus Icon]
Change the displayed focus icon when the subject is focused.
Press 3/4 to select the focus icon, and then press [MENU/
SET].
To add additional face images.
(Add Images)
1 Select the unregistered face recognition frame, and then press
[MENU/SET].
2 Perform step 4 in “Face Settings”.
[Add Images]
To delete one of the face images.
(Delete)
Press 2/1 to select the face image to delete, and then press
[MENU/SET].
• If there is only one image registered, it cannot be deleted.
• Confirmation screen is displayed. It is executed when [Yes] is selected.
• Exit the menu after it is set.
- 107 -
Recording
∫ Point of recording when registering the face images
• Face front with eyes open and mouth closed, making sure the
outline of the face, the eyes, or the eyebrows are not covered with
the hair when registering.
• Make sure there is no extreme shading on the face when
registering. (Flash will not flash during registration.)
(Good example for
registering)
∫ When it is not recognizing during recording
• Register the face of same person indoors and outdoors, or with different expressions or angles.
(P107)
• Additionally register at the location of recording.
• When a person who is registered is not recognized, correct by re-registering.
• Face Recognition may not be possible or may not recognize faces correctly even for registered
faces, depending on the facial expression and environment.
Change or delete the information for a registered person
You can modify the pictures or information of an already registered person. You can also delete
the information of the registered person.
1
2
3
Press 4 to select [MEMORY] and press [MENU/SET].
Press 3/4/2/1 to select the face image to edit or delete and then press [MENU/
SET].
Press 3/4 to select the item and then press [MENU/SET].
Item
Description of settings
[Info Edit]
Changing the information of an already registered person.
Perform step 5 in “Face Settings”.
[Priority]
The focus and exposure are preferentially adjusted for
higher-priority faces.
Press 3/4/2/1 to select the priority and then press [MENU/
SET].
[Delete]
Deleting information of a registered person.
• Confirmation screen is displayed. It is executed when [Yes] is selected.
• Exit the menu after it is set.
- 108 -
Recording
[i.Exposure]
Applicable modes:
Contrast and exposure will be adjusted automatically when there is a big difference in
brightness between the background and subject, to bring the image close to real life.
Settings: [ON]/[OFF]
] in the screen turns to yellow when [i.Exposure] is in effect.
•[
• Even when the [Sensitivity] is set to [100], [Sensitivity] may be set higher than [100] if the picture is
taken with [i.Exposure] set to valid.
• Compensation effect may not be achieved depending on the conditions.
[Min. Shtr Speed]
Applicable modes:
You can take bright pictures in dark places by setting [Min. Shtr Speed] slower. Also, you can
set it faster to reduce the blur of the subject.
Settings: [AUTO], [1/125], [1/60], [1/30], [1/15], [1/8], [1/4], [1/2], [1]
Minimum shutter speed setting
[1/125]
[1]
Brightness
Darker
Brighter
Jitter
Less
More
• This should usually be set to [AUTO] to take pictures. (When you select a minimum shutter speed
other than [AUTO], [
] appears on the screen.)
• Depending on the [Sensitivity] setting, the shutter speed may be limited to the fast ones.
• When [AUTO] is selected, shutter speed may be set up to 1 second when there is not much jitter to
adjust with the [Stabilizer], or when [Stabilizer] is set to [OFF].
• Setting [Min. Shtr Speed] to slower speed might increase the chance of jitter, so we recommend
using a tripod and the self-timer for taking pictures.
• Setting [Min. Shtr Speed] to faster speed might make the picture darker, so we recommend
recording the picture in well-lit area. If correct exposure cannot be achieved, [
when the shutter button is pressed halfway.
- 109 -
] will flash in red
Recording
[i.Resolution]
Applicable modes:
Pictures with sharp profile and resolution can be taken by utilizing the Intelligent Resolution
Technology.
Settings
Description of settings
[ON]
[i.Resolution] is activated.
[i.ZOOM]
[i.Resolution] is activated, and zoom magnification increased to
approx. 2 times while limiting deterioration of the picture.
j
[OFF]
• Refer to P65 for information about the Intelligent Zoom.
[Digital Zoom]
Applicable modes:
This can enlarge subjects even more than the Optical Zoom, Extended Optical Zoom, or
[i.ZOOM].
Settings: [ON]/[OFF]
• Refer to P65 for details.
• The setting is fixed to [ON] in Macro Zoom Mode.
- 110 -
Recording
[Burst]
Applicable modes:
Pictures are taken continuously while the shutter button is pressed.
Pictures taken with [ 40 ] and [ 60 ] are recorded as a single Picture Group (P44).
Settings
Description of settings
Number of
recordable
pictures
• The burst speed is set to approximately 2 frames/second
[
]
([Intelligent Burst
mode])¢1
[
]
([2 fps
AF-Continuous])
or 5 frames/second in accordance with the movement of
the subject.
• If a fast-moving subject is being recorded or the camera 100 pictures¢2
is moved, the burst speed will become faster. The number
of recordable pictures in the burst is limited to around 4 to
8 pictures.
• The focus, exposure, and White Balance are adjusted for
each picture recorded in the burst.
100 pictures¢2
[
]
([5 fps
AF-Continuous])
[ 10 ]
• The focus, exposure and White Balance are fixed to the
([10 fps AF-Single]) settings for the first picture.
[ 40 ]
([40 fps
AF-Single])¢3
[ 60 ]
([60 fps
AF-Single])¢3
[ ]
([Flash Burst])¢4
[OFF]
7 pictures
• The focus, exposure and White Balance are fixed to the
30 pictures
first picture.
• Pictures taken in the Burst Mode will be recorded as a
single burst picture group.
• The range that can be recorded will become smaller
60 pictures
when it is set to [ 60 ].
• Still pictures are taken continuously with flash.
• Settings for focus, zoom, exposure, shutter speed, ISO
sensitivity, flash output are fixed to the first picture.
• The flash setting is fixed to [‰ ].
5 pictures
—
¢1 This can be set only when Intelligent Auto Mode is set.
¢2 The number of Burst recording pictures are limited by the picture-taking conditions and the type
and/or status of the card used.
¢3 This item cannot be set in the Intelligent Auto Mode.
¢4 This option is available only in Program AE Mode.
- 111 -
Recording
• When [ 40 ], [ 60 ] or [
] is selected, the picture size setting will become as shown below.
Aspect ratio
[ 40 ]
[ 60 ]
[4:3]
[5M], [3M], [0.3M]
[2.5M], [0.3M]
[
[3M]
]
[3:2]
[4.5M], [2.5M], [0.3M]
[3M], [0.3M]
[2.5M]
[16:9]
[3.5M], [2M], [0.2M]
[3.5M], [0.2M]
[2M]
[1:1]
[3.5M], [2.5M], [0.2M]
[2M], [0.2M]
[2.5M]
• Depending on the operating conditions, it may take time to take the next picture if you repeat the
recording of pictures.
• It may take time to save pictures taken in Burst Mode on the card. If you take pictures
continuously while saving, the maximum number of recordable pictures decreases. For
continuous shooting, use of a high speed memory card is recommended.
• When [
] or [
] is set, focus prediction will be performed in a possible range to prioritize the
burst speed. Therefore, if you try to take a picture of a subject that is moving fast, it may have trouble
with focusing or it may take time to focus.
• When [ 10 ], [ 40 ] or [ 60 ] is set, the recording may be brighter or darker from the second picture
depending on changes in the brightness of the subject.
• Recording is performed by the electronic shutter when [ 40 ] or [ 60 ] is selected, so the recorded
picture may appear warped.
• When the Self-Timer is used, the number of recordable pictures in Burst Mode is fixed to 3.
(5 pictures in [ ])
• The burst speed (pictures/second) may become slower depending on the recording environment
such as in dark places, if the ISO sensitivity is high etc.
• Burst Mode is not canceled when the camera is turned off.
• The flash setting is fixed to [Œ] (except for [ ]).
• If you take pictures in Burst Mode with the built-in memory, it will take time to write the picture data.
• You cannot use the Burst in following conditions.
– [Toy Effect]/[Miniature Effect]/[Soft Focus]/[Star Filter] (Creative Control Mode)
– [Handheld Night Shot]/[HDR]/[Starry Sky]/[3D Photo Mode] (Scene Mode)
– When using [Time Lapse Shot]
- 112 -
Recording
[Time Lapse Shot]
Applicable modes:
You can set the recording start time, the recording interval and the number of pictures, and
automatically record subjects such as animals and plants as time elapses.
Pictures are recorded as a single Picture Group (P44).
You can create motion pictures using [Time Lapse Video] in [Playback] menu. (P164)
• Set the date and time settings in advance. (P28)
• It cannot be recorded into the built-in memory. Please use a card.
∫ Set the recording start time/interval/number of pictures
1
Press 3/4 to select the item and then press [MENU/SET].
Item
Description of settings
[Now]:
Starts the recording by fully-pressing the shutter button.
[Start Time Set]:
[Start Time]
[Shooting Interval]
[Image Count]
You can set the time to start recording. Any time up to 24 hours
ahead can be set.
Select the start time (hours/minutes) with 2/1, adjust with
3/4, and then press [MENU/SET] to set.
Sets the number of pictures to be taken and the recording interval.
Select the item (recording interval/number of pictures to be
taken) with 2/1, adjust with 3/4, and then press [MENU/
SET] to set.
[Shooting Interval]:
You can set the time ranging from 10 seconds to 1 minute in
10-second increments, and from 1 minute to 30 minutes in
1-minute increments.
• The setting may be available from a 1-minute interval or 5-minutes
interval depending on the shutter speed.
[Alert]
[Image Count]:
You can set the number of pictures ranging from 10 to 1000 in
10-picture increments.
[ON]:
The user is notified that recording is to start by a warning sound
and flashing AF assist lamp.
[OFF]:
There is no warning sound. Also, the AF assist lamp doesn’t flash.
- 113 -
Recording
2
Press 3/4 to select [Start Shooting] and then press [MENU/SET].
3
Press the shutter button fully.
• The recording starts automatically.
• If the recording interval is set to 40 seconds or more, this unit will turn off automatically while in
recording standby. [Time Lapse Shot] is continued even with the power turned off. When the
recording start time arrives, the power turns on automatically. To turn on the power manually,
press the camera [ON/OFF] button or press and hold [(].
• To stop the Time Lapse Shooting partway through, press [MENU/SET] or [(] with the power
turned on, and end the recording on the displayed confirmation screen.
• This function is not for use in a security camera.
• If you leave the unit somewhere to perform [Time Lapse Shot], please be careful of theft.
• Recording for long periods in cold places such as ski resorts or places at high altitude, or in
warm, wet environments may cause a malfunction, so please be careful.
• When the recording interval is set to a value of less than 1 minute and the previous recording has
not finished yet, recording may be skipped.
• We do not recommend using [Time Lapse Shot] while underwater.
• When the [Alert] is set to [ON], a warning sound will be emitted. Check this setting is suitable for the
recording environment.
• The unit is fixed to the zoom position prior to the start of recording.
• It cannot be used in the following case.
– [3D Photo Mode] (Scene Mode)
• When using [Time Lapse Shot], the GPS positioning does not work.
• We recommend to use a fully charged battery.
• In situations that require longer recording time such as when recording in [Starry Sky] of the Scene
Mode or when recording in a dark place, we recommend you use an AC adaptor (optional).
• We recommend that you use a tripod when performing [Time Lapse Shot] by using an AC adaptor
(optional).
• [Time Lapse Shot] will be canceled partway through in the following cases.
– When the charge on the battery runs out
– When the number of recordable pictures drops to none
• Do not connect the AV cable (optional), the HDMI micro cable (optional), or the USB connection
cable (supplied) during Time Lapse Shooting.
- 114 -
Recording
[Color Mode]
Applicable modes:
Sets various color effects, including making the picture sharper, brighter, or applying a sepia
tone.
Settings
Description of settings
[STANDARD]
This is the standard setting.
[Happy]¢1
Image with enhanced brightness and vividness.
[VIVID]¢2
The picture becomes sharper.
[B&W]
The picture becomes black and white.
[SEPIA]
The picture becomes sepia.
¢1 This can be set only when Intelligent Auto Mode is set.
¢2 This can be set only during Program AE Mode or Manual Exposure Mode.
[Color Reproduction]
Applicable modes:
• Refer to P82 for details.
[AF Assist Lamp]
Applicable modes:
AF assist lamp will illuminate the subject when the shutter button is pressed half-way making it
easier for the camera to focus when recording in low light conditions. (Larger AF area is
displayed depending on the recording conditions.)
Settings: [ON]/[OFF]
• The effective distance of the AF Assist Lamp is a maximum of approximately
1.5 m (4.9 feet).
• When you do not want to use the AF Assist Lamp A (e.g. when taking pictures of
animals in dark places), set the [AF Assist Lamp] to [OFF]. In this case, it will
become more difficult to focus on the subject.
• [AF Assist Lamp] is fixed to [OFF] in the following cases.
– [Scenery]/[Night Scenery]/[Handheld Night Shot]/[Sunset]/[Glass Through] (Scene Mode)
- 115 -
Recording
[Red-Eye Removal]
Applicable modes:
When Red-Eye Reduction ([
], [
]) is selected, Red-Eye Removal is performed
whenever the flash is used. The camera automatically detects red-eye and corrects the picture.
Settings: [ON]/[OFF]
• Only available when [AF Mode] is set to [š] and Face Detection is active.
• Under certain circumstances, red-eye cannot be corrected.
[Stabilizer]
Applicable modes:
Using this mode, jitter during picture taking is detected, and the camera automatically
compensates for the jitter, enabling jitter-free images to be taken.
Settings: [ON]/[OFF]
• The setting is fixed to [OFF] in the following cases.
– [Starry Sky]/[3D Photo Mode] (Scene Mode)
• The setting is fixed to [ON] in the following cases.
– [Handheld Night Shot] (Scene Mode)
– When recording motion pictures
• The stabilizer function may not be effective in the following cases.
Be careful of camera jitter when you press the shutter button.
– When there is a lot of jitter.
– When the zoom magnification is high.
– In Digital Zoom range.
– When taking pictures while following a moving subject.
– When the shutter speed becomes slower to take pictures indoors or in dark places.
- 116 -
Recording
[Date Stamp]
Applicable modes:
You can take a picture with date and time of recording.
Settings
Description of settings
[W/O TIME]
Stamp the year, month, and day.
[WITH TIME]
Stamp the year, month, day, hour, and minutes.
[OFF]
—
• Date information for pictures recorded with the [Date Stamp] set cannot be deleted.
• When printing pictures with [Date Stamp] at a shop or with a printer, the date will be printed
on top of the other if you choose to print with the date.
• If the time has not been set, you cannot stamp with the date information.
• The setting is fixed to [OFF] in the following cases.
– When using Auto Bracket
– [3D Photo Mode] (Scene Mode)
– When using [Burst]
– When recording motion pictures
• [Text Stamp], [Resize] and [Cropping] cannot be set for pictures recorded with [Date Stamp] set.
• Even if you take a picture with [Date Stamp] set to [OFF], it is possible to stamp dates onto the
recorded pictures using [Text Stamp] (P160) or setup the Date print (P169, 228).
[Clock Set]
• Refer to P28 for details.
- 117 -
Recording
Using the [Motion Picture] Menu
For details on [Motion Picture] menu settings, refer to P48.
• The [Motion Picture] menu is not displayed in the following cases.
– [Soft Focus]/[Star Filter] (Creative Control Mode)
– [3D Photo Mode] (Scene Mode)
[Rec Format]
Applicable modes:
This sets up the data format of motion pictures.
Settings
Description of settings
[AVCHD]
This data format is suitable for when playing back on a high-definition TV,
etc.
[MP4]
This data format is suitable for when playing back on a PC, etc.
- 118 -
Recording
[Rec Quality]
Applicable modes:
This sets up the picture quality of motion pictures.
When [AVCHD] is selected
Item
[FHD/60p]¢1
[FHD/60i/
Size
Frame rate
Bit rate
1920k1080
60p
28 Mbps
1920k1080
60i
17 Mbps
1280k720
60p
17 Mbps
Frame rate
Bit rate
Aspect ratio
]¢1,2
[FHD/60p/
]¢2
16:9
[FHD/60i]
[HD/60p/
]¢2
[HD/60p]
¢1 AVCHD Progressive
¢2 GPS information can be recorded.
When [MP4] is selected
Item
Size
[FHD/30p]
1920k1080
[HD/30p]
1280k720
[VGA/30p]
640k480
4 Mbps
Format
GPS information can be recorded
Size
Frame rate
A
Aspect ratio
20 Mbps
16:9
30p
10 Mbps
4:3
∫ Indication of the icon
A
B
C
D
C
B
AVCHD
FHD 60p
D
• What is bit rate
This is the volume of data for a definite period of time, and the quality becomes higher when the
number gets bigger. This unit is using the “VBR” recording method. “VBR” is an abbreviation of
“Variable Bit Rate”, and the bit rate (volume of data for definite period of time) is changed
automatically depending on the subject to record. Therefore, the recording time is shortened when a
subject with fast movement is recorded.
- 119 -
Recording
[Continuous AF]
Applicable modes:
It will continually keep on focusing to the subject that the focus was once set.
Settings: [ON]/[OFF]
• Set this function to [OFF] if you wish to fix the focus on the position where you started the motion
picture recording.
• The setting is fixed to [OFF] in the following case.
– [Starry Sky] (Scene Mode)
[Wind Cut]
Applicable modes:
This prevents the recording of wind-noise automatically.
Settings: [AUTO]/[OFF]
• Sound quality will be different than usual when [Wind Cut] is set.
• It is fixed to [OFF] in the following case.
– [Miniature Effect] (Creative Control Mode)
- 120 -
GPS/Sensor
Recording using the GPS function
Applicable modes:
Before use, read “About the GPS” on P9 and “User License Agreement for Location Name
data” on P241.
∫ About the “GPS”
GPS is an abbreviation of [Global Positioning System], which is a system that allows you to
check your position utilizing GPS satellites.
Calculating the current position by receiving radio waves including orbit information and clock
information from multiple GPS satellites is called positioning.
This unit is also compatible with the “GLONASS” satellite positioning system operated by the
Russian government.
The unit can record location name information and latitude/longitude for the recorded image
and automatically correct the time.
∫ Receiving signals from GPS satellites
• It is recommended to use by holding the camera still for a while at an outdoor location clear
to the sky, with the antenna pointed upward.
• Radio waves from GPS satellites cannot be received properly at the following locations, so the
positioning may not be possible or a significant error may occur.
– Indoor/underground or underwater/in the woods/traveling in a train or a car etc./close to or
between buildings/close to high voltage lines/inside a tunnel/close to mobile phones working on
1.5 GHz band etc.
• Do not cover the GPS antenna with your hands etc.
• Do not carry the unit inside a metallic case or similar when positioning. Positioning is not possible
when the unit is covered by metal etc.
- 121 -
GPS/Sensor
Acquiring of the GPS information
When [GPS Setting] is set to [ON], positioning is performed at regular intervals. When the
positioning is successful, location name information and latitude/longitude are acquired. For
details on the screen display for the acquired information, read “About the display of positioning
status and positioning results” on P123.
• If GPS automatic time correction is set in the time settings at the time of purchase, [GPS Setting] will
be set to [ON] automatically.
1
Select [GPS Setting] on the [GPS/Sensor] menu, and then press [MENU/
SET].
2
Press 3/4 to select the settings and then press [MENU/SET].
Settings
[ON]
Description of settings
Set the unit to receive the GPS satellite radio waves.
• Positioning continues even when this unit is turned off.
[OFF]
[INFO]
—
You can confirm and update the current reception status.
• It is displayed when [ON] is set.
• For detail, refer to “Update the GPS information” on P125.
• Exit the menu after it is set.
• GPS status indicator is lit during the positioning. Also,
when the GPS status indicator is lit with this unit is turned
off, [GPS Setting] is set to [ON].
A GPS status indicator
• When [GPS Setting] is set to [ON], the GPS function will operate even when this unit is turned
off. Electromagnetic waves from this unit may affect other electronic devices, so set
[GPS Setting] to [OFF] or [Airplane Mode] to [ON] and turn the unit off when you carry this
unit onboard an airplane or inside a hospital, etc.
- 122 -
GPS/Sensor
About the display of positioning status and positioning results
When the GPS begins positioning, an icon indicating the
positioning status is displayed on the recording screen. When
the positioning is successful, the location name information and
latitude/longitude are displayed.
B
C
A
A Location name information
B Icon indicating positioning status
C Icon indicating positioning results
∫ About the Icon indicating positioning status
Positioning is performed by this unit when radio waves from 3 or more GPS satellites are
received.
• The bar moves up the scale according to the number of GPS satellites from which signals are being
received.
When the bar has filled the scale and positioning has been successful, the indicator goes blue.
[
]: The acquiring of the latitude/longitude is complete.
[
]: The searching for the location name is complete.
• Even when reception is good, there may be times when positioning is not possible due to the status
of the GPS satellites. In this case, we recommend performing [Repositioning] (P125).
∫ About the Icon indicating positioning results
Elapsed time after successful positioning
[
] Within the last 5 minutes
[
] Between 5 minutes and 1 hour ago
[
] Between 1 hour and 2 hours ago
[
] More than 2 hours ago
[
] When there is no positioning data
- 123 -
GPS/Sensor
∫ When positioning is taking a long time
Under the following conditions, successful positioning may take 2 to 3 minutes even when
reception is good.
• When positioning is performed for the first time
• When reception has been poor for a significant time
• After changing the battery
• When the camera has been left for a significant time without being turned on
• When the camera has been moved a long way from the last location of successful reception
• When [GPS Setting] is set to [OFF]
• When [Airplane Mode] is set to [ON] and this unit is turned off
• Using GPS assist data can reduce the time required for positioning. (P128, 131)
∫ Displayed location name information
• Country/region
• Prefecture/state
• City/ward/county
• Town/village
• Landmark
• Latitude/longitude (displayed by pressing [DISP.] several times to switch among the environment
information screen)
The location name information and latitude/longitude displayed on success of the positioning
are recorded in the recorded still pictures and motion pictures¢. When playing back images,
[ ] is displayed on those with which location name information have been recorded, and
[
] is displayed on those with which location information have been recorded.
¢ Information can only be recorded when recording using [MP4] or [FHD/60p/ ]/[FHD/60i/ ]/[HD/
60p/ ] in [AVCHD]. Note that only the information measured at the start of the recording is
recorded.
Valid information for the current position is displayed as location name information by searching
the location names and landmarks in the database in this unit based on the latitude/longitude
from the positioning. (It may not display the closest location.)
• [---] is displayed when there is no valid information even when the positioning is successful.
• Even when the location name information is displayed as [---], it may be possible to select the
location name information with [GPS Area Select] (P126).
• Desired landmark may not be registered. Location name information is as of October 2012. For
details of the types of landmark, refer to “Landmark types” on P246.
• Location name information (location names or landmark names) may be different from the official
names.
Immediately after positioning has been achieved (and until the location name information can
be displayed), only latitude/longitude is recorded in the recorded image. Even if a positioning
attempt has failed during recording, location information may be recorded later when an
attempt succeeds.
• When playing back images containing only latitude/longitude, you can add location name
information.
- 124 -
GPS/Sensor
Update the GPS information
When the displayed location name information is different from the current location or when the
positioning is not successful, move to a location where the radio waves from GPS satellites can
be received better and perform the positioning update.
• When significant time has elapsed since the last successful positioning ([ ], [ ], [ ] and [ ]
are displayed), we recommend performing a positioning update.
Select [Repositioning] on the [GPS/Sensor] menu, and then press [MENU/
SET].
• Positioning is started and the current location information is updated once the positioning is
successful.
∫ Checking the GPS reception status before updating
1
2
3
Select [GPS Setting] on the [GPS/Sensor] menu, and then press [MENU/SET].
Press 3/4 to select [INFO] and then press [MENU/SET].
• Last updated positioning result is displayed.
[
]
Time positioning was performed
[
]
Number of GPS satellites received from
[
]
Latitude
Longitude
Press [MENU/SET] in the information confirmation screen.
• Positioning is started and the current location information is updated once the positioning is
successful.
∫ About automatic updating of positioning
• Even if you do not perform [Repositioning], it will perform the positioning automatically right after this
unit is turned on, and in constant time intervals.
• When [GPS Setting] is set to [ON], the unit will continue to perform the positioning at a constant time
interval even if this unit is turned off. Note that if [Airplane Mode] has been set to [ON], positioning
will not be performed when this unit is turned off.
• Positioning with this unit turned off is canceled in the following cases:
– When the remaining battery power becomes [
]
– When this unit is not turned on for a specific period of time
- 125 -
GPS/Sensor
Change the recorded location name information
When the information acquired by the positioning is different from the current location, it is
possible to change it by selecting the desired location name or landmark from the selectable
candidates registered in the database of this unit.
] is displayed with the location name
• Other location name information can be selected when [
information.
1
Select [GPS Area Select] on the [GPS/Sensor] menu, and then press
[MENU/SET].
2
Press 3/4 to select the item to change, and then press [MENU/SET].
3
Press 3/4 to select the location name or landmark from the candidates,
and then press [MENU/SET].
∫ When not storing the location name or the landmark in the recorded pictures
When not storing all the location name information:
Select [Delete all place-names] in above step 2.
– Confirmation screen is displayed. All the displayed location name information is deleted and the
information will not be stored from the next time a picture is recorded when [Yes] is selected.
When not storing specific location name information:
Select [Delete country], etc., in above step 3.
– Confirmation screen is displayed. All the items inferior to the deleted item are deleted and the
information will not be stored from the next time a picture is recorded when [Yes] is selected.
(Example: When the [State/Prov./County] is deleted, [County/Township], [City/Town/Village] and
[Landmark] that are inferior to it are also deleted.)
• To restore the location name information deleted, set them again.
• When desired location name or landmark is not displayed among the candidates, perform
[My Landmark] (P127) before taking a picture, or perform [Place-Name Edit] (P159) after taking a
picture.
• Latitude/longitude is not deleted even when the location name or landmark is deleted. Turn
[GPS Setting] to [OFF] if you would not like to store the latitude/longitude.
- 126 -
GPS/Sensor
Switch between displaying and hiding the location name information
Switches the displaying and hiding of the location name information displayed on the screen.
1
Select [Area Info. Set] on the [GPS/Sensor] menu, and then press [MENU/
SET].
2
Press 3/4 to select the item to change, and then press [MENU/SET].
3
Select [ON] for the items to display and [OFF] for the items not to display
by pressing 3/4, and then press [MENU/SET].
Register additional landmarks
Additionally register new landmarks in the database of this unit. It can be displayed on the
screen or stored as a positioning result once registered.
1
Select [My Landmark] on the [GPS/Sensor] menu, and then press [MENU/
SET].
2
Press 3/4 to select [None], and then press [MENU/SET].
• Confirmation screen is displayed. Positioning is started when [Yes] is selected.
• Current location information is displayed once the positioning is successful.
3
4
After confirming the GPS information, press [MENU/SET].
Enter landmark name.
• For details on how to enter characters, refer to “Entering Text” on P94.
∫ Change or delete registered landmark names
1 Select registered landmark name in above step 2, and then press [MENU/SET].
2 Press 2/1 to select [Edit] or [Delete], and then press [MENU/SET].
• Text input screen is displayed when [Edit] is selected. Enter the landmark name again.
• The registered landmark is deleted when [Delete] is selected.
• Up to 50 landmarks can be additionally registered.
• The only information that can be registered is landmark names. Place names such as city, town or
village names cannot be registered.
- 127 -
GPS/Sensor
Reducing the Time Required for Positioning
Applicable modes:
You can reduce the time required for positioning by copying the predicted satellite information
(GPS assist data) of GPS satellites required for positioning to the camera in advance.
• To acquire/update the GPS assist data, you can use the “GPS Assist Tool” on your PC, or use the
Wi-Fi function.
• GPS assist data cannot be used if the clock has not been set.
• The validity period of GPS assist data is 30 days.
• GPS assist data is updated once a day.
• The service that provides GPS assist data may change or end without notice.
(This service is as of January 2013)
Update using the “GPS Assist Tool”
Using the “GPS Assist Tool” will download the GPS assist data from the internet and update the
GPS assist data on the unit.
∫ PC that can be used
The PC that can connect to the internet is required.
• For Windows:
Windows XP/Windows Vista/Windows 7/Windows 8
• For Mac:
OS X v10.4 ~ v10.8
• If the “GPS Assist Tool” cannot be used, download the GPS assist data from the support site and
copy it to the card.
To connect to the support site, double-click “GPSASIST.HTM” that is displayed when connecting the
unit to a PC, or copying the “GPS Assist Tool” to the card. For details about downloading the GPS
assist data, etc., refer to the support site.
∫ Changing the proxy settings
Perform the proxy settings only if the GPS assist data cannot be updated successfully when
the PC is connected to the Internet via proxy.
1 Launch the “GPS Assist Tool”, and click [Settings] on the screen of the PC.
2 Perform the proxy settings
• For Windows:
Enable [Use proxy server.] and change the settings.
• For Mac:
Change the settings using the network settings screen of the displayed system environment
settings screen.
- 128 -
GPS/Sensor
∫ Update by connecting this unit to a PC
Preparation:
Close all other running applications.
1
Select [Assist Data] on the [GPS/Sensor] menu, and then press [MENU/
SET].
2
3
4
Press 3/4 to select [Update], and then press [MENU/SET].
Press 3/4 to select [Connect USB], and then press [MENU/SET].
Connect the PC and camera with the USB connection cable (supplied).
• Check the directions of the connectors, and plug them straight in or unplug them straight out.
(Otherwise the connectors may bend out of shape which will cause a malfunction.) Do not
connect devices to incorrect terminals. Doing so may cause malfunction.
• Do not use any other USB connection cables except the supplied one or a genuine
Panasonic USB connection cable (DMW-USBC1: optional).
A USB connection cable (supplied)
B Align the marks, and insert.
5
Launch the “GPS Assist Tool” with the PC.
For Windows:
Double-click [GPSASIST.EXE] stored in the connected camera.
For Mac:
1 Double-click [GPSASIST.DMG] stored in the connected camera.
2 Double-click [GPSASIST].
6
Click [Update] on the screen of the PC.
• Proceed with the steps according to messages appearing on the PC.
When the update is complete, click [Exit].
• Do not disconnect the unit from the PC until the data has been updated.
7
Disconnect the unit from the PC and remove the USB connection cable.
• You can also update the GPS assist data if [USB Mode] (P59) is set to [GPS assist data] in [Setup]
menu, when you connect this unit to a PC.
- 129 -
GPS/Sensor
∫ Using a card reader/writer (commercially available)
Preparation:
Close all other running applications.
Insert the card into the unit.
1
Select [Assist Data] on the [GPS/Sensor] menu, and then press [MENU/
SET].
2
3
Press 3/4 to select [Update], and then press [MENU/SET].
Press 3/4 to select [SD card], and then press [MENU/SET].
• The “GPS Assist Tool” is copied to the card.
4
5
Turn this unit off and remove the card.
6
Launch the “GPS Assist Tool” with the PC.
Insert the card into the card reader/writer (commercially available) that is
connected to the PC.
For Windows:
Double-click [GPSASIST.EXE] stored in the [AD_LUMIX] folder of the card.
For Mac:
1 Double-click [GPSASIST.DMG] stored in the [AD_LUMIX] folder of the card.
2 Double-click [GPSASIST].
7
Click [Update] on the screen of the PC.
• Proceed with the steps according to messages appearing on the PC.
When the update is complete, click [Exit].
• Do not disconnect the unit from the PC until the data has been updated.
8
9
Remove the card.
Insert the card into this unit and turn the unit on.
• The GPS assist data of this unit is updated.
- 130 -
GPS/Sensor
Update using the Wi-Fi Function
The GPS assist data can be updated by connecting to a wireless access point that is
connected to the internet.
1
Select [Assist Data] on the [GPS/Sensor] menu, and then press [MENU/
SET].
2
3
Press 3/4 to select [Update], and then press [MENU/SET].
Press 3/4 to select [Wi-Fi], and then press [MENU/SET].
• The GPS assist data is updated.
• The Wi-Fi connection setting screen will be displayed if the Wi-Fi connection settings have
not been configured. For details on setting the Wi-Fi connection, refer to P185.
• The connection used to update GPS assist data with the Wi-Fi function will not remain in [History
Connection] in [Wi-Fi] menu. The connection cannot be registered to [Favorite Connection] either.
Check the validity period of the GPS assist data
The validity period of GPS assist data is 30 days. Using new GPS assist data is recommended.
1
Select [Assist Data] on the [GPS/Sensor] menu, and then press [MENU/
SET].
2
Press 3/4 to select [Expiry Date], and then press [MENU/SET].
• When launching the “GPS Assist Tool” on the PC, the validity period can also be checked on the
screen.
• The start date of the validity period may differ to the date of the update due to the timing of the GPS
assist data update.
- 131 -
GPS/Sensor
GPS Logs
Applicable modes:
Record GPS Logs
Location information acquired in the GPS positioning is recorded continuously as a GPS log.
• GPS logs are not recorded to the built-in memory. Please use the card.
1
Select [GPS Log] on the [GPS/Sensor] menu, and then press [MENU/
SET].
2
Press 3/4 to select [Log Record], and then press [MENU/SET].
• The message is displayed. Press [MENU/SET], and perform the operation of step 8 in
“Setting Date/Time (Clock Set)” (P28). (first time only)
3
Set [Recording interval] and [Recording duration].
[Recording
interval]
[Recording
duration]
4
[60 SEC.], [30 SEC.], [15 SEC.]
• Depending on the radiowave reception conditions, log recording intervals
may be longer.
[ENDLESS], [48HRS], [24HRS], [12HRS], [6HRS]
• To continue recording a log without setting an end time, set to
[ENDLESS].
Press 3/4 to select [Start] and then press [MENU/SET].
•[
] is displayed while recording.
∫ End recording GPS log
1 Select [GPS Log] on the [GPS/Sensor] menu, and then press [MENU/SET].
2 Press 3/4 to select [Log Record], and then press [MENU/SET].
3 Press 3/4 to select [End], and then press [MENU/SET].
• GPS log recording will end in the following case.
– When the remaining battery power becomes [
• In the following cases, the file will be divided.
– Changing the date
– Changing the [World Time] area (time zone)
]
- 132 -
GPS/Sensor
Output GPS logs to files
GPS logs are saved as NMEA format files.
GPS logs can be output to KML format files.
1
Select [GPS Log] on the [GPS/Sensor] menu, and then press [MENU/
SET].
2
3
Press 3/4 to select [KML File Output], and then press [MENU/SET].
Select the recording date of the GPS Log, and then press [MENU/SET].
• Confirmation screen is displayed. It is executed when [Yes] is selected.
Exit the menu after it is executed.
• [±] is displayed on the GPS log that has already been output to the KML file.
∫ GPS log storage location
GPS logs will be saved in the following location on the card.
• Card
DCIM
1 GPS log file
MISC
PRIVATE
AD_LUMIX
GPSLOG
KML
NMEA
• This unit can display up to only 1000 GPS logs.
• For details on how to display the GPS log on the PC, and the compatible file formats that can be
used, refer to the operating instructions of the application you are using.
- 133 -
GPS/Sensor
Delete GPS Logs
1
Select [GPS Log] on the [GPS/Sensor] menu, and then press [MENU/
SET].
2
3
Press 3/4 to select [Delete Log], and then press [MENU/SET].
Press 3/4 to select settings, and then press [MENU/SET].
Settings
Description of settings
Deletes 1 GPS log.
[1 DAY]
Press 3/4 to select the log you want to delete, and then press
[MENU/SET].
[ALL]
Deletes all GPS logs.
• Confirmation screen is displayed. It is executed when [Yes] is selected.
Exit the menu after it is executed.
• If a file has been output to KML format, both the file in NMEA format and the one in KML format will
be deleted.
- 134 -
GPS/Sensor
Sensors (compass/altimeter/barometer) are
operated
Applicable modes:
The direction, altitude, and atmospheric pressure can be measured and recorded in the
recorded images.
• If compass/altimeter/barometer are operated in the time settings (P28) at the time of purchase,
[Sensor Settings] will be set to [ON] automatically.
1
Select [Sensor Settings] on the [GPS/Sensor] menu, and then press
[MENU/SET].
2
Press 3/4 to select [ON], and then press
[MENU/SET].
• Exit the menu after it is set.
• To switch the environment information screen, press
[DISP.] several times.
A
B
C
D
E
F
A
10
B
C
D
E
Compass
Altimeter
Latitude
Longitude
Time positioning was performed
Barometer
0ft
N
N
5
0
-5
-10
N
00' 00' 00.00
E
000' 00' 00.00
GPS
10:00 DEC.1
10:00 DEC.1.2013
1013hPa
-24H
F
0H
• When [GPS Setting] is set to [OFF], the latitude/longitude and positioning timing are not displayed.
• They keep working when this unit is turned off. If you do not wish the compass/altimeter/barometer
to keep working when this unit is turned off, set [Airplane Mode] to [ON]. (P53)
• For motion pictures¢, the direction, altitude and atmospheric pressure measured at the start of the
recording are recorded.
¢ When recording using [MP4] or [FHD/60p/
]/[FHD/60i/
- 135 -
]/[HD/60p/
] in [AVCHD]
GPS/Sensor
Using the altimeter
Applicable modes:
You can check the altitude of the current location.
Altimeter is not adjusted at the time of purchase.
• Displaying range is j600 m (–2000 feet) to 9000 m (30000 feet).
• A depth meter will be displayed instead of the altimeter in Beach &
Snorkeling mode.
For details about the depth meter, please read P81.
A B
10
5
N
N
0
-5
-10
A Altitude
B Current altitude
0ft
N
00' 00' 00.00
E
000' 00' 00.00
GPS
10:00 DEC.1
10:00 DEC.1.2013
1013hPa
-24H
0H
∫ About altitude conversion
The displayed altitude is a relative altitude¢1. The altitude is a value calculated by converting an
atmospheric pressure within the unit to an altitude with 0 m (0 feet) (sea level) u 1013 hPa¢2 as
a reference.
Altitude
Atmospheric pressure
Approx. 8 hPa per 100 m (328 feet)
Approx. 9 hPa per 100 m (328 feet)
Approx. 10 hPa per 100 m
(328 feet)
Approx. 11 hPa per 100 m
(328 feet)
Approx. 12 hPa per 100 m
(328 feet)
¢1 Altitude can be expressed in two forms — as an altitude above sea level (absolute height from
sea surface) or as a relative altitude (difference in altitude between two locations). This unit
displays a relative altitude estimated by a method which uses the relationship between the
altitude and atmospheric pressure in the ISA [International Standard Atmosphere], as specified by
the ICAO [International Civil Aviation Organization].
¢2 “hPa (hectopascal)” is a unit used to represent atmospheric pressure.
¢3 Readings fluctuate with the weather. Adjust frequently with [Adjust] (P137) in [Altimeter].
- 136 -
GPS/Sensor
Adjusting the Altimeter
The altimeter can be adjusted manually or using GPS.
To measure altitude with greater accuracy, we recommend that you perform [Adjust] regularly
by comparing a reference altitude on a sign or other accurate altitude information with the
altitude indicated by the unit.
1
Select [Altimeter] on the [GPS/Sensor] menu, and then press [MENU/
SET].
2
Press 3/4 to select [Adjust], and then press [MENU/SET].
3
Press 3/4 to select the settings, and then press [MENU/SET].
Settings
[GPS]
Description of settings
Use the GPS information to adjust the altimeter.
• The [GPS Setting] turns [ON] automatically.
• The adjusted altitude may show errors of more than approximately d50 m
(164 feet) depending on the positions of the GPS satellites. When the
error is too large, we recommend that you select [ON] and make manual
adjustments.
• Even when GPS positioning is successful, the altitude can be affected by
satellite positioning and signal conditions. In this case, the altimeter will
not be adjusted.
• When [GPS Setting] is set to [OFF], [Adjust] is automatically set to [ON].
Adjust the altitude manually.
[ON]
Press 2/1 to select the items, and press 3/4 to set.
• It can be adjusted to between j599 m (–1999 feet) and 8999 m
(29999 feet).
[OFF]
The adjusted altitude value is restored to the value which is before you
adjust.
- 137 -
GPS/Sensor
∫ Example of adjusting the altitude manually
(measuring the height from the ground to the roof of a building)
1
2
3
Set [ON] in [Adjust] in [Altimeter] on the ground A, and then
set the altimeter to 0 m (0 feet).
Move from the ground A to the roof B.
Check the altitude measured on the roof B.
A Ground
B Roof
C Height of building
(relative altitude)
• When [Adjust] is set to [GPS], the altitude prior to and after recording can vary according to the
timing at which GPS data is received.
• Adjustment is not possible when the measured value exceeds the display range. It will display [----].
• With the displaying of the relative altitude, it may display with negative numbers even if it is higher
than sea level depending on the value adjusted with [Adjust] in [Altimeter].
• After adjustment, errors of a few metres may still occur. For information on preserving the adjusted
accuracy, read “About the measured altitude and atmospheric pressure” (P143).
- 138 -
GPS/Sensor
Adding an altimeter log
The altitude is recorded at 15 minute intervals and displayed as a graph.
• Set the date and time settings in advance. (P28)
• It cannot be recorded into the built-in memory. Please use a card.
1
Select [Altimeter] on the [GPS/Sensor] menu, and then press [MENU/
SET].
2
Press 3/4 to select [Logging], and then press [MENU/SET].
3
Press 3/4 to select [ON], and then press
[MENU/SET].
A Altimeter log 12 hours before
B Latest altimeter log
6000ft
0ft
-12H
0H
A
B
• Press [DISP.] several times on the recording standby
screen until the altitude graph display screen appears. You can view a graph of the altimeter
log for the last 12 hours.
The period up to when the [Logging] is set to [OFF] is saved as a single log file.
In the following cases, even if [Logging] is not set to [OFF], the record of the altitude as a
single log file will be interrupted.
• When the time settings are changed (including [Auto Clock Set])
• When the [World Time] setting is changed
• When the battery remaining is [
]
• When there is insufficient space on the card
• In the following cases, altitude is not recorded.
– When [Airplane Mode] is set to [ON] and this unit is turned off
– When [Sensor Settings] is set to [OFF]
– Beach & Snorkeling Mode
– Advanced Underwater Mode
– When using [Time Lapse Shot]
– When connecting to a PC or a printer
– When recording motion pictures
- 139 -
GPS/Sensor
Viewing the altimeter log
You can specify the period of the recorded altimeter log to display.
1
Select [Altimeter] on the [GPS/Sensor] menu, and then press [MENU/
SET].
2
Press 3/4 to select [Display Log], and then press [MENU/SET].
3
Press 3/4 to select the recording start date, and press
[MENU/SET].
'(&
'(&
'(&
'(&
• This unit can display up to only 1000 altimeter logs.
4
Press 3/4/2/1 to select a date at which to start the
period to display, and press [MENU/SET].
SUNMONTUE WED THU FRI SAT
• It will not be displayed, if the date to start and the date to finish is the
2
3
4
5
6
7
8
9
10
11
12
13
14
15
1
16
17
18
19
20
21
22
23
24
25
26
27
28
29
30
31
12 2013
same.
∫ About the altitude graph
The altitude graph is displayed with the highest altitude in the log as the
upper limit and the lowest altitude as the lower limit.
6000ft
0ft
0
[W]/[T] Switches between the 12 hour display and the 48 hour display
2/1
Moves the log left and right
• Move the log in units of 3 hours on the 12 hour display.
• Move the log in units of 12 hours on the 48 hour display.
- 140 -
3
6
9
12
GPS/Sensor
Deleting the altimeter log
You can delete part of the altimeter log by specifying a period.
1
Select [Altimeter] on the [GPS/Sensor] menu, and then press [MENU/
SET].
2
Press 3/4 to select [Delete Log], and then press [MENU/SET].
3
Press 3/4 to select the recording start date, and press [MENU/SET].
• Confirmation screen is displayed. It is executed when [Yes] is selected.
Exit the menu after it is executed.
- 141 -
GPS/Sensor
Using the barometer
Applicable modes:
With the current atmospheric pressure as a reference, it is
displayed on the graph within the range of j10 hPa to
_10 hPa.
(Atmospheric pressure out of range cannot be displayed in
details)
1013hPa
+10 hPa
-10 hPa
A 24 hours earlier
B Current
C Time periods for which history was not recorded (white
portion)
D Atmospheric pressure information in 90 minute intervals
− 24H
0H
• The barometer is an indicator of changes between fine weather and rain.
– When the atmospheric pressure rises: Weather tends to recover
– When the atmospheric pressure drops: Weather tends to worsen
• In the following cases, atmospheric pressure is not recorded on the graph.
– When [Sensor Settings] is set to [ON], the battery is low, and this unit is turned off
– When [Airplane Mode] is set to [ON] and this unit is turned off
– When [Sensor Settings] is set to [OFF]
• When the displayable range (current atmospheric pressure of j10 hPa to _10 hPa from the
reference pressure) is exceeded, the atmospheric pressure will not be displayed correctly.
- 142 -
GPS/Sensor
∫ About the measured altitude and atmospheric pressure
• Altitude value may show errors depending on the change in atmospheric pressure compared to
areas such as locations with altimeter reference signs. Perform frequently with [Adjust] in [Altimeter].
• Altitude announced onboard an airplane is measured using the atmospheric pressure surrounding
the airplane. It does not match the altitude actually measured inside the airplane.
• Even if the unit is fixed at a constant altitude, the measured altitude may fluctuate due to the effects
of change in atmospheric pressure.
In coastal areas, the altitude changes by 1 m (3.3 feet) per 0.12 hPa.
• Altitude and atmospheric pressure may not be measured
accurately in the following cases:
– When there is a significant change in weather conditions
(Pressure and air temperature)
– When there is a movement with a rapid change in altitude
– When pressure is applied to the front or rear of this unit¢1
– When this unit is wet (after using underwater, etc.)¢2
– When closing the side door¢2
¢1 Hold this unit as shown in the figure when measuring.
¢2 It will adapt to the ambient atmospheric pressure within a few minutes, and display correct
measurement values.
- 143 -
GPS/Sensor
Using the compass
Applicable modes:
16 bearings are measured based on the direction the lens of
the camera is pointing in.
• The colored portion of the compass needle points north.
• When [GPS Setting] is set to [OFF], magnetic declination is not
North
corrected.
About the declination adjustment
Earth is a giant magnet with the South Pole at the Geographic North Pole and the North Pole
at the Geographic South Pole, and the magnetism the Earth has is called “geomagnetism”.
There is a difference between the angle of the “magnetic north” that a magnetic compass
points to and the geographical “true north” due to the effect of the “geomagnetism”. The
difference between these angles is called “declination”.
The compass in this unit points “true north”, when it corrects “magnetic declination” based on
the latitude and longitude acquired in the GPS positioning.
• The size of the magnetic declination can change as you move to different locations, so we
recommend that you set [GPS Setting] to [ON] and perform positioning regularly to update
your latitude/longitude.
• It may not measure correctly when you measure with this unit upside down.
• The bearing measurement value may be affected in locations with weak geomagnetism.
• It may not measure accurately if close to the following objects:
– Permanent magnets (metals in magnetic necklaces, etc.)/metallic objects (steel desks, lockers,
etc.)/high-voltage lines or overhead wires/household appliances (TVs, PCs, mobile phones,
speakers, etc.)
• It may not measure accurately in the following locations:
– Inside cars/trains/ships/airplanes/rooms (when the steel beams are magnetised)
- 144 -
GPS/Sensor
Adjusting the compass
When [
] is displayed on the compass, perform [Calibrate compass].
1
Select [Calibrate compass] on the [GPS/Sensor] menu, and then press [MENU/SET].
2
Securely hold the unit vertically, and adjust by
turning it in a figure of 8 by rolling your wrist a few
times.
• An adjustment completed message is displayed when
the adjustment is successful.
• Perform the adjustment with the strap around your wrist to avoid dropping the unit.
• When the adjustment fails, move to a location with no effect from surrounding magnetism, and
perform the adjustment again.
• When the compass cannot acquire directions due to the presence of an object nearby with a strong
magnetic field, etc., [
] will be displayed.
- 145 -
Playback/Editing
Various methods of playback
You can play back the recorded pictures in various methods.
1
Press [(].
2
Press [MODE].
3
Press 3/4/2/1 to select item, and then press [MENU/SET].
• Following items can be selected.
[
] ([All]) (P42)
[
] ([2D/3D Settings])¢
[
] ([Slide Show]) (P147)
[
] ([Filtering Play]) (P149)
[
] ([Calendar]) (P152)
¢ The playback method for the 3D pictures can be switched. This item is only displayed
during HDMI output. Refer to P217 for details about the playback method.
- 146 -
Playback/Editing
[Slide Show]
Recorded pictures can be played back in fixed intervals in order along with music. It is also
possible to playback only the still pictures, only the motion pictures, only the 3D pictures, or
pictures recorded with the location name information or the altitude information, etc., as a slide
show. This method of playback is recommended when connecting to a TV and viewing the
pictures.
Press 3/4 to select [Start] and then press [MENU/SET].
∫ Operations performed during slide show
The cursor displayed during playback is the same as 3/4/2/1.
3 Play/Pause
Reduce volume level
4 Stop
2 Back to previous picture
Increase volume level
1 Ahead to next picture
∫ To filter images for slide show playback
You can filter images and play them back in a slide show by selecting
[Filtering] on the slide show menu screen.
• If you select [All], you can play back all images in a slide show.
You can also filter images by using the same setting as [Filtering Play]. Refer
to P149–151 for the setting.
• The filter settings are stored even after terminating slide show playback. To
cancel filtering, refer to P149.
- 147 -
Playback/Editing
∫ Changing the slide show settings
By selecting [Setup] on the slide show menu screen, you can change the
settings such as [Effect] and [Duration] for slide show playback.
Settings
[Effect]
Description of settings
This allows you to select the screen effects or music effects when switching
from one picture to the next.
[NATURAL], [SLOW], [SWING], [URBAN], [OFF]
• When [URBAN] has been selected, the picture may appear in black and
white as a screen effect.
• Some [Effect] will not operate when playing back pictures displayed
vertically.
• Even if [Effect] is set, it does not work during a slide show of Group
Pictures.
• Screen effects do not operate during a [3D Play] slide show.
• [Effect]is locked to[OFF] when [Filtering] is set to the following:
– [Motion Pic. Only]
–[
]/[
] in [Category Selection]
[1 SEC]/[2 SEC]/[3 SEC]/[5 SEC]
• When playing back the following pictures, the [Duration] setting is
[Duration]
[Repeat]
disabled.
– Motion pictures
– Panorama pictures
– Group Pictures
[ON]/[OFF]
[OFF]:
There will be no sound.
[AUTO]:
Music is played when the still pictures are played back,
and audio is played when the motion pictures are played
back.
[Music]:
Music is played back.
[Audio]:
Audio (only for motion pictures) is played back.
[Sound]
- 148 -
Playback/Editing
[Filtering Play]
Pictures are classified into only still pictures, only motion pictures, or only 3D pictures etc., and
played back.
Settings
Description of settings
[Picture Only]
Only still pictures are played back.
[Video Only]
Only motion pictures are played back.
[3D Play]
Only 3D pictures are played back.
• Refer to P217 for the method to play back [3D Play] pictures in 3D.
It is possible to play back by selecting the location name or landmark of the
place where it was recorded.
[GPS Area Play]
1
2
Press 3/4 to select an item and then press [MENU/SET].
Press 3/4/2/1 to select the location name or landmark, and
then press [MENU/SET].
Playing back still pictures by altitude.
[Altimeter Log]
Press 3/4 to select the recording start date,
and press [MENU/SET].
• Select an altitude on the graph using 2/1 to
display still pictures recorded at that altitude.
• You can change the display period of the log using
the zoom button.
'(&
6000ft
0ft
0
3
1
6
9
2
12
3
You can play back the pictures you have recorded with [Travel Date] set.
[Travel]
Select the item with 3/4, and press [MENU/SET].
• When [All] is selected, all the pictures recorded with [Travel Date] set are
played back.
• When [Travel Date] or [Location] is selected, select the date or the travel
destination with 3/4/2/1, and press [MENU/SET].
[Category Selection]
This mode allows you to search images by Scene Mode or other categories
(such as [Portrait], [Scenery] or [Night Scenery]) and sort the pictures into
each of the categories. You can then play back the pictures in each
category.
[Select Date]
You can play back pictures taken on each date.
[Favorite]
You can play back the pictures you have set as [Favorite] (P167).
- 149 -
Playback/Editing
∫ To cancel filtering
1 Press 3 while playing back one picture at a time.
2 Press 3/4 to select [Filtering Off] and then press [MENU/SET].
• Filtering is also canceled by turning off the camera or switching to Recording Mode.
Sorting by category to play back
1
2
Press 3/4 to select [Category Selection] and then press [MENU/SET].
Press 3/4/2/1 to select the category and then press [MENU/
SET] to set.
• You can play back only the category in which an image has been found.
Category
Recording information e.g. Scene Modes
[Face Recog.]¢
*
[Portrait], [i-Portrait], [Soft Skin], [Night Portrait], [i-Night Portrait], [Baby1]/[Baby2],
[i-Baby]
,
Panorama Shot Mode, [Scenery], [i-Scenery], [Sunset], [i-Sunset], [Glass Through]
.
[Night Portrait], [i-Night Portrait], [Night Scenery], [i-Night Scenery], [Handheld Night
Shot], [iHandheld Nite Shot], [Starry Sky]
Î
í
1
Sports Mode, Snow Mode, Beach & Snorkeling Mode
[Baby1]/[Baby2], [i-Baby]
[Pet]
[Food]
Advanced Underwater Mode
Pictures taken continuously with [Burst] set to [ 40 ] or [ 60 ]
[Time Lapse Shot], [Time Lapse Video]
¢ Press 3/4/2/1 to select the person to play back and then press [MENU/SET].
Grouped pictures are treated as a single picture with a recognized face.
- 150 -
Playback/Editing
You can play back pictures taken on each date
1
2
Press 3/4 to select [Select Date] and then press [MENU/SET].
Press 3/4/2/1 to select the date to be played back, and then
press [MENU/SET].
• If there were no pictures recorded during a month, that month is not
displayed.
SUN MON TUE WED THU FRI
3
4
5
SAT
1
2
8
9 10 11 12 13 14
6
7
15 16 17 18 19 20 21
22 23 24 25 26 27 28
29 30 31
12 2013
∫ Changing the filtering date
1
2
3
Press 3 while playing back one picture at a time.
Press 3/4 to select [Change Date] and then press [MENU/SET].
Press 3/4/2/1 to select the date to be played back, and then press [MENU/SET].
• The recording date of the picture selected in the playback screen becomes the date selected when
the calendar screen is first displayed.
• If there are multiple pictures with the same recording date, the first picture recorded on that day is
displayed.
• You can display the calendar between January 2000 and December 2099.
• If the date is not set in the camera, the recording date is set as January 1st, 2013.
• If you take pictures after setting the travel destination in [World Time], the pictures are displayed by
the dates at the travel destination in Calendar Playback.
- 151 -
Playback/Editing
[Calendar]
You can search for images by recorded date.
1
Press 3/4/2/1 to select the date you want to search.
• If there were no pictures recorded during a month, that month is not
3
4
5
SAT
1
2
8
9 10 11 12 13 14
6
7
15 16 17 18 19 20 21
22 23 24 25 26 27 28
29 30 31
displayed.
2
SUN MON TUE WED THU FRI
12 2013
Press [MENU/SET] to display the list of images.
• Pictures are displayed with Multi Playback (30 screens). The cursor
appears on the picture at the beginning of the selected date.
3
Press 3/4/2/1 to select a picture and then press
[MENU/SET].
1/52
• To continue the search, return to the previous screen with [W] of the zoom
button. (P43)
• The recording date of the picture selected in the playback screen becomes the date selected when
the calendar screen is first displayed.
• If there are multiple pictures with the same recording date, the first picture recorded on that day is
displayed.
• You can display the calendar between January 2000 and December 2099.
• If the date is not set in the camera, the recording date is set as January 1st, 2013.
• If you take pictures after setting the travel destination in [World Time], the pictures are displayed by
the dates at the travel destination in Calendar Playback.
- 152 -
Playback/Editing
Having Fun with Recorded Pictures (Retouch)
You can adjust the color tone of the pictures taken, or add your preferred effects.
• The processed pictures are newly generated, so be sure that you have enough space in the built-in
memory or on the card. Note also that processing will not be possible if the Write-Protect switch of
the card is in the [LOCK] position.
• Effects may be difficult to see depending on the picture.
• Pictures taken with other cameras may not be processed.
[Auto Retouch]
The brightness and color of the pictures taken can be balanced.
¢ These pictures are examples to show the effect.
1
Press 2/1 to select a picture, and then press 3.
• If you have filtered images for playback by using [Slide Show] (P147) or [Filtering Play]
(P149), the selection screen appears. You can proceed to step 2 by selecting [Retouch] with
3/4, and then pressing [MENU/SET].
• You can also proceed to step 2 by selecting [Retouch] from the [Playback] menu.
2
Press 3/4 to select [Auto Retouch], and then press [MENU/SET].
3
Press 3/4 to select [ON], and then press [MENU/SET].
• If you select [OFF], an image with no effect is displayed. If you are not going to add an effect,
exit the menu.
• Confirmation screen is displayed. It is executed when [Yes] is selected.
• Depending on the picture, noise may be emphasized by [Auto Retouch].
• It may not be possible to perform [Auto Retouch] on pictures which have already been retouched.
• The following pictures cannot be processed:
– Motion pictures
– Pictures taken in Panorama Shot Mode
– Pictures taken with [3D Photo Mode] in Scene Mode
• Picture Groups cannot be processed on a group level.
- 153 -
Playback/Editing
[Creative Retouch]
You can add your desired effects to the pictures that you have taken.
1
Press 2/1 to select an picture, and then press 3.
• If you have filtered images for playback by using [Slide Show] (P147) or [Filtering Play]
(P149), the selection screen appears. You can proceed to step 2 by selecting [Retouch] with
3/4, and then pressing [MENU/SET].
• You can also proceed to step 2 by selecting [Retouch] from the [Playback] menu.
2
Press 3/4 to select [Creative Retouch], and then press [MENU/SET].
3
Press 3/4 to select image effects and then press [MENU/SET].
• You can select the item from the following options that are also available in the Creative
Control mode.
[Expressive]/[Retro]/[High Key]/[Low Key]/[Sepia]/[Dynamic Monochrome]/[Impressive Art]/
[High Dynamic]/[Cross Process]/[Toy Effect]/[Miniature Effect]/[Soft Focus]/[Star Filter]/[One
Point Color]
• A brief description of selected image effect appears when you press [DISP.].
• To set the color you want to keep by using [One Point Color], move
the frame at the center of the screen to the desired color with 3/4/
2/1, and then press [MENU/SET].
• Read P76–79 for details on the respective effects.
• If you select [OFF], an image with no effect is displayed. To proceed
the retouch operation, select another image effect. If you are not
going to add any effect, exit the menu.
• Confirmation screen is displayed. It is executed when [Yes] is selected.
• The image effect may appear weak compared to the effect given by the Creative Control Mode.
• The following pictures cannot be processed:
– Motion pictures
– Pictures taken in Panorama Shot Mode
– Pictures taken with [3D Photo Mode] in Scene Mode
• Picture Groups cannot be processed on a group level.
- 154 -
Playback/Editing
[Color Reproduction]
You can recreate the red tinge of the pictures taken underwater.
¢ These pictures are examples to show the effect.
1
Press 2/1 to select an picture, and then press 3.
• If you have filtered images for playback by using [Slide Show] (P147) or [Filtering Play]
(P149), the selection screen appears. You can proceed to step 2 by selecting [Retouch] with
3/4, and then pressing [MENU/SET].
• You can also proceed to step 2 by selecting [Retouch] from the [Playback] menu.
2
Press 3/4 to select [Color Reproduction], and then press [MENU/SET].
3
Press 3/4 to select the effect, and then press [MENU/SET].
• You can select from three levels of effect.
• If you select [OFF], an image with no effect is displayed. To proceed with the
[Color Reproduction] operation, select another image effect. If you are not going to add any
effect, exit the menu.
• Confirmation screen is displayed. It is executed when [Yes] is selected.
• The effect may be weaker than that of [Color Reproduction] in the [Rec] menu.
• The following pictures cannot be processed:
– Motion pictures
– Pictures taken in Panorama Shot Mode
– Pictures taken with [3D Photo Mode] in Scene Mode
• Picture Groups cannot be processed on a group level.
- 155 -
Playback/Editing
Using the [Playback] Menu
You can perform actions like cropping recorded pictures, as well as set up the protection of
recorded images, etc.
• With [Text Stamp], [Retouch], [Time Lapse Video], [Resize] or [Cropping] a new edited picture is
created. A new picture cannot be created if there is no free space on the built-in memory or the card
so we recommend checking that there is free space and then editing the picture.
[Location Logging]
The location information (longitude/latitude) acquired by the smartphone/tablet can be sent to
the camera and written in images.
To record location name information, use [Place-Name Edit] in the playback menu. (P159)
• Pictures in the built-in memory cannot store location information. If you want to record location
information on them, copy the pictures in the built-in memory to a memory card, then perform
[Location Logging].
Preparation:
Sending location information to the camera from the smartphone/tablet. (P178)
1
2
3
Select [Location Logging] on the [Playback] menu. (P48)
Press 3/4 to select [Add Location Data] and then press [MENU/SET].
Press 3/4 to select the period you intend to record location information
on pictures, then press [MENU/SET].
• Confirmation screen is displayed. It is executed when [Yes] is selected.
Exit the menu after it is executed.
• The location information is recorded onto images.
• Images with location information are indicated with [
- 156 -
].
Playback/Editing
∫ To pause the recording of location information
Press [MENU/SET] while recording of the location information onto pictures is taking
place.
• During a suspended period, [±] is displayed.
Select the period with [±] to restart the recording process from the picture you left off.
∫ To delete the received location information
1 Select [Location Logging] on the [Playback] menu. (P48)
2 Press 3/4 to select [Delete Location Data] and then press [MENU/SET].
3 Press 3/4 to select the period you want to delete, then press [MENU/SET].
• Confirmation screen is displayed. It is executed when [Yes] is selected.
Exit the menu after it is executed.
• When there is insufficient free space on the card, location information might not be able to be written.
• When the card is locked, location information cannot be written onto the images or received location
information cannot be deleted.
• Location information cannot be written in the following cases.
– Motion pictures recorded with [Rec Format] set to [AVCHD]
– Pictures taken after [Send location data] (P178)
– Pictures taken with location information acquired with GPS
– Pictures taken with other cameras
- 157 -
Playback/Editing
[Title Edit]
You can add text (comments) to pictures. After text has been registered, it can be stamped in
prints using [Text Stamp] (P160).
1
Select [Title Edit] on the [Playback] menu. (P48)
2
Press 3/4 to select [SINGLE] or [MULTI] and then press [MENU/SET].
3
Select the picture, and then press
[MENU/SET] to set.
[SINGLE]
[MULTI]
1
2
3
4
5
6
• [’] is displayed for pictures with titles already
registered.
[MULTI] setting
Press 2/1 to
Press [DISP.] to set (repeat), and then
select the picture.
press [MENU/SET] to set.
• The setting is canceled when [DISP.] is pressed
Press 3/4/2/1 to
select the pictures.
again.
4
Enter the text. (P94)
• Exit the menu after it is set.
• To delete the title, erase all the text in the text input screen.
• You can print out texts (comments) using the “PHOTOfunSTUDIO” bundled software on the
CD-ROM (supplied).
• You can set up to 100 pictures at one time in [MULTI].
• You cannot use [Title Edit] for the following types of pictures:
– Motion pictures
– Pictures taken with [3D Photo Mode] in Scene Mode
– Pictures recorded with other equipment
- 158 -
Playback/Editing
[Place-Name Edit]
Place name information can be written in images.
1
Select [Place-Name Edit] on the [Playback] menu. (P48)
2
Press 2/1 to select the picture, and then press [MENU/SET].
3
Press 3/4 to select the settings, and then press [MENU/SET].
Item
Settings
Display other candidates by searching within the database in this unit
using the location information.
1
2
[Candidate]
Press 3/4 to select the item to change, and then press
[MENU/SET].
Select the candidate from the search result, and then press
[MENU/SET].
] icon can be set.
• Only images with the [
• The place name and landmark will be deleted, if they are lower position
than the item to change.
(For example, [City/Town/Village] or [Landmark] will be deleted when
changing [County/Township].)
• Place name information other than the landmark will be deleted if the
landmark name registered with [My Landmark] (P127) is selected.
[Direct]
Stored location or landmark name can be changed with the text entry
function.
• For details on how to enter character, refer to “Entering Text” on P94.
[Repeat]
Copy the contents of the last performed edit into other pictures.
• Confirmation screen is displayed. It is executed when [Yes] is selected.
Exit the menu after it is executed.
• Images with place name information are indicated with [ ].
- 159 -
Playback/Editing
[Text Stamp]
You can stamp the recording date/time, name, location, travel date, the location name or
landmark name stored by the GPS function, etc., onto the recorded pictures.
1
Select [Text Stamp] on the [Playback] menu. (P48)
2
Press 3/4 to select [SINGLE] or [MULTI] and then press [MENU/SET].
3
Select the picture, and then press
[MENU/SET] to set.
[SINGLE]
[MULTI]
1
2
3
4
5
6
• [‘] is displayed on pictures already with date
or text stamped.
[MULTI] setting
Press 2/1 to
Press [DISP.] to set (repeat), and then
select the picture.
press [MENU/SET] to set.
• The setting is canceled when [DISP.] is pressed
Press 3/4/2/1 to
select the pictures.
again.
4
Press 3/4 to select [Set], and then press [MENU/SET].
5
Press 3/4 to select text stamp items, and then press [MENU/SET].
- 160 -
Playback/Editing
6
Press 3/4 to select the settings, and then press [MENU/SET].
Item
[Shooting Date]
Setting item
[W/O TIME]:
Stamp the year, month and day.
[WITH TIME]:
Stamp the year, month, day, hour and minutes.
[OFF]
[
]:
([Face Recognition])
Name registered in Face Recognition will be stamped.
[Name]
[
]:
([Baby/Pet])
Stamps names registered in name settings for
[Baby1]/[Baby2] or [Pet] in Scene Mode.
[OFF]
[ON]:
[Location]
Stamps the travel destination name set under
[Location].
[OFF]
[ON]:
Stamps the travel date set under [Travel Date].
[Travel Date]
[OFF]
[ON]:
Title input in the [Title Edit] will be stamped.
[Title]
[OFF]
[Country/Region]
[State/Prov./County]
[ON]:
Stamps the Location name information or latitude/
longitude recorded with GPS function.
[OFF]
[County/Township]
[City/Town/Village]
[Landmark]
[Longitude/Latitude]
[ON]:
[Sensor Information]
Stamps the direction/altitude/atmospheric pressure
information.
[OFF]
- 161 -
Playback/Editing
7
Press [Q.MENU/ ].
8
Press 3 to select [OK], and then press [MENU/SET].
• Confirmation screen is displayed. It is executed when [Yes] is selected.
Exit the menu after it is executed.
• When you print pictures stamped with text, the date will be printed over the stamped text if you
specify printing of the date at the photo shop or on the printer.
• You can set up to 100 pictures at one time in [MULTI].
• The picture quality may deteriorate when text stamping is carried out.
• Depending on the printer being used, some characters may be cut at printing. Check before printing.
• When text is stamped onto the images smaller than 0.3 M, it is difficult to read it.
• The whole set of characters may not be stamped for location names or landmark names that have
many characters.
• When you stamp pictures in a group, the stamped ones are saved separately from the original ones
in the group.
• Text and dates cannot be stamped on the pictures in the following cases.
– Motion pictures
– Pictures taken in Panorama Shot Mode
– Pictures taken with [3D Photo Mode] in Scene Mode
– Pictures recorded without setting the clock and title
– Pictures with date or text stamped
– Pictures recorded with other equipment
[Retouch]
You can add the effect of [Auto Retouch], [Creative Retouch], or [Color Reproduction] to
recorded pictures.
• Refer to P153 to 155 for details.
- 162 -
Playback/Editing
[Video Divide]
Recorded motion picture can be divided in two. It is recommended for when you want to divide
a part you need with a part you do not need.
It cannot be restored once divided.
1
Select [Video Divide] on the [Playback] menu. (P48)
2
Press 2/1 to select the motion picture to divide, and then press [MENU/
SET].
3
Press 3 at the location to divide.
• Motion picture is played back from the same location when 3 is
pressed again.
• You can finely adjust the location for division by pressing 2/1 while
the motion picture is paused.
4
Press 4.
• Confirmation screen is displayed. It is executed when [Yes] is selected.
Exit the menu after it is executed.
• Motion picture may be lost if the card or battery is removed while processing the dividing.
• [Video Divide] may not be performed on motion pictures recorded with other equipment.
• Motion pictures cannot be divided at a location close to the start or end of the motion picture.
• With [MP4] motion pictures, the order of pictures will change if divided.
It is recommended to search these motion pictures by using [Calendar] or [Video Only] in the
[Filtering Play].
• Motion pictures with a short recording time cannot be divided.
- 163 -
3s
Playback/Editing
[Time Lapse Video]
This function allows you to create a motion picture from a picture group recorded with [Time
Lapse Shot]. The created motion picture is saved in MP4 recording format.
1
Select [Time Lapse Video] on the [Playback] menu. (P48)
2
Press 2/1 to select the picture group from which you want to create a
motion picture, and then press [MENU/SET].
3
Press 3/4 to select the item and settings, and then press [MENU/SET].
Item
[Rec Quality]
Settings
Setting item
[FHD]
Creates motion pictures in the pixel resolution of
1920k1080 and aspect ratio of 16:9.
[HD]
Creates motion pictures in the pixel resolution of
1280k720 and aspect ratio of 16:9.
[VGA]
Creates motion pictures in the pixel resolution of
640k480 and aspect ratio of 4:3.
[6fps]
Plays back 6 images in 1 second.
[30fps]
Plays back 30 images in 1 second.
[Frame Rate]
4
Press 3/4 to select [Start], and then press [MENU/
SET].
• Confirmation screen is displayed. It is executed when [Yes] is
selected.
Exit the menu after it is executed.
• When recording to the built-in memory, [Time Lapse Video] is not available.
• If you select the image quality in which the aspect ratio is different from the one for the picture group,
black strips will appear on the top and bottom or left and right of the image.
• If a recorded image quality with a resolution higher than the group pictures have been selected, the
image will become blurry.
• When creating motion pictures, we recommend you use the sufficiently-charged battery or the AC
adaptor (optional).
• If power supply is lost by unplugging the AC adaptor or due to a blackout while creating a motion
picture with the AC adaptor, the motion picture you are creating will not be recorded.
• The following motion pictures cannot be created:
– A motion picture longer than 29 minutes and 59 seconds
• A motion picture shorter than 1 second is displayed as “0s” on the motion picture recording time
(P42).
- 164 -
Playback/Editing
[Resize]
To allow easy posting to web pages, attachment to e-mail etc., picture size (number of pixels) is
reduced.
1
2
Select [Resize] on the [Playback] menu. (P48)
3
Select the picture and size.
Press 3/4 to select [SINGLE] or [MULTI] and then press [MENU/SET].
[SINGLE] setting
1 Press 2/1 to select the picture, and then press [MENU/
SET].
2 Press 2/1 to select the size, and then press [MENU/SET].
• Confirmation screen is displayed. It is executed when [Yes] is
selected.
Exit the menu after it is executed.
[MULTI] setting
1 Press 3/4 to select the size, and then press [MENU/SET].
2 Press 3/4/2/1 to select the picture, and then press
[DISP.].
• Repeat this step for each picture, and press [MENU/SET] to set.
• Confirmation screen is displayed. It is executed when [Yes] is
selected.
Exit the menu after it is executed.
• You can set up to 100 pictures at one time in [MULTI].
• The picture quality of the resized picture will deteriorate.
• It may not be possible to resize pictures recorded with other equipment.
• The following images cannot be resized.
– Motion pictures
– Pictures taken in Panorama Shot Mode
– Pictures taken with [3D Photo Mode] in Scene Mode
– Pictures with date or text stamped
- 165 -
3
1
2
3
4
5
6
Playback/Editing
[Cropping]
You can enlarge and then crop the important part of the recorded picture.
1
2
3
Select [Cropping] on the [Playback] menu. (P48)
Press 2/1 to select the picture, and then press [MENU/SET].
Use the zoom button and press 3/4/2/1 to select the parts to be
cropped.
:
Reduction
:
Enlargement
3/4/2/1:
4
Move
Press [MENU/SET].
• Confirmation screen is displayed. It is executed when [Yes] is selected.
Exit the menu after it is executed.
• The picture quality of the cropped picture will deteriorate.
• Crop one picture at a time. (You cannot edit all pictures in a group at once)
• When you crop pictures in a group, the cropped ones are saved separately from the original ones in
the group.
• It may not be possible to crop pictures recorded with other equipment.
• Information regarding the Face Recognition in the original picture will not be copied to images
having undergone [Cropping].
• The following images cannot be cropped.
– Motion pictures
– Pictures taken in Panorama Shot Mode
– Pictures taken with [3D Photo Mode] in Scene Mode
– Pictures with date or text stamped
- 166 -
Playback/Editing
[Favorite]
You can do the following if a mark has been added to pictures and they have been set as
favorites.
• Play back only the pictures set as favorites. ([Favorite] in [Filtering Play])
• Play back the pictures set as favorites only as a slide show.
• Delete all the pictures not set as favorites. ([All Delete Except Favorite])
1
Select [Favorite] on the [Playback] menu. (P48)
2
Press 3/4 to select [SINGLE] or [MULTI] and then press [MENU/SET].
3
Select the picture, and then press
[MENU/SET].
[SINGLE]
[MULTI]
1
2
3
4
5
6
• The setting is canceled when [MENU/SET] is
pressed again.
• Exit the menu after it is set.
Press 2/1 to
select the picture.
∫ Canceling all the [Favorite] settings
1 Select [Favorite] on the [Playback] menu.
2 Press 3/4 to select [CANCEL] and then press [MENU/SET].
• Confirmation screen is displayed. It is executed when [Yes] is selected.
Exit the menu after it is executed.
• You can set up to 999 pictures as favorites.
• You may not be able to set pictures taken with other equipment as favorites.
- 167 -
Press 3/4/2/1 to
select the pictures.
Playback/Editing
[Print Set]
DPOF “Digital Print Order Format” is a system that allows the user to select which pictures to
print, how many copies of each picture to print and whether or not to print the recording date on
the pictures when using a DPOF compatible photo printer or photo printing store. For details,
ask at your photo printing store.
When you want to use a photo printing store to print pictures recorded on the built-in memory,
copy them to a card (P172) and then set the print setting.
When you set [Print Set] for a group pictures, the print setting for the number of prints will be
applied to every picture in the group.
For more information visit:
http://panasonic.jp/dc/dpof_110/white_e.htm
1
Select [Print Set] on the [Playback] menu. (P48)
2
Press 3/4 to select [SINGLE] or [MULTI] and then press [MENU/SET].
3
Select the picture, and then press
[MENU/SET].
[SINGLE]
[MULTI]
1
1
2
4
5
3
1
&RXQW
1
'DWH
Press 2/1 to
select the picture.
4
&RXQW
1
6
DISP.
'DWH
Press 3/4/2/1 to
select the pictures.
Press 3/4 to set the number of prints, and then press [MENU/SET] to
set.
• When [MULTI] has been selected, repeat steps 3 and 4 for each picture. (It is not possible to
use the same setting for a multiple number of pictures.)
• Exit the menu after it is set.
- 168 -
Playback/Editing
∫ Canceling all the [Print Set] settings
1 Select [Print Set] on the [Playback] menu.
2 Press 3/4 to select [CANCEL] and then press [MENU/SET].
• Confirmation screen is displayed. It is executed when [Yes] is selected.
Exit the menu after it is executed.
∫ To print the date
After setting the number of prints, set/cancel printing with the recording date by pressing
[DISP.].
• Depending on the photo printing store or the printer, the date may not be printed even if you set to
print the date. For further information, ask at your photo printing store or refer to the operating
instructions for the printer.
• The date cannot be printed on pictures with date or text stamped.
• The number of prints can be set from 0 to 999.
• Depending on the printer, the date print settings of the printer may take precedence so check if this
is the case.
• It may not be possible to use the print settings with other equipment. In this case, cancel all the
settings, and reset the settings.
• You cannot use [Print Set] for the following pictures.
– Motion pictures
– File that does not comply with the DCF standard
- 169 -
Playback/Editing
[Protect]
You can set protection for pictures you do not want to be deleted by mistake.
1
Select [Protect] on the [Playback] menu. (P48)
2
Press 3/4 to select [SINGLE] or [MULTI] and then press [MENU/SET].
3
Select the picture, and then press
[MENU/SET].
[SINGLE]
[MULTI]
1
2
3
4
5
6
• The settings are canceled when [MENU/SET]
is pressed again.
• Exit the menu after it is set.
Press 2/1 to
select the picture.
Press 3/4/2/1 to
select the pictures.
∫ Canceling all the [Protect] settings
1 Select [Protect] on the [Playback] menu.
2 Press 3/4 to select [CANCEL] and then press [MENU/SET].
• Confirmation screen is displayed. It is executed when [Yes] is selected.
Exit the menu after it is executed.
• The protect setting may not be effective on other equipment.
• Even if you protect pictures in the built-in memory or a card, they will be deleted if the built-in
memory or the card is formatted.
• Even if you do not protect pictures on a card, they cannot be deleted when the card’s Write-Protect
switch is set to [LOCK].
- 170 -
Playback/Editing
[Face Rec Edit]
You can delete or change the information relating to Face Recognition for the selected picture.
1
Select [Face Rec Edit] on the [Playback] menu. (P48)
2
Press 3/4 to select [REPLACE] or [DELETE] and then press [MENU/
SET].
3
Press 2/1 to select the picture and then press [MENU/SET].
4
Press 2/1 to select the person and then press [MENU/
SET].
5
(When [REPLACE] is selected) Press 3/4/2/1 to
select the person to replace and then press [MENU/
SET].
• Confirmation screen is displayed. It is executed when [Yes] is
selected.
Exit the menu after it is executed.
• Cleared information regarding the [Face Recog.] cannot be restored.
• When all Face Recognition information in a picture has been canceled, the picture will not be
categorized using Face Recognition in [Category Selection] in [Filtering Play].
• You cannot edit the Face Recognition information of protected pictures.
- 171 -
Playback/Editing
[Copy]
You can copy the data of the pictures you have taken from the built-in memory to a card or from
a card to the built-in memory.
1
Select [Copy] on the [Playback] menu. (P48)
2
Press 3/4 to select the copy destination and then press [MENU/SET].
[
]:
([IN>SD])
All the picture data in the built-in memory are copied onto the card at one
time.
[
]:
One picture at a time is copied from the card to the built-in memory.
Press 2/1 to select the picture and then press [MENU/SET].
([SD>IN])
• Confirmation screen is displayed. It is executed when [Yes] is selected.
Exit the menu after it is executed.
• Do not turn the camera off at any point during the copying process.
• If a picture exists with the same name (folder number/file number) as the picture to be copied in the
copy destination when [
] is selected, a new folder is created and the picture is copied. If a
picture exists with the same name (folder number/file number) as the picture to be copied in the copy
destination when [
] is selected, that picture is not copied.
• It may take time to copy the picture data.
• [Print Set], [Protect] or [Favorite] settings will not be copied. Perform the settings again after copying
is finished.
• Motion picture recorded in [AVCHD] cannot be copied.
- 172 -
Wi-Fi
Wi-FiR function
∫ Use the camera as a wireless LAN device
When using equipment or computer systems that require more reliable security than wireless
LAN devices, ensure that the appropriate measures are taken for safety designs and defects
for the systems used. Panasonic will not take any responsibility for any damage that arises
when using the camera for any purpose other than as a wireless LAN device.
∫ Use of the Wi-Fi function of this camera is presumed to be in countries where this
camera is sold
There is the risk that the camera violates the radiowave regulations if used in countries other
than those where this camera is sold, and Panasonic takes no responsibility for any violations.
∫ There is the risk that data sent and received via radio waves may be intercepted
Please note that there is the risk that data sent and received via radio waves may be
intercepted by a third party.
∫ Do not use the camera in areas with magnetic fields, static electricity or interference
• Do not use the camera in areas with magnetic fields, static electricity or interference, such as near
microwave ovens. Radio waves may not reach the camera.
• Using the camera near devices such as microwave ovens or cordless telephones that use the
2.4 GHz radio wave band may cause a decrease in performance in both devices.
∫ Do not connect to the wireless network you are not authorized to use
When the camera utilizes its Wi-Fi function, wireless networks will be searched automatically.
When this happens, wireless networks that you are not authorized to use (SSID¢) may be
displayed, however do not attempt to connect to the network as it may be considered as
unauthorized access.
¢ SSID refers to the name that is used to identify a network over a wireless LAN connection. If the
SSID matches for both devices, transmission is possible.
∫ Before Use
• To use the Wi-Fi function on this unit, a wireless access point or a destination device equipped with
the wireless LAN function is required.
- 173 -
Wi-Fi
∫ Images that can be sent
Destination
Images to
send
[AV device]
[Smart
phone]
[PC]
[Cloud Sync.
Service]
[Web
service]
JPEG
±
±
±
±
±
±
±
MP4¢1
±
±
±
±
—
—
—
[Home]
[External]
[Printer]¢1
AVCHD¢1, 2
—
±
—
—
—
—
—
3D
—
±
±
±
±
±
—
¢1 Sending by [Send Images While Recording] is not available.
¢2 A motion picture recorded in [AVCHD] can be sent to [PC] if the file size is 4 GB or smaller. It
cannot be sent if the size is greater than 4 GB.
• Some images may not be played back or sent depending on the device.
• Refer to the manual of the destination equipment or the WEB service for more information on how to
playback pictures.
∫ About the Wi-Fi connection lamp
A Wi-Fi connection lamp
Lit blue:
The Wi-Fi connection is on standby
Blinking blue: Sending/receiving data through the Wi-Fi
connection
• When you bring the camera on an airplane or to a hospital, etc., set [Airplane Mode] to [ON], and
turn off the camera because electromagnetic waves, etc. emitted by the camera may interfere with
gauges. (P53)
• The camera cannot be used to connect to a public wireless LAN connection.
• Use a IEEE802.11b, IEEE802.11g or IEEE802.11n compatible device when using a wireless access
point.
• We strongly recommend that you set an encryption to maintain information security.
• It is recommended to use a fully charged battery when sending images.
• When the battery indicator is flashing red, the connection with other equipment may not start or the
connection may be disrupted. (A message such as [Communication error] is displayed.)
• When sending images on a mobile network, high packet communication fees may be incurred
depending on the details of your contract.
• Pictures may not be completely sent depending on radio wave conditions. If the connection is
terminated while sending pictures, pictures with missing sections may be sent.
• Do not remove the memory card or battery or move to an area without any reception while
sending images.
• The LCD monitor display may become distorted for an instant while connected to the service,
however this will not affect the image being sent.
- 174 -
Wi-Fi
What you can do with the Wi-Fi function
Linking with the Wi-Fi compatible equipment allows you to remotely operate the camera, or
share pictures with people in distant places even during recording or playing back.
Remote Shooting (P176)
Playback on TV (P188)
Linking with a smartphone/tablet enables the
following:
• Remote recording (P178)
• Playing back the pictures in the camera (P178)
• Saving the pictures in the camera to the
smartphone/tablet, or sending them to WEB
services. (P178)
• Sending the acquired location information to the
camera. (P178)
Send Images While Recording (P190)
By linking with the DLNA compatible TV, you
can display pictures on TV right after taking
them or display them on TV later by playing
them back on the camera.
Send Images Stored in the Camera (P198)
Every time you take a picture, the picture can You can select and send recorded images.
be automatically sent to a specified location. • Send to:
– [Smartphone] (P198)/[PC] (P201)/[Cloud
You can play back the picture on the
Sync. Service] (P202)/[Web service] (P203)/
smartphone/tablet, or save and edit it on PC.
• Send to:
[AV device] (P204)/[Printer] (P205)
– [Smartphone] (P190)/[PC] (P193)/[Cloud
Sync. Service] (P195)/[Web service] (P196)/
[AV device] (P197)
- 175 -
Wi-Fi
Remote Shooting
You can remotely operate the camera using a smartphone/tablet.
You need to install “Panasonic Image App” (referred to as “Image App” from this point on) on
your smartphone/tablet.
Installing the smartphone/tablet app “Image App”
The “Image App” is an application provided by Panasonic.
For AndroidTM apps
For iOS apps
Version
1.2 or higher
OS
Android 2.2~Android 4.2¢
iOS 4.3~iOS 6.0
1
1
Installation
procedure
2
3
4
Connect your Android device
to a network.
Select “Google PlayTM Store”.
Enter “Image App” into the
search box.
Select “Image App” and
install it.
2
3
4
Connect the iOS device to the
network.
Select “App StoreSM”.
Enter “Image App ” into the search
box.
Select “Image App” and install it.
• The icon will be added to the menu.
• The icon will be added to the
menu.
• The service may not be able to be used properly depending on the type of smartphone/tablet being
used. For compatible devices, see the following support site.
http://panasonic.jp/support/global/cs/dsc/ (This Site is English only.)
• When downloading the app on a mobile network, high packet communication fees may be incurred
depending on the details of your contract.
¢ Connecting to this unit with [Wi-Fi Direct] requires Android OS 4.0 or higher and Wi-Fi DirectTM
support.
- 176 -
Wi-Fi
Connecting to a smartphone/tablet
For details on how to connect easily using the NFC function, refer to P182.
Preparations:
• Install the “Image App” in advance. (P176)
1
Press [Wi-Fi].
2
Press 3/4/2/1 to select [New Connection], and
then press [MENU/SET].
• When connecting with the setting you used before, you can select the
connection destination from [History Connection] (P179) or [Favorite
Connection] (P180).
3
Press 3/4 to select [Remote Shooting], and then press [MENU/
SET].
• The information (SSID and password) required for directly connecting
your smartphone/tablet to this unit is displayed.
• To change the connection method, press [DISP.], and then select the
connection method. For details, refer to “Changing the connection
method”. (P178)
On your smartphone/tablet
(The default connection method is set to [Manual Connection].)
4 On the setting menu of your smartphone/tablet, turn on the Wi-Fi function.
5 Select the SSID that matches the one displayed on the screen of this unit, and then
enter the password.
6 Start “Image App” on your smartphone/tablet. (P176)
• When the connection is complete, live images being captured by the camera are displayed on
the smartphone/tablet.
- 177 -
Wi-Fi
∫ Changing the connection method
• When connecting with [Via Network]
(On the camera)
1
2
Press 3/4 to select [Via Network], and then press [MENU/SET].
Select the method for connecting to a wireless access point, and set.
• Refer to P185 for details.
(On your smartphone/tablet)
3
4
5
On the setting menu of your smartphone/tablet, turn on the Wi-Fi function.
Select the wireless access point you want to connect to, and set.
Start “Image App” on your smartphone/tablet. (P176)
• When connecting with [Wi-Fi Direct] or [WPS Connection]
(On the camera)
1
Press 3/4 to select [Direct], and then press [MENU/SET].
• For details on the connection methods, refer to P187.
(On your smartphone/tablet)
2 Start “Image App” on your smartphone/tablet. (P176)
Taking pictures via a smartphone/tablet (remote recording)
Select [
] on the smartphone/tablet.
• The recorded images are saved in the camera.
• Motion pictures can also be recorded (excluding [FHD/60p/
]/[FHD/60p]).
• Some settings are not available.
• The screen differs depending on the operating system.
Playing back pictures in the camera
Select [
] on a smartphone/tablet.
• You can save pictures on the smartphone/tablet.
• Motion pictures cannot be played back.
• You can send pictures to a WEB service, etc.
• The screen differs depending on the operating system.
Sending location information to the camera from a smartphone/tablet
You can acquire location information from a smartphone/
tablet, and write it on images afterwards. Refer to P156 for
how to write the location information on the images
recorded by this unit.
Select [
] on a smartphone/tablet.
• The screen differs depending on the operating system.
- 178 -
Wi-Fi
• Read the [Help] in the “Image App” menu for further details on how to operate.
• To quit [Remote Shooting], press [Q.MENU/ ].
• Caution:
Be sure to pay special attention to the privacy, the likeness rights, etc. of the subject when
you use this function. Use at your own risk.
• If you have changed the clock setting of this unit or the smartphone/tablet after [Time sync], perform
[Time sync] again.
• On the smartphone/tablet, you can set the acquisition interval of location information and check the
transfer status of location information. Refer to [Help] in the “Image App” menu for details.
• The smartphone/tablet may fail to acquire location information in China and the border area in the
neighbouring countries of China. (As of January 2013)
• (When using “Image App” for iOS)
If you press the Home or On/Off button of a smartphone/tablet while [Rec. loc. Info] is working,
location information recording is stopped.
History Connection
If you want to make a Wi-Fi connection with the setting you used before, you can select it from
the history, and connect.
• The number of settings that can be saved in the history is limited. It is recommended that you save
frequently used Wi-Fi connection settings in [Favorite Connection]. (P180)
• Performing [Reset Wi-Fi Settings] clears the history and the contents saved in [Favorite Connection].
1 Press [Wi-Fi].
2
3
Press 3/4/2/1 to select [History Connection], and
then press [MENU/SET].
Select the desired connection setting with 3/4, and then press
[MENU/SET].
• To display the connection detail, press [DISP.].
• To save the selected connection setting in [Favorite Connection], read
steps 3 and 4 of “Registering to favorites”. (P180)
- 179 -
Wi-Fi
Registering to favorites
If you register a frequently used Wi-Fi connection, you can quickly call it and connect.
1
Press [Wi-Fi].
2
Press 3/4/2/1 to select [History Connection], and
then press [MENU/SET].
3
Select the item you want to register to favorites with 3/4, and
then press 1.
• To display the connection detail, press [DISP.].
Enter a registration name.
• For details on how to enter characters, refer to “Entering Text” section
4
on P94.
• A maximum of 30 characters can be entered.
• Up to 15 characters can be entered for [ ], [ ], [ ], [ ] and [ ].
Favorite Connection
1
Press [Wi-Fi].
2
Press 3/4/2/1 to select [Favorite Connection], and
then press [MENU/SET].
Select the desired connection setting with 3/4, and then press
[MENU/SET].
• To display the connection detail, press [DISP.].
• To edit the items saved in [Favorite Connection], read steps 3 and 4 of
3
“Editing the items registered to favorites”. (P181)
- 180 -
Wi-Fi
Editing the items registered to favorites
1
Press [Wi-Fi].
2
Press 3/4/2/1 to select [Favorite Connection],
and then press [MENU/SET].
3
Select the favorite item you want to edit with 3/4, and then
press 1.
4
Press 3/4 to select the item, and press [MENU/SET].
Item
Description of settings
[Remove from Favorite]
[Change the Order in Favorite]
[Change the Registered Name]
—
Select the destination with 3/4, and then press
[MENU/SET].
• For details on how to enter characters, refer to
“Entering Text” section on P94.
• A maximum of 30 characters can be entered.
• Up to 15 characters can be entered for [ ], [ ], [ ],
[ ] and [ ].
- 181 -
Wi-Fi
Connecting Easily to a Smartphone/tablet (NFC)
Using the NFC “Near Field Communication” function, you can easily transfer data necessary
for a Wi-Fi connection between this camera and the smartphone/tablet.
∫ Compatible models
This function can be used with the NFC compatible device with Android (OS version 2.3.3 or
higher). (excluding some models)
Controlling this camera remotely with a smartphone/tablet by using the NFC
function
You can use the following functions by controlling this camera remotely with your smartphone/
tablet.
– Remote recording (P178)
– Playing back the pictures in the camera (P178)
– Saving the pictures in the camera to the smartphone/tablet, or sending them to WEB services. (P178)
– Sending the acquired location information to the camera. (P178)
Preparation:
(On the camera)
• Set [NFC Operation] to [ON]. (P211)
(On your smartphone/tablet)
• Check that your smartphone/tablet is a compatible model.
• Turn on the Wi-Fi function.
• Install the “Image App” in advance. (P176)
1
2
Launch “Image App” on your smartphone/tablet.
3
When the connection confirmation screen is
displayed, press 2/1 to select [Yes], and then
press [MENU/SET].
Touch the smartphone/tablet to [ ] of the camera
again.
• When the smartphone/tablet has connected, an image of
this camera will be displayed on the smartphone/tablet.
• The connected smartphone/tablet is registered to this
camera. A connection can be established with the
Touch the smartphone/tablet to [ ] of the camera.
• This function can be used even while the camera is
turned off.
4
operation of steps 1 and 2 from the second time
onwards.
• You can register up to 20 smartphones/tablets. When the number exceeds 20, registrations will be
deleted, starting from the oldest touched one.
• Performing [Reset Wi-Fi Settings] will delete the smartphone/tablet registration.
- 182 -
Wi-Fi
Transferring images in this camera to a smartphone/tablet one at a time by
using the NFC function
You can transfer pictures in this camera to the smartphone/tablet. This function is useful when
you want to transfer an image to the smartphone/tablet of your family or friend.
Preparation:
(On the camera)
• Set [NFC Operation] to [ON]. (P211)
(On your smartphone/tablet)
• Check that your smartphone/tablet is a compatible model.
• Turn on the Wi-Fi function.
• Install the “Image App” in advance. (P176)
1
2
3
Launch “Image App” on the smartphone/tablet at the transfer destination.
Play back the picture you want to transfer to the
smartphone/tablet in this camera.
Touch the smartphone/tablet to [ ] of the camera.
• Multiple pictures cannot be transferred as a batch.
• Depending on the environment you are using, it may take a few minutes to complete the image
transfer.
- 183 -
Wi-Fi
About NFC
• If the camera is not recognized even when touching the smartphone/tablet, change positions and try
again.
• Do not touch this camera to the smartphone/tablet strongly.
• For information on the operation and settings of NFC-compatible smartphones/tablets, refer to the
operating instructions of your device.
• If there is a metal object between this camera and the smartphone/tablet, reading may fail. Also,
putting a sticker around the NFC area may deteriorate the communication performance.
• This function cannot be used in the following cases.
– When [Airplane Mode] is set to [ON]
– When connecting to a TV, PC or a printer
– When recording motion pictures
– When using [Time Lapse Shot]
– When the marine case is attached
- 184 -
Wi-Fi
Selecting the connection method
Connecting via a wireless access point
You can select the method for connecting to a wireless access point.
¢ WPS refers to a function that allows you to easily configure the settings
related to the connection and security of wireless LAN devices. To check
if the wireless access point you are using is compatible with WPS, refer to
the manual of the wireless access point.
Connection method
Description of settings
[WPS (Push-Button)]
Save push button type wireless access point that is
compatible with Wi-Fi Protected SetupTM with a WPS mark.
P185
[WPS (PIN code)]
Save PIN code type wireless access point that is compatible
with Wi-Fi Protected Setup with a WPS mark.
P185
[Manual Connection]
Select this option when you are not sure about the WPS
compatibility, or when you want to search for and connect
to a wireless access point.
P186
When connecting with [WPS (Push-Button)]
Press the wireless access point WPS button until it switches
to WPS Mode.
• Refer to the wireless access point instruction manual for details.
e.g.:
When connecting with [WPS (PIN code)]
1
2
3
Press 3/4 to select the wireless access point you are connecting to, and press
[MENU/SET].
Enter the PIN code displayed on the camera screen into the wireless access point.
Press [MENU/SET].
• Refer to the wireless access point instruction manual for details.
- 185 -
Wi-Fi
If you are not sure about the WPS compatibility (connecting by [Manual Connection])
Search for available wireless access points.
• Confirm encryption key of the selected wireless access point if the network authentication is
encrypted.
• When connecting by [Manual Input], confirm SSID, encryption type, encryption key of the wireless
access point you are using.
1
Press 3/4 to select the wireless access point you are
connecting to, and press [MENU/SET].
• Pressing [DISP.] will search for a wireless access point again.
• If no wireless access point is found, refer to “When connecting with
[Manual Input]” on P186.
2
(If network authentication is encrypted)
Enter the encryption key.
• For details on how to enter characters, refer to “Entering Text” section
on P94.
∫ When connecting with [Manual Input]
1 On the screen displayed in step 1 of “If you are not sure about the WPS
compatibility (connecting by [Manual Connection])”, select [Manual Input] by
pressing 3/4, then press [MENU/SET].
2 Enter the SSID of the wireless access point you are connecting to, then select [Set].
• For details on how to enter characters, refer to “Entering Text” section on P94.
3 Press 3/4 to select the network authentication type, and press [MENU/SET].
• For information on network authentication, see the manual of the wireless access point.
4 Press 3/4 to select the encryption type, and press [MENU/SET].
• The type of settings that can be changed may vary depending on the details of network
authentication settings.
Network authentication type
5
Encryption types that can be set
[WPA2-PSK]/[WPA-PSK]
[TKIP]/[AES]
[Common Key]
[WEP]
[Open]
[No Encryption]/[WEP]
(When an option other than [No Encryption] is selected)
Enter the encryption key and select [Set].
• Check the wireless access points instruction manual and settings when saving a wireless access
point.
• If no connection can be established, the wireless access point’s radio waves may be too weak. Refer
to “Message Display” (P247) and “Troubleshooting” (P251) for details.
• Transmission speed may decrease, or may not be usable depending on the environment it is used
in.
- 186 -
Wi-Fi
Connecting directly
You can select the method for connecting to the device you are using.
Select the connection method supported by your device.
Connection method
Description of settings
1
2
[Wi-Fi Direct]
3
Set the device to Wi-Fi DirectTM mode.
Press 3/4 to select [Wi-Fi Direct] and then press [MENU/
SET].
Press 3/4 to select the device to connect to, and then
press [MENU/SET].
• Read the operating instructions of your device for details.
[WPS (Push-Button)]
1 Press 3/4 to select [WPS (Push-Button)] and then press
[MENU/SET].
2 Set the device to WPS mode.
• You can wait longer for a connection by pressing the [DISP.] button
[WPS Connection]
on this unit.
[WPS (PIN code)]
1 Press 3/4 to select [WPS (PIN code)] and then press
[MENU/SET].
2 Enter the PIN code of the device into this unit.
[Manual Connection]
Enter the SSID and password into the device. The SSID and
password are displayed on the connection waiting screen of
this unit.
- 187 -
Wi-Fi
Playback on TV
You can display pictures on a TV that supports the Digital Media Renderer (DMR) function of
the DLNA standard.
Displaying the picture on TV right after taking it/Displaying the picture on
TV by playing it back on the camera
Preparations:
Set the TV to DLNA waiting Mode.
• Read the operating instructions for your TV.
• For details on compatible devices, refer to the support sites below.
http://panasonic.jp/support/global/cs/dsc/
(This Site is English only.)
1
Press [Wi-Fi].
2
Press 3/4/2/1 to select [New Connection], and
then press [MENU/SET].
• When connecting with the setting you used before, you can select the
connection destination from [History Connection] (P179) or [Favorite
Connection] (P180).
3
Press 3/4 to select [Playback on TV], and then press [MENU/
SET].
4
Press 3/4 to select connection method, and then press
[MENU/SET].
5
6
[Via Network]
When you want to connect to your TV via an wireless access point.
(P185)
[Direct]
When you want to directly connect your TV to this unit with [Wi-Fi Direct],
[WPS Connection], or [Manual Connection]. (P187)
Press 3/4 to select a device you want to connect, and then press [MENU/SET].
• When the connection is established, the screen is displayed.
Take or play back pictures on this unit.
• To change the setting or disconnect, press [Wi-Fi]. (P189)
- 188 -
Wi-Fi
• Motion pictures cannot be played back.
• During the multi/calendar playback, pictures displayed on the screen of this unit are not displayed on
TV.
• When a TV is connected to this unit, the TV screen may temporarily return to the status before the
connection. Pictures are displayed again when you take or play back pictures.
• [Effect] and [Sound] of the Slide Show are disabled.
What you can do with the [Wi-Fi] button when connected to Wi-Fi
1
2
Press [Wi-Fi] when connected to Wi-Fi.
Press 3/4 to select the item, and press [MENU/SET].
Item
Description of settings
[Terminate the Connection]
Terminates the Wi-Fi connection.
[Change the Destination]
Terminates the Wi-Fi connection, and allows you to
select a different Wi-Fi connection.
[Change Settings for Sending
Images]¢
Refer to P192 for details.
[Register the Current Destination to
Favorite]
Registering the current connection destination or the
connection method, you can easily connect with the
same connection method next time.
[Network Address]
Displays the MAC address and IP address of this unit.
¢ This is not displayed when the destination of [Playback on TV] or [Send Images Stored in the
Camera] is set to [Printer].
- 189 -
Wi-Fi
Send Images While Recording
A picture can be automatically sent to a specified device every time you take it.
Since the camera gives priority to recording, sending may take longer during the recording.
• Motion pictures cannot be sent.
• If you turn off this unit or the Wi-Fi connection before sending is complete, unsent pictures will not be
resent.
• You may not be able to delete files or use the playback menu while sending.
• When sending images on a mobile network, high packet communication fees may be incurred
depending on the details of your contract.
When sending images to smartphone/tablet
Preparations:
• Install the “Image App” in advance. (P176)
1
Press [Wi-Fi].
2
Press 3/4/2/1 to select [New Connection], and
then press [MENU/SET].
• When connecting with the setting you used before, you can select the connection destination
3
4
5
6
Press 3/4 to select [Send Images While Recording], and then press [MENU/SET].
Press 3/4 to select [Smartphone], and then press [MENU/SET].
Select the connection method. (P191)
Press 3/4 to select a device you want to connect, and then press [MENU/SET].
• When the connection is complete, the screen is displayed. To change the send setting, press
7
Take pictures.
• The pictures are sent automatically after taking them.
• To change the setting or disconnect, press [Wi-Fi].
from [History Connection] (P179) or [Favorite Connection] (P180).
[DISP.]. (P192)
You cannot change the settings while sending pictures. Wait until sending is complete.
- 190 -
Wi-Fi
Selecting the method for connecting to the smartphone/tablet
∫ When you want to connect to the smartphone/tablet via a wireless access point
(On your smartphone/tablet)
1
2
3
On the setting menu of your smartphone/tablet, turn on the Wi-Fi function.
Select the wireless access point you want to connect to, and set.
Start “Image App” on your smartphone/tablet.¢ (P176)
(On the camera)
4
5
Press 3/4 to select [Via Network], and then press [MENU/SET].
Select the method for connecting to a wireless access point, and set.
• Refer to P185 for details.
∫ When you want to directly connect the smartphone/tablet to this unit
• When connecting with [Wi-Fi Direct] or [WPS Connection]
(On the camera)
1
Press 3/4 to select [Direct], and then press [MENU/SET].
• For details on the connection methods, refer to P187.
(On your smartphone/tablet)
2 Start “Image App” on your smartphone/tablet.¢ (P176)
• When connecting with [Manual Connection]
(On the camera)
1
2
Press 3/4 to select [Direct], and then press [MENU/SET].
Press 3/4 to select [Manual Connection], and then press
[MENU/SET].
(On your smartphone/tablet)
3 On the setting menu of your smartphone/tablet, turn on the
Wi-Fi function.
4 Select the SSID that matches the one displayed on the screen of
this unit, and then enter the password.
5 Start “Image App” on your smartphone/tablet.¢ (P176)
¢ A window indicating that the smartphone/tablet is connecting to the camera is displayed. If you
are using an Android device, press the back key. If you are using an iOS device, close the
window.
- 191 -
Wi-Fi
Changing the settings for sending images
Press 3/4 to select the item, and press [MENU/SET].
Item
Description of settings
Resize the image to send.
[Original]/[Auto]¢1/[Change]
• If you select [Auto], the image size is determined by the circumstances at
the destination.
• You can select the image size for [Change] from [M] or [S].
The aspect ratio does not change.
[Size]
Select whether to delete the location information from images before
sending them.
[Delete Location
Data]¢2
[ON]:
Delete the location information, then send.
[OFF]:
Keep the location information and send.
• This operation only deletes the location information from the images that
are set to be sent. (The location information will not be deleted from the
original images stored in this unit.)
[Cloud Limit]
¢3
You can select whether to send images when the Cloud Folder runs out of
free space.
[ON]:
Do not send images.
[OFF]:
Delete images from the oldest ones, then send new images.
¢1 Only available when the destination is set to [Web service].
¢2 Only available when the destination of [Send Images Stored in the Camera] is set to [Cloud
Sync. Service], [Web service] or [External] in [AV device].
¢3 Only available when the destination is set to [Cloud Sync. Service].
- 192 -
Wi-Fi
When sending images to PC
Preparations:
• Turn the computer on.
• Prepare folders for receiving images on the PC before sending a picture to the PC. (P194)
• If the workgroup of the destination PC has been changed from the standard setting, you also need
to change the setting of this unit in [PC Connection]. (P211)
1
Press [Wi-Fi].
2
Press 3/4/2/1 to select [New Connection], and
then press [MENU/SET].
• When connecting with the setting you used before, you can select the connection destination
3
4
5
Press 3/4 to select [Send Images While Recording], and then press [MENU/SET].
Press 3/4 to select [PC], and then press [MENU/SET].
Press 3/4 to select connection method, and then press [MENU/SET].
from [History Connection] (P179) or [Favorite Connection] (P180).
[Via Network]
When you want to connect to your PC via a wireless access point.
(P185)
[Direct]
When you want to directly connect your PC to this unit with [Wi-Fi
Direct], [WPS Connection], or [Manual Connection]. (P187)
6
7
Press 3/4 to select the PC you want to connect to, and then press [MENU/SET].
Press 3/4 to select the destinations folder of the PC, and then press [MENU/SET].
• When the connection is complete, the screen is displayed. To change the send setting, press
8
Take pictures.
• To change the setting or disconnect, press [Wi-Fi]. (P189)
[DISP.]. (P192)
You cannot change the settings while sending pictures. Wait until sending is complete.
• Folders sorted by the sent date are created in the specified folder, and pictures are saved in those
folders.
• If the screen for a user account and password entry appears, enter the one you set on your PC.
- 193 -
Wi-Fi
To create a folder that receives images
• Create a PC user account [account name (up to 254 characters) and password (up to
32 characters)] consisting of alphanumeric characters. An attempt to create a receive folder may fail
if the account includes non-alphanumeric characters.
∫ When using “PHOTOfunSTUDIO”
1 Install “PHOTOfunSTUDIO” to the PC.
• For details on hardware requirements and installation, read “About the supplied software”
(P220).
2
Create a folder that receives images with “PHOTOfunSTUDIO”.
• To create the folder automatically, select [Auto-create]. To specify a folder, create a new folder,
or set a password to the folder, select [Create manually].
• For details, refer to the operating instructions of “PHOTOfunSTUDIO” (PDF).
∫ When not using “PHOTOfunSTUDIO”
(For Windows)
Supported OS: Windows XP/Windows Vista/Windows 7/Windows 8
Example: Windows 7
1 Select a folder you intend to use for receiving, then right-click.
2 Select [Properties], then enable sharing of the folder.
• For details, refer to the operating instructions of your PC or Help on the operating system.
(For Mac)
Supported OS: OS X v10.4 to v10.8
Example: OS X v10.8
1 Select a folder you intend to use for receiving, then click on the items in the
following order.
[File]
2
[Get Info]
Enable sharing of the folder.
• For details, refer to the operating instructions of your PC or Help on the operating system.
- 194 -
Wi-Fi
When sending images to [Cloud Sync. Service]
Preparations:
You need to register to “LUMIX CLUB” (P206) and configure the Cloud Sync. setting to send a
picture to a Cloud Folder.
1
Press [Wi-Fi].
2
Press 3/4/2/1 to select [New Connection], and
then press [MENU/SET].
• When connecting with the setting you used before, you can select the connection destination
3
4
5
6
7
8
Press 3/4 to select [Send Images While Recording], and then press [MENU/SET].
Press 3/4 to select [Cloud Sync. Service], and then press [MENU/SET].
Press [MENU/SET].
Press 3/4 to select [Via Network], and then press [MENU/SET].
Press 3/4 to select connection method, and then press [MENU/SET]. (P185)
Check the send setting.
• When the connection is complete, the screen is displayed. To change the send setting, press
9
Take pictures.
• To change the setting or disconnect, press [Wi-Fi]. (P189)
from [History Connection] (P179) or [Favorite Connection] (P180).
[DISP.]. (P192)
You cannot change the settings while sending pictures. Wait until sending is complete.
∫ About the images sent to a Cloud Folder by the use of [Cloud Sync. Service]
(As of January 2013)
To send images to a Cloud Folder, Cloud Sync. setting is required. Configure the settings on a
PC with “PHOTOfunSTUDIO” or on a smartphone/tablet with “Image App”.
• If you set the picture destination to [Cloud Sync. Service], sent pictures are temporarily saved in the
cloud folder, and they can be synchronized with the device in use, such as the PC or smartphone/
tablet.
• A Cloud Folder stores transferred images for 30 days (up to 1000 pictures). Transferred images are
deleted automatically 30 days after the transfer. Furthermore, when the number of stored images
exceeds 1000, some images may be deleted depending on the [Cloud Limit] (P192) setting even
within 30 days after the transfer.
• When the download of images from a Cloud Folder to all specified devices is complete, images
may be deleted from the Cloud Folder even within 30 days after the transfer.
- 195 -
Wi-Fi
When sending images to WEB Service
Preparations:
You need to register to “LUMIX CLUB” (P206) to send a picture to a WEB service.
To send images to a WEB service, you need to register the WEB service. (P209)
1
Press [Wi-Fi].
2
Press 3/4/2/1 to select [New Connection], and
then press [MENU/SET].
• When connecting with the setting you used before, you can select the connection destination
3
4
5
6
7
Press 3/4 to select [Send Images While Recording], and then press [MENU/SET].
Press 3/4 to select [Web service], and then press [MENU/SET].
Press 3/4 to select [Via Network], and then press [MENU/SET].
Press 3/4 to select connection method, and then press [MENU/SET]. (P185)
Press 3/4/2/1 to select a WEB service you want to connect, and then press
[MENU/SET].
• When the connection is complete, the screen is displayed. To change the send setting, press
8
Take pictures.
• To change the setting or disconnect, press [Wi-Fi]. (P189)
from [History Connection] (P179) or [Favorite Connection] (P180).
[DISP.]. (P192)
You cannot change the settings while sending pictures. Wait until sending is complete.
• Images uploaded to the WEB Service cannot be displayed or deleted with this camera. Check
images by accessing the WEB Service with your smartphone/tablet or computer.
• If sending images fails, a report email outlining the failure will be sent to the email address registered
with “LUMIX CLUB”.
• Images may contain personal information that can be used to identify the user, such as a
title, the time and date when the images was taken, and the location where the image was
taken. Check this information before uploading images to WEB services.
• Panasonic assumes no responsibility for the damages resulting from the leakage, loss, etc.
of images uploaded on WEB services.
• When uploading images to the WEB Service, do not delete images from this camera, even
after they have finished sending, until you have checked that they have been properly
uploaded to the WEB Service. Panasonic assumes no responsibility for the damages
resulting from the deletion of images stored in this unit.
- 196 -
Wi-Fi
When sending images to AV device
Preparations:
When sending a picture to [Home], set your device to DLNA waiting mode.
• Read the operating instructions of your device for details.
When sending images to [External], the following are required:
• Registration to “LUMIX CLUB”. (P206)
• Address number and access number acquired by the destination External AV device. (P210)
1
Press [Wi-Fi].
2
Press 3/4/2/1 to select [New Connection], and
then press [MENU/SET].
• When connecting with the setting you used before, you can select the connection destination
3
4
5
6
Press 3/4 to select [Send Images While Recording], and then press [MENU/SET].
Press 3/4 to select [AV device], and then press [MENU/SET].
Press 3/4 to select [Home] or [External], and then press [MENU/SET].
Press 3/4 to select connection method, and then press [MENU/SET].
from [History Connection] (P179) or [Favorite Connection] (P180).
[Via Network]
[Direct]
• This can be
selected only
when [Home]
is selected.
When you want to connect to an AV device via a wireless access point.
(P185)
When you want to directly connect an AV device to this unit with [Wi-Fi
Direct], [WPS Connection], or [Manual Connection]. (P187)
7
Press 3/4 to select a device you want to connect, and then press [MENU/SET].
• When the connection is complete, the screen is displayed. To change the send setting, press
8
Take pictures.
• To change the setting or disconnect, press [Wi-Fi]. (P189)
[DISP.]. (P192)
You cannot change the settings while sending pictures. Wait until sending is complete.
- 197 -
Wi-Fi
Send Images Stored in the Camera
• When sending images on a mobile network, high packet communication fees may be incurred
depending on the details of your contract.
• Details of the playback menu [Favorite] or [Print Set] settings will not be sent.
• Some images taken with a different camera may not be able to be sent.
• Images that have been modified or edited with a computer may not be able to be sent.
When sending images to smartphone/tablet
Preparations:
• Install the “Image App” in advance. (P176)
1
2
Press [Wi-Fi].
Press 3/4/2/1 to select [New Connection], and
then press [MENU/SET].
• When connecting with the setting you used before, you can
select the connection destination from [History Connection]
(P179) or [Favorite Connection] (P180).
3
4
5
6
Press 3/4 to select [Send Images Stored in the Camera], and then press [MENU/
SET].
Press 3/4 to select [Smartphone], and then press [MENU/SET].
Select the connection method. (P199)
Press 3/4 to select a device you want to connect, and then press [MENU/SET].
• When the connection is complete, the screen is displayed. To change the send setting, press
[DISP.]. (P192)
7
8
Press 3/4 to select [SINGLE] or [MULTI] and then press [MENU/SET].
• To change the setting or disconnect, press [Wi-Fi]. (P189)
Select and send the images. (P200)
- 198 -
Wi-Fi
Selecting the method for connecting to the smartphone/tablet
∫ When you want to connect to the smartphone/tablet via a wireless access point
(On your smartphone/tablet)
1
2
3
On the setting menu of your smartphone/tablet, turn on the Wi-Fi function.
Select the wireless access point you want to connect to, and set.
Start “Image App” on your smartphone/tablet.¢ (P176)
(On the camera)
4
5
Press 3/4 to select [Via Network], and then press [MENU/SET].
Select the method for connecting to a wireless access point, and set.
• Refer to P185 for details.
∫ When you want to directly connect the smartphone/tablet to this unit
• When connecting with [Wi-Fi Direct] or [WPS Connection]
(On the camera)
1
Press 3/4 to select [Direct], and then press [MENU/SET].
• For details on the connection methods, refer to P187.
(On your smartphone/tablet)
2 Start “Image App” on your smartphone/tablet.¢ (P176)
• When connecting with [Manual Connection]
(On the camera)
1
2
Press 3/4 to select [Direct], and then press [MENU/SET].
Press 3/4 to select [Manual Connection], and then press
[MENU/SET].
(On your smartphone/tablet)
3 On the setting menu of your smartphone/tablet, turn on the
Wi-Fi function.
4 Select the SSID that matches the one displayed on the screen of
this unit, and then enter the password.
5 Start “Image App” on your smartphone/tablet.¢ (P176)
¢ A window indicating that the smartphone/tablet is connecting to the camera is displayed. If you
are using an Android device, press the back key. If you are using an iOS device, close the
window.
- 199 -
Wi-Fi
Select and send the images
[SINGLE] setting
1 Press 2/1 to select the picture.
2 Press [MENU/SET].
• Confirmation screen is displayed. It is
[SINGLE]
[MULTI]
1
2
3
4
5
6
executed when [Yes] is selected.
[MULTI] setting
1 Select the picture, and then press [DISP.]
Press 2/1 to select
to set (repeat).
the picture.
• The setting is canceled when [DISP.] is
pressed again.
2 Press [MENU/SET].
• Confirmation screen is displayed. It is
executed when [Yes] is selected.
• The number of pictures that can be sent by [MULTI] is limited.
- 200 -
Press 3/4/2/1 to
select the pictures.
Wi-Fi
When sending images to PC
Preparations:
• Turn the computer on.
• Prepare folders for receiving images on the PC before sending a picture to the PC. (P194)
• If the workgroup of the destination PC has been changed from the standard setting, you also need
to change the setting of this unit in [PC Connection]. (P211)
1
Press [Wi-Fi].
2
Press 3/4/2/1 to select [New Connection], and
then press [MENU/SET].
• When connecting with the setting you used before, you can select the connection destination
3
Press 3/4 to select [Send Images Stored in the Camera], and then press [MENU/
SET].
Press 3/4 to select [PC], and then press [MENU/SET].
Press 3/4 to select connection method, and then press [MENU/SET].
from [History Connection] (P179) or [Favorite Connection] (P180).
4
5
[Via Network]
When you want to connect to your PC via a wireless access point.
(P185)
[Direct]
When you want to directly connect your PC to this unit with [Wi-Fi
Direct], [WPS Connection], or [Manual Connection]. (P187)
6
7
Press 3/4 to select a PC you want to connect, and then press [MENU/SET].
Press 3/4 to select the destinations folder of the PC, and then press [MENU/SET].
• When the connection is complete, the screen is displayed. To change the send setting, press
8
Press 3/4 to select [SINGLE] or [MULTI] and then press [MENU/SET].
• To change the setting or disconnect, press [Wi-Fi]. (P189)
Select and send the images. (P200)
[DISP.]. (P192)
9
• Folders sorted by the sent date are created in the specified folder, and pictures are saved in those
folders.
• If the screen for a user account and password entry appears, enter the one you set on your PC.
- 201 -
Wi-Fi
When sending images to [Cloud Sync. Service]
Preparations:
You need to register to “LUMIX CLUB” (P206) and configure the Cloud Sync. setting (P195) to
send a picture to a Cloud Folder.
1
Press [Wi-Fi].
2
Press 3/4/2/1 to select [New Connection], and
then press [MENU/SET].
• When connecting with the setting you used before, you can select the connection destination
3
Press 3/4 to select [Send Images Stored in the Camera], and then press [MENU/
SET].
Press 3/4 to select [Cloud Sync. Service], and then press [MENU/SET].
Press [MENU/SET].
Press 3/4 to select [Via Network], and then press [MENU/SET].
Press 3/4 to select connection method, and then press [MENU/SET]. (P185)
Check the send setting.
• When the connection is complete, the screen is displayed. To change the send setting, press
from [History Connection] (P179) or [Favorite Connection] (P180).
4
5
6
7
8
[DISP.]. (P192)
9
10
Press 3/4 to select [SINGLE] or [MULTI] and then press [MENU/SET].
• To change the setting or disconnect, press [Wi-Fi]. (P189)
Select and send the images. (P200)
- 202 -
Wi-Fi
When sending images to WEB Service
Preparations:
You need to register to “LUMIX CLUB” (P206) to send a picture to a WEB service.
To send images to a WEB service, you need to register the WEB service. (P209)
1
Press [Wi-Fi].
2
Press 3/4/2/1 to select [New Connection], and
then press [MENU/SET].
• When connecting with the setting you used before, you can select the connection destination
3
Press 3/4 to select [Send Images Stored in the Camera], and then press [MENU/
SET].
Press 3/4 to select [Web service], and then press [MENU/SET].
Press 3/4 to select [Via Network], and then press [MENU/SET].
Press 3/4 to select connection method, and then press [MENU/SET]. (P185)
Press 3/4/2/1 to select a WEB service you want to connect, and then press
[MENU/SET].
• When the connection is complete, the screen is displayed. To change the send setting, press
from [History Connection] (P179) or [Favorite Connection] (P180).
4
5
6
7
[DISP.]. (P192)
8
9
Press 3/4 to select [SINGLE] or [MULTI] and then press [MENU/SET].
• To change the setting or disconnect, press [Wi-Fi]. (P189)
Select and send the images. (P200)
• Images uploaded to the WEB Service cannot be displayed or deleted with this camera. Check
images by accessing the WEB Service with your smartphone/tablet or computer.
• If sending images fails, a report email outlining the failure will be sent to the email address registered
with “LUMIX CLUB”.
• Images may contain personal information that can be used to identify the user, such as a
title, the time and date when the images was taken, and the location where the image was
taken. Check this information before uploading images to WEB services.
• Panasonic assumes no responsibility for the damages resulting from the leakage, loss, etc.
of images uploaded on WEB services.
• When uploading images to the WEB Service, do not delete images from this camera, even
after they have finished sending, until you have checked that they have been properly
uploaded to the WEB Service. Panasonic assumes no responsibility for the damages
resulting from the deletion of images stored in this unit.
- 203 -
Wi-Fi
When sending images to AV device
Preparations:
When sending a picture to [Home], set your device to DLNA waiting mode.
• Read the operating instructions of your device for details.
When sending images to [External], the following are required:
• Registration to “LUMIX CLUB” (P206)
• Address number and access number acquired by the destination External AV device. (P210)
1
Press [Wi-Fi].
2
Press 3/4/2/1 to select [New Connection], and
then press [MENU/SET].
• When connecting with the setting you used before, you can select the connection destination
3
Press 3/4 to select [Send Images Stored in the Camera], and then press [MENU/
SET].
Press 3/4 to select [AV device], and then press [MENU/SET].
Press 3/4 to select [Home] or [External], and then press [MENU/SET].
Press 3/4 to select connection method, and then press [MENU/SET].
from [History Connection] (P179) or [Favorite Connection] (P180).
4
5
6
[Via Network]
[Direct]
• This can be
selected only
when [Home]
is selected.
When you want to connect to an AV device via a wireless access point.
(P185)
When you want to directly connect an AV device to this unit with [Wi-Fi
Direct], [WPS Connection], or [Manual Connection]. (P187)
7
Press 3/4 to select a device you want to connect, and then press [MENU/SET].
• When the connection is complete, the screen is displayed. To change the send setting, press
8
Press 3/4 to select [SINGLE] or [MULTI] and then press [MENU/SET].
• To change the setting or disconnect, press [Wi-Fi]. (P189)
Select and send the images. (P200)
[DISP.]. (P192)
9
- 204 -
Wi-Fi
When sending images to Printer
Preparations:
• You can print out recorded pictures wirelessly from a PictBridge (wireless LAN-compatible)¢ printer.
¢ Compliant with the DPS over IP standards.
See the following website for information on the PictBridge (wireless LAN-compatible) printer.
http://panasonic.jp/support/global/cs/dsc/ (This Site is English only.)
1
Press [Wi-Fi].
2
Press 3/4/2/1 to select [New Connection], and
then press [MENU/SET].
• When connecting with the setting you used before, you can select the connection destination
3
Press 3/4 to select [Send Images Stored in the Camera], and then press [MENU/
SET].
Press 3/4 to select [Printer], and then press [MENU/SET].
Press 3/4 to select connection method, and then press [MENU/SET].
from [History Connection] (P179) or [Favorite Connection] (P180).
4
5
6
7
[Via Network]
When you want to connect to your Printer via a wireless access point.
(P185)
[Direct]
When you want to directly connect your printer to this unit with [Wi-Fi
Direct], [WPS Connection], or [Manual Connection]. (P187)
Press 3/4 to select a printer you want to connect, and then press [MENU/SET].
Select pictures, and then print. (P227)
• To change the setting or disconnect, press [Wi-Fi]. (P189)
• Motion pictures cannot be printed out.
- 205 -
Wi-Fi
Using “LUMIX CLUB”
About the [LUMIX CLUB]
Acquire a “LUMIX CLUB” login ID (free).
If you register this unit to the “LUMIX CLUB”, you can synchronize images between the devices
you are using, or transfer these images to WEB services.
Use the “LUMIX CLUB” when uploading pictures to WEB services or external AV device.
• You can set the same “LUMIX CLUB” login ID for this unit and a smartphone/tablet. (P208)
Refer to the “LUMIX CLUB” site for details.
http://lumixclub.panasonic.net/eng/c/
Please note;
• The service may be suspended due to regular maintenance or unexpected troubles, and the
service contents may be changed or added, without prior notice to the users.
• The service may be stopped in whole or in part with a reasonable period of advance notice.
1
2
3
Select [Wi-Fi Setup] in the [Wi-Fi] menu, and press [MENU/SET]. (P48)
Press 3/4 to select [LUMIX CLUB], and press [MENU/SET].
Press 3/4 to select [Add/Change Account], and press [MENU/
SET].
4
Press 3/4 to select [New account], and press [MENU/SET].
• Connect to the network. Proceed to the next page by pressing [MENU/
SET].
• A confirmation screen will be displayed if a login ID has already been
acquired for the camera. Select [Yes] to acquire a new login ID, or [No]
if you do not need to acquire a new login ID.
5
Select the method for connecting to a wireless access point, and set.
• Refer to P185 for details.
• A setting screen will be displayed only when connecting for the first time. Once you set the
connection method, it will be saved on this unit and used when connecting the next time. To
change the wireless access point you want to connect to, press [DISP.], and change the
connection destination.
6
7
Press [MENU/SET].
Read through the “LUMIX CLUB” terms of use and press [MENU/SET].
• You can switch pages by 3/4.
• You can enlarge (2k) the display by pressing [T] of the zoom button.
• You can reset the enlarged display to its original size (1k) by pressing [W] of the zoom button.
• You can move the position of the enlarged display with 3/4/2/1.
• Press [Q.MENU/ ] to cancel the process without acquiring a login ID.
- 206 -
Wi-Fi
8
9
Enter a password and press [MENU/SET].
• Enter any combination of 8 to 16 characters and numbers for the password.
• For details on how to enter characters, refer to “Entering Text” section on P94.
Check the login ID and press [MENU/SET].
• The login ID (12-digit number) will be displayed automatically. When
logging in to the “LUMIX CLUB” with a computer, you only need to enter
the numbers.
• A message is displayed when the connection is complete. Press
[MENU/SET].
• Be sure to make a note of the login ID and password.
• Exit the menu after it is executed.
Check or change the acquired login ID/password
Preparation:
To change the “LUMIX CLUB” password on the camera, access the “LUMIX CLUB” website
from your smartphone/tablet or PC and change the “LUMIX CLUB” password in advance.
1
2
3
4
Select [Wi-Fi Setup] in the [Wi-Fi] menu, and press [MENU/SET]. (P48)
Press 3/4 to select [LUMIX CLUB], and press [MENU/SET].
Press 3/4 to select [Add/Change Account], and press [MENU/SET].
Press 3/4 to select [Change Login ID], and press [MENU/SET].
• The login ID and password are displayed.
• The password is displayed as “ ”.
• Close the menu if only checking the login ID.
5
Press 3/4 to select the login ID or password you want to
change, and press [MENU/SET].
• The confirmation screen is displayed when changing the login ID.
Select [Yes].
6
Enter the login ID or password, and press [MENU/SET].
• Refer to “Entering Text” (P94) for information on how to enter text.
• Enter the new password you have created on your smartphone/tablet or PC into the camera. If
the password differs from the one you created on your smartphone/tablet or PC, you will not be
able to upload images.
• Exit the menu after it is executed.
- 207 -
Wi-Fi
To set the same login ID for the camera and the smartphone/tablet
• Setting the same login ID on this unit and your smartphone/tablet is convenient for sending images
on this unit to other devices or WEB services.
When either this unit or the smartphone/tablet has acquired the login ID:
1
2
Connect this unit to the smartphone/tablet. (P177)
From the “Image App” menu, set the common login ID.
• The login IDs for this unit and the smartphone/tablet become the same.
• After connecting this unit to the smartphone/tablet, the setup screen for a common login ID may
appear when you display the playback screen. You can also set a common login ID by following the
on-screen instructions.
• This operation is not available for [Wi-Fi Direct] connection.
When this unit and the smartphone/tablet have acquired different login IDs:
(When you want to use the smartphone’s/tablet’s login ID for this unit)
Change the login ID and password for this unit to those acquired by the smartphone/
tablet.
(When you want to use this unit’s login ID for the smartphone/tablet)
Change the login ID and password for the smartphone/tablet to those acquired by this
unit.
Check the “LUMIX CLUB” terms of use
Check the details if the terms of use have been updated.
1
2
3
Select [Wi-Fi Setup] in the [Wi-Fi] menu, and press [MENU/SET]. (P48)
Press 3/4 to select [LUMIX CLUB], and press [MENU/SET].
Press 3/4 to select [Terms of use], and press [MENU/SET].
• The camera will connect to the network and the terms of use will be displayed. Close the menu
after checking the terms of use.
- 208 -
Wi-Fi
Delete your login ID and account from the “LUMIX CLUB”
Delete the login ID from the camera when transferring it to another party or disposing of it. You
can also delete your “LUMIX CLUB” account.
1
2
3
4
5
Select [Wi-Fi Setup] in the [Wi-Fi] menu, and press [MENU/SET]. (P48)
Press 3/4 to select [LUMIX CLUB], and press [MENU/SET].
Press 3/4 to select [Delete account], and press [MENU/SET].
• The message is displayed. Press [MENU/SET].
Select [Yes] in the login ID delete confirmation screen.
• The message is displayed. Press [MENU/SET].
Select [Yes] on the confirmation screen for deleting the “LUMIX CLUB” account.
• If you want to continue using the service, selecting [No] will only delete the login ID. Exit the
menu after it is executed.
6
Press [MENU/SET].
• The login ID is deleted, and then the message notifying the deletion of your account is
displayed. Press [MENU/SET].
• Exit the menu after it is executed.
• Changes and other actions to login IDs can only be made to the login ID acquired with the camera.
Using WEB services
When sending images to WEB services, the WEB service being used must be registered with
the “LUMIX CLUB”. Registering multiple WEB services will send images to all services
simultaneously.
• Check the “FAQ/Contact us” on the following site for compatible WEB services.
http://lumixclub.panasonic.net/eng/c/lumix_faqs/
Preparation:
Make sure that you have created an account on the WEB service you want to use, and have
the login information available.
1
Connect to the “LUMIX CLUB” site using a smartphone/tablet or computer.
2
3
4
Enter your “LUMIX CLUB” login ID and password and log in to the service. (P206)
Save your email address.
Select the WEB service to be used and save it.
• Follow the instructions on the screen to save the service.
http://lumixclub.panasonic.net/eng/c/
- 209 -
Wi-Fi
Configuring the external AV device settings
Images can be sent to the AV device of relatives and acquaintances via “LUMIX CLUB”.
• See the following site for AV device that is compatible with “LUMIX CLUB”.
http://panasonic.jp/support/global/cs/dsc/ (This Site is English only.)
Preparation:
Check the address number (16-digit number) and access number (4-digit number) of the
destination AV device issued by “LUMIX CLUB”.
(Refer to the AV device instruction manual for details)
1
2
3
4
5
6
Select [Wi-Fi Setup] in the [Wi-Fi] menu, and press [MENU/SET]. (P48)
Press 3/4 to select [External AV device], and press [MENU/SET].
Press 3/4 to select [Add new device], and press [MENU/SET].
Enter the address number and select [Set].
• Refer to “Entering Text” (P94) for information on how to enter text.
Enter the access number and select [Set].
Enter any name and select [Set].
• A maximum of 28 characters can be entered.
• Up to 14 characters can be entered for [ ], [ ], [ ], [ ] and [ ].
• Exit the menu after it is executed.
Change or delete information on registered AV device
Information on AV device that has already been saved can be changed or deleted.
1
2
3
4
Select [Wi-Fi Setup] in the [Wi-Fi] menu, and press [MENU/SET]. (P48)
Press 3/4 to select [External AV device], and press [MENU/SET].
Press 3/4 to select the AV device you want to change or delete, and press [MENU/
SET].
Press 2/1 to select [Edit] or [Delete], and press [MENU/SET].
Item
Description of settings
[Edit]
Change information on AV device that has already been registered.
Perform steps 4 through 6 of “Configuring the external AV
device settings”.
[Delete]
Delete information on AV device that has already been registered.
• Confirmation screen is displayed. It is executed when [Yes] is selected.
• Exit the menu after it is executed.
- 210 -
Wi-Fi
How to Use the [Wi-Fi Setup] Menu
For details on how to select the [Wi-Fi] menu settings, refer to P48.
Configure the settings required for the Wi-Fi function.
[Wi-Fi Setup] cannot be changed when connected to Wi-Fi.
1 Select [Wi-Fi Setup] in the [Wi-Fi] menu, and press [MENU/SET]. (P48)
2 Press 3/4 to select item, and press [MENU/SET].
[LUMIX CLUB]
Acquires or changes the “LUMIX CLUB” login ID.
• Refer to P206 for details.
You can set the workgroup.
To send images to a PC, a connection to the same workgroup as the
destination PC is required.
(The default setting is “WORKGROUP”.)
[PC Connection]
[Change Workgroup Name]:
Enter the workgroup of the connecting PC.
Close the menu after changing settings.
[Restore to Default]:
Restores the default state.
Confirmation screen is displayed. It is executed when [Yes] is selected.
Exit the menu after it is executed.
• For details on how to enter characters, refer to “Entering Text” section on P94.
• If you are using the PC with standard settings, you do not need to change the workgroup.
You can change the name of this unit.
[Device Name]
1
2
Press [DISP.].
Enter the desired device name.
• Refer to “Entering Text” (P94) for information on how to enter text.
• Up to 32 characters can be entered for [A], [a], [1], and [&].
[External AV device]
Images can be sent to the AV device of relatives and acquaintances
via “LUMIX CLUB”.
• Refer to P210 for details.
Configures the settings for the NFC function.
[NFC Operation]
[ON]:
NFC function is worked.
[OFF]
• It is initially set to [ON] on the camera.
- 211 -
Wi-Fi
To prevent incorrect operation or use of the Wi-Fi function by a third
party and to protect saved personal information, it is recommended
that you protect the Wi-Fi function with a password.
Setting a password will automatically display the password input
screen when the Wi-Fi function is used.
[Wi-Fi Password]
[Setup]:
Enter any 4-digit numbers as the password.
Close the menu after changing settings.
[Delete]:
Confirmation screen is displayed. It is executed when [Yes] is selected.
Exit the menu after it is executed.
• For details on how to enter characters, refer to “Entering Text” section on P94.
• Make a copy of password. If you forget the password, you can reset it with [Reset Wi-Fi Settings] in
the [Setup] menu, however other settings will also be reset. (excluding [LUMIX CLUB])
[Network Address]
Displays the MAC address and IP address of this unit.
• A “MAC Address” is a unique address that is used to identify network equipment.
• “IP address” refers to a number that identifies a PC connected to a network such as the Internet.
Usually, the addresses for homes are automatically assigned by the DHCP function such as a
wireless access point. (Example: 192.168.0.87)
[Approved
Regulations]¢
Displays the certification number for radio regulations.
¢ [Approved Regulations] is only available on the version DMC-TS5P.
- 212 -
Connecting to other equipment
Playing Back Pictures on a TV Screen
Pictures recorded with this unit can be played back on a TV screen.
Preparations: Turn this unit and the TV off.
Confirm the terminals on your TV and use a cable compatible with the terminals. Image
quality may vary with the connected terminals.
1 High quality
2 HDMI socket
3 Video socket
1
Connect the camera and a TV.
• Check the direction of the terminals and plug in/out straight holding onto the plug. (It may
result in malfunction by the deforming of the terminal if it is plugged in obliquely or in wrong
direction.) Do not connect devices to incorrect terminals. Doing so may cause malfunction.
To connect with an HDMI micro cable (optional)
• Always use a genuine Panasonic HDMI micro cable (RP-CHEU15: optional).
Part number: RP-CHEU15 (1.5 m) (5 feet)
• Audio will be played back as stereo (2ch).
• Pictures are not displayed on the LCD monitor.
• Some playback functions are restricted.
• [Playback] menu, [GPS/Sensor] menu and [Setup] menu cannot be used.
• For more details about VIERA Link (HDMI) playback, refer to P215.
To connect with an AV cable (optional)
• Always use a genuine Panasonic AV cable (DMW-AVC1: optional).
• Check the [TV Aspect]. (P59)
• Audio will be played back in monaural.
A HDMI socket
B HDMI micro cable (optional)
C Align the marks, and insert.
D Yellow: to the video input socket
E White: to the audio input socket
F AV cable (optional)
- 213 -
Connecting to other equipment
2
Turn on the TV and select the input to match the terminal in use.
3
Turn the camera on and then press [(].
• Depending on the [Aspect Ratio], black bands may be displayed on the top and bottom or the left
and right of the pictures.
• Change the screen mode on your TV if the picture is displayed with the top or bottom cut off.
• Output from the HDMI micro cable has priority when both AV cable and HDMI micro cable are
connected.
• The connection with the USB connection cable will take priority when you connect the USB
connection cable simultaneously with the HDMI micro cable.
• When you play back a picture vertically, it may be blurry.
• When pictures are displayed, they may not be displayed properly depending on the type of TV.
• Environment information such as direction, altitude (water depth) and atmospheric pressure is not
displayed.
• No sound is output from the camera speakers.
• Read the operating instructions for the TV.
• Before removing a battery, turn the camera off and disconnect the AV cable or HDMI micro cable.
The recorded still pictures can be played back on a TV with an SD Memory Card slot.
• Depending on the TV model, pictures may not be displayed on the full screen.
• The file format of the motion pictures that can be played back differs depending on the TV model.
• In some cases, panorama pictures cannot be played back. Also, auto-scroll playback of
panorama pictures may not work.
• For cards compatible with playback, refer to the operating instructions of the TV.
- 214 -
Connecting to other equipment
Using VIERA Link (HDMI)
What is the VIERA Link (HDMI) (HDAVI Control™)?
• This function allows you to use your remote control for the Panasonic TV for easy operations
when this unit has been connected to a VIERA Link compatible device using an HDMI micro
cable (optional) for automatic linked operations. (Not all operations are possible.)
• VIERA Link is a unique Panasonic function built on an HDMI control function using the standard
HDMI CEC (Consumer Electronics Control) specification. Linked operations with HDMI CEC
compatible devices made by other companies are not guaranteed. When using devices made by
other companies that are compatible with VIERA Link, refer to the operating instructions for the
respective devices.
• This unit supports “VIERA Link Ver.5” function. “VIERA Link Ver.5” is the standard for Panasonic’s
VIERA Link compatible equipment. This standard is compatible with Panasonic’s conventional
VIERA Link equipment.
Preparations:
Set the [VIERA Link] to [ON]. (P60)
1
Connect this unit to a Panasonic TV compatible with VIERA Link with an
HDMI micro cable (optional). (P213)
2
Turn the camera on and then press [(].
3
Operate with the remote control for the TV.
• Operate with reference to the operation icons displayed on the screen.
• To play back the audio of the motion pictures, set the [Sound] in the Slide Show setting screen to
[AUTO] or [Audio].
• It is recommended to connect this unit to an HDMI terminal other than the HDMI1 if there are 2 or
more HDMI input terminals on the TV.
• Operation on this unit will be limited.
- 215 -
Connecting to other equipment
∫ Other linked operations
Turning this unit off:
If you use the remote control for the TV to turn the TV off, this unit is also turned off.
Automatic input switching:
• If you connect with an HDMI micro cable and then turn this unit on, and then press [(], the input
channel on the TV automatically switches to this unit’s screen. If the TV’s power is in standby status,
it will turn on automatically (if [Set] has been selected for the TV’s [Power on link] setting).
• Depending on the HDMI terminal on the TV, the input channel may not switch automatically. In this
case, use the remote control for the TV to switch the input channel. (For details on how to switch
input, please read the operating instructions for the TV.)
• If VIERA Link does not work properly, refer to P263.
• If you are unsure whether or not the TV you are using are compatible with VIERA Link, read the
operating instructions for the TV.
• Available linked operations between this unit and a Panasonic TV is different depending on the types
of Panasonic TVs even if they are compatible with VIERA Link. Refer to the operating instructions of
the TV for the operations that support on the TV.
• Operation is not possible with a cable that is not based on the HDMI standard.
Always use a genuine Panasonic HDMI micro cable (RP-CHEU15: optional).
Part number: RP-CHEU15 (1.5 m) (5 feet)
- 216 -
Connecting to other equipment
Playing back 3D pictures
Connecting the camera to a 3D compatible television and playing back pictures taken in 3D
allows you to enjoy 3D pictures for extra impact.
It is also possible to play back the recorded 3D pictures by inserting an SD card into the 3D
compatible television with an SD card slot.
For current information regarding devices that can play back 3D pictures recorded
with this unit, please refer to the below support site.
http://panasonic.jp/support/global/cs/dsc/ (This site is English only.)
Preparations:
Set [3D Playback] (P60) to [3D].
Connect the unit to a 3D compatible television using the HDMI micro cable and
display the playback screen. (P213)
• When [VIERA Link] (P60) is set to [ON] and the camera is connected to a TV supporting VIERA
Link, input of the TV will be switched automatically and playback screen will be displayed. Refer to
P215 for details.
• For the pictures recorded in 3D, [3D] will appear on the thumbnail display at playback.
∫ Play back as a 3D slide show by selecting only the still pictures recorded in 3D
Select [3D Play] in [Slide Show] in the Playback Mode. (P147)
∫ Play back in 3D by selecting only the still pictures recorded in 3D
Select [3D Play] in [Filtering Play] in the Playback Mode. (P149)
∫ Switch the playback method for the still pictures recorded in 3D
1 Select the picture recorded in 3D.
2 Select [2D/3D Settings] on the Playback Mode and then press [MENU/SET]. (P146)
• Playback method will switch to 3D if it is playing back in 2D (conventional image).
• If you feel tired, uncomfortable or otherwise strange when playing back pictures recorded in 3D,
set to 2D.
- 217 -
Connecting to other equipment
• When the picture is not appropriate to view in 3D (disparity is too large, etc.)
– [Slide Show]:
The picture will be played back in 2D.
– [Filtering Play]:
Confirmation screen is displayed. Select whether or not to play back the picture in 3D.
• 2 pictures may be displayed side by side when a 3D picture is played back on a TV that is not 3D
compatible.
• When a picture recorded in 3D is displayed on the LCD monitor of this unit, it is played back in 2D
(conventional image).
• A black screen is displayed for a few seconds when switching back and forth playback of 3D pictures
and 2D pictures.
• When you select a 3D picture thumbnail, it may take a few seconds for playback to start. After
playback, the thumbnail display may take a few seconds to reappear.
• When viewing 3D pictures, your eyes may become tired if you are too close to the television screen.
• If your television does not switch to a 3D picture, make the necessary settings on the TV. (For
details, refer to the operating instructions of the TV.)
• Pictures cannot be deleted when 3D pictures are being played back. The [Wi-Fi] menu, [Setup]
menu, [GPS/Sensor] menu, [Playback] menu and Playback zoom functions cannot be used.
• 3D pictures can be saved to your computer or Panasonic devices. (P219, 225)
- 218 -
Connecting to other equipment
Saving still pictures and motion pictures on your
PC
You can transfer the pictures in the camera to a PC by connecting the camera and the PC.
• Some PCs can read directly from the card removed from the camera. For details, refer to the
operating instructions of your PC.
• If the computer being used does not support SDXC Memory Cards, a message prompting you
to format may appear. (Doing so will cause recorded images to be erased so do not choose to
format.)
If the card is not recognized, please refer to the below support site.
http://panasonic.net/avc/sdcard/information/SDXC.html
∫ PC that can be used
The unit can be connected to any PC capable of recognizing a mass storage device.
• For Windows:
Windows XP/Windows Vista/Windows 7/Windows 8
• For Mac:
OS X v10.1 ~ v10.8
AVCHD motion pictures may not be imported correctly when copied as files or folder.
• With Windows, always import AVCHD motion pictures using “PHOTOfunSTUDIO”, one of the
programs on the CD-ROM (supplied).
• With a Mac, AVCHD motion pictures can be imported using “iMovie’11”.
Note that motion pictures (AVCHD Progressive) recorded in [FHD/60p/
imported.
(For details about iMovie’11, please contact Apple Inc.)
- 219 -
]/[FHD/60p] cannot be
Connecting to other equipment
About the supplied software
The supplied CD-ROM includes the following software.
Install the software on to your computer before use.
• PHOTOfunSTUDIO 9.1 PE (Windows XP/Vista/7/8)
This software allows you to manage images. For example, you can send pictures and motion
pictures to a PC and sort them by recording date or model name. You can also perform operations
such as writing images to a DVD, processing and correcting images, and editing motion pictures.
• LoiLoScope 30 day full trial version (Windows XP/Vista/7/8)
LoiLoScope is a video editing software where that draws out the full power of your PC. Creating
videos is as easy as organizing cards on top of a desk. Use your music, picture and video files to
create videos to share with your friends and family by burning it to a DVD, uploading it to websites,
or simply share your videos with your friends via e-mail.
– This will only install a shortcut to the trial version download site.
For more information on how to use LoiLoScope, read the LoiLoScope manual available
for download at the link below.
Manual URL: http://loilo.tv/product/20
- 220 -
Connecting to other equipment
∫ Installing supplied software
• Before inserting the CD-ROM, close all running applications.
1
Check the environment of your PC.
• Operating environment of “PHOTOfunSTUDIO 9.1 PE”
– OS:
WindowsR XP (32bit) SP3,
Windows VistaR (32bit) SP2,
WindowsR 7 (32bit/64bit) or SP1
WindowsR 8 (32bit/64bit)
– CPU:
PentiumR III 500 MHz or higher (WindowsR XP),
PentiumR III 800 MHz or higher (Windows VistaR),
PentiumR III 1 GHz or higher (WindowsR 7/WindowsR 8)
– Display:
1024k768 pixels or more (1920k1080 pixels or more recommended)
– RAM:
512 MB or more (WindowsR XP/Windows VistaR),
1 GB or more (WindowsR 7 32bit/WindowsR 8 32bit),
2 GB or more (WindowsR 7 64bit/WindowsR 8 64bit)
– Free hard disk space:
450 MB or more for installing software
• Refer to the operating instructions of “PHOTOfunSTUDIO” (PDF) for further operating
environment.
2
Insert the CD-ROM with the supplied software.
• When you insert the supplied CD-ROM, the install menu will start.
3
Click on the [Applications] on the install menu.
4
Click on the [Recommended Installation].
• Proceed with installation according to messages appearing on the screen.
• The software compatible with your PC will be installed.
• “PHOTOfunSTUDIO” and “LoiLoScope” are not compatible with Mac.
- 221 -
Connecting to other equipment
∫ Transferring pictures to a PC
Preparations:
1
Install “PHOTOfunSTUDIO” to the PC.
Connect the computer and camera with the USB connection cable
(supplied).
• Check the directions of the connectors, and plug them straight in or unplug them straight
out. (Otherwise the connectors may bend out of shape which will cause a malfunction.) Do
not connect devices to incorrect terminals. Doing so may cause malfunction.
• Do not use any other USB connection cables except the supplied one or a genuine
Panasonic USB connection cable (DMW-USBC1: optional).
A USB connection cable (supplied)
B Align the marks, and insert.
2
Press 3/4 to select [PC], and then press [MENU/SET].
• If [USB Mode] (P59) is set to [PC] in the [Setup] menu in advance, the camera will be
automatically connected to the PC without displaying the [USB Mode] selection screen.
• When the camera is connected to a PC while [USB Mode] is set to [PictBridge(PTP)], a
message may appear on the PC screen. In that case, close the message, and remove the
USB connection cable safely (P224), and then set the [USB Mode] to [PC].
• When [USB Mode] (P59) in [Setup] menu is set to [GPS assist data], the folder where
pictures are saved will not be displayed. Set [USB Mode] to [PC].
3
Copy the images to a PC using “PHOTOfunSTUDIO”.
• Do not delete or move copied files or folders in Windows Explorer. When viewing in
“PHOTOfunSTUDIO”, you will not be able to play back or edit.
• Use a battery with sufficient battery power or the AC adaptor (optional). If the remaining battery
power becomes low while the camera and the PC are communicating, the alarm beeps.
Refer to “Disconnecting the USB connection cable safely” (P224) before disconnecting the USB
connection cable. Otherwise, data may be destroyed.
• Before connecting or disconnecting the AC adaptor (optional), turn the camera off.
• Before inserting or removing a card/battery, turn the camera off and disconnect the USB connection
cable. Otherwise, data may be destroyed.
- 222 -
Connecting to other equipment
∫ Copying to a PC without using “PHOTOfunSTUDIO”
If the installation of “PHOTOfunSTUDIO” fails, you can copy files and folders to your PC by
dragging and dropping them from the camera after connecting to your PC.
Directory structure of built-in memory/card of this unit is shown by the figure below.
For Windows:
A drive ([Removable Disk]) is displayed in [Computer]
For Mac:
A drive ([NO_NAME]) is displayed on the desktop
• Built-in Memory
• Card
DCIM
100_PANA
P1000001.JPG
P1000002.JPG
P1000999.JPG
101_PANA
999_PANA
MISC
PRIVATE 1
AVCHD
DCIM:
1 Folder number
2 File number
3 JPG:
MP4:
MPO:
MISC:
AVCHD:
LOG:
AD_LUMIX:
4 GPS log file
Images
Still pictures
[MP4] Motion pictures
3D pictures
DPOF print
Favorite
[AVCHD] Motion pictures
Altimeter log
¢1 Cannot be created in the built-in memory.
¢2 When the “GPS Assist Tool” is copied to the card, it will
be saved in this folder.
LOG
AD_LUMIX 1, 2
GPSLOG
KML
NMEA
• AVCHD motion pictures may not be imported correctly when copied as files or folder. We
recommend using “PHOTOfunSTUDIO” on the CD-ROM (supplied) for importing files. Refer to P222
for details.
• A new folder is created when pictures are taken in the following situations.
– After [No.Reset] (P58) in the [Setup] menu has been executed
– When a card containing a folder with the same folder number has been inserted (such as when
pictures were taken using another maker of camera)
– When there is a picture with file number 999 inside the folder
- 223 -
Connecting to other equipment
∫ Disconnecting the USB connection cable safely
Select the [
] icon in task tray displayed on the PC, and then click [Eject DMC-XXX]
(XXX varies by model).
• Depending on your PC’s settings, this icon may not be displayed.
• If the icon is not displayed, check that [Access] is not displayed on the LCD monitor of the digital
camera before removing the hardware.
∫ Connection in the PTP Mode
Set [USB Mode] to [PictBridge(PTP)].
• Data can now be read only from the card into the PC.
• When there are 1000 or more pictures on a card, the pictures may not be imported in the PTP Mode.
• Motion picture cannot be played back in PTP Mode.
- 224 -
Connecting to other equipment
Saving still pictures and motion pictures on a
Recorder
If you insert card holding content recorded with this unit into a Panasonic recorder, you can dub
the content to a Blu-ray Disc or DVD etc.
For details on Panasonic devices compatible with the
respective file format (such as a Blu-ray Disc recorder), refer
to the support sites below.
http://panasonic.jp/support/global/cs/dsc/
(This Site is English only.)
¢ Some compatible devices may not be sold in certain countries and regions.
• See the operating instructions for the recorder about the details about copying and playing back.
∫ Dubbing with non-compatible equipment
You can dub the content played back using this unit to non-compatible equipment such as
recorders and video players by connecting this unit to the non-compatible equipment using an
AV cable (optional). Non-compatible equipment will be able to play back the content. This is
convenient if you wish to pass around dubbed content. In this case, the content will be played
back in standard rather than high-definition picture quality.
1
2
3
Connect this unit with the recording
equipment with an AV cable (optional).
Start the playback of this unit.
Start the recording on the recording
equipment.
• When ending the recording (copying), stop
the playback on this unit after stopping the
recording of the recording equipment.
1 Yellow: to the video input socket
2 White: to the audio input socket
A AV cable (optional)
• When you play back motion pictures on 4:3 aspect ratio TV, you must set [TV Aspect] (P59) on this
unit to [4:3] before starting a copy. The image will be vertically long if you play back motion pictures
copied with [16:9] setting on a [4:3] aspect TV.
• See the operating instructions for the recording equipment regarding the details of copying and
playing back.
- 225 -
Connecting to other equipment
Printing the Pictures
If you connect the camera to a printer supporting PictBridge, you can select the pictures to be
printed out and instruct that printing be started from the camera’s LCD monitor.
• Grouped pictures are displayed individually.
• Some printers can print directly from the card removed from the camera. For details, refer to the
operating instructions of your printer.
Preparations:
Turn on the camera and the printer.
Remove the card before printing the pictures in the built-in memory.
Check print quality and other settings on the printer before printing the pictures.
1
Connect the printer and camera with the USB connection cable
(supplied).
• Check the directions of the connectors, and plug them straight in or unplug them straight
out. (Otherwise the connectors may bend out of shape which will cause a malfunction.) Do
not connect devices to incorrect terminals. Doing so may cause malfunction.
• Do not use any other USB connection cables except the supplied one or a genuine
Panasonic USB connection cable (DMW-USBC1: optional).
A USB connection cable (supplied)
B Align the marks, and insert.
2
Press 3/4 to select [PictBridge(PTP)], and then press [MENU/SET].
• Use a battery with sufficient battery power or the AC adaptor (optional). If the remaining battery
power becomes low while the camera and the printer are connected, the alarm beeps. If this
happens during printing, stop printing at once. If not printing, disconnect the USB connection cable.
• Do not disconnect the USB connection cable while [å] (Cable disconnect prohibit icon) is displayed.
(May not be displayed depending on the type of printer used)
• Before connecting or disconnecting the AC adaptor (optional), turn the camera off.
• Before inserting or removing a card/battery, turn the camera off, and disconnect the USB connection
cable.
• Motion pictures cannot be printed out.
- 226 -
Connecting to other equipment
Selecting a single picture and printing it
1
Press 2/1 to select the picture and then press [MENU/
SET].
2
Press 3 to select [Print start] and then press [MENU/
SET].
• Refer to P228 for the items which can be set before starting to print the
PictBridge
6LQJOH6HOHFW
3ULQWVWDUW
3ULQWZLWK'DWH
1XPRISULQWV
3DSHU6L]H
3DJH/D\RXW
pictures.
• Disconnect the USB connection cable after printing.
&DQFHO
2))
6HOHFW
Selecting multiple pictures and printing them
1
Press 3.
2
Press 3/4 to select an item and then press [MENU/SET].
Item
Description of settings
[Multi Select]
Multiple pictures are printed at one time.
• Press 3/4/2/1 to select the pictures, and then press [DISP.]. (When
[DISP.] is pressed again, the setting is canceled.)
• After the pictures have been selected, press [MENU/SET].
[Select All]
Prints all the stored pictures.
[Print Set (DPOF)]
Prints the pictures set in [Print Set] only. (P168)
[Favorite]
Prints the pictures set as favorites only. (P167)
3
Press 3 to select [Print start] and then press [MENU/SET].
• If the print check screen has appeared, select [Yes], and print the pictures.
• Refer to P228 for the items which can be set before starting to print the pictures.
• Disconnect the USB connection cable after printing.
- 227 -
6HW
Connecting to other equipment
Print Settings
Select and set the items both on the screen in step 2 of the “Selecting a single picture
and printing it” and in step 3 of the “Selecting multiple pictures and printing them”
procedures.
• When you want to print pictures in a paper size or a layout which is not supported by the camera, set
[Paper Size] or [Page Layout] to [{] and then set the paper size or the layout on the printer. (For
details, refer to the operating instructions of the printer.)
• When [Print Set (DPOF)] has been selected, the [Print with Date] and [Num.of prints] items are not
displayed.
[Print with Date]
Item
Description of settings
[ON]
Date is printed.
[OFF]
Date is not printed.
• If the printer does not support date printing, the date cannot be printed on the picture.
• Depending on the printer, the date print settings of the printer may take precedence so check if this
is the case.
• When printing images with [Date Stamp] or [Text Stamp], please remember to set [Print with Date] to
[OFF] or the date will print on top.
When asking the photo shop to print the pictures
• By stamping the date using [Date Stamp] (P117) or [Text Stamp] (P160) or setting date printing at the
time of the [Print Set] (P168) setting before going to a photo shop, the dates can be printed at the
photo shop.
[Num.of prints]
You can set the number of prints up to 999.
- 228 -
Connecting to other equipment
[Paper Size]
Item
Description of settings
{
Settings on the printer are prioritized.
[L/3.5qk5q]
89 mmk127 mm
[2L/5qk7q]
127 mmk178 mm
[POSTCARD]
100 mmk148 mm
[16:9]
101.6 mmk180.6 mm
[A4]
210 mmk297 mm
[A3]
297 mmk420 mm
[10k15cm]
100 mmk150 mm
[4qk6q]
101.6 mmk152.4 mm
[8qk10q]
203.2 mmk254 mm
[LETTER]
216 mmk279.4 mm
[CARD SIZE]
54 mmk85.6 mm
• Paper sizes not supported by the printer will not be displayed.
- 229 -
Connecting to other equipment
[Page Layout] (Layouts for printing that can be set with this unit)
Item
Description of settings
{
Settings on the printer are prioritized.
á
1 picture with no frame on 1 page
â
1 picture with a frame on 1 page
ã
2 pictures on 1 page
ä
4 pictures on 1 page
• An item cannot be selected if the printer does not support the page layout.
∫ Layout printing
When printing a picture several times on 1 sheet of paper
For example, if you want to print the same picture 4 times on 1 sheet of paper, set
[Page Layout] to [ä] and then set [Num.of prints] to 4 for the picture that you want to print.
When printing different pictures on 1 sheet of paper
For example, if you want to print 4 different pictures on 1 sheet of paper, set [Page Layout] to
[ä] and then set [Num.of prints] to 1 for each of the 4 pictures.
• The camera is receiving an error message from the printer when the [¥] indication lights orange
during printing. After finishing printing, make sure there are no problems with the printer.
• If the number of prints is high, the pictures may be printed several times. In this case, the remaining
number of prints indicated may differ from the number set.
- 230 -
Others
Screen Display
∫ In recording
1
2
16 Number of days that have passed since
the departure date (P52)
Location (P52)
Name (P91)
Age (P91)
Current date and time
Location name information (P123, 124)
“: World Time (P51)
3 4 5 6 7 8 9
30p
31
30
29
28
27
26
25
24
1
3s
ISO
F3.3
1/60
10
11
12
13
14
15
16
17
Zoom (P64):
23 22 21 20 19 18
1
2
3
4
5
6
7
8
9
10
11
12
13
14
15
Recording Mode
Recording format (P118)
Recording Quality (P119)
Picture size (P96)
: Backlight Compensation (P33)
Quality (P97)
Flash Mode (P66)
: LED light (P56)
Optical Image Stabilizer (P116)
: Jitter alert (P30)
White Balance (P99)
Color Mode (P115)
: Motion Deblur (P34)
: Creative control adjustment display
(P75)
AF Macro Mode (P69)
: Macro Zoom Mode (P69)
Battery indication (P19)
Burst (P111)
: Auto Bracket (P72)
GPS (P123)
Icon indicating positioning status (P123)
: A GPS log is being recorded (P132)
Intelligent Exposure (P109)
Histogram (P55)
Wind Cut (P120)
W
T
17 Shutter speed (P36)
1 : Minimum shutter speed (P109)
18 AF area (P37)
: Spot AF area (P102)
19 Aperture value (P36)
20 ISO sensitivity (P98)
21 Self-timer Mode (P70)
: Time Lapse Shot (P113)
22 AF Tracking (P104)
: AF assist lamp (P115)
23 Exposure Compensation (P71)
24 Elapsed recording time (P39): 8m30s ¢
25 Monitor Luminance (P54)
ECO : Monitor power save (P57)
26 Altimeter log (P139)
27 Date Stamp (P117)
28 Recording state
29 Built-in memory (P24)
: Card (P24) (displayed only during
recording)
30 Focus (P37)
31 Number of recordable pictures (P26)
Available recording time
(P27, 39): R8m30s ¢
¢ “h” is an abbreviation for hour, “m” for minute
and “s” for second.
- 231 -
Others
∫ In playback
1 2 3 4 5
24
23
22
21
20
19
6
7 8 9
1/2
100 _ 0001
3s
1
30p
10
11
12
13
14
18
17
1
2
3
4
5
6
7
8
9
10
11
12
13
14
15
16
16
15
Playback Mode (P146)
Protected picture (P170)
Favorites (P167)
Date/Text stamped display (P117, 160)
Color Mode (P115)
After Auto Retouch (P153)
After Creative Retouch (P154)
After Underwater Color Reproduction
(P155)
Picture size (P96)
Quality (P97)
Battery indication (P19)
Picture number
Total pictures
Elapsed playback time (P42): 8m30s ¢1
Location Information display (P124, 156)
Place Name Information display (P124,
159)
Histogram (P55)
Number of prints (P168)
Burst Picture Group Display (P44)
: [Time Lapse Shot] Picture Group
Display (P44)
Location (P52)
Recording information (P63)
Name (P91, 107)
Age¢2 (P91, 107)
Title (P158)
Location name information (P123, 124)
17 Auto Retouch (P153)
Creative Retouch (P154)
Underwater Color Reproduction (P155)
Motion picture playback (P42)
Play panorama (P86)
Continuously Burst Picture Group
Playback (P44)
Continuously [Time Lapse Shot] Picture
Group Playback (P44)
Filtering cancel (P150)
18 Number of days that have passed since
the departure date (P52)
Recorded date and time
“: World Time (P51)
19 Power Monitor (P54)
ECO : Monitor power save (P57)
20 Folder/File number (P223)
21 Currently retrieving information icon
(P249)
22 Motion picture recording time
(P42): 8m30s ¢1
23 Recording format (P118)
Recording Quality (P119)
˜: Burst Picture Group (P44)
: [Time Lapse Shot] Picture Group
(P44)
24 Built-in memory (P24)
Cable disconnect prohibit icon (P226)
¢1 “h” is an abbreviation for hour, “m” for minute
and “s” for second.
¢2 It is not displayed when the location name
information or the number of days that have
passed since the departure date is displayed.
- 232 -
Others
Cautions for Use
(Important) About the waterproof/dustproof and anti-shock performance of the
camera
• This camera has a waterproof/dustproof function equivalent to “IP68”. It is possible to take pictures
in 13 m (43 feet) depth for 60 minutes.¢
(This means that the camera can be used underwater for specified time in specified pressure in
accordance with the handling method established by Panasonic.)
• The camera has cleared a drop test from a height of 2 m (6.6 feet) onto 3 cm (0.1 feet) thick
plywood, which is compliant with “MIL-STD 810F Method 516.5-Shock”.¢
¢ This does not guarantee no destruction, no malfunction, or waterproofing in all conditions.
• Waterproofing is not guaranteed if the unit is subject to an impact as a result of being hit or dropped
etc. If an impact to the camera occurs, it should be inspected (subject to a fee) by Panasonic to
verify that the waterproofing is still effective.
• Using the camera in environments where splashing with hot spring water, oil or alcohol is likely to
occur may cause the water/dust resistance and impact resistance of the camera to deteriorate.
• Malfunction caused by exposure to water due to mishandling by the customer will not be covered by
the warranty.
• Supplied accessories are not waterproof.
For more detail, refer to “(Important) About the Waterproof/Dustproof and Anti-shock
Performance of the Camera” (P10).
- 233 -
Others
When using in a cold climate or at low temperatures
• It may cause injury to the skin if you directly touch the metal parts of the unit in places where
temperature is very low [environments under 0 oC (32 oF), such as ski resorts or places at
high altitude] for a long period of time.
Use gloves or similar when using it for long periods.
• The performance of the battery (number of recordable pictures/operating time) may decrease
temporarily when using in a temperature between j10 oC and 0 oC (14 oF and 32 oF) (cold places
such as ski resorts or places at high altitude).
• The battery cannot be recharged in a temperature less than 0 oC (32 oF). (The [CHARGE] indicator
blinks when the battery cannot be recharged.)
• If the camera gets very cold in cold places such as ski resorts or places at high altitude, performance
of the LCD monitor may temporarily drop immediately after turning this unit on, e.g. the picture on
the LCD monitor being slightly darker than usual or ghost images appearing. In cold environments,
keep the camera warm during use by keeping it inside your cold-weather gear or clothes. The
performance will resume as normal when the internal temperature rises.
• If the camera is used in cold places such as ski resorts or places at high altitude with snow or water
droplets adhered to the camera, some parts of the camera may become hard to move or the sound
may become dim with snow or water droplets freezing in the gap of the zoom button, the camera
[ON/OFF] button, speakers, and microphone. This is not a malfunction.
- 234 -
Others
Optimal use of the camera
Keep this unit as far away as possible from electromagnetic equipment (such as
microwave ovens, TVs, video games etc.).
• If you use this unit on top of or near a TV, the pictures and/or sound on this unit may be disrupted by
electromagnetic wave radiation.
• Do not use this unit near cell phones because doing so may result in noise adversely affecting the
pictures and/or sound.
• Recorded data may be damaged, or pictures may be distorted, by strong magnetic fields created by
speakers or large motors.
• Electromagnetic wave radiation generated by microprocessors may adversely affect this unit,
disturbing the pictures and/or sound.
• If this unit is adversely affected by electromagnetic equipment and stops functioning properly, turn
this unit off and remove the battery or disconnect AC adaptor (optional). Then reinsert the battery or
reconnect AC adaptor and turn this unit on.
Do not use this unit near radio transmitters or high-voltage lines.
• If you record near radio transmitters or high-voltage lines, the recorded pictures and/or sound may
be adversely affected.
Always use the supplied cords and cables. If you use optional accessories, use the
cords and the cables supplied with them.
Do not extend the cords or the cables.
Do not spray the camera with insecticides or volatile chemicals.
• If the camera is sprayed with such chemicals, the body of the camera may be damaged and the
surface finish may peel off.
• Do not keep rubber or plastic products in contact with the camera for a long period of time.
Operation of this unit is tested up to j10 oC (14 oF), but be aware that some parts of the
camera may become hard to move when the zoom button or the camera [ON/OFF]
button gets frozen etc., or the side door may become hard to open in cold places such
as ski resorts or places at high altitude where the temperature may drop very rapidly.
• When the camera is used in a cold places such as ski resorts or places at high altitude, keep the
camera warm by placing it in a warm place such as inside your cold protection gear or clothing.
- 235 -
Others
Cleaning
Before cleaning the camera, remove the battery or the DC coupler (optional), or
disconnect the power plug from the outlet. Then wipe the camera with a soft, dry cloth.
• When the camera is soiled badly, it can be cleaned by wiping the dirt off with a wrung wet cloth, and
then with a dry cloth.
• Do not use solvents such as benzine, thinner, alcohol, cleanser, kitchen detergents, etc., to clean the
camera, since it may deteriorate the external case or the coating may peel off.
• When using a chemical cloth, be sure to follow the accompanying instructions.
• When salt etc., has adhered to the camera, the arm part of the side
door etc., may whiten. Use damp cotton swabs or similar to wipe
until the whitened part is removed.
A Arm part
About the LCD Monitor
• Do not press the LCD monitor with excessive force. Uneven colors may appear on the LCD monitor
and it may malfunction.
• If the camera gets very cold in cold places such as ski resorts or places at high altitude, performance
of the LCD monitor may temporarily drop immediately after turning this unit on, e.g. the picture on
the LCD monitor being slightly darker than usual or ghost images appearing. Keep the camera warm
when using in a cold environment. The performance will resume as normal when the internal
temperature rises.
Extremely high precision technology is employed to produce the LCD monitor screen.
However, there may be some dark or bright spots (red, blue or green) on the screen. This is
not a malfunction. The LCD monitor screen has more than 99.99% effective pixels with a
mere 0.01% of the pixels inactive or always lit. The spots will not be recorded on pictures on
the built-in memory or a card.
- 236 -
Others
About the lens, the microphone, and the speaker
• Do not press the lens with excessive force.
• Do not leave the camera with the lens facing the sun as rays of light from the sun may cause it to
malfunction. Also, be careful when placing the camera outside or near a window.
• If there is water or dirt on the lens, wipe it off with dry soft cloth before taking a picture.
• A sound might be muffled or warped when there is water on the microphone or the speaker. Wipe
the residues after letting the water drip out from the microphone and speaker by tipping the camera
downward, and use it after letting it dry for a while.
• Do not poke the holes of microphone and speaker with sharp points. (It may damage the waterproof
sheet inside, which may damage the waterproof performance.)
Battery
The battery is a rechargeable lithium ion battery. Its ability to generate power comes
from the chemical reaction that takes place inside it. This reaction is susceptible to the
surrounding temperature and humidity. If the temperature is too high or too low, the
operating time of the battery will become shorter.
Always remove the battery after use.
• Place the removed battery in a plastic bag, and store or carry away from metallic objects (clips, etc.).
If you drop the battery accidentally, check to see if the body of the battery and the
terminals are damaged.
• Inserting a damaged battery in the camera will damage the camera.
Do not remove or damage the external label on the battery.
• Using a battery with part or all of the external label removed or using the one with a torn label may
result in malfunctions.
Bring charged spare batteries when going out.
• Be aware that recordable time will become shorter in cold places such as ski resorts or places at
high altitude.
• When you travel, do not forget to bring the battery charger (supplied) and the AC cable (supplied) so
that you can charge the battery in the country that you are traveling in.
Dispose of unusable battery.
• The battery has a limited life.
• Do not throw the battery into fire because it may cause an explosion.
• The unusable battery should be discarded in accordance with battery recycling laws. Call the RBRC
hotline at 1-800-822-8837 for information.
Do not allow battery terminals to come into contact with metal objects (such as
necklaces, hairpins etc.).
• This can cause short circuiting or heat generation and you may be badly burned if you touch a
battery.
- 237 -
Others
Charger
• The [CHARGE] indicator may blink under the influence of static electricity or electromagnetic wave.
This phenomenon have no effects on charging.
• If you use the battery charger near a radio, the radio reception may be disturbed.
• Keep the charger 1 m (3.3 feet) or more away from radios.
• The charger may generate whirring sounds when it is being used. This is not a malfunction.
• After use, be sure to disconnect the power supply device from the electrical outlet. (A very small
amount of current is consumed if it is left connected.)
• Keep the terminals of the charger and battery clean.
About 3D
∫ About 3D viewing
Anyone who is hyper sensitive to light, suffers from heart disease or is otherwise unwell
should avoid viewing 3D contents.
• Viewing 3D contents may have an adverse effect to the individual.
If you feel tired, uncomfortable or otherwise strange when viewing 3D contents, stop
viewing at once.
• Continuing to view may cause illness.
• After stopping viewing, please rest appropriately.
When viewing 3D contents, we recommend taking a break every 30 to 60 minutes.
• Viewing for extended periods may cause eye-fatigue.
Short-sighted or long-sighted persons, those with differences in the sight of their right
and left eyes, and those with astigmatism are advised to correct their vision by wearing
glasses etc.
Stop viewing if you can clearly see a double image while viewing 3D contents.
• There are differences in the way that different people experience 3D contents. Please correct your
sight appropriately before viewing 3D contents.
• You can change the 3D setting of your television or 3D output setting of the unit to 2D.
- 238 -
Others
Card
Do not leave the card where the temperature is high, where electromagnetic waves or
static electricity are easily generated or exposed to direct sunlight.
Do not bend or drop the card.
• The card may be damaged or the recorded content may be damaged or deleted.
• Put the card in the card case or the storage bag after use and when storing or carrying the card.
• Do not allow dirt, dust or water to get into the terminals on the back of the card and do not touch the
terminals with your fingers.
Notice for when transferring to another party, or disposing of the memory card
• “Format” or “delete” using the camera or a PC will only modify the file management information, and
it will not erase the data in the memory card completely.
It is recommended to physically destroy the memory card or use the commercially available
computer data deletion software to completely erase the data in the memory card before transferring
to another party or disposing.
Management of data in the memory card is the responsibility of the user.
About the personal information
If a name or birthday is set for [Baby1]/[Baby2]/Face Recognition function, this personal
information is kept in the camera and recorded in the image.
Setting a Wi-Fi password is recommended to protect personal information. (P212)
Disclaimer
• Information including personal information may be altered or vanish due to erroneous operation,
effect of static electricity, accident, malfunction, repair, or other handlings.
Please note in advance that Panasonic is not liable in any way for any direct or indirect damage from
the alteration or vanishing of information or personal information.
When requesting a repair, transferring to another party or disposing
• After making a copy of personal information, always delete information such as personal information
and wireless LAN connection settings that you have saved within the camera with [Reset Wi-Fi
Settings]/[Delete account] (P59, 209).
• Reset the settings to protect the personal information. (P58)
• If there are pictures stored in the built-in memory, copy them into the memory card (P172) before
formatting the built-in memory (P61) as needed.
• Remove the memory card from the camera when requesting a repair.
• Built-in memory and settings may return to factory default when camera is repaired.
• Please contact the dealer where you purchased the camera or Panasonic if above operations are
not possible due to malfunction.
When transferring to another party, or disposing of the memory card, please refer to
“Notice for when transferring to another party, or disposing of the memory card” above.
When uploading images on WEB services
• Images may contain information that can be used for identifying individuals such as titles, recording
dates, and location information. When uploading images on WEB services, check carefully, and then
upload.
- 239 -
Others
When not using the camera for a long period of time
• Store the battery in a cool and dry place with a relatively stable temperature: [Recommended
temperature: 15 oC to 25 oC (59 oF to 77 oF), Recommended humidity: 40%RH to 60%RH]
• Always remove the battery and the card from the camera.
• If the battery is left inserted in the camera, it will discharge even if the camera is turned off. If the
battery continues to be left in the camera, it will discharge excessively and may become unusable
even if charged.
• When storing the battery for a long period of time, we recommend charging it once a year. Remove
the battery from the camera and store it again after it has completely discharged.
• We recommend storing the camera with a desiccant (silica gel) when you keep it in a closet or a
cabinet.
About the picture data
Recorded data may be damaged or lost if the camera breaks down due to inappropriate
handling. Panasonic will not be liable for any damage suffered due to loss of recorded data.
About tripods or unipods
• When you use a tripod, make sure the tripod is stable when this unit is attached to it.
• You may not be able to remove the card or the battery when using a tripod or unipod.
• Make sure that the screw on the tripod or unipod is not at an angle when attaching or detaching the
camera. You may damage the screw on the camera if you use excessive force when turning it. Also,
the camera body and the rating label may be damaged or scratched if the camera is attached too
tightly to the tripod or unipod.
• Read the operating instructions for the tripod or unipod carefully.
• Some tripods or unipods cannot be attached when the AC adaptor (optional) are connected.
- 240 -
Others
Important!
Be sure to read the following before using the location names that are stored in this
product.
User License Agreement for Location Name data
Personal Use Only.
You agree to use this Data together with this digital camera for the solely personal,
non-commercial purposes for which you were licensed, and not for service bureau,
time-sharing or other similar purposes. Accordingly, but subject to the restrictions set forth in
the following paragraphs, you agree not to otherwise reproduce, copy, modify, decompile,
disassemble or reverse engineer any portion of this Data, and may not transfer or distribute it in
any form, for any purpose, except to the extent permitted by mandatory laws. Multi-disc sets
may only be transferred or sold as a complete set as provided by Panasonic Corporation and
not as a subset thereof.
Restrictions.
Except where you have been specifically licensed to do so by Panasonic Corporation, and
without limiting the preceding paragraph, you may not (a) use this Data with any products,
systems, or applications installed or otherwise connected to or in communication with vehicles,
capable of vehicle navigation, positioning, dispatch, real time route guidance, fleet
management or similar applications; or (b) with or in communication with any positioning
devices or any mobile or wireless-connected electronic or computer devices, including without
limitation cellular phones, palmtop and handheld computers, pagers, and personal digital
assistants or PDAs.
Warning.
The Data may contain inaccurate or incomplete information due to the passage of time,
changing circumstances, sources used and the nature of collecting comprehensive geographic
data, any of which may lead to incorrect results.
No Warranty.
This Data is provided to you “as is,” and you agree to use it at your own risk. Panasonic
Corporation and its licensors (and their licensors and suppliers) make no guarantees,
representations or warranties of any kind, express or implied, arising by law or otherwise,
including but not limited to, content, quality, accuracy, completeness, effectiveness, reliability,
fitness for a particular purpose, usefulness, use or results to be obtained from this Data, or that
the Data or server will be uninterrupted or error-free.
- 241 -
Others
Disclaimer of Warranty:
PANASONIC CORPORATION AND ITS LICENSORS (INCLUDING THEIR LICENSORS AND
SUPPLIERS) DISCLAIM ANY WARRANTIES, EXPRESS OR IMPLIED, OF QUALITY,
PERFORMANCE, MERCHANTABILITY, FITNESS FOR A PARTICULAR PURPOSE OR
NON-INFRINGEMENT. Some States, Territories and Countries do not allow certain warranty
exclusions, so to that extent the above exclusion may not apply to you.
Disclaimer of Liability:
PANASONIC CORPORATION AND ITS LICENSORS (INCLUDING THEIR LICENSORS AND
SUPPLIERS) SHALL NOT BE LIABLE TO YOU: IN RESPECT OF ANY CLAIM, DEMAND OR
ACTION, IRRESPECTIVE OF THE NATURE OF THE CAUSE OF THE CLAIM, DEMAND OR
ACTION ALLEGING ANY LOSS, INJURY OR DAMAGES, DIRECT OR INDIRECT, WHICH
MAY RESULT FROM THE USE OR POSSESSION OF THE INFORMATION; OR FOR ANY
LOSS OF PROFIT, REVENUE, CONTRACTS OR SAVINGS, OR ANY OTHER DIRECT,
INDIRECT, INCIDENTAL, SPECIAL OR CONSEQUENTIAL DAMAGES ARISING OUT OF
YOUR USE OF OR INABILITY TO USE THIS INFORMATION, ANY DEFECT IN THE
INFORMATION, OR THE BREACH OF THESE TERMS OR CONDITIONS, WHETHER IN AN
ACTION IN CONTRACT OR TORT OR BASED ON A WARRANTY, EVEN IF PANASONIC
CORPORATION OR ITS LICENSORS HAVE BEEN ADVISED OF THE POSSIBILITY OF
SUCH DAMAGES. Some States, Territories and Countries do not allow certain liability
exclusions or damages limitations, so to that extent the above may not apply to you.
Export Control.
Panasonic Corporation shall not export from anywhere any part of the Data or any direct
product thereof except in compliance with, and with all licenses and approvals required under,
applicable export laws, rules and regulations, including but not limited to the laws, rules and
regulations administered by the Office of Foreign Assets Control of the U.S. Department of
Commerce and the Bureau of Industry and Security of the U.S. Department of Commerce. To
the extent that any such export laws, rules or regulations prohibit NT from complying with any
of its obligations hereunder to deliver or distribute Data, such failure shall be excused and shall
not constitute a breach of this Agreement.
Entire Agreement.
These terms and conditions constitute the entire agreement between Panasonic Corporation
(and its licensors, including their licensors and suppliers) and you pertaining to the subject
matter hereof, and supersedes in their entirety any and all written or oral agreements
previously existing between us with respect to such subject matter.
- 242 -
Others
About location information/place name information
About the geographical coordinate system
The latitude and longitude standard (geographical coordinate system) recorded with this
camera is WGS84.
About copyright
According to copyright law, the map data stored in this camera may not be used for purposes
other than personal use without the permission of the copyright holder.
About navigation functions
This camera is not equipped with a navigation function.
Notices related to licensed software copyright holders
© 2012 NAVTEQ. All rights reserved.
“MAPPLE” is a trademark of Shobunsha Publications, Inc.
This data includes information taken with permission from Canadian authorities,
including © Her Majesty the Queen in Right of Canada,
© Queen’s Printer for Ontario, © Canada Post Corporation, GeoBase®,
© Department of Natural Resources Canada. All rights reserved.
© United States Postal Service® 2012, USPS®, ZIP+4®
Fuente: INEGI (Instituto Nacional de Estadística y Geografía)
Traffic Codes for Belgium are provided by the Ministerie van de Vlaamse
Gemeenschap and the Ministère de l’Equipement et des Transports.
- 243 -
Others
Territory
Notice
Austria
C Bundesamt für Eich- und Vermessungswesen
Croatia
C EuroGeographics
Belgium
Traffic Codes for Belgium are provided by the Ministerie van de Vlaamse
(If using Traffic
Gemeenschap and the Ministèrie de l’Equipement et des Transports.
Codes for Belgium)
Cyprus
C EuroGeographics
Estonia
C EuroGeographics
France
source: C IGN 2009 – BD TOPO R
Germany
“Die Grundlagendaten wurden mit Genehmigung der zuständigen
Behörden entnommen”
or
“Die Grundlagendaten wurden mit Genehmigung der zustaendigen
Behoerden entnommen.”
Great Britain
Contains Ordnance Survey data C Crown copyright and database right
2010
Contains Royal Mail data C Royal Mail copyright and database right 2010
Greece **
Copyright Geomatics Ltd.
Hungary
Copyright C 2003; Top-Map Ltd.
Italy
La Banca Dati Italiana è stata prodotta usando quale riferimento anche
cartografia numerica ed al tratto prodotta e fornita dalla Regione Toscana.
Latvia
C EuroGeographics
Lithuania
C EuroGeographics
Moldova
C EuroGeographics
Norway
Copyright C 2000; Norwegian Mapping Authority
Poland
C EuroGeographics
Portugal
Source: IgeoE – Portugal
Slovenia
C EuroGeographics
Spain
Información geográfica propiedad del CNIG
Sweden
Based upon electronic data C National Land Survey Sweden.
Switzerland
Topografische Grundlage: C Bundesamt für Landestopographie
Ukraine
C EuroGeographics
Canada
“This data includes information taken with permission from
Canadian authorities, including C Her Majesty, C Queen’s Printer
for Ontario, C Canada Post, GeoBaseR, C Department of Natural
Resources Canada. All rights reserved.”
- 244 -
Others
Territory
Notice
United States
CUnited States Postal ServiceR 2012. Prices are not established,
controlled or approved by the United States Postal ServiceR. The
following trademarks and registrations are owned by the USPS: United
States Postal Service, USPS, and ZIP+4.
Australia
Copyright. Based on data provided under license from PSMA Australia
Limited (www.psma.com.au).
Product incorporates data which is C 2012 Telstra Corporation Limited,
GM Holden Limited, Intelematics Australia Pty Ltd and Continental Pty
Ltd.
Australia
Product incorporates traffic location codes which is C 2012 Telstra
(If using RDS-TMC Corporation Limited and its licensors.
Traffic Codes for
Australia)
Australia
(If using Actual
Address Range
Content for
Australia)
Copyright. Based on data provided under license from PSMA Australia
Limited (www.psma.com.au).
Nepal
Copyright C Survey Department, Government of Nepal.
Sri Lanka
This product incorporates original source digital data obtained from the
Survey Department of Sri Lanka
C 2009 Survey Department of Sri Lanka
The data has been used with the permission of the Survey Department of
Sri Lanka
Israel
C Survey of Israel data source
Jordan
“C Royal Jordanian Geographic Centre”. The foregoing notice
requirement for Jordan Data is a material term of the Agreement. If Client
or any of its permitted sublicensees (if any) fail to meet such requirement,
NT shall have the right to terminate Client’s license with respect to the
Jordan Data.
Mozambique
Certain Data for Mozambique provided by Cenacarta C 2012 by
Cenacarta
Réunion
source: C IGN 2009 - BD TOPO R
Ecuador
INSTITUTO GEOGRAFICO MILITAR DEL ECUADRO AUTORIZACION
N° IGM-2011-01- PCO-01 DEL 25 DE ENERO DE 2011
Guadeloupe
source: C IGN 2009 - BD TOPO R
Guatemala
Aprobado por el INSTITUTO GEOGRAFICO NACIONAL – Resolución
del IGN No 186-2011
French Guiana
source: C IGN 2009 - BD TOPO R
Martinique
source: C IGN 2009 - BD TOPO R
Mexico
Fuente: INEGI (Instituto Nacional de Estadística y Geografía)
- 245 -
Others
∫ Landmark types
The following points of interest, such as tourist spots and public facilities, are displayed as
landmarks.
• Although approx. 1,000,000 landmarks, are registered in the built-in memory, there are some
unregistered landmarks. (The registered information is current as of October 2012 and will not be
updated.)
• It differs from that registered on our GPS-equipped models before 2011.
Zoo
Amusement park
Ski resorts
Famous site, tourist attraction,
beauty spot
Temple
Botanical garden
Golf course
Skating rinks
Castle, ruins
Church
Aquarium
Camp sites
Outdoor activity sites
Shrine
Tomb, monument, mound,
historic site
Airport
Port
Ferry terminal
Baseball park
Athletics ground
Gymnasium
Park
Station
Prefectural or state office
Lifts, cable cars
Art museum
History museum
Theater
Cinemas, performing theatres Wineries, sake makers
Mountains, meadows, passes Canyons, mountain streams, Tower, high buildings
waterfalls, valleys, seashores
- 246 -
Others
Message Display
Confirmation messages or error messages will be displayed on the screen in some cases.
The major messages are described below as examples.
[GPS feature is not available in this region.]
• The GPS may not operate in China or close to the Chinese border in neighbouring countries. (As of
January 2013)
[This picture is protected]
> Delete the picture after canceling the protect setting. (P170)
[Some pictures cannot be deleted]/[This picture cannot be deleted]
• Pictures not based on the DCF standard cannot be deleted.
> Format the card after saving necessary data on a PC etc. (P61)
[Cannot be set on this picture]
• [Title Edit], [Text Stamp] or [Print Set] cannot be set for pictures not based on the DCF standard.
[Built-in memory full]/[Memory card full]/[Not enough space on built-in memory]/[Not
enough memory on the card]
• There is no space left on the built-in memory or the card.
• When you copy pictures from the built-in memory to the card (batch copy), the pictures are copied
until the capacity of the card becomes full.
[Some pictures cannot be copied]/[Copy could not be completed]
• The following pictures cannot be copied.
– When a picture with the same name as the picture to be copied exists in the copy destination.
(Only when copying from a card to the built-in memory.)
– Files not based on the DCF standard.
• Moreover, pictures recorded or edited by other equipment may not be copied.
[Built-In Memory Error]/[Format built-in memory?]
• This message will be displayed when you formatted the built-in memory on a PC.
> Format the built-in memory on the camera again. (P61) The data on the built-in memory will be
deleted.
- 247 -
Others
[Memory card error.
This card cannot be used in this camera.
Format this card?]
• It is a format that cannot be used with this unit.
> Insert a different card.
> Format the card again with the camera after saving necessary data on a PC etc. (P61) Data will
be deleted.
[Please turn camera off and then on again]/[System Error]
• This message will be displayed when the lens did not operate properly.
> Turn the camera off and on. If the message persists, contact the dealer or Panasonic.
[Memory Card Error]/[Memory card parameter error]/[This memory card cannot be
used]
> Use a card compatible with this unit. (P24)
– SD Memory Card (8 MB to 2 GB)
– SDHC Memory Card (4 GB to 32 GB)
– SDXC Memory Card (48 GB, 64 GB)
[Insert SD card again]/[Try another card]
• An error has occurred accessing the card.
> Insert the card again.
> Insert a different card.
[Read Error/Write Error
Please check the card]
• It has failed to read or write data.
> Remove the card after turning this unit off. Insert the card again, turn this unit on, and try to
read or write the data again.
• The card may be broken.
> Insert a different card.
[Motion recording was cancelled due to the limitation of the writing speed of the card]
• Use a card with SD Speed Class with “Class 4” or higher when recording motion pictures.
• In the event that it stops even after using a “Class 4” card or higher, the data writing speed has
deteriorated so it is recommended to make a backup and then format (P61).
• Depending on the type of the card, Motion Picture Recording may stop in the middle.
[Cannot record due to incompatible format(NTSC/PAL) data on this card.]
> Format the card after saving necessary data on a PC etc. (P61)
> Insert a different card.
- 248 -
Others
[A folder cannot be created]
• A folder cannot be created because there are no remaining folder numbers that can be used.
> Format the card after saving necessary data on a PC etc. (P61) If you execute [No.Reset] in the
[Setup] menu after formatting, the folder number is reset to 100. (P58)
[Picture is displayed for 16:9 TV]/[Picture is displayed for 4:3 TV]
• Select [TV Aspect] in the [Setup] menu if you want to change the TV aspect. (P59)
• This message also appears when the USB connection cable is connected to the camera only.
In this case, connect the other end of the USB connection cable to a PC or a printer. (P222, 226)
[Editing operation cannot proceed as information processing is ongoing.]
• When a card with pictures deleted or file names changed using a PC or other device is inserted into
this unit, it will automatically retrieve new information and reconstruct the group pictures. The
currently retrieving information icon [
] may be displayed in the playback screen for long
period of time when there are many image files, and deletion or [Playback] menu cannot be used
during this time.
If you turn this unit off while information is being retrieved, only the still pictures for which data has
been retrieved will be saved as the group. When you switch on again, the information retrieval will
restart from the same point.
[Recording failed.]
• You may not record when the recording location is too dark/too bright, or if the subject does not
have enough contrast when recording in 3D.
[This battery cannot be used]
• Use a genuine Panasonic battery. If this message is displayed even when a genuine Panasonic
battery is used, contact the dealer or Panasonic.
• If the battery terminal is dirty, clean it and remove any objects.
[To prevent water leakage, ensure that the door is locked properly.]
• Refer to “About the water leakage warning message” on P23 for details.
[Failed to connect wireless access point]/[Connection failed]/[No destination found]
• Check following regarding the wireless access point.
> The wireless access point information set on this unit is wrong. Check the authentication type,
encryption type, and encryption key. (P186)
> Power of the wireless access point is not turned on.
> Setting of the wireless access point is not supported by this unit.
• Check the network setting of the destination.
• Radio waves from other devices may block the connection to a wireless access point. Check other
devices that are connected to the wireless access point and devices that use the 2.4 GHz band.
[No picture to send]
• This is displayed when there is no image to transmit due to the restriction of the destination. Check
the file type of the image to transmit. (P174)
- 249 -
Others
[Connection failed. Please retry in a few minutes.]/[Network disconnected. Transfer
stopped.]
• Radio waves from the wireless access point are getting weak. Perform the connection closer to the
wireless access point.
• There is no reply from the server or it has exceeded the communication processing time. Try again
after a while.
• Depending on the wireless access point, connection may be automatically disconnected after
specific time has passed. Reconnect the connection again.
[Upload to the Cloud Folder is available, after Cloud Sync setting has been done on
downloadable devices such as PC or smartphone.]
• Devices that download images from a cloud folder are not registered.
• Perform Cloud Sync setting. Configure the settings on a PC with “PHOTOfunSTUDIO” or on a
smartphone/tablet with “Image App”. Refer to P195 for details on [Cloud Sync. Service].
[Connection failed]
• Check following regarding the smartphones/tablet you intend to connect.
> The smartphone/tablet does not operate.
> Change the access point to connect to in the smartphone/tablet Wi-Fi settings to this camera.
> There is no free storage space on the smartphone/tablet.
[Login failed. Please check Login ID and Password]
• Login ID or password for the “LUMIX CLUB” is not correct. Please enter it again. If you have
forgotten the login ID or the password, there is information in the login screen of the “LUMIX CLUB”
website.
[Some files cannot be sent because of destination limit]/[Transfer completed. Some
files are left because of destination limit.]
• Check the file format of the image to send. (P174)
• Sending motion pictures may fail if the file size is too large. Split the motion picture using [Video
Divide]. (P163)
[Unavailable. Please set Login settings on LUMIX CLUB web site.]
• Login to the “LUMIX CLUB” from your smartphone/tablet or PC, and set the login details of the
destination WEB service.
[Both picture and video sharing service cannot be selected together]
• WEB services designed only for pictures, and WEB services designed only for motion pictures
cannot be selected at the same time. Deselect one of the services.
[Cannot get IP address. Please set wireless AP’s IP address setting to DHCP.]
• Turn on DHCP settings of the IP address of the connected wireless access points.
[Cannot connect to server]
• If a message is displaying asking to update the root certificate, agree to update the root certificate.
- 250 -
Others
Troubleshooting
First, try out the following procedures (P251–266).
If the problem is not resolved, it may be improved by selecting [Reset] (P58) on the
[Setup] menu.
Battery and power source
The camera cannot be operated even when it is turned on.
The camera turns off immediately after it is turned on.
• The battery is exhausted. Charge the battery.
• If you leave the camera on, the battery will be exhausted.
> Turn the camera off frequently by using the [Economy] etc. (P57)
This unit is turned off automatically.
• If you connect to a TV compatible with VIERA Link with an HDMI micro cable (optional) and turn the
TV off with the remote control for the TV, this unit is also turned off.
> If you are not using VIERA Link, set [VIERA Link] to [OFF]. (P60)
Side door does not close.
• Insert all the way until you hear a locking sound and it is locked by the lever while being careful
about the direction the battery is inserted. (P22)
The battery becomes flat too quickly.
• Is a Wi-Fi connection being used for a long period of time? The battery can become flat quickly when
connected to Wi-Fi.
> Turn the camera off frequently by using the [Economy] etc. (P57)
- 251 -
Others
About the GPS
Positioning is not possible.
• [GPS Setting] is set to [OFF]. (P122)
• Radio waves from GPS satellites may not be received depending on the recording environment,
such as indoors or close to a building. (P121)
> It is recommended to use by holding the camera still for a while at an outdoor location clear to
the sky, with the antenna pointed upward.
GPS status indicator is lit while this unit is turned off.
• [GPS Setting] is set to [ON].
> Set [GPS Setting] to [OFF] or [Airplane Mode] to [ON] when you turn the unit off onboard an
airplane or inside a hospital etc. (P53)
Positioning takes time.
• It may take a few minutes the first time you use it or when it has not been used for a while.
• Positioning is performed within 2 minutes normally, but since the position of the GPS satellites
change, it may take longer depending on the location or environment of the recording.
Using GPS assist data can reduce the time required for positioning. (P128, 131)
• It will take longer for positioning in an environment where it is harder to receive the radio waves from
the GPS satellites. (P121)
Location name information is different from the place the picture was recorded in.
• Straight after this unit is turned on, or when the GPS icon is not set to [
], current location and
location name information stored in the unit may differ significantly.
• It can be changed to a different candidate before recording a picture when [ ] is displayed. (P126)
Location name information is not displayed.
• When a landmark etc. does not exist nearby or no information is registered in the database of the
unit, [---] is displayed. (P124)
> You can enter location names etc. with [Place-Name Edit] during the playback. (P159)
- 252 -
Others
Recording
The picture cannot be recorded.
• Is there any memory remaining on the built-in memory or the card?
> Delete the pictures which are not necessary to increase the available memory. (P46)
• You may not be able to record for a short while after turning this unit on when using a large capacity
card.
The recorded picture is whitish.
• The picture can become whitish if there is dirt e.g. fingerprints on the lens.
> When it is dirty, lightly wipe the surface of the lens with soft and dry cloth.
• Is the inside of the lens fogged?
> There is condensation. Refer to “When inner side of the lens is fogged (condensation)” on P8 for
what to do.
The recorded picture is too bright or dark.
> Check that the exposure is correctly compensated. (P71)
• Setting the [Min. Shtr Speed] to faster speed might make the picture darker.
> Set the [Min. Shtr Speed] (P109) to slower speed.
Multiple pictures are taken at one time.
> Set Auto Bracket (P72) or [Burst] (P111) of the [Rec] menu to [OFF].
The subject is not focused properly.
• The focus range varies depending on the Recording Mode.
> Set to the proper mode for the distance to the subject.
• The subject is beyond the focus range of the camera. (P37)
• There is camera shake (jitter) or the subject is moving slightly. (P30)
The recorded picture is blurred.
The Optical Image Stabilizer is not effective.
> The shutter speed becomes slower when pictures are taken in dark places so hold the camera
firmly with both hands to take the pictures. (P30)
> When taking pictures at a slow shutter speed, use the Self-timer. (P70)
- 253 -
Others
Taking pictures using Auto Bracket is not possible.
• Is there any memory remaining on the built-in memory or the card?
The recorded picture looks rough.
Noise appears on the picture.
• Is the ISO sensitivity high or the shutter speed slow?
(ISO sensitivity is set to [AUTO] when the camera is shipped. Therefore, when taking pictures
indoors etc. noise will appear.)
> Decrease the ISO sensitivity. (P98)
> Take pictures in bright places.
• Has [High Sens.] in the Scene Mode been set? If so, the resolution of the recorded picture
decreases slightly because of high sensitivity processing, but this is not a malfunction.
Striping or flicker may appear under lighting such as fluorescent lighting and LED
lighting fixture.
• This is characteristic of MOS sensors which serve as the camera’s pickup
sensors.
This is not a malfunction.
The brightness or the hue of the recorded picture is different from the actual scene.
• When recording under fluorescent or LED lighting fixture etc., increasing the shutter speed may
introduce slight changes to brightness and color. These are a result of the characteristics of the light
source and do not indicate a malfunction.
• When recording subjects in extremely bright locations or recording under fluorescent lighting, LED
lighting fixture, mercury lamp, sodium lighting etc., the colors and screen brightness may change or
horizontal striping may appear on the screen.
Reddish horizontal streaks appear on the LCD monitor during recording.
• This is characteristic of MOS sensors which serve as the camera’s pickup
sensors. It appears when the subject has a bright part. Some unevenness
may occur in the surrounding areas, but this is not a malfunction.
It is recorded in pictures or motion pictures.
• It is recommended that you take pictures while taking care not to expose the
screen to sunlight or any other source of strong light.
- 254 -
Others
Motion Picture Recording stops in the middle.
• Use a card with SD Speed Class with “Class 4” or higher when recording motion pictures.
• Depending on the type of the card, recording may stop in the middle.
> If Motion Picture Recording stops during use of a card of at least “Class 4” or if you use a card
that has been formatted on a PC or other equipment, the data-writing speed is lower. In such
cases, we recommend that you make a backup of the data and then format (P61) the card in this
unit.
Object seems to be warped.
• Object seems to be warped slightly when the object moves across the image very fast, but this is
because the unit is using MOS for the image sensor. This is not a malfunction.
Subject cannot be locked.
(AF tracking not possible)
• Set the AF area to the distinctive color of the subject if there is a part that is different from the
surrounding color. (P104)
Recording by Panorama Shot Mode is ended before finishing.
• If the camera is moved too slowly, the camera has assumed that camera motion was stopped and
will end the still picture recording.
• If there is a great deal of shaking towards the recording direction while moving the camera, recording
will end.
> When recording with Panorama Shot Mode, move the camera by trying to trace a small circle
parallel to the recording direction at a speed of about 8 seconds per revolution (estimated).
Lens
Recorded image may be warped, or nonexistent color is surrounding the subject.
• It is possible that the subject may be warped slightly, or the borders get colored, depending on the
zoom magnification, due to the characteristics of the lens. Also, the peripherals of the image might
look warped because the perspective is enhanced when the wide angle is used. This is not a
malfunction.
The inner side of the lens is fogged.
• The inside of the lens may fog due to condensation depending on the environment this unit is used
in, areas that undergo a significant change in temperature or in high humidity, etc. Refer to “When
inner side of the lens is fogged (condensation)” on P8 for what to do.
- 255 -
Others
LCD monitor
The LCD monitor becomes darker or brighter for a moment.
• This phenomenon appears when you press the shutter button halfway to set the aperture value and
does not affect the recorded pictures.
• This phenomenon also appears when the brightness changes when the camera is zoomed or when
the camera is moved. This is because of operation of the automatic aperture of the camera, and it is
not a malfunction.
The LCD monitor flickers indoors.
• The LCD monitor may flicker for a few seconds after this unit is turned on. This is an operation to
correct flicker caused by lighting such as fluorescent lights, LED lights etc. and is not a malfunction.
The LCD monitor is too bright or dark.
• Is [Monitor Luminance] active? (P54)
• Perform [Monitor Display]. (P53)
Black, red, blue and green dots appear on the LCD monitor.
• This is not a malfunction.
These pixels do not affect the recorded pictures.
Noise appears on the LCD monitor.
• In dark places, noise may appear to maintain the brightness of the LCD monitor. This does not affect
the pictures you are recording.
Flash
The flash is not activated.
• Is the flash setting set to [Œ]?
> Change the flash setting. (P66)
• The flash cannot be used in the following cases:
– When using Auto Bracket (P72)
– Creative Control Mode (P75)
– Panorama Shot Mode (P84)
– [Scenery]/[Night Scenery]/[Handheld Night Shot]/[HDR]/[Sunset]/[Starry Sky]/[Glass Through]/
[3D Photo Mode] (Scene Mode) (P87)
– When recording in [Burst] (except for [
]) (P111)
Flash is activated several times.
• The flash is activated twice when Red-Eye Reduction (P66) has been set.
• Has [Burst] (P111) in the [Rec] menu been set to [ ]?
- 256 -
Others
Playback
The picture being played back is rotated and displayed in an unexpected direction.
• [Rotate Disp.] (P60) is set to [
] or [
].
The picture is not played back.
The recorded pictures are not displayed.
• Is there a picture on the built-in memory or the card?
> The pictures on the built-in memory appear when a card is not inserted. The picture data on the
card appears when a card is inserted.
• Is this a folder or picture which was processed in the PC? If it is, it cannot be played back by this unit.
> It is recommended to use the “PHOTOfunSTUDIO” software in the CD-ROM (supplied) to write
pictures from PC to card.
• Are you playing back filtered images by using [Slide Show] or [Filtering Play]?
> Cancel the filter. (P150)
The folder number and the file number are displayed as [—] and the screen turns
black.
• Is this a non-standard picture, a picture which has been edited using a PC or a picture which was
taken by another make of digital camera?
• Did you remove the battery immediately after picture-taking or did you take the picture using a
battery with a low remaining charge?
> Format the data to delete the pictures mentioned above. (P61)
(Other pictures will be deleted as well and it will not be possible to restore them. Therefore,
check well before formatting.)
Displaying images takes long in Multi Playback.
• When the number of images edited with [Resize], [Retouch], etc., is large, it may take a few minutes
to display all the images.
With a Calendar Search, pictures are displayed on dates differing from the actual
dates on which the pictures were taken.
• Is the clock in the camera set properly? (P28)
• When pictures edited using a PC or pictures taken by other equipment are searched, they may be
displayed on dates differing from the actual dates on which the pictures were taken.
- 257 -
Others
White round spots like soap bubbles appear on the recorded picture.
• If you take a picture with the flash in a dark place or indoors, white round
spots may appear on the picture caused by the flash reflecting of particles of
dust in the air. This is not a malfunction.
A characteristic of this is that the number of round spots and their position
differ in every picture.
Red part of the recorded image has changed color to black.
• When Red-Eye Removal ([
], [
]) is in operation, if you take a picture of a subject with red
color surrounded by a skin tone color, that red part may be corrected to black by the Red-Eye
Removal function.
> It is recommended to take a picture with the Flash Mode set to [‡], [‰] or [Œ], or
[Red-Eye Removal] on the [Rec] menu set to [OFF]. (P116)
[Thumbnail is displayed] appears on the screen.
• Is it a picture that has been recorded with other equipment? In such cases, these pictures may be
displayed with a deteriorated picture quality.
The sound of the recorded motion pictures sometimes breaks up.
• This unit automatically adjusts the aperture during Motion Picture Recording. At such times, the
sound may break up. This is not a malfunction.
Motion pictures recorded with this model can not be played back on other
equipment.
• Motion pictures recorded in [AVCHD] or [MP4] may be played back with poor picture or sound quality
or playback may not be possible even when played back with equipment compatible with these
formats. Also, the recording information may not be displayed properly.
- 258 -
Others
About the Wi-Fi function
It cannot connect to the wireless LAN. Radio waves get disconnected.
• Use within the communication range of the wireless LAN network.
• Connection types and security setting methods are different depending on the wireless access point.
> Refer to the operating instructions of the wireless access point.
• When the radio waves are interrupted, the condition may improve by moving the location or
changing the angle of the wireless access point.
• It may not automatically connect when the network SSID of the wireless access point is set not to
broadcast.
> Set the network SSID of the wireless access point to broadcast.
• Is any device, such as microwave oven, cordless phone, etc., that uses 2.4 GHz frequency operated
nearby?
> Radio waves may get interrupted when used simultaneously. Use them sufficiently away from
the device.
• Is the 5 GHz/2.4 GHz switchable wireless access point connected to other equipment using
the 5 GHz band?
> The use of a wireless access point that can use 5 GHz/2.4 GHz simultaneously is
recommended. It cannot be used simultaneously with this camera if it is not compatible.
• When the battery indicator is flashing red, the connection with other equipment may not start or the
connection may be disrupted. (A message such as [Communication error] is displayed.)
Wireless access point is not displayed. Or it cannot be connected.
• Check if the wireless access point to connect is in operating state.
• The camera may not display or connect to a wireless access point depending on the radio wave
condition.
> Perform the connection closer to the wireless access point.
• It may not display even if the radio waves exist depending on the setting of the wireless access
point.
> Check the settings of the wireless access point.
• The wireless access point may not be found depending on the radio wave condition.
> Perform the [Manual Connection]. (P186)
• Is the network SSID of the wireless access point set not to broadcast?
> It may not be detected when it is set not to broadcast. Enter and set the network SSID. (P186)
• Try the following:
> Move this unit closer to the wireless access point
> Remove the obstacles between this unit and the wireless access point
> Change the direction of this unit
- 259 -
Others
It takes long time every time to connect to a smartphone/tablet.
• It may take longer time to connect depending on the Wi-Fi connection setting of the smartphone/
tablet, but it is not a malfunction.
This unit is not displayed in the Wi-Fi setting screen of the smartphone/tablet.
It takes time to setup the connection.
> Try switching the ON/OFF of the Wi-Fi function in the Wi-Fi settings of the smartphone/tablet.
I have forgotten the login ID or password for the “LUMIX CLUB”.
• Check the information in the login screen of “LUMIX CLUB”.
http://lumixclub.panasonic.net/eng/c/
I do not have a wireless access point at my home, but I would like to perform service
user registration of the “LUMIX CLUB”.
• Service user registration for the “LUMIX CLUB” is not possible in the environment without a wireless
access point.
Images cannot be transmitted to a PC.
• When the firewall of the OS, security software, etc. is enabled, connecting to the PC may not be
possible.
Images cannot be transmitted to the WEB service.
> Confirm that the login information (login ID/user name/email address/password) is correct.
• WEB service server or the network may be busy.
> Try again after a while.
> Check the site of the WEB service you are sending the image to.
It takes time to transmit an image to the WEB service.
• Is the size of the image too large?
> Reduce the image size at [Size] (P192), and then send.
> Transmit after dividing the motion picture with [Video Divide] (P163).
• It may take longer time to transmit when distance to the wireless access point is far.
> Transmit closer to the wireless access point.
- 260 -
Others
The image that was supposed to have uploaded to the WEB service is not there.
• Upload may not complete when it is disconnected while transmitting the image.
• It may take some time after uploading the image to be reflected in the WEB service depending on
the status of the server.
> Wait for a while and try again.
• You can check the transmission status on the WEB service link settings by logging into “LUMIX
CLUB”.
I would like to return the image in the WEB service to the camera.
• The images in the WEB Service cannot be saved (downloaded) to this unit. Do not delete the
uploaded images, and make a backup of them.
I cannot display or delete the images uploaded to the WEB service by this unit.
• The images uploaded to the WEB service cannot be displayed or deleted by this unit.
> Perform the task using a smartphone/tablet or a PC.
Your “LUMIX CLUB” login ID and password were deleted after sending the camera in
to be repaired.
• The settings stored in the camera may be deleted depending on the type of repair.
> Always make a copy of important settings.
There is an image that could not be transmitted.
• Is the size of the image too large?
> Divide the motion picture using [Video Divide] (P163).
> Reduce the image size at [Size] (P192), and then send.
• Capacity or number of images in the WEB service is full.
> Login to “LUMIX CLUB”, and check the status of the destination on the WEB service link
settings.
I have forgotten the password for the Wi-Fi.
> Execute the [Reset Wi-Fi Settings] in the [Setup] menu. (P59)
> However, all the information you have set on the [Wi-Fi Setup] menu, which includes the “LUMIX
CLUB” login settings, will be reset. (excluding [LUMIX CLUB])
Transmission of the image fails midway.
• Is the size of the image too large?
> Transmit after dividing the motion picture with [Video Divide] (P163).
> Reduce the image size at [Size] (P192), and then send.
> Image cannot be transmitted when the battery indicator is flashing red.
- 261 -
Others
Motion picture cannot be transmitted.
• File format of the motion picture that can be sent differs depending on the destination. (P174)
• Is the size of the image too large?
> Transmit after dividing the motion picture with [Video Divide] (P163).
I cannot send images to an AV device.
• Sending may fail depending on the operational status of the AV device.
Also, sending may take a while.
Cannot be connected using NFC.
• Is your smartphone compatible with NFC?
> This unit can be used with NFC-compatible terminals via Android (OS version 2.3.3 or higher).
• Make sure the NFC function of your smartphone is ON.
• Is [NFC Operation] set to [OFF]? (P211)
• Some smartphones cannot be easily checked simply by touching. If the camera is not recognized
even after touching, change positions and try again by touching slowly.
• If the duration of touching is short, the smartphone may not be recognized. Touch and hold the
smartphone for a while.
- 262 -
Others
TV, PC and printer
The picture does not appear on the television.
• Is the camera connected to the TV correctly?
> Set the TV input to External Input Mode.
The display areas on the TV screen and the camera’s LCD monitor are different.
• Depending on the TV model, the pictures may be extended horizontally or vertically or they may be
displayed with their edges cut off.
The motion pictures cannot be played back on a TV.
• Are you trying to play back the motion pictures by directly inserting the card in the card slot of the
TV?
> Connect the camera to the TV with the AV cable (optional), or with the HDMI micro cable
(optional), and then play back the motion pictures on the camera. (P213)
The picture is not displayed fully on the TV.
> Check [TV Aspect] setting. (P59)
VIERA Link does not work.
• Is it connected properly with the HDMI micro cable (optional)? (P213)
> Confirm that the HDMI micro cable (optional) is firmly fitted.
> Press [(] on this unit.
• Is the [VIERA Link] on this unit set to [ON]? (P60)
> Depending on HDMI terminal of the TV, the input channel may not switch automatically. In this
case, use the remote control for the TV to switch input. (For details on how to switch input,
please read the operating instructions for the TV.)
> Check the VIERA Link setting on the connected device.
> Turn this unit off and on.
> Set [HDAVI Control] to [Off] on the TV and then turn it back to [On]. (Refer to the operating
instructions of the TV for details.)
Cannot communicate with the PC.
• Is the camera connected to the PC correctly?
• Is the camera recognized by the PC correctly?
> Set to [PC] in [USB Mode]. (P59, 222)
> Turn this unit off and on.
- 263 -
Others
The card is not recognized by the PC. (The built-in memory is recognized.)
> Disconnect the USB connection cable. Connect it again while the card is inserted in the camera.
> If there are two or more USB terminal on a single PC, try connecting the USB connection cable
to another USB terminal.
The card is not recognized by the PC. (SDXC memory card is used.)
> Check if your PC is compatible with SDXC memory cards.
http://panasonic.net/avc/sdcard/information/SDXC.html
> A message prompting to format the card may be displayed when connecting, but do not format.
> If the [Access] displayed on the LCD monitor does not disappear, disconnect the USB
connection cable after turning this unit off.
The picture cannot be printed when the camera is connected to a printer.
• Pictures cannot be printed using a printer which does not support PictBridge.
> Set to [PictBridge(PTP)] in [USB Mode]. (P59, 226)
The ends of the pictures are cut at printing.
> When using a printer with a Cropping or Borderless Printing function, cancel this function before
printing. (For details, refer to the operating instructions for the printer.)
> When you order photo studios to print pictures, ask the photo studio if the pictures can be printed
with both ends.
The panorama picture is not printing correctly.
• Since aspect ratio of a panorama picture differs from normal pictures, it may not always be possible
to print it correctly.
> Please use a printer that supports panorama pictures. (For details, please see the operating
instructions of your printer)
> We recommend using the “PHOTOfunSTUDIO” software on the CD-ROM (supplied) to adjust
the size of the still picture to the print paper size.
- 264 -
Others
Others
[Requirements for Underwater use] is displayed repeatedly whenever this unit is
turned on.
• Press [MENU/SET] after viewing the last screen (12/12). For details, refer to P11.
An unreadable language was selected by mistake.
> Press [MENU/SET], select the [Setup] menu icon [ ]. Then press [MENU/SET], and then
select the [~] icon to set the desired language. (P61)
A white lamp sometimes turns on when the shutter button is pressed halfway.
• AF Assist Lamp will turn on white in the dark place to assist the focusing.
The AF Assist Lamp does not turn on.
• Is [AF Assist Lamp] on the [Rec] menu set to [ON]? (P115)
• The AF Assist Lamp does not turn on in bright places.
The camera becomes warm.
• The surface of the camera may become warm during use. This does not affect the performance or
quality of the camera.
The side door will not close.
• Have foreign objects become trapped?
> Remove the foreign objects. (P12)
• When closing, do not set the [LOCK] switch to the locked side. Doing so may cause damage or
leaks.
> Release the lock. (P22)
A part of the camera such as the zoom button and side door does not move.
• If the camera is used in cold places such as ski resorts or places at high altitude with the snow or
water droplets adhered to the camera, some parts of the camera may become hard to move with
snow or water droplets freezing in the gap of the zoom button or the camera [ON/OFF] button. This
is not a malfunction. When the camera returns to normal temperature it will function as normal.
• When using the camera in a place with sand or dust, some parts of the camera may become hard to
move with foreign objects getting in the gap of the zoom button, or the camera [ON/OFF] button.
Wipe off with a dry, lint-free cloth or rinse with fresh water.
The camera makes a rattling sound or you can feel some vibration.
• Below cases are not malfunctions, so you can use the camera as normal.
> You hear a “rattling” sound when the camera is shaken while this unit is turned off or during
Playback Mode (this is the sound of the lens moving).
> When this unit is turned on or off, or when switching from recording to Playback Mode, there is a
rattling noise (this is the sound of the lens moving).
> When zooming, you can feel some vibration (this is caused by the lens moving).
- 265 -
Others
The lens clicks.
• When the brightness changes due to zoom or camera movement etc., the lens may click and the
picture on the screen may drastically change. However, the picture is not affected. The sound is
caused by the automatic adjustment of the aperture. This is not a malfunction.
The clock is reset.
• If you do not use the camera for a long time, the clock may be reset.
> [Please set the clock] message will be displayed; please reset the clock. (P28)
Zooming stops instantaneously.
• When using the Extended Optical Zoom, the zooming action will stop temporarily. This is not a
malfunction.
Zoom does not go up to maximum magnification.
• Is the camera set to Macro Zoom Mode? (P69)
Maximum zoom during Macro Zoom Mode is 3k digital zoom.
The file numbers are not recorded consecutively.
• When you perform an operation after taking a certain action, the pictures may be recorded in folders
with different numbers from the ones used prior to the operation.
The file numbers are recorded in ascending order.
• If you insert or remove the battery before turning off this unit, the folder and file numbers for the
pictures taken will not be stored in the memory. When this unit is turned on again and pictures are
taken, they may be stored under file numbers which should have been assigned to previous
pictures.
The card cannot be formatted.
• Formatting is not available in Intelligent Auto Mode. Switch the recording mode to another one.
(P31)
Bearing information measured with this unit is different from the public bearing
indications.
• When [GPS Setting] is set to [OFF], magnetic declination is not corrected.
> Perform [Repositioning] of [GPS/Sensor] menu (P125), and acquire correct latitude/longitude of
the current location.
- 266 -
Others
• SDXC Logo is a trademark of SD-3C, LLC.
• “AVCHD”, “AVCHD Progressive” and the “AVCHD Progressive”
logo are trademarks of Panasonic Corporation and Sony
Corporation.
• Manufactured under license from Dolby Laboratories.
Dolby and the double-D symbol are trademarks of Dolby
Laboratories.
• HDMI, the HDMI Logo, and High-Definition Multimedia Interface
are trademarks or registered trademarks of HDMI Licensing LLC
in the United States and other countries.
• HDAVI Control™ is a trademark of Panasonic Corporation.
• QuickTime and the QuickTime logo are trademarks or registered
trademarks of Apple Inc., used under license therefrom.
• iMovie, Mac and Mac OS are trademarks of Apple Inc.,
registered in the U.S. and other countries.
• Windows and Windows Vista are either registered trademarks or
trademarks of Microsoft Corporation in the United States and/or
other countries.
• App Store is a service mark of Apple Inc.
• Android and Google Play are trademarks or registered
trademarks of Google Inc.
• The Wi-Fi CERTIFIED Logo is a certification mark of the Wi-Fi Alliance.
• The Wi-Fi Protected Setup Mark is a mark of the Wi-Fi Alliance.
• “Wi-Fi”, “Wi-Fi Protected Setup”, “Wi-Fi Direct”, “WPA” and “WPA2” are marks or registered
marks of the Wi-Fi Alliance.
• DLNA, the DLNA Logo and DLNA CERTIFIED are trademarks, service marks, or certification
marks of the Digital Living Network Alliance.
• This product uses “DynaFont” from DynaComware Corporation. DynaFont is a registered
trademark of DynaComware Taiwan Inc.
• Other names of systems and products mentioned in these instructions are usually the registered
trademarks or trademarks of the manufacturers who developed the system or product concerned.
This product is licensed under the AVC patent portfolio license for the personal and
non-commercial use of a consumer to (i) encode video in compliance with the AVC Standard (“AVC
Video”) and/or (ii) decode AVC Video that was encoded by a consumer engaged in a personal and
non-commercial activity and/or was obtained from a video provider licensed to provide AVC Video.
No license is granted or shall be implied for any other use. Additional information may be obtained
from MPEG LA, LLC. See http://www.mpegla.com .
- 267 -
Others
This product incorporates the following software:
(1) the software developed independently by or for Panasonic Corporation,
(2) the software owned by third party and licensed to Panasonic Corporation and/or,
(3) open sourced software including the software developed by the OpenSSL Project for use in the
OpenSSL Toolkit (http://www.openssl.org/), and the software written by Eric Young
([email protected]).
This product contains OpenSSL software developed by the OpenSSL Project, and can be used under
the following licencing conditions.
LICENSE ISSUES
The OpenSSL toolkit stays under a dual license, i.e. both the conditions of the OpenSSL License and
the original SSLeay license apply to the toolkit. See below for the actual license texts. Actually both
licenses are BSD-style Open Source licenses. In case of any license issues related to OpenSSL
please contact [email protected].
OpenSSL License
Copyright (c) 1998-2004 The OpenSSL Project. All rights reserved.
Redistribution and use in source and binary forms, with or without modification, are permitted
provided that the following conditions are met:
1. Redistributions of source code must retain the above copyright notice, this list of conditions and
the following disclaimer.
2. Redistributions in binary form must reproduce the above copyright notice, this list of conditions
and the following disclaimer in the documentation and/or other materials provided with the
distribution.
3. All advertising materials mentioning features or use of this software must display the following
acknowledgment:
"This product includes software developed by the OpenSSL Project for use in the OpenSSL
Toolkit. (http://www.openssl.org/)"
4. The names "OpenSSL Toolkit" and "OpenSSL Project" must not be used to endorse or promote
products derived from this software without prior written permission. For written permission,
please contact [email protected].
5. Products derived from this software may not be called "OpenSSL" nor may "OpenSSL" appear in
their names without prior written permission of the OpenSSL Project.
6. Redistributions of any form whatsoever must retain the following acknowledgment:
"This product includes software developed by the OpenSSL Project for use in the OpenSSL
Toolkit (http://www.openssl.org/)"
THIS SOFTWARE IS PROVIDED BY THE OpenSSL PROJECT "AS IS" AND ANY EXPRESSED OR
IMPLIED WARRANTIES, INCLUDING, BUT NOT LIMITED TO, THE IMPLIED WARRANTIES OF
MERCHANTABILITY AND FITNESS FOR A PARTICULAR PURPOSE ARE DISCLAIMED. IN NO
EVENT SHALL THE OpenSSL PROJECT OR ITS CONTRIBUTORS BE LIABLE FOR ANY DIRECT,
INDIRECT, INCIDENTAL, SPECIAL, EXEMPLARY, OR CONSEQUENTIAL DAMAGES (INCLUDING,
BUT NOT LIMITED TO, PROCUREMENT OF SUBSTITUTE GOODS OR SERVICES; LOSS OF
USE, DATA, OR PROFITS; OR BUSINESS INTERRUPTION) HOWEVER CAUSED AND ON ANY
THEORY OF LIABILITY, WHETHER IN CONTRACT, STRICT LIABILITY, OR TORT (INCLUDING
NEGLIGENCE OR OTHERWISE) ARISING IN ANY WAY OUT OF THE USE OF THIS SOFTWARE,
EVEN IF ADVISED OF THE POSSIBILITY OF SUCH DAMAGE.
- 268 -
Others
This product includes cryptographic software written by Eric Young ([email protected]). This
product includes software written by Tim Hudson ([email protected]).
Original SSLeay License
Copyright (C) 1995-1998 Eric Young ([email protected])
All rights reserved.
This package is an SSL implementation written by Eric Young ([email protected]).
The implementation was written so as to conform with Netscapes SSL.
This library is free for commercial and non-commercial use as long as the following conditions are
adhered to. The following conditions apply to all code found in this distribution, be it the RC4, RSA,
lhash, DES, etc., code; not just the SSL code. The SSL documentation included with this distribution
is covered by the same copyright terms except that the holder is Tim Hudson ([email protected]).
Copyright remains Eric Young's, and as such any Copyright notices in the code are not to be
removed. If this package is used in a product, Eric Young should be given attribution as the author of
the parts of the library used. This can be in the form of a textual message at program startup or in
documentation (online or textual) provided with the package.
Redistribution and use in source and binary forms, with or without modification, are permitted
provided that the following conditions are met:
1. Redistributions of source code must retain the copyright notice, this list of conditions and the
following disclaimer.
2. Redistributions in binary form must reproduce the above copyright notice, this list of conditions
and the following disclaimer in the documentation and/or other materials provided with the
distribution.
3. All advertising materials mentioning features or use of this software must display the following
acknowledgement:
"This product includes cryptographic software written by Eric Young ([email protected])"
The word 'cryptographic' can be left out if the routines from the library being used are not
cryptographic related :-).
4. If you include any Windows specific code (or a derivative thereof) from the apps directory
(application code) you must include an acknowledgement:
"This product includes software written by Tim Hudson ([email protected])"
THIS SOFTWARE IS PROVIDED BY ERIC YOUNG "AS IS" AND ANY EXPRESS OR IMPLIED
WARRANTIES, INCLUDING, BUT NOT LIMITED TO, THE IMPLIED WARRANTIES OF
MERCHANTABILITY AND FITNESS FOR A PARTICULAR PURPOSE ARE DISCLAIMED. IN NO
EVENT SHALL THE AUTHOR OR CONTRIBUTORS BE LIABLE FOR ANY DIRECT, INDIRECT,
INCIDENTAL, SPECIAL, EXEMPLARY, OR CONSEQUENTIAL DAMAGES (INCLUDING, BUT NOT
LIMITED TO, PROCUREMENT OF SUBSTITUTE GOODS OR SERVICES; LOSS OF USE, DATA,
OR PROFITS; OR BUSINESS INTERRUPTION) HOWEVER CAUSED AND ON ANY THEORY OF
LIABILITY, WHETHER IN CONTRACT,STRICT LIABILITY, OR TORT (INCLUDING NEGLIGENCE
OR OTHERWISE) ARISING IN ANY WAY OUT OF THE USE OF THIS SOFTWARE, EVEN IF
ADVISED OF THE POSSIBILITY OF SUCH DAMAGE.
The license and distribution terms for any publically available version or derivative of this code cannot
be changed. i.e. this code cannot simply be copied and put under another distribution license
[including the GNU Public License.]
- 269 -
Others
This product contains encryption software developed by Eric Young, and can be used under the
following licencing conditions.
Copyright (C) 1995-1998 Eric Young ([email protected])
All rights reserved.
This package is an SSL implementation written by Eric Young ([email protected]).
The implementation was written so as to conform with Netscapes SSL.
This library is free for commercial and non-commercial use as long as the following conditions are
adhered to. The following conditions apply to all code found in this distribution, be it the RC4, RSA,
lhash, DES, etc., code; not just the SSL code. The SSL documentation included with this distribution
is covered by the same copyright terms except that the holder is Tim Hudson ([email protected]).
Copyright remains Eric Young's, and as such any Copyright notices in the code are not to be
removed. If this package is used in a product, Eric Young should be given attribution as the author of
the parts of the library used. This can be in the form of a textual message at program startup or in
documentation (online or textual) provided with the package.
Redistribution and use in source and binary forms, with or without modification, are permitted
provided that the following conditions are met:
1. Redistributions of source code must retain the copyright notice, this list of conditions and the
following disclaimer.
2. Redistributions in binary form must reproduce the above copyright notice, this list of conditions
and the following disclaimer in the documentation and/or other materials provided with the
distribution.
3. All advertising materials mentioning features or use of this software must display the following
acknowledgement:
"This product includes cryptographic software written by Eric Young ([email protected])"
The word 'cryptographic' can be left out if the routines from the library being used are not
cryptographic related :-).
4. If you include any Windows specific code (or a derivative thereof) from the apps directory
(application code) you must include an acknowledgement:
"This product includes software written by Tim Hudson ([email protected])"
THIS SOFTWARE IS PROVIDED BY ERIC YOUNG "AS IS" AND ANY EXPRESS OR IMPLIED
WARRANTIES, INCLUDING, BUT NOT LIMITED TO, THE IMPLIED WARRANTIES OF
MERCHANTABILITY AND FITNESS FOR A PARTICULAR PURPOSE ARE DISCLAIMED. IN NO
EVENT SHALL THE AUTHOR OR CONTRIBUTORS BE LIABLE FOR ANY DIRECT, INDIRECT,
INCIDENTAL, SPECIAL, EXEMPLARY, OR CONSEQUENTIAL DAMAGES (INCLUDING, BUT NOT
LIMITED TO, PROCUREMENT OF SUBSTITUTE GOODS OR SERVICES; LOSS OF USE, DATA,
OR PROFITS; OR BUSINESS INTERRUPTION) HOWEVER CAUSED AND ON ANY THEORY OF
LIABILITY, WHETHER IN CONTRACT, STRICT LIABILITY, OR TORT (INCLUDING NEGLIGENCE
OR OTHERWISE) ARISING IN ANY WAY OUT OF THE USE OF THIS SOFTWARE, EVEN IF
ADVISED OF THE POSSIBILITY OF SUCH DAMAGE.
The license and distribution terms for any publically available version or derivative of this code cannot
be changed. i.e. this code cannot simply be copied and put under another distribution license
[including the GNU Public License.]
- 270 -
Others
This product contains NetBSD software, and can be used under the following licencing conditions.
Copyright (c) 1990 The Regents of the University of California. All rights reserved.
This code is derived from software contributed to Berkeley by Chris Torek.
Redistribution and use in source and binary forms, with or without modification, are permitted
provided that the following conditions are met:
1. Redistributions of source code must retain the above copyright notice, this list of conditions and
the following disclaimer.
2. Redistributions in binary form must reproduce the above copyright notice, this list of conditions
and the following disclaimer in the documentation and/or other materials provided with the
distribution.
3. Neither the name of the University nor the names of its contributors may be used to endorse or
promote products derived from this software without specific prior written permission.
THIS SOFTWARE IS PROVIDED BY THE REGENTS AND CONTRIBUTORS "AS IS" AND ANY
EXPRESS OR IMPLIED WARRANTIES, INCLUDING, BUT NOT LIMITED TO, THE IMPLIED
WARRANTIES OF MERCHANTABILITY AND FITNESS FOR A PARTICULAR PURPOSE ARE
DISCLAIMED. IN NO EVENT SHALL THE REGENTS OR CONTRIBUTORS BE LIABLE FOR ANY
DIRECT, INDIRECT, INCIDENTAL, SPECIAL, EXEMPLARY, OR CONSEQUENTIAL DAMAGES
(INCLUDING, BUT NOT LIMITED TO, PROCUREMENT OF SUBSTITUTE GOODS OR SERVICES;
LOSS OF USE, DATA, OR PROFITS; OR BUSINESS INTERRUPTION) HOWEVER CAUSED AND
ON ANY THEORY OF LIABILITY, WHETHER IN CONTRACT, STRICT LIABILITY, OR TORT
(INCLUDING NEGLIGENCE OR OTHERWISE) ARISING IN ANY WAY OUT OF THE USE OF THIS
SOFTWARE, EVEN IF ADVISED OF THE POSSIBILITY OF SUCH DAMAGE.
- 271 -
Others
This product contains OpenSSL software developed by the OpenSSL Project, and can be used under
the following licencing conditions.
Copyright (c) 1999-2002 The OpenSSL Project. All rights reserved.
Redistribution and use in source and binary forms, with or without modification, are permitted
provided that the following conditions are met:
1.
2.
3.
4.
5.
6.
Redistributions of source code must retain the above copyright notice, this list of conditions and
the following disclaimer.
Redistributions in binary form must reproduce the above copyright notice, this list of conditions
and the following disclaimer in the documentation and/or other materials provided with the
distribution.
All advertising materials mentioning features or use of this software must display the following
acknowledgment:
"This product includes software developed by the OpenSSL Project for use in the OpenSSL
Toolkit. (http://www.OpenSSL.org/)"
The names "OpenSSL Toolkit" and "OpenSSL Project" must not be used to endorse or promote
products derived from this software without prior written permission. For written permission,
please contact [email protected].
Products derived from this software may not be called "OpenSSL" nor may "OpenSSL" appear in
their names without prior written permission of the OpenSSL Project.
Redistributions of any form whatsoever must retain the following acknowledgment:
"This product includes software developed by the OpenSSL Project for use in the OpenSSL
Toolkit (http://www.OpenSSL.org/)"
THIS SOFTWARE IS PROVIDED BY THE OpenSSL PROJECT "AS IS'' AND ANY EXPRESSED OR
IMPLIED WARRANTIES, INCLUDING, BUT NOT LIMITED TO, THE IMPLIED WARRANTIES OF
MERCHANTABILITY AND FITNESS FOR A PARTICULAR PURPOSE ARE DISCLAIMED. IN NO
EVENT SHALL THE OpenSSL PROJECT OR ITS CONTRIBUTORS BE LIABLE FOR ANY DIRECT,
INDIRECT, INCIDENTAL, SPECIAL, EXEMPLARY, OR CONSEQUENTIAL DAMAGES (INCLUDING,
BUT NOT LIMITED TO, PROCUREMENT OF SUBSTITUTE GOODS OR SERVICES; LOSS OF
USE, DATA, OR PROFITS; OR BUSINESS INTERRUPTION) HOWEVER CAUSED AND ON ANY
THEORY OF LIABILITY, WHETHER IN CONTRACT, STRICT LIABILITY, OR TORT (INCLUDING
NEGLIGENCE OR OTHERWISE) ARISING IN ANY WAY OUT OF THE USE OF THIS SOFTWARE,
EVEN IF ADVISED OF THE POSSIBILITY OF SUCH DAMAGE.
This product includes cryptographic software written by Eric Young ([email protected]). This
product includes software written by Tim Hudson ([email protected]).
- 272 -
Others
This product contains encryption software developed by Eric Young, and can be used under the
following licencing conditions.
Copyright (C) 1995-1998 Eric Young ([email protected])
All rights reserved.
This package is an SSL implementation written by Eric Young ([email protected]).
The implementation was written so as to conform with Netscapes SSL.
This library is free for commercial and non-commercial use as long as the following conditions are
adhered to. The following conditions apply to all code found in this distribution, be it the RC4, RSA,
lhash, DES, etc., code; not just the SSL code. The SSL documentation included with this distribution
is covered by the same copyright terms except that the holder is Tim Hudson ([email protected]).
Copyright remains Eric Young's, and as such any Copyright notices in the code are not to be
removed. If this package is used in a product, Eric Young should be given attribution as the author of
the parts of the library used. This can be in the form of a textual message at program startup or in
documentation (online or textual) provided with the package.
Redistribution and use in source and binary forms, with or without modification, are permitted
provided that the following conditions are met:
1. Redistributions of source code must retain the copyright notice, this list of conditions and the
following disclaimer.
2. Redistributions in binary form must reproduce the above copyright notice, this list of conditions
and the following disclaimer in the documentation and/or other materials provided with the
distribution.
3. All advertising materials mentioning features or use of this software must display the following
acknowledgement:
"This product includes cryptographic software written by Eric Young ([email protected])"
The word 'cryptographic' can be left out if the routines from the library being used are not
cryptographic related :-).
4. If you include any Windows specific code (or a derivative thereof) from the apps directory
(application code) you must include an acknowledgement:
"This product includes software written by Tim Hudson ([email protected])"
THIS SOFTWARE IS PROVIDED BY ERIC YOUNG "AS IS" AND ANY EXPRESS OR IMPLIED
WARRANTIES, INCLUDING, BUT NOT LIMITED TO, THE IMPLIED WARRANTIES OF
MERCHANTABILITY AND FITNESS FOR A PARTICULAR PURPOSE ARE DISCLAIMED. IN NO
EVENT SHALL THE AUTHOR OR CONTRIBUTORS BE LIABLE FOR ANY DIRECT, INDIRECT,
INCIDENTAL, SPECIAL, EXEMPLARY, OR CONSEQUENTIAL DAMAGES (INCLUDING, BUT NOT
LIMITED TO, PROCUREMENT OF SUBSTITUTE GOODS OR SERVICES; LOSS OF USE, DATA,
OR PROFITS; OR BUSINESS INTERRUPTION) HOWEVER CAUSED AND ON ANY THEORY OF
LIABILITY, WHETHER IN CONTRACT, STRICT LIABILITY, OR TORT (INCLUDING NEGLIGENCE
OR OTHERWISE) ARISING IN ANY WAY OUT OF THE USE OF THIS SOFTWARE, EVEN IF
ADVISED OF THE POSSIBILITY OF SUCH DAMAGE.
The license and distribution terms for any publically available version or derivative of this code cannot
be changed. i.e. this code cannot simply be copied and put under another distribution license
[including the GNU Public License.]
- 273 -
Others
This product contains NetBSD software, and can be used under the following licencing conditions.
Copyright (c) 1990 The Regents of the University of California.
All rights reserved.
This code is derived from software contributed to Berkeley by Chris Torek.
Redistribution and use in source and binary forms, with or without modification, are permitted
provided that the following conditions are met:
1. Redistributions of source code must retain the above copyright notice, this list of conditions and
the following disclaimer.
2. Redistributions in binary form must reproduce the above copyright notice, this list of conditions
and the following disclaimer in the documentation and/or other materials provided with the
distribution.
3. Neither the name of the University nor the names of its contributors may be used to endorse or
promote products derived from this software without specific prior written permission.
THIS SOFTWARE IS PROVIDED BY THE REGENTS AND CONTRIBUTORS "AS IS" AND ANY
EXPRESS OR IMPLIED WARRANTIES, INCLUDING, BUT NOT LIMITED TO, THE IMPLIED
WARRANTIES OF MERCHANTABILITY AND FITNESS FOR A PARTICULAR PURPOSE ARE
DISCLAIMED. IN NO EVENT SHALL THE REGENTS OR CONTRIBUTORS BE LIABLE FOR ANY
DIRECT, INDIRECT, INCIDENTAL, SPECIAL, EXEMPLARY, OR CONSEQUENTIAL DAMAGES
(INCLUDING, BUT NOT LIMITED TO, PROCUREMENT OF SUBSTITUTE GOODS OR SERVICES;
LOSS OF USE, DATA, OR PROFITS; OR BUSINESS INTERRUPTION) HOWEVER CAUSED AND
ON ANY THEORY OF LIABILITY, WHETHER IN CONTRACT, STRICT LIABILITY, OR TORT
(INCLUDING NEGLIGENCE OR OTHERWISE) ARISING IN ANY WAY OUT OF THE USE OF THIS
SOFTWARE, EVEN IF ADVISED OF THE POSSIBILITY OF SUCH DAMAGE.
- 274 -
Others
This product contains NetBSD software, and can be used under the following licencing conditions.
Copyright (c) 1989 The Regents of the University of California.
All rights reserved.
This code is derived from software contributed to Berkeley by Tom Truscott.
Redistribution and use in source and binary forms, with or without modification, are permitted
provided that the following conditions are met:
1. Redistributions of source code must retain the above copyright notice, this list of conditions and
the following disclaimer.
2. Redistributions in binary form must reproduce the above copyright notice, this list of conditions
and the following disclaimer in the documentation and/or other materials provided with the
distribution.
3. All advertising materials mentioning features or use of this software must display the following
acknowledgement:
This product includes software developed by the University of California, Berkeley and its
contributors.
4. Neither the name of the University nor the names of its contributors may be used to endorse or
promote products derived from this software without specific prior written permission.
THIS SOFTWARE IS PROVIDED BY THE REGENTS AND CONTRIBUTORS "AS IS" AND ANY
EXPRESS OR IMPLIED WARRANTIES, INCLUDING, BUT NOT LIMITED TO, THE IMPLIED
WARRANTIES OF MERCHANTABILITY AND FITNESS FOR A PARTICULAR PURPOSE ARE
DISCLAIMED. IN NO EVENT SHALL THE REGENTS OR CONTRIBUTORS BE LIABLE FOR ANY
DIRECT, INDIRECT, INCIDENTAL, SPECIAL, EXEMPLARY, OR CONSEQUENTIAL DAMAGES
(INCLUDING, BUT NOT LIMITED TO, PROCUREMENT OF SUBSTITUTE GOODS OR SERVICES;
LOSS OF USE, DATA, OR PROFITS; OR BUSINESS INTERRUPTION) HOWEVER CAUSED AND
ON ANY THEORY OF LIABILITY, WHETHER IN CONTRACT, STRICT LIABILITY, OR TORT
(INCLUDING NEGLIGENCE OR OTHERWISE) ARISING IN ANY WAY OUT OF THE USE OF THIS
SOFTWARE, EVEN IF ADVISED OF THE POSSIBILITY OF SUCH DAMAGE.
- 275 -
Others
This product contains NetBSD software, and can be used under the following licencing conditions.
Copyright (c) 1990, 1993
The Regents of the University of California. All rights reserved.
This code is derived from software contributed to Berkeley by Chris Torek.
Redistribution and use in source and binary forms, with or without modification, are permitted
provided that the following conditions are met:
1. Redistributions of source code must retain the above copyright notice, this list of conditions and
the following disclaimer.
2. Redistributions in binary form must reproduce the above copyright notice, this list of conditions
and the following disclaimer in the documentation and/or other materials provided with the
distribution.
3. Neither the name of the University nor the names of its contributors may be used to endorse or
promote products derived from this software without specific prior written permission.
THIS SOFTWARE IS PROVIDED BY THE REGENTS AND CONTRIBUTORS "AS IS" AND ANY
EXPRESS OR IMPLIED WARRANTIES, INCLUDING, BUT NOT LIMITED TO, THE IMPLIED
WARRANTIES OF MERCHANTABILITY AND FITNESS FOR A PARTICULAR PURPOSE ARE
DISCLAIMED. IN NO EVENT SHALL THE REGENTS OR CONTRIBUTORS BE LIABLE FOR ANY
DIRECT, INDIRECT, INCIDENTAL, SPECIAL, EXEMPLARY, OR CONSEQUENTIAL DAMAGES
(INCLUDING, BUT NOT LIMITED TO, PROCUREMENT OF SUBSTITUTE GOODS OR SERVICES;
LOSS OF USE, DATA, OR PROFITS; OR BUSINESS INTERRUPTION) HOWEVER CAUSED AND
ON ANY THEORY OF LIABILITY, WHETHER IN CONTRACT, STRICT LIABILITY, OR TORT
(INCLUDING NEGLIGENCE OR OTHERWISE) ARISING IN ANY WAY OUT OF THE USE OF THIS
SOFTWARE, EVEN IF ADVISED OF THE POSSIBILITY OF SUCH DAMAGE.
- 276 -
This product contains XML parser library, and can be used under the following licencing conditions.
Copyright (c) 1998, 1999, 2000 Thai Open Source Software Center Ltd
Permission is hereby granted, free of charge, to any person obtaining a copy of this software and
associated documentation files (the "Software"), to deal in the Software without restriction, including
without limitation the rights to use, copy, modify, merge, publish, distribute, sublicense, and/or sell
copies of the Software, and to permit persons to whom the Software is furnished to do so, subject to
the following conditions:
The above copyright notice and this permission notice shall be included in all copies or substantial
portions of the Software.
THE SOFTWARE IS PROVIDED "AS IS", WITHOUT WARRANTY OF ANY KIND, EXPRESS OR
IMPLIED, INCLUDING BUT NOT LIMITED TO THE WARRANTIES OF MERCHANTABILITY,
FITNESS FOR A PARTICULAR PURPOSE AND NONINFRINGEMENT. IN NO EVENT SHALL THE
AUTHORS OR COPYRIGHT HOLDERS BE LIABLE FOR ANY CLAIM, DAMAGES OR OTHER
LIABILITY, WHETHER IN AN ACTION OF CONTRACT, TORT OR OTHERWISE, ARISING FROM,
OUT OF OR IN CONNECTION WITH THE SOFTWARE OR THE USE OR OTHER DEALINGS IN
THE SOFTWARE.