1
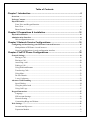
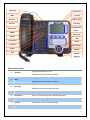
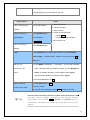
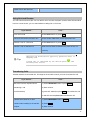
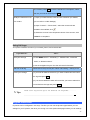
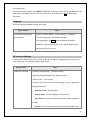
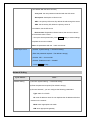
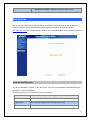
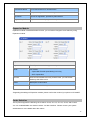
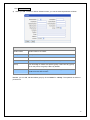
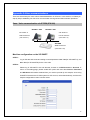
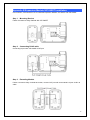
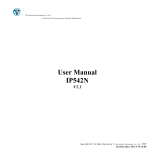
Enterprise PoE IP Phone
VIP-560PT / VIP-560PE
User’s manual
Version 1.1
1
Copyright
Copyright (C) 2010 PLANET Technology Corp. All rights reserved.
The products and programs described in this User’s Manual are licensed products of PLANET Technology, This User’s
Manual contains proprietary information protected by copyright, and this User’s Manual and all accompanying hardware,
software, and documentation are copyrighted.
No part of this User’s Manual may be copied, photocopied, reproduced, translated, or reduced to any electronic medium or
machine-readable form by any means by electronic or mechanical. Including photocopying, recording, or information
storage and retrieval systems, for any purpose other than the purchaser's personal use, and without the prior express
written permission of PLANET Technology.
Disclaimer
PLANET Technology does not warrant that the hardware will work properly in all environments and applications, and
makes no warranty and representation, either implied or expressed, with respect to the quality, performance,
merchantability, or fitness for a particular purpose.
PLANET has made every effort to ensure that this User’s Manual is accurate; PLANET disclaims liability for any
inaccuracies or omissions that may have occurred.
Information in this User’s Manual is subject to change without notice and does not represent a commitment on the part of
PLANET. PLANET assumes no responsibility for any inaccuracies that may be contained in this User’s Manual. PLANET
makes no commitment to update or keep current the information in this User’s Manual, and reserves the right to make
improvements to this User’s Manual and/or to the products described in this User’s Manual, at any time without notice.
If you find information in this manual that is incorrect, misleading, or incomplete, we would appreciate your comments and
suggestions.
CE mark Warning
The is a class B device, In a domestic environment, this product may cause radio interference, in which case the user may
be required to take adequate measures.
Energy Saving Note of the Device
This power required device does not support Stand by mode operation.
For energy saving, please remove the DC-plug or push the hardware Power Switch to OFF position to disconnect the
device from the power circuit.
Without remove the DC-plug or switch off the device, the device wills still consuming power from the power circuit. In the
view of Saving the Energy and reduce the unnecessary power consuming, it is strongly suggested to switch off or remove
the DC-plug for the device if this device is not intended to be active.
WEEE Warning
To avoid the potential effects on the environment and human health as a result of the presence of hazardous
substances in electrical and electronic equipment, end users of electrical and electronic equipment should
understand the meaning of the crossed-out wheeled bin symbol. Do not dispose of WEEE as unsorted
municipal waste and have to collect such WEEE separately.
2
Trademarks
The PLANET logo is a trademark of PLANET Technology. This documentation may refer to numerous hardware and
software products by their trade names. In most, if not all cases, their respective companies claim these designations as
trademarks or registered trademarks.
Revision
User’s Manual for PLANET SIP PoE IP Phone:
Model: VIP-560PT / VIP-560PE
Rev: 1.1 (2010, August)
Part No. EM-VIP560 Series_v1.1
3
Table of Contents
Chapter 1 Introduction.................................................................................... 6
Overview .......................................................................................................................................6
Package Content...........................................................................................................................7
Physical Details.............................................................................................................................7
Front View and Keypad function ...........................................................................................7
Rear View.............................................................................................................................10
Phone Screen Features .........................................................................................................10
Chapter 2 Preparations & Installation......................................................... 12
Physical Installation...................................................................................................................12
Administration Interface...........................................................................................................14
Web configuration access.....................................................................................................14
Chapter 3 Network Service Configurations................................................ 15
Configuring and monitoring your IP Phone from web browser............................................15
Manipulation of IP Phone via web browser.........................................................................15
Network configuration via web configuration interface......................................................16
Chapter 4 VoIP IP Phone Configurations.................................................... 18
General Settings .........................................................................................................................18
Placing a Call .......................................................................................................................18
Placing a Call .......................................................................................................................20
Answering a call ..................................................................................................................20
Ending a Call........................................................................................................................21
Using Hold and Resume ......................................................................................................22
Transferring Calls ................................................................................................................22
Using Mute...........................................................................................................................23
Do Not Disturb.....................................................................................................................23
3-way Conference ................................................................................................................23
Advanced Call Handling ...........................................................................................................24
Speed Dialing.......................................................................................................................24
Using the phone book ..........................................................................................................25
Using Call Logs ...................................................................................................................27
Keypad Instruction ....................................................................................................................27
Language..............................................................................................................................28
SIP Account Settings............................................................................................................28
Network Setting ...................................................................................................................29
Customizing Rings and Volume...........................................................................................30
Web Settings ...............................................................................................................................31
Account and Sip server ........................................................................................................31
Expansion Module ...............................................................................................................32
4
Codec Selection ...................................................................................................................32
Contact .................................................................................................................................33
Appendix A Voice communications ..........................................................................................35
Case : Voice communication via IP PBX (IPX-300) ...........................................................35
Appendix B Expansion Module-VIP-56EXT Installation......................................................37
Appendix C Frequently Asked Questions List ........................................................................39
Appendix D Specifications ........................................................................................................41
5
Chapter 1
Introduction
1
Overview
Combining the cutting edge of Voice over IP and Internet telephony manufacturing experience, PLANET now
introduces the latest member of mainstream enterprise IP phone series: the VIP-560PT / VIP-560PE, the
4-line professional PoE IP Phone.
To bring the most satisfaction to customers, the VIP-560PT / VIP-560PE is the ideal choice for a business to
deploy by using IP PBX service. The standard features of the VIP-560PT / VIP-560PE include 4-line, dual
10/100 switched Ethernet ports and integrated IEEE power over Ethernet (802.3af) circuitry for offering a
choice of powering and cabling options to help reduce cabling expenses and cord clutter.
To give most flexibility to users, the VIP-560PT / VIP-560PE platform contains a 240 x 160 pixels graphic LCD
with Back light, 4 soft-keys, 10 fixed function keys and a 5-position navigation key. The PLANET VIP-560PT /
VIP-560PE desktop phone is engineered to make Easy-to-install communications, cost-effective to deploy,
self-contained, service-integrated, intelligent phone features offering and powerful voice processing power as
possible. The VIP-560PT / VIP-560PE can effortlessly deliver toll voice quality equivalent to the regular
VoIP/IP PBX connections utilizing cutting-edge Quality of Service (QoS) capabilities to encompass
IP-TOS/DiffServ, 802.1 p/q VLAN tagging, echo cancellation, comfort noise generation (CNG) and voice
compensation technology. Meanwhile, the dual Ethernet interfaces on the IP phone allow users to install in an
existing network location without interfering with connections of desktop PC networks.
The VIP-560PT / VIP-560PE has streamlined wired IP telephone that provides additional features such as
built-in PPPoE/DHCP clients, password-protected machine management, call hold, forwarding, mute, transfer,
waiting, pickup, caller ID, peed-dial, 3-way conference, last number redial, incoming message indicator,
multiple call appearances and user-intuitive web administration system.
The VIP-560PE could expend the programmable buttons via connected the Expansion Module – VIP-56EXT.
the VIP-56EXT features 32 fully programmable buttons (each with dual-color LED) when used with VIP-560PE.
The VIP-56EXT creates up to 192 additional programmable extensions when 6 EXT are daisy chained with the
VIP-560PE. The VIP-560PE supports speed dialing, BLF (Busy Lamp Field), BLA (Bridged Line Appearance)
on each of the programmable buttons on the VIP-56EXT module.
Besides, the VIP-560PT / VIP-560PE are the ideal solution for office use as well as installation for Internet
Telephony Service Provider (ITSP) from leading vendors. It's the delivery platform for IP voice services that
makes benefits from the VoIP technology in business class communications services.
6
Product Features
•
IEEE 802.3af (Power over Ethernet) compliant
•
Full-Featured enterprise SIP Desktop Phone
•
Full duplex speakerphone (both Mic and Speaker)
•
Large 4-level gray scales LCD (240 x 160) with backlight
•
Efficient installation deployment of IP PBX solution
•
Reversible base stand and wall mount installation options
VoIP Features
•
SIP 2.0 (RFC3261) compliant
•
Supports up to 4 service domains
•
8 programmable buttons
•
Supports up to 6 Expansion Module (VIP-560PE)
•
Interoperability with leading PLANET IP PBX platforms
•
Supports BLF (Busy Lamp Field), BLA (Bridged Line Appearance)
•
Voice codec support: G.711(A-Law, u-Law), G.723.1, G.722, G.729 A
•
In-band, out-of-band DTMF Relay (RFC 2833) and SIP INFO
•
3-Way Conference / Caller ID / Speed Dial
•
Call Hold / Mute / Forward / Transfer / Waiting
•
Voice processing: VAD, CNG, AEC, Adaptive Jitter Buffer Management
Package Content
The contents of your product should contain the following items:
Enterprise PoE IP Phone VIP-560PE unit
Quick Installation Guide
CD-ROM containing the on-line manual.
RJ-45 cable
Physical Details
The following figure illustrates the front/rear panel of IP Phone.
Front View and Keypad function
7
Message
LCD screen
Line Key
Mute
Headset
Status light
Service
Soft Key
Programmable
Directories
Button
MENU
Navigation
Volume
OK
Conference
Back
Transfer
Microphone
Redial
Speaker
Hold
Number
Keypad
Keypad Description
Toggles the headset on or off.
1
Headset
Red light means the feature is enabled.
Toggles the Mute feature on or off.
2
Mute
Red light means the feature is enabled.
Typically auto-dials your voice message service.
3
Message
Red light means have unread voice mail.
4
Service
Open or Close the Services menu. (Reserved for customization purpose)
5
Directories
Use it to access call logs and corporate directories.
6
MENU
Allows you to scroll through menus.
7
Volume
Controls the volume and other settings.
8
Conference
Connect calling / called party to the conference.
8
9
Redial
To Redial the last number.
10
Transfer
Transfer redirects a connected.
11
Hold
Put a call on hold.
12
Number Keypad
Basic Call Handling: Press “#” sends out a call (default).
Toggles the speakerphone on or off.
13
Speaker
1) Flashing (Red): There is an incoming call.
2) Steady (Red): Pick up and enter normal call.
Select the phone line (Call or Answer).
Different colors for different status:
1) Red, flashing: There is an incoming call.
14
Line Key
2) Red, steady: Pick up and enter normal call.
3) Yellow-green, flashing: Holding call.
4) Yellow-green, steady: Active call.
15
Soft key
Each displays a soft key function. To activate a soft key, press the soft key
button.
Programmable Buttons can be used to bind in order to achieve speed dial.
Turn on BLF:
16
Programmable Button
1) Red, steady: Remote line is busying.
2) Yellow-green, steady: Remote line is idle.
17
Back
Return to the standby interface.
Down: Open “Missed Calls” list.
18
Navigation
Left: Open “Received Calls” list.
Right: Open “Dialed Numbers” list.
19
OK
To confirm the action.
20
Speaker
Hands-free voice of the output.
21
LCD screen
480*160 pixel Color high-definition display.
22
Status light
Red flashing: There is incoming call.
Red, steady: Missed Calls, or phone busy.
23
Microphone
Hands-free voice of the input.
9
Rear View
Power Jack
10/100 RJ-45
Ethernet Port
Headset Jack
(To LAN)
(RJ-22)
EXT
10/100 RJ-45
Handset Jack
(RJ-22)
Ethernet Port
(To PC)
EXT
Headset Jacks
(3.5 mm)
Keypad Description
RJ-45 connector, for Internet access, connected directly to
Switch/Hub through straight CAT-5 cable.
1
LAN
The LAN interface also can be connected with 802.3af PoE
switch or converter for power supply
2
PC
3
12V DC
4
5
6
7
LNote
RJ-45 connector, to maintain the existing network structure,
connected directly to the PC through straight CAT-5 cable
12V DC Power input outlet
Handset Jack RJ-22 connector, for telephone handset.
Headset Jack
(RJ-22)
Headset Jack
(3.5 mm)
EXT
RJ-22 connector, for ear-phone.
3.5 mm connector, for ear-phone.
To connect the expansion module (VIP-56EXT) at IN port.
Please don’t connect PoE injector and AC adapter to
VIP-560PT/VIP-560PE at the same time, this may make the
effect of current pulse and then cause device damage. Be
noted to power the SIP IP phone either from 802.3af PoE or Phone
AC adapter.
10
Screen Features
This is what your main phone screen might look like with an active call.
1
4
2
5
3
6
Graphic Icon Description
1
Time and Data
2
Call activity Area
Displays calls per line, including caller ID, for the highlighted line.
3
Missed calls tips
Show the number of missed calls.
Display current time and data.
AA: Auto-answer turned on.
4
Service status
Mu: Mute turned on.
HS: Headset turned on.
(1)
: Line is successfully registered to a SIP server.
(2)
: Line is not successfully registered to a SIP server.
(3)
: DND turned on in this line.
Line Status /
5
Speed Call
6
Softkey labels
Each displays a softkey function. To activate a softkey, press the
softkey button.
11
Chapter 2
Preparations & Installation
2
Physical Installation
VIP-560PT/560PE: Enterprise PoE SIP IP Phone (2 x RJ-45, 1 x PoE for LAN interface)
Step 1: Handset Connection
Plug Handset Core with Handset and Handset Jack
Step 2a:
LNote
Connecting Power Adapter and Network
The power adapter not bundles in standard pacage. Please
use the DC 12V/1A standard power adapter with the unit to
ensure correct functionality.
12
Step 2b:
Connecting Power via PoE interface and Network
In the VIP-560PT/VIP-560PE can be powered without external power, if connecting to an
IEEE802.3af PSE devices such as 802.3af POE injector/hub or 802.3af POE Switch.
LNote
Please don’t connect PoE injector and AC adapter to
VIP-560PT/PE at the same time, this may make the effect of
current pulse and then cause device damage. Be noted to power
the SIP IP phone either from 802.3af PoE or AC adapter.
Step 3:
LNote
Step 4:
Foot-stand Adjust
Hold the two buttons before adjust the stand angle, bend
the stand without holding the button will damage the stand.
Computer Network Setup
Set your computer’s IP address to 192.168.0.x, where x is a number between 2 to 254 (except 1
where is being used for the camera by default). If you don’t know how to do this, please ask your
network administrator.
13
Step 5:
Login Prompt
Use web browser (Internet Explorer 6.0 or above) to connect to 192.168.0.1 (type this address in
the address bar of web browser). You’ll be prompted to input user name and password: admin / 123.
Administration Interface
The IP Phone provides GUI (Web based, Graphical User Interface) for machine management and
administration. Key pad administration also available for simple configuration.
Web configuration access
To start IP Phone web configuration, you must have one of these web browsers installed on computer
for management
•
Microsoft Internet Explorer 6.0.0 or higher with Java support
Default IP address of IP Phone is 192.168.0.1. You may now open your web browser, and insert
http://192.168.0.1 in the address bar of your web browser to logon IP Phone web configuration page.
IP Phone will prompt for logon username/password, please enter: admin / 123 to continue machine
administration.
ÍNote
In order to connect machine for administration, please
locate your PC in the same network segment (192.168.0.x)
of IP Phone. If you’re not familiar with TCP/IP, please refer
to related chapter on user’s manual CD or consult your
network administrator for proper network configurations.
14
Chapter 3
Network Service Configurations
3
Configuring and monitoring your IP Phone from web browser
The IP Phone integrates a web-based graphical user interface that can cover most configurations
and machine status monitoring. Via standard, web browser, you can configure and check machine
status from anywhere around the world.
Manipulation of IP Phone via web browser
Log on IP Phone via web browser
After TCP/IP configurations on your PC, you may now open your web browser, and input
http://192.168.0.1 to logon IP Phone web configuration page.
IP Phone will prompt for logon username/password: root / null (without password)
When users login the web page, users can see the IP Phone system information like firmware version,
company…etc in this main page.
15
Network configuration via web configuration interface
Execute your web browser, and insert the IP address (default: 192.168.0.1) of IP Phone in the address
bar. After logging on machine with username/password (default: admin / 123), browse to “Network”
configuration menu:
16
Network Parameter Description
IP address
LAN IP address of IP Phone
Default: 192.168.0.1
Subnet Mask
LAN mask of IP Phone
Default: 255.255.255.0
Default Gateway
Gateway of IP Phone
Default: 192.168.0.254
After confirming the modification you’ve done, please click on the Submit button to apply settings and
the machine will be reboot to make the settings effective.
Connection Type
Data required.
Obtain an IP Address Automatically
Use the Following IP Address
Behind xDSL Modem (PPPoE)
L Hint
The ISP will assign IP Address, and related information.
In most circumstances, it is no need to configure the
DHCP settings.
The ISP will assign PPPoE username / password for
Internet access,
Please consult your ISP personnel to obtain proper PPPoE/IP
address related information, and input carefully.
If Internet connection cannot be established, please check
the physical connection or contact the ISP service staff
for support information.
17
Chapter 4
VoIP IP Phone Configurations
4
General Settings
You can perform basic call-handling tasks using a range of features and services. Feature availability
can vary; see your system administrator for more information.
Note: The bold type of the following text and following a “button” in table signifies the phone's button
(for example, OK button), and the New Call signifies softkey.
Placing a Call
Here are some easy ways to place a call on IP Phone.
Item
Descriptions
Toggles the headset on or off.
Headset
Red light means the feature is enabled.
Toggles the Mute feature on or off.
Mute
Red light means the feature is enabled.
Typically auto-dials your voice message service.
Message
Red light means have unread voice mail.
Service
Open or Close the Services menu. (Reserved for customization
purpose)
Directories
Use it to access call logs and corporate directories.
MENU
Allows you to scroll through menus.
Volume
Controls the volume and other settings.
Conference
Connect calling / called party to the conference.
Redial
To Redial the last number.
Transfer
Transfer redirects a connected.
Hold
Put a call on hold.
Number Keypad
Basic Call Handling: Press “#” sends out a call (default).
Speaker
Toggles the speakerphone on or off.
18
1) Flashing (Red): There is an incoming call.
2) Steady (Red): Pick up and enter normal call.
If you want to...
Place a call using the
Then...
Pick up the handset;
1)Hear the dial tone.
2)The first line light.
handset
Place a call using a
3)Enter number.
Press Speaker button
4)Press “#” button(default)
or press Send
Speakerphone
or Line buttons
or New Call
Place a call using a
or wait five seconds (default)
Then send the call.
Press Headset button.
headset
Redial
- Press Redial button to dial the last number or press Navigation
button -Right -> “Dialed number”, select a number, and press Dial or
OK button.
Dial from the
1) Press MENU or OK button -> “Call history”, you can select “Missed
Directory on your
calls”, “Received calls” and “Dialed numbers” or press Navigation
phone
button (in Standby interface) > select “Missed calls” (Down),
“Received calls” (Left) and “Dialed numbers” (Right)
2) Then press OK button or Dial
Place a call while
1) Press Hold button or Hold
Another call is active
2) Enter a number.
3) Press ‘#’ button (default) or press Send to send the number.
L Tips
You can dial on-hook, without a dial tone (pre-dial). To
pre-dial, enter a number, and then go off-hook by lifting
the handset or pressing Send , Headset or Speaker button.
If you make a mistake while dialing, press C button to erase
digits.
19
Placing a Call
Here are some easy ways to place a call on IP Phone.
If you want to...
Place a call using the
Then...
Pick up the handset.
1)Hear the dial tone.
2)The first line light.
handset
3)Enter number.
Place a call using a
Press Speaker button or
4)Press “#” button (default) or press
Send or wait five seconds (default).
Speakerphone
Line buttons or New Call
Place a call using a
Press Headset button.
Then send the call.
headset
Redial
--Press REDIAL button to dial the last number or press Navigation
button-Right > “Dialed number”, select a number, and press
Dial or OK button.
Dial from the
1) Press MENU or OK button > “Call history”, you can select “Missed
Directory on your
calls”, “Received calls” and “Dialed numbers” or press
phone
Navigation button (in Standby interface) > select “Missed calls”
(down), “Received calls” (left) and “Dialed numbers” (right).
2) Then press OK button or Dial
Place a call while
1) Press Hold button or Hold
Another call is active
2) Enter a number
3) Press ‘#’ button (default) or press Send to send the number.
L Tips
You can dial on-hook, without a dial tone (pre-dial). To
pre-dial, enter a number, and then go off-hook by lifting
the handset or pressing Send, Headset or Speaker button.
If you make a mistake while dialing, press C button to erase
digits.
Answering a call
You can answer a call by simply lifting the handset,or you can use other options if they are available on
IP Phone.
20
If you want to...
Answer with a handset
Then...
1) Your phone ring.
Pick up the handset
2) Line button of the
Answer with the
Press Speaker button or press the Line
ringing line is Red
and flashing,
speakerphone
button flashing Red
or press Ans
Light strip is Red
(Non-headset mode)
and flashing.
Answer with the a
Put on headset, press Headset button so
that the status light is Red
headset
and then
do as using speakerphone.
Switch from a connected
1) Another Line button is Red
Call to answer a ringing
and flashing.
Call
2) Press the flashing
and flashing, Light strip is Red
Line button to answer (at this time, the
original call will be hold.)
Auto-answer
1) Press MENU or OK button > “Function setting” > “Auto answer”.
2) Select “Enable”.
3) Your phone answers incoming calls automatically after a few rings.
Ending a Call
To end a call, simply hang up, here are some more details.
If you want to...
Then...
Hang up while using the Handset
Return the handset to its cradle or press Reject
Hang up while using the
Press Speaker button that is Red
Speakerphone
for the appropriate line or press Reject
Hang up while using the Headset
Press Handset button (Do not keep the headset mode) or
or press Line button
press Reject (keep the headset mode)
Hang up one call, but preserve
Press Reject or refer to the above three methods
21
another call on the other line
Using Hold and Resume
You can hold and resume calls. You can take a call in one line at anytime, and the other lines would be
hold. As a result of that, you can switch different calling line on IP Phone.
If you want to...
Then...
Put a call on hold
Press HOLD button or press Hold
Hold a line and switch to another line
Press another Line button for the appropriate line
Resume a call on current line
Press HOLD button or press Hold
Release a call on different line
Select the line want to release hold, press the line, so
recovery.
Engaging the Hold feature typically generates music or a
beeping tone.
L Tips
A held call is indicated by the Yellow-green
flashing Line button.
and
Transferring Calls
Transfer redirects a connected call. The target is the number to which you want to transfer the call.
If you want to...
Then...
Talk to the transfer recipient before
1) Press TRANSFER button or press Transf
transferring a call
2) Enter number.
(consult transfer)
3) press “#”(default) or press Send then transfer the call
or wait five seconds(default)then transfer the call
Transferred to idle lines or other
1) Press TRANSFER button or Transf
numbers without talking to the transfer
2) Press Blind
recipient
3) Enter number
22
4) Press “#”(default) or press Send, then transfer the
(Blind transfer)
call or wait five seconds(default)then transfer the call
Blind transfer to the
1) Press TRANSFER button or press Transf
held line
2) Press the Line button of held line
Using Mute
With Mute enabled, you can hear other parties on a call but they cannot hear you. You can use mute in
conjunction with the handset, speakerphone, or a headset.
If you want to...
Then...
Toggle Mute on
Press Mute button, then the button is Red
Toggle Mute off
Press Mute button, then the button light off.
Do Not Disturb
You can use the Do Not Disturb (DND) feature to block incoming calls on your phone with a busy tone
(Can also be set to their voice mail or other extension numbers, etc.).
If you want to...
Enable global DND
Then...
1) Press DND
2) All enabled line on the phone would changes to 8001:DND status.
Enable DND on a single line
Press MENU or OK button > “Function setting” > “DND” > (select line)
“Enable”
Disable DND
1) Global DND enabled, press DND to disable global DND.
2) Line DND enabled, press twice DND or press MENU or OK button >
“Function setting” > “DND” >(select line) “Disable”
3-way Conference
You can establish a three-party conference, during the conversation three phone parties can
communicate with each other.
23
If you want to...
Then...
Invite the transfer recipient into a
1) When the transfer recipient answer the call, press
CONFERCENCE button or Confe on your phone.
conference in a transferring
2) Then the held one, transfer recipient and you will be into a
conference.
Invite the third party into a
1) Press CONFERENCE button or Confe in an active call.
conference in a active call
2) Enter the third party number.
3) After connected the third party, press CONFERENCE
button or Confe again.
establish a conference with held line
1) When one phone line is holding on and the other line is
busy.
2) Press CONFERENCE button or Press Confe Soft key
3) Press the held line's Line button, the 3-way Conference will
establish.
Advanced Call Handling
Speed Dialing
Speed dialing allows you to enter an index number, press a button, or select a phone screen item to
place a call.
If you want to...
Then…
Set up Speed Dials on
1) Press MENU or OK button > “Function setting” > “Hot line keys”
your phone
2) You can configure twelve speed dial numbers on the IP Phone
3) Press OK button or Modify to set and modify:
-Mode:
-Speed dial: Speed dial mode
24
-Asterisk BLF: In the Speed dial based on the increase in BLF
(Busy line detection) function
-Account: Speed Dial hot keys using the account
-Name: Description of this hot-key,
-Number: Need to speed dial numbers
4) Press Submit to save the changes
Using the phone book
You can store a large number of contacts in your phone's directory. You can add, edit, delete, dial, or
search for a contact in this directory.
If you want to…
Add Contacts
Then…
1) Press Contac
-or press MENU button > “Phone book”,
-or press Directories button > “Phone book”;
2) Press Modify
3) Select “Add contact”, press OK button or OK
4) Use the navigation keys to select content, press OK button or
Modify to set and modify:
-Name: set the name of contact,
-NO.1-5: you can set up 5 contacts’ numbers,
-Group: the contacts be divided into different user’s groups
5) Press Submit soft key to complete
Add group
1) Press Contac soft key or press MENU button > “Phone book” or
press Directories button > “Phone book”.
2) Press Modify soft key
3) Select the “add group” then press OK button or OK
4) Use the navigation keys to select content, press OK button or
25
Modify to set and modify.
-Group name: name of the group
-Description: description of the group
5) Press Submit soft key to complete
Modify group
1) Press Contac soft key or press MENU button > “Phone book” or
press Directories button > “Phone book”.
2) Press Modify soft key.
3) Select the “Modify group” then press OK button or press OK
4) Select the group you want to modify, press the OK button or
Modify to set and modify, press Submit to save the change.
Delete group
1) Press Contac soft key or press MENU button > “Phone book” or
press Directories button > “Phone book”.
2) Press Modify soft key.
3) Select the “Delete group” or OK button or OK
4) Select a group you want to delete, press OK button or OK
View/Edit Contacts
1) Press Contac soft key or press MENU button > “Phone book” or
press Directories button > “Phone book”.
2) Select “View ALL” or select a contact that is belong to different
group.
3) Select the contact, press the OK button or View (to edit the
contact’s information, press OK button or Modify )
Call from phone book
1) Press Contac soft key or press MENU button > “Phone book” or
press Directories button > “Phone book”.
2) Select “View ALL” or select a contact that is belong to different
group.
3) Select a contact, then press Dial (If there are multiple numbers of
26
one contact, press Dial to enter the interface of “call options”, select
the one you want to call and press Dial )
Modify the relative account
1) Open your web browser; enter the “web” interface. (For details,
of a contact
you can refer to 7.Web Settings.)
2) Open “Contact” > “Phone book”, select the contact who are
needed to be modified, click
3) Select the account in the drop-down column of the account; click
“Submit” to complete it.
Using Call Logs
Your phone maintains records of your missed, placed, and received calls.
If you want to…
View your call logs
Then…
1) Press MENU button > “Call history” > “Missed Calls”, “Received
Calls”, or “Dialed numbers”
2) Use the navigation keys to view the call record information.
Dial from a call log
Please refer to the previous part 4.Basic call handing – Placing a call.
Erase your call logs
1) If you want to delete a call record, you have to select this record from
the logs and press Del
2) If you want to delete an entire call record list, you have to select this
record list from the logs and press Del All
ÍTips
Each call log store up to 20 entries on IP phone.
Keypad Instruction
IP phones can be configured in two ways. The first you can use the phone keypad where you can
settings for you IP phones, the other you can log in to User Options web pages where you can settings
27
for you IP phones.
Use phone keypad to setting. Press MENU or OK button to the main menu, Use the navigation keys to
select menu, press OK button to confirm menu selections, press C button or Del to delete input
information.
Language
IP Phone supports Simplified Chinese and English.
If you want to…
Then…
To change the language via
1) Choose “System setting” > “Phone setting” > “Language”;
phone interface
2) Scroll through the list of available languages.
3) Press OK button or Modify when the desired language is
highlighted. The language appears on the graphic display will be
changed to the one you chose.
SIP Account Settings
IP phone make calls based on SIP accounts, IP phone can support 4 independent SIP account, and
each account can be configured to different SIP server.
If you want to…
Create an sip account
Then...
1) Choose “System setting” > “Advanced setting”.
2) Enter the password required (The default is empty).
3) Choose “SIP” > “Account SIP”.
4) Choose one of the account you want to setting, you can configure the
following parameters
-Enable account*: choose Enable
-Display Name: The name displayed on the screen
-User Name*: the account matched with the SIP server. (extension
number)
-Authen usr: the Authenticated users matched with the SIP server.
28
(The default With the same account)
-user pwd*: the user password matched with the SIP server.
-Description: description of this account
-SIP1*: the primary SIP server, By default all calls through the server
-SIP2: the secondary SIP, When the primary server is
unavailable ,use the SIP server
-Refresh time: Registration refresh interval, the minimum value is
20 The default value is 3600.
5)Set up the above parameters, press Submit softkey to saves settings,
complete the account creation.
* Note: the parameters with the * mark must be set.
Disable sip account
1) Choose “System setting” > “Advanced setting”
2) Enter the password required(The default is empty)
3) Choose “SIP” > “Account SIP”
4) Choose “Enable account” > “Disable”
5)Press Submit soft key
Network Setting
If you want to…
Network Setting
Then…
1) Choose “System setting” > “Advanced setting”
2) Enter the password required (The default is empty)
3) Choose “Network”, you can configure the following parameters:
-Type: static IP or DHCP
-IP: enter IP address. Note: Do not duplicate the IP address with other
devices on the network
-Mask: enter appropriate sub mask
-GW: enter appropriate gateway
29
-DNS1: enter IP address of the primary DNS server
-DNS2: enter IP address of the secondary DNS server
-Web port: the default Web port is 80, if you change it (for example
change it to 88), you must use IP and Web port to login the web page (for
example http://192.168.0.200:88). It will take effect on next reboot.
-Telnet port: the default Telnet port is 23, if you change it (for example
changes it to 2003), you must use IP and Telnet port to login the manage
page (for example telnet 192.168.0.200:2003). It will take effect on next
reboot.
Customizing Rings and Volume
If you want to…
Change the ring tone
This…
1) Choose “System setting” > “Phone setting” > “Ring type”
2) Press navigation to choose ring tone.
3)Press Play softkey to choose a ring tone to play a sample of it.
Press Stop softkey to Stop Playing
Press OK or Select softkey to set the ring tone,
Press Back softkey to return to previous menu.
Adjust the volume level
1) Choose “System setting” > “Phone setting” > “Volume setting”
2)You can adjust the volume level of following types
-Ring volume: Phone call ring volume
-Handset volume: Handle output volume
-Handset mic volume: Handle input volume
-Speaker volume: Hands-free speaker output volume
-Speaker mic volume: Hands-free input volume
-Headset volume: Headphone output volume
30
-Headset mic volume: Headset microphone input volume
Web Settings
We can configure the IP Phone handier through web setting. Press OK button on the keypad of the
phone to enter the status page and find out the IP address of IP phone. Enter it (for example
http://192.168.0.200) into the address bar of web browser. The default login name / password are admin
/ 123.
Account and Sip server
The phone attempts to register to the SIP server using the account/registrar data provided by the
automatic or manual initialization.
Choose one Account, you will find the following parameters:
Field
Description
Enable
You can choose on/off to enable/disable the line.
Display Name
It is showed as Caller ID when making a phone call.
Username
It is authenticated ID for authentication.
31
Authenticate Name
It is authenticated ID for authentication.
Password
It is provided by administrator for registration.
SIP Server
Server for registration, provided by administrator.
Register Expire Time
IP phone automatically registered every time.
Expansion Module
Expansion module is extended Hotline function; you can believe it support more hotline by using
Expansion module.
Expansion module
Key n
Each Expansion module supports 32 keys.
Mode
Two modes:
-- Speed Dial: Enable speed dialing in this key;
-- BLF+ Speed Dial
Account
A SIP account relates to this key, another word, you will call this
hotline by this SIP account.
Name
Description of this hotline.
Number
Number relates to this key.
*Regarding the settings of Expansion module, please confirm the model of your phone is VIP-560PE.
Codec Selection
The IP phone supports the following voice codecs: G.722, G.711A, G.711U, G.723, and G.729A.
You can enable/disable the desired codecs via Web interface. Please contact your system
administrator for more details about the codecs.
32
To enable/disable the codecs:
1)
Choose Audio-> Audio Codecs
2) Use the navigation keys to highlight the desired one in the Enabled/Disable Codecs list, and press
the
>>
/
<<
to move to the other list.
3) Choose Submit to save the change.
Of course, you can control the voice bulk in this choose.
Contact
You can add, edit and delete contact in a phone book on web page of IP Phone.
1) Click “Contact” > “Phone book”,
If you want to add a contact, you just ought to click Add Contact .
You can edit an existed contact by click
You can delete an existed contact by click
.
, if you want to delete all contacts, you just ought to
33
click Delete All Contact .
2) When you add a contact or edit an existed contact, you can set several parameter as follow:
Phone book
Serial number
Serial number of a contact
Description
Description of a contact
Name
Name of a contact
Phone n
You can add 5 different phone number for every contact
Group
You can assign a contact to a specific group. If there isn’t any group
set on the phone, the group is None by default.
Account ID
Select a SIP account relating this contact that is you can dial to the
contact from this SIP account.
Besides, you can add, edit and delete group by click “Contact” > “Group”. The operation is similar to
phone book.
34
Appendix A Voice communications
There are several ways to make calls to desired destination in IP Phone. In this section, we’ll lead you
step by step to establish your first voice communication via keypad and web browsers operations.
Case : Voice communication via IP PBX (IPX-300)
Number: 100
Number: 200
VIP-560PT-A
VIP-560PT-B
LAN IP Address
LAN IP Address
(192.168.0.1)
(192.168.0.2)
IPX-300
WAN IP Address
(192.168.0.50)
Machine configuration on the VIP-560PT:
STEP 1:
Log in IPX-300 and create two testing accounts/password: 100 / 123 (for VIP-560PT-A), and
200 / 123 (for VIP-560PT-B) for the voice calls.
STEP 2:
Please log in VIP-560PT-A via web browser, browse to the”SIP Account -> Account 1”
menu. In the setting page, please enable SIP option and insert the Account / Password
and SIP Server information obtained from your service provider (in this sample, we’re using
PLANET IPX-300 as the IP PBX system for SIP account, call authentications), and then the
sample configuration screen is shown below:
35
STEP 3:
Repeat the same configuration steps on VIP-560PT-B, and check the machine registration
status, make sure the registrations are completed.
STEP 4:
To verify the VoIP communication, please pick up the telephone. Dial the destination number
to make call between SIP clients. For example, VIP-560PT-A (with number 100) with keypad
number 200 to VIP-560PT-B, or reversely makes calls from SIP client (VIP-560PT-B) to the
number 100 (VIP-560PT-A).
36
Appendix B Expansion Module-VIP-56EXT Installation
In this section, we’ll introduce how to install the Expansion Module- VIP-56EXT with VIP-560PE
Step 1.
Mounting Bracket
Fasten 4 screws to daisy chained with VIP-560PE
Step 2.
Connecting RJ-45 cable
Connecting IN port with VIP-560PE’s EXT port
Step 3.
Extending Module
Fasten 4 screws to daisy chained each other, connect OUT port with next module’s IN port via RJ-45
cable
37
Step 4.
Foot-stand Adjust
Pressing Foot-stand button to adjust the same angle with phone base
LNote
Hold the two buttons before adjust the stand angle, bend
the stand without holding the button will damage the stand.
38
Appendix C Frequently Asked Questions List
Q1 : [VIP-560PT/VIP-560PE] I can not register to the server?
A1: 1. Check the IP address. If you set your LAN port in DHCP mode, please make sure that your
DHCP server is on.
2. Check your gateway.
3. Check your DNS server.
4. Make sure your account information is the same as you have got from your ISP.
5. Check whether the SIP server is on.
6. Check the SIP register port, the default value is 5060.
Q2: [VIP-560PT/VIP-560PE] I can’t get the IP address?
A2: 1.Make sure you have plugged the Ethernet cable into the LAN port.
2. Make sure that the DHCP server is on, and there are available IP addresses in the server.
3. Try to set your LAN port to static IP client mode.
Q3: [VIP-560PT/VIP-560PE] During a call, I can not hear any voice?
A3: 1.Make sure Your handset is tightly connected with the phone.
2. Check whether you have muted the conversation or not.
3. Consult the outbound server details with your ISP.
Q4: [VIP-560PT/VIP-560PE] Have DTMF problem?
A4 : 1.Check which kind of DTMF you are using, and whether it is compatible with the server
2.Consult the payload value with your ISP
Q5: [VIP-560PT/VIP-560PE] How to change the time?
A5: Go to “Advance -> Phone Setting” page change to Manual for Set Time mode at first, then to fill in
the date and time at fitting fields.
Note: The IP Phone will automatically get the time from the SNTP server for default values.
Q6: [VIP-560PT/VIP-560PE] How to answer the incoming calls during a call?
A6: If a call comes in when you are in a conversation, press the flashing Line key to answer the call,
and the original call will been held.
Q7: [VIP-560PT/VIP-560PE] How to send SMS?
A7: You could edit the SMS in the MENU -> Messaging -> Create messages.
Note: Make sure that the SIP server you have registered supports SMS function.
Q8: [VIP-560PT/VIP-560PE] How to update the firmware?
A8: 1. Update the firmware on the webpage “Phone Maintenance -> TFTP/HTTP Upgrade”.
39
2. Select the correct file you want to download to the IP Phone then click the “Upgrade” button.
Q9: [VIP-560PT/VIP-560PE] How to adjust volume?
A9: During a call, press VOL+▲/ VOL-▼ key to adjust the volume of earpiece or speaker.
Q10: [VIP-560PT/VIP-560PE] How to select ring?
A10: 1.There is eight kinds of ring styles to choose.
2. Go to “MENU -> System setting -> Phone setting Ring Type” page, press the ▲/ ▼ key on the
phone to choose the ring type.
Q11: [VIP-560PE] Why the IP Phone can’t work when connect more than 4 VIP-56EXT?
A11: If the IP Phone be powered by 802.3af POE injector/hub or 802.3af POE Switch, the IP Phone just
could connect to 3 VIP-56EXT. If the IP Phone needs to connect more than 4 VIP-56EXT, it needs be
powered by external power adapter to make sure all units could work properly.
40
Appendix D Specifications
Product
Enterprise PoE IP Phone
Model
VIP-560PT
VIP-560PE
Hardware
LAN
1 x 10/100 Base-TX RJ-45 port (802.3af support)
PC
1 x 10/100 Base-TX RJ-45 port
Display
240 x 160 pixels LCD with backlight
Supports Expansion Module
N/A
Up to 6 x VIP-56EXT ( 192
Headset Jack
RJ-11, 3.5 mm (Mic / Speaker separately)
Function Keys
4 x Line Buttons
programmable buttons)
(Red LED)
4 x Soft Buttons
5 x Navigation Buttons
2 x Volume Buttons
8 x Programmable Buttons
12 x Fixed Function Buttons (Headphone, MUTE, Voice Mail, Service,
Directory, Menu, Conference, Redial, Transfer, Hold, Speaker, Delete)
Protocols and Standard
Standard
SIP 2.0 (RFC 3261)
RTP(RFC 2833)
STUN (RFC 3481)
SNTP (RFC 2030)
TCP/IP, UDP, HTTP, ICMP, DNS, NTP
STUN (RFC 3481)
Outbound Proxy
VPN Network
L2TP, IPSec encryption
Voice Code
G.711(A-law /μ-law), G.722, G.723.1 (6.3 Kbps / 5.3Kbps), G.729 A
Voice Standard
Auto negotiation
Acoustic echo cancellation for integrated speakerphone operations
Voice activity detection
Silence suppression
Comfort noise generation
Dynamic Jitter buffer
Call Progress Tone Generation
DTMF Support: In-band / Out-of-band DTMF (RFC 2833) / Out-of-band DTMF
(SIP Info)
Security
User Authentication for configuration pages
Signaling encryption
Media encryption
Features
Call Features
Caller ID display
Address Book
Missed Calls
Received Calls
41
Placed Calls
Date / Time Display
Speed dial configuration (mapped to 8 speed dial key)
Network Setting
Time Zone Setting
SIP port configurable
RTP port configurable
Call Forward: Busy Forward / No Answer Forward / Unconditional Forward
Call Waiting
Call Transfer
Call Hold
3-Way Conference
DND (Do Not Disturb)
Multi-line Appearance / Registration (up to 4)
Selectable Ring Tone
Distinctive Ring by Group Name
NTP Support
LCM Contrast Adjustment
BLF (Busy Lamp Field), BLA (Bridged Line Appearance)
Network and Configuration
Internet Connection Type
Fixed IP, DHCP, PPPoE
Management
LCD / Keypad UI
Web (HTTP)
Auto Provision (TFTP)
Dimension (W x D x H)
254 x 205 x 87 mm
Operating Environment
0~50 Degree C, 10~90% humidity
Power Requirement
12V DC, PoE (IEEE 802.3af)
EMC/EMI
CE, FCC
42