1
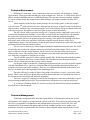
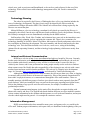
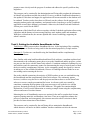
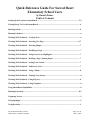
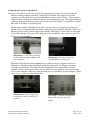
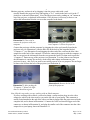
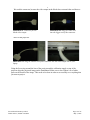
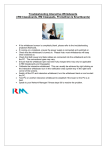
School of Computer Science
Course 15-391
Spring 2006
Final Consulting Report
Sacred Heart Elementary School
Daniel Dvinov
Sacred Heart Elementary School
Executive Summary
Student Consultant, Daniel Dvinov
Community Partner, Sr. Lynn Rettinger
I. Background Information
Sacred Heart Elementary School is one of the institutions under the auspices of the Diocese of
Pittsburgh and is administrated by the Department of Catholic Schools. The school's mission
determines the programs and the overall goal of the organization:
"The administration, faculty and staff of Sacred Heart School believe that the
primary purpose of Catholic Education is the formation of the intellect with the
sound foundation in the Catholic faith. Students learn through instruction and
example to participate fully in their faith and to participate in the life of the church
and civic community."
SHES employs about 40 staff members and provides education to about 500 students, grades K-8.
There are 23 classrooms in the main building, each of which has at least one computer, all of which
are various Apple models. Aside from the computer lab with more modern machines and wired
connectivity, everywhere else the 802.11 airport wireless connection is used, with 6 access points
throughout the building. Network connectivity has been school's main technology problem
throughout network's existence. The school has a five year technology plan developed by the
Diocese of Pittsburgh.
E-mail communication is rarely used by the staff because of the poor network connectivity.
development.The AppleWorks-based database that runs on office machines contains various contact
information for the students and their parents, as well as the staff members, and anyone who the
school might need in general – for example the contractor workers. Technology management falls
under the responsibilities of the principal, and she has several staff members and volunteers to
implement the current needs.
II. Consulting Tasks
Consulting Task 1: Deploying the SchoolTools and Gradebook software
The Diocese of Pittsburgh requires SHES to install and use the software applications called
SchoolTools and Gradebook by River Valley Software (RVS). The SchoolTools application is a
database that allows for easy tracking of student attendance, contact, discipline, grading, medical
and other information common and necessary for the school office. SchoolTools also enables the
user to define the report card layouts and then easily print them out. Gradebook is a web
application that provides students, parents, and teachers access grading information online. This
application is integrated with SchoolTools and thus allows teachers to work with class rosters
created in SchoolTools in order to define weighted
assignment categories, grading scales and
assignments. Gradebook automatically calculates grades, allows for additional comments for a
reporting period, and lets students and parents review missing or upcoming assignments, as well as
midterm reports.
Consulting Task 2: Putting the available SmartBoards to use
A few years ago, SHES has acquired three SmartBoard devices that could potentially be used to
provide a better education for students. SmartBoard is an interactive whiteboard developed by
Sacred Heart Elementary School
Daniel Dvinov, Student Consultant
Page 1 of 22
May 5, 2006
Smart Technologies Inc. that allows capturing information written on it using the electronic stylus
on the computer. At the beginning of the consulting period, only one of which was being used for
the educational purposes by a single teacher.
III. Outcomes Analysis and Recommendations
Outcomes of Consulting Task 1
• SchoolTools is successfully installed and is ready to use. The administration staff is now able to
run SchoolTools on principal's machine. All necessary information was successfully entered by the
school principal, with some assistance from teachers in cases when the information required was
class-specific, such as which teacher has what students in their homeroom. The data was then
exported to RVS, and the Gradebook is now accessible for the newly created accounts.
• Community partner is comfortable using both SchoolTools and Gradebook. Community partner
learned how to export the data from SchoolTools and then import the changes into the Gradebook
application in order to coordinate the applications and reflect in Gradebook the modifications done
in SchoolTools. Teachers need to learn how to efficiently use the software for the purposes of
managing student grades and attendance.
Outcomes of Consulting Task 2
• Teachers are comfortable using the SmartBoards and complimentary SmartTools software.
Workshops for two staff members and community partner were conducted to demonstrate the
capabilities of both the device and complimentary software. Reference guide was created for the
teachers explaining how to set up the SmartBoard and how to use the complimentary software to
create a lesson. Most teachers still need to practice using the devices.
Recommendation 1: Incorporate the record keeping associated with the current database into the
SchoolTools database.
As the first consulting task is deploying the SchoolTools software, it is now the case that the school
needs to essentially maintain two databases with similar types of information, since the SchoolTools
requires storing a subset of the data stored in current database. The staff needs to undergo training
in order to learn how to use the SchoolTools database efficiently, and the current database needs to
be replicated in SchoolTools.
Recommendation 2: Creating a schedule for the use of SmartBoards and projectors, as well as
collection of good ways the SmartBoards may be used.
A collection of records describing the good uses of the SmartBoards will help teachers exchange
their experiences, quickly learn from other teachers' experience, and avoid common pitfalls.
Teachers are going to act as resources themselves in this recommendation, and by sharing their
experiences will create such collection.
Community Partner
About the Consultant
Sr. Lynn Rettinger
Daniel Dvinov
[email protected]
[email protected]
Sacred Heart Elementary School
325 Emerson St.
Sacred Heart Elementary School
Daniel Dvinov, Student Consultant
Daniel is a senior Computer Science major. He
will spend 10 weeks this Summer working in
Marshall Islands participating in the TGinGC
program.
Page 2 of 22
May 5, 2006
Sacred Heart Elementary School
Final Consulting Report
Student Consultant, Daniel Dvinov
Community Partner, Sr. Lynn Rettinger
I. About the Organization
Organization
Sacred Heart Elementary School is one of the institutions under the auspices of the Diocese of
Pittsburgh and is administrated by the Department of Catholic Schools. The school building is located
at 325 Emerson Street in the Shadyside area of Pittsburgh. The school's mission determines the
programs and the overall goal of the organization:
"The administration, faculty and staff of Sacred Heart School believe that the
primary purpose of Catholic Education is the formation of the intellect with the
sound foundation in the Catholic faith. Students learn through instruction and
example to participate fully in their faith and to participate in the life of the church
and civic community."
Sacred Heart Elementary was established in 1873, and currently provides education for about 500
students. The school employes about 40 staff members, including the administration staff, teachers,
specialists, and additional personnel, such as a nurse and a cafeteria manager.
Facilities
The organization is located in one two-story building with the basement, as well as auditorium
and gymnasium in the nearby buildings. The main and principal offices are located on the first floor,
along with the classrooms for grades K-4. Classrooms for grades 5-8 are located on the second floor,
where one would also find the computer lab, library, kitchenette, and two meeting rooms. The
building is rather spacious, and both floors have wide halls across them, from which all the classrooms
are accessed. There is no wired networking anywhere in the school, besides the computer lab, which is
the school's newest addition. The lab was made possible by a major joint effort of school staff and
many volunteers. There are 28 available workstations in the lab and an instructor station by the server.
The building is scheduled for rewiring this upcoming Summer.
Programs
As stated in the description of their program, SHES “provides the spiritual, academic, and
social dimensions of a formal Catholic education Children in preschool through grade eight enjoy
academic experiences based on sound educational principles consistent with the developmental stages
of each student.” The curriculum includes courses in science, mathematics, Spanish, humanities, as
well as art, music, and technical skills education.
All students from 2nd to 8th grade have a scheduled class in the lab once a week for the
development of their technical skills, with the exception of 6th graders, who have two classes per
week. Aside from these scheduled periods, teachers from other classes may take the students to the lab
if it's free during their regular class time in order to conduct some research, or use the text editor in
order to create some documents, or any other helpful resource. The lab reservation schedule is outside
the lab, so teachers can see when there is an opening. Also available are the lunch time slots for the lab
use. During the technical skills period, students learn how to use various software - starting with the
Sacred Heart Elementary School
Daniel Dvinov, Student Consultant
Page 3 of 22
May 5, 2006
2nd graders learning to use the keyboard, and finishing with the 8th graders working with the iMovie
software to work with the video media.
From the 2nd grade and on, students also use AppleWorks software. For example, they use
simple templates prepared by the teacher in order to create stories. From 2nd grade and on, students
also start using Inspiration software in order to create cycle diagrams.
The 3rd graders use Ultrakey software, which provides the keyboard drills, and StoryBook
software to make more complicated stories and even full books.
The 4th graders do the animal research using StoryBook, which allows creating an educational
presentation on the current research topic.
The 5th graders practice making a sample Technology Paper - they start off with a template of
an organized document with pictures, and text snippets.
The 6th graders use AppleWorks to work with the spreadsheets, and learn how to use the
formulas and similar things. SHES maintains several extra-curricular activities, such as their Summer
Digital Youth program, which develops the multimedia/presentation skills by learning to use the
iMovie software.
Math teachers for different class levels use Math24 software in order to practice math skills,
such as addition, multiplication, etc. with the students and get quick feedback in form of the printouts
of each student’s performance.
Staff
School maintains about 40 staff members, including the administration staff, teachers,
specialists, and additional personnel, such as a nurse and a custodians. Administration consists of two
secretaries, Mrs. Rodgers and Ms. Soisson. The two secretaries spend most of their time in the main
office coordinating daily events, contacting students parents if needed, using phone, fax and e-mail for
external communication with Diocese of Pittsburgh and any other organizations and people who are
related to SHES. Sr. Lynn Rettinger is the school's principal and is the chief administrator. She has a
laptop and mainly uses it for e-mail communication between herself as the school representative and
external entities, such as the Diocese of Pittsburgh.
Technical skills teacher, Mrs. Theresa Wood, is also an art teacher. She, along with Mr. Greg
Giardina, the 8th grade teacher, is one of the few staff members who feel comfortable around
technology and put a lot of effort in maintaining school's technology. Mrs. Wood maintains the
school's computer lab in which she teaches technical skills. Mr. Giardina uses computers and a
projector extensively in conducting his lessons for the 8th-graders. He has also learned to use the
SmartBoard and incorporated it into his set of tools for conducting lessons. Both of these teachers were
community partners with this class in both semesters of 2004.
SHES also benefits from the help of volunteers – Mr. Earl Price, and Mr. Ari Beedle. These people
have strong ties with the school as they are parents of the students/ex-students, and both of them have
contributed to the maintenance and development of school's technology. Mr. Price has been with the
school for quite a few years. He is at school approximately twice a week, and mainly assists in
technical support, such as installing new software. He played an active role in creating school's
network and dealing with administrator tasks, such as managing user accounts on the server. Mr.
Beedle is responsible for upgrading the school's web site.
When a more in-depth expertise is needed, school hires a contractor, Mr. Charles Firth. One of the
last projects Mr. Ferth worked on, was setting up and troubleshooting school's new server.
Sacred Heart Elementary School
Daniel Dvinov, Student Consultant
Page 4 of 22
May 5, 2006
Technical Environment
SHES has 23 classrooms, each of which has at least one computer, all of which are various
Apple models. The most modern machines are in the computer lab – there are 12 1GHz eMacs, and 16
iMacs, which are 400MHz and have 192MB RAM chips. The network is based on a newly installed
G4 server. Nearby library has around 6 more iMac machines. All Apple computers run Mac OS X
10.2.8.
All the machines in the lab have identical images for each of the grades, so that for example
everyone in the 3rd grade will have the same desktop when they log in, so that it's easier for the kids to
follow teacher's example if she is demonstrating the use of some software. There are shared folders for
different user groups, but students do not have rights to write on disk individually.
The lab is wired, while everywhere else the 802.11 airport wireless connection is used, with 6
access points throughout the building. Verizon DSL is school's ISP; the SonicWall Pro 100 provides
the connection. Network connectivity has been school's main technology problem throughout
network's existence, which is the primary reason for rewiring. Some parts of the building suffer from
bad signal, while all the users experience difficulties using the network because of the server
synchronization issues. General consensus is that the poor network connectivity results into many other
problems and inefficiencies within the school.
The new server seems to give better support of multiple simultaneous network users, but it still
occasionally does not provide adequate connection speed and sometimes crashes. There's a shared
space on the server for the faculty members, but they rarely use it because of the time it takes to
connect to the server. They mainly just use the Internet access and use the individual hard drives to
save their data, as opposed to using the server space.
The lab also has a projector, which is mainly used by Mrs. Wood when she needs the students
to follow her in learning how to use certain software. Mr. Giardina also uses the projector for his
classes. There's a third projector that is rarely used by anyone.
For the past couple of months Mr. Giardina has been practicing the use of the projector together
with the SmartBoard device, which is a whiteboard that allows capturing information written on it
using the electronic stylus on the computer. There are two additional SmartBoards in the school, and
they are not being used at the beginning of the consulting period.
The main office has a couple of iMacs, along with a fax machine, a copier, a typewriter, and a
printer. There is also an HP laser printer that is used on the network that is located in the lab. Some of
the classrooms also have black-and-white ink jet printers.
There are a couple PC computers located in the meeting room, which are used mainly for quick
text-processing/portable media needs. These machines have no Internet access and are rarely used.
Sr. Lynn uses a 500MHz iBook G4, which is now hosts the SchoolTools software installation,
described later in this document.
Technical Management
Technology management falls under the responsibilities of the principal, and she has several
staff members and volunteers to implement the current needs. Mrs. Wood assists in staff training, and
Mr. Price is responsible for maintenance and configuration of the network. Mostly Mr. Price and
sometimes Mrs. Wood install and update software on the machines and the server, update virus
definitions, and back up selected data. Mr. Giardina is knowledgeable about some of the devices the
Sacred Heart Elementary School
Daniel Dvinov, Student Consultant
Page 5 of 22
May 5, 2006
school owns, such as projectors and SmartBoards, so he can be a good reference for the use of this
technology. When serious issues with technology management arises, Mr. Ferth is contacted for
assistance.
Technology Planning
The school is required by the Diocese of Pittsburgh to have a five year plan that includes the
issue of technology development. The plan is basic and is developed by the Diocese with the
consideration of budget allocated to SHES. The SchoolTools software that is being required by the
Diocese was not on that plan.
Michael Killmeyer, who is a technology consultant for all schools governed by the Diocese, is
contacted by the school if needs arise, and allocates funds available to resolve the problems. Recently,
Mr. Killmeyer arranged an on-site SmartBoards workshop fot the SHES teachers.
Staff members, Mrs. Wood, Mrs. Giardina, and volunteers have some role in the immediate, more
concrete technology planning, such as equipping the computer lab. There's also a committee for
technology planning, of which Pr. Mertz is a member, that consists of faculty and parents who wish to
have an impact on technology development. They meet monthly, and discuss what needs to be done
technology wise. Their decisions included a new web site, a new server, wiring of the building
(planned for the upcoming Summer), and the technology budget planning, whichcomes mostly from
donations.
Internal and External Communication
SHES has a web site at http://www.sacredheartschool-pgh.org, hosted by Pair.com. Currently,
besides static information such as activities description, school history, and handbooks, the web site
has a calendar with school's main daily events, and also a cafeteria menu. It seems like this is a
relatively new feature, and it's not yet known how many people actually use the web site to find out
about current events. Mr. Beedle has taken responsibility of developing tje new web site with a more
modern layout and more useful calendar capabilities. This web site is currently in its development
stage. It is located at http://www.shes-pgh.org/shes and is hosted by TotalChoiceHosting.com.
Although the faculty members have email accounts, they do not use them very often, as logging
in currently takes a while because of the network connectivity. Most of the internal communication is
done either via physical contact, or is communicated through the office staff members. There are
monthly meetings with different groups of teachers (pre-school teachers meet separately from the 8th
grade teachers), which are intended to keep everyone on the same page regarding more global issues,
such as the planning of age-specific activities and concerns, for example, coordination of the
graduation procedures.
External communication happens via the main office, through the secretaries dealing with
phone calls, emails, and faxes. The AppleWorks-based database that runs on office machines contains
various contact information for the students and their parents, as well as the staff members, and anyone
who the school might need in general – for example the contractor workers.
Information Management
SHES current database has been around for many years, and appears to be very useful to the
office staff. Student progress information, such report cards, are distributed in the beginning of the year
Sacred Heart Elementary School
Daniel Dvinov, Student Consultant
Page 6 of 22
May 5, 2006
in the hard copy form to the teachers, who when the time comes fill them out and then give it to the
students. Thus, the teachers have student grades in their personal records, but there's no centralized
location for this data. Most of the staff uses their hard drives to store the data, although some do use
the shared space on the server. Students can not write to disk, so they either print the hard copies or
their school work is being saved by the faculty member.
II. Scope of Work
Task 1. Deploying the SchoolTools and Gradebook Software
• The Diocese of Pittsburgh requires SHES to install and use the software applications called
SchoolTools and Gradebook by River Valley Software (RVS). The SchoolTools application is
a database that allows for easy tracking of student attendance, contact, discipline, grading,
medical and other information common and necessary for the school office. SchoolTools also
enables the user to define the report card layouts and then easily print them out. Gradebook is a
web application that provides students, parents, and teachers access grading information online.
This application is integrated with SchoolTools, and thus allows teachers to work with class
rosters created in SchoolTools in order to define weighted assignment categories, grading
scales and assignments. Gradebook automatically calculates grades, allows for additional
comments for a reporting period, and lets students and parents review missing or upcoming
assignments, as well as midterm reports.
• SchoolTools and Gradebook software allows teachers to better organize information about
students, as well as creates new options for grading process and tracking students performance.
This meets SHES mission in that it makes it possible for the staff to focus on educating the
students while eliminating the busy work, and allows parents to closely track the progress of
students and specific problems they might have. Aside from the obvious benefits of having
quick and easy access to that kind of information, this should reduce the amount of
administrative work the staff members currently perform in order to create the report cards, and
hence, it should allow the staff to spend more time working with the students. This fits into the
school's mission to promote the formation of intellect in students by having them learn through
instruction and example to participate fully in their faith and to participate in the life of the
church and civic community.
• The software was developed for a Windows platform, and thus has to be run via Virtual PC on
Sr. Lynn's laptop, on which it was installed prior the student consultant involvement. Software
installation involves completion of the 10 steps, which consist of creating a database of
students/teachers, assigning teachers to certain subjects and grades, assigning homerooms and
entering other similar information. After completion of these steps, the data is exported and
sent to the RVS. User accounts are then created at RVS and are sent to the users. Also, the
Gradebook application then becomes available to the same users with the data from the
SchoolTools database. Therefore, consultant's approach consisted of assisting Sr. Lynn in
completion of the installation process, and then dealing with troubleshooting and making sure
the staff members are able to use the software. In the beginning of the consulting period, no
manual for SchoolTools and Gradebook was available that fits the technical skills of those who
will use the software in SHES. Consultant was planning on creating a manual for most common
tasks the users have to perform in order to use the software, as well as conducting workshops to
educate them on the use of the software, if needed.
•
Successful installation of the SchoolTools and export of the data lays a foundation for
successful use as well as assures that the correct data will be processed and used later. This
Sacred Heart Elementary School
Daniel Dvinov, Student Consultant
Page 7 of 22
May 5, 2006
•
•
step was measured by both the possibility of exporting the data (one can't export the data
until all the necessary fields are filled), as well as an OK from the software people upon
their receipt of the data.
Troubleshooting of the software assures that all the accounts are set up correctly and the
software is in fact providing the users with the promised features. This step was measured
by whether or not supplied login/password combination are working correctly, and seeing if
the users are able to enter/access the students' grades.
Making sure the staff and parents can use the software signifies an overall success of the
operation, marking a useful addition to the progress tracking process in SHES. This step is
measured by seeing if the staff members and parents are aware of the software capabilities
and are comfortable with using these features without assistance. A manual consisting of
summary of the common operations available to staff members is another measure success
in this step, in case if such manual proves necessary. The school administration needs to
organize a workshop with student parents to ensure that the parents are capable of using the
Gradebook in order to track their children's performance.
Task 2. Putting the Available SmartBoards to Use
• A few years ago, SHES has acquired three SmartBoard devices that could potentially be used to
provide a better education for students. SmartBoard is an interactive whiteboard developed by
Smart Technologies Inc. that allows capturing information written on it using the electronic
stylus on the computer.
• The use of these devices could potentially result into enhancing aspects such as
communication, information management, as well as providing better education for students
by dramatically increasing the level of interaction between teacher and students, as well as
creating new options in the context of lessons. Together, with potential new possibilities of
conducting lessons and methods of teaching will result into a better education for the SHES
students. This fits into the school's mission to promote the formation of intellect in students by
having them learn through instruction and example to participate fully in their faith and to
participate in the life of the church and civic community.
• Consultant’s approach consisted of finding out the capabilities of SmartBoards, learning to use
them together with the complimentary software, and then make sure the staff members were
comfortable using it.
•
Finding out the capabilities of SmartBoards involved reading the manual as well as the
information on the Smart Technology Inc. web site and coming up with possible uses of the
device in the SHES context. As a result of this step, the consultant gained knowledge of and
is now capable of explaining to others what the SmartBoards can be used for.
•
Learning to use the SmartBoard involved reading the manual and following the steps
described in the manual while practicing using the device. This step was measured by
consultant being able to use the device and the complimentary software in order to achieve
achieve the results from the previous step.
•
Making sure the staff members are comfortable using the SmartBoards and the
complimentary software marks the overall success of the project. Successful completion of
this step was measured by whether or not the staff was capable of using the basic features
of the device and create a sample lesson using the device together with the software. At the
beginning of the consulting period, Mr. Giardina, the 8th grade teacher, was the only teacher
actively using the SmartBoard to conduct lessons.
Sacred Heart Elementary School
Daniel Dvinov, Student Consultant
Page 8 of 22
May 5, 2006
III. Outcomes and Recommendations
Task 1. Deploying the SchoolTools and Gradebook Software
Task Review: The Diocese of Pittsburgh requires SHES to install and use the software
applications called SchoolTools and Gradebook by River Valley Software (RVS).
Outcome #1: SchoolTools is successfully installed and is ready to use.
SchoolTools was installed on principal's machine by Mr. Price, technical support volunteer.
Virtual PC application was also installed on the same machine in order to be able to
access the application. Mr. Price together with the consultant then assisted the community
partner in figuring out what data needs to be entered into the SchoolTools database, and the
mechanics of entering, saving, reviewing and printing out the data. All necessary information
was successfully entered by the school principal, with some assistance from teachers in cases
when the information required was class-specific, such as which teacher has what students in
their homeroom. The data was then exported to RVS, and the Gradebook is now accessible for
the newly created accounts.
The administration staff is now able to run SchoolTools on principal's machine. The software
allows reviewing and modifying the information entered and works properly in every respect.
Accounts for administration staff, teachers, and students were created for them to be able to
access the Gradebook web application. The passwords have been e-mailed to the account
owners and those with the enabled accounts are able to login into their Gradebook accounts
successfully.
Before this, the software was not fully installed, as the installation process is complete only
when all required data is entered into the SchoolTools database. Consequently, the Gradebook
web application was not accessible for the SHES users, as the data from SchoolTools was not
exported on the web, and no user accounts were created.
Installing the SchoolTools software on the SHES equipment is essential for the users to run the
software and learn how to use it, the process discussed below. Installation of SchoolTools took
a lot of effort as it required both learning how to use the software to enter information, and
entering large amount of data. It is then considered an outcome in itself, since it is a substantial
part of the effort to deploy the SchoolTools software in SHES.
This outcome can be sustained by the staff maintaining the SchoolTools installation on
principal's machine and by the RVS server being reliable and accessible for the SHES users.
Failure to maintain the SchoolTools will result into a loss of the database and not being able to
update the information for the Gradebook. The principal and the office staff were given the
administrator rights in both SchoolTools and Gradebook, which allows them to update the
SchoolTools database as well as coordinate the data contained in these applications. Currently,
the principal is the only person who is able to do perform these operations, and the other staff
still needs to learn these skills, as this knowledge is crucial to sustainability of this outcome.
Sacred Heart Elementary School
Daniel Dvinov, Student Consultant
Page 9 of 22
May 5, 2006
Installing SchoolTools, along with entering the correct data into its database is necessary for
the possibility of future successful use of this software in order to achieve better management
of student grades and attendance. Thus, successful installation upholds the vision of
technology supporting the school’s mission.
Outcome #2: SHES administration staff is comfortable using both SchoolTools and Gradebook
applications and teachers are comfortable using the Gradebook.
The SchoolTools application is only installed on principal's machine, and is meant to serve as
database for SHES teachers and students. It is also the backbone of the Gradebook application,
as the data entered in SchoolTools gets exported to Gradebook. While it's possible to assign
grades in SchoolTools, the web base Gradebook is far more convenient for teachers, as it gives
them capabilities of creating the assignments, grading scales and grade reports. Although it is
possible to make special notes about attendance in Gradebook, SchoolTools has a convenient
way of doing that. Thus, it is logical to have the administration staff be comfortable with using
both applications, while it is sufficient for the teachers to only master the Gradebook.
Once familiar with using both applications, consultant explained and demonstrated to the
community partner how to use their main features, such as entering student grades. Community
partner learned how to export the data from SchoolTools and then import the changes into the
Gradebook application in order to coordinate the applications and reflect in Gradebook the
modifications done in SchoolTools. Community partner was able to make progress in learning
more complex features of Gradebook on her own.
By the end of the consulting term, the teachers of SHES were not comfortable using the
Gradebook application. As the reference manual helping those like teachers at SHES to learn
how to use the software is still not finished, there was no easy way of educating the teachers on
the use of Gradebook. Schedule constraints together with another consulting task, also
requiring teachers' time, prevented the possibility of having a workshop with the teachers.
The rest of the administration staff is likewise yet to learn how to use SchoolTools and
Gradebook. The grades are issued by the teachers, who hand-write them on the report cards,
created by the staff members using the typewriter in the beginning of the year.
Although the teachers have not undergone training in using Gradebook, it is likely that the
process will be fairly quick and easy. Both SchoolTools and Gradebook applications are quite
intuitive, which the community partner affirmed by being able to make quick progress in
learning how to use them. Once the teacher is logged into their Gradebook account, operating
becomes rather self-explanatory. They have links available to view student grades, create and
grade the assignments, create their grading schemes etc. Together with the fact that the manual
for users like SHES teachers is being created by the software manufacturer, such intuitive
structure of the software lead the consultant to disregard prior plans on creating a basic
reference guide for Gradebook users.
Once this outcome will be achieved, SHES can start using the SchoolTools and Gradebook
applications to manage student grades. This will allow the staff to better organize information
about students, as well as create new options for grading process and tracking student
performance. Such results meet the school’s mission in that they allow the staff to focus on
educating the students while eliminating the busy work. Using Gradebook will also allow
Sacred Heart Elementary School
Daniel Dvinov, Student Consultant
Page 10 of 22
May 5, 2006
parents to more closely track the progress of students and address the specific problems they
might have.
This outcome can be sustained by the administration staff being able to update the information
in SchoolTools and then send the data to the RVS server, so that the Gradebook information is
also updated. If this does not happen, the application will become unusable as the database will
be outdated. Teachers need to learn how to efficiently use the software for the purposes of
managing student grades and attendance, and parents need to learn how to use the Gradebook
application to track their children's performance. Otherwise, the SchoolTools and Gradebook
will not prove useful for the SHES.
Deployment of the SchoolTools software together with the Gradebook application allows using
computers and the Internet to better manage and keep track student grades and attendance.
With these evident benefits, the outcome upholds the vision of technology supporting the
school’s mission.
Task 2. Putting the Available SmartBoards to Use
Task Review: SHES possesses three SmartBoard devices. At the beginning of the consulting
period, only one of which was being used for the educational purposes by a single teacher.
Outcome #1: Teachers are comfortable using the SmartBoards and the complimentary
SmartTools software.
Once familiar with using both SmartBoard and SmartTools software, consultant explained and
demonstrated to the community partner how to set up the SmartBoard and the projector, so that
one may use the device with the SmartTools software. Consultant conducted workshops for two
staff members and the community partner for demonstrating the usage of main features of both
the device and the complimentary software. As the community partner developed live interest
in making use of the available SmartBoards, Diocese of Pittsburgh allocated funds for an onsite training session on using the devices.
Due to the schedule constraints, the majority of SHES teachers are not yet comfortable using
the SmartBoards and the complimentary SmartTools software. The community partner
however, is able to set up the device and the projector and knows how to use the SmartTools
software to create a sample presentation-like lesson. A reference guide was created by
consultant, containing the description of the steps necessary to set up the device with the
projector, designed specifically for the SHES hardware. This guide also contains helpful
illustrations, as well as useful information on creating a sample lesson using the complimentary
software and some of its other features.
Mastering the use of SmartBoards creates new options for the staff to conduct their lessons,
organize learning materials, and distribute class notes. These new capabilities enhance the
process of education, and consequently, this outcome meets the school’s mission in that it
provides for better instruction of the students.
This outcome can be sustained by the staff being able to maintain the SmartBoards,
which otherwise will not be in usable condition. Another condition crucial to the outcome
Sacred Heart Elementary School
Daniel Dvinov, Student Consultant
Page 11 of 22
May 5, 2006
sustainability is the teachers being able to find good ways of using the SmartBoards in
conducting their lessons. If this condition remains unmet, the teachers will not have the need
of to incorporate the SmartBoards in their teaching routine, and will waste their time learning to
operate the SmartBoards and the complimentary software.
This outcome allows the use of SmartBoard devices and computers to increase the options of
educating the students. Teachers are likely to find the SmartBoards helping them to present
more in-depth educational materials to the students, as well as save time on planning the
lessons. Similarly, the teachers are likely to find the SmartBoards enhancing the interaction
level between themselves and the students, which helps the students to absorb the material
better. Such benefits of this outcome uphold the vision of technology supporting SHES
mission.
Recommendation 1. Incorporate the record keeping associated with the
current database into the SchoolTools database.
Currently, SHES relies on a database developed using the AppleWorks application, created
over 14 years ago. The database runs on an office Apple machine, is used by the office staff,
and contains records about students, staff members, and other people the school might need to
contact. A record in this database contains over 20 fields, which are not necessarily all
applicable to a given entry, depending on its type. As the first consulting task is deploying the
SchoolTools software, it is now the case that the school needs to essentially maintain two
databases with similar types of information, since the SchoolTools requires storing a subset of
the data stored in current database.
Consequently, the school now has two different places to store the same data. For example,
student’s records in current database and SchoolTools will both include name, address,
emergency contact information, classes taken, homeroom, etc. Similarly, teacher’s records will
both contain name, address, classes taught, etc. Maintaining two databases results into a
coordination issue, as well as repetitive task of updating both current database and the data in
SchoolTools. SchoolTools database leaves room for possibility of entering any nonstandardized information in a record. That way, if a field in the current database is not reflected
in SchoolTools, it can be added under additional information, and a code system used for the
current database for this field may be reused. Searching the SchoolTools database appears to be
fairly intuitive and rather similar to the way the current database is used for lookups, aside from
the difference in the interface. Thus, using the SchoolTools for the same purposes the current
database is used provides for more efficient use of office staff time while avoiding the double
entry, as well as eliminates possible issues of coordination of data between the two databases.
In order to successfully start using the SchoolTools software, as the database several steps need
to be completed. The staff needs to undergo training in order to learn how to use the database
efficiently. Any changes that the switch might cause in the process of using the database, (i.e.
people who enter or lookup information, time and place in which they do it) have to be
discussed. Finally, the staff needs to replicate the current database in SchoolTools.
Technical support at the River Valley Software, SchoolTools manufacturer, will be helpful in
implementing this recommendation as they presumably should be able to help with finding the
ways of storing the necessary information in SchoolTools if there are issues. The soon-to-come
Sacred Heart Elementary School
Daniel Dvinov, Student Consultant
Page 12 of 22
May 5, 2006
user's manual from RVS will also be helpful for the staff member, since it should contain this
information as well.
Recommendation 2. Creating a schedule for the use of SmartBoards
and projectors, as well as collection of good ways the SmartBoards may
be used.
The second consulting test, putting the available SmartBoard devices to use, creates an issue of
availability of the devices and other hardware necessary for their use. In addition, in order to
ensure sustainability of the SmartBoard usage, as well as fully extract all the benefits it brings,
the staff needs to know what the devices can do for them in terms of enhancing the teaching
process.
Using the SmartBoards during the lessons creates more options for teachers to organize and
present the learning materials, as well as distribute the class notes and conducting lessons in
general. This supports the the school’s mission in providing better instruction to its students.
The schedule of availability will help teachers to plan their uses of the devices. Good ways of
using the SmartBoards, as well as helpful lesson templates any other useful material could be
recorded and organized into a collection accessible for teachers. Such collection of records
describing the good uses of the SmartBoards will help teachers exchange their experiences,
quickly learn from other teachers' experience, and avoid common pitfalls.
Given the advantages of using SmartBoards and limited availability of the devices and
projectors, conflicts between the teachers willing to use this technology may arise. Thus, a
schedule should be created based on the priorities given to certain classes and teachers and their
class schedules. This will allow the teachers who are planning on using the devices need to
work out the schedule between them accordingly. Good ways of using the SmartBoards may be
recorded using simple text files and SmartTools Notebook files, and stored on a server in a
folder that is shared, which is accessible to all the teachers with read/write rights. They then can
put documents in that folder describing their experiences as well as entire sample lessons
composed using the Notebook application.
Teachers are going to act as resources themselves in this recommendation. In addition, the
manufacturer, Smart Technologies Inc., maintains a web site containing various training
materials, found at http://www.smarttech.com/trainingcenter/ . These materials range from web
tutorials, to on-line computer and phone conferences, and even a possibility of requesting an
on-site training session.
About the Consultant
Daniel Dvinov is a senior in Computer Science with a minor in Mathematical Science at Carnegie
Mellon University. He will be taking part in the Technology Consulting in the Global Community
internship over the summer in Marshall Islands.
Sacred Heart Elementary School
Daniel Dvinov, Student Consultant
Page 13 of 22
May 5, 2006
Appendix A.
This appendix includes a reference guide for setting up and using the SmartBoard devices
created by the consultant for the SHES users. Note: the page numbers in the table of context are with
respect to the guide itself, and not this report.
Making Setting Up and Using the
SmartBoard Easier
Image source: www.videocentric.co.uk
Sacred Heart Elementary School
Daniel Dvinov, Student Consultant
Page 14 of 22
May 5, 2006
Quick Reference Guide For Sacred Heart
Elementary School Users
by Daniel Dvinov
Table of Contents
Setting Up the Projector, SmartBoard ............................................................................................. 3-5
Getting Ready To Use the SmartBoard............................................................................................... 6
Running Orient...................................................................................................................................... 6
Running Notebook ................................................................................................................................. 6
Working With Notebook – Creating Text ........................................................................................... 6
Working With Notebook – Inserting New Page ...............................................................................6-7
Working With Notebook – Inserting Shapes .......................................................................................7
Working With Notebook – Modifying a Page ..................................................................................... 7
Working With Notebook – Using Eraser, Pen, Highlighter.............................................................. 7
Working With Notebook – Deleting a Page, Turning Pages.............................................................. 7
Working With Notebook – Saving Your Lesson................................................................................ 7
Working With Notebook – Full Screen View...................................................................................... 7
Working With Notebook – Using a Shade .......................................................................................... 8
Working With Notebook – Printing Your Lesson .............................................................................. 8
Working With Notebook - Using Clip Art .......................................................................................... 8
Working With Notebook - Using Templates ....................................................................................... 8
Using SmartBoard Capabilities ............................................................................................................ 8
Running Keyboard.............................................................................................................................. 8-9
Capturing Screen ...............................................................................................................................….9
Using Spotlight ....................................................................................................................................... 9
Using Recorder....................................................................................................................................... 9
Sacred Heart Elementary School
Daniel Dvinov, Student Consultant
Page 15 of 22
May 5, 2006
2
Setting Up the Projector, SmartBoard
There are a few steps involved in the setup of the equipment before one may use the SmartBoard.
Obtain a working computer (turned on, running an OS) with the video output. We need the
computer to run the software to operate the SmartBoard, and we need it to have a video output in
order to be able to display the information on the screen using the projector. This might remind you
of the way they project the movie tape on the screen in the movie theater. You should use a regular
blue iMac, or an eMac, or an iBook laptop.
Obtain and position the SmartBoard somewhere in front of where your projector is going to be
positioned. It is recommended that the distance from the projector would be around 2-5 yards, and
that the projector will be located roughly in the middle of the board. You are limited by the length
of the USB cable that is the only cable coming out of the SmartBoard – that cord has to go into a
USB port on your computer.
Illustration 1: USB cable connecting
the SmartBoard and the USB port on
your computer
Illustration 2: Wait for the light on
the SmartBoard to turn green
Plug in the USB cable from the SmartBoard into a USB port on your computer as shown in
Illustration 1. The light on the SmartBoard, pictured on Illustration 2 will begin to flash and
eventually will turn green. This means that the SmartBoard is now synchronized with your
computer, which is necessary in order to use the software on your computer successfully. In this
case, you are using the USB port to connect another device, SmartBoard, to your computer, similar
to the way you connect an external disk drive.
Illustration 4: The O-l toggle next
to the power cord is is turned in "l"
position
Sacred Heart Elementary School
Daniel Dvinov, Student Consultant
Illustration 3: Push the On/Stand By
button with the green dot in the
middle
Page 16 of 22
May 5, 2006
3
Obtain a projector, and turn it on by plugging it into the power outlet with a cord
(usually found in the projector case) and toggling a “O- l” switch in the back so it's in the “l”
position as is shown in Illustration 3. Next, turn the projector on by pushing an “on” button on
top of the projector, as depicted in Illustration 4. The projector is necessary so that we can
project the information from the screen on the computer to the board.
Illustration 5: Video cord to
connect the projector with your
Illustration 6: Plug the video cord
computer
into Computer 1 slot on the projector
Connect the projector with the computer by plugging the video cord (usually found in the
projector case, see Illustration 5) into the blue slot on the back of the computer labeled
“Computer 1,” (see Illustration 6) and plugging the other end of the cord into the blue video
output slot on the back of the computer. We need to connect the projector with the computer, so
that we can project the information from the screen onto the board. We than need to push the
“Computer 1” button on top of the projector (see Illustration 7) so that it knows on what port
the information is coming. Do not worry about all the other inputs and buttons on your
projector for now – this is all you need to successfully operate it for our purposes. Do not forget
to remove the lid from the lens of the projector (see Illustration 8).
Illustration 7: After pushing the
"Computer 1" button, the light
above it should turn green
Illustration 8: Remove the lid at the
front of the projector
Note: Skip this step unless you are working with an iBook computer.
If you are working with an iBook, you need to obtain a connector that plugs in to the video
output slot, which is the closest one to you on the left side of your laptop. This connector is
usually found attached to the end of the video cord that is plugged into the projector used in the
computer lab, and is shown in Illustration 9. Connect the video cord into the bigger end of the
connector, as shown in Illustration 10, and plug the smaller end of the connector into the video
output slot on your laptop, shown in Illustration 11.
Sacred Heart Elementary School
Daniel Dvinov, Student Consultant
Page 17 of 22
May 5, 2006
4
We need the connector, because the video output in the iBook does not match the cord that we
Illustration 9: Connector for the
iBook video output
Illustration 10: Plug the video cord
into the bigger end of the connector
have for the projector.
Illustration 11: Plug the smaller end of the connector into the video output slot on your
laptop
Using the focus ring around the lens of the projector and the calibration toggle on top of the
projector align the projected image on the SmartBoard. Make sure to leave about 1cm of white
space on the border of the image. This needs to be done in order to successfully see everything that
you want to project.
Sacred Heart Elementary School
Daniel Dvinov, Student Consultant
Page 18 of 22
May 5, 2006
5
Getting Ready To Use the SmartBoard
After the projector has been set up, the board has been plugged into a USB port on your
computer and the light on the board is steady green, the SmartBoard needs to be calibrated. Say, we
were to pick up a SmartBoard marker and put a dot in the left top corner of the board - the computer
needs to know that this in fact is a left top corner and that the mark needs to appear in the left top
corner on your screen, as opposed to any other location. Note, that depending on the setup of the
projector and the size of the image, your projected computer screen can take up a whole SmartBoard
area, or only a portion of it.
Running Orient
In order for the software to know the size of the image, the Orient program of the SmartTools
needs to be run every time you begin working with the SmartBoard. So, after everything is plugged in,
and the light indicator on the SmartBoard is steady green, click on SmartTools on your dock menu and
choose Orient. The instructions on the screen/SmartBoard should very clearly state what needs to be
done next: you are to pick up any of the four SmartBoard markers and put a dot on the SmartBoard in
the middle of the red target. This needs to be repeated 9 times (left top, left middle, left bottom, middle
top, etc.), and the board is ready to use. Running Orient should not take more than half a minute or so.
Note: If for some reason, the Open Orient tab on the SmartTools menu is grey and you are unable to
run it, unplug the SmartBoard and plug it back in. If this doesn't help, unplugging the SmartBoard and
quitting the SmartTools, and then plugging the SmartBoard in again, and running the SmartTools.
Running Notebook
Perhaps the most useful tool among the SmartTools applications is the Notebook program. This
application allows one to create a PowerPoint-like presentation, which could very well serve as a
lesson. In this lesson the SmartBoard capabilities can prove very useful for the teacher-class
interaction. To open Notebook, click on the SmartNotebook icon on your dock, or choose Open
Notebook from the SmartTools menu. A Word-like application window should pop up. As the
application opens, the first page of your presentation is already inserted for you. Now, create your
lesson the way you like.
Working With Notebook – Creating Text
The first step might be naming your lesson, let's say "Lesson 1." In order to do that, click an
"abc" button from the lower row of the top menu, and then click in the slide wherever it is you would
like the name to go - let's say in the middle. You may then proceed typing "Lesson 1," and use the
buttons to the left of the "abc" in order to change the font, size, boldness, color, or any other available
standard text attribute.
Working With Notebook – Inserting New Page
Once your lesson name is in place, you may proceed with creating a new slide. In the top row
of the top menu click Insert Blank Page button - the one with a white sheet of paper and a yellow plus
sign. Note, that if you are unsure what a certain button on the menu does, or are looking for a certain
button, you may roll the mouse over any button, and its name will pop up underneath. Once you added
the next page, you may proceed to modify it according to your lesson plan.
If you take a look at the right, you should see a bar with two pages, with the blue rectangle
Sacred Heart Elementary School
Daniel Dvinov, Student Consultant
Page 19 of 22
May 5, 2006
6
being on the lower page, indicating that this is the page you are currently working with. Also , the top
of the bar should say "Page 2 of 2," also indicating where you are in your lesson. Note, that at any
time, you may go back and forth between the pages of your presentation by simply clicking the page
you would like to work on.
Working With Notebook – Inserting Shapes
Now, let's say you need to insert some geometric shapes on your page. From the lower row of
the top menu, select the shape you need under the Shapes menu. You may then select the color and the
size of the shape line similar to the way you select these attributes for a text. Let's say, you would like
to have a rectangle on your page. After selecting a rectangle from the Shapes menu, simply click on the
place in the page where you want the rectangle to be, and create one by moving the mouse while it is
still clicked. You may add as many shapes as you like, and add text as needed.
Working With Notebook – Modifying a Page
If you made a mistake and would like to redraw the shape, you may press the Undo button from
the top row of the top menu. In case you need to move the shape or multiple shapes over, you may
click on the Select button, the leftmost button of the lower row on the top menu. Then, use the mouse
to select the shapes you would like to move, and simply drag them wherever you like. Note, that you
may do this with any object on your page, including text, numbers, or groups of shapes.
Working With Notebook – Using Eraser, Pen, Highlighter
In order to use the eraser, select the Eraser button from the lower row of the top menu and
simply click and drag the mouse over the part you wish to erase. To use a pen or highlighter, click the
respective Pen or Highlighter buttons to the left of the Eraser button. Note, that you are free to change
the color and the thickness of the pen or highlighter.
Working With Notebook – Deleting a Page, Turning Pages
In case you wish to delete a page from your presentation, select the page from the bar on the
right, and then proceed by clicking the Delete Page button from the top menu, located to the left of the
Insert Blank Page button. To go from page to page in your presentation, you may use either the bar on
the right, or Previous Page and Next Page buttons located on the top row of the top menu.
Working With Notebook – Saving Your Lesson
In order to save your lesson, click on the Save Document button located on the left of the top
row of the top menu. You may then choose a name for your lesson and a location to which you would
like it to be saved.
Working With Notebook – Full Screen View
When you conduct a lesson you have created before, you might choose to use a full screen view
mode, such that the image is bigger on the SmartBoard, and the students can not see the pages bar on
the right. In order to do that, click the Full Screen button, the rightmost button on the top row of the top
menu. Your image will switch to a full screen mode, and a small menu will pop up above the image.
You may use this three buttons available to move from page to page in your presentation, as well as
quit the full screen mode.
Sacred Heart Elementary School
Daniel Dvinov, Student Consultant
Page 20 of 22
May 5, 2006
7
Working With Notebook – Using a Shade
If you wish to cover the pages or parts of pages in your presentation, click the Show/Hide
Screen Shade button located to the left of the Full Screen button. Upon switching to a new page, click
the arrow on the shade and drag it down as far as you need. This feature is useful if you are asking the
students questions and do not want them to see the answer right away.
Working With Notebook – Printing Your Lesson
At any time, before, during, or after your lesson, you may print all or some pages by clicking
Print button on the top menu.
Working With Notebook - Using Clip Art
It might be useful for your lesson to have a clip art to work with. A clip art is essentially an
image of your choice, which may be put on a page. The Notebook comes with several clip arts, which
are split into categories, such as Culture, Ecology, Flags, etc. Most of the clip arts are the images that
might prove to be useful in teaching certain subjects. For example, the Math clip arts include graphical
representation of ways of calculating area of various shapes, examples of different angles, and many
more useful material. In order to insert a clip art in your page, go to Insert in the top menu, select Clip
Art, and then choose the clip art you would like to insert.
Working With Notebook - Using Templates
Another useful feature that comes with the Notebook, is the page templates. In this context, a
template is a ready page that you might choose to use in your lesson. Like Clip Art, templates are also
split into several categories, such as Arts, Geography, History, etc. For example, the Geography
templates include a map of the outline of the U.S. This template could prove useful if you need to call
students to the SmartBoard and quiz them by having them write in the state names on the map. In order
to insert a template in your page, go to Insert in the top menu, select Browse for Page Template, and
then choose the template you would like to insert.
Using SmartBoard Capabilities
All this, can be done from your computer terminal, and you do not need to be physically next to
the SmartBoard to perform any of these actions. However, to fully utilize the SmartBoard capabilities
and to have a more interactive, lesson, you may choose to create a lesson, or modify an already created
lesson by standing next the the SmartBoard as if it were a regular white board. Note, that you may
click any buttons, perform any drawing or typing by simply tapping the SmartBoard, or picking up a
marker and writing on it.
To write on the SmartBoard, you can just pick up any marker and do it as if it were a regular
white board. Select Open Floating Tools from the SmartTools menu. In the menu that pops up, select
the tool you would like to use (pen, highlighter, shape, eraser), then select the color and size. The by
either using a marker, or just your finger, proceed by creating a shape. You may also use select tool the
same way you could use it from your computer terminal - simply select the shapes you need to relocate
on the SmartBoard, and then drag them to wherever you like.
Running Keyboard
In case you would like the typed text to appear on the SmartBoard, but do not want to go to
your terminal, you may select Open Keyboard from the SmartTools menu. Then, click the "abc" button
from the top menu and click at the spot in your page where you would like the typed text to
Sacred Heart Elementary School
Daniel Dvinov, Student Consultant
Page 21 of 22
May 5, 2006
8
appear. Then, by tapping on the pop up keyboard type what you need.
Capturing Screen
At any time while working with the SmartBoard, you may save current screenshot for further
reference or in order to print out and distribute it to the students. Select Capture Screen from the
SmartTools menu, and then select Capture Full Screen to save the full screen or Capture Selected Area
and use your mouse in order to save selected area of the screen. A screenshot will then appear as a new
page of your presentation in the pages bar on the right.
Using Spotlight
While conducting a lesson, you may choose to have the audience focus on particular part of the
screen. In order to do that, select Open Spotlight from the SmartTools menu. You may change the
shape and transparency of the spotlight by clicking the pop up menu button next to a flashlight picture,
and then selecting the attributes you need. To exit the spotlight mode, press Menu and Exit.
Using Recorder
Recorder is perhaps the most advanced application of the SmartTools and is unlikely to be used
frequently. This program allows one to record everything that is happening on the screen, and save the
result into a movie file. This may be useful in cases when you need the students to repeat some actions
you perform on your computer – for example, going to a certain web site. Note, that the resulting files
are of a considerably bigger size compared to say, Notebook lessons.
Sacred Heart Elementary School
Daniel Dvinov, Student Consultant
Page 22 of 22
May 5, 2006
Past Community Partners
4 Kids Early Learning Centers
Addison Behavioral Care, Inc.
Alafia Cultural Services
Alcoa Collaborative
Allegheny Co. Housing Authority
Allegheny General Hospital Pastoral Staff
American Association of University Women
Animal Friends, Inc.
ASSET, Inc.
ASTEP-Grace Memorial Presbyterian Church
Auberle
Auberle In-Home Services
Bedford Hope Center – Resident Council
Bedford Initiatives
Bethany House Ministry
Bishop Boyle Center
Bloomfield-Garfield Corporation
Borough of Crafton
Boys & Girls of Wilkinsburg
Braddock Carnegie Library & Community Center
Brashear Association, Inc.
Breachmenders
BTC Center
CADA-Citizens to Abolish Domestic Apartheid
Career and Workforce Development Center East
Carnegie LIbrary of Homestead
Carnegie Library of Pittsburgh
Carnegie Science Center – Hill House
Association
CART-Consumer Action Response Team
Center Avenue YMCA
Center Avenue YMCA, Allequippa Terrace
Center for Creative Play
Center for Hearing and Deaf Services, Inc.
Center of Life
Central Academy
Central New Development Corporation
Children Youth Ministry
Children's Museum
Christian Life Skills
Community Day
Community Day School
Community Human Services Corporation
Community Technical Assistance Center
Competitive Employment Opportunities
Conflict Resolution Center International
CONTACT Pittsburgh
CTAC-Community Technical Assistance Center
East End Cooperative Ministries
East End Neighborhood Employment Center
East End Neighborhood Forum
East Liberty Development
East Liberty Presbyterian Church
East Side Community Collaborative
Eastminster Child Care Center
Eastside Neighborhood Employment Center
Education Center
Every Child, Inc.
Fair Housing Partnership
Faison Development & Opportunities Center
FAME
Family Services of Western PA
First Charities/First United Methodist Church
Friendship Development Association
Garfield Jubilee Association, Inc.
Gateway to the Arts
Glen Hazel Family Reading Center
Greater Pittsburgh Community Food Bank
Greater Pittsburgh Literacy Council
Greenfield Senior Center
Gwen’s Girls
Hazelwood Senior Center
Hazelwood YMCA
Hill House Association
Hill House Association – After School Program
Hill/Oakland Workforce Collaborative
Hope Academy of Music and the Arts
Hosanna House
Housing Alliance of Pennsylvania
Hunger Services Network
Jane Holmes Residence
Jewish Family & Children’s Service
Jewish Residential Services
Joy-Full-Gospel Fellowship After School Program
Just Harvest
Kingsley Association
Lawrenceville Development Corporation
League of Young Voters
Light of Life Family Assistance Program
Madison Elementary School
Manchester Academic Charter School
McKees Rocks Terrace
McKeesport Collaborative
McKelvy Elementary School
Methodist Union of Social Agencies
Miller Elementary School, Principal's Office
Mon Valley Initiative
Mon Valley Providers Council
Mon Valley Resources Unlimited
Mon Valley Unemployment Committee
Mon Yough Community Services
Mount Ararat Community Activities Center
NAACP National Voter Fund
NAMI Southwestern Pennsylvania
National Association of Minority Contractors /
Black Contractors Association
Negro Educational Emergency Drive
New Beginnings Learning Center
New Penley Place
Northside Coalition for Fair Housing
Northside Institutional Children Youth Ministry
Northside Leadership Conference
Northview Heights Family Support Center
OASIS Senior Center
Opera Theater of Pittsburgh
Operation Better Block
Orr Compassionate Care Center
Outreach Teen & Family Services
Parental Stress Center
Pennsylvania Biodiversity Partnership
(This list is continued on the next page…)
Past Community Partners (continued)
Pennsylvania Low Income Housing Coalition
People’s Oakland
Pittsburgh Action Against Rape
Pittsburgh Citizens’ Police Review Board
Pittsburgh Health Corps
Pittsburgh Mediation Center
Pittsburgh Social Venture Partners
Pittsburgh Vision Services
Pittsburgh Voyager
POISE Foundation
Program for Health Care to Underserved
Populations
Providence Family Support Center
Radio Information Service
Reading Is Fundamental Pittsburgh
Regional Coalition of Community Builders
River Valley School
Rodef Shalom
Rodman Street Missionary Baptist Church
Ronald McDonald House Charities of Pittsburgh
Rosedale Block Cluster
Rx Council of Western PA
Sacred Heart Elementary School
Salvation Army Family Crisis Center
Schenley Heights Community Development
Center
Second East Hills Social Services Center
Sharry Everett Scholarship Fund
Southwest Pennsylvania Area Health
St. James School
St. Stephen Elementary School
Sustainable Pittsburgh
The Community House
The HUB Downtown Street Outreach Center
Thomas Merton Center
Three Rivers Center for Independent Living
Three Rivers Youth
TLC-USA
Turtle Creek Valley Council of Governments
Tzu Chi Wen Chinese School
Union Project
United Cerebral Palsy
Urban League of Pittsburgh
Urban Youth Action
Ursuline Services
Vintage Senior Center
Weed & Seed Program, Mayor's Office
Wesley Center
West Pittsburgh Partnership
Wireless Neighborhoods
Women's Enterprise Center
Working Order
YMCA McKeesport
YMCA Senior AIDE Center
Youth Fair Chance
YouthBuild
YWCA Bridge Housing
YWCA of McKeesport
Community Partner Information FAQ
(continued from back cover)
7. What does it cost to be a Community Partner?
The cost for participating in this experience is your time and your commitment to follow through as agreed. As leaders of
community organizations, we know your time is of premium value. Those who have made this investment of time have
reaped returns many times over.
8. What does the Community Partner have to offer Carnegie Mellon
students?
•
•
•
•
•
Students learn to structure unstructured problems. Community organizations are complex environments with complex
problems. Your organization provides excellent environments in which to practice the art of structuring problems.
Students come from different cultural backgrounds and most have never been in a nonprofit organization. They are
practicing how to communicate across cultural differences and across technical knowledge differences. They need to
be able to make mistakes and learn from them. Community partners provide a supportive relationship in which students
can take risks and learn about how to communicate, how to relate, and how to maintain professionalism.
Students get the opportunity to practice process consulting. They are learning that expertise is only as valuable as the
ability to help others solve authentic problems. You provide a context in which students can practice these skills.
We've found that Community Partners are very appreciative for the students' assistance. There is nothing more
rewarding than to experience your efforts as valuable and rewarding for others. You provide that experience for
students.
Finally, you offer a glimpse into career opportunities in the nonprofit arena. Students learn to appreciate those who
work in the nonprofit sector, and they grow to appreciate the role and function of community organizations. We hope
this appreciation not only informs the choices they make in life, but also encourages them to care and give back to the
community throughout their professional careers.
9. How do I become a Community Partner
Contact an instructor, Joe Mertz or Scott McElfresh. Send your contact
information: name, title, name of organization, address, phone, fax, location of
organization and your interest in being a Community Partner. You will have a
telephone conversation and possibly an on-site visit. All organizations are
considered, though preference is given to organizations providing services to a
low-income community or a community at risk for falling into the "digital
divide."
Send email to
[email protected]
(email preferred)
Or call
Joe Mertz: 412.268.2540
Scott McElfresh: 412.268.4859
10. Caveats
•
•
•
We do our best to ensure that students who sign-up for the class are committed to completing the class, however,
occasionally, a student ends up withdrawing from the class during the semester. Typically, this happens when a student
has under estimated the time they need for this class. We do our best to advise students so this does not happen. When
it does happen, there is nothing we can do except to invite the Community Partner to participate in the following
semester.
The semester is short and the student has to do a lot of work in a short amount of time. For this reason, it is critical that
you keep your scheduled appointments, do the work you agree to do, and maintain communication with the student.
The student will need your feedback on reports quickly, often the next day. When we get to the final consulting reports,
we will need fast turnaround time from Community Partners because we also need to get the reports published in time
for the Community Technology Forum.
If there is any chance that you think you will not be able to follow through with the requirements of this partnership,
please wait until such time as when you are able to do it. Since the Community Partner is the focus for the student's
learning, it is essential that the partnership be sustained for the semester.
Community Partner Information FAQ
1. What is the goal of the partnership in this course?
The goal of this class is to expand the capacity of the Community Partner to use, plan for, and manage technology,
administratively and programmatically. The student is learning process consulting, project management, communication,
relationship management, problem identification, and analysis.
2. As a Community Partner, what can I expect to happen?
Once you match with a student consultant, you will set a meeting schedule that you and the student will keep for the
remainder of the semester. The student comes to your location for 3 hours a week. During this time you and the student
work together. This is not an internship in which the student merely works on site. Rather, it is a consulting partnership in
which you must work together to achieve your technology goals. The student facilitates a process that moves from
assessment, to analysis of problems and opportunities, to defining a scope of work, to developing a work plan, to analyzing
outcomes and finally presenting that analysis. As the Community Partner, you are the consulting client. You provide
information and discuss that information with the student. But you are more than a client; you are also a learner. In process
consulting the client "owns the problem" as well as its solution. The consultant facilitates the client in achieving that
solution. The consultant doesn't "do for" the client. Rather, the consultant works with the client.
3. What types of activities are typically included in a scope of work?
Each scope of work is unique and depends solely upon the specific needs and opportunities of the individual Community
Partner. Partnerships have focused on a wide range of activities, including: personal information management (how to use
Windows, organize files, backup files, use various software packages, use time managers, use Palm Pilots and other
personal information management tools, e-mail, etc.), developing a plan for how to train staff and how to incorporate
knowledge and skill into job description, designing a local area network, implementing Internet connectivity, designing and
developing a web site, determining effective data storage methods, analyzing the needs for an information database,
designing and implementing a database, solving technical problems, designing a public community technology access
center, determining the specifications for computers, developing disaster recovery plans, and more.
4. Who can be a Community Partner?
This course target individuals playing an administrative or programmatic leadership role within a community organization.
Typically Community Partners are Executive Directors, Directors, Assistant/Associate Directors, Coordinators, and
Managers. But, we make the selection based on the organization and the role that the individual plays within that
organization, regardless of title.
5. Why do you focus on organizational leaders?
For an organization to use information technology effectively, its leaders must have a vision for how it can support the
organization's mission, they must be comfortable enough to integrate technology into their personal work practices, and
they must know enough to budget, staff, and subcontract appropriately. By partnering one-on-one with a student consultant,
the leader has a unique opportunity to build that vision, comfort, and knowledge, no matter where they are starting from.
6. What are the requirements for being a Community Partner?
•
•
•
•
•
•
•
•
•
•
Hold a leadership role within your organization.
Have a computer in your office or one you could or do use in your job.
Reliably meet with the student consultant 3 hours per week, every week, for about the 13 weeks.
Come to an on-campus gathering 2 times during the semester. Once at the beginning and once at the end.
Share information about your organization with the student consultant.
Read project reports prepared by the student and give the student immediate feedback.
Complete a brief response form after reading each report and return to the instructor.
Keep a log of consulting sessions and send to instructors twice during the semester.
Read the final consulting report. Give feedback to the student immediately.
Make a brief presentation at the end of the semester (with the student) at the Community Technology Forum.
(This is the 2nd on-campus gathering you are required to attend.)
(continued inside back cover)