1
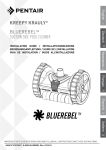
English
INTELLIPOOL™
AUTOMATION
INSTALLATION AND USER’S GUIDE
IMPORTANT SAFETY INSTRUCTIONS READ AND FOLLOW ALL INSTRUCTIONS SAVE THESE INSTRUCTIONS
WATER SOLUTIONS (Rev. 09/2012)
A label is pasted at the back of the front page of the cover with your
confidential codes.
This unique number (ID-Key) will be asked to create your free account
www.intellipool.eu.
It is necessary to have an internet connection to access the account
for remote management.
SB-CU-IMP-027-G
Customer Support : HERENTALS, BELGIUM (8:30 A.M. to 4:30 P.M.) CET
Website: www.pentairpooleurope.com
IMPORTANT SAFETY INSTRUCTIONS READ AND FOLLOW ALL INSTRUCTIONS SAVE THESE INSTRUCTIONS
-
This document is subject to change without notice
Trademarks and disclaimers: IntelliFlo® and Pentair® are trademarks and/or registered trademarks of Pentair and/or its affiliated companies. Unless noted, names and brands of others that may be used in this
document are not used to indicate an affiliation or endorsement between the proprietors of these names and brands and Pentair. Those names and brands may be the trademaks or registered trademarks of those
parties or others.
Waste treatment of electronic devices treatment: The crossed-out dustbin symbol placed on the main component parts of the product indicates that it must not be thrown out with household
waste. It must be dropped off at an appropriate collection point for recycling of electronic devices (information available your local waste treatment company).
This product contains potentially dangerous substances that may have adverse effects on the environment and human health.
Safety advice on batteries: Batteries may contain dangerous substances, so they must not be thrown out into the dustbin, or be opened, burned or be recharged, as this may cause explosion.
Handle a leaking battery with gloves. Remove the batteries in case of prolonged periods out of use.
Security advices about the buffer solution for pH probe calibration: It must be kept away from children, ensuring the bottles are properly closed, stored in a dry and ventilated area and
does not expose them to temperatures below zero. pH 4 etalon solution is acid.
DANGER - SERIOUS BODILY INJURY OR DEATH CAN RESULT IF THIS PRODUCT IS NOT INSTALLED AND USED CORRECTLY
DANGER - INSTALLERS, POOL OPERATORS AND POOL OWNERS MUST READ THESE WARNINGS AND ALL INSTRUCTIONS BEFORE
USING THIS PRODUCT.
WARNING - Most countries regulate the construction, installation, and operation of public pools and spas, and the construction of residential pools and spas. It is important to
comply with these codes, many of which directly regulate the installation and use of this product. Consult your local building and health codes for more information.
IMPORTANT NOTICE
Attention Installer: This Installation and User’s Guide contains important information about the installation, operation and safe use of this product.
This Guide should be given to the owner and/or operator of this product.
WARNING - Before installing this product, read and follow all warning notices and instructions in this guide. Failure to follow warnings and instructions can result in severe
injury, death, or property damage. Please refer to www.pentairpooleurope.com for more information related to this products.
DANGER - RISK OF ELECTRICAL SHOCK OR ELECTROCUTION
BEFORE WORKING ON INTELLIPOOL: Always disconnect power to the IntelliPool® controller at the circuit breaker before servicing. Failure to do so could result in death or
serious injury to service person, pool users or others due to electric shock.
DANGER - BE SURE TO DISCONNECT ALL SUPPLY CONNECTIONS BEFORE SERVICING INTELLIPOOL®. AC Power may be supplied to the relay terminals from other
sources.
WARNING –Connect IntelliPool® to a ground-fault interrupter-circuit (GFCI). If this system is used to control underwater lighting fixtures, a ground-fault interrupter (GFCI)
must be provided for these fixtures. Conductors on the load side of the ground-fault circuit-interrupter shall not occupy conduit, junction boxes or enclosures containing other
conductors unless such conductors are also protected by a ground-fault circuit-interrupter. Refer to local codes for details.
WARNING - This product must be installed by a licensed or certified electrician or a qualified pool professional. All applicable local installation codes and ordinances must also
be adhered to. Improper installation will create an electrical hazard which could result in death or serious injury to pool users, installers or others due to electrical shock, and
may also cause damage to property.
DANGER - DO NOT PERMIT CHILDREN TO OPERATE THIS EQUIPMENT
WARNING - When mixing acid with water, ALWAYS ADD ACID TO WATER. NEVER ADD WATER TO ACID.When adding any chemical to the pool, be sure to follow the
manufacturer’s instructions thoroughly.
DANGER - DO NOT MIX SODIUM HYPOCHLORITE AND MURATIC ACID
WARNING - CHEMICAL BURN HAZARD: Make sure all pumps are switched off at the main circuit breakers at the house before drilling into any pipes. Securely fasten all
electrical, water and chemical lines. Locate chemical feed pumps and chemical storage tanks in a safe and secure area.
WARNING - Strictly follow the acid manufacturers safety and handling protocols including hand, body and eye protection when transferring or handling acid. Safety
precautions should be used when handling Muriatic acid to control pH water levels. Muriatic acid can cause serious body injury and damage pool equipment. Extra care must
be taken when installing, maintaining and operating acid pump feed systems. Acid is dangerous to handle and should be properly contained, transported, poured, stored, and
dispensed.
WARNING - Check the pH and sanitizer levels of the water before using the pool and make sure filtration is not obstructed.
WARNING - Periodically use an independent pH and Chlorine test kit to verify that pH and chlorine is at a safe level. If the pH and Oxidation Reduction Potential (ORP) or
conductivity sensors are broken, depleted or dirty with oils, lotions, or other contaminants, they can report inaccurate results to the system causing incorrect water chemistry,
which could harm people or equipment.
WARNING - Check the IntelliPool® display each day to ensure there are no Alarm messages.
DANGER - Water temperature in excess of 100° F (37.7° C) may be hazardous to your health. Prolonged immersion in hot water may induce hyperthermia. Hyperthermia
occurs when the internal temperature of the body reaches a level several degrees above normal body temperature of 38° C (100° F ). Effects of hyperthermia include: (1)
Unawareness of impending danger. (2) Failure to perceive heat. (3) Failure to recognize the need to leave the spa. (4) Physical inability to exit the spa. (5) Fetal damage in
pregnant women. (6) Unconsciousness resulting in danger of drowning. The use of alcohol, drugs, or medication can greatly increase the risk of fatal hyperthermia in hot tubs
and spas.
WARNING - HEATER: The IntelliPool® automation control system is intended to control heaters with a high temperature limit switch(s) safety circuit ONLY. Failure to do so
may cause property damage or personal injury.
WARNING - Do not use this product to control an automatic pool cover. Swimmers may become entrapped underneath the cover.
WARNING - For units intended for use in other than single-family dwellings, additional safety equipment might be required in order to be compliant with local regulations.
CAUTION - Except for remote controls, install components at a minimum of five 1.5m (5 ft) from the inside wall of the pool and spa.
CAUTION - This product is intended for use in swimming pool applications only.
1
English
© 2012 Pentair International LLC, All rights reserved
Contents
PRESENTATION
> Contents of packaging
> General operation
> IntelliPool® features
> IntelliFlo® pre-setting
p3
p3
p4
p4
INSTALLATION
> Internet relay
> Probe unit
> Control center
> Electrical connections
> Control center menu
> Outdoor remote control
> Radio relay
> Create an account on www.IntelliPool.eu
p5
p6
p8
p9
p 13
p 19
p 19/20
p 21
USE
> www.intellipool.eu menus
> Reading remote display messages
p 21
p 27
OPTIONS & MAINTENANCE
> Add a new radio relay
> Reprogramming the original indoor remote display
> Add a new remote display
> Calibration of pH probe
> Calibration of RedOx/ORP probe
> Garantee
> Maintenance
> Technical characteristics and garantees
> Spare parts
2
p 31
p 31
p 32
p 35
p 36
p 37
p 37
p 37
p 37
1 - Control center
3 - Probe unit (and its 4 probes, delivered separately)
5 - Outdoor radio relay
7 - pH calibration solutions
9 - RJ45 cable
11 - 8 x AA batteries ProCell high temperature resistant
13 - Internet relay
15 - 12 mm diam. gland x3 for pH/ORP/Conduct probes
x11
1 2 / 0 7 / 1 0 1 5 :2 3 :4 8
Wate r te m p :+ 2 4 .0 ° C
p H :7 ,3 O R P:6 2 9 m V
Co n d :5 5 7 1 u S 3 .5 1 g / l
CONTROL CENTER
x7
ESC
ENTER
English
Contents of packaging
2 - Grommets for watertightness of electrical connections
4 - Indoor wireless display
6 - Outdoor remote control
8 - Silicon grease
10 - Internet relay power supply
12 - IntelliComm® communication cable
14 - Hose clamp 50/70 mm diameter for temperature sensor
2
PROBE UNIT
REDOX - PH
TEMPERATURE
CONDUCTIVITY
pH
O.R.P.
1
4
6
5
4
x3
8 x AA
7
7
3
Conductivity
8
9
10
11
12
13
14
15
Introduction
Your new IntelliPool® system will bring you a fully automated management of your swimming pool system. It controls and manages the quality of
the water and enables remote access to all comfort functions of your pool also for your poolbuilder; The result is a safer pool environment.
IntelliPool® will also generate substantial savings in operating your pool. Its unique control of the IntelliFlo® variable speed pumps guarantees
the lowest possible power consumption while maintaining optimum filtration and water quality. Savings up to 90% can be achieved. The automatic
control also minimizes the use of chemicals and will extend the life of a salt chlorinator.
IntelliPool® will furthermore adapt filtration, desinfection and other pool functions when the pool is covered.
What you will appreciate the most about IntelliPool® will be the increased convenience in using your pool. Controlling lights, heating and filtration
can be done everywhere anytime using any smartphone or tablet PC. Automatic backwash is possible using a specific backwash valve on the
filter.
IntelliPool® uses precision sensors and controls. Please follow the recommendations as described in this manual and use professional assistance
for the installation of your system.
This way the only thing left is to sit back and enjoy your pool !
IntelliPool® features
IntelliPool® manage the variations speed and operating schedule of IntelliFlo® depending on: Water temperature / Position of the pool cover /
Specifics features (water falls, heating, IntelliChlor)
- Optimalisation IntelliFlo®
- Automatic ON/OFF / Schedule mode
- Disinfection based on ORP (Redox) measure
- Supervision and pH dosage (pH+ or pH-) including empty tank information
- Conductivity measure to inform salt concentration
- Heating piloting and temperature setting
- Lighting ON/OFF, schedule mode and IntelliBrite color choice
Auxilliary output :
- Automatic backwash (with push/pull valve)
- Water feature (with a second pump or 3 way valve)
- ON/OFF , schedule mode, timer
All these features are both accesible directly on IntelliPool® or on smartphone / tablet
3
General operation
The Probe unit located in the technical room collects information on water quality and communicates them to the Control center. Also situated in
the technical room, the Control center activates the different pool functions. For IntelliFlo® and IntelliChlor® this information is sent using an
RS485 bus. This way IntelliPool® also retrieves information and feedback from IntelliPool® and IntelliChlor®. Using a proprietary wireless protocol
the control center sends and receives information and commands from the other system components. The Internet relay allows remote access to
the system using PC, tablet or smartphone. The Indoor display informs the pool owner on the pool’s main parameters, while the Outdoor remote
control enables activation of lights and a water feature from the side of the pool. The Radio relay assures optimum radio communication between
the components while at the same time collecting ambient air temperature. In this setup the system contains all the necessary input and control
to assure a trouble free pool environment.
Internet
Relay
Control Center
Remote Control
Radio Relay
Indoor
Display
Power Unit
12/07/10 15: 23: 48
Water temp: +24. 0°C
pH: 7, 3 ORP: 629mV
Cond: 5571u S 3. 51g/l
CONTROL CENTER
ESC
ENTER
PROBE UNIT
REDOX - PH
TEMPERATURE
CONDUCTIVITY
Under Waters Light
Automatic Valve
Salt chlorinator
Dosing & measuring
equipment
Heating
Filter
Pump
Specific IntelliFlo® Settings for VSD drives
IntelliFlo® VS and VF do not require specific settings on the pump itself. For IntelliFlo® VSD however make sure to:
- disable the antifreeze function in the pump
- set the miminum and maximum speed to the same values as in the IntelliPool® menu in order to obtain similar protection when operating the
pump manually.
- determine if you want the priming function to be activated. Consult the VSD manual on this feature. When enabled on the pump, priming setting
as determined on the pump drive wil become active. Please note this can lead to unwanted results in combination with water features!
Caution: IntelliPool® will always control the pumps keypad; it is not possible to stop the pump from the keypad while IntelliPool® is
active. Use IntelliPool® or in case of emergency the pump’s main power switch to stop the pump.
4
English
Internet relay - Your pool accessible 24/24 on www.intellipool.eu
The internet relay allows internet to keep in touch with your pool even when your home computer is shut down. What ever your type of computer
(PC or Mac) you have access to your data in real time and can also work on settings and controls.
Simply plug the internet relay to your internet router and the connection to the server Pentair is automatic. After you create your free account on
www.intellipool.eu, you connect to your system in few minutes. Commands to Control center ordered via internet are effective in seconds.
1 - Connect the Ethernet cable to the Ethernet port of your internet relay. Then connect the other end of Ethernet cable to an available Ethernet
port on your router or ADSL modem. The Ethernet cable can be replaced by an equivalent cable with a maximum length of 100m. If you do not
have a free Ethernet port on your router or ADSL modem, you should get an Ethernet switch to connect your system permanently.
2 - Connect the power cord and connect the power transformer to an AC outlet.
The internet relay is automatiquely configured than internet provided that the DHCP server of your internet router is enabled (in the vast majority
of cases, the DHCP server is enabled by default when you install your internet router). This function is accessible via the menu system of your
Internet router, refer to your Internet service provider for more details.
Verify the correct operation of the internet relay using the led indicator on the device (see illustration below).
2
1
2
1
Data transmission processing
Off = Not connected to server
> Check the power supply, the Ethernet cable connection and internet connection.
Lighted = Connected to server
Blinking = Sending data
- Off= Initialization default or power failure.
> Check the 230V power connection.
- Slow blinking = No network.
> Check the connection of the RJ45 cable and check the internet connection.
- Fast flashing = Resolution DHCP operating.
> Requires at least one second. If the blinking continues, check the activation
of DHCP in the management interface of your internet router.
On = Operating
Off = No power
> Check the 110V / 220V power supply.
- Fix illuminated = Network Connection.
> The Internet Transmitter is well connected to the network.
5
Probe unit
The Probe unit collects pH, ORP (RedOx), conductivity and water temperature. These informations are sent to the Control center. The cable length
of the pH and ORP probes is deliberately limited to 50 cm for good readability.
1 : Rubber cover (insulation from acid fumes and humidity)
2 : Screw cover (insulation acid fumes and moisture circulating through the screw hole)
3 : pH probe (0.5m lenght cable)
4 : ORP probe (0.5m lenght cable)
5 : Conductivity probe (0.9m lenght cable)
6 : Water temperature probe (2m lenght cable)
Conductivity probes bottle
Probe cap
12/07/10 15:23:48
Wate r te mp : + 2 4 . 0 ° C
p H : 7 , 3 O R P: 6 2 9 mV
Co n d : 5 5 7 1 u S 3 . 5 1 g / l
with (screwed on top) = probes out of water
without = probes in the water
ESC
Conductivity
pH
ENTER
O.R.P.
CONTROL CENTER
The conductivity probe cap should not be
used for other probes.
3
4
5
6
pH / ORP probes bottles
The sensor caps must be filled with
potassium chlorid or failing that tap water.
Screw up / down the fitted bottles, never push or pull bottles with cap.
Distilled
water
1
2
Install and connect probes
The Probe unit need to be installed close to the by-pass (pH & ORP probes cable is 50cm long)
1 - On a by-pass with siphon, in an analyse chamber, in a bol or 50/63mm PVC, install pH & ORP probes head up, Conductivity probe head down.
Water temperature sensor need to be installed outside the bypass with the hope clamp provided (see detail next page).
2 - Pass the cables through the white gland, connect the cables following marks and screw the white gland.
2
Conductivity
Connect before pump suction
O.R.P.
e
con
e sili
graiss e grease a
silicon de silicon
grasa
pH
EARTH
connection
10 ml
After Filtration
1
The lifetime of the probes (depending on usage conditions) is about 2 years for the
pH probe, 5 years for the ORP probe and lifetime for conductivity sensors and
temperature. Only Pentair probes are compatible and guarantee the proper functioning of IntelliPool®.
IT IS IMPERATIVE TO ISOLATE THE BYPASS BY CLOSING BOTH VALVES
BEFORE WANTING TO CHANGE A PROBE UNDER THREAT OF FLOODING.
6
2
Ø 6.5 mm
3
Ø 50/70 mm
1 - The water temperature probe can be installed outside the by pass
before the pump filtration or filter inlet for a better reading.
2 - Drill a 6.5mm diameter (1/4 inch) in the PVC (50 or 63mm) piping
3 - Place the metal hose clamp over the sensor and tighten.
English
Water temperature probe installation
Attach the Control center / Probe unit on the wall
Drill three holes equipped with plugs as shown below.
1 - Screw the top screws and hang the unit.
2 - Screw the 2 screws from the bottom.
3 - Install the 2 rubber insulation covers.
150 mm
1
2
185 mm
3
Authorised cables
= RO2V (2 x 1.5 mm2 or 2 x 2.5 mm2)
Ø 8 / 8.8 mm
= VGV (4 x 0.75 mm2)
Ø 7.0 / 7.5 mm
= RO2V (3 x 1.5 mm2 or 3 x 2.5 mm2)
Ø 8 / 8.8 mm
Probe unit and Control center location
The Probe unit needs to be positioned in close proximity to the by pass carrying the probes.
The Control center need to be positionned to be able to easely reach the keypad in order to adjust settings.
7
Control center
It is the brain of the system. It automatically calculates and controls the operating time of each connected device. It receives orders from the
remote control or via the Internet and activates specific devices. The activity is retained in memory for 64 days (available for the user).
1: Screen (4 x 20 characters)
2 : Buttons (menu navigation)
3: Doors fuse (10A)
4 : Doors fuse (1A)
5: Connectors cover (removable with a screwdriver)
6 : Screw cover (protection against water ingress)
7: Elastomer cover (insulation acid fumes and moisture)
8 : Radio antenna
9 : Deported magnetic radio antenna (option) ref : INTP-5240
10 : Identification plate
11 : Multi cable grommet compatible for cable from diameter 7mm to 10mm, have to be fitted with silicon grease provided. Avoids any acid
vapour or humidity entering the system
12 : Cap, closes a hole in case of non utilisation of an output, to be fitted with silicon grease provided. Avoids any acid vapour or humidity
entering.
8
9
1
1 2/07 /1 0 15 :23 :48
Water tem p :+2 4.0 °C
p H:7,3 O R P:62 9m V
Co nd:5 57 1uS 3.5 1g /l
2
In the rubber grommet,
cables have to be fitted
with silicon grease
provided.
CONTROL CENTER
ESC
ENTER
3
10
4
10 ml
e
con
e sili
graiss e grease a
silicon de silicon
grasa
433.445 MHz
model :
MADE IN FRANCE serial :
5
6
11
7
12
Remove the orange protection on Control center
To meet electrical codes, a snapfit security cover, unclipsable without tools, protects the electrical connectors.
> Place a flat screwdriver on the clips 2 and 3 while maintaining force on the cover to unclip.
1
4
2
8
3
Replace this electrical protection after
each intervention.
230 V
The Control center need to be placed near the electrical panel to optimise the electricals connections. Connect the 230V. Engage the 230V only at the end of the
electrical installation. Connect bus cable on Datas and Power from Control center to Probe unit.
IntelliPool®, Control center on Probe unit and pool cover connection
1 - Connect the 220V.
2 - Connect the IntelliFlo® cable ref 350122 / long 15m provided with the IntelliPool®.
3 - Connect the green cable on Datas+ and connect the yellow cable on Datas-.
Each bus connection (Intelli
range) have to be plugged
following this principe.
3
Dry contact closed when cover
close the pool.
230 V
> Control Center
NEUTRAL (N)
EARTH
1
PHASE (L)
pool cover
electrical panel
2
9
English
230V + Probe unit connection Control center
Desinfectant connection
IntelliChlor® salt chlorinator connection inside the Probe unit
1 - Connect the 230V.
2 - Connect the IntelliFlo cable ref 350122 / long 15m provided withg the IntelliPool®.
3 - Connect the green cable on Datas+ and connect the yellow cable on Datas-.
4 - Connect the green cable on the terminal block 2 and the yellow cable on the terminal block 3 of the IntelliChlor® Power center.
1
2
3
4
230 V
3
NEUTRAL (N)
4
1
PHASE (L)
2
Chlorine pump connection inside the Control center
1 - Connect the chlorine pump and the chlorine level sensor as descrided bellow. Select «other» in settings menu/install/other, see p16.
230 V
NEUTRAL (N)
EARTH
PHASE (L)
30 mA
10A
Liquid level switch need to be a normaly open model.
(switch closed = tank empty)
The injection of chlorine occurs after the filtration, after heating and
after probes location.
chlorine
Alternative salt chlorinator connection inside the Control center
1 - Connect a classical electrolysis as descrided bellow.
serial connection
10
ELECTROLYSIS FLOW-SWITCH
The control of the chlorinator is done in series on the flow-switch. The original flow safety
is maintained. Set the chlorinator on maximum level.
English
pH pump connection on Control center
230 V
1 - Connect the pH pump and the pH corrector level sensor as desbrided below.
Liquid level switch need to be a normaly open model.
(switch closed = tank empty).
NEUTRAL (N)
GROUND
30 mA
If the installation comport a chlorine pump and a pH
pump, it is necessary to connect the two tank level
sensor in series.
10 A
PHASE (L)
The injection of pH correction occurs after the filtration, after disinfection, after heating and after Probes unit.
pH pH+
AUX1 connection (fountain, swim-jet, water fall, garden lighting...)
Accessory water pump connection on Control center
1 - Connect the second water pump as desbrided bellow on AUX1 output. Usable for a fountain, a swim jet, water fall...
A2
NEUTRAL (N)
EARTH
230 V
A1
PHASE (L)
Pneumatic push/pull valve (for automatic back wash)
connection on Control center
3 way valve (for animation)
connection on Control center
1 - Connect the 3 way valve as desbrided bellow on AUX1 output.
1 - Connect the air push/pull valve as desbrided bellow on AUX1 output.
3 bar mini
A2
NEUTRAL (N)
EARTH
230 V
A1
PHASE (L)
To filter
From filter
11
Lighting connection on Control Center
1 - Connect the lighting as descrided bellow depending the power of the lighting.
A2
NEUTRAL (N)
EARTH
PHASE (L)
Heater connection on Control center
Connection on the heater flow switch
1 - Connect the heating pump as desbrided bellow.
Make sure the heater is equipped with a built-in overheating protection!
The piloting of the heating is done in series on the flow-switch. The original heating safety is
maintained.
serial connection
> Set the heating on maximum temperature.
HEATING
FLOW-SWITCH
Connection through a contactor
1 - Connect the heating pump as descrided bellow.
A2
NEUTRAL (N)
EARTH
PHASE (L)
12
230 V
A1
230 V
A1
230 V
> 1600W
12 V
PHASE (L)
Total lighting power is more than 1600 W
230 V
NEUTRAL (N)
230 V
< 1600W
12 V
Total lighting power is less than 1600 W
Designed to drive an auxiliary output and lighting from the edge of the pool, it is waterproof and floats if dropped in the pool. As the radio network
consists of several elements, it is normal for the start of a function to take a few seconds (1 to 10s depending on the configuration).
1 : Short press = button lighting ON / OFF
2 : Short press = button Aux1 ON-OFF, long press (>3s) = back wash (if present)
3 : (Simultaneous 3s) = Function SHOCK (24H forced filtration and desinfection, this feature can be useful after a strong activity in the pool).
4 : Radio antenna
5 : 3s LED blinking (after pressing) = Low battery cell
6 : Serial number identification plate
7 : Anti slip rubber foot
8 : Battery hatch (button cell CR2032 supplied - Pull tab to open)
2
5
1
4
A
6
7
433.445 MHz
model :
MADE IN FRANCE serial :
8
3
CR2032 x 1
A
Radio relay
This element is necessary to relay the radio waves between the equipment room and home. It measures the outside temperature. With its shapes
and natural colors, designed for outdoor use, it takes place in the garden (or plant in a clump on his clip screwed to a wall). The battery life is
approximately 1 year. In case of long distance or garden with great relief, it is possible to add one or more Radio relay (see p31).
1 : Wall clip fixing holes
2 : Wall clip trap grooves
3 : Air temperature sensor
4 : Radio antenna
5 : Battery access tab
6 : Pot
7 : Identification plate (inside)
8 : Battery holder contacts
9 : Jump position
9A : Air temperature is transmitted
9B : Air temperature is not transmitted (required for adding a radio relay, see p31).
A
3
A
4
8
5
9
6
7
2
433.445 MHz
model :
9A
9B
MADE IN FRANCE serial :
1
T°ext = ON
T°ext = OFF
Use only alkaline batteries of high quality
resistant to temperatures of +70 ° C (ex
DURACELL PROCELL)
13
English
Outdoor remote control
Radio relay installation
Outdoor radio relay may be subjected to very high heat. It is necessary to use alkaline batteries of high quality resistant to temperatures
of +70 ° C (ex DURACELL PROCELL).
1 - Take off the pot by pulling the tab.
2 - Install the 4 AA batteries (supplied).
3 - Reconnect the battery holder.
4 - The red LED flashes. Put the container’s cover back on.
2
3
AA
AA
AA
4
AA
1
The Radio relay ensures the connection between the equipment room (Control center) and the house (Indoor display and Internet relay). It should
be placed vertically (wall, pole) and away from any metal object (fence iron, zinc gutter) and not directly exposed to the sun to ensure a reliable air
temperature measurement.
Perform tests (reading the radio signal strength on the display, move the switch CALIB back of the indoor display to refresh the information) before
fixing it permanently. For very large distance between the pool and the house, it is possible to add an extra Radio relay (option).
or
Place the radio relay:
- directly into the earth (gardening)
- between two pots on a window sill
- through its support screwed to a pole or wall
- through his support using two cable ties
To refresh the display of data, positioning the switch (on the back of the
Indoor Display) to "CALIB" then back "ON". After 10s, the radio signal
strength at each test positioning relay radio is refreshed.
calib on alarm
calib on alarm
14
English
Installation restricted menu for access to specific settings
The settings, accessible only by Installation Menu are listed in Bold Italic, should be changed only by a qualified pool professional.
1 : In Settings menu, press simultaneously ESC & ENTER for 3 seconds. The submenu Instal appears bottom right of the screen (automatically removed
after 120 minutes).
SE T T INGS MENU
- p H /Disinfec t./Temp
- Language -Time
- R adio
12/07/10 15: 23: 4 8
Water temp: +24. 0° C
pH: 7, 3 O RP: 629m V
Con d: 5571u S 3. 51g/ l
CONTROL CENTER
ESC
ENTER
Menu Settings
CONTROL CENTER
SE T T INGS MENU
- p H /Disinfec t./Temp
- Language -Time
- R adio - I nst al
ESC
ENTER
CONTROL CENTER
ESC
ENTER
3s
pH/Disinfect./Temp
pH
Auto / Off
pH+/pH- define
Set point
Priming
Disinfectant
Auto / Off
Set point
Priming
Temperature
Auto / Off
Setpoint
Units (language + choice °F /°C)
Time
Radio
Register Equipment
Register Remote Control
Reset Remote Control
Menu Lighting
Manuel / Program / Off
Couleur : 0
Programing settings
Menu Filtration
Auto / On / Off / Program
Shock
Program settings
Cleaning
Filtration operarion time slot
Menu Aux1 (invisible if AUX1 is programed in auto back wash)
Manual / Horloge / Off
Timer: 10’
Timer setting
Menu Install
Electrolysis / Other
Filtration
Antifreeze : + 3C
Eco=(Standard- 30 %)
Turbo=(Standard+ 30%)
pH
Injection time: 15 s
Min temperature : 16C
Volume days Max: 0,2 L
Disinfect.
Injection time : 15 s
Minimal temperature : 14C
Volume days Max: 0,5 L
Aux1
Robot mode: No
Backwash mode : Yes
Backwash duration : 10 sec
Default values
The adjustment speeds of IntelliFlo are accessible via the
IntelliFlo menu on www.intellipool.eu
15
Customizing settings, (restricted)
This menu allows the installer to customize the settings according to the specifics of the equipment. Changing these settings can have serious consequences on
the pool. It is advisable to check the settings changed by a professional. Access to the SETUP MENU and then press simultaneously ESC & ENTER for 3 seconds.
The submenu Instal appears bottom right of the screen (automatically removed after 120 minutes).
E l e c tro l ys i s / O th e r : Select the type of disinfectant. O th e r correspond to a
metering pump traitment (bromure, chlorine, active oxygen...)
3s
S E T TIN GS M E N U
-pH/D i s i nfe c t./Te mp
-L a ng u age -Ti m e
-R a d i o
x1
ESC
+
3s
ENTER
x4
S E T TI N GS M E N U
-pH/ D i si n fe c t. /Te mp
-Lan g u a g e -Ti me
-R adi o - I n st a l
x2
+
ENTER
+
ENTER
E l e c t r l ysi s O t h e r
- Fi l t rat i o n - p H
- D i si n fe c t. -Au x1
D e fa u l t va l u e s
x3
+
ENTER
x4
+
ENTER
+
ENTER
INSTA L L . F ILTR ATION
Anti fre e z i ng :+ 3° C
Eco = (Stand ar t- 30% )
Tur bo = (Stand ar t+ 30%)
pH INS TA LLAT ION
I n jec tion time: 15s
M in te mperatu re : 25 ° C
Day max volu me: 0.2 L
D I S I N F E C TA N T I N S TA L.
I n j e c t i o n t i me : 1 5 s
M i n te mp e rat u re : 1 5 ° C
D ay ma x vo l u me : 0 . 5 L
AUX 1 I N S TA LLATI O N
R o b o t mo d e : N o
B a c k wa sh mo d e : N o
B a c k wa sh Ti me r : 3 0 s
Anti freezing:
Allows you to change the water
temperature from which the
filtration is switched ON forced.
Changing the injection parameters of pH regulator
Changing
the
disinfectant
injection parameters except salt
chlorinator (injection of bromine,
oxygen)
Changing parameters using the
output Aux1
Eco:
Sets the divider ratio of economic
mode.
Turbo:
Sets the multiplier ration of turbo
mode.
Injection time:
Time sequence of each pump
injection by correcting pH.
Min temperature:
Temperature below which the
pH correction is not injected.
Day max volume:
Maximum volume allowed for
injection of pH controler (for a
pump at a rate of 1 l / H) to
secure a possible overdose.
Injection time:Time of each
injection sequence of
disinfectant.
Min temperature:
Temperature below which the
disinfectant is not injected or
electrolyzer is shut down to
reduce wear on the plates.
Day max volume: Maximum
volume allowed for injection pH
corrector (for a pump at a rate of
1 l / H) to secure a possible
overdose.
16
Robot mode : Select Yes to
asign the output Aux1 is used to
drive robot cleaner and so
launch filtration.
Backwash mode : Select Yes
to drive a back wash pneumatic
push pull valve
Backwash timer : Back wash
duration
This menu shows the actual values, and values of the >previous 64 days, of each parameter and running duration of each feature connected (daily
average).
Alternative display
0 7 / 12/11 15:23:48
Water te mp.:+ 29.0°C ¥
p H: 7, 8 OR P:607mV
Con d: 5626uS 3.51g/l
Light ing
Filt rat io n
Aux 1
H eat ing
: ON
: OFF
: ON
: OFF
I nte l l i Fl o
¥
Powe r : 0 0 0 0 W
Sp e e d : 1 2 0 0 r p m
O p t i m um : 9 8 0 r p m
I nte l l i C hl or
¥
Produc t i on : 7 4 %
3s
ENTER
CU R R ENT DAY AC TIVIT Y
Filtration :14 H 07m
Aux1
:00H01m
L ig hting
:04H 23m
CURREN T DAY AC T I VI T Y
H eat ing
: 0 0 H0 0 m
pH co r re c t i on: 0 1 m 3 0 s
D isinfec t a nt : 1 4 H5 3 m
ENTER
CURREN T DAY AC T I VI T Y
Temperat ure : +2 8 . 5 ° C
pH
: 7.6
ORP
: 648mV
HI STORY D -1
ENTER
HI STORY D -2
C U RRE N T DAY AC T I VI T Y
Salt
: 2.75ppt
ENTER
HI STORY D -3
Radio menus
Meaning of the various Radio menus.
-S e ttings me nu
-L ighting me nu
-Filtration me nu
-Aux1 me nu
ENTER
SE T TIN GS M E N U
-pH /D i s i nfe c t. /Te m p
-Languag e -Ti m e
-R ad io
x4
+
ENTER
RADIO MENU
- R e cord Eq ui p m e nt
- R e c. R e m . Cont rol
- R e s e t R e m . Cont ro l
x1
x2
+
+
ENTER
ENTER
R ECOR DI NG EQUIPMENT
45XXX
L aunch programming
proce dure on M aster1
To add a new remote control
in the radio network.
REC . RE M OT E CO N T R O L
Swi tch on t he
R e m ote Cont rol
R EC. REMOTE CONTR OL
R e m o te Co nt ro l
re co rd ed
RE C . RE M OT E CO N T R O L
R e m ote Cont rol
al re a dy re corde d
ENTER
Val i dat i on of t he
m odi fi cat i ons ?
No
Ye s
To erase all the remote control
registred on the radio network.
RE C . RE M OT E CO N T R O L
Too m uch R e m ote
re corde d ( m ax: 4 )
17
English
Current values & status / previous days activities
Lighting / filtration / AUX1 menus
This menu shows settings of filtration, lighting and AUX1 menu.
07/ 1 2 /11 15:23:48
Wate r te mp.:+ 29.0°C ¥
p H : 7 ,8 OR P:607mV
Con d: 5626uS 3.51g /l
-S et t ings menu
-Light ing menu
-Filt rat io n menu
-Aux1 menu
x1
x2
x3
+
+
+
ENTER
ENTER
AU X 1 M E N U
M anua l Ti m e r
O ff Te m p o: O FF
-Ti m e r s e t t i ng
ENTER
x3
+
LI GHTI NG MENU
M anual Time r OFF
Color : 0
-Ti me r se ttings
x3
+
ENTER
LIGHTI NG TI MER
0123456789 10 11
AM:
XXX
PM:
XX X
ENTER
Auto On O ff Ti m e r
Cho c -Tim e r s e t t i ng
- Cleaning - Pum p fl ow
Filt rat io n t i m e s l ot
x2
Add the cross for lighting the
pool per each hour (if Lighting is
on AUTO mode, this timer table
won't be used.
+
ENTER
x3
x4
x5
18
AU X 1 T I M E R
0123456789 10 11
AM :
PM : XXXXXX
+
+
+
ENTER
ENTER
ENTER
FI LT R AT I O N T I M E R
0123456789 10 11
AM : XXXXXXX
PM :
!!!!!!!!!!!!!!!!!!!!
! Fi l te r cl e ani ng !
!
re s e te d
!
!!!!!!!!!!!!!!!!!!!!
FI LT R AT I ON SE T T I N G
Eco St andar t Tur b o
Pum p s p e e d
4256 rpm
FI LT R AT I O N T I M E SLOT
St ar t : 0 8 h E nd: Auto
Pr i or i t i e s O RP: X
He at i ng : _ p H: X
If the back-wash was done
manually or if your facility is
not equipped with a pressure
sensor,
this
operation
IntelliPool® informed that the
filter was cleaned.
This setting over run or under
run your filtration to adapt the
filtration time to the pump
size and/or the pool activity.
This menu makes you
master the begining hour and
the end hour of the filtration
to avoid some neighborhood
noise problem.
By crossing a priority, you
accept that a value could
launch the filtration even if it
is in the non-running time.
IntelliPool is factory pre-setted. These settings are changeable. If it is recommended to move, a qualified pool professional change these
setting.
-S e tting s me nu
-L ig hting me nu
-Filtration menu
-Aux1 me nu
SE T T I N GS M E N U
-pH /D i s i nfe c t. /Te m p
-Lang ua g e -Ti m e
-R ad i o
ENTER
x1
x2
+
+
ENTER
+
ENTER
ENTER
LA N GUAGE M E N U
E N GLI SH
E U ( ° C a nd cm )
U K ( ° F a nd i nch)
R EGU L AT IONS
-pH
-Disinfe c t ant
-Te mpe rat ure
x1
x3
SE T T I N GS T I M E /DAT E
M M /D D /Y Y
1 2 /0 7 /1 0
00:08
x2
+
English, German, French, Deutch, Italian & Spanish are the
available languages.
+
ENTER
ENTER
TEMPER ATUR E RE GU L.
Auto
O ff
-S et Po int
D ISINFEC TAN T RE GU L.
Auto
O ff
-S et Po int Pr i m i ng
x2
x2
+
+
ENTER
T E M PE R AT U RE
SE T- PO I N T
25°C
ENTER
ENTER
E LE C T R O LYSI S
SE T- POI N T
650mV
ENTER
"Priming" is proposed if "Other" is the
choice of disinfectant
pH REGULAT I ON
Auto
O ff
- pH +/pH - d e fi ne
-S et Po int Pr i m i ng
x2
x3
+
+
ENTER
pH R EGU L ATOR T YPE
pHpH+
p H SE T- PO I N T
7.5
ENTER
19
English
Settings menu overview :
pH-disinfectant-temperature setpoints / language / time menus
Alert menus
Meaning of the various menus alerts.
!!!!!!!!!!!!! ! ! ! ! ! ! !
! L ighting is O ff !
! in the men u !
!!!!!!!!!!!!! ! ! ! ! ! ! !
!!!!!!!!!!!!!!!!!!!!
! N onf re e zing m ode !
! in a c t ion
!
!!!!!!!!!!!!!!!!!!!!
You try to switch ON the lighting but in lighting menu, the position is
OFF.
Nonfreezing mode is in action.
This message is just displayed for your information.
!!!!!!!!!!!!! ! ! ! ! ! ! !
! pH regulat ion !
!
pro blem
!
!!!!!!!!!!!!! ! ! ! ! ! ! !
Control center need to use more pH corrector than allowed in the
"Volume Days Max" menu (factory pre-setted at 0.5l / day). Check
the disinfectant tank level.
!!!!!!!!!!!! ! ! ! ! ! ! ! !
! R a dio sign al !
!
problem
!
!!!!!!!!!!!! ! ! ! ! ! ! ! !
!!!!!!!!!!!!!!!!!!!!
! Tim e / D ate !
!
proble m
!
!!!!!!!!!!!!!!!!!!!!
Internal Real Time Clock problem.
> Contact your dealer.
!!!!!!!!!!!!!!!!!!!!
! Cle a ning filte r !
!
re quire d
!
!!!!!!!!!!!!!!!!!!!!
The Control center is not connected anymore to the radio network.
Check the antenna or the radio relay status (position, batteries). A
deported antenna is available in option.
The filter need to be cleaned
> Make a back-wash.
!!!!!!!!!!!! ! ! ! ! ! ! ! !
! O R P regulat ion !
!
problem
!
!!!!!!!!!!!! ! ! ! ! ! ! ! !
!!!!!!!!!!!!!!!!!!!!
! pH re gulator !
! t a nk e m pt y !
!!!!!!!!!!!!!!!!!!!!
Control center needs to use more disinfectant than allowed in the
"Volume Days Max" menu (factory pre-setted at 0.5l / day). Check
the disinfectant tank level.
pH minus or plus, depending choice, is empty
> Add some pH regulator in concerned tank.
!!!!!!!!!!!! ! ! ! ! ! ! ! !
! B US con n ec t ion !
!
problem
!
!!!!!!!!!!!! ! ! ! ! ! ! ! !
Check the connection of the BUS cable between the Probe unit and
the conrol unit.
!!!!!!!!!!!!!!!!!!!!
!
Ch ec k
!
!
p ro b es
!
!!!!!!!!!!!!!!!!!!!!
Make the calibration of the pH probe.
20
!!!!!!!!!!!!!!!!!!!!
! O RP re gulator !
! t a nk e m pt y !
!!!!!!!!!!!!!!!!!!!!
Chlorine tank is empty
> Add some chlorine in concerned tank.
!!!!!!!!!!!!!!!!!!!!
! p H re g u l ato r !
! t an k e m p t y !
!!!!!!!!!!!!!!!!!!!!
+
! ! ! ! ! ! ! ! ! ! ! ! ! ! ! ! ! !!!
! O R P re g ul ato r !
! t an k e m p t y !
! ! ! ! ! ! ! ! ! ! ! ! ! ! ! ! ! !!!
pH corrector or chlorine tank is empty
> Check and add the liquid in concerned tank.
www.
intellipool.
eu
Account connection / creation
English
www.
intellipool.
eu
For a remote access
1 - Log in on www.intellipool.eu.
2 - Click on Create account.
2 - Fill in the fields of the window PERSONAL INFORMATION.
4 - Type of Account: Pool owner is main private customer access limited for the main controls only, professional account is reserved for pool
maintenance professionals.
5 - Fill in the fields of the window DEVICES INFORMATIONS :
5.1 - Serial number : The serial number is on the second page of this user manual.It is also on the identification plates (the most
accessible is the remote display (see p5), it is of 5 digits after the 2 letters. Do not use the serial number of the internet
transmitter or the Control Center.
5.2 - ID-Key : It is a unique security code certifying the device. It is on the last page of the cover of this user manual.
6 - Click on Create account. The account is created.
7 - To access your system, add the login and password you have created and click «connect».
5.1
433.445 MHz
5.2
5.1
SN : 12345
ID key : 12:34:56:78
model :
MADE IN FRANCE serial :
Conservez ces références nécessaires à la gestion à
distance de votre piscine.
Keep these details required for remote management
of your pool.
On www.intellipool.eu, create an account by filling the required fields.
3
REMOTE MANAGER
4
Login :
Password :
Connect
Create account
2
5
Cookies and Javascript must be activated
Pentair Aquatic Systems - www.pentairpooleurope.com
Copyright 2012 Pentair International LLC - Terms of Use
21
www.
intellipool.
eu
www.
intellipool.
eu
Menus on www.intellipool.eu
Summary menu
The menu Summary is the main menu. It appears as a dashboard that displays all the parameters of the current situation.
date and time of the last data
received
pool cover deployed
lighting ON
snow alert (air temperature <+3.0°C)
filtration running
freezing alert (water temperature
<+3.0 ° C)
filter to clean
empty tank alert
unit selected in the Alarms
menu
mode and setpoint value
cross = value out of range
check = good value
radio signal strength
Radio relay battery strength
Commands menu
The menu Commands is used to launch an equipment or to set the mode.
Commands : 45000
Choice of operating equipment
The timers settings are accessible in
the menu Setpoint / Timer
OFF
Filtration
Lighting
ON
ECO
NORMAL
TURBO
OFF
SCHEDULE
MANUAL
Backwash
Launch
Heating
AUTO
OFF
pH regulation
OFF
AUTO
ORP regulation
OFF
AUTO
AUX1
OFF
Save modifications
22
HORL. AUTO CHOC
The function starts CHOC 24H filtration
and electrolysis forced. This function is
useful after a strong activity in the pool.
SCHEDULE
MANUAL
AUX1 presents OFF / SCHEDULE /
MANUAL choice if AUX1 is not connected on Backwash.
Setpoints menu
English
This menu allows to set all the setpoints of connected equipments.
Some settings can be only accessible through a professional account.
Setpoints : 45000
Get PC time on Control center
Heating value to be achieved in AUTO mode in
the menu Commands
Synchronize time
Pool information
Heating
AUX 1 Auto BackWash
28
m3
Setpoint value :
24
°C
Feature affectation :
pH regulation
The choice of the type of disinfectant is
directly on the Control center.
Volume :
Feature affection :
7.3
pH corrector type :
pH-
Injection time :
20
Maximum volume :
0.3
ORP
Setpoint value :
Disinfectant type :
Filtration
The timer settings are used only if the
filtration is set on timer mode in the menu
Commands.
backwash
650
s
- The choice between pH and pH + is directly
accessible on the Control Center.
- The choice is not available with a customer
mode.
ORP value to be achieved in AUTO mode in the
menu Commands
mV
Electrolysis
Value of frost protection.
3
°C
Eco mode :
30
%
Mode turbo :
30
%
Anti freezing :
pH value to be achieved in AUTO mode in the
menu Commands
Timer settings
0h 1h 2h 3h 4h 5h 6h 7h 8h 9h 10h 11h 12h 13h 14h 15h 16h 17h 18h 19h 20h 21h 22h 23h 24h
This setting will limit the time frame of the filter
to ensure it does not work at times innoportuns
(noise problems at night with respect to the
neighborhood, for example).
Filtration authorizations in automatic mode
Start time :
Priorité pH :
The timer settings are used only if the
lighting is set on timer mode in the menu
Commands.
Lighting
7h
Stop time :
Priorité RedOx :
Auto
Priorité chauffage :
Color choice :
11
Timer settings
0h 1h 2h 3h 4h 5h 6h 7h 8h 9h 10h 11h 12h 13h 14h 15h 16h 17h 18h 19h 20h 21h 22h 23h 24h
Any changes made since the Internet may
take up to 15 minutes to see its application
on the installation.
Synchronize time
Priority is used to control the filtration during the
time frame allowed (because the equipment
required to operate when the filter is in
operation and under normal circumstances,
these items are not allowed to drive the
filtration).
Display depend of type of equipments connected and options chosen.
: not accessible in pool owner account
23
IntelliFlo® menu
IntelliPool® enables you to obtain the most efficient and economic use of your IntelliFlo® pump. The system can operate with every type of
IntelliFlo® equipped with the VS, VF or VSD variable frequency drive.
Before setting up the speeds in the IntelliPool® menu on IntelliPool®, it is advised to run an operational test in order to establish the most functional speed settings.. You can do this before the actual installation or by disconnecting the IntelliFlo® Communication cable. This way you can use
the pump keypad to quickly change speeds on the pump. Consult your IntelliFlo® manual for precice explanation on how to change speeds on
your pump. (IntelliFlo® VF customers need to use the manual button using the ‘ste speed’ command.)
IntelliFlo : 45000
Min :
1200
rpm
Min :
3000
rpm
Electrolysis filtration speed
Min :
1300
rpm
Heating filtration speed
Min :
3000
rpm
Shock mode speed
Min :
2400
rpm
Shock mode speed
AUX 2 Setpoint :
No change
rpm
AUX 3 Setpoint :
No change
rpm
AUX 4 Setpoint :
No change
rpm
2600
rpm
IntelliFlo speed range
Backwash filtration speed
Setpoint :
Sequence duration :
0m 10s
IntelliFlo - Warning
1 2 3 4 5 6 7 8
#2: DRIVE TEMPERATURE WARNING'
Mimimum speed: find out the mimimum speed still generating sufficienbt
flow in the pool. IntelliPool® will not run lower then this speed. The lower you
can establish this speed the better the energy savings.
Maximum: speed: this is generally the speed required for backwashing, the
pump will not allow higher speeds in order to prevent damage to the pool
system.
Heater: your heatpump will require a mimimum flow; select a speed at wich
the heatpump can operate. You can adjust the speed upwards until the
heatpump compressor is activated. Set the speed another 5% higher.
Salt Chlorinator: your salt chlorinator will require a mimimum flow. Determine what RPM is required for your chlorinator to be activated and set the
menu at a 5% higher value.
Aux speed: for auxiliary features 3 options are possible (selectable in the
scroll menu)
1. no change: pump will continue normal filtration speed while aux feature is
active (example: garden lights).
2. OFF: pump will stop while aux is active ( example robotic cleaner).
3. set specific RPM: the pump will run at a specific RPM while aux feature is
active (example: fountain).
Automatic backwash valve: if the aux feature is set-up as an automatic
Backwash valve, specific BW speed and time can be set in this section.
With these setting in place IntelliFlo will run at the lowest, most economical
speed, but will increase this speed only when required for the specified
functions.
Save modifications
Comments about current alarms displayed (hover the mouse
on the concerned alarm).
IntelliChlor® menu
The IntelliChlor® menu allows to adapt the running duration in case of pool cover presence and to know the type of warning
IntelliChlor : 45000
Running duration cover closed
0h 15min
/day
Save modifications
IntelliChlor - Warning
Limited duration of chlorinator running in presence of cool cover
1 2 3 4 5 6 7 8
#2: LOW SALT'
24
Comments about current alarms displayed (hover the mouse on the concerned alarm).
E-mails and alarms menu
English
These two menus allow you to configure different e-mails with alarms that may be different alarms to display indoors.
The values of the alarm condition also display check marks and crosses on the menu SUMMARY and HISTORICY.
Green light = active configuration
Grey light = inactive configuration
E-mails : 45000
E-mails parameters
New configuration
The selected configuration is on
a blue background.
Configuration : Mickael iPhone
OFF
ON
Configaration list :
E-mail adress : [email protected]
Mickael iPhone
Job e-mail
Country house
Pool cleaning service
Alert periodicity : Weekly
E-mail time : 06
h 30
min
New configuration
Delete this configuration
Save
Alarms : 45000
This menu allows to edit alarm’s values and enable e-mail alert
Technics is alert for internal technical information
(filtration order impossible, filter wash needed
,pH corrector empty tank, disinfectant empty tank,
probe calibration needed, check communication
cable...).
Water temp.
Max:
Min:
3
pH
Max:
7.7
Min:
6.7
Conductivity
Max:
5
Min:
2.5
ORP
Max:
800
Min:
500
34
g/L
mV
Technics
Reset
(Default values)
OFF
ON
OFF
ON
OFF
ON
OFF
ON
OFF
ON
°C
Save modifications
Reset = e-mails alarms values by default :
Water temperature : Min=+3.0°C Max=+40.0°C
pH : Min=7.1 Max=8.4
Conductivity : Min=2.5 g/l Max=5.5 g/l
ORP : Min=500 Max=800
25
Data History menu
The history menu is a powerful tool enabling you to analyse and compare data from your installation . In many cases this tool will allow the pool
professional to solve problems without having to be present on-site.
Data are available up to 10 years.
Datagraph can be enabled/disabled
Data marker can be set to specific moment
Data analysis per day/month year
Graph scale can be adjusted
26
English
Indoor display
The Indoor remote display informs all parameters (updated every 15 minutes) of the water and air temperature.
Intended for indoor use, pre-programmed alerts allow a quick glance to check the chemical balance of water without the analysis tedious at the
poolside.
Moving the display can cause signal loss. If there is more than 1 hour out of reach,calib
all informationalarm
on is erased.
The remote display can be used put on a tripod or wall mounted (after testing the signal range)
1 : Air temperature (° C or ° F)
3 : Pool cover rolled
5 : Operating without heat
7 : Sand filter alert
9 : IntelliFlo® alert
11 : Alarm Mode
13 : Radio mode
15 : OFF the alarm
17 : IntelliChlor® alert
19 : Clean filter required
21 : Radio relay batteries level
23 : Value of ORP in mV
25 : Self-adaptive unit (g / l) or (µS)
27 : Tick for a correct value
29 : Spot litght ON
31 : Risk of snow
2 : Water temperature (° C or ° F)
4 : Heating alert
6 : Heating running
8 : Efficienty percentage
10 : IntelliFlo® running
12 : Calibration Mode
14 : The alarm ON
16 : IntelliFlo® alert
18 : Heater alert
20 : Indoor display batteries level
22 : Radio force signal
24 : Value of the rate of salt (g / l) or conductivity (ĩS)
26 : pH value
28 : Water temperature alert (<+3°C)
30 : Pool cover closed
32 : Temperature unit (° C or ° F).
32
31
1
alternative display water / air
2
30
29
28
27
3
4
5
6
7
26
1 = escape
1
2
3
4
- go back to previous stage without confirming modifications
2 = move down / decrease
- browse downward in scrolling menus or decrease values in numerical sections
3 = move up / increase
- browse upward in scrolling menus or increase values in numerical sections
4 = validate
- access the parameter displayed or validates modifications and goes back to the previous menu
25
24
9
10
11
12
13
23
14
15
16
17
19
20
21
22
27
Indoor display
REAR VIEW
433.445 MHz
4
1
2
model :
MADE IN FRANCE serial :
REFRESH VALUES
A return (ON > CALIB > ON or ON > ALARM > ON)
"refresh" the values on the screen after 20 seconds
TRIPOD
Use only alkaline batteries of high quality
resistant to temperatures of +70 ° C (ex
DURACELL PROCELL)
5
Alarm sound switch
ON / OFF
3
BATTERY HATCH
calib on alarm
Mode switch
calibration / on / alarm
ON mode:
- device operating
CALIBRATION mode:
- personalise alarm values
- calibrate pH and RedOx/ORP sensors
- calibrate water temperature
- choose units
ALARM mode:
- personalise alarm values
The display is intended for indoor use. Do not expose to sunlight or rain. Exposure to
sunlight (UV) or rain can damage it irreversibly.
Temperatures
Remote display provided alternately (in ° C or ° F, see p34) the air temperature along with the cloud symbol and
temperature of water accompanied by the words "water" symbol.
Note : direct exposure of the Radio relay to sunlight disturbs the air temperature measuring. If the installation
includes two Radio relays, is that which the jumper is ON, which will provide these values, see p13. In the event
of a discrepancy between displayed temperature value and the reference value provided by a standard instrument, it is possible to recover this gap via "calibration", see p34.
Snow / freezing risk detection
The freezing pictogram for the air temperature is displayed if the temperature measured by the Radio relay is
below +3°C (37.4° F).
28
The water freezing pictogram is displayed if the pool temperature is below +3°C (37.4°F). There is a risk of ice forming on
the surface; action must be taken to prevent damage to the pool. If filtration is connected, Control unit will automatically
launch the filtration. In case of technical room heated, +3°C set point can be changed in ControlCenter/Setting/Install/
Filtration menu.
Current mode
Alarm mode and Calibration mode correspond to the position of the switch on the back of the remote display. RADIO mode
means that the radio is programming a new element on the IntelliPool® network.
Activate / deactivate sound
On remote display, an audible alert for the different alarms and a discreet button beep are available. This pictogram illustrates
sound activation and deactivation, accessible via the switch on the back of remote display.
Batteries level
The level of the batteries is displayed under the pictogram representing each element.
The service life of the batteries is over 1 year, but may vary according to climate conditions.
1
2
3
4
> As soon as the level reaches "Batteries very low", the batteries should be changed: (Radio relay: 4 X LR6 / Remote display:
4 X LR6).
1 : Batteries full
2 : Batteries ok
3 : Batteries very low
4 : Batteries to replacen
Network radio signal strength
1
2
3
4
5
The IntelliPool® network signal strength depends on the geographic location of the Radio relay (long distance, pool situated
above the house, and the presence of an enclosing wall are detrimental), on the house materials (reinforced concrete and
metal buildings are detrimental) and on the Radio relay bracket (metal pickets or galvanised drainpipes are detrimental).
If after testing different radio relay location configurations, the network signal remains too low or non-existent, place a second
Radio relay between equipment room and remote display to optimise the signal strength (test before fixing the elements).
Adding an element to the IntelliPool® radio network entails programming it (see p31).
Pool cover position
For swimming pools equipped with a pool cover and after the connection is made on Control center, the position (cover
unfolded, cover wrapped) is displayed.
29
English
Ice risk detection
Conductivity / Salt concentration
A water’s capacity to allow an electric current to flow, conductivity is proportional to concentration of dissolved minerals (partly originating from
water treatment products). The value in μS reveals "the water age of your pool".
conductivity has reached the maximum alarm value
(factory pre-setted 1200μS / 0.75g/L,
modifiable via the alarm menu, see p.33)
conductivity has reached the minimum alarm value
(factory pre-setted 50μS / 0.03g/L,
modifiable via the alarm menu, see p.33)
conductivity compliant with alarm setpoint values
(factory pre-setted from 50 μS to 1200 μS)
measured conductivity value
(display limited between 0 and 1999μS, 19.90g/L)
conductivity outside alarm setpoint values
( Mini or Maxi indicate whether
the value is too low or too high)
= Conduc < 0 g/l
= Conduc > 19.99 g/l
Conductivity in a salt electrolysis pool (in g/l)
> Conductivity too low (depending on type of electrolyser): add salt up to the value advised for your electrolyser.
> Conductivity is too high (depending on type of electrolyser): change the pool water (drain + refill) until the desired value is obtained.
Conductivity in a pool without salt electrolysis (in μS/cm)
> Conductivity is too high (> 1200 μS, modifiable default alarm value): change the pool water (drain + refill) until a value of below 1200 μS is obtained. Water
with conductivity of over 1200μS is said to be "buffered", and treatments become ineffective.
ORP : Oxidation-Reduction Potential
Concentration level of disinfectant (chlorine, bromine, active oxygen ...) present in the pool. For this "disinfection potential" measurement, it is
usually advised to keep to between 500 mV and 800 mV. The Oxidation-Reduction Potential tells us about the oxidant quality in the water. It is the
result of the ratio quantity of disinfectant / quantity of pollution.
0
100
200
300
400
500
600
700
ORP
ORP has reached the maximum alarm value
(factory pre-setted 800mV modifiable via the alarm menu, see p.33)
ORP has reached the minimum alarm value
(factory pre-setted 500mV modifiable via the alarm menu, see p.33)
ORP value measured in mV
(display limited between 0 and 999)
= ORP < -99 mV
= ORP > 999 mV
EXCESSIVELY HIGH ORP CAUSES SKIN IRRITATION AND MAY DAMAGE THE ELEMENTS OF YOUR POOL.
ESCESSIVELY LOW ORP MAY BE A HEALTH HAZARD
> Make sure that:
- the bottle has been removed from the ORP sensor
- the ORP sensor is not clogged
> Manual regulation: > Add disinfectant (chlorine, bromine, active oxygen...) to the desired value.
> Automatic regulation: > Have your pool dealer verify that your equipment is working correctly.
30
800
900
1000
mV
ORP compliant with alarm setpoint values
(factory pre-setted from 500mV to 800mV)
ORP outside alarm setpoint values
(Mini or Maxi indicate whether
the value is too low or too high)
pH is a (unitless) quantity measuring the acidity (0 to 7) or alkalinity (7 to 14) of the pool. pH is the concentration of hydrogen ions. For a pool, the
generally advised ideal pH is close to 7.3 (to be confirmed with your pool dealer, according to your installation).
The accuracy of the pH measurement is strongly tied to regular maintenance of the pH probe. It is advisable to check regularly for any clogging,
and to calibrate it before the summer season (see p.33). The pH high and low alarm setpoint values are preset in the factory to 6.7 and 7.9. These
values can be modified via alarm mode (see p.33).
0
1
2
3
4
5
6
7
8
9
10
11
12
13
14
pH
pH has reached the maximum alarm value
(factory pre-setted 7.9 modifiable via the alarm menu, see p.33)
pH compliant with alarm setpoint values
(factory pre-setted from 6.7 to 7.9)
pH has reached the minimum alarm value
(factory pre-setted 6.7 modifiable via the alarm menu, see p.33)
measured pH value
(display limited between 0 and 9.9)
= pH < 0
= pH > 9.9
pH outside alarm setpoint values
(Mini or Maxi indicate whether
the value is too low or too high)
EXCESSIVELY HIGH OR LOW pH CAUSES SKIN IRRITATION
> Make sure that:
- the bottle has been removed from the pH probe
- the pH probe has been calibrated in the last 6 months (see p.35)
- the pH probe is not clogged
> Manual regulation: apply some "pH-" or "pH+" product, depending on the pH deviation.
> Automatic regulation: verify that the equipment is working properly
Add a new radio relay
This RADIO mode enables the following to be added a second radio relay to cope with demanding radio range situations (lay of the land, very long
distances...).
1 - Press RESET briefly (0.5 s) with a paper clip at the back of the remote display. note: Pressing and holding ( >4 s until the beep) activates a
setpoint values reset. > The remote display will then display «radio».
2 - Take off the pot by pulling the tab on the radio relay.
3 - Place the jump in OFF position to avoid to perturb the air temperature values of the radio relay#1, see p3.
4 - Remove the battery insulation film.
5 - Reconnect the battery holder.
6 - The red LED flashes max 120s untill the radio relay is recognised > Put the container’s cover back on.
1
2
3
OFF
4
5
6
CL AC !!
31
English
pH value
Reprogramming the original indoor remote display
The components of a set are factory matched by a single radio code which prevents any risk of interference with other IntelliPool® (neighborhood,
several ponds nearby ...).
1 - Remove the blue rubber cover of the Probe unit.
2 - Click on "radio programming" with a paper clip. > The yellow LED lights up, Probe unit then emits a radio code learning for 5 min note: starting
up the remote display will activate automatic recognition/programming of a radio code.
3 - Remove the battery hatch.
4 - Remove the insulating film batteries.
5 - The remote display goes into learning mode radio > The remote display displays values. > Replace the battery hatch.
1
3
2
5
4
Add a new Indoor remote display
This RADIO mode enables to add a second remote display to set up a second source of information reading from your pool.
1 - Press RESET briefly (0.5 s) on the original remote display «A» (it displays «radio»). Note: Pressing more than 4 s until the beep activates a
alarm values reset.
2 - Remove the battery hatch of the new remote display «B».
3 - Remove the battery insulation film of the new remote display.
4 - The new remote display switches to radio programming mode.
5 - The new remote display displays the same values as the original remote display. Replace the battery hatch. Note: If the values of alarms
original remote display have been customized, it must be refered manually to the new remote display for identical alarms.
1
A
A
2
3
A
B
4
B
B
A
5
32
B
English
ALARM MODE - Modification of alarm setpoint values
With this mode you can modify the setpoint value of:
- the pH high alarm (factory pre-setting 7.9)
- the pH low alarm (factory pre-setting 6.7)
- the conductivity high alarm (factory pre-setting 1200μS)
- the conductivity low alarm (factory pre-setting 50μS)
- the RedOx/ORP high alarm (factory pre-setting 800 mV)
- the RedOx/ORP low alarm (factory pre-setting 500 mV)
1 - Push the switch to alarm mode (rear face of indoor display). note: All these values remain stored in a battery change
2 - Set the value following the navigation operating principle.
3 - When the last modification is valited, set the switch back to ON mode
2
1
1 = escape
1
2
3
4
- go back to previous stage without confirming modifications
2 = move down / decrease
- browse downward in scrolling menus or decrease values in numerical sections
3 = move up / increase
- browse upward in scrolling menus or increase values in numerical sections
4 = validate
- access the parameter displayed or validates modifications and goes back to the previous menu
calib on alarm
To restore all the device’s default values, press and hold (4 s) RESET with a paper clip on the
rear of the remote display.The operation is validated by a long beep.
33
CALIB MODE - Changing units & deliberate correction of values
In spite of calibration of measurement sensors, it may be that a value is out of line with another measurement reference (regular thermometer...).
For this reason you have the option of deliberately correcting certain values as the units of the air temperature & water temperature (factory
pre-setting °C) and the conductivity (factory pre-setting µS) or values of air temperature and water temperature.
1 - Push the switch to CALIB mode (rear face of indoor display).
2 - Set the value following the navigation operating principle.
3 - When the last modification is valited, set the switch back to ON mode
1
calib on alarm
2
1 = escape
1
2
3
4
- go back to previous stage without confirming modifications
2 = move down / decrease
- browse downward in scrolling menus or decrease values in numerical sections
3 = move up / increase
- browse upward in scrolling menus or increase values in numerical sections
4 = validate
- access the parameter displayed or validates modifications and goes back to the previous menu
3
calib on alarm
34
By its nature, a pH probe needs to be regularly recalibrated (preferably before the season). The lifetime is aprroximatively 2 years.
For this operation, you will need to hand the remote display and the "pH4" and "pH7" standard bottles delivered. The pH is temperature dependent,
this procedure requires to be practiced in the shade (25 ° C / 77 ° F).
1 - Push the switch to CALIB mode (rear face of indoor display).
2 - Set the value following the navigation operating principle.
3 - Dip the end of the pH probe in the bottle of pH 7 standard solution during 10 min minimum and then VALID. A 99s countdown is launched.
A - PROCEDURE FAILED: > Check that there is a pH 7.0 solution in contact with the probe during the procedure > The probe is no longer working
(to replace).
4 - Dip the end of the pH probe in the bottle of pH 4 standard solution during 10 min minimum and then VALID. A 99s countdown is launched.
5 - Operation successful. > Set the switch back to ON mode.
B - PROCEDURE FAILED: > Check that there is a pH 4.0 solution in contact with the probe during the procedure > The probe is no longer working
(to replace).
1
calib on alarm
2
x3
10 min
pH
pH
10 min
4
3
7
100 s Max
4
100 s Max
A
5
B
calib on alarm
35
English
CALIB MODE - Calibrating a pH probe
CALIB MODE - Calibrating a OPR probe
The ORP probe can be recalibrated. The lifetime is aprroximatively 5 years. By nature, an ORP sensor drift few, and requires exceptionally to be
recalibrated. Therefore, ORP standard solutions are not provided because it is very rare to calibrate and it can be done some years after delivery
but a ORP calibration solution can’t be stocked more than 2 years. For this operation, you will need to hand the remote display and 240mV and
470mV standard bottles. This procedure would be performed in the shade.
1 - Push the switch to CALIB mode (rear face of indoor display).
2 - Set the value following the navigation operating principle.
3 - Dip the end of the ORP probe in the bottle of ORP 240mV standard solution during 10 minutes minimum and then VALID. A 99s countdown is
launched.
A - PROCEDURE FAILED: > Check that there is a ORP 240mV solution in contact with the probe during the procedure > The probe is no longer
working (to replace).
4 - Dip the end of the pH probe in the bottle of ORP 470mV standard solution during 10 min minimum and then VALID. A 99s countdown is
launched.
5 - Operation successful. > Set the switch back to ON mode.
B - PROCEDURE FAILED: > Check that there is a ORP 470mV solution in contact with the probe during the procedure > The probe is no longer
working (to replace).
1
calib on alarm
2
x5
100 s Max
470 mV
4
100 s Max
A
5
B
36
O.R.P.
10 min
3
240 mV
O.R.P.
10 min
calib on alarm
GARANTEE
For specific warranty conditions refer to the Pentair product catalogue.
Exclusions and limitations:
Besides the considerations above, Pentair does not offer any guarantee (explicit, implicit, statutory or otherwise), for the product or software that it contains or accompanying it,
regarding the accuracy of the information provided or suitability for a particular purpose.
Pentair is in no way liable for the consequences of an action performed due to a value displayed.
Under this guarantee, Pentair is only obliged to repair or replace products meeting the conditions of this guarantee. Pentair is in no way liable for any loss or damage due to the
products, service, under this guarantee or otherwise, including - financial losses; the price paid for the product; loss of profit, revenue, data, enjoyment or use of the product or any
associated product; indirect or fortuitous loss or damage.
SPECIFICATIONS - Technical characteristics
- Weight of assembly: approx. 3 kg
- Standard: CE
- Radio range: 100 m in free field
- Radio frequency: 433,445 MHz
- Hand assembled in France
- Guarantee excluding sensors and consumables: 2 years
- Water-tightness: Probes/Control Centers IP61 / Radio relay IP65 / Indoor display IP40 / Remote control IP66
DECLARATION OF COMPLIANCE : Adheres to directive RTTE 99/5/EC
EMC : compliance demonstrated by adherence to standard EN 301-489
Safety : compliant with standard EN 60950-1/2001
Radio : compliance demonstrated by adherence to standard EN 300-220 covering the essential requirements of the RTTE directive.
Exposure to radio frequency signals: As per the recommendations of 1999/519/EC, when using the device, keep the products over 20 cm away from your body.
Notes :
- compliance has been evaluated as per the procedure described in Appendix III of the RTTE directive.
- receiver class (if applicable): 3
At St. Laurent du Var / 12 Juillet 2011
Precautions and maintenance
As radio relay is mounted outdoors, the appearance of traces of deposits is completely normal.
The indoor display is intended exclusively for indoor use.
Exposure to the sun (UV) or rain may damage it irreversibly.
> Do not subject the device to impacts, forces, dust, excessive temperature or humidity changes that could alter the device’s operation or limit its service life.
> Do not submerge the device in water.
> Clean the exterior with a micro-fibre cloth or a soft cloth. Do not use solvent, abrasives or acids.
Spare parts
The original spare parts necessary to maintain your device Pentair, are available from your dealer.
UTILISATION OF PARTS OTHER THAN PENTAIR GENIUNE PARTS VOID THE WARRANTY.
INTP-5210
INTP-5220
INTP-5230
INTP-5240
INTP-5150
INTP-5160
INTP-5161
H-52-0272
R350122
IntelliPool ph probe + ph4 & ph7
IntelliPool ORP redox probe
IntelliPool conductivity probe
IntelliPool ext antenna for control ctr
IntelliPool Radio relay
IntelliPool Indoor display
IntelliPool Remote Control
SENSOR TMP IT/ET/ST 10KOHM THERMISTOR20F
IntelliFlo 2wire comm cable
37
English
For the consumer, Pentair guarantees that the product, with the exception of the consumables or parts with limited resistance (e.g. batteries, pH sensor, O-ring...), is guaranteed
against any quality, material and manufacture defect for a period of TWO YEARS from the date of installation.
SAVE THESE INSTRUCTIONS !
PENTAIR AQUATIC SYSTEMS
INDUSTRIEPARK WOLFSTEE, TOEKOMSTLAAN 30, 2200 HERENTALS - BELGIUM, WWW.PENTAIRPOOLEUROPE.COM
Copyright – Limited License: except as specifically permitted herein, no portion of the content on this document may be reproduced in any form or by any mean without the
prior written permission of Pentair International SRL.
Printed in France
creation: S . Colomb