1
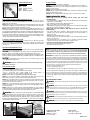
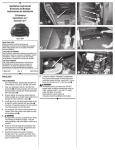
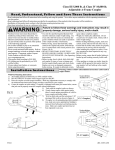
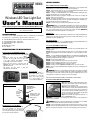
86064
Wireless LED Tow-Light Set
User’s Manual
How to safely install, operate, and maintain portable Wireless LED Tow - Lights.
READ THIS FIRST: Read and follow all instructions carefully
before beginning installation.
PACKAGE CONTENTS
This wireless set comes with the following items. Please check whether they are all included in
the package, if one or some is missing, contact the retailer for replacement.
1 - Transmitter Module with 6 foot long harness with 4-way flat trailer end connector
1 - Super Bright LED Tow-Lights - Left Side Unit
1 - Super Bright LED Tow-Lights - Right Side Unit
2 - Magnetic Mounts
4 - Mounting Straps, 30" long
1 - User's Manual
UNDERSTANDING THE MAIN FEATURES
Operation of the 3-Position ON/ON/OFF Push Switch
Your Tow-Lights are equipped with a 3-position
ON/ON/OFF push switch, located on the right Tow-Light
module.
•Depress the switch once, this will turn ON your
Tow-Lights. The green LED in the top right corner
of the right Tow-Light will illuminate, indicating
the Tow-Lights are now ready for operation.
• Depress the push switch a second time. This will
MANUALLY turn ON the running lights which is the
Night Operation mode.
• OFF: Depress the push switch a third time.
This will turn the Tow-Lights OFF.
Battery Compartment
Each Tow-Lights Module is
equipped with a battery compartment designed for 4 "AA" type
batteries and a battery housing
cover as shown. Battery covers
are secured using the Wing Nut .
Quick Release
Locking Pin for
Tow Light Module
Attachment
Tow-Lights Magnetic Mounts
Tabs for
Tow Light
Module
Support
Installing the straps on Tow-light Module.
Illustration shows the suggested strap
run to your Tow-lights. You will need to
detach the snap release end of the buckle in
order to thread it through loop holes. Re-attach
the snap release and the clip retainer.
Magnetic Base - 132
lb Pulling Force with
Scratch Resistant
Rubber Cover
GETTING STARTED
How To Install Batteries In The Tow-Lights Module.
Step 1 Eight (8) 1.5 volt AA NEW batteries are required (4 batteries for each Tow-Light module).
Lithium batteries are recommended. (The transmitter requires NO batteries.)
Step 2 Remove the wing nut in the rear of each Tow-Light Module by turning the wing nut
counter-clockwise to loosen. Remove the battery housing plate.
Step 3 Install (4) 1.5 volt AA NEW batteries in each Tow-Light module, aligning the proper
polarity as indicated by the + and – symbols in the module.
Step 4 Reattach both battery housing plates and wing nuts. Be careful not to over tighten the
wing nuts. Tighten just to a snug position.
Step 5 To verify that the batteries have been properly installed, push the 3-way push switch
twice to enter the Night Operating mode. If the Tow-Lights’ running lights do not illuminate, recheck that the batteries have been installed properly.
Step 6 Turn off the 3-way push switch by pressing the button one more time.
WARNING: There is a LOW BATTERY warning built into the Tow-Lights circuit. When the
low battery circuit determines the receiver can NO longer operate safely, it will automatically
switch both Tow-Lights to an Emergency flashing mode. Flashing Tow-Lights indicate that the batteries are low and NO signal can be received from the tow vehicles’ transmitter. IMMEDIATELY
install fresh batteries in BOTH Tow Lights before continuing to tow.
Lithium Batteries
For best operation, use lithium 1.5 volt AA batteries. With their increased lifespan, lithium batteries
will operate your Tow-Lights about three times longer than standard alkaline batteries, or for approximately one 24-hour day/night period.
Cold -Weather Operation
For temperatures below 20° F ( - 7° C), use only AA lithium batteries. Standard alkaline batteries do
not work well at low temperatures and will deplete too quickly.
Test your Tow-Lights BEFORE you START Towing
Step 1 Install the batteries in your Tow-Lights. Follow the “How to Install the Batteries in the
Tow-Lights” guide.
Step 2 Make sure your vehicle’s wiring harness plug connector is clean. Plug the Tow-Lights’
Transmitter 4-way flat plug into your tow vehicle’s wiring harness connector and place your transmitter.
Step 3 Locate the YELLOW PUSH BUTTON SWITCH on your RIGHT light and (PRESS ONCE).
There will be a small green LED that will illuminate in the top right corner of the RIGHT light. The
illuminated green LED indicates that your lights are ready to test.
Step 4 Turn your vehicle’s ignition to ON.
Step 5 Activate your RIGHT turn signal and check for proper operation.
Step 5 Activate your LEFT turn signal and check for proper operation.
Step 7 Activate your BRAKE lights and check for proper operation.
Step 8 Activate your vehicle’s EMERGENCY FLASHERS and check for proper operation.
Step 9 Turn your vehicle’s RUNNING LIGHTS (headlights) ON and check running lights for
proper operation.
WARNING: If ANY of your vehicle lighting functions DO NOT operate with your Tow Lights
appropriately, DO NOT use your Tow Lights. Un-plug and re-plug the 4-way flat plug several times
and repeat Steps 1-9. If the results continue to be the same, have a qualified repair person service
your wiring harness and plug connection before you use your Tow Lights.
IF ALL LIGHT FUNCTIONS WORK PROPERLY, YOU ARE READY TO START TOWING.
Placing The Transmitter Module On The Towing Vehicle
Step 1 The transmitter is equipped with a magnetic base.
When placing the transmitter on the tow vehicle, always locate the most secure position possible.
Step 2 Place the transmitter in a clear, unobstructed view
of the tow vehicle. Do not place the transmitter inside the bed
of a pick-up truck unless the pick-up gate has been lowered
or removed. Do not place the transmitter in the trunk of a car.
Semi truck operators: Place the transmitter directly behind
the cab on top of the frame of the tractor.
Step 3 The transmitter base magnet must be placed on a
flat clean (HORIZONTAL) surface.
CAUTION: To avoid damage to your vehicle’s paint, check the surface of the transmitter base
magnet for any foreign matter.
WARNING: Take extra care in placing the transmitter around luggage carriers and similar
accessories. Obstructing the transmitter may interfere with its safe operation.
Step 4 Locate the female light system plug on the tow vehicle and remove any dirt or corrosion.
Step 5 Connect the 4-prong male flat plug of the 6-foot long transmitter harness with the female
plug of the tow vehicle. The transmitter is now connected to the lighting system of your vehicle.
Transmitter Wiring Color Codes
and Light Functions
White
Yellow
Brown
Green
- Ground
- Left Brake / Left Turn
- Running
- Right Brake / Right Turn
Storing the Tow-Lights
Step 1 Make sure your Tow-Lights are turned OFF.
Step 2 If you are going to store your Tow-Lights for more than 30 days, remove the batteries.
CAUTION: Keeping the batteries in the Tow-Lights for long periods can cause leakage and
damage the electric circuitry.
Step 3 Unplug the transmitter from the vehicle.
Step 4 Wipe the Tow-Lights and the transmitter with a clean, damp cloth and place them back
in their original clam shell packaging.
Step 4 Store the Tow-Lights and the transmitter in a dry area out of the reach of children.
TROUBLESHOOTING GUIDE
How to install the Tow-Lights on the Magnetic Mounts (Mag Mounts)
Step 1 Before attaching your Wireless Tow-Lights to the Mag Mounts, make sure that you
install fresh batteries. Keep in mind that LITHIUM batteries last 3 times longer than the standard
Alkaline when choosing batteries.
Step 2 Make sure you note how the webbing is run through the buckle. Remove the straps that
came with the Tow-Lights by removing the buckle at one end and sliding the straps through the
Tow-Light loops. Re-attach the buckle to the webbing for storage.
Step 3 The Right and Left Tow-Lights are marked with corresponding Left and Right arrows on
the top ridge. The Right Tow-Light also has the 3 way ON/ON/OFF switch. Make sure you attach
the Tow-Light marked with the Right arrow and switch to the Right positioned Mag Mount. On the
Right Mag Mount, pull the spring loaded pin located on the rear and lower the Right Tow-Light onto
the four hooks on the front. When the Tow-Light is seated, release the spring loaded pin. The pin
should now be in position over the top of the battery housing on the rear of the Tow-Light. Use the
same procedure for the Left Tow-Light on the Left Mag Mount.
Securing Excess Cable Between The Tow-Lights
After placing the Mag Mounts and attaching the Tow-Lights, any excess cable can be spooled up
on the spools on the rear of each Mag Mount. Wind 1/2 of excess cable in a figure eight (8) around
the spools on each Mag Mount, by passing the cable between the flexible spool faces and then
onto the spools.
Tips On Keeping The Mag Mount Bases Clean
1. Clean the Mag Mount bases with a damp cloth and be certain to remove any metallic particles
before placing mounts on any painted surface.
CAUTION: Never set the Mag Mounts on the ground or other areas that may have dirt or metallic particles. Small rocks have metallic properties and they will be picked up by the bases.
2. After completing each trip, return Mag Mounts to original packaging. If not available, use two
plastic bags with ties. Either method will help keep unwanted foreign objects and dirt from attaching to the bases.
CAUTION: Never allow magnetic bases to touch face to face. You may pinch a finger, etc. and/
or have difficulty separating the bases.
WARNING: NEVER USE THE MAGNETIC MOUNTS FOR ANY OTHER PURPOSE THAN
OUR WIRELESS TOW-LIGHTS.
How to mount the Tow-Lights
Step 1 Consider the following three points when deciding where to mount your Tow-Lights:
• Mount the Tow-Lights high, whenever possible.
• Try to maintain a distance of 6 to 8 feet between the two Tow-Lights.
• Choose a location that offers complete visibility to ALL following vehicles at
ALL times. Note: Check your state’s regulations on tail light spacing.
Step 2 Your Tow-Lights are equipped with two 30”adjustable straps per light.
Step 3 You can secure the Tow-Lights to a variety of different locations on most trailers or other
units that you are going to tow. Take your time to determine the optimal location.
Step 4 For some towing situations you may have to improvise by using a small washer with a
screw or nail through the straps to secure them. Likewise, duct tape, bungee straps, etc. may also
be used. Do not cover any portion of the lenses.
Step 5 Once you have located the proper place to mount your Tow-Lights, adjust the straps so
that when you snap the two ends of the buckle together you can feel a slight pulling resistance
before the buckle locks.
Step 6 Roll up any excess cable between the Tow-Lights by winding the excess into a small coil
around your hand. Run a strap through the coil before locking the snap. A slight pulling resistance
before locking the snaps will ensure that your Tow-Lights are tight and secure.
WARNING: Do NOT cover any portion of the Tow-Lights lenses at any time while towing.
Step 7 When towing a vehicle, if you do not want to use the magnetic mounts, you may consider
securing the Tow-Light straps to the handles of two one-gallon containers (e.g., milk containers
filled with water or sand) placed in the trunk. Adjust the straps so that the Tow-Lights are below
the trunk lid and above the bumper area. Close the trunk lid to secure the straps. You can apply the
same technique for hatch-back vehicles.
“Running lights do not turn on manually with the 3-position push on/off switch
set to Night Operation.”
• If your running lights do not illuminate when switched to Night Operation, check the batteries
in both units for correct installation.
• Try activating the push switch again for Night Operation mode.
• Make sure your batteries are fresh and fully charged.
• If the transmitter is plugged into the vehicle’s wiring harness, try activating the running lights
by turning on the vehicle’s running lights or headlights.
“Running lights work when switched to Night Operation but will not work with the
transmitter/vehicle.”
• If the running lights work by switching to Night Operation but will not work using the
transmitter via the vehicle’s wiring, the most likely problem is in the vehicle’s wiring or a
bad plug connection.
• Unplug and check the transmitter/vehicle connection.
• Check the terminals on the tow vehicle for possible corrosion. Clean and put a little di-electric
grease on the connections.
• Plug and unplug the harness several times. If you are absolutely sure that the transmitter
is properly connected, check your vehicle’s wiring for problems or shorts.
“Some, but not all of the light functions work via the transmitter.”
• Check all of the above for bad wiring in the tow vehicle.
• Check and clean all plug connections.
Notice This product will emit electromagnetic wave, just like other wireless products, however, its transmitting
power is less than other wireless products such as mobile phones. The 2.4 GHz WIRELESS TRANSMITTER AND WIRELESS RECEIVER MEET APPLICABLE FCC RULES AND REGULATIONS FOR LOW POWER COMMUNICATION DEVICE
TRANSMITTER ( TITLE 47 OF THE CODE OF FEDERAL REGULATIONS AND PART 15 RADIO FREQUENCY DEVICES).
Restrictions This equipment has been tested and found to comply with the limits of FCC Rules and Regulations
for low power communication device transmitter ( Title 47 of the Code of Federal Regulations and Part 15 Radio Frequency devices). These limits are designed to provide reasonable protection against interference in residential installation. This wireless device generates, uses and can radiate radio frequency energy and, if NOT installed and used in
accordance with the instructions, may cause interference to radio communications. However, there is no guarantee
that interference will not occur in a particular installation. If this equipment does cause interference to radio or television reception, the user is encouraged to try to correct the interference by the following measures:
• Reorient or relocate the receiving Unit or antenna.
• Increase the separation between the devices
• Connect the equipment into an outlet or circuit different from that to which the receiver is connected
This device complies with Part 15 of the FCC Rules. Operation is subject to the following two conditions: a) This device
may not cause harmful interference, and b) this device must accept any interference received, including interference that may cause undesired operation, changes and modifications not expressly approved by the manufacturer
or registrant of this equipment can void your authority to operate this equipment under Federal Communications
Commissions rules.
Important Safety Precautions
WARNING: Do not operate your Tow-Lights if your tow vehicle has wiring problems or faulty wiring
harness connections.
WARNING: Trailers with electric brakes: Disconnecting the trailer connector from the tow vehicle
will eliminate the electric brakes on your trailer and can cause an accident. DO NOT unplug the original trailer
harness. You will need to purchase a standard 4-prong female flat plug and install on your tow vehicle.
WARNING: Semi truck operators: Place the transmitter directly behind the cab on top of the frame
of the tractor. Best placement for the Tow-Lights on the trailer is the area where the channels meet the bumper.
A standard 4-flat plug is required on the tow vehicle.
WARNING: Do not submerge your Tow-Lights in water. Doing so may cause damage to the circuitry.
Warning: Do not carry or pick up your Tow-Lights by the connecting wire between the Tow-Lights.
WARNING: Do NOT cover any portion of the Tow-Lights lenses at any time while towing.
Patent 4,859,982 (Other Patents Applied for)
CEQUENT CONSUMER
PRODUCTS, INC.
29000-2 Aurora Road
Solon, Ohio 44139
MADE IN CHINA
www.cequent-cpi.com
Help Hotline: 1-800-234-6992
86064IN 05/10