1
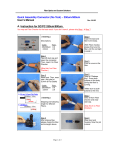
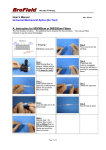
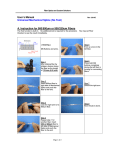
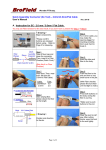
Fiber Optics and Custom Solutions
Quick Assembly Connector (No Tool) – 2.0mm/3.0mm/Flat Cable
User’s Manual
Rev. 2010D
A. Instruction for SC/PC 2.0 mm / 3.0mm / Flat Cable
You may set Fiber Checker for the best result. If you don’t have it, please skip Step 1 & Step 9.
< Drawing >
Descriptions.
Cable
Tube
250/900um 0.9
2.0mm
2.0
Step 1
Take off dust cap and
clean the connector.
Then, insert it to Fiber
Checker (Patch Cord).*
(Skip this if no Fiber
Checker.)
Step 2
Wear boot. Then, wear
tube. (No tube for
3.0mm & Flat Cable)
Cable
Tube
250/900um 0.9
2.0mm
2.0
Step 3
After striping fiber,
please cleave the fiber
as the length.
< Drawing >
Position and direction
for Kevlar.
*Patch cord on Step 1 is for easy operation and keeps the dust from Fiber checker.
Page 1 of 2
Step 4
Insert the tube and
fiber to the body.
Step 5
Push the fiber to the
end and form a very
small curve in the jaw.
(With Fiber checker,
please fine tune fiber
until red light is weak.)
Step 6
Take off “Release
Key”.
Step 7
Press both buttons on
the body during the
fiber is curving.
*Make sure to push
buttons to the end.
Step 8
Wear the boot to half
way. After cutting
Kevlar, wear the boot
to the end tightly.
Fiber Optics and Custom Solutions
Quick Assembly Connector (No Tool) – 2.0mm/3.0mm/Flat Cable
User’s Manual
Step 9
Take off from Fiber
Checker (Patch Cord)
and wear the dust cap.
(Skip this if no Fiber
Checker.)
B. Release Methods
Use Our Release Key
to push buttons up.
(The Key is free to
customers.)
C. Contact Information
If you have any question for our products, please contact us.
Page 2 of 2
Rev. 2010D
Step 10
Wear the housing.
Now the job is done.