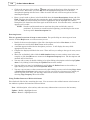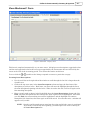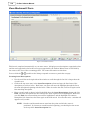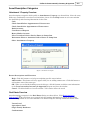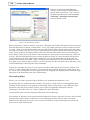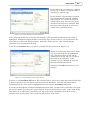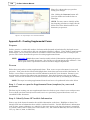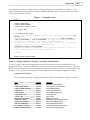
1
ProDoc® Document Assembly Software
Software Manual
Version 5
www.prodoc.com
© 2006-2008 Thomson Reuters. All rights reserved.
Revised 11/7/2008
Welcome to ProDoc®
Thank you for choosing us as your solution for automating your practice to save time, reduce errors,
and better serve your clients.
So you can reap the most benefit from ProDoc, the following services are standard with your
subscription:
* Automatic Updates - We continually enhance ProDoc software and our form templates. We send you
these updates at no charge several times each year and particularly before new legislation takes effect,
so your ProDoc-generated documents are always current with the law.
* FREE Training - In a few days, you’ll receive a call from our Customer Support Department to set up
free phone training for you and your staff. The purpose of the training is to help your team quickly learn
how to assimilate ProDoc software into your practice.
* Toll-Free Technical Support - Feel free to call our Customer Service Center at 800-759-5418 for any
questions you may have regarding the software. We particularly encourage you to call us when you’re
ready to install ProDoc on your network.
Finally, visit www.prodoc.com/support/index.asp to view our FAQs, hours of operation, and other
helpful information.
Many of our subscribers report that ProDoc pays for itself many times over through increased
productivity and reduced error rates. Based on our experience, you’ll discover ProDoc’s benefits when
you and your staff overcome your natural reluctance to change from your comfortable, but inefficient,
way of generating documents to the new, and more efficient, ProDoc way.
That’s why we encourage you to make the time to take advantage of our free training; it will be one of
the best investments you and your staff will ever make in your practice.
We guarantee it!
For more information, please call ProDoc at 1-800-759-5418.
Contents
I
Contents
Software Manual Introduction
Overview
of this Manual
.............................................................................................................................
Warranty
Information
.............................................................................................................................
Customer
Support
.............................................................................................................................
ProDoc
Website
.............................................................................................................................
ProDoc® Program Introduction
Welcome
to ProDoc
.............................................................................................................................
About
ProDoc
.............................................................................................................................
How.............................................................................................................................
ProDoc Assembles Documents
Chapter 1, Installation and Setup
Introduction
to ProDoc Setup
.............................................................................................................................
System
Requirements
.............................................................................................................................
Installing
ProDoc
.............................................................................................................................
Registration
and Setup
.............................................................................................................................
Manage
Users Login
.............................................................................................................................
Compatibility
Mode
.............................................................................................................................
Chapter 2, Assembling Documents
Assembling
Documents
.............................................................................................................................
Document
Assembly Wizard
.............................................................................................................................
Document
Assembly Menu
.............................................................................................................................
Phase
1 - Establish Assembly Settings
.............................................................................................................................
Phase
2 - Answer "Assembly" Questions
.............................................................................................................................
Phase
3 - Answer "Merge" Questions
.............................................................................................................................
Phase
4 - Saving Documents
.............................................................................................................................
Phase
5 - Edit and Save Completed Documents
.............................................................................................................................
Chapter 3, Main Menu
The
Main Menu
.............................................................................................................................
File
Menu
.............................................................................................................................
Edit
Menu
.............................................................................................................................
Clients
and Cases Menu
.............................................................................................................................
PowerPacks
Menu
.............................................................................................................................
Print
Menu
.............................................................................................................................
© 2006-2008 Thomson Reuters. All rights reserved.
1
1
2
2
3
4
4
5
6
7
7
7
7
11
13
14
16
16
16
16
17
23
26
27
27
29
29
30
31
32
41
41
II
ProDoc Software Manual
Print Blank
Forms Menu
..............................................................................................................
Print Client
Lists Menu
..............................................................................................................
Print Case
Data Sheet Menu
..............................................................................................................
Print Form
Lists Menu
..............................................................................................................
Print Global
Questions Menu
..............................................................................................................
Print Volume
Questions Menu
..............................................................................................................
Print Supplemental
Questions Menu
..............................................................................................................
Print Worksheets
Menu
..............................................................................................................
Print Labels
Menu
..............................................................................................................
Print QuickText
Menu
..............................................................................................................
Print Preview
Window Menu
..............................................................................................................
Customize
Menu
.............................................................................................................................
Document
Formatting Menu
..............................................................................................................
Supplemental
Forms and Questions Menu
..............................................................................................................
Default..............................................................................................................
Answers Menu
Edit Forms
Menu
..............................................................................................................
Form Sets
Menu
..............................................................................................................
QuickText
Menu
..............................................................................................................
Firm Information
Menu
..............................................................................................................
Options
Menu
..............................................................................................................
Assembly
Settings
..............................................................................................................
Word Processor
Settings
..............................................................................................................
Completed
Documents Settings
..............................................................................................................
Graphic
Forms Settings
..............................................................................................................
WebUpdate
Settings
..............................................................................................................
Miscellaneous
Personal Settings
..............................................................................................................
Backup
Settings
..............................................................................................................
Small Office
Suite (SOS) Settings
..............................................................................................................
Timeslips
Settings
..............................................................................................................
Phone..............................................................................................................
Types Settings
Clients..............................................................................................................
& Cases Settings
Custom
Fields Settings
..............................................................................................................
Firm Information
Fields Settings
..............................................................................................................
Firm Information
in Answers
..............................................................................................................
Miscellaneous
Firm Settings
..............................................................................................................
Tools
Menu
.............................................................................................................................
Certified
Mailer
..............................................................................................................
Design..............................................................................................................
Labels
Repair..............................................................................................................
Data Files
42
43
44
44
45
45
45
46
47
47
48
49
50
55
57
60
60
61
62
63
64
65
66
67
68
69
70
70
72
72
73
74
74
75
75
75
76
77
78
© 2006-2008 Thomson Reuters. All rights reserved.
Contents
Backup
Data Files
..............................................................................................................
Database
Transfer
..............................................................................................................
Registration
Menu
..............................................................................................................
Register
ProDoc
..............................................................................................................
Change
Registration
..............................................................................................................
Change
Firm Name
..............................................................................................................
Uninstalling
Volumes
..............................................................................................................
Edit Volumes
List
..............................................................................................................
Show Installed
Volumes
..............................................................................................................
Register
the PowerPacks
..............................................................................................................
Check..............................................................................................................
for Updates
ProDoc
WebUpdate Window
..............................................................................................................
Browse
WebUpdate History
..............................................................................................................
Cancel..............................................................................................................
ProDoc Subscription
Export..............................................................................................................
Data Menu
Window
Menu
..............................................................................................................
Help Menu
..............................................................................................................
III
78
79
79
80
80
80
80
82
83
83
84
84
84
84
85
87
87
Introduction to California PowerPacks
88
Selecting a Case for PowerPack Use
90
California Inventory & Appraisal
91
Getting
Started
.............................................................................................................................
General
Form
.............................................................................................................................
Community
Property Form
.............................................................................................................................
Separate
Property Form
.............................................................................................................................
View
Attachment 1 Form
.............................................................................................................................
View
Attachment 2 Form
.............................................................................................................................
Asset
Description Categories
.............................................................................................................................
Attachment
1 Property Overview
..............................................................................................................
Real ..............................................................................................................
Estate Overview
Business
Interests Overview
..............................................................................................................
Tangible
Personal Property Overview
..............................................................................................................
Debt ..............................................................................................................
or Promissory Notes Owed to the Decedent
Securities
Overview
..............................................................................................................
Other..............................................................................................................
Intangible and Unscheduled Property
Selecting
a Case
.............................................................................................................................
Select
a Date Window
.............................................................................................................................
California Property Declaration & Distribution
© 2006-2008 Thomson Reuters. All rights reserved.
91
92
94
96
98
99
100
100
100
102
103
104
105
106
107
108
109
IV
ProDoc Software Manual
Getting
Started
.............................................................................................................................
Main
Toolbar
.............................................................................................................................
General
Form
.............................................................................................................................
Printing
Forms
..............................................................................................................
Community
Property Form
.............................................................................................................................
Allocating
Community Property
..............................................................................................................
Petitioner
Separate Property Form
.............................................................................................................................
Respondent
Separate Property Form
.............................................................................................................................
After
Tax Values Form
.............................................................................................................................
Depreciation
Recapture
..............................................................................................................
Pre-Tax
Statistics Form
.............................................................................................................................
After
Tax Statistics Form
.............................................................................................................................
Selecting
a Case
.............................................................................................................................
Select
a Date Window
.............................................................................................................................
109
109
110
115
115
118
119
121
123
125
125
126
127
128
129
Family Law - UCCJEA Declaration
Getting
Started
.............................................................................................................................
UCCJEA
Toolbar
.............................................................................................................................
General
Form
.............................................................................................................................
Children
Form
.............................................................................................................................
Adding/Changing
Child's Information
..............................................................................................................
Child's
Address
..............................................................................................................
Person
Child Lived With
..............................................................................................................
Other
Proceedings Form
.............................................................................................................................
Restraining/Protective
Orders Form
.............................................................................................................................
Nonparty
Form
.............................................................................................................................
Adding
or Changing Nonparty Information
..............................................................................................................
Other
Windows
.............................................................................................................................
Selecting
a Case
..............................................................................................................
Select
a Date Window
..............................................................................................................
129
129
130
131
132
134
135
136
137
137
138
139
139
140
141
California Guardianship Inventory & Appraisal
Getting
Started
.............................................................................................................................
Main
Toolbar
.............................................................................................................................
General
Form
.............................................................................................................................
Minor
Form
.............................................................................................................................
Community
Property Form
.............................................................................................................................
Separate
Property Form
.............................................................................................................................
View
Attachment 1 Form
.............................................................................................................................
View
Attachment 2 Form
.............................................................................................................................
141
141
142
144
146
148
150
151
© 2006-2008 Thomson Reuters. All rights reserved.
Contents
Asset
Description Categories
.............................................................................................................................
Attachment
1 Property Overview
..............................................................................................................
Real ..............................................................................................................
Estate Overview
Business
Interests Overview
..............................................................................................................
Tangible
Personal Property Overview
..............................................................................................................
Debt ..............................................................................................................
or Promissory Notes Owed to the Minor
Securities
Overview
..............................................................................................................
Other..............................................................................................................
Intangible and Unscheduled Property
Other
Windows
.............................................................................................................................
Selecting
a Case
..............................................................................................................
Select
a Date Window
..............................................................................................................
Guardianship - UCCJEA Declaration
Getting
Started
.............................................................................................................................
UCCJEA
Toolbar
.............................................................................................................................
General
Form
.............................................................................................................................
Children
Form
.............................................................................................................................
Adding/Changing
Child's Information
.............................................................................................................................
Child's
Address
.............................................................................................................................
Person
Child Lived With
.............................................................................................................................
Other
Proceedings Form
.............................................................................................................................
Restraining/Protective
Orders Form
.............................................................................................................................
Nonparty
Form
.............................................................................................................................
Adding
or Changing Nonparty Information
.............................................................................................................................
Other
Windows
.............................................................................................................................
Selecting
a Case
..............................................................................................................
Select
a Date Window
..............................................................................................................
Guardianship Accounting
Getting
Started
.............................................................................................................................
Main
Toolbar
.............................................................................................................................
General
Form
.............................................................................................................................
Beginning
Community Property Form
.............................................................................................................................
Beginning
Separate Property Form
.............................................................................................................................
Charges
Form
.............................................................................................................................
Charges
Overview
..............................................................................................................
Credits
Form
.............................................................................................................................
Credits
Overview
..............................................................................................................
Ending
Community Property Form
.............................................................................................................................
Ending
Separate Property Form
.............................................................................................................................
© 2006-2008 Thomson Reuters. All rights reserved.
V
152
152
152
155
156
157
158
159
160
160
161
162
162
162
163
164
165
166
168
169
169
170
171
172
172
173
174
174
174
176
177
181
183
185
187
189
191
193
VI
ProDoc Software Manual
Changes
in Asset
.............................................................................................................................
Changes
in Form of Asset During Accounting Period
..............................................................................................................
Attachment
1 Property
.............................................................................................................................
Attachment
1 Property Overview
..............................................................................................................
Real
Estate Assets
.............................................................................................................................
Real ..............................................................................................................
Estate Assets Overview
Business
Interests Assets
.............................................................................................................................
Business
Interests Assets Overview
..............................................................................................................
Tangible
Personal Property
.............................................................................................................................
Tangible
Personal Property Assets Overview
..............................................................................................................
Debt
or Promissory Note
.............................................................................................................................
Securities
.............................................................................................................................
Securities
Assets Overview
..............................................................................................................
Other
Intangible and Unscheduled Property Assets
.............................................................................................................................
Selecting
a Case
.............................................................................................................................
Selecting
a Date
.............................................................................................................................
California Conservatorship Inventory &
Appraisal
195
195
196
196
197
197
199
199
201
201
202
203
203
205
206
207
208
Getting
Started
.............................................................................................................................
Main
Toolbar
.............................................................................................................................
General
Form
.............................................................................................................................
Conservatee
Form
.............................................................................................................................
Community
Property Form
.............................................................................................................................
Separate
Property Form
.............................................................................................................................
View
Attachment 1 Form
.............................................................................................................................
View
Attachment 2 Form
.............................................................................................................................
Asset
Description Categories
.............................................................................................................................
Attachment
1 Property Overview
..............................................................................................................
Real ..............................................................................................................
Estate Overview
Business
Interests Overview
..............................................................................................................
Tangible
Personal Property Overview
..............................................................................................................
Debt ..............................................................................................................
or Promissory Notes Owed to the Conservatee
Securities
Overview
..............................................................................................................
Other..............................................................................................................
Intangible and Unscheduled Property
Selecting
a Case
.............................................................................................................................
Select
a Date Window
.............................................................................................................................
208
208
209
211
213
215
217
218
219
219
219
221
222
223
224
225
226
227
228
Conservatorship Accounting
Getting
Started
.............................................................................................................................
228
© 2006-2008 Thomson Reuters. All rights reserved.
Contents
Main
Toolbar
.............................................................................................................................
General
Form
.............................................................................................................................
Beginning
Community Property Form
.............................................................................................................................
Beginning
Separate Property Form
.............................................................................................................................
Charges
Form
.............................................................................................................................
Charges
Overview
..............................................................................................................
Credits
Form
.............................................................................................................................
Credits
Overview
..............................................................................................................
Ending
Community Property Form
.............................................................................................................................
Ending
Separate Property Form
.............................................................................................................................
Changes
in Asset
.............................................................................................................................
Changes
in Form of Asset During Accounting Period
..............................................................................................................
Liabilities
.............................................................................................................................
Ending
Liabilities
..............................................................................................................
Attachment
1 Property
.............................................................................................................................
Attachment
1 Property Overview
..............................................................................................................
Checks
Issued After Appointment of Conservator
..............................................................................................................
Real
Estate Assets
.............................................................................................................................
Real ..............................................................................................................
Estate Assets Overview
Business
Interests Assets
.............................................................................................................................
Business
Interests Assets Overview
..............................................................................................................
Tangible
Personal Property
.............................................................................................................................
Tangible
Personal Property Assets Overview
..............................................................................................................
Debt
or Promissory Note
.............................................................................................................................
Securities
.............................................................................................................................
Securities
Assets Overview
..............................................................................................................
Other
Intangible and Unscheduled Property Assets
.............................................................................................................................
Selecting
a Case
.............................................................................................................................
Selecting
a Date
.............................................................................................................................
Glossary
Browse
for Folder
.............................................................................................................................
Clipboard
.............................................................................................................................
Common
Controls on Browse Windows
.............................................................................................................................
Configuration
File
.............................................................................................................................
Copy
.............................................................................................................................
Cut
.............................................................................................................................
Default
Answers
.............................................................................................................................
Directory
.............................................................................................................................
Filename
.............................................................................................................................
© 2006-2008 Thomson Reuters. All rights reserved.
VII
228
230
231
235
237
239
240
242
244
246
248
248
249
250
250
250
251
252
252
254
254
256
256
258
259
259
261
262
263
264
264
264
264
265
265
265
265
265
265
VIII
ProDoc Software Manual
Form
Sets
.............................................................................................................................
Global
.............................................................................................................................
Global
Questions
.............................................................................................................................
Highlight
.............................................................................................................................
License
.............................................................................................................................
Master
Forms
.............................................................................................................................
Paste
.............................................................................................................................
QuickText
.............................................................................................................................
Registration
.............................................................................................................................
Select
.............................................................................................................................
Supplemental
Forms
.............................................................................................................................
Token
.............................................................................................................................
ToolTips
.............................................................................................................................
Volume
.............................................................................................................................
Volume
Questions
.............................................................................................................................
268
Appendices
Appendix
A - Networking ProDoc
.............................................................................................................................
Appendix
B - How ProDoc Works
.............................................................................................................................
Appendix
C - Timeslips Extension
.............................................................................................................................
Appendix
D - Creating Supplemental Forms
.............................................................................................................................
Appendix
E - Backup and Restore
.............................................................................................................................
Index
266
266
266
266
266
266
266
266
266
266
267
267
267
267
267
268
271
281
294
299
303
© 2006-2008 Thomson Reuters. All rights reserved.
Software Manual Introduction
1
Software Manual Introduction
Overview of this Manual
Navigating Through This Manual
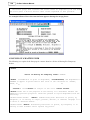
Click on the blue highlighted text links throughout the manual to jump to a topic or get more information.
Click on the back arrow at the bottom of your screen,
, or press Alt + Left Arrow on your keyboard
to return to your previous view. If you scrolled or linked more than once, you will need to do this more
than once to return to where you started.
Click on topic titles listed in the Table of Contents to jump to the indicated topic.
You can also use the bookmarks provided in the Adobe navigation pane to pick the topic you want to see.
Quick Links to Each Program's Section
The ProDoc Program 4 is the primary program used for document assembly. PowerPack programs,
specific to each state we serve, are available as additional subscription items. These programs are
designed to work with ProDoc and significantly increase your productivity. These programs allow you to
enter information in your clients' case files and manage the information quickly and efficiently. If
calculations are necessary, the program makes them and inserts the results wherever they are needed.
The information you enter is saved in ProDoc data files for future use.
You can click the blue links below to jump to the sections of this manual which describe the processes and
features of different ProDoc programs.
ProDoc Program 4 - Covers all major program functions and includes appendices on network
considerations, ProDoc's internal operations, linking your ProDoc data with Timeslips and creating your
own supplemental forms.
California PowerPack Programs
88
Other Reference Material
The following documents are stored in your ProDoc home directory in a folder named "Documentation",
along with the manual.
ProDoc Quick Reference Card - This document gives you procedures for major ProDoc functions, short
and to the point, on two pages.
ProDoc Quick Start Guide - This document is the electronic version of the pamphlet inside your CD
shipping jacket. It helps you quickly start assembling documents with ProDoc and guides you step-bystep through the Quick Start Assistant procedures.
The ProDoc Software Manual, Quick Reference Card and Quick Start Guide can also be viewed
and/or printed from your desktop by clicking Start > Programs > ProDoc > Documentation, then
clicking the appropriate file name.
2
ProDoc Software Manual
Warranty Information
Legal Notices
Subject to the Terms and Conditions of the ProDoc Subscription License Agreement and the ProDoc End
User License Agreement.
Disclaimer of Warranty
This publication is designed to provide accurate information in regard to the subject matter covered. It is
provided with the understanding that ProDoc, Inc. is not engaged in rendering legal or other professional
services. You are urged to independently verify the accuracy of all of the form language and calculations
prepared using the ProDoc® Document Assembly and/or Small Office Suite Software (SOS®) so that you
are certain of the desired legal, business, and tax consequences and other intended results.
The material in the ProDoc Document Assembly and/or Small Office Suite Software and this manual are
provided without representation or warranty of any kind. Therefore, ProDoc, Inc. and its licensors and/or
authors, assume no responsibility and shall have no liability, consequential or otherwise make no
warranties of any kind arising from the use of the Software, manuals or any supplementary programs
and material released by ProDoc, Inc.
THIS DISCLAIMER SPECIFICALLY INCLUDES ANY EXPRESS OR IMPLIED WARRANTIES OF
MERCHANTABILITY OR FITNESS FOR A PARTICULAR PURPOSE OR OF NONINTERFERENCE
WITH INFORMATION, NONINFRINGEMENT, OR ACCURACY OF INFORMATIONAL CONTENT.
RONALD LIPMAN AND LIPMAN'S WILLS AND TRUSTS, LTD. ARE INTENDED THIRD PARTY
BENEFICIARIES OF THE LIMITATIONS OF LIABILITY UNDER THIS AGREEMENT.
Copyright and Trademark Notices
The ProDoc Document Assembly Software and this manual are protected by United States copyright
and/or patent laws, and international treaty provisions. You must treat the Software and manual like
any other legally protected material. You may make one copy of the Software solely for backup or archival
purposes. You may not reverse engineer, decompile, or disassemble the Software. You may not copy the
manual. All title and copyrights in and to the Software are owned by Thomson Reuters or its Licensors.
Microsoft, Excel, Microsoft Word, Windows, Windows CE, Windows 98, Windows Me, Windows NT,
Windows XP, Windows Vista, Windows Mobile, and ActiveSync are either registered trademarks or
trademarks of Microsoft Corporation in the United States and/or other countries. Adobe, Acrobat, and
Reader are either registered trademarks or trademarks of Adobe Systems Incorporated in the United
States and/or other countries. WordPerfect is a registered trademark of Corel Corporation. Timeslips is a
registered trademark of Sage Software SB, Inc. Palm and Handspring are registered trademarks of Palm
Inc. All other trademarks are owned by their respective owners.
ProDoc, SOS and PowerPack are trademarks or registered trademarks of Thomson Reuters.
Customer Support
Telephone Assistance
Our staff of highly skilled support technicians and attorney developers are available to assist qualified
users during regular business hours. The phone number for support is 800-759-5418.
You can also send an email to [email protected].
Other Available Support Resources
Software Manual Introduction
·
·
·
3
Help buttons on each ProDoc window
Quick Reference Cards
At the ProDoc Web site:
· Online Tips and FAQs
· Computer Based Training (CBT) Modules
· Periodic Internet live training seminars
· Schedule training seminars in your area
ProDoc Website
You are also invited to visit our Internet Web site at www.prodoc.com, which provides helpful information
such as ProDoc Tips, Tech Notes, a list of frequently asked questions/answers (FAQs) and computer based
training modules for major ProDoc functions. You can also schedule training seminars convenient to your
location (subject to geographic availability) and join live seminars conducted over the Internet.
Current and prospective customers will also find a wealth of information about ProDoc, including major
features and sales information. Our Web site is constantly undergoing changes so be sure to visit often.
Let us know how we can improve its overall content to better serve your needs.
4
ProDoc Software Manual
ProDoc® Program Introduction
Welcome to ProDoc
Congratulations!
You have purchased the finest document assembly system for legal professionals available today. It is a
revolutionary tool which vastly increases office productivity by automating repetitive document assembly
tasks.
Several features make ProDoc superior to many other document assembly programs:
·
Displaying in Context — The “cut-and-pasted” form is displayed while you are answering the
fill-in-the-blank questions. If you prefer to answer the questions in questionnaire boxes instead of
the context window, you may do so.
·
Client/Case Manager — You can easily create and update clients and cases, even while you are
simultaneously selecting a case. The related Case Answers feature helps you change answers to
the questions asked during previous document assembly sessions for each client and their
individual cases. When you assemble subsequent documents for a case, you have the option of
answering only the new questions which you have not previously answered. You can still review
each question previously answered if desired.
·
Document Manager — The document manager feature helps you keep track of what documents
you have assembled for each client and case. It has many of the same features as your Windows
Explorer (file manager) to facilitate the management of all of your documents right from ProDoc.
·
Working with Multiple Documents — Since law offices generally work with sets of related
documents, ProDoc is designed to assemble multiple documents in a single session. This
capability is further facilitated by the Form Sets feature, which allows you to pre-select
commonly used groups of forms. These features are an extremely efficient way to produce
documents because related information is shared between documents and fewer questions must
be answered.
·
Supplemental Forms (templates) — You can prepare your own supplemental forms, create the
necessary fill-in-the-blank questions, and generate the finished document in ProDoc. Your
supplemental forms and questions are kept separate from the ProDoc master forms (templates)
and questions, but you can assemble supplemental forms in the same session with the ProDoc
standard forms.
·
Graphic forms capability — This gives you the capability to assemble popular predefined
fill-in-the-blank graphic forms. These forms can be assembled and printed directly from within
ProDoc. Press the F1 key while using the Graphic Form Filler to see additional information on
how to assemble and print these forms.
·
Timeslips extension (optional feature) — If you have Timeslips (version 9.1 or newer), you
can integrate it with ProDoc to generate Timeslips “slips” while maintaining synchronized ProDoc
and Timeslips databases. Consult Appendix C 281 for assistance in setting up and using this
optional feature.
·
Long filename support (Windows 98/ME/NT/2000/XP/Vista) — This enhancement permits
the use of more descriptive names for completed documents and their storage folders. Click the
Help button on the Options And Settings window for assistance in setting up your operating
preferences.
·
Streamlined document assembly — We have consolidated the steps necessary to initiate a
document assembly session into one composite window to simplify and expedite the overall
document assembly process. Click the Help button on the Starting Document Assembly
window for additional information on how to use this feature.
ProDoc® Program Introduction
5
·
Print various lists and reports — You can print client lists, case data sheets, labels and
QuickText reports from information drawn from the ProDoc client and case database. ProDoc
also allows you to print blank forms, form lists, questions lists and form worksheets from the
volume libraries to which you subscribe.
·
Print labels — ProDoc has the ability to print mailing labels from information in your client and
case database.
·
Export client and case data — You can export your client and case database information for
use by other law office automation software systems.
·
Custom Fields — Several user definable fields have been added for both contacts and cases to
allow you to track additional information you want such as client social security numbers and
cause numbers for cases.
We believe that you will be amazed at the simplicity and efficiency with which our software creates your
legal documents. We are committed to developing the finest document assembly system available. We
welcome your comments and suggestions so that we can continue to improve ProDoc with the features
you need.
About ProDoc
ProDoc begins document assembly by asking a series of questions, then using the responses to determine
the clauses and paragraphs to use in the final document. Following these questions, the form itself is
shown, displaying finished legal language and all data completed to this point. Finally, users answer
questions to enter the data in the remaining blank fields to complete the document. What you do not see
is the complete logic the computer is processing in order to determine which questions need to be asked,
skipped or answered automatically. It also renumbers all paragraphs and inserts proper gender
pronouns. This system goes far beyond the simple "merge" systems that do nothing more than fill in the
blanks.
The logic built into ProDoc is very extensive and results in an extremely efficient operation that asks all
the questions that need to be asked while skipping the ones that do not apply to the transaction. In fact,
many times the program will be able to determine the proper answer without even having to ask you.
Information input for a particular client and case is saved for automatic use in subsequent document
preparation for that client's case. Also, some information may always or nearly always be the same, e.g.
attorney's name, address, signature block, etc. This information can be set as defaults to automatically
appear whenever they are called for in any document.
ProDoc generated documents may be changed or customized. The master forms that contain the standard
wording and clauses can be permanently edited by using your word processor. That way, you can insert
your own customized wording to be included in the documents every time. Additionally, after a document
is created by the system, you can use your word processor for the final editing and printing.
ProDoc was designed to be a versatile tool that can change and grow with your law practice and with the
times. Its design allows you to build an entire library of volumes containing the documents you need
most in your office. There are four types of information contained in each volume:
·
Master Forms (templates) which are files containing the text and codes ProDoc uses to create
the shell of your document.
·
Data Files containing instructions telling ProDoc which questions to ask and what to do with
your answers. ProDoc merges data and answers to the questions in the master forms to create a
finished document.
·
Help Files with explanations and information to help you use ProDoc.
·
Supplemental Forms (templates) and Supplemental Questions are created by you to extend
the power of ProDoc. They work just like the master forms in the volumes which you purchased,
6
ProDoc Software Manual
but cover the specific areas you need for your legal practice. Appendix D
procedure for creating supplemental forms.
294
details the
How ProDoc Assembles Documents
ProDoc uses master forms (templates) which contain standard document text clauses that go into the
finished document. These master forms also include special character strings (called tokens) which tell
ProDoc how to assemble the document and which questions to ask during the assembly process. Master
forms for each volume library are stored on your hard disk in a subdirectory under the main ProDoc
directory. It is possible to customize master forms using WordPerfect or any other word processor which
can read and write documents in the WordPerfect format. Information on customizing master forms can
be found in chapter 3 of this manual.
ProDoc goes through five separate steps in the process of preparing your documents.
1. Transaction Setup - In this step, you select the volume you want to work with, select the master
forms you want to assemble completed documents for, specify whether you want to view the
document during the merge or fill-in-the-blank phase, tell ProDoc whether to save your answers,
and specify where to save the documents after they are prepared.
2. Assembly Questions - In this step, ProDoc asks questions that allow the program to assemble
an intermediate document from the master form. The questions are asked using logic
programmed by the ProDoc development staff. This logic instructs the program to skip irrelevant
questions, offer preset default answers, copy prior answers, assign answers based on logic, or
perform other time saving functions.
3. Intermediate Document Creation - In this step, ProDoc takes the answers you entered in the
assembly questions and deletes or inserts clauses and paragraphs to create an intermediate
document.
4. Merge Phase Questions - Also called filling-in-the-blanks. In this step, ProDoc asks questions
whose answers will be inserted into the document or used to calculate other text to insert. For
instance, a question might ask for the date of birth of the ward in a guardianship to be entered
numerically, e.g. 01/11/99. ProDoc might use this answer to insert the ward’s date of birth into a
document as January 11, 1999, and might calculate and insert the ward's age. The questions use
logic to simplify your work.
5. Final Document Creation - In this step, answers to merge questions and text calculated from
them is inserted into the final document. The completed final document is saved as a word
processor file according to the instructions given by you during transaction setup.
Chapter 1, Installation and Setup
7
Chapter 1, Installation and Setup
Introduction to ProDoc Setup
This chapter will cover the information that you need to install ProDoc on your computer or network.
Check the System Requirements and make sure that your computer meets the minimum standards for
performance. If your computer does not meet these standards, you will need to upgrade or purchase a
new computer before using ProDoc. Follow the installation steps carefully and you will have ProDoc up
and running in no time at all.
System Requirements
ProDoc can be installed to any desktop or laptop computer meeting the following requirements. It can be
installed on either a client/server or peer-to-peer network and accessed through desktop shortcuts on
individual workstations. Offices installing ProDoc on a network are encouraged to read Appendix A 268
of this manual.
You will need the following resources to run ProDoc with acceptable performance:
Hardware Requirements
An IBM®-compatible computer with at least 1 GB of RAM, a CD ROM drive, and a local hard disk
drive (or network disk drive) with sufficient space to install and run ProDoc and the volumes. A
monitor is required with a resolution of at least 1024 x 768 pixels. A Network Interface connection is
required with a throughput of at least 1 Gbps for local network and high speed internet connection.
Operating System Requirements
Microsoft® Windows® 2000, Windows XP, or Windows Vista with all service releases and service
packs.
Word Processor Requirements
In order to edit, save and print completed documents using ProDoc and SOS, a separate word processing
program is required. Select either Corel® WordPerfect® 12 (or newer) or Microsoft Word® 2003 for
Windows (or newer) with all service releases and service packs.
Stand-alone or Networked
ProDoc can be installed to any desktop or laptop computer meeting the above requirements as a
stand-alone program. It can also be installed on a server or host computer on either a client/server or
peer-to-peer network, and the program can be used from shortcuts on client computer desktops.
Backup Tape Drive
It is very important that you use a tape drive to backup ProDoc files. You may use other forms of media
to backup ProDoc, but we believe that it is in your best interest to get a tape drive for backups if you do
not already have one.
Installing ProDoc
Networked Law firms should first read Appendix A 268 , and then install ProDoc on their
network server, paying particular attention to “network install note” annotations that appear
during the installation process.
8
ProDoc Software Manual
NOTE:
These steps pertain especially to a new installation. Users updating an existing ProDoc
installation will see somewhat different windows.
INSTALLATION INSTRUCTIONS
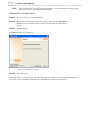
Step #1 - Insert the CD into your CD-ROM drive.
Step #2 - Installation will normally start automatically. If not, see the Quick Start
Guide in the CD shipping folder for help with beginning the installation
process.
Step #3 – Opening Screen
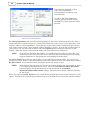
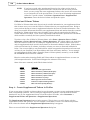
Click Next to begin the installation.
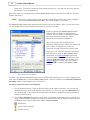
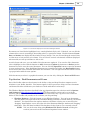
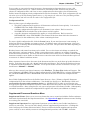
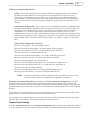
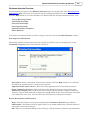
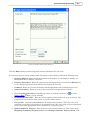
Figure 1-1, Installation Start Window
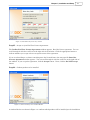
Step #4 - Enter Key Code
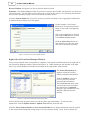
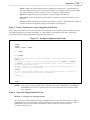
Setup will update or install ProDoc and volume libraries in accordance with a unique installation key
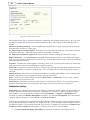
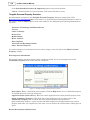
code. Enter your unique Key Code and then click Next to continue the installation.
Chapter 1, Installation and Setup
9
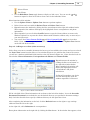
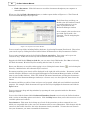
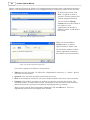
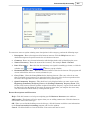
Figure 1-2, Installation Key Code entry window
Step #5 - Accept or reject End User License Agreements
The ProDoc End User License Agreement window appears. Read the license agreement. You can
scroll through it with the scroll bar on the right side of the window. Click the appropriate button to
indicate whether you accept or do not accept the terms of the agreement.
If you are subscribing to a volume containing state bar licensed forms, the state-specific State Bar
License Agreement window appears. You can scroll through it with the scroll bar on the right side of
the window. If you accept the agreement, click the Accept button. If not, click the Do NOT Accept
button.
Step #6 - Confirm products to be installed
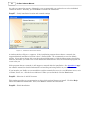
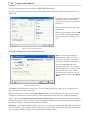
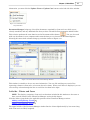
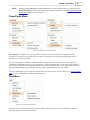
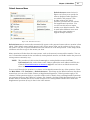
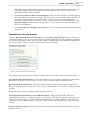
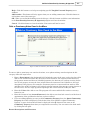
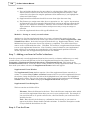
Figure 1-3, Select Product(s) to be Installed Window
A window like the one shown in Figure 1-3 confirms which products will be installed per the installation
10
ProDoc Software Manual
key code you entered in step #4. Although it's not recommended, you can deselect or select individual
volumes if desired. Normally, just click Next to continue the installation.
Step #7 – Verify installation location and network settings
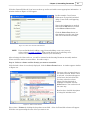
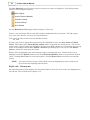
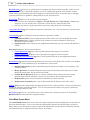
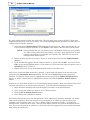
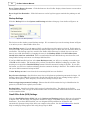
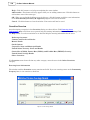
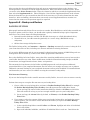
Figure 1-4, Installation Destination Window
A window similar to Figure 1-4 appears. If the installation program doesn't detect a network, the
suggested default installation location is the C:\ProDoc folder. We recommend you use the default
setting. If you wish to change this, type the path and folder name or click the button next to the field to
browse to the folder you wish to use. If the installation folder doesn't exist, the installation program will
create it for you.
If the program detects a network, it will suggest a network drive for installation. See Appendix A
the software manual for detailed information on installing and using ProDoc on your network.
268
of
If you intend to use ProDoc on a network drive and the network file server is a non-Windows server, such
as Linux, Novell, etc., click the box as indicated. When you are finished, click the Next button.
Step #8 – Selection of “Add In” features
This window provides you an opportunity to select which optional features to install. Click the Help
button for additional information. Then, click Next to continue the installation.
Step #9 – Finish Installation
Chapter 1, Installation and Setup
11
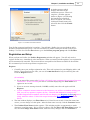
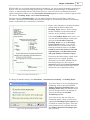
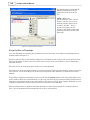
A window appears which
displays the status of the
installation process. When it is
complete, a window appears
similar to Figure 1-5 indicating
the installation is finished.
Select the option you want by
clicking the button next to the
selection; then click the Finish
button.
Figure 1-5, Installation Finished Window
Your ProDoc program installation is complete. You will find a ProDoc icon on your desktop and in
Window's Programs/ProDoc group. You can run ProDoc by double-clicking the ProDoc icon on your
desktop. You can also click the Start button, go to the ProDoc program group and click ProDoc.
Registration and Setup
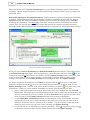
When you first run ProDoc, the ProDoc Registration window will appear. You will only need to
register ProDoc once, immediately after installation. When you install periodic updates, your registration
will be automatically extended. The sections below correspond to the buttons available on the window.
We recommend you use the steps below to register now.
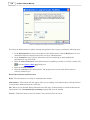
Register
1. Carefully enter your 24 digit registration code. This code is printed on your Shipping Advice and
Invoice. If you don't have the code, you can call 1-800-759-5418 for help in retrieving the code.
Click the Register button.
(if available)
a. If you entered the correct code, ProDoc will check your computer for an active Internet
connection. If one is found, you will see a window displaying your Firm Name as it
appears in our records.
b. If you see an error message instead, click OK, carefully enter the code again and click
Register.
c.
If your computer cannot connect to the Internet, you will see a window telling you
that you can try again or register by fax. Click the OK button to return to the
ProDoc Registration window, which will now display the Register by Fax 12 button
along with the others. Follow the steps listed in the Register by Fax 12 section
below.
2. The next window displays your Firm Name as it is listed in our records. If the firm name isn't
correct, you can change it at this point. After the firm name is ready, click the Continue button.
3. The Confirm Firm Name window appears. This window provides an opportunity to make
changes to your firm name. If it is correct as shown, click the This is My Firm Name button. If
not, click the Change Firm Name button, make necessary changes, and click Continue to
12
ProDoc Software Manual
return to this window.
4. A window will appear informing you that your registration process is complete. Click the
Continue and Run ProDoc button to exit the window.
(If available)
Register by Fax. You can only use this option if you don't have an Internet connection. If you do, the
Register by Fax button will not appear.
1. Click the Register by Fax button. The ProDoc Fax Registration window appears.
a. Enter your registration code.
b. Enter your Firm Name (or confirm it if you are a present user). This name will appear on all
of your documents, pleadings, etc. that you produce with ProDoc.
c.
Enter a Contact Name, Fax Number and Phone Number in the appropriate fields.
d. When you are sure the above entries are correct, click the Print Fax Instructions and
Continue button.
2. The Confirm Firm Name window appears. This window provides you one more opportunity to
make firm name changes. If it is correct as shown, click the This is My Firm Name button. If
not, click the Change Firm Name button, make necessary changes, and click Continue to
return to this window.
3. You will be prompted to print a form to fax to us. This form contains information that we need to
know in order to register your software.
4. After you print the form, a window will appear informing you that you've completed the first part
of the process. ProDoc will be temporarily registered for 15 days. Click the OK button to close
the window. Fax the form to us at 1-866-306-2697. We will send you a confirmation code by
either fax or mail.
5. At this point, each time you open ProDoc, the Complete the Registration Process window will
open prior to login. To open the window after ProDoc is already running, click Tools ®
Registration ® Register ProDoc.
a. Enter the confirmation code in the displayed fields. If you still do not have your confirmation
code, you can click the appropriate buttons to re-print the fax instruction sheet, register later,
or exit without registering. If you have an internet connection, you can click the Register
(Recommended) button to register over the Internet.
b. After entering the confirmation code, click the Complete Registration button. A window
will appear telling you the registration process is complete. Click the Continue and Run
ProDoc button.
Register Later and Run ProDoc. If you choose this option:
·
A window will appear informing you that a temporary registration has been created for you which
will expire in 15 days.
·
The ProDoc Registration window will appear each time you run ProDoc for the next 15 days to
help you register. To register while you are working in ProDoc, click Tools ® Registration ®
Register ProDoc and use the steps in the Register 11 section above.
·
If you don't register within 15 days, you will only be able to use ProDoc after you register the
software.
Exit ProDoc without Registering. If you choose this option, the registration window will appear each
time you run ProDoc. After you register, it will no longer appear.
Setup Windows. After you select your choices for registration, other windows appear to help you tailor
Chapter 1, Installation and Setup
13
the installation to your needs.
·
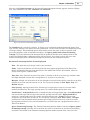
Logging In. The program will ask you to enter login initials or name. Type your initials or login
name (depending on your preferred method) in the field provided. Your initials or login name can
be up to 20 characters long. Since this is the first time these initials have been used, a message
box will appear stating that you have not logged in with these initials before and asks if you want
to log on. Click OK to use the initials. Click OK again and ProDoc will activate.
·
The first user who logs in is designated as the Supervisor. Supervisors will see a Customize
menu item called Manage Users Login and can designate other users as Supervisors or Users.
This function is fully discussed in the Manage Users Login 13 section.
(If available)
·
·
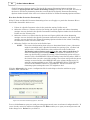
The Options and Settings window will appear, displaying the Firm Information box. It will
display your Firm Name differently depending on whether or not you have registered your
software. Please note that you cannot change the Firm Name at this window.
§
If you have not yet registered, the Firm Name will appear as Unregistered User. When
you register, you will designate your firm name.
§
If you have already registered, your firm name will appear as you entered it during
registration. If you need to change your firm name in the future, click Tools ®
Registration ® Change Firm Name.
§
Enter your firm's information in the appropriate fields. The required entries are Firm Name
(completed for you), the first Address field, City, State, Zip Code and Phone. We
recommend that you also complete any other fields which apply to your firm. The information
you enter will appear on many of your documents.
Another window appears offering to install a toolbar in your word processor. We recommend you
click the OK button. This will make it much easier to work with documents in both ProDoc and in
your word processor. You can remove it or reinstall it later in the Customize ® Options menu.
If you choose to install the toolbar, simply follow the prompts in succeeding windows.
Manage Users Login
The first person to sign on and run ProDoc will be added to the Staff file as the only supervisor.
Supervisors are able to view and use a menu choice under the Customize menu titled Manage Users
Login. From this menu, the supervisor can add, change or delete user records and specify default
settings for new users.
Click Customize ® Manage Users Login to display the Browse Users Records window (Figure 1-6).
Figure 1-6, Browse Users Records Window
14
ProDoc Software Manual
This window displays all users who have logged in previously to ProDoc, along with their privilege level
and name (if entered). If the information has been entered, the highlighted user's name and address are
displayed on the right side of the window. Buttons and their functions are described below:
New - Click this button to add a user, the user's privilege level, and name and address data. You must
enter at least a login name. If you enter no other information, the privilege level will default to User.
Update - Click this button to edit any of the above information for the highlighted user.
Delete - Click this button to delete a user. A confirmation window will appear. Click the OK button to
delete the user or the Cancel button to keep the user. You can right click a user name and click the
New, Update or Delete selections on the pop-up menu to perform the same functions.
Configure New User Settings - Click this button to specify default personal settings for new users. A
confirmation window will appear which states that settings for existing users will not be affected. To
continue to the settings window, click the Yes button. To stop, click the No button. If desired, you can
specify initial personal settings for document assembly, completed documents and WebUpdate. Settings
for Word Processor, Graphic Forms and Miscellaneous Personal Settings categories cannot be changed;
these links on this window are inactive. Individual users can change these settings later if desired. Click
the Help button on each setting window for more detailed help. An explanation of these settings is
available at the following links: Assembly Settings 64 , Completed Documents Settings 66 and
WebUpdate Settings 68 .
Compatibility Mode
If a program will not run under Microsoft Vista or Windows XP, these operating systems attempt to run
the program so that it thinks it’s operating under a compatible operating system in an effort to make the
program work. For example, if a program’s compatibility mode is set to Windows 98, these operating
systems will try to make the program think it is running under Windows 98.
ProDoc should not be run in a compatibility mode and, in fact, will not run properly in the compatibility
modes for Windows 98 or ME. Thomson Reuters products run well on all versions of Windows 98 and
later versions of Windows. On computers with Windows Vista or XP, all compatibility mode settings
should be turned off.
Shutting Off Compatibility Mode
There are two ways to turn off the compatibility mode for ProDoc on your computer. You may shut off the
compatibility mode with Windows Explorer or through ProDoc’s shortcut on your desktop.
To shut off the compatibility mode using Windows Explorer:
1.
Open Windows Explorer.
2.
Scroll to the ProDoc folder and open it.
3.
Locate the Prowin.exe file and right click it.
4.
From the menu that appears, click Properties.
5.
On the Properties box, click the Compatibility tab.
6.
In the section titled Compatibility Mode, make sure the box next to Run this program in
compatibility mode for: is unchecked.
7.
Click OK.
To shut off the compatibility mode through ProDoc’s shortcut:
1. On your desktop, locate the ProDoc icon and right click it.
Chapter 1, Installation and Setup
15
2. From the menu that appears, click Properties.
3. On the ProDoc Properties box, click the Compatibility tab.
4. In the section titled Compatibility Mode, make sure the box next to Run this program in
compatibility mode for: is unchecked.
5. Click OK.
NOTE:
If you are running ProDoc across a network, you must make compatibility changes to
the computer on which Prowin.exe is installed because this is the only computer on the
network that can set a compatibility mode for Prowin.exe. If you try to access the
compatibility mode feature from a computer that has a shortcut pointing to the network
drive on which ProDoc is loaded, your compatibility settings will be disabled.
16
ProDoc Software Manual
Chapter 2, Assembling Documents
Assembling Documents
Overview
This chapter guides you through a document assembly session step-by-step to illustrate the basics of the
document assembly process. Keep in mind that simply following the steps outlined here only gives you a
small portion of the power, productivity and efficiency of ProDoc. Refer to Chapter 3 for additional details
about the ProDoc software's various menu driven features.
NOTES: The process described here primarily addresses the assembly of typical non-graphical
forms. The graphical forms assembly process differs somewhat. Please click the Help
button on applicable assembly windows for assistance.
The screen figures in this chapter are typical of what a Windows user with ProDoc installed
on a local hard drive sees.
This chapter has been written for new and existing customers alike. So, many of the screen
figures depict accurate information, typical of what you will encounter.
Document Assembly Wizard
ProDoc also has the Document Assembly Wizard to help you start assembling documents. This tool is
geared towards new users and helps them assemble documents easily by taking them through a
document assembly session step-by-step. If you want to use the Document Assembly Wizard, click
File ® Document Assembly Wizard. If you are currently using the ProDoc Quick Start Assistant, you
may start the Document Assembly Wizard by selecting the Documents and Forms tab and clicking
the Create Documents Using Wizard button.
Document Assembly Menu
Start ProDoc from the Windows 98/ME/NT/2000/XP/Vista Start button or from the ProDoc shortcut icon
on your desktop. Users will be asked to log on with their initials in order to recall their unique ProDoc
operating preferences. Chapter 3 discusses this configuration at greater length.
Select Assemble Documents
Figure 2-1, Assemble Documents
Menu Choice
To begin assembling documents, click File ® Assemble Documents or click the Assemble icon,
Chapter 2, Assembling Documents
17
, on the left side of the toolbar.
Phase 1 - Establish Assembly Settings
The Starting Document Assembly window appears, shown at Figure 2-2. This window is used to start
an assembly session. It lets you specify which case file to use, which forms to assemble, where to save
completed documents, and which default answer set to use.
Note the flat blue button at the bottom of the window. You can click it to contract the window to only
reveal Steps 1 and 2, or click it again to reveal all four steps. In later assembly sessions, you may wish to
skip Steps 3 and 4. ProDoc remembers your choice when opening the window again.
Figure 2-2, Starting Document Assembly Window
Step 1 - Select a client and case for storing your answers.
If you are a new customer and have no clients/cases entered, you should see Step 1A and Step
1B 19 , then return here.
The ability to use case files for each client and case is one of the most powerful features of ProDoc.
Answers you provide for clients/cases are automatically saved for use with documents you assemble later.
This feature is described in detail in Chapter 3 of the software manual. We strongly recommend you do
not check Don't use a case file for the following reasons:
·
If you use a case file, ProDoc saves the answers you enter with the case. During subsequent case
assembly sessions, these answers are displayed as defaults. This not only prevents re-typing; it
also ensures consistent information entry when an item of information, such as a name, appears
in more than one document.
·
If you use a case file, you will have the option to save time by not reviewing answers to questions
you answered during a previous assembly session using the same case.
·
Timeslips users must use case files in order to generate slips from ProDoc as discussed in
Appendix C 281 of the software manual.
·
Lastly, using a case file makes it easy for you to organize your assembled documents by client
18
ProDoc Software Manual
and/or case. You'll have a record of all documents prepared by case, and you can easily open the
documents in your word processor.
Due to the above, we recommend you click the Select case button to open the client and case selection
window, Figure 2-3.
NOTE:
If desired, you can still start your assembly session without client and case by clicking in
the box labeled Don't use a case file. You will then skip case selection.
The Select a Case window lists existing clients and all cases for the clients. Here, you can select cases;
see and modify related client/case data; and create new clients and cases.
Figure 2-3 depicts the Select a Case window.
Note the flat blue button at the right of the
window. You can click it to expand the window
to reveal client and case details. This is
discussed in more detail in Chapter 3.
The client/case list will be blank for new
customers until they have added new clients and
cases. Then, as in Figure 2-3, it lists all
previously entered cases for the selected client.
If you are a new customer with no clients listed,
you will want to click the New Client button.
Scroll down or see Step 1A 19 for more help.
After you add the client, you can add a new case
with the New Case button. Scroll down or see
Step 1B 20 for more help. After you add the
case, click OK to return to the Select a Case
window.
Figure 2-3, Select a Case Window
To select a case for assembling documents, you can double-click a displayed case, or click a displayed case,
then press the Enter key or click the Select Case button. You'll be returned to the Starting Document
Assembly window, which displays the selected case.
To find a client/case that's not displayed:
·
Use the keyboard locator. Type the first few letters of the client's last name. As you type, the
highlight will move to the next match on the client list. To start over, press the Backspace key
on your keyboard. If the desired client isn't found, you need to change the category of clients to
display as detailed below.
·
Use the Now Showing: drop down arrow. Cases are grouped under clients. You can choose the
types of contacts/clients to display, including all contacts. These will be displayed with type icons
of different colors on the window. The default is Active Clients.
All Contacts
Active Clients (default)
Closed Contacts
Chapter 2, Assembling Documents
19
Private Clients
Non-Clients
·
Use the Hide/Show Cases toggle button to display or hide cases. You can use the
buttons to expand a client list to hide or show cases for the individual client.
and
Other functions of this window:
·
Use the Update Client or Update Case buttons to perform updates.
·
Delete clients and cases with the Delete Client and Delete Case buttons.
·
Expand/contract the window by clicking the blue arrow button on the right side window border.
When expanded, the window will display the highlighted client's correspondence and phone
information.
·
When expanded, you can click the Send To button to copy the client's address or name to the
Windows clipboard, or to paste the client's address with salutation, address only, or name only to
your word processor.
·
You can use the Client Custom Fields 74 and Case Custom Fields 74 tabs to view these
fields. If you want to change any information, click the Update Client or Update Case buttons
on the left side of the window.
Step 1A - Adding a new client (when necessary)
If the client you want to assemble documents for has not yet been added to the system and you've selected
the New Client button from the Select a Case window (Figure 2-3) to add the new client to the system,
you will see a window (with blank fields) similar to the one shown in Figure 2-4. Notice the three tabs on
this window: Client information, Correspondence & Phones and Custom Fields.
Expand/contract the window by
clicking the blue arrow button on
the right side window border.
When expanded, the window will
display the highlighted client's
correspondence and phone
information.
ProDoc will remember your choice
and will subsequently open the
window expanded or contracted.
Figure 2-4, Client Will Be Added Window
Fill in each field of the Client information tab as shown at the left of the window. Leave the Override
Document Placement box unchecked to use the default directory you specified in document settings.
Only check the Override box to specify a different directory for this particular client.
After completing the information on the left, click the Refresh button on the right to copy envelope
addresses from the left to the right.
At the right side, add a Salutation for correspondence.
Enter phone information on the right side by clicking the New button. In the window that appears, select
20
ProDoc Software Manual
the type of phone and enter the number in XXX-XXX-XXXX format.
Click the Custom Fields tab to reveal the custom fields entry box on the window, like the one shown in
Figure 2-5.
If desired, enter any Custom Fields
information for the custom fields
you have set up earlier as shown in
Figure 2-5.
Setting up these fields is discussed
in Chapter 3.
When you are finished, click the OK
button. Then click the New Case
button to proceed to adding a new
case.
Figure 2-5, Entering Custom Fields
Step 1B - Adding a new case (when necessary)
Note: If you want to integrate
Timeslips with ProDoc, you will
need to use Case IDs. Activating
Case IDs is explained in Chapter 3.
If you use Case IDs, enter the
appropriate one here. The ID must
either be blank or be a unique set of
characters for each case. If your
firm doesn't use Case IDs, you can
turn this feature off from the Main
Menu.
Figure 2-6, Adding a Case
The Date: field will default to today's date. You can change the date by typing it in or clicking on the
date selection button next to the field.
Enter a unique name or phrase in the Description: field to help identify this case. It can be any word,
number or combinations. Common uses are short descriptions such as "Divorce" or "Estate Planning".
Only click the Override Document Placement and Directory box if you want to override the default
setting for this particular case. You can type in the path or click the browse button. The Directory Browse
Window will appear; use this to find the desired location.
Filename - This field will not be visible if you chose in setup to have ProDoc automatically "use the form
title for filename". Use this field to enter a file name to store all files for the case. Specifying the filename
here prevents manually typing it for each document assembly session.
Chapter 2, Assembling Documents
21
Click the Custom Fields tab if you have set these up earlier and wish to enter appropriate information. A
window similar to Figure 2-7 will appear.
In this example, Case Custom
Fields were set up which included
Judge, Court Clerk, and Opposing
Counsel.
Type in the information as needed,
then click the OK button to return
to the Select a Case window.
Click the Select Case button on
that window to use the new client
and case for document assembly.
Figure 2-7, Enter Case Custom Fields Window
NOTE:
If you are finished with adding a new client and adding a new case, you may
want to either go back to Step 1 17 to review the process for selecting cases,
or move on to Step 2 to continue to assemble your document(s).
After selecting the client and case, you will be returned to the Starting Document Assembly window.
Client and Case entries are now shown. Proceed to step 2.
Step 2 - Select a volume and the form(s) you want to assemble.
If the desired volume is not already displayed, click the Select Forms button. A window appears similar
to Figure 2-8.
You may select as many forms at
one time as desired. When a form
is selected, a check mark appears
in the box to the left of the title.
To select or deselect a form,
either click the form title or
highlight it and then click the
Select button. You can deselect it
the same way.
Read on for a detailed description
of using this window's tools.
Figure 2-8, Select Forms Window
First, select a Volume by clicking the drop-down arrow field. A list of all installed volumes will appear.
Click the one representing the area of law you want to use.
22
ProDoc Software Manual
Use the Search button at the top right of the window to open a search dialog window. At that window,
you can enter words or phrases likely to be in the forms you want to find. After selecting a form from that
window, it will be marked as selected in the Select Forms window.
Tools for Displaying and Finding a Form. The tabs across the top of this window provide several
unique options:
Numerical - Displays forms in numerical order, organized by area of law. This is the default
display.
Alphabetical - Displays forms in alphabetical order based on their title. The form number appears
to the right of the form's title.
Supplemental - Shows a window for supplemental forms for assembly for that volume of law.
Supplemental forms are forms you create to add to the ProDoc software's forms library.
Form Sets - Shows a window for form sets which have been created for that volume of law. Form
sets are collections of forms that allow a single item to select several forms at the same time, saving
you time in selecting a number of forms in a volume.
Selections - Displays forms currently selected for action. The Clear Selections button can be used
to deselect a highlighted form.
The Numerical and Alphabetical selections also contain the following options at the bottom of the
window:
Form Info - Brings up detailed information about the highlighted form.
Find - Brings up the find form dialog window to search for forms containing a specific word or phrase.
View - Displays the highlighted form with all language inserted and blanks inserted where client/
case information would be located. This feature is useful for viewing a form without assembling it.
NOTE:
If you need to change to a different volume, click the drop-down arrow field labeled
Volume: and choose another from the list.
Tree Control
The Numerical display tab includes a standard Windows tree control which is used to hide and display
the forms contained in each chapter of a volume. It can be especially useful when dealing with a very
large volume. When you contract the tree, only the chapter headings are displayed. This makes it easier
to scroll through the list looking for the chapter you need. After finding it, you can expand that chapter
and select the appropriate form.
·
To contract the entire form list, click Hide Forms.
·
To expand the entire form list, click Show Forms.
·
To contract a single chapter, click the
·
To expand a single chapter, click the
box.
box.
When you have finished selecting one or more forms, proceed to Step 3.
After selecting your form(s), you can either accept answers you've already entered or review each
question and answer. Click the Review prior answers box to go over any previously saved answers and
make changes before assembling documents. If you leave the box unchecked, only those questions not
previously answered will be asked, and the answers previously entered will be used without review.
An arrow button at the bottom of the Starting Document Assembly window lets you hide or show
Steps 3 and 4, which deal with document location and default answer sets.
Chapter 2, Assembling Documents
23
Step 3 — Tell ProDoc where to save the completed documents.
Normally, you'll want to use the displayed directory, which will be the default settings you chose in your
setup preferences.
·
The Directory field lists the drive and directory where assembled documents will be saved. If
you prefer a different directory for these documents, type it in or click the Browse button to the
right of the box and select the drive and directory from the Directory Browse window.
·
The Documents will be saved as: entry shows the path and confirms whether the actual form
title or another name will be assigned.
NOTE:
The filename will usually end with .doc for Microsoft Word and .wpd for
WordPerfect, depending on your selected word processor. These settings are
discussed in detail in Chapter 3.
Step 4 - Verify other assembly options.
The Default Answer Set field is provided to let you designate optional default answer sets (discussed in
Chapter 3) for this document assembly session.
If you have created any alternate sets, select the default answer set you want to use from this list by
clicking the drop down arrow at the right of this field. Otherwise, ProDoc will use your PRIMARY SET.
Figure 2-9 provides example entries following the completion of the foregoing steps 1-4:
Figure 2-9 shows the completed
assembly session settings.
Now, you’re ready to start
assembling. Click the Start
Assembling button in the lower
right hand corner of the Starting
Document Assembly window to
begin document assembly.
Figure 2-9, Completed Starting Document Assembly Window
Phase 2 - Answer "Assembly" Questions
After clicking the Start Assembling button, you will see a Volume Banner Screen similar to the one in
Figure 2-10.
24
ProDoc Software Manual
Every Volume has a banner screen to
provide information about the
volume.
You can read it, choose to get more
information on the listed volume by
clicking the Info button, or click the
box next to Do not show this
window again to avoid seeing it
again.
Select OK to continue to the next
window.
Figure 2-10, Banner Screen
Questions used to assemble your document will be presented in various windows similar to the one shown
in Figure 2-11. Note that you can click the flat blue button labeled Show or Hide Explanation to see or
hide an explanation for the question.
Simply complete the
Answer field and click the
Next button to proceed to
the next question window.
NOTE: The questions are
displayed in one of several
formats, including
Fill-in-the-Blank context,
Fill-in-the-Blank
non-context, Single and
Multiple Choice, Combo,
List and Table as follows:
(see below)
Figure 2-11, Processing Assembly Questions Window
Fill-in-the-Blank questions allow you to simply type in your answer (such as a client’s name or street
address). They may be presented in either a context or non-context window. Click the Next button after
you have typed in your answer.
Single Choice questions present you with a list of items from which you select only one. To select an
item, highlight it, then press ENTER or click the Next button.
Multiple Choice questions present a list of items from which you select any number of items or none at
all. To select an item, highlight it, then press SPACE or click the Select button. You can also use your
mouse. When you have made all of your selections, click the Next button.
Combo Questions present you with a list of likely answers and an entry field. Your answer is the text
Chapter 2, Assembling Documents
25
that you put in the entry field. An answer from the list is put into the entry field when it becomes
highlighted. You are not limited to the answers in the list. You may type whatever you want into the
entry field.
List Questions are used to fill in answers in lists, and you can add rows/answers, edit answers in
previous rows and move rows as needed. One example of this is entering a list of names of minor
children.
Table Questions allow you to enter answers in rows and columns of a table, selectively edit or delete
any entry, and move rows up and down in the table.
Validation for Answers: For answers which have special requirements, ProDoc checks the answers
against specific criteria to minimize data entry and logic errors. Follow the guidance in the validation
window to correct the answer and move to the next answer field.
Options Buttons. Depending on the type of question, the following buttons are available:
Help - Displays the help topic for the window.
Set as Default Answer - Sets the current answer as the default answer for the active question. To
use this feature, type in the answer you want to use as a default and click the button. Verify
whether or not you want this answer as the default by clicking Yes or No on the resulting window.
NOTE:
Several answers taken from Firm Information fields are handled differently; click
the Firm Information in Answers 75 link to see how to set default answers for
these items.
QuickText - only visible on fill-in-the-blank answers. Click the button to bring up the QuickText
window, where you can select one of the entries as the answer to your question. You can always
insert QuickText by using the shortcut designated when the entry was created.
Previous - displays the previous question.
Next - displays the next question.
Save and Continue - saves all answers you previously entered and accepted by clicking Next.
Use this button to ensure your answers are saved in the event of a computer malfunction during an
assembly session. Clicking this button does not save the currently displayed answer because it has
not yet been accepted.
Quit - Exit the current question. If assembling a document, this button brings up the session quit
options window to determine where to proceed after exiting.
Show or Hide Explanation - Provides helpful information about the current question.
Auto - will not be available for every window. Selecting this option tells ProDoc to automatically
answer this and all remaining questions with the placeholder specified in system Assembly
Settings. This will create a finished document with the placeholder inserted in all locations where
you did not actually enter an answer. Later, you can reassemble the document and fill in the blank
answers or replace the placeholders with answers in your word processor. Reassembling is best
because it adds saved answers to your case database that can be used in future documents.
26
ProDoc Software Manual
Phase 3 - Answer "Merge" Questions
Figure 2-12 shows the document
after it has been pre-assembled
with necessary clauses. You now
progress through the document by
completing the blank fields with
information for the specific client
and case.
For each blank, a question is
displayed at the bottom left of this
window (circled in red). You can
also click Explain on the menu
bar for more help on the question.
Figure 2-12, Context Display Window
Type your answer in the shaded fields and then press TAB, Alt+N, or click the N button to move to the
next field. You will be prompted to enter information in the bottom left corner of your screen as noted in
Figure 2-12. After you enter the information in the last field and press Tab, ProDoc will close the merge
phase and save your document. If you have chosen the option in setup preferences, ProDoc will then open
the document in your word processor.
Validation for Answers: For answers which have special requirements, ProDoc checks the answers
against specific criteria to minimize data entry and logic errors. Follow the guidance in the validation
window to correct the answer and move to the next answer field.
A description of controls on this window follows.
Navigating From Field To Field. To move forward to the next field:
·
Press the Tab key,
·
Click N on the menu bar, or
·
Press ALT + N.
To move backward to the previous field:
·
Press the Shift + Tab keys,
·
Click P on the menu bar,
·
Press ALT + P.
Menu Options
Quit - Exit the current document. Brings up the Session Quit Options window to determine
where to proceed after exiting.
Explain - Provides help information about the active question.
Default - Sets the current answer as the default answer for the active question. To use this
feature, type in the answer you want to use as a default, then select Default from the menu. This
brings up a window to verify you want to set the answer as a default.
Chapter 2, Assembling Documents
NOTE:
27
Several answers taken from Firm Information fields are handled differently; click
the Firm Information in Answers 75 link to see how to set default answers for
these items.
QuickText - Accesses the QuickText browse window to paste entries into the document.
Auto - Tells ProDoc to automatically answer this and all remaining questions with the placeholder
specified in system Assembly Settings. This will create a finished document with the placeholder
inserted in all locations where you did not actually enter an answer. Later, you can reassemble the
document and fill in the blank answers or replace the placeholders with answers in your word
processor. Reassembling is best because it adds saved answers to your case database that can be
used in future documents.
P - Backs up to the previous field.
N - Advances to the next field.
Save and Continue - saves all answers you previously entered and accepted by clicking N or
pressing the Tab key. Use this button to ensure your answers are saved in the event of a computer
malfunction during an assembly session. Clicking this button does not save the current field's
displayed answer because it has not yet been accepted.
Help - Brings up the help topic for this window.
NOTE:
Cut, copy, and paste actions can be performed from this window.
Phase 4 - Saving Documents
After all of your selected documents have
been assembled, a Completed Documents
window (Figure 2-13) appears with a list
of completed documents showing the
filenames under which they were stored.
Note the filename(s) and file location,
then click the Continue button.
A Rename button is provided should
you want to alter any aspect of the
document path and name. We
recommend that you avoid renaming at
this stage of document assembly.
A Move button is also available for use if
you want to store the document in a
different folder than the default.
Figure 2-13, Completed Documents Window
Phase 5 - Edit and Save Completed Documents
ProDoc will automatically send the first completed document to your word processor for final review,
editing, re-saving and printing.
NOTE:
Microsoft Word users saving a document will most likely encounter a pop-up window
28
ProDoc Software Manual
asking confirmation if you want to save it as a Word document. If you encounter this
window, it is best to save the document in Word format in order to preserve the formatting
integrity of the edited document. WordPerfect users should do likewise and save in their
native version.
If you are using a recent version of WordPerfect or Microsoft Word, ProDoc will insert the document's
name into the “recently used files list” at the File drop down menu if you enabled this feature in setup.
This makes it very easy to find and open recently saved documents. If you assembled more than one
document, you can open successive documents in the same fashion. If you have not enabled this feature
in setup, you must find and open the files in the location where you told ProDoc to save your completed
documents.
Now that you know how to assemble documents with ProDoc, proceed to Chapter 3 to learn more about
how to navigate the program's various menu items and buttons.
NOTE:
Assembling and printing graphical forms differs from the foregoing procedure. ProDoc uses
an entirely different assembly technique which includes sending finished graphical forms to
your default PDF reader rather than sending them to your word processor.
Chapter 3, Main Menu
29
Chapter 3, Main Menu
The Main Menu
This chapter helps you learn how to navigate through ProDoc by providing a description of the various
options and features available from the main screen menu and toolbar 29 . Figure 3-1 shows the main
screen menu on a ProDoc installation on a computer which also has the Small Office Suite program
installed.
Figure 3-1, Main Menu
Also, ProDoc has many windows which list information you scroll through, like your list of clients and the
list of forms in a volume. These lists are called Browsers because you can browse through the list and
make a selection.
Most of the ProDoc software's browse lists include "locator fields". This means when the list is selected,
you can simply type the first few letters of the selection you want and ProDoc will instantly jump to it. As
you type letters, they are displayed in the locator field (usually located above the top left corner of the list)
so that you can see what you have typed. For example, if you want to jump to form "3-16" in the form
selection screen, simply type "3-16". When you enter "3", ProDoc will jump to form 3-1 and the locator
field will display "3". As you continue typing "-16", ProDoc will jump to form "3-16" and that is what is
displayed in the locator field. If you want to jump to a different entry, you will need to clear the locator
field. To do this, simply press Backspace to delete each letter or press the up or down arrow key once.
For example, after you type "Smi" to jump to "Smith" you will need to clear the locator field before you
can type "Ada" to jump to "Adams".
NOTES: The screen figures in this chapter are typical of what a Windows 98/ME/NT/2000/XP/Vista
user with ProDoc installed on a local hard drive sees.
This chapter has been written for new and existing customers alike. So, many of the screen
figures depict accurate information, typical of what you will encounter.
Toolbar Buttons
Figure 3-1A, Main Menu Toolbar
The ProDoc main window normally has five icon buttons displayed on the main window toolbar. This
changes to six buttons if the Small Office Suite is installed, which is the case in Figure 3-1A. If the Small
Office Suite program is not installed, then that particular icon will not be displayed. Click the buttons
below to get more detailed help. Click the Back Arrow or Contents tab to get back to this section.
Click to begin a document assembly session.
30
ProDoc Software Manual
Click to start your preferred word processor (Microsoft Word or WordPerfect). This
button switches to or opens your word processor.
Click to open the Small Office Suite (SOS) program if you have it installed. This
program can help you:
- Track more detailed information regarding your clients and cases
- Track time and appointments
- Manage billing
- And much more!
To find more information about SOS, please call the Sales Department at 800-759-5418.
Click to open the Certified Mailer program. It interacts with your databases to easily
print certified mailer labels.
Click to open the Client/Case Manager, a central management area for clients and
cases. You can add, change and delete client and case information.
Click to open Document Manager, the central document management area, where you
can add, change, move and delete completed documents.
File Menu
Figure 3-2, Main Menu File
Drop-Down Box
Assemble Documents
16
starts a document assembly session. This selection performs the same
function as the Assemble toolbar button,
detail.
Document Assembly Wizard
16
. Chapter 2 explains the document assembly process in
takes you step-by-step through the document assembly process. The
Chapter 3, Main Menu
31
wizard is especially useful for new ProDoc customers because it provides an easy-to-use interface for
creating new documents. You may use the Document Assembly Wizard in the Quick Start Assistant or
by clicking File® Document Assembly Wizard on the ProDoc menubar.
Microsoft Word 65 lets you open or switch to your preferred word processor. The word processor that
starts (either Microsoft Word or WordPerfect) depends upon which is installed and which you chose
during setup. This selection also switches to your word processor if it's open. This selection performs the
same function as the Word Processor toolbar button,
.
ProDoc PDF Reader opens the ProDoc software's built-in PDF file reading program. This program also
has a typing feature for filling in blanks in PDF forms. You can designate this program as your default
viewer for all PDF documents and use it to view and print completed graphic documents in ProDoc.
Find Forms brings up the form search window shown in Figure 3-3. You can search for forms by typing
a key word or phrase in the Search for: field. You can search either in specific volume(s) or throughout
all volumes.
You must first select one or more
volumes from the list on the left by
clicking the title, box or the Select
All/Select buttons. If you cancel the
search after one or more matches
have been found, you will be asked
whether you would like to view a list
of the matches found up to that
point.
Figure 3-3, Search Window
Exit closes ProDoc. If "Auto Backup at exit" is selected in Options and Settings, you will be prompted for
a backup choice. If you are running SOS, you'll likely want to backup your files with that program
instead of using ProDoc.
Edit Menu
Figure 3-4, Edit
Menu
Drop-Down Box
Cut, Copy and Paste are shown in Figure 3-4. These choices will be available when you are working on
a form or document, or when you are entering information into any available text field in ProDoc. These
choices will be grayed out when they cannot be used. Each of these selections performs the desired action
only on the text you have selected.
Cut moves selected text from your document to the Windows clipboard and deletes it from your
document.
32
ProDoc Software Manual
Copy copies selected text to the Windows clipboard.
Paste inserts selected text from the Windows clipboard to the cursor position in your document.
Clients and Cases Menu
Figure 3-5, Clients & Cases
Drop-Down Box
Client/Case Manager brings up a management window where you can add, delete, search for or select
clients and cases as well as modify specific client and case information. This selection performs the same
function as the Client/Case toolbar button,
.
One of the most important features of ProDoc is its ability to build a case file for saving your answers.
Using this feature allows you to reuse information entered in earlier assembly sessions every time you
produce documents for that case. As the case progresses, you find that you enter less and less
information in order to produce finished documents. For example, once you enter the county where the
suit is filed, dates, names of the parties, addresses, etc., that information is automatically available for
subsequent documents and does not have to be retyped. The answers you entered in previous assembly
sessions will be automatically displayed as the proposed answer whenever appropriate to the question.
You can have an unlimited number of clients in ProDoc and each client can have an unlimited number of
cases. Note: Normally, you will enter new clients and/or cases during a document assembly session as
discussed in Chapter 2.
While a case file should normally be created for a single legal matter (such as Estate Planning or
Divorce), you are not restricted to using only one ProDoc volume. If necessary, you can assemble
documents from several volumes in a single case file.
Clicking Client/Case Manager brings up a window like the one shown in Figure 3-6. This window
displays the clients you have entered, the cases, phones, correspondence addresses and custom fields for
each client and case. It allows you to add, update and delete these items.
Chapter 3, Main Menu
33
The client/case list will be blank
for new customers until they have
added new clients and cases.
Then, as in Figure 3-6, it lists all
previously entered cases and
clients.
Note the flat blue button at the
right of the window. You can click
it to expand the window to reveal
client and case details or contract
it to only reveal clients and cases.
Figure 3-6, Client/Case Manager Window
Left side of Client/Case Manager Window (visible in both basic and expanded mode)
Clients, cases and unique IDs for each will be displayed alphabetically by last name. The IDs appear
only if you have chosen to use these in setup preferences.
The Now Showing: box tells you what types of contacts or clients are displayed. Click the drop down
arrow to select the type to display:
All Contacts
Active Clients (default)
Closed Contacts
Private Clients
Non-Clients
Use the Hide/Show Cases toggle button to display or hide cases. Click
or to hide or show cases for
individual clients. You can drag the vertical line column separator left and right to allow more room for a
particular column. You can also use the scroll bar at the bottom of the section to move the column view to
the right.
To add a new client or update the information for the highlighted client, click New Client or Update
Client. This brings up the Client Information Dialog window where you perform the desired action.
You can also double-click a client to update the information for that client. Right-clicking on a client
brings up a pop-up menu corresponding with the New, Update and Delete options displayed. You can
also click Delete Client to remove the client from the system.
When you double-click a client or click the New Client or Update Client buttons, a Client Information
Dialog window similar to Figure 3-7 will appear.
34
ProDoc Software Manual
Information is displayed in three
tabs: Client Information,
Correspondence and Phones and
Custom Fields.
To add or edit client information,
click the appropriate field or press
the Tab key to move from one field to
the next.
Figure 3-7, Client Dialog Window
The Client Information tab of the Client Dialog Window is where basic information about the client is
maintained such as shown in Figure 3-7. Most of the information in this screen is self-explanatory, such
as name, address, and correspondence. Client ID's are unique letter/number combinations that identify
each client (similar to how a social security number identifies a person). If you do not use this feature in
your practice, you can turn it off in ProDoc under the Options menu as discussed elsewhere in this
chapter. When this feature is turned off in ProDoc, the client ID field is not displayed.
NOTE:
If you will use Timeslips with ProDoc, you should assign Client IDs and Case IDs. You
should also ensure your Client IDs are no more than 30 characters long due to Timeslips
program limitations on that program's corresponding Nickname fields.
The Close Client button will only appear when you are updating an existing client. You can use it to
change your client's status. If you are updating a client with a status of closed, the button will be labeled
Re-Open Client. If you click this button, the client's status will change to open.
NOTE:
At the bottom of this window is a Directory field which displays the default location where
your completed documents will be saved. Leave the Override Document Placement
box unchecked to use the default directory you specified in the Customize
/Options/Completed Document settings. Check the box to specify a different directory
for this client.
When you click the Custom Fields tab, the Custom Dialog window like the one shown in Figure 3-8 will
appear. Just fill in the custom fields provided (if any were established by you in system options settings).
Chapter 3, Main Menu
35
Figure 3-8, Client Custom Fields Tab
The same functions on the left side of the Client/Case Manager Window explored earlier for clients also
apply to working with cases. Double-click a case or highlight it and click Update Case to reveal the
Case Dialog Window, where you perform the desired action. Clicking New Case also reveals the
window. Clicking Delete Case removes the case from the system.
When you double-click a case or click the New Case or Update Case button, a window similar to Figure
3-9 appears.
If you use Case IDs, enter the
appropriate one here. The ID must
either be blank or be a unique set of
characters for each case. If your
firm doesn't use Case IDs, you can
turn this feature off from the Main
Menu.
NOTE: If you want to integrate
Timeslips with ProDoc, you will
need to use Case IDs. Activating
Case IDs is explained in the
Clients & Cases Settings 73
section in Chapter 3.
Figure 3-9, Case Dialog Window
The Close Case box will only appear when you are updating an existing case. You can use it to change
the status of the case.
The Date: field will default to today's date. You can change the date by typing it in or clicking on the
date selection button next to the field.
Enter a unique name or phrase in the Description: field to help identify this case. It can be any word,
number or combinations. Common uses are short descriptions such as "Divorce" or "Estate Planning".
Only click the Override Document Placement and Directory box if you want to override the default
setting for this particular case. You can type in the path or click the browse button. The Directory
36
ProDoc Software Manual
Browse Window will appear; use this to find the desired location.
Filename - This field will not be visible if you chose in setup to have ProDoc automatically "use the form
title for filename". Use this field to enter a file name to store all files for the case. Specifying the filename
here prevents manually typing it for each document assembly session.
Click the Custom Fields tab if you have set these up earlier and wish to enter appropriate information.
A window similar to Figure 3-10 will appear.
In this example, Case Custom
Fields were set up which included
Judge, Court Clerk, and Opposing
Counsel.
Type in the information as needed,
then click the OK button to return
to the Select a Case window.
Click the Select Case button on
that window to use the new client
and case for document assembly.
Figure 3-10, Enter Case Custom Fields Window
Right side of Client/Case Manager Window
You can view detailed client correspondence, telephone, and custom field information on the right side of
the Client/Case Manager window, depicted in Figure 3-11. While working on this window, if the right
side is not already displayed, click the arrow button on the right border of the window.
The Client Information tab
displays salutation, mailing
address and phone information.
Click the Send to... button to
reveal a pick list of actions
involving this information.
Choosing Paste functions opens
your word processor and pastes
the information. Clipboard
functions copy information to the
Windows clipboard for later
pasting.
Figure 3-11, Client/Case Manager Window, Right Side
You can double-click any phone entries to edit the phone type and number. To edit any other
information, click the Update Client or Update Case buttons on the left side.
Click the Client Custom Fields and Case Custom Fields tabs to display information already entered
in the custom fields designated during setup or in a later options setting. If you want to change any
Chapter 3, Main Menu
37
information, you must click the Update Client or Update Case buttons on the left side of the window.
Figure 3-12, Clients & Cases
Drop-Down Box
Document Manager brings up a list of the documents, organized by client and case, which you've
already assembled, and any additional files that you have selected for file management within ProDoc.
This selection performs the same function as the Document toolbar button,
. You can also work
with any documents in your computer and/or network that you can locate with Windows Explorer.
Selecting this menu item or button brings up a window similar to Figure 3-13.
Figure 3-13, Clients & Cases Document Manager Window
This window is resizable to let you see more information. You can click and drag any vertical line
separating columns to allow more or less room for each column. Where scroll bars are displayed, you can
also scroll up or down through the lists or scroll the view from left to right.
Left side - Clients and Cases
NOTE: The display, navigation, client and case functions included in this window are the same as
those covered in detail in the Client/Case Manager section of this chapter.
Click the links to jump back to the applicable portions of the Client/Case Manager section:
Adding and Updating Clients
Adding and Updating Cases
33
35
The upper left side of the Document Manager window lists the clients alphabetically by last name along
with client and case IDs (if assigned).
38
ProDoc Software Manual
The Now Showing: box tells you what types of contacts or clients are displayed. Click the drop down
arrow to select the types to display:
All Contacts
Active Clients (default)
Closed Contacts
Private Clients
Non-Clients
Use the Hide/Show Cases toggle button to display or hide cases.
Clients, cases and unique IDs for each will be displayed alphabetically by last name. The IDs appear
only if you have chosen to use these in setup preferences.
Click
or
to show or hide cases for individual clients.
To add a new client or update the information for the highlighted client, click New Client or Update
Client. This brings up the Client Dialog window where you perform the desired action. You can also
double-click a client to update the information for that client. Right-clicking on a client brings up a pop-up
menu corresponding with the New, Update and Delete options displayed. You can also click Delete
Client to remove the client from the system.
While a client is highlighted, the same functions apply to working with cases. Double-click a case or
highlight it and click Update Case to reveal the Case Dialog Window, where you perform the desired
action. Clicking New Case also reveals the window. Clicking Delete Case removes the case from the
system.
NOTE:
A locator field lets you type a letter which causes the highlighting cursor to jump to the
first client name beginning with the letter.
Right side – Documents
The right side of the window displays the documents linked to either the client or the case highlighted on
the left side. This is illustrated by Figure 3-14:
Chapter 3, Main Menu
39
Figure 3-14, Documents Displayed in Document Manager Window
Documents are listed for the highlighted case, sorted alphabetically by title. If desired, you can click the
column titles to sort in ascending or descending order by a particular column. Each document's Create
Date and Author are displayed if the window is large enough. You can click and drag the vertical lines
to allow more or less room for each column. You can also use vertical or horizontal scrollbars (displayed
when needed) to scroll up and down or side to side.
As with clients and cases, you can double-click a document to update it. You can also click a document
title to highlight it, then click the buttons to Add a document, Update the document or Delete just the
document record or erase the actual document. You can click the Open File button to open the document
in your word processor. If the highlighted document was assembled in ProDoc, the Reassemble button
will be active and can be clicked to reassemble the document. You can right-click the document to reveal
a pop up window with the same options.
If the document you select is a graphics document, you can view it by clicking the Preview PDF button.
Top Section - Find Documents and Forms
One of the ProDoc software's key features is the ability to drag and drop files from computer search
windows to your ProDoc database. Two buttons appear in the top section to help you locate documents
and forms and either add them to your database or work with them in other ways.
The Windows Explorer functions described below are dependent upon the selections made in Options
and Settings for Miscellaneous Firm Settings 75 . Drag and drop results can be set to do the
following: physically move selected files to the client/case file folder; only copy files to the client/case
folder; or have ProDoc ask you what to do each time you drag and drop.
·
Windows Explorer - Click this button to open Windows Explorer. You can locate documents
and drag them to the right side of the Document Manager window to include them in your ProDoc
database. You should resize the explorer window to facilitate selecting one or more file(s) for
“dragging” from Explorer over to the right side of the Document Manager window and “dropping”
them there. They will then be added to the database for the client or case currently selected.
NOTE:
You can do the same thing using Windows File Find or Search, and drag the
result of your search to the Documents Organizer browse window.
40
·
ProDoc Software Manual
Find a Document - Click this button to search for documents throughout your computer or
network folders.
When you click the Find a Document button, a window opens similar to Figure 3-15. The Clients &
Cases Document Manager stays open also.
To facilitate drag and drop, you
should resize the window as small
as possible and move it as far
away as possible from the
Document Manager window.
As an example, this search was set
up to find any file with a .doc
extension. The file Assigning.doc
was found.
Figure 3-15, Prepare Your Search Window
You can search any folder, including ProDoc databases, by selecting Document Text Search. Then select
your search scope by clicking the button labeled either All Documents or Only Documents in ProDoc.
You can enter matching text in the field labeled Text to search for:. Your entry can be up to 512
characters long. ProDoc will search any text document it finds for matching text.
Opposite the field labeled File(s) to look for, you can enter classic DOS masks, like *.doc to look only
for Word documents; P* to find any files starting with the letter P, and so on.
Enter your Directory to search by either typing it in or clicking the browse button,
directory. Subdirectories will automatically be searched.
, and selecting the
Documents matching your criteria will be displayed in the right side of the window. Documents you find
outside of ProDoc databases can be dragged and dropped to the Document Manager window to include
them in your ProDoc database. Click a file, hold the left mouse button down, and drag the document to
the left side of the Document Manager window (to a client or case) or to the right side, then release the
button.
Documents and files you add to clients and cases can be opened, edited and saved with their associated
program. For example, Word documents will open in Word if you highlight the document and click the
Open button.
You can correct any drag and drop mistakes by repeating the same operation inside the Document
Manager window.
You can also click the button labeled Advanced Database Search to search only the ProDoc database
with a variety of matching options and criteria. Click the Help button when you use this screen to see all
available options and controls.
Case Answers - This menu choice brings up a list of all the questions you have answered in a case,
which you can quickly edit so that your case documents reflect correct information. This changes only the
answers in the ProDoc data files, not in the documents already assembled. To insert the new answers
into your documents, you must reassemble the documents.
Chapter 3, Main Menu
NOTE:
41
Changing Case Answers is handled differently for those answers that are taken from the
Firm Information fields (which were entered upon installation). See Firm Information
in Answers 75 for more information.
PowerPacks Menu
Figure 3-16, California PowerPacks Menu
PowerPacks - In Figure 3-16, the PowerPack name is listed on the left and the programs in the
PowerPack are listed on the right side of the menu. This menu will change depending upon which
PowerPacks you have installed.
We have developed PowerPacks—Additional Time savers, specific to each state we serve, which are
designed to significantly increase your productivity. These programs allow you to enter information in
your clients' case files and manage the information quickly and efficiently. If calculations are necessary,
the programs perform the calculations and insert the results wherever they are needed.
For more information on the programs available for your state, please visit our Web site at www.prodoc.
com or call our Sales Department at (800) 759-5418.
Print Menu
Figure 3-17, Print Drop-Down Menu
This menu item conveniently lists in one place ALL of the print options that are available in ProDoc,
including the list of items which follows.
42
ProDoc Software Manual
Blank Forms 42 allows you to quickly preview and print any form available in ProDoc so that you can
quickly determine if it contains the language you need. Blank forms printed in this manner contain
visible coding and formatting that will not appear in your finished ProDoc documents and, accordingly,
generally should not be opened for editing directly in your word processor.
Client List
43
prints a list of clients from your database.
·
You can select any combination of Open or Closed Clients and/or Non-Clients. Within these
categories, you can sort the list by Last Name, Client ID, City, State and Zip Code.
·
You can also choose to print open and/or closed cases along with your client listings.
Case Data Sheet
or inactive cases.
Form Lists
·
·
·
44
44
prints a summary report for a particular case. You can select the case from active
prints a listing of all master forms in a particular volume:
Alphabetical Order prints a listing of forms in the volume you select in alphabetical order.
Menu Order prints a listing of forms in the volume you select in numerical order by the
document selection number.
Supplemental prints a listing of any supplemental forms that you have created and added to a
volume.
Question Lists gives you three menu options:
·
Global Questions
·
Volume Questions
·
Supplemental Questions
you've added.
45
45
prints a list of global questions that apply to all volumes.
prints a list of questions that apply to selected volumes.
45
prints a list of questions specific to any supplemental forms
Worksheets 46 generates interview questionnaires for clients, reducing the time it takes you to produce
documents. There are five different types of worksheets to choose from:
·
Assembly Questions are those asked during the first phase (assembly or cut-and-paste) of an
assembly session.
·
Merge Questions are asked during the merge phase. Prints all questions that may be asked
during the merge phase for the selected document.
·
Custom Merge Questions creates a "custom" worksheet that contains only those merge
questions that would be asked for a specific set of answers to the assembly questions.
·
All Questions prints a list of all questions asked for the selected form(s).
·
All Questions as Asked prints a list of all questions for the form(s) in the order asked.
Labels 47 displays the setup window for printing labels for all or selected clients. You may choose from a
number of commonly available templates. You can also control which labels on a page are printed by
selecting how many labels to skip.
QuickText 47 gives you a convenient way to view and/or print a summary report of all established
QuickText entries along with their assigned hot keys.
Print Blank Forms Menu
The Print Blank Forms menu choice lets you to print a document that has blank spaces in the place of
fill-in-the-blank answers. You can see what the completed document will look like before you print it.
Many attorneys use this feature so they can fill in the information on paper instead of directly entering
the information into a computer while the client is in the office.
Chapter 3, Main Menu
43
This topic covers the basic choices for this function from beginning to end. Detailed help for each window
you see is available by pressing the F1 key or clicking the Help button on each window.
1.
From the Main Menu, click Print ® Blank Forms.
2.
Click Select Form.
3.
Select a volume with the drop down arrow at the top of the window. A list of forms appears.
4.
Select a subvolume if desired. Set the list order with the Numerical or Alphabetical tabs.
5.
Double-click the form you want. If it's not visible, you can scroll down or use the Find button to
search for a form by entering search words. Clicking the Info button opens a window with
specific form information.
a.
If you select a graphic form, the form will always be printed blank and no questions will be
asked. The remaining steps here will not apply. Simply click the Print button to send the
form to your printer.
b.
If you select a non-graphic form, see steps 6-10 below.
6.
Select Assembled or Not Assembled.
7.
For Assembled, you'll be given assembly questions to answer. Fill-in-the-blank underlines
"___" will be inserted in the document. For Not Assembled, no questions will be asked and the
form will appear with programming codes and selection choices.
8.
Click Print. If you chose Assembled, a series of questions will appear.
9.
You can type in answers or insert QuickText entries, and you can also designate the answer as
a Default Answer for the question. Click Next or Previous to move between questions. An
explanation of the question can be toggled on and off by the Show/Hide Explanation tab.
After you answer the questions, the form will be displayed in a window.
10. You can send the form to your printer, open it in your word processor to view how it will look
when printed, or close it by clicking the displayed buttons.
Print Client Lists Menu
The Print Client list menu choice prints a list of all clients in the database. This topic covers the basic
choices for this function from beginning to end. Detailed help for each window you see is available by
pressing the F1 key or clicking the Help button on each window.
·
·
You can select any combination of Open or Closed Clients and/or Non-Clients. Within these
categories, you can sort the list by Last Name, Client ID, City, State and Zip Code.
You can also choose to print open and/or closed cases along with your client listings.
To print a client list:
1. From the Main Menu, click Print ® Client List.
2. Use the drop down arrow next to Sort Clients by: to choose a sort order for your list.
3. Click the boxes to select any combination of Open, Closed or Non-Clients.
4. Along with these entries, you can print cases. Select the appropriate check boxes to do this.
5. Select Print Preview if you want to see the results on the screen before printing.
6. Click Print. A window for your default printer will appear.
7. Click OK, or change printers and click OK.
If you didn't choose Print Preview, your report will print. If you chose Print Preview, you will see the
report on your screen before printing it. For detailed help with the Print Preview Screen, click here
48 .
44
ProDoc Software Manual
Print Case Data Sheet Menu
The Print Case Data Sheet menu choice prints a summary report for a particular case. This topic
covers the basic choices for this function from beginning to end. Detailed help for each window you see
is available by pressing the F1 key or clicking the Help button on each window.
1. From the Main Menu, click Print ® Case Data Sheet. Click the Select Case button on the
Case Data Sheet Report window.
2. If the case you want isn't shown, use the "Now Showing" drop down arrow to choose a type of
contact/client: All Contacts, Active Clients, Closed Contacts, Private Clients or NonClients. You can also click the Show/Hide Cases button to perform each operation. Finally,
you can use the scroll bar.
3. Select a case. Note that you can also add, update or delete cases. You can also reveal more
detailed client information by clicking on the arrow button on the right border.
4. Select Print Preview if you want to see the results on the screen before printing.
5. Click Print. A window for your default printer will appear.
6. Click OK, or change printers and click OK.
If you didn't choose Print Preview, your report will print. If you chose Print Preview, you will see
the report on your screen before printing it. For detailed help with the Print Preview Screen, click
here 48 .
Print Form Lists Menu
The Print Form lists menu choice prints all master forms in a particular volume. This topic covers the
basic choices for this function from beginning to end. Detailed help for each window you see is available
by pressing the F1 key or clicking the Help button on each window.
·
·
·
Alphabetical Order prints a listing of forms in the volume you select in alphabetical order.
Menu Order prints a listing of forms in the volume you select in numerical order by the
document selection number.
Supplemental prints a listing of any supplemental forms that you have created and added to a
volume.
To print a form list:
1.
From the Main Menu, click Print ® Form Lists.
2.
Use the drop down arrow to choose a sort order for your list: Alphabetical Order, Menu Order
(in the order forms appear on a volume list), or Supplemental (will print only supplemental
forms you've added to a volume).
3.
Click Select Volume. Choose a volume from the list. Click OK.
4.
Select Print Preview if you want to see the results on the screen before printing.
5.
Click Print. A window for your default printer will appear.
6.
Click OK, or change printers and click OK.
If you didn't choose Print Preview, your report will print. If you chose Print Preview, you will see the
report on your screen before printing it. For detailed help with the Print Preview Screen, click here
48 .
Chapter 3, Main Menu
45
Print Global Questions Menu
This menu choice allows you to print a list of questions that apply to all volumes. You can print either
Merge Questions or Assemble Questions.
·
Merge Questions ask for information such as names, addresses and dates for a specific case
document.
·
Assemble Questions are used by ProDoc to determine how to cut and paste clauses/paragraphs
in a master form to create a customized document for your specific case.
Use the following steps to print Global Questions:
1. From the Main Menu, click Print ® Question Lists ® Global Questions.
2. Choose either Merge or Assemble Questions by clicking the button next to your choice.
3. The Print Preview box is selected by default. If you do not want to preview the print job before
printing, click the box to deselect the option.
4. Click Print. The Report Destination window appears.
5. Click OK, or change printers and click OK.
If you didn't choose Print Preview, your report will print. If you chose Print Preview, you will see the
report on your screen before printing it. For detailed help with the Print Preview Screen, click here
48 .
Print Volume Questions Menu
This menu choice allows you to print a list of questions that apply to a single volume. You can print
either Merge Questions or Assemble Questions.
·
Merge Questions ask for information such as names, addresses and dates.
·
Assemble Questions help ProDoc determine how to cut and paste clauses/paragraphs in a
master form to create a customized document for your specific case.
Use the following steps to print Volume Questions:
1. From the Main Menu, click Print ® Question Lists ® Volume Questions.
2. Choose a Volume by clicking the Select Volume button and selecting the appropriate volume
from the Volume Selection Window.
3. Choose either Merge or Assemble Questions by clicking the button next to your choice.
4. The Print Preview box is selected by default. If you do not want to preview the print job before
printing, click the box to deselect the option.
5. Click Print. The Report Destination window appears.
6. Click OK, or change printers and click OK.
If you didn't choose Print Preview, your report will print. If you chose Print Preview, you will see the
report on your screen before printing it. For detailed help with the Print Preview Screen, click here
48 .
Print Supplemental Questions Menu
This menu choice allows you to print a list of supplemental questions that you've added to your ProDoc
installation to tailor it to your needs. Use the following steps to print Supplemental Questions:
1. From the Main Menu, click Print ® Question Lists ® Supplemental Questions.
2. Choose a Volume by clicking the Select Volume button and selecting the appropriate volume
46
ProDoc Software Manual
from the Volume Selection Window.
3. The Print Preview box is selected by default. If you do not want to preview the print job before
printing, click the box to deselect the option.
4. Click Print. The Report Destination window appears.
5. Click OK, or change printers and click OK.
If you didn't choose Print Preview, your report will print. If you chose Print Preview, you will see the
report on your screen before printing it. For detailed help with the Print Preview Screen, click here
48 .
Print Worksheets Menu
The Print Worksheets menu choice generates interview questionnaires for clients, reducing the time it
takes you to produce documents. This topic covers the basic choices for this function from beginning to
end. Detailed help for each window you see is available by pressing the F1 key or clicking the Help
button on each window.
There are five different types of worksheets to choose from:
·
Assembly Questions are those asked during the first phase (assembly or cut-and-paste) of an
assembly session.
·
Merge Questions are asked during the merge phase of document assembly. This prints all
questions that may be asked during the merge phase.
·
Custom Merge Questions creates a "custom" worksheet that contains only those merge
questions that would be asked for a specific set of answers to the assembly questions. For
instance, using this option for a divorce petition would cause ProDoc to ask how many children
there are. If you answer zero, then the worksheet will not include questions that pertain only to
couples with children. This option lets you use the answers you previously entered for a case as
default answers to the assembly questions and to include the assembly questions and answers in
the worksheet.
·
All Questions prints a list of all questions asked for the selected form(s).
·
All Questions as Asked prints a list of all questions for the form(s) in the order asked
Perform the following steps to print worksheets:
1. From the Main Menu, click Print ® Worksheets.
2. Choose a report type by clicking the button next to the desired type.
3. Click the Select Forms button. Basic functions of the window that appears are described
below.
a. You can find and select one or multiple forms from the volume you select.
i.
You can choose from the sub-volumes on the left; the default is All.
ii. You can also display the list in Numerical or Alphabetical order by selecting the tabs.
iii. Once you've added Supplemental forms to a volume you select, you can find these by
selecting the Supplemental tab.
iv. Use the Form Sets tab to add the forms from any special sets you have created to the
list of forms to print. If you have not yet set up any special sets, you can do so by
clicking the Set up form sets button.
v. Click the Selections tab to display only the forms you have selected.
b. Click the box next to the forms you want. You can research the forms further:
i.
Click the form title to select the form;
Chapter 3, Main Menu
47
ii. Click Form Info to see discussion about the highlighted form and/or View to see the
form.
c.
You can click Find to search for a form by a word or phrase in either the form and title or
only in the title. You can flip through instances using the Find Previous or Find Next
buttons.
4. Select the form(s) for which you want a worksheet. If you chose Custom Merge Questions,
you may click the Select Case button to select a specific case before proceeding. This is not
required. However, if you select a case, you can save the answers you provide in the case file.
5. If desired, click the box labeled Show Question Token Numbers. These numbers are
assigned by ProDoc to identify the questions and control certain other variables. If the box is
selected, these questions will be displayed in your report.
6. If you chose Custom Merge Questions, the Show Assembly Questions selection box is
displayed. You may click this box to print the questions that will be asked during assembly of
the form.
7. Click Print. If you are producing a report of Custom Merge Questions, you will be prompted
to answer questions before printing. When you are finished, the Report Destination window
appears.
8. Click OK, or change printers and click OK.
If you didn't choose Print Preview, your report will print. If you chose Print Preview, you will see the
report on your screen before printing it. For detailed help with the Print Preview Screen, click here
48 .
Print Labels Menu
The Print Labels menu choice displays the setup window for printing mailing labels for all contacts or
for only those contacts you select. This section covers the basic choices for this function from beginning
to end. Detailed help for each window you see is available by pressing the F1 key or clicking the Help
button on each window.
1.
Choose a template by clicking on the drop-down arrow field next to Label:. Several common label
definitions are included here, and you can also design your own. See the Tools Menu 75 to do
this.
2.
If desired, select the Skip Labels box to skip a set number of labels. Select the number by
clicking the spin arrows in the How many to skip: field.
3.
By default, the All Contacts button is selected. If you want to select specific clients, click the All
Contacts button to cancel the selection.
4.
Select specific contacts by clicking the Select Contacts button.
5.
Click the Select Contacts button. Choose contacts from the resulting window.
6.
The Print Preview box is selected by default. If you do not want to preview the print job before
printing, click the box to cancel the selection.
7.
Ensure you have loaded the appropriate label forms in your printer. Click the Print button.
If you chose print preview, you will see the report on your screen before printing it. For detailed help
with the Print Preview Screen, click here 48 .
Print QuickText Menu
The Print QuickText menu choice lets you print a list of QuickText entries you've created.
1. From the Main Menu, click Print ® QuickText.
48
ProDoc Software Manual
2. Select or unselect Print Preview by clicking in the box. Either way, the print window for your
default printer appears. Click OK to print or to preview the list before printing, depending on
your Print Preview choice.
3. Click OK, or change printers and click OK.
If you didn't choose Print Preview, your report will print. If you chose Print Preview, you will see the
report on your screen before printing it. For detailed help with the Print Preview Screen, click here
48 .
Print Preview Window Menu
If you selected Print Preview while printing a report, a window similar to Figure 3-18 appears. See the
captions on the window for descriptions of icon/arrow functions. You can search, flip through pages,
select pages to print and more.
When you're finished previewing, click the
icon to print only the current page, or click the
to print all pages or the page range you've designated.
Figure 3-18, Print Preview Screen Functions
icon
Chapter 3, Main Menu
49
Customize Menu
Figure 3-19, Customize Menu
This menu item brings up a list of settings and information used throughout ProDoc.
NOTE:
You must have Supervisor login privilege to access the Manage Users Login.
Document Formatting
50
leads you to two sections:
·
Pleading Paper lets you modify the print format to use for pleadings. By default, all pleadings
you produce will be formatted according to California court requirements, with line numbers,
page numbers and a document title footer.
·
General Formatting
and forms.
52
lets you set default formatting options for word processing documents
Figure 3-20, Supplemental Forms & Questions Menu
Supplemental Forms and Questions
55
leads you to two sections:
·
Supplemental Forms allows you to access any forms that you've created and added to ProDoc
software's thousands of professionally developed master forms. See Appendix D 294 of the
software manual for help on creating your own forms.
·
Supplemental Questions lists supplemental questions you've added to your ProDoc installation
to tailor it to your needs. You can also add, change or delete supplemental questions here.
50
ProDoc Software Manual
Figure 3-21, Default Answers Menu
Default Answers 57 allows you to specify what information is automatically entered when questions are
asked by the program. This feature is categorized by global questions, questions for each volume, and
supplemental questions. You can also use this menu item to import another user's default answers. This
is useful in many situations that arise when different users must work on the same computer.
Edit Forms 60 allows you to edit the master forms (or form templates) used in ProDoc. Use this option
to open a forms management window where you can search for forms or select a volume to find the form
(s) that you wish to edit. For detailed information on editing forms, see Appendix B 271 and Appendix
D 294 .
Form Sets 60 allows you to designate groups of forms and retrieve them by the set name. For instance,
if you've identified three forms that you complete for every adoption case, you can group those forms here
and label them appropriately.
QuickText 61 lets you save text (e.g., courthouse addresses, favorite clauses) that you may wish to easily
recall and re-use in any case, and assign hot keys to these text entries. This helps you avoid retyping
repetitive phrases.
(If available)
Firm Information 62 lets you enter or edit relevant firm information (except your Firm Name,
which is entered during registration) so you can avoid entering it on each document, form or report.
Options 63 brings up the Options and Settings window. You can specify settings and set defaults here
for forms, document assembly options, client and case IDs and custom fields, choice of word processor, file
name styles and locations, graphic form settings, startup options and backup settings. You can also
specify how ProDoc interacts with your word processor and with the Small Office Suite and Timeslips (if
these are installed).
Manage Users Login 13 is only available to designated Supervisors. This choice is not displayed in the
graphic figures in this manual. This choice opens the Browse Users Records window, which
Supervisors can use to manage various user settings.
Document Formatting Menu
This menu allows you to change the formatting properties of word processing documents. These
settings do not apply to graphic forms 67 .
Chapter 3, Main Menu
51
While ProDoc has an excellent default format for documents, you can set specific formatting properties if
desired. You can change formatting for pleadings, all documents (Global Settings), all documents in a
Volume, or individual documents. This feature gives you control over how your finished documents
appear when printed. When you select Document Formatting from the menu, a submenu appears with
two choices: Pleading Paper and General Formatting.
The first selection, Pleading Paper, lets you make formatting choices for pleadings. When you
assemble a pleading without making any formatting changes, it automatically includes the formatting
features required for these documents in California.
Figure 3-21A illustrates a pleading document
printed with the default settings for
Pleading Paper options. These settings
include California's required formatting
features on any pleadings you produce.
Using the Pleading Paper menu choice, you
can turn off all formatting by clearing the
check in the Let ProDoc Generate
Pleading Paper box on the Pleading
Paper Options window. You can also
uncheck the box to exclude either of the
following formatting features: (1) Line
numbers and vertical lines at left and
right margins, or (2) Document name
and page number at bottom of page.
Please note that when either or both of the
options above are enabled, pleading
documents you assemble will not contain
formatting changes you have made to
margins through the General Formatting
menu. All other formatting changes will be
reflected in your completed document.
Figure 3-21A, Printed Document View
To change the default settings, click Customize ® Document Formatting ® Pleading Paper.
If you don't want to use any pleading paper
formatting, uncheck the box titled Let
ProDoc Generate Pleading Paper. For
pleading forms only, this action will also
activate changes made to the margins of
these forms through the Default
Formatting window.
Figure 3-21B, Pleading Options Window
If you want to use only one of the two
formatting options, check or uncheck the
appropriate Pleading Paper Options box
to include or exclude an option. Note that
these options are only available when the
Let ProDoc Generate Pleading Paper
box is checked.
52
ProDoc Software Manual
The second menu choice, General Formatting, lets you set default formatting options for documents
and forms. Options range from global to volume to specific form settings for fonts, spacing, margins and
paragraph styles.
Default Formatting for Pleading Documents. ProDoc generates required pleading paper formatting
by default. This formatting require pre-set margins. Therefore, formatting changes that you make to
margins through this window will NOT be applied to printed pleading documents until you disable
pleading paper formatting. Click here 51 or scroll up to see the procedures for disabling this default
setting. Font, line spacing and justification changes are included in completed pleading documents.
Pleadings are the only word processing documents with these restrictions on margin formatting changes.
Figure 3-22, Default Formatting Window
When you choose General Formatting, the Default Formatting window appears. The window opens
with Global Settings highlighted. In the navigation tree, this is designated with the Globe
icon. To
change formatting for all documents in all volumes, click the Update Settings button at the lower right
corner of the window. If you navigate elsewhere on this window and then decide to change global
settings, click anywhere on the Global Settings line to highlight it, then click Update Settings.
To change settings for all documents in a Volume (designated with the
icon) or for an individual
document (designated with the icon), you can click the desired volume or document, then click the
Update Settings button. You will not be able to update settings by chapters (
icon); these only group
related forms. There are several methods for finding the volume or document that you want:
·
Type a word or phrase into the box at the bottom left corner of the window and click the Find
Text button. The search process will find instances of the text in volume and document titles and
open the navigation tree to reveal a match. Click the Find Text button again to reveal the next
match if needed. Click Update Settings when the item you want is highlighted.
·
Use the Show/Hide all Documents button to either display or hide all documents. Selecting
"Show" will take some time; it fully expands the navigation tree on the left side of the window.
Hiding all documents makes it easier to scroll to volumes. Use the scroll bar at the right of the
window to scroll to the item you want, click it, and then click Update Settings.
·
Use the left side tree to drill down to a volume or document. Click to expand a category and
to shrink the category header. Click the item you want, then click Update Settings.
Chapter 3, Main Menu
53
After you click Update Settings, the Document Formatting Options window appears, similar to Figure
3-23. This window has two tabs - Standard and Advanced.
Figure 3-23, Document Formatting Options, Standard
The Standard tab is selected by default. It allows you to set default standard formatting options: font
type and size, margins, line spacing and text justification. Click in each box and/or use drop down arrows
to change settings. The formatting options work almost exactly the same as those in popular word
processing programs, with an important exception: the Ignore global and volume formatting
settings. If you check this box, the document will be produced with the exact settings shown in the
window and global/volume configuration files will be ignored. If you don't check it and leave some
features unchanged, global and volume settings will be used for the unchanged features.
Document Formatting Window Terms Explained
Font – The particular style of type used in your document.
Name - Name of the font for use. This includes the most popular proportional serif (Times New
Roman and Roman) and sans serif (Arial) fonts. The default font is Times New Roman, unless an
agency form requires a different font.
Font Size - Size of the font in points. One point is 1/72nd of an inch, so 12 point type would be 1/6th
inch high. Standard sizes for most correspondence is 10 point or 12 point type.
Margins - Margin size in fractions of an inch. Margins of one-half inch would be entered as 0.50 while
margins of one inch would be entered as 1.00. You can specify settings for Left, Right, Top, and
Bottom margins.
Line Spacing - Spacing between lines. Normal type is single-spaced, and you can enter whole
numbers and fractions. For single spacing enter 1.00, and for double spacing enter 2.00.
Justification - Left-justified text has a smooth left edge and ragged right edge, while full-justified
text has smooth right and left edges with variable spacing between words. Right-justified text
results in a smooth right edge with variable spacing between words. Center is rarely used in
documents since both sides are uneven. You can specify settings for Left, Full, Center, and Right
justification. Using full justification with mono-spaced type (Courier New) may result in excessive
spacing between letters. If you use full justification, you should also use a proportional font, such as
Times New Roman.
Ignore Formatting Settings - The Volume Formatting Options window contains an Ignore global
formatting settings check box. If it is checked, the value set in the form is used for any formatting
item that is unchecked in the Volume Formatting Options window instead of the value set in the
54
ProDoc Software Manual
Global Formatting Options window. The Specific Documents Formatting Options window also
contains an Ignore global and volume formatting settings check box. If it is checked, the value in
the form is used for any formatting item that is unchecked in the Specific Document Formatting
Options window instead of the value set in either the Global or Volume Formatting Options windows.
How does ProDoc Prioritize Formatting?
Global, Volume and Specific Document formatting values can all apply to a particular document. Here's
how ProDoc determines which to use:
1. If there is a Specific Document value for the particular setting, ProDoc uses it.
2. Otherwise, if there's a Volume value for the setting and "Ignore global and volume formatting
settings" was not checked in the Specific Document Formatting Options window for the document,
ProDoc uses the Volume value.
3. Otherwise, if there is a Global value for the item and "Ignore global and volume formatting
settings" was not checked in the Specific Document window for the document, and "Ignore global
settings" was not checked in the Volume Formatting Options window for the volume containing
the document, ProDoc uses the Global value.
4. Otherwise, ProDoc uses the value in the ProDoc form.
NOTE:
The sources for formatting item values are determined item by item. A document
might be assembled using a Specific Document line spacing value, a Volume left
margin value, a Global justification value and the font in the ProDoc form.
Formatting option settings apply only to the user who created them. To
make the formatting option settings of one user available to another user, you
must copy the files that contain the settings. Global formatting option values are
stored in a file called XXXGCFG.INI in the ProDoc home directory where "XXX" is
the initials of the user who created the settings. The volume and specific document
settings are stored in files called XXXCFG.INI in the volume subdirectories. To
make the settings available to user YYY, copy XXXGCFG.INI to YYYGCFG.INI
and each of the XXXCFG.INI files to YYYCFG.INI. This will overwrite any
formatting option settings that user YYY might have had.
Click the Advanced tab to create a configuration file for such things as headers and footers, page
numbers, fonts, and the like.
Figure 3-24, Document Formatting Options, Advanced
You can click Create to open your word processing program and create an advanced configuration file. If
you've already created an advanced configuration file, Edit enables you to open your word processor and
make changes to it. Delete lets you delete it.
Chapter 3, Main Menu
55
You can refer to your particular word processor's documentation to determine how to create a file
containing headers, footers, etc. When a document is assembled, ProDoc checks for the presence or
absence of configuration files, and if one or more configuration files that apply to the document exist,
ProDoc inserts the highest priority configuration file into the document. Note: If the configuration file sets
the value of one of the Formatting Options items, e.g. left margin, the value set in the formatting window
takes precedence and will override the value in the configuration file.
Configuration Files
There are three types of configuration files:
·
The global configuration file applies to all documents and has the lowest priority. It is stored as
GLOBAL.CIF in the ProDoc home directory.
·
A volume configuration file applies to all documents in one volume. Each is stored as
VOLUME.CIF in the subdirectory of the volume to which applies.
·
A specific document configuration file applies to a single document. Each is stored as
DOCNAME.CIF, where "DOCNAME" is the filename of the form from which the document is
generated, in the subdirectory of the volume containing the form.
To create a global configuration file, click the Create button. If your word processor is not running, a
dialog box will ask you whether you want to start it. Click Yes to start your word processor. Once your
word processor is running, add the formatting features you want. The procedure will differ depending on
which word processor you use.
Headers, footers and normal text items can be added. You can also insert such things as symbols, the
date and/or time, and page numbers. Follow your word processor's guidance on creating or inserting
items other than normal text. You may also insert ProDoc codes as text, such as ~P0001G, which during
document assembly causes ProDoc to ask the user to enter the name of the law firm and then replace all
occurrences of ~P0001G with that answer.
Many customers choose to have the name of the document and the case style show up in their headers or
footers. To do this, insert the code ~I9100G into headers and footers. The code for the Petitioner’s name
is ~M1200G and the Respondent is ~M1300G. To set up the header or footer to show the case style, you
should enter ~M1200G v. ~M1300G.
After you have entered your desired contents, select File/Save. The Save File window will appear. The
correct filename is GLOBAL.CIF for a global configuration file, VOLUME.CIF for a volume configuration
file, and DOCNAME.CIF where "DOCNAME" is the name of the form to which the configuration file
applies.
Save Global Configuration files to the ProDoc home directory. Save a Volume or Specific Document
configuration file in the volume's subdirectory. You should save the file as a WordPerfect 5.X file and
surround the file name with quotation marks (e.g. "GLOBAL.CIF”) in order to avoid having your
word processor append its unique file extension. Some Word users may only be able to save the document
as a Word Document. After saving the file, exit your word processor and return to ProDoc. Subsequently
assembled documents to which the configuration file applies will contain your additions or changes.
Supplemental Forms and Questions Menu
Supplemental Forms allows you to access any forms that you've created and added to ProDoc software's
thousands of professionally developed master forms. See Appendix D 294 of the software manual for help
on creating your own forms.
Supplemental Questions lists supplemental questions you've added to your ProDoc installation to
tailor it to your needs. You can also add, change or delete supplemental questions here. Clicking this
choice brings up the Volume Selection window. Choose a volume that holds supplemental questions
you've created, or one to which you want to add supplemental questions, and click OK. A window
56
ProDoc Software Manual
appears, similar to Figure 3-25. Either a list of supplemental questions you've created for the volume is
shown, or the window will be blank if you are adding questions to a particular volume for the first time.
To add a new question, click
New. To update or delete a
question, click the question and
click the appropriate button.
You can click the Change
Volume button at the bottom of
the window to view
supplemental questions in a
different volume, or add them to
the volume.
Figure 3-25, Browse Supplemental Questions
When you click the New or
Update buttons, a window
appears similar to Figure 3-26.
Use this dialog window to add or
change supplemental questions,
their tokens and size parameters.
Figure 3-26, Update Supplemental Questions
You need to complete four fields for a new question:
·
Tokens must only start with a P, followed by 4 alphanumeric characters, i.e. "P00A1." Special
characters are not allowed.
·
Question is the text of the question you want the user to see.
·
Rows is the number of rows (lines) you want to make available to the user to enter an answer.
·
Columns is the number of columns you want to give the user to answer the question. The
maximum number of columns allowed is 65. The number of characters that can be entered to
answer the question is generally determined by multiplying Rows by Columns.
After you have entered all the appropriate information, click the OK button. Your new
supplemental question will now appear in the window.
Chapter 3, Main Menu
57
Default Answers Menu
Default Answers menu choices in
Figure 3-27 allow you to specify the
answers displayed when questions
are asked by the program. This
includes answers for global
questions, questions for each volume,
and supplemental questions. You
can also use this menu to import
another user's default answers. This
is useful when different users must
work on the same computer or
support multiple attorneys.
Figure 3-27, Default Answer Sets
Default Answers are answers that automatically appear as the proposed answer when a question is first
asked. If the default answer which appears is the correct answer, then you do not have to type or select
the answer. You just accept the default answer and continue on to the next question. If not, simply make
a different selection or type in the answer you want.
Many questions will often have the same answer, such as the attorney’s name and bar number. You can
save a tremendous amount of time and effort by setting default answers, and ProDoc makes the process of
setting answers extremely easy.
NOTE:
The procedures in this section do not apply to setting default answers for Firm
Information fields, such as firm's name, address, phone/fax, email address and Web site.
Click the Firm Information in Answers 75 link to see how to set default answers for
these items.
You can scroll through the questions in a volume and set default answers for any of the questions. From
the Main Menu, click Customize ® Default Answers. This brings up the Default Answers drop down
menu where you can select Global, Volume or Supplemental Questions. Global questions apply to all
volumes, Volume questions apply to a specific volume (such as Family Law), and Supplemental questions
are questions which you have added to a volume. For example, selecting Global Questions brings up a Set
Default Answers window like the one shown in Figure 3-28. Setting default answers for Volume and
Supplemental questions (if any) is done in the same manner.
58
ProDoc Software Manual
Figure 3-28, Set Default Answers for Global Questions Window
To create default answers, follow the steps below. The procedure is the same for Global, Volume and
Supplemental questions, with one exception: for Volume and Supplemental questions, you must select a
volume before seeing the questions.
1. Select the desired Default Answer Set using the drop down arrow. After selecting the set, you
can scroll down and pick questions, or click Find to enter words to find one time or many times.
NOTE: We recommend that you concentrate first on establishing defaults for your primary
set. Then, when you feel that your primary set is firm, create optional sets by first
copying your primary set or another user's primary set. This will save you from
having to make double entries.
2. Double-click the question you want to answer, or click the question and click Update Default
Answer.
3. In the window that appears, double-click the answer, or click it and click OK. You can also click
OK to accept the highlighted answer. If the answer is a fill in the blank, type the answer or use a
QuickText entry to answer it.
4. Repeat until you've set up all the default global answers you'd like to use.
After you've created a default answer for a question, a check mark will appear in the box next to the
question in the Set Default Answers window. You can use the Find button to find a particular
question. To update a default answer, highlight the question and click the Update Default Answer
button. To delete a default answer, highlight the question and click the Remove Default Answer
button.
Another way to set default answers is to do it during document assembly. Many users find it much easier
and more convenient to set default answers this way. To do this while assembling documents:
1.
Begin document assembly and work through the procedures to the question phase.
2.
Select or type the answer you want to set as a default answer.
3.
Click the Set as Default Answer button.
4.
Select Yes on the confirmation window.
From that point forward, every time that question is first asked during document assembly, the default
value will be displayed. This only changes if it is preempted by an answer you gave during a prior
assembly session using the same case, or by a default answer calculated by ProDoc. To change the
default answer, repeat the above steps. Also note that default answers are stored in the default answer
sets. If you save answers in an optional set, the answers will only appear when you assemble documents
while using the optional set.
Chapter 3, Main Menu
59
Creating Default Answer Sets
This menu choice allows you to create a new default answer set or add a set created by another user. This
is useful in many situations that arise when different users must work on the same computer or support
multiple attorneys. From the Main Menu, click Customize ® Default answers® Default answer
sets. A window similar to Figure 3-29 appears.
This window allows you to create optional sets of default
answers which you can pick from a drop-down list to use
during an assembly session. For example, if a secretary
prepares documents for three attorneys, a default answer
set could be created for each attorney.
This doesn't change the default answer set that appears
automatically during an assembly session. For help on
choosing which set appears by default, see Assembly
Session Settings 64 .
The PRIMARY SET is the set containing all default
answers that were entered before any optional sets were
created. You can click the New button to create a new set,
the Change button to change the name of the highlighted
set, and the Delete button to delete the highlighted set.
Figure 3-29, Default Answer Sets Window
To create a new set, click the New button. A Default Answer Set Name dialog window appears,
similar to Figure 3-30. Note that if you are working in ProDoc for the first time on a new installation,
there are no other user sets to copy.
This browse window lists all of the
default answer sets you can copy and
use.
The New and Change buttons add
new sets and change the names of
existing sets, while the Delete
button removes a default answer set
from your list of sets.
Figure 3-30, Adding a Default Answer Set
Type in the Set Name, click the drop-down box to choose which Existing set to copy, then click the OK
button. Your Primary Set and any added new sets will now appear in the Default Answer Set window
and will be available for use when you begin assembling documents.
Using Default Answer Sets. You specify which default answer set to use for an assembly session when
you reach Step 4 of the Starting Document Assembly window. If optional default answer sets exist, the
window will contain a Default Answer Set drop-down box. Select the set you want to use from choices in
the drop-down box. If no optional default answer sets exist, the window will not contain a Default
Answer Set drop-down box, and the PRIMARY SET will automatically be used.
Specifying the Default Answer Set for Assembly Sessions. If you've added any optional sets, you
can specify the one that appears by default during an assembly session. Click Customize ® Options,
then click the Assembly Settings link on the left side of the Options and Settings window. Select the set
60
ProDoc Software Manual
you want to appear automatically from the drop-down list in the first field. You can still use any
available set during an assembly session.
Edit Forms Menu
Edit Forms allows you to edit the master forms (or form templates) used in ProDoc. Use this option to
open a forms management window where you can search for forms or select a volume to find the form(s)
that you wish to edit. For detailed information on editing forms, see Appendix B 271 and Appendix D
294 .
Form Sets Menu
Form sets are groups of forms that you often assemble at the same time. Using the Form Sets option, you
define different sets of forms. All forms in the set can then be selected in the Select Forms window by
selecting the form set rather than selecting each of the forms individually. For example, if you frequently
prepare adoptions documents, you could define a form set called Adoption Starter, consisting of the forms
in Figure 3-31. In order to select all of these forms at once, you could simply click the Form Sets tab in
the Select Forms window and choose the “Adoption Starter” set.
Here is a step-by-step example showing how to create a form set:
Creating Form Sets.
Click Customize ® Form Sets. T
he Volume Selection Window
appears. Select the volume you want
to define a form set for. For this
example, click Family Law and click
the Select button to select the
volume. The Browse and Update
Form Sets window is shown in Figure
3-31. If you need a different volume,
click the Change Volume button.
Figure 3-31, Browse and Update Form Sets Window
This is where you define your form sets. The Sets tab lists any existing sets in the volume. The Forms
for set tab contains a list of the forms in the highlighted form set. The New Set button lets you create a
new form set. The Update Set button lets you change the name of the highlighted form set. The Delete
Set button allows you delete the highlighted form set. The Update forms button lets you add or delete
forms to or from the highlighted form set.
To create a form set, click New Set. The Form Set Name box appears. Type the name of the form set,
"Adoption Starter", then click OK to return to the Browse and Update Form Sets window. A form set
named "Adoption Starter" now exists and appears in the list of form sets. It does not yet contain any
forms. To add forms to the set, make sure the set name is the highlighted form set and then click the
Update Forms button. A Selecting Forms window appears. Select all the forms that you want the
form set to contain. Click OK to accept your selections and return to the Browse and Update Form Sets
window. The forms you selected appear in the forms list in the Forms for set tab. You may return to the
main menu by clicking the Close button.
Chapter 3, Main Menu
61
Using Form Sets
Using a form set to select multiple forms to assemble is as easy as selecting a document. After selecting a
volume during document assembly, a Select Forms browse window will appear. If one or more form sets
have been defined for that volume, a Form Sets tab will be present. Click the Form Sets tab to see a
list of the form sets. To select all of the forms in a form set, double-click the form set or highlight it and
then click the Select button. The window will then switch to the Selections tab, which contains a list of
all forms currently selected for assembly. If you want to deselect one of the listed forms, highlight the
form and click the Clear Selection button. If you wish to select additional forms, click the Numerical,
Alphabetical or Form Sets tab.
QuickText Menu
Click Customize ® QuickText to see a
window similar to Figure 3-32. This menu
choice allows you to pre-define clauses or
paragraphs you commonly use for answers.
When you need to insert that clause into an
answer, simply select the clause from this
list. You can also set up a QuickText entry
to automatically insert today's date. You can
assign a hot key to any clause, and you can
press that particular key combination to
automatically insert the clause. For
example, you could set up Ctrl-D as the hot
key to insert today's date into an answer.
Figure 3-32, QuickText Browse Window
There is no limit to the number of entries you can have, and each can consist of over 3,000 characters.
The New and Update buttons add and change QuickText entries, while the Delete button removes
entries. You can also double-click on the name of the QuickText entry to open the dialog window and
edit the text string, or right click on a QuickText entry to bring up a drop-down menu to add, update, or
delete an entry. The Copy QuickText button allow you to copy another user's entry for your own use.
Add/Update QuickText Records. To add or update a QuickText entry, click the New or Update
button. The QuickText dialog box will appear. Enter the name of the QuickText entry and the text that
will be pasted into the fill-in-the-blank answer. The name should be descriptive so you can easily find a
QuickText entry during document assembly. Text can be entered as a single line or as multiple lines
formatted as you would like it to appear in the finished document.
A QuickText entry can also be used to paste the current date rather than a fixed block of text. To create
such an entry, select the Date option. The text field will be replaced with a drop-down box containing all
the available date formats. Select the how you want the pasted date to be displayed. You may assign a
hot key to any QuickText entry using the Hot Key drop down box.
Delete QuickText Record. To delete an entry, highlight it and click Delete. You will be asked to
confirm the deletion before the entry is removed.
NOTE:
To use a QuickText entry to paste a text block or the current date into a fill-in-the-blank
answer, move the cursor to the point in the answer where you want the entry to be inserted.
62
ProDoc Software Manual
Then click QuickText. This brings up the QuickText Selection window. Highlight the
desired entry and click Select. The question window will appear with the entry pasted into
the answer.
Alternately, you can use a hot key to paste a QuickText entry with a single keystroke. After
moving the cursor to the point in the answer where you want the entry inserted, simply
press the hot key for the entry. The entry will be inserted without you having to bring up
the QuickText selection window.
Copying a QuickText Entry. Click the Copy QuickText button. The window that appears is depicted
in Figure 3-33. This window allows you to copy other users' QuickText records for your own use. The
window displays other users who've created records and the records they've created in a tree format. You
can select individual records to copy, or you can copy all the entries made by another user.
You can click the Show/Hide
Description button to toggle between
displaying only users (denoted by the
icon) and displaying users and
their records (denoted by the icon).
You can click the icon to expand a
user tree and reveal records. You can
click the icon to contract a user tree
and hide the records.
Figure 3-33, Copy QuickText Window
To select one or more QuickText records to copy:
1. Click a record to highlight it. The actual entry will then be displayed on the right side of the
window. If the entry is a date, the format for the entry will be shown.
2. Click the Select button to select the highlighted entry. A green check mark will appear next to
the entry on the list. Repeat this process for any entries you wish to copy.
3. If you wish to select all QuickText entries for a particular user, click the user's login name or
initials and click the Select button.
4. Click the UnSelect button to remove a highlighted entry from your selections. Click the
UnSelect All button to remove all selections and start over.
5. When you are satisfied with your selections, click the OK button. A message window will appear
telling you that your selections were copied. If you want to print the information displayed in this
window, click the Print button.
6. Click the Close button to return to the QuickText browse window, where your selections will
appear.
Firm Information Menu
Click Customize ® Firm Information to bring up the Firm Information box on the Options and
Settings Window (Figure 3-34).
(If available)
Chapter 3, Main Menu
63
Information you enter here becomes part of ProDoc software's global information database
and selectively becomes available for insertion for applicable questions during document
assembly. Fill in all fields (except the Firm Name field, which cannot be changed here), or
edit the fields as needed, and click the OK button. The required entries are Firm Name
(already completed), the first Address field, City, State, Zip Code and Phone. The other fields
are optional, but you should still complete the fields that apply to your firm. Enter the
information carefully; this information will appear on many of your documents.
The Firm Name field was completed when you registered ProDoc. If you need to change the
name, go to the Main Menu and click Tools ® Registration ® Change Firm Name. Click here
80 for detailed help with this menu choice.
Figure 3-34, Firm Information Fields
Options Menu
From the main menu, you can click Customize ® Options to choose virtually all of your system
settings. Each of the settings listed on the left side of the Options and Settings window, shown in
Figure 3-35, is explained in detail in its own section, in the order shown on the window.
Figure 3-35, Options And Settings Window
64
ProDoc Software Manual
Assembly Settings
Click the Assembly Settings link on the Options and Settings window to bring up a box similar to
Figure 3-36. These settings control the ways in which you and ProDoc interact while you assemble
documents. Use the drop down arrows and check boxes to change settings as desired.
Figure 3-36, Assembly Settings
This window permits you to set the following defaults:
Default Answer Set – The "Primary Set" appears in this field. If you have created any optional default
answer sets, you can reveal these by clicking the down arrow. The set you select here will be
automatically used by ProDoc when you assemble forms and print custom worksheets.
Insert placeholder – This field is used to tell ProDoc to insert a placeholder any place where you
skipped past a question without entering an answer. You can enter anything you like here; a common
entry is a long blank line, "_____".
Show assembled document during merge phase – The second phase of a document assembly session
is called the merge phase, where you fill in blanks with names, addresses, dates, etc. If you select this
option, the assembled document will be displayed on screen so that you can actually see the blank you are
filling in. If you do not select this option, each question will pop up in a dialog box and you will be
provided with a field to enter your answer, which will later be merged into the document.
Add assembled documents to Word Processor's most recently used file list – You will want to
leave this checked since newer versions of WordPerfect and Microsoft Word display the most recently
opened documents at the bottom of the drop-down Files menu. ProDoc automatically adds documents to
that list as they are assembled if this option is selected.
Switch to Word Processor after assembly – After assembling documents, ProDoc can automatically
start your word processor and open the file(s) just assembled. This allows you to instantly edit and print
the assembled document.
Assemble RTF documents if using Microsoft Word – After assembling a WordPerfect document,
ProDoc will convert it to RTF format if your word processor is Microsoft Word and this option is selected.
You will usually want to select this option since Microsoft Word displays and prints RTF files more
accurately than it displays and prints WordPerfect files. Selecting this option has no effect if your word
processor is WordPerfect.
Review prior answers – This setting controls the default setting for the Review prior answers check
box when you start an assembly session. If you check this box, you will be asked all document assembly
questions during subsequent assembly sessions by default. If you want to skip questions you have
already answered during document assembly, you will need to uncheck the Review prior answers box
on the Starting Document Assembly window. If you want the most flexibility, leave this box
unchecked.
Chapter 3, Main Menu
65
Word Processor DDE Timeout – Leave as is. ProDoc interacts with your word processor using a
process known as Dynamic Data Exchange. On some systems, particularly networks, the process of
starting up a word processor and sending messages back and forth may be slower than normal. If you are
having problems such as Invalid page fault, Illegal operation, etc. when ProDoc attempts to start or
switch to your word processor, try increasing the value in this field by 30 seconds at a time. This tells
ProDoc to wait longer before it determines that a DDE transaction failed.
Word Processor Settings
Click the Word Processor link on the Options and Settings window to bring up a box similar to
Figure 3-37. This option box allows you to change your word processor and install a ProDoc toolbar in the
program.
Figure 3-37, Word Processor Settings
This screen lets you see what word processor you are using with ProDoc. ProDoc automatically finds and
sets up your word processor when it is installed. This screen allows you to change to a different word
processor than the one noted on the screen. Having the correct word processor chosen is very important in
controlling a number of features that help you save time in document assembly.
Normally, you will not need to change this setting. However, if you prefer to change to a different word
processor or your word processor is not displayed on the screen, you may browse to the word processing
program you use:
1. Click the large button titled If there is no Word Processor in the list above, or if you prefer
to use another one, click here to select another Word Processor.
2. Two fields open underneath the button you clicked.
3. Click the drop-down arrow to the right of the top field and you will see a list of word processors to
choose from. Locate your word processor on the list and highlight it. If it is not listed, click
Other.
4. Click the folder icon that appears to the right of the Location of Word Processor field.
5. The Select your Word processor box appears.
6. Browse to the executable file for your word processor. Executable files have the extension ".exe" at
the end of the file name.
7. Highlight the correct file and click Open to place the full command line path in the dialog box.
8. Click OK.
If you select Other, please note that ProDoc software only fully supports the use of Microsoft Word and
WordPerfect. However, you can open ProDoc documents with any word processor which can open and
work with WordPerfect 5.X/6.X files. ProDoc software's normal word processing interactions will not
function with unsupported word processors. At a minimum, you will have to open completed documents
manually.
66
ProDoc Software Manual
Installing a ProDoc toolbar in your word processor
To install a handy document manager toolbar in your word processor, click the Install a ProDoc
toolbar in… button at the bottom of the screen. The ProDoc toolbar that now appears in your word
processor features icons (with descriptive tool tip pop-ups) that perform the following functions when you
click them:
Start ProDoc or toggle to ProDoc if already running.
Start a new document. A dialog window appears where you can fill in the indicated fields. You
can associate your new document with an existing ProDoc client and case for tracking purposes. Click
the drop down arrow to the right of each field to select the client and case.
Open an existing document.
Save the opened document.
Search for documents using key words or advanced matching options.
Removing the ProDoc toolbar and menu choice from WordPerfect
To remove the ProDoc toolbar and menu selection from WordPerfect, open WordPerfect. On the menu,
click Edit and then Settings. Click the Customize icon in the Settings box. The Customize Settings box
appears. To remove the ProDoc toolbar, select the Toolbars tab and remove the check from the ProDoc
Organizer check box. To remove the ProDoc menu selection, select the Menus tab and highlight ProDoc
Organizer. Click Delete and then click Close.
Removing the ProDoc toolbar and menu choice from Word
To remove the ProDoc toolbar and menu selection from Word, open ProDoc and click Customize ?
Options. Click the Word processor link on the left side of the window. Click the Remove Word
Processor Toolbar button.
Completed Documents Settings
Click the Completed Documents link on the Options and Settings window to bring up a box similar
to Figure 3-38. This option box allows you to specify file locations for finished documents; choose a folder
naming convention; and choose a default file name type.
Figure 3-38, Completed Documents Settings
Use this window to specify the way you want ProDoc to work during a document assembly session. The
following default options can be set from this window: Folder for Completed Documents 67 and
Filename of completed documents 67 .
Chapter 3, Main Menu
67
Folder for Completed Documents
Folder – The location specified in this window is used as the default location in the Starting
Document Assembly window. Generally, this will be something like F:\clients if you are a
Network user or C:\Clients if you are single user. If you want to choose the directory from a
browse listing, click the browse button to the right of the box and select the drive and directory
from the directory browse window. Any path components specified above are appended to the
directory.
Folder Name Components – You can choose to store assembled documents in subfolders under
the folder specified above. Subfolders will be based on the client name or client ID and the case
description or case ID for the client and case selected for the assembly session. To select the
components to use, click the down arrow to open the drop down list box. To select a path
component set from the list, click it. The following list shows the locations that correspond to the
various path component sets with a folder of "F:\clients" for an assembly session using the client
"John J Smith" with a client ID of "ALS-SJJ-123" and the case "Divorce" with a case ID of "SJJDIV".
Folder Name Components....Location
Directory\Client Name....F:\clients\Smith, John J
Directory\Name\Case Description....F:\clients\Smith, John J\Divorce
Directory\Client Name\Case ID....F:\clients\Smith, John J\SJJ-DIV
Directory\Client ID....F:\clients\ALS-SJJ-123
Directory\Client ID\Case Description....F:\clients\ ALS-SJJ-123\Divorce
Directory\Client ID\Case ID....F:\clients\ALS-SJJ-123\SJJ-DIV
Directory\Case Description....F:\clients\Divorce
Directory\Case Description\Client Name....F:\clients\Divorce\Smith, John J
Directory\Case Description\Client ID....F:\clients\Divorce\ ALS-SJJ-123
Directory\Case ID....F:\clients\SJJ-DIV
Directory\Case ID\Client Name....F:\clients\SJJ-DIV\Smith,John J
Directory\Case ID\Client ID....F:\clients\SJJ-DIV\ALS-SJJ-123
NOTE:
Any blank components, such as a blank Case ID, are omitted. If no case is used
for the assembly session, no components are appended to the folder.
Filename of completed documents. By default, the Use form title for filename box is checked.
When this box is checked, ProDoc will use the title of the form as the filename of the document you
assemble. The filename cannot be changed in the Starting Document Assembly window. Also, fields for
entering filenames for clients and cases will be removed from the Client Dialog Window and Case Dialog
Window.
If you remove the check from this box, you can specify a filename for all documents you assemble in the
field provided. You can change this filename in an assembly session.
If you assemble the same document for a case more than once, ProDoc will use the filename you specify
and add "-#2" to the filename. The numerals advance as instances occur.
Graphic Forms Settings
Click the Graphic Forms link on the Options and Settings window to bring up a box similar to Figure
3-39. The options here let you customize settings for filling, completing and printing graphics-type forms.
68
ProDoc Software Manual
Figure 3-39, Graphic Forms Settings
This window allows you to customize settings for completing and printing graphics forms. In most cases,
the default settings will result in an excellent finished product. A description of the fields and choices
follows:
Shrink to fit when printing - ensures graphic forms designed for one page actually print on one page
without border breaks to a second page.
Do not prompt for manual duplex - this refers to a prompt which will ask you if you want to print on
both sides of the paper. When this box is checked, the prompt is disabled.
No duplex even if printer supports it - when checked, disables printing on both sides of a page.
Duplex Direction - can be horizontal or vertical. Horizontal will result in a two-sided printed page
that you can pick up from the bottom to read the back. Vertical will print the back so that you can flip the
right edge and read the back.
Typeface - identifies the default typeface for filling a form. You can change this typeface by clicking the
drop-down arrow in the field and clicking on a different typeface.
Point Size - One point is 1/72nd of an inch, so 12 point type would be 1/6th inch high. Standard sizes for
most correspondence is 10 point or 12 point type. You can change this by manually typing the entry in
the field.
Squish Percent - the relative size of the form's width as it is displayed in ProDoc. You can change this
with the spin button or by typing the percentage you want in the field.
Style - Can be set to normal (nothing checked) or Bold, Italic, or Underline. To use a style, click the
box next to the style you want to use.
Initial Zoom - the relative size of the entire form as it is displayed in ProDoc. You can change this by
using the drop-down arrow and selecting the percentage you want from the choices displayed.
WebUpdate Settings
WebUpdate runs automatically the first time ProDoc is opened, by default. When you start ProDoc, the
program checks the ProDoc server for updates. If updates are available, a window is displayed listing
these updates. You can change the setting by clicking Customize ® Options ® WebUpdate and
checking or clearing the Disable WebUpdate check box. If you disable WebUpdate, you can manually
check for updates anytime by clicking Tools ® Check for Updates.
If the feature is enabled, the program will check the ProDoc software's online server for updates needed
for your installation when you initially run ProDoc each day. A box will appear indicating that ProDoc is
checking for updates. If no updates are found, the box closes. If updates are available, the Updates for
ProDoc are now available window appears. You have three choices on this window:
·
Click Download and Apply All Updates to download all updates. The updates will be
Chapter 3, Main Menu
69
downloaded, and a window will be displayed which tells you the updates have been downloaded.
You will be prompted to restart ProDoc to install the updates. After ProDoc restarts, the
downloaded updates will be installed.
·
Click Select Updates to Download and Apply to open a window displaying available updates
and a description of each update available. The selection box for each update will be checked. We
recommend you download each available update. If you want to exclude an update from
download, click the update's check box to clear it, and the update will not be downloaded. Click
Begin Download to download the selected updates. If you don't want to download updates at
this time, click Cancel.
·
Click Do Not Download Updates at this time to close the update window without downloading
any updates.
Miscellaneous Personal Settings
Click the Miscellaneous Personal Settings link on the Options and Settings window to bring up a
box similar to Figure 3-40. These options include the ability to show/not show the Quick Start Assistant
or the Quick Click Menu; use/not use the ProDoc software's PDF Reader to view Adobe PDF documents;
and restore ProDoc software's original window positions for all windows.
Figure 3-40, Miscellaneous Personal Settings
This window allows you to set miscellaneous defaults that only take effect when you log in to ProDoc.
Quick Start Assistant (Beginner) - When this button is selected, ProDoc automatically brings up the
Quick Start Assistant for your use after you log in. This is recommended for beginning users.
Quick Click Menu (Advanced) - When this button is selected, ProDoc automatically brings up the
Quick Click Menu for your use after you log in. This is recommended for users who are familiar with the
program.
None - When this button is selected, neither of the above starts.
Use the ProDoc PDF Reader to view PDF Documents - When checked, ProDoc will use its
embedded PDF reader to view PDF documents. If unchecked, Adobe Reader or another program you've
designated on your computer to open PDF documents will start and display PDF documents when you
select these while working in ProDoc. If you have Adobe Reader, you would normally want to uncheck
this box.
Restore Window Position - Click this button to reset all ProDoc windows to appear in their original
positions and size.
70
ProDoc Software Manual
Reset Volume Banner Screens - Click this button to have ProDoc display volume banner screens when
you assemble documents.
Reset Legal Size Reminder - Click this button to set the legal size paper reminder for printing on and
off.
Backup Settings
Click the Backup link on the Options and Settings window to bring up a box similar to Figure 3-41.
Figure 3-41, Backup Settings
The choices on this window control backup settings. We recommend you use the settings shown in Figure
3-41 unless you are a Small Office Suite user.
Auto Backup at exit - If you do not use SOS, you should ensure this option is selected. If this option is
selected, ProDoc will periodically automatically make backup copies of client and case data files when you
exit ProDoc. The backup copies are stored in the ProDoc home directory by default, but you can save
these in any valid drive/folder by changing the entry in the Backup folder field. SOS subscribers
should leave this box unchecked. This is recommended because SOS backs up more data files, and
using ProDoc backup and restore can damage SOS data files.
If you have SOS installed and you select Auto Backup at exit, you will see a warning screen when you
click OK on this window. The warning tells you that you should use SOS for backing up your data. The
warning screen provides a Disable Backup button to disable automatic backup in ProDoc. If you click
the button, you will see a window confirming that the automatic backup is disabled. The window will also
ask you to enable automatic backup in SOS.
If Auto Backup at exit is not selected, the remaining fields here are disabled.
Days between backups - Specifies how many days to skip between performing automatic backups. No
backup is done if the difference between the current date and the date of any existing backup copies is
less than the frequency. If the frequency is zero then a backup is always done.
Station triggering automatic backups - Ensure that this field contains the log in identification of a
person in your office who regularly uses ProDoc.
Backup folder - Specifies the folder which receives backup data files. The default is the ProDoc
installation folder. You can type in another folder name or use the browse folder button next to the field
to select another folder.
Small Office Suite (SOS) Settings
Click the Small Office Suite (SOS) link on the Options and Settings window to bring up a box similar
to Figure 3-42. The box helps you designate amounts to charge, using SOS charge slips, for assembled
documents. If you have SOS installed, you can designate billing amounts for documents and
automatically generate charge slips when you complete a document. See the SOS Manual for detailed
help in setting up billing options and using charge slips in SOS.
Chapter 3, Main Menu
71
Figure 3-42, SOS Settings
Enable the Generation of billing slips in SOS for documents assembled. (Requires SOS) – Place
a check in this box if you would like to enable the feature that allows you to automatically bill your clients
in SOS for the documents that you assemble. To select documents and specify amounts:
1.
Choose a Volume by clicking on the drop down arrow field.
2.
Arrange the list of volume forms either by Numerical or Alphabetical order by clicking the
appropriate tabs.
a.
If you list forms numerically, you can also use the Contract All or Expand All buttons to
reveal chapters only or all forms grouped by chapters.
b.
In a numerically ordered list, you can also click the
forms in a chapter.
button or
button to reveal or hide
3.
If desired, you can click the Form Sets tab to display a form set you've created. You can then
specify the amount you want to charge for the complete set.
4.
Select the desired form by clicking it once. Click the Edit Amount button and enter the desired
dollar amount to charge for assembling the document.
5.
Repeat the process as needed.
Generating Charges in SOS for Completed Documents
If you have enabled the feature, the Charges to Generate In SOS window appears after you have
assembled one or more documents listing an amount to charge. This window only opens if you used a
case file. The information that appears on the screen is the Activity/Doc Name, Fee Charged and
Timekeeper.
If a T appears before a charge on the list, it means that the charge will not be billed but will be tracked
for the case. If a B appears before a charge on the list, it means that the item will be billed to the case.
You may choose whether to Track or Bill charges by highlighting the charge and clicking on the Track
this Charge (Will Not Generate a Billable Slip) or Bill this Charge (Will Show as a Billable Slip)
buttons that appear in the Charge Tracking/Billing field of the Charges to Generate In SOS
window.
Highlight a charge and click the Edit Charge button to adjust the Activity Name, Fee or Timekeeper.
If you want to remove the charge so that it does not appear in the Charges to Generate In SOS
window, highlight the charge and click the Delete Charge button. Clicking the Consolidate All button
will allow you to generate one flat fee slip for the total amount of the documents that have been
assembled instead of separate slips for each document's specified amount. Click Generate Charges to
create SOS billing slips for the documents that have been created. Click Cancel Charges to close the
72
ProDoc Software Manual
Charges to Generate In SOS window.
Timeslips Settings
Click the Timeslips Settings link on the Options and Settings window to bring up a box similar to
Figure 3-43. This window is only applicable for Timeslips version 9.1 and newer users who have
interfaced Timeslips with ProDoc. Use this window to set up phone types and name mapping .
Figure 3-43, Timeslips Settings
For detailed help with synchronizing Timeslips and ProDoc, see Appendix C
281
of this manual.
This window is only applicable for Timeslips version 9.1 and newer users who have interfaced
Timeslips with ProDoc.
The Timeslips extension gives you the ability to bill your clients by generating "slips" for each document
created in ProDoc. Generating a slip takes place after document assembly in ProDoc and before the
document is opened in the word processor.
CAUTION: Do not use ProDoc with a version of Timeslips (e.g., Timeslips Express) that
does not allow you to use "project separators". "Project separators" distinguish
clients and cases. Using ProDoc with a version of Timeslips that does not use
"project separators" will cause the loss of important data.
Enable the ProDoc to Timeslips Connection the next time ProDoc is started. (Requires
Timeslips) – Place a check in this box if you would like to enable the feature that allows you to
synchronize Timeslips and ProDoc for client and document billing purposes.
Synchronize at Start – Click the On button to have ProDoc automatically start the synchronization of
Timeslips and ProDoc data when you start ProDoc. Click the Off button to synchronize data only when
you choose to do so.
Use this window's Timeslips Name Mapping tab to match the Nickname 1, Nickname 2, and
Nickname 2 custom field parameters in Timeslips to match the corresponding fields in ProDoc. Select the
entry types with the drop down arrows next to the fields. If you leave these fields blank, Timeslips will
use Client and Case IDs for the Nickname1 field.
Use the Timeslips Phone Type Mapping tab to match the Timeslips and ProDoc phone type fields.
Select the phone types using the drop down arrows next to the fields.
Phone Types Settings
Click the Phone Types link on the Options and Settings window to bring up a box similar to Figure 344. Timeslips users can use this tab to change the order of phone number listings to conform with the
Chapter 3, Main Menu
73
scheme in Timeslips. ProDoc allows you to store many phone numbers for a client. Timeslips limits this
option to four phone numbers.
Figure 3-44, Phone Types Settings
Use this window to insert, change or delete phone types for your contacts with the controls provided.
From the ProDoc Options Window, Timeslips users can use the convenient Move Up and Move Down
buttons to adjust the order of the various phone types to properly match the ProDoc software's phone
listings with those in Timeslips. Changing these settings will also determine how phone types are
displayed when you add or update phone types for clients.
You can use the New, Update or Delete buttons to add, change or delete phone types. Any new phone
types you create can be updated or deleted. Home, business and fax phone types cannot be deleted or
updated.
Clients & Cases Settings
Click the Clients & Cases link on the Options and Settings window to bring up a box similar to Figure
3-45. This box allows you to specify the use of unique IDs to identify clients and cases.
Figure 3-45, Clients & Cases Settings
This window allows you to use or not use unique IDs for clients and cases.
Use unique Client IDs to identify clients – (Mandatory for Timeslips users) - Click this box to
specify a client ID for each client. This requires that each client ID be unique (no duplicates). If you plan
to use an ID for each client, you should check this box to ensure no two clients share the same ID. An
example of a client ID could be 2005-ALS-2311, which would show the year the client was opened, the
attorney who opened it and the actual client number. If you turn this feature on, then when adding a new
client to the system, the client ID field must be left blank or a unique number must be entered.
Use unique Case IDs to identify cases – (Mandatory for Timeslips users) - Similar to the client ID
above, this allows you to specify a case ID for each case. The case ID must be unique (no duplicates) for
each client, although different clients can share the same case ID (two clients can have a case ID called
divorce). If you plan to use an ID for each case, you should check this box to ensure no two cases for the
same client share the same ID. If you turn this feature on, then when adding a new case to the system,
the case ID field must be left blank or a unique number must be entered.
74
ProDoc Software Manual
Leave either box blank to let ProDoc know you don't want to use client or case IDs. This will prevent the
fields for these items from being displayed on client and case add/update windows.
Custom Fields Settings
Click the Custom Fields link on the Options and Settings window to bring up a box similar to Figure
3-46. This box lets you build up to six separate custom fields for Clients and Cases. Simply type in any
desired Client fields, such as "SSN", in the space provided, or type in Case custom fields such as
"Opposing Counsel". Then click OK.
Figure 3-46, Custom Fields Settings
Firm Information Fields Settings
(If available)
Click the Firm Information link on the Options and Settings window to bring up a box similar to
Figure 3-47. This box lets you enter or edit relevant firm information (except your Firm Name, which
cannot be changed here) so you can avoid entering it on each document, form or report.
The Firm Name field was completed when you registered ProDoc. If you need to change the
name, go to the Main Menu and click Tools ® Registration ® Change Firm Name. Click here
80 for detailed help with this menu choice.
Figure 3-47, Firm Information Settings
(If available)
The required entries are Firm Name (already completed), the first Address field, City, State, Zip
Code and Phone. The other fields are optional, but you should still complete the fields that apply to
your firm. Enter the information carefully; this information will appear on many of your documents.
Chapter 3, Main Menu
75
Firm Information in Answers
The Firm Information fields are entered when you install ProDoc. The information in these fields
overrides any changes made by setting default answers or changing case answers. ProDoc will always
display the current firm information as the suggested/displayed answer during assembly sessions.
This applies to all Firm Information fields, including firm name, address, city, state, zip code, phone/fax
numbers, email and Web site name.
(If available)
Changing Firm Information Default Answers. To change the default answer for the Firm
Name, you must click Tools ® Registration ® Change Firm Name. To change default answers for
all other firm information fields, you must click Customize ® Firm Information and make the
changes on the Options And Settings window.
Miscellaneous Firm Settings
Click the Miscellaneous Firm Settings link on the Options and Settings window to bring up a box
similar to Figure 3-48.
Figure 3-48, Miscellaneous Firm Settings
This window allows you to specify settings for revealing related forms during an assembly session; lead
time for warnings about volume expiration; and how to handle Windows Explorer file moves.
Show logically related Forms – If this box is selected, ProDoc will note when you fail to select a form
logically related to the form you've chosen during an assembly session or when defining a form set. The
Select Forms window will appear to give you another chance to select logically related forms.
Display volume registration warning how many days before the volume expires? - Use the spin
buttons here to select the lead time for getting a warning that a volume is going to expire. The warning
will start appearing when a volume's expiration date reaches the number of days that you have set in this
field.
Use the selections under Drop of a file from Windows Explorer causes the file to be: to tell ProDoc
how you want the source and destination file to be treated while using Windows Explorer for drag and
drop operations in the Document Manager. For more information on these settings and the drag and
drop function, click here 39 .
Tools Menu
This menu choice brings up useful utility programs which perform external and housekeeping tasks.
76
ProDoc Software Manual
Figure 3-49, Tools Drop-Down
Menu
Certified Mailer 76 opens the Certified Mailer program to help you create and print certified mail labels
for your certified letters and packages.
Design Labels
77
brings up a pick list of available label formats.
Repair Data Files
Backup Data Files
78
78
is a utility you can use whenever you suspect a data file is damaged.
lets you backup or restore data files.
Database Transfer 79 enables you to transfer contact data files to a system using ProDoc which doesn't
already have access to your files. You can also import contact data that was exported from another
ProDoc system.
Registration
PowerPacks.
79
lets you manage all licensing and registration for ProDoc, including volumes and
Export Data 85 lets you export contacts, cases and answers to questions. This is useful if you expand
ProDoc to another computer system.
Certified Mailer
Law offices normally send a large
amount of certified mail. The Certified
Mailer feature makes it easy to produce
certified mail labels by automating the
process. Figure 3-50 depicts the
Certified Mailer window.
You can quickly choose clients from your
database, or you can add addressees that
are not in your database.
Figure 3-50, Certified Mailer Window
Before you can use this feature, you will need to purchase certified mail shipping labels. You can buy
labels from most office supply stores. The certified mailer program works well with Walz™ Form 35663
Certified Mailer forms.
Chapter 3, Main Menu
77
To produce certified mail labels:
1. From the Main Menu,click the Cert. Mailer button or Tools ® Certified Mailer. Type in the
subject of the mail in the RE: box at the top.
2. If you need a label for one or more contacts in your database, click Select Contacts. The Select
Contacts window appears, similar to Figure 3-51.
Select the contact by clicking in the box
next to the name(s), or by highlighting the
name(s) and clicking the Select button. If
you want to limit your choices to clients
only, click the Clients only box.
Click the Unselect button to remove a
previous choice. Click OK.
Figure 3-51, Select Contacts Window
3. The contact(s) will appear in the Certified Mailer box as receiving the certified mail. Repeat as
needed.
4. If you need to add addressees who are not in your ProDoc database, click the New button and
enter their address. Click OK. Repeat as needed.
NOTE:
Any person(s) and mailing addresses you add here do not become a part of your
ProDoc client database.
5. Choose Return receipt requested or Restrict delivery to addressee as desired by clicking in
the boxes. Enter or change the fees using the appropriate boxes.
6. Determine the certified mail fee and postage. You can enter these for each addressee by clicking
on the name on the left side of the window, then entering amounts in the boxes on the right side
of the window. You can also click Apply to all records to apply what you've entered to everyone
receiving the mail. Use Setup Default Rates to set options and amounts for future use.
7. Review your selections. You can change options, addresses and amounts by highlighting the
addressee and making the desired changes on the right side of the window. You can also do this
in a separate window by highlighting the name and clicking Update. Click OK to return to the
Certified Mailer window.
8. Click Print. You'll see a printer report destination window. Choose your printer and any other
preferences, then click OK.
9. A warning screen will remind you to insert the appropriate number of Certified Mail labels into
your printer. Do this, then click OK.
Design Labels
ProDoc has several common label definitions pre-defined for you to choose from. However, if you want to
create a custom label definition, the easy to use interface is here. From the Main Menu, click Tools ®
Design Labels. A window appears, similar to Figure 3-52.
78
ProDoc Software Manual
You may create, update or delete label
definitions from this window. The label
definitions you create control the size and
type of labels you use.
Design options include label type, paper
type (height and width), type of printer
used, label height and width, margins,
and offset dimensions.
Figure 3-52, Available Label Definitions Window
If you click the Label Name tab, a list of all label definitions displays. If you click the Dot Matrix tab,
only label definitions for dot matrix printers will display. If you click the Laser tab, only label definitions
for laser printers will display.
To create a new label definition, click New. The Adding a label definition window appears. Provide
the requested information. You may update a label definition by highlighting it, clicking the Update
button and making the changes you desire. To delete a label definition, highlight it and click Delete.
Repair Data Files
The Repair Data Files utility lets you attempt to repair a data file which has somehow been damaged.
CAUTION: Under normal circumstances you will not have occasion to use this utility. It
has been included to facilitate repair of data files with direct assistance from
one of our Customer Support staff. Accordingly, before using this utility, we
recommend that you first call (800) 759-5418 and ask to speak with one of our
Support Technicians who will help guide you through the process.
Backup Data Files
Selecting this option will reveal another drop down box with
two options, Backup and Restore, as shown in Figure 353.
These are used to manually backup your data files or
restore your data files from a previous backup location.
Figure 3-53, Backup Data Files Menu
·
If you select the Backup option, ProDoc makes a backup copy of client and case information
Chapter 3, Main Menu
79
files to the location you specify on the window that appears. This location can be a floppy
disk, a directory on a standard hard drive or a network location.
·
Similarly, in the event of system failure, file corruption or other reasons, you may elect to
click Restore from the main screen menu to restore the client and case information backup
file back to the ProDoc home directory. In this case, this window should reflect a Backup
from location which is usually the same floppy disk or hard drive you previously backed up
to.
NOTE: The Backup and Restore menu options are disabled while other ProDoc tasks
that use the case information files are running.
Database Transfer
Selecting this option reveals two
choices, Transfer Contact Data Out
and Transfer Contact Data In, as
shown in Figure 3-54. When you choose
either option, a window appears where
you select the drive and directory for
each transfer in the backup files dialog
window. You can transfer data out to, or
in from, any file location or drive
available to your computer.
Figure 3-54, Database Transfer Menu
After you make this selection, you can select one or more contacts whose data you wish to transfer.
Registration Menu
Figure 3-55, Registration Menu and Sub-menus
(If available) Figure 3-55 displays the Registration menu selection and sub-menus which let you manage
all licensing and registration for ProDoc, including volumes and PowerPacks. After ProDoc is
registered, Register ProDoc is replaced by Change Registration and Change Firm Name
80
ProDoc Software Manual
choices as shown on the right side of Figure 3-55.
Register ProDoc
Normally you will only need to register the computer one time when you initially install the software.
Subsequent periodic updates will automatically extend the period of your registration. Click here 11 to
jump back to Chapter 1 and read the section on registration.
Change Registration
You can use this option if you need to change your ProDoc license information or need to enter a new
registration code. Click Tools ®Registration ® Change Registration. The Change Registration
Code window appears. Before you change any information, please call us at 1-800-759-5418. Our
Technical Support representative will help you complete the window and take any other necessary steps
to change your registration.
If there is ever a problem with your registration code, this selection allows you to change your registration
code or enter a new registration code, then go through the registration process again.
Change Firm Name
(If available)
To change your firm name, click Tools ® Registration ® Change Firm Name. This selection
allows you to change your firm name and your account and contact information. There are
two selections on this submenu, Change by Internet and Change by Phone. If you have an
Internet connection, it's best to use the Change by Internet selection.
·
Selecting Change by Internet brings up an internet log in screen. You will need your
customer number (located on your invoice, shipping advice or billing statement) and
your web password, which was provided to you after you registered. Simply log in and
update your information.
·
Selecting Change by Phone brings up a window listing details about your computer
and ProDoc installation and your Firm Name. You can edit your firm name in the New
Firm Name field. You will then need to call us at 1-800-759-5418 to obtain and enter the
Thomson Reuters Supplied Confirmation Code. Enter it and click the Change Firm
Name button to make the firm name change. The technician you speak with will help
you complete any other necessary actions.
·
If you decide not to make any changes, click the Return to ProDoc button.
Uninstalling Volumes
The Uninstall Volume menu selection allows you to uninstall volumes that you no longer use. Before
uninstalling a volume, please read the information that follows.
More Information on Volume Registration. ProDoc volumes are updated regularly to provide our
customers with forms that reflect the most current laws. It is important to update ProDoc and delete your
superseded volumes so you are using forms that represent the current state of the law.
ProDoc provides an expiration date for each of its volumes. It is the expiration date that helps keep
attorneys and their staff up-to-date with the most current laws and forms. If you try to access ProDoc
after a volume's expiration date, a window entitled Inaccessible Volumes appears, similar to Figure 3-56,
warning that the volume's registration has expired and the volumes listed are no longer accessible.
Chapter 3, Main Menu
81
Figure 3-56, Inaccessible Volumes Window
In the Inaccessible Volumes window, the Volume Title and Explanation are displayed. Additional
Information is provided underneath the display window. Click Help to view help for the Inaccessible
Volumes window. If you want to see specific information about each volumes' authors, changes,
variances and forms, click Volume Help. Click Uninstall Volume to uninstall a volume. ProDoc will
display the Volume Uninstall message box. The message provides you with two options; Hide Volume
Only – No files are deleted and Permanently Delete Files and Hide Volume. These options are
discussed in detail below.
Hide Volumes Only – No files are deleted
If you choose Hide Volumes Only – No files are deleted, the volume that you choose to hide will no longer
show up on the list of volumes from which you can choose. The volume will remain on your hard drive.
This allows you to move any modified master forms or supplemental forms you may have created into the
new volume before deleting the prior version of the volume. If you want to continue using a volume that
you have hidden, call Thomson Reuters Customer Support at 800-759-5418.
Permanently Delete Files and Hide Volumes
If you choose Permanently Delete Files and Hide Volumes, the files will be deleted from the ProDoc
directory on your hard drive and the volume will be removed from the list of volumes. If you decide later
that you want to use the expired volume, call Thomson Reuters Customer Support at 800-759-5418.
Solutions for Expired Volumes:
·
Usually the only action you need to take is to install the latest available WebUpdate. If this
is the case, on the main menu, click Tools ® Check for Updates and install all new
updates. The message will discontinue.
·
If you have already installed all available updates, you should call Thomson Reuters
Customer Support at 800-759-5418.
·
If you do not install the update and the volume expires, you will need to call Customer
Support and have a new registration issued for the expired volumes.
·
Install the latest CD using the registration code licensed for your volumes. If you cannot
locate the CD, call Thomson Reuters Customer Support at 800-759-5418.
Ended your subscription. If you no longer subscribe to a volume, you will not be able to access the
volume and you will not receive the updated volume for that area of law.
Solutions:
·
Call Sales at 800-759-5418 and add the expired volume to your subscription.
·
Delete the unregistered volume(s).
Supplemental Forms Use. If you created supplemental forms in the expired volume, they will become
82
ProDoc Software Manual
inaccessible once the volume they were created in becomes unregistered or is deleted. You may subscribe
to the volume and renew the volume's registration or move the supplemental forms into the new volume.
Solution: Call Customer Support at 800-759-5418 and request assistance with renewing your
volume's registration or moving your supplemental forms into the new volume.
Why keep a superseded volume?
We are constantly updating our volumes to provide you with the most current styles and laws. Usually,
the new updates affect only a portion of a particular volume. However, when substantial changes have
been made in an area of law, we create a new volume to replace the outdated volume. When an outdated
volume is replaced, it is superseded. If you have current cases that were created in the superseded
volume, you will want to keep the superseded volume active until you have completed those cases. You
should keep a superseded volume active while ongoing cases are active. This prevents the need to input
the answers to questions that you have already answered once. Use the new volume for any cases you
receive after installing the new volume. Once you have completed the cases that used the superseded
volume, you may delete the superseded volume. You may use the new volume for your older cases, but
you will have to answer all of the questions again.
You may also want to keep a superseded volume in which there are modified master forms or
supplemental forms. Keeping the volume will provide you the means to move the modified master forms
and supplemental forms into the new volume.
Solution: Call Thomson Reuters Customer Support at 800-759-5418 and request a Vlicense to extend
the expiration date for the superseded volume (a Vlicense is Thomson Reuters' license for each volume).
Edit Volumes List
This menu selection is used to add a volume or change the way a volume appears on the volume selection
window. It also tells ProDoc where the volume is located. The required information includes the following:
Title - Title of the volume as you want it displayed on the selection window, for example, Family Law.
Subdirectory - Name of the directory where the volume is installed. Do not enter the full path for the
directory, since ProDoc assumes the subdirectory entered here is a subdirectory directly beneath the
ProDoc home directory. For example, if ProDoc is installed in the directory C:\PRODOC and if you enter
FAM as the subdirectory here, ProDoc will look for the volume in C:\PRODOC\FAM. If you are adding a
volume, ProDoc will create the directory as described above.
When you select the Edit Volume List utility, the Volume Browse window will appear. It displays the
volumes list and has New, Change and Delete buttons. To add a volume to the list, select New. The
Volume Information window will appear, similar to Figure 3-57.
Figure 3-57, Volume Information Window
The same window will appear if you select Change to change the title or subdirectory of the highlighted
Chapter 3, Main Menu
83
volume. The window contains two entry fields:
Title — Title of the volume as you wish it to appear in browse and selection windows, e.g. “Family
Law.”
Subdirectory — Subdirectory where volume files are stored. This must be a subdirectory under
the main ProDoc directory (normally C:\PRODOC). If you enter an incorrect subdirectory,
ProDoc will not be able to find the volume files and you will not be able to access the volume until
this subdirectory is changed to the subdirectory where the volume files are stored.
To delete a volume from the volumes list, highlight the volume desired and click the Delete button. You
will be prompted to confirm the deletion, and the volume will be removed from the list. You will no longer
be able to access the deleted volume even though deleting the volume from the volumes list doesn't delete
any volume files. WARNING – if you delete a ProDoc volume from the list and later want to add it back,
you should install the volume rather than merely adding it back to the volumes list.
Show Installed Volumes
Selecting Show Installed Volumes displays a browse list of all of the volumes you have installed. You
may need to refer to this list while getting help from technical support. You can click the Info button to
see a listing of the current changes from the last update, any variances, the authors of the forms, and a
list of forms for each volume.
Register the PowerPacks
This menu option will only be available to those customers who subscribe to the PowerPacks—Additional
Timesavers.
If your PowerPack registration expires while your subscription is current, you should call Technical
Support at (800) 759-5418. The technician that you speak with will take you through a number of steps
that must be completed before you can re-register the PowerPack.
To register a PowerPack:
1. Call Thomson Reuters Technical Support at (800) 759-5418.
2. On the ProDoc toolbar click Tools ® Registration ® Register the PowerPacks.
3. The Registration Information for PowerPack window appears.
4. Give the support technician the Validation seed that appears in the upper left side of the
Registration Information for PowerPack window.
5. Make sure that Today's date is correct.
6. The technician will tell you the Registration type, Expiration date, Validation Code and
which PowerPack(s) to choose. To choose a PowerPack:
a. In the PowerPack section of the Registration information for PowerPack window
highlight the PowerPack you are registering by clicking on it. If only one PowerPack is
displayed in the PowerPack section it is always highlighted.
b. Click to the left of the highlighted PowerPack and a green check mark appears. You may also
click the Select button to place a green check mark next to the highlighted PowerPack.
c.
If you need to register all listed PowerPacks, click the Select All button to select all the
PowerPacks in the list. Click the Clear All button to clear all selections.
7. Click OK. This button is disabled if no PowerPacks are selected.
To permanently un-register one or more installed PowerPacks, select the desired PowerPacks and click
the Permanently Unregister PowerPack button. This button is disabled if no PowerPacks are
selected. Click Yes when the Unregister the PowerPack window appears and the selected PowerPack
(s) will be permanently unregistered.
To take no action, click the Cancel button to close the window.
84
ProDoc Software Manual
Check for Updates
To run WebUpdate, click Tools ® Check for Updates. The program will check Thomson Reuters'
online server for updates needed for your installation. If updates are available, the Updates for ProDoc
are now available window appears. You have three choices on this window:
·
Click Download and Apply All Updates to download all updates. The updates will be
downloaded, and a window will be displayed which tells you the updates have been downloaded.
You will be prompted to restart ProDoc to install the updates. After ProDoc restarts, the
downloaded updates will be installed.
·
Click Select Updates to Download and Apply to open a window displaying available updates
and a description of each update available. The selection box for each update will be checked. We
recommend you download each available update. If you want to exclude an update from
download, click the update's check box to clear it, and the update will not be downloaded. Click
Begin Download to download the selected updates. If you don't want to download updates at
this time, click Cancel.
·
Click Do Not Download Updates at this Time to close the update window without
downloading any updates.
ProDoc WebUpdate Window
This window displays available updates and a description of each update available. The selection box for
each update will be checked. We recommend you download each available update. If you want to exclude
an update from download, click the update's check box to clear it, and the update will not be downloaded.
Click Begin Download to download the selected updates. If you don't want to download updates at this
time, click Cancel.
Browse WebUpdate History
To check your update history, Click Tools ® Browse WebUpdate History. The Browse WebUpdate
History window will appear. This window displays a history of all updates you've downloaded. If you
want to see updates that you have not downloaded, uncheck the box labeled Display only downloaded
updates. Click Close to close the window.
Cancel ProDoc Subscription
This menu choice provides you the means to notify us that you wish to cancel your subscription. The
window that appears provides us with the information needed to complete your request. It also provides
fields where you can tell us your reasons for cancelling and any suggestions you may have for us. We
value your feedback, and this information will help us improve the services we provide. When completed,
this window generates an email which is sent to us so we can process your request.
Chapter 3, Main Menu
85
Export Data Menu
The Export Data menu choices are shown
in Figure 3-58.
You can use this menu selection to export
contact information, case information, and
answers.
The data is exported to a comma-delimited
ASCII file.
Figure 3-58, Export Menu Choices
To export data from the three categories, you first select the appropriate contacts or cases, then you must
select the fields you wish to export. Selecting Export Contacts brings up the Select Contacts window,
while selecting Export Cases and Export Answers brings up the Select Cases window. Figures 3-59
and 3-60 depict these windows. The basic process for selecting the contact or case is the same for
exporting contacts or exporting cases.
When selecting contacts for export, you can
display your list by Name or by ID. If
desired, you can click the Clients Only box
to only display clients.
Use the buttons at the bottom of the window
to select or unselect individual contacts and
view only those you've selected.
Use the buttons on the right side of the
window to quickly change your selections,
flip one or all selections, search the database
for a particular contact, move the highlight
to the previous or next one selected, or
perform a query to find those who match
selected search criteria.
Figure 3-59, Select Contacts Window
86
ProDoc Software Manual
When selecting cases or case
answers for export, you can
display your list by Case
Description or by Case ID.
The selections buttons and
controls on this window operate
in the same manner as those on
the Select Clients window.
Figure 3-60, Select Cases Window
After you select the clients or cases as appropriate and click the OK button, the Choose Field for Export
window appears, similar to Figure 3-61.
Figure 3-61, Choose Fields for Export Window
A list of controls for this window follows:
Add - Highlighting any of the fields that are displayed on the left side of the Choose Fields for Export
box and clicking Add will place the highlighted field in the Export Fields display on the right side of
the box.
Remove - Highlighting any of the fields that are displayed on the right side of the Choose Fields for
Export box and clicking Remove will remove the highlighted field in the Export Fields display.
Shift Up - Moves the highlighted field up in the list of fields to export.
Shift Down - Moves the highlighted field down in the list of fields to export.
Picture - Allows you to set the format in which your numbers are exported. Example: @n6.2 means
that the numbers that you export will be exported as six numbers, a decimal point and two numbers
following the decimal point.
When you are finished choosing fields, click the OK button. A browse/save directory window will appear,
Chapter 3, Main Menu
87
where you will enter the file name and locate the folder in which to save the file.
Window Menu
The Window menu, depicted in Figure 3-62, shows you what
windows you currently have opened and allows you to display
the windows in different ways on the screen. You can also use
the numbered list of open windows to choose which one to
work with.
Figure 3-62, Window Menu Choices
Help Menu
The Help Menu displays options for getting help. The menu is depicted in Figure 3-63.
Figure 3-63, Help Menu
Context Sensitive allows you to get help on the particular task you're working on.
Contents displays the Help library.
Search for Help on... allows you to use search for and find help topics.
How to use Help explains the help system used in ProDoc.
About ProDoc lists version, license and subscription information.
About the Volumes lets you access the list of the latest updates installed. This information includes a
description of the current changes from the last update, any variances, the authors of the forms, and a list
of forms for each volume.
Visit ProDoc Website opens the ProDoc Web site in a browser window.
Send an Email to ProDoc opens an Outlook message addressed to ProDoc. This message will
automatically contain version, installation and firm information. This information will help Thomson
Reuters' Customer Service technicians handle your issue efficiently.
88
ProDoc Software Manual
Introduction to California PowerPacks
What are PowerPacks?
PowerPacks are collections of powerful tools that allow fast and efficient entry of information for
document assembly and information management. Using PowerPack programs significantly reduces the
amount of time it takes to assemble documents. The following PowerPacks are currently available for
subscription in California:
California Probate PowerPack. This PowerPack features the Inventory & Appraisal 91 . This
program provides you the tools needed to quickly produce estate inventories for your probate matters.
It completely eliminates manual calculations, simplifies your work and dramatically reduces the time
necessary to handle probate matters.
California Family Law PowerPack. This PowerPack features two programs:
·
Property Declaration & Distribution 109 - This program helps you inventory combined
property, identify the property awarded to each party and create multiple scenarios to explore
different ways to split the combined property.
·
Family Law - UCCJEA Declaration 129 - The Family Law UCCJEA (Uniform Child
Custody Jurisdiction and Enforcement Act) Declaration program is designed to assist you
with entering the current address of each minor child as well as the five year residential
history of each child. As a part of the declaration, you can enter additional information
regarding ancillary matters which affect the children. Finally, you can also list all third
parties claiming visitation and/or custody rights to the children.
California Guardianship PowerPack. This PowerPack features three programs:
·
Guardianship Inventory & Appraisal 141 - This program provides you the tools needed to
quickly produce inventories for your guardianship matters.
·
Guardianship - UCCJEA Declaration 162 - The Guardianship UCCJEA (Uniform Child
Custody Jurisdiction and Enforcement Act) Declaration program is designed to assist you
with entering the current address of each minor child as well as the five year residential
history of each child. As a part of the declaration, you can enter additional information
regarding ancillary matters which affect the children. Finally, you can also list all third
parties claiming visitation and/or custody rights to the children.
·
Guardianship Accounting 174 - This program makes it easy to produce a guardianship
accounting with no manual calculations. You only need to list the information once. The
program lists the transactions that have occurred during the accounting period and lists the
assets that remain on hand at the end of the reporting period.It consists of a Summary sheet
and Schedule A showing all Receipts, Schedule B showing all gains on sale of property,
Schedule C showing all Disbursements, Schedule D showing all losses on sales of property,
and Schedule E showing cash assets on hand at the end of the accounting period.
California Conservatorship PowerPack. This PowerPack features two programs:
·
Conservatorship Inventory & Appraisal 208 - This program provides you the tools to
quickly produce inventories for your conservatorship matters.
·
Conservatorship Accounting 228 - This program makes it easy to produce a
conservatorship accounting with no manual calculations. You only need to list the information
once. The program lists the transactions that have occurred during the accounting period and
lists the assets that remain on hand at the end of the reporting period.It consists of a
Summary sheet and Schedule A showing all Receipts, Schedule B showing all gains on sale of
property, Schedule C showing all Disbursements, Schedule D showing all losses on sales of
Introduction to California PowerPacks
89
property, and Schedule E showing cash assets on hand at the end of the accounting period.
How Can I Locate the PowerPacks?
On the ProDoc menubar, click PowerPacks.
·
If you subscribe to the California Probate Volume and PowerPack, you should see the Probate
menu choice. Click Probate to display the Inventory & Appraisal program choice.
·
If you subscribe to the California Family Law Volume and PowerPack, you should see the Family
Law menu choice. Click Family Law to display the Property Declaration & Distribution
and UCCJEA Declaration program choices.
·
If you subscribe to the California Guardianship PowerPack, you should see the Guardianship
menu choice. Click Guardianship to display the Guardianship Inventory and Appraisal,
Accounting, and Guardianship - UCCJEA Declaration program choices.
·
If you subscribe to the California Conservatorship PowerPack, you should see the
Conservatorship menu choice. Click Conservatorship to display the Conservatorship
Inventory and Appraisal and Conservatorship Accounting program choices.
How Do I Get the PowerPacks If I Don’t Already Subscribe?
If your subscription does not currently include a PowerPack you need, call ProDoc Sales at 800-759-5418
to add it to your subscription. Get the power today!
How Do I Use PowerPack Tools?
If you would like further instructions on using PowerPacks, consult this manual, click the Help buttons
that appear in the PowerPack program you are using or call Technical Support at 800-759-5418. Support
included at no extra charge includes:
·
·
·
·
·
Help buttons on each window (or press the F1 key).
Computer Based Training (CBT) Modules at the ProDoc Web site.
Periodic ProDoc user seminars; schedule these through the ProDoc Web site.
Call our Technical Support specialists at 1-800-759-5418.
Send email to [email protected].
90
ProDoc Software Manual
Selecting a Case for PowerPack Use
This section discusses selecting an existing client and case. If you need to create a new client and case,
click the New Client button to create the client. After creating the client, highlight the new client's
name and click the New Case button to create a new case for the client. For help, click the Help buttons
on the windows used or click here 33 to see the section on adding new clients.
Use the Select a Case window to choose a client and case
file in which to save the information you input into your
PowerPack program. It lists existing ProDoc clients and all
cases for the clients. You can also use it to see and modify
related client/case data and create new clients and cases.
You can select a case to use by either of the methods listed
below:
·
Double-click a displayed case.
·
Click a displayed case, then press the Enter key or
click the Select Case button.
Select a Case Window
To find a case that's not displayed:
·
Type the first letter(s) of a client's name to jump to that client's entry on the tree. To do this more
than once, use the backspace key to clear your previous letter entries.
·
Use the scroll bar on the right of the form to quickly scroll through the list. You can also click on
any entry on the left and scroll with keyboard page up, page down, and up/down arrow keys.
·
Use the Now Showing: drop down arrow to choose the types of contacts or clients to display.
Cases are grouped under clients, who are grouped in alphabetical order. Categories will be
displayed with type icons of different colors on the window. The default is Active Clients. Other
choices are All Contacts, Closed Contacts, Private Clients and Non-Clients.
·
Use the Hide/Show Cases toggle button to display or hide cases. Likewise, you can click the
or symbols in the client tree to reveal or hide cases.
California Inventory & Appraisal
91
California Inventory & Appraisal
Getting Started
It's easy to create estate inventories for your probate matters with the Inventory & Appraisal
program. This program completely eliminates manual calculations, simplifies your work and
dramatically reduces the time necessary to handle probate matters.
You need to only list the necessary information once. ProDoc automatically calculates the value of the
estate and prints the required form and attachments.
Starting the Program
1. Click PowerPacks ® Probate ® Inventory & Appraisal.
2. The Select a Case 107 window opens. Select a case by double-clicking a visible case title. You
can also click the title once, then press the Enter key or click the Select button. Click the Help
button on the window or click here 107 for detailed help for finding and selecting cases.
3. The Inventory & Appraisal program opens to the General tab.
Navigating the Inventory & Appraisal Program
There are five tabs across the top of the main program window: General 92 , Community Property
94 , Separate Property 96 , View Attachment 1 98 and View Attachment 2 99 . Each tab
represents a different form. To move from one screen to another, position the cursor over the tab you
want to use and click on it.
You can also use hot keys. Wherever a window, screen or field title shows an underlined character, i.e.,
"Primary Attorney", you can navigate to that entry by holding the "Alt" key and pressing the
underlined keyboard character. In the earlier example, pressing Alt + A on your keyboard puts your
cursor in the Primary Attorney field.
92
ProDoc Software Manual
General Form
Figure 2, General Form
The General form is used to enter all basic information about the decedent and estate except for the
listing of assets.
Navigating through the General form
To navigate from one field/button to another, click on the field, radio button or button you would like to
use. You can also press the Tab key on your keyboard to move forward to the next entry and press Shift
+ Tab to move to the previous entry.
Completing the General form
Descriptions of entry fields and choices required for this form are listed below.
Name of Decedent - Enter the decedent's name.
List of Aliases - Enter any other names by which the decedent may be known.
Date of Death - Enter the date of death in mm/dd/yyyy format. You can also click the calendar icon to
select the date from a calendar tool. Click Select a Date 108 for detailed help with this tool.
Client(s) - Click the drop-down arrow field to select the client(s) for this case. To edit the client(s) list for
the case, click the Update button. The Client Names window will appear, where you can add, update or
delete clients. If you click the New or Update buttons on that window, a window will appear to help you
add or edit the client name. The option to update a client's name will not be available if the client is in
your ProDoc database; you must use the Client/Case Manager for this. For specific help for these
windows, click the Help button on each window.
Inventory and Appraisal Section - Click the appropriate radio button to indicate the type of inventory
California Inventory & Appraisal
93
you are creating. If you select Partial, the Partial Appraisal Number field is activated. Enter a
numeral representing the serial number of the appraisal (i.e. "1", "2"). If you select Amended, the Date
of Superseded Inventory field is activated. Enter the date of the superseded inventory.
Extent of Inventory Section - Click the appropriate radio button to indicate whether the inventory is
complete or partial.
Property Tax Certificate Section - Click the appropriate selection box to indicate whether change of
ownership certificates have been filed as required. If the decedent owned no California real property at
the time of death, indicate this by clicking the appropriate selection box.
Describe Bond Situation Section - Click the appropriate radio button to describe the bond situation:
Bond is Waived, Bond Filed, or bond is Deposited in a Blocked Account.
·
If you choose Bond Filed, enter the amount in the Bond Amount field and click the appropriate
radio button to indicate whether or not the bond amount is sufficient.
·
If you choose Deposited in a Blocked Account, enter both the Deposit Amount and the name
and location of the financial institution holding the deposit in the appropriate fields.
Date Signed by Personal Representative - Enter the date the Inventory & Appraisal was signed by
the decedent's personal representative in mm/dd/yyyy format or click the calendar icon to use the Select
a Date 108 calendar tool.
Is Appointment of a Probate Referee Required? Section - Click the appropriate Yes or No radio
button.
Probate Referee Section - Enter the requested information for the Probate Referee if one is required.
·
For date fields, enter the date in mm/dd/yyyy format or click the calendar icon to use the Select a
Date 108 calendar tool.
·
Enter the amount provided by the Probate Referee for the total of Attachment 2 property in the
Referee's Total Appraisal field. The amount you enter here will be printed in the applicable
field on the DE-160 form. If the amount entered differs from the amount calculated from your
asset entries, you will be notified when you print the form.
Attorney Information Section - Enter the Primary Attorney's name and Bar Number in the fields
provided.
Court Information Section - Click the Edit Court Information button to open the Court
Information window. Enter the Case Number and choose the County and Branch. The Street
Address, Mailing Address, City and Zip Code should be automatically completed for you depending
upon your previous selections. If not, enter the information in the fields provided. Click the Save button
when you are finished to return to the General form.
When you are finished entering the information on the General form, click the Save and Continue
button to save your entries and continue working, or click the Save and Close button to save your
entries and close the Inventory & Appraisal program.
94
ProDoc Software Manual
Community Property Form
Figure 3, Community Property Form
The Community Property form is used to enter details regarding estate community property.
Scroll down or click the links to jump to the help section in this topic you want to see:
How Assets are Displayed
94
Locating Asset Descriptions
Entering Assets
94
95
Using Toolbar Buttons
95
How Assets are Displayed
The information for each asset or debt is displayed in columns: Asset Description, Q
(Quasi-Community Property, identified by a green check mark), and Appraised Value. As you enter
assets, a running total is displayed under the listing, labeled Total Community Assets.
Entries of actual assets are highlighted in yellow.
To view all asset descriptions, click the Expand button in the top right side of the screen. This button
serves as both an Expand and Contract button. To view only the main title, Assets, in the Asset
Description column, click the Contract button. You can also click the or symbols on the listing to
expand or contract a particular category.
Locating Asset Descriptions
·
Use the scroll bar at the right side of the window to scroll through the list.
·
Ensure the list is fully expanded. Click on the top entry of the window, Assets, and type the
first letter of the description you wish to locate. Each letter you enter will move the highlight
through the list to the next description beginning with the letter. When it reaches the end, it will
start again at the first matching description.
California Inventory & Appraisal
·
95
Enter a search word or phrase in the blank field above the Asset Description column and click
Find. The first description title that contains the word or phrase will be highlighted. Each time
you click Find, the next matching asset will be highlighted, and the highlight will continue
through the list of matches, then start again at the first match. If no matches exist, a window will
appear to tell you this.
Note: Searches and keystroke moves start from the point at which the cursor is positioned. If you
want to search from the beginning, you should place the cursor at the top of the Asset Description
list.
Entering Assets
This is a general overview of steps for asset entries. For specific help on various types of asset
entries, click the Help button on each asset entry screen.
1. Double-click an asset description, or click a description once and click New.
2. A window will appear titled with the description you chose. It will display the entry fields
appropriate for the asset.
3. Complete the displayed fields for the asset. These will vary according to the type of asset you are
entering.
4. When you are finished, either click the Add Another button to enter another asset in the same
category or click the OK button to return to the Community Property form. The descriptions
and amounts will be listed here.
5. You may edit an entry by double-clicking it, or by clicking it and clicking the Update button on
the toolbar. To delete an entry, highlight it and click the Delete button. You can also right-click
an asset entry and click the appropriate menu choice: New, Update or Delete.
Using Toolbar buttons to work with Assets
First, find and click the line containing the asset. You can now use the toolbar buttons at the bottom of
the window to perform the functions indicated below:
New - Add description, value and any other necessary information on an asset to the inventory.
Update - Modify a highlighted asset.
Delete - Remove a highlighted asset.
96
ProDoc Software Manual
Separate Property Form
Figure 4, Separate Property Form
The Separate Property form allows you to enter details regarding the decedent's separate property
and the value of the property.
Scroll down or click the links to jump to the help section in this topic you want to see:
How Assets are Displayed
96
Locating Asset Descriptions
Entering Assets
96
97
Using Toolbar Buttons
97
How Assets are Displayed
The information for each asset or debt is displayed in columns: Asset Description and Appraised
Value. As you enter assets, a running total is displayed under the listing, labeled Total Separate
Assets.
Entries of actual assets are highlighted in yellow.
To view all asset descriptions, click the Expand button in the top right side of the screen. This button
serves as both an Expand and Contract button. To view only the main title, Assets, in the Asset
Description column, click the Contract button. You can also click the or symbols on the listing to
expand or contract a particular category.
Locating Asset Descriptions
·
Use the scroll bar at the right side of the window to scroll through the list.
·
Ensure the list is fully expanded. Click on the top entry of the window, Assets, and type the
first letter of the description you wish to locate. Each letter you enter will move the highlight
through the list to the next description beginning with the letter. When it reaches the end, it will
California Inventory & Appraisal
97
start again at the first matching description.
·
Enter a search word or phrase in the blank field above the Asset Description column and click
Find. The first description title that contains the word or phrase will be highlighted. Each time
you click Find, the next matching asset will be highlighted, and the highlight will continue
through the list of matches, then start again at the first match. If no matches exist, a window will
appear to tell you this.
Note: Searches and keystroke moves start from the point at which the cursor is positioned. If you
want to search from the beginning, you should place the cursor at the top of the Asset Description
list.
Entering Assets
Note: This is a general overview of steps for asset entries. For specific help on various types of
asset entries, click the Help button on each asset entry screen.
1. Double-click an asset description, or click a description once and click New.
2. A window will appear titled with the description you chose. It will display the entry fields
appropriate for the asset.
3. Complete the displayed fields for the asset. These will vary according to the type of asset you are
entering.
4. When you are finished, either click the Add Another button to enter another asset in the same
category or click the OK button to return to the Separate Property form. The descriptions and
amounts will be listed here.
5. You may edit an entry by double-clicking it, or by clicking it and clicking the Update button on
the toolbar. To delete an entry, highlight it and click the Delete button. You can also right-click
an asset entry and click the appropriate menu choice: New, Update or Delete.
Using Toolbar buttons to work with Assets
First, find and click the line containing the asset. You can now use the toolbar buttons at the bottom of
the window to perform the functions indicated below:
New - Add description, value and any other necessary information on an asset to the inventory.
Update - Modify a highlighted asset.
Delete - Remove a highlighted asset.
98
ProDoc Software Manual
View Attachment 1 Form
Figure 5, View Attachment 1 Form
This form is completed automatically as you enter assets. It displays asset descriptions, appraised values
and the total appraised value for the asset types appraised by the personal representative that are still
held by the estate at the close of the accounting period. You cannot edit entries on this form.
You can click the
or
symbols on the listing to expand or contract a particular category.
Locating Asset Descriptions
·
Use the scroll bar at the right side of the window to scroll through the list if it is longer than the
viewable area.
·
Click on the top entry asset entry in the Asset Description column and type the first letter of
the description you wish to locate. Each letter you enter will move the highlight through the list
to the next description beginning with the letter. When it reaches the end, it will start again at
the first matching description.
·
Enter a search word or phrase in the blank field above the Asset Description column and click
Find. The first description title that contains the word or phrase will be highlighted. Each time
you click Find, the next matching asset will be highlighted, and the highlight will continue
through the list of matches, then start again at the first match. If no matches exist, a window will
appear to tell you this.
NOTE:
Searches and keystroke moves start from the point at which the cursor is positioned. If
you want to search from the beginning, you should place the cursor at the top of the
Asset Description list.
California Inventory & Appraisal
99
View Attachment 2 Form
Figure 6, View Attachment 2 Form
This form is completed automatically as you enter assets. It displays asset descriptions, appraised values
and the total appraised value for the asset types appraised by the Probate Referee that are still held by
the estate at the close of the accounting period. You cannot edit entries on this form.
You can click the
or
symbols on the listing to expand or contract a particular category.
Locating Asset Descriptions
·
Use the scroll bar at the right side of the window to scroll through the list if it is longer than the
viewable area.
·
Click on the top entry asset entry in the Asset Description column and type the first letter of
the description you wish to locate. Each letter you enter will move the highlight through the list
to the next description beginning with the letter. When it reaches the end, it will start again at
the first matching description.
·
Enter a search word or phrase in the blank field above the Asset Description column and click
Find. The first description title that contains the word or phrase will be highlighted. Each time
you click Find, the next matching asset will be highlighted, and the highlight will continue
through the list of matches, then start again at the first match. If no matches exist, a window will
appear to tell you this.
NOTE:
Searches and keystroke moves start from the point at which the cursor is positioned. If
you want to search from the beginning, you should place the cursor at the top of the
Asset Description list.
100
ProDoc Software Manual
Asset Description Categories
Attachment 1 Property Overview
Asset description categories which qualify as Attachment 1 Property are shown below. Since the entry
fields vary considerably across these asset windows, please click the Help button on each asset window
for detailed help with entering information for the asset.
Cash
Check Issued Before Death
Check Issued After Death
Bank Accounts
Certificates of Deposit
Money Market Account
Life or Accident Policies Paid to Estate in Lump Sum
Retirement Plans or Annuities Paid to Estate in Lump Sum
Other Attachment 1 Property
Figure 7, Example Attachment 1 Property Entries
Button Descriptions and Functions
Help - Click this button to see help on completing specific asset windows.
Add Another - This button will only appear when you are adding a new asset. Click this button to
add another asset of the same type.
OK - When you are finished adding assets of this type, click this button to add the asset information
to the Inventory & Appraisal program and close the window.
Cancel - Click this button to close the window. Your entries will not be saved.
Real Estate Overview
Asset description categories in the Real Estate listing are shown below. Click Entering Asset
Information 101 or scroll down to see general help for entering information for assets in this listing.
Click the Help button on each asset window to see detailed help for entering information for the asset.
Vacant Land
Agricultural Land
Single Family Residence
Condominium
Leasehold Interest
California Inventory & Appraisal
101
Stock Cooperatives
Residential Income Producing Property
Commercial or Industrial Property
Life Estate
Remainder and Reversionary Interest
Time Share Interest
Other Real Estate
If a real estate asset doesn't fit into any other category, enter the asset in the Other Real Estate
category.
Entering Asset Information. Each asset description window opens with two tabs available, the Asset
tab and the Property Description tab.
Figure 8, Example Real Estate Asset Tab Entries
Figure 9, Example Legal Description Tab Entry
The Asset tab contains two fields. If you are entering assets on the Community Property form, it also
contains a check box.
Property Address - Enter the physical address of the property in line form (i.e., 12 Mockingbird
Street, Berkeley, CA 94704).
Appraised Value - Enter the appraised value of the real estate or interest.
Quasi-Community Property - This check box is only displayed when you enter assets on the
Community Property form. Click the box if the real estate qualifies as Quasi-Community Property.
A green check mark will be displayed in the Q column for the asset on property forms after you
complete the asset entry. You can remove the check mark by clicking the box again.
The Property Description tab provides you one field to enter. Click the tab and enter the complete
legal description of the asset. Click the Help button to see a detailed description of the information
required for the field.
Button Descriptions and Functions
Help - Click this button to see help on completing specific Real Estate asset windows.
Add Another - This button will only appear when you are adding a new asset. Click this button to
add another asset of the same type.
OK - When you are finished adding assets of this type, click this button to add the asset information
to the Inventory & Appraisal program and close the window.
Cancel - Click this button to close the window. Your entries will not be saved.
102
ProDoc Software Manual
Business Interests Overview
Asset description categories in the Business Interests listing are shown below. Click Entering Asset
Information 102 or scroll down to see general help for entering information for assets in this listing.
Click the Help button on each asset window to see detailed help for entering information for the asset.
Closely Held Corporation
Limited Partnerships
General Partnerships
Sole Proprietorships
Limited Liability Companies
Other Business
If a business asset doesn't fit into any other category, enter the asset in the Other Business category.
Entering Asset Information
The window used for business interests assets contains two fields. If you are entering assets on the
Community Property form, it also contains a check box.
Figure 10, Example Business Interests Asset Entries
Description - Enter a description of the business interest. Click the Help button to see a detailed
description of required entries for each business interest.
Appraised Value - Enter the appraised value of the business interest.
Quasi-Community Property - This check box is only displayed when you enter assets on the
Community Property form. Click the box if the business interest qualifies as Quasi-Community
Property. A green check mark will be displayed in the Q column for the asset on property forms after
you complete the asset entry. You can remove the check mark by clicking the box again.
Button Descriptions and Functions
Help - Click this button to see help on completing specific Business Interests asset windows.
Add Another - This button will only appear when you are adding a new asset. Click this button to
add another asset of the same type.
OK - When you are finished adding assets of this type, click this button to add the asset information
to the Inventory & Appraisal program and close the window.
Cancel - Click this button to close the window. Your entries will not be saved.
California Inventory & Appraisal
103
Tangible Personal Property Overview
Asset description categories in the Tangible Personal Property listing are shown below. Click
Entering Asset Information 103 or scroll down to see general help for entering information for assets in
this listing. Click the Help button on each asset window to see detailed help for entering information for
the asset.
Furniture, Furnishings and Miscellaneous
Jewelry
Coins or Stamps
Work of Art
Mobile Homes
Motor Vehicles
Boat, Airplane
Livestock and Breeding Animals
Other Personal Property
If a personal property asset doesn't fit into any other category, enter the asset in the Other Personal
Property category.
Entering Asset Information
The window used for personal property assets contains two fields. If you are entering assets on the
Community Property form, it also contains a check box.
Figure 11, Example Tangible Personal Property Entries
Description - Enter a description of the property. Click the Help button to see a detailed
description of required entries for each type of property.
Appraised Value - Enter the appraised value of the business interest.
Quasi-Community Property - This check box is only displayed when you enter assets on the
Community Property form. Click the box if the business interest qualifies as Quasi-Community
Property. A green check mark will be displayed in the Q column for the asset on property forms after
you complete the asset entry. You can remove the check mark by clicking the box again.
Button Descriptions and Functions
Help - Click this button to see help on completing specific Tangible Personal Property asset
windows.
Add Another - This button will only appear when you are adding a new asset. Click this button to
add another asset of the same type.
104
ProDoc Software Manual
OK - When you are finished adding assets of this type, click this button to add the asset information
to the Inventory & Appraisal program and close the window.
Cancel - Click this button to close the window. Your entries will not be saved.
Debt or Promissory Notes Owed to the Decedent
Figure 12, Example Debt or Promissory Notes Owed to Decedent Entries
To enter a debt or promissory note owed to the decedent, or to update existing asset descriptions in this
category, follow the steps below:
1. Enter a Description in the designated field. Include the terms of the note, such as the date of
the debt or note and the final date due, the names of the borrowers, the original amount
borrowed, the payment amount and dates of scheduled payments, the interest rate, and any
security for the loan. If real property secures the loan, include either the Assessor's Parcel
Number or the legal description of the property. Example: "Promissory note for an unsecured
loan made to John and Mary Doe on May 23, 2006, in the original principal amount of $10,000.00,
earning interest at the rate of 8%, due in a single payment of principal and accrued interest on
May 23, 2007."
2. Enter the Value of the debt or note. The program will convert whole dollar entries to currency
format for you.
3. Enter the amount of any Accrued Interest for the debt or note that had accrued as of the date of
death but had not yet been credited.
4. If you are adding/updating an asset on the Community Property form, the Quasi-Community
Property check box is displayed. Click the box if the asset qualifies as Quasi-Community
Property. A green check mark will then be displayed in the Q column for the asset on the
Community Property form after you complete the asset entry. You can remove the check mark
by clicking the box again.
Button Descriptions and Functions
Help - Click this button to see help on completing the asset window.
Add Another - This button will only appear when you are adding a new asset. Click this button to
add another asset of the same type.
OK - When you are finished adding assets of this type, click this button to add the asset information
to the Inventory & Appraisal program and close the window.
Cancel - Click this button to close the window. Your entries will not be saved.
California Inventory & Appraisal
105
Securities Overview
Asset description categories in the Securities listing are shown below. Click Entering Asset
Information 105 or scroll down to see general help for entering information for assets in this listing.
Click the Help button on each asset window to see detailed help for entering information for the asset.
Brokerage Accounts
Brokerage Account Securities
Common and Preferred Stocks
Mutual Funds
Stock Options
Corporate, State and Municipal Bonds
United States Treasury Notes and Bonds
Ginnie Mae (GNMA), Fannie Mae (FNMA), and Freddie Mac (FHLMC) Security
United States Savings Bonds
Other Securities
If a Securities asset doesn't fit into any other category, enter the asset in the Other Securities
category.
Entering Asset Information
The window used for Securities assets contains two fields. If you are entering assets on the
Community Property form, it also contains a check box.
Figure 13, Example Securities Entries
Description - Enter a description of the security. Click the Help button to see a detailed description
of required entries for each type of security.
Appraised Value - Enter the appraised value of the security.
Quasi-Community Property - This check box is only displayed when you enter assets on the
Community Property form. Click the box if the security qualifies as Quasi-Community Property.
A green check mark will be displayed in the Q column for the asset on property forms after you
complete the asset entry. You can remove the check mark by clicking the box again.
Button Descriptions and Functions
Help - Click this button to see help on completing specific Securities asset windows.
Add Another - This button will only appear when you are adding a new asset. Click this button to
add another asset of the same type.
OK - When you are finished adding assets of this type, click this button to add the asset information
106
ProDoc Software Manual
to the Inventory & Appraisal program and close the window.
Cancel - Click this button to close the window. Your entries will not be saved.
Other Intangible and Unscheduled Property
This window helps you enter assets which do not fit into any other listed category. To enter new assets or
update existing asset descriptions in this category, follow the steps below:
1. Enter a Description of the asset in the designated field. Include a full description of intangible
property not included in any of the previously described categories that was owned by the
Decedent. Example: "Copyright and future royalty stream from 2001 book, 'The Life and Times
of J.J. Schmidt', ISBN no. 1234567890, published by Narcissus Press."
2. Enter the Appraised Value of the property. The program will convert whole dollar entries to
currency format for you.
3. If you are adding/updating an asset on the Community Property form, the Quasi-Community
Property check box is displayed. Click the box if the asset qualifies as Quasi-Community
Property. A green check mark will then be displayed in the Q column for the asset on the
Community Property form after you complete the asset entry. You can remove the check mark
by clicking the box again.
Button Descriptions and Functions
Help - Click this button to see help on completing the asset window.
Add Another - This button will only appear when you are adding a new asset. Click this button to
add another asset of the same type.
OK - When you are finished adding assets of this type, click this button to add the asset information
to the Inventory & Appraisal program and close the window.
Cancel - Click this button to close the window. Your entries will not be saved.
California Inventory & Appraisal
107
Selecting a Case
Use the Select a Case window to choose a client
and case file in which to save the information you
input. It lists existing ProDoc clients and all cases
for the clients. You can use it to see and modify
related client/case data and create new clients and
cases.
You can select a case to use by either of the
methods listed below:
·
Double-click a displayed case.
·
Click on a displayed case and then press
the Enter key.
·
Click on a displayed case and then click the
Select Case button.
Figure 14, Select a Case Window
To find a case that's not displayed:
·
Type the first letter(s) of a client's name to jump to that client's entry on the tree. To do this more
than once, use the backspace key to clear your previous letter entries.
·
Use the scroll bar on the right of the form to quickly scroll through the list. You can also click on
any entry on the left and scroll with keyboard page up, page down, and up/down arrow keys.
·
Use the Now Showing: drop down arrow to choose the types of contacts or clients to display.
Cases are grouped under clients, who are grouped in alphabetical order. Categories will be
displayed with type icons of different colors on the window. The default is Active Clients. Other
choices are All Contacts and Cases, Closed Clients, Private Clients and Non-Clients.
·
Use the Hide/Show Cases toggle button to display or hide cases. Likewise, you can click the
or symbols in the client tree to reveal or hide cases.
108
ProDoc Software Manual
Select a Date Window
This window helps you quickly complete date fields. Tools and
buttons on this calendar tool, depicted as Figure 15, include:
Figure 15, Select a Date Window
·
and
- Click to move back or forward one year.
·
and
- Click to move back or forward one month.
·
and
- Click to move back or forward one week.
·
Use Up and Down arrow keys to move back and forward one
week.
·
Use Left and Right arrow keys to move back and forward
one day.
·
Click Today to move the underline/highlight to today's date.
·
Click on the date to choose it or press the Enter key to
choose the underlined date.
·
Click Cancel to close the calendar without choosing a date.
California Property Declaration & Distribution
109
California Property Declaration & Distribution
Getting Started
The Property Declaration & Distribution program is used to gather information about the parties’
property and how it is to be divided. This program allows you to:
· Enter and save information related to the parties and their estate.
· Create scenarios to display and save different divisions of the property.
· List and assign property.
· Determine after tax property values.
· View pre-tax and after tax statistics for the assets and net estate amounts.
Starting the Program
To open the Property Declaration & Distribution program:
1. Click PowerPacks ® Family Law ® Property Declaration & Distribution.
2. The Select a Case 127 window opens. Select a case by double-clicking a visible case title. You
can also click the title once, then press the Enter key or click the Select button. Click the Help
button on the window for detailed help for finding and selecting cases.
3. The program opens to the General
110
tab.
Navigating the Property Declaration & Distribution Program
The Property Declaration & Distribution program has seven main forms, shown in tabs across the
top of the screen: General 110 , Community Property 115 , Petitioner Separate Property 119 ,
Respondent Separate Property 121 , After Tax Values 123 , Pre-Tax Statistics 125 , and After Tax
Statistics 126 . These forms, and other windows you will see when completing the forms, are discussed in
this manual in the order in which the forms are listed.
This program has built-in hot key navigation. Wherever a window, form or field title shows an
underlined character, i.e., "Primary Attorney", you can navigate to that entry by holding the "Alt" key
and pressing the underlined keyboard character. In the earlier example, pressing Alt + A on your
keyboard puts your cursor in the Primary Attorney field.
Main Toolbar
Figure 1, Main Toolbar
The toolbar at the bottom of the program window consists of the Help, Import Data, Export Data,
Print, Save and Continue, Save and Close and Cancel buttons. This toolbar is always available
while you are using the program. The buttons and their actions are discussed below.
Help - Click this button to call up the help topic for the window you are viewing.
Import Data - Click this button to import scenario data from a backup file into the program.
Export Data - Click this button to export all data from the current loaded scenario to either your hard
110
ProDoc Software Manual
drive, a connected network drive or a removable media drive.
Send to Excel - Click this button to send all categories and data from the Community Property,
Petitioner Separate Property, Respondent Separate Property, and After Tax Values forms to an
Excel spreadsheet. Information for each form will be displayed on a separate sheet.
Print - Click this button to print and/or preview one or more of the forms designed to work with the
program.
Save and Continue - Click this button to save the data entered and continue working with the program.
Save and Close - Click this button to save the data entered and exit the program.
Cancel - Click this button to exit the program without saving the information that you entered during
the current session.
General Form
Figure 2, General Form
In this section:
Completing Fields on the General Form
About Scenarios
111
111
Loading Scenarios
112
Creating A New Scenario
112
Changing Scenario Names And Descriptions
113
California Property Declaration & Distribution
111
On the General Form, you designate your client as Petitioner or Respondent, enter the opposing
party's name, enter the Primary Attorney name and Bar Number and enter the requested court
information. You can also load, save, create and delete scenarios on this form.
Before completing the entries on this form, you should ensure that the correct client and case appear at
the top of the window. If not, click the Cancel button at the bottom of the form, open the program again
and select the case you want to use.
Completing Fields on the General Form
To complete the fields on the General Form:
1. In the Client Information section, click the Petitioner or Respondent radio button to indicate
your client's status in the Describe Client subsection. Your client's name will appear in the
appropriate field.
2. Enter the name of the opposing party in the Petitioner or Respondent field as appropriate.
3. Enter the preparing Primary Attorney and Bar Number in the fields provided.
4. Enter the Short Title of the case, normally the last name, any suffix, first name and middle
initial of the Petitioner on the first line, then press the Enter key and enter the last name, first
name and middle initial of the Respondent on the second line. For instance, "John K. Smith III"
should be entered as "Smith III, John K."
5. In the Court Information section, click the Edit Court Information button. Provide the
requested information in the Court Information section.
a. Enter the Case Number.
b. Choose the County by clicking the drop-down arrow field and clicking on the desired county.
c.
Choose the Branch by clicking the drop-down arrow field and selecting one of the available
entries for the selected county. If there is only one existing branch, it will be selected for you.
d. The Street Address, Mailing Address, City and Zip Code fields should be automatically
completed for you depending upon your previous selections. If necessary, type in the
information.
Scenarios
The Property Declaration & Distribution program allows you to create scenarios. Scenarios contain
a list of the parties’ property and how the property is to be divided. You can divide the property as you
want and save each division as a scenario. In fact, creating multiple scenarios for your cases can
provide you with a useful negotiating tool. Scenarios can help you compare what the parties want and
what the judge is likely to order, and they help you get a better look at the big picture.
When creating multiple scenarios, it is important to remember that the scenario on which you are
working in the Property Declaration & Distribution program is not necessarily the scenario that
will be used in the ProDoc forms. Only one scenario is actually used to assemble documents for your
client's case out of all of the scenarios you create to determine the best division of property. There are
fields on this form that allow you to see which scenario is being used by the Property Declaration &
Distribution program and which scenario will be used in ProDoc's forms. Before creating documents in
ProDoc that use information from the Property Declaration & Distribution program, you should
make sure that the correct scenario is displayed in the Scenario Saved in ProDoc Forms field so the
correct information appears in your documents.
You may load, copy, create and delete scenarios using the buttons in the center of the Scenarios for
112
ProDoc Software Manual
Current Case section of the window. Previously created and saved scenarios are listed in this section. If
there is an icon to the left of a scenario’s name, it means that it is currently loaded for use in the
Property Declaration & Distribution program. Figure 3 displays the section of the General Form
used for working with scenarios.
Figure 3, Scenarios Section
Loading Scenarios
To load a scenario for use in the Property Declaration & Distribution program:
1. Highlight the scenario you want to use from the list of scenarios in the Scenarios for Current
Case section.
2. Click the Load Selected Scenario into this Property Program button.
3. The Confirm box appears and asks if you want to save the currently loaded scenario before
loading the scenario you chose in Step 1.
a. Click Yes if you want to save any changes you made to the currently loaded scenario.
b. Click No if you do not want to save any changes you made to the currently loaded scenario.
4. The name of the scenario you have just loaded now appears as the Working Scenario above the
scenario listing. At this point your scenario is loaded in the program and is ready to be updated.
Saving Scenarios
To save changes made to a scenario as a new scenario:
1. Click the Copy Current Scenario as New Scenario button.
2. The Confirm box appears.
a. Click Yes to save the changes that have been made to the current scenario.
b. Click No to close the current scenario and copy the current scenario and the changes that
have been made to a new scenario.
c.
Click Cancel to return to the Property Inventory without copying the current scenario.
3. The Create New Scenario box appears.
a. Enter a name for the scenario in the Scenario Name field.
b. Enter a description of the scenario in the Scenario Description field.
4. Click OK.
Creating a New Scenario
California Property Declaration & Distribution
113
To create a new blank scenario:
1. Click the Create Blank Scenario button.
2. The Confirm box appears and asks if you want to save the scenario that is currently loaded in
the Property Declaration & Distribution program.
a. Click Yes to save any changes you made to the currently loaded scenario.
i.
The Create New Scenario box appears.
ii. Enter a scenario name and description.
iii. Click OK.
iv. You may now enter information for the scenario.
b. Click No to discard changes you made to the currently loaded scenario.
i.
The Create New Scenario box appears.
ii. Enter a scenario name and description.
iii. Click OK.
iv. You may now enter information for the scenario.
c.
Click Cancel to return to the Property Declaration & Distribution program without
creating a new scenario.
Deleting a Scenario
To delete a scenario:
1. Select a scenario from the list.
2. Click the Delete Selected Scenario button.
3. The Confirm box appears and asks if you want to delete the selected scenario.
4. Click Yes to delete the scenario.
NOTE:
If the scenario you are deleting is the current scenario that is listed in the Scenario
Saved in ProDoc Forms field, the Select a ProDoc Scenario box appears. Click the
drop down arrow, select another scenario to load in ProDoc and click OK.
If the scenario you are deleting is the only scenario for the selected client and case, the
Confirm box appears. Click Yes to delete all of the inventory answers except for the
general information, which includes the names of the petitioner and respondent, court
information and which party is the petitioner and client.
Changing Scenario Names or Descriptions
To change a scenario’s name or description:
1. Double-click a scenario on the list, or click a scenario on the list and click the Update button.
2. The Change Scenario box appears.
3. Enter a new name and/or description for the scenario and click OK.
The information that you enter for a scenario may be used for document assembly in ProDoc, but the
scenario must be loaded in ProDoc before it may be used. The Scenarios for Current Case section
(displayed in Figure 3) displays which scenario is loaded in the Property Declaration & Distribution
114
ProDoc Software Manual
program as the Working Scenario and allows you to load a scenario for document assembly in ProDoc
using the Scenario Saved in ProDoc Forms field.
Figure 4, Scenarios Used Fields
The scenario shown as the Working Scenario and the scenario shown in the Scenario Saved in
ProDoc Forms field may be different because the scenario on which you are working in the Property
Declaration & Distribution program is not necessarily the scenario that you will use when creating
documents in ProDoc.
The scenario shown as the Working Scenario is the scenario that is currently loaded in the Property
Declaration & Distribution program. This is the scenario to which you can make changes in the
Property Declaration & Distribution program. You may change this scenario by highlighting a
scenario in the Scenarios for Current Case list and clicking the Load Selected Scenario into this
Property Program button.
The scenario shown in the Scenario Saved in ProDoc Forms field is the scenario that ProDoc will
use to create documents. This scenario is used for the actual document assembly in ProDoc. You may
change this scenario by clicking the drop-down arrow field and choosing the scenario that you want to
use to assemble documents in ProDoc. If you change the scenario, you must click the Save and
Continue button to activate the new scenario in ProDoc.
California Property Declaration & Distribution
115
Printing Forms
To print forms from the program, click the Print button
on the main toolbar at the bottom of the screen. The
Select Forms to Print window appears, similar to
Figure 5.
Select the scenario to print by clicking the drop-down
arrow field and clicking the desired scenario.
Click the box next to the form(s) that you want to print
and/or preview on the list that appears. For FL-160
forms, a question is listed: "Does this form, FL-160
(version), contain the locations of, or identifying
information about, the assets and debts listed?". This
question corresponds to a required check box on the
completed form. The default answer is Yes. If this is not
correct, click the button labeled No.
When you are finished selecting forms, click the OK
button to print and/or preview the form. The Preview
window appears and asks if you want to review the
report. Click Yes if you want to review form before
printing it. Click No if you want to print the form
without reviewing it. Click Cancel if you decide not to
view or print the form.
Figure 5, Select Forms to Print Window
The forms that can be printed using information from the Property Declaration & Distribution
program are:
· FL-160 Community Property
· FL-160 Petitioner's Separate Property
· FL-160 Respondent's Separate Property
· FL-142 Schedule of Assets and Debts
Other reports that can be printed include:
· Net (After-Tax) Values Sheet
· Pre-Tax Statistics Sheet
· After-Tax Statistics Sheet
· Property Declaration & Distribution Summary Sheet
Community Property Form
The Community Property Form allows you to enter details regarding community property, the value
of the property, and the person(s) to whom the property is allocated. This is the first of three property
forms in the Property Declaration & Distribution program.
Click one of the following links to jump to descriptions and procedures, or scroll down to see these in the
order shown:
116
ProDoc Software Manual
How Assets and Debts are Displayed
116
Locating Asset and Debt Descriptions
Entering New Assets and Debts
Editing Asset and Debt Entries
117
117
117
Deleting Asset and Debt Entries
117
Using Toolbar Buttons to work with Assets and Debts
117
Figure 6, Community Property Form
How Assets and Debts are Displayed
The information for each asset or debt is displayed in columns: Asset/Debt Description, Q
(Quasi-Community Property, identified by a green check mark), Asset (amount), Debt (amount),
Petitioner % (of Asset/Debt), Petitioner Asset and Debt (amounts), Respondent % (of Asset/Debt),
and Respondent Asset and Debt (amounts). As you enter assets and debts, a running total is
displayed under the listing, consisting of the Total Community Estate amounts (yellow background
color) and Net Community Estate Allocation amounts (peach background color). The percentages of
the estate allocation are also listed for both Petitioner and Respondent.
The Petitioner % and Respondent % columns will only contain an entry when a user chooses to
ignore the values and allocate the asset or debt by percentage. Users can clear the appropriate check
box to remove the displayed percentage amounts and reveal the values or amounts in the appropriate
columns.
Entries of actual assets/debts are highlighted in yellow. The values of assets which were entered as
community property but are not yet allocated will be highlighted in silver-grey.
To view all asset and debt descriptions, click the Expand button in the top right side of the form. This
button serves as both an Expand and Contract button. To view only the main titles of the category
groups within the Asset/Debt Description window, click the Contract button. You can also click the
or symbols on the listing to expand or contract a particular category.
California Property Declaration & Distribution
117
Locating Assets and Debt Descriptions
·
Use the scroll bar at the right side of the window to scroll through the list.
·
Ensure the list is fully expanded. Click on the top entry of the window, Assets, and type the
first letter of the description you wish to locate. Each letter you enter will move the highlight
through the list to the next description beginning with the letter. When it reaches the end, it will
start again at the first matching description.
·
Enter a search word or phrase in the blank field above the Asset/Debt Description column and
click Find. The first description title that contains the word or phrase will be highlighted.
NOTE:
Searches and keystroke moves start from the point at which the cursor is positioned. If
you want to search from the beginning, you should place the cursor at the top of the
Asset/Debt Description list.
Entering New Assets and Debts
1. Double-click a description, or click a description once and click New. You can also right-click a
description and click New on the pop-up menu.
2. A window will appear titled with the description you chose. It will display appropriate fields to
enter for the asset or debt and buttons and fields for allocation between the parties.
3. In the General section, complete the displayed fields for the asset or debt. To enter the Date
Acquired or other dates, type the date in the format shown, or click on the calendar icon to pick
the date from the displayed calendar. Click here 128 for detailed help in using the Select a Date
window.
4. Use the remaining portions of the window to allocate the amounts of the asset and/or debt
between the petitioner and respondent. Click here 118 for detailed help on allocating the asset or
debt.
a. Allocate Assets and/or Allocate Debt sections. Use the buttons and fields to specify the
allocation of assets/debts. For assets, you can allocate the values of the asset and any debt
against it. For debts, you simply allocate the debt amount.
b. Allocate Using Percentage section. If you wish to display only percentages of allocation on
the Community Property Form, click the check box here to do this. Use the buttons and
fields to specify the allocation percentage. If you clear the check box, the values or amounts
will be displayed on the Community Property Form and the percentages will be cleared.
5. When you are finished, either click the Add Another button to save your entries and enter
another asset or debt in the same category or click the OK button to return to the Community
Property Form. The description, amounts and allocations will be listed here.
Editing Asset and Debt Entries. You may edit an entry by using any of the following methods:
·
Double-click the asset or debt description.
·
Right-click the asset or debt description and click Update on the pop-up menu.
·
Click the asset or debt description to highlight it and click the Update button on the toolbar.
Deleting Asset and Debt Entries. To delete an asset or debt entry, click on the entry to highlight it
and click the Delete button. You can also right-click the entry and click Delete on the pop-up menu.
Using Toolbar buttons to work with Assets and Debts
First, find and click the line containing the asset/debt. You can now use the toolbar buttons at the bottom
of the window to perform the functions indicated below:
New - Add description, value and allocation (if necessary) of an asset or debt to the inventory.
118
ProDoc Software Manual
Update - Modify a highlighted asset or debt.
Delete - Remove a highlighted asset or debt.
Unallocate - Remove previous allocations of the highlighted asset or debt. This button is grayed out if
no allocation exists.
Split - Divide the highlighted asset or debt between the parties. Click this button to open the asset or
debt window, where you can change the allocation as desired. Click here 118 for detailed help with
allocating assets or debts.
Petitioner - Allocates the highlighted asset or debt entirely to the petitioner.
Respondent - Allocates the highlighted asset or debt entirely to the respondent.
Allocating Community Property
Figure 7 displays an asset entry window of
a community property asset. The bottom
half of the window contains the Allocate
Asset, Allocate Debt and Allocate Using
Percentage sections. These boxes allow
you to specify the allocation of assets/debts
between the petitioner and respondent. For
assets, you can allocate the values of the
asset and any debt against it in both the
Allocate Asset and Allocate Debt
sections. For debts, only one section is
displayed, which you use to allocate the
debt amount.
You can use the Allocate Using
Percentage section to display only the
percentage of allocation on the
Community Property form rather than
displaying the amounts.
Figure 7, Community Property Asset Entry Window
Use any of the procedures below to complete both the Allocate Asset and Allocate Debt sections for
assets or only the Allocate Debt section for debts.
·
Click the All to Petitioner or All to Respondent button to assign the total amount to either
party.
·
To assign less than the total amount, use the box labeled % Asset to Petitioner. Click on the
arrows to raise or lower the percentage, or type in the percentage. The Respondent percentage
will be calculated automatically.
·
If you don't use either of the above methods, you can type the amount to allocate to the
Petitioner in the field provided. The Respondent amount will be calculated automatically.
California Property Declaration & Distribution
119
Displaying Allocation Percentages. Use the Allocate Using Percentage section to display
allocation percentages instead of amounts on the Community Property form. This section's check box
and fields will be labeled differently according to whether the window is used for an asset or for a debt,
but the functions are the same on each.
·
Click the check box to activate the displayed fields and buttons.
·
Click the All to Petitioner or All to Respondent buttons to allocate 100 percent to either party.
·
Click the up and down arrows in the percentage allocation fields to raise or lower the percentage,
or type in the desired percentage. The other percentage field will be automatically adjusted.
If you clear the check box in this section, the allocation percentages will be removed from the
Community Property form and the amounts will be displayed.
If you are entering and allocating a new asset or debt, the Add Another button appears at the bottom of
the window. Click this button to save your current entries and immediately add another asset or debt in
the same category. When you are finished adding and allocating assets/debts in this category, click the
OK button to save your entry and return to the Community Property form. Click Cancel to discard
your entries and close the window.
Petitioner Separate Property Form
The Petitioner Separate Property Form allows you to enter details regarding the petitioner's
separate property and the value of the property.
Click one of the following links to jump to descriptions and procedures, or scroll down to see these in the
order shown:
How Assets and Debts are Displayed
120
Locating Asset and Debt Descriptions
Entering New Assets and Debts
Editing Asset and Debt Entries
120
120
121
Deleting Asset and Debt Entries
121
Using Toolbar Buttons to work with Assets and Debts
121
120
ProDoc Software Manual
Figure 8, Petitioner Separate Property Form
How Assets and Debts are Displayed
The information for each asset or debt is displayed in columns: Asset/Debt Description, Asset
(amount) and Debt (amount). As you enter assets and debts, a running total is displayed under the
listing, consisting of Total Separate Estate amounts (yellow background color) and Net Separate
Estate amounts (peach background color). Entries of actual assets/debts are highlighted in yellow.
To view all asset and debt descriptions, click the Expand button in the top right side of the form. This
button serves as both an Expand and Contract button. To view only the main titles of the category
groups within the Asset/Debt Description window, click the Contract button.
Locating Assets and Debt Descriptions
·
Use the scroll bar at the right side of the window to scroll through the list.
·
Ensure the list is fully expanded. Click on the top entry of the window, Assets, and type the
first letter of the description you wish to locate. Each letter you enter will move the highlight
through the list to the next description beginning with the letter. When it reaches the end, it will
start again at the first matching description.
·
Enter a search word or phrase in the blank field above the Asset/Debt Description column and
click Find. The first description title that contains the word or phrase will be highlighted.
NOTE:
Searches and keystroke moves start from the point at which the cursor is
positioned. If you want to search from the beginning, you should place the cursor
at the top of the Asset/Debt Description list.
Entering New Assets and Debts
1. Double-click a description, or click a description once and click New. You can also right-click a
description and click New on the pop-up menu.
2. A window will appear titled with the description you chose. It will display the appropriate entry
fields for the asset or debt.
California Property Declaration & Distribution
121
3. Complete the displayed fields for the asset or debt. To enter the Date Acquired, type it in the
format shown, or click on the calendar icon to pick the date from the displayed calendar. Click
here 128 for detailed help in using the Select a Date window.
4. When you are finished, either click the Add Another button to save your current entries and
enter another asset or debt in the same category or click the OK button to return to the
Petitioner Separate Property Form. The description and amounts will be listed here.
Editing Asset and Debt Entries. You may edit an entry by using any of the following methods:
·
Double-click the asset or debt description.
·
Right-click the asset or debt description and click Update on the pop-up menu.
·
Click the asset or debt description to highlight it and click the Update button on the toolbar.
Deleting Asset and Debt Entries. To delete an asset or debt entry, click on the entry to highlight it
and click the Delete button. You can also right-click the entry and click Delete on the pop-up menu.
Using Toolbar buttons to work with Assets and Debts
First, find and click the line containing the asset/debt. You can now use the toolbar buttons at the bottom
of the window to perform the functions indicated below:
New - Add description and value of an asset or debt to the inventory.
Update - Modify a highlighted asset or debt.
Delete - Remove a highlighted asset or debt.
Respondent Separate Property Form
The Respondent Separate Property Form allows you to enter details regarding the respondent's
separate property and the value of the property.
Click one of the following links to jump to descriptions and procedures, or scroll down to see these in the
order shown:
How Assets and Debts are Displayed
122
Locating Asset and Debt Descriptions
Entering New Assets and Debts
Editing Asset and Debt Entries
122
122
123
Deleting Asset and Debt Entries
123
Using Toolbar Buttons to work with Assets and Debts
123
122
ProDoc Software Manual
Figure 9, Respondent Separate Property Form
How Assets and Debts are Displayed
The information for each asset or debt is displayed in columns: Asset/Debt Description, Asset
(amount) and Debt (amount). As you enter assets and debts, a running total is displayed under the
listing, consisting of Total Separate Estate amounts (yellow background color) and Net Separate
Estate amounts (peach background color). Entries of actual assets/debts are highlighted in yellow.
To view all asset and debt descriptions, click the Expand button in the top right side of the form. This
button serves as both an Expand and Contract button. To view only the main titles of the category
groups within the Asset/Debt Description window, click the Contract button.
Locating Assets and Debt Descriptions
·
Use the scroll bar at the right side of the window to scroll through the list.
·
Ensure the list is fully expanded. Click on the top entry of the window, Assets, and type the
first letter of the description you wish to locate. Each letter you enter will move the highlight
through the list to the next description beginning with the letter. When it reaches the end, it will
start again at the first matching description.
·
Enter a search word or phrase in the blank field above the Asset/Debt Description column and
click Find. The first description title that contains the word or phrase will be highlighted.
NOTE:
Searches and keystroke moves start from the point at which the cursor is
positioned. If you want to search from the beginning, you should place the cursor
at the top of the Asset/Debt Description list.
Entering New Assets and Debts
1. Double-click a description, or click a description once and click New. You can also right-click a
description and click New on the pop-up menu.
2. A window will appear titled with the description you chose. It will display the Asset or Debt tab
entry fields as appropriate.
California Property Declaration & Distribution
123
3. Complete the displayed fields for the asset or debt. These will change according to the type of
asset or debt you are entering. To enter the Date Acquired, type it in the format shown, or click
on the calendar icon to pick the date from the displayed calendar. Click here 140 for detailed help
in using the Select a Date window.
4. When you are finished, either click the Add Another button to save your entries and enter
another asset or debt in the same category or click the OK button to return to the Respondent
Separate Property Form. The description and amounts will be listed here.
Editing Asset and Debt Entries. You may edit an entry by using any of the following methods:
·
Double-click the asset or debt description.
·
Right-click the asset or debt description and click Update on the pop-up menu.
·
Click the asset or debt description to highlight it and click the Update button on the toolbar.
Deleting Asset and Debt Entries. To delete an asset or debt entry, click on the entry to highlight it
and click the Delete button. You can also right-click the entry and click Delete on the pop-up menu.
Using Toolbar buttons to work with Assets and Debts
First, find and click the line containing the asset/debt. You can now use the toolbar buttons at the bottom
of the window to perform the functions indicated below:
New - Add description and value of an asset or debt to the inventory.
Update - Modify a highlighted asset or debt.
Delete - Remove a highlighted asset or debt.
After Tax Values Form
Figure 10, After Tax Values Form
The After Tax Values Form allows users to enter amounts for the Cost or Basis, Cost of Sale and
Tax Rate, calculates tax amounts and displays net values after taxes. Amounts on this form are
124
ProDoc Software Manual
categorized as Cost or Basis, displayed for Fed (Federal) or CA (California), Current Value, Cost of
Sale, Tax Rate (%), displayed for Fed (Federal) or CA (California), Tax, and Net to Parties,
displayed for Petitioner and Respondent. The Net Community Estate Allocation After Taxes
amounts (yellow background color) and Percentage (peach background color) are displayed at the
bottom of the listing. These amounts are updated as values are changed.
To view all asset and debt descriptions, click the Expand button in the top right side of the form. This
button serves as both an Expand and Contract button. To view only the main titles of the category
groups within the Asset/Debt Description window, click the Contract button.
Locating Assets and Debt Descriptions
·
Use the scroll bar at the right side of the window to scroll through the list.
·
Ensure the list is fully expanded. Click on the top entry of the window, Assets, and type the
first letter of the description you wish to locate. Each letter you enter will move the highlight
through the list to the next description beginning with the letter. When it reaches the end, it will
start again at the first matching description.
·
Enter a search word or phrase in the blank field above the Asset/Debt Description column and
click Find. The first description title that contains the word or phrase will be highlighted.
NOTE:
Searches and keystroke moves start from the point at which the cursor is
positioned. If you want to search from the beginning, you should place the cursor
at the top of the Asset/Debt Description list.
Entering Cost or Basis, Cost of Sale and Tax Rates. Note that you can only enter data for assets
previously entered as community property. You cannot add or delete assets or debts on this form.
1. Double-click an asset description, or click an asset description to highlight it and click Update.
You can also right-click an asset description and click Update on the pop-up menu.
2. The Change the Cost and Tax Rate window will appear with the title of the property, name of
the asset and current value displayed.
3. Enter the Cost or Basis and Cost of Sale for both the Federal and California categories.
a. For the principal residence, you will need to enter the Principal Residence Exclusion.
b. After you enter the Principal Residence Exclusion, click on the Depreciation button and
enter the depreciation recapture amount (if any). Click Depreciation Recapture 125 or
scroll further for more information on this entry.
4. Either type in the Tax Rate (%) for each category or use the spin buttons to enter the rate. The
tax rates you enter will become the default entries when you update an asset that has no
previously entered tax rate.
5. Click the OK button to save your entries and return to the After Tax Values Form. The
amounts will be listed here, including the calculated tax value.
Using Toolbar buttons to work with After Tax Values
Update - Modify entries for a highlighted asset.
Print After Tax Values - View and/or print a Net Value Sheet which lists the community assets and
debts claimed. When you click the button, a window appears asking if you want to preview the report.
Click Yes to preview it before printing; click No to print without preview; click Cancel to stop the
preview/print process.
California Property Declaration & Distribution
125
Depreciation Recapture
If the Principal Residence home has been rented or has a home office, depreciation may have been
taken on the home. Enter the amount of depreciation that has been claimed on the principal residence
since May 6, 1997. Tax on the depreciation will be calculated at the appropriate federal and/or state tax
rate.
Pre-Tax Statistics Form
Figure 11, Pre-Tax Statistics Form
The Pre-Tax Statistics Form displays community and separate assets and debts, and net estate
amounts before taxes have been deducted. The form is divided into Pre-tax Community Assets and
Net Estate, Pre-Tax Separate Assets and Net Estate and Pre-Tax Community and Separate
Assets and Net Estate sections. These sections display pre-tax amounts for the total community assets
and debts and the net community estate. The totals are further broken down to show the amounts
allocated to the petitioner and respondent, and the amounts that have not been allocated. The amounts
that have been allocated are also shown as percentages in the Pre-Tax Community Assets and Net
Estate and Pre-tax Community and Separate Assets and Net Estate sections.
To print statistics sheets:
1. Click the Print Statistics Sheet button.
2. A list appears with the selections Print this Sheet, Print After Tax Sheet, Print Both
Pre-Tax and After Tax Sheet or Cancel.
3. Select the statistics sheet(s) you want to print from the list or Cancel to proceed without printing.
4. The Preview window appears and asks if you want to review the report.
a. Click Yes if you want to review the statistics sheet before printing it.
b. Click No if you want to print the statistics sheet without reviewing it.
c.
Click Cancel if you do not want to view or print the statistics sheet.
126
ProDoc Software Manual
After Tax Statistics Form
Figure 12, After Tax Statistics Form
The After Tax Statistics Form displays community and separate assets and debts, and net estate
amounts after taxes have been deducted. The form is divided into After Tax Community Assets and
Net Estate and After Tax Community and Separate Assets and Net Estate sections. The
difference between the two sections is that the After Tax Community and Separate Assets and Net
Estate section includes separate assets and debts along with the community assets and debts. These
totals are further broken down to show the amounts allocated to the petitioner and respondent and the
amounts that have not been allocated. The amounts that have been allocated to the petitioner and
respondent are also shown as percentages.
To print statistics sheets:
1. Click the Print Statistics Sheet button.
2. A list appears with the selections Print this Sheet, Print Pre-Tax Sheet, Print Both Pre-Tax
and After Tax Sheet or Cancel.
3. Select the statistics sheet(s) you want to print from the list or Cancel to proceed without printing.
4. The Preview window appears and asks if you want to review the report.
a. Click Yes if you want to review the statistics sheet before printing it.
b. Click No if you want to print the statistics sheet without reviewing it.
c.
Click Cancel if you do not want to view or print the statistics sheet.
California Property Declaration & Distribution
127
Selecting a Case
Use the Select a Case window to choose a client
and case file in which to save the information you
input. It lists existing ProDoc clients and all cases
for the clients. You can use it to see and modify
related client/case data and create new clients and
cases.
You can select a case to use by either of the
methods listed below:
·
Double-click a displayed case.
·
Click on a displayed case and then press
the Enter key.
·
Click on a displayed case and then click the
Select Case button.
Figure 13, Selecting a Case Window
To find a case that's not displayed:
·
Type the first letter(s) of a client's name to jump to that client's entry on the tree. To do this more
than once, use the backspace key to clear your previous letter entries.
·
Use the scroll bar on the right of the form to quickly scroll through the list. You can also click on
any entry on the left and scroll with keyboard page up, page down, and up/down arrow keys.
·
Use the Now Showing: drop down arrow to choose the types of contacts or clients to display.
Cases are grouped under clients, who are grouped in alphabetical order. Categories will be
displayed with type icons of different colors on the window. The default is Active Clients. Other
choices are All Contacts, Closed Contacts, Private Clients and Non-Clients.
·
Use the Hide/Show Cases toggle button to display or hide cases. Likewise, you can click the
or symbols in the client tree to reveal or hide cases.
128
ProDoc Software Manual
Select a Date Window
This window helps you quickly complete date fields. Tools and buttons on
this calendar tool, depicted as Figure 14, include:
Figure 14, Selecting a Date
Window
·
and
- Click to move back or forward one year.
·
and
- Click to move back or forward one month.
·
and
- Click to move back or forward one week.
·
Use Up and Down arrow keys to move back and forward one
week.
·
Use Left and Right arrow keys to move back and forward one
day.
·
Click Today to move the underline/highlight to today's date.
·
Click on the date to choose it or press the Enter key to choose the
underlined date.
·
Click Close to close the calendar without choosing a date.
Family Law - UCCJEA Declaration
129
Family Law - UCCJEA Declaration
Getting Started
The California Family Law - UCCJEA (Uniform Child Custody Jurisdiction and Enforcement
Act) Declaration program is designed to assist you with entering the current address of each child, as
well as the five year residential history of each child. As a part of the declaration, you can enter
additional information regarding ancillary matters which affect the children. Finally, you can also list all
third-parties claiming visitation and/or custody rights to the children.
This feature allows you to:
·
Enter information about the parties and the children that are affected by the proceeding.
·
Enter the current address of each child, as well as the five year residential history of each child.
·
Enter the names and addresses of nonparties who may have actual physical custody of the
child(ren), or are claiming visitation or custody rights for the child(ren) subject to the action.
·
Enter other proceedings which concerned the child(ren) affected by this suit in which the
declarant participated or had knowledge.
·
Complete and print the UCCJEA Declaration.
Starting the Program
To open the UCCJEA Declaration program:
1. Click PowerPacks ® Family Law ® UCCJEA Declaration.
2. The Select a Case 139 window opens. Select a case by double-clicking a visible case title. You
can also click the title once, then press the Enter key or click the Select button. Click the Help
button on the window for detailed help for finding and selecting cases.
3. The UCCJEA Declaration program opens to the General
130
tab.
Using Links
Underlined text links appear throughout the help topics. Click these links to see more details on the
indicated subject or window, or to see other related information.
Hot Keys
This program has built-in hot key navigation. Wherever a window, screen or field title shows an
underlined character, i.e., "Respondent", you can navigate to that entry by holding the "Alt" key and
pressing the underlined keyboard character. In the earlier example, pressing Alt + O on your keyboard
puts your cursor in the Respondent field.
UCCJEA Toolbar
Figure 1, UCCJEA Toolbar
The toolbar along the bottom of the UCCJEA Declaration program consists of the Help, Print, Save
and Continue, Save and Close and Cancel buttons. The buttons and their actions are discussed
below.
Help - Click this button to see help for the form you are viewing.
130
ProDoc Software Manual
Print - Click this button to generate the UCCJEA Declaration in ProDoc and print it. The Print
Preview window will appear asking if you want to preview the document before printing it. Click the
Yes button to preview the document before printing it. Click the No button to print the document
without previewing it.
Save and Continue - Click this button to save your work and continue working in the program.
Save and Close - Click this button to save your work and close the program.
Cancel - Click this button to exit the program. A caution window appears, telling you that canceling will
cause you to lose all information you entered since the last save, and asking you if you want to continue.
To return to the program to save your work, click No. If you do not want to save your work, click Yes.
General Form
Figure 2, General Form
To complete the General form:
1. In the Describe Client section, select whether the Declarant is the Petitioner or Respondent.
Click the appropriate radio button. The client's name will appear in the corresponding field in
the Case Information section.
2. In the Case Information section:
a. Enter the opposing party's name in the Petitioner or Respondent field.
b. Enter the primary attorney's name in the Primary Attorney field and that attorney's Bar
Number in the indicated field.
c.
Enter the Short Title of the case, normally the last name, any suffix, first name and middle
initial of the Petitioner on the first line, then press the Enter key and enter the last name,
first name and middle initial of the Respondent on the second line. For instance, "John K.
Smith III" should be entered as "Smith III, John K."
3. In the section labeled Is Declarant's Address Confidential?, click the appropriate answer.
4. In the Court Information section, click the Edit Court Information button. Enter the case
number, county, branch, street and mailing address. The address fields are normally completed
automatically depending upon county and branch entries.
Family Law - UCCJEA Declaration
131
When you have completed the General Form, click the Save and Continue or the Save and Close
button to save your work to this point.
Children Form
Figure 3, Children Form
The Children Form lists the children that are affected by the proceeding. You can enter the current
address of each child, as well as the five year residential history of each child. We suggest you enter the
oldest child's name and information first, as the initial child.
This topic contains specific help on Children Form entries and an overview of the process of completing
related windows. For detailed help on the windows you use while completing the Children Form, click
the Help button on each window. To see help for the windows in this manual, click the links in this
section or continue scrolling to see help for the windows in the order that the windows appear.
Adding Children's Names
To add the names of minor children to the Names of Children section of the Children Form::
1. Click on the Check if all children lived at the same address(es) for the previous five
years checkbox if the statement applies.
a. If this box is checked, any child entered after the initial child will automatically list the same
addresses as the initial child.
b. If you uncheck the Check if all children lived at the same address(es) for the previous
five years checkbox, you will need to enter the addresses for each child separately.
2. Click the New button. You can also right-click anywhere inside the list box and click New on the
menu that appears.
3. The Adding Child's Address Information 132 window appears. Complete the name, date of
birth and place of birth of the initial child. To add another child's name, press the Next Child
button. After the last child's name is entered, press the OK button.
4. The Adding Child's Address 134 window appears. Use it to enter the most current address for
the initial child, then click the New button on the right side of the window and enter the name of
the person the child lived with, and their relationship to the child. Click the OK button when you
are finished.
5. If more addresses are necessary to complete a five year history, click the initial child's name and
132
ProDoc Software Manual
click the Update button. Repeat steps 4 and 5 to enter the next most recent address information
and information on whom the child lived with for the past five years. When the history is
complete, click the OK button.
6. Repeat the process above to enter other children. When you are finished, click the Save and
Continue button or Save and Close button as desired to save your work up to this point.
To update a child's information, do any one of the following to open a window to update the information:
·
Double-click the child's name.
·
Right-click the child's name and click Update on the menu that appears.
·
Click the name and click the Update button.
The Changing Child's Address Information
and click OK to return to the Children Form.
134
window will appear. Edit the information as desired
To delete a child from the listing, click the child's name and click the Delete button, or right-click the
child's name and click Delete on the menu that appears. On the confirmation window that appears,
click Yes to delete the child or No to return to the Children Form without deleting the child.
Adding/Changing Child's Information
Figure 4, Adding Child's Address Information Window
This window is used to add a child and the child's residential history to the Children Form or to update
the information on an existing child. When changing an address of a child, the title of the window will be
Changing Child's Address Information. Figure 16 depicts the window when it is used to add a child's
information. To complete the entries on this window:
1. Enter a Child's Name.
2. Enter the child's Date of Birth in mm/dd/yyyy format, or click the calendar icon and choose the
date with the Select a Date 140 window.
3. Enter the child's Place of Birth (City, State).
4. In the Sex section, click the appropriate radio button for Male or Female.
5. Click New to add the current address of the child or add additional addresses. To update/edit an
entry, either double-click the entry or click it and click the Update button.
6. The Adding Child's Address 134 window appears (if updating an address, the window title will
be Changing Child's Address).
Family Law - UCCJEA Declaration
133
7. Enter the Begin Date and End Date in the corresponding fields, or click the calendar icon and
choose the date with the Select a Date 140 window.
8. If you want to keep any addresses confidential, click the box labeled Address Confidential. You
will need to complete the City and State fields at a minimum. If desired, you can enter all
address fields. If the box is checked, these fields will be displayed on your declaration as follows,
regardless of whether or not you enter the street address and zip code:
a. Most current address: your printed declaration will only show "Address Confidential" for that
address.
b. Other addresses: your printed declaration will show "Address Confidential" as the street
address, and it will also display the entered city and state.
9. Enter the child's addresses for the past five years in the Street, City, State and Zip fields. You
can also click the browse button next to the Street field to choose previously entered addresses.
10. On the right side of the window, click the New button to add the current address of each person
the child lived with during the time span. The Current Address 135 window appears. You can
click the Available Persons button to quickly copy information for persons you've already
entered into the program, or type the entries in the fields.
a. To keep this person's current address confidential, check the Address Confidential box,
then complete the mandatory Person Lived With and Relationship fields. If desired, enter
the address fields. Whether or not you enter the address, it will be displayed on your printed
declaration as Address Confidential.
b. If there is no need to keep the address confidential, leave the Address Confidential box
unchecked and complete all entry fields. If the Address Confidential box is not checked, the
full address will be displayed on your printed declaration.
c.
Click the OK button, or click the Cancel button to close the window without saving your
entries.
11. If you want to add more addresses for the child, click the Add Another button.
When you finish entering the addresses, click OK. Click Cancel to close the window without saving your
entries.
Button Descriptions and Functions
Previous Child - Click this button to display the window's information for the previous child on the list.
You can now add, update or delete addresses for this child. If you are currently working with the first
child on the list, this button will be disabled.
Next Child - Click this button to display the window's information for the next child on the list. You can
now add, update or delete addresses for this child. If you are currently working with the last child on the
list, a dialog window will appear to ask if you wish to add another child. Click Yes to do so or No to close
the window.
New - Click this button to add an address for the listed child. This choice also appears if you right-click
anywhere inside a list box.
Update - Click this button to update an address for the listed child. You can also double-click an address
entry to update it. This choice also appears if you right-click a child's address entry.
Delete - Click this button to delete the highlighted address for the listed child. This choice also appears
if you right-click a child's address entry.
OK - Click this button to enter the information on the Children Form and close the window.
Cancel - Click to close the window and return to the Children Form. Your entries will not be saved.
134
ProDoc Software Manual
Child's Address
Figure 5, Changing Child's Address Window
This window is used to add an address for a child or update an existing address. You should enter
addresses for the past five years, beginning with the most current.
1. Enter the Begin Date and End Date in the corresponding fields, or click the calendar icon and
choose the date with the Select a Date 140 window. If you are adding the first entry (current
address) for a child, the End Date field will contain the current date.
2. If you want to keep any addresses confidential, click the box labeled Address Confidential. You
will need to complete the City and State fields at a minimum. If desired, you can enter all
address fields. If the box is checked, these fields will be displayed on your declaration as follows,
regardless of whether or not you enter the street address and zip code:
a. Most current address: your printed declaration will only show "Address Confidential" for that
address.
b. Other addresses: your printed declaration will show "Address Confidential" as the street
address, and it will also display the entered city and state.
3. Enter the child's address in the Street, City, State and Zip fields. You can also click the browse
button next to the Street field to choose any previously entered address.
4. On the right side of the window, click the New button to add the current addresses of each person
the child lived with during the time span. If you need to update an existing entry, double-click
the entry, or click it and click the Update button. The Delete button deletes the highlighted
entry.
5. The Current Address 135 window appears. You can click the Available Persons button to
quickly copy information for persons you've already entered into the program, or type the entries
in the fields.
a. To keep this person's current address confidential, check the Address Confidential box,
then complete the mandatory Person Lived With and Relationship fields. If desired, enter
the address fields. Whether or not you enter the address, it will be displayed on your printed
declaration as Address Confidential.
b. If there is no need to keep the address confidential, leave the Address Confidential box
unchecked and complete all entry fields. If the Address Confidential box is not checked, the
full address will be displayed on your printed declaration.
Family Law - UCCJEA Declaration
c.
135
Click the OK button, or click the Cancel button to close the window without saving your
entries.
6. If you want to add more addresses for the child, click the Add Another button.
When you finish entering addresses, click OK to return to the Adding/Changing Child's Address
Information window. Click Cancel to close the window without saving your entries.
Person Child Lived With
Figure 6, Current Address Window
This window is used to add a person who lived with the child during a particular time span. It also allows
you to update a previous entry. To complete the entries on this window:
1. You can click the Available Persons button to quickly copy information for persons you've
already entered into the program, or type the entries in the fields if the person's information has
not yet been entered.
2. To keep this person's current address confidential, check the Address Confidential box, then
complete the mandatory Person Lived With and Relationship fields. If desired, enter the
address fields. Whether or not you enter the address, it will be displayed on your printed
declaration as Address Confidential.
3. If there is no need to keep the address confidential, leave the Address Confidential box
unchecked and complete all entry fields. The person's current address information should be
entered. If the Address Confidential box is not checked, the full address will be displayed on
your printed declaration.
4. Click the OK button, or click the Cancel button to close the window without saving your entries.
NOTE:
If the person with whom the child lived is your client and you change the person's
name or address here, you should make the same changes to the client's
information in the Client/Case Manager. There is a possibility that your client will
be listed twice in the available persons list if you enter information that is different
from the information entered in the Client/Case Manager.
136
ProDoc Software Manual
Other Proceedings Form
Figure 7, Other Proceedings Form
The Other Proceedings form lists other relevant proceedings concerning the child(ren) affected by this
suit in which the Declarant was involved, either by participation or by knowledge.
To add (or update) other proceedings in which the declarant participated and which concerns a child
subject to the instant proceeding:
1. Click the New button in the upper section of the window to add a proceeding. To update/edit an
entry, double-click an existing entry or click it and click the Update button.
2. The Proceedings in Which Declarant Participated window appears.
3. Complete the Capacity of Declarant, Court, State and Location fields.
4. If a child custody determination has been made, enter or select the date of the order or judgment
in the Date of Order/Judgment field.
5. Select the children affected by the proceeding.
6. Click OK to return to the Other Proceedings form.
To delete a proceeding, click the proceeding and click the Delete button. On the confirmation window
that appears, click Yes to delete the proceeding or No to close the window without deleting the
proceeding.
To add (or update) other proceedings concerning the child(ren) in which the declarant has knowledge:
1. Click the New button in the lower section of the window to add a proceeding. To update/edit an
entry, double-click an existing entry or click it and click the Update button.
2. The Other Proceedings of Which the Declarant has Information window appears.
3. Complete the Nature of Proceeding, Court, State and Location fields.
4. Enter the Status of Proceeding.
5. Select the children affected by the proceeding.
6. Click OK to return to the Other Proceedings form.
Family Law - UCCJEA Declaration
137
When you are finished entering information on the Other Proceedings form, click the Save and
Continue button or the Save and Close button to save your work to this point.
Restraining/Protective Orders Form
Figure 8, Restraining/Protective Order Form
The Restraining/Protective Orders form allows you to enter information on any domestic violence
orders that are now in effect and have an affect on the case at hand. To complete the form, click the
appropriate check box to indicate the type of court that issued the order (Criminal, Juvenile, Family
or Other). The entry fields for the particular type of court will activate. Enter the County/state where
the order was issued. If known, enter the Case No. for the case associated with the order.
Nonparty Form
Figure 9, Nonparty Form
The Nonparty form helps you enter the name and address of nonparties who may have actual physical
custody of the child(ren) or are claiming visitation or custody rights of the child(ren) subject to the action.
To enter the nonparty claiming actual physical custody, visitation or custody rights of the child(ren)
138
ProDoc Software Manual
subject to the action:
1. Click New. The Adding Nonparty Information
138
window appears.
2. Enter the nonparty's name or select it by clicking the Available Persons button and making
your selection from the Select a Person window.
3. In the Type of Claim section, click the appropriate entry (or entries) to describe the nonparty's
type of claim: Has Physical Custody, Claims Custody Rights or Claims Visitation Rights.
4. Enter the nonparty's address in the Address section. If you selected the party with the
Available Persons button, the address you entered previously is automatically entered. In the
Check Affected Children section, select each child affected by clicking the appropriate name.
You can also click a selected name to clear the selection.
5. Click OK to return to the Nonparty form.
6. Repeat the process to add other nonparties. When you are finished, click the Save and
Continue button or the Save and Close button to save your work to this point.
To update/edit a nonparty entry, double-click the name or click the name and click the Update button.
Use the procedures above to edit the information.
To delete a nonparty from the listing, click the name and click the Delete button. On the confirmation
window that appears, click Yes to delete the nonparty or No to return to the Nonparty form without
deleting the nonparty.
Adding or Changing Nonparty Information
Figure 10, Changing Nonparty Information Window
This window allows you to add or update a nonparty's information.
1. Enter the nonparty's name or select it by clicking the Available Persons button and making
your selection from the Select a Person window.
2. In the Type of Claim section, select whether the nonparty Has Physical Custody, Claims
Family Law - UCCJEA Declaration
139
Custody Rights or Claims Visitation Rights by clicking the appropriate checkbox.
3. If you want to keep the address confidential, click the box labeled Address Confidential. If this
box is checked, only "Address Confidential" will be printed on the declaration instead of any
address information you enter.
4. Enter the nonparty's address in the Address section. If you selected the party with the
Available Persons button, the address you entered previously is automatically entered.
5. In the Check Affected Children section, click the name of the children who are affected. You
can also click a selected name to clear the selection.
6. Click OK to return to the Nonparty form. Click Cancel to close the window without saving your
entries.
Other Windows
Selecting a Case
Use the Select a Case window to choose a client
and case file in which to save the information you
input. It lists existing ProDoc clients and all cases
for the clients. You can use it to see and modify
related client/case data and create new clients and
cases.
You can select a case to use by either of the
methods listed below:
·
Double-click a displayed case.
·
Click on a displayed case and then press
the Enter key.
·
Click on a displayed case and then click the
Select Case button.
Figure 11, Select a Case Window
To find a case that's not displayed:
·
Type the first letter(s) of a client's name to jump to that client's entry on the tree. To do this more
than once, use the backspace key to clear your previous letter entries.
·
Use the scroll bar on the right of the form to quickly scroll through the list. You can also click on
any entry on the left and scroll with keyboard page up, page down, and up/down arrow keys.
·
Use the Now Showing: drop down arrow to choose the types of contacts or clients to display.
Cases are grouped under clients, who are grouped in alphabetical order. Categories will be
displayed with type icons of different colors on the window. The default is Active Clients. Other
choices are All Contacts, Closed Contacts, Private Clients and Non-Clients.
·
Use the Hide/Show Cases toggle button to display or hide cases. Likewise, you can click the
or symbols in the client tree to reveal or hide cases.
140
ProDoc Software Manual
Select a Date Window
This window helps you quickly complete date fields. Tools and buttons
on this calendar tool, depicted as Figure 12, include:
·
and
- Click to move back or forward one year.
·
and
- Click to move back or forward one month.
·
and
- Click to move back or forward one week.
·
Use Up and Down arrow keys to move back and forward one
week.
·
Use Left and Right arrow keys to move back and forward one
day.
·
Click Today to move the underline/highlight to today's date.
·
Click on the date to choose it or press the Enter key to choose
the underlined date.
·
Click Close to close the calendar without choosing a date.
Figure 12, Select a Date Window
California Guardianship Inventory & Appraisal
141
California Guardianship Inventory & Appraisal
Getting Started
It's easy to create inventories for your guardianship matters with the Guardianship Inventory &
Appraisal program. This program completely eliminates manual calculations, simplifies your work and
dramatically reduces the time necessary to handle guardianship matters. You need to only list the
necessary information once. ProDoc automatically calculates the value of the estate and prints the
required form and attachments.
Starting the Program
1. Click PowerPacks ®Guardianships ® Inventory & Appraisal.
2. The Select a Case 160 window opens. Select a case by double-clicking a visible case title. You
can also click the title once, then press the Enter key or click the Select Case button. Click the
Help button on the window or click here 160 for detailed help for finding and selecting cases.
3. The Guardianship Inventory & Appraisal program opens to the General tab.
Navigating the Guardianship Inventory & Appraisal Program
There are six tabs across the top of the main program window: General 142 , Minor 144 , Community
Property 146 , Separate Property 148 , View Attachment 1 150 , and View Attachment 2 151 . Each
tab represents a different form. To move from one screen to another, position the cursor over the tab
you want to use and click on it.
You can also use hot keys. Wherever a window, screen or field title shows an underlined character, For
Example, "Primary Attorney", you can navigate to that entry by holding the "Alt" key and pressing
the underlined keyboard character. In the earlier example, pressing Alt + A on your keyboard puts
your cursor in the Primary Attorney field.
Help with using the Guardianship Inventory & Appraisal Program
·
·
·
·
·
·
Click the Help buttons on each window (or press the F1 key).
View or print the ProDoc Software Manual.
View Computer Based Training (CBT) Modules at the ProDoc Website.
Periodic ProDoc user seminars; schedule these at the ProDoc Website.
Call our Customer Support specialists at 1-800-759-5418.
Send email to [email protected].
Main Toolbar
Figure 1, Main Toolbar
The toolbar along the bottom of each of the six major forms consists of the Help, Copy Property To,
Print, Send to Excel, Save and Continue, Save and Close, and Cancel buttons. This toolbar is
always available while you are using the program. The buttons and their actions are discussed below.
Help - Click this button to display the help topic for the form or current window.
Copy Property To - Click this button to copy property data from the current minor to another minor
with whom you wish to share the data. A box opens entitled Minor Selection, listing the names of all
142
ProDoc Software Manual
minors. Select the name of the minor(s) to whom you want to copy assets.
To copy a single asset to another minor, select an asset on the current form, right-click on the asset and
select the minor to receive the asset.
Print - Click this button to print and/or preview form GC-040, Inventory & Appraisal, and form GC-041
attachment forms. A box opens entitled, Minor Selection. Accept the selection of All or select only the
names of minor(s) for whom you want to print inventories.
Send to Excel - Click this button to send all categories and amounts entered in the program to an Excel
spreadsheet. A box opens titled, Minor Selection. Accept the selection of All or select only the names of
minor(s) for whom you wish to export inventory data to Excel spreadsheets.
Save and Continue - Click this button to save the data that has been entered and continue working
with the program.
Save and Close - Click this button to save the data that has been entered and exit the program.
Cancel - Click this button to exit the program without saving the information that you entered during
the current session.
General Form
Figure 2, General Form
The General Form is used to enter information about the minor children, the client(s), guardian(s),
referee, primary attorney, and court.
Navigating through the General Form
California Guardianship Inventory & Appraisal
143
To navigate from one field/button to another, click on the field or button you would like to use. You can
also press the Tab key on your keyboard to move forward to the next entry and press Shift + Tab to
move to the previous entry.
Completing the General Form
Select Minor - Press the Update button. The Minor Names popup window opens and you are prompted
to Add/Change Minor Name and Alias. You can create a separate inventory for each minor. Use the
New, Update, or Delete buttons to add, edit, or delete minor names.
Alias - Enter any other names by which a minor may be known.
Client(s) - To edit the client(s) list for the case, click the Update button in the Client Information
section. The Client Names window appears.. Use the New, Update, or Delete buttons to add, edit, or
delete client names. The option to update or delete a client's name will not be available if the client is in
your ProDoc database; you must use the Client/Case Manager for this. For specific help for these
windows, click the Help button on each window.
Date of Appointment of Guardian(s) - Enter the date in mm/dd/yyyy format. You can also click the
calendar icon
to select the date from a calendar tool. Click Select a Date 161 for detailed help with
this tool. If the guardianship appointment is temporary, click the Temporary guardianship box.
Guardian(s) of the Estate - To edit the guardians list for the case, click the Update button. The
Guardian Names popup window opens where you are prompted to Add or Update the List of
Guardians.
Probate Referee Section - Enter the requested information for the Probate Referee if one is required.
· Is Appointment of a Probate Referee Required? - Click the appropriate Yes or No button.
· If Yes was selected, enter the name of the probate referee in the Name of Referee field.
· If you checked the box for Probate Referee Waived by Court Order, enter the Date of Court
Order in mm/dd/yyyy format or click the calendar icon to use the Select a Date 161 calendar tool.
Attorney Information Section - Enter the Primary Attorney's name and Bar Number in the fields
provided.
Court Information Section - Click the Edit Court Information button to open the Court
Information window. Enter the Case Number and choose the County and Branch. The Street
Address, Mailing Address, City and Zip Code should be automatically completed for you, depending
upon your previous selections. If not, enter the information in the fields provided. Click the Save button
when you are finished to return to the General Form.
When you are finished entering the information on the General Form, click the Save and Continue
button to save your entries and continue working, or click the Save and Close button to save your
entries and close the Guardianship Inventory & Appraisal program.
144
ProDoc Software Manual
Minor Form
Figure 3, Minor Form
The Minor Form is used to enter all basic information about the referees commission, type and extent of
inventory and appraisal, bond situation, and date inventory was signed by the guardian of the estate.
Navigating through the Minor Form
To navigate from one field/button to another, click on the field or button you would like to use. You can
also press the Tab key on your keyboard to move forward to the next entry and press Shift + Tab to
move to the previous entry.
Completing the Minor Form
Descriptions of entry fields and choices required for this form are listed below.
Referee's Commission and Total Appraisal Section
The fields will be subdued and you will not be able to enter data in this section if data entered in the
General Form indicates that a probate referee is not required or is waived by court order.
· Enter the Statutory Commission paid to the probate referee.
· Enter the Expenses Incurred by the probate referee.
· The computer calculates and completes the Total Commission field.
· Enter the Date Signed in mm/dd/yyyy format or click the calendar icon
Date 161 calendar tool.
to use the Select a
California Guardianship Inventory & Appraisal
145
· Enter the amount provided by the probate referee for the Referee's Total Appraisal field for
Attachment 2 property. The amount you enter here will be printed in the applicable field on
the GC-040 form. If the amount entered differs from the amount calculated from your asset
entries, you will be notified when you print the form.
Inventory and Appraisal Section - Click the appropriate button to indicate whether the inventory is
Initial, Partial, Final, or Amended.
·
Select Initial if this is the first inventory and appraisal completed since becoming guardian.
·
If you select Partial, the Partial Appraisal Number field is activated. Enter a numeral
representing the serial number of the appraisal (i.e. "1", "2").
·
Select Final if this is your final inventory and appraisal.
·
If you select Amended, the Date of Superseded Inventory field is activated. Enter the date of
the superseded inventory.
·
If you select Supplemental, it should only contain new information. (For example, to correct the
omission of one or several items that were omitted in the final inventory and appraisal.)
·
Select Reappraisal for Sale if real property is being sold more than one year after the date of
appointment of the guardian.
·
Select Property Tax Certificate if the minor owned California real property and the property
change of ownership certificates have been filed as required. (If the minor owned no California
real property on the date of appoiintment, this button should not be selected.)
Extent of Inventory Section. - Click on the appropriate button to indicate whether the inventory is a
Complete Inventory or a Partial Inventory.
Describe Bond Situation Section - Click the appropriate button to describe the bond situation: Bond
is Waived, Bond Filed, or bond is Deposited in a Blocked Account.
·
If you choose Bond is waived, no further fields need to be completed in this section.
·
If you choose Bond Filed, enter the amount in the Bond Amount field and click the appropriate
button to indicate whether or not the bond amount is sufficient.
·
If you choose Deposited in a Blocked Account, enter both the Deposit Amount and the name
and location of the financial institution holding the deposit in the appropriate fields.
Joint bond to cover all minors - If a joint bond was filed on behalf of all minor's inventories, check the
Joint Bond to cover all minors box.
Date Inventory Signed by Guardian(s) of the Estate - Enter the date the Inventory & Appraisal was
signed by the guardian(s) of the estate in mm/dd/yyyy format or click the calendar icon
Select a Date 161 calendar tool.
to use the
When you are finished entering the information on the Minor Form, click the Save and Continue
button to save your entries and continue working, or click the Save and Close button to save your
entries and close the Guardianship Inventory & Appraisal program.
146
ProDoc Software Manual
Community Property Form
Figure 4, Community Property Form
The Community Property Form is used to enter details regarding estate community property.
Scroll down or click the links to jump to the help section in this topic you want to see:
How Assets Are Displayed
146
Locating Asset Descriptions
Entering Assets
146
147
Using Toolbar Buttons
147
How Assets are Displayed
The information for each asset or property is displayed in three columns: Asset Description, Q
(Quasi-Community Property, identified by a green check mark), and Appraised Value. As you enter
assets, a running total is displayed under the listing, labeled Total Community Assets.
Entries of actual assets are highlighted in yellow.
To view all asset descriptions,move the vertical scroll bar on the right side of the screen. To view only
the main title, Assets, in the Asset Description column, click the
or symbols on the listing to
expand or contract a particular category.
Locating Asset Descriptions
·
Use the scroll bar at the right side of the window to scroll through the list.
·
Click on the top entry of the window,
Assets, and type the first letter of the description you
California Guardianship Inventory & Appraisal
147
wish to locate. Each letter you enter will move the highlight through the list to the next
description beginning with the letter. When it reaches the end, it will start again at the first
matching description.
·
Enter a search word or phrase in the blank field above the Asset Description column and click
Find. The first description title that contains the word or phrase will be highlighted. Each time
you click Find, the next matching asset will be highlighted, and the highlight will continue
through the list of matches, then start again at the first match. If no matches exist, a window will
appear to tell you this.
NOTE:
Searches and keystroke moves start from the point at which the cursor is positioned. If
you want to search from the beginning, you should place the cursor at the top of the Asset
Description list.
Entering Assets
NOTE:
This is a general overview of the steps to enter assets. For specific help on various
types of asset entries, click the Help button on each asset entry screen.
1. Double-click an asset description, right click a description and select New Asset, or click a
description once and click New.
2. A window will appear titled with the description you chose. It will display the entry fields
appropriate for the asset.
3. Complete the displayed fields for the asset. These will vary according to the type of asset you are
entering.
4. Check the box if the asset is a Quasi-Community Property.
5. When you are finished, either click the Add Another button to enter another asset in the same
category or click the OK button to return to the Community Property form. The descriptions
and amounts will be listed here.
6. You may edit an entry by double-clicking it, or by clicking it and clicking the Update button on
the toolbar.
7. You may delete an entry by highlighting it and clicking the Delete button on the toolbar, or
right-clicking an asset entry and clicking Delete Asset.
8. You may copy an entry to other minors by right clicking an entry and selecting Copy Asset. A
Minor Selection window appears and you can select the minor(s) to whom you wish to copy the
asset. Also, you may copy entire lists of assets to another minor by selecting Copy Property To
on the toolbar.
Using Toolbar buttons to work with Assets
First, find and click the line containing the asset. You can now use the toolbar buttons at the bottom of
the window to perform the functions indicated below:
New - Add description, value and any other necessary information to an asset entry in the inventory.
Update - Modify a highlighted asset.
Delete - Remove a highlighted asset.
148
ProDoc Software Manual
Separate Property Form
Figure 5, Separate Property Form
The Separate Property form allows you to enter details regarding the minor's separate property and
the value of the property.
Scroll down or click the links to jump to the help section in this topic you want to see:
How Assets are Displayed
148
Locating Asset Descriptions
Entering Assets
148
149
Using Toolbar Buttons
149
How Assets are Displayed
The information for each asset or property is displayed in columns: Asset Description and Appraised
Value. As you enter assets, a running total is displayed under the listing, labeled Total Separate
Assets.
Entries of actual assets are highlighted in yellow.
You can click the
or
symbols on the listing to expand or contract a particular category.
Locating Asset Descriptions
·
Use the scroll bar at the right side of the window to scroll through the list.
California Guardianship Inventory & Appraisal
149
·
Click on the top entry of the window, Assets, and type the first letter of the description you
wish to locate. Each letter you enter will move the highlight through the list to the next
description beginning with the letter. When it reaches the end, it will start again at the first
matching description.
·
Enter a search word or phrase in the blank field above the Asset Description column and click
Find. The first description title that contains the word or phrase will be highlighted. Each time
you click Find, the next matching asset will be highlighted, and the highlight will continue
through the list of matches, then start again at the first match. If no matches exist, a window will
appear to tell you this.
NOTE: Searches and keystroke moves start from the point at which the cursor is positioned. If you
want to search from the beginning, you should place the cursor at the top of the Asset
Description list.
Entering Assets
NOTE: This is a general overview of steps to enter assets. For specific help on various types
of asset entries, click the Help button on each asset entry screen.
1. Double-click an asset description, right click a description and select New Asset, or click a description
once and click the New button on the toolbar.
2. A window will appear titled with the description you chose. It will display the entry fields appropriate
for the asset.
3. Complete the displayed fields for the asset. These will vary according to the type of asset you are
entering.
4. When you are finished, either click the Add Another button to enter another asset in the same
category or click the OK button to return to the Separate Property Form. The descriptions and
amounts will be listed here.
5. You may edit an entry by double-clicking it, by right-clicking a description and selecting Update
Asset, or by clicking it and clicking the Update button on the toolbar.
6. You may delete an entry by highlighting it and clicking the Delete button on the toolbar, or
right-clicking an asset entry and clicking Delete Asset.
7. You may copy an entry to other minors by right clicking an entry and selecting Copy Asset. A Minor
Selection window appears and you can select the minor(s) to whom you wish to copy the asset. Also,
you may copy entire lists of assets to another minor by selecting Copy Property To on the toolbar.
Using Toolbar Buttons to Work With Assets
First, find and click the line containing the asset. You can now use the toolbar buttons at the bottom of
the window to perform the functions indicated below:
New - Add description, value, and any other necessary information to an asset to the inventory.
Update - Modify a highlighted asset.
Delete - Remove a highlighted asset.
150
ProDoc Software Manual
View Attachment 1 Form
Figure 6, Attachment 1 Property Form
This form is completed automatically as you enter assets. It displays asset descriptions, appraised values
and the total appraised value for the asset types appraised by the guardian that are still held by the
estate at the close of the accounting period. You cannot edit entries on this form.
You can click the
or
symbols on the listing to expand or contract a particular category.
Locating Asset Descriptions
·
Use the scroll bar at the right side of the window to scroll through the list if it is longer than the
viewable area.
·
Click on the top asset entry in the Asset Description column and type the first letter of the
description you wish to locate. Each letter you enter will move the highlight through the list to
the next description beginning with the letter. When it reaches the end, it will start again at the
first matching description.
·
Enter a search word or phrase in the blank field above the Asset Description column and click
Find. The first description title that contains the word or phrase will be highlighted. Each time
you click Find, the next matching asset will be highlighted, and the highlight will continue
through the list of matches, then start again at the first match. If no matches exist, a window will
appear to tell you this.
NOTE: Searches and keystroke moves start from the point at which the cursor is positioned. If you
want to search from the beginning, you should place the cursor at the top of the Asset
Description list.
California Guardianship Inventory & Appraisal
151
View Attachment 2 Form
Figure 7, Attachment 2 Form
This form is completed automatically as you enter assets. It displays asset descriptions, appraised values
and the total appraised value for the asset types appraised by the Probate Referee that are still held by
the estate at the close of the accounting period. You cannot edit entries on this form.
You can click the
or
symbols on the listing to expand or contract a particular category.
Locating Asset Descriptions
·
Use the scroll bar at the right side of the window to scroll through the list if it is longer than the
viewable area.
·
Click on the top asset entry in the Asset Description column and type the first letter of the
description you wish to locate. Each letter you enter will move the highlight through the list to
the next description beginning with the letter. When it reaches the end, it will start again at the
first matching description.
·
Enter a search word or phrase in the blank field above the Asset Description column and click
Find. The first description title that contains the word or phrase will be highlighted. Each time
you click Find, the next matching asset will be highlighted, and the highlight will continue
through the list of matches, then start again at the first match. If no matches exist, a window will
appear to tell you this.
NOTE: Searches and keystroke moves start from the point at which the cursor is positioned. If you
want to search from the beginning, you should place the cursor at the top of the Asset
152
ProDoc Software Manual
Description list.
Asset Description Categories
Attachment 1 Property Overview
Asset description categories which qualify as Attachment 1 Property are shown below. Since the entry
fields vary considerably across these asset windows, please click the Help button on each asset window
for detailed help with entering information for the asset.
Cash
Check Issued Before Appointment of Guardian
Check Issued After Appointment of Guardian
Bank Accounts
Certificates of Deposit
Money Market Account
Life or Accident Policies Paid to Estate in Lump Sum
Retirement Plans or Annuities Paid to Estate in Lump Sum
Other Attachment 1 Property
Figure 8, Certificate of Deposit
Button Descriptions and Functions
Help - Click this button to see help on completing specific asset windows.
Add Another - This button will only appear when you are adding a new asset. Click this button to
add another asset of the same type.
OK - When you are finished adding assets of this type, click this button to add the asset information
to the Guardianship Inventory & Appraisal program and close the window.
Cancel - Click this button to close the window. Your entries will not be saved.
Real Estate Overview
Asset description categories in the Real Estate listing are shown below. Click Entering Asset
Information 153 or scroll down to see general help for entering information for assets in this listing.
Click the Help button on each asset window to see detailed help for entering information for the asset.
California Guardianship Inventory & Appraisal
153
Vacant Land
Agricultural Land
Single Family Residence
Condominium
Leasehold Interest
Stock Cooperatives
Residential Income Producing Property
Commercial or Industrial Property
Life Estate
Remainder and Reversionary Interest
Time Share Interest
Other Real Estate
If a real estate asset doesn't fit into any other category, enter the asset in the Other Real Estate
category.
Entering Asset Information. The asset description window opens with three fields for entering data:
the Property Address field, the Appraised Value field, and the Property Description field. If you
are entering assets on the Community Property Form, it also contains a check box for selecting
Quasi-Community Property.
154
ProDoc Software Manual
Figure 9, Example Single-Family Residence
Click the Help button for detailed help with entering information for each asset.
Property Address - Enter the physical address of the property in line form (i.e., 12 Mockingbird
Street, Berkeley, CA 94704).
Appraised Value (from referee) - Enter the referee-appraised value of the real estate or interest.
Quasi-Community Property - This check box is only displayed when you enter assets on the
Community Property form. Click the box if the real estate qualifies as Quasi-Community Property.
A green check mark will be displayed in the Q column for the asset on property forms after you
complete the asset entry. You can remove the check mark by clicking the box again.
Property Description - Enter the complete legal description of the asset. Click the Help button to
see a detailed description of the information required for the field.
Button Descriptions and Functions
Help - Click this button to see help on completing specific Real Estate asset windows.
Add Another - This button will only appear when you are adding a new asset. Click this button to
add another asset of the same type.
OK - When you are finished adding assets of this type, click this button to add the asset information
to the Guardianship Inventory & Appraisal program and close the window.
Cancel - Click this button to close the window. Your entries will not be saved.
California Guardianship Inventory & Appraisal
155
Business Interests Overview
Asset description categories in the Business Interests listing are shown below. Click Entering Asset
Information 155 or scroll down to see general help for entering information for assets in this listing.
Click the Help button on each asset window to see detailed help for entering information for the asset.
Closely Held Corporation
Limited Partnerships
General Partnerships
Sole Proprietorships
Limited Liability Companies
Other Business
If a business asset doesn't fit into any other category, enter the asset in the Other Business category.
Entering Asset Information
The window used for business interests assets contains two fields. If you are entering assets on the
Community Property form, it also contains a check box.
Figure 10, Limited Partnership Example
Description - Enter a description of the business interest. Click the Help button to see a detailed
description of required entries for each business interest.
Appraised Value (from referee) - Enter the referee-appraised value of the business interest.
Quasi-Community Property - This check box is only displayed when you enter assets on the
Community Property form. Click the box if the business interest qualifies as Quasi-Community
Property. A green check mark will be displayed in the Q column for the asset on property forms after
you complete the asset entry. You can remove the check mark by clicking the box again.
Button Descriptions and Functions
Help - Click this button to see help on completing specific Business Interests asset windows.
Add Another - This button will only appear when you are adding a new asset. Click this button to
add another asset of the same type.
OK - When you are finished adding assets of this type, click this button to add the asset information
156
ProDoc Software Manual
to the Guardianship Inventory & Appraisal program and close the window.
Cancel - Click this button to close the window. Your entries will not be saved.
Tangible Personal Property Overview
Asset description categories in the Tangible Personal Property listing are shown below. Click
Entering Asset Information 156 or scroll down to see general help for entering information for assets in
this listing. Click the Help button on each asset window to see detailed help for entering information for
the asset.
Furniture, Furnishings and Miscellaneous
Jewelry
Coins or Stamps
Work of Art
Mobile Homes
Motor Vehicles
Boat, Airplane
Livestock and Breeding Animals
Other Personal Property
If a personal property asset doesn't fit into any other category, enter the asset in the Other Personal
Property category.
Entering Asset Information
The window used for personal property assets contains two fields. If you are entering assets on the
Community Property form, it also contains a check box.
Figure 11, Example Tangible Personal Property Entries
Description - Enter a description of the property. Click the Help button to see a detailed description
of required entries for each type of property.
Appraised Value (from referee) - Enter the referee-appraised value of the personal property asset.
Quasi-Community Property - This check box is only displayed when you enter assets on the
Community Property form. Click the box if the personal property asset qualifies as
Quasi-Community Property. A green check mark will be displayed in the Q column for the asset on
property forms after you complete the asset entry. You can remove the check mark by clicking the box
again.
Button Descriptions and Functions
California Guardianship Inventory & Appraisal
157
Help - Click this button to see help on completing specific Tangible Personal Property asset
windows.
Add Another - This button will only appear when you are adding a new asset. Click this button to
add another asset of the same type.
OK - When you are finished adding assets of this type, click this button to add the asset information
to the Guardianship Inventory & Appraisal program and close the window.
Cancel - Click this button to close the window. Your entries will not be saved.
Debt or Promissory Notes Owed to the Minor
Figure 12, Debt or Promissory Note Owed to the Minor
To enter a debt or promissory note owed to the minor, or to update existing asset descriptions in this
category, follow the steps below:
1. Enter a Description in the designated field. Include the terms of the note, such as the date of the
debt or note and the final date due, the names of the borrowers, the original amount borrowed,
the payment amount and dates of scheduled payments, the interest rate, and any security for the
loan. If real property secures the loan, include either the Assessor's Parcel Number or the legal
description of the property. For example: "Promissory note for an unsecured loan made to John
and Mary Doe on May 23, 2006, in the original principal amount of $10,000.00, earning interest at
the rate of 8%, due in a single payment of principal and accrued interest on May 23, 2007."
2. Enter the Value of the debt or note. The program will convert whole dollar entries to currency
format for you.
3. Enter the amount of any Accrued Interest for the debt or note that had accrued as of the date of
appointment of the guardian but had not yet been credited.
4. If you are adding/updating an asset on the Community Property form, the Quasi-Community
Property check box is displayed. Click the box if the asset qualifies as Quasi-Community
Property. A green check mark will then be displayed in the Q column for the asset on the
Community Property form after you complete the asset entry. You can remove the check mark
by clicking the box again.
Button Descriptions and Functions
158
ProDoc Software Manual
Help - Click this button to see help on completing the asset window.
Add Another - This button will only appear when you are adding a new asset. Click this button to
add another asset of the same type.
OK - When you are finished adding assets of this type, click this button to add the asset information
to the Guardianship Inventory & Appraisal program and close the window.
Cancel - Click this button to close the window. Your entries will not be saved.
Securities Overview
Asset description categories in the Securities listing are shown below. Click Entering Asset
Information 158 or scroll down to see general help for entering information for assets in this listing. Click
the Help button on each asset window to see detailed help for entering information for the asset.
Brokerage Accounts
Common and Preferred Stocks
Mutual Funds
Stock Options
Corporate, State and Municipal Bonds
United States Treasury Notes and Bonds
Ginnie Mae (GNMA), Fannie Mae (FNMA), and Freddie Mac (FHLMC) Security
United States Savings Bonds
Other Securities
If a Securities asset doesn't fit into any other category, enter the asset in the Other Securities
category.
Entering Asset Information
The window used for Securities assets contains two fields. If you are entering assets on the Community
Property form, it also contains a check box.
Figure 13, US Savings Bond
California Guardianship Inventory & Appraisal
159
Description - Enter a description of the security. Click the Help button to see a detailed description
of required entries for each type of security.
Appraised Value (from referee) - Enter the referee-appraised value of the security.
Quasi-Community Property - This check box is only displayed when you enter assets on the
Community Property form. Click the box if the security qualifies as Quasi-Community Property. A
green check mark will be displayed in the Q column for the asset on property forms after you
complete the asset entry. You can remove the check mark by clicking the box again.
Button Descriptions and Functions
Help - Click this button to see help on completing specific Securities asset windows.
Add Another - This button will only appear when you are adding a new asset. Click this button to
add another asset of the same type.
OK - When you are finished adding assets of this type, click this button to add the asset information
to the Guardianship Inventory & Appraisal program and close the window.
Cancel - Click this button to close the window. Your entries will not be saved.
Other Intangible and Unscheduled Property
This window helps you enter assets which do not fit into any other listed category. To enter new assets or
update existing asset descriptions in this category, follow the steps below:
1. Enter a Description of the asset in the designated field. Include a full description of intangible
property not included in any of the previously described categories that was owned by the minor.
For example: "Copyright and future royalty stream from 2001 book, 'The Life and Times of J.J.
Schmidt', ISBN no. 1234567890, published by Narcissus Press."
2. Enter the Appraised Value (from referee) of the property. The program will convert whole
dollar entries to currency format for you.
3. If you are adding/updating an asset on the Community Property form, the Quasi-Community
Property check box is displayed. Click the box if the asset qualifies as Quasi-Community
Property. A green check mark will then be displayed in the Q column for the asset on the
Community Property form after you complete the asset entry. You can remove the check mark
by clicking the box again.
Button Descriptions and Functions
Help - Click this button to see help on completing the asset window.
Add Another - This button will only appear when you are adding a new asset. Click this button to
add another asset of the same type.
OK - When you are finished adding assets of this type, click this button to add the asset information
to the Guardianship Inventory & Appraisal program and close the window.
Cancel - Click this button to close the window. Your entries will not be saved.
160
ProDoc Software Manual
Other Windows
Selecting a Case
Use the Select a Case window to choose a
client and case file in which to save the
information you input. It lists existing
ProDoc clients and all cases for the clients.
You can use it to see and modify related
client/case data and create new clients and
cases.
You can select a case to use by either of the
methods listed below:
·
Double-click a displayed case.
·
Click on a displayed case and then
press the Enter key.
·
Click on a displayed case and then
click the Select Case button.
Figure 14, Selecting a Case Window
To find a case that's not displayed:
·
Type the first letter(s) of a client's name to jump to that client's entry on the tree. To do this more
than once, use the backspace key to clear your previous letter entries.
·
Use the scroll bar on the right of the form to quickly scroll through the list. You can also click on
any entry on the left and scroll with keyboard page up, page down, and up/down arrow keys.
·
Use the Now Showing: drop down arrow to choose the types of contacts or clients to display.
Cases are grouped under clients, who are grouped in alphabetical order. Categories will be
displayed with type icons of different colors on the window. The default is Active Clients. Other
choices are All Contacts, Closed Contacts, Private Clients and Non-Clients.
·
Use the Hide/Show Cases toggle button to display or hide cases. Likewise, you can click the
symbols in the client tree to reveal or hide cases.
or
California Guardianship Inventory & Appraisal
161
Select a Date Window
This window helps you quickly complete date fields. Tools and buttons
on this calendar tool, depicted as Figure 15, include:
·
and
- Click to move back or forward one year.
·
and
- Click to move back or forward one month.
·
and
- Click to move back or forward one week.
·
Use Up and Down arrow keys to move back and forward one
week.
·
Use Left and Right arrow keys to move back and forward one
day.
·
Click Today to move the underline/highlight to today's date.
·
Click on the date to choose it or press the Enter key to choose
the underlined date.
·
Click Cancel to close the calendar without choosing a date.
Figure 15, Select a Date Window
162
ProDoc Software Manual
Guardianship - UCCJEA Declaration
Getting Started
The California Guardianship - UCCJEA (Uniform Child Custody Jurisdiction and Enforcement
Act) Declaration program is designed to assist you with entering the current address of each minor
child, as well as the five year residential history of each child. As a part of the declaration, you can enter
additional information regarding ancillary matters which affect the minor children. Finally, you can list
all third-parties claiming visitation and/or custody rights to the children.
This feature allows you to:
·
Enter information about the parties and the minor children that are affected by the proceeding.
·
Enter the current address of each minor child, as well as the five year residential history of each
child.
·
Enter the names and addresses of nonparties who may have actual physical custody of the
child(ren), or are claiming visitation and/or custody rights to the minor children.
·
Enter other proceedings which concern the minor children affected by this suit in which any
declarant participated or had knowledge.
·
Complete and print the UCCJEA Declaration.
Starting the Program
To open the UCCJEA Declaration program:
1. Click PowerPacks ® Guardianships ® UCCJEA Declaration.
2. The Select a Case 172 window opens. Select a case by double-clicking a visible case title. You
can also click the title once, then press the Enter key or click the Select Case button. Click the
Help button on the window for detailed help for finding and selecting cases.
3. The UCCJEA Declaration program opens at the General
163
Form.
Hot Keys
This program has built-in hot key navigation. Wherever a window, screen or field title shows an
underlined character, i.e., "Respondent", you can navigate to that entry by holding the "Alt" key and
pressing the underlined keyboard character. In the earlier example, pressing Alt + O on your keyboard
puts your cursor in the Respondent field.
UCCJEA Toolbar
Figure 1, UCCJEA Toolbar
The toolbar along the bottom of the UCCJEA Declaration program consists of the Help, Print, Save
and Continue, Save and Close, and Cancel buttons. The buttons and their actions are discussed
below.
Help - Click this button to see help for the form you are viewing.
Print - Click this button to generate the UCCJEA Declaration form (GC-120) in ProDoc and print it.
The Print Preview window appears, asking if you want to preview the document before printing it.
Click the Yes button to preview the document before printing it. Click the No button to print the
Guardianship - UCCJEA Declaration
163
document without previewing it.
Save and Continue - Click this button to save your work and continue working in the program.
Save and Close - Click this button to save your work and close the program.
Cancel - Click this button to exit the program. A caution window appears, telling you that canceling will
cause you to lose all information you entered since the last save, and asking you if you want to continue.
To return to the program to save your work, click No. If you do not want to save your work, click Yes.
General Form
Figure 2, General Form
To complete the General Form, perform the following steps:
1. In the Case Information section:
a. The client you selected when you opened the program appears in the Client(s) field. If you
wish to add additional client name(s), click the Add button. The Add Client window appears.
Add a client name and click OK. To add an additional client name, click the Add button
again.
b. If you wish to change a client name, highlight the client name to change and press the
Update button. The Edit Client window appears. Enter your changes and click OK.
c.
You can also delete a client name with the Delete button (a confirmation popup window will
appear).
d. Enter the primary attorney's name in the Primary Attorney field and enter that attorney's
Bar Number in the indicated field.
e. Enter the Case Name. This can be anything you choose, such as the petitioner's name or
declaration type. For example, "Guardianship for Jack Smith and Jackie Smith."
f.
Select the Short Title field. The information in the Case Name field is automatically
duplicated here. You can edit this to anything you choose.
NOTE:
After information is automatically entered from the Case Name field to the
Short Title field (as in 1.e. and 1.f., above), you can edit either the Case Name
or the Short Title field without affecting the other field, so long as the Short
Title field is not blank.
164
ProDoc Software Manual
2. In the section labeled Is Declarant's Address Confidential?, click the appropriate answer.
3. In the Court Information section, click the Edit Court Information button. Enter the case
number, county, branch, street and mailing address. The address fields are normally completed
automatically depending upon county and branch entries.
When you have completed the General Form, click the Save and Continue or the Save and Close
button to save your work to this point.
Children Form
Figure 3, Children Form
The Children Form lists the children that are affected by the proceeding. You can enter the current
address of each child, as well as the five year residential history of each child. We suggest you enter the
oldest child's name and information first, as the initial child.
This topic contains specific help on Children Form entries and an overview of the process of completing
related windows. For detailed help on the windows you use while completing the Children Form, click
the Help button on each window. To see help for the windows in this manual, click the links in this
section or continue scrolling to see help for the windows in the order that the windows appear.
Adding Children's Names
To add a child to the list of children affected by the proceeding, perform the following steps:
1. Click on the Check if all children lived at the same address(es) for the previous five
years check box if the statement applies.
a. When this box is checked, any child entered after the initial child automatically lists the same
addresses as the initial child.
b. If you do not check the box labeled, Check if all children lived at the same address(es)
for the previous five years, you will need to enter the addresses for each child separately.
2. Click the New button. The Adding Child's Address Information window appears.
Changing Child's Address Information
To update a child's information, do any one of the following at the Children Form to open a window to
Guardianship - UCCJEA Declaration
165
update the information:
·
Double-click the child's name.
·
Right-click the child's name and click Update on the menu that appears.
·
Click the name and click the Update button.
To delete a child from the listing, click the child's name at the Children Form and click the Delete
button, or right-click the child's name and click Delete on the menu that appears. On the confirmation
window that appears, click Yes to delete the child or No to return to the Children form without deleting
the child.
Adding/Changing Child's Information
Figure 4, Adding Child's Address Information Window
This window is used to add the initial child and that child's residential history when you have selected
the check box on the Children Form labeled, Check if all children lived at the same address(es)
for the previous five years. If you did not check this box, will have to enter the addresses of each child
separately (each time using this window).We suggest you enter the oldest child's name and information
first as the initial child. Figure 4 depicts the window when it is used to add an initial child's information.
Addresses are listed with the present address listed first, followed by previous addresses and the
inclusive dates lived at each address.
To complete entries on this window, perform the following steps:
1. Enter a Child's Name.
2. Enter the child's Date of Birth in mm/dd/yyyy format, or click the calendar icon and choose the
date with the Select a Date 173 window.
3. Enter the child's Place of Birth (City, State).
4. In the Sex section, click the appropriate button for Male or Female.
5. Click OK to return to the Children Form or, if you have additional names to add, click Next
166
ProDoc Software Manual
Child. A warning box appears asking, "Do you wish to add another child to the UCCJEA
Declaration?" Click Yes and another Adding Child's Address Information window appears.
Click No and you are returned to the Adding Child's Address Information window in which
you just added a child's information. Click OK when you have entered the last child's information
to save and return to the Children Form.
6. Select the top entry (the name of the initial child), and click Update. The Changing Child's
Address Information window appears. Click here 166 to go to help in completing this form
7. If you want to add more addresses for the child, click the Add Another button.
When you finish entering the addresses, click OK. Click Cancel to close the window without saving your
entries.
Button Descriptions and Functions
Previous Child - Click this button to display the window's information for the previous child on the list.
You can now add, update or delete addresses for this child. If you are currently working with the first
child on the list, this button will be disabled.
Next Child - Click this button to display the window's information for the next child on the list. You can
now add, update or delete addresses for this child. If you are currently working with the last child on the
list, a dialog window will appear to ask if you wish to add another child. Click Yes to do so or No to close
the window.
New - Click this button to add an address for the listed child. This choice also appears if you right-click
anywhere inside a list box.
Update - Click this button to update an address for the listed child. You can also double-click an address
entry to update it. This choice also appears if you right-click a child's address entry.
Delete - Click this button to delete the highlighted address for the listed child. This choice also appears
if you right-click a child's address entry.
OK - Click this button to enter the information on the Children Form and close the window.
Cancel - Click to close the window and return to the Children Form. Your entries will not be saved.
Child's Address
This window is used to add address information for a minor child. It also allows you to update a previous
entry. To complete the entries on this window, perform the following steps:
Guardianship - UCCJEA Declaration
167
Figure 5, Changing Child's Address Information (Initial Entry)
1. At the Changing Child's Address Information window, click the New button at the bottom of
the Address for [child's name] section. The Adding Child's Address window appears.
2. Enter the Begin Date and End Date in the corresponding fields, or click the calendar button
and choose the date with the Select a Date
173
window.
Figure 6, Adding Child's Address window
3. If you want to keep any addresses confidential, click the box labeled Address Confidential. You
will need to complete the City and State fields at a minimum. If desired, you can enter all
address fields. If the box is checked, these fields will be displayed on your declaration as follows,
regardless of whether or not you enter the street address and zip code:
a.
Most current address: Your printed declaration will only show "Address Confidential" for that
address.
b.
Other address: Your printed declaration will show "Address Confidential" as the street
address, and it will also display the entered city and state.
168
ProDoc Software Manual
4. Enter the child's addresses for the past five years in the Street, City, State and Zip fields. You
can also click the browse button
next to the Street field to choose previously entered
addresses.
5. On the right side of the window, click the New button to add the current address of each person
the child lived with during the time span. The Current Address window appears. Click here
168 for help completing the Current Address window.
Person Child Lived With
Figure 7, Current Address Window
This window is used to add a person who lived with the child during a particular time span. It also allows
you to update a previous entry. To complete the entries on this window, perform the following steps:
1.
You can click the Available Persons button. The Select a Person window appears and you can
quickly copy information for persons you've already entered into the program, or type the entries
in the fields.
2.
To keep this person's current address confidential, check the Address Confidential box, then
complete the mandatory Person Lived With and Relationship fields. If desired, enter the
address fields. Whether or not you enter the address, it will be displayed on your printed
declaration as Address Confidential.
3.
If there is no need to keep the address confidential, leave the Address Confidential box
unchecked and complete all entry fields. The person's current address information should be
entered. If the Address Confidential box is not checked, the full address will be displayed on your
printed declaration.
4.
Click the OK button, or click the Cancel button to close the window without saving your entries.
NOTE: If the person with whom the child lived is your client and you change the person's
name or address here, you should make the same changes to the client's information
in the Client/Case Manager. There is a possibility that your client will be listed
twice in the available persons list if you enter information that is different from the
information entered in the Client/Case Manager.
Guardianship - UCCJEA Declaration
169
Other Proceedings Form
Figure 8, Other Proceedings Form
The Other Proceedings Form lists other relevant proceedings concerning the minor child(ren) affected
by this suit in which any declarant was involved, either by participation or by knowledge.
Select the upper New or Update buttons to complete the Proceeding In Which Any Declarant
Participated section fields, and select the lower New or Update buttons to complete the Proceeding
Of Which Any Declarant Has Knowledge section fields. If there is a single client (declarant) listed on
the General Form, the titles of these section fields are: Proceedings In Which Declarant
Participated and Other Proceedings In Which Declarant Has Knowledge.
Restraining/Protective Orders Form
Figure 9, Restraining/Protective Orders Form
170
ProDoc Software Manual
The Restraining/Protective Orders form allows you to enter information on any current domestic
violence orders that affect or are related to the case at hand. To complete the form, click the appropriate
check box to indicate the type of court that issued the order (Criminal, Juvenile, Family, or Other).
The entry fields for the particular type of court will activate. Enter the County/state where the order
was issued. If known, enter the Case No. for the case associated with the order.
Nonparty Form
Figure 10, Nonparty Form
The Nonparty Form helps you enter names and addresses of nonparties who may have physical custody
of the child(ren) or are claiming visitation or custody rights subject to the action.
To enter the nonparty claiming actual physical custody, visitation or custody rights to the child(ren)
subject to the action, perform the following steps:
1.
Click New. The Adding Nonparty Information
2.
Enter the nonparty's name or select it by clicking the Available Persons button and making
your selection from the Select a Person window.
3.
In the Type of Claim section, click the appropriate entry (or entries) to describe the nonparty's
type of claim: Has Physical Custody, Claims Custody Rights, or Claims Visitation Rights.
4.
If you want to keep the address confidential, click the box labeled Address Confidential. If this
box is checked, only "Address Confidential" will be printed on the declaration instead of any
address information you enter.
5.
Enter the nonparty's address in the Address section. If you selected the party with the
Available Persons button, the address you entered previously is automatically applied.
6.
In the Check Affected Children section, select each child affected by clicking the appropriate
name. You can also click a selected name to clear the check box.
7.
Click OK to save the information and return to the Nonparty Form.
8.
Repeat the process to add other nonparties. When you are finished, click the Save and
Continue button or the Save and Close button to save your work to this point.
171
window appears.
To update/edit a nonparty entry, double-click the name from the Select a Person window or click the
name at the Nonparty Form window and click the Update button. Use the procedures above to edit
Guardianship - UCCJEA Declaration
171
the information.
To delete a nonparty from the listing, click the name and click the Delete button. On the confirmation
window that appears, click Yes to delete the nonparty or No to return to the Nonparty Form without
deleting the nonparty.
Adding or Changing Nonparty Information
Figure 11, Changing Nonparty Information Window
This window allows you to add or update a nonparty's information. If you selected New, the title of this
window is Adding Nonparty Information. If you selected Update, the title of this window is
Changing Nonparty Information. To complete this window, perform the following steps:
1.
Enter the nonparty's name or select it by clicking the Available Persons button and making your
selection from the Select a Person window.
2.
In the Type of Claim section, select whether the nonparty Has Physical Custody, Claims
Custody Rights, or Claims Visitation Rights by clicking the appropriate check box.
3.
If you want to keep the address confidential, click the box labeled Address Confidential. If this
box is checked, only "Address Confidential" will be printed on the declaration instead of any
address information you enter.
4.
Enter the nonparty's address in the Address section. If you selected the party with the
Available Persons button, the address you entered previously is automatically entered.
5.
In the Check Affected Children section, click the name of the children who are affected. You
can also click a selected name to clear the selection.
6.
Click OK to return to the Nonparty Form. Click Cancel to close the window without saving
your entries.
172
ProDoc Software Manual
Other Windows
Selecting a Case
Use the Select a Case window to choose a client
and case file in which to save the information you
input. It lists existing ProDoc clients and all cases
for the clients. You can use it to see and modify
related client/case data and create new clients and
cases.
You can select a case to use by either of the
methods listed below:
·
Double-click a displayed case.
·
Click on a displayed case and then press
the Enter key.
·
Click on a displayed case and then click the
Select Case button.
Figure 12, Select a Case Window
To find a case that's not displayed:
·
Type the first letter(s) of a client's name to jump to that client's entry on the tree. To do this more
than once, use the backspace key to clear your previous letter entries.
·
Use the scroll bar on the right of the form to quickly scroll through the list. You can also click on
any entry on the left and scroll with keyboard page up, page down, and up/down arrow keys.
·
Use the Now Showing: drop down arrow to choose the types of contacts or clients to display.
Cases are grouped under clients, who are grouped in alphabetical order. Categories will be
displayed with type icons of different colors on the window. The default is Active Clients. Other
choices are All Contacts and Cases, Closed Clients, Private Clients and Non-Clients.
·
Use the Hide/Show Cases toggle button to display or hide cases. Likewise, you can click the
or symbols in the client tree to reveal or hide cases.
Guardianship - UCCJEA Declaration
173
Select a Date Window
This window helps you quickly complete date fields. Tools and buttons on
this calendar tool, depicted as Figure 13, include:
·
and
- Click to move back or forward one year.
·
and
- Click to move back or forward one month.
·
Figure 13, Select a Date Window
and
- Click to move back or forward one week.
·
Use Up and Down arrow keys to move back and forward one
week.
·
Use Left and Right arrow keys to move back and forward one
day.
·
Click Today to move the underline/highlight to today's date.
·
Click on the date to choose it or press the Enter key to choose the
underlined date.
·
Click Close to close the calendar without choosing a date.
174
ProDoc Software Manual
Guardianship Accounting
Getting Started
It's easy to produce an estate accounting for your guardianship matters with the Guardianship
Accounting program. This program completely eliminates manual calculations, simplifies your work
and dramatically reduces the time necessary to handle guardianship matters. You need to only list the
necessary information once. ProDoc automatically calculates the value of the estate and prints the
required forms and attachments.
Starting the Program
1.
Click PowerPacks ®Guardianships ® Accounting.
2.
The Select a Case 206 window opens. Select a case by double-clicking a visible case title. You can
also click the title once, then press the Enter key or click the Select Case button. Click the Help
button on the window or click here 206 for detailed help for finding and selecting cases.
3.
The Guardianship Accounting program opens to the General tab.
Navigating the Guardianship Accounting Program
There are nine tabs across the top of the main program window: General 176 , Begin Comm Property
177 , Begin Sep Property 181 , Charges 183 , Credits 187 , End Comm Property 191 , End Sep
Property 193 , Changes in Asset 195 , and Liabilities 249 . Each tab represents a different form. To
move from one form to another, position the cursor over the tab you want to use and click on it.
The tabs labeled Begin Comm Property and End Comm Property are abbreviations for Beginning
Community Property and Ending Community Property. In like manner, the tabs labeled Begin
Sep Property and End Sep Property are abbreviations for Beginning Separate Property and
Ending Separate Property.
You can also use hot keys. Wherever a window, screen or field title shows an underlined character, i.e.,
"Case Number", you can navigate to that entry by holding the "Alt" key and pressing the underlined
keyboard character. In the earlier example, pressing Alt + a on your keyboard puts your cursor in the
Case Number field.
Help With Using the Guardianship Accounting Program
·
·
·
·
·
·
Click the Help buttons on each window (or press the F1 key).
View or print the ProDoc Software Manual.
View Computer Based Training (CBT) Modules at the ProDoc Website.
Periodic ProDoc user seminars; schedule these at the ProDoc Website.
Call our Customer Support specialists at 1-800-759-5418.
Send email to [email protected].
Main Toolbar
Figure 1, Main Toolbar
The toolbar along the bottom of each of the nine major forms consists of the Help, Copy Property To,
Print, Send to Excel, Save and Continue, Save and Close, and Cancel buttons. This toolbar is
always available while you are using the program. The buttons and their actions are discussed below.
Guardianship Accounting
175
Help - Click this button to display the help topic for the form or the current window.
Copy Property To - Click this button to copy asset data, credits, and charges from the current minor to
another minor with whom you wish to share the data. A box opens titled Minor Selection, displaying
the names of all minors, and the message, Select minor(s) For Whom You Want To Copy
Accounting Information. Accept the selection of all minors or select only the names of minor(s) for
whom you want to copy the accounting information. A box titled Copy Complete appears with the
message, All accounting information has been successfully copied from [minor name] to the
minor(s) you selected.
Print - Click this button to print and/or preview form GC-400/GC-405 accounting forms. Here is the
sequence of events after pressing the Print button:
1. A box opens titled Minor Selection appears with the message, Select Minors For Whom You
Want To Print The Accounting. Accept the selection of all or select only the names of minor(s)
for whom you want to print the accounting.
2. A box opens titled Select Type of Accounting with the caption, Type of Accounting for
[Minor Name]. Select Standard Account or Simplified Account and click OK.
If you selected Simplified Accounting a message box may appear titled Confirm with the
message, You have chosen to print a Simplified Accounting, but we have found that you
may have met the Standard Accounting filing requirements. Are you sure that you
want to print the Simplified Account? Click Yes and the Simplified Accounting form prints.
Select No and you are returned to the Select Type of Accounting decision box described in Step
2.
3. A box opens titled Preview Standard Account and the message, Do you want to preview
this form? Click Yes to view the form; click No and the forms are sent to your default printer.
4. After the accounting forms are sent to the printer, a box appears titled Report Progress, with
the message, This is a complex form which will take some time to Complete. The actual
time will depend on the speed of your computer and your free memory available.
Send to Excel - Click this button to send all categories and amounts entered in the program to an Excel
spreadsheet.
1. A box opens titled Minor Selection. Accept the selection of All or select only the names of
minor(s) for whom you wish to export inventory data to Excel spreadsheets and click OK.
2. A Save CSV File window appears. Accept the name of the minor you selected (followed by a
filename extension of .csv) as the filename to be saved or select any filename you wish, but keep
the .csv filename extension. Click Save to save your CSV (comma separated values) file.
3. A Microsoft Excel window opens with the CSV spreadsheet displayed.
Save and Continue - Click this button to save the data that has been entered and continue working
with the program.
Save and Close - Click this button to save the data that has been entered and exit the program.
Cancel - Click this button to exit the program without saving the information that you entered during
the current session.
176
ProDoc Software Manual
General Form
Figure 2, General Form
This form collects name(s) of minor child(ren), case number, accounting period dates, type of accounting,
and accounting number information. A separate Summary Section presents totals of assets on hand at
the beginning of the inventory, totals of property received or disbursed during the inventory period, and
lastly, the totals of assets on hand at the end of the accounting period. This section presents a summation
of the information that you have entered on all of the forms. This section is completed automatically as
you enter information into all of the remaining program forms. You cannot edit entries on this form.
To complete the General Form, perform the following steps:
1. Select Minor - Press the Update button. The Minor Names popup window opens and you are
prompted to Enter the names of all minors. You may create a separate accounting for
each minor. Use the New, Update, or Delete buttons to add, edit, or delete minor names. The
Add Minor, Update Minor Name and Alias, or Confirm Delete window appears, where you
can add, update or delete the names of minors and any aliases by which they are known.
2. Case Number: Enter the case number for this minor child.
3. In the General Accounting Information of [Minor Name] section, enter the Opening Date
and Closing Date of the accounting period. Click the calendar icon
207 from a pop-up calendar.
to easily Select a Date
4. Enter the Type of Accounting you are performing (Interim or Final) by checking the
appropriate button.
5. Enter the Accounting Number.
Guardianship Accounting
177
Beginning Community Property Form
Figure 3, Beginning Community Property Form
The Beginning Community Property Form collects community property asset information as of the
beginning date of the accounting period.
Scroll down or click the links to jump to the help section in this topic you want to see:
How Assets Are Displayed
177
Locating Asset Descriptions
Entering Assets
177
178
Importing Assets
179
Using Toolbar Buttons
181
How Assets Are Displayed
The information for each asset or property is displayed in four columns: Asset Description, Q
(Quasi-Community Property, identified by a green check mark), Estimated Market Value, and Carry
Value.
Entries of actual assets are highlighted in yellow.
You can click the
or
symbols on the listing to expand or contract a particular category.
Locating Asset Descriptions
·
Use the scroll bar at the right side of the window to scroll through the list.
178
ProDoc Software Manual
·
Click on the top entry of the window, Assets, and type the first letter of the description you
wish to locate. Each letter you enter will move the highlight through the list to the next
description beginning with the letter. When it reaches the end, it will start again at the first
matching description.
·
Enter a search word or phrase in the blank field above the Asset Description column and click
Find. The first description title that contains the word or phrase will be highlighted. Each time
you click Find, the next matching asset will be highlighted, and the highlight will continue
through the list of matches, then start again at the first match. If no matches exist, a window will
appear to tell you this.
NOTE:
Searches and keystroke moves start from the point at which the cursor is positioned.
If you want to search from the beginning, you should place the cursor at the top of
the Asset Description column.
Entering Assets
This procedure applies to the following forms:
· Beginning Community Property Form
· Beginning Separate Property Form.
· Ending Community Property Form
· Ending Separate Property Form
This is a general overview of steps to enter assets. Some types of assets have different fields than
those given in this procedure. For specific help on various types of asset entries, click the Help button on
each asset entry screen.
1.
Double-click an asset description, right click a description and select New Asset, or click a
description once and click the New button on the toolbar.
2.
A window appears, titled with the description you chose. It will display the entry fields
appropriate for the asset. When the cursor is placed in a field, a message appears with
explanatory information regarding the information that should be entered.
Expect to see different fields for the various types of assets. For example, real estate topics will
have Property Address, Property Description, and Carry Value fields; whereas cash type
assets will have fields for account Balance and Accrued Interest.
3.
Complete the displayed fields for the asset. These will vary according to the type of asset you are
entering.
4.
In the Description field, enter a complete description of the asset.
5.
In the Comment field, enter any relevant information which might aid in identifying the asset.
6.
In the Name of Inventory field, list the type of inventory. For example: Initial, Partial, Final,
Amended, Supplemental, Reappraisal for Sale, or Property Tax Certificate.
7.
In the Date of Inventory field, list the date the inventory was signed in mm/dd/yyyy format or
click the calendar icon
to use Select a Date
207
calendar tool.
8.
Enter the Estimated Market Value of the asset. The program will convert whole dollar entries
to currency format for you.
9.
Enter the Carry Value of the asset. (The carry value of an asset that is included in an inventory
is its appraised value. The carry value of an asset purchased for the estate after appointment of
the guardian is its purchase price.)
10. In the Amount section (if shown), enter the amount of the asset. The program will convert whole
dollar entries to currency format for you.
11. (This Step applies to the Beginning Community Property Form and the Ending
Community Property Form only.)
Check the box if the asset is Quasi-Community Property. When you are finished, either click the
Guardianship Accounting
179
Add Another button to enter another asset in the same category or click the OK button to return
to the form in which you were entering assets. The descriptions and amounts will be listed here.
12. (This Step applies to the Ending Community Property Form and the Ending Separate
Property Form only)
Check the box that represents the Property Status of the asset: Still on Hand, Disposed of,
or Acquired.
13. You may edit an entry by double-clicking it, by right-clicking a description and selecting Update
Asset, or by clicking it and clicking the Update button on the toolbar.
14. You may delete an entry by highlighting it and clicking the Delete button on the toolbar, or
right-clicking an asset entry and clicking Delete Asset.
15. You may copy an asset entry to other minors by right clicking an entry and selecting Copy Asset.
A Minor Selection window appears and you can Select Minor(s) For Whom You Want to
Copy Accounting Information. After selecting all or selected names, click OK and a Copy
Complete box appears with the message, The selected item has been successfully copied
from [Minor name] to the minor(s) you selected. Click OK and you are returned to the form
in which you were entering assets. Also, you may copy entire lists of assets to another minor by
selecting Copy Property To on the toolbar.
Importing Assets
The Import Assets button on this form's toolbar allows you to select and import items from the last
Guardianship Inventory and Appraisal for this minor child. This procedure applies to the Beginning
Community Property Form and the Beginning Separate Property Form.
This is a general overview of the steps to import assets. For specific help on importing various
types of asset entries, click the Help button on each import asset screen.
1.
You may import an asset from this minor's last inventory report by clicking the Import Assets
button. An Import Inventory message appears: This import will overwrite any assets with same
description from the same inventory. Do you want to continue? Select OK and the Import Assets
From Inventory window appears.
180
ProDoc Software Manual
Figure 4, Importing Assets From Inventory Window
2.
In the Import Assets From Inventory window:
a.
Select assets from the inventory's Community Property pages or Separate Property pages.
b.
Click check boxes to select assets to import.
c.
Click OK. The Inventory Information window appears.
Figure 5, Inventory Information Window
3.
In the Inventory Information window this message is displayed: Information About the Inventory
From Which You Are Importing: Date of Inventory: [mm/dd/yyyy], Type of Inventory: [Initial,
Partial, Final, Amended, Supplemental, Reappraisal for Sale, Property Tax Certificate].
a.
Click OK.
Guardianship Accounting
b.
181
You are returned to the Beginning Community Property Form or the Beginning Separate
Property Form.
Using Toolbar Buttons to Work with Assets
First, find and click the line containing the asset. You can now use the toolbar buttons at the bottom of
the window to perform the functions indicated below:
New - Add description, value and any other necessary information to an asset entry.
Update - Modify a highlighted asset.
Delete - Remove a highlighted asset.
Import Assets - Select and import assets from this child's last inventory report.
Beginning Separate Property Form
This form collects separate property assets as of the beginning date of the accounting period.
Figure 6, Beginning Separate Property Form
The Beginning Separate Property Form collects separate property asset information as of the
beginning date of the accounting period.
Scroll down or click the links to jump to the help section in this topic you want to see:
How Assets are Displayed
182
Locating Asset Descriptions
182
182
ProDoc Software Manual
Entering Assets
182
Importing Assets
182
Using Toolbar Buttons
182
How Assets are Displayed
The information for each asset or property is displayed in three columns: Asset Description,
Estimated Market Value, and Carry Value.
Entries of actual assets are highlighted in yellow.
You can click the
or
symbols on the listing to expand or contract a particular category.
Locating Asset Descriptions
·
Use the scroll bar at the right side of the window to scroll through the list.
·
Click on the top entry of the window, Assets, and type the first letter of the description you
wish to locate. Each letter you enter will move the highlight through the list to the next
description beginning with the letter. When it reaches the end, it will start again at the first
matching description.
·
Enter a search word or phrase in the blank field above the Asset Description column and click
Find. The first description title that contains the word or phrase will be highlighted. Each time
you click Find, the next matching asset will be highlighted, and the highlight will continue
through the list of matches, then start again at the first match. If no matches exist, a window will
appear to tell you this.
NOTE: Searches and keystroke moves start from the point at which the cursor is positioned.
If you want to search from the beginning, you should place the cursor at the top of
the Asset Description list.
Entering Assets
See the Entering Assets procedure in the Beginning Community Property Form for a general
overview of the steps to enter assets.
Importing Assets
See the Importing Assets procedure in the Beginning Community Property Form for a general
overview of the steps to import assets.
Using Toolbar Buttons to Work With Assets
First, find and click the line containing the asset. You can now use the toolbar buttons at the bottom of
the window to perform the functions indicated below:
New - Add description, value, and any other necessary information to an asset to the inventory.
Update - Modify a highlighted asset.
Delete - Remove a highlighted asset.
Import Assets - Select and import assets from this child's last inventory report.
Guardianship Accounting
183
Charges Form
Figure 7, Charges Form
The Charges Form collects information on all charges received during the accounting period that are not
shown on the beginning inventory. Charges are payments received from all sources, including income
from trade or business, dividends, interest, pensions, rent, Social Security or other benefits, and gains on
sales.
If the entries involve gains on sales of assets or other adjustments to the carrying values of assets, they
should be entered on Schedule B (at the bottom of this form).
Scroll down or click the links to jump to the help section in this topic you want to see:
How Charges are Displayed
183
Locating Charge Descriptions
Entering Charges
184
184
Using Toolbar Buttons
185
How Charges are Displayed
The information for each charge is displayed in three columns: Description, Date of Receipt, and
Amounts
Entries of actual charges are highlighted in yellow.
You can click the
or
symbols on the listing to expand or contract a particular category.
184
ProDoc Software Manual
Locating Charge Descriptions
·
Use the scroll bar at the right side of the window to scroll through the list.
·
Click on the top entry of the window, Receipts (Schedule A), and type the first letter of the
description you wish to locate. Each letter you enter will move the highlight through the list to
the next description beginning with the letter. When it reaches the end, it will start again at the
first matching description.
·
Enter a search word or phrase in the blank field above the Description column and click Find.
The first description title that contains the word or phrase will be highlighted. Each time you
click Find, the next matching charge item will be highlighted, and the highlight will continue
through the list of matches, then start again at the first match. If no matches exist, a window will
appear to tell you this.
NOTE:
Searches and keystroke moves start from the point at which the cursor is
positioned. If you want to search from the beginning, you should place the cursor
at the top of the Description column.
Entering Charges
This is a general overview of the steps to enter charges. For specific help on various types of
charge entries, click the Help button on each charge entry screen.
To enter data on the Charges Form, perform the following steps:
1. Double-click a charge description, right click a description and select New Charge Item, or click
a description once and click the New button on the toolbar.
2. A window appears, titled with the description you chose. It will display the entry fields
appropriate for the charge item. When the cursor is placed in a field, a message appears with
explanatory information regarding the information that should be entered.
3. Complete the displayed fields for the charge item. These will vary according to the type of charge
you are entering.
4. In the Description field, enter a complete description of the charge item.
5. In the Comment section, enter any relevant information which might aid in identifying the
charge item.
6. Enter the Date of Receipt for each entry in mm/dd/yyyy format or use the calendar icon
use the calendar tool 207 to add a date.
to
7. In the Amount section, enter the amount of the received payment. The program will convert
whole dollar entries to currency format for you.
8. For Gains on Sales (Schedule B) assets, use the Sale Price, Carry Value, and Gain fields to
compute the net value received on the sale.
For Net Income From Trade or Business, use the fields for the Name of Business and, in
another Business Transactions window, use the fields for Description of the transaction,
Comment, Date of Transaction, and Amount.
9. When you are finished, either click the Add Another button to enter another charge item in the
same category or click the OK button to return to the Charges Form. The descriptions and
amounts will be listed here.
10. You may edit an entry by double-clicking it, or right-clicking a charge item entry and clicking
Update Charges, or by clicking it and clicking the Update button on the toolbar.
11. You may delete an entry by highlighting it and clicking the Delete button on the toolbar, or
right-clicking a charge entry and clicking Delete Charges.
12. You may copy a charge item entry to other minors by right clicking an entry and selecting Copy
Guardianship Accounting
185
Charge. A Minor Selection window appears and you can Select Minor(s) For Whom You
Want to Copy Accounting Information. After selecting all or selected names, click OK and a
Copy Complete box appears with the message, The selected item has been successfully
copied from [Minor name] to the minor(s) you selected. Click OK and you are returned to
the Charges Form. Also, you may copy entire lists of charges, credits, and assets to another
minor by selecting Copy Property To on the toolbar.
Using Toolbar Buttons
First, find and click the line containing the charge item. You can now use the toolbar buttons at the
bottom of the window to perform the functions indicated below:
New - Add description, value and any other necessary information to a charge item.
Update - Modify a highlighted charge item.
Delete - Remove a highlighted charge item.
Charges Overview
Asset description categories which qualify as charge items are shown below. Since the entry fields vary
considerably across these windows, please click the Help button on each asset window for detailed help
with entering information for the charge item.
Dividends
Interest
Pensions, Annuities, and Other Regular Periodic Payments
Rental Income
Social Security, Veterans, Other Public Benefits
Other Receipts
Gains on Sales
Other Charges
Net Income From Trade or Business
Figure 8, Rental Income
186
ProDoc Software Manual
To enter new charge receipts or update existing receipt descriptions in this category, perform the
following steps:
1. In the Description field, enter a description of the charge item. Click the Help button to see a
detailed description of required entries for each type of receipt.
2. In the Comment section add any information you feel would help in understanding the
information in any of the fields.
3. Enter the Date of Receipt of the payment in mm/dd/yyyy format or click the calendar icon
use the Select a Date 207 calendar tool.
to
4. Enter the Amount of this receipt. The program will convert whole dollar entries to currency
format for you.
Button Descriptions and Functions
Help - Click this button to see help on completing this charge window.
Add Another - This button will only appear when you are adding a new charge item. Click this button to
add another charge of the same type.
OK - When you are finished adding assets of this type, click this button to add the asset information to
the Guardianship Accounting program and close the window.
Cancel - Click this button to close the window. Your entries will not be saved.
Guardianship Accounting
187
Credits Form
Figure 9, Credits Form
The Credits Form collects information all disbursements, distributions, losses on sales, other credits, or
net loss from trade or business occurring during the accounting period that are not shown on the
beginning inventory.
If the entries involve losses on the sale of assets or adjustments to the carrying values of assets, they
should be entered on Schedule D (at the bottom of this form).
Scroll down or click the links to jump to the help section in this topic you want to see:
How Credits are Displayed
187
Locating Credit Descriptions
Entering Credits
187
188
Using Toolbar Buttons
189
How Credits are Displayed
The information for each credit is displayed in three columns: Description, Date of Payment, and
Amounts
Entries of actual credits are highlighted in yellow.
You can click the
or
symbols on the listing to expand or contract a particular category.
Locating Credit Descriptions
188
ProDoc Software Manual
·
Use the scroll bar at the right side of the window to scroll through the list.
·
Click on the top entry of the window, Disbursements, and type the first letter of the
description you wish to locate. Each letter you enter will move the highlight through the list to
the next description beginning with the letter. When it reaches the end, it will start again at the
first matching description.
·
Enter a search word or phrase in the blank field above the Description column and click Find.
The first description title that contains the word or phrase will be highlighted. Each time you
click Find, the next matching asset will be highlighted, and the highlight will continue through
the list of matches, then start again at the first match. If no matches exist, a window will appear
to tell you this.
NOTE:
Searches and keystroke moves start from the point at which the cursor is
positioned. If you want to search from the beginning, you should place the cursor
at the top of the Description list.
Entering Credits
This is a general overview of the steps to enter credits. For specific help on various types of credit
entries, click the Help button on each credit entry screen.
1. Double-click a credit description, right click a description and select New Credit, or click a
description once and click the New button on the toolbar.
2. A window will appear titled with the description you chose. It will display the entry fields
appropriate for the credit. When the cursor is placed in a field, a message appears with
explanatory information regarding the information that should be entered.
3. Complete the displayed fields for the credit. These will vary according to the type of credit you are
entering.
4. In the Description field, enter a complete description of the credit.
5. In the Comment section, enter any relevant information which might aid in identifying the
credit.
6. Enter the Date of Payment in mm/dd/yyyy format or use the calendar icon
a Date 207 calendar tool.
to use the Select
7. Enter the Amount of the payment. The program will convert whole dollar entries to currency
format for you.
8. For Losses on Sales (Schedule D) assets, use the Carry Value, Sale Price, and Amount of
Loss fields to compute the amount of loss on the sale.
For payments for Fiduciary and Attorney Fees and Distributions to Minor, provide the
Date of Order authorizing each distribution.
9. When you are finished, either click the Add Another button to enter another credit in the same
category or click the OK button to return to the Credits Form. The descriptions and amounts
will be listed here.
10. You may edit an entry by double-clicking it, right click a description and select Update Credit, or
by clicking it and clicking the Update button on the toolbar.
11. You may delete an entry by highlighting it and clicking the Delete button on the toolbar, or
right-clicking a credit entry and clicking Delete Credit.
12. You may copy a credit entry to other minors by right clicking the entry and selecting Copy
Credit. A Minor Selection window appears and you can Select Minor(s) For Whom You
Want to Copy Accounting Information. After selecting all or selected names, click OK and a
Copy Complete box appears with the message, The selected credit item has been
successfully copied from [Minor name] to the minor(s) you selected. Click OK and you
Guardianship Accounting
189
are returned to the Credits Form. Also, you may copy entire lists of credits and assets to
another minor by selecting Copy Property To on the toolbar.
Using Toolbar Buttons to Work With Credits
First, find and click the line containing the credit. You can now use the toolbar buttons at the bottom of
the window to perform the functions indicated below:
New - Add description, value and any other necessary information to a credit entry.
Update - Modify a highlighted credit.
Delete - Remove a highlighted credit.
Credits Overview
Asset description categories which qualify as Credits Form disbursements are shown below. Since the
entry fields vary considerably across these credit windows, please click the Help button on each credit
window for detailed help with entering information for the disbursement.
Caregiver
Residential or Long-Term Care Facilities
Education
Fiduciary and Attorney Fees
General Administration
Investments
Living Expenses
Medical Expenses
Sale of Property
Rental Property Expenses
Other Expenses
Losses on Sales
Distributions to Minor
Other Credits
Net Loss From Trade or Business
190
ProDoc Software Manual
Figure 10, Residential or Long-Term Care Facilities Expenses
To enter new disbursements or update existing descriptions in this category, perform the following steps:
1. In the Description field, enter a description of the disbursement. Click the Help button to see a
detailed description of required entries for each type of disbursement.
2. In the Comment section add any information you feel would help in understanding the
information in any of the fields.
3. Enter the Date of Payment of the disbursement in mm/dd/yyyy format or click the calendar icon
to use the Select a Date
207
calendar tool.
4. Enter the Check Number.
5. Enter the Amount of this disbursement. The program will convert whole dollar entries to
currency format for you.
Button Descriptions and Functions
Help - Click this button to see help on completing this window.
Add Another - This button will only appear when you are adding a new disbursement. Click this button
to add another disbursement of the same type.
OK - When you are finished adding disbursement of this type, click this button to add the disbursement
information to the Guardianship Accounting program and close the window.
Cancel - Click this button to close the window. Your entries will not be saved.
Guardianship Accounting
191
Ending Community Property Form
Figure 11, Ending Community Property Form
The Ending Community Property Form collects community property asset information as of the
ending date of the accounting period. All assets appearing in the Beginning Community Property
Form automatically appear in the Ending Community Property Form. If the status or condition of
the asset has changed; its value appreciated or depreciated; the asset has been sold or otherwise disposed
of; such asset information should be edited or updated to reflect its value as of the ending date of the
accounting period.
Schedule E (Attachment 1) cash-type assets are assets that may be appraised by the guardian and listed
on Attachment 1 of the inventory. All other non-cash assets must be appraised by a probate referee and
listed on Attachment 2 of the inventory and appraisal. List all non-cash assets, group them by the
inventory in which their latest appraised values appear, or if none, as after-acquired assets in order of
their purchase dates.
Scroll down or click the links to jump to the help section in this topic you want to see:
How Assets are Displayed
191
Locating Asset Descriptions
Entering Assets
192
192
Using Toolbar Buttons
192
How Assets are Displayed
The information for each asset or property is displayed in three columns: Asset Description, Q
(Quasi-Community Property, identified by a green check mark), Property Status (Still on Hand,
Disposed of, and Acquired), Estimated Market Value, and Carry Value.
192
ProDoc Software Manual
Entries of actual assets are highlighted in yellow.
You can click the
or
symbols on the listing to expand or contract a particular category.
Locating Asset Descriptions
·
Use the scroll bar at the right side of the window to scroll through the list.
·
Click on the top entry of the window, Assets, and type the first letter of the description you
wish to locate. Each letter you enter will move the highlight through the list to the next
description beginning with the letter. When it reaches the end, it will start again at the first
matching description.
·
Enter a search word or phrase in the blank field above the Asset Description column and click
Find. The first description title that contains the word or phrase will be highlighted. Each time
you click Find, the next matching asset will be highlighted, and the highlight will continue
through the list of matches, then start again at the first match. If no matches exist, a window will
appear to tell you this.
NOTE:
Searches and keystroke moves start from the point at which the cursor is
positioned. If you want to search from the beginning, you should place the cursor
at the top of the Asset Description list.
Entering Assets
All of the assets listed in the Beginning Community Property Form are automatically entered in
this Ending Community Property Form. Likewise, All of the assets listed in the Beginning
Separate Property Form are automatically listed in the Ending Separate Property Form.
See the Entering Assets procedure in the Beginning Community Property Form for a general
overview of the steps to enter assets.
Using Toolbar buttons to work with Assets
First, find and click the line containing the asset. You can now use the toolbar buttons at the bottom of
the window to perform the functions indicated below:
New - Add description, value and any other necessary information to an asset entry.
Update - Modify a highlighted asset.
Delete - Remove a highlighted asset.
Guardianship Accounting
193
Ending Separate Property Form
Figure 12, Ending Separate Property Form
The Ending Separate Property Form collects community property asset information as of the ending
date of the accounting period. All assets appearing in the Beginning Separate Property Form
automatically appear in the Ending Separate Property Form. If the status or condition of the asset
has changed; its value appreciated or depreciated; the asset has been sold or otherwise disposed of; such
asset information should be edited or updated to reflect its value as of the ending date of the accounting
period.
Schedule E (Attachment 1) cash-type assets are assets that may be appraised by the guardian and listed
on Attachment 1 of the inventory. All other non-cash assets must be appraised by a probate referee and
listed on Attachment 2 of the inventory and appraisal. List all non-cash assets, group them by the
inventory in which their latest appraised values appear, or if none, as after-acquired assets in order of
their purchase dates.
Scroll down or click the links to jump to the help section in this topic you want to see:
How Assets are Displayed
193
Locating Asset Descriptions
Entering Assets
194
194
Using Toolbar Buttons
194
How Assets are Displayed
The information for each asset or property is displayed in three columns: Asset Description, Property
Status (Still on Hand, Disposed of, and Acquired), Estimated Market Value, and Carry Value.
194
ProDoc Software Manual
Entries of actual assets are highlighted in yellow.
You can click the
or
symbols on the listing to expand or contract a particular category.
Locating Asset Descriptions
·
Use the scroll bar at the right side of the window to scroll through the list.
·
Click on the top entry of the window, Assets, and type the first letter of the description you
wish to locate. Each letter you enter will move the highlight through the list to the next
description beginning with the letter. When it reaches the end, it will start again at the first
matching description.
·
Enter a search word or phrase in the blank field above the Asset Description column and click
Find. The first description title that contains the word or phrase will be highlighted. Each time
you click Find, the next matching asset will be highlighted, and the highlight will continue
through the list of matches, then start again at the first match. If no matches exist, a window will
appear to tell you this.
NOTE:
Searches and keystroke moves start from the point at which the cursor is positioned.
If you want to search from the beginning, you should place the cursor at the top of
the Asset Description list.
Entering Assets
All of the assets listed in the Beginning Community Property Form are automatically entered in
the Ending Community Property Form. Likewise, All of the assets listed in the Beginning
Separate Property Form are automatically listed in this Ending Separate Property Form.
See the Entering Assets procedure in the Beginning Community Property Form for a general
overview of the steps to enter assets.
Using Toolbar Buttons to Work With Assets
First, find and click the line containing the asset. You can now use the toolbar buttons at the bottom of
the window to perform the functions indicated below:
New - Add description, value, and any other necessary information to an asset to the inventory.
Update - Modify a highlighted asset.
Delete - Remove a highlighted asset.
Guardianship Accounting
195
Changes in Asset
Figure 13, Changes in Asset Form
This form allows you to record all transactions that changed the form of assets during the accounting
period. If the entries reflect changes in asset values, they should also be recorded in one of the
appropriate forms (Charges Form, Credits Form, Ending Community Property Form, or Ending
Separate Property Form).
Click New to enter information on changes in the form of assets. The Changes in Form of Asset
During Accounting Period 195 window appears.
Using Toolbar Buttons to Work With Assets
First, find and click the line containing the asset. You can now use the toolbar buttons at the bottom of
the window to perform the functions indicated below:
New - Add description, value, and any other necessary information to an asset to the inventory.
Update - Modify a highlighted asset.
Delete - Remove a highlighted asset.
Changes in Form of Asset During Accounting Period
The Changes in Form of Asset During the Accounting Period window is where you record
transactions that affect a change in the form of an asset. These are transactions that may report damage
to an asset, appreciation or depreciation over time, zoning, condemnation, purchases of assets, or other
196
ProDoc Software Manual
proceedings that affect the form of an asset.
To record entries in the Changes in Form of Asset During the Accounting Period fields, perform
the following steps:
1. In the Description field, enter all available information concerning the change. For example:
Purchase of an additional 400 shares of ABC preferred Stock, Series "C," NASDAQ ticker symbol
ABCC, CUSIP No. XXXXX5678 at the price of $172.50/share, plus $15 brokerage transaction fee.
2. In the Comment section add any information you feel would help in understanding the change in
the form of the asset information in any of the fields. For example: This increases the number of
shares held to 500 shares. This transaction is also recorded on the Credits Form in the asset titled
"Investments."
3. Enter the Date in mm/dd/yyyy format or click the calendar icon
from a pop-up calendar.
to easily Select a Date
207
Button Descriptions and Functions
Help - Click this button to see help on completing this window.
Add Another - This button will only appear when you are adding a new liability. Click this button to add
another liability.
OK - When you are finished adding liabilities of this type, click this button to add the information to the
Guardianship Accounting program and close the window.
Cancel - Click this button to close the window. Your entries will not be saved.
Attachment 1 Property
Attachment 1 Property Overview
Cash assets are assets that may be appraised by the guardian and listed on Attachment 1 of the
Inventory and Appraisal. Cash items can be immediately converted to cash on a dollar for dollar basis
(meaning the value does not fluctuate). Rare coins or currency are not Attachment 1 items.
Asset description categories which qualify as Attachment 1 Property are shown below. Since the entry
fields vary considerably across these asset windows, please click the Help button on each asset window
for detailed help with entering information for the asset.
Cash
Uncashed Checks Issued On or Before the Beginning of the Account Period
Bank Accounts
Certificates of Deposit
Money Market Account
Life or Accident Policies Paid to Estate in Lump Sum
Retirement Plans or Annuities Paid to Estate in Lump Sum
Other Attachment 1 Property
Guardianship Accounting
197
Figure 15, Certificate of Deposit
Button Descriptions and Functions
Help - Click this button to see help on completing specific asset windows.
Add Another - This button will only appear when you are adding a new asset. Click this button to
add another asset of the same type.
OK - When you are finished adding assets of this type, click this button to add the asset information
to the Guardianship Accounting program and close the window.
Cancel - Click this button to close the window. Your entries will not be saved.
Real Estate Assets
Real Estate Assets Overview
Asset description categories in the Real Estate listing are shown below. Scroll down to Entering Asset
Information to see general help for entering information for assets in this listing. Click the Help button
on each asset window to see detailed help for entering information for the asset.
Vacant Land
Agricultural Land
Single Family Residence
Condominium
Leasehold Interest
Stock Cooperatives
Residential Income Producing Property
Commercial or Industrial Property
Life Estate
Remainder and Reversionary Interest
Time Share Interest
Other Real Estate
198
ProDoc Software Manual
If a real estate asset doesn't fit into any other category, enter the asset in the Other Real Estate
category.
Entering Asset Information.
The asset description window opens with seven fields for entering data: the Property Address,
Property Description, Comment, Name of Inventory, Date of Inventory, Estimated Market
Value, and Carry Value. If you are entering assets on the Beginning Community Property Form or
the Ending Community Property Form, it also contains a check box for selecting Quasi-Community
Property.
Figure 16, Example Single-Family Residence
Click the Help button for detailed help with entering information for each asset.
Property Address - Enter the physical address of the property in line form. For example: 12
Mockingbird Street, Berkeley, CA 94704.
Property Description - Enter the complete legal description of the asset. Click the Help button to
see a detailed description of the information required for the field.
Comment - Enter any relevant information which might further aid in identifying the asset.
Name of Inventory - List the type of inventory. For example: Final or Partial.
Date of Inventory - List the date the inventory was signed in mm/dd/yyyy format or click the
calendar icon
to use Select a Date
207
calendar tool.
Estimated Market Value - Enter the estimated market value for the property. The program will
Guardianship Accounting
199
convert whole dollar entries to currency format for you.
Carry Value - Enter the Carry Value for the property. (The carry value of an asset that is included in
an inventory is its referee-appraised value. The carry value of an asset purchased for the estate after
appointment of the guardian is its purchase price.)
Quasi-Community Property - This check box is only displayed when you enter assets on the
Beginning Community Property Form or the Ending Community Property Form. Click the
box if the real estate qualifies as Quasi-Community Property. A green check mark will be displayed in
the Q column for the asset on property forms after you complete the asset entry. You can remove the
check mark by clicking the box again.
Button Descriptions and Functions
Help - Click this button to see help on completing specific Real Estate asset windows.
Add Another - This button will only appear when you are adding a new asset. Click this button to
add another asset of the same type.
OK - When you are finished adding assets of this type, click this button to add the asset information
to the Guardianship Accounting program and close the window.
Cancel - Click this button to close the window. Your entries will not be saved.
Business Interests Assets
Business Interests Assets Overview
Asset description categories in the Business Interests listing are shown below. Scroll down to Entering
Asset Information to see general help for entering information for assets in this listing. Click the Help
button on each asset window to see detailed help for entering information for the asset.
Closely Held Corporation
Limited Partnerships
General Partnerships
Sole Proprietorships
Limited Liability Companies
Other Business
If a business asset doesn't fit into any other category, enter the asset in the Other Business category.
Entering Asset Information
The window used for business interests assets contains six fields. If you are entering assets on the
Community Property form, it also contains a check box.
200
ProDoc Software Manual
Figure 17, Limited Partnership Example
Description - Enter a description of the business interest. Click the Help button to see a detailed
description of required entries for each business interest.
Comment - Enter any relevant information which might aid in identifying the asset.
Name of Inventory - List the type of inventory. For example: Final.
Date of Inventory - List the date the inventory was signed in mm/dd/yyyy format or click the
calendar icon
to use Select a Date
207
calendar tool.
Estimated Market Value - Enter the estimated market value for the interest. The program will
convert whole dollar entries to currency format for you.
Carry Value - The carry value of an asset that is included in an inventory is its appraised value.
The carry value of an asset purchased for the estate after appointment of the guardian is its purchase
price.
Quasi-Community Property - This check box is only displayed when you enter assets on the
Community Property form. Click the box if the business interest qualifies as Quasi-Community
Property. A green check mark will be displayed in the Q column for the asset on property forms after
you complete the asset entry. You can remove the check mark by clicking the box again.
Button Descriptions and Functions
Help - Click this button to see help on completing specific Business Interests asset windows.
Add Another - This button will only appear when you are adding a new asset. Click this button to
add another asset of the same type.
OK - When you are finished adding assets of this type, click this button to add the asset information
to the Guardianship Accounting program and close the window.
Cancel - Click this button to close the window. Your entries will not be saved.
Guardianship Accounting
201
Tangible Personal Property
Tangible Personal Property Assets Overview
Asset description categories in the Tangible Personal Property listing are shown below. Scroll down
to Entering Asset Information to see general help for entering information for assets in this listing.
Click the Help button on each asset window to see detailed help for entering information for the asset.
Furniture, Furnishings and Miscellaneous
Jewelry
Coins or Stamps
Work of Art
Mobile Homes
Motor Vehicles
Boat, Airplane
Livestock and Breeding Animals
Other Personal Property
If a personal property asset doesn't fit into any other category, enter the asset in the Other Personal
Property category.
Entering Asset Information
The window used for personal property assets contains five fields. If you are entering assets on the
Community Property form, it also contains a check box.
Figure 18, Example Tangible Personal Property Entries
Description - Enter a description of the property. Click the Help button to see a detailed description
of required entries for each type of property.
Comment - Enter any relevant information which might aid in identifying the asset.
Name of Inventory - List the type of inventory. For example: Final.
Date of Inventory - List the date the inventory was signed in mm/dd/yyyy format or click the
202
ProDoc Software Manual
calendar icon
to use Select a Date
207
calendar tool.
Estimated Market Value - Enter the estimated market value for the asset. The program will
convert whole dollar entries to currency format for you.
Carry Value - The carry value of an asset that is included in an inventory is its appraised value.
The carry value of an asset purchased for the estate after appointment of the guardian is its purchase
price.
Quasi-Community Property - This check box is only displayed when you enter assets on the
Community Property form. Click the box if the personal property asset qualifies as
Quasi-Community Property. A green check mark will be displayed in the Q column for the asset on
property forms after you complete the asset entry. You can remove the check mark by clicking the box
again.
Button Descriptions and Functions
Help - Click this button to see help on completing specific Tangible Personal Property asset
windows.
Add Another - This button will only appear when you are adding a new asset. Click this button to
add another asset of the same type.
OK - When you are finished adding assets of this type, click this button to add the asset information
to the Guardianship Inventory & Appraisal program and close the window.
Cancel - Click this button to close the window. Your entries will not be saved.
Debt or Promissory Note
Figure 19, Debt or Promissory Note Owed to the Minor
To enter a debt or promissory note owed to the minor, or to update existing asset descriptions in this
Guardianship Accounting
203
category, follow the steps below:
1. Enter a Description in the designated field. Include the terms of the note, such as the date of the
debt or note and the final date due, the names of the borrowers, the original amount borrowed,
the payment amount and dates of scheduled payments, the interest rate, and any security for the
loan. If real property secures the loan, include either the Assessor's Parcel Number or the legal
description of the property. For example: "Promissory note for an unsecured loan made to John
and Mary Doe on May 23, 2006, in the original principal amount of $10,000.00, earning interest at
the rate of 8%, due in a single payment of principal and accrued interest on May 23, 2008."
2. In the Comment section, enter any relevant information which might aid in identifying the asset.
3. In the Name of Inventory field, list the type of inventory. For example: Final.
4. In the Date of Inventory field, list the date the inventory was signed in mm/dd/yyyy format or
click the calendar icon
to use Select a Date
207
calendar tool.
5. Enter the Estimated Market Value for the asset. The program will convert whole dollar entries
to currency format for you.
6. Enter the Carry Value of the asset. (The carry value of an asset that is included in an inventory
is its appraised value. The carry value of an asset purchased for the estate after appointment of
the guardian is its purchase price.)
7. Enter the amount of any Accrued Interest for the debt or note that had accrued as of the date of
appointment of the guardian but had not yet been credited.
8. If you are adding/updating an asset on the Community Property form, the Quasi-Community
Property check box is displayed. Click the box if the asset qualifies as Quasi-Community
Property. A green check mark will then be displayed in the Q column for the asset on the
Community Property form after you complete the asset entry. You can remove the check mark
by clicking the box again.
Button Descriptions and Functions
Help - Click this button to see help on completing the asset window.
Add Another - This button will only appear when you are adding a new asset. Click this button to
add another asset of the same type.
OK - When you are finished adding assets of this type, click this button to add the asset information
to the Guardianship Accounting program and close the window.
Cancel - Click this button to close the window. Your entries will not be saved.
Securities
Securities Assets Overview
Asset description categories in the Securities listing are shown below. Scroll down to Entering Asset
Information to see general help for entering information for assets in this listing. Click the Help button
on each asset window to see detailed help for entering information for the asset.
Brokerage Accounts
Common and Preferred Stocks
Mutual Funds
Stock Options
Corporate, State and Municipal Bonds
United States Treasury Notes and Bonds
Ginnie Mae (GNMA), Fannie Mae (FNMA), and Freddie Mac (FHLMC) Security
United States Savings Bonds
204
ProDoc Software Manual
Other Securities
If a Securities asset doesn't fit into any other category, enter the asset in the Other Securities
category.
Entering Asset Information
The window used for Securities assets contains a varying number of fields. If you are entering assets on
the Community Property form, it also contains a check box.
Figure 20, US Savings Bond Example
Description - Enter a description of the security. Click the Help button to see a detailed description
of required entries for each type of security.
Comment - Enter any relevant information which might aid in identifying the asset.
Name of Inventory - List the type of inventory. For example: Final.
Date of Inventory - List the date the inventory was signed in mm/dd/yyyy format or click the
calendar icon
to use Select a Date
207
calendar tool.
Estimated Market Value - Enter the estimated market value for the asset. The program will
convert whole dollar entries to currency format for you.
Carry Value - The carry value of an asset that is included in an inventory is its appraised value.
The carry value of an asset purchased for the estate after appointment of the guardian is its purchase
price.
Quasi-Community Property - This check box is only displayed when you enter assets on the
Community Property form. Click the box if the security qualifies as Quasi-Community Property. A
green check mark will be displayed in the Q column for the asset on property forms after you
complete the asset entry. You can remove the check mark by clicking the box again.
Button Descriptions and Functions
Guardianship Accounting
205
Help - Click this button to see help on completing specific Securities asset windows.
Add Another - This button will only appear when you are adding a new asset. Click this button to
add another asset of the same type.
OK - When you are finished adding assets of this type, click this button to add the asset information
to the Guardianship Accounting program and close the window.
Cancel - Click this button to close the window. Your entries will not be saved.
Other Intangible and Unscheduled Property Assets
This window helps you enter assets which do not fit into any other listed category. To enter new assets or
update existing asset descriptions in this category, perform the following steps:
1. Enter a Description of the asset in the designated field. Include a full description of intangible
property not included in any of the previously described categories that was owned by the minor.
For example: "Copyright and future royalty stream from 2001 book, 'The Life and Times of J.J.
Schmidt', ISBN no. 1234567890, published by Narcissus Press."
2. In the Comment section, enter any relevant information which might aid in identifying the asset.
3. In the Name of Inventory field, list the type of inventory. For example: Final.
4. In the Date of Inventory field, list the date the inventory was signed in mm/dd/yyyy format or
click the calendar icon
to use Select a Date
207
calendar tool.
5. Enter the Estimated Market Value of the stock. The program will convert whole dollar entries
to currency format for you.
6. Enter the Carry Value of the asset. (The carry value of an asset that is included in an inventory
is its appraised value. The carry value of an asset purchased for the estate after appointment of
the guardian is its purchase price.)
7. If you are adding/updating an asset on the Beginning Community Property Form or the
Ending Community Property Form, the Quasi-Community Property check box is displayed.
Click the box if the asset qualifies as Quasi-Community Property. A green check mark will then be
displayed in the Q column for the asset after you complete the asset entry. You can remove the
check mark by clicking the box again.
Button Descriptions and Functions
Help - Click this button to see help on completing the asset window.
Add Another - This button will only appear when you are adding a new asset. Click this button to
add another asset of the same type.
OK - When you are finished adding assets of this type, click this button to add the asset information
to the Guardianship Accounting program and close the window.
Cancel - Click this button to close the window. Your entries will not be saved.
206
ProDoc Software Manual
Selecting a Case
Use the Select a Case window to choose a client
and case file in which to save the information you
input. It lists existing ProDoc clients and all
cases for the clients. You can use it to see and
modify related client/case data and create new
clients and cases.
You can select a case to use by either of the
methods listed below:
·
Double-click a displayed case.
·
Click on a displayed case and then press
the Enter key.
·
Click on a displayed case and then click
the Select Case button.
Figure 21, Selecting a Case Window
To find a case that's not displayed:
·
Type the first letter(s) of a client's name to jump to that client's entry on the tree. To do this more
than once, use the backspace key to clear your previous letter entries.
·
Use the scroll bar on the right of the form to quickly scroll through the list. You can also click on
any entry on the left and scroll with keyboard page up, page down, and up/down arrow keys.
·
Use the Now Showing: drop down arrow to choose the types of contacts or clients to display.
Cases are grouped under clients, who are grouped in alphabetical order. Categories will be
displayed with type icons of different colors on the window. The default is Active Clients. Other
choices are All Contacts and Cases, Closed Clients, Private Clients and Non-Clients.
·
Use the Hide/Show Cases toggle button to display or hide cases. Likewise, you can click the
symbols in the client tree to reveal or hide cases.
or
Guardianship Accounting
207
Selecting a Date
This window helps you quickly complete date fields. Tools and buttons on
this calendar tool, depicted as Figure 22, include:
Figure 22, Select a Date Window
·
and
- Click to move back or forward one year.
·
and
- Click to move back or forward one month.
·
and
- Click to move back or forward one week.
·
Use Up and Down arrow keys to move back and forward one
week.
·
Use Left and Right arrow keys to move back and forward one
day.
·
Click Today to move the underline/highlight to today's date.
·
Click on the date to choose it or press the Enter key to choose the
underlined date.
·
Click Cancel to close the calendar without choosing a date.
208
ProDoc Software Manual
California Conservatorship Inventory & Appraisal
Getting Started
It's easy to create inventories for your conservatorship matters with the Conservatorship Inventory
& Appraisal program. This program completely eliminates manual calculations, simplifies your work
and dramatically reduces the time necessary to handle conservatorship matters. You need to only list
the necessary information once. ProDoc automatically calculates the value of the estate and prints the
required form and attachments.
Starting the Program
1. Click PowerPacks ® Conservatorships ® Inventory & Appraisal.
2. The Select a Case 226 window opens. Select a case by double-clicking a visible case title. You
can also click the title once, then press the Enter key or click the Select Case button. Click the
Help button on the window or click here 226 for detailed help for finding and selecting cases.
3. The Conservatorship Inventory & Appraisal program opens to the General tab.
Navigating the Conservatorship Inventory & Appraisal Program
There are six tabs across the top of the main program window: General 209 , Conservatee 211 ,
Community Property 213 , Separate Property 215 , View Attachment 1 217 , and View Attachment
2 218 . Each tab represents a different form. To move from one screen to another, position the cursor
over the tab you want to use and click on it.
You can also use hot keys. Wherever a window, screen or field title shows an underlined character, i.e.,
"Primary Attorney", you can navigate to that entry by holding the "Alt" key and pressing the
underlined keyboard character. In the earlier example, pressing Alt + A on your keyboard puts your
cursor in the Primary Attorney field.
Help with using the Conservatorship Inventory & Appraisal Program
·
·
·
·
·
·
Click the Help buttons on each window (or press the F1 key).
View or print the ProDoc Software Manual.
View Computer Based Training (CBT) Modules at the ProDoc Website.
Periodic ProDoc user seminars; schedule these at the ProDoc Website.
Call our Customer Support specialists at 1-800-759-5418.
Send email to [email protected].
Main Toolbar
Figure 1, Main Toolbar
The toolbar along the bottom of each of the six major forms consists of the Help, Copy Property To,
Print, Send to Excel, Save and Continue, Save and Close, and Cancel buttons. This toolbar is
always available while you are using the program. The buttons and their actions are discussed below.
Help - Click this button to display the help topic for the form or current window.
Copy Property To - Click this button to copy lists of property assets from the current conservatee to
conservatee(s) with whom you wish to share the data. A popup box opens entitles Conservatee
Selection. Select the name of the conservatee(s) to whom you want to copy assets.
California Conservatorship Inventory & Appraisal
209
To copy a single asset to another conservatee, select an asset on the current form, right-click on the asset
and select Copy Asset. A box opens entitled, Conservatee Selection. Select only the conservatee(s) to
whom you want to copy the asset.
Print - Click this button to print and/or preview form GC-040, Inventory & Appraisal, and form GC-041
attachment forms. A box opens entitled, Conservatee Selection. Accept the selection of All or select
only the names of conservatee(s) for whom you want to print inventories.
Send to Excel - Click this button to send all categories and amounts entered in the program to an Excel
spreadsheet. A box opens titled, Conservatee Selection. Accept the selection of All or select only the
names of conservatee(s) for whom you wish to export inventory data to Excel spreadsheets.
Save and Continue - Click this button to save the data that has been entered and continue working
with the program.
Save and Close - Click this button to save the data that has been entered and exit the program.
Cancel - Click this button to exit the program without saving the information that you entered during
the current session.
General Form
Figure 2, General Form
The General Form is used to enter information about the conservatee(s), the client(s), conservator(s),
referee, primary attorney, and court.
Navigating through the General Form
210
ProDoc Software Manual
To navigate from one field/button to another, click on the field or button you would like to use. You can
also press the Tab key on your keyboard to move forward to the next entry and press Shift + Tab to
move to the previous entry.
Completing the General Form
Select Conservatee - Press the Update button. The Conservatee Names popup window opens and
you are prompted to Add or Update Conservatee Name and Alias. You can create a separate
inventory for each conservatee. Use the New, Update, or Delete buttons to add, edit, or delete
conservatee names.
Alias List - Enter any other names by which a conservatee may be known.
Client(s) - To edit the client(s) list for the case, click the Update button in the Client Information
section. The Client Names window appears.. Use the New, Update, or Delete buttons to add, edit, or
delete client names. The option to update or delete a client's name will not be available if the client is in
your ProDoc database; you must use the Client/Case Manager for this. For specific help for these
windows, click the Help button on each window.
Date of Appointment of Conservator(s) - Enter the date in mm/dd/yyyy format. You can also click
the calendar icon to select the date from a calendar tool. Click Select a Date 227 for detailed help with
this tool. If the conservatorship appointment is temporary, click the Temporary Conservatorship box.
Conservator(s) of the Estate - To edit the conservators list for the case, click the Update button. The
Conservator Names popup window opens where you are prompted to Add or Update the
Conservator Names.
Probate Referee Section - Enter the requested information for the Probate Referee if one is required.
·
Is Appointment of a Probate Referee Required? - Click the appropriate Yes or No button.
·
If Yes was selected, enter the name of the probate referee in the Name of Referee field.
·
If you checked the box for Probate Referee Waived by Court Order, enter the Date of Court
Order in mm/dd/yyyy format or click the calendar icon to use the Select a Date 227 calendar tool.
Attorney Information Section - Enter the Primary Attorney's name and Bar Number in the fields
provided.
Court Information Section - Click the Edit Court Information button to open the Court
Information window. Enter the Case Number and choose the County and Branch. The Street
Address, Mailing Address, City and Zip Code should be automatically completed for you, depending
upon your previous selections. If not, enter the information in the fields provided. Click the Save button
when you are finished to return to the General form.
When you are finished entering the information on the General Form, click the Save and Continue
button to save your entries and continue working, or click the Save and Close button to save your
entries and close the Conservatorship Inventory & Appraisal program.
California Conservatorship Inventory & Appraisal
211
Conservatee Form
Figure 3, Conservatee Form
The Conservatee Form is used to enter all basic information about the referees commission, type and
extent of inventory and appraisal, bond situation, and date inventory was signed by the conservator of the
estate.
Navigating through the Conservatee Form
To navigate from one field/button to another, click on the field or button you would like to use. You can
also press the Tab key on your keyboard to move forward to the next entry and press Shift + Tab to
move to the previous entry.
Completing the Conservatee Form
Descriptions of entry fields and choices required for this form are listed below.
Referee's Commission and Total Appraisal Section
· Enter the Statutory Commission and Expenses Incurred in their respective fields. The
Total Commission value will be automatically calculated and entered in its field.
· Enter the Date Signed in mm/dd/yyyy format or click the calendar icon
a Date 227 calendar tool.
to use the Select
· Enter the amount provided by the Probate Referee for the Referee's Total Appraisal field for
Attachment 2 property. The amount you enter here will be printed in the applicable field on
the GC-040 form. If the amount entered differs from the amount calculated from your asset
entries, you will be notified when you print the form.
Inventory and Appraisal Section - Click the appropriate button to indicate whether the inventory is
212
ProDoc Software Manual
Initial, Partial, Final, Amended, Supplemental, a Reappraisal for Sale, or for Property Tax
Certificate.
· Select Initial if this is the first inventory and appraisal completed since becoming conservator.
· If you select Partial, the Partial Appraisal Number field is activated. Enter a numeral
representing the serial number of the appraisal (i.e. "1", "2").
· Select Final if this is your final inventory and appraisal.
· If you select Amended, the Date of Superseded Inventory field is activated. Enter the date
of the superseded inventory.
· If you select Supplemental it should only contain new information. (For example, to correct
the omission of one or several items that were omitted in the final inventory and appraisal.)
· Select Reappraisal for Sale if real property is being sold more than one year after the date of
appointment of the conservator.
· Select Property Tax Certificate if the conservatee owned California real property and the
proper change of ownership certificates have been filed as required. (If the conservatee owned
no California real property on the date of appointment, this button should not be selected.)
Extent of Inventory Section - Click the appropriate button to indicate whether the inventory is a
Complete Inventory or a Partial Inventory.
Describe Bond Situation Section - Click the appropriate button to describe the bond situation: Bond
is waived, Bond filed, or bond is Deposited in a blocked account.
·
If you choose Bond is waived, no further fields need to be completed in this section.
·
If you choose Bond Filed, enter the amount in the Bond Amount field and click the appropriate
button to indicate whether or not the Bond Filed Is Sufficient or Insufficient.
·
If you choose Deposited in a Blocked Account, enter both the Deposit Amount and the name
and location of the financial institution holding the deposit in the appropriate fields.
Joint bond to cover all conservatees - If a joint bond was filed on behalf of all conservatee's
inventories, check the Joint bond to cover all conservatees box.
Date Inventory Signed Section - Enter the date the Inventory & Appraisal was signed by the
conservator(s) of the estate in mm/dd/yyyy format or click the calendar icon
227 calendar tool.
to use the Select a Date
When you are finished entering the information on the Conservatee Form, click the Save and
Continue button to save your entries and continue working, or click the Save and Close button to save
your entries and close the Conservatorship Inventory & Appraisal program.
California Conservatorship Inventory & Appraisal
213
Community Property Form
Figure 4, Community Property Form
The Community Property Form is used to enter details regarding estate community property.
Scroll down or click the links to jump to the help section in this topic you want to see:
How Assets are Displayed
213
Locating Asset Descriptions
Entering Assets
213
214
Using Toolbar Buttons
214
How Assets are Displayed
The information for each asset or property is displayed in three columns: Asset Description, Q
(Quasi-Community Property, identified by a green check mark), and Appraised Value. As you enter
assets, a running total is displayed under the listing, labeled Total Community Assets.
Entries of actual assets are highlighted in yellow.
To view all asset descriptions,move the vertical scroll bar on the right side of the screen. To view only
the main title, Assets, in the Asset Description column, click the
or symbols on the listing to
expand or contract a particular category.
Locating Asset Descriptions
·
Use the scroll bar at the right side of the window to scroll through the list.
·
Click on the top entry of the window,
Assets, and type the first letter of the description you
214
ProDoc Software Manual
wish to locate. Each letter you enter will move the highlight through the list to the next
description beginning with the letter. When it reaches the end, it will start again at the first
matching description.
·
Enter a search word or phrase in the blank field above the Asset Description column and click
Find. The first description title that contains the word or phrase will be highlighted. Each time
you click Find, the next matching asset will be highlighted, and the highlight will continue
through the list of matches, then start again at the first match. If no matches exist, a window will
appear to tell you this.
NOTE: Searches and keystroke moves start from the point at which the cursor is positioned.
If you want to search from the beginning, you should place the cursor at the top of
the Asset Description list.
Entering Assets
This is a general overview of the steps to enter assets. For specific help on various types of asset
entries, click the Help button on each asset entry screen.
1. Double-click an asset description, right click a description and select New Asset, or click a
description once and click the New button on the toolbar.
2. A window appears titled with the description you chose. It will display the entry fields
appropriate for the asset.
3. Complete the displayed fields for the asset. These will vary according to the type of asset you are
entering.
4. Check the box if the asset is a Quasi-Community Property.
5. When you are finished, either click the Add Another button to enter another asset in the same
category or click the OK button to return to the Community Property form. The descriptions
and amounts will be listed here.
6. You may edit an entry by double-clicking it, by right-clicking a description and selecting Update
Asset, or by clicking it and clicking the Update button on the toolbar.
7. You may delete an entry by highlighting it and clicking the Delete button on the toolbar, or
right-clicking an asset entry and clicking Delete Asset.
8. You may copy an entry to other conservatees by right clicking an entry and selecting Copy Asset.
A Conservatee Selection window appears and you can select the conservatee(s) to whom you
wish to copy the asset. Also, you may copy entire lists of assets to another conservatee by
selecting Copy Property To on the toolbar.
Using Toolbar Buttons to work with Assets
First, find and click the line containing the asset. You can now use the toolbar buttons at the bottom of
the window to perform the functions indicated below:
New - Add description, value and any other necessary information to an asset entry in the inventory.
Update - Modify a highlighted asset.
Delete - Remove a highlighted asset.
California Conservatorship Inventory & Appraisal
215
Separate Property Form
Figure 5, Separate Property Form
The Separate Property form allows you to enter details regarding the conservatee's separate property
and the value of the property.
Scroll down or click the links to jump to the help section in this topic you want to see:
How Assets are Displayed
215
Locating Asset Descriptions
Entering Assets
215
216
Using Toolbar Buttons
216
How Assets are Displayed
The information for each asset or property is displayed in columns: Asset Description and
Appraised Value. As you enter assets, a running total is displayed under the listing, labeled Total
Separate Assets.
Entries of actual assets are highlighted in yellow.
You can click the
or
symbols on the listing to expand or contract a particular category.
Locating Asset Descriptions
·
Use the scroll bar at the right side of the window to scroll through the list.
216
ProDoc Software Manual
·
Click on the top entry of the window, Assets, and type the first letter of the description you
wish to locate. Each letter you enter will move the highlight through the list to the next
description beginning with the letter. When it reaches the end, it will start again at the first
matching description.
·
Enter a search word or phrase in the blank field above the Asset Description column and click
Find. The first description title that contains the word or phrase will be highlighted. Each time
you click Find, the next matching asset will be highlighted, and the highlight will continue
through the list of matches, then start again at the first match. If no matches exist, a window will
appear to tell you this.
NOTE:
Searches and keystroke moves start from the point at which the cursor is
positioned. If you want to search from the beginning, you should place the cursor
at the top of the Asset Description list.
Entering Assets
This is a general overview of steps to enter assets. For specific help on various types of asset
entries, click the Help button on each asset entry screen.
1. Double-click an asset description, right click a description and select New Asset, or click a
description once and click the New button on the toolbar.
2. A window appears titled with the description you chose. It will display the entry fields
appropriate for the asset.
3. Complete the displayed fields for the asset. These will vary according to the type of asset you are
entering.
4. When you are finished, either click the Add Another button to enter another asset in the same
category or click the OK button to return to the Separate Property form. The descriptions and
amounts will be listed here.
5. You may edit an entry by double-clicking it, by right-clicking a description and selecting Update
Asset, or by clicking it and clicking the Update button on the toolbar.
6. You may delete an entry by highlighting it and clicking the Delete button on the toolbar, or
right-clicking an asset entry and clicking Delete Asset.
7. You may copy an entry to other conservatees by right clicking an entry and selecting Copy Asset.
A Conservatee Selection window appears and you can select the conservatee(s) to whom you
wish to copy the asset. Also, you may copy entire lists of assets to another conservatee by
selecting Copy Property To on the toolbar.
Using Toolbar Buttons to Work with Assets
First, find and click the line containing the asset. You can now use the toolbar buttons at the bottom of
the window to perform the functions indicated below:
New - Add description, value and any other necessary information to an asset to the inventory.
Update - Modify a highlighted asset.
Delete - Remove a highlighted asset.
California Conservatorship Inventory & Appraisal
217
View Attachment 1 Form
Figure 6, Attachment 1 Property Form
This form is completed automatically as you enter assets. It displays asset descriptions, appraised values
and the total appraised value for the asset types appraised by the Conservator that are still held by the
estate at the close of the accounting period. You cannot edit entries on this form.
You can click the
or
symbols on the listing to expand or contract a particular category.
Locating Asset Descriptions
·
Use the scroll bar at the right side of the window to scroll through the list if it is longer than the
viewable area.
·
Click on the top asset entry in the Asset Description column and type the first letter of the
description you wish to locate. Each letter you enter will move the highlight through the list to
the next description beginning with the letter. When it reaches the end, it will start again at the
first matching description.
·
Enter a search word or phrase in the blank field above the Asset Description column and click
Find. The first description title that contains the word or phrase will be highlighted. Each time
you click Find, the next matching asset will be highlighted, and the highlight will continue
through the list of matches, then start again at the first match. If no matches exist, a window will
appear to tell you this.
NOTE:
Searches and keystroke moves start from the point at which the cursor is positioned.
If you want to search from the beginning, you should place the cursor at the top of
the Asset Description list.
218
ProDoc Software Manual
View Attachment 2 Form
Figure 7, Attachment 2 Form
This form is completed automatically as you enter assets. It displays asset descriptions, appraised values
and the total appraised value for the asset types appraised by the Probate Referee that are still held by
the estate at the close of the accounting period. You cannot edit entries on this form.
You can click the
or
symbols on the listing to expand or contract a particular category.
Locating Asset Descriptions
·
Use the scroll bar at the right side of the window to scroll through the list if it is longer than the
viewable area.
·
Click on the top asset entry in the Asset Description column and type the first letter of the
description you wish to locate. Each letter you enter will move the highlight through the list to
the next description beginning with the letter. When it reaches the end, it will start again at the
first matching description.
·
Enter a search word or phrase in the blank field above the Asset Description column and click
Find. The first description title that contains the word or phrase will be highlighted. Each time
you click Find, the next matching asset will be highlighted, and the highlight will continue
through the list of matches, then start again at the first match. If no matches exist, a window will
appear to tell you this.
NOTE:
Searches and keystroke moves start from the point at which the cursor is
positioned. If you want to search from the beginning, you should place the cursor
at the top of the Asset Description list.
California Conservatorship Inventory & Appraisal
219
Asset Description Categories
Attachment 1 Property Overview
Asset description categories which qualify as Attachment 1 Property are shown below. Since the entry
fields vary considerably across these asset windows, please click the Help button on each asset window
for detailed help with entering information for the asset.
Cash
Check Issued Before Appointment of Conservator
Check Issued After Appointment of Conservator
Bank Accounts
Certificates of Deposit
Money Market Account
Life or Accident Policies Paid to Estate in Lump Sum
Retirement Plans or Annuities Paid to Estate in Lump Sum
Other Attachment 1 Property
Figure 8, Certificate of Deposit
Button Descriptions and Functions
Help - Click this button to see help on completing specific asset windows.
Add Another - This button will only appear when you are adding a new asset. Click this button to
add another asset of the same type.
OK - When you are finished adding assets of this type, click this button to add the asset information
to the Conservatorship Inventory & Appraisal program and close the window.
Cancel - Click this button to close the window. Your entries will not be saved.
Real Estate Overview
Asset description categories in the Real Estate listing are shown below. Click Entering Asset
Information 220 or scroll down to see general help for entering information for assets in this listing.
Click the Help button on each asset window to see detailed help for entering information for the asset.
Vacant Land
Agricultural Land
Single Family Residence
Condominium
220
ProDoc Software Manual
Leasehold Interest
Stock Cooperatives
Residential Income Producing Property
Commercial or Industrial Property
Life Estate
Remainder and Reversionary Interest
Time Share Interest
Other Real Estate
If a real estate asset doesn't fit into any other category, enter the asset in the Other Real Estate
category.
Entering Asset Information. The asset description window opens with three fields for entering data:
the Property Address field, the Appraised Value field, and the Property Description field. If you
are entering assets on the Community Property form, it also contains a check box for selecting
Quasi-Community Property.
Figure 9, Example Vacant Land Entry
Click the Help button for detailed help with entering information for each asset.
Property Address - Enter the physical address of the property in line form (i.e., 101 Oak Street,
Bakersfield, CA 94704).
Appraised Value (from referee) - Enter the referee-appraised value of the real estate or interest.
Quasi-Community Property - This check box is only displayed when you enter assets on the
Community Property form. Click the box if the real estate qualifies as Quasi-Community Property.
A green check mark will be displayed in the Q column for the asset on property forms after you
complete the asset entry. You can remove the check mark by clicking the box again.
California Conservatorship Inventory & Appraisal
221
Property Description - Enter the complete legal description of the asset. Click the Help button to
see a detailed description of the information required for the field.
Button Descriptions and Functions
Help - Click this button to see help on completing specific Real Estate asset windows.
Add Another - This button will only appear when you are adding a new asset. Click this button to
add another asset of the same type.
OK - When you are finished adding assets of this type, click this button to add the asset information
to the Conservatorship Inventory & Appraisal program and close the window.
Cancel - Click this button to close the window. Your entries will not be saved.
Business Interests Overview
Asset description categories in the Business Interests listing are shown below. Click Entering Asset
Information 221 or scroll down to see general help for entering information for assets in this listing.
Click the Help button on each asset window to see detailed help for entering information for the asset.
Closely Held Corporation
Limited Partnerships
General Partnerships
Sole Proprietorships
Limited Liability Companies
Other Business
If a business asset doesn't fit into any other category, enter the asset in the Other Business category.
Entering Asset Information
The window used for business interests assets contains two fields. If you are entering assets on the
Community Property form, it also contains a check box.
Figure 10, Limited Partnership Example
Description - Enter a description of the business interest. Click the Help button to see a detailed
description of required entries for each business interest.
Appraised Value (from referee) - Enter the referee-appraised value of the business interest.
Quasi-Community Property - This check box is only displayed when you enter assets on the
Community Property form. Click the box if the business interest qualifies as Quasi-Community
222
ProDoc Software Manual
Property. A green check mark will be displayed in the Q column for the asset on property forms after
you complete the asset entry. You can remove the check mark by clicking the box again.
Button Descriptions and Functions
Help - Click this button to see help on completing specific Business Interests asset windows.
Add Another - This button will only appear when you are adding a new asset. Click this button to
add another asset of the same type.
OK - When you are finished adding assets of this type, click this button to add the asset information
to the Conservatorship Inventory & Appraisal program and close the window.
Cancel - Click this button to close the window. Your entries will not be saved.
Tangible Personal Property Overview
Asset description categories in the Tangible Personal Property listing are shown below. Click
Entering Asset Information 222 or scroll down to see general help for entering information for assets in
this listing. Click the Help button on each asset window to see detailed help for entering information for
the asset.
Furniture, Furnishings and Miscellaneous
Jewelry
Coins or Stamps
Work of Art
Mobile Homes
Motor Vehicles
Boat, Airplane
Livestock and Breeding Animals
Other Personal Property
If a personal property asset doesn't fit into any other category, enter the asset in the Other Personal
Property category.
Entering Asset Information
The window used for personal property assets contains two fields. If you are entering assets on the
Community Property form, it also contains a check box.
Figure 11, Example Tangible Personal Property Entries
Description - Enter a description of the property. Click the Help button to see a detailed
California Conservatorship Inventory & Appraisal
223
description of required entries for each type of property.
Appraised Value (from referee) - Enter the referee-appraised value of the personal property asset.
Quasi-Community Property - This check box is only displayed when you enter assets on the
Community Property form. Click the box if the personal property asset qualifies as
Quasi-Community Property. A green check mark will be displayed in the Q column for the asset on
property forms after you complete the asset entry. You can remove the check mark by clicking the
box again.
Button Descriptions and Functions
Help - Click this button to see help on completing specific Tangible Personal Property asset
windows.
Add Another - This button will only appear when you are adding a new asset. Click this button to
add another asset of the same type.
OK - When you are finished adding assets of this type, click this button to add the asset information
to the Conservatorship Inventory & Appraisal program and close the window.
Cancel - Click this button to close the window. Your entries will not be saved.
Debt or Promissory Notes Owed to the Conservatee
Figure 12, Debt or Promissory Note Owed to the Conservatee
To enter a debt or promissory note owed to the conservatee, or to update existing asset descriptions in
this category, follow the steps below:
1. Enter a Description in the designated field. Include the terms of the note, such as the date of
the debt or note and the final date due, the names of the borrowers, the original amount
borrowed, the payment amount and dates of scheduled payments, the interest rate, and any
security for the loan. If real property secures the loan, include either the Assessor's Parcel
Number or the legal description of the property. Example: "Promissory note for an unsecured
loan made to John and Mary Doe on May 23, 2006, in the original principal amount of $10,000.00,
earning interest at the rate of 8%, due in a single payment of principal and accrued interest on
May 23, 2007."
2. Enter the Value of the debt or note. The program will convert whole dollar entries to currency
format for you.
3. Enter the amount of any Accrued Interest for the debt or note that had accrued as of the date of
appointment of the Conservator but had not yet been credited.
224
ProDoc Software Manual
4. If you are adding/updating an asset on the Community Property form, the Quasi-Community
Property check box is displayed. Click the box if the asset qualifies as Quasi-Community
Property. A green check mark will then be displayed in the Q column for the asset on the
Community Property form after you complete the asset entry. You can remove the check mark
by clicking the box again.
Button Descriptions and Functions
Help - Click this button to see help on completing the asset window.
Add Another - This button will only appear when you are adding a new asset. Click this button to
add another asset of the same type.
OK - When you are finished adding assets of this type, click this button to add the asset information
to the Conservatorship Inventory & Appraisal program and close the window.
Cancel - Click this button to close the window. Your entries will not be saved.
Securities Overview
Asset description categories in the Securities listing are shown below. Click Entering Asset
Information 224 or scroll down to see general help for entering information for assets in this listing.
Click the Help button on each asset window to see detailed help for entering information for the asset.
Brokerage Accounts
Brokerage Account Securities
Common and Preferred Stocks
Mutual Funds
Stock Options
Corporate, State and Municipal Bonds
United States Treasury Notes and Bonds
Ginnie Mae (GNMA), Fannie Mae (FNMA), and Freddie Mac (FHLMC) Security
United States Savings Bonds
Other Securities
If a Securities asset doesn't fit into any other category, enter the asset in the Other Securities
category.
Entering Asset Information
The window used for Securities assets contains two fields. If you are entering assets on the
Community Property form, it also contains a check box.
California Conservatorship Inventory & Appraisal
225
Figure 13, US Savings Bond
Description - Enter a description of the security. Click the Help button to see a detailed description
of required entries for each type of security.
Appraised Value (from referee) - Enter the referee-appraised value of the security.
Quasi-Community Property - This check box is only displayed when you enter assets on the
Community Property form. Click the box if the security qualifies as Quasi-Community Property.
A green check mark will be displayed in the Q column for the asset on property forms after you
complete the asset entry. You can remove the check mark by clicking the box again.
Button Descriptions and Functions
Help - Click this button to see help on completing specific Securities asset windows.
Add Another - This button will only appear when you are adding a new asset. Click this button to
add another asset of the same type.
OK - When you are finished adding assets of this type, click this button to add the asset information
to the Conservatorship Inventory & Appraisal program and close the window.
Cancel - Click this button to close the window. Your entries will not be saved.
Other Intangible and Unscheduled Property
This window helps you enter assets which do not fit into any other listed category. To enter new assets or
update existing asset descriptions in this category, follow the steps below:
1. Enter a Description of the asset in the designated field. Include a full description of intangible
property not included in any of the previously described categories that was owned by the
conservatee. Example: "Copyright and future royalty stream from 2001 book, 'The Life and
Times of J.J. Schmidt', ISBN no. 1234567890, published by Narcissus Press."
2. Enter the Appraised Value (from referee) of the property. The program will convert whole
dollar entries to currency format for you.
3. If you are adding/updating an asset on the Community Property form, the Quasi-Community
Property check box is displayed. Click the box if the asset qualifies as Quasi-Community
Property. A green check mark will then be displayed in the Q column for the asset on the
Community Property form after you complete the asset entry. You can remove the check mark
by clicking the box again.
Button Descriptions and Functions
Help - Click this button to see help on completing the asset window.
Add Another - This button will only appear when you are adding a new asset. Click this button to
226
ProDoc Software Manual
add another asset of the same type.
OK - When you are finished adding assets of this type, click this button to add the asset information
to the Conservatorship Inventory & Appraisal program and close the window.
Cancel - Click this button to close the window. Your entries will not be saved.
Selecting a Case
Use the Select a Case window to choose a client
and case file in which to save the information you
input. It lists existing ProDoc clients and all cases
for the clients. You can use it to see and modify
related client/case data and create new clients and
cases.
You can select a case to use by either of the
methods listed below:
·
Double-click a displayed case.
·
Click on a displayed case and then press
the Enter key.
·
Click on a displayed case and then click the
Select Case button.
Figure 14, Selecting a Case Window
To find a case that's not displayed:
·
Type the first letter(s) of a client's name to jump to that client's entry on the tree. To do this more
than once, use the backspace key to clear your previous letter entries.
·
Use the scroll bar on the right of the form to quickly scroll through the list. You can also click on
any entry on the left and scroll with keyboard page up, page down, and up/down arrow keys.
·
Use the Now Showing: drop down arrow to choose the types of contacts or clients to display.
Cases are grouped under clients, who are grouped in alphabetical order. Categories will be
displayed with type icons of different colors on the window. The default is Active Clients. Other
choices are All Contacts and Cases, Closed Clients, Private Clients and Non-Clients.
·
Use the Hide/Show Cases toggle button to display or hide cases. Likewise, you can click the
or symbols in the client tree to reveal or hide cases.
California Conservatorship Inventory & Appraisal
227
Select a Date Window
This window helps you quickly complete date fields. Tools and buttons
on this calendar tool, depicted as Figure 15, include:
·
and
- Click to move back or forward one year.
·
and
- Click to move back or forward one month.
·
and
- Click to move back or forward one week.
·
Use Up and Down arrow keys to move back and forward one
week.
·
Use Left and Right arrow keys to move back and forward one
day.
·
Click Today to move the underline/highlight to today's date.
·
Click on the date to choose it or press the Enter key to choose
the underlined date.
·
Click Cancel to close the calendar without choosing a date.
Figure 15, Select a Date Window
228
ProDoc Software Manual
Conservatorship Accounting
Getting Started
It's easy to produce an estate accounting for your conservatorship matters with the Conservatorship
Accounting program. This program completely eliminates manual calculations, simplifies your work
and dramatically reduces the time necessary to handle conservatorship matters. You need to only list
the necessary information once. ProDoc automatically calculates the value of the estate and prints the
required forms and attachments.
Starting the Program
1. Click PowerPacks ®Conservatorship ® Accounting.
2. The Select a Case 262 window opens. Select a case by double-clicking a visible case title. You
can also click the title once, then press the Enter key or click the Select Case button. Click the
Help button on the window or click here 262 for detailed help for finding and selecting cases.
3. The Conservatorship Accounting program opens to the General tab.
Navigating the Conservatorship Accounting Program
There are nine tabs across the top of the main program window: General 230 , Begin Comm Property
231 , Begin Sep Property 235 , Charges 237 , Credits 240 , End Comm Property 244 , End Sep
Property 246 , Changes in Asset 248 , and Liabilities 249 . Each tab represents a different form. To
move from one form to another, position the cursor over the tab you want to use and click on it.
The tabs labeled Begin Comm Property and End Comm Property are abbreviations for Beginning
Community Property and Ending Community Property. In like manner, the tabs labeled Begin
Sep Property and End Sep Property are abbreviations for Beginning Separate Property and
Ending Separate Property.
You can also use hot keys. Wherever a window, screen or field title shows an underlined character, i.e.,
"Case Number", you can navigate to that entry by holding the "Alt" key and pressing the underlined
keyboard character. In the earlier example, pressing Alt + a on your keyboard puts your cursor in the
Case Number field.
Help With Using the Conservatorship Accounting Program
·
·
·
·
·
·
Click the Help buttons on each window (or press the F1 key).
View or print the ProDoc Software Manual.
View Computer Based Training (CBT) Modules at the ProDoc Website.
Periodic ProDoc user seminars; schedule these at the ProDoc Website.
Call our Customer Support specialists at 1-800-759-5418.
Send email to [email protected].
Main Toolbar
Figure 1, Main Toolbar
The toolbar along the bottom of each of the nine major forms consists of the Help, Copy Property To,
Print, Send to Excel, Save and Continue, Save and Close, and Cancel buttons. This toolbar is
always available while you are using the program. The buttons and their actions are discussed below.
Conservatorship Accounting
229
Help - Click this button to display the help topic for the form or the current window.
Copy Property To - Click this button to copy all accounting information from the current conservatee to
another conservatee with whom you wish to share the information. A box opens titled Conservatee
Selection, displaying the names of all conservatees, and the message, Select Conservatees For Whom
You Want To Copy Accounting Information. Accept the selection of all conservatees, or select only
the names of conservatee(s) for whom you want to copy the accounting information. A box titled Copy
Complete appears with the message All accounting information has been successfully copied
from [conservatee name] to the conservatee(s) you selected.
Print - Click this button to print and/or preview form GC-400/GC-405 accounting forms. Here is the
sequence of events after pressing the Print button:
1.
A box opens titled Conservatee Selection appears with the message, Select Conservatees
For Whom You Want To Print The Accounting. Accept the selection of all or select only the
names of conservatee(s) for whom you want to print the accounting.
2.
A box opens titled Select Type of Accounting with the caption, Type of Accounting for
[Conservatee Name]. Select Standard Account or Simplified Account and click OK.
If you selected Simplified Account a message box may appear titled Confirm with the
message: You have chosen to print a Simplified Accounting, but we have found that you
may have met the Standard Accounting filing requirements. Are you sure that you
want to print the Simplified Account? Click Yes and the Simplified Accounting form
prints. Click No and you are returned to the Select Type of Accounting decision box described
in Step 2.
3.
A box opens titled Preview Standard Account with the message, Do you want to preview
this form? Click Yes to view the form, click No and the forms are sent to your default printer.
4.
After the accounting forms are sent to the printer, a box appears titled Report Progress, with
the message, This is a complex form which will take some time to Complete. The actual
time will depend on the speed of your computer and your free memory available.
Send to Excel - Click this button to send all categories and amounts entered in the program to an Excel
spreadsheet.
1. A box opens titled Conservatee Selection. Accept the selection of All or select only the names of
conservatee(s) for whom you wish to export inventory data to Excel spreadsheets and click OK.
2. A Save CSV File window appears. Accept the name of the conservatee you selected (followed by
a filename extension of .csv) as the filename to be saved or select any filename you wish, but keep
the .csv filename extension. Click Save to save your CSV (comma separated values) file.
3. A Microsoft Excel window opens with the CSV spreadsheet displayed.
Save and Continue - Click this button to save the data that has been entered and continue working
with the program.
Save and Close - Click this button to save the data that has been entered and exit the program.
Cancel - Click this button to exit the program without saving the information that you entered during
the current session.
230
ProDoc Software Manual
General Form
Figure 2, General Form
This form collects name(s) of conservatee(s), case number, accounting period dates, type of accounting,
and accounting number information. A separate Summary Section presents totals of assets on hand at
the beginning of the inventory, totals of property received or disbursed during the inventory period, and
lastly, the totals of assets on hand at the end of the accounting period. This section presents a summation
of the information that you have entered on all of the forms. This section is completed automatically as
you enter information into all of the remaining program forms. You cannot edit entries on this form.
To complete the General Form, perform the following steps:
1. Select Conservatee - Press the Update button. The Conservatee Names popup window
opens and you are prompted to Enter the names of all conservatees. You may create a
separate accounting for each conservatee. Use the New, Update, or Delete buttons to
add, edit, or delete conservatee names. The Add Conservatee, Update Conservatee Name
and Alias, or Confirm Delete window appears, where you can add, update or delete the
names of conservatees and any aliases by which they are known.
2. Case Number: Enter the case number for this conservatee.
3. In the General Accounting Information of [Conservatee Name] section, enter the
Opening Date and Closing Date of the accounting period. Click the calendar icon
easily Select a Date 263 from a pop-up calendar.
4. Enter the Type of Accounting you are performing (Interim or Final) by checking the
appropriate button.
5. Enter the Accounting Number.
to
Conservatorship Accounting
231
Beginning Community Property Form
Figure 3, Beginning Community Property Form
The Beginning Community Property Form collects community property asset information as of the
beginning date of the accounting period.
Scroll down or click the links to jump to the help section in this topic you want to see:
How Assets are Displayed
231
Locating Asset Descriptions
Entering Assets
231
232
Importing Assets
233
Using Toolbar Buttons
235
How Assets are Displayed
The information for each asset or property is displayed in four columns: Asset Description, Q
(Quasi-Community Property, identified by a green check mark), Estimated Market Value, and Carry
Value.
Entries of actual assets are highlighted in yellow.
You can click the
or
symbols on the listing to expand or contract a particular category.
Locating Asset Descriptions
·
Use the scroll bar at the right side of the window to scroll through the list.
232
ProDoc Software Manual
·
Click on the top entry of the window, Assets, and type the first letter of the description you
wish to locate. Each letter you enter will move the highlight through the list to the next
description beginning with the letter. When it reaches the end, it will start again at the first
matching description.
·
Enter a search word or phrase in the blank field above the Asset Description column and click
Find. The first description title that contains the word or phrase will be highlighted. Each time
you click Find, the next matching asset will be highlighted, and the highlight will continue
through the list of matches, then start again at the first match. If no matches exist, a window will
appear to tell you this.
NOTE:
Searches and keystroke moves start from the point at which the cursor is
positioned. If you want to search from the beginning, you should place the cursor
at the top of the Asset Description list.
Entering Assets
This procedure applies to the following forms:
· Beginning Community Property Form
· Beginning Separate Property Form.
· Ending Community Property Form
· Ending Separate Property Form
This is a general overview of the steps to enter assets. For specific help on various types of asset
entries, click the Help button on each asset entry screen.
1.
Double-click an asset description, right click a description and select New Asset, or click a
description once and click the New button on the toolbar.
2.
A window appears titled with the description you chose. It will display the entry fields
appropriate for the asset. When the cursor is placed in a field, a message appears with
explanatory information regarding the information that should be entered.
Expect to see different fields for the various types of assets. For example, real estate topics will
have Property Address, Property Description, and Carry Value fields; whereas cash type
assets will have fields for account Balance and Accrued Interest.
3.
Complete the displayed fields for the asset. These will vary according to the type of asset you are
entering.
4.
In the Description field, enter a complete description of the asset.
5.
In the Comment field, enter any relevant information which might aid in identifying the asset.
6.
In the Name of Inventory field, list the type of inventory. For example: Initial, Partial, Final,
Amended, Supplemental, Reappraisal for Sale, or Property Tax Certificate.
7.
In the Date of Inventory field, list the date the inventory was signed in mm/dd/yyyy format or
click the calendar icon
to use Select a Date
263
calendar tool.
8.
Enter the Estimated Market Value of the asset. The program will convert whole dollar entries
to currency format for you.
9.
Enter the Carry Value of the asset. (The carry value of an asset that is included in an inventory
is its appraised value. The carry value of an asset purchased for the estate after appointment of
the conservator is its purchase price.)
10. In the Amount section (if shown), enter the amount of the asset. The program will convert whole
dollar entries to currency format for you.
11. (This Step applies to the Beginning Community Property Form and the Ending
Community Property Form only.)
Check the box if the asset is Quasi-Community Property. When you are finished, either click the
Add Another button to enter another asset in the same category or click the OK button to return
Conservatorship Accounting
233
to the form in which you were entering assets. The descriptions and amounts will be listed here.
12. (This Step applies to the Ending Community Property Form and the Ending Separate
Property Form only)
Check the box that represents the Property Status of the asset: Still on Hand, Disposed of,
or Acquired.
13. You may edit an entry by double-clicking it, or by clicking it and clicking the Update button on
the toolbar, or by right clicking an asset entry and selecting Update Asset.
14. You may delete an entry by highlighting it and clicking the Delete button on the toolbar, or
right-clicking an asset entry and clicking Delete Asset.
15. You may copy an asset entry to other conservatees by right clicking an entry and selecting Copy
Asset. A Conservatee Selection window appears and you can Select Conservatee(s) For
Whom You Want to Copy Accounting Information. After selecting all or selected names,
click OK and a Copy Complete box appears with the message, The selected item has been
successfully copied from [Conservatee name] to the conservatee(s) you selected. Click
OK and you are returned to the form in which you were entering assets. Also, you may copy
entire lists of assets to another conservatee by selecting Copy Property To on the toolbar.
Importing Assets
The Import Assets button on this form's toolbar allows you to select and import items from the last
Conservatorship Inventory and Appraisal for this conservatee. This procedure applies to the
Beginning Community Property Form and the Beginning Separate Property Form.
This is a general overview of the steps to import assets. For specific help on importing various
types of asset entries, click the Help button on each import asset screen.
1.
You may import an asset from this conservatee's last inventory report by clicking the Import
Assets button. An Import Inventory message appears: This import will overwrite any
assets with same description from the same inventory. Do you want to continue?
Select OK and the Import Assets From Inventory window appears.
234
ProDoc Software Manual
Figure 4, Importing Assets From Inventory Window
2. In the Import Assets From Inventory window:
a.
Select assets from the inventory's Community Property pages or Separate Property
pages.
b.
Click check boxes to select assets to import.
c.
Click OK. The Inventory Information window appears.
Figure 5, Inventory Information Window
3. In the Inventory Information window this message is displayed: Information About the
Inventory From Which You Are Importing: Date of Inventory: [mm/dd/yyyy], Type of
Inventory: [Initial, Partial, Final, Amended, Supplemental, Reappraisal for Sale, Property Tax
Certificate].
Conservatorship Accounting
235
a. Click OK.
b. You are returned to the Beginning Community Property Form or the Beginning
Separate Property Form.
Using Toolbar Buttons to Work With Assets
First, find and click the line containing the asset. You can now use the toolbar buttons at the bottom of
the window to perform the functions indicated below:
New - Add description, value and any other necessary information to an asset entry.
Update - Modify a highlighted asset.
Delete - Remove a highlighted asset.
Import Assets - Select and import assets from this conservatee's last inventory report.
Beginning Separate Property Form
Figure 6, Beginning Separate Property Form
The Beginning Separate Property Form collects separate property asset information as of the
beginning date of the accounting period.
Scroll down or click the links to jump to the help section in this topic you want to see:
How Assets are Displayed
236
Locating Asset Descriptions
Entering Assets
236
236
236
ProDoc Software Manual
Importing Assets
236
Using Toolbar Buttons
236
How Assets are Displayed
The information for each asset or property is displayed in three columns: Asset Description,
Estimated Market Value, and Carry Value.
Entries of actual assets are highlighted in yellow.
You can click the
or
symbols on the listing to expand or contract a particular category.
Locating Asset Descriptions
·
Use the scroll bar at the right side of the window to scroll through the list.
·
Click on the top entry of the window, Assets, and type the first letter of the description you
wish to locate. Each letter you enter will move the highlight through the list to the next
description beginning with the letter. When it reaches the end, it will start again at the first
matching description.
·
Enter a search word or phrase in the blank field above the Asset Description column and click
Find. The first description title that contains the word or phrase will be highlighted. Each time
you click Find, the next matching asset will be highlighted, and the highlight will continue
through the list of matches, then start again at the first match. If no matches exist, a window will
appear to tell you this.
NOTE:
Searches and keystroke moves start from the point at which the cursor is
positioned. If you want to search from the beginning, you should place the cursor at
the top of the Asset Description list.
Entering Assets
See the Entering Assets 232 procedure in the Beginning Community Property Form for a general
overview of the steps to enter assets.
Importing Assets
See the Importing Assets procedure in the Beginning Community Property Form for a general
overview of the steps to import assets.
Using Toolbar Buttons to Work With Assets
First, find and click the line containing the asset. You can now use the toolbar buttons at the bottom of
the window to perform the functions indicated below:
New - Add description, value, and any other necessary information to an asset to the inventory.
Update - Modify a highlighted asset.
Delete - Remove a highlighted asset.
Import Assets - Select and import assets from this conservatee's last inventory report.
Conservatorship Accounting
237
Charges Form
Figure 7, Charges Form
The Charges Form collects information on all charges received during the accounting period that are not
shown on the beginning inventory. Charges are payments received from all sources, including income
from trade or business, dividends, interest, pensions, rent, Social Security or other benefits, and gains on
sales.
If the entries involve gains on sales of assets or other adjustments to the carrying values of assets, they
should be entered on Schedule B (at the bottom of this form).
Scroll down or click the links to jump to the help section in this topic you want to see:
How Charges are Displayed
237
Locating Charge Descriptions
Entering Charges
238
238
Using Toolbar Buttons
239
How Charges are Displayed
The information for each charge is displayed in three columns: Description, Date of Receipt, and
Amounts.
Entries of actual charges are highlighted in yellow.
You can click the
or
symbols on the listing to expand or contract a particular category.
238
ProDoc Software Manual
Locating Charge Descriptions
·
Use the scroll bar at the right side of the window to scroll through the list.
·
Click on the top entry of the window, Receipts, and type the first letter of the description you
wish to locate. Each letter you enter will move the highlight through the list to the next
description beginning with the letter. When it reaches the end, it will start again at the first
matching description.
·
Enter a search word or phrase in the blank field above the Description column and click Find.
The first description title that contains the word or phrase will be highlighted. Each time you
click Find, the next matching charge item will be highlighted, and the highlight will continue
through the list of matches, then start again at the first match. If no matches exist, a window will
appear to tell you this.
NOTE:
Searches and keystroke moves start from the point at which the cursor is
positioned. If you want to search from the beginning, you should place the cursor
at the top of the Description list.
Entering Charges
This is a general overview of the steps to enter charges. For specific help on various types of
charge entries, click the Help button on each charge entry screen.
To enter data on the Charges Form, perform the following steps:
1. Double-click a charge description, right click a description and select New Charge Item, or click
a description once and click the New button on the toolbar.
2. A window appears, titled with the description you chose. It will display the entry fields
appropriate for the charge item. When the cursor is placed in a field, a message appears with
explanatory information regarding the information that should be entered.
3. Complete the displayed fields for the charge item. These will vary according to the type of charge
you are entering.
4. In the Description field, enter a complete description of the charge item.
5. In the Comment section, enter any relevant information which might aid in identifying the
charge item.
6. Enter the Date of Receipt for each entry in mm/dd/yyyy format or click the calendar icon
use a Select a Date 263 that makes it easy to add a date.
to
7. In the Amount section, enter the amount of the received payment. The program will convert
whole dollar entries to currency format for you.
8. For Gains on Sales (Schedule B) assets, use the Sale Price, Carry Value, and Gain fields to
compute the net value received on the sale.
9. For Net Income From Trade or Business, use the fields for the Name of Business and, in
another Business Transactions window, use the fields for Description of the transaction,
Comment, Date of Transaction, and Amount.
10. When you are finished, either click the Add Another button to enter another charge item in the
same category or click the OK button to return to the Charges Form. The descriptions and
amounts will be listed here.
11. You may edit an entry by double-clicking it, or right-clicking an asset entry and clicking Update
Charges, or by clicking it and clicking the Update button on the toolbar.
12. You may delete an entry by highlighting it and clicking the Delete button on the toolbar, or
right-clicking a charge entry and clicking Delete Charges.
Conservatorship Accounting
239
13. You may copy a charge item entry to other conservatees by right clicking an entry and selecting
Copy Charge. A Conservatee Selection window appears and you can Select Conservatee(s)
For Whom You Want to Copy Accounting Information. After selecting all or selected names,
click OK and a Copy Complete box appears with the message, The selected item has been
successfully copied from [Conservatee name] to the conservatee(s) you selected. Click
OK and you are returned to the Charges Form. Also, you may copy entire lists of charges,
credits, and assets to another conservatee by selecting Copy Property To on the toolbar.
Using Toolbar Buttons
First, find and click the line containing the asset. You can now use the toolbar buttons at the bottom of
the window to perform the functions indicated below:
New - Add description, value and any other necessary information to a charge item.
Update - Modify a highlighted charge item.
Delete - Remove a highlighted charge item.
Charges Overview
Asset description categories which qualify as charge items are shown below. Since the entry fields vary
considerably across these asset windows, please click the Help button on each asset window for detailed
help with entering information for the charge item.
Dividends
Interest
Pensions, Annuities, and Other Regular Periodic Payments
Rental Income
Social Security, Veterans, Other Public Benefits
Other Receipts
Gains on Sales
Other Charges
Net Income From Trade or Business
Figure 8, Rental Income
240
ProDoc Software Manual
To enter new charge receipts or update existing receipt descriptions in this category, perform the
following steps:
1. In the Description field, enter a description of the charge item. Click the Help button to see a
detailed description of required entries for each type of receipt.
2. In the Comment section add any information you feel would help in understanding the
information in any of the fields.
3. Enter the Date of Receipt of the payment in mm/dd/yyyy format or click the calendar icon
use the Select a Date 263 calendar tool.
to
4. Enter the Amount of this receipt. The program will convert whole dollar entries to currency
format for you.
Button Descriptions and Functions
Help - Click this button to see help on completing this window.
Add Another - This button will only appear when you are adding a new charge item. Click this button to
add another charge of the same type.
OK - When you are finished adding receipts of this type, click this button to add the information to the
Conservatorship Accounting program and close the window.
Cancel - Click this button to close the window. Your entries will not be saved.
Credits Form
Figure 9, Credits Form
Conservatorship Accounting
241
The Credits Form collects information on all disbursements, distributions, losses on sales, other credits,
or net loss from trade or business occurring during the accounting period that are not shown on the
beginning inventory.
If the entries involve losses on the sale of assets or adjustments to the carrying values of assets, they
should be entered on Schedule D (at the bottom of this form).
Scroll down or click the links to jump to the help section in this topic you want to see:
How Credits are Displayed
241
Locating Credit Descriptions
Entering Credits
241
241
Using Toolbar Buttons
242
How Credits are Displayed
The information for each disbursement, distribution, or loss is displayed in three columns: Description,
Date of Payment, and Amounts
Entries of actual disbursement, distribution, or loss are highlighted in yellow.
You can click the
or
symbols on the listing to expand or contract a particular category.
Locating Credit Descriptions
·
Use the scroll bar at the right side of the window to scroll through the list.
·
Click on the top entry of the window, Disbursements, and type the first letter of the
description you wish to locate. Each letter you enter will move the highlight through the list to
the next description beginning with the letter. When it reaches the end, it will start again at the
first matching description.
·
Enter a search word or phrase in the blank field above the Description column and click Find.
The first description title that contains the word or phrase will be highlighted. Each time you
click Find, the next matching asset will be highlighted, and the highlight will continue through
the list of matches, then start again at the first match. If no matches exist, a window will appear
to tell you this.
NOTE:
Searches and keystroke moves start from the point at which the cursor is positioned.
If you want to search from the beginning, you should place the cursor at the top of
the Description list.
Entering Credits
This is a general overview of the steps to enter assets. For specific help on various types of credit
entries, click the Help button on each credit entry screen.
1. Double-click a credit description, right click a description and select New Credit, or click a
description once and click the New button on the toolbar.
2. A window will appear titled with the description you chose. It will display the entry fields
appropriate for the asset. When the cursor is placed in a field, a message appears with
explanatory information regarding the information that should be entered.
3. Complete the displayed fields for the credit. These will vary according to the type of credit you are
entering.
4. In the Comment section, enter any relevant information which might aid in identifying the
credit.
242
ProDoc Software Manual
5. Enter the Date of Payment in mm/dd/yyyy format or use the calendar icon
a Date 263 calendar tool.
to use the Select
6. Enter the Amount of the payment. The program will convert whole dollar entries to currency
format for you.
7. For Losses on Sales (Schedule D) assets, use the Carry Value, Sale Price, and Amount of
Loss fields to compute the amount of loss on the sale.
8. For payments for Fiduciary and Attorney Fees and Distributions to Conservatee, provide
the Date of Order authorizing each distribution.
9. When you are finished, either click the Add Another button to enter another credit in the same
category or click the OK button to return to the Credits Form. The descriptions and amounts
will be listed here.
10. You may edit an entry by double-clicking it, right click a description and select Update Credit, or
by clicking it and clicking the Update button on the toolbar.
11. You may delete an entry by highlighting it and clicking the Delete button on the toolbar, or
right-clicking an asset entry and clicking Delete Credit.
12. You may copy a credit entry to other conservatees by right clicking an entry and selecting Copy
Credit. A Conservatee Selection window appears and you can Select Conservatee(s) For
Whom You Want to Copy Accounting Information. After selecting all or selected names,
click OK and a Copy Complete box appears with the message, The selected credit item has
been successfully copied from [Conservatee name] to the conservatee(s) you selected.
Click OK and you are returned to the Credits Form. Also, you may copy entire lists of credits
and assets to another conservatee by selecting Copy Property To on the toolbar.
Using Toolbar Buttons to Work With Credits
First, find and click the line containing the asset. You can now use the toolbar buttons at the bottom of
the window to perform the functions indicated below:
New - Add description, value and any other necessary information to an asset entry.
Update - Modify a highlighted asset.
Delete - Remove a highlighted asset.
Credits Overview
Asset description categories which qualify as Credits Form disbursements, distributions, or losses are
shown below. Since the entry fields vary considerably across these credit windows, please click the Help
button on each credit window for detailed help with entering information for the disbursement.
Caregiver
Residential or Long-Term Care Facilities
Education
Fiduciary and Attorney Fees
General Administration
Investments
Living Expenses
Medical Expenses
Sale of Property
Rental Property Expenses
Conservatorship Accounting
243
Other Expenses
Losses on Sales
Distributions to Conservatee
Other Credits
Net Loss From Trade or Business
Figure 10, Residential or Long-Term Care Facilities Expenses
To enter new disbursements or update existing descriptions in this category, perform the following steps:
1. In the Description field, enter a description of the disbursement. Click the Help button to see a
detailed description of required entries for each type of disbursement.
2. In the Comment section add any information you feel would help in understanding the
information in any of the fields.
3. Enter the Date of Payment of the disbursement in mm/dd/yyyy format or click the calendar icon
to use the Select a Date
263
calendar tool.
4. Enter the Check Number.
5. Enter the Amount of this disbursement. The program will convert whole dollar entries to
currency format for you.
Button Descriptions and Functions
Help - Click this button to see help on completing this window.
Add Another - This button will only appear when you are adding a new disbursement. Click this button
to add another disbursement of the same type.
OK - When you are finished adding disbursement of this type, click this button to add the disbursement
information to the Conservatorship Accounting program and close the window.
Cancel - Click this button to close the window. Your entries will not be saved.
244
ProDoc Software Manual
Ending Community Property Form
Figure 11, Ending Community Property Form
The Ending Community Property Form collects community property asset information as of the
ending date of the accounting period. All assets appearing in the Beginning Community Property
Form automatically appear in the Ending Community Property Form. If the status or condition of
the asset has changed; its value appreciated or depreciated; the asset has been sold or otherwise disposed
of; such asset information should be edited or updated to reflect its value as of the ending date of the
accounting period.
Schedule E (Attachment 1) cash-type assets are assets that may be appraised by the conservator and
listed on Attachment 1 of the inventory. All other non-cash assets must be appraised by a probate referee
and listed on Attachment 2 of the inventory and appraisal. List all non-cash assets, group them by the
inventory in which their latest appraised values appear, or if none, as after-acquired assets in order of
their purchase dates.
Scroll down or click the links to jump to the help section in this topic you want to see:
How Assets are Displayed
244
Locating Asset Descriptions
Entering Assets
245
245
Using Toolbar Buttons
245
How Assets are Displayed
The information for each asset or property is displayed in five columns: Asset Description, Q
(Quasi-Community Property, identified by a green check mark), Property Status (Still on Hand,
Disposed of, and Acquired), Estimated Market Value, and Carry Value.
Conservatorship Accounting
245
Entries of actual assets are highlighted in yellow.
You can click the
or
symbols on the listing to expand or contract a particular category.
Locating Asset Descriptions
·
Use the scroll bar at the right side of the window to scroll through the list.
·
Click on the top entry of the window, Assets, and type the first letter of the description you
wish to locate. Each letter you enter will move the highlight through the list to the next
description beginning with the letter. When it reaches the end, it will start again at the first
matching description.
·
Enter a search word or phrase in the blank field above the Asset Description column and click
Find. The first description title that contains the word or phrase will be highlighted. Each time
you click Find, the next matching asset will be highlighted, and the highlight will continue
through the list of matches, then start again at the first match. If no matches exist, a window will
appear to tell you this.
NOTE:
Searches and keystroke moves start from the point at which the cursor is
positioned. If you want to search from the beginning, you should place the cursor
at the top of the Asset Description list.
Entering Assets
All of the assets listed in the Beginning Community Property Form are automatically entered in
this Ending Community Property Form. Likewise, All of the assets listed in the Beginning
Separate Property Form are automatically listed in the Ending Separate Property Form.
See the Entering Assets 232 procedure in the Beginning Community Property Form for a general
overview of the steps to enter assets.
Using Toolbar Buttons to Work With Assets
First, find and click the line containing the asset. You can now use the toolbar buttons at the bottom of
the window to perform the functions indicated below:
New - Add description, value and any other necessary information to an asset entry.
Update - Modify a highlighted asset.
Delete - Remove a highlighted asset.
246
ProDoc Software Manual
Ending Separate Property Form
Figure 12, Ending Separate Property Form
This form collects separate property assets as of the ending date of the accounting period. All assets
appearing in the Beginning Separate Property Form automatically appear in the Ending Separate
Property Form. If the status or condition of the asset has changed; its value appreciated or depreciated;
the asset has been sold or otherwise disposed of; such asset information should be edited or updated to
reflect its value as of the ending date of the accounting period.
Schedule E (Attachment 1) cash-type assets are assets that may be appraised by the conservator and
listed on Attachment 1 of the inventory. All other non-cash assets must be appraised by a probate referee
and listed on Attachment 2 of the inventory and appraisal. List all non-cash assets, group them by the
inventory in which their latest appraised values appear, or if none, as after-acquired assets in order of
their purchase dates.
You will only need to enter new assets acquired through either the Charges Form or the Credits Form.
Scroll down or click the links to jump to the help section in this topic you want to see:
How Assets are Displayed
246
Locating Asset Descriptions
Entering Assets
247
247
Using Toolbar Buttons
247
How Assets are Displayed
The information for each asset or property is displayed in four columns: Asset Description, Property
Status (Still on Hand, Disposed of, and Acquired), Estimated Market Value, and Carry Value.
Conservatorship Accounting
247
Entries of actual assets are highlighted in yellow.
You can click the
or
symbols on the listing to expand or contract a particular category.
Locating Asset Descriptions
·
Use the scroll bar at the right side of the window to scroll through the list.
·
Click on the top entry of the window, Assets, and type the first letter of the description you
wish to locate. Each letter you enter will move the highlight through the list to the next
description beginning with the letter. When it reaches the end, it will start again at the first
matching description.
·
Enter a search word or phrase in the blank field above the Asset Description column and click
Find. The first description title that contains the word or phrase will be highlighted. Each time
you click Find, the next matching asset will be highlighted, and the highlight will continue
through the list of matches, then start again at the first match. If no matches exist, a window will
appear to tell you this.
NOTE:
Searches and keystroke moves start from the point at which the cursor is
positioned. If you want to search from the beginning, you should place the cursor
at the top of the Asset Description list.
Entering Assets
All of the assets listed in the Beginning Community Property Form are automatically entered in
the Ending Community Property Form. Likewise, All of the assets listed in the Beginning
Separate Property Form are automatically listed in this Ending Separate Property Form.
See the Entering Assets 232 procedure in the Beginning Community Property Form for a general
overview of the steps to enter assets.
Using Toolbar Buttons to Work With Assets
First, find and click the line containing the asset. You can now use the toolbar buttons at the bottom of
the window to perform the functions indicated below:
New - Add description, value, and any other necessary information to an asset to the inventory.
Update - Modify a highlighted asset.
Delete - Remove a highlighted asset.
248
ProDoc Software Manual
Changes in Asset
Figure 13, Changes in Assets Form
This form allows you to record all transactions that changed the form of assets during the accounting
period. If the entries reflect changes in asset values, they should also be recorded in one of the
appropriate forms (Charges Form, Credits Form, Ending Community Property Form, or Ending
Separate Property Form).
Click New to enter information on changes in the form of assets. The Changes in Form of Asset
During Accounting Period 248 window appears.
Using Toolbar Buttons to Work With Assets
First, find and click the line containing the asset. You can now use the toolbar buttons at the bottom of
the window to perform the functions indicated below:
New - Add description, value, and any other necessary information to an asset to the inventory.
Update - Modify a highlighted asset.
Delete - Remove a highlighted asset.
Changes in Form of Asset During Accounting Period
The Changes in Form of Asset During the Accounting Period window is where you record
transactions that affect a change in the form of an asset. These are transactions that may report damage
to an asset, appreciation or depreciation over time, zoning, condemnation, purchases of additional assets
Conservatorship Accounting
249
of the same type, or other proceedings that affect the form of an asset.
To record entries in the Changes in Form of Asset During the Accounting Period fields, perform
the following steps:
1. In the Description field, enter all available information concerning the change. For example:
Purchase of an additional 400 shares of ABC preferred Stock, Series "C," NASDAQ ticker symbol
ABCC, CUSIP No. XXXXX5678 at the price of $27.00/share, plus $15 brokerage transaction fee.
2. In the Comment field, add any information you feel would help in understanding the change in
the form of the asset information in any of the fields. For example, This purchase of 400 shares,
together with the current position of 100 shares, changes the asset form to 500 shares on hand.
3. Enter the Date in mm/dd/yyyy format or click the calendar icon
from a pop-up calendar.
to easily Select a Date
263
Button Descriptions and Functions
Help - Click this button to see help on completing this window.
Add Another - This button will only appear when you are adding a new liability. Click this button to add
another liability.
OK - When you are finished adding liabilities of this type, click this button to add the information to the
Conservatorship Accounting program and close the window.
Cancel - Click this button to close the window. Your entries will not be saved.
Liabilities
Figure 14, Liabilities Form
250
ProDoc Software Manual
The Liabilities Form allows you to list those liabilities of the estate or trust as of the ending date of the
accounting period.
All of the following shall be included as liabilities as of the ending date of the accounting period:
·
All liabilities which are a lien on estate or trust assets.
·
Taxes due but unpaid as shown on filed returns, or assessments received subsequent to the filing
of returns.
·
All notes payable as of the ending date of the accounting period.
·
Any judgments for which the estate or trust is liable.
·
Any other material liability.
The following current and future periodic payments are not to be included on this form:
·
Rents
·
Salaries
·
Utility payments
·
Other recurring payments
Click New to enter liability information. The Liabilities at End of Account Period
appears.
250
window
Ending Liabilities
To enter liabilities as of the ending date of the accounting period, perform the following steps:
1. In the Description field, enter all available information concerning the liability. For example:
Treasurer of the US, Internal Revenue Service, Letter No. 07-329754 dated July 23, 2007, Subject
"CY 2004 Federal Income Tax Return - Assessment of Levy, Penalties, and Interest."
2. In the Comment section add any information you feel would help in understanding the
information in any of the fields.
Button Descriptions and Functions
Help - Click this button to see help on completing this window.
Add Another - This button will only appear when you are adding a new liability. Click this button to add
another liability.
OK - When you are finished adding liabilities of this type, click this button to add the information to the
Conservatorship Accounting program and close the window.
Cancel - Click this button to close the window. Your entries will not be saved.
Attachment 1 Property
Attachment 1 Property Overview
Cash assets are assets that may be appraised by the conservator and listed on Attachment 1 of the
Inventory and Appraisal. Cash items can be immediately converted to cash on a dollar for dollar basis
(meaning the value does not fluctuate). Rare coins or currency are not Attachment 1 items.
Asset description categories which qualify as Attachment 1 Property are shown below. Since the entry
fields vary considerably across these asset windows, please click the Help button on each asset window
for detailed help with entering information for the asset.
Conservatorship Accounting
251
Cash
Uncashed Checks Issued On or Before the Beginning of the Account Period
Bank Accounts
Certificates of Deposit
Money Market Account
Life or Accident Policies
Retirement Plans or Annuities
Other Attachment 1 Property
Figure 15, Certificate of Deposit
Button Descriptions and Functions
Help - Click this button to see help on completing specific asset windows.
Add Another - This button will only appear when you are adding a new asset. Click this button to
add another asset of the same type.
OK - When you are finished adding assets of this type, click this button to add the asset information
to the Conservatorship Accounting program and close the window.
Cancel - Click this button to close the window. Your entries will not be saved.
Checks Issued After Appointment of Conservator
To enter new assets or update existing asset descriptions in this category, follow the steps below:
1. Enter a Description of the asset in the designated field. This may be checks received by the
estate after the date of appointment of a Conservator, health insurance payments, rebates, utility
refunds, returned deposits, etc. Example: "Check number 24598, dated November 11, 2006, from
Southern California Gas Company, representing a refund of a utility deposit."
2. In the Comment section, enter any relevant information which might further aid in identifying
the asset.
3. Enter the Name of Inventory. For example: Final.
4. In the Date of Inventory field, list the date the inventory was signed in mm/dd/yyyy format or
252
ProDoc Software Manual
click the calendar icon
to easily Select a Date
263
from a pop-up calendar.
5. Enter the Amount of the check issued after the appointment of the conservator. The program will
convert whole dollar entries to currency format for you.
6. If you are adding/updating an asset on the Beginning Community Property Form or the
Ending Community Property Form, the Quasi-Community Property check box is
displayed. Click the box if the asset qualifies as Quasi-Community Property. A green check mark
will then be displayed in the Q column for the asset after you complete the asset entry. You can
remove the check mark by clicking the box again.
Button Descriptions and Functions
Help - Click this button to see help on completing the asset window.
Add Another - This button will only appear when you are adding a new asset. Click this button to
add another asset of the same type.
OK - When you are finished adding assets of this type, click this button to add the asset information
to the Conservatorship Inventory & Appraisal program and close the window.
Cancel - Click this button to close the window. Your entries will not be saved.
Real Estate Assets
Real Estate Assets Overview
Asset description categories in the Real Estate listing are shown below. Scroll down to Entering Asset
Information to see general help for entering information for assets in this listing. Click the Help button
on each asset window to see detailed help for entering information for the asset.
Vacant Land
Agricultural Land
Single Family Residence
Condominium
Leasehold Interest
Stock Cooperatives
Residential Income Producing Property
Commercial or Industrial Property
Life Estate
Remainder and Reversionary Interest
Time Share Interest
Other Real Estate
If a real estate asset doesn't fit into any other category, enter the asset in the Other Real Estate
category.
Entering Asset Information.
The asset description window opens with seven fields for entering data: the Property Address field,
Property Description field, the Comment field, the Name of Inventory field, the Date of Inventory
field, the Estimated Market Value field, and the Carry Value field. If you are entering assets on the
Beginning Community Property Form or the Ending Community Property Form, it also contains
a check box for selecting Quasi-Community Property.
Conservatorship Accounting
253
Figure 16, Example Single Family Residence
Click the Help button for detailed help with entering information for each asset.
To enter new assets or update existing asset descriptions in this category, perform the following steps:
1. Property Address - Enter the physical address of the property in line form For example: 12
Mockingbird Street, Berkeley, CA 94704.
2. Property Description - Enter the complete legal description of the asset. Click the Help button
to see a detailed description of the information required for the field.
3. Comment - Enter any relevant information which might further aid in identifying the asset.
4. Name of Inventory - Enter the name of the inventory For example: Final or Partial.
5. Enter the Date of Inventory in mm/dd/yyyy format, or click the calendar icon
Select a Date 263 from a pop-up calendar.
to easily
6. Estimated Market Value - Enter the referee-appraised value of the real estate or interest. The
program will convert whole dollar entries to currency format for you.
7. Carry Value - Enter the Carry Value for the single family residence. (The carry value of an
asset that is included in an inventory is its appraised value. The carry value of an asset purchased
for the estate after appointment of the conservator is its purchase price.)
8. Quasi-Community Property - This check box is only displayed when you enter assets on the
Beginning Community Property Form or the Ending Community Property Form. Click
254
ProDoc Software Manual
the box if the real estate qualifies as Quasi-Community Property. A green check mark will be
displayed in the Q column for the asset on property forms after you complete the asset entry. You
can remove the check mark by clicking the box again.
Button Descriptions and Functions
Help - Click this button to see help on completing specific Real Estate asset windows.
Add Another - This button will only appear when you are adding a new asset. Click this button to
add another asset of the same type.
OK - When you are finished adding assets of this type, click this button to add the asset information
to the Conservatorship Accounting program and close the window.
Cancel - Click this button to close the window. Your entries will not be saved.
Business Interests Assets
Business Interests Assets Overview
Asset description categories in the Business Interests listing are shown below. Scroll down to Entering
Asset Information to see general help for entering information for assets in this listing. Click the Help
button on each asset window to see detailed help for entering information for the asset.
Closely Held Corporation
Limited Partnerships
General Partnerships
Sole Proprietorships
Limited Liability Companies
Other Business
If a business asset doesn't fit into any other category, enter the asset in the Other Business category.
Entering Asset Information
The window used for business interests assets contains six fields. If you are entering assets on the
Community Property form, it also contains a check box.
Conservatorship Accounting
255
Figure 17, Limited Partnership Example
To enter new assets or update existing asset descriptions in this category, perform the following steps:
1. Description - Enter a description of the business interest. Click the Help button to see a
detailed description of required entries for each business interest.
2. Comment - Enter any relevant information which might further aid in identifying the asset.
3. Name of Inventory - Enter the name of the inventory. For example: Final or Partial.
4. Date of Inventory - Enter the date the inventory was signed in mm/dd/yyyy format, or click the
calendar icon
to easily Select a Date
263
from a pop-up calendar.
5. Estimated Market Value - Enter the estimated market value for the interest. The program will
convert whole dollar entries to currency format for you.
6. Carry Value - Enter the Carry Value for the business interest. (The carry value of an asset
that is included in an inventory is its appraised value. The carry value of an asset purchased for
the estate after appointment of the conservator is its purchase price.)
7. Quasi-Community Property - This check box is only displayed when you enter assets on the
Beginning Community Property Form or the Ending Community Property Form. Click
the box if the business interest qualifies as Quasi-Community Property. A green check mark will
be displayed in the Q column for the asset on property forms after you complete the asset entry.
You can remove the check mark by clicking the box again.
Button Descriptions and Functions
Help - Click this button to see help on completing specific Business Interests asset windows.
Add Another - This button will only appear when you are adding a new asset. Click this button to
add another asset of the same type.
OK - When you are finished adding assets of this type, click this button to add the asset information
to the Conservatorship Accounting program and close the window.
Cancel - Click this button to close the window. Your entries will not be saved.
256
ProDoc Software Manual
Tangible Personal Property
Tangible Personal Property Assets Overview
Asset description categories in the Tangible Personal Property listing are shown below. Scroll down
to Entering Asset Information to see general help for entering information for assets in this listing.
Click the Help button on each asset window to see detailed help for entering information for the asset.
Furniture, Furnishings and Miscellaneous
Jewelry
Coins or Stamps
Work of Art
Mobile Homes
Motor Vehicles
Boat, Airplane
Livestock and Breeding Animals
Other Personal Property
If a personal property asset doesn't fit into any other category, enter the asset in the Other Personal
Property category.
Entering Asset Information
The window used for personal property assets contains six fields. If you are entering assets on the
Beginning Community Property Form or the Ending Community Property Form, it also
contains a check box.
Figure 18, Example Tangible Personal Property
To enter new assets or update existing asset descriptions in this category, perform the following steps:
Conservatorship Accounting
257
1.
Description - Enter a description of the property. Click the Help button to see a detailed
description of required entries for each type of property.
2.
Comment - Enter any relevant information which might further aid in identifying the asset.
3.
Enter the Name of Inventory. For example: Final or Partial.
4.
Enter the Date of Inventory in mm/dd/yyyy format or click the calendar icon
Select a Date 263 from a pop-up calendar.
5.
Estimated Market Value - Enter the estimated value of the personal property asset. The
program will convert whole dollar entries to currency format for you.
6.
Carry Value - Enter the Carry Value for the asset. (The carry value of an asset that is included
in an inventory is its appraised value. The carry value of an asset purchased for the estate after
appointment of the conservator is its purchase price.)
7.
Quasi-Community Property - This check box is only displayed when you enter assets on the
Beginning Community Property Form or the Ending Community Property Form. Click
the box if the personal property asset qualifies as Quasi-Community Property. A green check
mark will be displayed in the Q column for the asset on property forms after you complete the
asset entry. You can remove the check mark by clicking the box again.
to easily
Button Descriptions and Functions
Help - Click this button to see help on completing specific Tangible Personal Property asset
windows.
Add Another - This button will only appear when you are adding a new asset. Click this button to
add another asset of the same type.
OK - When you are finished adding assets of this type, click this button to add the asset information
to the Conservatorship Accounting program and close the window.
Cancel - Click this button to close the window. Your entries will not be saved.
258
ProDoc Software Manual
Debt or Promissory Note
Figure 19, Debt or Promissory Note Owed to the Conservatee
To enter a debt or promissory note owed to the conservatee, or to update existing asset descriptions in
this category, follow the steps below:
1.
Enter a Description in the designated field. Include the terms of the note, such as the date of
the debt or note and the final date due, the names of the borrowers, the original amount
borrowed, the payment amount and dates of scheduled payments, the interest rate, and any
security for the loan. If real property secures the loan, include either the Assessor's Parcel
Number or the legal description of the property. For example: "Promissory note for an unsecured
loan made to John and Mary Doe on May 23, 2006, in the original principal amount of $10,000.00,
earning interest at the rate of 8%, due in a single payment of principal and accrued interest on
May 23, 2010."
2.
In the Comment section, enter any relevant information which might aid in identifying the
asset.
3.
Enter the Name of Inventory. For example: Final or Partial.
4.
Enter the Date of Inventory in mm/dd/yyyy format or click the calendar icon
Select a Date 263 from a pop-up calendar.
5.
Enter the Estimated Market Value for the asset. The program will convert whole dollar entries
to currency format for you.
6.
Enter the Carry Value of the asset. (The carry value of an asset that is included in an inventory
is its appraised value. The carry value of an asset purchased for the estate after appointment of
the conservator is its purchase price.
7.
Enter the amount of any Accrued Interest for the debt or note that had accrued as of the date of
appointment of the conservator but had not yet been credited.
to easily
Conservatorship Accounting
8.
259
If you are adding/updating an asset on the Beginning Community Property Form or the
Ending Community Property Form, the Quasi-Community Property check box is
displayed. Click the box if the asset qualifies as Quasi-Community Property. A green check mark
will then be displayed in the Q column for the asset on the Beginning Community Property
Form or the Ending Community Property Form after you complete the asset entry. You can
remove the check mark by clicking the box again.
Button Descriptions and Functions
Help - Click this button to see help on completing the asset window.
Add Another - This button will only appear when you are adding a new asset. Click this button to
add another asset of the same type.
OK - When you are finished adding assets of this type, click this button to add the asset information
to the Conservatorship Accounting program and close the window.
Cancel - Click this button to close the window. Your entries will not be saved.
Securities
Securities Assets Overview
Asset description categories in the Securities listing are shown below. Scroll down to Entering Asset
Information to see general help for entering information for assets in this listing. Click the Help button
on each asset window to see detailed help for entering information for the asset.
Brokerage Accounts
Common and Preferred Stocks
Mutual Funds
Stock Options
Corporate, State and Municipal Bonds
United States Treasury Notes and Bonds
Ginnie Mae (GNMA), Fannie Mae (FNMA), and Freddie Mac (FHLMC) Security
United States Savings Bonds
Other Securities
If a Securities asset doesn't fit into any other category, enter the asset in the Other Securities
category.
Entering Asset Information
The windows used for Securities assets contains varying numbers of fields. If you are entering assets on
the Beginning Community Property Form or the Ending Community Property Form, the window
also contains a check box.
260
ProDoc Software Manual
Figure 20, US Savings Bond
Description - Enter a description of the security. Click the Help button to see a detailed description
of required entries for each type of security.
Comment - Enter any relevant information which might further aid in identifying the asset.
Name of Inventory - Enter the Name of Inventory. For example: Final or Partial.
Date of Inventory - Enter the Date of Inventory in mm/dd/yyyy format or click the calendar icon
to easily Select a Date
263
from a pop-up calendar.
Estimated Market Value - Enter the estimated value of the personal property asset. The program
will convert whole dollar entries to currency format for you.
Carry Value - Enter the Carry Value for the asset. (The carry value of an asset that is included in
an inventory is its appraised value. The carry value of an asset purchased for the estate after
appointment of the conservator is its purchase price.)
Quasi-Community Property - This check box is only displayed when you enter assets on the
Beginning Community Property Form or the Ending Community Property Form. Click the
box if the security qualifies as Quasi-Community Property. A green check mark will be displayed in
the Q column for the asset on property forms after you complete the asset entry. You can remove the
check mark by clicking the box again.
Button Descriptions and Functions
Help - Click this button to see help on completing specific Securities asset windows.
Add Another - This button will only appear when you are adding a new asset. Click this button to
add another asset of the same type.
OK - When you are finished adding assets of this type, click this button to add the asset information
to the Conservatorship Accounting program and close the window.
Cancel - Click this button to close the window. Your entries will not be saved.
Conservatorship Accounting
261
Other Intangible and Unscheduled Property Assets
This window helps you enter assets which do not fit into any other listed category. To enter new assets or
update existing asset descriptions in this category, perform the following steps:
1.
Enter a Description of the asset in the designated field. Include a full description of intangible
property not included in any of the previously described categories that was owned by the
conservatee. For example: "Copyright and future royalty stream from 2001 book, 'The Life and
Times of J.J. Schmidt', ISBN no. 1234567890, published by Narcissus Press."
2.
In the Comment section, enter any relevant information which might aid in identifying the asset.
3.
Enter the Name of Inventory. For example: Final or Partial.
4.
Enter the Date of Inventory in mm/dd/yyyy format or click the calendar icon
Select a Date 263 from a pop-up calendar.
5.
Enter the Estimated Market Value of the stock. The program will convert whole dollar entries
to currency format for you.
6.
Enter the Carry Value of the asset. (The carry value of an asset that is included in an inventory
is its appraised value. The carry value of an asset purchased for the estate after appointment of
the conservator is its purchase price.)
7.
If you are adding/updating an asset on the Beginning Community Property Form or the
Ending Community Property Form, the Quasi-Community Property check box is
displayed. Click the box if the asset qualifies as Quasi-Community Property. A green check mark
will then be displayed in the Q column for the asset after you complete the asset entry. You can
remove the check mark by clicking the box again.
to easily
Button Descriptions and Functions
Help - Click this button to see help on completing the asset window.
Add Another - This button will only appear when you are adding a new asset. Click this button to
add another asset of the same type.
OK - When you are finished adding assets of this type, click this button to add the asset information
to the Conservatorship Accounting program and close the window.
Cancel - Click this button to close the window. Your entries will not be saved.
262
ProDoc Software Manual
Selecting a Case
Use the Select a Case window to choose a client
and case file in which to save the information you
input. It lists existing ProDoc clients and all
cases for the clients. You can use it to see and
modify related client/case data and create new
clients and cases.
You can select a case to use by either of the
methods listed below:
·
Double-click a displayed case.
·
Click on a displayed case and then press
the Enter key.
·
Click on a displayed case and then click
the Select Case button.
Figure 21, Selecting a Case Window
To find a case that's not displayed:
·
Type the first letter(s) of a client's name to jump to that client's entry on the tree. To do this more
than once, use the backspace key to clear your previous letter entries.
·
Use the scroll bar on the right of the form to quickly scroll through the list. You can also click on
any entry on the left and scroll with keyboard page up, page down, and up/down arrow keys.
·
Use the Now Showing: drop down arrow to choose the types of contacts or clients to display.
Cases are grouped under clients, who are grouped in alphabetical order. Categories will be
displayed with type icons of different colors on the window. The default is Active Clients. Other
choices are All Contacts, Closed Contacts, Private Clients, and Non-Clients.
·
Use the Hide/Show Cases toggle button to display or hide cases. Likewise, you can click the
symbols in the client tree to reveal or hide cases.
or
Conservatorship Accounting
263
Selecting a Date
This window helps you quickly complete date fields. Tools and buttons on
this calendar tool, depicted as Figure 22, include:
Figure 22, Select a Date Window
·
and
- Click to move back or forward one year.
·
and
- Click to move back or forward one month.
·
and
- Click to move back or forward one week.
·
Use Up and Down arrow keys to move back and forward one
week.
·
Use Left and Right arrow keys to move back and forward one
day.
·
Click Today to move the underline/highlight to today's date.
·
Click on the date to choose it or press the Enter key to choose the
underlined date.
·
Click Cancel to close the calendar without choosing a date.
264
ProDoc Software Manual
Glossary
Browse for Folder
This window appears when you click the Browse button next to a directory dialog box. You use this
window to search through folders to choose where you wish to save files.
You can navigate through the folders by using both the vertical and horizontal scroll bars on the window.
You can also use keyboard navigation keys (arrow, Page Up/Down, Home, etc.) to move to different
folders.
Available file system folders and drives are shown in a tree structure similar to the one used by Windows
Explorer. You can click to expand the tree for the folder/drive, or click to contract the tree.
Double-click a folder to select it, or highlight the desired folder and click the OK button. Click the
Cancel button to exit the window without choosing a folder.
Clipboard
The Clipboard is a temporary Windows storage area for objects like text blocks. You insert text to the
clipboard with the cut or copy commands. Text in the clipboard can be pasted into the document at the
current location.
Common Controls on Browse Windows
The following fields, buttons, keys, and menu items are commonly found on browse windows in ProDoc.
Fields and Buttons
Add or New - Opens dialog window to add a new record to the database.
Change or Update - Opens dialog window to change the details of the record which is
highlighted at the time the button is selected.
Delete - Deletes the record which is highlighted at the time the button is selected.
Select - Selects the record which is highlighted at the time the button is selected.
Keys
Insert - Opens dialog window to add a new record to the database.
Delete - Deletes the record which is highlighted at the time the delete key is pressed.
Menu Options
Close - Closes the window and returns you to the previous window.
Edit or Change - Opens a drop-down menu containing options for adding, changing and deleting
records.
Help - Calls up the standard Windows help system.
On some browse screens, you can right click on a record listing to display a floating drop-down menu with
the new, update, and delete options.
Glossary
265
Configuration File
Configuration files let you customize your documents in ways not possible through the Formatting
Options windows. Configuration files can contain headers, footers, page numbers, fonts, or any other
feature you would normally put at the beginning of a document. Refer to your particular word processor's
documentation to determine how to create a file containing headers, footers, etc.
When a document is assembled, ProDoc checks for a configuration file. If one or more configuration files
that apply to the document exist, ProDoc inserts the highest priority configuration file into the document.
If the configuration file sets the value of one of the Formatting Options items, e.g. left margin, that value
will override any value set in the Formatting Options window.
There are three types of configuration files:
· The global configuration file applies to all documents and has the highest priority. It is
stored as GLOBAL.CIF in the ProDoc home directory.
· A volume configuration file applies to all documents in one volume. Each file is stored as
VOLUME.CIF in the subdirectory of the volume to which applies.
· A specific document configuration file applies to a single document. Each is stored as
DOCNAME.CIF, where "DOCNAME" is the filename of the form from which the document is
generated, in the subdirectory of the volume containing the form.
Copy
Copying text is a common word processing procedure. The text is duplicated to the clipboard. From the
clipboard, you can paste the text to another section of the document.
Cut
Cutting text is a common word processing procedure. The text is removed (cut) from the document and
stored in the clipboard. From the clipboard, you can paste the text to another section of the document.
Default Answers
Default answers are automatically displayed as a proposed answer when a question is asked by ProDoc.
This feature saves a tremendous amount of time for answers which are the same over and over again.
One example of a default answer is the address block for a law office.
When a default answer is displayed during document assembly, you can accept it and keep going or
simply type over it if the answer you want is different than the default. You can set your own default
answers. ProDoc will use its logic capabilities to create default answers.
Directory
The location where you want to save completed documents. This must include a valid drive (floppy drive
or hard drive) and the subdirectories if applicable. For example, since ProDoc is normally located in the
PRODOC subdirectory on your hard drive (C drive), the directory would be C:\PRODOC.
Filename
A filename is the name of the file under which you want to save completed documents. Filenames can be
as descriptive as the full name of the form, e.g. Final Divorce Decree. They can also include conventional
word processor file extensions such as .doc or .wpd.
266
ProDoc Software Manual
Form Sets
Form sets are groups of related forms which are often assembled at the same time. You can define these
sets of forms so that during a document assembly session, you can select a number of forms by choosing
the name of the set.
Global
Global refers to items that apply across all ProDoc volumes.
Global Questions
Global questions are questions which apply across all ProDoc volumes.
Highlight
Highlight means to set focus to an item that you want acted upon. On a list in a browse screen, an item is
highlighted when it is in reverse color. Buttons and other items on a screen are highlighted when they are
in reverse color or when a faint dotted outline appears on them. Use the up and down cursor keys to
highlight an item in a browse list and use TAB and SHIFT+TAB to highlight other items on a window.
License
License is authorization to use software on a properly registered computer under the terms of a legal
agreement. Your use of ProDoc is governed by a License Agreement which spells out how the program can
be used. The software can only be used by an authorized licensee under the specific limitations set forth
by the License Agreement.
Master Forms
Master forms are the text files ProDoc uses to assemble your documents. They contain paragraphs of legal
text and tokens to indicate the questions you must answer. These documents are stored as word
processing files and can be modified for your specific practice.
Paste
Pasting text is a common word processing procedure. The text must be cut or copied to the clipboard.
From the clipboard, the text is inserted into the document at the current cursor location.
QuickText
QuickText allows you to store custom blocks of text to paste into answers. You use QuickText for items
like an attorney's signature block where it would not be appropriate to have a default answer (as for a
firm with several attorneys), but you do not want to type the information every time. Store each entry as
a QuickText item and paste the data as an answer where it is required.
Registration
Registration is usually completed when you first install and run ProDoc. Your registration will remain
current as long as you use the WebUpdate feature to install periodic updates or load the updates from CD
if you don't have an Internet connection. If you need to register ProDoc again, you can click the following
link to view the registration processes 80 .
Select
You may select an item by:
1. Clicking on an item with the left button of your mouse.
Glossary
267
2. Highlighting an item and then pressing ENTER.
3. If an item has a hot key, holding the ALT key while pressing the hot key.
Supplemental Forms
Supplemental forms are forms which you add to a volume to extend the power of ProDoc. These forms are
not included in the volume(s) provided with the program, but are created by the user for a specific
purpose.
Token
Tokens are the six character codes used to identify a question or other object in ProDoc. When ProDoc
finds a token in a master form, that token tells it what question to ask, how much room to provide for the
answer, etc. As an example, a token could appear in master forms as ~P1234S.
ToolTips
ToolTips are small help balloons that appear when the cursor is placed over a control (menu, field, or
button). These tips show the purpose of the control and what it will do.
Volume
Volumes are collections of master forms and data files which are used by ProDoc. Each volume usually
deals with a single area of law, such as Real Estate, Family Law, Litigation, etc. Volumes must be
installed before they can be used by ProDoc.
Volume Questions
Volume questions are questions supplied with a particular volume, such as Business Organizations or
Family Law. These questions are used to assemble a document for your specific legal matter and insert
the appropriate information for your client and case.
268
ProDoc Software Manual
Appendices
Appendix A - Networking ProDoc
Benefits
Networking with ProDoc can provide your law office with many benefits, including:
Software Sharing - Networking allows you to install ProDoc to a central location on your
network server or host computer which permits all other computer work stations to have
concurrent access to the program. By networking your computers, master forms libraries
(templates), client and case data and completed documents can then be shared by all users.
Increased Office Productivity – With ProDoc networked, you can share client and case
information by storing client data and completed documents in a central location, providing easy
access for everyone networked. A central location also streamlines your backup procedure.
Decreased Equipment Cost – With a network, everyone in your office can share printers, fax
machines, modems and CD-ROM drives. For example, if your firm has two attorneys, two
secretaries, and an office manager, you might need three printers, one for each attorney /
secretary and one for the office manager. A network also allows you to extend the useful lives of
older PCs by providing access to newer PCs and their associated peripherals.
Drawbacks
Networking does have some drawbacks. Two of the more obvious ones are:
Cost – Expenses to network a law office can be higher than usual depending on how sophisticated
a network you want to create.
Knowledge – Networks require greater expertise to set up and maintain than stand alone
personal computers. Is there someone on your staff with networking skills or who is willing to
learn? If not, can you afford to hire someone with networking knowledge?
Types of Networks
There are two fundamental types of networks, peer-to-peer and client-server. Each type has its own
capabilities and limitations. Which type of network you elect to use depends primarily on your firm’s size,
requirements and budget. ProDoc is compatible with both peer-to-peer and client-server networks as
discussed on the next page.
Peer-To-Peer Networks - In a peer-to-peer network set up, one computer will serve as a “Host”
computer on which ProDoc is preferably installed. A peer-to-peer network is a good choice when
you have only a few computers, you do not expect your network to expand in the near future, your
budget is restricted, and security is not an issue. Each user does the day-to-day administration at
their computer. There is no central administration to maintain and a relatively low level of
security. The cost of setting up a peer-to-peer network is also minimal. You need not purchase a
dedicated network operating system, a server. All that's needed is a network interface card for
each computer, a network hub and sufficient network cable to physically link all computers
together. It is recommended you use Windows 98/ME/2000/XP/Vista or NT workstation 4.0.
Peer-to-peer networks normally require less administration. The only drawback is an increased
potential for slower data exchange rate between the workstation and the host computer. Your
local computer technician can probably assist you in setting up this type of network.
Appendices
269
Client-Server Networks - This is the more sophisticated type of networking environment. A
sole dedicated computer acts as the “network server”. The computers networked to it act as
“clients”. ProDoc is preferably installed only on the server. A common misconception is that you
must purchase a large powerful computer marketed as a server. While that is sometimes true,
small networks may only require a reasonably capable PC running a server version of a
networking operating system such as Windows NT or Novell NetWare. It is the job of the
dedicated network server (sometimes called a “file-server” or "Application-Server") to keep track
of all users and validate their log on requests. The server stores most, if not all, applications and
data files, provides centralized administration for the network, and a higher level of security for
your programs and files. In a client-server network, all users must initially log on to gain access
to the server. A network administrator can assign permissions to users so that they only gain
access to the resources they need. This protects your information from unauthorized access.
Otherwise, people might attempt to gain access to confidential files on your computer via the
network. This type of a network is usually more expensive to install. In addition to network
cards, a network hub and cables, you will need to purchase a network operating system such as
Windows NT or Novell NetWare. It is highly recommended that you consult a network specialist
for assistance for this type of network.
Preferred Network Installation Configuration
If your office computers are networked, we recommend you install ProDoc on your network server or
"Host" computer.
For a client-server network, ProDoc should normally be installed only on the dedicated network server.
For a peer-to-peer network, ProDoc should be similarly installed only on the computer you have
designated as the Host computer.
Each Windows client workstation or peer computer should have a shortcut icon on its Windows desktop to
start ProDoc. Refer to “Setting Up User Workstations”, discussed later in this appendix, for assistance
with creating shortcuts and icons.
This installation method creates a centralized database for storage of client and case information and
data files. It also permits all network users to access Client/Case information entries made by other
networked users. This eliminates duplication of data on individual workstations and ensures all
documents are centrally located and contain consistent information for each client and case. A ProDoc
network installation is also the simplest to keep current, since periodic ProDoc update releases only need
to be installed once to the server or host computer.
NOTES:
·
ProDoc is normally installed to a mapped shared network drive location such as F:\ProDoc.
Optionally, you can install ProDoc under a Universal Naming Convention (UNC) scheme where
computer names are substituted for a drive letter, for example \\GEORGE\PRODOC. Contact
your network technician if you are uncertain about how your network is configured.
·
ProDoc will work properly when deployed on Citrix and Linux based servers.
Installing and Configuring ProDoc on a Network
Step 1 - Install the program. Begin by installing ProDoc on the network server or host computer.
Insert the CD and follow the prompts. If needed, consult the procedures in Chapter 1 of this manual.
NOTES:
·
These procedures apply to new customers and to those customers migrating from stand-alone to a
network installation. Previous users who have saved ProDoc data should follow these procedures,
270
ProDoc Software Manual
then consolidate data as explained later in this appendix.
·
Normally, you should only install ProDoc to a single location on the server or host computer.
There is no need to separately install ProDoc on any of the other client or peer workstations.
However, you may want to separately install it to a laptop or other non-networked computer.
Step 2 - Establish user access. Before ProDoc can be used, it must be “shared” with the other
computers on the network. All users must have full access (read and write) to the computer/directory in
which ProDoc is installed. Likewise, if completed documents are to be saved to a central directory on a
network drive (preferred), all users must also have full access to that directory. Contact your local
network professional for assistance.
Step 3 - Create workstation shortcuts. To enable networked users to run ProDoc from their
workstations, you must create a shortcut (under Windows 98/ME/NT/2000/XP/Vista) on each workstation.
1. Right click anywhere in the middle of the workstation desktop.
2. From the menu, click New and then click Shortcut.
3. In the Create Shortcut dialog box, enter the Command line where ProDoc is installed. For
example:X:\PRODOC\PROWIN.EXE (where X is the network drive letter where the program
directory and files are located). Alternatively, you may click the Browse… button to browse to
the correct location. Then, click Next.
4. In the dialog window, enter “ProDoc” as the name for the shortcut and click Finish.
5. To start ProDoc, simply double click this shortcut.
Step 3 - Run ProDoc for the first time. When starting ProDoc, you will be asked to enter your initials
or login name. This is necessary in order to establish new operating parameters or access existing
parameters for each network user. The first user who runs ProDoc is automatically assigned as a
Supervisor. See the Manage User Login 13 section which explains this menu item. Supervisors can
designate others as Supervisors or Users and manage various user settings.
Follow the prompts on succeeding windows to complete other setup options (described in Chapter 1).
If you are a new user with no ProDoc data or other installations, you are finished.
Migrating from Stand-alone Installations to a Network Installation
If you have established a network in your office but are still using one or more stand-alone installations,
simply install ProDoc on your server or host computer. If you do not yet have a network but are planning
to establish one, you will first need to decide on certain hardware and software alternatives. We
recommend that you seek assistance from a computer technician in your area with networking
experience.
Once you install ProDoc on your server or host computer, you will need to transfer your client/case files (if
any exist) to the ProDoc directory on the server, uninstall all previous installations and create desktop
shortcuts on each of the workstations as follows:
1. Follow the steps above to install ProDoc to the network server or host computer and configure
workstations.
2. Double click the ProDoc shortcut icon. You will most likely receive a message indicating that
ProDoc’s location may have changed and asking if you want to use the old or new location. Click
OK to open ProDoc from its new location.
3. In order to continue to use previously created client/case information, that data must be
consolidated into the server's ProDoc directory. You do this by using ProDoc's Database
Transfer, discussed in Chapter 3, as follows:
Appendices
271
·
Have your network administrator map each applicable workstation with a unique drive letter.
·
Log on to ProDoc on the server from one of the workstations.
·
Click Tools from the main screen menu, then Database Transfer and select Transfer
Client Data In.
·
Browse to the correct previously mapped workstation drive and double click the ProDoc
directory where you will be transferring data from and click OK.
·
The Select Clients window will appear listing all of the clients stored in that workstation's
ProDoc directory. Normally you will click the Select All button and click OK. This will
transfer all client and case information to the server's ProDoc directory. However, if you
would like to selectively transfer clients, simply select the clients you want to transfer and
then click OK.
·
The client information will start transferring to the server. Please be patient as this
procedure can take considerable time, depending on the size of your client list.
·
You will receive a screen message when the transfer is complete. Click OK to return to the
ProDoc main window. Repeat these steps as necessary for other applicable workstations.
NOTE:
The client/case transfer process can become complex when attempting to
consolidate data for clients that exist on two or more computers. ProDoc may
ask you whether two clients or two cases are really the same client and case.
Carefully read the information in the question window before answering.
·
Start ProDoc on the server, click Clients & Cases and then Client/Case Manager to inspect
your client and case data base to make sure it is intact and includes all of the client/case data
from your other installations. After verifying the data, assemble a simple document with
client and case information to make sure the program is fully operational and that completed
documents are saved to the desired location, preferably to a central location on the server.
·
When you are confident of your new network installation, it should be safe to delete ProDoc
from each workstation where it had been previously run. We recommend that you manually
delete the entire ProDoc directory from the workstation's local drive by highlighting it in
Windows Explorer and pressing the Delete key. You should also delete the ProDoc group
from the C:\Windows\Start menu\Programs directory, since you will be starting ProDoc from
the windows desktop shortcut.
Appendix B - How ProDoc Works
THE ASSEMBLY PROCESS
ProDoc assembles documents in a two-phase process. During the first phase, called the assembly phase,
ProDoc asks questions and then uses the answers to "cut and paste” the appropriate clauses, paragraphs
and words together to create the basic document. In the second phase, ProDoc asks fill-in-the-blank
questions then inserts the answers into the assembled document. This is a general description, but there
are exceptions to this scheme.
MASTER FORMS
The basic forms that ProDoc uses during the assembly process are called master forms (templates). This
is a standard word processing document, which contains special codes called tokens in places where
questions are to be asked or text is to be inserted, or at the beginning or end of blocks of text.
SUPPLEMENTAL FORMS
When you subscribe to a ProDoc volume, it contains master forms (templates). You may also add your
272
ProDoc Software Manual
own forms to ProDoc as supplemental forms. The process of creating your own supplemental forms is
discussed in Appendix D 294 of this manual.
OBJECTS
An object is a set of instructions which tells ProDoc to ask a question, insert text, perform a calculation,
etc. Most of these objects are stored in database files. There are five basic types of objects used in
ProDoc:
Questions - Question objects tell ProDoc to ask a question. There are two categories of questions
- assembly questions and merge questions. Assembly questions are processed during the
assembly phase and the answers are used to determine what clauses, paragraphs and words to
insert into and delete from the document. Merge questions are normally processed during the
second (merge) phase. Their answers are usually merged into the document. On occasion, a
merge question may be asked early in the assembly phase when the information is needed earlier
for some special purpose.
Processors - Processor objects tell ProDoc to calculate a value, manipulate pieces of text to create
something different or to import a text file into the current document. There are assembly phase
processors and merge phase processors.
Delete - Delete objects tell ProDoc to delete blocks of text if a particular condition exists. For
example, if the user answers a question indicating they do not want a particular provision in the
document, the delete object will omit the corresponding clause from the document. Delete objects
are processed during the assembly phase.
Loop - Loop objects tell ProDoc to repeat sections of the master form if a particular condition
exists. For example, a loop object may check to see how many sellers there are on a deed and then
loop that many times creating one signature line for each seller.
Special - There are two objects, which do not contain instructions in a database. They are
processed internally by ProDoc to perform a specific task. These objects are formatting objects
and numbering objects. Formatting objects are used to tell ProDoc to use certain formatting
characteristics such as line spacing and margin settings. Numbering objects are used for
automatically numbering paragraphs in a finished document.
Most objects include logical instructions which ProDoc processes in order to determine what to do. For
example, question objects often include logic, which determines whether to show a default answer and
delete objects always include logical instructions, which determine whether or not to delete text.
TOKENS
When ProDoc is processing a master form, it is looking for tokens. You can think of tokens in the same
manner as you think of simple merge codes you would use in WordPerfect or Word, except that they are
much more flexible and powerful. When ProDoc finds a token, it looks for a matching object in the
database file and then performs the instructions stored in that object. As mentioned above, the objects
tell ProDoc when to ask a question, perform a calculation, delete or insert text or run a script. There are
no special keys or techniques required to create a token. A token is simply a six-character word with a
tilde (~) in front of it that you type into the form. A typical token would look like ~P1000V.
The first character in a token tells ProDoc what kind of object it represents. The most common types of
tokens are:
A - assembly questions (for example ~A1000V)
P - merge questions (for example ~P1000V)
I - assembly insert (for example ~I1000V)
M - merge insert (for example ~M1000V)
Appendices
273
C - calculator assembly (for example ~C1000V)
D - delete (for example ~D1000V)
E - end delete (tells ProDoc where to stop deleting (for example ~E1000V)
L - repeat a section of the master form (for example ~L1200V)
ELOOP - end of the master form section to be repeated (~ELOOPV)
F - format instruction (for example ~FLNSPV is a line spacing instruction)
N - auto numbering instruction (for example ~NR001V)
To summarize, a token is simply a name that ProDoc uses to locate the corresponding object (instructions)
in its database. The first character in the token tells ProDoc what kind of object it represents.
VOLUMES
ProDoc provides a simple method for organizing your master forms into a useful forms library. Forms are
grouped together in sets called volumes. A volume normally contains forms for a specific area of law or
subject, such as real estate, family law, corporations, etc. This method of grouping forms together by
subject makes it much easier to find and maintain those forms. A ProDoc system can contain an
unlimited number of volumes.
SCOPE
A large ProDoc system may contain many volumes and many thousands of objects. If all objects for all
volumes were stored in a single database, it would become an extremely large database and it would be
very difficult to manage. When the volume is installed, all of the forms as well as the object database files
are copied into a separate directory just for that volume. An example of an object that applies only to a
particular volume would be the name of the seller in a real estate transaction. This information is only
relevant to the real estate volume - it would not be useful in an adoptions volume. Therefore, that object
is stored in the real estate volume’s directory so that when ProDoc is assembling a deed it looks in the
real estate directory for the database which contains the instructions. This type of object is said to have a
volume scope.
Sometimes, however, there are certain questions or instructions, which will always be the same, no
matter which volume you are assembling. An example of this would be a law firm’s name. It doesn’t
matter whether you are preparing a will or a deed, the law firm's name will be the same in each of those
two volumes. This type of object is said to have a global scope. When ProDoc processes a global object, it
looks in the main ProDoc directory for the database which contains the appropriate instructions. The
benefit of this mechanism is that, when you are producing forms from more than one volume in a single
case, you will only have to enter the law firm's name one time instead of once for each volume you are
using.
In addition to volume and global objects, you can also have supplemental objects. A supplemental object
is volume specific but it is an object created by you. Your objects (questions) are stored in separate
databases so that you do not have to worry about interfering with objects, which were shipped to you as
part of a volume.
When ProDoc finds a token in a document, it looks at the last (sixth) character to determine what scope
the object is and therefore which database to search for instructions. The three possibilities are V for
volume objects, G for global objects and S for supplemental objects.
THE ASSEMBLY PHASE
The assembly phase is the initial processing stage where ProDoc processes some initial questions and
then cuts and pastes text in the master form in order to create an interim form which contains all of the
necessary text and clauses needed for the final document. The questions to be asked and other objects to
be processed during this phase are contained in a database list, which is created for each master form.
274
ProDoc Software Manual
After this list of objects has been processed, ProDoc begins scanning the master form for additional
objects to process.
Delete objects: When ProDoc finds a delete object, it checks to see how a question was answered or
whether some other condition exists and it determines whether to begin deleting text from the form. If
text is to be deleted, ProDoc begins cutting text out of the master form one character at a time. ProDoc
does not stop deleting text until it finds the appropriate end delete token which stops the deletion process.
Processor objects: When ProDoc finds a processor object, it checks to see how a question was answered or
whether some other condition exists and it determines whether to insert text into the form. For example,
it may check to see whether the Plaintiff is male or female and then insert the proper object (him or her)
into the document.
Most questions asked in the assembly phase are assembly questions (~A), which are used to determine
what clauses, paragraphs, nouns, etc. are to be inserted into or cut out of a document. An example of this
would be a question asking the user to select any special provisions he wants in the document or asking
what is the gender of the plaintiff. Occasionally, however, the author of a volume may include merge
questions (~P) in the assembly phase question list. The most common reason for doing this is to get an
answer that will be used in the text of a subsequent question. For example, What is the name of the
Petitioner? ANSWER: Jane Doe, and then How many children does Jane Doe have?. It is sometimes
helpful to include the person’s name in the text of a question and the only way to have that name
available is to ask for it with a preceding question.
In volumes, which are subscription items, assembly questions are always contained in a separate
database list. Assembly question tokens (~Axxxx) however, can be contained at the very top of a master
form. If ProDoc finds an assembly question token at the beginning of a master form, it will ask that
question during the assembly phase. This feature allows you, the user, to use our assembly questions in
your own forms even though you do not have access to the assembly phase question list.
Here’s how this feature can be very useful. Suppose you are creating a supplemental form in which you
would like to use one of our volume codes (say ~I0001V) which inserts either him or her in the document.
You can use this code and, if you have already produced a regular document which processes an assembly
question asking if the plaintiff is male or female (say ~A1000V), then the insert code will work just fine.
On the other hand, if you have not previously created a document, which asked this question, then your
supplemental form won’t be able to determine which pronoun to insert. To solve this problem, you can
insert the assembly question token at the very beginning of your supplemental form. When ProDoc
processes the form, it will check to see whether the question has already been answered and, if not, it will
ask the question.
THE MERGE PHASE
When ProDoc reaches the merge phase, it has created an intermediate form which is the same as the final
assembled document except that it lacks fill in the blank information. ProDoc then asks the
fill-in-the-blank questions to get the missing information.
You can select whether you want to see the intermediate form during the merge phase. Normally, users
elect to have the intermediate form displayed as ProDoc jumps to each merge question and stops for the
user to fill in the blanks. Some users, however, prefer to have ProDoc not show the form and instead
simply pop up the questions as the tokens are found.
After all of the blanks are filled in, the document is completed and ProDoc stores it on disk in the
directory selected by you.
MISCELLANEOUS CONSIDERATIONS
For technical reasons, ProDoc has been designed to process ASCII, WordPerfect® 5.x or WordPerfect 6.x
Appendices
275
text files only. That means that if you edit a master form or create a supplemental form and save as a
Microsoft Word file, ProDoc will have to convert it to a WordPerfect file before processing. ProDoc
performs this conversion automatically without the user even knowing it has happened. This process
works very reliably but it does take a few seconds each time the conversion is performed. Therefore, if
speed is important to you, you would do better to save the master form or supplemental form as a
WordPerfect 5.x or 6.x type file.
Formatting master forms (templates) - (~F tokens)
Formatting a master form to work consistently can be problematic. Consider a situation where
you normally use 1" margins with line spacing of 1.5. In one form, you need to indent a section to
2" margins with line spacing set to 1. At the end of that indented section, you reset margins to 1"
and line spacing to 1.5.
When ProDoc begins processing a master form, it memorizes the formatting settings that are in
effect at the beginning of the form. Whenever ProDoc encounters a formatting token, it inserts
the original setting into the document at that location. Just think of this as a way to restore the
original formatting settings, whatever they are. In the example above, instead of putting the 1"
margin and 1.5 line spacing settings in the master form, type in ~FLNSPV~FLMARV~FRMARV
to reset line spacing and margins to the original setting.
ProDoc’s formatting tokens are:
FLNSPV - line spacing
FLMARV - left margin
FRMARV - right margin
FTMARV - top margin
FBMARV - bottom margin
FFONT
- font
FJUST
- justification
Paragraph Numbering
Volumes purchased from Thomson Reuters do not use WordPerfect’s or Microsoft Word’s auto
numbering capabilities. This is because our forms are used with a wide variety of word processors
and auto-numbering codes simply don’t convert between the different formats very reliably.
Instead, ProDoc uses its own auto numbering mechanism. Our auto numbering tokens begin with
~N as follows:
~NRxxx - number with roman numerals (I, II, III, etc
~NAxxx - number with arabic numbers (1, 2, 3 etc.)
~NCxxx - use capital letters (A, B, C, etc.)
~NLxxx - use lower case letters (a, b, c)
Dimensioned Questions
In early versions of ProDoc, we couldn’t simply ask, “How many children are there?” and then loop
through and ask for the names for however many children were indicated. Instead, what we had to do is
give the user a choice between a limited range such as 0, 1, 2, 3 or 4 children. We would then create
separate objects for child 1, child 2, child 3 and child 4. Beginning with version 2.0, however, we now
have what are called dimensioned objects, which can hold multiple answers. (For you programmers, these
are arrays.) In the above example, we could use a single dimensioned object to hold the names of all the
children. The benefit to this method is that we no longer have to limit the number of children to a preset
maximum such as 4.
276
ProDoc Software Manual
To use a dimensioned object, it must be placed in a loop structure. Loop structures begin with an L token,
end with an ELOOP token, and may contain text and tokens in between. The L token is tied to an
assembly phase token that indicates how many times the loop should repeat. For example, if the user
says there are 5 children, then the loop would repeat five times, asking for the names of the first child,
second child, third child, fourth child and fifth child.
A loop structure like the one below could be used to list the names and birth dates of several children in a
document. In this example P1508V and P1514V are dimensioned objects that ask for and store the names
and birth dates, respectively, of multiple children. L1500V is tied to an assembly phase token that asks
how many children there are. Generally the assembly phase token is a token with the same number as
the L token. In this case that would be A1500V.
~L1500V
Name of the Child: ~P1508V
Date of Birth: ~P1514V
~EL00PV
The questions asked in this example would be as follows. First would be the A1500V question, which
might be "Number of children affected by the suit:". Assume the user answers "2". Next would be
"Name of the 1st child:" (assume the answer is "Ann", then "Birth date of Ann:" (assume the answer is
"January 1, 1991"), then "Name of 2nd child:" (assume the answer is "Bob"), then "Birth date of Bob:"
(assume the answer is "February 2, 1992"). The text appearing in the assembled form for the loop
structure for these answers would be as follows.
Name of child: Ann
Date of Birth: January 1, 1991
Name of the child: Bob
Date of Birth: February 2, 1992
In the bulk of the Family Law forms, only one petitioner is possible, but a dimensioned object, P1208G, is
used to hold the name of the petitioner. If ~P1208G appears in a form, it must be in a loop structure even
though there will be only one petitioner. There are no exceptions to the rule that a token in a form for a
dimensioned object must be in a loop structure. The L token for the number of petitioners is L1200G. So,
to insert the petitioner's name in a form using P1208G, use the loop structure
~L1200G~P1208G~EL00PG rather than ~P1208G.
SAMPLE ASSEMBLY SESSION
Assembly Questions
The first step in an assembly session is to ask a series of questions and perform calculations
necessary to do the initial cutting and pasting which creates the form. The tokens for these
questions and calculations are contained in a list, which is stored in a database file. A sample list
is reproduced below:
C0001G
- calculator that transfers client’s name from Client/Case Manager
P9005G - Question: County where the action is pending. (Some counties have local
requirements)
A0100V
- Question: Describe your client:
A1200G
- Question: How many petitioners are there:
L1200G
- loop once for each petitioner
CPETIV
- calculator that transfers client data from Client/Case Manager
P1208G
- Question: Petitioner’s full name:
Appendices
P1240G
- Question: Petitioner’s birth date:
A8605V
- Question: Describe the Petitioner:
277
ELOOPG - end of loop
A1300G
- Question: How many respondents are there:
L1300G
- loop once for each respondent
CRESPV - calculator which transfers client data from the contact manager
P1308G
- Question: Respondent’s full name:
P1340G
- Question: Respondent’s date of birth:
A8610V
- Question: Describe the respondent:
ELOOPG - end of loop
A1500V
- Question: Number of children affected by this suit:
L1500V
- loop once for each child
P1508V
- Question: Name of the [1st, 2nd, 3rd...] child:
P1514V
- Question: Birth date of the child:
ELOOPV - end of loop
A2000V
- Question: Select a domicile provision:
A2005V
- Question: Select type of Service for Original Petition:
This is only a partial reproduction of the assembly question list for the Original Petition for
Divorce. There are many more items in the complete list.
ProDoc works through this list and processes the tokens just as if they were found in the master
form. Notice question A1200G, which asks how many petitioners there are. This question has
logic attached to which automatically assigns “1" as the answer when you are creating divorce
documents because there can only be one petitioner in a divorce. The question must be in the list,
however, because the answer to this question determines how many times to process the following
loop.
Assembling the Form
After the assembly phase question list has been processed, ProDoc begins processing the master
form. This task involves scanning the form looking for assembly phase tokens. As each token is
found, it is processed, which causes ProDoc to cut or paste text into the form. When this cutting
and pasting is completed, ProDoc has created the form which contains all of the pronouns,
paragraph numbers, clauses, paragraphs and provisions which are needed for the completed
document. This intermediate form still contains fill-in-the-blank tokens, which will be processed,
in order to fill in the blanks during the following merge phase. A sample page from a master form
before the assembly phase and one from the form after the assembly phase is reproduced on the
next pages:
This master form is filled with assembly and merge phase tokens:
~I0001V
~FLNSPV
Original Petition for Divorce ~FFONTV
~FLNSPV~NA001V.
Parties
~L1200GThis suit is brought by ~P1208G, Petitioner, who is ~P1241G (~M1204G) years of
age and resides at ~P1215G, ~P1218G, ~P1222G.~ELOOPG ~L1300G~P1308G, Respondent, is
278
ProDoc Software Manual
~P1341G (~M1304G) years of age and resides at ~P1315G, ~P1318G, ~P1322G.~ELOOPG
~NA001V. Domicile
~D2009V
~I2000V has been a domiciliary of Texas for the preceding six-month period and a
resident of this county for the preceding ninety-day period.
~E2009V~D2000V Petitioner is domiciled in another state or nation. Respondent has been a
domiciliary of Texas for at least the last six months and a resident of this county for the
preceding ninety-day period.
~E2000V~NA001V. Service
~D2002V
Process should be served on Respondent at ~L1300G~I2002V~ELOOPG.
~E2002V~D2004V No service on Respondent is necessary at this time.
~E2004V~D2006V Citation of Respondent by publication or other substituted service is
necessary for the reasons stated in the attached affidavit.
~E2006V~D2012V~NA001V.
Long-Arm Jurisdiction
~D2008V~D2014V Respondent is a nonresident of Texas. Petitioner is a resident or a domiciliary of Texas at
the commencement of this suit. Texas is the last state in which marital residence between Petitioner and
Respondent occurred, and this suit is commenced within two years after the date on which marital residence
ended.
~E2014V~D2016V ~P2024V
~E2016V~E2008V~D2010V~D2018VThe child~I2004V the subject of...
The form that follows is an example of an intermediate form in which all of the
assembly phase tokens have been processed and the only remaining tokens will
be processed in the merge phase. Notice that all of the unwanted clauses and
paragraphs have been stripped out and paragraph numbers and pronouns
have been inserted. This intermediate form is created internally by ProDoc
and it is displayed to you while you are filling in the blanks during the
assembly process.
Appendices
279
NO. ______
IN THE MATTER OF
'
THE MARRIAGE OF
'
IN THE DISTRICT COURT
'
[insert list of PETITIONERS]
'
AND
'
[insert list of RESPONDENTS]
'
______ JUDICIAL DISTRICT
[insert county] COUNTY, TEXAS
Original Petition for Divorce
1. Parties
This suit is brought by JOHN DOE, Petitioner, who is ~P1241G years of age and
resides at ~P1215G, ~P1218G,~P1222G. JANE DOE, Respondent, is ~P1341G years of
age and resides at ~P1315G,~P1318G,~P1322G.
2. Domicile
Petitioner has been a domiciliary of Texas for the preceding six-month period
and a resident of this county for the preceding ninety-day period.
3. Service
Process should be served on Respondent at ~P1315G,~P1318G,~P1322G.
4. Protective Order Statement
No protective order under chapter 71 or section 3.581 of the Texas Family
Code is in effect, and no application for a protective order is pending with
regard to the parties to this suit.
5. Dates of Marriage and Separation
The parties were married on or about ~P2038V and ceased to live together as
husband and wife on or about ~P2040V.
6. Grounds for Divorce
The marriage has become insupportable because of discord or conflict of
personalities between Petitioner and Respondent that destroys the legitimate
ends of the marriage relationship and prevents any reasonable expectation of
reconciliation.
7. Children of the Marriage
There is no child born or adopted of this marriage, and none is expected.
8. Division of Community Property
Petitioner believes Petitioner and Respondent will enter into an agreement
for the division of their estate.
If such an agreement is made, Petitioner
requests the Court to approve the agreement and divide their estate in a manner
consistent with the agreement.
If such an agreement is not made, Petitioner
requests the Court to divide their estate in a manner that the Court deems just
and right, as provided by law.
9. Statement on Alternative Dispute Resolution
Petitioner has signed a statement on alternative dispute resolution, which is
attached as Exhibit ~P2072V.
10.
Prayer
280
ProDoc Software Manual
Petitioner prays that citation and notice issue as required by law and that
the Court grant a divorce and all other relief requested in this petition.
An example follows of how this interim form appears during the merge phase:
ANALYSIS OF A MASTER FORM
The following is a reprint of the first page of a master form for a Notice of Hearing For Temporary
Orders.
~I0001V
Notice of Hearing for Temporary Orders ~FFONTV
~FLNSPV ~L1300GNotice is given to Respondent, ~P1308G~ELOOPG, and Respondent is
ORDERED to appear in person before this Court in the courthouse at ~P2450V,
Texas, on
at
m.
~D1500VThe child~I2004V the subject of this suit ~I2003V ~M1504V.
~E1500V~D2320V One of the purposes of the hearing is to determine whether the
temporary injunction prayed for should be granted to enjoin Respondent from the
following:
~E2320V~D2322V~D2260V
~NA001V. Communicating with Petitioner in person, by
telephone, or in writing in vulgar, profane, obscene, or indecent language or in
a coarse or offensive manner.
~E2260V~D2262V ~NA001V. Threatening Petitioner in person, by telephone, or in
writing to take unlawful action against any person.
Appendices
281
~E2262V~D2264V ~NA001V. Placing one or more telephone calls, anonymously, at any
unreasonable hour, in an offensive and repetitious manner, or without a
legitimate purpose of communication.
~E2264V~D2268V ~NA001V. Causing bodily injury to Petitioner~D1500V or to a child
of either party~E1500V.
~E2268V~D2270V ~NA001V. Threatening Petitioner~D1500V or a child of either
party~E1500V with imminent bodily injury.
~E2270V~D2272V ~NA001V. Destroying, removing, concealing, encumbering,
transferring, or otherwise harming or reducing the...
Here’s what the highlighted objects mean:
~I0001V - this is an assembly insert code which inserts the appropriate caption, depending on how many
children are in the case (~A1500V);
~FLNSPV - the caption is single-spaced and then the form resets line spacing to “2". If the user set line
spacing to something different in the format option in ProDoc, then this code will override the double
spacing with whatever the user set;
~L1300G - this global loop loops one time for each Respondent. It has logic which presets the count to “1"
when the user is preparing Family Law documents;
~P1308G - this global merge question asks for the name of each Respondent. Since the loop it is in
(L1300G) is preset to “1" for family law, the user will only be asked for the name of one Respondent;
~ELOOPG - this end loop token signifies the end of the loop for the respondent’s name;
~D1500V - this delete object deletes the following paragraph if there are no children in the case.
(~A1500V);
~I2004V - this assembly insert code inserts “ren” if there are more than one child in the case;
~I2003V - this assembly insert code inserts “are” or “is”, depending on how many children are in the case;
~M1504V - this merge insert object inserts the name(s) of the child(ren) into the document in a formatted
list. A formatted list means, if there are more than one child, there is a comma between each name and
an “and” before the last name;
~E1500V - this end delete token marks the point to quit deleting if there are no children;
~NA001V - these numbering tokens will sequentially number each of the paragraphs in the completed
document.
Appendix C - Timeslips Extension
Overview
The Timeslips extension gives you the ability to bill your clients by generating “slips” for each document
created in ProDoc. Generating a slip takes place after document assembly in ProDoc and before the
document is opened in the word processor.
You must install Timeslips version 9.1 (or newer) in order to implement this extension.
282
ProDoc Software Manual
ProDoc‘s database files must first be synchronized with Timeslips’ database files. Synchronization
ensures that changes made in one program’s database are replicated in the other program’s database.
There are many ways in which the synchronizer can be used:
·
If you are a new Timeslips user and a current ProDoc user with Client and Case information, the
Synchronizer will automatically export all the records into Timeslips. Conversely, if you are a
new ProDoc user and a current Timeslips user, the Synchronizer will export all clients and
projects into ProDoc.
·
You can set the Timeslips extension to keep both databases synchronized automatically or
manually.
·
You can individually select, in either Timeslips or ProDoc, which records to synchronize.
·
After the first step is completed, you can set the Synchronizer to display only new records which
have not been previously synchronized. This gives you the opportunity to decide later whether or
not you want to synchronize the records.
It is important that you read this appendix thoroughly before proceeding to integrate ProDoc and
Timeslips.
Step 1: Setting up ProDoc before synchronization
There are some specific requirements in the synchronization with Timeslips, which you will need to
satisfy before synchronizing.
1. From the Main Menu, click Customize > Options, then click the Timeslips link on the left side
of the options and settings window. See the Timeslips Settings 72 section of this manual for a
view of the screen.
a. Select the box labeled Enable the Timeslips Connection.
b. If desired, click the On radio button to have the synchronizer start each time you run ProDoc.
If you do this, ProDoc will attempt to connect with Timeslips in subsequent program starts. If
you select Off, you will need to use the Tools menu to manually start the synchronization
process.
c.
You will now have a new menu option under the Tools menu, titled Timeslips, which
branches to Timeslips setup, Timeslips synchronizer, and Timeslips task manager.
You will use these menu items while managing ProDoc and Timeslips interactions.
2. We recommend that you assign Client IDs and Case IDs in order to simplify the
synchronization.
a. First, set up ProDoc to use unique Client and Case IDs. From the Main Menu, click
Customize > Options, then click the Clients & Cases link at the left of the window.
Ensure both boxes on this window are selected. See the Client & Case Settings 73 section
of this manual for help with this process. Each client record and project record in Timeslips
contains a field called Nickname1. These fields are required and must contain a unique value.
The ProDoc “Client ID” field and “Case ID” fields are the fields which must match the
“NickName1” fields in Timeslips.
b. Next, if you haven't already assigned IDs to your cases and clients, use the Client & Case
Manager 32 to enter Client IDs and Case IDs for each client and case in your database.
c.
Exit ProDoc and proceed to Step 2.
Why use Client and Case IDs? If you are using Client IDs and Case IDs in ProDoc, then the
Appendices
283
synchronizer will use those fields to fill in the Timeslips NickName1. If these fields are vacant in ProDoc,
the synchronizer will attempt to “intelligently” fill in those fields in BOTH programs using your client's
initials.
You should not rely too much on this convention, as Timeslips does not allow for duplicated NickName1
and you may very well have another client with identical initials. For this reason, if you are not using
Client IDs and/or Case IDs in ProDoc, you should be sure to set up auto formatting for Nickname1 in
Timeslips and that scheme will then be used when you synchronize clients. Better yet, take the time to
go into the Client & Case Manager and assign client and case IDs to everyone. Timeslips limits its
Nickname1 field to 30 characters or less. When setting up Client IDs and Case IDs in ProDoc, make sure
to keep them under 30 characters long when combined.
If, after synchronization, you find ProDoc records marked as not synchronized, chances are there is
another record already in Timeslips with the same Nickname1.
NOTE:
If you have the same case code for two different clients, it will work with Timeslips provided
the client nickname is different. For example, if you use 1999/3/16-Divorce to refer to Smith’
s divorce and 1999/3/16-Divorce to refer to John’ s divorce, it will be inserted in Timeslips as
Smith!1999/3/16 and John!1999/3/16.
Once synchronization is completed, updating names, addresses and related information in one program
will update the same information in other programs’ data files. Initially, these options are set to
automatically synchronize.
Step 2: Setting up Timeslips before synchronization
To work properly with ProDoc, some methods that are allowed in Timeslips should be avoided to keep the
two databases as compatible as possible. This appendix details those specific points that you should
check. If you are an existing Timeslips user, you may need to make some changes in your database to
avoid more work once both products are synchronized.
Timeslips offers three billing system possibilities: per Client, per User, and per Task. ProDoc works only
with the “per Task” billing system on a flat rate. If you have currently defined a billing rate for your
Clients and Timekeepers, you can still use these for all jobs not related to ProDoc. However, in order to
bill from ProDoc, you will need to define tasks that will be used by ProDoc to generate slips.
New Timeslips user
If you have been using ProDoc and recently installed Timeslips, carefully read your Timeslips software
manual before attempting to initiate the synchronization process. In particular it is important that you
understand the concept of “Templates” and “New Name” defaults as defined in the Timeslips Version 9.1
or later manual. These allow you to define options for billing your clients and other important settings.
When ProDoc exports clients into Timeslips, it uses the appropriate template if one exists. If there is no
template, then the imported client will reflect the default settings in Timeslips. Clearly it would be better
to have new Timeslips clients set up the way you want them rather than relying on the Timeslips default
settings. Likewise, if your firm uses a specific coding scheme for client id’s, you will want to set this up in
Timeslips before you import clients from ProDoc.
NOTE: See Nickname Formatting in your Timeslips software manual for more information.
You should familiarize yourself with Timeslips and then define how you want to bill your clients. To save
time, use Timeslips templates whenever possible. You must perform the following two steps before
using Timeslips and ProDoc together:
284
ProDoc Software Manual
1. Define a “project” separator.
“Project” is the Timeslips term that ProDoc
will refer to as “Cases”. Access this option
from the Timeslips Setup menu. Click the
General item and then click on the
Nicknames tab. A window similar to
Figure C-1 appears.
Figure C-1, Timeslips General Settings Window
2. Define a “Default” Task to be used by
ProDoc when no Task has been assigned to
a form. You may want to define more tasks,
but the “Default” is needed to begin
generating slips from ProDoc. You define
tasks by going to Timeslips Navigator,
clicking Tasks and then selecting New
Task.
During initial synchronization, you will select the default task that you've set up in Timeslips and enter a
default charge for the task. This is needed in the beginning, and it can be changed while generating slips.
Existing Timeslips Users
If you have been using Timeslips and recently installed ProDoc, there are a few items that you need to
consider in Timeslips. In particular:
· Timeslips allows you to combine both client and project information into a single master record (i.e.,
Jones/Divorce),
· Or, you can have one master record (i.e., Jones), which stores client information, and separate
records for each project (i.e., Divorce or Bankruptcy, etc.)
ProDoc can only synchronize records when there is a separate master record for each client with separate
records for each project (Option B).
Therefore, if you have combined client and project information into a single master record, you will have
to modify your database before attempting to synchronize the databases. To modify your database, you
must add a record to store the client alone, check the master checkbox for this record and then uncheck
the master mark for the client/project record. This is the only way to ensure that your Timeslips records
will be properly synchronized with ProDoc.
ProDoc assumes that the “master” record stores only the client information and has no project separator
character in the NickName1 field. The “child” records (cases) are the only ones to have this character.
Double check your database to ensure that is correct if you want to have a smooth synchronization
process.
You will also want to check that EVERY “client/case” record has a full name in your database before
exporting your records to ProDoc and synchronizing. If this field is blank, the record will NOT be
imported in ProDoc. If necessary, you can correct this later, although these Timeslips records will be
marked as not synchronized.
Step 3: Start ProDoc and run the Timeslips Synchronizer Settings Wizard
Setup options for synchronizing the databases are primarily established from within ProDoc. These
options include either automatic or manual processing of data, frequency, and timing. You can run the
synchronizer settings wizard from the Main Menu by clicking Tools > Timeslips > Timeslips setup.
This action will initiate five wizard settings windows similar to Figures C-2 through C-6.
Appendices
285
Important Note: If this is the first time you are running the Synchronization Wizard, the
default settings should normally be used.
The first settings window informs you that
several questions need to be asked about
how you want ProDoc and Timeslips to
work together.
This window sets the stage for the four
remaining settings windows.
Click Next.
Figure C-2, Synchronizer Settings Window 1
The first option here applies only to those
who already have databases in both ProDoc
and Timeslips. It lets you check the status
of a record before it is synchronized.
The second option is to add records in
ProDoc. Be aware that if you answer No to
both questions, and press the Begin
button on the synchronizer window, you
will have to synchronize all your records by
dragging and dropping each of them. For
now, if you are synchronizing for the first
time, accept the default settings and click
Next to continue.
Figure C-3, Synchronizer Settings Window 2
For the first choice, if you are importing
from ProDoc to Timeslips and answer No
here, nothing will happen when you press
the Begin button. You will have to drag
and drop each record.
The two other choices affect daily usage
after initial synchronization. Answering
No here will disable the automatic
processing, and you will need to use the
synchronizer. Again, when initially
synchronizing, accept the default selections
and click Next.
Figure C-4, Synchronizer Settings Window 3
286
ProDoc Software Manual
This window will modify how ProDoc
handles changes that are made in
Timeslips. A computer running ProDoc
can be set to automatically check for
changes made in Timeslips every few
minutes or once each time you start
ProDoc.
Figure C-5, Synchronizer Settings Window 4
In a networked environment, it would be most efficient to have only one workstation checking for changes
in the Timeslips database. Since these settings are per workstation, we recommend that this checkbox
only be set “ON” at one workstation on the network. The workstation which checks for changes should be
one which is used every day. If you uncheck this box, choices for the timer settings will disappear.
If you uncheck Timer ON?, changes made to your Client/Cases database in Timeslips would only be
checked when you start ProDoc. This choice would be very logical if you are on a stand-alone computer
and you are the one making the changes.
If the timer is on, you can set the frequency that checks are to be made. By default, it is 1 minute, but you
may prefer to have ProDoc checking for changes in Timeslips less frequently. To increase the time
between checks, just increase the value in the timer delay field.
Moreover, if the timer is set to ON and you have other applications open such as your word processor,
every time the check is made screen focus will unexpectedly return to ProDoc. If this proves bothersome
for you, you may want to not check it ON.
In Timeslips, you can have multiple databases. Most law offices will probably not use this feature and
therefore do not want to specify which Timeslips database to use every time they start ProDoc. If you
check the box labeled Dialog to select Timeslips database ON?, you will be presented with a window
each time you start ProDoc which will ask which Timeslips database you want to use. The default is
unchecked. You should leave it unchecked if you only have one database set up in Timeslips. It is logical
to assume that you want to use the same database as you used the previous time.
The last choice concerns slips generation after you generate documents for a case. By default, it is set to
always generate a slip. You can change the default setting to be asked each time or you can set it to
never generate a slip. Keep in mind that even if you set this to always generate a slip, you will still
always be able to cancel or edit the slip before ProDoc sends it to Timeslips. Again, accept the default
settings and click Next if you are synchronizing for the first time.
Appendices
287
The last settings window allows you to
select which Timeslips task will be your
“default” task. All documents generated
from ProDoc without an “assigned” task
will generate a Slip using this default task.
In order to select a default task here, your
Timeslips installation must have the task
set up and active.
ProDoc will use the value you specify here
instead of any rate you place on the default
task when setting it up in Timeslips.
Figure C-6, Synchronizer Settings Window 5
Regardless of any default values you enter here, you will be able to cancel or edit any slip before ProDoc
sends it to Timeslips. If you are synchronizing for the first time, accept the default settings and click
Finish.
Step 4: Start the Synchronization process
Depending on your particular circumstances, one of the following scenarios probably applies to you:
·
If you are already a Timeslips user and just acquired ProDoc to assemble your legal documents,
read the section below called "From Timeslips to ProDoc".
·
If you are a ProDoc user and just installed Timeslips, you will want to read about "From ProDoc
to Timeslips".
·
If you were already using both products, but with a previous version where the synchronization
between the two was not available, read about "Both Together".
NOTE:
This distinction is valid only for your first use. Once both databases are
synchronized, the process will be the same, whatever "history" you have.
After you have complied with the prerequisites discussed above, ProDoc and Timeslips will be properly
configured. You can now begin the synchronization process. To start the synchronization process, open
ProDoc and click Tools > Timeslips >Timeslips synchronizer. A window similar to Figure C-7 will
appear.
NOTE: If you don’t see this option in your Tools menu, there is a problem with your Timeslips
installation, and ProDoc cannot find it.
288
ProDoc Software Manual
The Synchronizer window will be
different depending on which
application is the new one for
you.
NOTE: Before the
synchronization, when you run
ProDoc, you may see an error
message stating “There are no
records to Process”. This is
because each time you run
ProDoc, it will build a table with
matching records in ProDoc and
Timeslips.
Figure C-7, Synchronization Window
From ProDoc to Timeslips
As a new Timeslips user running the synchronizer for the first time, you should see something like the
window shown in Figure C-7.
The list on the left side is your ProDoc contact file, and linked to each client are the case(s) for that client.
This type of display is called a tree. To see the cases for each client, just click the + sign to expand that
branch of the tree.
The blue cross icon means that this record is not yet synchronized.
The buttons in the center of the window are usually not used in initial synchronization. These are used in
later sessions. Click on the Help icon in the lower left portion of the window to see full details on these
buttons.
To launch the export/synchronization process itself, click the Begin button in the lower right hand corner
of the window. While the synchronization is in process, the name of your client/case being synchronized is
displayed on the bottom of the screen. Be patient as this process could be quite lengthy depending on your
computer’s performance and how many clients/cases you have in the database.
After synchronization is completed and both databases are fully synchronized, all records should now
have a green checkmark icon meaning that the record is synchronized.
Appendices
289
To check the current state of
synchronization, open Timeslips and
click File > Connected Databases.
select the menu item Special from the
main screen. Then, click on Connected
Databases from the drop down window
as shown in Figure C-8.
NOTE: You will notice that ProDoc
has been added as the last item on this
menu, which allows you to run ProDoc
from Timeslips.
Figure C-8, Selecting Timeslips Connected Databases
You should then see something like
the window in Figure C-9, which
confirms that both applications are
properly linked together.
You can click on the View Records
button to see a list of all your
Timeslips clients/cases records, with a
Yes displayed in the Connected
column. If you are not sure about
synchronization for one particular
record, this is the place to look.
Figure C-9, Connected Databases Window
From Timeslips to ProDoc
If you are a new ProDoc user, the only real difference is that the empty list will be on the left side in
Figure C-7 with your Clients/Cases relation tree on the right side. Click on the “begin” button, and watch
your records being converted/synchronized into ProDoc.
Both together
If you were using both applications before the synchronization was available, you should refer to BOTH
“existing” Timeslips user above, and “existing” ProDoc user above, as the synchronization process will
attempt to match records from ProDoc client IDs and case IDs with Timeslips NickName1. If those fields
for clients and cases are different in each program, the process may create two entries in each program
for each client and each case.
Note: ProDoc exports phone numbers to Timeslips using a predefined scheme. On the other
hand, if a phone number change is detected in Timeslips, there is no reliable way to determine
which phone number changed or if a new number was added. The synchronizer process will
systematically add the numbers for the contact into ProDoc using the order they are stored in
Timeslips. So, if you wind up with several “home” numbers in ProDoc, it may be because you
changed a phone number in Timeslips and the number was then incorrectly added to ProDoc
during synchronization. In short, once the two databases are synchronized, it is more efficient
to add clients and cases or make changes in ProDoc rather than in Timeslips.
290
ProDoc Software Manual
Daily ProDoc use with synchronization
Each time you run ProDoc, you will briefly see a small information window telling you that ProDoc is
connecting to Timeslips. ProDoc is reading the synchronization tables to store them in memory so that
changes made in one or the other database can be replicated in the matching record.
Should you want to change the default settings used in the initial synchronization, you can do so by
selecting Tools > Timeslips > Timeslips setup from the ProDoc menu. This will bring up the same
series of five windows previously described. Use this procedure to customize the way subsequent
synchronizations will work. You should become familiar with the options described for each of the five
windows before beginning to work with both applications linked together.
Add or make changes to clients and cases in ProDoc
Now that the synchronization is operational and the settings are acceptable, you will want to know what
happens if you change, add or delete a client and/or a case in ProDoc.
If you have not changed the settings, the routine synchronization with Timeslips will be completely
transparent. Therefore, when you select a client in ProDoc and change the name, address, or even the
Client-ID and click OK, you will find these changes reflected to the same client in Timeslips. You can do
the same for a case, or add a new case.
If you have changed your settings so that the synchronization is not automatic, you will not see the
changes in Timeslips immediately. In this case, you will need to run the Synchronizer and use it to
synchronize any changed records by using the buttons in the center of the window or with drag and drop.
Important note: If you delete a client and/or a case in ProDoc, these will NOT be deleted in
Timeslips.
Add or make changes to clients and cases in Timeslips
When you add or change a Client
and/or a case in Timeslips , that
change will be reflected differently
in ProDoc depending on your
settings. If Check Changes ON is
not checked, you have disabled
ProDoc’s mechanism for
automatically detecting changes
made in Timeslips.
Figure C-10, Synchronization Window
If you have disabled automatic checking, the only way to see if changes have been made and to import
them is to run the Synchronizer from ProDoc’s Tools menu. Figure C-10 shows some Timeslips records
listed in red color that were added to Timeslips and have not yet been synchronized.
Appendices
291
If you left your settings to have the synchronizer operate automatically, you will see a window like Figure
C-11 each time you run ProDoc. If you elected in setup to check every few minutes, you will see it every
time an automatic check finds records which need to be synchronized.
When the synchronizer adds or
changes a client in ProDoc, a
window like the one in Figure C-11
will pop up to let you know about
the change so that you are not
surprised to discover new names in
your client list.
Just click the Close button. The
process is the same for adding new
clients or changing existing client
information.
Figure C-11, Records Changed in Timeslips
Defining tasks and assigning fees to tasks
The Task Manager lets you assign a pre-existing Timeslips task to either an individual ProDoc master
form or to a form set. You cannot create Timeslips tasks in ProDoc. You can only assign them
from within ProDoc. If you do not assign a task, ProDoc will use the pre-defined “Default” task.
Assigning fees to a predefined task is done only in Timeslips. Modifying fees for a completed document
can be done in ProDoc when you are generating the time slip. The tasks themselves are created in
Timeslips. If you want to use a task for generating slips in ProDoc, you will need to “assign” the task to
forms or form sets in ProDoc. You decide which rules to follow when you bill your clients for the work
done in ProDoc.
You should initially create a task in Timeslips intended to be your “default” task. That means that
anytime you generate a document in ProDoc for a case and you have not assigned a specific task for that
form or form set, ProDoc will use information from the default task. You can always change or cancel this
Slip before it is sent to Timeslips. Creating this default task is the best way to get accustomed to this
feature. In due time, you will develop your own guidelines for which forms or form sets you want to
create individual tasks for. When you define a task in Timeslips, it should be set as billable and the rate
type should be Flat rather than hourly.
292
ProDoc Software Manual
Figure C-12 shows the Task Manager,
which is used to assign Timeslips tasks to
specific forms or form sets. You access the
Task Manager Wizard by clicking Tools >
Timeslips > Timeslips task manager
from the ProDoc menu.
Figure C-12, Task Manager Window
When you generate a form set which is covered by a Timeslips task, ProDoc will generate only one slip for
that task instead of one slip for each document. It is a very simple operation to assign a form or form set
to a task. First, select the desired task in the upper left list box. Then select the form on the right (after
selecting the volume you want), and “drag” it (by holding your left mouse button down while you move the
mouse cursor) to the list of assigned forms on the lower left side. Then drop it there, by releasing your
mouse button. When you see the mouse cursor changing to a down arrow, it means that your “drop” will
be valid. The first task shown above has no form assigned to it since it is the task which will always be
used by default. If you don’t assign forms to tasks here, you can still assign them on the fly after you
generate the documents in ProDoc. After you find yourself assigning the same task and form over and
over again as you generate slips in ProDoc, you will eventually see that it would be more efficient to come
to this Task Manager and assign the task permanently.
Conversely, you might also want to create a series of tasks in Timeslips that are keyed to a dollar value
such as "created a $25 ProDoc document". You would also have tasks for documents valued at $50, $75,
etc. Then, you can assign them to each applicable form by dragging and dropping the form from the right
hand pane to the bottom left pane in the task manager.
Generating Slips
Finally, you are ready to generate slips in ProDoc as you assemble documents for a case.
Generating slips is a seamless process in ProDoc. If you select a client and case at the beginning of the
assembly session and that case is properly synchronized, ProDoc will generate a slip. When the slip is
presented at the end of an assembly session, you can edit any significant information, like the
“timekeeper”, the dollar value, etc., before “sending” the slip to Timeslips.
You will still be able to edit the slip before billing the client in Timeslips.
Your settings on Window 4 of the setup wizard will affect how slips are generated. You may select to NOT
generate slips, which could be useful if you are still making tests and you do not want your actual
database to be affected by these tests. You can also select NOT if you have Timeslips but you don’t yet
want to use it from within ProDoc.
Appendices
293
In any other case, you should see a window
like the one in Figure C-13 when ProDoc is
preparing to generate slips.
In this example, a document has just been
generated for which no specific task has
been assigned. As a result, the standard
default task is used. You see in the upper
left list box the slips to be generated, with
the name of the task used, as well as the
default value, and billing status.
Figure C-13, Prepare Slips to be Generated Window
In the lower left list box you see the title and filename of the document included in the slip, which is
highlighted. Multiple documents would be listed if the slip were for a form set. In the text box on the
lower right you will see the Slip description. By default, ProDoc will use a list of the documents
generated as the description of the task.
If you click on the Edit button, you will see a window like the one shown in Figure C-14.
Figure C-14 illustrates what you see when
you are in edit mode for the highlighted
slip. The two list boxes on the left are
disabled (grayed out), but you can edit all
the fields on the right side. In this
example, we have changed the value for
this slip from $50.00 to $55.25
Clicking on the OK button will save your
changes.
Figure C-14, Prepare Slips to be Generated Window
You may see a Consolidate All button. This command allows you create a single slip from all listed slips
so that you will have only one slip for all of the generated documents. All of the listed tasks will be
consolidated into the task, which is highlighted when you click the Consolidate All button.
If you have many different documents and different kind of tasks, you may wish to consolidate your slips,
but not all together. To achieve this, simply drag the desired task and drop it on the “target” task. Doing
that allows you to individually consolidate your slips rather than consolidating all of them. In the
example on the previous page, either method would yield the same result.
294
ProDoc Software Manual
Figure C-15 shows what you get after
saving your changes.
Now, clicking the Generate button will
close the window and send the data to
Timeslips.
NOTE: You may want to initially utilize
the foregoing procedure to simply edit the
dollar value of the default task for each
document you generate.
Figure C-15, Prepare Slips to be Generated Window
Appendix D - Creating Supplemental Forms
Purpose
ProDoc contains a considerable number of volumes with thousands of professionally developed master
forms. However, you may wish to add your own forms to ProDoc’s volumes. Using ProDoc’s supplemental
forms feature, you can create documents to assemble in ProDoc from documents you are using in your
practice. This section describes the process of creating supplemental forms.
NOTE: Appendix B 271 of this manual contains useful technical information regarding the process
ProDoc uses to assemble documents. Also, feel free to call 800-759-5418 for assistance. Just
ask to speak with a representative from our Technical Support department.
Process
Follow these steps when creating supplemental forms. First, create or open a document in your word
processor. Next, print the document and highlight those items that represent variable information. In
ProDoc, create tokens to represent the variable information needed in your document. Return to your
word processor and insert the tokens into your document. Save the document to the correct ProDoc
volume. Associate the document to the ProDoc database and test the form by assembling the document.
NOTE: The steps in creating supplemental forms do not have to be performed in the order below.
Step 1 - Create or open the Supplemental form (template) in your word
processor
The first step in creating your own supplemental forms is to draft or open a form in your word processor.
You can draft your form entirely from scratch; base it on a previously prepared document; or use an
assembled ProDoc document.
Step 2 - Identify Items Of Variable Information
Print a copy of the form to determine the variable information on the form. Highlight or draw a line
through each item of information that could be considered variable. Variable information is information
such as dates, names, addresses, etc. asked for in the same manner each time a document is assembled
(e.g. What is today’s date?, What is the client’s name?, etc.), but answered differently for each client and
case (e.g. June 13, 2000, or John Doe).
Appendices
295
For example, let's look at a sample letter to a client confirming his appointment. See Figure 1. The
variable information needed appears in bold UPPER-CASE letters at the locations in the letter where
each answer should be inserted.
Figure 1 - Sample Letter
DATE
CLIENT'S NAME INSIDE
CLIENT'S STREET ADDRESS
CLIENT'S CITY, STATE ZIP CODE
Re:
TYPE OF CASE
Dear SALUTATION FOR CLIENT:
Thank you for contacting our office and giving us the opportunity to review your TYPE
OF CASE claim.
This letter shall serve to confirm your appointment with attorney NAME OF ATTORNEY, on
DATE OF APPOINTMENT at TIME OF APPOINTMENT.
If unable to attend this appointment,
please contact me immediately at the below listed telephone number.
In order for me to review your claim thoroughly, please bring the following
information, if available, with you to your appointment:
INFORMATION TO BRING TO THE APPOINTMENT
If you have any questions regarding this matter, please do not hesitate to contact our
office. Your cooperation in this matter is appreciated.
Sincerely,
NAME OF PERSON SIGNING LETTER
Step 3 - Assign tokens to items of variable information
You must assign a token and an appropriate question to each item of variable information in your
supplemental form. Usually you will have to create your own tokens ("supplemental tokens"). For some
items of variable information in your supplemental form, there might be a Global or Volume token in the
database. If so, you may use the Global or Volume token instead of creating a supplemental token.
Supplemental Tokens
For the sample letter above, supplemental tokens and questions might be assigned as follows:
ITEM
---------------------------------- TOKEN #
QUESTION
DATE -------------------------------------------- ~P0001S
Date Letter is being written?
CLIENT'S NAME INSIDE ----------------- ~P0002S
Client's Name for inside address?
CLIENT'S STREET ADDRESS ---------- ~P0003S
Client's Street Address?
CLIENT'S CITY ----------------------------- ~P0004S
Client's City of Residence?
CLIENT'S STATE --------------------------- ~P0005S
Client's State of Residence?
CLIENT'S ZIP CODE ----------------------- ~P0006S
Client's Zip Code?
TYPE OF CASE ------------------------------ ~P0007S
Type of Case?
SALUTATION FOR CLIENT ------------- ~P0008S
Salutation for Client?
NAME OF ATTORNEY --------------------- ~P0009S
Name of Attorney meeting with Client?
DATE OF APPOINTMENT -------------- ~P0010S
Date of Client's Appointment?
TIME OF APPOINTMENT ----------------- ~P0011S
Time of Client's Appointment
INFO TO BRG TO APPOINT ------------- ~P0012S
Information to bring to Appointment?
NAME OF PERSON SIGNING ---------- ~P0013S
Name of Person Signing Letter?
296
ProDoc Software Manual
NOTE:
If you have created other supplemental forms for the volume and an item of
variable information appears in both the current form and one of the previous
forms, you may assign the same supplemental token to the item in the current form
as you assigned to it in the previous form. To see a list of all existing supplemental
tokens for a specific volume, click Print > Question Lists > Supplemental
Questions, choose the desired volume and print the report.
Global and Volume Tokens
If a Global or Volume token exists for an item of variable information in your supplemental form
then in most cases you can use the Global or Volume token in your supplemental form. Doing so
saves you from having to create a supplemental token for the item of variable information. Also,
when you assemble documents from both your supplemental form and another form that contains
the Global or Volume token in the same assembly session, only the question for the Global or
Volume token will be asked. If you used a supplemental token then the questions for both tokens,
which would be essentially the same question, would both be asked.
To print or view a list of Global or Volume tokens, select Print > Question Lists > Global
Questions or Print > Question Lists > Volume Questions. For volume tokens you must then
select the volume to which you are adding the supplemental form. Volume tokens can be used
only for supplemental forms saved in that volume as discussed in Method 1 below. Global tokens
can be used in forms in all volumes, including a volume you create as discussed in Method 2
below. You are more likely to use Global tokens, which correspond to frequently used items such
as Name of your Law Firm, Law Firm Address and Name of Primary Attorney. In our example
we could assign the Global token ~P0190G ("Name of client's primary attorney:") to the NAME
OF ATTORNEY item instead of ~P0009S.
Exercise caution when inserting Global and Volume tokens in supplemental forms as some can
yield unexpected results. Call Technical Support for assistance if necessary.
Some of the more commonly used Global tokens include:
TOKEN
QUESTION
~P0001G
What is the name of your law firm?
~P0002G
What is the law firm’s address (block style)?
~P0003G
What is the law firm’s address (line style)?
~P0007G
What is the law firm’s phone number?
~P0020G
What is the law firm’s county?
~P0108G
What is your first client’s full name?
~P0127G
First Client’s name and mailing address?
~P0190G
Who is the client’s primary attorney?
Step 4 – Create Supplemental Tokens in ProDoc
If you are not using all global or volume tokens in your document, you must create supplemental tokens
with corresponding questions. After creating the supplemental questions, enter them in the ProDoc
database for use in your supplemental forms. From the toolbar in ProDoc, select Customize >
Supplemental Forms and Questions > Supplemental Questions.
The Supplemental Questions browse window appears. This is where you add, change or delete
supplemental tokens and questions. For our example, select New to create a new token and question.
Next, select the volume and the Supplemental Questions dialog box appears.
There are several fields in the Supplemental Questions dialog box:
Appendices
297
Token - Enter the token for the question, omitting its leading tilde (~) and trailing "S".
The token must start with a P. For the first token in our example, we would enter P0001
in the Token field, instead of ~P0001S. Note: you must use capital letters.
Question - Enter the text of the question you want displayed to the user.
Size / Rows - Enter the number of rows (lines) you want to allow for the answer to the
question.
Columns - Enter the number of columns you want in each row. The maximum number of
columns allowed is 65 columns, which is the width of a normal page.
Step 5 - Insert Tokens into your Supplemental Form
Now, return to the open form in your word processor and replace each item of variable information with
the applicable token you created or found for it. After doing so, the sample letter above would look
something like the sample supplemental form shown in Figure 2.
Figure 2 - Sample Supplemental Form
~P0001S
~P0002S
~P0003S
~P0004S, ~P0005S
RE:
~P0006S
~P0007S
Dear ~P0008S:
Thank you for contacting our office and giving us the opportunity to review your
~P0007S claim.
This letter shall serve to confirm your appointment with attorney ~P0009S, on ~P0010S,
at ~P0011S.
If unable to attend this appointment, please contact me immediately at
the below listed telephone number.
In order to review your claim thoroughly, please bring the following information, if
available, with you to your appointment:
~P0012S
If you have any questions regarding this matter, please do not hesitate to contact our
office. Your cooperation in this matter is appreciated.
Sincerely,
~P0013S
NOTE:
If we chose to use the Global token ~P0190G rather than ~P0009S for the NAME OF
ATTORNEY item, then we would replace the item in the form with ~P0190G rather
than ~P0009S.
Step 6 – Save the Supplemental Form
Method 1 - Saving to an existing volume
Save your form in the subdirectory of the existing ProDoc volume to which you want to add the
supplemental form. For example, a Microsoft Word user creating a letter to confirm a client’s
appointment to be used in the Texas Litigation volume would save the form letter as
C:\prodoc\txlit\ltr1.doc.
298
ProDoc Software Manual
NOTES:
1) You can find the subdirectory for any volume by selecting either "Edit volume list" or
"Show installed volumes" from the Tools menu and the Registration submenu. "Edit
volume list" also shows the complete pathname of the subdirectory if you highlight the
volume and click Change.
2) Supplemental form filenames should be no more than eight characters long.
3) The filename you assign must either have no extension or a .doc, .wpd or .wp extension.
As illustrated in the above example, Microsoft Word versions 98 and later automatically
append a .doc extension to filenames. Likewise, newer versions of WordPerfect add a
.wpd extension. Older versions of either word processor may or may not assign an
extension.
4) Save the supplemental form as file type WordPerfect 5.x.
Method 2 – Saving to a newly created volume
Another way of saving supplemental forms is to create a volume with a name of your own
choosing. In order to create the new volume, open ProDoc and click Tools > Registration > Edit
Volumes List > New. In the title box type the desired title (e.g. Supplemental Forms). In the
Subdirectory box type the name of your new volume (e.g. supforms). You will be asked if you
want to create a folder with that name. Click Yes. You now have a supplemental forms volume
to store your supplemental forms into. Note: Creating a central volume for your supplemental
forms enables you to maintain one comprehensive set of supplemental questions instead of
smaller repetitive sets of supplemental questions for each volume.
Step 7 - Adding your form in ProDoc’s database
Now that your newly created supplemental form has been saved in a volume's subdirectory or a newly
created volume, you must add the form to the list of supplemental forms for that volume. Select
Customize > Supplemental Forms & Questions > Supplemental Forms. This brings up the
Volume Selection window. Select the correct volume in which to add the supplemental form. Once you
have made your volume selection, the Supplemental Forms window will appear.
Supplemental Forms Window
The Supplemental Forms window contains a list of the supplemental forms currently in a
volume. It contains New, Update and Delete buttons which let you add a supplemental form to
the volume, change the filename and title of the highlighted form, and remove the highlighted
form from the volume. You can also change the volume shown in this window with the Change
Volume button. Select New to bring up the Supplemental Form dialog box.
Supplemental Form Dialog Box
This box contains two fields to fill in.
Filename - Enter the filename for the form. This is the filename component under which
you saved the supplemental form when you were in your word processor. For example, if
you saved the form as C:\prodoc\txlit\ltr1.doc, then the filename you would enter here
would be ltr1.doc.
Title - Enter the title of the form (e.g. confirmation letter) exactly as you want it to
appear in the Select Forms window and other windows. It should be descriptive to make
it easy to find the desired form in a list.
Step 8 - Test the Form
Appendices
299
After creating the form and adding the form and any new supplemental tokens to the database, you
should generate a document to test the supplemental form. Start a document assembly session. When
you arrive at the Select Forms window, select the volume for which you created the supplemental form,
then select the Supplemental tab. This will display a list of all the supplemental forms in the volume.
Select the form that you just created from that list in the same way as you select forms from the main
forms list. After assembling a document from your newly created supplemental form, examine it to
insure that the answers to the questions appear as expected.
Appendix E - Backup and Restore
BACKING UP FILES
Most people inadvertently delete files at one time or another. Hard disk drives can fail after extended use.
To protect against such loss of data, you should make regularly scheduled backup copies of important
data files to one of these forms of backup destinations:
·
Removable media (diskette, writable CD, ZIP disk, data tapes, or a flash drive/thumb drive)
·
Network drive on your office network (preferably to a server using a RAID disk storage
subsystem)
·
Off site data storage facility/data center
The ProDoc backup utility, at Customize ® Options ® Backup automatically creates a backup of all of
your client data and case data, including case answers and links to existing documents.
If you run the SOS program and do your systematic backups from that program, all SOS billing and case
management data is backed up, as well as the ProDoc program data listed above.
Due to the flexibility built into ProDoc, many other files containing modifications you may have made to
your ProDoc data files may exist. These modifications include document formatting changes; modified
master forms; and supplemental volumes, forms, and questions.
The automatic back up features in the ProDoc and SOS programs do not back up these additional
personalized files or your completed documents. For this reason, we strongly encourage you to perform
additional systematic backups of your completed documents and any other modified or customized forms
and documents you have created, in addition to using the automatic backup utility.
File Structure Planning
If you save the backup files in the same file structure used by ProDoc, it's much easier to restore correctly.
Perform these steps to set up the file structure on your backup drive:
1. Create a folder on your backup drive and name it ProDoc Backup Utility Files (For example:
Z:\ProDoc Backup Utility Files\ProDoc, where Z represents the backup drive letter).
a. Locate and copy the entire ProDoc installation folder (by default, c:\ProDoc) to this folder.
This will work well as long as you have enough available space on your backup drive.
b. Locate and copy the clients folder (by default, c:\Clients) to this ProDoc Backup Utility
Files folder.
2. If you want to reduce the amount of drive space used on the backup drive, and make the restore
process quicker, you can remove certain files from the folders you copied to ProDoc Backup
Utility Files folder:
a. In the copied backup folders named ProDoc and Clients, highlight and delete all individual
files in the folders.
b. Open each individual subfolder, and delete all individual files in each one. Don’t delete the
300
ProDoc Software Manual
folders themselves.
c.
You should only have empty file folders when you are finished. This file structure will help
save drive space and make the restore process quicker.
Backup Procedure
If you set up a file structure as described above, the steps in this section will help you ensure that any
new ProDoc installation will operate in the same manner as your old installation. Note: SOS users
should set up backups through SOS instead of ProDoc to preserve billing and case management data
along with client/case data.
Perform these steps to back up your ProDoc data files:
1. Click Customize ® Options ® Backup to configure the needed settings.
a. Check the Auto Backup at exit box and set the Days between backups number (we
recommend using 0 to always backup when you exit ProDoc).
b. Click the Station triggering automatic backups field and select the login name or initials
of a user who uses ProDoc on a daily basis.
c.
In the Backup folder field, enter the drive letter and folder names you used in step 1 under
File Structure Planning, (For example: Z:\ProDoc Backup Utility Files\ProDoc, where Z
represents the backup drive letter). Click OK to save your changes.
2. Back up your completed document folders to your backup drive every day, or any time you
create/update documents. If you use the default document locations, copy the c:\Clients folder to
your backup drive. If you save documents elsewhere, back up the appropriate folders, preferably
to the same location or folder on the drive relative to your ProDoc installation folder.
If you are sure you haven't modified ProDoc, you can stop here. If you have modified document
formatting or forms; or created supplemental forms, questions, or forms sets; continue to Step 3. You
need to back up these files.
3. Perform the following steps once, then do them again any time a user changes formatting,
modifies a form, updates supplemental forms/questions or creates/modifies a form set.
a. In the installation directory (by default, c:\ProDoc), copy any files named xxxgcfg.ini (xxx
represents user login name or initials) to Z:\ProDoc Backup Utility Files\ProDoc where
Z represents the backup drive letter. Do the same with the global.cif file if it exists.
b. In each subfolder of the installation directory, locate the following files and copy them to the
same folder name on your backup drive:
i.
Any files with the extensions .doc, .wpd, .wp, .cif, or .ini.
ii. Docgrps.tps, grpitems.tps, Sdocs.tps, SQues.tps, SLogic.tps and SAuto.tps.
To make the ProDoc installation work correctly, these files must all be copied to the same folder
location on the backup drive relative to their folder location in their original drive.
Follow the steps in the following section, Restoring from a Backup whenever it becomes necessary to
restore files from the backup you have made.
RESTORING FROM A BACKUP
Like backing up files, restoring is a matter of specifying what, when, where, and how. You probably chose
to restore data files because your hard disk was replaced or reformatted, or perhaps you have reinstalled
the ProDoc document assembly program (and perhaps the SOS program as well). Here is what you can
expect out of your new installation depending on what was previously backed up, from the least effective
to the most effective backup routines:
Appendices
301
1. If you have only used the backup utility from ProDoc or SOS, your client, case and document
listing will be restored and your case answers will also be restored. You will need to reassemble
your documents, and any modifications or additions to forms will not be made to the documents
unless you re-enter the modifications before reassembling. Any changes to documents made
through your word processor and saved will not be included.
2. If you also backed up your completed documents, these will be available as before.
3. If you used the backup utility from ProDoc or SOS, and also backed up your completed documents
and any modified files, your new installation will basically operate exactly as it did before.
If you used a commercial backup program to do your backups, you should follow the program's
instructions as well as those below. The steps in the following procedure assume you use the Windows
Explorer program to locate and copy the backed up files.
Restoring Backed up Data Files.
This procedure assumes that the ProDoc program (and the SOS program, if subscribed to) was
successfully installed from a CD. If you encountered problems during this installation process, call
Customer Support at 1-800-759-5418 for help.
Perform the following steps to restore your backed up data files.
1. Restore files backed up with the ProDoc or SOS backup utility.
a. If you don't use SOS: In ProDoc, Click Tools ® Backup Data Files ® Restore.
i.
If you are using a network installation, ensure no other users are logged in and click Yes
on the warning window. If ProDoc is not networked, click Yes on the warning window.
ii. Click Restore on the next warning window.
iii. Enter the location of the backup files in the Files to Restore Location window. Click
OK. Your client, case and document list will be restored.
b. ProDoc and SOS users: Perform these steps in SOS if you performed backups through SOS:
i.
Click Utilities ® Back up data files ® Restore data files.
ii. Enter the backup file location on the Files to restore location window. Click OK. Your
data files will be restored for both ProDoc and SOS.
2. If you backed up your completed documents, locate the backup folder location.
a. Users who used default document locations can then copy either the c:\Clients folder to the
ProDoc installation directory, c:\ProDoc if installed to the default location on a stand-alone
computer, or copy all backup folders named after clients to the Clients folder in the ProDoc
installation folder. If you see a warning about overwriting existing files, confirm that these
should be overwritten. Your backed up documents will then be restored.
b. Users who did not use default document locations should copy the backup document folder(s)
to the same location on the drive in which these were placed before. Your backed up
documents will then be restored and can be accessed through the Clients & Cases
Document Manager if they are restored to the same location.
3. Users who modified document formatting or master forms, or created supplemental forms and
questions should locate and restore these files. If nothing was changed or not backed up, you can
skip this step.
a. If you used the steps under Backup Procedure in the Backing Up Files section, you
backed up the following files:
i.
In the ProDoc installation directory (by default, c:\ProDoc): Any existing xxxgcfg.ini
files (xxx is each user's login initials/name) and Global.cif.
302
ProDoc Software Manual
ii. In each volume folder: Any files with the extensions .doc, .wpd, .wp, .cif or .ini and any
files named Docgrps.tps, grpitems.tps, Sdocs.tps, SLogic.tps and SAuto.tps.
b. Copy these files and all volume folders to the ProDoc installation directory and overwrite
existing files.
c.
If you have created and backed up any supplemental volumes, you must place these back on
the volume listing. Click Tools ® Registration ® Edit Volume List and add the
information required for the supplemental volume(s).
4. If you didn't do so before, set up a backup routine as described in the topic Backing Up Files
Your latest ProDoc installation should now run as it did before. If you encounter problems during this
process, call Customer Support at 1-800-759-5418 for help.
Index
Index
-AAbout ProDoc 5
Accounting Number (Conservatorship Accounting)
230
Accounting Number (Guardianship Accounting)
176
Accrued Interest (Conservatorship Accounting) 258
Adding Child Information (Guardianship UCCJEA)
165
Adding Child Information (UCCJEA Declaration)
132
Adding New Clients 33
Adding Nonparty Information (Guardianship
UCCJEA) 171
Adding Other Proceedings (Guardianship UCCJEA)
169
Adding Other Proceedings (UCCJEA Declaration)
136
Adding Person Child Lived With (Guardianship
UCCJEA) 168
Adding Person Child Lived With (UCCJEA
Declaration) 135
After Tax Statistics Form (Property
Declaration/Distribution) 126
After Tax Values Form (Property
Declaration/Distribution) 123
Allocating Community Property (Property
Declaration/Distribution) 118
Appendix A 268
Appendix B 271
Appendix C 281
Appendix D 294
Assembly Questions 23
Attachment 1 Form (Probate Inventory) 98
Attachment 1 Property (Conservatorship Accounting)
250
Attachment 1 Property (Conservatorship Inventory)
219
Attachment 1 Property (Guardianship Accounting)
196
Attachment 1 Property (Guardianship Inventory)
152
Attachment 1 Property (Probate Inventory) 100
Attachment 2 Form (Probate Inventory) 99
303
-BBackup Options 70
Beginning Community Property (Guardianship
Accounting) 177
Beginning Community Property Form
(Conservatorship Accounting) 231
Beginning Community Property Form (Guardianship
Accounting) 177
Beginning Separate Property (Guardianship
Accounting) 181
Beginning Separate Property Form (Conservatorship
Accounting) 235
Business Interests (Conservatorship Accounting)
254
Business Interests (Conservatorship Inventory)
221
Business Interests (Guardianship Accounting) 199
Business Interests (Guardianship Inventory) 155
Business Interests (Probate Inventory) 102
-CCalendar Icon (Conservatorship Inventory) 227
Calendar Icon (Guardianship Inventory) 161
Calendar Icon (Guardianship UCCJEA) 173
Calendar Icon (Probate Inventory) 108
Calendar Icon (Property Declaration/Distribution)
128
Calendar Icon (UCCJEA Declaration) 140
Calendar Tool (Conservatorship Accounting) 263
Calendar Tool (Conservatorship Inventory) 227
Calendar Tool (Guardianship Accounting) 207
Calendar Tool (Guardianship Inventory) 161
Calendar Tool (Guardianship UCCJEA) 173
Calendar Tool (Probate Inventory) 108
Calendar Tool (Property Declaration/Distribution)
128
Calendar Tool (UCCJEA Declaration) 140
California PowerPacks 88
Cancel (Conservatorship Inventory) 208
Cancel Subscription 84
Case Number (Conservatorship Accounting) 230
Case Selection 90
Case Selection (Conservatorship Inventory) 226
Case Selection (Guardianship Inventory) 160
Case Selection (Guardianship UCCJEA) 172
Case Selection (Probate Inventory) 107
304
ProDoc Software Manual
Case Selection (Property Declaration/Distribution)
127
Case Selection (UCCJEA Declaration) 139
Certified Mailer 76
Change Pleading Paper Settings 51
Changes in Asset Form (Conservatorship
Accounting) 248
Changes in Asset Form (Guardianship Accounting)
195
Changes in Form of Asset (Guardianship Accounting)
195
Changes in Form of Asset During the Accounting
Period (Conservatorship Accounting) 248
Changing Child Information (UCCJEA Declaration)
132
Changing Cost or Basis (Property
Declaration/Distribution) 123
Changing Nonparty Information (Guardianship
UCCJEA) 171
Changing Nonparty Information (UCCJEA
Declaration) 138
Changing word processor 65
Charges Form (Conservatorship Accounting) 237,
239
Charges Form (Guardianship Accounting) 183,
185
Check for Updates 84
Check Issued After Apppointment of Conservator
(Conservatorship Accounting) 251
Child Address Window (Guardianship UCCJEA)
166
Child Address Window (UCCJEA Declaration) 134
Child Information (Guardianship UCCJEA) 165
Child Information (UCCJEA Declaration) 132
Children Form (Guardianship UCCJEA) 164
Children Form (UCCJEA Declaration) 131
CIF Files 55
Clients and Case Settings 73
Clients and Cases Menu 32
Clipboard 264
Closing Date (Conservatorship Accounting) 230
Closing Date (Guardianship Accounting) 176
Common Controls on Browse Windows 264
Community Property Form (Conservatorship
Inventory) 213
Community Property Form (Guardianship Inventory)
146
Community Property Form (Probate Inventory) 94
Community Property Form (Property
Declaration/Distribution) 115
Compatibility Mode 14
Completing Children Form (UCCJEA Declaration)
131
Completing the General Form (Probate Inventory)
92
Configuration File 265
Configuration Files 55
Conservatee Form (Conservatorship Inventory)
211
Copy 265
Copy Property To (Conservatorship Inventory) 208
Copy text 265
Creating Supplemental Forms 294
Credits Form (Conservatorship Accounting) 240
Credits Form (Guardianship Accounting) 187, 189
Custom Fields Options 74
Customer Support 2
Customize Menu 49
Cut 265
Cut Text 265
-DDebt or Promissory Note (Conservatorship
Accounting) 258
Debt or Promissory Note (Conservatorship Inventory)
223
Debt or Promissory Note (Guardianship Accounting)
202
Debt Owed Decedent (Probate Inventory) 104
Debt Owed the Conservatee (Conservatorship
Inventory) 223
Debt Owed to Decedent (Probate Inventory) 104
Debt Owed to Minor (Guardianship Accounting)
202
Debt Owed to Minor (Guardianship Inventory) 157
Default Answers 265
Depreciation Recapture (Property
Declaration/Distribution) 125
Directory 265
Directory Browse Window 264
Disable Pleading Paper Formatting 51
Display Allocation Percentages (Property
Declaration/Distribution) 118
Distributions (Conservatorship Accounting) 248
Document Assembly Menu 16
Document Assembly Wizard 16
Document Formatting 51
Changing 49
Document Manager 37
Index
Domestic Violence Orders (Guardianship UCCJEA)
169
Domestic Violence Orders (UCCJEA Declaration)
137
Download Updates 84
-EEdit Documents 27
Edit Menu 31
Editing Master Forms 49
Ending Community Property Form (Conservatorship
Accounting) 244
Ending Community Property Form (Guardianship
Accounting) 191
Ending Liabilities (Conservatorship Accounting)
250
Ending Separate Property Form (Conservatorship
Accounting) 246
Ending Separate Property Form (Guardianship
Accounting) 193
Enter Child Information (Guardianship UCCJEA)
165
Enter Child Information (UCCJEA Declaration) 132
Entering Asset Information (Guardianship Inventory)
155
Entering Assets (Conservatorship Accounting) 231,
235, 244, 246
Entering Assets (Conservatorship Inventory) 213,
215
Entering Assets (Guardianship Accounting) 181,
191, 193
Entering Assets (Guardianship Inventory) 146, 148
Entering Assets (Probate Inventory) 94
Entering Cost or Basis (Property
Declaration/Distribution) 123
Entering General Information (Guardianship
UCCJEA) 163
Entering General Information (UCCJEA Declaration)
130
Entering Personal Property (Guardianship Inventory)
156
Entering Protective Orders (Guardianship UCCJEA)
169
Entering Protective Orders (UCCJEA Declaration)
137
Entering Real Estate Assets (Guardianship Inventory)
153
Entering Restraining Orders (Guardianship UCCJEA)
169
Entering Restraining Orders (UCCJEA Declaration)
137
Entering Securities (Guardianship Inventory)
Establish Assembly Settings 17
Export Menu 85
305
158
-FFile Menu 30
Filename 265
Firm Information in Answers
Changing Case Answers for Firm Information
Answers 75
Setting Defaults for Firm Information Answers
75
Form Sets 266
Formatting Documents 49
-GGeneral Accounting Information of [Conservatee
Name] (Conservatorship Accounting) 230
General Form (Conservatorship Accounting) 230
General Form (Conservatorship Inventory) 209
General Form (Guardianship Accounting) 176
General Form (Guardianship Inventory) 142
General Form (Guardianship UCCJEA) 163
General Form (Probate Inventory) 92
General Form (Property Declaration/Distribution)
110
General Form (UCCJEA Declaration) 130
Getting Help (Guardianship UCCJEA) 162
Getting Help (Property Declaration/Distribution)
109
Getting Help (UCCJEA Declaration) 129
Getting Started ((Property Declaration/Distribution)
109
Getting Started (Conservatorship Accounting) 228
Getting Started (Conservatorship Inventory) 208
Getting Started (Guardianship Accounting) 174
Getting Started (Guardianship Inventory) 141
Getting Started (Guardianship UCCJEA) 162
Getting Started (Probate Inventory) 91
Getting Started (UCCJEA Declaration) 129
Global 266
Global Questions 266
Glossary 264
306
ProDoc Software Manual
-H-
-M-
Headers and Footers 54
Help (Probate Inventory) 91
Help Menu 87
Highlight 266
Hot Keys (Guardianship UCCJEA) 162
Hotkeys (UCCJEA Declaration) 129
How Assets are Displayed (Conservatorship
Accounting) 231, 235, 244, 246
How Assets are Displayed (Conservatorship
Inventory) 213, 215
How Assets Are Displayed (Guardianship
Accounting) 181, 191, 193
How Assets Are Displayed (Guardianship Inventory)
146, 148
How Assets are Displayed (Probate Inventory) 94
How ProDoc Assembles Documents 6
How ProDoc Works 271
Main Menu Overview 29
Main Toolbar (Conservatorship Accounting) 228
Main Toolbar (Guardianship Accounting) 174
Main Toolbar (Guardianship Inventory) 141
Main Toolbar (Property Declaration/Distribution)
109
Manage Users 13
Manage Users Login 13
Master Forms 266
Merge Questions 26
Minor (Guardianship Accounting) 176
Minor Form
Referee's Total Appraisal (Guardianship
Inventory) 144
Minor Name and Alias
Adding, Changing (Guardianship Inventory)
142
Minor Selection (Guardianship Accounting) 174
Miscellaneous Firm Settings 75
Miscellaneous Personal Settings 69
-IImporting Assets (Conservatorship Accounting)
231, 235, 246
Importing Assets (Guardianship Accounting) 181
Inaccessible Volumes 80
Installing ProDoc 7
Intangible and Unscheduled (Probate Inventory)
106
-LLiabilities Form (Conservatorship Accounting) 249
License 266
Locating Asset Descriptions (Conservatorship
Accounting) 231, 235, 244, 246
Locating Asset Descriptions (Conservatorship
Inventory) 213, 215
Locating Asset Descriptions (Guardianship
Accounting) 181, 191, 193
Locating Asset Descriptions (Guardianship Inventory)
146, 148
Locating Asset Descriptions (Probate Inventory) 94
Location of files 66
Login 13
-NNavigating 1
Navigating the Program (Probate Inventory) 91
Navigating the Program (Property
Declaration/Distribution) 109
Networking ProDoc 268
Nonparties (Guardianship UCCJEA) 170
Nonparties (UCCJEA Declaration) 137
Nonparty Claims (Guardianship UCCJEA) 171
Nonparty Claims (UCCJEA Declaration) 138
Nonparty Form (Guardianship UCCJEA) 170
Nonparty Form (UCCJEA Declaration) 137
Nonparty Information (UCCJEA Declaration) 138
Notes Owed (Conservatorship Inventory) 223
Notes Owed (Guardianship Inventory) 157
Notes Owed (Probate Inventory) 104
Notes Owed the Conservatee (Conservatorship
Inventory) 223
Notes Owed to Minor (Guardianship Accounting)
202
Index
-OOpening Date (Conservatorship Accounting) 230
Opening Date (Guardianship Accounting) 176
Options - Backup 70
Options - Clients/Cases 73
Options - Custom Fields 74
Options - Firm Info 74
Options - Firm Miscellaneous 75
Options - Graphic Engine 67
Options - Personal Misc. Settings 69
Options - Small Office Suite 70
Options - Timeslips 72
Options - Word Processor 65
Other Intangible and Unscheduled Assets
(Conservatorship Inventory) 225
Other Intangible and Unscheduled Property
(Conservatorship Inventory) 225
Other Intangible Assets (Conservatorship
Accounting) 261
Other Intangible Assets (Guardianship Accounting)
205
Other Intangible Assets (Guardianship Inventory)
159
Other Intangible Assets (Probate Inventory) 106
Other Proceedings Form (Guardianship UCCJEA)
169
Other Proceedings Form (UCCJEA Declaration)
136
Other Unscheduled Assets (Guardianship Inventory)
159
Other Unscheduled Assets (Probate Inventory) 106
Overview 1
-PPage Numbers 54
Paste 266
Paste text 266
Person Child Lived With (Guardianship UCCJEA)
168
Person Child Lived With (UCCJEA Declaration)
135
Petitioner Separate Property Form (Property
Declaration/Distribution) 119
Phone Types Settings 72
Pleading Paper Options 51
PowerPacks
307
California 88
PowerPacks Menu 41
Pre Tax Statistics Form (Property
Declaration/Distribution) 125
Preview Standard Account (Guardianship
Accounting) 174
Print Blank Forms 42
Print Case Data Sheet 44
Print Client Lists 43
Print Form Lists 44
Print Forms (Property Declaration/Distribution) 115
Print Global Questions 45
Print Labels 47
Print Menu 41
Print Preview Screen 48
Print QuickText 47
Print Statistics Sheets (Property
Declaration/Distribution) 126
Print Supplemental Questions 45
Print Volume Questions 45
Print Worksheets 46
ProDoc Software Manual (Guardianship Inventory)
141
ProDoc Web site (Conservatorship Inventory) 208
ProDoc Web site (Guardianship Accounting) 174
ProDoc Web site (Guardianship Inventory) 141
ProDoc Website 3
ProDoc Website (Conservatorship Accounting) 228
ProDoc Website (Guardianship UCCJEA) 162
Promissory Note Owed (Conservatorship Accounting)
258
Promissory Note Owed (Conservatorship Inventory)
223
Promissory Note Owed (Guardianship Inventory)
157
Promissory Notes Owed (Guardianship Accounting)
202
Promissory Notes Owed to Decedent (Probate
Inventory) 104
Protective Orders (Guardianship UCCJEA) 169
Protective Orders (UCCJEA Declaration) 137
Purchases (Guardianship Accounting) 183
-QQ column (Conservatorship Inventory) 213
Q column (Guardianship Accounting) 177, 191
Quasi-Community Property (Conservatorship
Accounting) 231, 244
308
ProDoc Software Manual
Quasi-Community Property (Conservatorship
Inventory) 213
Quasi-Community Property (Guardianship
Accounting) 177, 191
Quasi-Community Property (Guardianship Inventory)
146
Quasi-Community Property (Probate Inventory) 94
Quick Links to Programs 1
QuickText 266
-RReal Estate (Conservatorship Accounting) 252
Real Estate (Conservatorship Inventory) 219
Real Estate (Guardianship Accounting) 197
Real Estate (Guardianship Inventory) 152
Real Estate (Probate Inventory) 100
Real Estate Assets (Conservatorship Inventory)
219
Recapture (Property Declaration/Distribution) 125
Register 266
Register Menu 79
Register This Computer 80
Registering PowerPacks 83
Registration 266
Registration And Setup 11
Respondent Separate Property Form (Property
Declaration/Distribution) 121
Restraining Orders (UCCJEA Declaration) 137
Restraining/Protective Orders Form (Guardianship
UCCJEA) 169
-SSave and Close (Conservatorship Inventory) 208
Save and Continue (Conservatorship Inventory)
208
Save location for finished document 66
Saving Documents 27
Securities (Conservatorship Accounting) 259
Securities (Conservatorship Inventory) 224
Securities (Guardianship Accounting) 203
Securities (Guardianship Inventory) 158
Securities (Probate Inventory) 105
Securities Assets (Conservatorship Inventory) 224
Select 266
Select a Case 90
Select a Case (UCCJEA Declaration) 139
Select a Date (Property Declaration/Distribution)
128
Select a Date (UCCJEA Declaration) 140
Select Form to Print (Property
Declaration/Distribution) 115
Select Minor (Guardianship Accounting) 176
Select Updates 84
Selecting a Case (Conservatorship Accounting)
262
Selecting a Case (Conservatorship Inventory) 226
Selecting a Case (Guardianship Accounting) 206
Selecting a Case (Guardianship Inventory) 160
Selecting a Case (Guardianship UCCJEA) 172
Selecting a Case (Probate Inventory) 107
Selecting a Case (Property Declaration/Distribution)
127
Selecting a Date (Conservatorship Accounting)
263
Selecting a Date (Conservatorship Inventory) 227
Selecting a Date (Guardianship Accounting) 207
Selecting a Date (Guardianship Inventory) 161
Selecting a Date (Guardianship UCCJEA) 173
Selecting a Date (Probate Inventory) 108
Separate Property Form (Conservatorship Inventory)
215
Separate Property Form (Guardianship Inventory)
148
Separate Property Form (Probate Inventory) 96
Setup 11
Show Volumes 83
Simplified Accounting (Guardianship Accounting)
174
SOS Options 70
Splitting Property (Property Declaration/Distribution)
118
Standard Accounting (Guardianship Accounting)
174
Starting the Program (Conservatorship Accounting)
228
Starting the Program (Conservatorship Inventory)
208
Starting the Program (Guardianship Accounting)
174
Starting the Program (Guardianship Inventory) 141
Starting the Program (Guardianship UCCJEA) 162
Starting the Program (Probate Inventory) 91
Starting the Program (UCCJEA Declaration) 129
Summary Section (Conservatorship Accounting)
230
Summary Section (Guardianship Accounting) 176
Supervisors and Users 13
Index
Supplemental Forms 267
System Requirements 7
-TTangible Personal Property (Conservatorship
Accounting) 256
Tangible Personal Property (Conservatorship
Inventory) 222
Tangible Personal Property (Guardianship
Accounting) 201
Tangible Personal Property (Guardianship Inventory)
156
Tangible Personal Property (Probate Inventory)
103
Timeslips Extension 281
Timeslips Options 72
Token 267
Toolbar (Conservatorship Inventory) 208
Toolbar (Guardianship Inventory) 141
Toolbar Buttons
Main Menu Toolbar 29
Toolbar buttons (Guardianship UCCJEA) 162
Toolbar buttons (UCCJEA Declaration) 129
Tools Menu 75
ToolTips 267
Type of Accounting (Conservatorship Accounting)
230
Type of Accounting (Guardianship Accounting) 176
-UUnscheduled Assets (Guardianship Inventory) 159
Unscheduled Assets (Probate Inventory) 106
Update Button (Conservatorship Accounting) 230
Update Child Information (Guardianship UCCJEA)
165
Update Child Information (UCCJEA Declaration)
132
Updating Cost or Basis (Property
Declaration/Distribution) 123
Updating Nonparty Information (Guardianship
UCCJEA) 171
Updating Nonparty Information (UCCJEA
Declaration) 138
Updating Person Child Lived With (Guardianship
UCCJEA) 168
Updating Person Child Lived With (UCCJEA
Declaration) 135
309
Using Toolbar Buttons (Conservatorship Accounting)
231, 235, 244, 246
Using Toolbar Buttons (Conservatorship Inventory)
213, 215
Using Toolbar Buttons (Guardianship Accounting)
181, 191, 193
Using Toolbar Buttons (Guardianship Inventory)
146, 148
Using Toolbar Buttons (Probate Inventory) 94
-VView Attachment 1 Form (Conservatorship Inventory)
217
View Attachment 1 Form (Guardianship Inventory)
150
View Attachment 2 Form (Conservatorship Inventory)
218
View Attachment 2 Form (Guardianship Inventory)
151
Volume 267
Volume Edit Dialog 82
Volume Edit Form 82
Volume Questions 267
-WWarranty 2
WebUpdate
Check for Updates 84
WebUpdate History 84
WebUpdate Window 84
Welcome to ProDoc 4
Window Menu 87
Word processor 65
310