1
Dome Heat Shrinkable Seal Fiber Optic Splice Closure
(FOSC)
GPJM-R24
MANUAL DE INSTALARE
1. Scope of application
This Installation Manual suits for the Fiber Optic Splice Closure (Hereafter abbreviated as FOSC), as the
guidance of proper installation.
The scope of application is: aerial, underground, pipeline, hand-holes. The ambient temperature ranges from -40
to65'C.
2. Basic structure and configuration
2.1 Dimension and capacity^
Outside dimension (Height x Diameter)
540mm X 205mm
Weight (excluding outside box)
3000 g— 3600g
Number of inlet/out ports
4 pieces in general
Diameter of fiber cable
Ø8mm~-Ø36mm
Capacity of FOSC
Bunchy:24-96 (cores), Ribbon: up to 288 (cores)
2.2 M ain components
No.
Name
of Quantity
components
1
FOSC cover
1 piece
2
Usage
Remarks
Protecting fiber
splices in whole
cable
3
Base
Max. 4 trays
(bunchy)
Max.: 4 trays
(ribbon)
Iset
4
Plastic hoop
1 set
Fixing between
cover and base
FOSC
5
Seal fitting
1 piece
Sealing between
cover and base
FOSC
6
Pressure testing
valve
1 set
7
Earthing deriving
device
1 set
After inject air, it is used for
pressure testing and sealing
testing
Deriving metal parts of
fiber cables in FOSC for
earthing connection
Fiber optic splice
tray (FOST)
Fixing heat shrinkable
protective sleeve and
holding fibers
Height x Diameter
450mm x 170mm
Suitable for:
Bunchy:
24(cores)
Ribbon: 12 (pieces)
Fixing internal and external
structure
1
Configuration as per
requirement
Configuration as per
requirement
2.3 Main accessories and special tools
No.
Name of accessories
1
Usage
Remarks
Heat shrinkable protective
sleeve
Protecting fiber splices
Configuration as
per capacity
2
Nylon tie
3
Configuration as
per capacity
Configuration as
per requirement
Configuration as
per requirement
5
Heat shrinkable fixing sleeve
(elliptical)
Heat shrinkable fixing sleeve
(circular)
Branching clip
Fixing fiber with protective
coat
Fixing and sealing single
fiber cable
Fixing and sealing mass of
fiber cable
Branching fiber cables
6
Earthing wire
1 piece
Putting through between
earthing devices
7
Desiccant
1 bag
8
Labeling paper
1 piece
Put into FOSC before sealing
for desiccating air.
Labeling fibers
10
Buffer tube
11
Aluminum foil paper
decided by
customers
1 piece
4
Quantity
Hitched to fibers and fixed
with POST, managing buffer.
Configuration as
per requirement
Configuration as
per requirement
To protect the bottom of
closure and inlet/outlet tubes
when heating heat shrinkable
fixing sleeve with fire sprays
3. Necessary tools for installation
3.1 Supplementary materials (to be provided by operator)
Name of materials
Usage
Scotch tape
Labeling, temporarily fixing
Ethyl alcohol
Cleaning
Gauze
Cleaning
3.2 Special tools (to be provided by operator)
Name of tools
Usage
Fiber cutter
Cutting off fiber cable
Fiber stripper
Strip off protective coat of fiber cable
Combo tools
Assembling FOSC
2
3.3 Universal tools(to be provided by operator)
Name of tools
Usage and specification
Band tape
Measuring fiber cable
Pipe cutter
Cutting fiber cable
Electrical cutter
Take off protective coat of fiber cable
Combination pliers
Cutting off reinforced core
Screwdriver
Crossing/Paralleling screwdriver
Scissor
Waterproof cover
Waterproof, dustproof
Metal wrench
Tightening nut of reinforced core
3.4 Splicing and testing instruments (to be provided by operator)
Name of instruments
Usage and specification
Fusion Splicing Machine
Fiber splicing
OTDR
Splicing testing
Provisional splicing tools
Provisional testing -
Notice: The above-mentioned tools and testing instruments should be provided by the operators
themselves.
3
Installation flow chart
1. Open the closure
2. Determine length of fiber cable to be fixed and stripped inside FOSC
3. Strip off protective coats of fiber cable and fiber
4. Separate fiber cores and prepare work prior to fixing fiber cable
5. Fix reinforced core, and pyrocondense, fix and seal fiber cable
6. Splice fibers
7. Install heat shrinkable protective sleeve and house fibers
8. Check up comprehensively
9. Assemble FOSC housing and fix FOSC4
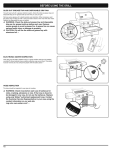
5. The process of installing FOSC.
5.1 Step One - Open the closure
5.1.1 Cleaning the locale and determine where to install the FOSC and then place
fiber cables required
5.1.2 Check whether the main components and accessories have been well prepared
4
inside the package.
5.1.3 Open the closure
(D Demount hoop fixing bolt and pull hoop locking system out, then proceed in
demounting the hoop.
(§) Pull the FOSC cover upwards out, installation could begin.
5.1.4 See Drawing I
Important issues: If the weather condition is not good enough, then a tent must
be pitched for waterproof and dustproof.
5.2 Step Two -Determine length of fiber cable to be fixed and stripped inside
5.2.1 If all fibers are for branch splicing, please refer to Drawing 2(A) for stripping length.
5.2.2 If some fibers are for straight-througli, while others are for branch splicing, please refer
to Drawing 2(B) for stripping length.
5.2.3 See Drawing 2.
Important issues: 1. Reserve enough length of fiber cable to be spliced.
2. Stripping length also could be decided by customers according to
5
FOSC"
installation requirement
Drawing 2(A)
Drawing 2(B)
5.3
Step Three -^Strip off protective coat of fiber cable and fiber
5.3.1 Strip off protective coat of fiber cable from the temp, locating mark with the cutter and
the stripper, please refer to Drawing 2 for stripping length. Stripping length also could
be decided according to installation requirement
5.3.2 See Drawing 3.
Important issues: If it is difficult to pull all the protective coat of fiber cable at one time, strip
it off section by section to avoid fiber breakage.
Stripping terminal fiber cable
Inlet terminal Tiber eable
5.4
Step Four - Separate fiber cores and prepare work prior to fixing fiber cable.
5.4.1 Wind 2 layers of insulation tape on protective coat of fiber core for protection.
Meanwhile, get rid of the stuffing to separate fiber core and clean them. Form a ring
with the diameter of 100mm or so and fix it on the fiber temporarily by adhesive tape.
5.4.2 Depending on fiber cable stripped, the following two cases are available.
© All fibers are to be branched after being spliced completely.
6
® Some of fibers are for straight-through after being winded, while the others are for
branch splicing.
5.4.3 The FOSC is provided with 7 single inlet/outlet tubes, six of which suit for single fiber
cables with max. diameter (|)21mm and 1 mass inlet/outlet tube which suits for 1
piece of fiber cable with max. diameter c[> 36mm or 2 pieces of fiber cables with max.
diameter (j) 32mm or multi-pieces of fiber cables with short diameter.
5.4.4 Mass inlet/outlet tube is required if some fibers are for straight-through
5.4.5 The corresponding inlet/outlet tube cover could be slightly knocked out with
screwdriver from inside to outside according to number and diameter of fiber cable
required.
5.4.6 Reserve reinforced core in 70mm length and cut off the unnecessary ones.
5.4.7 See Drawing 4 and Drawing 5.
Important Issues: Inlet/outlet tubes are to be selected accurately to make it easy for splicing and
sealing.
7
5.5 Fix reinforced core, and pyrocondense, fix and seal fiber cable.
5.5.1 Insert fiber cable into the corresponding heat shrinkable fixing tube, further insert the
them into inlet/outlet tube at the bottom of FOSC.
5.5.2 Demount fixing nut of reinforced core with a special wrench (plastic one), which is to be inserted
into the fixing slot afterward and tighten it. Then retighten it with a metal wrench (the metal
wrench is to be provided by operator).
5.5.3 Hitch heat shrinkable fixing sleeve to the fiber cable till its root by hand.
5.5.4 Please refer to Drawing 5 for installing branching clip.
5.5.5 Heat heat shrinkable fixing sleeve with fire sprayer to make it hugging inlet/outlet tube
and fiber cable to reach complete sealing.
5.5.6 See Drawing 5
important issue: 1. Fixing nut of reinforced core should be tightened.
2. While heating, heat shrinkable fixing tube should shrink evenly, and there
should be no bubbles, pores and other defects inside the tube.
5.6 Step Six - Splice fibers
5.6.1 Follow user manual of fusion splicing machine to splice fiber.
Important issue: pay attention to the twist and bend of fiber
8
Step Seven -Install heat shrinkable protective sleeve and house fibers.
5.7.1 When having completed splicing the fibers, the first fiber ring should be housed
on the farthest side of FOST, the remaining fiber optic should be winded, forming a ring
with diameter not less than 80mm. then put it into FOST (Fiber Optic Splice Tray)
together with heat shrinkable protective sleeve.
( Firstly fix heat shrinkable protective sleeve into the slot, then enlarge the diameter of
fiber ring properly.)
5.7.2 see Drawing 6
Important issue: pay attention to the twist and bend of fiber.
Drawing 6
5.8 Step Eight - Check up comprehensively
To ensure the technical requirements, the following instructions must be followed:
5.8.1 Fibers with protective coat are fixed with nylon tie at the entrance of FOST.
5.8.2 Grommet should be pressed from inside to outside in order to properly install FOST.
5.8.3 Straight-through fibers with protective coat should be winded to the clasp, as well as reserved
9
fibers.
5.8.4 Check whether the internal tighteners and fixing nut of reinforced core are well tightened.
5.8.5 Check whether seal fitting is installed neatly and smoothly.
5.8.6 Check whether heat shrinkable fixing sleeve is reliable and sealing completely.
5.8.7 See Drawing 7.
Important issues: If any problems occur, they should be solved right away.
Drawing 7
5.9 Step Nine - Assemble FOSC housing and fix FOSC
5.9.1 Put FOSC cover on base directly.
5.9.2 Install plastic hoop between FOSC cover and base, aim at the central point of the FOSC, tighten
hoop locking system, which is to be fixed by hoop fixing bolt then.
5.9.3 FOSC installation
® Aerial application: fix metal hoop and transom to the pole. Please refer to Drawing 8
10
© Wall mounting application: fix the bracket on the wall with bolt, (metal hoop is not
required.)
(3) Underground application: metal hoop is not required.
5.9.4 See drawing 8
Important issues: 1. Pay attention while installing plastic hoop.
2. The specification of bolt for fixing the bracket is M8.
Drawing 8
6. Fiber Optic Splice Closures (KOSC) inspecting and testing items
Inspecting type
Inspecting
item
Technical Requirements
11
Routine test
(Before leaving
factory)
Type test
Package
Each small package contains one fiber optic splice
closure, together with its accessories, tools, installation
manual and packing list.
Appearance
Intact in shape, no burrs, bubbles, chaps, pores, warps,
impurities and other defects, all background colors should
be even and continual.
Sign
Fiber storage
device
Electrical
jointing
device
Sealing
performance
There is a clear sign on the housing, such as name and
model of the product, etc.
The fibers reserved are to be winded in fiber optic splice
tray (FOST), the length of fibers housed in FOST is
>1.6m, the curved radius is >30mm. During the
installation and maintenance, (here should be no
attenuation on fibers.
Inside FOSC: metallic components of fiber cables has the
functions of electrical putting through, earthing
connection and disconnecting. It is possible to install
earthing deriving device outside the housing
After sealing according to the stipulated operation
procedures, the injected air pressure is 100KPa + 5Kpa,
when immersed in clean water of normal temperature for
15 minutes, there should be no'air bubbles, then observed
for 24 hours, there should be no change of air pressure.
Re-sealing
performance
After reopening and resealing according to the stipulated
operation procedures, the injected air pressure is lOOKPa
± 5Kpa, when immersed in clean water of normal
temperature for 15 minutes, there should be no air
bubbles, then observed for 24 hours, there should be no
change of air pressure.
Pull
Bearing pull is ^ 800N at axle orientation, there should
be no breakage on the housing.
Punching
full
At least 3
sets
sampled
At least 3 sets
sampled each
time
each time
Bearing pressure of 2000N/10cm for 1 minutes, there
should be no breakage on the housing
Impact
Bearing impact energy of I6N'm, 3 times of impacts there
should be not breakage on the housing
Bending
The spot between the FOSC and seal fitting can bear
bending tension of 150N at bending angle of ±45° for 10
circles, there should be no breakage on the housing
Torsion
Bearing torsion 50N*m, 10 circle at torsion angle±900'
There should be no breakage on the housing.
12
At least 3 sets
sampled each
time
At least 3
sets
sampled
each time
Temperature
circle
Voltage
resistance
strength
Isolating
resistance
Injected air pressure of 60KPa ± 5 KPa, the temperature
circle ranging from -40'C~+65°C, 10 times of the circular
tests (one circular consists of high temperature for 2 hours
+ indoor temperature for 2 hours + low temperature for 2
hours + indoor temperature for 2 hours ) when the
pressure declines, the amplitude is S 5Kpa, immerse the
swatch in clean water of normal temperature for 15
minutes, there should be no air bubbles.
After sealing the FOSC according to the stipulated
operation procedures, immerse it in clean water of normal
temperature in 1.5m depth for 24 hours, there should be
no breakdown or arc over between the metallic
components of the FOSC, between metallic components
and the ground at DC 15KV for 1 minutes.
After sealing the FOSC according to stipulated operation
procedure, immerse it in clean water in 1.5m depth for
24h, the isolating resistance between the metallic
components of the FOSC, between the metallic
components and the ground should be ≥ 2* 104 M Ώ
13
www.mondoplast.ro