1
LifeSize® Bridge™ 2200
Installation Guide
April 2011
LifeSize Bridge 2200 Installation Guide
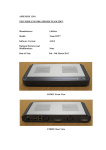
LifeSize Bridge 2200 Components
LifeSize Bridge 2200 is a 2U (8.89 cm, 3.5 inch) rack-mountable system that ships with the following
components:
•
LifeSize Bridge 2200
•
Power cord
•
Serial cable
For best performance, use a Category 6 Ethernet cable (not included) to connect the LifeSize Bridge 2200
to your network. At minimum, Category 5e is required.
NOTE
For the most current product information refer to lifesize.com/support.
Deployment Considerations
Choose a location in a clean, dust-free area that is well ventilated. Avoid areas where heat, electrical
noise, and electromagnetic fields are generated. Choose an area near a grounded power outlet. If you
intend to mount the system in a new or existing rack, refer to Installing LifeSize Bridge 2200 into a Rack for
guidance.
LifeSize recommends that you deploy LifeSize Bridge 2200 on a gigabit ethernet network for optimal
performance.
LifeSize Bridge 2200 Installation
Before you install LifeSize Bridge 2200, read the Safety and Regulatory Notices for important safety
information. This document is available on the documentation CD-ROM and from lifesize.com/support.
To install LifeSize Bridge 2200, follow these steps:
1. Remove all components from the product packaging.
2. Prepare the chassis for installation. You can install the system in one of the following hardware
configurations:
-
With the rack mounting brackets in their default configuration. Continue with step 3.
-
With the rack mounting brackets removed. Refer to Removing the Rack Mounting Brackets.
-
With the rack mounting brackets moved to another position. Refer to Moving the Rack Mounting
Brackets to Another Position.
3. Place the system in the desired position in your environment. Refer to Installing LifeSize Bridge 2200
into a Rack if you are installing the system in a rack.
4. Insert the network cable into any one of the four network ports (two on the front and two on the back).
Insert the opposite end of the network cable into an active network port.
2
LifeSize Bridge 2200 Installation Guide
5. Insert the power cord into the back of the system. Insert the opposite end of the power cord into a
grounded power outlet.
ARTWORK IN PROGRESS
6. Insert the serial cable into the serial port on the front of the system. Insert the opposite end of the serial
cable into a serial port on a computer.
ARTWORK IN PROGRESS
NOTE
If your computer does not have a serial port, use a USB-to-serial adapter to
connect the serial cable to a USB port on your computer. The USB port on the
back is reserved for future use.
7. Apply power using the power switch on the back of the system. Refer to Power and Reboot.
8. Refer to Configuring LifeSize Bridge 2200 for instructions on configuring the bridge using the serial
port.
3
LifeSize Bridge 2200 Installation Guide
Installing LifeSize Bridge 2200 into a Rack
Use the included rack mounting hardware to install LifeSize Bridge 2200 into your rack. The rack mounting
procedure can vary because of differences among racks. Therefore, refer to the installation instructions
that came with your rack in conjunction with these instructions.
Consider the following as you plan the rack installation:
Rack Stability
Ensure that the leveling jacks on the bottom of the rack are fully extended to the floor with the
full weight of the rack resting on them. In a single rack installation, attach stabilizers to the rack.
In multiple rack installations, couple the racks together.
Air Flow and
Access
Leave approximately 63.5 centimeters (25 inches) of clearance in front of the rack, and
approximately 76 centimeters (30 inches) of clearance in the back of the rack to allow for
sufficient airflow and ease in servicing.
Ambient
Operating
Temperature
If you install LifeSize Bridge 2200 in a closed or multi-unit rack assembly, the operating
temperature of the rack environment may be greater than the ambient temperature of the
room. The maximum rated operating temperature is 40 degrees Celsius.
Circuit
Overloading
Consider the connection of the equipment to the power supply circuitry and the effect that any
possible overloading of circuits might have on overcurrent protection and power supply wiring.
Give appropriate consideration to equipment nameplate ratings when addressing this concern.
Reliable Ground
Because a reliable ground must be maintained at all times, ensure the rack itself is grounded.
Pay particular attention to power supply connections other than the direct connections to the
branch circuit (the use of power strips, for example).
Positioning the Rack Mounting Hardware
LifeSize Bridge 2200 ships with the following rack mounting hardware:
•
One rack mounting bracket with four flat head screws installed at the front of each side of the chassis.
•
Four pan head screws and four washers installed in the middle of each side of the chassis.
•
Four pan head screws and four washers installed at the back of each side of the chassis.
You can leave the rack mounting brackets in their default position, remove the brackets entirely, or move
the brackets to the middle or back positions on each side of the chassis.
4
LifeSize Bridge 2200 Installation Guide
Removing the Rack Mounting Brackets
1. Starting at the right side of the chassis (facing the front with the plastic bezel and LifeSize logo),
remove the four flat head screws and the rack mounting bracket from the chassis.
ARTWORK IN PROGRESS
NOTE
If you wish to move the bracket to another position on the chassis, skip the
rest of this procedure and proceed with step 2 of Moving the Rack Mounting
Brackets to Another Position.
2. From the middle position on the side of the chassis, remove the top two pan head screws and washers
and the lower pan head screw and washer closest to the front of the chassis.
3. At the front position on the side of the chassis, replace two pan head screws and washers in the
bottom two holes and one pan head screw and washer in the top hole closest to the front of the
chassis.
4. Tighten all screws with 10 in-lb. of torque.
5. Repeat these steps to remove the left rack mounting bracket.
Moving the Rack Mounting Brackets to Another Position
1. Starting at the right side of the chassis (facing the front with the plastic bezel and LifeSize logo),
remove the four flat head screws and the rack mounting bracket from the chassis.
2. Remove the four pan head screws and washers from the position to which you want to move the
brackets, at either the middle or the back of the chassis.
3. Attach the bracket to the chassis with the four flat head screws at the position from which you removed
the screws and washers in step 2.
4. Replace the four pan head screws and the washers at the position at the front of the chassis.
5. Tighten all screws with 10 in-lb. of torque.
6. Repeat these steps to move the left rack mounting bracket to the same position on the left side of the
chassis.
5
LifeSize Bridge 2200 Installation Guide
Installing the System Into a Rack
After you have the rack mounting brackets in the correct position, install the system into the rack.
1. Line up the system in the desired position on the rack.
NOTE
Ensure that sufficient access is provided to the serial port to allow connection
for set-up and servicing.
2. Attach the rack mounting brackets on the system to the rack using the appropriate hardware for your
rack (not included).
Power and Reboot
The power switch on the back of the system controls the main system power. Standby power is available to
the system when the AC power cord is plugged in and when the power switch is turned on. Turning off the
power switch also turns off standby power.
Press and hold the reset button on the front of the system to perform actions such as rebooting the system.
The LED indicators indicate the following conditions:
LED
Indicator
System Status/
Reset
When the reset button is not pressed:
•
•
•
•
•
Solid blue — The system is idle (no current or scheduled calls).
Rapidly blinking blue — The system is in use (call in progress).
Slowly blinking blue — Scheduled calls are pending.
Solid purple — System upgrade is in progress.
Solid red — Major error occurred.
When the reset button is pressed, the indicator cycles through the following states:
• Alternating blue and red — Release to reboot the system without changing the
configuration.
• Solid green — Release to reboot the system and reset all preferences to default values.
• Blinking green — Release to reboot the system, reset all preferences to default values,
and switch to the alternate partition.
• Solid blue — Releasing the button does not reboot or change values.
Network
Activity/Speed
Solid yellow on a network port indicates a valid link. Flashing yellow indicates both a valid link
and network activity on the port. On an active port, speed is indicated by a second indicator
as follows:
None/Off — 10 Mb/s.
Green — 100 Mb/s.
Orange — 1000 Mb/s.
6
LifeSize Bridge 2200 Installation Guide
Configuring LifeSize Bridge 2200
After the system has successfully booted, you must either configure the IP address using a directly
connected ethernet cable between your computer and the system and then use the LifeSize Utility, or
using a serial cable and terminal program.
Using a Directly Connected Ethernet Cable
1. Ensure there is no other ethernet cable plugged into the system.
2. Attach an ethernet cable between your computer and the system.
3. Allow the DHCP address acquisition to time out, approximately 30 seconds.
Your system is then configured with the IP address of 169.254.x.x.
4. Use the LifeSize Utility to configure your system using the default IP address 169.254.1.1. Refer to the
LifeSize Bride 2200 Administrator Guide for instructions on installing and using the utility.
5. Once you are connected to the utility, you can plug the main network cable into another port on the
system.
Using a serial connection
1. On your computer, open a connection to the serial port using an application such as HyperTerminal,
Tera Term, Cygwin, or PuTTY. Use COM1, COM2, or COM3 as appropriate for your system.
2. Configure the serial connection as follows:
-
Baud rate — 9600
-
Data bits — 8 bit
-
Parity — none
-
Stop bit — 1 bit
-
Flow control — none
3. At the prompt, log in as the default administrator. The user name and password are both admin.
4. Change the admin password using the set password command. Passwords must be a minimum of
5 characters. LifeSize recommends that you use a combination of upper and lowercase letters and
numbers.
5. Configure your network to use an IP address or DHCP.
NOTE
If you are configuring a static IP address, you must first configure a gateway
using the set gateway <gateway-address> command. You must set the
gateway before configuring the port; otherwise, the address will change and
routing may not be possible. For example, set gateway 10.10.10.1.
set ethN <dhcp>|<ip-address>/<mask-size> [broadcast]|<ip-address> <netmask>
[broadcast]
7
LifeSize Bridge 2200 Installation Guide
For example, to set the network port 0 to static IP address 10.10.10.5, subnet mask
255.255.255.0, and broadcast address 10.10.10.255, enter the following:
set eth0 10.10.10.5 255.255.255.0 10.10.10.255
The broadcast address is optional in this command, unless a non-standard broadcast address is in
use.
NOTE
If you are attaching a VLAN trunk to the bridge, you must set a VLAN tag for
that interface:
set ethN <vlan {0..4094}>
For example:
set eth0 10.10.10.15/24
6. The bridge network ports are configured to auto-negotiate speed and duplex settings by default. If the
installation requires a fixed speed and duplex, then configure the speed of the network connection (10,
100, or 1000 Mb/s) and full or half duplex of the port using the set ethN command.
set ethN <auto>|<{10|100|1000} {full|half}>
7. To display your current configuration, run the show all command. Refer to Additional Configuration
from the Serial Port for a list of additional commands you can run from the serial port.
8. Type exit to close the serial connection.
9. Disconnect the serial cable from the system and your computer.
10. Open the LifeSize Utility to further configure the system.
Additional Configuration from the Serial Port
Use the following optional commands for additional configuration of the system.
Enter help for a list of commands.
Enter help command for help using that command.
NTP Server Commands
Use the set ntp <ntp-server> command to configure the NTP server for the system. Specify the IP
address or DNS name for the NTP server. You can only set one NTP server address per command; the
last one set overwrites any previous entries.
System Time Commands
Use the show time command to view the system time.
Use the set time command to manually configure the system time.
set time [MM/DD/YYYY] hh:mm[:ss]
8
LifeSize Bridge 2200 Installation Guide
Time Zone Commands
Use the show timezone command to view current time zone for the system.
Use the set timezone command to configure the time zone for the system, where zone is the name of a
city, the name of a city preceded by a continent, or a time zone identifier.
set timezone <zone>
Example:
set timezone Chicago
Use the help zones command to view a list of possible values.
SSH Settings Commands
Use the show ssh command to view or configure SSH settings.
Reset System Commands
Use the reset <defaults [swap]> command to reset the system to default values. Use the swap
argument to reset the system using the previous installation.
Refer to the LifeSize Bridge Administrator Guide for instructions on installing and using the LifeSize Utility
for additional configuration from a browser.
9
May 2011
Copyright Notice
©2010–2011 Logitech, and its licensors. All rights reserved.
LifeSize Communications, a division of Logitech, has made every effort to ensure that the information contained in this
document is accurate and reliable, but assumes no responsibility for errors or omissions. Information in this document
is subject to change without notice. Companies, names, and data used in examples herein are fictitious unless noted.
This document contains copyrighted and proprietary information which is protected by United States copyright laws
and international treaty provisions. No part of the document may be reproduced or transmitted, in any form or by any
means, electronic or mechanical, for any purpose, without the express written permission from LifeSize
Communications.
Trademark Acknowledgments
LifeSize, the LifeSize logo and other LifeSize marks, are registered trademarks or trademarks of Logitech. All other
trademarks are the property of their respective owners.
Patent Notice
For patents covering LifeSize® products, refer to lifesize.com/support/legal.
Contacting Technical Services
LifeSize Communications welcomes your comments regarding our products and services. If you have feedback about
this or any LifeSize product, please send it to [email protected]. Refer to lifesize.com/support for additional ways
to contact LifeSize Technical Services.