1
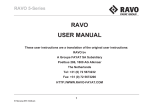
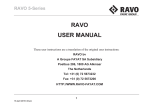
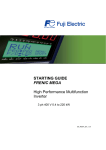
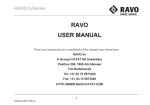
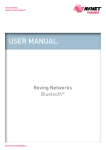
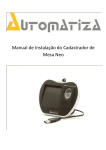
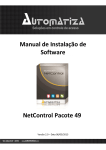
Drying oven VWR DRY-Line
with Natural Convection
DL 53, DL 115
European Catalogue Numbers:
Euro Plug:
UK Plug:
Swiss Plug:
DL 53: 466-3510
DL 53: 466-3511
DL 53: 466-3512
User Manual
Issue 05-08_en
valid from device serial number 08-35000
DL 115: 466-3513
DL 115: 466-3514
DL 115: 466-3515
DRY-Line DL 05-2008_en
page 2/40
DRY-Line DL 05-2008_en
page 3/40
Content
1
1.1
1.2
1.3
Introduction ............................................................................................................................ 5
General guidelines ................................................................................................................... 5
Syntax ...................................................................................................................................... 5
Safety instructions structure..................................................................................................... 5
2
2.1
2.2
General safety instructions................................................................................................... 8
Intended use ............................................................................................................................ 8
Dangers.................................................................................................................................... 8
3
Specification of services ..................................................................................................... 11
4
Scope of delivery ................................................................................................................. 11
5
5.1
5.2
5.3
Description of the device .................................................................................................... 12
Views of the device ................................................................................................................ 12
Controller components ........................................................................................................... 15
Technical data ........................................................................................................................ 16
6
6.1
6.2
Transport and storage ......................................................................................................... 18
Guidelines for safe transport.................................................................................................. 18
Storage................................................................................................................................... 18
7
7.1
7.2
7.3
7.4
Installing the DRY-Line drying oven................................................................................... 19
Installation location and ambient conditions .......................................................................... 19
Positioning the DRY-Line drying oven.................................................................................... 21
Placing two DRY-Line drying ovens on top of one another.................................................... 22
Connecting the electrical supply ............................................................................................ 23
8
8.1
8.2
8.3
8.4
8.5
8.6
8.7
8.8
8.9
Operating the DRY-Line drying oven ................................................................................. 24
Opening and closing the DRY-Line drying oven .................................................................... 24
Adjusting the air exchange of the DRY-Line drying oven....................................................... 24
Switching on the DRY-Line drying oven................................................................................. 25
Setting the temperature safety device class 3.1 .................................................................... 26
General instructions for setting the operating parameters at the controller........................... 27
Setting of temperature and timer ........................................................................................... 28
Setting of advanced operating parameters ............................................................................ 29
Inserting sample materials into the DRY-Line drying oven .................................................... 30
Using the timer function ......................................................................................................... 31
9
Cleaning ................................................................................................................................ 32
10
Taking the DRY-Line drying oven out of service .............................................................. 33
11
Adjusting the temperature control ..................................................................................... 33
12
12.1
12.2
Trouble shooting .................................................................................................................. 34
Temperature safety device class 3.1 alarm............................................................................ 34
Controller alarm signals ......................................................................................................... 35
13
Regular checks and maintenance ...................................................................................... 36
14
Technical service ................................................................................................................. 37
15
15.1
15.2
15.3
Waste disposal ..................................................................................................................... 37
Disposal of the unit in the member states of the EC.............................................................. 37
Disposal of the unit in non-member states of the EC ............................................................ 38
Disposing of packaging .......................................................................................................... 38
DRY-Line DL 05-2008_en
page 4/40
1
Introduction
1.1
General guidelines
These operating instructions describe how to set up, operate, clean and adjust the DRY-Line drying
ovens. They apply to these models:
•
DRY-Line drying oven DL 53
•
DRY-Line drying oven DL 115
These operating instructions are intended for staff using the equipment in the laboratory.
Other service and maintenance activities should be carried out exclusively by your distributor's customer
service agents, and are therefore not explained in this manual.
1.2
Syntax
Syntax
Meaning
Mono spaced
Display
italics
Parameters
<button>
Button to be pressed
"text"
Text to be entered
1.3
Safety instructions structure
These operating instructions employ the terms and symbols below to describe dangerous situations, in
line with the harmonization of ISO 3864-2 and ANSI Z535.4.
1.3.1
Safety instructions hierarchy
WARNING LEVELS
Warning symbols and/or
Type of danger.
Prohibitory symbols and/or
Possible consequences.
Imperative symbols
[ Instruction how to avoid the hazard: prohibition
¾ Instruction how to avoid the hazard: mandatory action
1.3.2
Warning levels
Dangers are indicated, according to the severity and likelihood of their consequences, by a word to
attract attention, with the associated warning color and, if appropriate, with the safety alert symbol.
DANGER
Indicates an imminently hazardous situation that, if not avoided, will result in death or serious
(irreversible) injury.
DRY-Line DL 05-2008_en
page 5/40
WARNING
Indicates a potentially hazardous situation which, if not avoided, could result in death or serious
(irreversible) injury.
CAUTION
Indicates a potentially hazardous situation which, if not avoided, may result in moderate or minor
(reversible) injury.
CAUTION
Indicates a potentially hazardous situation which, if not avoided, may result in damage of the product
and/or its functions or of a property in its ambiance.
1.3.3
Safety alert symbol
Danger of injury.
Follow all the directions indicated by the safety alert symbol in order to avoid injury or
death.
1.3.4
Warning symbols used in this manual
Danger of electric shock.
Danger of explosion.
Danger of fire.
Danger of poisoning.
Danger of hot surface.
Danger of damage to health by harmful substance
Danger of injury through an object tipping up.
DRY-Line DL 05-2008_en
page 6/40
Danger of injury through lifting heavy objects.
Danger of environmental damages.
1.3.5
Prohibitory symbols used in this manual
Do not spray with water.
1.3.6
Imperative symbols used in this manual
Pull the power plug.
Observe environmental protection.
1.3.7
Information symbol used in this manual
Important information
DRY-Line DL 05-2008_en
page 7/40
2
General safety instructions
2.1
Intended use
The DRY-Line drying ovens are designed for all standard drying and tempering tasks as well as
sterilizing glassware.
They are intended for use in biological, chemical, medical, pharmaceutical and physical laboratories.
Any other use is not intended, and can cause damage and be harmful to health.
The DRY-Line drying ovens should not, in particular, be used to prepare foods intended for consumption
or to sterilize or decontaminate medical products or medical equipment as defined by the Medical
Device Directive 93/42/EWG (MDD).
2.2
Dangers
When the DRY-Line drying oven is installed, operated, cleaned, adjusted or set up incorrectly, there is a
risk of malfunction which could cause harm to human beings and material damage to the equipment
and samples.
Therefore the DRY-Line drying oven should only be installed, operated, cleaned, adjusted and set up by
qualified persons.
•
Persons qualified to install, operate, clean, and adjust the DRY-Line drying oven include everyone
who has carefully read the user manual.
•
Persons qualified to repair the DRY-Line drying oven only include service engineers authorized by
the equipment supplier who have undergone appropriate electrical training and who have
carefully read the DRY-Line drying oven service and user manual.
DANGER
Danger of explosion.
Danger to life.
¾ Only install the device where there is no danger of explosion.
[ Do not keep explosive powders or solvent/air mixtures in the vicinity.
[ Never insert materials into the device that are explosive or inflammable at the
interior temperature selected.
[ Never insert materials into the device that contain explosive or inflammable
solvents.
[ Never insert materials into the device that sublimate or pyrolyze to form flammable
materials at the interior temperature selected.
DRY-Line DL 05-2008_en
page 8/40
DANGER
Danger of electric shock.
Danger to life.
[ Do not allow the device to get wet while operating or maintaining.
[ Do not connect any device with a dented or damaged rear panel to the power
supply.
¾ Remove the plug from the power supply before opening the rear panel.
¾ If a device has a damaged power cable or rear panel, withdraw it from use
immediately, remove the power plug and contact your dealer to get it repaired.
¾ All work on the device's electrical components should be carried out by qualified
electricians only.
DANGER
Danger of poison.
Danger to life.
[ Never insert materials into the device that disintegrate to form poisonous gases at
the interior temperature selected.
WARNING
Danger of fire.
[ DRY-Line drying ovens must not be used if the test of the temperature safety device
class 3.1 fails.
¾ In case of temperature safety device test failure withdraw the DRY-Line drying oven
from use immediately, remove the power plug and contact your dealer to get it
repaired.
¾ Only rest the device on a base that is heat-resistant to 100°C.
[ Do not push anything beneath the device, e.g. paper, plastic film
¾ Only use the device connected to a power source fused to at least 10 Amp
(adequate). Follow the regulations of your local electricity supply company.
CAUTION
Danger of burnings.
¾ The vent cover at the back of the housing is hot and must not be touched while the
unit is operating.
DRY-Line DL 05-2008_en
page 9/40
CAUTION
Danger of breakages.
Danger of injury.
¾ Only place the device on surfaces that can support its weight.
CAUTION
Danger of toppling.
Danger of injury.
[ Never stack more than two DRY-Line drying ovens on top of each other.
¾ Always secure the two stacked devices with the flat assembly bars supplied (see
chapter 7.3, page 22).
CAUTION
Danger of injury.
Through the device slipping or tipping over.
Damage to the device.
¾ The device should be lifted by 2 people.
¾ The device should only be transported in its original packaging.
¾ The device should be secured with straps when being transported.
¾ The device should only be lifted along with the supporting pallet from below using
mechanical tools (e.g. fork-lift truck).
[ The device should not be lifted directly from below using mechanical tools (e.g.
fork-lift truck).
[ The device should not be lifted or moved by pulling the door.
DRY-Line DL 05-2008_en
page 10/40
3
Specification of services
The DRY-Line drying ovens are designed for all standard drying and tempering tasks as well as
sterilizing glassware.
The DRY-Line drying ovens are available for a 230 V power supply
The DRY-Line drying oven consists of an outer casing made from powder-coated steel paneling and an
inner, stainless steel chamber.
The interior is tempered by a direct heating system with natural convection that provides rapid heating
up and a precise internal temperature. The DRY-Line drying oven can be operated stably within an
interior temperature range from 5°C above ambient temperature up to 220°C at ambient temperatures
of 18°C to 32°C.
The tempering of the interior of the DRY-Line drying oven is measured by a Pt100 temperature sensor
and adjusted by a controller which monitors and regulates the temperature inside the chamber. The
controller is also equipped with a timer function. The timer can be set from 0 to 999 minutes or 0.0 to
99.9 hours alternatively.
The DRY-Line drying oven is equipped with three safety devices to protect the drying oven, its
environment and the samples inside from forbidden temperature excesses:
•
Electrically controlled temperature limitation
The software of the controller switches off the heating in the DRY-Line drying oven and triggers
audible and visual alarms if an adjustable maximum temperature is exceeded. This maximum
temperature is specified as an offset to the temperature set point (Alarm offset).
Alarm offset specifies a temperature difference by which the temperature set point may not be
exceeded, e.g. set point: 105°C, Alarm offset: 10°C. In the example, the alarm is triggered after an
interior temperature of 115°C is exceeded.
•
Temperature safety device class 3.1 (as per DIN 12880)
The temperature safety device serves to protect the drying oven, its environment and the samples
from unintended temperature excesses. The device is functionally and electrically independent of
the temperature control system.
If an error occurs at the controller the safety device assumes the regulatory function.
•
Temperature fuse class 1 (as per DIN 12880)
The temperature fuse is triggered off irreversibly if the maximum temperature of 229°C inside the
DRY-Line drying oven is exceeded.
4
Scope of delivery
•
DRY-Line Drying oven DL
•
2 trays (additional trays can be ordered)
•
Flat assembly bar for stacking (it is vital to keep them, as two flat assembly bars are required to
stack two devices, and each device comes supplied with one)
DRY-Line DL 05-2008_en
page 11/40
5
Description of the device
5.1
Views of the device
1
2
3
4
5
6
Figure 1:
DRY-Line drying oven front view
1
Unit door
2
Controller
3
On/off switch
4
Door handle
5
Thermostat of temperature safety device class 3.1
6
Supporting foot
DRY-Line DL 05-2008_en
page 12/40
7
8
Figure 2:
9
10
11
12
13
14
1
15
DRY-Line drying oven front view with open door
1
Door
7
Locking bracket for cabinet bolt
8
Adjusting screw of locking bracket
9
Guide bar
10
Tray
11
Ventilation flap
12
Vent
13
Door gasket
14
Pt100 temperature sensor
15
Cabinet bolt in door frame
DRY-Line DL 05-2008_en
page 13/40
16
17
Figure 3:
18
19
DRY-Line drying oven rear view
16
Power cable
17
Fuse
18
Rear panel
19
Vent cover
DRY-Line DL 05-2008_en
page 14/40
5.2
Controller components
°C
°F
Figure 4:
Controller components and display
Table 1:
Display symbols
Symbol
Meaning
Value
Not assigned
Heating active
°C
Interior temperature displayed as °C
°F
Interior temperature displayed as °F
s
Not assigned
h
Time displayed as h (hours)
min
Time displayed as min (minutes)
Table 2:
Button
Controller user interface
Function
• Enter operation modes
• Confirm entry and page forward through the controller's parameter list
• Confirm alarm and switch off alarm sound
Reduce the parameter value
Increase the parameter value
• Start timer
• Terminate timer count down
DRY-Line DL 05-2008_en
page 15/40
5.3
Technical data
DRY-Line drying oven DL 53 DRY-Line drying oven DL
115
Outer casing
Material
Powder-coated steel
Width
620 mm
820 mm
Height
680 mm
760 mm
Depth
600 mm
710 mm
Minimum rear clearance
100 mm
100 mm
Minimum lateral clearance to
adjacent devices and walls
150 mm
150 mm
Outer door swing radius
125°
125°
Interior
Material
Stainless steel
Width
401 mm
600 mm
Height
401 mm
480 mm
Depth
330 mm
400 mm
Interior volume
53 l
115 l
Interior fittings
• supplied: 2 chrome-plated trays
• maximum: 4 chrome-plated trays
Maximum load capacity of trays
• 10 kg per tray
• 15 kg per tray
• 35 kg in sum of all trays
• 45 kg in sum of all trays
41 kg
62 kg
Weight
Weight incl. 2 trays
Heating system
Heating system
Direct heating system
Air convection
natural
Temperature data (interior)
Settable temperature range
5°C above ambient temperature up to 220°C
Temperature deviation as a function
of time at 150 °C set temperature*
±0.4°C
±0.3°C
Overtemperature protection devices
Electrically controlled temperature
limitation
Alarm offset 0°C to 99.9°C (see Table 4, page 29)
Temperature safety device class 3.1
(as per DIN 12880)
50°C to 250°C
DRY-Line DL 05-2008_en
50°C to 250°C
page 16/40
DRY-Line drying oven DL 53 DRY-Line drying oven DL
115
Electrical data
IP protection type as per EN 60529
20
20
Nominal voltage (±10%)
230 V 50/60 Hz
Power supply type
1/N/PE
1/N/PE
Protection system
Class 1
Class 1
Nominal power
0.8 kW
1.0 kW
Installation category as per
IEC 1010-1
II
II
Pollution degree as per IEC 1010-1
2
2
Fusing
5 x 20 mm, 230 V / middle time-lag M, 10 Amp
Ambient climate
Operating temperature
18°C to 32°C
Storage temperature
-10°C to +60°C
Operating air humidity
Up to 70 % r.H. - non-condensing
Storage air humidity
Up to 85 % r.H. - non-condensing
Altitude of installation location
max. 2000 m above sea level
DRY-Line DL 05-2008_en
page 17/40
6
Transport and storage
6.1
Guidelines for safe transport
CAUTION
Danger of injury.
Through the device slipping or tipping over.
Damage to the device.
¾ The device should be lifted by 2 people.
¾ The device should only be transported in its original packaging.
¾ The device should be secured with straps when being transported.
¾ The device should only be raised along with the supporting pallet from beneath
using mechanical tools (e.g. fork-lift truck).
[ The device should not be lifted directly from below using mechanical tools (e.g.
fork-lift truck).
[ The device should not be lifted or moved by pulling the door.
6.1.1
Transporting a used DRY-Line drying oven
1.
Switch off the DRY-Line drying oven using the power switch.
2.
Pull out the power plug.
3.
Remove the trays.
4.
Clean the DRY-Line drying oven and its trays (see chapter 9 on page 32).
5.
Dry the interior of the DRY-Line drying oven and the trays.
6.
Wrap up the trays in bubble wrap.
7.
Pack the trays in the original box and put them inside the DRY-Line drying oven.
8.
Pack the DRY-Line drying oven in its original packaging.
• Take care that the DRY-Line drying oven does not become wet while being
transported.
• During transport, maintain the permitted ambient temperature of -10°C to +60°C.
6.2
Storage
• Only store the DRY-Line drying oven in enclosed, dry areas.
• The permitted storage temperature is -10°C to +60°C, while the maximum permitted
storage air humidity is 85 % r.H. non-condensing.
DRY-Line DL 05-2008_en
page 18/40
6.2.1
Storing a used DRY-Line drying oven
1.
Switch off the DRY-Line drying oven using the power switch.
2.
Pull out the power plug.
3.
Clean the DRY-Line drying oven and its trays (see chapter 9 on page 32).
4.
Dry the interior of the DRY-Line drying oven.
5.
Store the DRY-Line drying oven in a suitable place.
7
Installing the DRY-Line drying oven
The DRY-Line drying oven drying oven is designed to be used in laboratories in enclosed spaces.
The minimum requirements for the location where the DRY-Line drying oven is to be installed are given
below.
When installing the DRY-Line drying oven in a laboratory or in a room similar to a
laboratory, please comply with the national safety regulations that apply.
7.1
Installation location and ambient conditions
Place the DRY-Line drying oven up in such a way that the On/Off switch is always
accessible and that the device can be switched off immediately in case of danger.
7.1.1
Avoiding explosions
DANGER
Danger of explosion.
Danger to life.
¾ Only install the device where there is no danger of explosion.
¾ Do not keep explosive powders or solvent/air mixtures in the vicinity.
The DRY-Line drying oven provides no protection against explosions.
Never install or operate the DRY-Line drying oven in a location where explosive gases, powder or
solvent-air mixtures could penetrate.
DRY-Line DL 05-2008_en
page 19/40
7.1.2
Avoiding wetting
DANGER
Danger of electric shock.
Danger to life.
¾ Do not allow the device to get wet while operating or maintaining.
The DRY-Line drying oven is not waterproof. Do not install the DRY-Line drying oven in locations where
water could be sprayed about, e.g. in the vicinity of sinks or safety showers.
7.1.3
Ventilation
CAUTION
Danger of overheating.
Damage to the device.
¾ Ensure that there is sufficient ventilation to disperse the heat.
¾ Maintain a clearance of 150 mm to adjacent devices and walls.
[ Do not install the device in unventilated alcoves.
While operating the DRY-Line drying oven produces substantial amounts of heat.
The DRY-Line drying oven should only be installed in well-ventilated locations where the heat produced
will be well dispersed. However, it should be shielded from strong gusts of air.
7.1.4
Supporting surface
WARNING
Danger of fire.
¾ Only rest the device on a base that is heat-resistant to 100°C.
[ Do not push anything beneath the device, e.g. paper, plastic film
DRY-Line DL 05-2008_en
page 20/40
CAUTION
Danger of breakages.
Danger of injury.
¾ Only place the device on surfaces that can support its weight.
•
The surface used to support a DRY-Line drying oven DL 53 must be capable of bearing at least 80
kg.
•
The surface used to support a DRY-Line drying oven DL 115 must be capable of bearing at least
110 kg.
•
A maximum of two DRY-Line drying ovens may be stacked on top of one another, and they should
be secured together using two flat assembly bars.
•
The surface used to support two stacked DRY-Line drying ovens DL 53 must be capable of bearing
at least 160 kg.
•
The surface used to support two stacked DRY-Line drying ovens DL 115 must be capable of
bearing at least 220 kg.
•
The supporting surface should be flat and level so that the DRY-Line drying oven can be set up in a
way that is stable.
•
There must be a clearance of at least 150 mm to the walls and other equipment.
7.1.5
•
Ambient climate for operating the DRY-Line drying oven
Ambient temperature: 18°C to 32°C
The ideal ambient temperature for the DRY-Line drying oven should be at least by 5°C below the
intended interior operating temperature, e. g. interior operating temperature 35°C: ambient
temperature +18°C to +30°C.
•
Keep the device out of direct sunlight.
•
Keep the device away from strong gusts of air (e.g. heating and ventilation systems).
•
Ambient air humidity: max. 70 % r.H., non-condensing
•
Altitude of installation location: max. 2000 m above sea level
7.2
Positioning the DRY-Line drying oven
CAUTION
Danger of injury.
Through the device slipping or tipping over.
Damage to the device.
¾ The device should be lifted by 2 people at the device's 4 supporting feet.
¾ The device should only be raised along with the supporting pallet from beneath
using mechanical tools (e.g. fork-lift truck).
[ The device should not be lifted directly from below using mechanical tools (e.g.
fork-lift truck).
[ The device should not be lifted or moved by pulling the door.
DRY-Line DL 05-2008_en
page 21/40
The minimum requirements for the location of the DRY-Line drying oven are described in chapter 7.1 on
page 19.
1.
Place the DRY-Line drying oven on the intended supporting surface. Ensure there is sufficient
clearance of at least 150 mm between the device and walls and other equipment.
2.
Place the trays onto the guide bars in the interior space.
7.3
Placing two DRY-Line drying ovens on top of one another
CAUTION
Danger of toppling.
Danger of damage to health.
[ Never stack more than two DRY-Line drying ovens on top of one another.
¾ Always secure stacked devices to one another using both flat assembly bars
supplied.
The DRY-Line drying oven is designed so that two devices can be stacked on top of one another.
To ensure that they are safely positioned, the two devices should be attached to one another using both
flat assembly bars supplied. One flat assembly bar is supplied with each DRY-Line drying oven.
1.
Place the lower DRY-Line drying oven at the intended location. Leave enough space between the
rear panel of the device and the wall behind the device so that you can turn screws into the rear
panel of the lower DRY-Line drying oven using a TX20 screwdriver.
2.
Unscrew two of the screws which fix the upper edge of the rear panel of the lower DRY-Line drying
oven.
3.
Fasten two flat assembly bars with these
screws at the upper edge of the rear panel
(see Figure 5).
4.
Place the second DRY-Line drying oven on
top of the first.
5.
Unscrew two of the screws which fix the
lower edge of the rear panel of the upper
DRY-Line drying oven.
6.
Place the upper DRY-Line drying oven with
the empty drilling holes overlapping the
holes in the lower DRY-Line drying oven’s
flat assembly bars.
7.
Screw the two assembly bars to the rear
panel of the upper DRY-Line drying oven
using the screws of step 5.
Figure 5:
DRY-Line DL 05-2008_en
Placing two DRY-Line drying
ovens on top of one another
page 22/40
7.4
Connecting the electrical supply
DANGER
Danger of electric shock.
Danger to life.
[ Do not connect any device with a dented or damaged rear panel to the power
supply.
¾ Where a device has a damaged power cable or rear panel, withdraw it from use
immediately, remove the power plug and contact your dealer to get it repaired.
WARNING
Danger of fire.
¾ Only use the device connected to a power source fused to at least 10 Amp
(adequate).
¾ Observe the regulations of your local electricity supply company.
CAUTION
Danger of damage to the device.
¾ The device should only be operated at the supply voltage shown on the rating plate.
Using a different supply voltage will damage the device.
The DRY-Line drying oven is available for a power supply of 230 V, 50/60 Hz AC 1/N/PE
1.
Before connecting the DRY-Line drying oven to your power supply, verify that the supply voltage is
the same as the supply voltage shown on the rating plate. If it is not the same, you must not
connect this DRY-Line drying oven to your power supply.
2.
Using the power plug, connect the DRY-Line drying oven to an adequately fused power source.
DRY-Line DL 05-2008_en
page 23/40
8
Operating the DRY-Line drying oven
8.1
Opening and closing the DRY-Line drying oven
The door of the DRY-Line drying oven must be closed while the device is operating normally in order to
ensure that there is stable temperature in the interior.
1.
To open the door, turn the locking knob clockwise and pull the door open.
2.
Close the door in reverse order.
8.2
Adjusting the air exchange of the DRY-Line drying oven
CAUTION
Danger of burnings.
¾ The vent cover at the back of the housing is hot and must not be touched while the
unit is operating.
If the ventilation flap is completely open, the temperature accuracy can be negatively
influenced
1.
Shift the ventilation flap so that no condensation inside the DRY-Line drying oven takes place (see
Figure 6).
Figure 6:
Adjusting the air exchange
DRY-Line DL 05-2008_en
page 24/40
8.3
Switching on the DRY-Line drying oven
CAUTION
Danger of samples being destroyed.
[ During the equilibration phase after the device is switched on, undefined climatic conditions are
produced within the device. During this phase, do not place any sample materials in the device.
1.
Check that the interior of the DRY-Line drying oven is empty, except the trays.
2.
If you do not know what the DRY-Line drying oven was last used for, you should clean the interior
(see chapter 9 on page 32).
3.
Using the on/off switch on the bottom of the controller, switch on the DRY-Line drying oven.
There is a subsequent brief startup phase with the controller display flashing.
After a few seconds, the display shows the current interior temperature of the DRY-Line drying
oven (see example in Figure 7).
4.
On the controller, set the desired interior temperature that is to be used to operate the DRY-Line
drying oven (see chapter 8.6 on page 28).
The display symbol
shows that the heating is active.
Only insert samples into the DRY-Line drying oven when it has reached its stable operating state
(see chapter 8.8 on page 30).
°C
°F
°F
or
Figure 7:
Basic mode: display is showing the current interior temperature (in °C or °F)
(example)
DRY-Line DL 05-2008_en
page 25/40
8.4
Setting the temperature safety device class 3.1
The temperature safety device must be checked at every change of the interior
temperature set point and readjusted if necessary.
The temperature being set at the temperature safety device must be higher than the
temperature set point of the controller. Otherwise the temperature safety device
switches off the DRY-Line drying oven before the temperature set at the controller is
reached.
The temperature safety device class 3.1 (as per DIN 12880) serves to protect the unit, its environment
and the samples from unintended temperature excesses. The device is functionally and electrically
independent of the temperature control system. If an error occurs at the controller the safety device
assumes the regulatory function.
The temperature safety device has an operating range from 50°C to 250°C.
•
If the control knob is turned to its end-stop (maximum temperature), the temperature safety device
class 3.1 functions as a safety device for the DRY-Line drying oven and switches off the heating if
the interior temperature reaches 250°C.
•
If the temperature safety device is set to a temperature somewhat higher than that selected on the
controller, it switches off the heating if the controller fails and the interior temperature reaches these
value.
If the selected temperature of the safety device is reached in case of controller failure the red alarm
lamp lights up (see chap. 12.1 on page 34).
When the interior temperature decreases below the temperature set at the safety device, the red alarm
lamp extinguishes and the heating resets automatically.
5a
5b
Figure 8:
Temperature safety device
5a
Alarm lamp
5b
Control knob
DRY-Line DL 05-2008_en
page 26/40
8.4.1
Setting the temperature safety device
1.
For using the temperature safety device to protect the DRY-Line drying oven turn the control knob
clockwise to maximum.
2.
For using the temperature safety device to protect the samples inside the DRY-Line drying oven
use the following method for the setting of the temperature safety device:
•
Turn the control knob clockwise to maximum.
•
On the controller of the DRY-Line drying oven, set the desired temperature (see chapter 8.6 on
page 28)
•
Wait until the interior temperature reaches the temperature set point.
•
Turn the control knob stepwise anti-clockwise until the red alarm lamp lights up.
•
Turn the control knob slightly clockwise from the value at which the red alarm lamp
extinguishes.
8.4.2
Testing the temperature safety device
1.
Switch on the DRY-Line drying oven.
2.
Turn the control knob clockwise to maximum.
3.
When the interior temperature reaches a temperature greater than 50°C, turn the control knob anticlockwise.
4.
When the setting of the temperature safety device remains below the interior temperature, the red
alarm lamp (4a) must light up.
WARNING
Danger of fire.
[ Do not use the DRY-Line drying oven if the test of the temperature safety device
fails.
¾ In case of temperature safety device test failure withdraw the DRY-Line drying
oven from use immediately, remove the power plug and contact your dealer to get
it repaired.
8.5
General instructions for setting the operating parameters at the
controller
The controller has two operation modes 1 and 2, for setting different parameters and altering their
values.
•
Press the <FKT> button to enter into the operation mode menu. The controller's display shows
alternately the selected parameter (e.g. SP) and its value (e.g. 105) (see Figure 9).
After 60 seconds without pressing any button the controller will automatically return to its basic
mode displaying the current interior temperature (see Figure 7) with accepting every changed
value.
•
Move to the next parameter by pressing the <FKT> button.
Pressing the <FKT> button will confirm the change made to the value of the current parameter and
the DRY-Line drying oven will control towards the new set point.
DRY-Line DL 05-2008_en
page 27/40
°C
°F
Figure 9:
•
°C
Displaying the parameter for the temperature set point (example)
Press the <▲> and <▼> buttons to change the values of the parameters.
For certain parameters pressing the buttons <▲> and <▼> enables selection between fixed
values.
There are parameter values which can only be read, but not changed, e.g. the Firmware revision
di.l (see Table 4 on page 29).
2 seconds after you have made a change to the value of a parameter the new value is
accepted automatically and cannot be set back by any function.
•
To go back to the basic controller display showing the current interior temperature (see Figure 7),
press the <FKT> button repeatedly, or press the <FKT>+<▼> buttons simultaneously, or wait for
60 seconds without pressing any button.
8.6
Setting of temperature and timer
1.
From the basic controller display, press the <FKT> button to go to the operation mode 1.
2.
Use the <FKT>, <▲> and <▼> buttons to successively set the values for the following parameters:
(see Table 3)
Table 3:
Operating parameters that can be set in operation mode 1
Parameter
Code
Value Range
Note
SP
Default
Value
110°C
Temperature
set point
0°C to 220°C
The Temperature set point must be by at least
5°C above the ambient temperature in order
to ensure a stable temperature inside the
DRY-Line drying oven.
Timer unit
t.Un
min
• min
• minutes
• hr
• hours
If Timer unit will be changed Timer initial value
is set to 0. When the timer counts down the
Timer initial value cannot be changed.
Timer initial
value
t.st
0
• 0 min to
999 min
• 0 to 99.9 hr
DRY-Line DL 05-2008_en
Initial value from which the timer counts down
after being started by pressing the <TIME>
button.
• t.st=0: no timer operation
page 28/40
8.7
Setting of advanced operating parameters
1.
From the basic controller display, press the <FKT> button for 5 seconds to go to the operation
mode 2.
2.
Use the <FKT>, <▲> and <▼> buttons successively set values for the following parameters: (see
Table 4).
Table 4:
Operating parameters that can be set in operation mode 2
Parameter
Code
Alarm function
AL.F
Default
Value
oFF
Value
Range
• oFF
• on
Note
Switching on/off the offset alarm function (see
chapter 12.2.1 on page 35).
Alarm offset
AL.o
10.0°C
0°C to
99.9°C
Temperature difference by which the
temperature set point may not be exceeded.
e.g. Temperature set point: 105°C, Alarm offset:
10°C. In the example, the offset alarm is
triggered after an interior temperature of 115°C
is exceeded (see chapter 12.2.1 on page 35).
Alarm hysteresis
AL.H
1.0°C
0°C to
99.9°C
Temperature difference by which the sum of
Temperature set point and Alarm offset has to
drop before the offset alarm reacts and unit
heating assumes normal control.
e.g. Temperature set point: 105°C, Alarm offset:
10°C, Alarm hysteresis: 1.0°C. The offset alarm
will be switched off when the interior
temperature drops to 114°C.
Temperature Unit
Uni
°C
°C
Display of temperature as °C or °F
Temperature values are always stored in °C and
will be converted into °F if Uni=°F is selected
°F
Offset
Temperature
oF.t
Firmware revision
di.1
Firmware revision
di.2
Data set date
(year)
di.3
Data set date
(month)
di.4
Data set date
(day)
di.5
Data set version
number
di.6
DRY-Line DL 05-2008_en
Last value
set
-25.0°C
to
+25.0°C
This parameter is used to adjust the temperature
sensor (see chapter 10 on page 33).
Parameters for service maintenance only
These values are part of the data for creating the
controller's data set. Parameters for service
maintenance only
Parameters for service maintenance only
page 29/40
8.8
Inserting sample materials into the DRY-Line drying oven
The DRY-Line drying oven is designed for all standard drying and tempering tasks as well as sterilizing
glassware.
DANGER
Danger of explosion.
Danger to life.
[ Never insert materials into the device that are explosive or flammable at the interior
temperature selected.
[ Never insert materials into the device that contain explosive or inflammable
solvents.
[ Never insert materials into the device that sublimate or pyrolyze to form flammable
materials at the interior temperature selected.
DANGER
Danger of poison.
Danger to life.
[ Never insert materials into the device that disintegrate to form poisonous gases at
the interior temperature selected.
[ Never insert materials into the device that react with moisture to form poisonous
gases.
CAUTION
Danger of mechanical damage.
¾ DRY-Line drying oven DL 53: The trays inside the unit may be loaded to a maximum of 10 kg of
sample material including containers respective 35 kg in total on all trays.
¾ DRY-Line drying oven DL 115: The trays inside the unit may be loaded to a maximum of 15 kg of
sample material including containers respective 45 kg in total on all trays.
CAUTION
Danger of samples being disturbed.
[ During the equilibration phase after the device is switched on, undefined climatic conditions are
produced within the device. During this phase, do not place any sample materials in the device.
1.
If it is important for your purpose, you should determine whether the operating temperature that
was set has stabilized before you insert sample material into the DRY-Line drying oven.
To do this, you should check the controller's temperature display every 10 to 15 minutes after you
have switched the DRY-Line drying oven on, or set a new temperature point.
2.
Wait for 30 minutes after the temperature has reached its set point so that the interior temperature
of the DRY-Line drying oven can become stable.
3.
Open the door of the DRY-Line drying oven and place the samples into the device's usable area.
DRY-Line DL 05-2008_en
page 30/40
The usable area as per DIN 12880 is that part of the interior where the temperature
fluctuations listed in the technical data are maintained.
• The usable area of the DRY-Line drying oven DL 53 starts 33 mm from the front and
rear panels of the interior and 40 mm from the side panels, top and bottom of the
interior.
• The usable area of the DRY-Line drying oven DL 115 starts 40 mm from the front and
rear panels of the interior, 60 mm from the side panels of the interior and 60 mm from
the top and bottom of the interior.
CAUTION
Danger of samples being disturbed.
[ Do not remove the trays from the device in order to load them.
[ Never load the trays when they are pulled out. The trays and samples could tip over and fall on
the floor.
[ Do not place samples on the interior base.
[ Do not place samples outside the usable area.
4.
Close the door. The DRY-Line drying oven will automatically re-set the interior temperature to the
set point defined.
5.
After completing the experiment, remove the samples from the DRY-Line drying oven.
6.
Clean the DRY-Line drying oven (see chapter 9 on page 32).
At temperatures above 150°C the surface of the inner, stainless steel chamber may
become oxidized by atmospheric oxygen and changes color to yellowish, brownish and
bluish.
This coloration has no impact in the performance and quality of the unit.
8.9
Using the timer function
You can use the timer function to switch off the drying oven heating after a defined time. The timer can
be set from 0 to 999 minutes or 0.0 to 99.9 hours, alternatively.
1.
Set the timer parameters to the required values (see chapter 8.6 on page 28).
2.
Press the <TIME> button to start the timer.
While the timer counts down the remaining time and the interior temperature are displayed
alternately.
3.
You can terminate the count down by pressing the <TIME> button.
t.oF and the interior temperature are displayed alternately and the drying oven heating is switched
off. The count down cannot be continued.
4.
When the time has elapsed the controller will give an acoustic signal of 5 beeps. t.oF and the
interior temperature will be displayed alternately while the drying oven remains switched off.
DRY-Line DL 05-2008_en
page 31/40
9
Cleaning
DANGER
Danger of electric shock.
Danger to life.
¾ Pull the power plug before cleaning.
¾ Do not pour water or cleaning agents excessively onto the inner or outer surfaces.
¾ Dry the device completely before starting to operate it again.
CAUTION
Danger of damage.
The interior of the unit is made from stainless steel.
[ Do not use any corrosive, oxidizing, acid or halide-containing cleaning agents for cleaning
purposes.
¾ Only use cleaning agents that can be removed from the chamber using water and/or ventilation.
¾ Any residual cleaning agents left in the device may attack the stainless steel.
CAUTION
Danger of samples being disturbed.
¾ Only use cleaning agents that can be removed from the device using water and/or ventilation.
¾ Any residual cleaning agents left in the device may pollute the samples.
1.
Remove the power plug before beginning to clean the device.
2.
Clean thoroughly the interior, the inside of the door, and the gaskets with a neutral cleaning agent
suited for use in laboratories or one containing ethanol or propanol.
3.
Clean the outer casing of the DRY-Line drying oven with a slightly damp cloth to which you can, if
you require, add a small amount of a neutral cleaning agent or one containing ethanol or propanol.
4.
Thoroughly remove all residues of cleaning agents from the interior with deionized water.
5.
If necessary, ventilate the interior thoroughly.
DRY-Line DL 05-2008_en
page 32/40
10
Taking the DRY-Line drying oven out of service
1.
Switch off the DRY-Line drying oven using the power switch.
2.
Pull out the power plug.
3.
Clean the DRY-Line drying oven and its trays (see chapter 9 on page 32).
4.
Dry the interior of the DRY-Line drying oven fully.
5.
Where necessary, store the DRY-Line drying oven (see chapter 6.2 on page 18).
11
Adjusting the temperature control
The temperature display and control must be checked for accuracy every year and, if necessary,
readjusted.
To adjust the temperature control, you need an electronic measuring and display instrument that has a
valid calibration certificate and which has been approved by a recognized standards or calibration
authority or regulatory body.
Measuring range: ≥ 20°C to 250°C
The sensor should be connected to the display instrument via a slim cable that can be placed over the
door gasket without this causing a leak.
1.
Attach the reference measuring instrument's temperature sensor to a tray in the center of the DRYLine drying oven’s usable area (see chapter 5.3 on page 16).
2.
Place the sensor cable out over the door gasket in such a way that the door can be closed and
sealed.
3.
Close the unit door.
4.
Switch on the DRY-Line drying oven and set the temperature at which you usually operate the
device.
5.
Before making adjustments, you should determine whether the operating parameters that were set
have stabilized.
To do this, look at the controller's temperature display every 10 or 15 minutes.
6.
Wait for 60 minutes after the interior temperature has first reached the set point so that the
temperature can stabilize.
7.
Compare the temperature displayed at the controller to the reading of the reference measuring
instrument.
The temperature control needs to be adjusted if the temperature displayed on the controller
deviates by more than ±1 K from the temperature shown by the reference measuring instrument
including the measurement uncertainty.
e.g.:
Reference measuring instrument measurement uncertainty:
Permitted deviation of controller display from reference temperature:
±0.5 K
±1.5 K
Controller display:
Temperature measured with reference measuring instrument:
⇒ Temperature control does not need to be adjusted.
105°C
104°C
Controller display:
Temperature measured with reference measuring instrument:
⇒ Temperature control needs to be adjusted.
105°C
103°C
DRY-Line DL 05-2008_en
page 33/40
8.
Calculate the temperature difference:
(Measured reference temperature) minus (Controller displayed temperature)
e. g. 103°C – 105°C = -2°C
9.
To adjust the temperature control, access the oF.t Offset temperature parameter in the operation
mode 2 (see chapter 8.7 on page 29).
10. Press the <▲> and <▼> buttons to enter the temperature difference calculated (see step 8.).
11. Confirm the temperature entry by pressing <FKT> + <▼> simultaneously.
The DRY-Line drying oven’s temperature control has now been readjusted.
Figure 10: Setting of adjusting parameter (example)
12
Trouble shooting
12.1
Temperature safety device class 3.1 alarm
When the interior temperature exceeds the temperature set at the temperature safety device the red
alarm lamp lights up.
•
The alarm signal is emitted immediately when the fault occurs.
•
Visual display: red alarm lamp of the temperature safety device is lighting
•
Audible alarm: no audible alarm
Actions:
1.
Check the temperature setting of the temperature safety device (see chap. 8.4 on page 26).
The temperature being set at the temperature safety device must be higher than the temperature
set point SP of the controller (see chapter 8.6 on page 28). If necessary, change the temperature
setting of the temperature safety device.
2.
If you can exclude point 1. as the source of the alarm, it may be that the device is faulty.
Disconnect the unit from the mains and contact your dealer.
DRY-Line DL 05-2008_en
page 34/40
12.2
Controller alarm signals
When operational faults occur in the DRY-Line drying oven during normal operations, the controller
indicates visual and audible alarm signals.
Table 5:
Alarms
Alarm Code
Alarm
Description
Offset alarm
see chapter 12.2.1
Break of temperature sensor, exceeding of
measuring range
see chapter 12.2.2
Short circuit of temperature sensor, underflow of
measuring range
see chapter 12.2.3
You may use the <FKT> button to confirm and thus switch off the audible alarm signal.
The visual alarm display may not be switched off but will resume when the reason for the fault has been
remedied or the temperature returns to within its tolerance limits (see Table 4 on page 29).
12.2.1
Offset alarm
The alarm offset temperature has been exceeded (see Table 3 on page 28).
•
The alarm signal is emitted immediately when the fault occurs.
°C
•
Visual display:
•
Audible alarm: buzzer (intermittent sound)
alternately actual temperature, e. g.
Actions:
1.
Check the setting of the parameter AL.o Alarm offset (see Table 3 on page 28).
The Alarm offset should be ≥ 10°C.
If necessary, change this parameter dependent on the other operating parameters.
2.
Check whether samples were inserted into the DRY-Line drying oven that produce heat under the
climate conditions in the device.
3.
Check the ambient climate.
The ambient temperature must be at least by 5°C below the temperature set point of the DRY-Line
drying oven.
The DRY-Line drying oven must be protected from direct sunlight.
The DRY-Line drying oven’s installation location must be sufficiently ventilated to prevent any
buildup of heat in the device.
4.
If you can exclude points 1. to 3. as the source of the fault, it may be that the device is faulty.
Please contact your dealer.
DRY-Line DL 05-2008_en
page 35/40
12.2.2
Break of temperature sensor, exceeding of measuring range
•
The alarm signal is emitted immediately when the fault occurs.
•
Visual display:
•
Audible alarm: buzzer (intermittent sound)
(flashing)
Actions:
1.
Switch off the DRY-Line drying oven.
2.
If necessary, clean the DRY-Line drying oven (see chapter 9 on page 32).
3.
Please contact your dealer.
12.2.3
Short circuit of temperature sensor, underflow of measuring range
•
The alarm signal is emitted immediately when the fault occurs.
•
Visual display:
•
Audible alarm: buzzer (intermittent sound)
(flashing)
Actions:
1.
Switch off the DRY-Line drying oven.
2.
If necessary, clean the DRY-Line drying oven (see chapter 9 on page 32).
3.
Please contact your dealer.
13
Regular checks and maintenance
Table 6:
Maintenance plan
Interval
Action
Weekly
Dust the outer casing
Check the power cable for damage
After each
experiment
Annually
Clean the device (see chapter 9 on page 32).
Check the device for mechanical damage and corrosion
Check the temperature control and, if necessary, adjust it
DRY-Line DL 05-2008_en
page 36/40
DANGER
Danger of electric shock.
Danger to life.
¾ If a device has a damaged power cable or rear panel, withdraw it from use
immediately, remove the power plug and contact your dealer to get it repaired.
14
Technical service
Web Resources
Visit the VWR’s website at www.vwr.com for:
•
Complete technical service contact information
•
Access to VWR’s Online Catalogue, and information about accessories and related products
•
Additional product information and special offers
Contact us
For information or technical assistance contact your local VWR representative or visit www.vwr.com.
15
Waste disposal
15.1
Disposal of the unit in the member states of the EC
WARNING
Contamination of the device with toxic or radioactive substances.
Danger of poisoning.
[ Never lead a unit with sticking toxic substances to recycling according to directive
2002/96/EC.
¾ Prior to disposal, clean the unit of sticking toxic substances.
¾ Dispose of a unit which you cannot safely free from all toxic substances as special
waste according to national law.
According to directive 2002/96/EC of the European Parliament and of the Council on waste electrical
and electronic equipment (WEEE), the DRY-Line drying oven is classified as “monitoring and control
instrument” (category 9) only intended for professional use.
DRY-Line DL 05-2008_en
page 37/40
The DRY-Line drying oven bears the label for electrical and electronic equipment
manufactured / distributed on the market in the EC after 13 August 2005 and to be
disposed of according to the directive 2002/96/EC on waste electrical and electronic
equipment (WEEE). WEEE label: crossed-out wheelie bin with solid bar below.
CAUTION
Violation of existing law.
[ The DRY-Line drying oven must not be disposed of at public collecting points.
¾ The DRY-Line drying oven should be disposed of professionally at a recycling
company which is certified according to implementation of the directive
2002/96/EC into national law.
Certified companies disassemble used VWR equipment into recyclable components according to
directive 2002/96/EC. In order to exclude any health hazard for the employees of the recycling
companies, the devices must be free from toxic, infectious or radioactive substances.
It is the user’s responsibility that the unit is free from toxic or radioactive substances
prior to handing it over to a recycling company.
15.2
•
Prior to disposal clean the unit from all introduced or sticking toxic substances.
•
If you cannot safely clean the unit from toxic substances, dispose of it as special
waste according to national law.
Disposal of the unit in non-member states of the EC
CAUTION
Danger of environmental damages.
¾ Refer to national legislation when disposing of used equipment.
15.3
Disposing of packaging
Packaging components
Material
Type of disposal
Pallet
Non-wood (compressed wood shavings)
Wood recycling
Inner and outer packaging
Cardboard
Paper recycling
L-section
PE foam
Plastics recycling
Bubble wrap
PE foil
Plastics recycling
Padded parts on pallet
PE foam
Plastics recycling
User manual bag
PE foil
Plastics recycling
Straps for fixing to pallet
Plastic
Plastics recycling
Where recycling is impossible, all the packaging parts can also be disposed of along with household
waste collection.
DRY-Line DL 05-2008_en
page 38/40
Manufacturer:
VWR International bvba
Haasrode Research Park Zone 3
Geldenaaksebaan 464
B-3001 Leuven
Belgium
Tel. +32 16 38 50 11
Internet: www.be.vwr.com
Equipment made in Germany
The reproduction, distribution and utilization of this document as well as the communication of its
content to others without explicit authorization is prohibited. Offenders will be held liable for the payment
of damages. All rights reserved in the event of the grant of a patent, utility model or design.
© by VWR International bvba, 2008
DRY-Line DL 05-2008_en
page 39/40
Local VWR offices in Europe
Austria
Ireland
Portugal
VWR International GmbH
Graumanngasse 7
1150 Wien
Tel.: 01 97 002 0
Fax: 01 97 002 600
E-mail: [email protected]
AGB Scientific Ltd - A VWR
International Company
Orion Business Campus
Northwest Business Park
Ballycoolin
Dublin 15
Tel.: 01 88 22 222
Fax: 01 88 22 333
e-mail [email protected]
VWR International - Material de
Laboratório, Lda
Edifício Neopark
Rua Tomás Ribeiro, 43- 3 D
2790-221 Carnaxide
Tel.: 21 3600 770
Fax: 21 3600 798/9
E-mail: [email protected]
Belgium
VWR International bvba/sprl
Haasrode Researchpark Zone 3
Geldenaaksebaan 464
3001 Leuven
Tel.: 016 385 011
Fax: 016 385 385
E-mail:
[email protected]
Denmark
VWR - Bie & Berntsen
Transformervej 8
2730 Herlev
Tel.: 43 86 87 88
Fax: 43 86 87 90
E-mail: [email protected]
Finland
VWR International Oy
Pihatörmä 1 C 1
FI - 02240 Espoo
Tel.: +358 9 80 45 51
Fax: +358 9 80 45 52 00
E-mail: [email protected]
France
VWR International S.A.S.
Le Périgares – Bâtiment B
201, rue Carnot
94126 Fontenay-sous-Bois cedex
Tel.: 0 825 02 30 30 (0,15 EUR
TTC/min)
Fax: 0 825 02 30 35 (0,15 EUR
TTC/min)
E-mail: [email protected]
Germany
VWR International GmbH
Hilpertstrasse 20a
D - 64295 Darmstadt
Tel.: 0180 570 20 00*
Fax: 0180 570 22 22*
E-mail: [email protected]
Spain
Northern Ireland
AGB Scientific Apparatus Ltd
A VWR International Company
A10 Harbour Court, 7 Heron Rd
Sydenham Business Park
Belfast BT3 9HB
Tel.: 028 9058 5800
Fax: 028 9080 7812
Email: [email protected]
VWR International Eurolab S.L.
Ronda Can Fatjó, nº 11
Edifici Tecnopark, 3
Parc Tecnològic del Vallés
08290 Cerdanyola del Vallés
(Barcelona)
Tel.: 902 222 897
Fax: 902 430 657
E-mail: [email protected]
Italy
Sweden
VWR International s.r.l.
Via Stephenson 94
20157 Milano (MI)
Tel.: 02 332 03 11
Fax: 800 152 999
E-mail: [email protected]
VWR International AB
Fagerstagatan 18a
163 94 Stockholm
Tel.: 08 621 34 00
Fax: 08 621 34 66
E-mail: [email protected]
The Netherlands
Switzerland
VWR International B.V.
Postbus 8198
1005 AD Amsterdam
Tel.: 020 4808 400
Fax: 020 4808 480
E-mail: [email protected]
VWR International AG
Lerzenstrasse 16/18
8953 Dietikon
Tel.: 044 745 13 13
Fax: 044 745 13 10
E-mail: [email protected]
Norway
UK
VWR International AS
Kakkelovnskroken 1
P.B. 45, Kalbakken
0901 Oslo
Tel.: 02290
Fax: 815 00 940
E-mail: [email protected]
VWR International Ltd
Customer Service Centre
Hunter Boulevard
Magna Park
Lutterworth
Leicestershire
LE17 4XN
Tel.: 0800 22 33 44
Fax: 01455 55 85 86
E-mail: [email protected]
*14 Cent/Minute aus d. dt. Festnetz
DRY-Line DL 05-2008_en
page 40/40