1
HiQ Flowmate ® Dual Syringe Pump User Manual FLEXCELL® INTERNATIONAL CORPORATION HIQ FLOWMATE® TABLE OF CONTENTS TableofContents Quick Start Guide .......................................................................................................................... 5 Unpacking and Inspection .................................................................................................................... 5 Installation .............................................................................................................................................. 5 Equipment Precautions ......................................................................................................................... 5 Introduction to the HiQ Flowmate® ........................................................................................ 7 HiQ Flowmate® Features ...................................................................................................................... 8 HiQ Flowmate® Configurations ........................................................................................................... 8 HiQ Flowmate® Applications ............................................................................................................... 8 Hardware Overview ..................................................................................................................... 9 HiQ Flowmate® Dual Syringe Pump Drive Unit ................................................................................ 9 Drive Unit ................................................................................................................................................ 9 Mounting Syringes on the HiQ Flowmate® ...................................................................................... 10 Safety Sensors ....................................................................................................................................... 10 Valve Unit and Fittings ........................................................................................................................ 11 Introduction to Touch Screen ............................................................................................................. 12 Fluid Flow Module Operation ................................................................................................. 21 Constant Flow Mode ............................................................................................................................ 21 Continuous Flow .................................................................................................................................. 24 Pulsatile Flow ........................................................................................................................................ 28 Stepped Flow ......................................................................................................................................... 33 Oscillatory Flow .................................................................................................................................... 37 Calculation Tools ......................................................................................................................... 41 Dose/Duration/Flowrate Calculator ................................................................................................. 41 Shear Stress Calculator ........................................................................................................................ 42 Maintenance ................................................................................................................................. 44 Troubleshooting ................................................................................................................................ 47 Appendix ........................................................................................................................................... 50 Specifications ..................................................................................................................................... 52 Fluid Flow Specifications: Option A .................................................................................................. 54 Fluid Flow Specifications: Option B .................................................................................................. 55 Fluid Flow Specifications: Option C .................................................................................................. 56 FLEXCELL®INTERNATIONALCORPORATION PAGE1 FLEXCELL® INTERNATIONAL CORPORATION HIQ FLOWMATE® WARRANTY FLEXCELL® INTERNATIONAL CORPORATION ONE YEAR LIMITED PARTS WARRANTY Flexcell HiQ Flowmate® Dual Syringe Pump 1. FLEXCELL INTERNATIONAL CORPORATION warrants to the original purchaser/customer all hardware components of the Flexcell HiQ Flowmate® Dual Syringe Pump serial #__________________________for a period of one year from the date of delivery to the purchaser/customer to be free from manufacturing defects in workmanship or materials with the following exceptions, terms and conditions: a. ITEMS EXCLUDED FROM THE WARRANTY ARE: Instruction manuals, CDs, DVDs, Accessories b. DURING THE WARRANTY PERIOD, the purchaser/customer must notify Flexcell of any warranty claim in writing, by telephone, fax transmission or email identifying each defective part or specifically describe the exact problem no later than the last day the warranty is in effect. c. FLEXCELL AGREES to correct any defect in workmanship or material and supply new or rebuilt parts in exchange for defective parts upon completion and submission by purchaser/customer of a printed “Parts Return Authorization” form furnished by Flexcell. Parts must be properly packed in original container and shipped to our factory service center or distributor with all shipping costs prepaid if the unit is out of warranty coverage. If the original shipping box is not available, Flexcell will send the required protective shipping container. (Flexcell will recommend the insurance value for parts or equipment to be shipped.) Return carrier shipping costs will be paid by Flexcell from the service center. The purchaser/customer is solely responsible for payment of custom fees, taxes, holding fees or value added taxes. d. THIS LIMITED WARRANTY only covers failures due to defects in materials or workmanship which occur during normal use. It does not cover damage which occurs in shipment or failures of original equipment due to products identified as add-ons not manufactured by Flexcell International Corporation or its distributors nor does this limited warranty cover damages or failures which result from accident or disaster such as fire, explosion, flood, wind, lightning, or earthquake or misuse, abuse, neglect, mishandling, misapplication, alteration, faulty installation, modification or service by anyone other than our factory or distributor. Breaking the seal and opening the unit case or violating unit components will void the warranty. This warranty is extended only to the original purchaser/customer unless a transfer of ownership is approved by Flexcell in writing. e. LIMITED LIABILITY. Flexcell or its distributor’s only liability shall be to remedy any defect to comply with its warranty and return the repaired equipment to function as designed. Under no circumstances shall Flexcell or its distributors be liable for any special incidental or consequential damages based upon breach of warranty or contract or negligence. Such damages include, but are not limited to: loss of profits, revenue, loss of data, down time, customer’s material or time. f. DISCLAIMER OF WARRANTIES: The Limited Warranty expressed in the foregoing language is the only warranty applicable to this product. Any other warranty, expressed or implied warranty or of merchantability or fitness for a particular purpose are hereby disclaimed. No oral or written information or advice provided by Flexcell, through its agents or employees, in the use and functioning of the equipment shall in any way create a warranty or in any way increase the scope of this limited warranty. g. DISCLAIMER: LANGUAGE. This warranty document, accompanying instruction manual and supplemental applicable laws appear in the English language. In the event of any inconsistency in the meaning of the words and terminology and any foreign language translation, the English language shall prevail. FLEXCELL®INTERNATIONALCORPORATION PAGE2 FLEXCELL® INTERNATIONAL CORPORATION HIQ FLOWMATE® WARRANTY 2. GOVERNING LAW. The performance of the duties and liabilities of the parties under the terms and conditions of this Limited Warranty shall be governed in all respects by the laws of the State of North Carolina, the United States of America. APPLICATION OF STATE LAWS: Some states do not allow the exclusion or limitation of consequential damages nor do some states allow limitations on how long an implied warranty lasts, so the above limitations may not apply to you. This warranty gives you specific legal rights and you may also have other rights that vary from state to state. 3. INTERNATIONAL CUSTOMERS. The full text of the foregoing limited warranty and all disclaimers is applicable to international customers/purchasers except when the purchase was made from an international distributor or reseller, the warranty will be covered through your distributor or reseller. If technical advisory support service is not available through your distributor or reseller, for service contact warranty headquarters by phone or fax. Within the United States only -toll free 1-800-728-3714 - Fax: 1-919-732-5196 International Customers telephone: 01-919-732-1591 - Fax: 01-919-732-5196 Email: [email protected] FLEXCELL® INTERNATIONAL CORPORATION 2730 Tucker Street, Suite 200, Burlington, NC 27215 1-800-728-3714 (within the U.S. only) 1-919-732-1591 fax: 1-919-732-5196 http://www.flexcellint.com CAUTION: HiQ Flowmate® is for research use only. Not for clinical use on patients. FLEXCELL®INTERNATIONALCORPORATION PAGE3 FLEXCELL® INTERNATIONAL CORPORATION HIQ FLOWMATE® FCC STATEMENT FEDERAL COMMUNICATIONS COMMISSION RADIO FREQUENCY INTERFERENCE STATEMENT This computing equipment has been type-tested and found to comply with the limits for a Class B digital device in accordance with the specifications for Subpart J of Part 15 of FCC Rules. These limits are designed to provide reasonable protection against harmful radio and TV interference in a residential installation. There is no guarantee that interference will not occur in a particular installation. The following instructions and precautions must be observed by the user when installing and operating this device: 1. The equipment must be operated in strict accordance with the manufacturer's instructions. 2. The unit(s) must be plugged into a properly-grounded power outlet and used with the power cord supplied with the unit(s), unmodified. 3. The unit must be operated with the factory-installed cover in place. 4. No modifications of the equipment can be made which may result in the equipment failing to meet the limits of the FCC Rules. 5. The equipment must be maintained in a satisfactory state of repair. 6. Shielded cables must be used with this equipment to ensure compliance with the FCC Rules. If the unit does interfere with radio or television reception, which can be tested by turning the unit off and on, the user is encouraged to try the following suggestions to correct the interference: 1. 2. 3. 4. Reorient the antenna of the receiver. Relocate the equipment to increase the distance between the unit and the radio/TV. Connect the unit to an outlet on a different circuit from the receiver. Consult with the dealer or an experienced radio/TV technician for advice on ways to reduce interference. NOTICE The information in this document is subject to change without notice. Flexcell International assumes no responsibility for any errors that may appear in this guide. This manual is believed to be complete and accurate at the time of publication. In no event shall Flexcell International Corporation be liable for incidental or consequential damages in connection with or arising from the use of the manual. Customers must contact Flexcell International Corporation or an authorized distributor before opening the case on the HiQ Flowmate® Dual Syringe Pump. FLEXCELL®INTERNATIONALCORPORATION PAGE4 FLEXCELL® INTERNATIONAL CORPORATION HIQ FLOWMATE® QUICK START GUIDE Quick Start Guide Unpacking and Inspection The unit should be inspected thoroughly for any shipping damage or missing components. The HiQ Flowmate® package (Figure 1) includes: o Syringe pump unit o Power cord o Instruction manual o Two plastic 1 mL and 10 mL syringes o Stylus and holder o Accessories: Extended thrust bar for clamping a single large syringe up to 140 mL Dual extended thrust bar for clamping two large syringes up to 140 mL Stainless steel blunt needle with luer Polypropylene hub 16 gauge x ½” length (Pack of 25) (refer to table below) Stainless steel blunt needle with luer Polypropylene hub 24 Gauge x 1” length (Pack of 25) (refer to table below) Tubing and micro-nozzle fitting kit for valve manifold (refer to table below) Secondary valve unit for oscillatory flow mode operation with drive shaft-B (Optional) Valve manifold micro-nozzle fittings: Valve Manifold Micro-Nozzle Size Option Connector OD (mm) 1 2 0.020" (0.51) 0.065" (1.65) Lee Company P/N for MicroNozzle Connector INZA3100914K INZA3362597D Tubing ID (mm) Tubing Length (Feet) SS Needle with Luer Polypropylene Hub (Pack of 25) 0.02" (0.51) 1/16" (1.59) 50 50 24 Gauge x 1" 16 Gauge x 1/2" Please notify Flexcell® International immediately if there are any discrepancies or missing components Installation Insert the power plug into a standard A/C wall outlet (100-230VAC, 50/60 Hz) Equipment Precautions Do not store the HiQ Flowmate® unit at temperatures above 140°F (60°C) or below 14°F (10°C). Do not operate the HiQ Flowmate® unit at temperatures above 104°F (40°C) or below 40°F (4°C). FLEXCELL®INTERNATIONALCORPORATION PAGE5 FLEXCELL® INTERNATIONAL CORPORATION HIQ FLOWMATE® QUICK START GUIDE Do not store or operate the HiQ Flowmate® unit at relative humidities exceeding 85% or below 20%. Always use HiQ Flowmate® in non-condensing environment. Do not place or operate the unit on wet surfaces or near liquid or oil spills. Make sure that the unit is properly grounded through the A/C wall outlet. Do not open the cover of the unit or touch circuitry inside. If damage is suspected to the unit, do not operate the unit. Contact Flexcell® International to obtain advice. Use the unit in the recommended orientation. Orienting the unit in any other way would damage the touch screen and other mechanical parts in the device. Read all warning labels on the unit to ensure proper usage. ® Figure 1. HiQ Flowmate components FLEXCELL®INTERNATIONALCORPORATION PAGE6 FLEXCELL® INTERNATIONAL CORPORATION HIQ FLOWMATE® INTRODUCTION TO THE HIQ FLOWMATE Introduction to the HiQ Flowmate The HiQ Flowmate® has been designed to provide researchers with a complete dual syringe pump system that has a multitude of functions to carry out cell and molecular biology experiments under fluid flow conditions. The HiQ Flowmate® provides general fluid pumping capabilities as wells as advanced fluid flow modes (i.e., oscillatory and pulsatile flow). The HiQ Flowmate® has a large touch screen interface (Figure 2, part A) for quick access to different functions and useful aids to set up the various fluid flow modes. Figure 2. Schematic of HiQ Flowmate® Dual Syringe Pump. FLEXCELL®INTERNATIONALCORPORATION PAGE7 FLEXCELL® INTERNATIONAL CORPORATION HIQ FLOWMATE® INTRODUCTION TO THE HIQ FLOWMATE HiQ Flowmate ® Features The HiQ Flowmate® is designed to operate as a dual syringe pump. This device utilizes five separate modules: constant flow, continuous flow, ramped flow, ocillatory flow, and pulsatile flow. The syringes are driven by two separate guide blocks that travel on lead screws. The lead screw rotation is controlled by two independent microprocessor controlled microstepping motors. The drive system has been designed to provide an accurate, smooth and vibration free syringe motion. Advanced microstepping techniques with smooth drive function have been employed to create continuous nonpulsating fluid flow. Due to the high resolution of the stepping motor drivers, the HiQ Flowmate® is able to reach a broad range of flowrates from picoliter to milliliter scale. The HiQ Flowmate® utilizes a valve unit to create continuous and oscillatory flow. The valve unit is built into the pump and is controlled by the HiQ Flowmate® software. The HiQ Flowmate® utilizes a touch screen interface and advanced software for operation. The large touch screen with user friendly icons and buttons eliminates the need to use an external computer for control. The HiQ Flowmate® application software provides help screens to aid in creating flow regimens as well as information on most common syringe dimensions. There are also calculation tools such as the Dose/Duration/Flowrate calculator and Shear Stress calculator to ease set up of flow regimens. The flow mode screens display real time flow regimen status either in time or volume scales. Additionally, the use of a dual independent drive system in the HiQ Flowmate® permits the user to program different flow modes in the separate syringes, except when the continuous flow mode is used. The use of a dual independent drive system enables users to utilize HiQ Flowmate® for multiple tasks simultaneously. HiQ Flowmate ® Configurations The table below lists the available configurations and their flowrate ranges. Configurations A and B include the drive system with smooth drive functions. Configuration C does not have smooth drive function. Configuration Maximum Flowrate with 140 mL Syringe (mL/min) A B C 83.4 260.6 260.6 Minimum Flowrate with 0.5 µL Syringe (pL/min) 3.8 11.8 1.2 HiQ Flowmate ® Applications Dispensing or withdrawal of fluid to or from a target, based on volume or on time Continuous unidirectional flow through a target area Low flowrate infusions Combined flow profiles using different flow modes through a single target area Simultaneous use of different flow profiles through multiple target areas Fluid shear stress applications FLEXCELL®INTERNATIONALCORPORATION PAGE8 FLEXCELL® INTERNATIONAL CORPORATION HIQ FLOWMATE® HARDWARE OVERVIEW Hardware Overview HiQ Flowmate ® Dual Syringe Pump Drive Unit Figure 3. HiQ Flowmate® dual syringe pump drive unit. Drive Unit Linear Guide Block System Function: The HiQ Flowmate® consists of two separate drive systems to move two separate syringes (Figure 3). Each drive system consists of a lead screw (Fig. 3, part I), two guide bars (Fig. 3, part j), a guide block and a guide block lock button (Fig. 3, part S). When the lead screw is rotated by a microprocessor controlled stepping motor, the guide block travels along the lead screw and guide bars linearly to push or pull the syringe plunger clamped to the guide block. Dynamics of The Linear Slider System: The guide block is coupled to the lead screw by a lock button (Fig. 3, part S). The lock button is spring loaded and can be disengaged from the lead screw by pressing it towards the guide block. When disengaged, the guide block can be moved freely along the lead FLEXCELL®INTERNATIONALCORPORATION PAGE9 FLEXCELL® INTERNATIONAL CORPORATION HIQ FLOWMATE® HARDWARE OVERVIEW screw and positioned anywhere along the lead screw. This function helps when positioning the syringe plunger (anywhere in the syringe) at the start of the flow regimen. Mounting Syringes on the HiQ Flowmate ® The syringes are clamped onto the pump at three positions. The syringe plunger is clamped to the guide block using the thrust plates (Fig. 3, parts L & M), while the flange of the syringe-barrel is clamped similarly to the front block. The syringe-barrel is also clamped down to the front block from the top using a thrust bar (Fig. 3, part O). Follow the guidelines below to accurately mount the syringe on to the pump. 1) Loosen the thumb screws (Fig. 3, part K) in the guide block and front bracket connected to thrust plates. 2) Select the appropriate thrust bar to suit the syringe size. For syringes larger than 50 mL, you may use the extended thrust bar or dual thrust bar. 3) Place the barrel of the syringe in the front bracket slot and adjust the guide block position based on the location of the syringe plunger so that the plunger plate can be easily slid into the front thrust plate in the guide block. 4) Slide the syringe barrel plate into the rear thrust plate (Fig. 3, part L) in the front bracket. 5) Tighten the thumb screws in the guide block and front bracket to secure the syringe barrel and plunger. 6) Tighten the thrust bar thumb screw to clamp the syringes vertically (Fig. 3, part N). Do not over tighten thrust bar thumb screw as it can increase the friction between syringe plunger and barrel and restrict smooth travel of syringe plunger. Safety Sensors Safety Sensor Location and Function: The HiQ Flowmate® pump is equipped with four safety sensors, two for each drive shaft. These photomicrosensors switch ON when a reflective surface is placed in front of the sensing face. The safety sensors are installed flushed with the top surface of base of the drive system at the front and rear end of each drive shaft (Fig. 3, part H & R). The sensors prevent the guide blocks from hitting the back and front end blocks of the drive system and causing damage to the lead screw, syringes and guide blocks. The sensor will be activated if the guide block travels over the sensing surface covering at least half of the sensing surface. The sensors will not function properly if the sensing surface is damaged, scratched or covered from dust or other matter. Therefore, it is important to periodically clean the surfaces to maintain proper functionality of the sensors. Refer to “Maintenance” section (pg. 44) for instructions on how to clean the sensor surface. Safety Sensor Display: The status of the safety sensors are displayed at the center of the setup screen for each flow mode (Figure 4, top left). If the sensors are activated, the display square color will change from green to red (Figure 4, bottom left). Sensor alert messages will pop-up indicating the activated sensor. In that case, move the guide block sufficiently away from the sensor and restart the flow regimen. FLEXCELL®INTERNATIONALCORPORATION PAGE10 FLEXCELL® INTERNATIONAL CORPORATION HIQ FLOWMATE® HARDWARE OVERVIEW Figure 4. HiQ Flowmate® sensor function showing photomicrosensor status display on flow mode screens (top left), sensor status display with syringe-A front sensor in activated state (bottom left) and sensor alert pop-up message (right) for syringe-A front sensor. Valve Unit and Fittings Function of Valve Unit: The built-in valve unit in the HiQ Flowmate® is used to control the direction of fluid flow. The valve unit consists of two 3-way valves, a manifold and an enclosure. The valves comprised of minimum internal volume and are manufactured with biocompatible materials to suit for biological applications. The valves are mounted to the manifold which utilizes internal fluid channels to control the direction of fluid flow. The fluid flows in and out of the manifold through four stainless steel micronozzles (4 ports) fitted into the manifold. It is of great importance to sterilize the valve unit between uses to prevent any contamination. Refer “Maintenance” section (pg. 44) for instructions on how to sterilize the valve unit. Flow Modules that Utilize the Valve Manifold: The valve unit is utilized in continuous and oscillatory flow modules. In the continuous flow mode, the valve unit is connected with both syringes to create unidirectional continuous fluid flow through a target area. The valves are synchronized with the syringes to maintain the direction of fluid flow through the target area when the syringes change travel direction. For the oscillatory flow mode, a separate valve unit is needed for each syringe to create oscillating flow through a target area. The built-in valve unit supplied with the HiQ Flowmate® is configured to work with syringe-A. FLEXCELL®INTERNATIONALCORPORATION PAGE11 FLEXCELL® INTERNATIONAL CORPORATION HIQ FLOWMATE® HARDWARE OVERVIEW Introduction to Touch Screen Start-up Screen The touch screen displays the start-up screen (Figure 5) whenever the system is first switched ON. Press START to go to the main screen. Figure 5. HiQ Flowmate® start-up screen Main Screen The main menu screen (Figure 6) displays the activation buttons for all fluid flow modes as well as buttons to go to Dose calculator, Shear Stress calculator and Flow Modes description screens. Press the button with the symbol to select a specific flow mode or function. Figure 6. HiQ Flowmate® main menu screen FLEXCELL®INTERNATIONALCORPORATION PAGE12 FLEXCELL® INTERNATIONAL CORPORATION HIQ FLOWMATE® HARDWARE OVERVIEW Inputs and Outputs Each flow mode consists of several inputs (variables) that need to be entered by using the touch screen. The units for the inputs should be set separately for each flow mode. Different units for inputs can be used for syringe-A and B. Based on the function of the flow mode, the number and type of input may vary for each flow mode. After selecting the flow mode, it is important to first setup the units and input syringe specifications before entering values for the other inputs. Following is a description of all the inputs, outputs and switches used in the HiQ Flowmate® touch screen. Touch Screen Switch Category Control Switches Description Screens Used to turn ON/OFF Syringe-A and/or Syringe-B. Switches will flash when turned ON. Press the switch to activate. Constant Flow Continuous Flow Pulsatile Flow Stepped Flow Oscillatory Flow Constant Flow Pulsatile Flow Stepped Flow Oscillatory Flow Used to select the direction of syringe motion. Press to activate. Used to select the direction of syringe motion. Press the switch to activate. Indicators under each switch will display the current direction of syringe travel. The highlighted switch indicates the direction of syringe travel at the start of the program. Syringe motion START switch. Press to activate syringe travel. Syringe motion PAUSE switch. Press to pause syringe travel. Syringe motion STOP switch. Press to stop syringe travel. FLEXCELL®INTERNATIONALCORPORATION Continuous Flow Constant Flow, Continuous Flow, Pulsatile Flow, Stepped Flow, Oscillatory Flow Constant Flow, Continuous Flow, Pulsatile Flow, Stepped Flow, Oscillatory Flow Constant Flow, Continuous Flow, Pulsatile Flow, Stepped Flow, Oscillatory Flow PAGE13 FLEXCELL® INTERNATIONAL CORPORATION HIQ FLOWMATE® HARDWARE OVERVIEW Touch Screen Switch Category Control Switches Description Screens Used to select the step stages for stepped flow. Press the numbered button to activate each step. Numbered button will turn blue when activated. Red buttons will flash when a syringe goes through the corresponding step. Units for syringe volume can be selected by pressing the labeled buttons. Buttons turn blue when activated. To select another unit, press the already selected button first to deactivate. Units for syringe internal diameter can be selected by pressing the labeled buttons. Buttons turn blue when activated. To select another unit, press the already selected button first to deactivate. Units for dispense/ withdrawal volume can be selected by pressing the labeled buttons. Buttons turn blue when activated. To select another unit, press the already selected button first to deactivate. Units for flowrate can be selected by pressing the labeled buttons. Buttons turn blue when activated. To select another unit, press the already selected button first to deactivate. FLEXCELL®INTERNATIONALCORPORATION Stepped Flow Units screens of Constant Flow Continuous Flow Pulsatile Flow Stepped Flow Oscillatory Flow Units screens of Constant Flow Continuous Flow Pulsatile Flow Stepped Flow Oscillatory Flow Units screens of Constant Flow Continuous Flow Pulsatile Flow Stepped Flow Units screens of Constant Flow Continuous Flow Pulsatile Flow Stepped Flow Oscillatory Flow PAGE14 FLEXCELL® INTERNATIONAL CORPORATION HIQ FLOWMATE® HARDWARE OVERVIEW Touch Screen Switch Category Numerical Inputs Description Screens Volume numerical input is used to input dispense or withdrawal volume. Press the square next to display and a key pad will pop-up. Type the desired value and press enter. Selected units will be displayed in front of the numerical input. Another volume numerical input as described above. In addition to the volume input, the red button below the numerical input is used to select the pulsatile flow control by volume. Press the red bar, and the square next to it will become green if the volume control is activated. Syringe volume numerical input is used to input volume of the syringe used. Press the square next to display and a key pad will pop-up. Type the desired value and press enter. Selected units will be displayed in front of the numerical input. Syringe ID numerical input is used to input internal diameter of the syringe used. Press the square next to display and a key pad will pop-up. Type the desired value and press enter. Selected units will be displayed in front of the numerical input. FLEXCELL®INTERNATIONALCORPORATION Constant Flow Continuous Flow Stepped Flow Control Pulsatile Flow, Parameters Syringe Specifications screens of Constant Flow, Continuous Flow, Pulsatile Flow, Stepped Flow, Oscillatory Flow Syringe Specifications screens of Constant Flow, Continuous Flow, Pulsatile Flow, Stepped Flow, Oscillatory Flow PAGE15 FLEXCELL® INTERNATIONAL CORPORATION HIQ FLOWMATE® Touch Screen Switch Category Numerical Inputs HARDWARE OVERVIEW Description Flowrate numerical input is used to input flowrate. Press the square next to display and a key pad will pop-up. Type the desired value and press enter. Selected units will be displayed in front of the numerical input. Another numerical input for the flowrate. This input is numbered as there are several flowrate inputs in stepped flow mode. Duration input is used to enter values for the duration parameters. Press squares next to DD (days), HH (hrs), MM (minutes), SS (sec.) and use the popup keypad to enter values. Another duration input. In addition to duration setup, the blue button below the numerical inputs is used to select the pulsatile flow control by duration. Press the blue bar and the square next to it will turn green if the duration control is activated. Duration numerical input of stepped flow mode. Press the squares next to the numerical input to open a key-pad and enter the values for duration in hrs, mins and seconds. FLEXCELL®INTERNATIONALCORPORATION Screens Constant Flow, Continuous Flow, Pulsatile FlowParameters, Oscillatory Flow Parameters Stepped Flow Continuous Flow, Oscillatory Flow Parameters Pulsatile Flow Parameters Stepped FlowControl PAGE16 FLEXCELL® INTERNATIONAL CORPORATION HIQ FLOWMATE® Touch Screen Switch Category Numerical Inputs Description Used to setup the pulse duration in minutes and seconds. Press the square next to the numerical display to open up a pop-up keypad to enter values for minutes and seconds. (M:S) Used to setup the cycle time in minutes and seconds. Press the square next to the numerical display to open up a pop-up keypad to enter values for minutes and seconds. (M:S) Used to enter the number of cycles in the stepped flow mode. Press the square next to the numerical display to open up a pop-up keypad to enter a value for the cycle number. Used to enter the Forward Duration of flow in minutes (M) and seconds (S). Used to enter the Reverse Duration of flow in minutes (M) and seconds (S). HARDWARE OVERVIEW Screens Pulsatile Flow Parameters Pulsatile Flow Parameters Stepped Flow Oscillatory Flow Oscillatory Flow Status Displays Status bar on left will display the syringe control status (Start, Pause or Stop). The square on right displays the direction of syringe travel (“D” for dispensing, and “W” for withdrawal). FLEXCELL®INTERNATIONALCORPORATION Constant Flow, Pulsatile Flow, Stepped Flow, Oscillatory Flow PAGE17 FLEXCELL® INTERNATIONAL CORPORATION HIQ FLOWMATE® Touch Screen Switch Category Status Displays HARDWARE OVERVIEW Description Level meter displays the volume of liquid currently dispensed from or withdrawn in to the syringe with units. Displays the status of four safety sensors mounted in the base (two at the front, and two at the back). The indicators will flash when sensors are activated. Terminate the program by pressing stop button and move the guide block away from the sensor before restarting the program. Displays the status of the two valves. “Flow out” indicates liquid flowing out of the valve. “Flow in” indicates liquid flowing into the valve. Displays the amount of time left in the current program in days: Hrs: Mins: Secs. Displays the forward duration of liquid flow in minutes (MM) and seconds (SS). Displays the reverse duration of liquid flow in minutes (MM) and seconds (SS). FLEXCELL®INTERNATIONALCORPORATION Screens Constant Flow Constant Flow, Continuous Flow, Pulsatile Flow, Stepped Flow, Oscillatory Flow Continuous Flow Pulsatile Flow, Oscillatory Flow Oscillatory Flow Oscillatory Flow PAGE18 FLEXCELL® INTERNATIONAL CORPORATION HIQ FLOWMATE® Touch Screen Switch Category General Switches HARDWARE OVERVIEW Description Screens Used to access more information on the current screen or how to set parameters on the current screen. All screens excluding main screen Used to return to the main menu screen of the HiQ Flowmate®. Used to go to the syringe specifications screen of the current flow mode. Used to go to the unit setup screen of the current flow mode. Used to go to the unit setup and syringe specification screen of the continuous flow mode. Used to go to the parameter setup screen of the current flow mode. Used to go to the syringe specifications screen where common syringe IDs and volumes are shown. FLEXCELL®INTERNATIONALCORPORATION Constant Flow, Continuous Flow, Pulsatile Flow, Stepped Flow, Oscillatory Flow, Shear Stress Calculator, Dose Calculator, Constant Flow, Pulsatile Flow – Parameters, Stepped Flow, Oscillatory Flow Parameters Constant Flow, Pulsatile Flow – Parameters, Stepped Flow, Oscillatory Flow Parameters Continuous Flow Pulsatile Flow, Oscillatory Flow All Syringe Specifications screens PAGE19 FLEXCELL® INTERNATIONAL CORPORATION HIQ FLOWMATE® Touch Screen Switch Category General Switches HARDWARE OVERVIEW Description Screens Used to return to the previous screen. Constant FlowUnits, Syringe Specifications, Continuous Flow Units, Pulsatile Flow Parameters, Pulsatile Flow Units, Stepped Flow Units, Stepped Flow Setup, Stepped Flow- Control, Oscillatory Flow Parameters, Oscillatory Flow Units Used to go to the Stepped Flow Control screen where the type of control (volume Stepped Flow or duration) for the stepped flow can be established. Used to go to the Stepped Flow Setup screen where the Stepped Flow flowrates for the stepped flow can be entered. Function Keys Six function keys are located on the touch screen frame. The first three function keys can be used for different tasks as follows: F1 – System date and time: Used to set the date and time of the system. F2 – Contrast and brightness: Used to change the contrast and brightness of the touch screen. F3- System menu: Used to change the communication modes of the touch screen. DO NOT CHANGE ANY SETTINGS ON THE SYSTEM MENU BEFORE CONSULTING FLEXCELL INTERNATIONAL. FLEXCELL®INTERNATIONALCORPORATION PAGE20 FLEXCELL® INTERNATIONAL CORPORATION HIQ FLOWMATE® FLUID FLOW MODULE OPERATION-CONSTANT FLOW MODE Fluid Flow Module Operation Constant Flow Mode In the constant flow mode, two independently driven stepper motors are used to generate precise dispensing or withdrawal of fluid at user set flowrates with different syringe sizes. The fluid flow regimens can be programmed in volume scale. The user will have the option of selecting a specific unit from a broad range of available units. User preferred syringe sizes can be input into the program. Several popular syringe specifications are also available to the user for reference. The total volume that can be dispensed or withdrawn will depend on the size of the syringe used. A real time level meter on the screen displays the volumes of liquid currently in the syringe during dispense or withdrawal action. Flow Regimen Setup 1. Press the CONSTANT FLOW symbol button on the HiQ Flowmate® main screen (Figure 7) to be directed to the Constant Flow Setup screen (Figure 8). 2. Select syringes by pressing Syringe-A or Syringe- B buttons. The buttons will turn red and continue to flash when selected (Figure 8). 3. Setting Up Units: Press UNITS button on the screen. The Constant Flow Units screen will appear (Figure 9). Select units for syringe volume, internal diameter, dispense/withdraw volume and flowrate by pressing the labeled buttons. The selected buttons will turn blue when properly activated. Note: Every time the pump is turned on, the units need to be reset by turning ON and OFF. Once all units have been set, return to the Constant Flow Setup screen by pressing BACK button. Check and confirm that the selected units appear next to the volume and flowrate (Fl. Rate) inputs in the Constant Flow Setup screen. Figure 7. HiQ Flowmate® main screen Figure 8. Constant Flow Setup screen 4. Syringe Specifications Setup: Press SYRINGE SPECS button on the Constant Flow Setup screen (Figure 8). FLEXCELL®INTERNATIONALCORPORATION PAGE21 FLEXCELL® INTERNATIONAL CORPORATION HIQ FLOWMATE® FLUID FLOW MODULE OPERATION-CONSTANT FLOW MODE When the Syringe Specifications screen (Figure 10) appears, press the square next to the numerical input besides the Sy. Vol. and Sy. ID. under syringe-A and enter the volume of the syringe and internal diameter of the syringe, respectively, using the pop-up key pad (Figure 11). If the units have been setup properly, the selected units will appear next to the Sy. Vol. and Sy. ID. numerical displays. Refer to manufacturer specifications or manually measure using a caliper to determine the internal diameter of the syringe. Repeat the above step for syringe-B if it is being used in this flow mode. Press BACK button to return to the setup screen. 5. Dispense/ Withdraw Volume and Flowrate Setup: In the Constant Flow Setup screen (Figure 8), press the square next to volume numerical display under syringe-A. Use the pop-up keypad to enter the desired volume that will be dispensed or withdrawn from the syringe. Press the square next to the flowrate numerical display under syringe-A and use the pop-up keypad to enter the desired flowrate for syringe-A. Repeat the above step for syringe-B if it is being used in Constant flow mode. 6. Setup of Syringe Travel Direction: On the Constant Flow Setup screen (Figure 8) under syringe-A, press DISP to set syringe-A to dispense liquid or press WITHD to set syringe-A to withdraw liquid into the syringe. The set syringe direction will be displayed in the direction status box next to the status bar (either “D” or “W”). Repeat the above step to set the direction of travel for syringe-B if it is being used in constant flow mode. Please make sure that syringes have enough distance (syringe sizes are accurate) from the ends to travel in their respective directions. FLEXCELL®INTERNATIONALCORPORATION Figure 9. Constant Flow Units screen Figure 10. Constant Flow Syringe Specifications screen Figure 11. Constant Flow Syringe Specifications screen with pop-up keypad PAGE22 FLEXCELL® INTERNATIONAL CORPORATION HIQ FLOWMATE® FLUID FLOW MODULE OPERATION-CONSTANT FLOW MODE Syringe Control Status Bar: The syringe control status bar is below the control buttons and displays the current syringe control status (Figure 12). When the syringes are not in use, it will display “Status”. It will display: “Started” when a flow regimen is started, “Paused” when a flow regimen is paused and “Stopped” when a flow regimen is stopped. Syringe Level Display: The syringe level display will show the volume of liquid in each syringe in real time (Figure 12). If the syringe is in dispense mode, it will initially display the liquid volume that is being set to dispense and gradually decrease to show in real time the volume of liquid that is being dispensed from the syringe. If the syringe is in withdrawal mode, it will initially show a zero volume and will gradually increase to show in real time the volume of liquid that is being withdrawn into the syringe. It will also show the unit that has been selected for dispense/ withdrawal volume. Figure 12. Syringe control status bar and syringe level display Safety Sensors: The status of safety sensors are displayed at the center of the setup screen (Figure 12, yellow oval). The actual photomicrosensors are located at each end (front and rear) of the lead screw in the drive system. These sensors are installed to prevent the guide blocks from hitting the back and front ends of the drive system. If the sensors are activated, the color of display square will change from green to red. In that case, move the guide block sufficiently away from the sensor and restart the flow regimen. 7. Flow Regimen Control Prior to starting a flow regimen, make sure that the sensors are all inactive (no red sensor indicators in the safety sensor section). Press RUN button (green triangle) to start syringe motion. The syringe travel can be stopped by pressing the button with the red square (i.e., the STOP button (Figure 12)). Press pause button (button with two yellow lines) to pause the syringe travel (Figure 12). If syringe travel is paused, press START button again to restart syringe travel. The syringe will restart from the paused state and continue to dispense/ withdraw remaining amount of liquid. Completion of Flow Regimen: The flow regimen status display (Figure 12, white oval) will show “FIN” when the flow regimen is completed. It will show a green background while the flow regimen is being run. 8. Termination of Flow Regimen Once the syringes have stopped after completing a regimen, press STOP button to reset the system. Turn OFF the respective syringe by pressing syringe-A or syringe-B button. The background color of the button should turn black when properly turned OFF. FLEXCELL®INTERNATIONALCORPORATION PAGE23 FLEXCELL® INTERNATIONAL CORPORATION HIQ FLOWMATE® FLUID FLOW MODULE OPERATION – CONTINUOUS FLOW MODE Use the MENU button to return to the main menu if you need to select another flow mode. Before turning off the system, use the MENU button to go back to the main menu. If the syringe-A and/or syringe-B is not turned OFF in this mode prior to exiting this mode, you will not be able to use the same syringe in any other flow mode. Help Screen: Press HELP button to access the help information on Constant flow mode. The help screens provide brief guidelines on how to setup a flow regimen in the constant flow mode. Continuous Flow Continuous flow mode can be used to generate steady continuous liquid flow in one direction (either withdraw/ dispense direction) through a target area. The fluid flow can be controlled based on time. Both syringes are utilized to maintain a unidirectional continuous flow for a set period of time. Two 3-way valves mounted onto a manifold are used to maintain unidirectional flow continuously through the target area. The valves are controlled by the flow control software. Both syringes travel simultaneously in opposite direction to maintain flow. At the end of each travel cycle (Example: If syringe-A in dispense mode and syringe-B in withdrawal, when syringe-A reaches the front end and when syringe-B reaches the rear end), the syringes change travel direction while the two valves switch status to maintain liquid flow in one direction. The initial flow directions of the syringes need to be set depending on the desirable direction of liquid flow through the target area. There onwards, the set direction will be maintained by the syringe control software at the set flowrate for the set period of time. The volume dispensed/ withdrawn during each cycle of syringe travel can be set in the Continuous Flow screen. The major advantage of this flow mode is that the user can continuously maintain unidirectional fluid flow through a target area without having to stop the flow regimen and fill-up syringes with liquid to maintain continuous flow. Tubing Connection to Valve Manifold: Two 3-way valves are used in the Continuous flow mode (Figure 13). These valves switch on and off with each change in syringe travel direction to maintain unidirectional liquid flow through a target area. It is important to connect tubing with the valve manifold accurately to maintain proper unidirectional flow. Connect tubing from syringe-A to port A of the valve manifold. Connect tubing from syringe-B to port B of the valve manifold. Connect port C of the valve manifold to the tubing from the outlet of the target area. Connect port D of the valve manifold to the tubing from the inlet of the target area. FLEXCELL®INTERNATIONALCORPORATION PAGE24 FLEXCELL® INTERNATIONAL CORPORATION HIQ FLOWMATE® FLUID FLOW MODULE OPERATION – CONTINUOUS FLOW MODE Figure 13. HiQ Flowmate® valve manifold for continuous flow mode Flow Regimen Setup 1. Press the CONTINUOUS FLOW symbol button on the HiQ Flowmate® main screen (Figure 14) to be directed to the Continuous Flow Setup screen (Figure 15). 2. Units and Syringe Specifications: To setup units and enter syringe specifications, press UNITS & SY. SPECS button on the screen. The Continuous Flow Units screen will appear (Figure 16). Figure 14. HiQ Flowmate® main screen Select units for syringe volume, internal showing continuous flow mode access button diameter, dispense/withdraw volume and flowrate by pressing the labeled buttons. The selected buttons will turn blue when properly activated. Note: Every time the pump is turned on, the units need to be reset by turning ON and OFF. 3. Syringe Specifications Setup: On the Continuous Flow Units screen under syringe specifications (Figure 16), press the square next to the numerical input besides the Sy. Vol. and Sy. ID. Enter the volumes and internal diameters of FLEXCELL®INTERNATIONALCORPORATION Figure 15. Continuous Flow Setup screen PAGE25 FLEXCELL® INTERNATIONAL CORPORATION HIQ FLOWMATE® FLUID FLOW MODULE OPERATION – CONTINUOUS FLOW MODE the syringes using the pop-up key pad (Figure 17). If the units have been setup properly, the selected units will appear next to the Sy. Vol. and Sy. ID. numerical displays. Refer to manufacturer specifications or manually measure using a caliper to determine the internal diameter of the syringe. You should use similar syringe sizes on the two drive shafts for the continuous flow mode to work accurately. Once all units and syringe specifications have been set, return to the Continuous Flow Setup screen by pressing BACK button. Check and confirm that the selected units appear next to the volume and flowrate (Fl. Rate) inputs in the Continuous Flow Setup screen (Figure 15). 4. Dispense/ Withdraw Volume and Flowrate Setup: In the Continuous Flow Setup screen (Figure 15), press the square next to the volume numerical display. Use the pop-up keypad to enter the desired volume that the syringes should dispense and withdraw during one cycle of syringe travel. In the continuous flow mode, in a single cycle of syringe travel, one syringe may travel from rear to front end (dispense) while the other syringe may travel from front to rear end (withdraw) or vice versa. The volume entered on the Continuous Flow Setup screen is the volume of liquid dispensed or withdrawn from each syringe during its travel from one end to the other. This volume can also be termed as the exchanged volume, as liquid does not flow out of the syringes in the continuous flow mode. To enter flowrate, press the square next to the flowrate numerical display and use the popup keypad to enter the desired flowrate for both syringes. Figure 16. Continuous Flow Units and Syringe Specifications screen. 5. Duration Setup: You may use the duration input on the Continuous Flow screen to setup the duration for the continuous flow regimen (Figure 18). Press the square next to each numerical input of days (DD), hours (HH), minutes (MM) and seconds (SS) and use the pop-up keypad to enter the values for each of these time Figure 17. Continuous Flow Syringe parameters (Figure 18, red oval). Specifications screen with pop-up keypad. FLEXCELL®INTERNATIONALCORPORATION PAGE26 FLEXCELL® INTERNATIONAL CORPORATION HIQ FLOWMATE® FLUID FLOW MODULE OPERATION – CONTINUOUS FLOW MODE 6. Setup of Syringe Travel Direction: The syringe travel direction may be setup based on the direction of flow through the target area. Prior to selecting the travel direction for syringes, confirm that the tubing connection configuration in the valve manifold is correct with respect to the fluid flow inlet and outlet of the target area. To select initial syringe travel direction, press DISP or WITHD under syringe-A and syringe-B on the Continuous Flow Setup screen (Figure 15). Figure 18. Setting up of duration for The right, red directional indicators under the continuous flow regimen. dispense and withdrawal buttons (Figure 15, white oval) will turn yellow and remain yellow during the flow regimen to show the starting syringe directions. The left directional indicators under the dispense and withdrawal buttons show the current travel direction of both syringes. These indicators will flash when its respective direction is being run. Syringe Control Status Bar: The syringe control status bar in the lower center of the Continuous Flow screen displays the current syringe control status (Figure 18). When the syringes are not in use, it will display “Status”. It will display: “Started” when a flow regimen is started, “Paused” when a flow regimen is paused and “Stopped” when a flow regimen is stopped. Valve Control Display: Two 3-way valves are used in the Continuous flow mode. These valves switch on and off with each change in syringe travel direction to maintain unidirectional liquid flow through a target area. The flow status of the valves is displayed in the valve control display area of the Continuous Flow screen (Figure 18, yellow oval). Letters A and B denotes valves 1 and 2, respectively. In Continuous flow mode, valve A is connected to syringe-A, while valve B is connected to syringe-B. When syringe-A and syringe-B are in dispense and withdrawal mode, respectively, the valve control area will display “Flow out” next to valve A and “Flow in” next to valve B. The display will read vice versa when syringe-A is in withdrawal mode and syringe-B is in dispense mode. When no action is selected for the syringes (no travel direction is selected), valve A will be in “Flow out” and valve B will be in “Flow in” mode. The valve status will change alternatively when syringes change travel direction after each cycle during continuous flow. 7. Flow Regimen Control: Prior to starting the flow regimen, make sure that the safety sensors are all inactive. There should be no red sensor indicators in the safety sensor section (lower right corner of the Continuous Flow screen, see Figure 18). FLEXCELL®INTERNATIONALCORPORATION PAGE27 FLEXCELL® INTERNATIONAL CORPORATION HIQ FLOWMATE® FLUID FLOW MODULE OPERATION – CONTINUOUS FLOW MODE Press RUN button (green triangle) to start syringe motion. The syringe travel can be stopped by pressing the button with the red square (i.e., the STOP button (Figure 18)). Press PAUSE button (button with two yellow lines) to pause the syringe travel (Figure 18). If syringe travel is paused, press START button again to restart syringe travel. The syringe will restart from the paused state and continue to run the programmed flow regimen. 8. Termination of Flow Regimen: Once the syringes have stopped after completing a regimen, press STOP button to reset the system. Use the MENU button to return to the main menu if you need to select another flow mode. Before turning off the system, use the MENU button to go back to the main menu. Since both syringes are utilized during Continuous flow mode, none of the syringes can be used simultaneously with any other flow modes. Help Screen: Press HELP button to access the help information on Continuous flow mode. The help screens provide brief guidelines on how to setup a flow regimen in the continuous flow mode. Pulsatile Flow Pulsatile flow mode is used to generate pulse flow in either withdraw or dispense direction. The travel of the syringes is controlled independently allowing the user to conduct multiple experiments simultaneously. The user needs to set the fluid flowrate, cycle time, and pulse on duration using the touch screen. The pulsatile flow can be controlled in time scale or volume scale such that the syringes can be programmed to maintain a pulsatile flow for a specified time or to dispense/withdraw a specified volume. Figure 19. HiQ Flowmate® main screen showing Pulsatile flow mode access button. Flow Regimen Setup 1. Press the PULSATILE FLOW symbol button on the HiQ Flowmate® main screen (Figure 19) to be directed to the Pulsatile Flow Setup screen (Figure 20). 2. Select a syringe by pressing the Syringe-A or Syringe-B button. The buttons will turn red Figure 20. Pulsatile Flow Setup screen. FLEXCELL®INTERNATIONALCORPORATION PAGE28 FLEXCELL® INTERNATIONAL CORPORATION HIQ FLOWMATE® FLUID FLOW MODULE OPERATION – PULSATILE FLOW MODE and continue to flash when selected (Figure 20). 3. Setting Up Units: Press SET PARAMETERS button on the Pulsatile Flow Setup screen. The Pulsatile Flow Parameters screen will appear (Figure 21). Press UNITS to go to Pulsatile Flow Units screen (Figure 22). Select units for syringe volume, internal diameter, dispense/withdraw volume and flowrate by pressing the labeled buttons (Figure 22). The selected buttons will turn blue when properly activated. Note: Every Figure 21. Pulsatile Flow Parameters screen. time the pump is turned on, the units need to be reset by turning ON and OFF. You may select units for both syringes or any one of the syringes. Once all units have been set, return to the Pulsatile Flow Parameters screen by pressing BACK button. Check and confirm that the selected units appear next to the volume (Vol.) and flowrate (Fl. Rate) inputs in the Pulsatile Flow Parameters screen. 4. Syringe Specifications Setup: Press SYR. SPECS button on the Pulsatile Flow Parameters screen (Figure 21). When the Syringe Specifications screen (Figure 23) appears, press the square next to the numerical input besides the Sy. Vol. and Sy. ID. under syringe-A and enter the volume of the syringe and internal diameter of the syringe, respectively, using the popup key pad (Figure 24). If the units have been setup properly, the selected units will appear next to the Sy. Vol. and Sy. ID. numerical displays. Refer to manufacturer specifications or manually measure using a caliper to determine the internal diameter of the syringe. Repeat the above step for syringe-B if it is being used in this flow mode. Press BACK button to return to the Pulsatile Flow Parameters screen. 5. Setting up Pulsatile Flow Profile Parameters In the Pulsatile Flow Parameters screen (Figure 21), press the square next to flowrate (Fl. rate) numerical display under syringe-A. FLEXCELL®INTERNATIONALCORPORATION Figure 22. Pulsatile Flow Units screen. Figure 23. Syringe Specification screen for pulsatile flow. PAGE29 FLEXCELL® INTERNATIONAL CORPORATION HIQ FLOWMATE® FLUID FLOW MODULE OPERATION – PULSATILE FLOW MODE Use the pop-up keypad to enter the desired flowrate. Press the squares next to the cycle time (Cyc. time) minutes (M) and seconds (S) numerical displays under syringe-A and use the pop-up keypad to enter the desired values. Press the squares next to the pulse duration (Pls. dur.) minutes (M) and seconds (S) numerical displays under syringe-A and use the pop-up keypad to enter the desired values. Repeat the above steps if syringe-B is being used in Pulsatile flow mode. Figure 24. Pulsatile Flow Syringe Specifications screen with pop-up keypad. Cycle time and Pulse Duration Minimum pulse duration: 0.3 sec Minimum cycle time: 0.4 sec Cycle time must always be greater than pulse duration. 6. Pulsatile Flow Control by Duration or Dispense/Withdraw Volume Control by Volume: On the Pulsatile Flow Parameters screen, press the red bar below the volume numerical (Vol.) input (Figure 21, white oval) to activate the flow regimen control by volume. The indicator next to the red bar should turn green if properly activated. Press the square next to the volume numerical input. Use the pop up keypad to enter the dispense or withdraw volume for syringe-A. Repeat the above steps if syringe-B is being used in Pulsatile flow mode. Control by Duration: On the Pulsatile Flow Parameters screen, press the blue bar below the “Duration” numerical input (Figure 21, white oval) to activate the pulsatile flow regimen control by time. The indicator next to the blue bar should turn green if properly activated. Press square next to numerical input for SS (seconds) under “Duration”. Use the pop up keypad to enter seconds. Repeat the same procedure to enter values for MM (minutes), HH (hours) and DD (days). Repeat the above steps if syringe-B is being used in Pulsatile flow mode. Press BACK button to return to Pulsatile Flow setup screen (Figure 20). FLEXCELL®INTERNATIONALCORPORATION PAGE30 FLEXCELL® INTERNATIONAL CORPORATION HIQ FLOWMATE® FLUID FLOW MODULE OPERATION – PULSATILE FLOW MODE Duration and Time Left Display: The duration of the pulsatile flow regimen is displayed on the Pulsatile Flow screen (Figure 18) next to “Duration” in seconds (SS), hours (HH), minutes (MM) and seconds (SS). This duration of the flow regimen is calculated from the values entered in the duration numerical input (if flow regimen is controlled by duration) or from the value entered in the volume numerical input (if flow regimen is controlled by dispense or withdraw volume) on the Pulsatile Flow Parameters screen. The “Time left” on the Pulsatile Flow screen will initially display the calculated duration and subsequently show the remaining time for the flow regimen to end. 7. Setup of Syringe Travel Direction: On the Pulsatile Flow setup screen under syringe-A, press DISP to set the syringe-A to dispense liquid or press WITHD to set syringeA to withdraw liquid into the syringe (Figure 25). The set syringe direction will be displayed in the direction status box next to the status bar (either “D” for dispense or “W” for withdraw). Repeat these steps to set the direction of travel for syringe-B if it is being used in Pulsatile flow mode. Please make sure that syringes have enough distance from the ends (syringe sizes are accurate) to travel in their respective directions. Figure 25. Flow regimen status and safety sensor status display on the setup screen. 8. Flow Regimen Control Prior to starting the flow regimen, make sure that the safety sensors are all inactive. There should be no red sensor indicators in the safety sensor section (see Figure 25, yellow oval). Press RUN button (green triangle) to start syringe motion. The syringe travel can be stopped by pressing the button with the red square (i.e., the STOP button (Figure 25)). Press PAUSE button (button with two yellow lines) to pause the syringe travel (Figure 25). If syringe travel is paused, press START button again to restart syringe travel. The syringe will restart from the paused state and continue to dispense/ withdraw remaining amount of liquid. 9. Termination of Flow Regimen Once the syringes have stopped after completing a regimen, press STOP button to reset the system. Turn OFF the respective syringes by pressing the syringe-A or syringe-B button (Figure 25). The background color of the button should turn black when properly turned OFF. FLEXCELL®INTERNATIONALCORPORATION PAGE31 FLEXCELL® INTERNATIONAL CORPORATION HIQ FLOWMATE® FLUID FLOW MODULE OPERATION – PULSATILE FLOW MODE Use the MENU button to return to the main menu if you need to select another flow mode. Before turning off the system, use the MENU button to go back to the main menu. If the syringe-A and/or syringe-B is not turned OFF in this mode prior to exiting this mode, you will not be able to use the same syringe in any other flow mode. Help Screen: Press HELP button to access the help information on pulsatile flow mode. The help screens provide brief guidelines on how to setup a flow regimen in the pulsatile flow mode. FLEXCELL®INTERNATIONALCORPORATION PAGE32 FLEXCELL® INTERNATIONAL CORPORATION HIQ FLOWMATE® FLUID FLOW MODULE OPERATION – STEPPED FLOW MODE Stepped Flow Stepped flow mode can be used to generate a fluid flow that increases or decreases in a stepwise pattern. A total of four stepping stages can be programmed with independent flowrates. Each step stage can be individually controlled based on either time or dispense/withdrawal volume. The travel of the syringes is controlled independently allowing the user to conduct multiple experiments simultaneously. User needs to set the fluid flowrate for each step, duration or dispense/ withdraw volume for each step, number of stepping cycles and select stepping stages for the flow regimen using the touch screen. Flow Regimen Setup 1. Press the STEPPED FLOW symbol button on the HiQ Flowmate® main screen (Figure 26) to be directed to the stepped flow setup screen (Figure 27). 2. Select syringes by pressing Syringe-A or Syringe- B buttons. The buttons will turn red and flash when selected (Figure 27). 3. Setting Up Units: Press UNITS button on the Stepped flow setup screen (Figure 27). The Stepped Flow Units screen will appear (Figure 28). Select units for syringe volume, internal diameter, dispense/withdraw volume and flowrate by pressing the labeled buttons. The selected buttons will turn blue when properly activated. Note: Every time the pump is turned on, the units need to be reset by turning ON and OFF. Units for both syringes or any one of the syringes may be selected. Once all units have been set, return to the Stepped Flow Setup screen by pressing BACK button. Figure 26. HiQ Flowmate® main screen showing stepped flow mode access button. Figure 27. Stepped Flow Setup screen. 4. Syringe Specifications Setup: Press SYR. SPECS button on the Stepped Flow Setup screen (Figure 27). When the Syringe Specifications screen Figure 28. Stepped Flow Units screen (Figure 29) appears, press the square next to the numerical inputs of Sy. Vol. and Sy. ID. under syringe-A. FLEXCELL®INTERNATIONALCORPORATION PAGE33 FLEXCELL® INTERNATIONAL CORPORATION HIQ FLOWMATE® FLUID FLOW MODULE OPERATION – STEPPED FLOW MODE Use the pop up keypad to enter the volume and internal diameter of the syringe (Figure 30). If the units have been setup properly, the selected units will appear next to the Sy. Vol. and Sy. ID. numerical displays. Refer to manufacturer specifications or manually measure using a caliper to determine the internal diameter of the syringe. Repeat the step above for syringe-B if it is being used in the stepped flow mode. Press BACK button to return to the Stepped Flow Setup screen (figure 27). Figure 29. Syringe Specifications screen for stepped flow mode. 5. Setting Up Fluid Flowrates for Step Stages In the Stepped Flow Setup screen, press the button with the yellow step symbol (Figure 27, white circle). The Flowrate Setup screen of the stepped flow mode will appear (Figure 31). Press the square next to the Flowrate-1 numerical input. Use the pop-up keypad to enter the desired value for flowrate-1. This is the flowrate of stepping stage-1. Note: The minimum step duration is 4 seconds. Figure 30. Stepped Flow Syringe Specifications screen with pop-up keypad. At least two or more stepping stages should be used for stepped flow to work properly. Repeat the above steps to enter values for flowrate-2, 3 and 4. If these steps will not be used, either enter zero or keep the existing values. Make sure that the units selected for flowrate appear next to each flowrate numerical Figure 31. Flowrate Setup screen of stepped display. flow mode. Press BACK to return to the Stepped Flow Setup screen. Repeat the above steps if syringe-B is going to be used in stepped flow mode. FLEXCELL®INTERNATIONALCORPORATION PAGE34 FLEXCELL® INTERNATIONAL CORPORATION HIQ FLOWMATE® FLUID FLOW MODULE OPERATION – STEPPED FLOW MODE 6. Stepped Flow Control by Duration or Dispense/Withdraw Volume On the Stepped Flow Setup screen, press CTRL button under syringe-A (Figure 27). The Stepped Flow – Control screen will appear (Figure 32). Control by Volume: Press SELECT button in the “Volume’ section under syringe-A to select flow regimen control by volume. The button will turn green if it is properly activated. Press square next to the volume-1 numerical input. Use the pop up keypad to enter a value for volume-1, the volume of liquid dispensed or withdrawn during stepping stage-1. Repeat the above step to enter values for Figure 32. Stepped flow control screen volume-2, 3 and 4. If these stepping stages will not be used, either enter zero or keep the existing values. Repeat the above steps if syringe-B is going to be used in stepped flow mode. Control by Duration: On the Stepped Flow-Control screen, press SELECT button in the “Duration” section under syringe-A to select flow regimen control by time. The button will turn green if it is properly activated (Figure 32). Press square next to the seconds (SS) numerical input of duration-1. Use the pop up keypad to enter a value for seconds in duration-1. Repeat the above steps to enter values for minutes (MM) and hours (HH) in duration-1. These inputs are the duration for stepping stage-1. Repeat above steps to enter hours, minutes and seconds into duration-2, 3 and 4. If these stepping stages will not be used, either enter Figure 33. Selecting steps and setting zero or keep the existing values. number of cycles on the Stepped flow setup Note: You should use at least two stepping stages to use the stepped flow mode successfully. 7. Selecting the Stepping Stages: On the Stepped Flow Setup screen, in the “Steps” section (Figure 33, red oval), press 1, 2, 3 and 4 buttons to select stepping stages for the stepped flow regimen. The buttons will turn blue when properly activated. The red indicators below each button will flash when the corresponding stage is being run. FLEXCELL®INTERNATIONALCORPORATION PAGE35 FLEXCELL® INTERNATIONAL CORPORATION HIQ FLOWMATE® FLUID FLOW MODULE OPERATION – STEPPED FLOW MODE 8. Setting the Number of Cycles: On the Stepped Flow Setup screen, under syringe-A, press the square next to “Cycle #” numerical input (Figure 33, yellow oval). Use the pop up keypad to enter the number of cycles for the stepped flow regimen. The cycle number should be equal to or greater than 1. The set cycle number will appear next to the cycle number numerical input immediately after the flow regimen is started and will count down the number of cycles until the end of the following regimen. 9. Setting Up the Syringe Travel Direction: On the Stepped Flow Setup screen, under syringe-A, press DISP to set the syringe-A to dispense liquid or press WITHD to set syringe-A to withdraw liquid into the syringe (Figure 33). The set syringe direction will be displayed in the direction status box next to the status bar (either “D” for dispense or “W” for withdraw). Repeat these steps to set the direction of travel for syringe-B if it is being used in stepped flow mode. Please make sure that syringes have enough distance from the ends (syringe sizes are accurate) to travel in their respective directions. 10. Flow Regimen Control Prior to starting the flow regimen, make sure that the sensors are all inactive (no red sensor indicators in the Safety Sensor section) (Figure 33, white oval). Press RUN button (green triangle) to start syringe motion. The syringe travel can be stopped by pressing the button with the red square (i.e., the STOP button (Figure 30)). Press PAUSE button (button with two yellow lines) to pause the syringe travel (Figure 33). If syringe travel is paused, press START button again to restart syringe travel. The syringe will restart from the paused state and continue through its step stages. 11. Termination of the Flow Regimen Once the syringes have stopped after completing a regimen, press STOP button to reset the system. Turn OFF the respective syringe by pressing syringe-A or syringe-B button (Figure 33). The background color of the button should turn black when properly turned OFF. Use the MENU button to return to the main menu if you need to select another flow mode. Before turning off the system, use the MENU button to go back to the main menu. If the syringe-A and/or syringe-B is not turned OFF in this mode prior to exiting this mode, you will not be able to use the same syringe in any other flow mode. Help Screen: Press HELP button to access the help information on stepped flow mode. The help screens provide brief guidelines on how to setup a flow regimen in the stepped flow mode. FLEXCELL®INTERNATIONALCORPORATION PAGE36 FLEXCELL® INTERNATIONAL CORPORATION HIQ FLOWMATE® FLUID FLOW MODULE OPERATION – OSCILLATORY FLOW MODE Oscillatory Flow Oscillatory flow mode can be used to generate oscillatory fluid flow (cyclic forward and reverse flow) through a target area. The two syringes can be controlled independently. The existing 3-way valve assembly provided with the system can be used to generate the oscillations with one syringe. A secondary valve assembly would be required to run the second syringe under oscillatory flow. The tubing connection between the valve and the target area/ flow chamber is different from that of the continuous flow mode. The user will need to set the fluid flowrate, forward duration, reverse duration and duration of the flow regimen using the touch screen. Tubing Connection to Valve Manifold A single valve unit ٭consisting of two 3-way valves is used for each syringe to create oscillatory flow (Figure 34). These valves switch on and off to change the direction of fluid flow (create oscillatory flow) through the target area. The fluid flows out into a reservoir (not provided with HiQ Flowmate®) after flowing through the target area. It is important to connect tubing with the valve manifold accurately to maintain proper fluid flow. Connect tubing from syringe-A to port C of the valve manifold. Connect tubing from reservoir to port D of the valve manifold. Connect port A of the valve manifold to the tubing from the inlet of the target area. Connect port B of the valve manifold to the tubing from the outlet of the target area. Only one valve unit that is configured to be used with syringe-A is supplied with the system. A secondary valve unit that can be configured to be used with syringe-B is optional and can be ordered separately. Figure 34. HiQ Flowmate® valve unit for oscillatory flow mode operation. FLEXCELL®INTERNATIONALCORPORATION PAGE37 FLEXCELL® INTERNATIONAL CORPORATION HIQ FLOWMATE® FLUID FLOW MODULE OPERATION – OSCILLATORY FLOW MODE Flow Regimen Setup 1. Press the OSCILLATORY FLOW symbol button on the HiQ Flowmate® main screen (Figure 35) to be directed to the Oscillatory Flow Setup screen (Figure 36). 2. Select syringes by pressing Syringe-A or Syringe- B buttons. The buttons will turn red and continue to flash when selected (Figure 36). 3. Setting Up Units: Press SET PARAMETERS button on the Oscillatory Flow Setup screen. The Oscillatory Flow Parameters screen will appear (Figure 37). Press UNITS to go to Oscillatory Flow Units screen (Figure 38). Under syringe-A, select units for syringe volume, internal diameter, and flowrate by pressing the labeled buttons (Figure 38). The selected buttons will turn blue when properly activated. Note: Every time the pump is turned on, the units need to be reset by turning ON and OFF. Units for syringe-B may be selected if it will be used in this mode. Once all units have been set, return to the Oscillatory Flow Parameters screen by pressing BACK button. Check and confirm that the selected units appear next to the flowrate (Fl. rate) numerical input in the Oscillatory Flow Parameters screen (Figure 37). Figure 35. HiQ Flowmate® main screen showing Oscillatory flow mode access Figure 36. Oscillatory Flow Setup screen 4. Syringe Specifications Setup: Press SYR. SPECS button on the Oscillatory Figure 37. Oscillatory Flow Parameters screen Flow Parameters screen (Figure 37). When the Syringe Specifications screen (Figure 39) appears, press the square next to the numerical input besides the Sy. Vol. and Sy. ID. under syringe-A and enter the volume of the syringe and internal diameter of the syringe, respectively, using the pop-up key pad (Figure 40). If the units have been setup properly, the selected units will appear next to the Sy. Vol. and Sy. ID. numerical displays. Refer to manufacturer specifications or manually measure using a caliper to determine the internal diameter of the syringe. Repeat the above steps for syringe-B if it is going to be used in this flow mode. Press BACK button to return to the Oscillatory Flow Parameters screen. FLEXCELL®INTERNATIONALCORPORATION PAGE38 FLEXCELL® INTERNATIONAL CORPORATION HIQ FLOWMATE® FLUID FLOW MODULE OPERATION – OSCILLATORY FLOW MODE 5. Setting Up Oscillatory Flow Parameters In the Oscillatory Flow Parameters screen (Figure 37), press the square next to the flowrate (Fl. rate) numerical display under syringe-A. Use the pop-up keypad to enter the desired flowrate. Press the squares next to forward duration (Fw. Dur.) minutes (M) and seconds (S) numerical displays under syringe-A and use the pop-up keypad to enter the desired values. Press the squares next to reverse duration (Rv. Dur.) minutes (M) and seconds (S) numerical displays under syringe-A and use the pop-up keypad to enter the desired values. Repeat the above steps if syringe-B is going to be used in oscillatory flow mode. Figure 38. Oscillatory Flow Units screen 6. Oscillatory Flow Control by Duration On the Oscillatory Flow Parameters screen (Figure 37), press the square next to the numerical input for SS (seconds) under Figure 39. Syringe Specifications screen for “Duration”. oscillatory flow Use the pop up keypad to enter the seconds. Repeat the same procedure to enter values for MM (minutes), HH (hours) and DD (days). Repeat the above steps if syringe-B is going to be used in oscillatory flow mode. Press BACK button to return to the Oscillatory Flow Setup screen (Figure 36). Time left display The duration of the oscillatory flow regimen is set in the Oscillatory Flow Parameters screen (Figure 37). The “Time left” on the Oscillatory Flow Setup screen will display the set duration initially and subsequently show the remaining time for the flow regimen to end. FLEXCELL®INTERNATIONALCORPORATION Figure 40. Oscillatory Flow Syringe Specifications screen with pop-up keypad PAGE39 FLEXCELL® INTERNATIONAL CORPORATION HIQ FLOWMATE® FLUID FLOW MODULE OPERATION – OSCILLATORY FLOW MODE 7. Setup of Syringe Travel Direction: On the Oscillatory Flow Setup screen under syringe-A, press DISP to set the syringe-A to dispense liquid or press WITHD to set syringe-A to withdraw liquid into the syringe (Figure 41). The set syringe direction will be displayed in the direction status box next to the status bar (either “D” for dispense or “W” for withdraw). Repeat these steps to set the direction of travel for syringe-B if it is going to be used in oscillatory flow mode. Please make sure that the syringes have enough distance from the ends (syringe sizes are accurate) to travel in their respective directions. 8. Flow Regimen Control Prior to starting the flow regimen, make sure that the sensors are all inactive (no red sensor indicators in the safety sensor Figure 41. Flow regimen control and safety section) (Figure 41, yellow oval). Press RUN button (green triangle) to start sensor display on Oscillatory setup screen syringe motion. The syringe travel can be stopped by pressing the button with the red square (i.e., the STOP button (Figure 41)). Press PAUSE button (button with two yellow lines) to pause the syringe travel (Figure 41). If syringe travel is paused, press START button again to restart syringe travel. The syringe will restart from the paused state and continue to travel through the remaining time. 9. Termination of Flow Regimen Once the syringes have stopped after completing a regimen, press STOP button to reset the system. Turn OFF the respective syringes by pressing syringe-A or syringe-B button (Figure 41). The background color of the button should turn black when properly turned OFF. Use the MENU button to return to the main menu if another flow mode needs to be selected. Before turning off the system, use the MENU button to go back to the main menu. If the syringe-A and/or syringe-B is not turned OFF in this mode prior to exiting this mode, you will not be able to use the same syringe in any other flow mode. Help Screen: Press HELP button to access the help information on oscillatory flow mode. The help screens provide brief guidelines on how to setup a flow regimen in the oscillatory flow mode. FLEXCELL®INTERNATIONALCORPORATION PAGE40 FLEXCELL® INTERNATIONAL CORPORATION HIQ FLOWMATE® CALCULATION TOOLS Calculation Tools Dose/Duration/Flowrate Calculator This tool can be used to calculate dose, duration or flowrate for injection of a single drug or multiple drugs to a target location or an animal. The weight of the animal and the concentration of the drug have to be known. Calculator Setup: 1. Press the DOSE CALCULATOR symbol button on the HiQ Flowmate® main screen (Figure 42) to be directed to the Dose Calculator screen (Figure 43). 2. Setting Up Units: Press UNITS button on the Dose Calculator screen (Figure 43). On the units screen, select units for weight, dose, concentration, duration and flowrate by pressing the labeled buttons (Figure 44). The selected buttons will turn blue when properly activated. Note: Every time the pump is turned on, the units need to be reset by turning ON and OFF. Press BACK button to return to the Dose Calculator Setup screen. Check and confirm that the selected units appear next to all numerical inputs on the Dose Calculator Setup screen. The selected units should also appear below the results display. Figure 42. HiQ Flowmate® main screen showing Dose calculator access button Figure 43. Dose Calculator Setup screen 3. Calculator Operation Dose Calculation: On the Dose Calculator Setup screen, press the square next to “Animal Weight”. Use the pop-up key pad to enter the weight. Repeat the above steps to enter values for drug concentration, duration and flowrate. Press CAL. DOSE button (Figure 43, yellow oval) to calculate dose. The calculated value will appear in the numerical display below the button. Figure 44. Dose Calculator Units screen Duration Calculation: FLEXCELL®INTERNATIONALCORPORATION PAGE41 FLEXCELL® INTERNATIONAL CORPORATION HIQ FLOWMATE® CALCULATION TOOLS On the Dose Calculator Setup screen, press the square next to “Animal Weight”. Use the pop-up key pad to enter the weight. Repeat the above steps to enter values for drug concentration, dose and flowrate. Press CAL. DURATION button (Figure 43, green oval) to calculate duration. The calculated value will appear in the numerical display below the button. Flowrate Calculation: On the Dose Calculator Setup screen, press the square next to “Animal Weight”. Use the pop-up key pad to enter the weight. Repeat the above steps to enter values for drug concentration, dose and duration. Press CAL. FLWRATE button (Figure 43, white oval) to calculate flowrate. The calculated value will appear in the numerical display below the button. 4. Press MENU button to return to the main menu screen. Shear Stress Calculator This tool can be used to calculate fluid shear stress in dynes/cm2 when viscosity of the fluid, flowrate, channel height and width are known. The units for these parameters can be selected on the same screen. Calculator Setup: 1. Press the SHEAR STRESS CALCULATOR symbol button on the HiQ Flowmate® main screen (Figure 45) to be directed to the Shear Stress Calculator screen (Figure 46). Figure 45. HiQ Flowmate® main screen showing Shear stress calculator access button. 2. Setting Up Units: On the Shear Stress Calculator screen, select units for viscosity, flowrate, and channel width and height by pressing the labeled buttons (Figure 46). The selected buttons will turn blue when properly activated. Note: Every time the pump is turned on, the units need to be reset by turning ON and OFF. Check and confirm that the selected units appear next to all numerical inputs on the screen. Figure 46. Shear Stress Calculator Setup screen. FLEXCELL®INTERNATIONALCORPORATION PAGE42 FLEXCELL® INTERNATIONAL CORPORATION HIQ FLOWMATE® CALCULATION TOOLS 3. Calculator Operation On the Shear Stress Calculator screen, press the square next to “Dyn. Viscosity”. Use pop-up key pad to enter the viscosity. Repeat the above step to enter values for flowrate, channel width and channel height. Press CALCULATE button to calculate the shear stress in dynes/cm2. The calculated value will appear in the numerical display above the button. Press MENU button to return to the main menu screen. FLEXCELL®INTERNATIONALCORPORATION PAGE43 FLEXCELL® INTERNATIONAL CORPORATION HIQ FLOWMATE® MAINTENANCE Maintenance General Instrument Care In order to maintain components of the HiQ Flowmate® in proper working condition, we suggest that you do the following: 1) Maintain a dust and lint free environment where the HiQ Flowmate® is placed. 2) Wipe off dust or lint from all surfaces using a lint free cloth periodically. 3) Do not spill liquid, oil, and chemicals or keep any dripping liquid containers or vessels on top of HiQ Flowmate® casing as the liquid can seep into the box and harm circuitry. 4) Avoid using HiQ Flowmate® near large liquid containers or vessels. 5) To ensure long life of the lead screw, periodically apply a small amount of lubrication oil (GL-4 or GL-5 oil) to the lead screw using a lint free cloth or a brush. Avoid using excessive oil or grease on the lead screws. Do not expose the lead screw to bleach or chlorine solutions as these solutions can corrode the lead screw. 6) Apply a thin layer of lubrication oil to the guide bars using a lint free cloth or a brush. Avoid using excessive oil on the guide bars. 7) When repositioning guide blocks on the lead screw, fully press the lock nuts to completely disengage the lock nuts from the lead screw. If the lock nut is partially pressed, it will rub against the lead screw and cause it to wear. 8) Do not use the valves or the valve manifold with liquids or gases at temperatures exceeding 40⁰C (104⁰F) or below 10⁰C (50⁰F to) as they can damage the seals and diaphragms in the valves. Periodic cleaning and sterilization should be performed to prevent fouling of internal channels of the valve and manifold. 9) The HiQ Flowmate® is installed with a cooling fan to provide adequate cooling to the internal components. In order to maintain efficient cooling, always make sure that the fan guard is free from dust and other material that may block the air flow. Position the HiQ Flowmate® so that its back wall is at least 3 inches away from walls/flat surfaces to ensure sufficient space for air flow. Touch Screen Care The touch screen should not be exposed to temperatures exceeding 50⁰C (122⁰F) or temperatures below 0⁰C (32⁰F). Do not expose the touch screen to high humidity that may result in condensation. It should not be exposed to chemicals, corrosive or flammable gases, oil, excessive shock or vibration, or strong ultraviolet light. In order to keep the touch screen clean, wipe the surface with a lint free cloth once a month or periodically as necessary. Do not use strong detergent, bleach, acids or solvents on the touch screen surface as it can harm and discolor the screen. Replacing the Battery: The battery service life of the touch screen is approximately five years at 25 ⁰C (77⁰F). The service life of the battery will be shortened if the battery is used at higher temperatures. The battery must be replaced after backing up the data. FLEXCELL®INTERNATIONALCORPORATION PAGE44 FLEXCELL® INTERNATIONAL CORPORATION HIQ FLOWMATE® MAINTENANCE Safety Sensor Cleaning and Testing The photomicro safety sensor installed in the HiQ Flowmate® prevents the guide blocks from colliding with the two end blocks. Therefore, it is important to maintain the photomicrosensors in good working condition to prevent any damage to the guide blocks. The sensors operate using infrared light. In order to prevent any blockage of light passing through the sensor surface, the sensor surfaces should be kept free from dust, lint and other materials that would block light transmittance. You should periodically clean sensor surface with a soft clean cloth to remove dust or other matter. You may partially moisten the cloth but do not use a dripping wet cloth to clean the sensor as water, if seeped through, could damage the underline circuitry. Do not use any acids, alkaline or solvents to wipe off the sensor surface. Use of harsh chemicals would discolor the sensor surface and block light transmittance. Please periodically inspect and check all sensors to confirm that all sensors are in good working condition. Valves and Manifold Cleaning and Sterilization The HiQ Flowmate® consists of a single valve unit that is comprised of two 3-way rocker isolation valves and a manifold. The isolation valves consist of a PEEK (Polyetheretherketone) body, FFPM (Perfluoroelastomer) seals and diaphragm. The valves can be used with liquids or gases in the temperature range from 10⁰C to 40⁰C (50⁰F to 104⁰F). The valve manifold is comprised of a Delrin (Acetal Polymer) body and stainless steel micro nozzles. Both PEEK and FFPM have excellent stability to most acids, alkalines and solvents (see appendix X for chemical stability information). Delrin is also stable to most acids and solvents. Sterilization: It is essential to sterilize the internal channels of the valve and manifold after use to prevent fouling and contamination problems. Sterilization of the internal channels of the valve and valve manifold can be done by flowing 70% ethanol through the valve and manifold. You may use the HiQ Flowmate® or use a syringe manually to flow ethanol through the valve unit. When the syringes are connected to respective ports of the valve manifold each syringe will have two separate paths through the valve to reach port C and D. Both these paths need to be sterilized. Follow the guidelines shown below to sterilize. 1) Turn ON the HiQ Flowmate® by switching the main power switch to ON in the back panel. 2) On the menu screen, select CONTINUOUS FLOW MODE. 3) If you plan to use the HiQ Flowmate® to flow 70% Ethanol through the valve and manifold, first mount syringes (5-10 mL) filled with 70% Ethanol on the pump and connect tubing from syringe-1 and 2 to port A and B of the manifold, respectively. 4) Connect tubing to port C and D with the open end of tubing connected to a container with 5 mL 70% ethanol. Make sure that the tube is immersed in the ethanol and the container is closed to maintain sterility. 5) Go to UNITS & SYRINGE SPECS screen from the CONTINUOUS FLOW screen. Set units for the continuous flow to have Sy. Vol: mL, Volume: mL, Flowrate: mL/min and Sy. ID: mm 6) Input syringe specifications: 5 mL: 10.30 mm or 10 mL: 14.57 mm. You may use other values in accordance with your syringe specifications. FLEXCELL®INTERNATIONALCORPORATION PAGE45 FLEXCELL® INTERNATIONAL CORPORATION HIQ FLOWMATE® MAINTENANCE 7) On the CONTINUOUS FLOW screen, set values to Volume: 2mL, Flowrate: 1mL/min and Duration: 8 mins. Select syringe-A to dispense and syringe-B to withdraw at the start. These settings will flow 2mL of 70% ethanol per cycle of syringe (a cycle is a single unidirectional travel of a syringe) through the valves for a duration of 8 mins. You may increase the volume based on the volume specifications of the syringe. The above settings will flow 70% ethanol through each path of the valve channels twice. 8) To remove ethanol from fluid channels in the valve and manifold, flow PBS or Deionized water by following the guidelines from (3) to (7). You may use multiple cycles of PBS or deionized water to ensure proper removal of all residual ethanol. Connect tubing from port C and D to a container with PBS or deionized water and make sure that the tubing is immersed in the liquid. 9) If you plan to use a syringe manually to flow 70% Ethanol, you may use the same settings on the CONTINUOUS FLOW MODE as given in steps 5, 6 and 7. 10) First fill up a 5 mL or 10 mL syringe with 70% ethanol. Then, connect tubing from the syringe to port A. Connect tubing from port C and D to a container with PBS or deionized water and make sure that the tubing is immersed in the liquid. 11) Once the syringe motion is started, start dispensing 70% ethanol manually at a relatively slow flowrate. Do not dispense ethanol rapidly as the pressure increase could damage the valve. The CONTINUOUS FLOW MODE settings would change the path of ethanol flow through the valve. You may continue dispensing ethanol until the end of syringe travel duration. 12) Repeat the above step with PBS or deionized water. 13) Repeat steps 10 and 11 for ports C, D and B to sterilize the second valve and second flow path of the valve manifold. FLEXCELL®INTERNATIONALCORPORATION PAGE46 FLEXCELL® INTERNATIONAL CORPORATION HIQ FLOWMATE® APPENDIX Troubleshooting PROBLEM CAUSE CORRECTION HiQ FLOWMATE® DOES NOT TURN ON OR RUNS IMPROPERLY HiQ Flowmate® unit does not HiQ Flowmate® may not be plugged in or plug may turn ON. be loose. PLC battery has expired. Ensure plug is tightly pushed into the outlet. Contact Flexcell. Building fuse blown or tripped. Contact supervisor or building manager. Power outage. Contact the local electric company. HiQ Flowmate® touchscreen stops working properly. HMI hardware problem. Contact Flexcell. HiQ Flowmate® unit turns OFF during operation. Safety timeout software has Touch the HMI touchscreen been activated. to keep working. The HiQ Flowmate® has Remove the HiQ operated in an environment Flowmate® from the not within the environment and return to specifications listed in the room temperature and Appendix. humidity and contact Flexcell. The fan inside of the unit Shut down the HiQ stops working and the Flowmate® and contact hardware overheated. Flexcell. HiQ FLOWMATE® FLOW MODES DO NOT START PROPERLY The HiQ Flowmate® syringe The “Syringe-A” or the “Syringe-B” button for the shaft does not move when the active syringe shaft is not START button is activated. activated on the current flow mode main screen. Press the “Syringe-A” or the “Syringe-B” button. Next, press the “Stop” button to reset any active mode and then press “Start.” A previous regimen has not Press the “Stop” button to been properly reset. reset any active mode and then press “Start.” The “Syringe-A” or the Find the flow mode where “Syringe-B” button for the the “Syringe-A” or the active syringe shaft is “Syringe-B” buttons have already activated in another been activated, then press flow mode main screen. to deactivate. FLEXCELL®INTERNATIONALCORPORATION PAGE47 FLEXCELL® INTERNATIONAL CORPORATION HIQ FLOWMATE® PROBLEM CAUSE TROUBLESHOOTING CORRECTION HiQ FLOWMATE® FLOW MODES DO NOT START PROPERLY (Cont.) The HiQ Flowmate® syringe Some numerical inputs are missing in the flow mode shaft does not move when the setup regimen. “Start” button is activated. Check all the inputs needed to setup the regimen to ensure they all have numerical values. Safety sensors were Move the guide block into activated during a regimen. a position outside of the safety sensor proximity. The Control by “Volume” Press the Control by or Control by “Duration” “Volume” or Control by button for the Pulsatile or “Duration” button for the Stepped flow mode is not pulsatile or stepped flow activated. mode. ® The HiQ Flowmate is in Adjust the cycle time to be pulsatile flow mode and the greater than the pulse pulse duration was greater duration. Minimum pulse than the cycle time. duration is 0.2 seconds. HiQ FLOWMATE® OPERATES AT AN UNDESIRED FLOWRATE The HiQ Flowmate® guide block moves extremely fast for the specific setup. The HiQ Flowmate® guide block moves slower than the desire flowrate for the specific setup. HiQ Flowmate® guide block stops during a continuous flow regimen. HiQ Flowmate® guide block stops during an oscillatory flow regimen before the duration time expires. The units selected or the user unit conversion may be incorrect. The previously active units have not been properly deselected. The units selected or the user unit conversion may be incorrect. The previously active units have not been properly deselected. A safety sensor was activated during the regimen. A safety sensor was activated during the regimen. FLEXCELL®INTERNATIONALCORPORATION Check the units for the specific flow mode in operation. De-select all units and reselect the desired units. Check the units for the specific flow mode in operation. De-select all units and reselect the desired units. Check the volume dispensed or withdrawn to ensure adequate guide block movement is allowed. Check the duration to ensure adequate time is allowed for guide block movement. Valves control oscillation and the syringe moves unidirectional. PAGE48 FLEXCELL® INTERNATIONAL CORPORATION HIQ FLOWMATE® PROBLEM CAUSE TROUBLESHOOTING CORRECTION HiQ FLOWMATE® OPERATES AT AN UNDESIRED FLOWRATE (Cont.) HiQ Flowmate® guide block A safety sensor was Check the duration or activated during the volume to ensure adequate stops during a pulsatile or regimen. time or movement is stepped flow regimen before allowed for the guide block the duration or the full to complete the regimen. volume is completed. ® HiQ FLOWMATE VALVE UNIT TUBING SYSTEM OPERATES IMPROPERLY The HiQ Flowmate® fluid The tubing system was Check the “Fluid Flow connected incorrectly for Module Operation” section flow in the valve unit tubing the continuous or for proper tubing/valve unit system is blocked. oscillatory flow mode. connections. A valve needle used to Examine the valve needles connect the tubing to the for visual verification. valve unit is deformed and Contact Flexcell if any limiting or blocking flow. deformations are found. Air pockets are present in Fill system completely with the system. the desired experimental fluid. A section of the tubing is Examine tubing and replace creased or blocked. tubing where necessary. Air pockets appear in the tubing during an oscillatory flow regimen when setup to withdraw. Air pockets appear in the tubing line. A section of the valve unit is possibly blocked. Contact Flexcell. The tubing is not properly submerged in the reservoir fluid container. Drain the system of air pockets and then securely submerge the tubing in the reservoir fluid. Examine tubing and replace tubing where necessary. A perforation or laceration occurred in the tubing. The syringe/tubing Properly seal the connection is not secured syringe/tubing attachment and sealed properly. connection. The target/tubing Properly seal the connection was not secured tubing/target attachment and sealed properly. connection. FLEXCELL®INTERNATIONALCORPORATION PAGE49 FLEXCELL® INTERNATIONAL CORPORATION HIQ FLOWMATE® APPENDIX Appendix Pulsatile Flow Figure 47. Pulsatile flow mode signal representation Pulsatile flow mode (Figure 47) is used to generate pulse flow in either withdraw or dispense direction. The pulsatile flow can be controlled in time scale or volume scale such that the syringes can be programmed to maintain a pulsatile flow for a specified time or to dispense/withdraw a specified volume. Stepped Flow Figure 48. Stepped flow mode signal representation The stepped flow mode (Figure 48) may have up to four different flowrates in one cycle. Depending on the control settings, each step may have a unique duration or may have a unique volume. FLEXCELL®INTERNATIONALCORPORATION PAGE50 FLEXCELL® INTERNATIONAL CORPORATION HIQ FLOWMATE® APPENDIX Oscillatory Flow Figure 49. Oscillatory flow mode liquid oscillation diagram During the oscillatory flow mode (Figure 49), the syringe movement is constantly forward while in the dispense setting and constantly reverse while in the withdrawal setting. The oscillatory motion is controlled by two actuating valves inside of the valve unit. Diagram (A) represents the syringe forward motion (dispense) and counter-clockwise flow inside the target. Diagram (B) represents syringe forward motion (dispense) and clockwise flow inside the target created by the valve unit actuating to reverse the flow. FLEXCELL®INTERNATIONALCORPORATION PAGE51 FLEXCELL® INTERNATIONAL CORPORATION HIQ FLOWMATE® SPECIFICATIONS Specifications HiQ Flowmate® Capability Accuracy ±0.02 % Reproducibility ±0.05 % 0.5 µL/ 140 mL Range of Syringe Volumes: (Min/Max) Modes of Operation Constant, Continuous, Pulsatile, Stepped, Oscillatory Flowrate Minimum (0.5 µl Syringe) (Pl/Min) Maximum (140 ml Syringe) (Ml/Min) Option A Option B Option C 1:3.77 11.77 1.17 83.38 260.57 260.57 Drive Unit Number of Independently Driven Shafts Drive Motor 2 0.72 º Stepper motor with low vibration and smooth drive function High speed pulse control with microstepping Driver Control Number of Microsteps Per One Rev. of Lead Screw Rate of Stepping Option A Option B Option C 1/10 1/10 1/100 50,000 100,000 1,000,000 Option A Option B Option C 1 Minimum (µstep/Sec) 150K 150K 1500K Option A Option B Option C Minimum (µm/Min) 0.48 1.5 0.15 Maximum (Mm/Min) 72 225 225 115 Lbs 11 Lbs 11 Lbs Maximum (µstep/Sec) Guide Block Travel Rate Linear Force FLEXCELL®INTERNATIONALCORPORATION PAGE52 FLEXCELL® INTERNATIONAL CORPORATION HIQ FLOWMATE® SPECIFICATIONS Valve Unit Valve Type 3-Way miniature rocker isolation valve Body: PEEK, Seals and Diaphragm: FFPM Material (See Appendix for chemical stability) 1 Bar (100 kPa) Differential Pressure Delrin Valve Manifold Material Operating Temperature Range 10ºC to 40ºC (50ºF to 104ºF) Display 5.7 inch QVGA STN color LCD Touch screen Power 100 to 240 VAC: 50/60 Hz, 150 W 17.9 (H) ×24.3 (W) × 40.1(L) cm Dimensions 7.0 (H) ×9.6 (W) × 15.8(L) in 17.5 Lbs (7.95 Kg) Weight Environment Operating Temperature 4ºC to 40ºC (40ºF to 104ºF) Storage Temperature -10ºC to 60ºC (14ºF To 140ºF) Humidity 20-85% RH, Non condensing Regulatory Certifications CE, RoHS FLEXCELL®INTERNATIONALCORPORATION PAGE53 FLEXCELL® INTERNATIONAL CORPORATION HIQ FLOWMATE® SPECIFICATIONS Fluid Flow Specifications: Option A Flow Modes: Constant, Continuous, Stepped, and Oscillatory Flow Syringe ID (mm) Min. Flowrate Max. Flowrate Volume 0.5µL 0.103 4 pL/min 0.6 µL/min 1.0 µL 0.15 8 pL/min 1.27 µL/min 2 µL 0.21 17 pL/min 2.49 µL/min 5 µL 0.33 41 pL/min 6.16 µL/min 10 µL 0.46 80 pL/min 11.97 µL/min 25 µL 0.73 201 pL/min 30.13 µL/min 50 µL 1.03 400 pL/min 59.99 µL/min 100 µL 1.46 804 pL/min 0.12 mL/min 250 µL 2.30 1.99 nL/min 0.29 mL/min 1mL 4.61 8.01 nL/min 1.20 mL/min 3 mL 8.66 28.27 nL/min 4.24 mL/min 5 mL 10.30 39.99 nL/min 5.99 mL/min 10 mL 14.57 80.03 nL/min 12.00 mL/min 20 mL 19.13 0.14 µL/min 20.69 mL/min 50 mL 26.70 0.27 µL/min 40.31 mL/min 60 mL 26.70 0.27 µL/min 40.31 mL/min 140 mL 38.40 0.56 µL/min 83.38 mL/min FLEXCELL®INTERNATIONALCORPORATION Flow Mode: Pulsatile Max. Flowrate 0.41 µL/min 0.87 µL/min 1.70 µL/min 4.19 µL/min 8.14 µL/min 20.49 µL/min 40.79 µL/min 81.97 µL/min 0.20 mL/min 0.82 mL/min 2.88 mL/min 4.08 mL/min 8.16 mL/min 14.07 mL/min 27.41 mL/min 27.41 mL/min 56.70 mL/min PAGE54 FLEXCELL® INTERNATIONAL CORPORATION HIQ FLOWMATE® SPECIFICATIONS Fluid Flow Specifications: Option B Flow Modes: Constant, Continuous, Stepped, and Oscillatory Flow Syringe ID (mm) Min. Flowrate Max. Flowrate Volume 0.5µL 0.103 12 pL/min 2 µL/min 1.0 µL 0.15 27 pL/min 4 µL/min 2 µL 0.21 52 pL/min 8 µL/min 5 µL 0.33 128 pL/min 19 µL/min 10 µL 0.46 249 pL/min 37 µL/min 25 µL 0.73 628 pL/min 94 µL/min 50 µL 1.03 1.25 nL/min 187 µL/min 100 µL 1.46 2.51 nL/min 377 µL/min 250 µL 2.30 6.23 nL/min 935 µL/min 1mL 4.61 25.04 nL/min 3.76 mL/min 3 mL 8.66 88.35 nL/min 13.25 mL/min 5 mL 10.30 124.94 nL/min 18.75 mL/min 10 mL 14.57 250.01 nL/min 37.51 mL/min 20 mL 19.13 0.43 µL/min 64.67 mL/min 50 mL 26.70 0.84 µL/min 125.98 mL/min 60 mL 26.70 0.84 µL/min 125.98 mL/min 140 mL 38.40 1.74 µL/min 260.58 mL/min Flow Mode: Pulsatile Max. Flowrate 1.3 µL/min 2.7 µL/min 5.3 µL/min 13.1 µL/min 25.4 µL/min 64.0 µL/min 127.48 µL/min 256.15 µL/min 635.68 µL/min 255.38 µL/min 9.01 mL/min 12.75 mL/min 25.51 mL/min 43.98 mL/min 85.66 mL/min 85.66 mL/min 177.19 mL/min FLEXCELL®INTERNATIONALCORPORATION PAGE55 FLEXCELL® INTERNATIONAL CORPORATION HIQ FLOWMATE® SPECIFICATIONS Fluid Flow Specifications: Option C Flow Modes: Constant, Continuous, Stepped, and Oscillatory Flow Syringe ID (mm) Min. Flowrate Max. Flowrate Volume 0.5µL 0.103 1.2 pL/min 1.87 µL/min 1.0 µL 0.15 2.7 pL/min 3.98 µL/min 2 µL 0.21 5.2 pL/min 7.79 µL/min 5 µL 0.33 12.8 pL/min 19.24 µL/min 10 µL 0.46 24.9 pL/min 37.39 µL/min 25 µL 0.73 62.8 pL/min 94.17 µL/min 50 µL 1.03 125.0 pL/min 187.48 µL/min 100 µL 1.46 0.25 nL/min 0.38 mL/min 250 µL 2.30 0.62 nL/min 0.93 mL/min 1mL 4.61 2.5 nL/min 3.75 mL/min 3 mL 8.66 8.83 nL/min 13.25 mL/min 5 mL 10.30 12.49 nL/min 18.75 mL/min 10 mL 14.57 25.01 nL/min 37.51 mL/min 20 mL 19.13 43.11 nL/min 64.67 mL/min 50 mL 26.70 83.98 nL/min 125.98 mL/min 60 mL 26.70 83.98 nL/min 125.98 mL/min 140 mL 38.40 173.72 nL/min 260.58 mL/min Flow Mode: Pulsatile Max. Flowrate 1.27 µL/min 2.70 µL/min 5.30 µL/min 13.09 µL/min 25.43 µL/min 64.04 µL/min 127.48 µL/min 256.15 µL/min 0.63 mL/min 2.55 mL/min 9.01 mL/min 12.75 mL/min 25.51 mL/min 43.97 mL/min 85.66 mL/min 85.66 mL/min 177.19 mL/min FLEXCELL®INTERNATIONALCORPORATION PAGE56


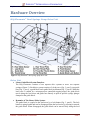

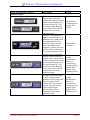
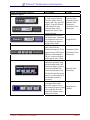
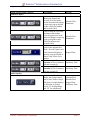
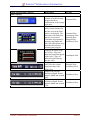


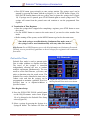

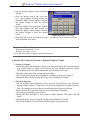
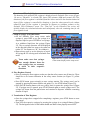

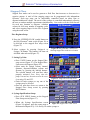

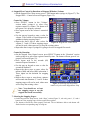

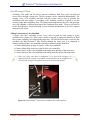
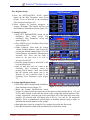
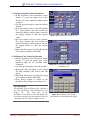


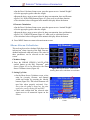


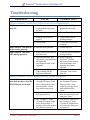
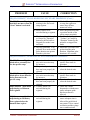

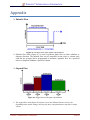

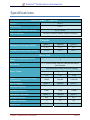

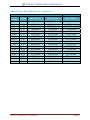
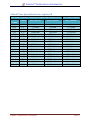


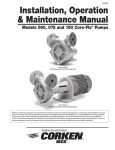
![[BAES + BAEH] Sati adressable encastré permanent Arcor 2 pour](http://vs1.manualzilla.com/store/data/006381220_1-f22d7642055d9dff8691ab8acec131f4-150x150.png)