1
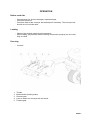
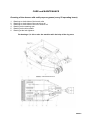
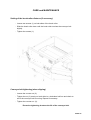
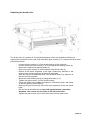
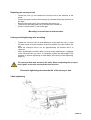
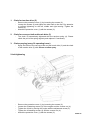
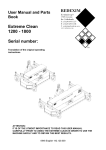
USER MANUAL AND SPARE PARTS LIST RINK Model SP950 Serial Number: English 933.095.410 TABLE OF CONTENTS Content Page Safety Regulations ...................................................................................3 Short Description .....................................................................................5 Technical Features ...................................................................................5 First Startup ..............................................................................................6 Starting the engine.............................................................................. 6 After the first loaded ride ................................................................... 6 Operation...................................................................................................7 Before each ride .................................................................................. 7 Loading ................................................................................................ 7 Dressing............................................................................................... 7 Setting of dressing density ................................................................ 8 Greasing of the dresser with multi-purpose grease (every 50 operating hours) ................................................................. 9 Setting of the brush roller distance (if necessary) ........................ 10 Conveyor belt tightening (when slipping) ...................................... 10 Removal of the dresser from the chassis....................................... 11 Replacing the brush roller................................................................ 12 Replacing the conveyor belt ............................................................ 13 Replacing the conveyor belt ............................................................ 14 Conveyor belt tightening after mounting........................................ 14 Chain tightening................................................................................ 14 1 Chain for traction drive (5) ............................................................ 15 2 Chain for conveyor belt and brush drive (3)................................ 15 3 Chain spraying (every 30 operating hours) ................................. 15 V-belt tightening................................................................................ 15 Trouble Shooting (Problem analysis) ............................................. 16 Spare Parts..............................................................................................18 Spare parts ordering ..................................................................18 Drawings and spare parts list ................................................19-26 Declaration of Conformity......................................................................27 Technical Changes Reserved SP950-2 SAFETY REGULATIONS (1) The RINK Topdresser SP950 is manufactured exclusively for the application of fine grained, loose dressing material such as sand, grit, granulate or similar materials. Any other use is considered improper. The manufacturer is not liable for damages resulting from improper use; the risk lies entirely with the user. Usage in line with the regulations includes compliance with the manufacturer's instructions for operation, maintenance and repair. (2) The dresser is built in accordance with the latest technology and is reliable; however, the dresser can entail danger to life or physical harm to the user or third parties if not used, maintained or repaired by persons who are familiar with it and aware of the dangers. (3) Any person on behalf the user's company who is responsible for the operation, the maintenance or the repair of the dresser, must have read and understood the user manual and particularly the chapter on Safety Regulations. The use, maintenance or repair of the machine by unauthorized persons entails dangers to life or physical harm to the user or third parties. This must be avoided! Please use only the manufacturer’s original spare parts for repair. In addition to the recommendations in this manual, the general safety and accident prevention regulations must be observed. Driving on public roads with this vehicle is subject to the relevant traffic provisions. Transporting passengers in this vehicle is forbidden! (4) The operator is obligated to check the dresser before each start up to detect any damages and defects. Any changes to the dresser (including performance) affecting its safety must be immediately repaired. In principal, no modifications or changes to the dresser (unless approved by the manufacturer) are permitted at the expense of safety. SP950-3 SAFETY REGULATIONS (5) The user is obligated, to check the RINK Topdresser SP950 before start up for any visible damages and defects. Changes to the RINK Topdresser SP950 (including operation), which may adversely affect safety, must be remedied immediately. For safety reasons, it is absolutely prohibited to make changes or additions to the RINK Topdresser SP950 (except changes / additions approved by the manufacturer). If modifications are made to the RINK Topdresser SP950, the CE-label, which is currently valid for the machine, loses its validity and can only be renewed by the person who made these modifications. Before moving the dresser, please make sure the immediate vicinity around it is free of obstacles and that your view is unobstructed. (6) It is prohibited to enter the loading bridge when the dressing facility is running. A notice to that effect is affixed to the board on both sides of the dresser. This notice must always be legible and must be replaced if damaged (see list of spare parts). (7) During operation, no one is allowed within the danger zone of the dresser due to risk of injury from rotating parts and ejected debris. (8) Pay attention to appropriate clothing. Wear sturdy shoes with steel toecaps and long trousers. Long hair must be pinned back. Do not wear loose clothing. Use appropriate personal protective equipment in accordance with the valid occupational health and safety regulations. Always wear certified hearing protection when you work with this machine (see illustration). (9) Adjustments and repair work to the axis (wheel bearing, tires) may be carried out by authorized personnel only. (10) In the immediate vicinity of the brush cylinder at the RINK Topdresser SP950 there is a noise level of 74 dB (a). Used oil endangers the environment; please dispose of it in an environmentally friendly manner. SP950-4 SHORT DESCRIPTION The RINK Topdresser SP950 is manufactured exclusively for the application of fine grained, loose dressing material such as sand, grit, granulate or similar materials. The dressing device of the Topdresser is driven by V-belts and chains. The dressing rate is controlled by a mechanical slide. Thus, the dressing material can be applied accurately. Dressing density or dressing rate can be determined by the driving speed and slide opening. TECHNICAL FEATURES Dimensions Length Width Height Loading amount Working width Weight Dressing width Dressing amount Motor Tires Tire pressure SP950 2.50 m 1.08 m 1.20 m 330 l 0.95 m 250 kg 0.95 m can be controlled via slide Vanguard 6.5 PS 6 x wheels 13x6.50-6 4PR 1.50 – 1.75 bar The type label is affixed on the right front of the dresser. SP950-5 FIRST STARTUP Starting the engine a) b) c) d) e) Fill the gas tank with lead-free gas. Put the throttle in FAST-position. Put the engine switch to ON-position and the starter lever to the left. Start the engine, repeat if necessary and close the choke slightly. As soon as the engine runs, push the starter lever back and adjust the desired engine speed with the throttle. Note: Please read also engine manufacturer's manual, which is included in this manual. It is important that the operator be familiar with the rules contained in this manual. After the first loaded ride - Tighten wheel nuts. Wheel-hub play, check and have adjusted if necessary. Check tire-pressure. Check tension of V-belts and chains. SP950-6 OPERATION Before each ride - Check dresser for obvious damages, repair damages. - Check tire-pressure. - Check the track of the conveyor belt and adjust if necessary. The conveyor belt should not rub on either side. Loading - Observe the desired maximal ground pressure. - When loading, pay attention that the driving components (engine) are not overly dirty or soiled. Dressing - Controls 1 2 3 4 5 Throttle Brake handle (holding brake) Reverse gear Lever to switch on conveyor belt and brush Forward gear SP950-7 Setting of dressing density The dressing density (mm) depends on - Driving speed - Engine rotation speed - Slide opening (1) Please set the desired dressing density on firm ground before starting work. SP950-8 CARE and MAINTENANCE Greasing of the dresser with multi-purpose grease (every 50 operating hours) 1 2 3 4 5 6 Bearings on both sides of the brush roller Bearings on both sides of the rear drive roll Bearings on both sides of the front tension roll Bearing on the steering axle Bearing on the drive shafts Bearing at the belt tightener For bearings 5, 6 tilt or raise the machine with the help of the ring nuts. SP950-9 CARE and MAINTENANCE Setting of the brush roller distance (if necessary) - Loosen two screws (1) on both sides of the brush roller. - Slide the brush roller down until the brush roller touches the conveyor belt slightly. - Tighten the screws (1). Conveyor belt tightening (when slipping) - Loosen the counter nut (2). - Tighten the nut (3) evenly on both sides in a clockwise half turn and check to see if the conveyor belt is running. Repeat if necessary. - Tighten the counter nut (2). Excessive tightening shortens the life of the conveyor belt. SP950-10 Removal of the dresser from the chassis For demounting and mounting of the conveyor belt and for possible maintenance work on the chassis, it is necessary to remove the dresser from the chassis. - Remove the protective cover (1) by loosening the screws (2). - Remove the chain (3) by pushing the chain tightener (5) through the tension spring (4) upwards in the direction of the arrow. - Loosen the dresser (6) by removing the screws (7) on both sides. - Affix the whole dresser (6) on the ring nuts (8) and lift it. Place the dresser on a wooden pallet or another secure surface. SP950-11 Replacing the brush roller The brush roller (6) consists of 10 individual segments, which are interlinked. Both outer segments are secured on the shaft, each with three grub screws (5). To replace the brush roller proceed as follows: - Loosen the grub screws (1) of the brush bearing on the right side. Loosen and remove the screws (2, 3) of the right brush bearing holder (4). Remove the right brush bearing holder (4). Remove the grub screws (5) on both sides of the brush roller (6). Detach all the brush segments to the right. Please pay attention to the correct order and arrangement of the brush segments. Slide the new brush segments back onto the brush shaft. Pay attention to the first and last segment. Mount the brush bearing block (4) using the screws (2, 3). Tighten the grub screws (1) of the brush bearing. Center the brush in the middle and tighten it if necessary with a bar clamp so that the gearing interlocks fully. Remove the grub screws (5) from both outer segments of the new brush roller. Drill into the brush shaft with a 5 mm drill approximately 4 mm deep. Attention: You cannot use the holes of the old brush roller. Tighten the grub screws (5) on both sides back into the brush roller. SP950-12 Replacing the conveyor belt SP950-13 Replacing the conveyor belt - Loosen the nuts (1) and release the conveyor belt in the direction of the arrow. Loosen the grub screws of the bearings (2) towards the driving direction on the right. Remove the brush roller (4) by loosening the screws (3). Take off the right side panel (6) by removing the screws (5). Pull the conveyor belt (7) out to the right. Mounting is carried out in reverse order. Conveyor belt tightening after mounting - - Tighten the conveyor belt on both sides and evenly with the nuts (1), until the axle center-to-center distance of the front shaft to the rear shaft is 491 mm. Allow the conveyor belt to run for approximately 30 minutes until it is centered. When operating the machine after a conveyor belt replacement, a slippage of the conveyor belt can occur. If necessary, tighten the band again. Pay attention to uniform tightening on both sides (see conveyor belt tightening, page 10). The conveyor belt must not touch the sides. When readjusting the conveyor belt, tighten on the side on which the band touches. Excessive tightening shortens the life of the conveyor belt. Chain tightening SP950-14 1. Chain for traction drive (5) - - Remove the protective cover (1) by loosening the screws (2). Loosen the screws (6) and tighten the axle shaft to the rear. Pay attention to uniform tightening on the left, middle and right bearing. Tighten the screws (6). Attach the protective cover (1) with the screws (2). 2. Chain for conveyor belt and brush drive (3) - The chain is automatically tightened with the tension spring (4). Please check the pull of the spring regularly and replace it if necessary. 3. Chain spraying (every 30 operating hours) - Spray the chain of the conveyor belt and the brush drive (3) and the chain of the traction drive (5) with silicon or teflon spray. V-belt tightening - Remove the protective cover (1) by loosening the screws (2). Loosen the 4 fastening screws (3) of the engine and the counter nut (4). Tighten the V-belt by moving the engine with the adjustment screw (5). Tighten the 4 fastening screws (3) and the counter nut (4). Attach the protective cover (1) with the screws (2). SP950-15 Attention: Excessive tightening causes a permanent idling of the conveyor belt, the brush and the traction drive. Should this be the case, please free up tightening. Trouble Shooting (Problem analysis) Problem Slide does not open Cause Solution Fastening elements too tight Loosen fastening elements Slider is jammed Check slide opening Slide is closed Check and open slide (see page 8) Drive is not switched on Check control lever (see page 7) Conveyor belt is slipping Tighten conveyor belt (see page 10) Engine is not running No gas in the tank Refill gas Observe instructions of the engine manufacturer Band and brush rotate in empty state (idling mixture) V-belt too tight Release V-belt tightening (see page 16) Conveyor belt is slipping Conveyor belt not tight enough Tighten conveyor belt (see page 10) Machine is overloaded Do not overload the machine V-belt tightening too weak Increase V-belt tightening (see page 16) There is no material coming out of the machine Conveyor belt and brush roller do not rotate SP950-16