1
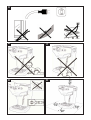
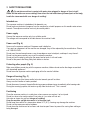
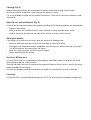
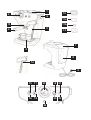
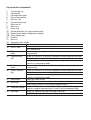
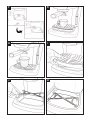
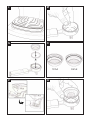
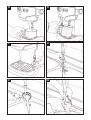
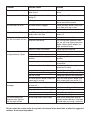
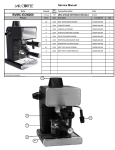
READ THESE OPERATING INSTRUCTIONS CAREFULLY BEFORE USING THE MACHINE.
FOR HOUSEHOLD USE ONLY
R
C
US
IMPORTANT SAFEGUARDS
When using electrical appliances, basic safety precautions should always
be followed including the following:
1.
2.
3.
4.
5.
6.
7.
8.
Read all instructions.
Do not touch hot surfaces (i.e. steam wand, portafilter).
To protect against electric shock, do not place cord, plugs or appliance in water or other liquid.
This appliance must be kept out of the reach of children.
Unplug from outlet when not in use and before cleaning.
Allow to cool before putting on or taking off parts, and before cleaning the appliance.
Do not remove the portafilter during the brewing cycles as there is a danger of burns.
The use of accessory attachments not recommended by the appliance manufacturer may result in fire,
electric shock or personal injury.
9. Do not use outdoors.
10. Do not let cord hang over edge of table or counter, or touch hot surfaces.
11. Do not place on or near a hot gas or electric burner or in a heated oven.
12. This machine was designed to process normal household quantities only. Not suitable for continuous
operation or for commercial use.
13. Do not operate any appliance with damaged cord or plug, if the appliance malfunctions, or has been
damaged in any manner. Return appliance to an authorized service facility for examination, repair or
adjustment.
14. Do not use if the water tank is not filled.
15. Always use cold water. Warm water or other liquids could cause damage to the appliance.
SAVE THESE INSTRUCTIONS
SHORT CORD INSTRUCTION
A short power supply cord is provided to reduce the risk of tripping over or
becoming entangled with a longer cord.
Longer extension cords are available at retailers authorized to sell electrical
accessories and may be utilized if care is exercised in their use. If an extension
cord is used:
• The marked electrical rating of the extension cord should be at least as great
as the electrical rating of the appliance.
• The longer cord should be arranged so that it will not drape over the countertop
or tabletop, where it may be pulled on by children or accidentally tripped over.
1 GENERAL INFORMATION
This espresso machine is made for pulling one or two shots of espresso, and features a swivel hot water
and steam wand. The controls on the front of the machine are labeled with easy-to-read symbols.
The machine has been designed for domestic use and is not suitable for professional, commercial, or
continuous use.
Warning. No liability is assumed for any damage caused by:
•
•
•
•
•
•
•
•
•
Incorrect use not in accordance with the intended uses;
Repairs not carried out by authorized customer service centers;
Tampering with the power cord;
Tampering with any part of the machine;
The use of non-original spare parts and accessories;
Failure to descale the machine;
Failure to assemble or failure to insert portafilter correctly;
Failure to clean portafilter thoroughly (see section 9).
Usage of machine at temperatures below 32°F (0°C).
In these cases, the warranty is not valid.
1.1 For ease of reading
A warning triangle draws attention to all the instructions that are important for user safety. Please follow
these instructions carefully to avoid serious injury.
This symbol is used to highlight important information to ensure optimal use of the machine.
1.2 How to use these operating instructions
Keep these operating instructions in a safe place and make them available to anyone else who may use the
espresso machine.
For further information or if you experience any problems, please contact an authorized service center, or
visit our website: www.starbucks.com/sirena
2 FEATURES
•
•
•
•
•
•
•
•
•
•
•
•
•
•
•
•
•
•
•
Commercial Quality Portafilter: Includes a patented back pressure adapter to
ensure great espresso extraction
Dual brewing spout
Auto shut off after 90 minutes of inactivity
Soft grip portafilter handle
Ground coffee filter for making single or double shots (included)
Pod capable with ESE pods (pod filter included)
Two user-programmable brew settings
Easy reading status lights show when machine is ready to brew or steam
Blue LED light indicates when water tank is empty
Steam wand with pannarello adapter for easy frothing of milk for cappuccinos or lattes
Rapid Steam™ boiler for quickly switching from brewing to frothing
Temperature gauge
Cup-warming surface
Stainless steel coffee boiler
15-bar pump pressure to ensure proper extraction
Sturdy all-metal housing
57.5 oz removable water tank for easy cleaning and refilling
Adjustable and removable drip tray
Removable power cord
TECHNICAL DATA
Nominal voltage
Power rating
Power supply
Housing material
Dimensions (w x h x d)
Weight
Power cord length
Control panel
Portafilter
Water tank capacity
Pump pressure
Brewing boiler material
Rapid Steam™ generator material
Safety devices
See label on the appliance
See label on the appliance
See label on the appliance
Metal and thermoplastic
13 in x 15 in x 12 in
21 lbs
47 in
Front
Pressurized
57.5 oz / removable
15 bar
Stainless steel
Die cast alloy
Hydraulic circuit over-pressure safety valve
Subject to engineering and manufacturing changes due to technological developments.
The machine conforms to the European Directive 89/336/EEC (Italian Legislative Decree 476 of 04/12/92)
concerning electromagnetic compatibility.
A
B
C
D
E
3 SAFETY REGULATIONS
Do not place machine in contact with water when plugged in: danger of short circuit!
Steam and hot water can cause scalding! Never direct the hot water/steam jet toward parts of the body;
handle the steam wand with care: danger of scalding!
Intended use
The espresso machine is intended only for domestic use.
Do not make any technical changes or use the machine for unlawful purposes as this would create serious
hazards. The espresso machine must only be used by adults.
Power supply
Connect the espresso machine only to a suitable socket.
The voltage must correspond to the indication on the machine’s label.
Power cord (Fig. A)
Never use the espresso machine if the power cord is defective.
If any parts or components of the machine are damaged, they will be replaced by the manufacturer. Please
call 1-800-933-7876.
Do not pass the cord around corners, over sharp edges or over hot objects, and keep it away from oil.
Do not use the power cord to carry or pull the espresso machine.
Do not pull out the plug by pulling on the power cord or touch it with wet hands.
Do not let the power cord hang freely from tables or shelves.
Protecting other people (Fig. B)
Make sure children cannot play with the espresso machine; children do not realize the danger associated
with household appliances.
Do not leave the espresso machine packaging within the reach of children.
Danger of burning (Fig. C)
Never direct the jet of hot steam and/or hot water towards yourself or others.
Always use the handles or knobs provided.
Do not disconnect (remove) the portafilter during espresso dispensing or immediately after brewing ends.
During the warming up phase, hot water may drip from the brew unit. This is normal.
Positioning
Place the espresso machine in a safe place, where no one can overturn it or be injured.
Do not turn over or tip machine when it has water in it, as water will leak out.
Hot water or steam may spill out: danger of scalding!
Keep the machine upright when water is in the water tank.
Do not keep the machine at a temperature below 32°F (0°C); freezing may damage the machine.
Do not use the espresso machine outdoors.
Do not place the machine on hot surfaces and close to open flames to prevent the casing from melting or
being damaged.
Cleaning (Fig. D)
Before cleaning the machine, you must deselect all buttons and remove the plug from the socket.
Wait for the machine to cool down. Never immerse the machine in water!
It is strictly forbidden to tamper with the inside of the machine. There are no user service able parts inside
the machine.
Space for use and maintenance (Fig. E)
To ensure that the espresso machine works properly and efficiently, the following conditions are recommended:
•
•
•
Choose a level surface;
Select a location that is sufficiently well-lit, clean, and near an easily reachable power socket;
Allow for a minimum distance from the sides of the machine as shown in the illustration.
Storing the machine
If the machine is to remain out of use for a long time, perform the following steps:
•
•
•
•
•
Empty the water tank and clean surfaces that have come in contact with coffee;
Thoroughly rinse the portafilter and its components, wipe the brew unit, and rinse the drip tray and grill;
Turn off the machine, and unplug it from the socket;
Store it in a clean, dry place, out of the reach of children;
Keep it protected from dust and dirt.
Servicing / Maintenance
In case of failure, faults or a suspected fault after dropping, immediately remove the plug from the socket.
Never attempt to operate a faulty machine.
Servicing and repairs may only be carried out by authorized Customer Service Centers, listed in the service
booklet included with the machine.
All liability for damages caused by maintenance not carried out in a professional manner is declined.
Fire safety
In the event of fire, use carbon dioxide extinguishers (CO2). Do not use water or dry-powder extinguishers.
1
2
10
6
11a
11b
13
3
4
12
7
5
8
14
9
15 17
23
16 18
19 21
20 22
24
Key to machine components
1
2
3
4
5
6
7
8
9
10
11a
11b
12
13
14
15
16
17
18
19
20
21
22
23
24
Cup warming tray
Control panel
Hot water/steam wand
Pressurized portafilter
Drip tray + grill
Hot water/steam knob
Water tank lid
Water tank
Power cord
Ground coffee filter (for single or double shots)
Rubber gasket adapter (backpressure adapter)
Plastic support peg
Pod filter
Brew unit
Removable steam handle
Activates and deactivates the machine
ON/OFF button
ON: machine is turned on and able to function
ON/OFF light
OFF: machine is off
Brews one single quantity (one shot) of espresso (dispensed quantity is user
Single espresso
programmable)
button
Steady ON: machine is at the correct temperature to brew espresso or hot water
Single espresso
Slowly blinking: machine is warming up to brew espresso or hot water
light
Quickly blinking: machine is preparing to brew a single shot of espresso, or the
machine is in programming mode
Brews a double quantity (two shots) of espresso (dispensed quantity is user
Double espresso
programmable)
button
Steady ON: machine is at the correct temperature to brew espresso or hot water
Double espresso
Slowly blinking: machine is warming up to brew espresso or hot water
light
Quickly blinking: machine is preparing to brew a double shot of espresso, or the
machine is in programming mode
Selects the steam function
Steam button
Steady ON: machine is at the correct temperature to dispense steam
Steam light
Slowly blinking: machine is warming up to dispense steam
Temperature gauge Indicates when the boiler has reached the ideal temperature for brewing (the
machine is ready to brew when lights 17 and 19 are illuminated and fixed)
Steady ON: Indicates the water tank needs to be filled
Water light
Quickly blinking: the machine’s water circuit needs to be primed (see section 4.5)
F
G
H
I
J
K
L
M
N
O
1/2 full
P
Q
3/4 full
R
S
T
U
V
W
4 INSTALLATION
For your own safety and that of other people, please strictly follow the “Safety Regulations” in section 3.
4.1 Packaging
The original packaging has been designed to protect the machine during transport.
It is recommended to keep the packaging for future transport.
4.2 Installation instructions
Before installing the machine, observe the following safety precautions:
•
•
•
Place the machine in a safe area: on a flat, stable surface, away from water and moisture;
Make sure the machine is out of the reach of children;
Avoid placing the machine on very hot surfaces or near open flames.
The espresso machine is now ready to be connected to the power supply.
4.3 Connecting to the power supply
Before turning on the machine, make sure that the hot water / steam knob is closed.
•
•
•
•
•
•
•
Electric current can be dangerous! Therefore, it is essential to follow the safety regulations carefully.
Never use faulty electrical cords! Faulty electrical cords and plugs must be replaced immediately by
authorized Customer Service Centers.
The voltage of the appliance has been set by the manufacturer.
Check that the voltage supplied matches the indications on the label on the bottom of the appliance.
Connect the power cord to the machine as shown in Figure F.
Connect the plug end of the power cord to a socket with suitable voltage.
You can preheat your cups by placing them on the cup warming tray. (Warm cups will help retain the
espresso’s crema and aroma.)
NOTE: The machine is equipped with an energy saving system. The machine will automatically
shut off 90 minutes after its last operation. To turn the machine on, press the power button (15).
4.4 Filling the water tank
•
•
•
•
Lift and remove the water tank lid (7).
Remove the water tank (8) using the handle provided on the inside.
Rinse and fill it with filtered water, taking care not to overfill.
Replace the tank; press down firmly. Replace the lid (7).
For best results, only use cold, filtered water to fill the tank. Never use sparkling water. The quality and
filtration of the water to fill the tank will affect the final flavor of the espresso.
Hot water or any other liquid may damage the tank. Do not turn on the machine without water in the
tank; always make sure there is enough water in the tank.
4.5 Priming the water circuit
The machine’s water circuit must be primed in the following cases: before using the machine, for the first time
out of the box, or after long periods of inactivity, and when the water tank becomes empty.
The machine indicates the need to prime the water circuit when the water light is blinking (24).
•
•
•
•
•
•
Press the main power button (15). The button lights will start blinking slowly. This means the machine
is warming up. The blinking will stop when the machine is warmed up and ready to use.
Place a container below the steam wand. Open the hot water/steam wand by turning the knob (6) clockwise
all the way.
Wait until the water light (24) stops blinking.
Close the hot water/steam wand, by rotating the knob (6) counter-clockwise all the way.
The machine has been primed when the water light (24) shuts off.
Remove and empty the container.
The machine will give best performance if the unit is allowed to fully heat up prior to pulling a shot of espresso.
For best results when making espresso, you will need to preheat the portafilter. A preheated portafilter will
result in warmer coffee and will help retain the espresso’s flavourful taste.
•
•
•
•
Insert the portafilter into the machine without coffee, and place a cup beneath the portafilter. (Fig. H)
Press the coffee button (17). Allow the machine to dispense water through the portafilter.
We suggest you dispense a couple of shots of water through the portafilter to heat it up to the optimal
temperature.
When not brewing a cup of espresso, leave the cleaned portafilter attached to the machine. This will
ensure the portafilter remains preheated.
The machine is now ready to dispense espresso and steam; please see related sections for operating details.
NOTE: The temperature gauge is a general indicator of the machine temperature. When the machine
is warming up, the coffee lights (18 and 20) will blink. The machine is warmed up and ready to use
when the coffee lights remain fixed. Even if the temperature gauge is in the green area, the machine
is ready to use only when the coffee lights remain fixed.
4.6 Drip tray adjustment
The drip tray can be adjusted according to the size of the cup(s) used.
When using small espresso cups or shot glasses used to prepare espresso, we recommend raising the drip
tray to the higher position, for optimal crema (Fig. G). If larger cappuccino or latte cups are used, lower the
drip tray. (Fig. H)
To lift the drip tray height, proceed as follows:
•
•
•
Remove the drip tray grill and the drip tray. (Fig. I)
Turn the “X” support upside down so that the hinges match up with the reference marks inside the base
of the machine as shown in the figure. (Fig. J and Fig. K)
Place the drip tray and the grill back into place. (Fig. L)
5 PULLING SHOTS
Warning! Do not remove the portafilter during coffee dispensing or immediately after brewing.
Wait 20 seconds while pressure is relieved in the filter: Danger of burning!
Warning! After pressing the coffee button(s), do not remove the portafilter immediately if
coffee does not flow out. In case this occurs, switch off the machine, and wait at 2-3 minutes
before removing the portafilter from the brew head.
The machine is fitted with a special pressurized portafilter (4), which allows you to pull either one or two
shots of espresso with the same filter basket for ground coffee (10).
•
•
•
•
To brew espresso, the machine must be turned on with the ON/OFF button (15). Wait until the brew lights
(18 and 20) illuminate and remain fixed.
During brewing, the machine ready lights located on the espresso buttons (18 and 20) may flash on and
off; this operation should be considered normal.
Before use, make sure that the hot water/steam wand (6) is closed and the water tank contains enough water.
Do not remove water tank when unit is brewing.
5.1 Brewing Espresso
Using the Pressure Adapter (rubber gasket adapter and plastic support peg)
The Sirena is equipped with a special pressure adapter (11a) and plastic support peg (11b) that assist in creating
a full body espresso with crema, even if the grind is not perfect. This adapter and peg are to be used when
making single and double shots, and will help you make a great shot of espresso with a high quality crema.
The pressure adapter (11a) and plastic support peg (11b) are offered as replacement parts by the manufacturer.
To order new parts, please call 1-800-933-7876.
•
•
•
Insert the plastic support peg (11b) into the portafilter (4). Then insert the rubber gasket adapter (11a), with
the curved side facing down, as shown in Figure M.
Insert the ground coffee filter (10) into the portafilter (4). (Fig. N)
Brew a single or double espresso as described in the sections below.
Note: When using pre-ground coffee, you must first insert the plastic support peg (11b) into the
portafilter, along with the rubber gasket adapter (11a), and then insert the ground coffee filter (10),
as shown in Figure N.
Note: The Sirena utilizes a self tamping method when brewing espresso: the coffee is tamped when
the portafilter is inserted into the brew head. For optimal brewing, it is better to avoid tamping the
coffee in the portafilter.
Brewing a Single Shot
For best results when making espresso, you will need to ensure the unit is fully warmed up and the portafilter
is preheated. A preheated portafilter will result in a higher temperature of coffee and will help retain the espresso’s
flavourful taste. We suggest you dispense a couple of shots of water through the portafilter to ensure it has
been heated to the optimal temperature.
•
•
•
•
Insert the plastic support peg (11b) into the portafilter body (4) along with the rubber gasket adapter (11a).
Then insert the ground coffee filter (10) into the portafilter (4) body. (Fig. N)
Holding the handle towards the left, fit the rim of the empty portafilter into the brew unit (13), as shown
in Figure P.
Turn the portafilter from left to right until it firmly locks in place; you may have to hold the base of the
machine to keep it from turning.
Release the grip from the portafilter.
•
•
•
•
•
•
•
•
Preheat the portafilter by pressing the brew button (17). Place a cup beneath the portafilter. Water will
dispense out of the portafilter (this operation is only necessary for the first espresso during each use).
Caution! The water will be very hot!
To pull one shot, insert 7 grams or one scoop of espresso in the ground coffee filter basket (10). This
will correspond to approximately 1/2 full portafilter. (Fig. O)
Clean any espresso residues from the edge of the portafilter.
Insert the portafilter into the brew unit (13) from the bottom, and turn the portafilter from left to right until
it locks into place. (Fig. P)
Take one preheated cup and place it under the portafilter; check that it is correctly placed under the
dispensing holes.
Press and release the single espresso button (17). The button light (18) will blink quickly when preparing
to brew the espresso.
The machine will dispense a single shot (1 fluid ounce) of espresso.
Brewing a Double Shot
•
•
•
•
•
•
•
Preheat the portafilter, as described above in “Brewing a Single Shot”.
To pull a double shot, insert approximately 14 grams or two scoops of espresso in the ground coffee filter
basket (10). This will correspond to approximately 3/4 full portafilter. (Fig. O)
Clean any espresso residues from the edge of the portafilter.
Insert the portafilter into the brew unit (13) from the bottom, and turn the portafilter from left to right until
it locks into place. (Fig. P)
Take one or two preheated cups and place them under the portafilter; check that they are correctly
placed under the dispensing holes.
Press and release the double espresso button (19). The button light (20) will blink quickly when preparing
to brew the espresso.
The machine will dispense a double shot (2 fluid ounces) of espresso.
The espresso quantities can be programmed according to your personal tastes (see section 5.3).
•
•
•
When the programmed quantity of espresso has been reached, the brewing stops automatically.
Remove the cup(s).
Wait a few seconds, then remove the portafilter and empty it from remaining espresso grounds.
Note: Keep the ground coffee filter basket (10) clean by removing and rinsing it every time with
water (see section 9). For deep cleaning, remove the filter basket (10), rubber gasket adapter (11a)
and plastic support peg (11b). Take care not to lose the adapter or its support peg. The adapter
will not function properly without the plastic support peg.
5.2 Espresso Pods
Note: When preparing espresso using espresso pods, you must remove the rubber gasket adapter
(11a) and plastic support peg (11b) from the portafilter. With the use of pods, only one single shot
of espresso can be brewed at a time.
•
•
•
•
•
Remove the ground coffee filter (10) from the portafilter (4) by pulling it out.
Remove the adapter (11a) and plastic support peg (11b) from the portafilter.
Insert the pod filter (12) into the portafilter (4). (Fig. Q)
Holding the handle towards the left, fit the rim of the empty portafilter into the brew unit (13). (Fig.P)
Turn the portafilter from left to right until it firmly locks in place; you may have to hold the base of the
machine to keep it from turning.
•
•
•
•
•
•
•
•
•
•
Release the grip from the portafilter.
Place a cup beneath the portafilter. Preheat the portafilter by pressing the brew button (17).
Water will dispense out of the portafilter (this operation is only necessary for the first espresso during
each use).
After the water dispensing has finished, wait a few seconds and remove the portafilter from the machine
by turning it from right to left; empty out the remaining water.
Insert the pod in the portafilter; make sure the paper filter of the pod does not overhang from the
portafilter edge.
Insert the portafilter in the brew unit (13) from the bottom. Turn the portafilter from left to right until it
locks in place.
Take one preheated cup and place it under the portafilter; check that it is correctly placed under the
dispensing holes.
Press and release the single espresso button (17).
The brewing stops automatically when the programmed quantity of espresso has been reached. Remove
the cup.
Wait a few seconds, then remove the portafilter and dispose of the used pod.
Note: Keep the pod filter (12) clean by removing and rinsing it every time with water (see section 9).
5.3 Programming the Quantity of Espresso
When using the machine for the first time, the brew buttons (17 and 19) have been programmed to brew the
pre-defined quantity of espresso. These quantities are one fluid ounce for a single shot and two fluid ounces
for a double shot.
This programming can be modified according to your personal tastes.
The programming of each brew button is independent from the other. To re-program the buttons, proceed as
follows below. The buttons can be re-programmed at any time. The programmed quantity will be kept in the
machine’s memory even if it has been turned off.
•
•
•
•
•
Make sure the machine is turned on.
Insert the appropriate filter with pre-ground coffee (see section 5.1).
Position the cup(s) that will be used beneath the dispensing holes.
Press the desired brew button (17 or 19), and keep it pressed. The button will blink during programming.
When the desired espresso quantity is reached, release the button. The machine is now programmed to
always brew the same quantity of espresso.
6 TIPS FOR CHOOSING COFFEE
As a general rule, any type of coffee blended for espresso available on the market can be used.
However, coffee is a natural product and its flavor changes according to its origin and blend. This machine
has been specially developed by Starbucks for Starbucks espresso and decaf espresso blend, in order to produce
the same flavor profile found in our cafes.
We recommend trying different varieties of beans and roasts to determine what kind of espresso taste you prefer.
Espresso should always be dispensed by the portafilter in an even flow. If the espresso does not flow out of the
portafilter easily and has a “dripping” effect, it is an indication that the grind is too fine, or there is too much
coffee in the portafilter, blocking the flow of water through the grinds. This will have an effect on the espresso’s
taste, so we recommend checking the flow of the espresso.
The speed of espresso dispensing can be modified by slightly changing the amount of espresso in the filter
and/or using a different espresso grind.
BEFORE PERFORMING ANY OPERATION RELATED TO STEAM OR HOT WATER DISPENSING,
CHECK THAT THE STEAM WAND IS DIRECTED OVER THE DRIP TRAY.
Warning! Always make sure the portafilter is inserted before steaming or dispensing hot water.
7 HOT WATER DISPENSING
Danger of scalding! Dispensing may be preceded by short sprays of hot water. The steam wand
can reach high temperatures; do not touch it with bare hands.
•
•
•
•
•
•
Turn on the machine, if not already on, with the main power button (14); the power light (15) illuminates.
Wait until the brew lights (18 and 20) illuminate and remain fixed.
Place a container or a glass under the steam wand.
Open the hot water/steam knob (6) by turning it clockwise all the way.
When the desired quantity of hot water has been dispensed, rotate the hot water/steam knob counter-clockwise (6).
Remove the container with hot water.
8 STEAM DISPENSING / STEAMING MILK
Danger of scalding! Dispensing may be preceded by short sprays of hot water. The steam
wand can reach high temperatures; do not touch it with bare hands.
Warning! Always make sure the portafilter is inserted before steaming or dispensing hot water.
Note: If the steam function is selected, but not used for a period of 1 minute, the machine will
automatically exit the steam function mode.
For best steaming results allow the unit to fully warm up before steaming.
•
•
•
•
•
•
Turn on the machine, if not already on, with the main power button (15); the power light (16) illuminates.
Wait until the brew lights (18 and 20) illuminate and remain fixed. Make sure the steam wand is directed
over the drip tray and the portafilter is inserted into the machine.
Press the steam button (21). The brew lights (18 and 20) turn off. The steam light (22) starts to blink.
The machine is ready for steam dispensing when the steam light (22) remains fixed.
Place a container below the steam wand and open the hot water/steam knob (6) by turning it clockwise
all the way for a few seconds, so that residual water exits from the steam wand. Shortly after, a steady jet
of steam will be dispensed. (Fig. R)
Close the knob (6) by turning it counter-clockwise, and remove the container.
To guarantee the best results when steaming milk, always use cold milk.
•
•
•
•
•
Immerse the steam wand in the milk and open the knob (6) by turning it clockwise all the way; turn the
container with slow upward movements so that it is warmed evenly. (Fig. S)
After using the steam for the desired time, close the knob (6) by turning it counter-clockwise; remove the
container with the warmed milk/beverage.
Press the steam button (21) to deselect the steam function.
After pressing the steam button, the machine automatically returns back to its normal mode for brewing
espresso and hot water.
IMPORTANT: Prime the water circuit as described in section 4.5 to rinse the inside of the steam wand of
any residual milk (also see section 9).
The same operation can be used to heat other beverages.
•
After this operation, clean the steam wand with a damp cloth.
9 CLEANING AND MAINTENANCE
Warning! To avoid serious injury and electrical shock, it is essential to turn off and unplug the
Sirena, and allow it to completely cool off before cleaning.
Cleaning and maintenance operations can only be carried out when the machine is cold and disconnected
from the power supply.
•
•
•
•
•
•
•
•
•
•
•
•
Do not immerse the machine in water or place any of its components in a dishwasher.
Do not use sharp objects or harsh chemical products (solvents) for cleaning.
Never use harsh cleaning agents, especially those containing alcohol, solvents, or abrasive materials on
your Starbucks Sirena Espresso Maker.
Wipe all external surfaces with a damp cloth; then wipe the surfaces dry to preserve the exterior of your
machine.
Do not dry the machine and/or its components using a microwave and/or conventional oven.
We recommend cleaning the water tank and filling it with fresh water daily.
After heating or steaming a beverage, always dispense a small amount of hot water out of the steam wand
to clean the inside of the steam wand, and clean it on the outside with a damp cloth.
- If you notice a residue build-up on the tip of the steam wand, or if water flow out of the steam wand seems
to be restricted, submerge the steam wand in a tall container of hot water. Allow the steam wand to soak
in this hot water overnight. Then clean the steam wand with a damp cloth, and run some water through
the steam wand to remove any internal residue. (Fig. T and Fig. U) This preventive measure can reduce or
eliminate the need for more intensive cleaning; however, the machine must still be descaled on a regular
basis (section 10).
Empty and clean the drip tray daily. (The drip tray and grill are dishwasher safe, but we recommend handwashing both parts.)
To clean the portafilter, proceed as follows:
- Remove the filter (10 or 12) from the portafilter. Immerse it in hot water and wash it thoroughly, making
sure to remove any remaining coffee grounds from the filter basket holes. If necessary, use a small
pin to clean out any clogged holes. (Fig. V)
- If soap is used, rinse thoroughly.
- If inserted, remove the rubber gasket adapter (11a) and plastic support peg (11b) and wash them thoroughly.
- Rinse the internal part of the portafilter thoroughly, making sure making sure to remove any remaining
coffee grounds by pressing on the inside part of the portafilter, as shown in Figure W.
At least once per month, clean the brew head from any coffee grounds, using a damp towel.
Descale your machine regularly, following the descaling instructions in section 10 of this manual.
Turn off the machine by pressing the power button (15), and unplug the machine from the power outlet
after each use.
10 DESCALING
Limescale normally forms with the use of the appliance. Descaling is necessary every 3-4 months of use of
the machine, every 500 cycles, and/or if you notice a reduction in water flow.
If you want to descale the machine yourself, you can use a non-toxic and/or non-harmful descaling product
for espresso machines, commonly available in stores.
We recommend using the Starbucks Barista Cleaner or a natural citric acid based decalcifying agent.
Use one packet of Starbucks Barista Cleaner mixed into one full tank of water. It is best to let the
Starbucks Barista Cleaner dissolve completely in warm water prior to adding to cold water in the
tank. For best results, descale every 3-4 months or every 500 cycles.
Warning! Never use vinegar as a descaler.
•
•
•
•
•
•
•
•
•
Read decalcifying agent directions. Make sure the machine is turned off. Insert the correct proportion of
decalcifying agent into the water tank. Fill the water tank with water, and mix thoroughly. Replace the tank.
Be sure to remove the portafilter (4) from the brew head (13).
Remove the single screw holding the flat, round screen underneath the brew head (13). The water will now
be able to dispense in one solid stream. Place a container under the brew head (13) and another container
under the steam wand (3).
Turn on the machine and immediately run one cup of the solution through the steam wand by turning the
hot water knob (6) clockwise. Close the knob by turning it counter-clockwise. Now dispense one cup of
the solution through the brew head (13), by pressing the brew button (17 or 19). DO NOT use the steam
function during the descaling process (simply let the water flow through the steam wand).
Turn the machine off and let the solution sit for ½ hour (30 minutes). This allows the descaling solution
to dissolve internal mineral build-up. Please note: Do not let solution sit longer than the recommended time.
Turn the machine back on and run the majority of the solution through the machine, alternating between
the brew head (13) and steam wand (3). Please note: DO NOT run the machine out of water.
Turn the machine off (before water tank is empty), and remove the tank. Rinse and refill the water tank
with fresh, filtered water and reinsert the tank.
Turn machine on and run 3-4 tanks of fresh water through the machine to rinse. Again, alternate between
dispensing water through the brew head (13) and the steam wand (3).
Turn off the machine and unplug it from the power outlet. Let the machine cool thoroughly.
Replace the brew head screen in the brew head (13) with the smooth side of the screen facing down.
Please note: DO NOT use the machine until the brew head screen has been replaced.
If you are using a product other than one recommended, it is important to always follow the
manufacturer’s instructions shown on the pack of the descaling product.
11 REGULAR SERVICING
Regular servicing by an Authorized Service Center prolongs the life and reliability of the machine.
Keep the original packaging as a protection for future transport.
12 LEGAL INFORMATION
•
•
•
•
•
•
•
•
•
These instructions contain the information necessary for the correct use, operation, and accurate maintenance
of the appliance.
This information and the observation of the instructions form the basis for safe, risk-free use, operation,
and maintenance of the appliance.
The manufacturer will be not responsible in any case of damage suffered to any party due to any portafilter
fault, incorrect insertion, or incorrect cleaning of the portafilter.
For further information, or should particular problems arise, please contact your local dealer or the manufacturer
directly.
Please note that the contents of these instructions for use are not part of a previous or already existing
covenant, agreement, or legal contract and that the substance has not been changed.
All the manufacturer’s obligations are based on the relative purchase agreement which also contains full,
exclusive regulations concerning the warranty procedures.
The contractual warranty regulations are neither reduced nor extended on the basis of these explanations.
These instructions for use contain information protected by copyright law.
Photocopy or translation into another language is not permitted without the manufacturer’s prior written
consent.
13 DISPOSAL
•
•
•
Put unused appliances out of service.
Disconnect the plug from the socket and cut the electrical cord .
At the end of its life, take the appliance to a suitable waste collection site.
Problem
Possible cause
The machine does not turn on. Machine is not connected to the
power source.
The espresso is too cold.
The portafilter is not inserted for preheating (5).
Cold cups.
Solution
Connect the machine to the power
source.
Preheat the portafilter.
Preheat the cups on the warming
plate or warm with hot water.
Milk froth does not form.
The steam wand is clogged.
The milk is too warm.
Ensure the steam wand is clean and
the air hole at the top is clear.
Use cold milk.
Espresso does not brew.
The LEDS 16, 18, 20 and 22 blink
rapidly at the same time.
Prime the water circuit as described in
section 4.5.
The espresso is dispensed too Too little espresso in the portafilter.
fast; the crema does not form. The grind is too coarse.
Espresso is old or not suitable.
Espresso is not dispensed,
or dispensed only in drips.
Add espresso (section 5).
Use a finer grind of espresso; make
sure you are using the back pressure
adapter (rubber gasket adapter) for
single and double shots.
Use fresh ground espresso.
No water.
The grind is too fine.
Espresso is packed too tightly in the
portafilter.
Too much espresso in the portafilter.
Refill tank with water (section 4.4).
Use a coarser grind.
Shake the ground espresso in the
portafilter.
Reduce the quantity of espresso in
the portafilter.
The hot water/steam knob (6) is open. Close the knob (6) by turning it counterclockwise all the way.
The machine has limescale build-up. Descale the machine (section 10).
The filter in the portafilter is clogged. Clean the filter (section 19) and portafilter.
Pods not suitable.
Change type of pod (use only single pods).
The rubber gasket adapter and plastic Insert the rubber gasket adapter and
support peg is missing.
plastic support peg (see section 5.1).
Espresso is dispensed from The portafilter is incorrectly inserted in
the edges.
the brew unit.
Upper edge of the portafilter is dirty.
The gasket of the brew unit is dirty.
Too much espresso in the portafilter.
Pod is not inserted correctly.
The machine does not
The hot water/steam knob is open.
dispense water after the
tank has been refilled.
Insert the portafilter correctly (section 5).
Clean the rim of the portafilter.
Clean the gasket of the brew unit.
Reduce the quantity of the espresso .
Insert the pod correctly.
Close the hot water/steam knob by
turning it counter-clockwise. Then open
the knob again, by turning it clockwise.
Please contact the service center for any faults not covered in the above table, or when the suggested
solutions do not solve the problem.
UNITED STATES SERVICE CENTER LISTING
Province
City
Service Center
Telephone
AZ
Phoenix
Kitchen Classics/Kitchen Store
602-954-8141
CA
Burlingame
Espresso Equip Engineering LLC
650-375-8480
CA
Escondido
Mart's Appliance Service
760-745-7711
CA
Gardena
A Latte Hotte
310-294-9744
CA
San Jose
Appliance Repair Express
408-371-8853
CA
Signal Hill
Swiss Systems, Inc.
310-689-2372
CA
Woodland Hills
Speedy Appliance Service
818-225-7774
CO
Colorado Springs
Maric Beverage Systems
719-380-1610
FL
Boca Raton
SmArt Deco
561-620-0287
FL
Sarasota
Beanz, Inc. (The Beanz Man)
941-359-8916
IL
Bensenville
The Expresso Shoppe
630-350-0066
IL
Chicago
Longo & Siefer, Inc. (Coffee Exchange)
773-745-9295
IN
Indianapolis
Pro Tech Beverage Service
317-271-8515
MA
Everett
TC's Repair Service, Inc.
800-381-5001
MI
Utica (Shelby Township) Espresso Machine Experts MI
586-739-9500
MN
Minneapolis
612-824-4417
NC
Cornelius
The Coffeeboss, LLC
704-987-3310
NC
Wilmington
Personal Systems, Ltd
877-286-2833
NJ
Berkeley Heights
The Repair Shack
908-464-0797
NJ
Somerville
Butensky Services Co.
908-707-0912
NY
Bronx
Cerini Coffee Services Inc
718-584-6120
NY
Brooklyn
Solomon's Appliance Center
718-236-5065
Kitchen Window / Alternative Con
NY
Mount Kisco
Enscrybe, Inc. (The Java Fix)
914-514-8042
OH
Rocky River
River Espresso
216-544-4954
OR
Elmira
Stefano's Espresso Care
541-935-1212
OR
Medford
Cafe West Distribution
877-701-2020
PA
Bethel Park
Espresso D'Milan, LLC
412-663-0125
PA
Lansdale
Services Unlimited, Inc.
215-361-7000
SC
Myrtle Beach
Coffee Joe's Repair
843-293-2886
TX
Richardson
Espresso RMI, Inc.
972-690-6969
UT
Salt Lake City
Rimini Coffee / Shea Service
801-539-1210
WA
Seattle
Home Espresso Repair Service
206-789-9513
WA
Spokane
Tech One Services
509-536-0524
WA
Vancouver
Espresso Resource NW
503-251-2970
CANADIAN SERVICE CENTER LISTING
Province
Ville
Societe
Telephone
Quebec
Montreal
Saeco Canada ltée
514-385-5551
Quebec
Québec
Importation Mi-Ra
418-682-3878
Quebec
Ste-Foy
Café en grains
418-653-6265
Quebec
Québec
Importation Nuava
418-649-7858
Quebec
Montreal
Centre du Rasoir Fairview Pointe Claire
514-697-6343
Quebec
Montreal
Centre du Rasoir fine Lame Carré Phillips
514-842-2921
Quebec
Baie Comeau
Centre du Rasoir Centre Comm. Manicouagan
418-295-2161
Quebec
Québec
Centre du Rasoir Galerie de la Capitale
418-627-2378
Quebec
Repentigny
Centre du Rasoir Fine Lame Rive Nord
450-585-9895
Quebec
Rimouski
Centre du Rasoir Carrefour Rimouski
418-722-0419
Quebec
Shawinigan
Centre du Rasoir Fine Lame Plaza de la Mauricie
819-539-4382
Quebec
Sherbrooke
Centre du Rasoir Carrefour de L’Estrie
819-346-8979
Quebec
St.Jean sur le Richelieu Centre du Rasoir Carrefour Richelieu
450-349-1605
Quebec
Ste-Foy
Centre du Rasoir Place Ste-Foy
418-653-1710
Quebec
Ville d’Anjou
Centre du Rasoir Galeries d’Anjou
514-493-0922
Quebec
Drummondville
Boutik Electrik / Drummondville
819-472-4244
Quebec
Gatineau
Boutik Electrik / Promenades de l’Outaouais
819-246-8400
Quebec
Hull
Boutik Electrik / Galeries de Hull
819-771-2434
Quebec
Rivière-du-Loup
Boutik Electrik / Centre Commerciale Rivière-du-Loup
418-867-8508
Quebec
Rosemère
Boutik Electrik Place Rosemère
450-437-9178
Quebec
Rouyn-Noranda
Boutik Electrik
819-762-1152
Quebec
Sherbrooke
Boutik Electrik Galeries Quatres Saisons
819-820-7890
Quebec
St-Antoine des Laurentides Boutik Electrik Galeries de Laurentides
418-277-2884
Quebec
Trois-Rivières
819-691-4125
Quebec
Trois-Rivières
Boutik ElectrikCentre Commercial Les Rivières
819-374-2545
Quebec
Victoriaville
Boutik Electrik Carrefour des Bois Francs
819-751-2321
Ontario
Toronto
Saeco Ontario Ltd.
416-256-9191
Ontario
London
Personal Edge / White Oaks Mall
519-681-0990
Ontario
Hamilton
Personal Edge / Lime Ridge Mall
905-318-6023
Ontario
Kitchener
Personal Edge / Fairview Park Mall
519-895-1328
Ontario
Carlingwood
Personal Edge / Carlingwood
613-725-0173
Ontario
Kingston
Personal Edge / Cataraqui Town Center)
613-634-9605
Ontario
London
Personal Edge / Masonville Place
519-672-7894
Ontario
Oshawa
Personal Edge
905-728-3503
Boutik Electrik
CANADIAN SERVICE CENTER LISTING (cont.)
Province
Ville
Societe
Telephone
Ontario
Thornhill
Personal Edge
905-764-7190
Saeco West Ltd
604-299-7555
British Columbia Vancouver
British Columbia Kelowna
Pioneer Coffee
250-861-3308
British Columbia Victoria
ABC Electric
250-382-7221
Alberta
Calgary
Espuccino
403-263-3224
Alberta
Calgary
National Cappuccino
403-571-8555
Alberta
Edmonton
Bilotta Food Equipment & Commercial Cappuccino Co. LTD 800-475-4656
Manitoba
Winnipeg
DeLuca Foods
204-775-8605
Nova Scotia
Halifax
Walkers Electronic
902-454-0291
Saskatchewan
Saskatoon
Bosch/Miele Kitchen Center
306-242-3744